 למרות שכרטיסי XQD אינם נפוצים כפי שהיו בעבר, הם נשארים כאמצעי אחסון אמין ונוח למצלמות שתומכות בהם. עם זאת, הם לא פטורים מאובדן נתונים, ועליכם לפעול במהירות אם תרצו לשחזר את התמונות והסרטונים שאבדו.
המשך לקרוא כדי ללמוד כיצד לשחזר קבצים שנמחקו מכרטיסי XQD.
מהי כרטיס XQD
XQD כרטיסי פותחו כיורשים של כרטיס CompactFlash. הם נוצרו כדי לענות על הצרכים הגוברים של מצלמות וידאו ומצלמות שהחלו לצלם בהגדרה גבוהה וברזולוציה גבוהה.
מכיוון שהם מיועדים לשימוש כבד ממושך בסביבות שונות, העמידות שלהם יוצאת דופן, להיותם עמידים לזעזועים, עמידים למגנטים, אנטי-סטטיים ועמידים יותר לנזקים פיזיים. בנוסף, הם מציעים מהירויות העברה של עד 1 GB/s (גרסה 2.0), מה שמבטיח שהם לא יגבילו את הביצועים של מצלמות יוקרה.
למרות שכרטיסי XQD הוחלפו בכרטיסי CFexpress, הם עדיין נשארים אמצעי אחסון עמיד ואמין עבור צלמי וידאו וצלמים כאחד. עם זאת, הם אינם חסינים לאובדן נתונים. אם יש לך כרטיס XQD שאיבד לאחרונה נתונים, עליך להתחיל בשחזור נתונים מכרטיס XQD באופן מיידי.
כיצד לשחזר קבצים מכרטיס XQD
גם אם התמונות והסרטונים שלך אינם מופיעים, יש סיכוי שהם עדיין נמצאים בכרטיס ה-XQD ומחכים לשחזור. כדי להחזיר אותם, עליך להשתמש בכלי לשחזור נתונים כמו דיסק דריל. בחרנו ב-Disk Drill בשל מהימנותו ואמינותו בשחזור נתונים ממגוון רחב של מכשירים ומערכות קבצים נתמכים. הוא גם עובד מצוין כתוכנה לשחזור כרטיסי XQD בחינם, שכן הוא מאפשר לך לשחזר עד 500 מגה-בייט של נתונים שאבדו לפני שתצטרך לשדרג לרמה בתשלום.
בצע את השלבים הבאים כדי לשחזר נתונים מכרטיס XQD בעזרת Disk Drill:
- הורד והתקן את Disk Drill.
- חבר את כרטיס ה-XQD למחשב ובחר בו מרשימת ההתקנים. לחץ על חפש נתונים שאבדו .
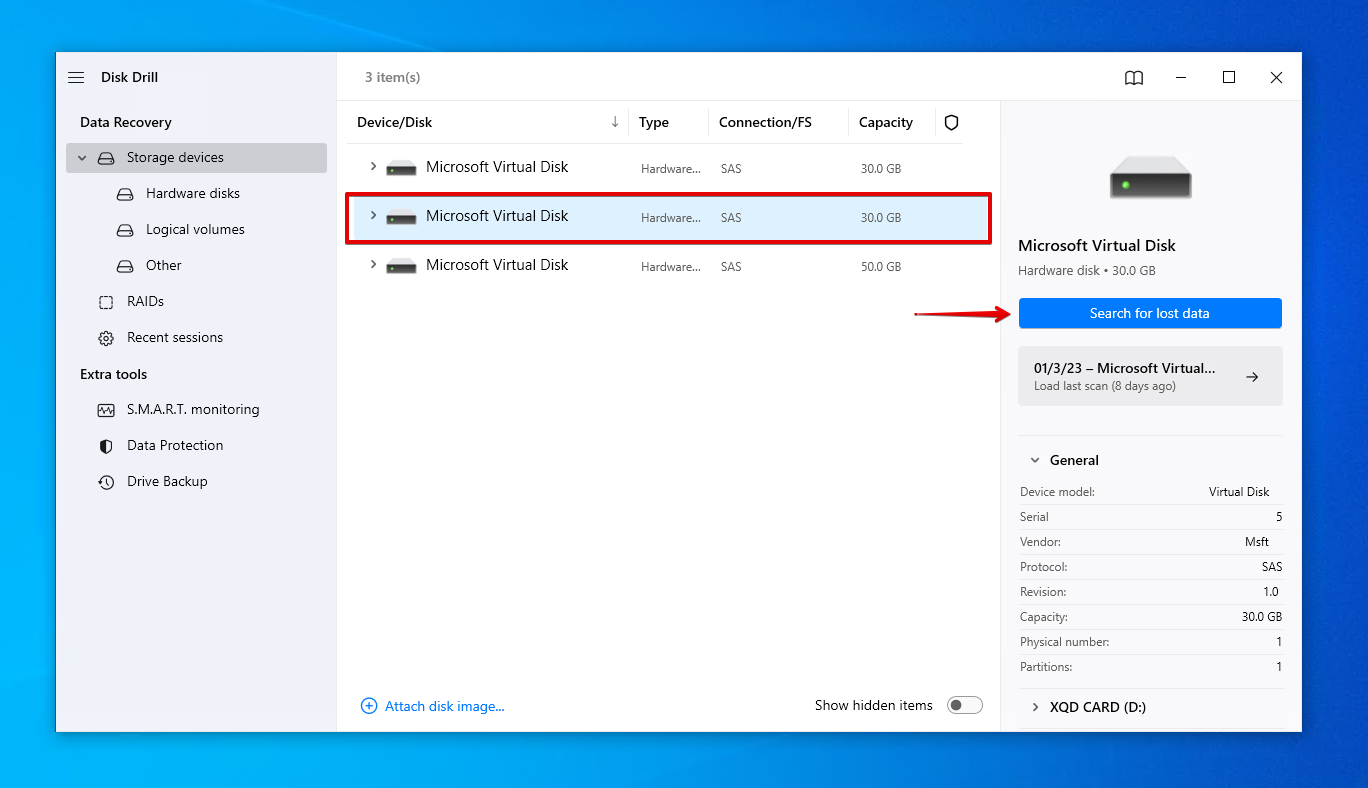
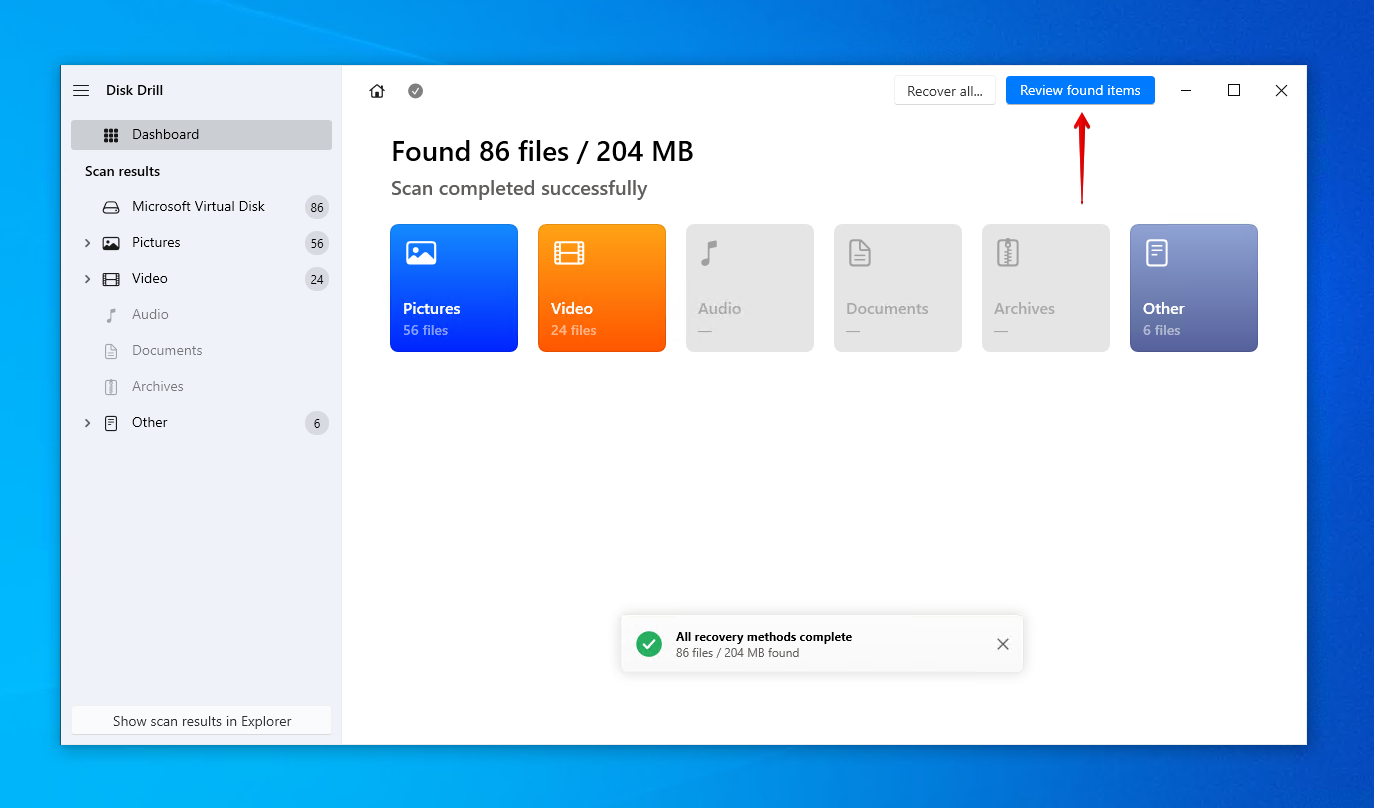
- לחץ על סקור פריטים שנמצאו ברגע שהסריקה מסתיימת. לחילופין, אם ברצונך לשחזר את כל מה שנמצא, לחץ על שחזר הכל .
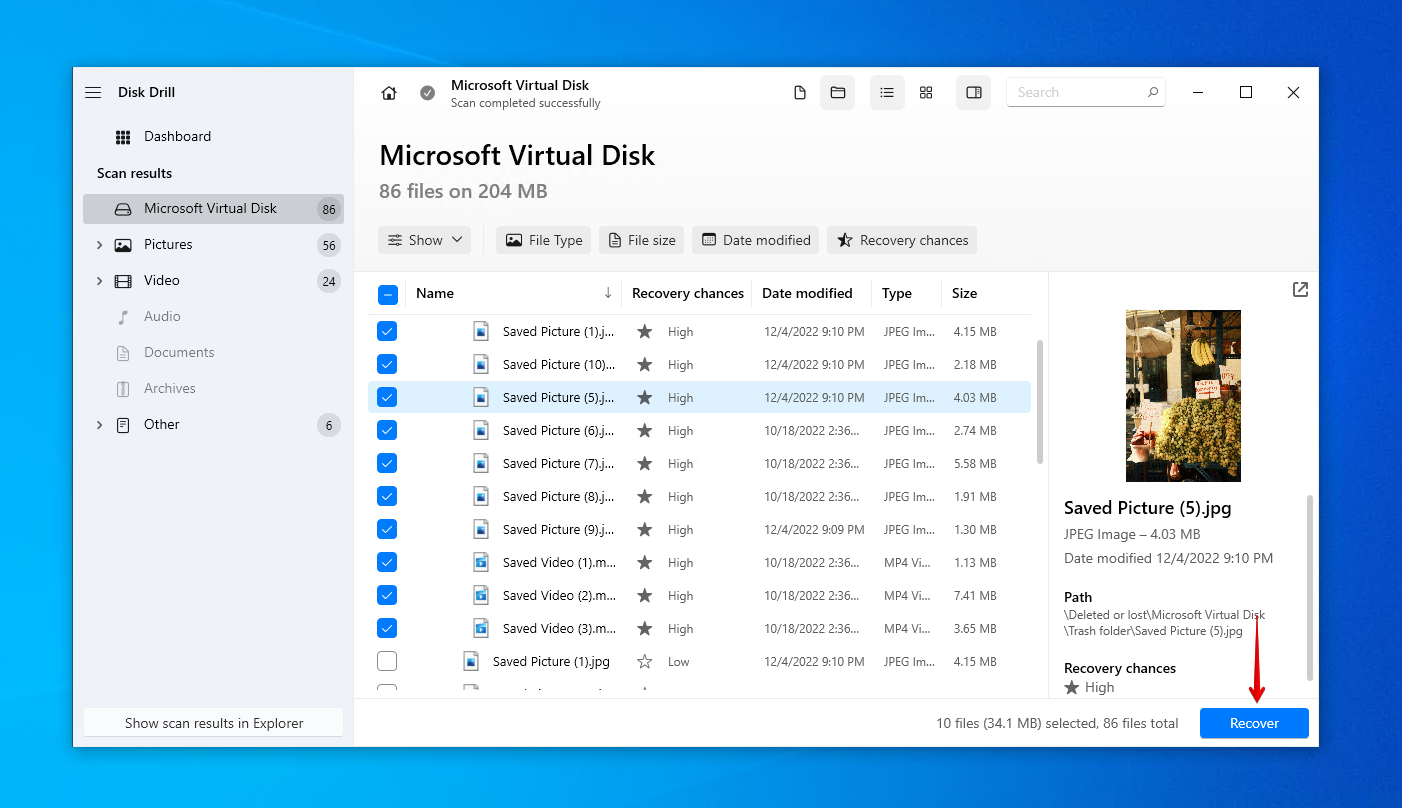
- סמן את הקבצים שברצונך לשחזר. השתמש בפונקציית התצוגה המקדימה כדי לוודא שהקבצים שלך בשלמותם. כשתהיה מוכן, לחץ על שחזר .
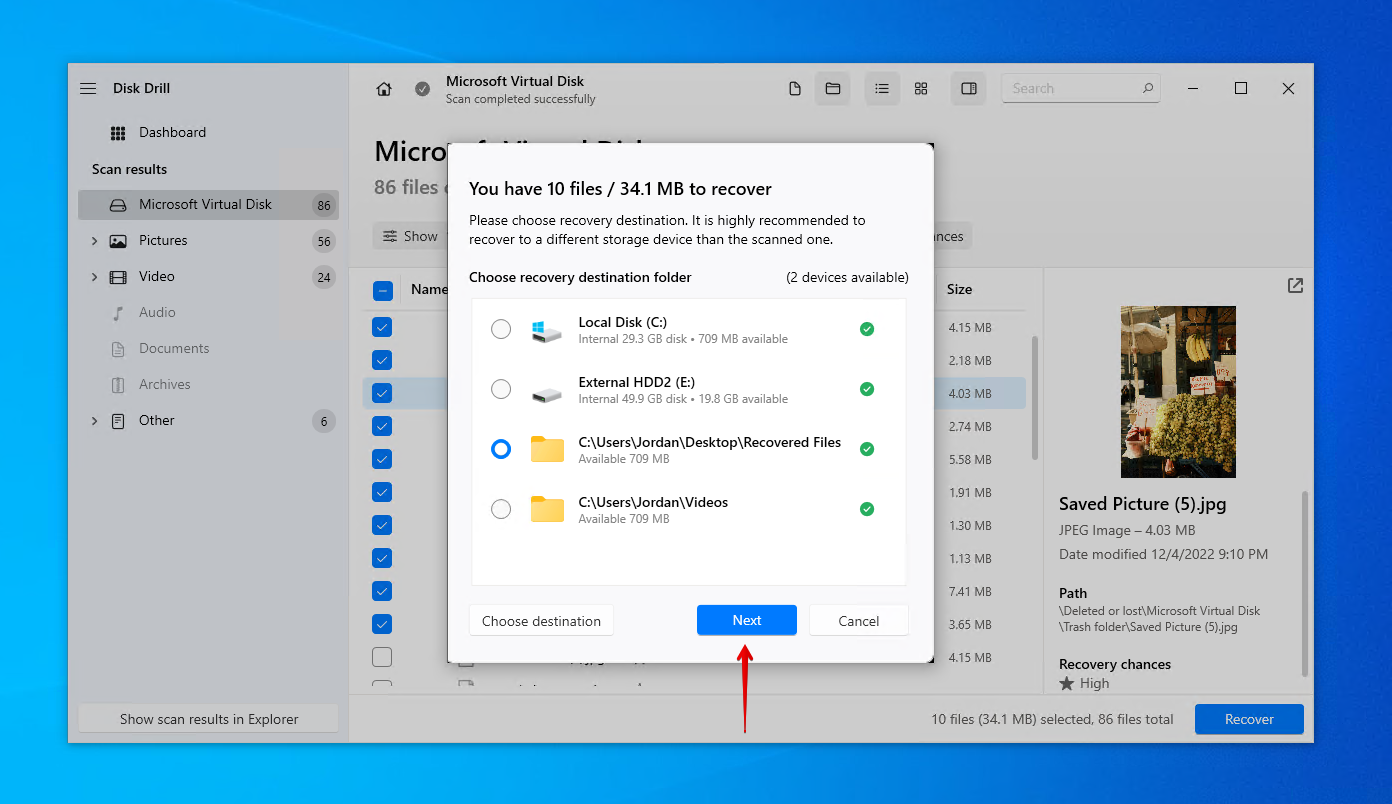
- בחר מיקום מתאים לשחזור. אל תבחר מיקום על אותו כרטיס XQD שממנו משחזרים. לחץ על הבא להשלמת השחזור.
כפי שהודגם, קל מאוד לשחזר תמונות שנמחקו מכרטיס XQD, גם סרטונים. Disk Drill שימושי גם עבור סוגי אחסון ניידים אחרים, כפי שמשתמשים בו לעיתים קרובות שחזר תמונות שנמחקו מכרטיסי SD שסבלו מאובדן נתונים.
כיצד למנוע אובדן נתונים מכרטיסי XQD
יש פעולות שתוכלו לנקוט כדי לשמור באופן אקטיבי על כרטיס ה-XQD ועל הנתונים המאוחסנים עליו ולצמצם את הסיכויים לאירוע של אובדן נתונים. עיינו בהמלצות שלנו למטה:
| הצעה | תיאור |
| 💽 בצע גיבויים | גיבוי נתונים הוא הדרך היחידה להבטיח את הגנתם מפני אובדן נתונים. אם הכרטיס XQD שלך ייתקל באירוע דומה בעתיד, עותק של הנתונים שלך יוכל לשחזר בקלות, ויחסוך לך את הזמן הדרוש לביצוע שחזור נתונים. |
| ⏏️ הוצאה בטוחה | כשאתה מנתק את כרטיס ה-XQD מהמחשב שלך, תמיד תוודא שאתה מוודא את ניתוקו הבטוח. ביצוע פעולה זו יבטיח שתהליכי הקריאה והכתיבה הרגישים הופסקו. הסרת הכרטיס XQD באופן מיידי ללא ביצוע ניתוק בטוח עלולה לגרום לנזק לנתונים או לפגיעה במערכת הקבצים. |
| ❄️ היזהרו מטמפרטורות | לכרטיסי XQD יש טווח טמפרטורות עבודה מוגדר. כל דבר מחוץ לזה יכול לפגוע בכרטיס. לדוגמה, כרטיס XQD של סוני (סדרת G) יש טמפרטורת עבודה של -25 ל-65°C / -13 ל-149°F. לכן, אם אתה צלם מטייל, שים לב לתנאים בהם אתה מצלם. |
| 🗃️ שמור את זה במקום בטוח | למרות שכרטיסי XQD מיוצרים להיות קשיחים ועמידים, מאמץ נוסף לשמור על בטיחותם יכול להאריך את תוחלת חייהם. שקול לרכוש קופסת אחסון עבור כרטיסי ה-XQD שלך ומדיות פלאש ניידות אחרות, כך שהם תמיד יהיו מאורגנים ומוגנים. |
מכל ההצעות שהוזכרו לעיל, יצירת גיבויים היא החשובה ביותר. אתה יכול לעשות זאת בפשטות על ידי העתקה/הדבקה של הקבצים שלך לאמצעי אחסון נוסף, העלאת עותקים לשירות ענן כמו OneDrive או Google Drive, או שימוש בכלי גיבוי של Windows כמו היסטוריית קבצים או גיבוי ושחזור.
שאלות נפוצות:
- חבר את כרטיס ה-XQD למחשב שלך.
- לחץ לחיצה ימנית התחל ופתח ניהול דיסקים .
- לחץ לחיצה ימנית על מחיצת כרטיס ה-XQD שלך ולחץ על פורמט .
- בחר את מערכת הקבצים הרצויה וודא ש- בצע פורמט מהיר נבחר. לחץ על אישור .
- לחץ על אישור .
