Lexar tillverkar några av de bästa och mest respekterade SD-korten. Det finns alternativ inom alla prisklasser, med ett stort urval av olika lagringsalternativ och massor av olika funktioner. Men inget SD-kort är perfekt. Oavsett om det är användarfel eller något annat, kan det finnas tillfällen då du behöver återställa data från ett Lexar SD-kort.
Som tur är finns det många sätt att göra så. Lexar SD-kortåterställning är faktiskt ganska lätt, om du har rätt verktyg och expertis. Här är allt du behöver veta om Lexar SD-kort, från vanliga problem med Lexar SD-kort, till hur du utför Lexar minneskortsåterställning.
Vanliga Problem med Lexar SD-kort
Alla SD-kort stöter på vissa typer av problem, och Lexar SD-kort är inget undantag från den regeln. Vissa av dessa problem är enkla att åtgärda, medan andra kräver lite mer arbete, och andra kommer fortfarande att kräva användning av någon form av verktyg för dataåterställning.
| Problem | Beskrivning |
| 📝 Skrivskydd | SD-kort kommer vanligtvis med en liten brytare på sidan, och den brytaren används för att “låsa” kortet. Om du stöter på felmeddelanden om skrivfel när du försöker spara filer till ett SD-kort, är det värt att dubbelkolla att den fysiska brytaren på kortet är i rätt läge. |
| 🧹 Oavsiktlig radering | Oavsiktlig radering är en av de vanligaste anledningarna till dataförlust på lagringsenheter. Till exempel kan du ha raderat en fil på ditt kort, bara för att inse att du fortfarande behöver den. Du kan också ha formaterat ditt minneskort utan att kontrollera om det fortfarande finns filer du kommer att behöva i framtiden. |
| 🦠 Virus | Det är möjligt att det finns någon form av virus eller skadlig kod som har infekterat kortet, i vilket fall du kan köra antivirusprogram för att bli av med virusen. Om du fortfarande inte kan komma åt dina filer, är det dags att vända sig till ett dataåterställningsverktyg. |
| 🤕 Filsystemskorruption (RAW-filsystem) | All filsystemskorruption kan orsaka dataförlust. Detta är speciellt sant i fallet med ett RAW-filsystem. Korrupta filsystem resulterar ofta i otillgängliga eller oläsliga filer/data, vilket kan kräva specialiserade dataåterställningsmetoder för att återfå. |
| 🔨 Fysisk Skada | Lexar SD-kort som skadas av vattenexponering, elektriska problem eller att de tappas eller flisas kan resultera i dataförlust. Värsta scenariot är att dessa skador påverkar kortets minneschips, vilket kan göra det väldigt svårt för kortet att fungera. Filåterställning skulle vara knepig och kräva dataåterställningsmetoder assisterade av en professionell. |
| 🔎 Saknade Filer | Ett annat vanligt problem är att när du kopplar ditt SD-kort till din dator, upptäcker du att det saknas filer eller att din dator inte kan hitta några filer alls på ditt SD-kort. Detta kan helt enkelt bero på en tillfällig störning i ditt system. I det fallet är det en bra idé att börja med att mata ut SD-kortet och koppla in det igen i din dator. |
Hur man återställer data från Lexar SD-kort
Vid vanliga scenarier med dataförlust, såsom oavsiktlig radering, formatering och filsystemkorruption, bland annat, kan du prova dataräddningsprogramvara för att enkelt försöka återställa filer.
Programvara för dataåterställning såsom Lexars egna Lexar Recovery Tool och tredjepartsappar som Disk Drill erbjuder stöd för personer som vill återställa sina filer själva. Dessa appar är effektiva för ett antal användare, där den ena kan vara bättre än den andra beroende på ditt användningsområde. Låt oss dyka in i hur man återställer data från Lexar SD-kort:
Metod 1: Använda Lexar Recovery Tool
Lexar tillhandahåller faktiskt sin egen verktyg för dataräddning för sina SD-kort. Lexars återställningsprogramvara kommer sannolikt att fungera för vissa användare, och dessa användare bör hålla sig till den – eftersom den är gratis. Men det finns några förbehåll.
Detta verktyg ger endast en grundläggande sökning. Detta innebär att du inte kan återställa dina filsystem eller filer med deras ursprungliga filnamn. Det har också svårt att återställa mindre vanliga professionella filtyper (t.ex, RAW-foton eller -videor, .psd-filer, .lrcat-filer, etc.). Dessutom är det inte tillgängligt för nedladdning i USA.
Men Lexar-verktyget för dataåterställning är tillgängligt för både Windows och Mac-användare — så oavsett vilket operativsystem du använder är det värt att testa innan du köper annan programvara.
Följ stegen nedan för att återställa filer med Lexar Data Recovery Tool:
- För att komma igång, ladda ner Lexar Recovery Tool från Lexars officiella webbplats.
- Extrahera zip-filen. Anslut sedan ditt Lexar-minneskort till din dator och öppna Lexar Recovery Tool.
- Välj sedan disken du vill återställa filer från och välj var du vill spara dina återställda data.
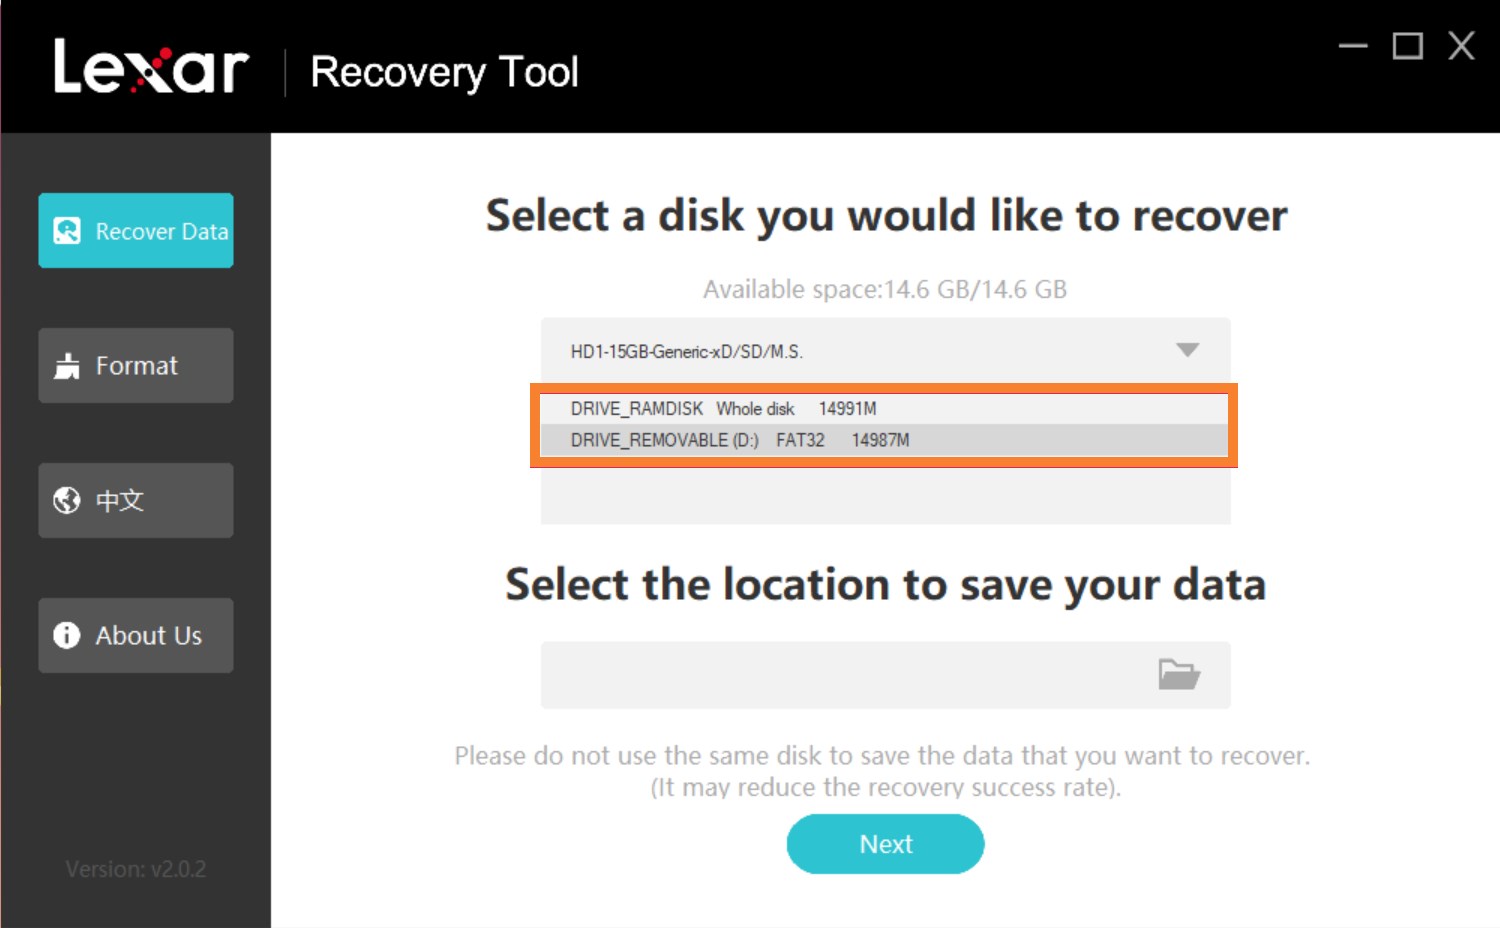
- Efter det, välj de filtyper du vill återställa, eller klicka på Alla typer för att låta appen skanna efter alla filtyper. Klicka sedan på Nästa.
- När skanningen är klar, välj de filer du vill återställa och klicka på Återställ.
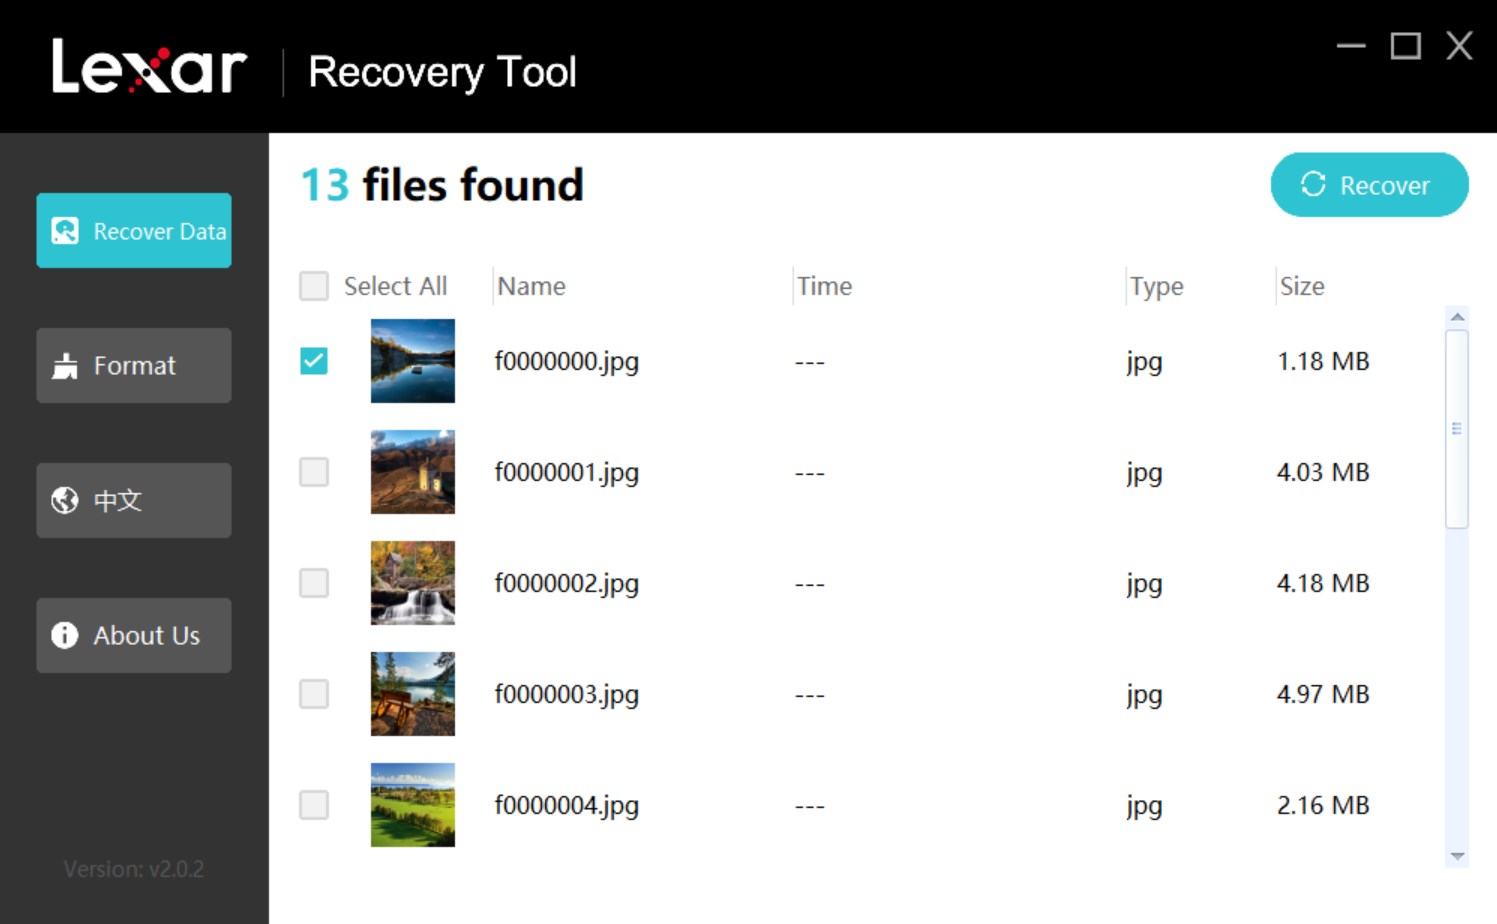
- En bekräftelse kommer att dyka upp efter återställningen. Klicka på Bekräfta för att stänga popup-fönstret och fortsätt filåterställningen eller gå till filplatsen du angav för att kontrollera dina filer.
Metod 2: Använda professionellt tredjepartsverktyg för dataräddning
Disk Drill är en tredjeparts mjukvara för dataräddning som vinner över användare som blivit missnöjda med vissa begränsningar hos Lexar Data Recovery Tool. Den erbjuder betydligt djupare skanningar och kan hitta en stor variation av filformat, inklusive vanliga format för foton, videor, ljud, dokument och till och med RAW foton och videor, tillsammans med andra ovanliga filtyper.
Dessutom kan Disk Drill skapa en byte-till-byte-kopia av ett Lexar SD-kort för att säkert extrahera data om ditt kort är skadat. Du kan också ladda ner appens gratisversion på både MacOS och Windows, där Windows-versionen tillåter upp till 500 MB återställning gratis.
Observera att även om skärmbilderna nedan visar verktyget på Windows, är gränssnittet liknande på Mac och dataåterställningsprocessen är densamma.
Här är stegen för hur man återställer data från ett Lexar SD-kort med Disk Drill:
- Ladda ner och installera Disk Drill för Mac eller Windows.
- Anslut ditt Lexar SD-kort till din dator. Vissa datorer tillåter dig att sätta in SD-kortet direkt i datorn. För andra behöver du en dongel eller adapter.
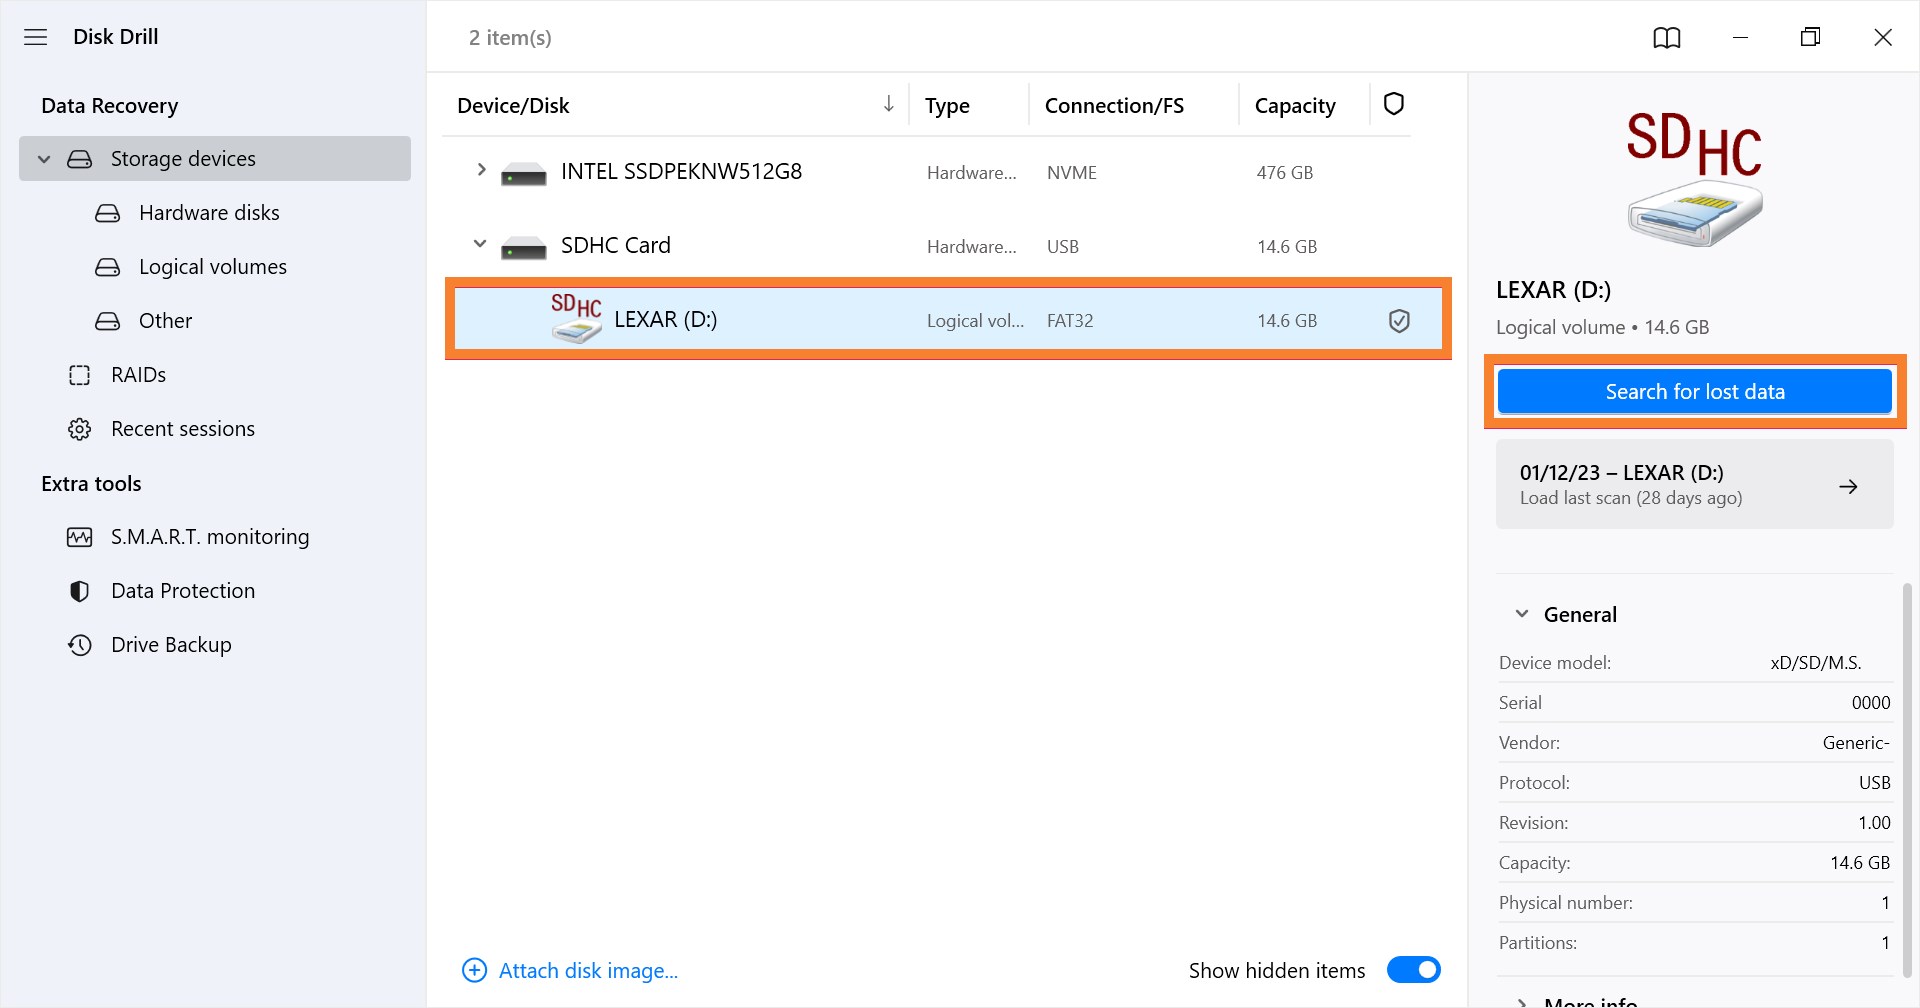
- Öppna Disk Drill och hitta rätt SD-kort på listan över enheter som visas på skärmen. Välj knappen “Sök efter förlorade data” till höger på skärmen.
- Vänta medan Disk Drill skannar din enhet efter förlorade filer. Detta kan ta några minuter, beroende på typen av filer som förlorades och storleken på dessa filer. Välj “Granska hittade objekt” för att förhandsgranska de filer och mappar som hittades under skanningen.
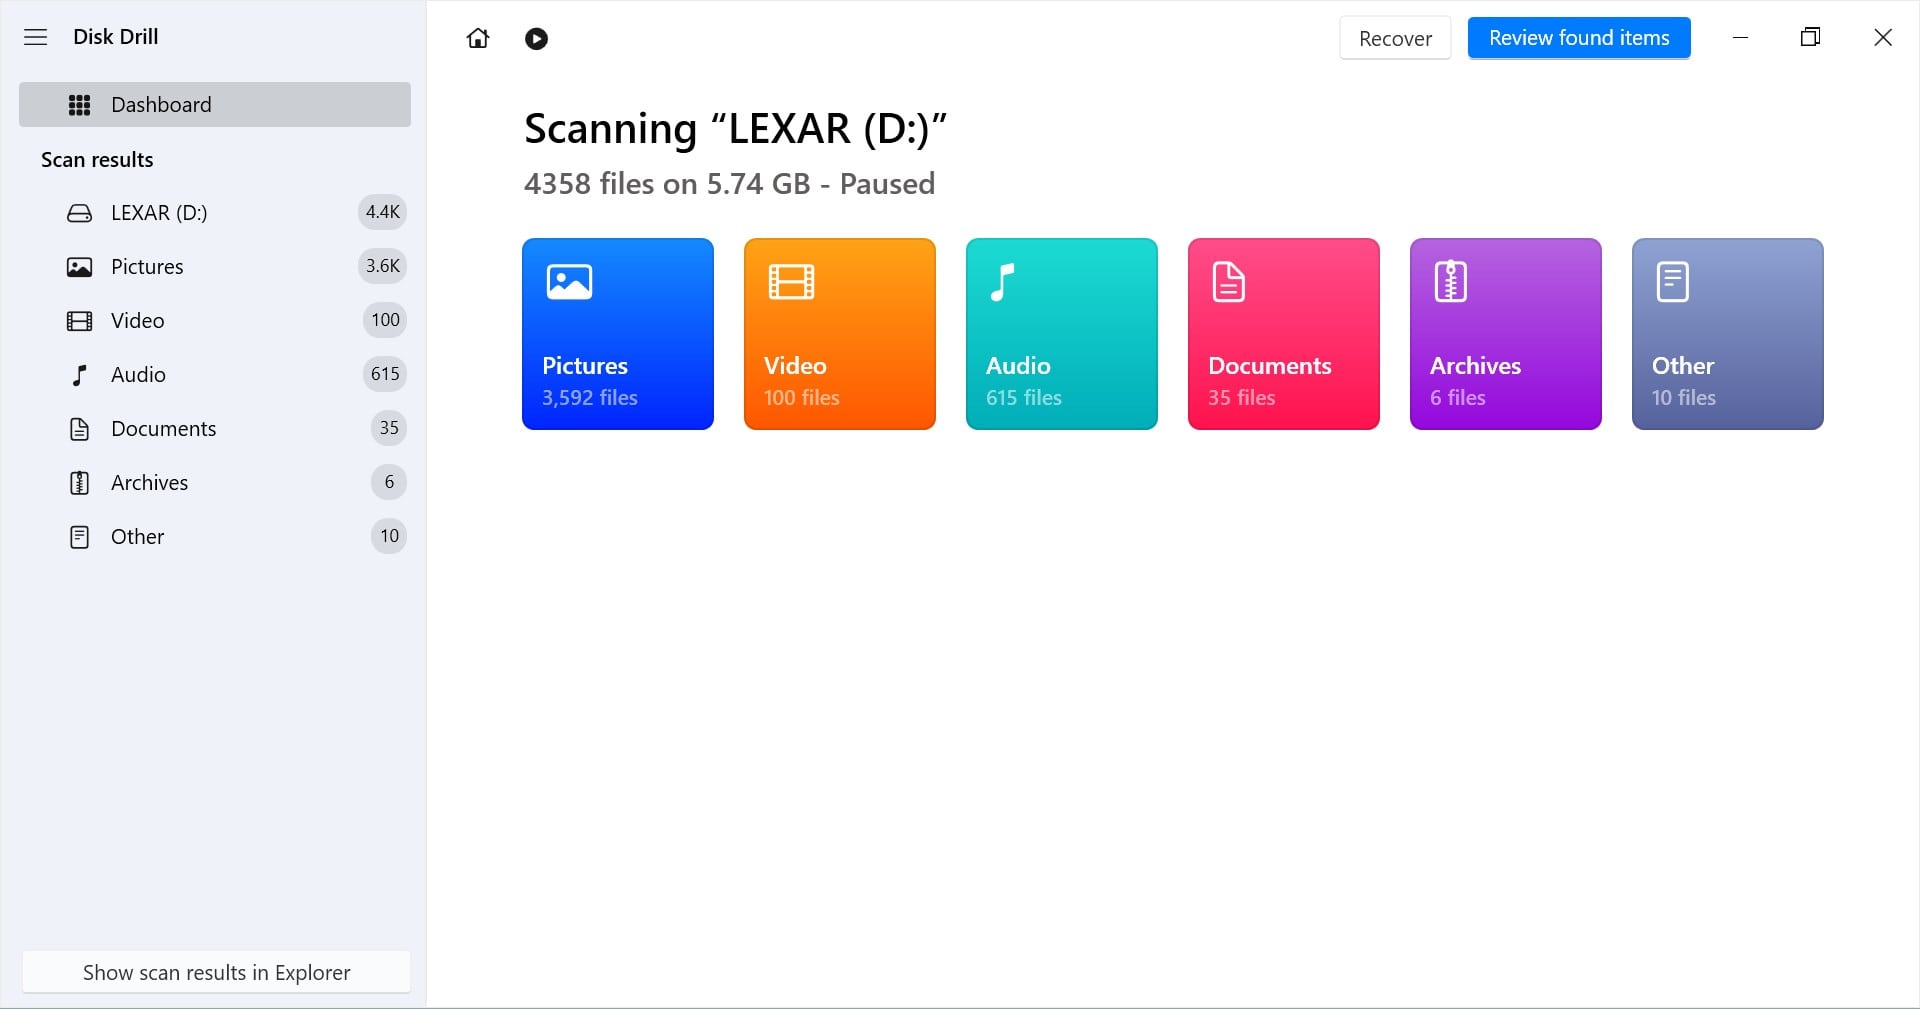
- Tryck på knappen “Återställ” längst ner på skärmen, efter det kan du välja en mapp att spara dessa filer i. Vänta sedan medan programmet sparar de återställda filerna, vilket kan ta några minuter.
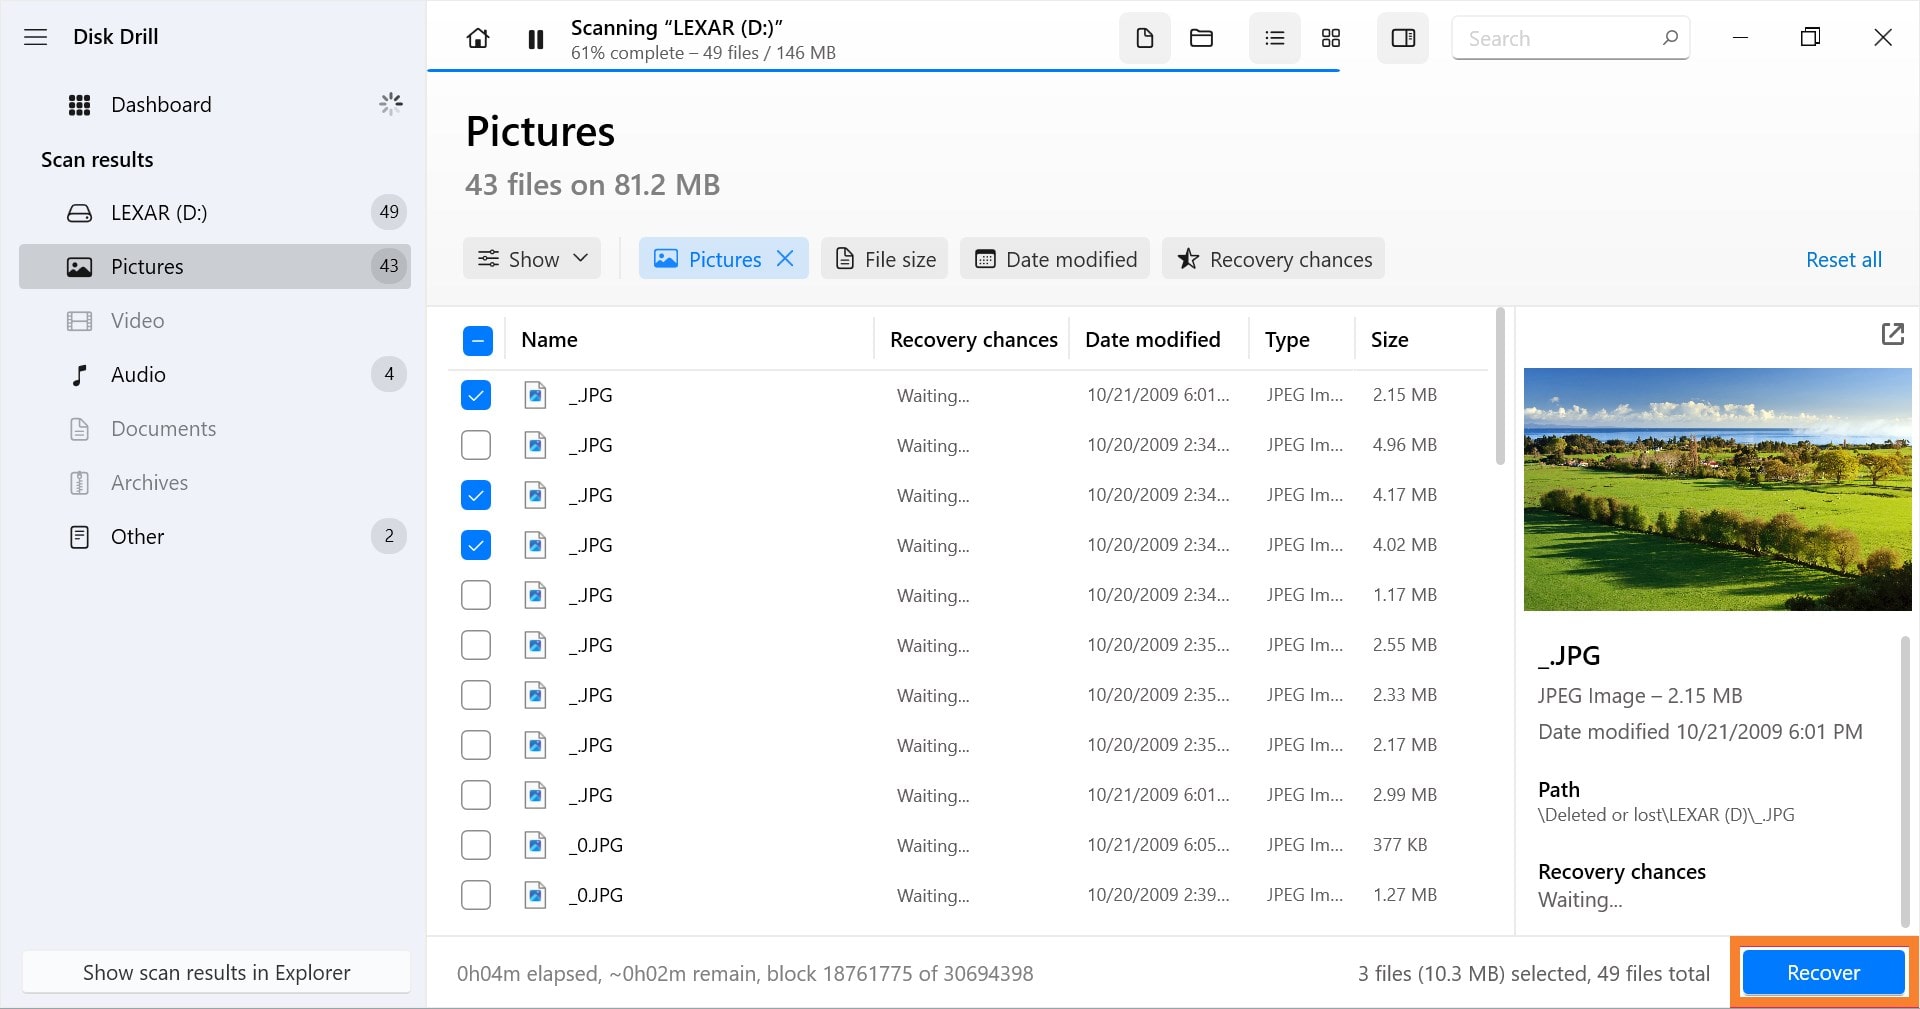
Dina filer ska nu vara sparade på din dator. Du kan sedan gå till mappen där du sparade dina filer och hitta de filer som du försökte återställa. Eller, tryck helt enkelt på knappen “Visa resultat i Finder” för att komma direkt till dem.
Slutsats
Lexar SD-kort-dataförlust på grund av oavsiktlig radering eller formatering, filsystemskorruption eller liknande problem kan lösas med hjälp av dataåterställningsappar.
Lexar tillhandahåller sitt eget verktyg för dataåterställning gratis. Tredjepartsappar som Disk Drill skulle dock vara ett mycket mer idealiskt alternativ för dataåterställning om du behöver mer avancerade funktioner.
Annars kan du behöva hjälp av dataåterställningsproffs. För att undvika dataförlust i framtiden rekommenderas det att hålla uppdaterade säkerhetskopior av dina viktiga filer.
Vanliga frågor:
- Först, anslut ditt Lexar-minneskort och starta Disk Drill.
- Välj ditt minneskort på listan över tillgängliga enheter och klicka på Sök efter förlorade data.
- Välj sedan de filer du vill återställa och klicka på Återställ.
- Välj filplats för dina data.
- Efter det, vänta tills återställningen är klar. Klicka på Visa återställda data i Utforskaren för att verifiera de återställda filerna.
- Anslut ditt Lexar SD-kort till din dator.
- Öppna sedan File Explorer/Finder.
- Hitta din enhet och högerklicka/kontroll-klicka på den. Välj sedan Formatera.
- Konfigurera filsystem, namn/volymetikett och snabbformateringsinställningar för din enhet och klicka på Start eller Formatera.
