 The dreaded “Error loading operating system” error pops up unexpectedly, during the Windows boot process. Understandably, you may wonder whether your data is at risk and is there a way to resolve the issue? The answer is yes – there are multiple ways you can effectively diagnose and fix the problem, without compromising the security of your files.
What Causes the “Error Loading Operating System” Issue on Windows
It can be confusing to pinpoint what caused your PC to display the “Error loading operating system” message because there’s no other info provided. However, the table below outlines the most common reasons behind this error:
| Reason | Description |
| 💻 An outdated or improperly configured BIOS | A pre-2000 motherboard’s BIOS typically won’t support newer hard drives with large capacities. On newer motherboards, it’s likely that the BIOS settings are not configured to work with the hard disk. Luckily, both these problems can be resolved with a simple BIOS update or a trip to the BIOS settings. |
| ⚙️ Corrupted Master Boot Record (MBR) | The first sector on your computer’s HDD contains the MBR, which stores the necessary information required for Windows to boot. A corrupt boot sector is a common culprit behind numerous operating system boot errors, including this one. Windows has in-built utilities that can help you repair a corrupted MBR. |
| 📋 Incorrect boot order | The boot order determines which drive contains the OS and should be used to boot. If it’s set incorrectly in the BIOS, Windows won’t boot, and you’ll get the “Error loading operating system” message. This typically happens when you have multiple drives attached to your PC. You can rectify an incorrect boot order using the Boot Sequence settings in the BIOS. |
| 🚫 Missing system boot files | In addition to the MBR, other system files need to be loaded during the boot process. Missing system boot files can be one reason why the operating system could not be loaded. |
| 🪟 Incorrectly installed GRand Unified Bootloader (GRUB) when dual-booting Windows and Linux | It can be tricky to dual-boot Linux and Windows, and any mistakes while setting up the dual-boot can lead to the “Error loading operating system” error. Installing GRUB to MBR, instead of in EFI, is usually the cause. While fixing dual-boot issues is beyond the scope of this article, here is an excellent resource related to Ubuntu and Windows dual-boot installations. |
| ☁️ Misconfigured VMware machine | Many users report facing operating system boot errors after converting a physical machine to a virtual one using the VMware converter. This usually happens if the Entire disk option was not selected during conversion. |
How to Recover Data When the Operating System Doesn’t Load
When it comes to operating system boot issues, your primary concern should be your data. Sometimes, the only way to solve the error loading operating system problem, is to perform a clean reinstallation of Windows. You will lose your files in this case. Furthermore, the culprit behind the error could be disk corruption, which can impact all the files on your drive.
Luckily, it’s entirely possible (and easier than you think) to recover your data from a hard drive that won’t boot. How? Using third-party data recovery software. We recommend you do this since it’ll provide you with the peace of mind that your data is secure, regardless of the method you use to resolve the error.
Part 1: Create a Live USB
Since Windows won’t boot, you’ll need to create a live Windows USB using a working PC. This allows you to boot into the Windows GUI on the non-booting PC, download the data recovery software and get back your data. To accomplish this, you first need to download the Windows 10, or Windows 11 ISO.
For Windows 11, the process is fairly simple, go to the Windows 11 download page, scroll down to the Download Windows 11 Disk Image (ISO) section, and download it.
For Windows, 10, the process is slightly longer:
- Download the Windows Media Creation tool from the Windows 10 download page. It’ll be under the Create Windows 10 installation media section.
- Run the Media Creation Tool and accept the license agreement.
- Choose the Create installation media for another PC option and click Next.
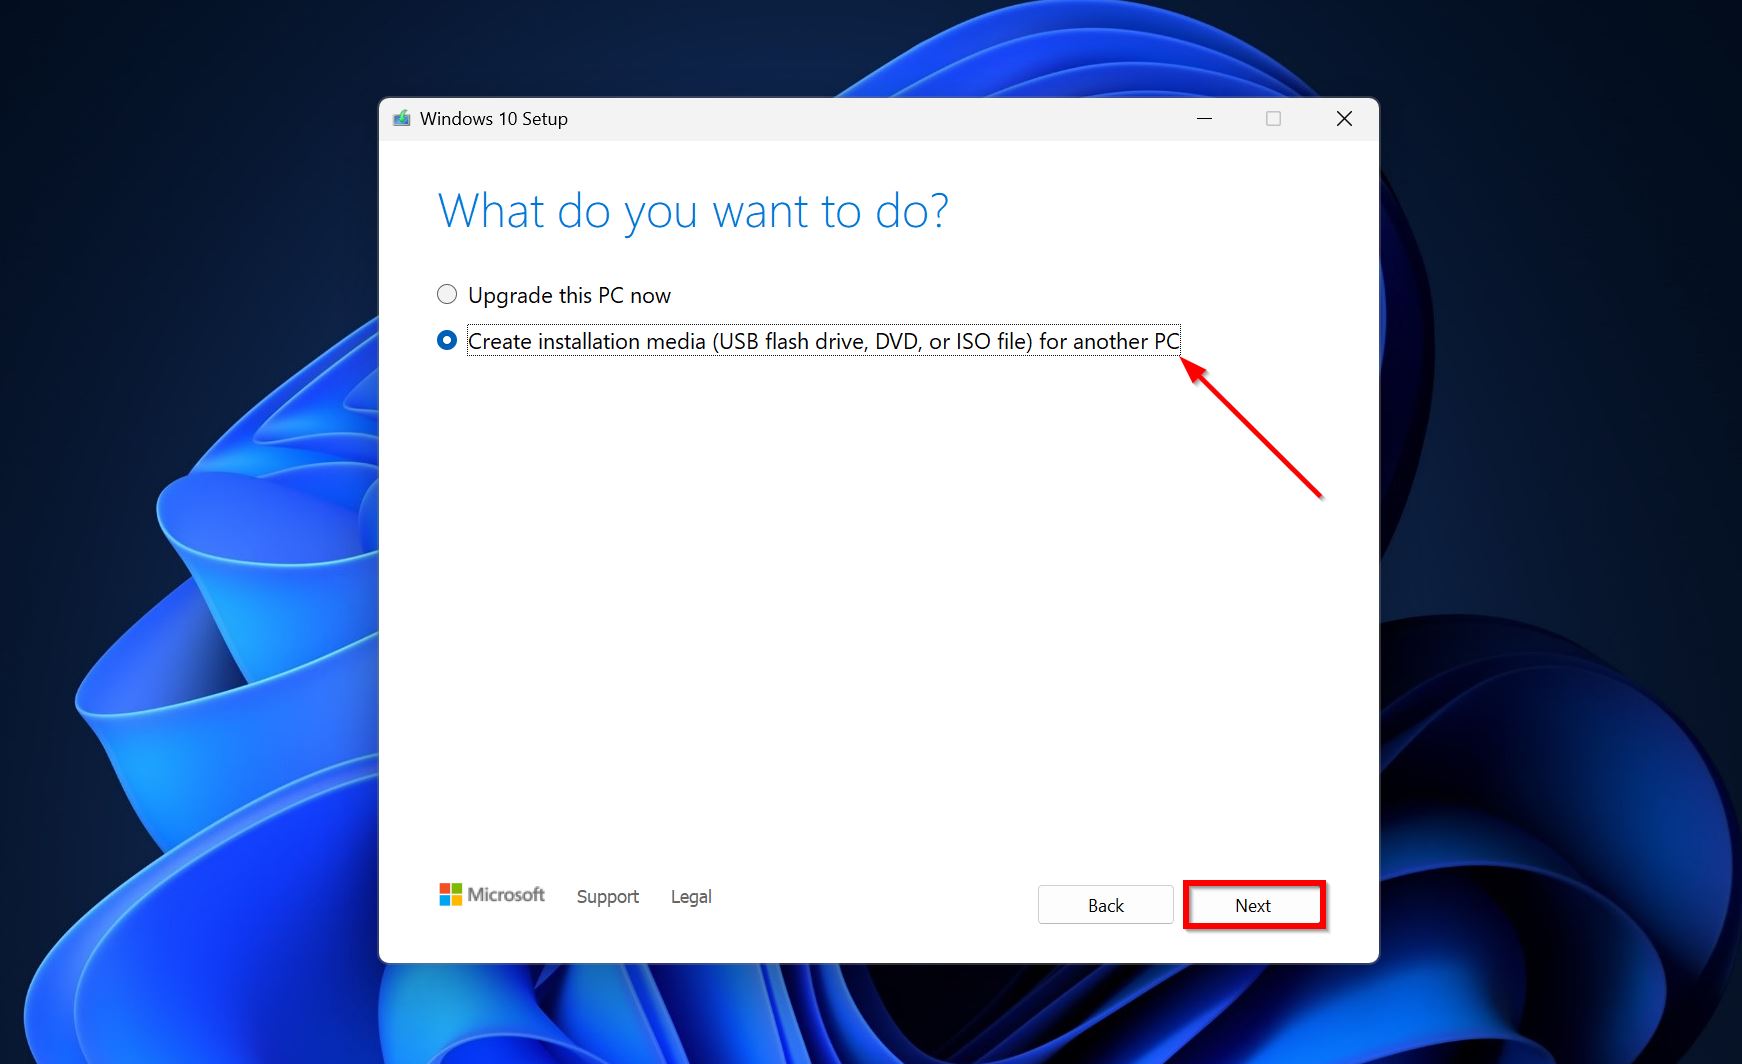
- Select the Windows version you want to download. Click Next.
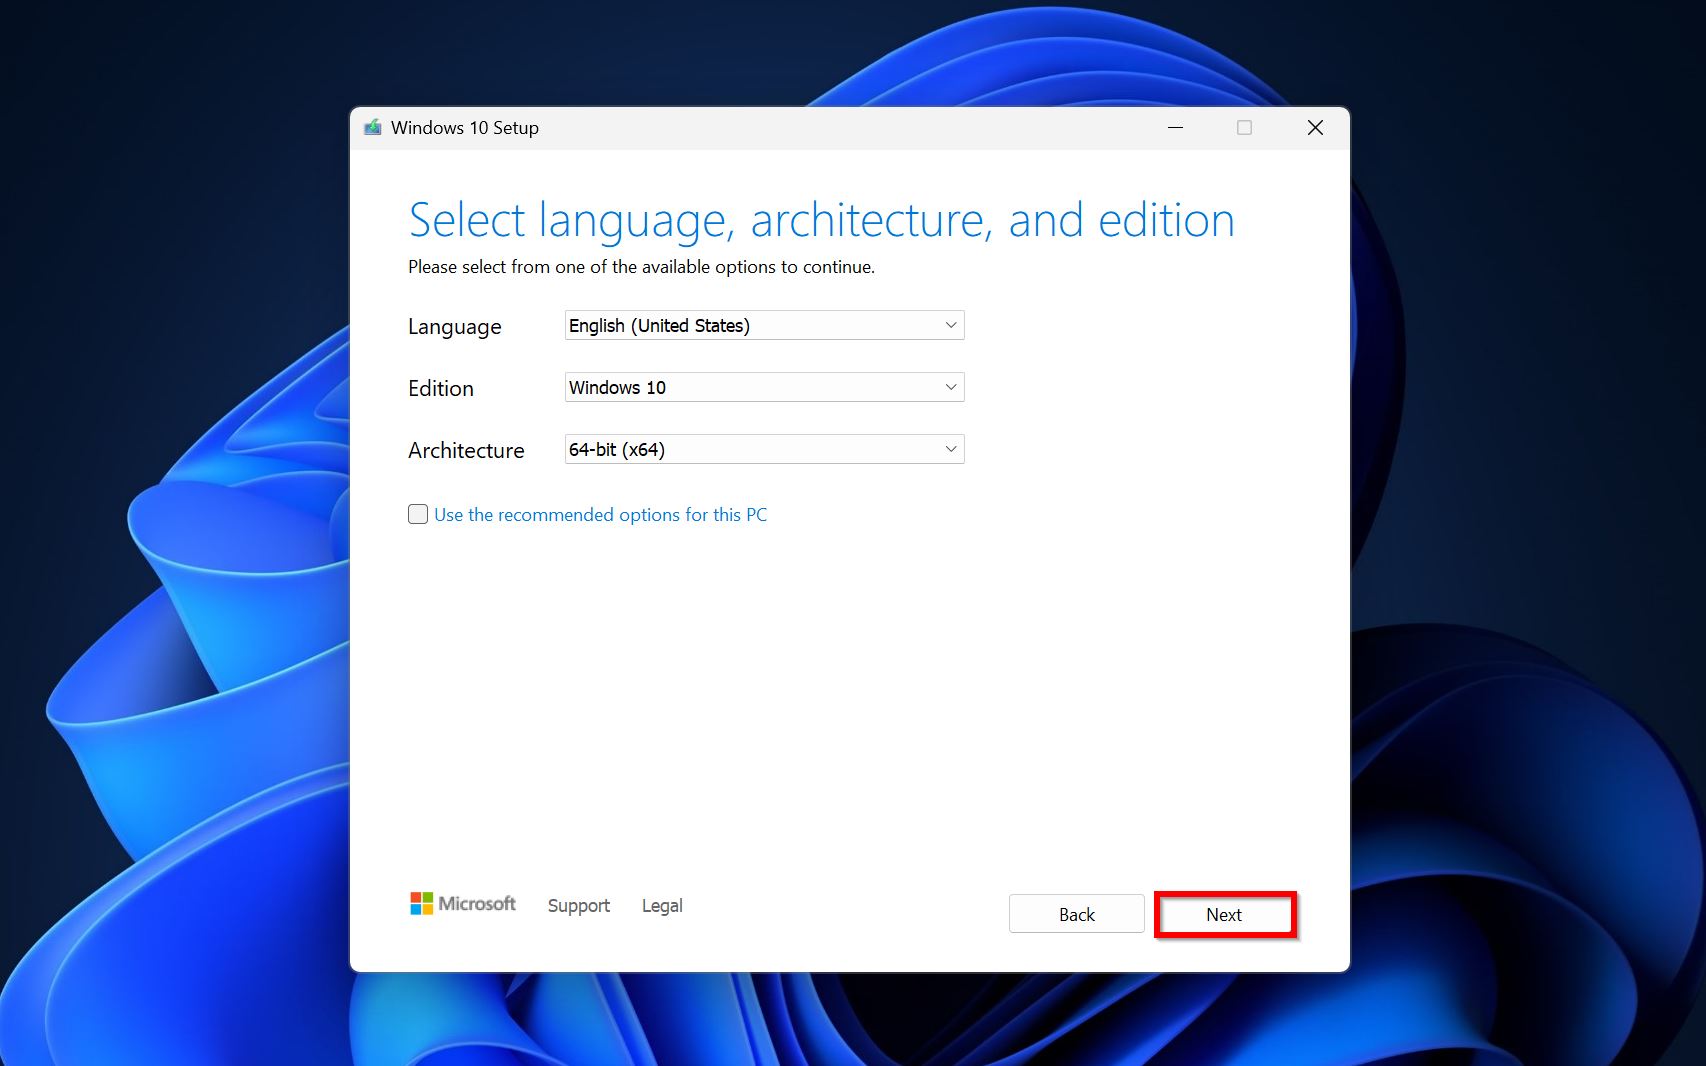
- Pick the ISO file option and click Next.
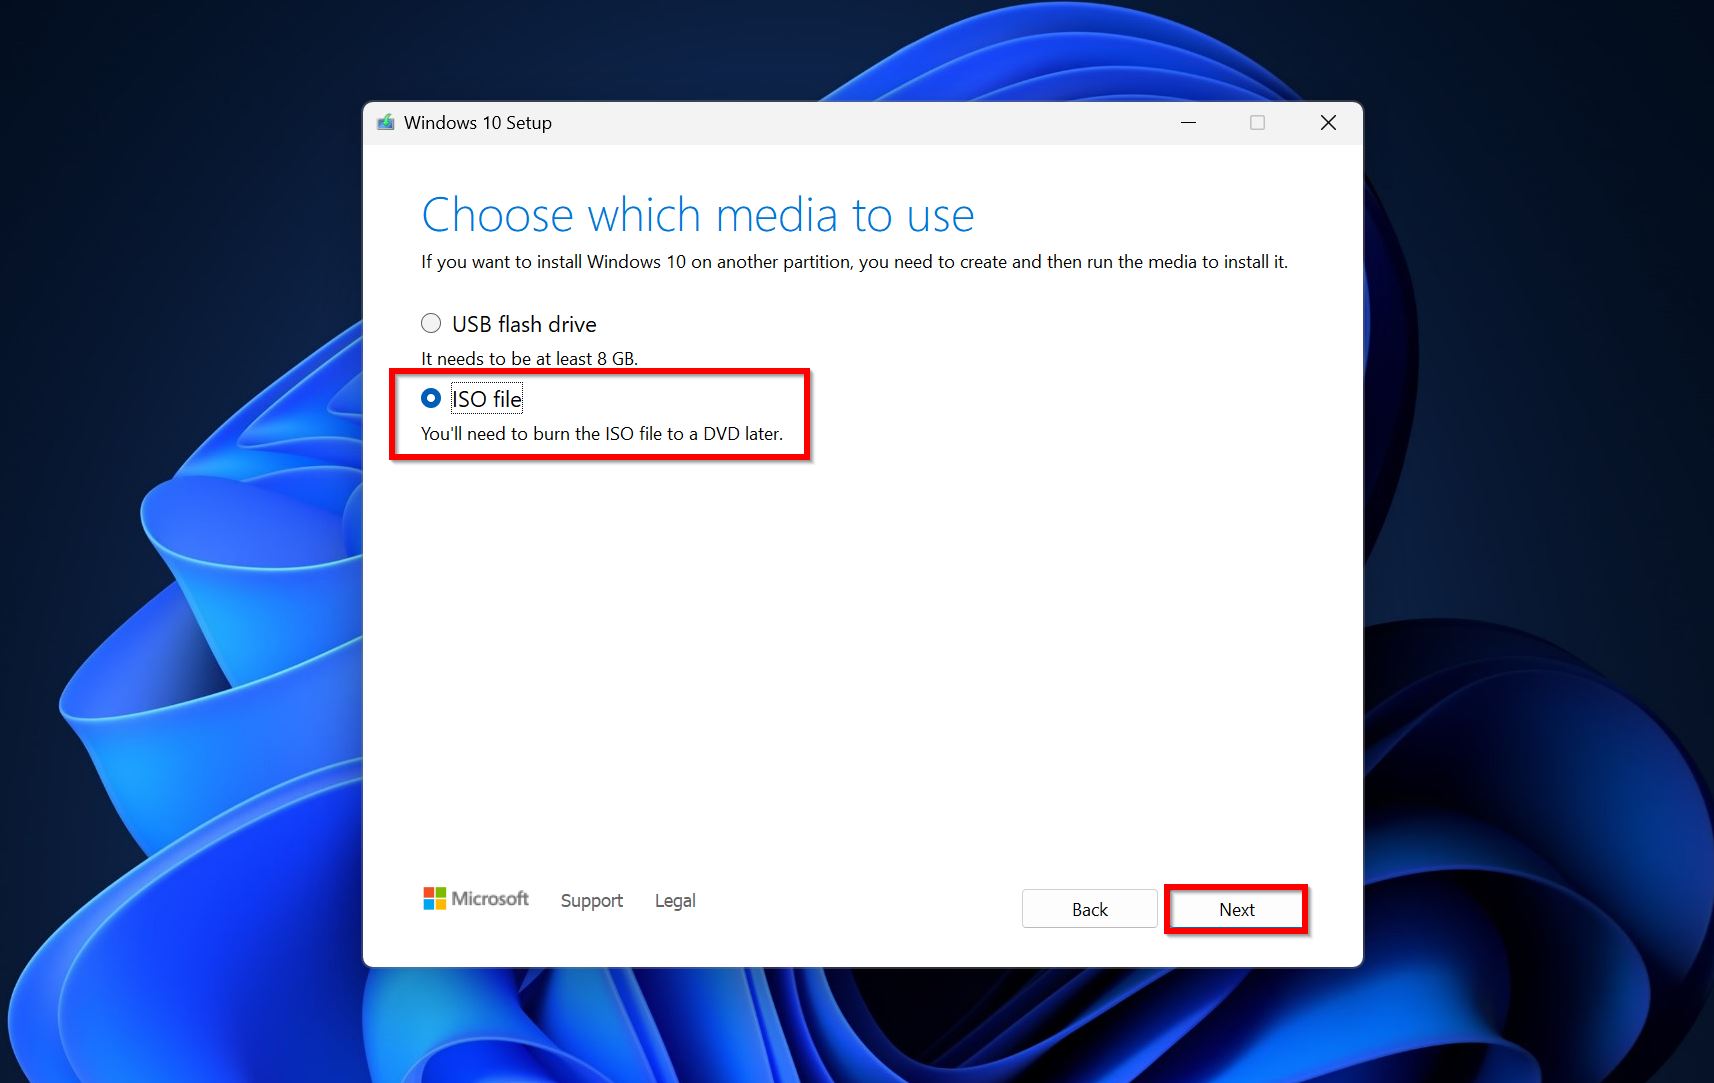
- Select a download location and wait while the ISO is downloaded.
Once you’ve downloaded the relevant ISO, it’s time to create a live USB. Here’s how:
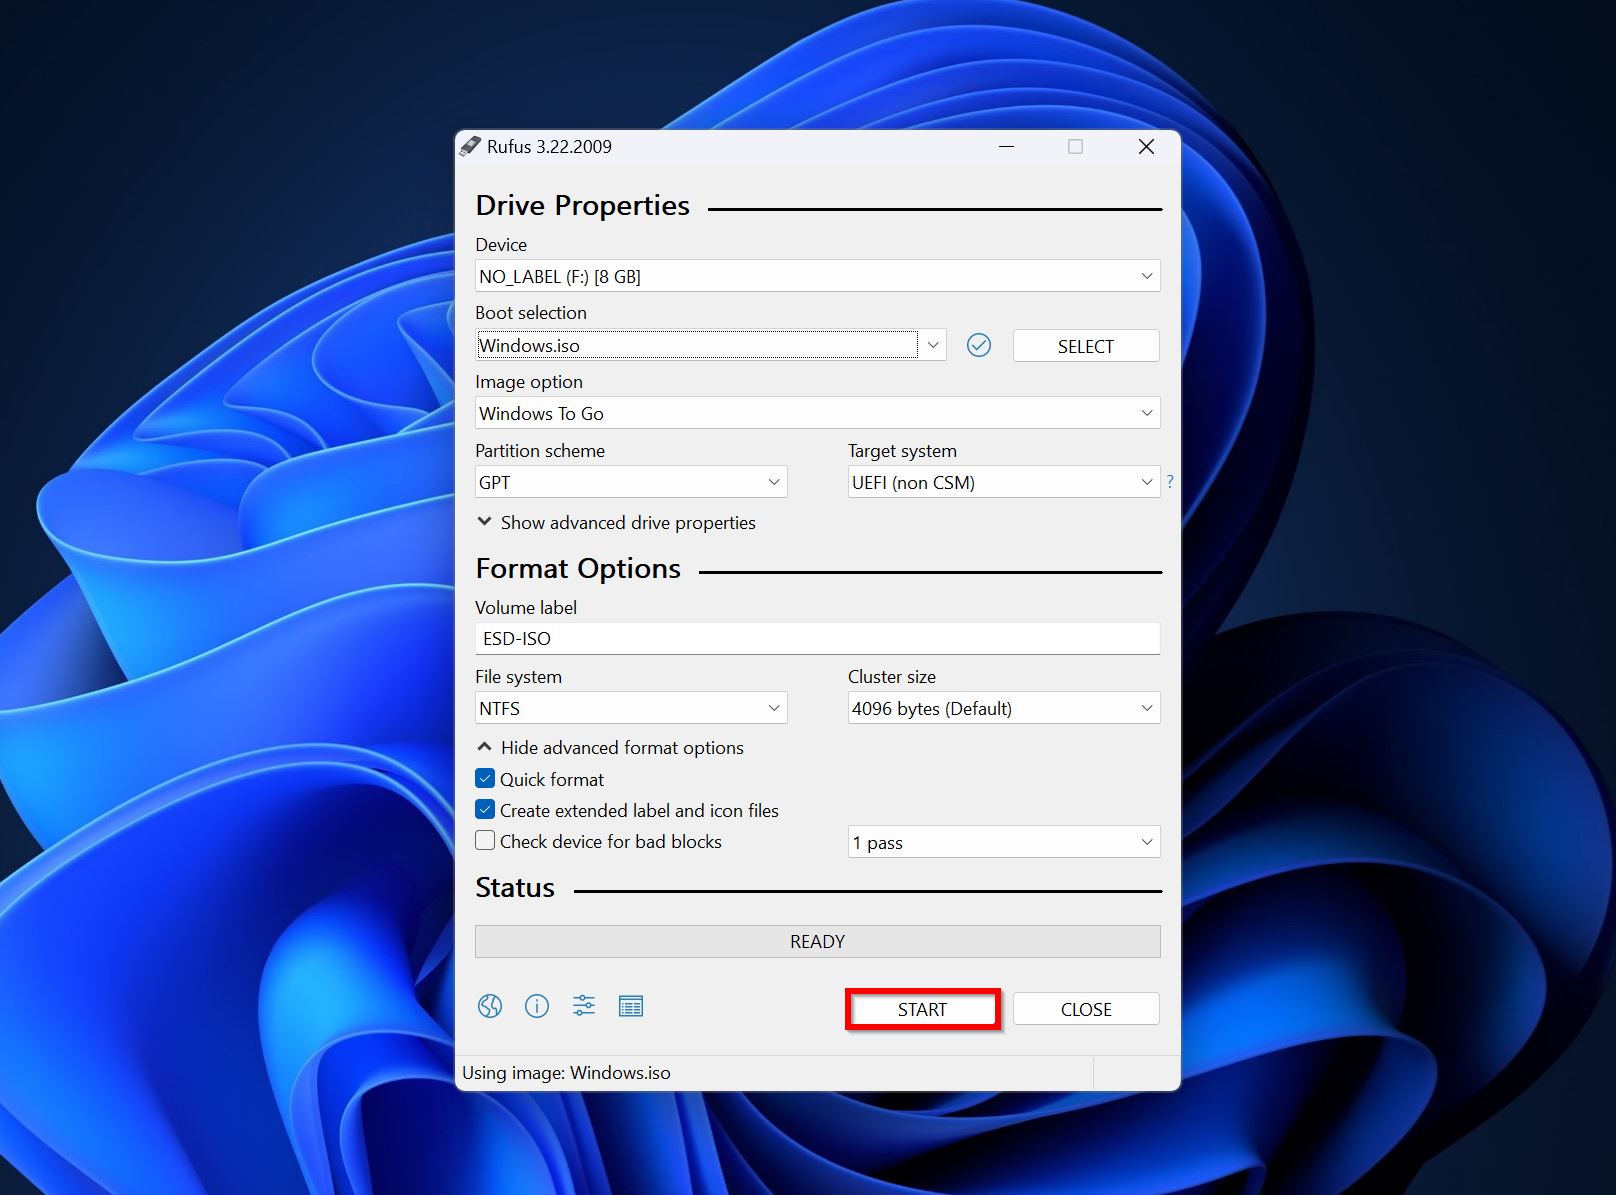
- Download Rufus and launch it. Make sure you have a USB drive (at least 8 GB) at hand and connected to your PC.
- Choose the USB drive from the Device drop-down menu,
- Click on the Select button. Browse for the Windows ISO file you downloaded and double-click on it.
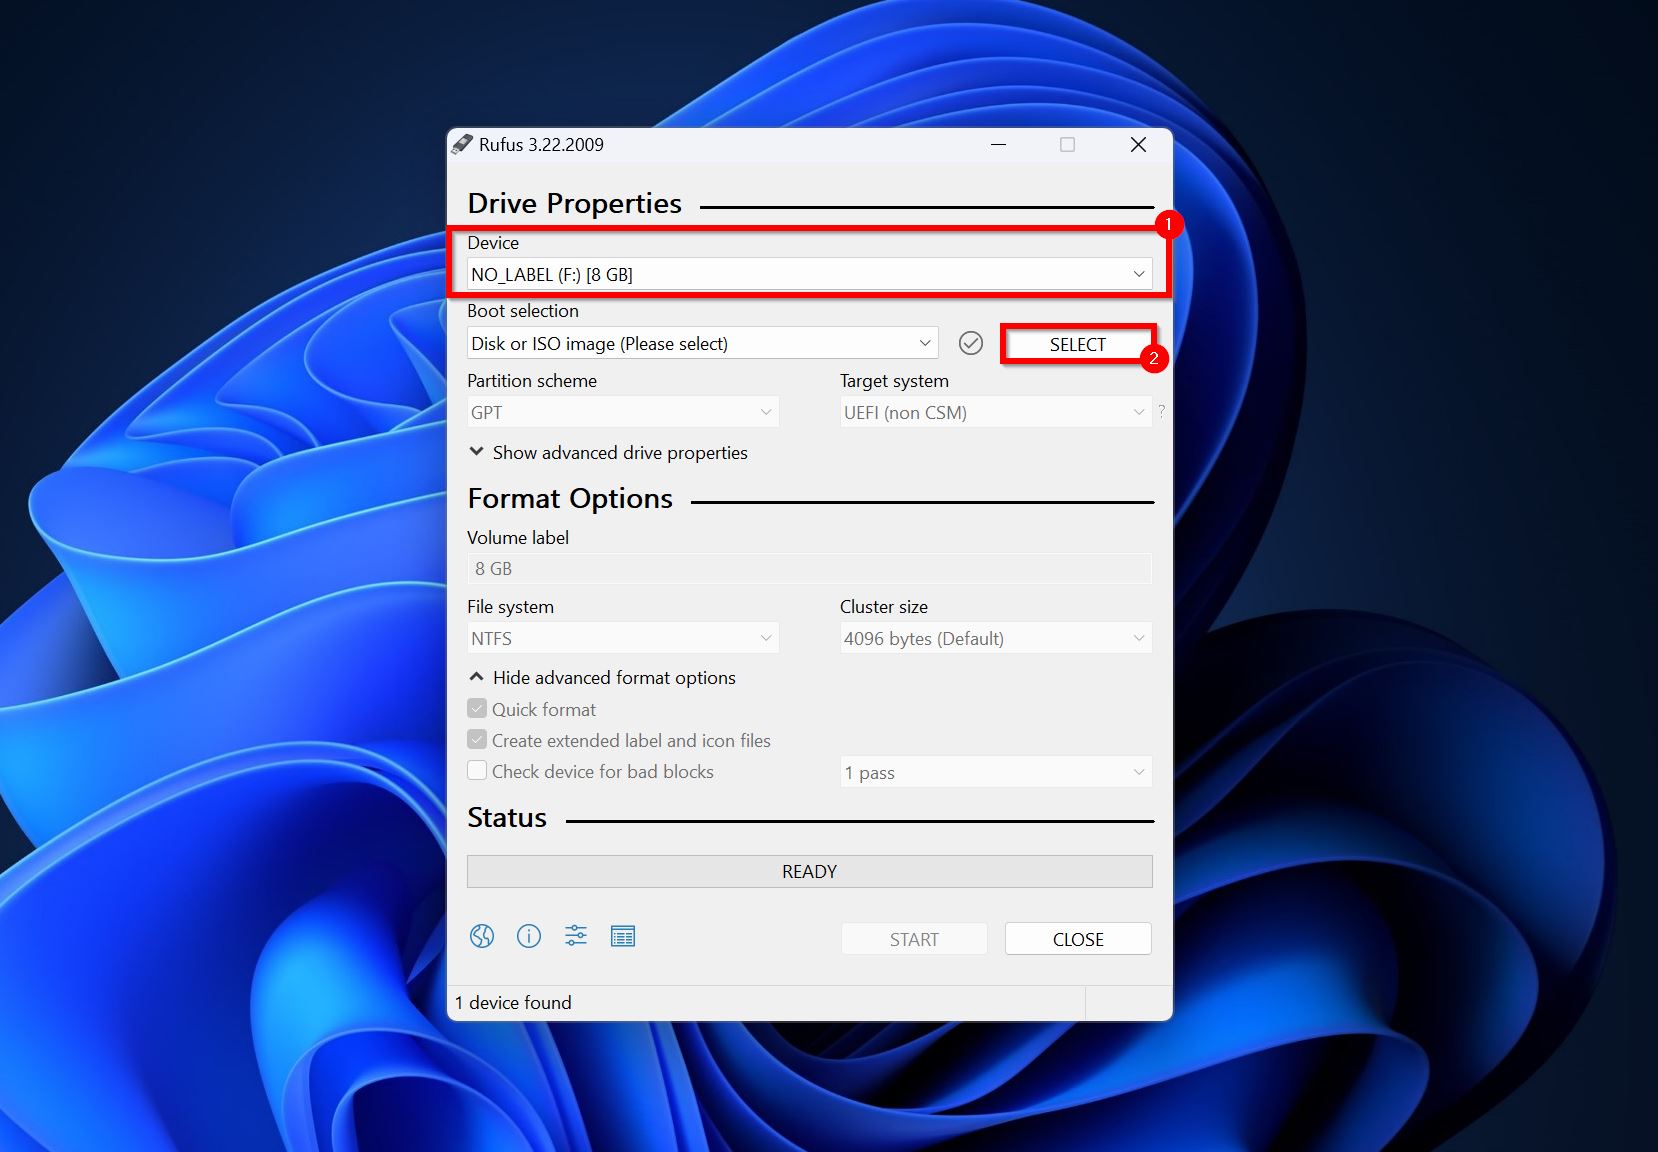
- Under Image option, select Windows To Go.
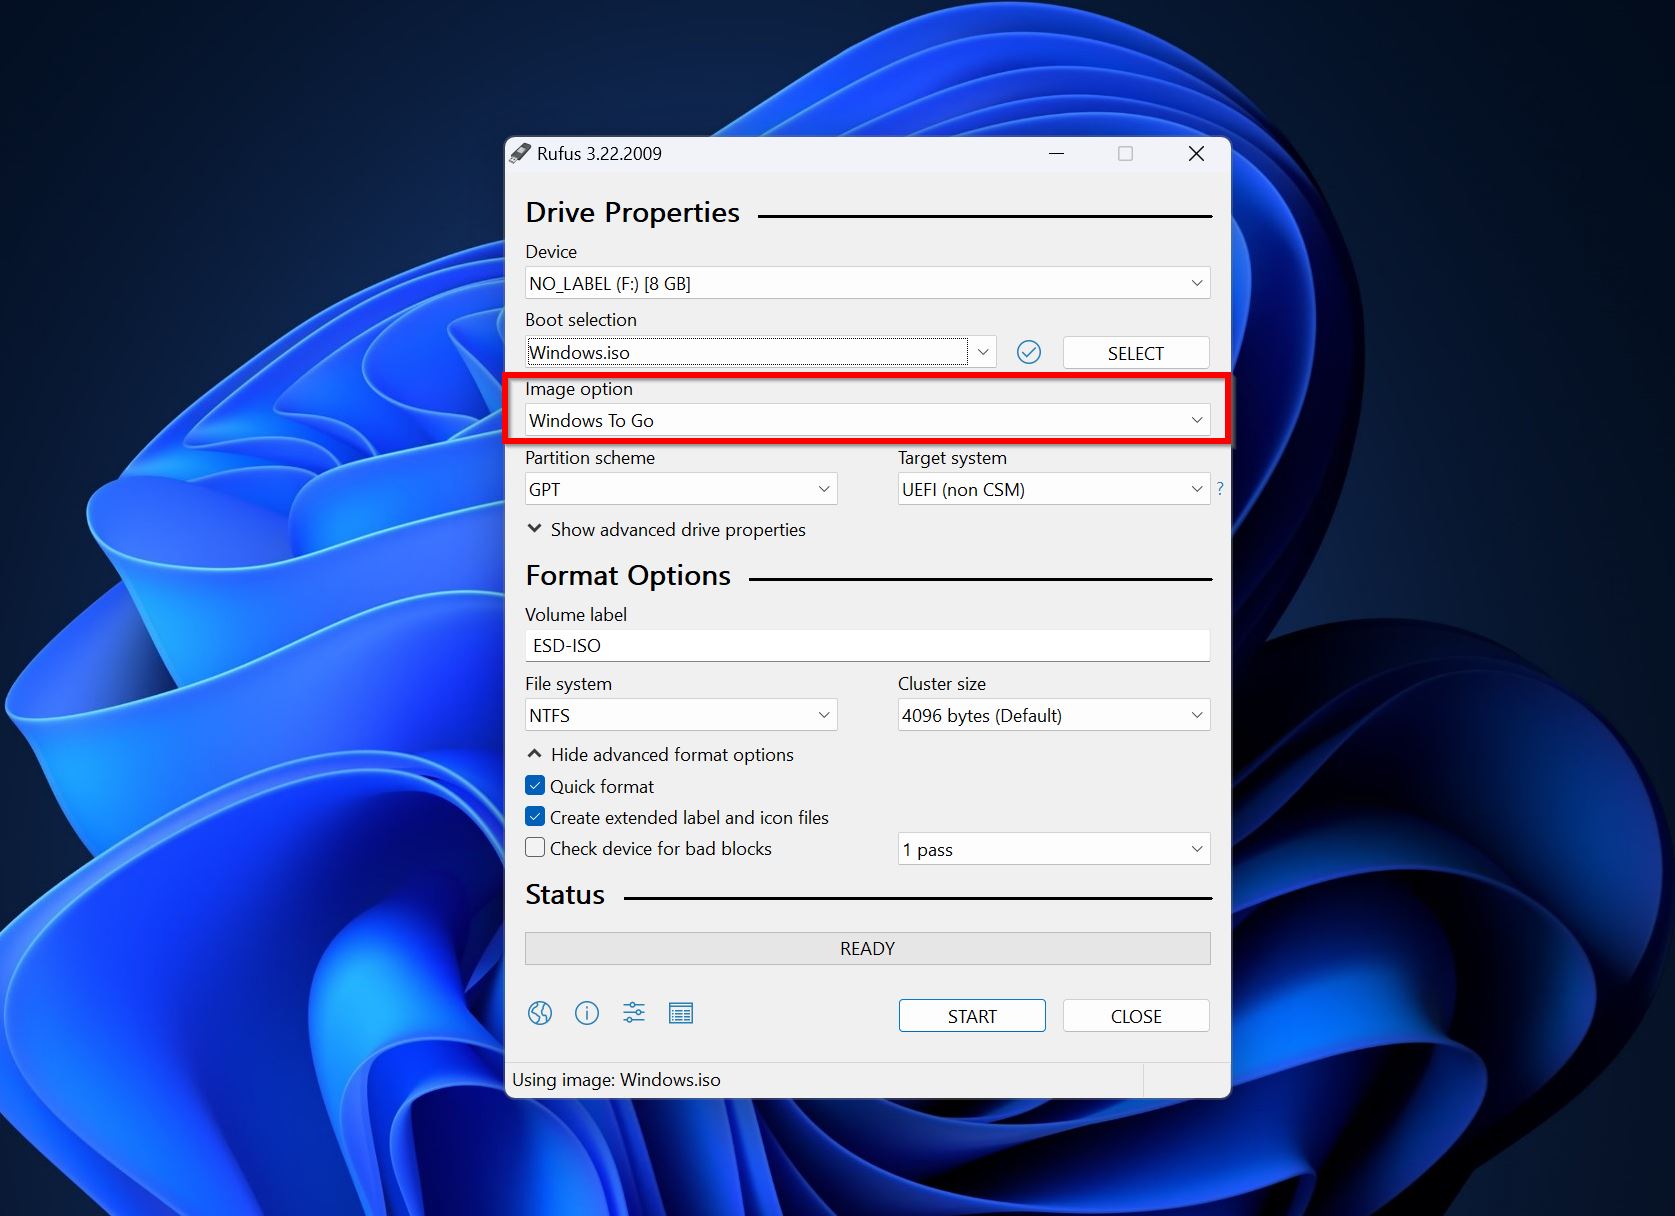
- Click on Start. Rufus will create the live Windows USB.
Part 2: Recover Your Data
For this tutorial, I picked Disk Drill as my choice of data recovery software. Thanks to its user-friendly GUI, advanced data recovery algorithm, and the ability to recover data from corrupt drives, it’s an excellent choice for most users. Disk Drill also supports over 400 file formats and will detect your drive even if it doesn’t have a file system at all (RAW).
Importantly, the system drive could be marked “offline” when you boot using a live USB. Disk Drill won’t detect your drive in this case. To fix this, first mark the disk Online, then proceed with data recovery.
Connect the live USB to the computer that’s not booting, and then follow these steps:
- Download and install Disk Drill. We recommend you connect another external drive to the PC to save the recovered files.
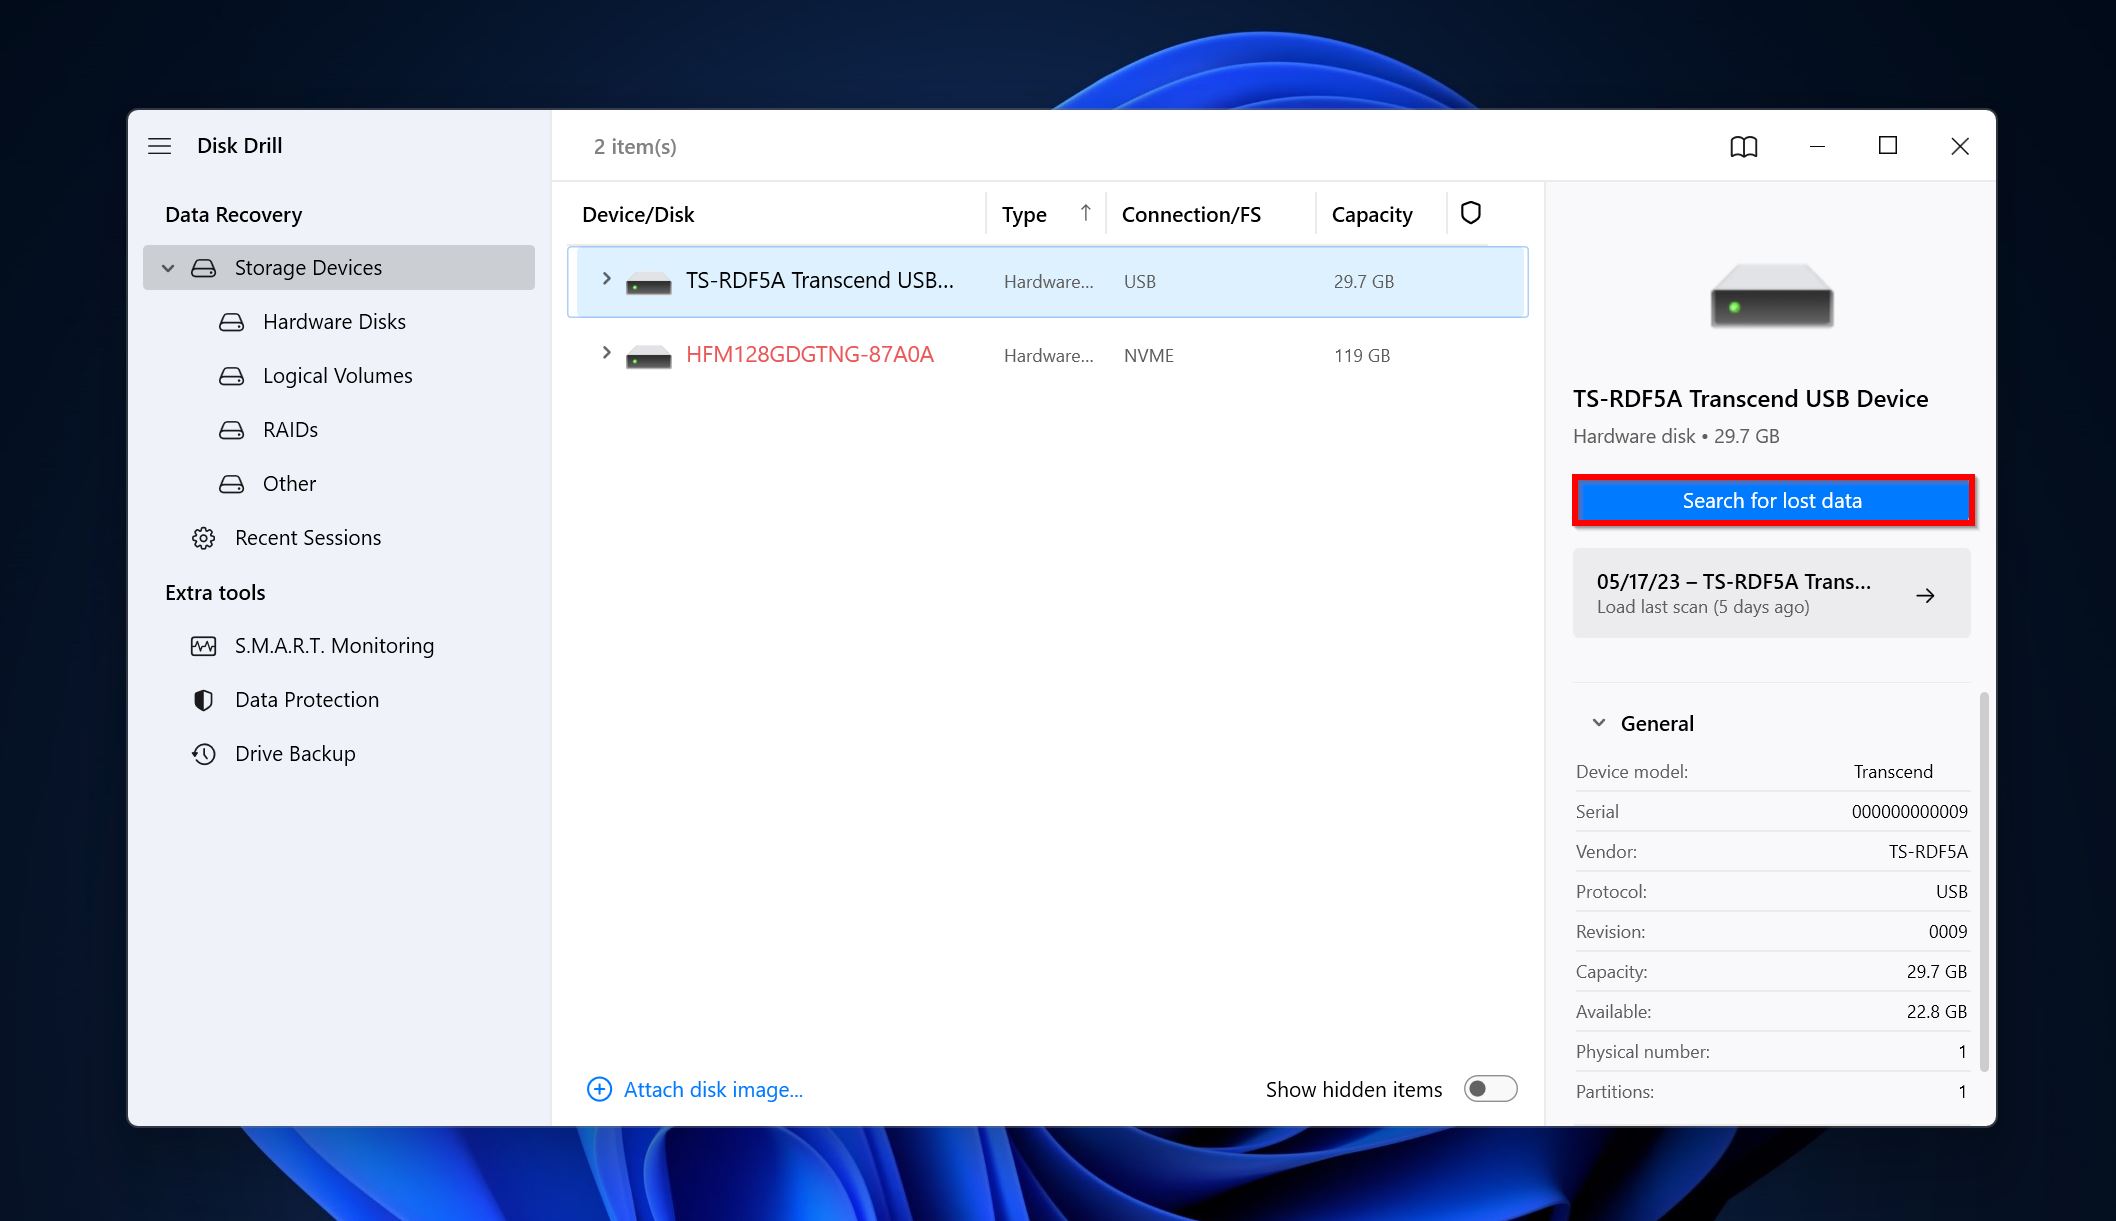
- Open Disk Drill, select the internal HDD, and click Search for lost data.
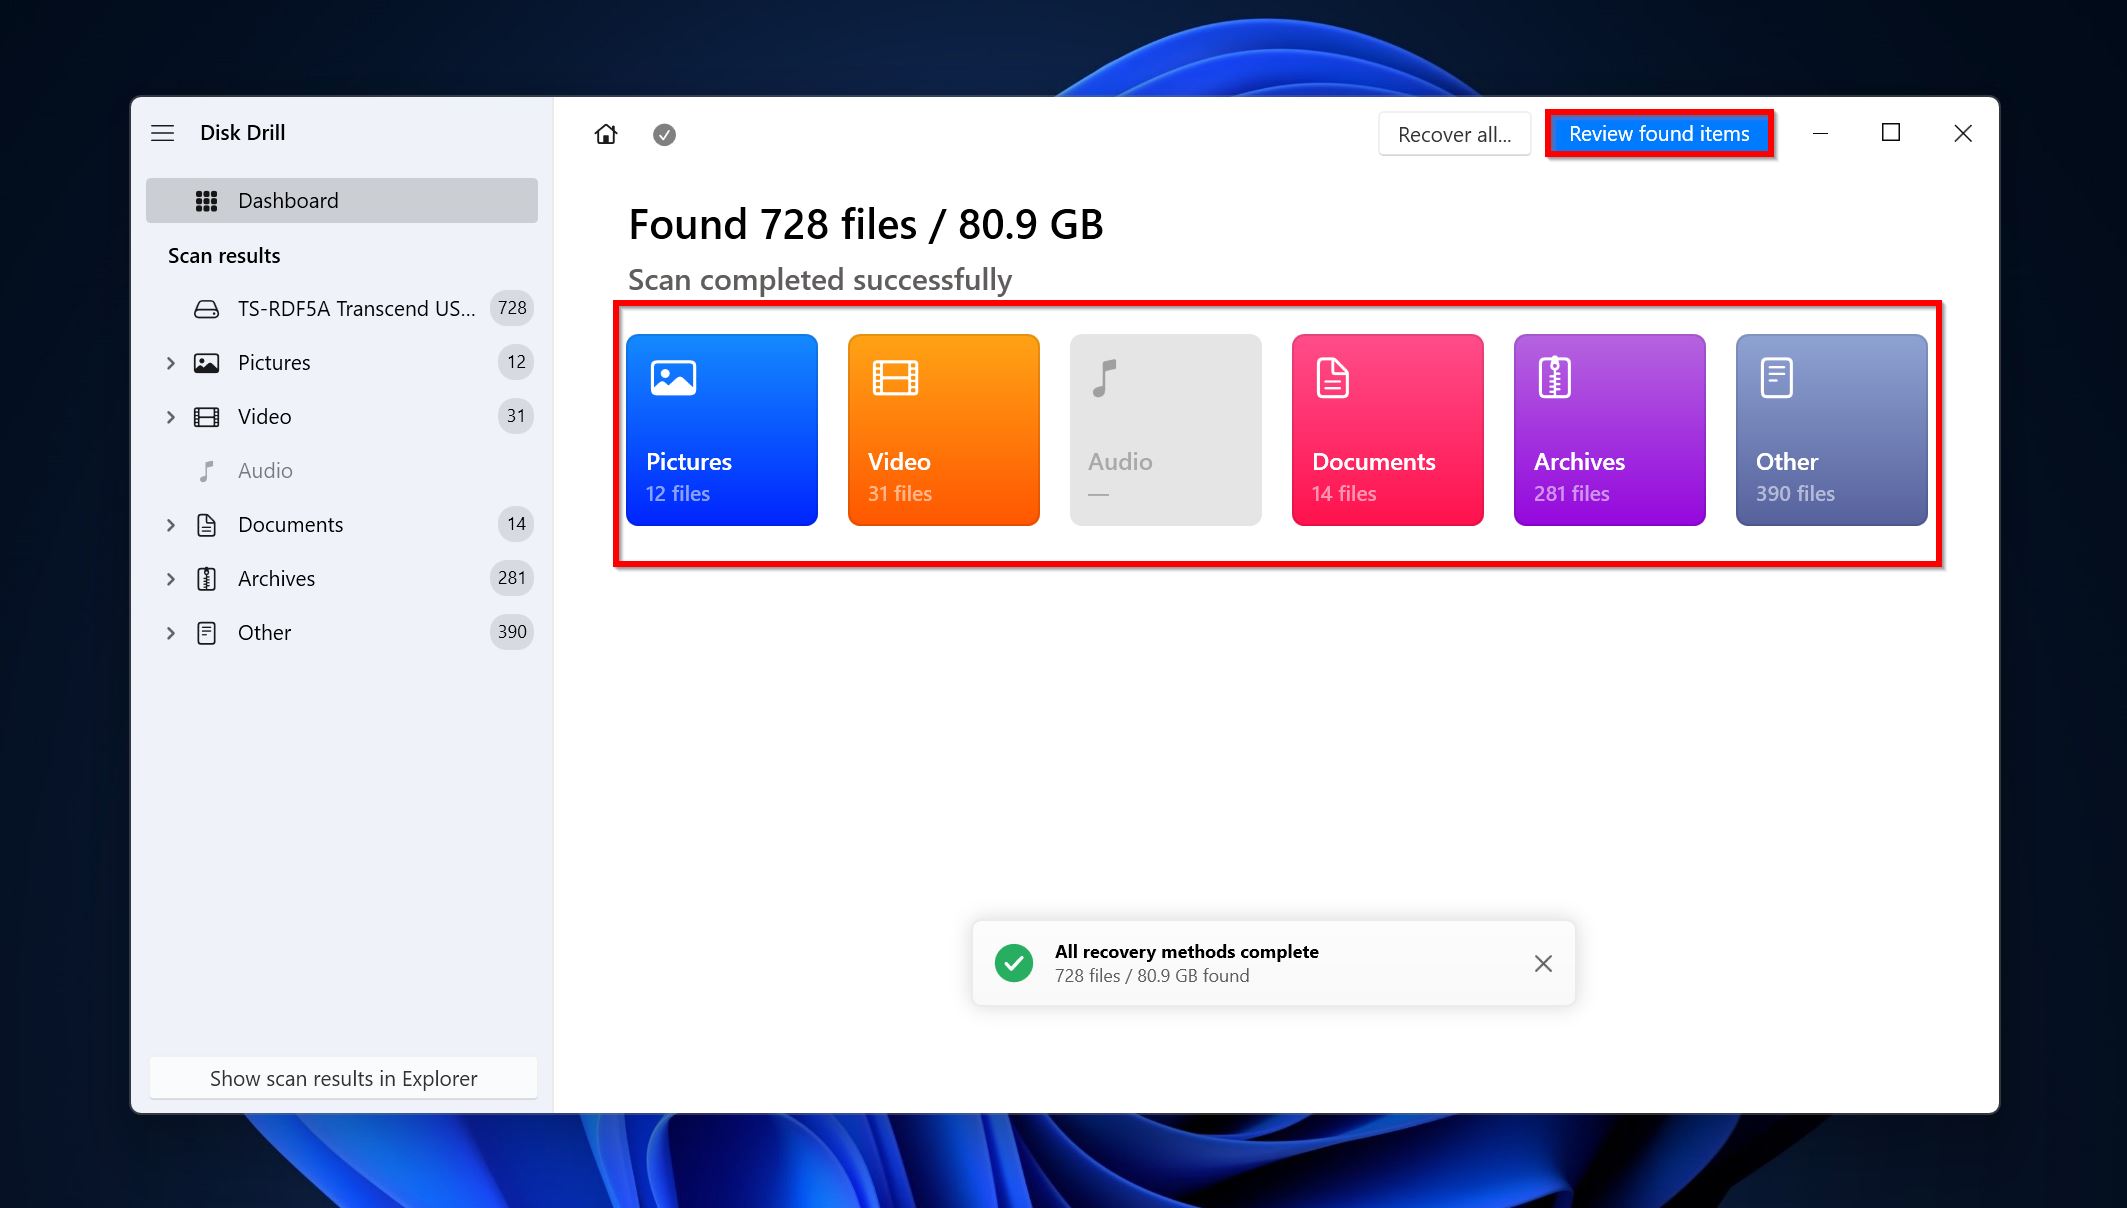
- Click on Review found items to view all the recoverable files that Disk Drill discovered. To filter out the results, directly click on the types of files you’re looking to recover (Pictures, Video, Audio, Documents, Archives, and Other).
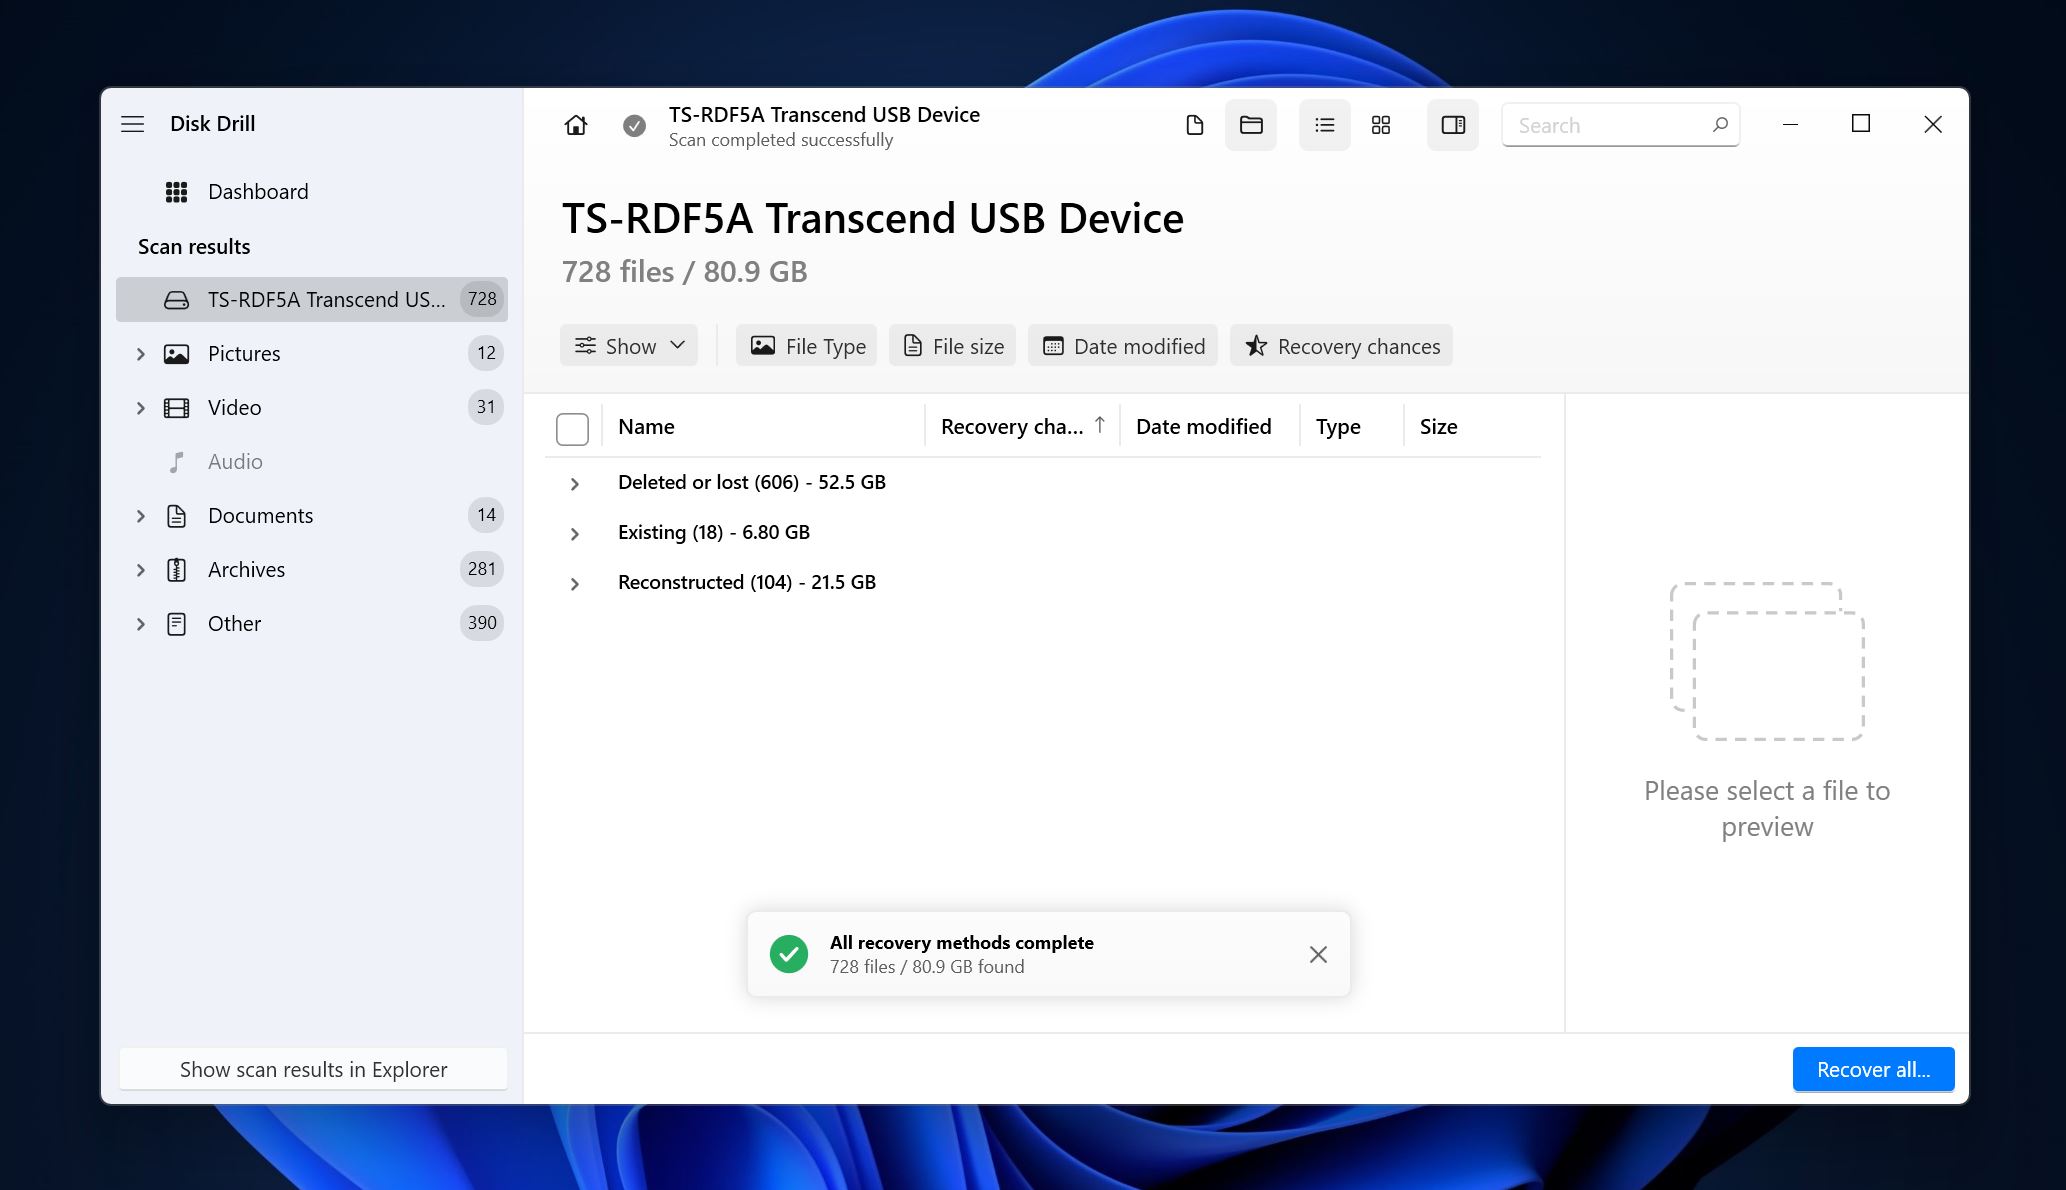
- Expand the Existing section to view the files currently stored on the drive. To view files that were deleted or went missing due to corruption, expand the Deleted or lost and Reconstructed sections.
- Use the checkboxes to select the files you wish to recover. Disk Drill displays a preview of the currently selected file. You can also manually preview a file by clicking the eye icon next to the filename. Click Recover after confirming your selection.
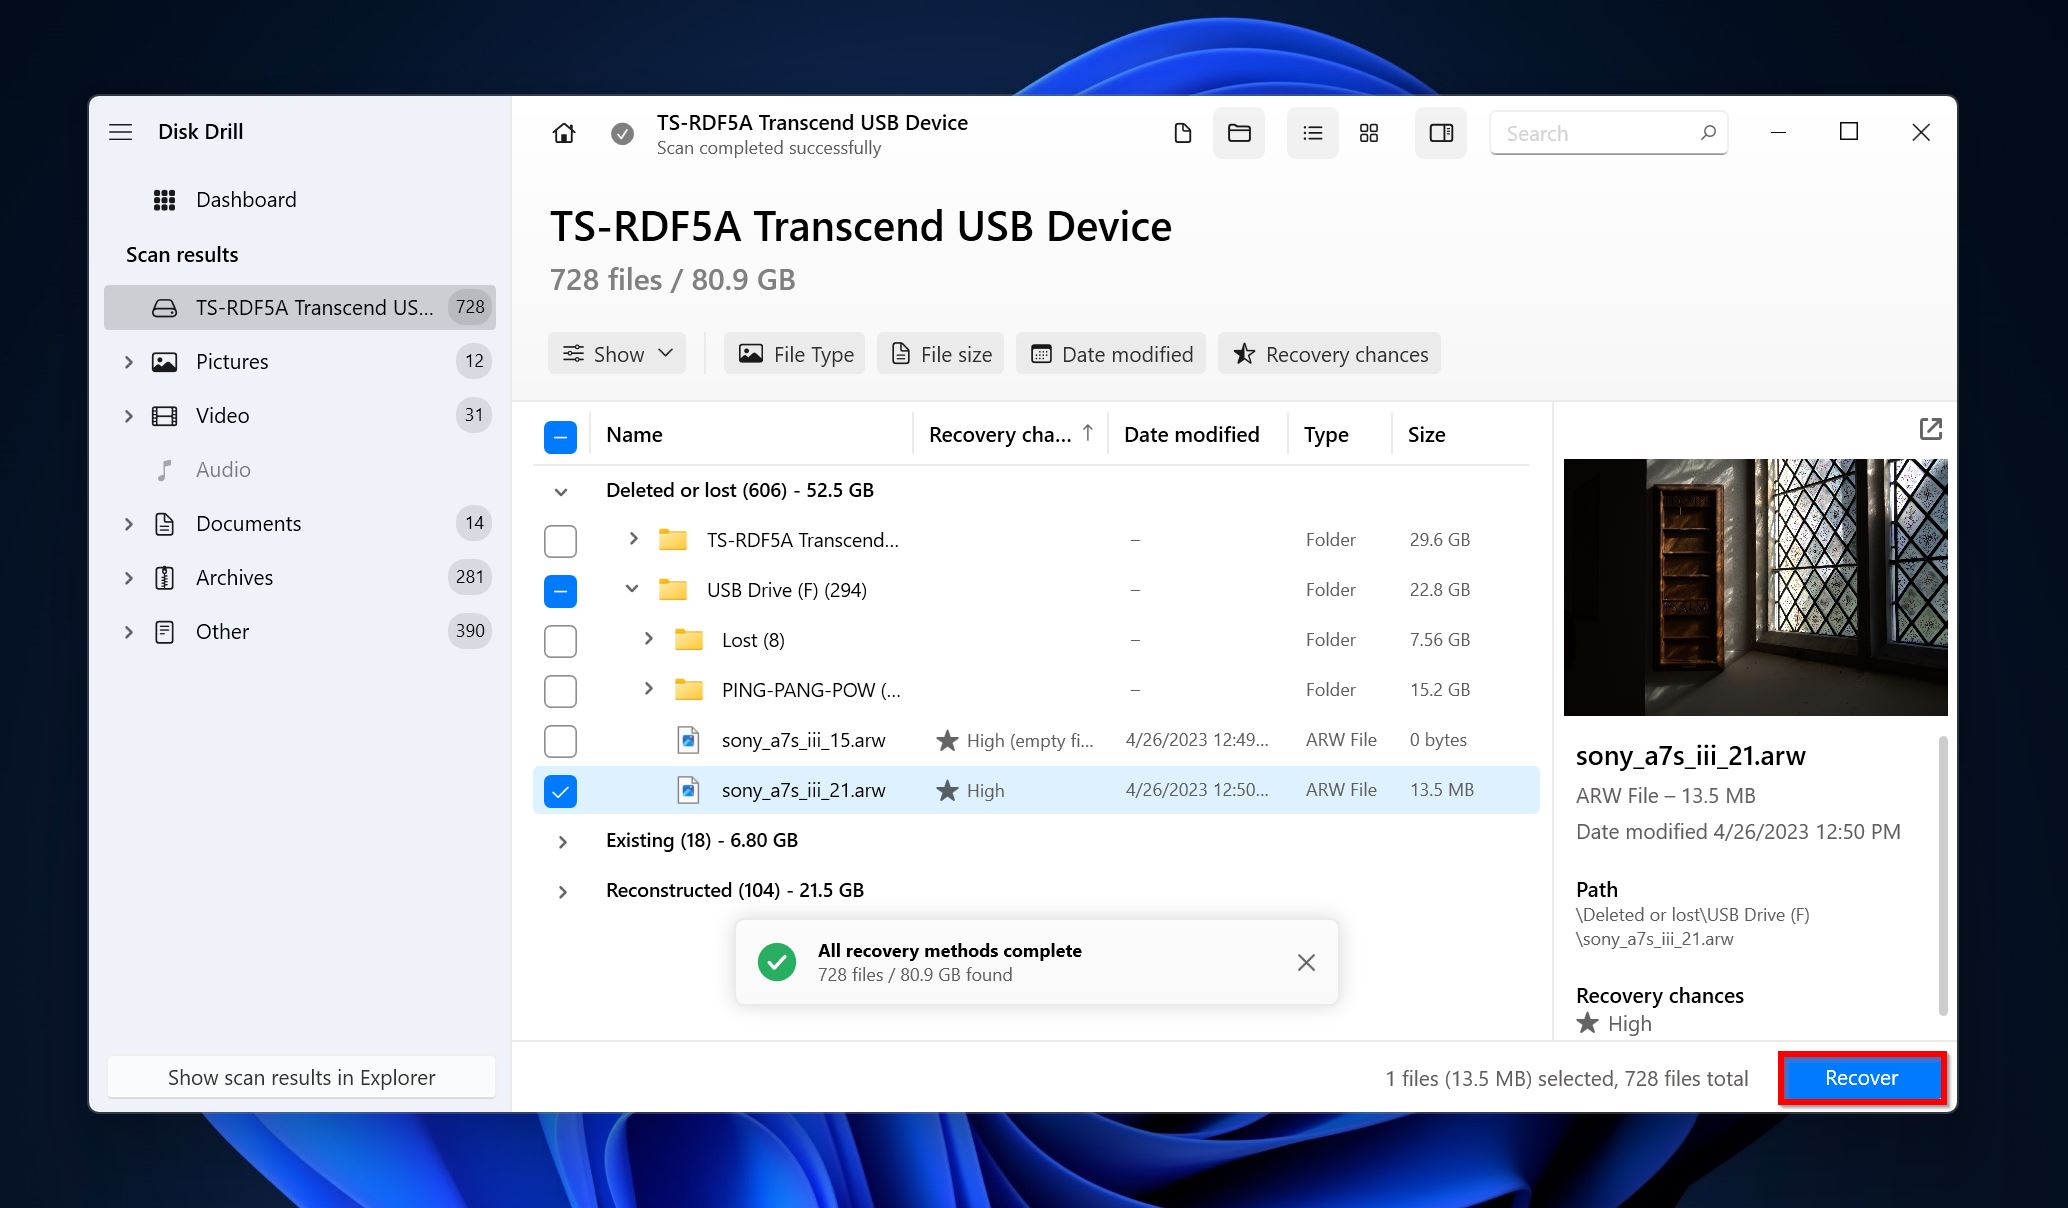
- Choose a recovery destination and click Next.
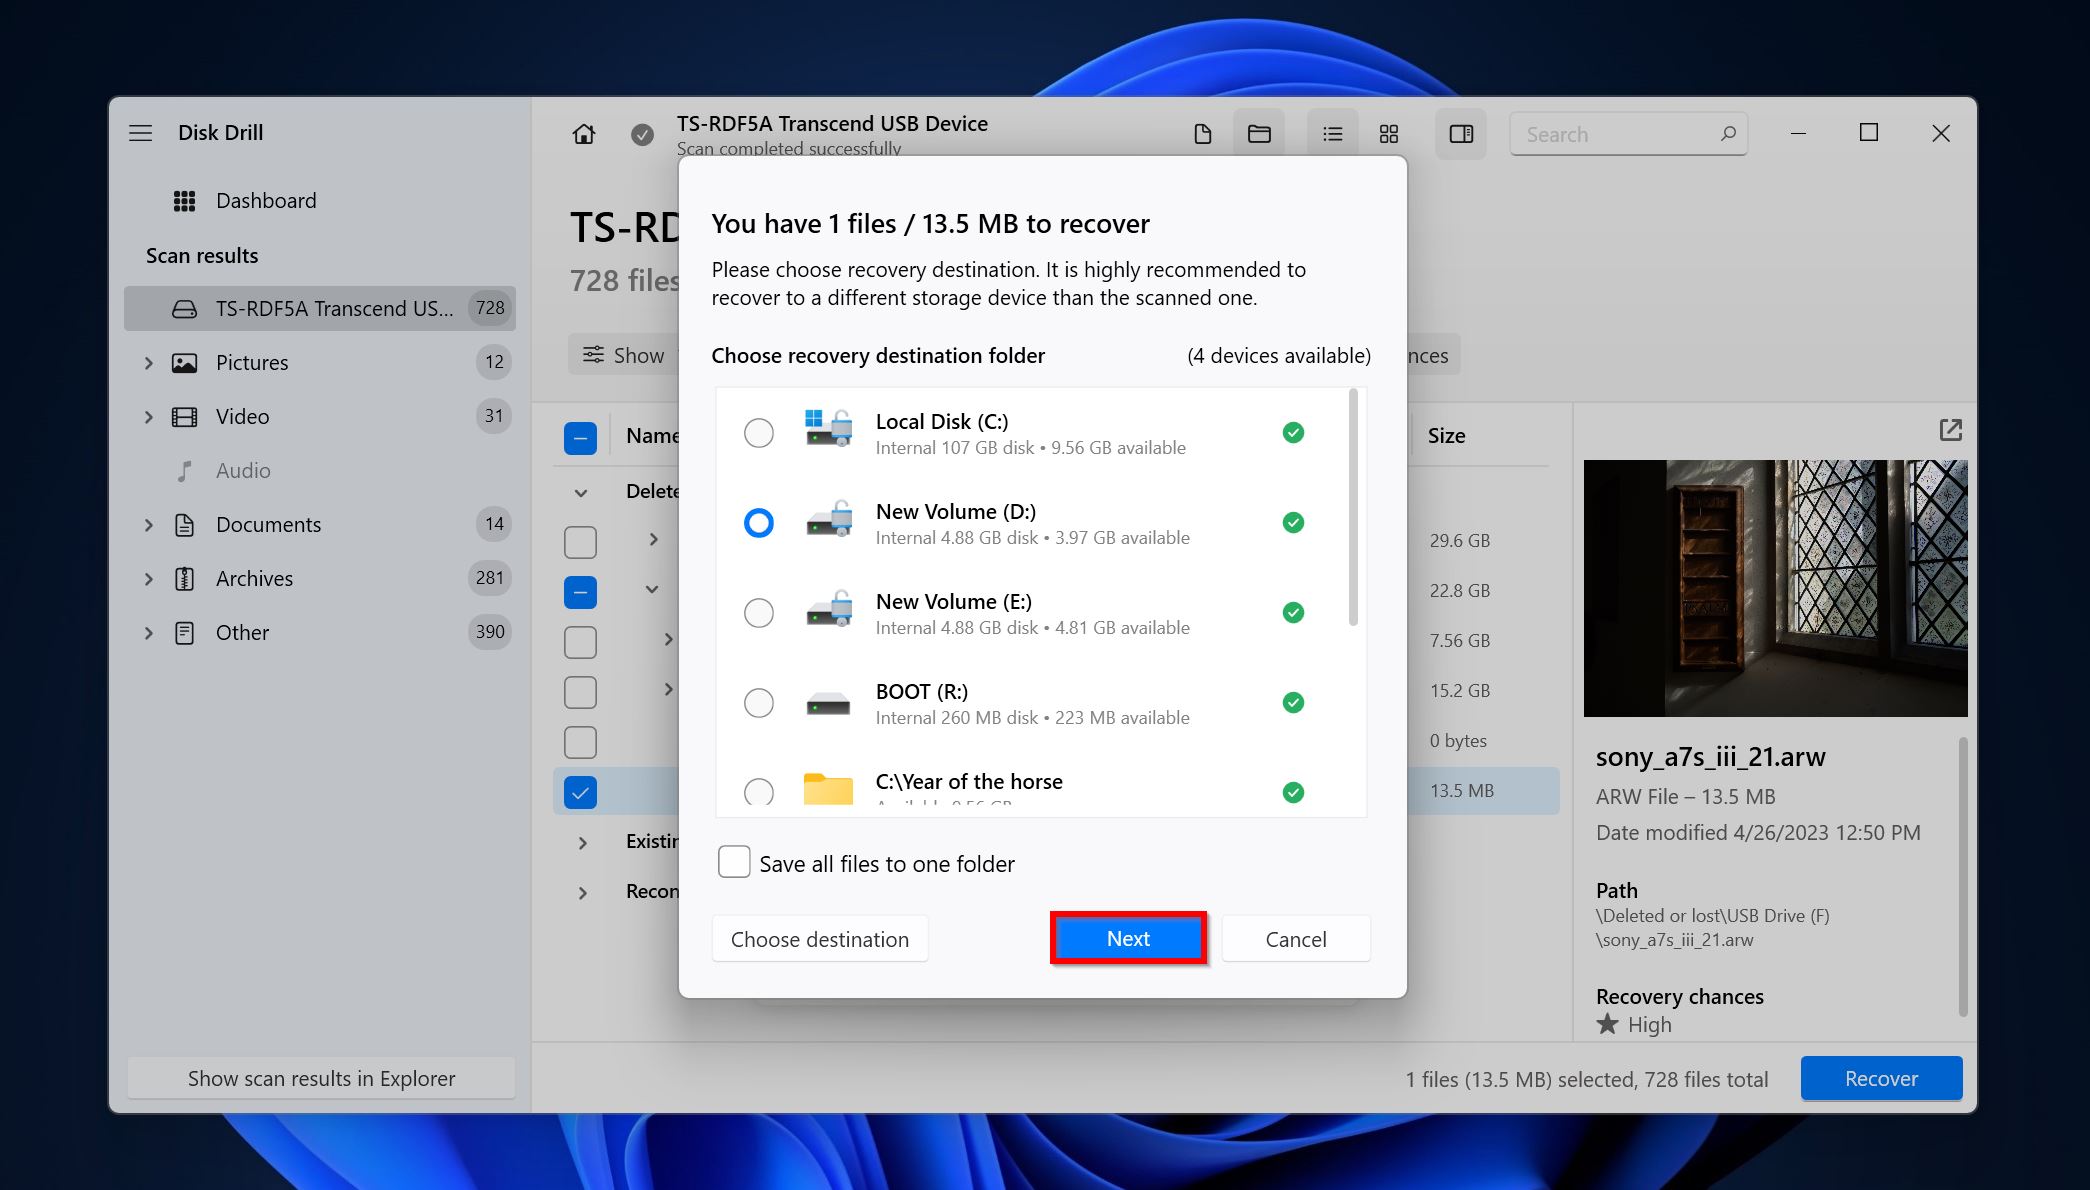
- Disk Drill will recover your files. You can recover up to 500 MB of data for free on Windows.
How to Fix the “Error Loading Operating System” Issue
Since it’s difficult to determine the cause of this error right away, you can’t just pick a solution and apply it. You should apply the following fixes in the order they appear and see which one resolves the issue for you.
These standard fixes are aimed at computers running Windows 10 and 11, but should work on Windows 7, 8, and 8.1 as well.
Some methods require you to use Windows installation media, so be sure to create it beforehand.
Fix 1: Check the Boot Order in the BIOS
The first thing you should do when you get the operating system not found error, is to double-check the boot order or boot sequence settings in the BIOS. The drive containing your Windows installation should be first in the list.
Now, the exact process to do this will differ across different motherboard manufacturers, but it should look something like this:
- Switch on your PC.
- As soon as the manufacturer’s logo appears, press the relevant key to enter the BIOS settings. It’ll usually be one of the function keys (F10, F11, etc.) or a key combination – refer to your motherboard or laptop’s user manual for the exact key.
- Navigate to the Boot Sequence settings in the BIOS.
- Ensure the drive containing Windows is at the top of the list. If not, move it to the top, save the settings and exit.
Fix 2: Change the CMOS Access Mode to “Large”
The BIOS detects and reads your hard drive using different translation methods–Normal, LBA, and Large. Among these, the most common translation scheme is LBA (Logical Block Addressing). But, if you’re running an old HDD, it may not support the LBA translation mode, and you’ll need to manually switch to the Large or ECHS translation mode.
Here’s how you can do this and potentially fix the operating system not found error:
- Enter the BIOS settings by pressing the required key when the manufacturer’s logo appears.
- Navigate to Standard CMOS Settings.
- Select your hard drive, then choose the Access Mode option.
- Switch the Access Mode to Large. It could also be labeled as ECHS.
Fix 3: Update the BIOS
An outdated BIOS is a recipe for operating system errors. If you don’t remember when the BIOS was last updated, you should do it as soon as possible.
There are three main ways to update the BIOS. However, it’s best to use the method described below:
- Visit your motherboard manufacturer’s website and download the latest BIOS update. You need to know the exact model of the motherboard for this.
- Connect a USB drive and ensure there are no other files on it.
- Extract the contents of the BIOS update file you downloaded to the USB drive.
- Connect the USB drive to the PC that’s not booting and power it on.
- Enter the BIOS settings using the required key.
- Navigate to the Boot menu and select the USB drive.
- Follow the on-screen instructions to install the update.
Fix 4: Fix Hard Drive Errors with CHKDSK
CHKDSK is an in-built Windows utility that can check for and fix bad sectors on your hard drive. To run this utility on a computer that’s displaying the “Error loading operating system” message, you’ll need to either use a live USB, or access the Command Prompt using Windows installation media.
If you’re using a live USB, simply search for the Command Prompt in Windows Search, right-click on it, and choose Run as administrator.
If not, here’s how to run CHKDSK:
- Connect the installation media to your PC and start it. You’ll boot into the Install Windows screen.
- Press Shift + F10 to launch the Command prompt.
- Alternatively, you can use the Repair your computer option. Then go to Troubleshoot > Advanced options > Command Prompt.
- In the console, type chkdsk C: /r /x and press Enter. The /r parameter prompts CHKDSK to find and recover info from bad sectors, along with checking for physical disk errors. The /x parameter asks CHKDSK to dismount the volume so that it can be repaired.
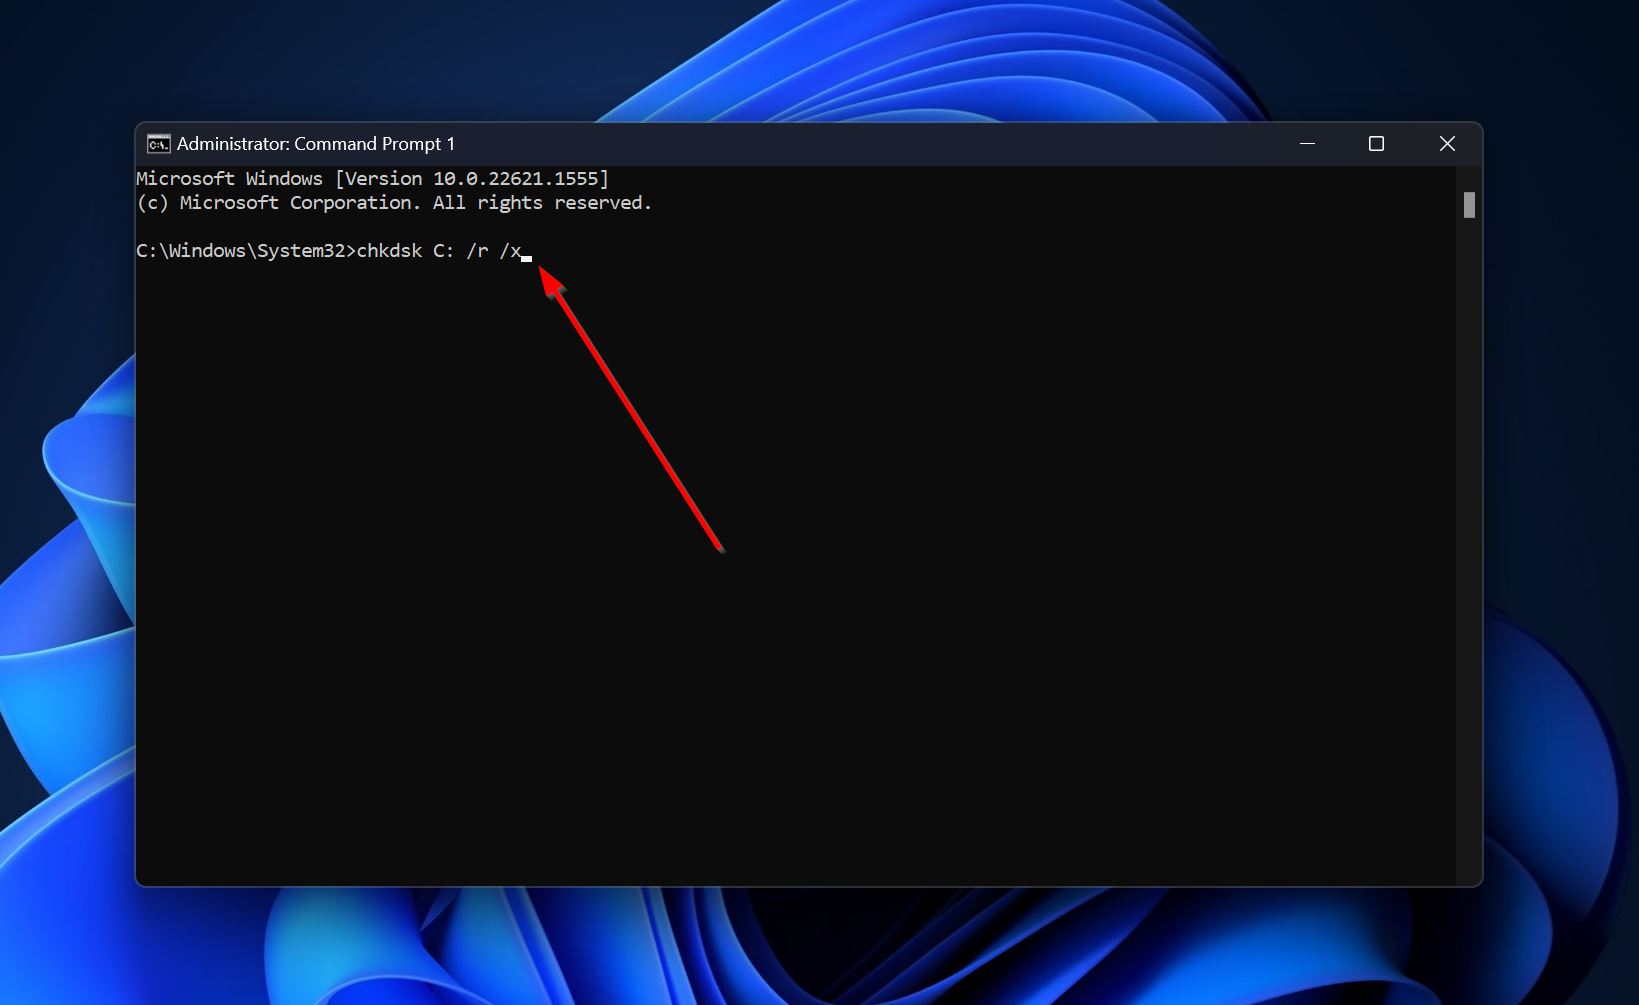
- Wait for CHDSK to finish fixing your drive.
Fix 5: Perform Startup Repair
The Startup Repair is a GUI-based tool that can detect and fix a wide range of boot-related issues on your PC. Usually, Windows will automatically launch the tool after multiple failed attempts at booting. But if it doesn’t, you can always use Window installation media to start the tool manually:
- Connect the Windows installation media USB to your PC.
- Click on Repair your computer.
- Click on Troubleshoot > Advanced options > Startup Repair.
- Let the Startup Repair tool do its job.
- Once the process is complete, select Shutdown and power on your PC again.
Fix 6: Use Bootrec to Repair the MBR
Windows has a dedicated utility – Bootrec.exe, that can repair the Master Boot Record (MBR). However, like CHKDSK, it is a command line utility that needs to be executed using the Command Prompt.
To run Bootrec and fix the Windows not booting issue, follow these steps:
- Connect the Windows installation media to your PC.
- Go to Repair your computer > Troubleshoot > Advanced options > Command Prompt.
- Type the following commands in succession and press Enter after each one:
- bootrec /FixMbr
- bootrec /FixBoot
- bootrec /ScanOs
- bootrec /RebuildBcd
- Exit CMD and reboot your PC.
Fix 7: Clean Install the OS
If all else fails, it’s best to perform a fresh installation of Windows. However, you will lose all data from the C: partition on your drive, so ensure you recover your data first. Additionally, if you encountered the OS not found issue when trying to dual boot Windows and Linux, you’ll almost always have to reinstall Linux and ensure that the GRUB bootloader was installed properly.
Performing a clean installation of Windows can be a lengthy process, but here is an excellent guide to help you with it. Ensure that you have a steady power connection throughout the installation process so that it’s not interrupted.
Conclusion
It’s impossible to predict when boot errors like “Error loading operating system” will appear. But, you can shield yourself from the additional anxiety of losing your data, by sticking to a regular backup schedule. It’s recommended you back up important data to a local storage drive as well as the cloud.
