 Recycle Bin is your safety net for digital content, storing deleted files so you can get them back if you change your mind. But sometimes, even this folder might disappear for different reasons. So where is the Recycle Bin in Windows, and how can you restore it?
In this article, we will explain where you can find Recycle Bin, why it might seem to disappear, and how you can restore your Recycle Bin in Windows 10/11.
Where is the Recycle Bin Folder Located?
The Recycle Bin is a centralized folder where your system displays all the files you delete. So where is the Recycle Bin in Windows 7/10/11? By default, the Recycle Bin can be found on your desktop.
However, you can also find a trash folder in each of your internal drives. In fact, there is a Recycle Bin folder on external drives as well. The folder $RECYCLE.BIN is a system-protected folder storing all the data of the deleted files on each drive. This folder links to the Recycle Bin you see on your desktop.
The $RECYCLE.BIN folder is located at the root directory of each drive. For example, the $RECYCLE.BIN in your C: drive is located in C:\$RECYCLE.BIN. However, this folder is hidden by default and will only be accessible if you configure the settings to show system-protected folders.
There are two key functions on how to use Recycle Bin in Computer: restoring your files and emptying the Recycle Bin. To restore your files, right-click on them and click Restore. Empty the Recycle Bin by right-clicking on the Recycle Bin icon and selecting Empty Recycle Bin.
How to Restore Recycle Bin on Desktop
If your Recycle Bin is not visible on your desktop, there’s a chance that it’s not enabled in the Desktop Icon Settings. To restore the Recycle Bin on your desktop, simply follow the steps below:
Restore Recycle Bin in Windows 10:
- Go to Settings > Personalization.
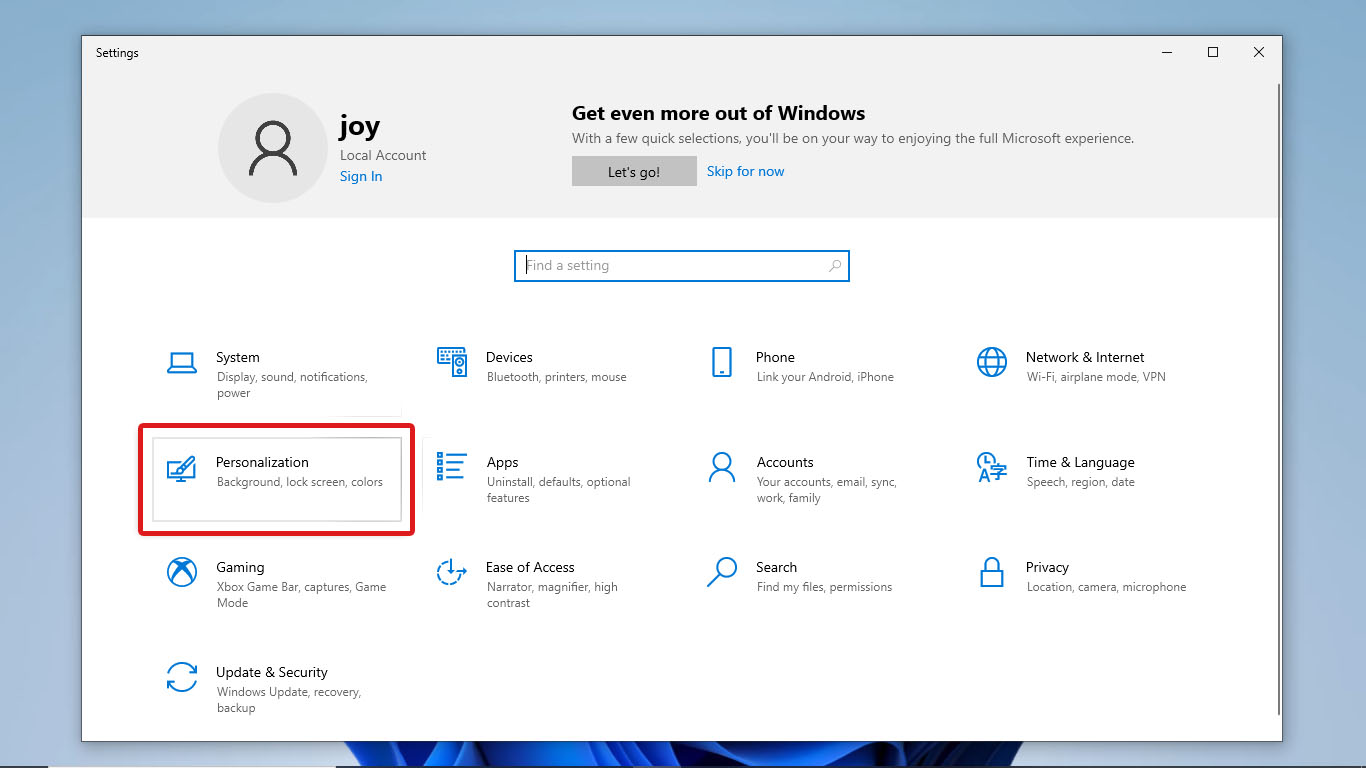
- In the left pane, select Themes.
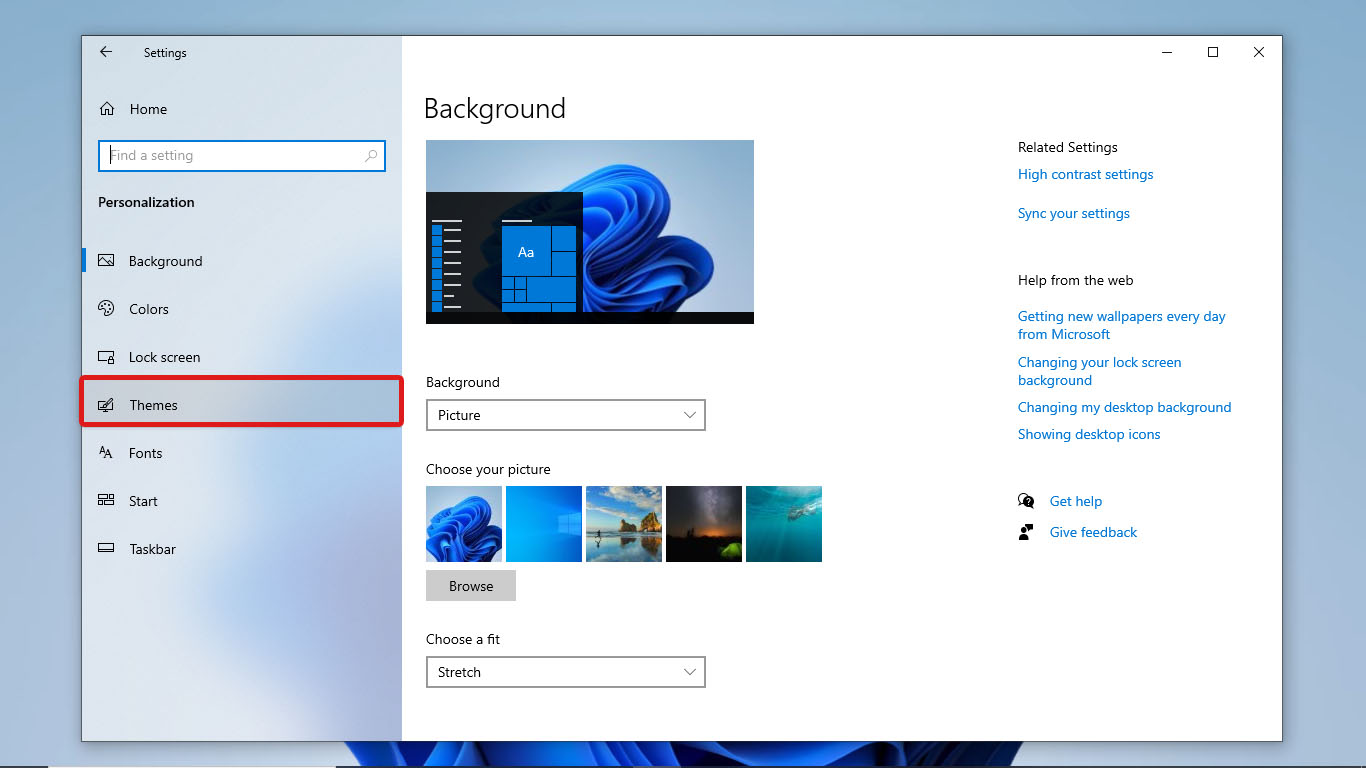
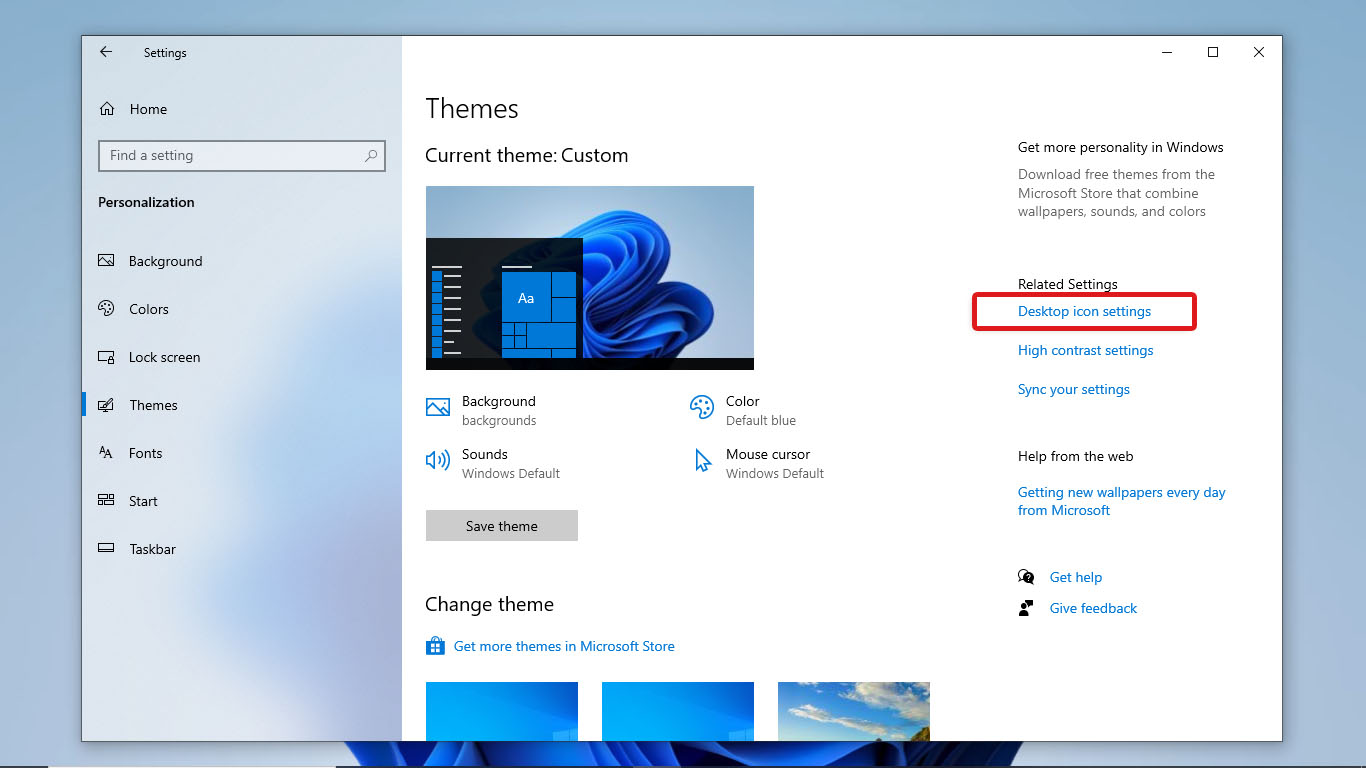
- Under the Related Settings section in the right pane, click on Desktop Icon Settings.
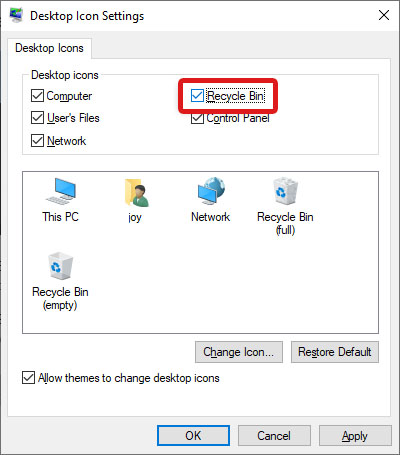
- Verify that the Recycle Bin is enabled under Desktop icons. If it’s not, tick the checkbox beside it and click OK.
Restore Recycle Bin in Windows 11:
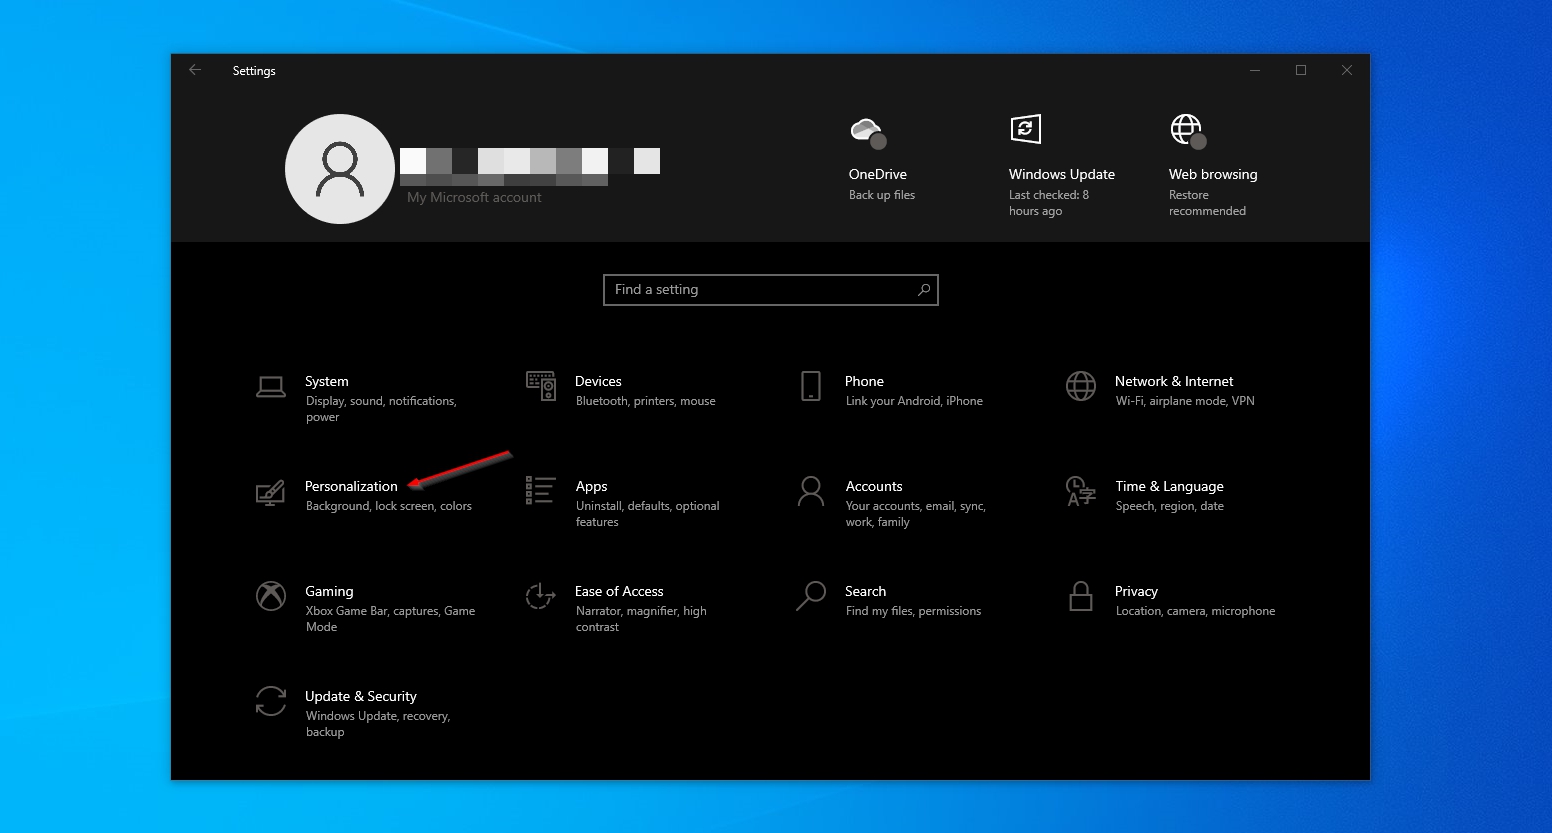
- Go to Settings > Personalization
- In the left pane, select Themes.
- Then, scroll down and click on the Desktop Icon Settings tab under “Related Settings.”
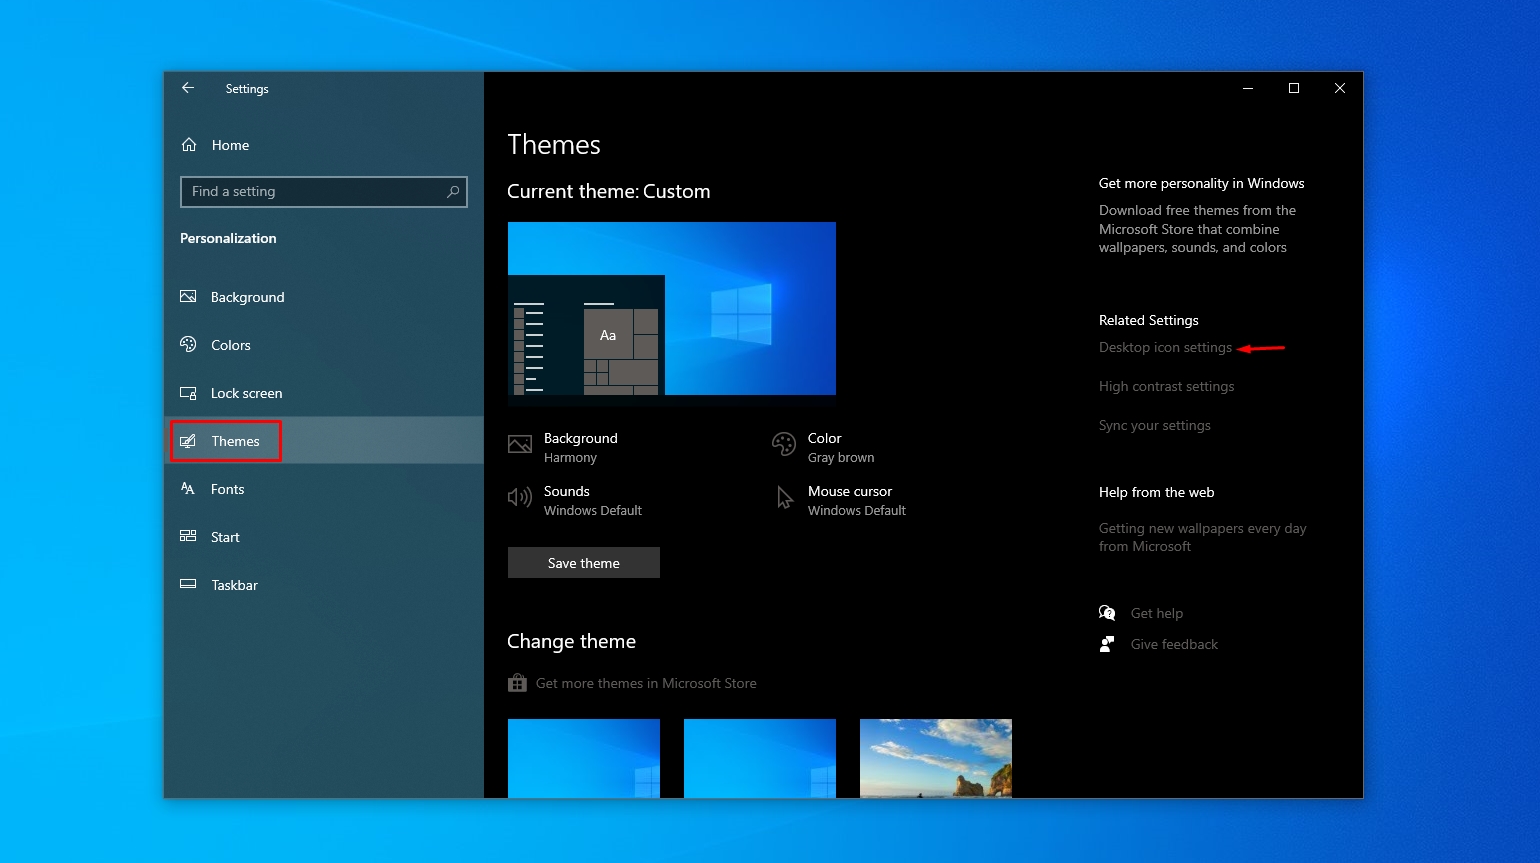
- Check if Recycle Bin is enabled. If it’s not, tick the checkbox beside it and click OK.

If you’re looking for the Recycle Bin to restore your deleted files, remember that this folder will only store files if it is enabled. If the Recycle Bin is bypassed, you have to try out methods to recover deleted files that are not in the Recycle Bin.
How to Recover Files that Aren’t in the Recycle Bin
If you did not enable your deleted files to get stored in the Recycle Bin, you won’t be able to see them on the Recycle Bin. The same thing happens if you press Shift + Delete / permanently deleted your files or if you empty your Recycle Bin. If you want to recover files from a Recycle Bin that has been emptied, you need to restore it using data recovery tools.
When you delete a file, your system only hides the data and marks the space it once occupied as “free” for incoming data. If you continue to use your device after data loss, you put your files at a bigger risk of being overwritten. This is why we recommend you stop using your drive after data loss and attempt data recovery as soon as you can.
Using professional data recovery software like Disk Drill will give you the best chance to get back your files. It has deep scanning algorithms that can scan different file systems, including NTFS, FAT32, exFAT, and other Windows-compatible file systems.
Disk Drill also has a free trial version on Windows that allows you to recover up to 500 MB of data for free.
Here’s an easy step-by-step guide on using Disk Drill to recover your files from the Recycle Bin:
- Download the Disk Drill setup file from the Cleverfiles website to get started. Then, run the installer and follow its instructions.
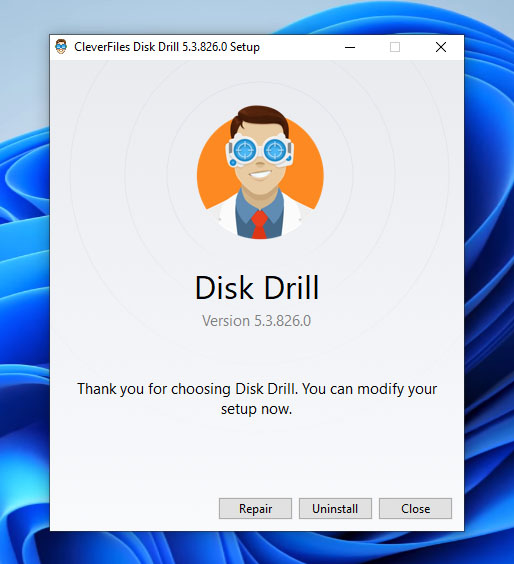
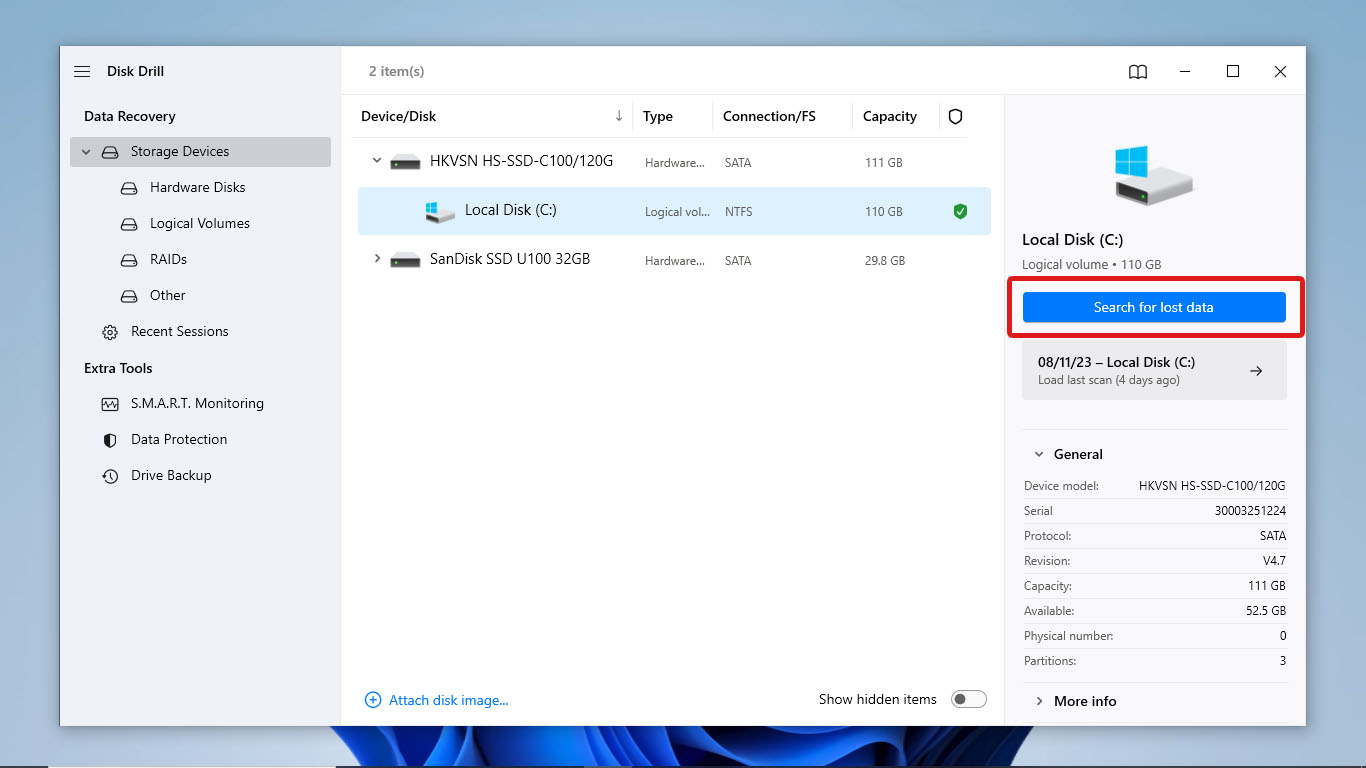
- Once the installation is complete, open Disk Drill. After the welcome message and guide, you will see a list of the drives you can scan. Click on the drive you want to scan and click Search for lost data. This starts the scan process.
- During the scan, you can already preview the files that Disk Drill was able to find so far by clicking Review found items. Head to the next step if you wish to let the scan be completed first.
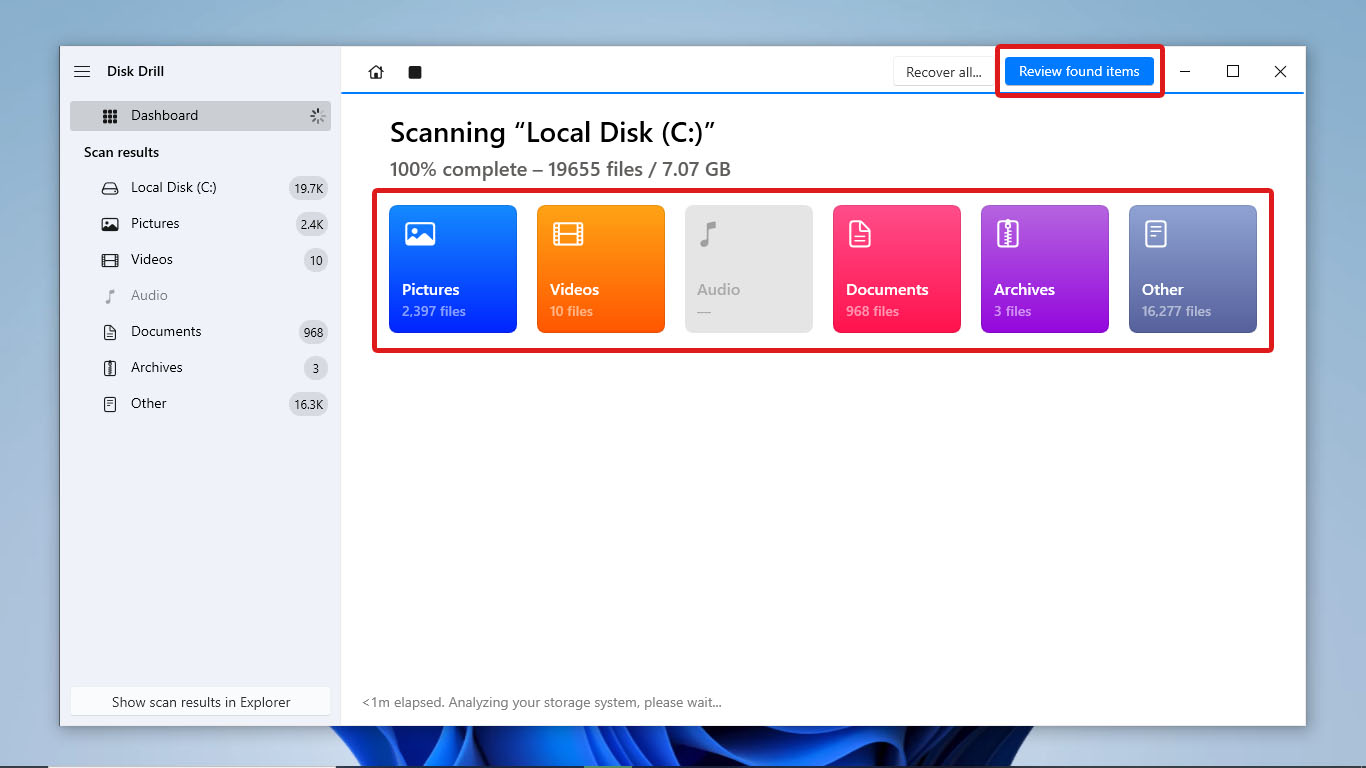
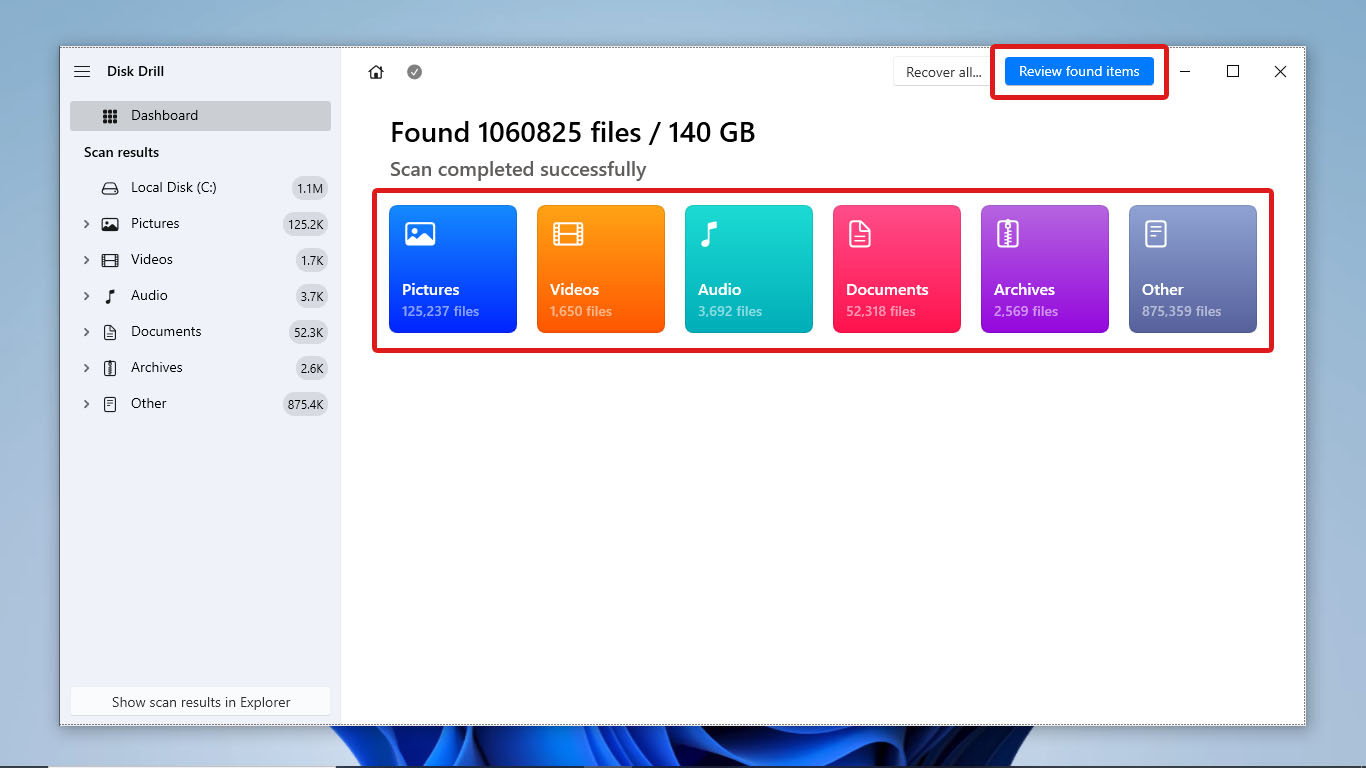
- After the scan, Disk Drill will display all the data it was able to find, along with the file types you can use to filter your files. Click a category to filter results by file type or click Review found items to check all the files it scanned.
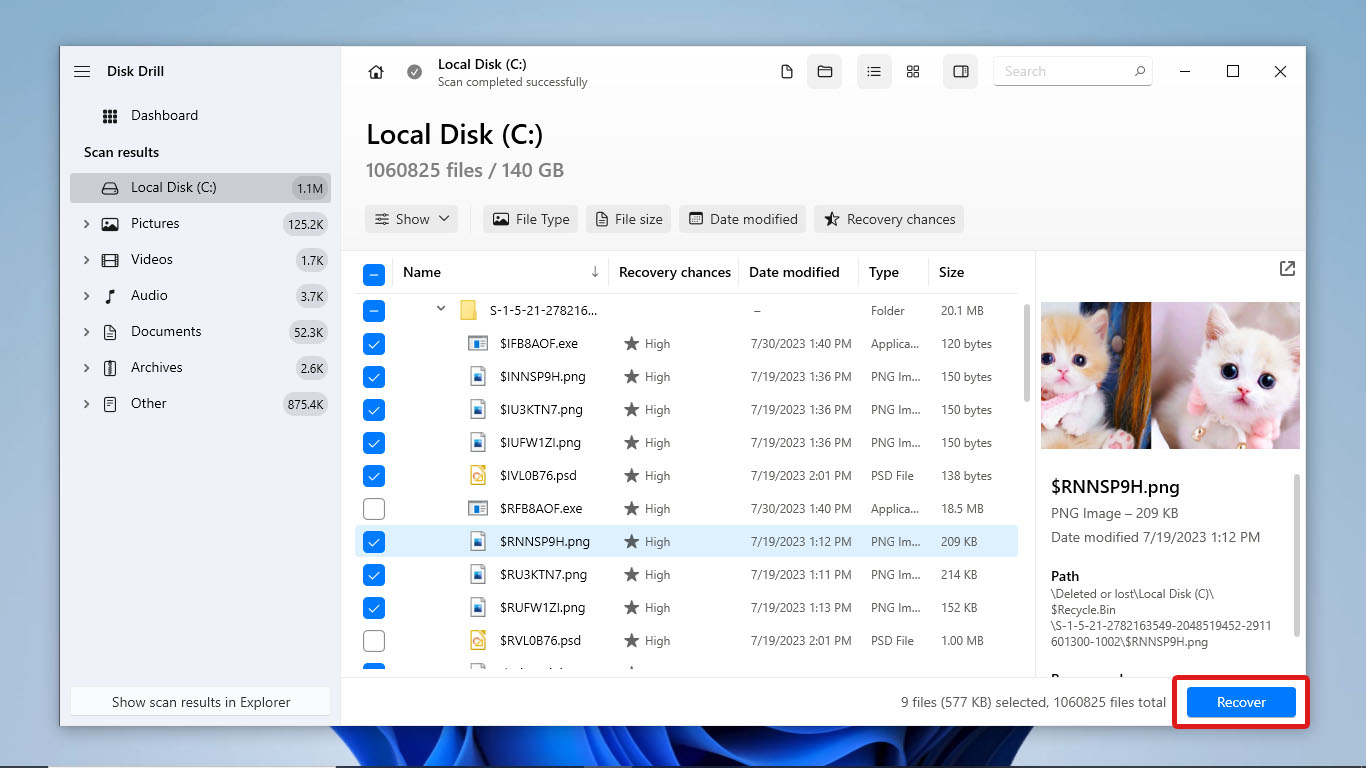
- You can check for your files in the $RECYCLE.BIN of the respective drive. You can also look for them in the drive they were located before you deleted them. Select all the files you want to recover by ticking the check boxes next to their names. After selecting all the files you want to recover, click Recover.
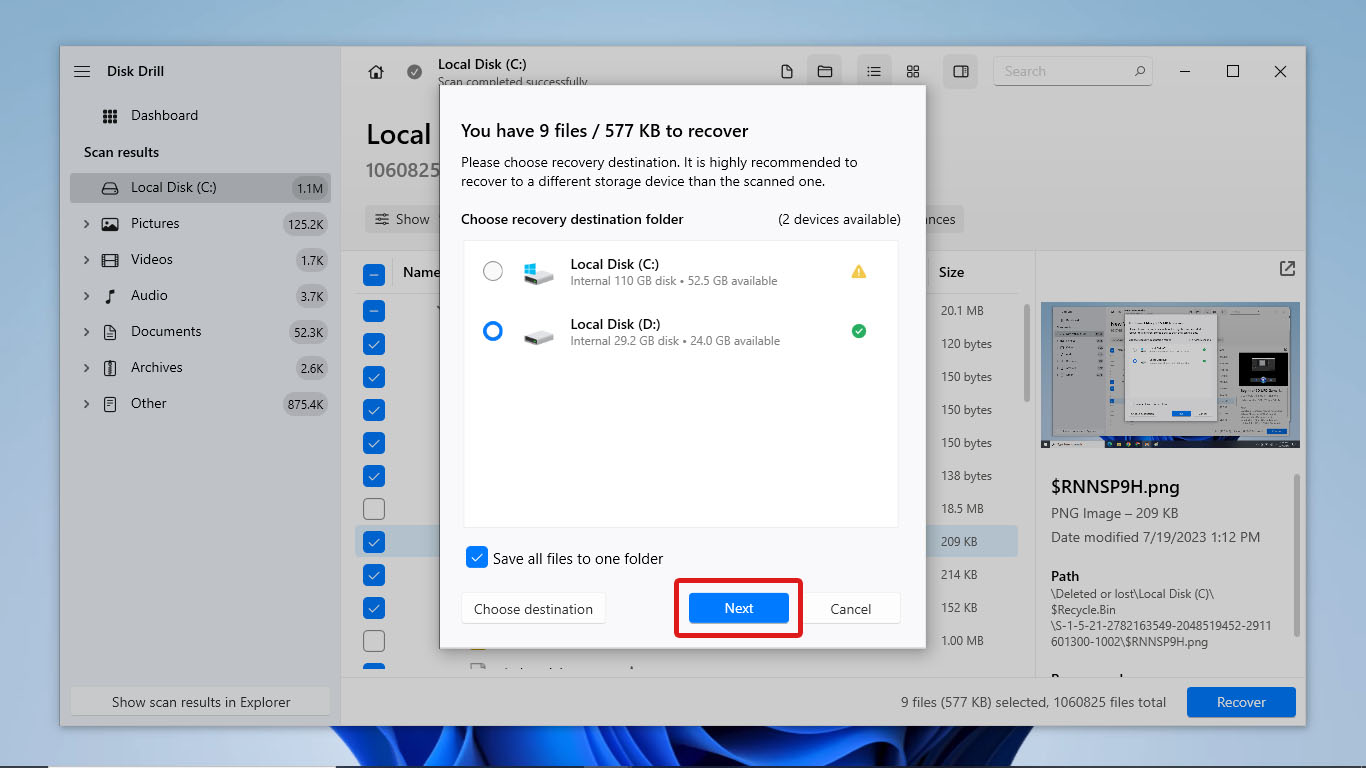
- Choose the location where you want to put your recovered files. Make sure that this is a different drive than the one you scanned to avoid overwriting data. Then, click Next to begin the recovery process.
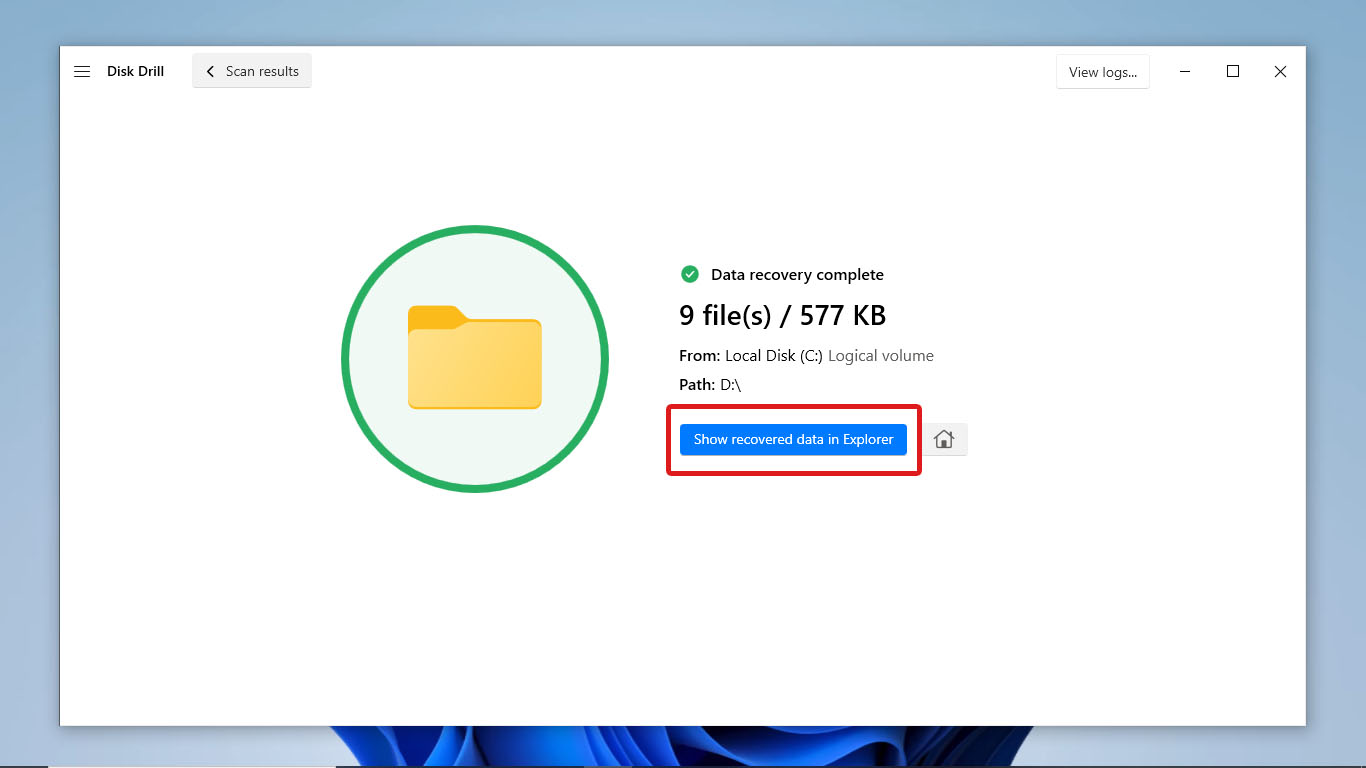
- After the data recovery process is complete, Disk Drill will show the files it got back. To check the recovered files, click Show recovered data in Explorer.
Conclusion
The Recycle Bin is one of the crucial components inbuilt on Windows. If enabled, it can store all the files you have deleted, which you can restore or permanently delete.
If you can’t locate the Recycle Bin in Computer or on your desktop, you can check if it’s enabled on the Desktop Icon Settings on both Windows 10 and Windows 11.
If you’re looking to restore files stored in the Recycle Bin, browse the folder and select all the files you want to recover. Then, right-click on the files and choose Restore.
But if your deleted files are not stored in the Recycle Bin or your Recycle Bin has already been emptied, you can go straight to trying out a professional data recovery software like Disk Drill to restore your files. However, it’s important to remember to stop using your drive to avoid overwriting the data you want to recover.
FAQ:
- Open the Run command dialog box by pressing the Windows key + R. Then, type shell:RecycleBinFolder and press Enter.
- Open the Command Prompt and type start shell:RecycleBinFolder. Next, press Enter.
- Open File Explorer. Then, type Recycle Bin on the address bar and press Enter.
- Open the Command Prompt.
- Type explorer.exe shell:RecycleBinFolder. Then, press Enter.
To locate Recycle Bin, you can search for a folder similar to it through navigating the left pane of your window or using the search bar. This folder might be labeled “Recycle Bin”, “Trash” or any similar naming, depending on the file manager app you’re using. By default, Windows has a file manager called File Explorer. You can access Recycle Bin in File Explorer by opening an instance of the app, typing “Recycle Bin” in the address bar, and pressing Enter.
You can also go to the Windows Recycle Bin path from the respective trash folders of your drives. Type “C:\$Recycle.Bin” on File Explorer’s address bar and press Enter to navigate to the $Recycle.Bin in your disk C: Remember that the $recycle.bin folder is a hidden folder that can only be accessed if you configure settings to show system-protected folders.

