
Windows Recycle Bin has been a part of the operating system since its early days. The bin is a special folder that temporarily holds deleted files and folders. It has helped millions of users over the years by making it possible to quickly restore a file that was mistakenly deleted.
But what if the file you need isn’t there? Why does that happen? In this article, we’ll explain why files might not show up in the Recycle Bin and what you can do about it.
How to Recover Deleted Files From the Recycle Bin
The Recycle Bin is the first place to look when searching for deleted files. It is a special folder that the operating system uses to temporarily store recently deleted files and folders. Here are the easy steps to follow:
- Open the Windows 11 Recycle Bin by double-clicking its desktop icon.
- Select the files you want to recover. You can hold the CTRL button on your keyboard and click on individual files to add them to your selection. If you want to select all files, you can press the CTRL + A key combination.
- Right-click any of the selected files and click Restore. The files will return back to their original locations. Alternatively, you can drag and drop the selected files to any location you want.
Is It Possible to Recover Files from an Emptied Recycle Bin?
Yes, it’s possible to recover files from the Recycle Bin even after it has been emptied. Here’s why: When a file or folder is deleted from your computer, it is logically moved from its original location to the Recycle Bin. When the Bin is emptied either automatically or manually, the logical links to the data are deleted by the operating system.
This action makes the data inaccessible to any applications but does not immediately physically remove it from the storage device. The space that was previously occupied by the items in the emptied Recycle Bin is now available to the operating system to store new information. Until the operating system uses this space and overwrites the previous data, files can be retrieved using data recovery software.
How to Recover Deleted Files from an Emptied Recycle Bin
The Windows Recycle Bin serves as a temporary storage for deleted files until you choose to empty its contents, intentionally or accidentally. However, this does not mean that your files are permanently lost. There are several reliable options available for recovering your data, including Windows native tools, built-in backups, and third-party apps.
In this guide, we will provide you with step-by-step instructions on how to recover your files from the Recycle Bin, even after emptying the folder.
Method 1: Recover Files Using Data Recovery Software
Data recovery software is a viable option for recovering files that have been deleted by emptying the Recycle Bin. In this example, we have chosen to use Disk Drill due to its ability to scan large amounts of files efficiently.
Disk Drill supports various file types, including documents, photos, videos, audio, and more. It can scan and recover files from major file systems such as NTFS, FAT32, exFAT, and others.
With Disk Drill, you can see a preview of all the files you can recover from an emptied Recycle Bin. It also shows the chance of successful recovery per file. The free trial version for Windows allows you to recover up to 500 MB of data.
It is important to note that performing data recovery as soon as possible is recommended. This is because the sooner you attempt data recovery, the less time your operating system has to overwrite the deleted files.
Follow these steps to use Disk Drill to recover deleted files after emptying the Recycle Bin:
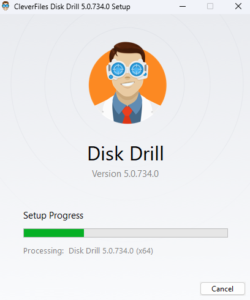
- Download and install Disk Drill for Windows. We suggest using a flash drive or external USB drive for the download and installation to preserve your lost data. You may need to provide system-level credentials during the installation. You will be guided through the installation process by pop-up windows.
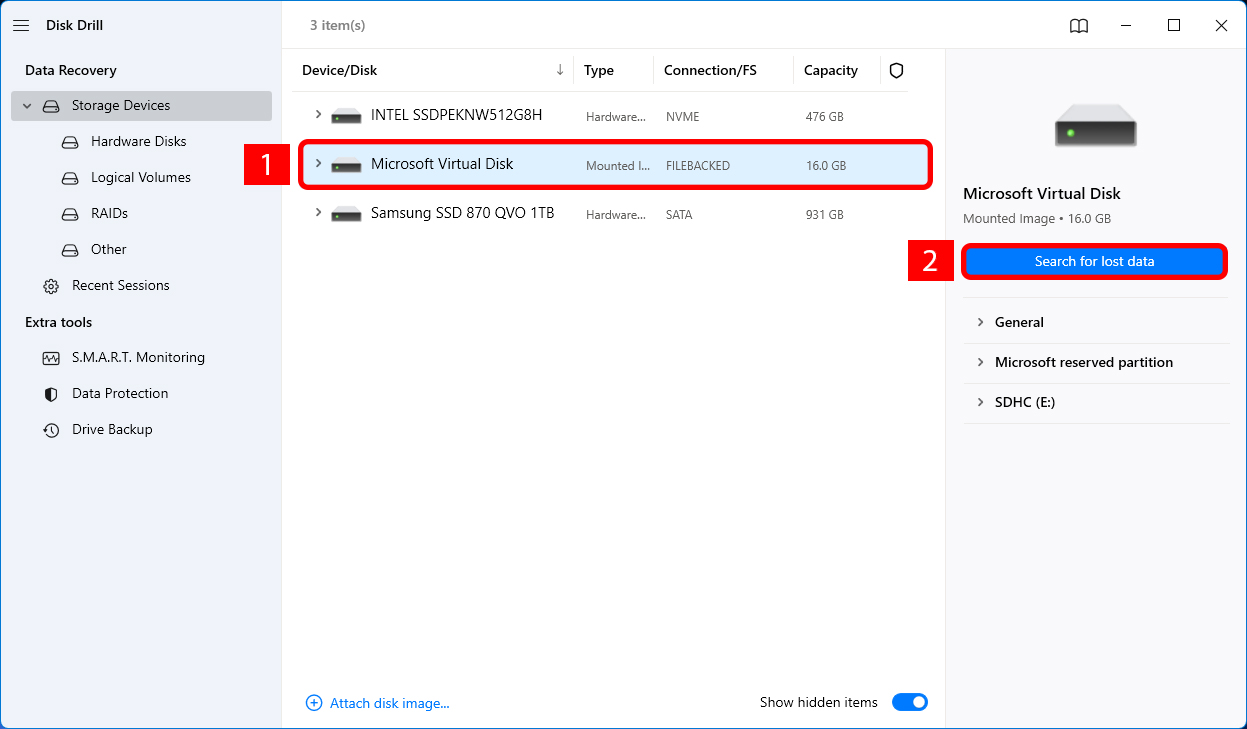
- Start Disk Drill and choose either the drive that contained files prior to deletion or the disk that contains the Recycle Bin (this will usually be your C: drive) from the app’s disk list.

- Click the Search for lost data button to start scanning for deleted data. As the scan proceeds, a status bar shows its progress. You can pause the scan at any time and view files already found while the scan continues.
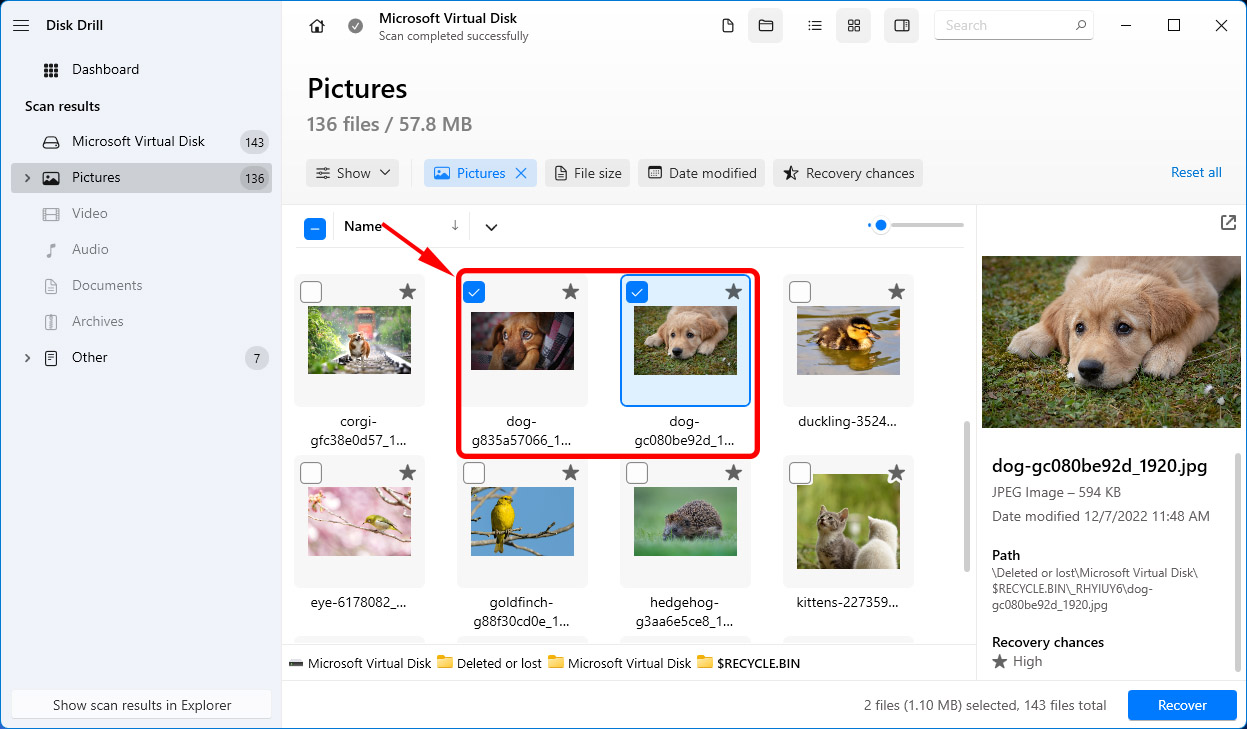
- Select the specific files that will be restored. You can preview them in the Pictures, Video, Audio, Documents, or Archives folders to make sure they are the files you want to retrieve. You can also choose to recover all files found by the tool.
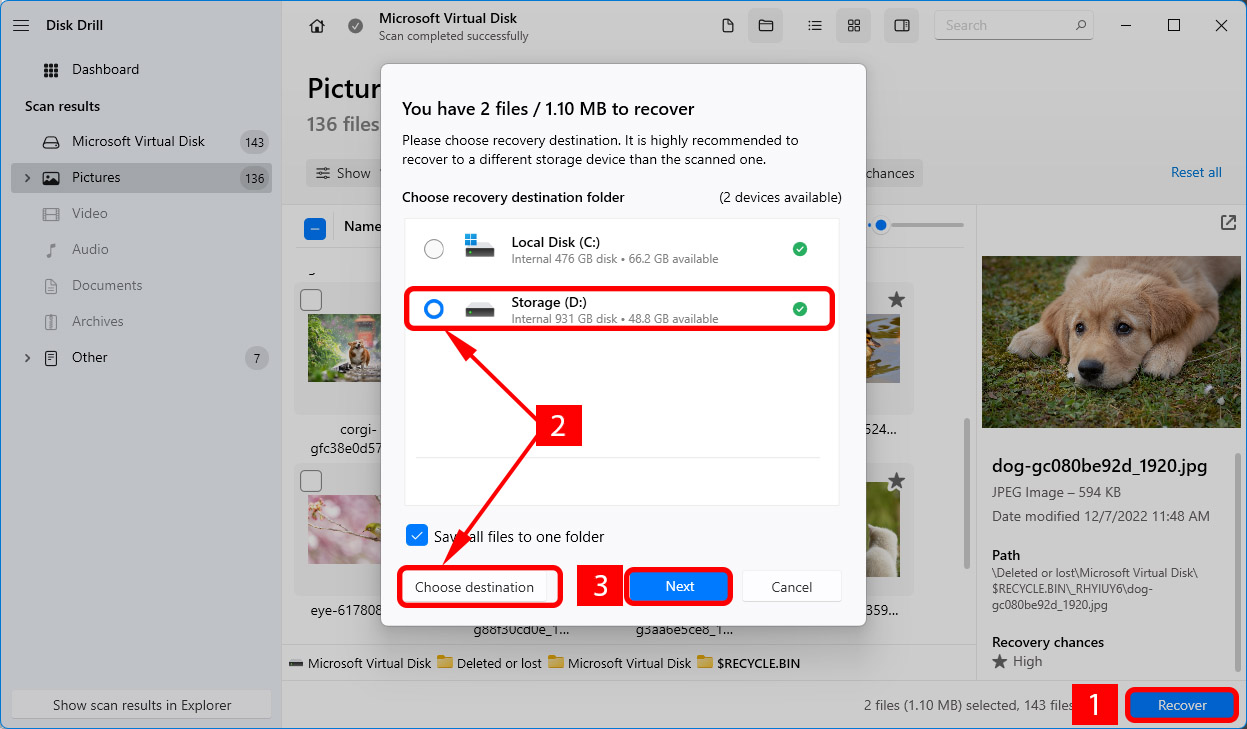
- Click the Recover button after making your selections and Disk Drill will perform the recovery. You will be prompted for a safe storage location where the recovered data can be saved. Save the recovered files to an external disk or USB drive to preserve the data you wish to recover.
Method 2: Recover Files Using Free Utility
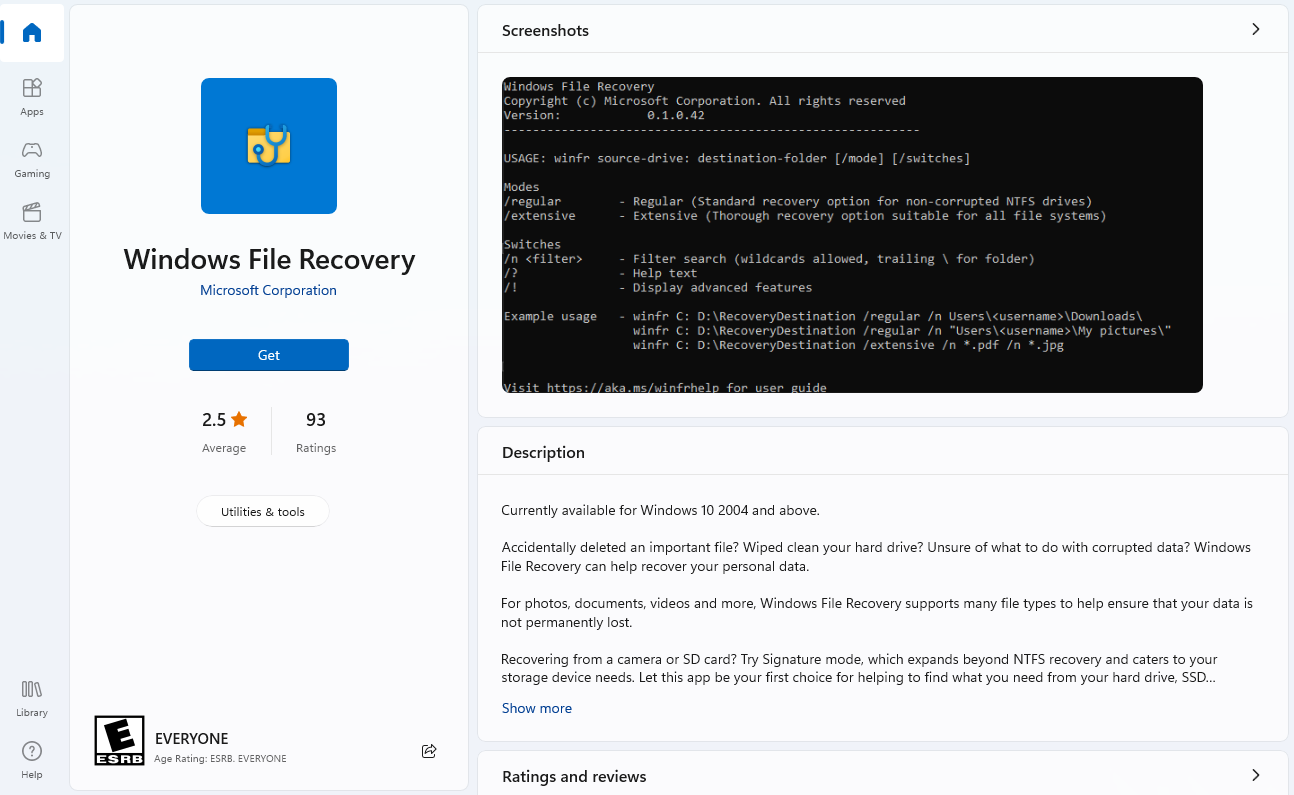
Windows also provides a dedicated recovery app called the Windows File Recovery (WFR) tool, which you can use to retrieve your files. This free command-line utility is compatible with Windows 10 version 19041.0 and higher.
Windows recommends using this utility for data recovery, but it does have some limitations. For instance, the tool only operates through a command-line interface, and it has a limited set of signatures that it can recognize. However, it’s still a handy tool that you can use for free.
Here’s a quick step-by-step guide on how to recover your data using the WFR tool:
- Download and install the Windows File Recovery tool from the Microsoft Store. Click on Get and let the app install.
- Once it’s installed, press Win + X and select Windows Terminal (Admin) from the list that pops up. Alternatively, you can also launch the Command Prompt as an administrator by pressing Ctrl + R, typing cmd, and pressing Ctrl + Shift + Enter.
- To make sure the utility has been properly installed, type
winfrin the utility. This will also give you a list of switches you can use.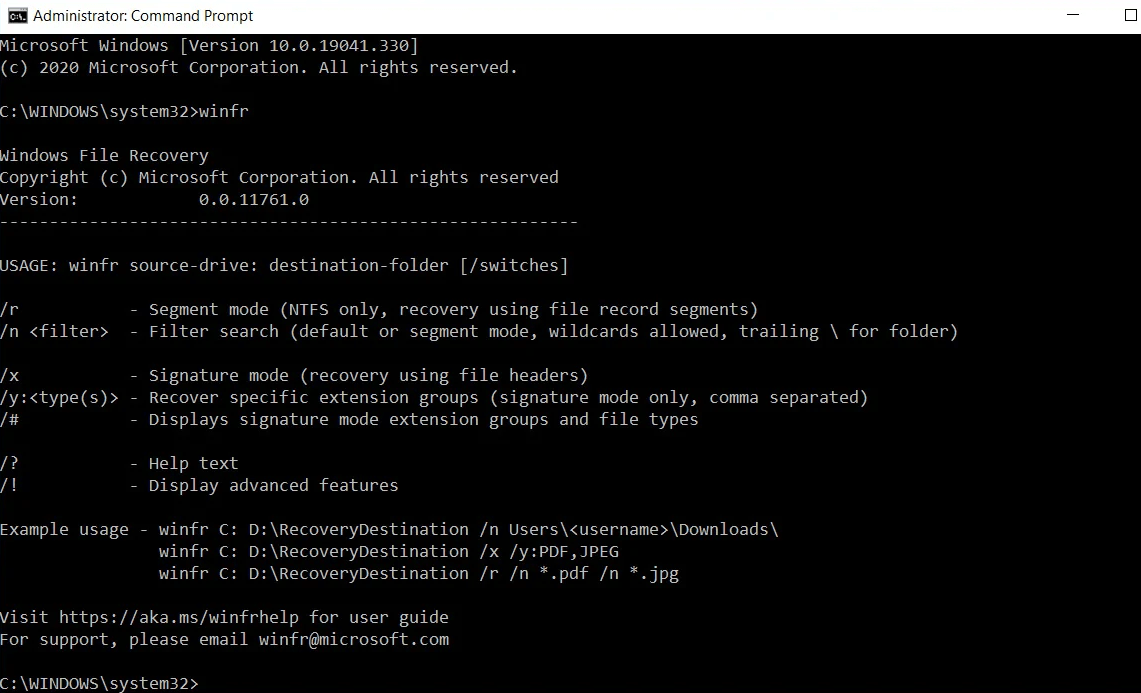
- Next, type the following command in the terminal:
winfr C: D: /regular /n \$Recycle.Bin\%SID%
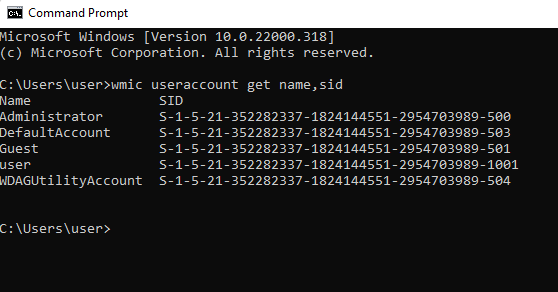
What this command does is it scans the recycle bin, and recovers the file to the D drive. You can change the command based on the path you want to scan and the drive where you want to recover. Note that the SID is different for all users. If you’re not sure what your SID is, you can use the following command to find out a user’s SID.
wmic useraccount get name,sid
Method 3: Recover Files Using Backup and Restore
If you have enabled File History on your PC, you can recover files that you have deleted from the Recycle Bin using the File History feature in the Control Panel.
To check if File History is enabled, simply follow the steps below:
- Go to the Control Panel from the Start Menu.
- In the list of items in the Control Panel, select File History.
- File History will display the status of your backup. If File History is off, click “Turn on” to start backing up your files.
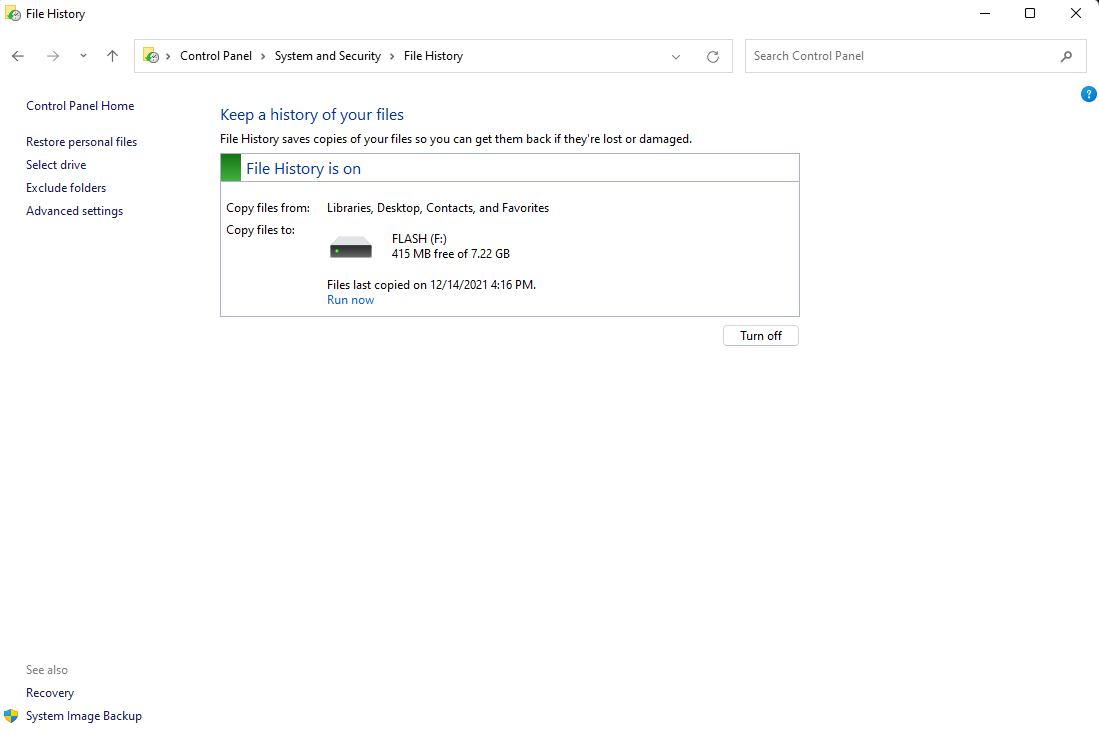
If File History is turned on, follow these steps to restore your files:
- Open the File History window and click “Restore your files with File History”. A window will appear showing all the files you can recover.
- Navigate to the Recycle Bin folder.
- Select the files you want to recover.
- Click the Restore button (green button) at the bottom-center of the window to begin recovering your files.
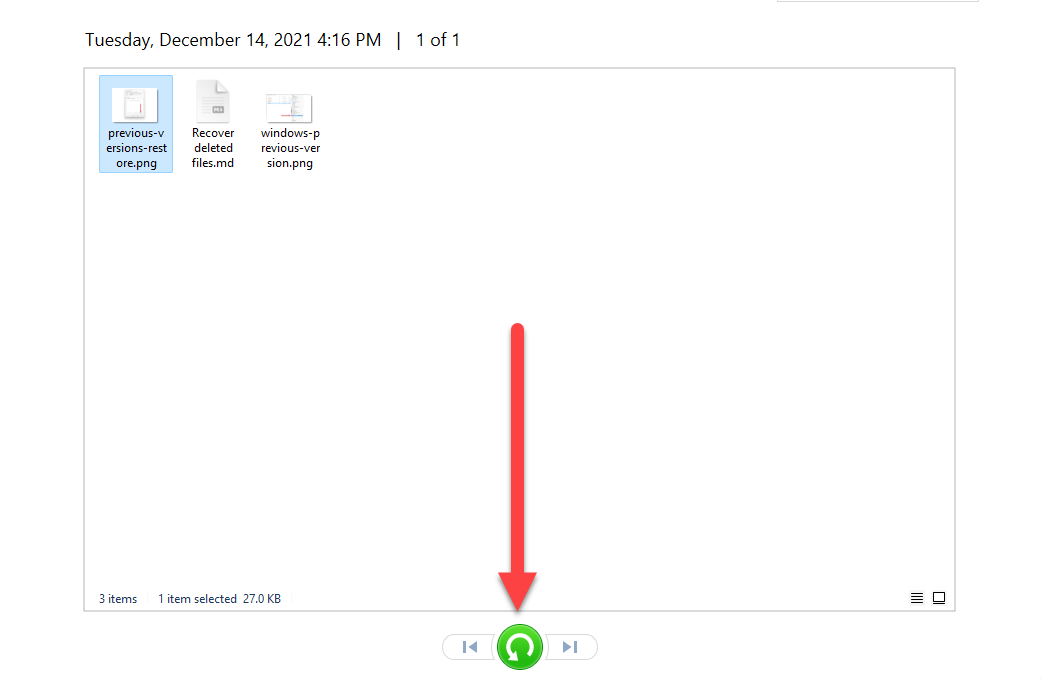
If you can’t find the Recycle Bin among the folders to restore, it may be because the folder is not backed up by File History.
Method 4: Recover Files with Windows Previous Versions Tool
You can also try recovering files using Windows’ Previous Versions tool. This tool allows you to view previous versions or states of a file or folder and restore them to a specific version.
However, you can only use this built-in tool if you have enabled System Protection and have previously backed up your file, or turned on and set up the File History feature.
To search for previous versions of your deleted file, here’s what you can do:
- Right-click on the folder or file you want to check.
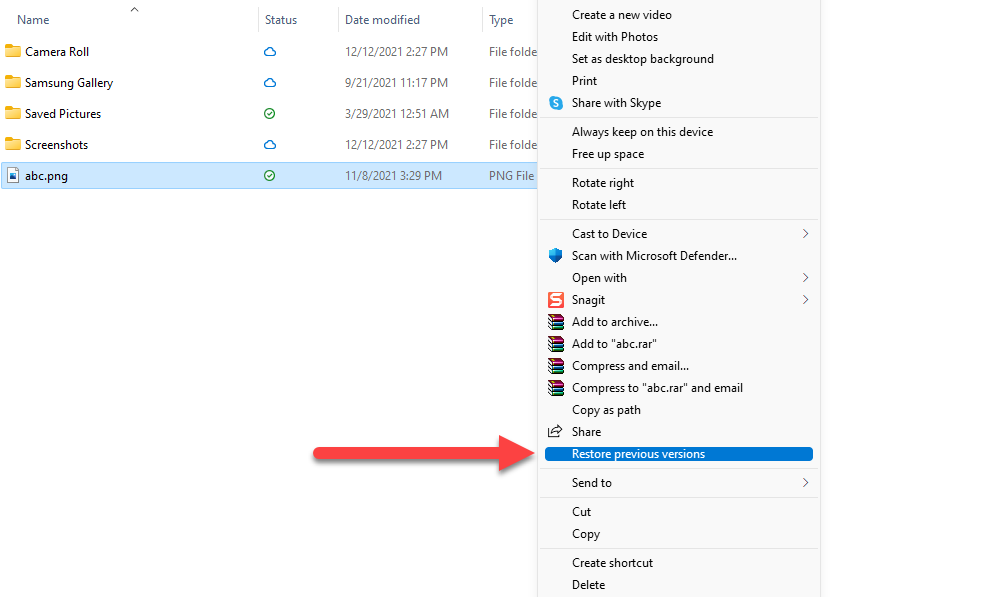
- Choose “Restore previous versions” from the drop-down menu.
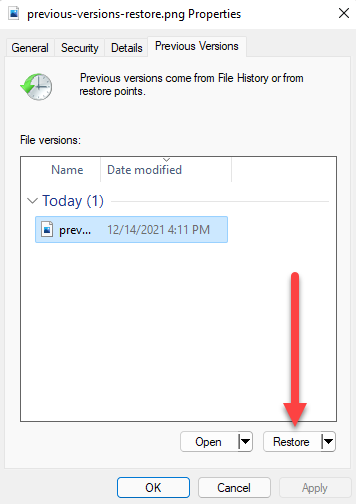
- You will see any available previous save points for the file. Select the version you want to recover and click Restore.
Why Deleted Files May Not Be in the Recycle Bin
The Recycle Bin can be extremely useful for recovering recently deleted files. There are, however, several conditions that can result in a deleted item not appearing in the Recycle Bin. Here are the factors you need to keep in mind concerning the Window Recycle Bin and why your deleted file cannot be found.
| Factor | Description |
| 📏 Space limitations | Space is kept available in the Recycle Bins by rolling off the oldest files to make room for newly deleted items. This can result in files being deleted much sooner than expected if the space allocation is too low. Similarly, a file will not be sent to the Recycle Bin if it exceeds the Bin’s size. This can also lead to files that are not available in the Bin when that is where you expect them to be located. |
| ⌛ Time limitation | Windows automatically removes items from the Recycle Bin after a designated number of days. By default, data is retained in the Bin for 30 days. This number can be modified as you wish and you can opt for files to never be automatically deleted from the Bin. In this case, you need to manually empty the Bin periodically or risk running out of space for newly deleted items. |
| ✂️ Permanent File Deletion | Using the Shift-Delete keystroke combination bypasses the Recycle Bin and essentially permanently deletes the item. Data recovery software may be able to restore files and folders that have been deleted in this way. |
| 🚯 Disabled Recycle Bin | The Recycle Bin can also be disabled by accessing Settings for selected location in the Recycle Bin Properties. If the Recycle Bin is turned off for any reason, any file deleted from your system will not be stored in the folder and will be permanently deleted immediately. |
Common Recycle Bin Problems
Different Recycle Bin problems might cause data loss or any sort of error that can affect your overall experience while using your device. Fixing these issues will enable the folder to effectively store your deleted files again.
Here are some of the common Recycle Bin problems and the simple solutions you can use to fix them on your own:
Missing Recycle Bin Icon
Solution: You can get the Recycle Bin icon on your desktop by following these steps.
1. Right-click the desktop and select Personalize.
2. Switch to the Themes tab.
3. Click the Desktop icons settings link.
4. Check the box for the Recycle Bin icon.
5. Click OK.
![]()
Recycle Bin is Corrupt Error
Solution: Resolve a Recycle Bin is corrupted message by performing this procedure.
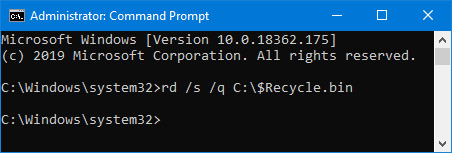
1. Open a Command Prompt window as administrator.
2. Paste the following command and hit Enter:
rd /s /q C:\$Recycle.bin
3. Close the Command Prompt window and restart your computer.
If your Recycle Bin is not on the C drive, modify the command with the correct letter.
Recycle Bin File Association Error
Solution: The best way to handle this error is to manually remove all of the items from the Recycle Bin. Open the Recycle Bin and verify that you really want to permanently delete the files it contains before performing the operation.
FAQ:
- Open the File History window.
- Click on "Restore your files with File History."
- Navigate to the Recycle Bin folder.
- Select the files you want to recover.
- Click the Restore button.
- Right-click your desktop screen and click Personalize.
- Select Change desktop icons.
- Tick the checkbox for Recycle Bin. Click OK.

