 The “dynamic disk invalid” error is a fairly common issue normally faced by Windows users who recently performed an operating system upgrade. Those facing this problem typically find that they’re unable to access data on the affected storage device, despite the device being recognized by Windows. This, of course, can be a major headache, especially if important files have been affected. The good news is that there are multiple ways you can repair the “invalid dynamic disk” error.
What Is a Dynamic Disk?
Dynamic disks are an advanced storage management feature in Windows that allows for more flexible disk configurations.
Originally introduced with Windows 2000, dynamic disks were designed to provide capabilities like creating volumes that span multiple physical drives, implementing software RAID configurations (used, for example, when creating mirrored volumes for data redundancy), and allowing for on-the-fly volume size adjustments without requiring a system restart.
However, Microsoft has now deprecated dynamic disks for most use cases. The company recommends using Storage Spaces instead, which is a more modern storage virtualization technology introduced in Windows 8 that offers similar functionality with improved reliability and easier management. The only exception where dynamic disks are still officially supported is for mirror boot volumes (using a mirrored volume to host the operating system).
Despite being deprecated, dynamic disks can still be found in many Windows environments, especially on servers and workstations. In fact, many users continue to rely on dynamic disk configurations without realizing it (often, their systems were set up years ago or are managed by IT administrators).
Why Is Dynamic Disk Showing as Invalid?
When Windows displays the “dynamic disk invalid” error, it means the system can no longer properly access or recognize the disk’s configuration.
A dynamic disk can become invalid for several reasons:
- Windows update: One of the most common causes occurs when users upgrade their Windows operating system to an unsupported version. Since dynamic disks are only supported on Professional and Enterprise editions of Windows, upgrading to a Home edition will cause the dynamic disk to become invalid.
- Change of location: Similarly, moving a dynamic disk from one computer to another can trigger this issue, as the new system might not have the necessary configuration or permissions to access the dynamic disk structure.
- Logical issues: Bad sectors on the drive can corrupt the Logical Disk Manager (LDM) database, which Windows uses to track information about dynamic volumes. When this happens, Windows can no longer properly interpret the disk’s structure properly.
- Too many volumes: If you have more than 99 volumes on one or more dynamic disks (or if any volume is larger than 2 terabytes), the volume manager might incorrectly flag the LDM record as incomplete.
- Malware infection: Some types of malware specifically target disk structures, and any tampering with the LDM database can result in the disk becoming invalid.
When a dynamic disk becomes invalid, the consequences are the inability to read from or write to any volumes on the affected disk. However, a dynamic disk showing as invalid doesn’t necessarily mean your data is lost—several fixes exist, and I’ll explore them in detail in the following section.
How to Fix an Invalid Dynamic Disk
The fixes below are presented in order of complexity, starting with the simplest solutions. I recommend you go through them in sequence unless you know for sure what the cause of the “invalid” status is.
Fix 1: Check your Windows Edition
As mentioned earlier, dynamic disks are only supported on specific Windows editions. The feature requires Professional, Enterprise, or Server editions of Windows. Home editions don’t support dynamic disks at all. Currently, dynamic disks are supported on:
- Windows 10 Professional/Enterprise
- Windows 11 Professional/Enterprise
- Windows Server 2019
- Windows Server 2022
That’s why you should start by checking which version of Windows you’re currently running. Here’s how:
- To get started, click the start button and head to Settings > System > About.
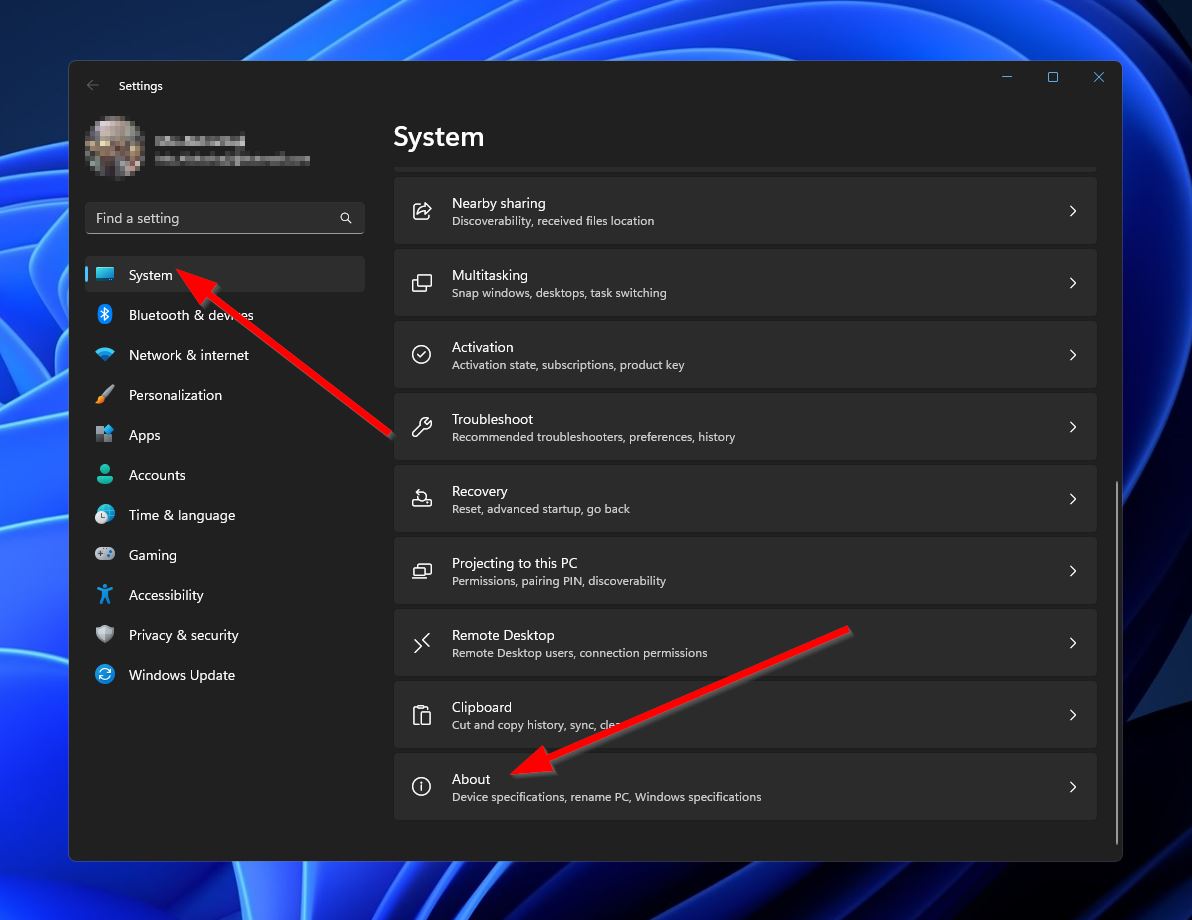
- After that, turn your attention to the “Windows specifications” section, and you’ll see your Windows version next to the “Edition” label. If it’s not a part of the list of supported editions listed earlier in this article, then that’s what’s causing your dynamic hard disk problem.
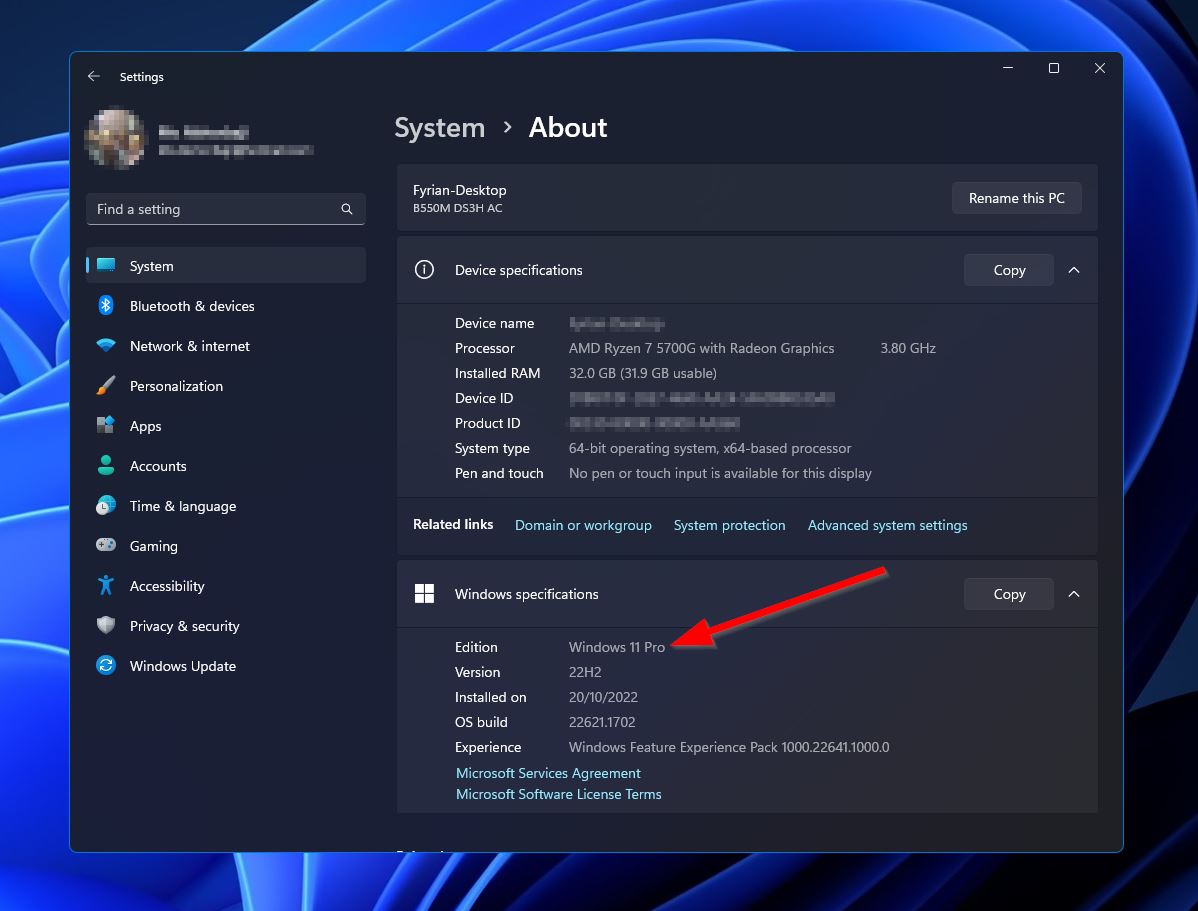
If you have a Windows version that doesn’t support dynamic disks, the only remedy is to install a different version that does. For more recent Windows variants, you’ll need the “Professional” edition or higher.
Fix 2: Reactivate Disk through Disk Manager
One of the most straightforward solutions for an invalid dynamic disk is to reactivate it using Windows Disk Management, a built-in Windows tool that can often resolve issues where the disk has been deactivated due to system changes or errors. Here’s how to reactivate your dynamic disk:
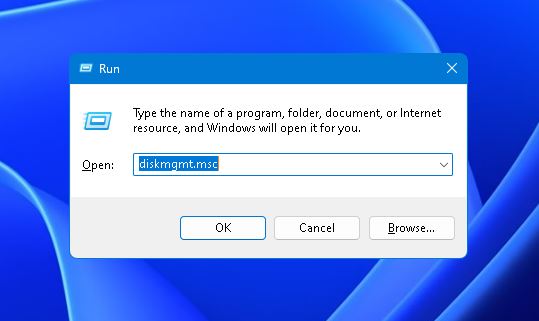
- First, press the Windows + R keys simultaneously to bring up the “Run” command, then type in “diskmgmt.msc” and hit Enter. This will bring up Disk Management.
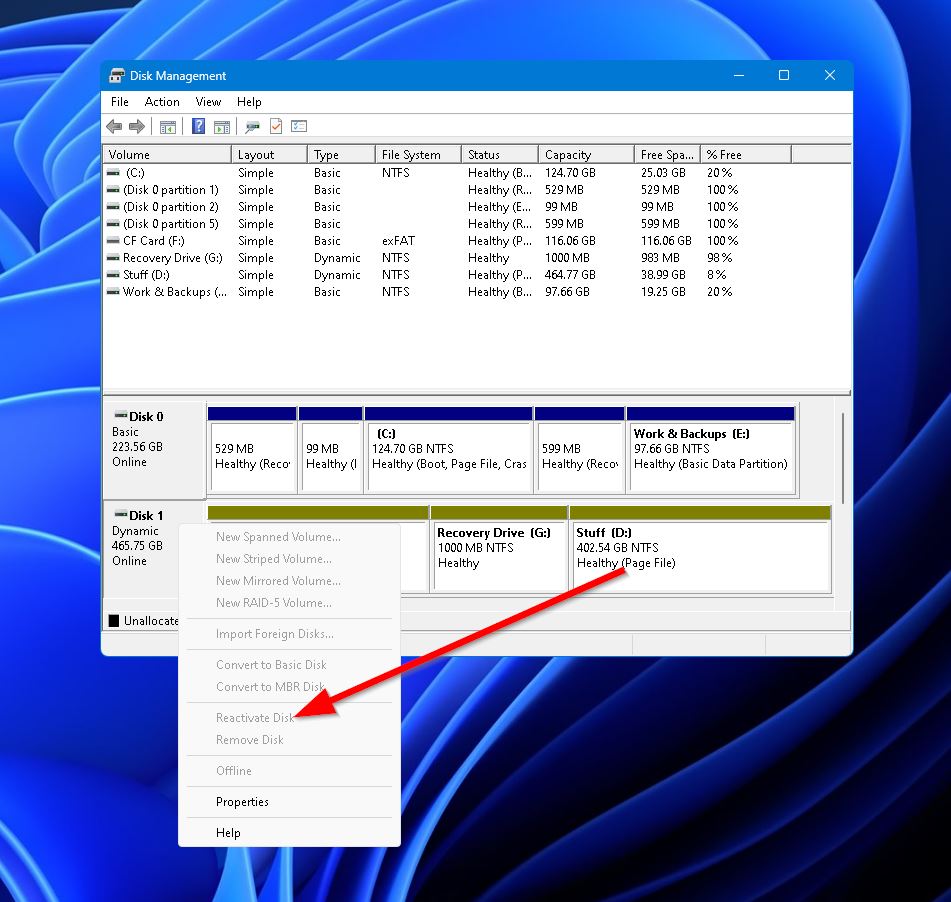
- Next, in the bottom half of the window, locate the disk that’s encountering the “dynamic disk is invalid” issue, then right-click it and select “Reactivate Disk.” If the option is greyed out, then your hard disk is not in need of reactivation.
Fix 3: Reactivate the Invalid Dynamic Disk with DiskPart
An alternative to using the Management to reactivate your invalid dynamic disk is to use DiskPart, a powerful command-line tool built into Windows.
DiskPart often succeeds where Disk Management fails because it provides lower-level access to disk structures and can bypass some system-level restrictions. However, you should know that DiskPart is a powerful tool that requires careful use as incorrect commands can result in data loss.
Here’s how to use DiskPart to reactivate your invalid dynamic disk:
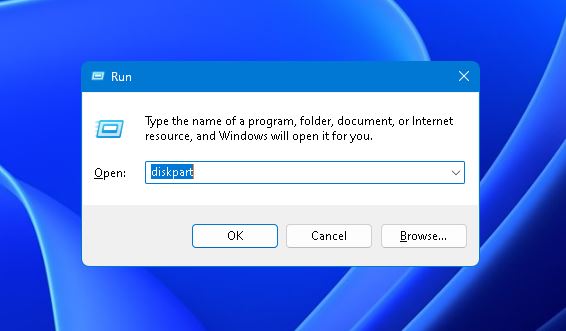
- Press the Windows + R keys simultaneously to bring up the “Run” command, then type in “diskpart” and hit Enter. This will launch diskpart.exe.
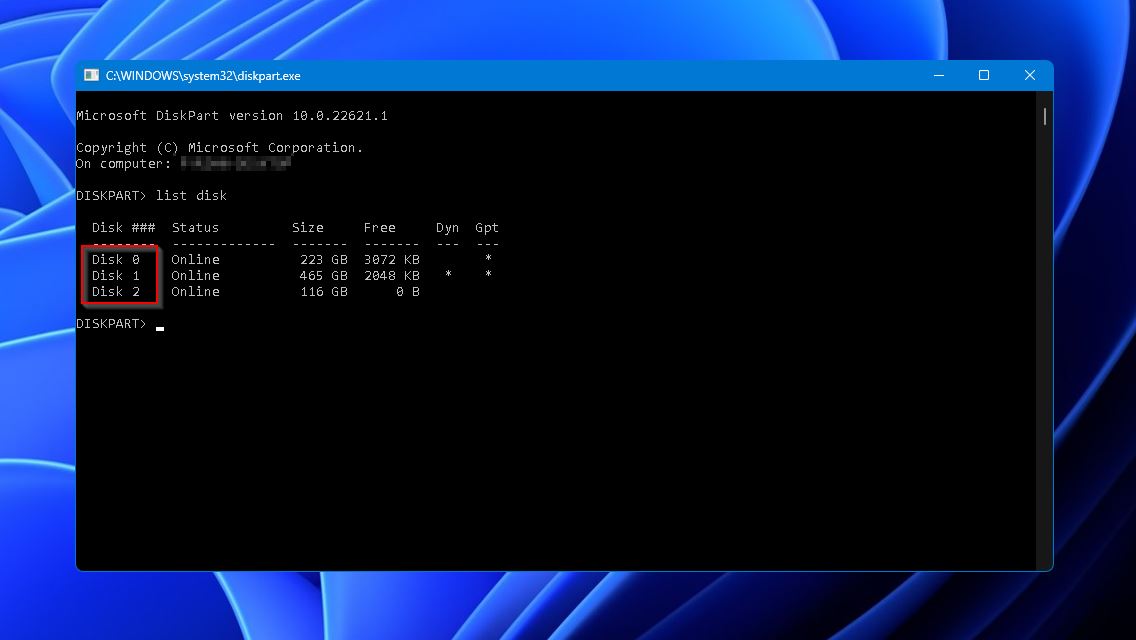
- Next, type in “list disk” and hit Enter. You’ll see a list of the available disks connected to your computer. Locate the one with the invalid problem and take note of the disk number on the left. You should be able to differentiate between disks by taking a look at their sizes.
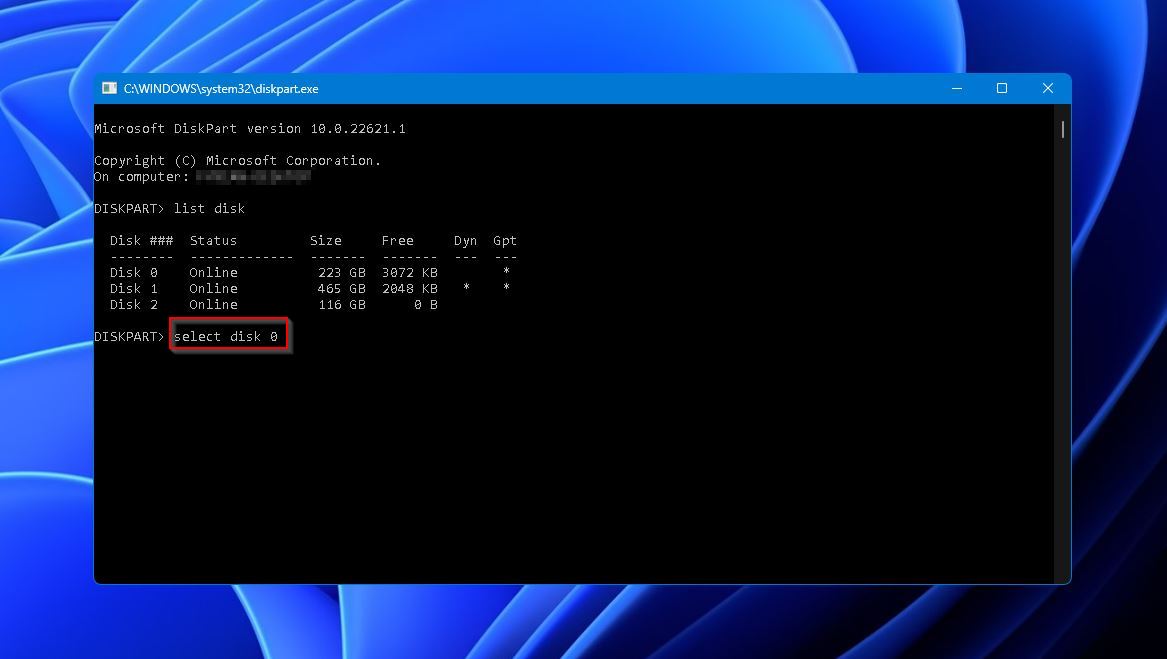
- After that, type “select disk” followed by a space and the number of the affected disk. A sample string would be “select disk 0”. Hit Enter when ready.
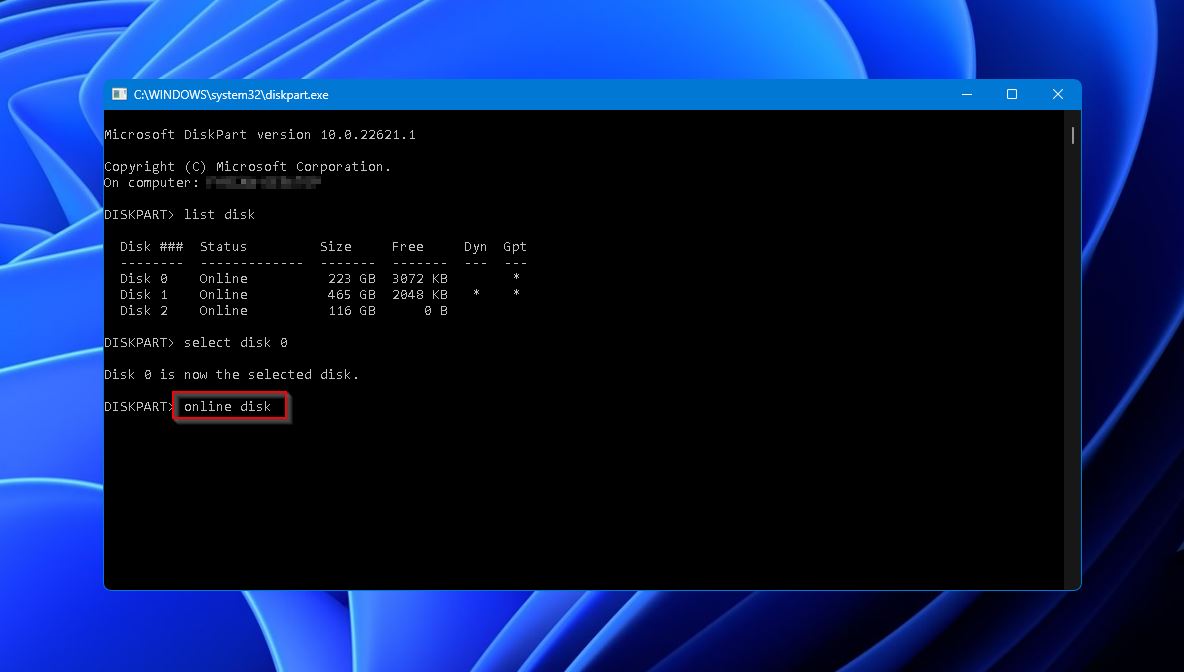
- Finally, type “online disk” to complete the reactivation process.
Fix 4: Manually Mark Disk as Basic via Hex Editor
If the dynamic disk fails to reactivate and shows the “this operation is not allowed on the invalid disk pack” error, then you can use a hex editor to manually mark the disk as basic and solve the problem without data loss.
Specifically, a hex editor allows us to change a single byte in the disk’s metadata that identifies it as a dynamic disk (value “42”) to the identifier for a basic disk (value “07”). Just like the previous fix, this one requires careful attention to detail because modifying the wrong values in a hex editor can cause serious problems.
If you’re ready, then you can follow these steps:
- To get started, download and install a good free hex editor, like HxD.
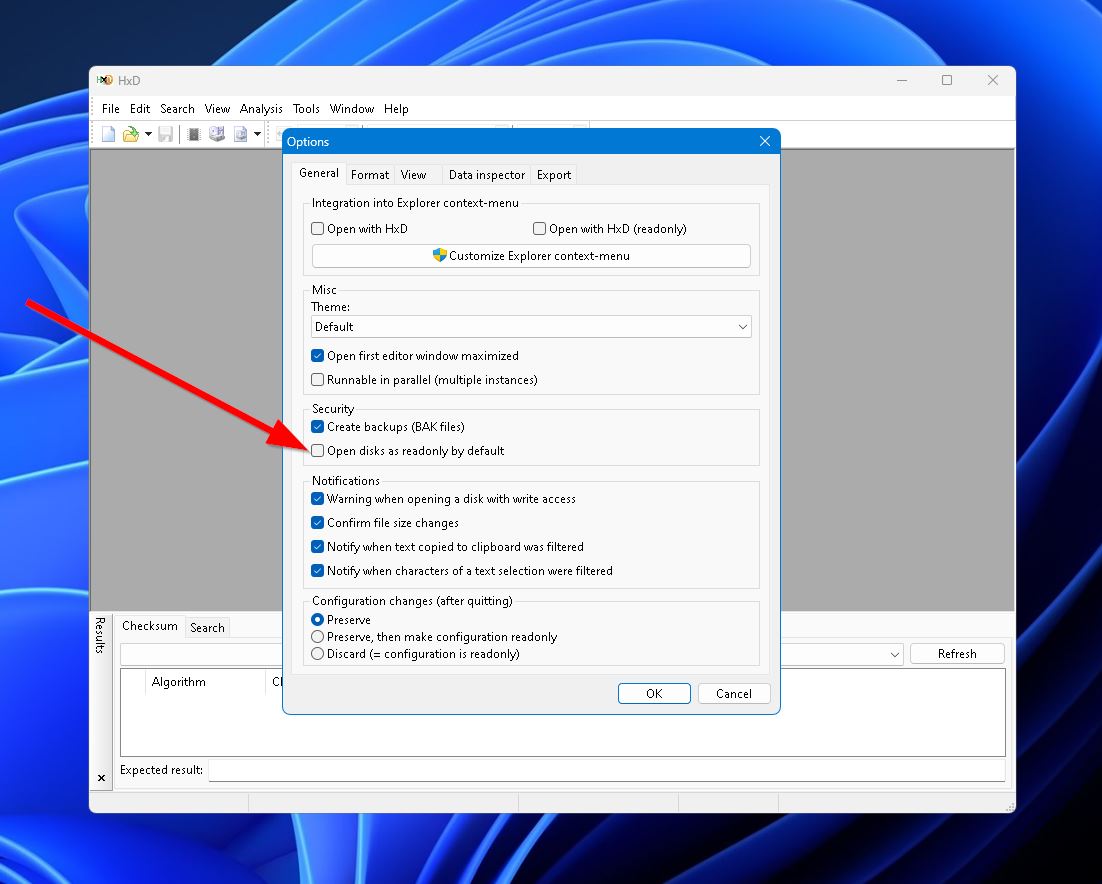
- Launch HXD with administrator privileges, then head to Tools > Options and untick the “Open disks as readonly by default” option. Click “OK” to confirm and head back to the home screen.”
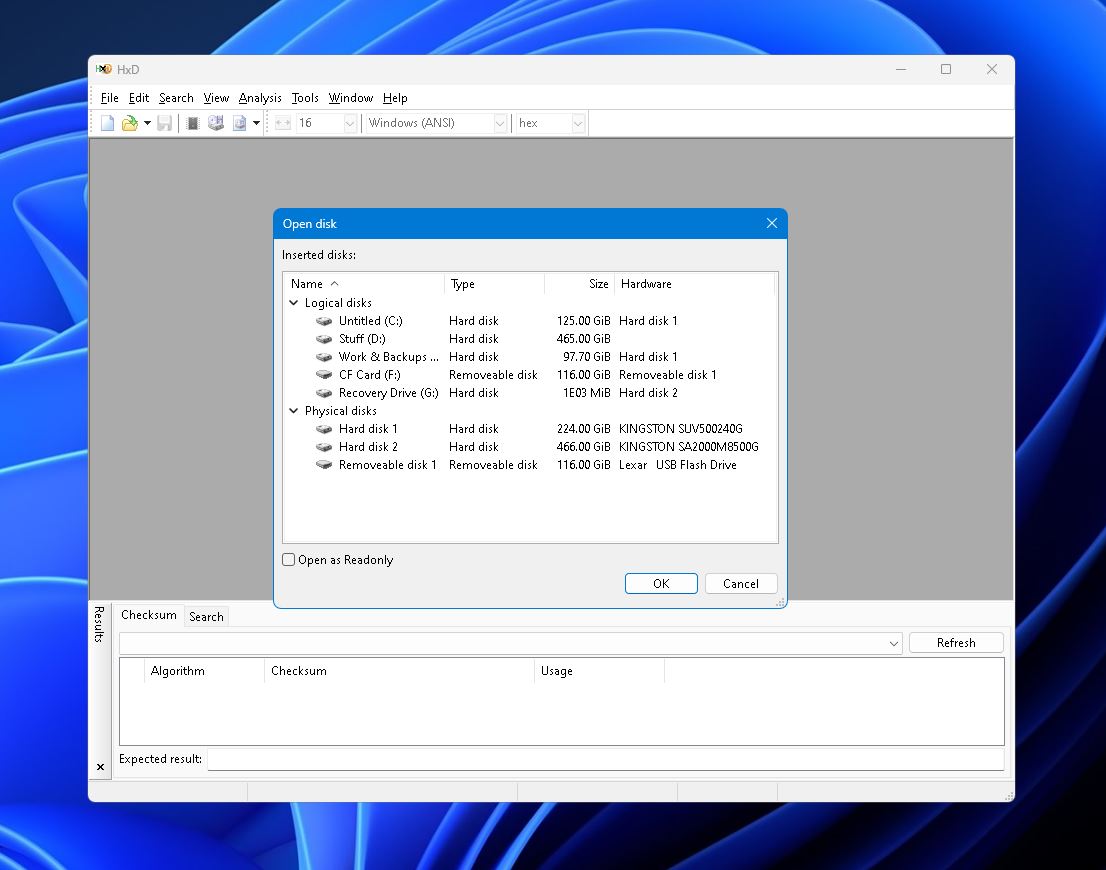
- Next, press the Ctrl + Shift + D keys simultaneously to bring up the “Open disk” command and double-click the invalid dynamic disk.
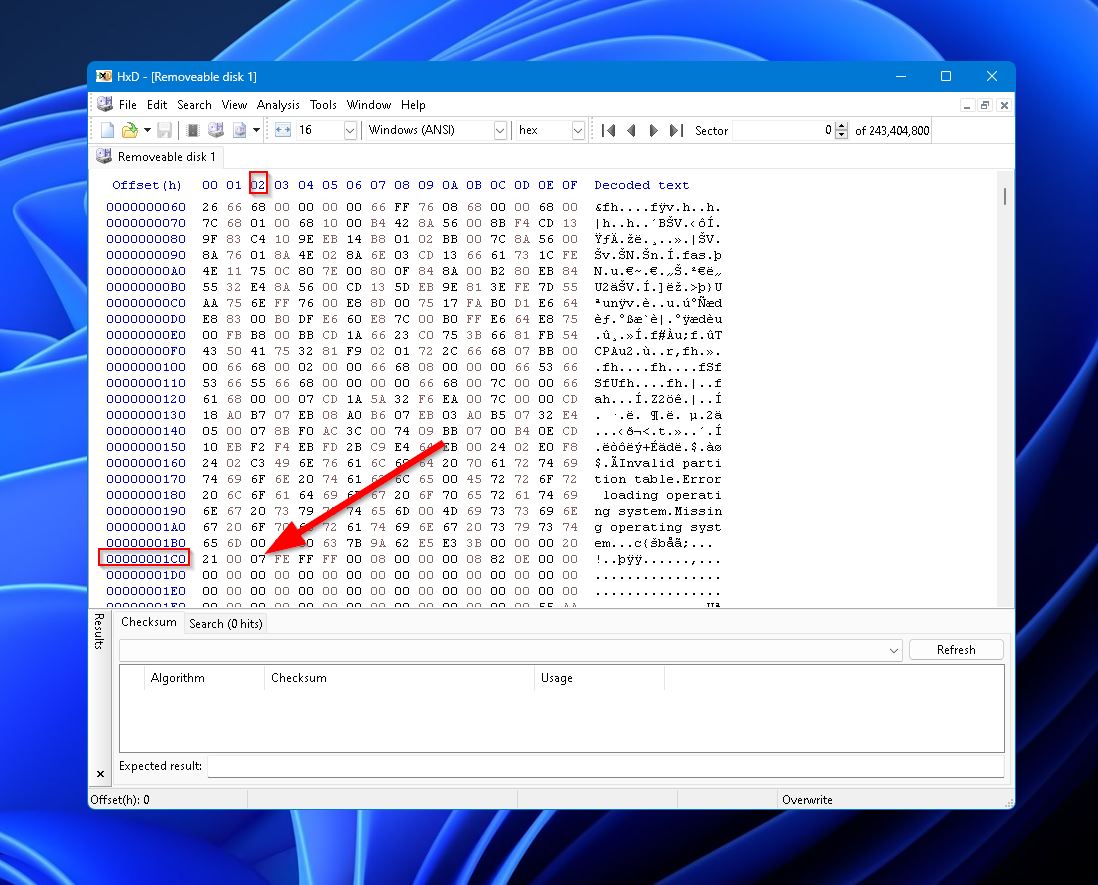
- After that, scroll down to sector “00000001C0” and take a look at column “02”. It should show “42,” which denotes a dynamic disk. Change it to “07,” which is for basic disks.
- Press Ctrl + S to save the changes, then go ahead and reboot your PC.
Note: It may take a few reboots for conversion to be successful. If you still don’t have access to your hard drive after the third reboot, just undo the changes to your disk by editing the “07” back to “42”.
Fix 5: Convert to Basic Disk Using Disk Manager
If your disk is invalid in disk management, the tool offers an easy way to convert it from dynamic to basic. This should effectively solve your issue. The problem is that doing so will delete all the volumes on your disk, wiping out all your data in the process. Fortunately, you can use a data recovery program beforehand to retrieve your files.
Recover Data Using Disk Drill:
Whenever I deal with invalid dynamic disk issues and need to recover data stored on the affected drive, Disk Drill is my go-to data recovery software of choice.
Disk Drill can work with all Windows-supported file systems, and it recovers files based on both file system information (when available) and file signatures, supporting over 400 file formats. This means that even if the dynamic disk’s file system is severely corrupted, Disk Drill can still identify and recover your files.
For users new to data recovery, Disk Drill offers an intuitive interface that completely eliminates the need for technical expertise. What probably impresses me the most is how the software handles the complexity of dynamic disk structures without exposing that complexity to the user. It automatically detects the disk configuration, adjusts its scanning algorithms accordingly, and presents the results in an organized, easy-to-navigate format
Here’s how to recover invalid dynamic disk data using Disk Drill:
- Download Disk Drill from the Cleverfiles website and install it on your computer to get started.
- Launch the program, then select the storage device affected by the dynamic hard disk problem and click “Search for lost data.”
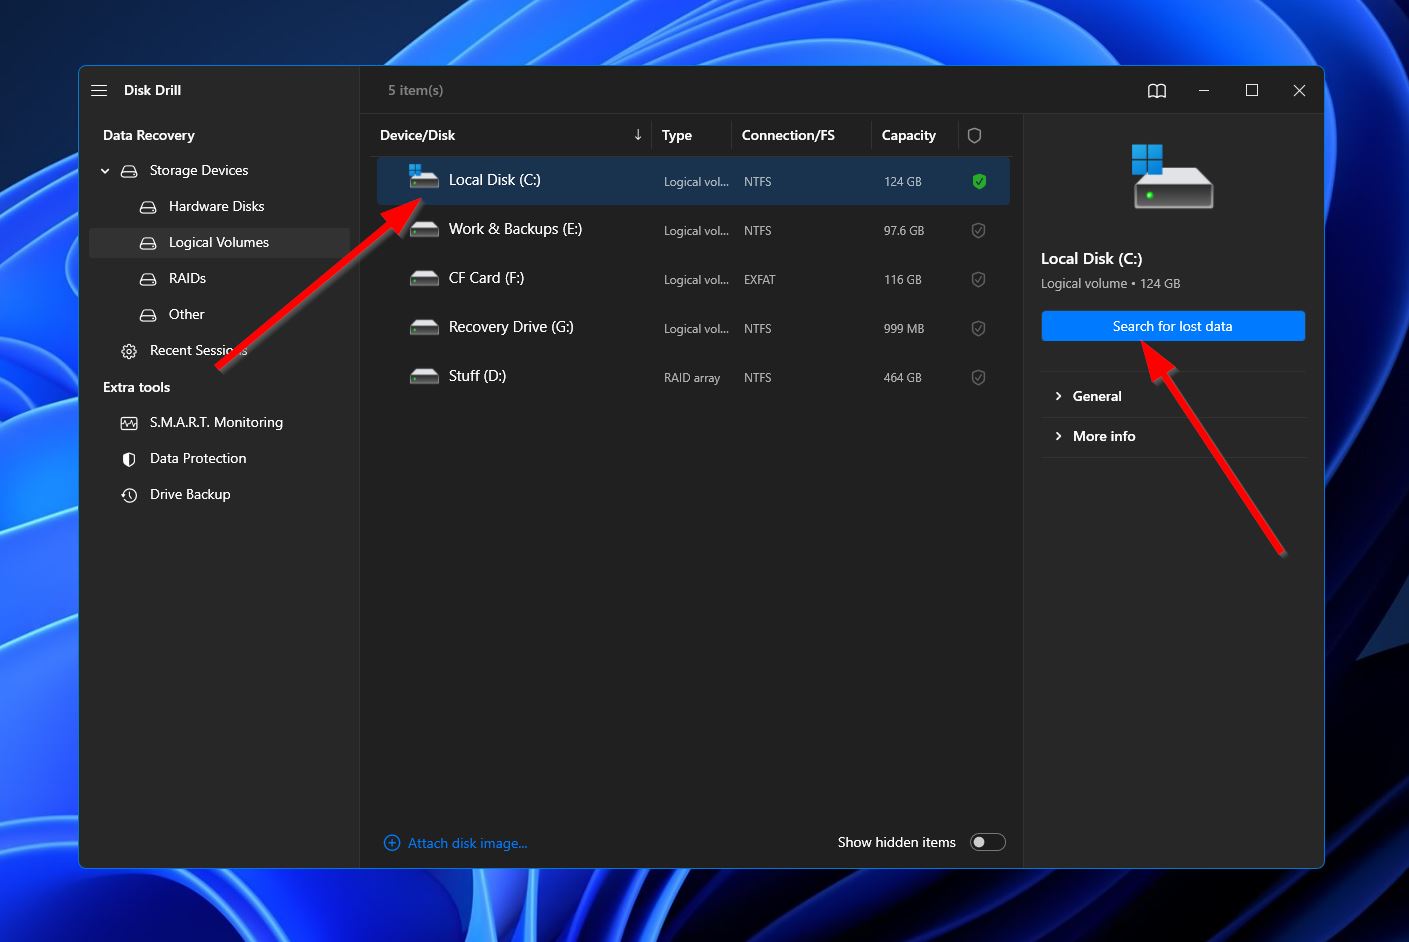
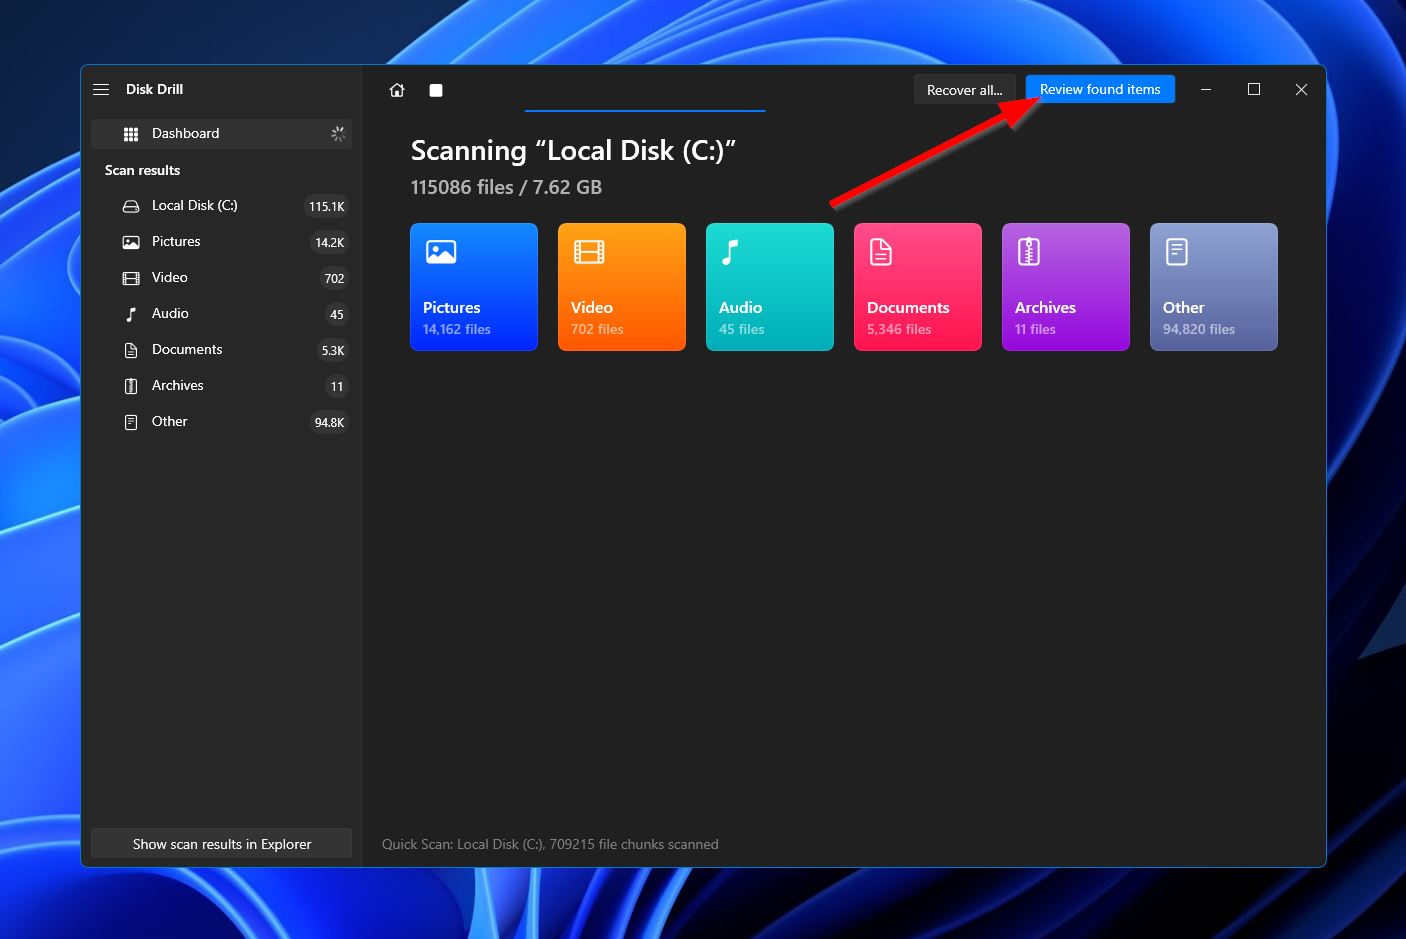
- Upon clicking, Disk Drill will start scanning your drive for all recoverable files. You can click the “Review found items” button at the top-right corner to move to the results page while the scan continues. Alternatively, you can wait for the scan to finish first, then click the same button to continue to the next step.
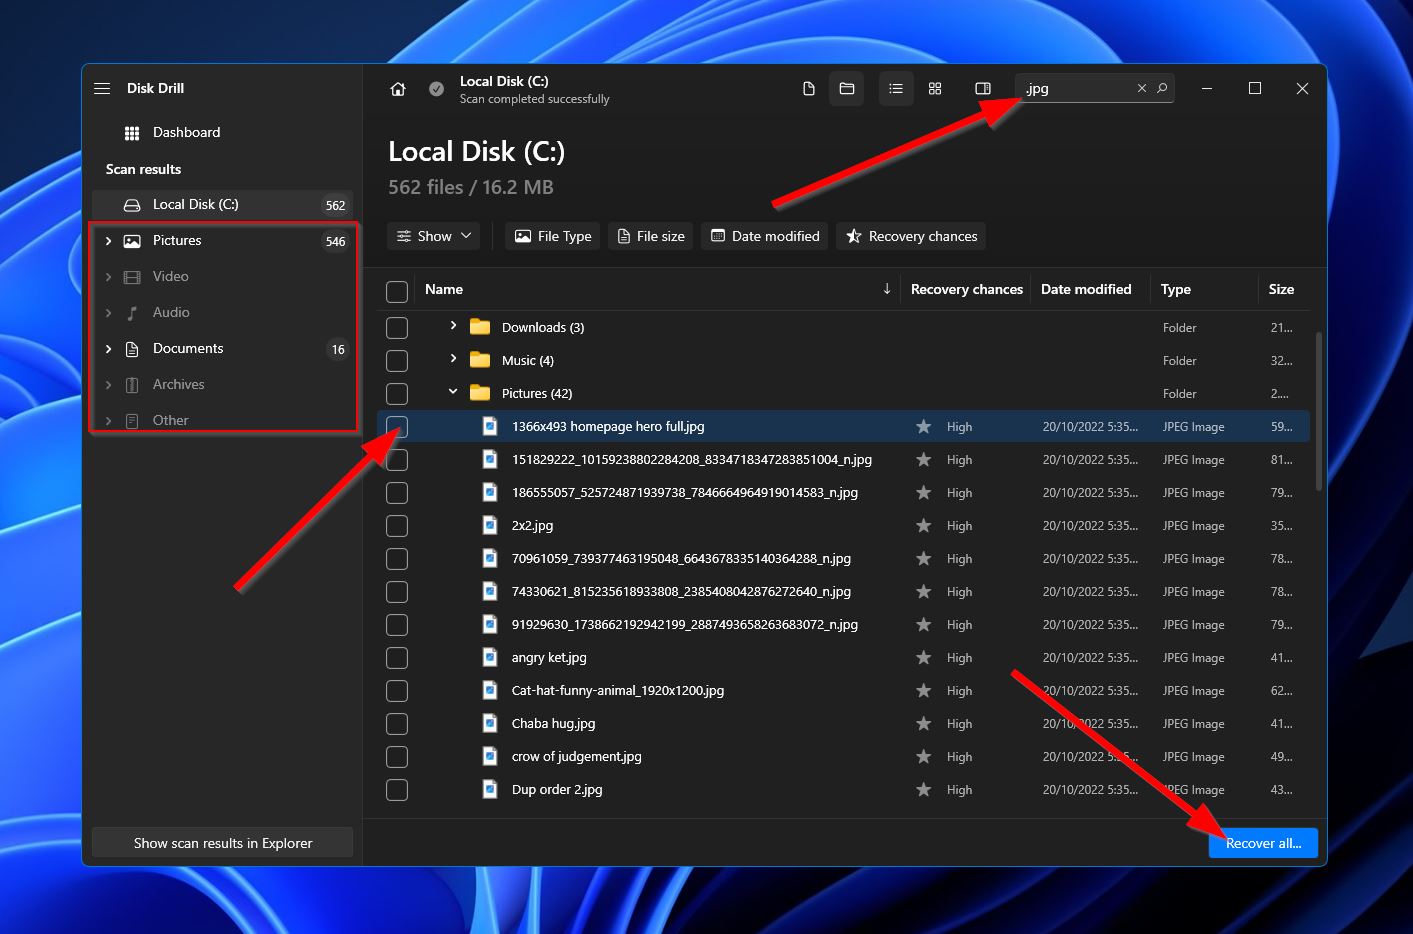
- When you get to the results screen, search for the files you want to recover and highlight them by ticking the checkbox next to their file names. You can also narrow down your search by using the category filters on the left and the search bar at the top right. Once you’re ready, click the “Recover” button.
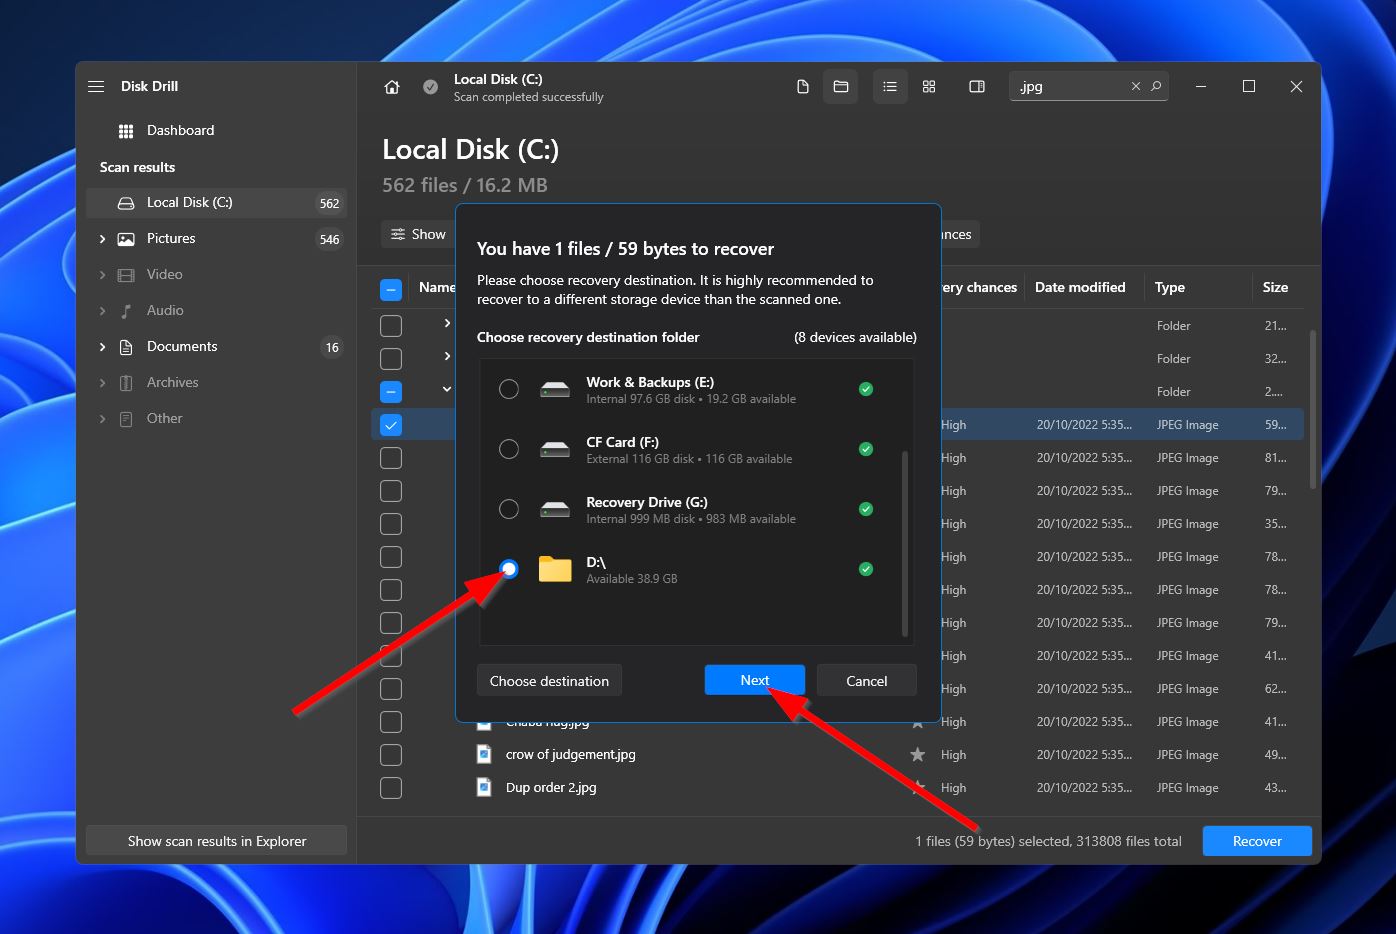
- After that, a small pop-up will appear where you’ll have to choose the storage location of your recovered files. Of course, this has to be on a different drive than the one you’re recovering from. Click “Recover” when you’re ready.
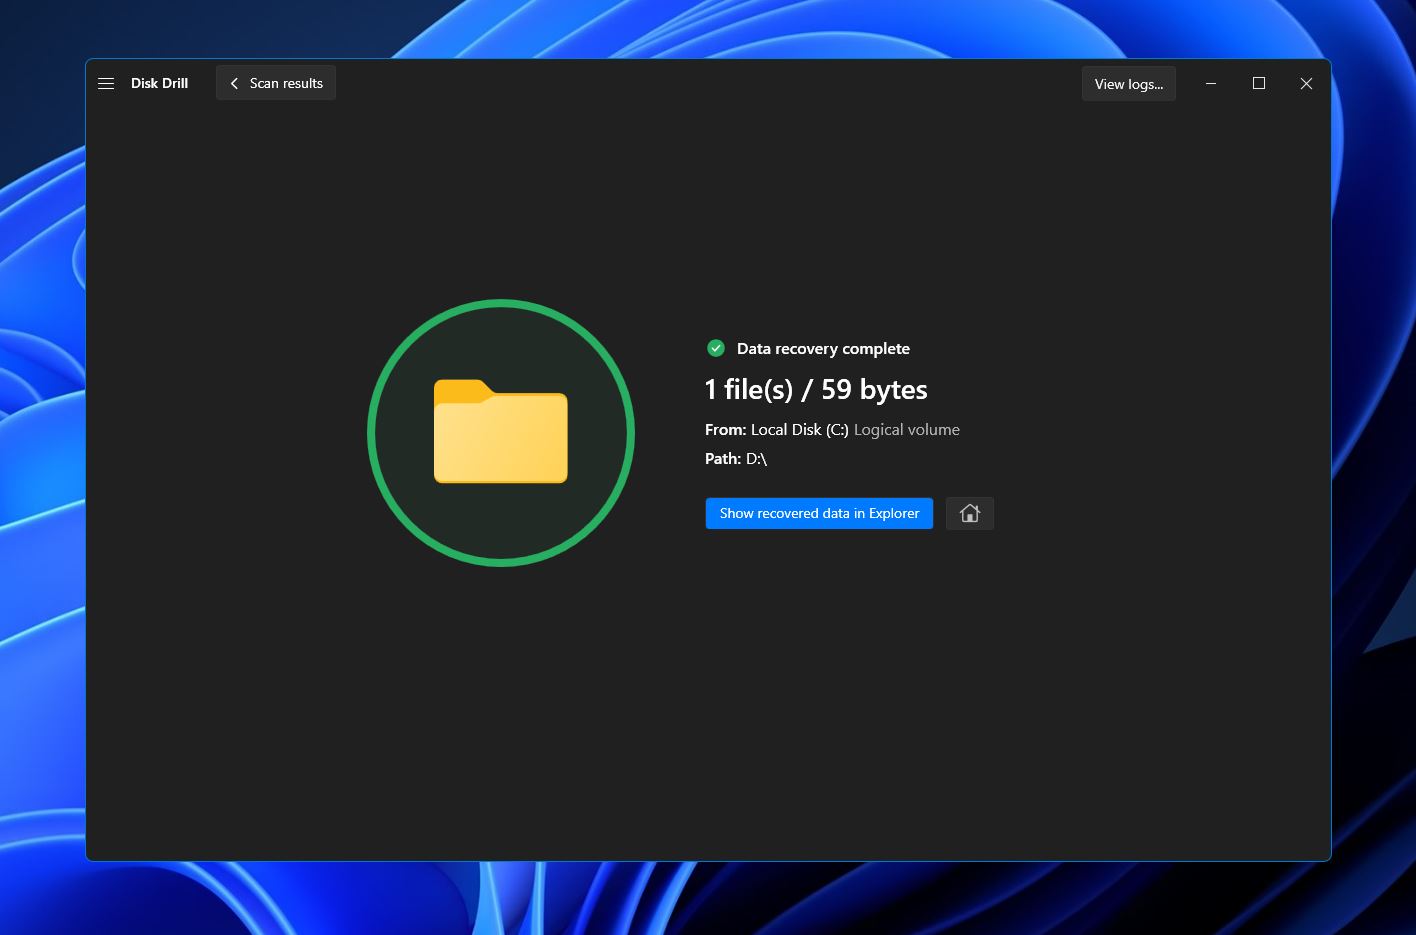
- Disk Drill will now start recovering your lost files. Once done, you’ll receive a completion message, along with a button labeled “Show recovered data in Explorer,” which you can click to open the folder containing your retrieved files.
The free version of Disk Drill allows you to recover up to 500 MB of data, so you can test the software’s capabilities with your specific dynamic disk issue before committing to a purchase. You can even preview all recoverable files directly in Disk Drill to be completely sure that your files are intact and recoverable before deciding to upgrade.
Convert Disk Using Disk Management tool:
- Press the Windows + R keys simultaneously to bring up the “Run” command, then type in “diskmgmt.msc” and hit Enter. This will bring up Disk Management.

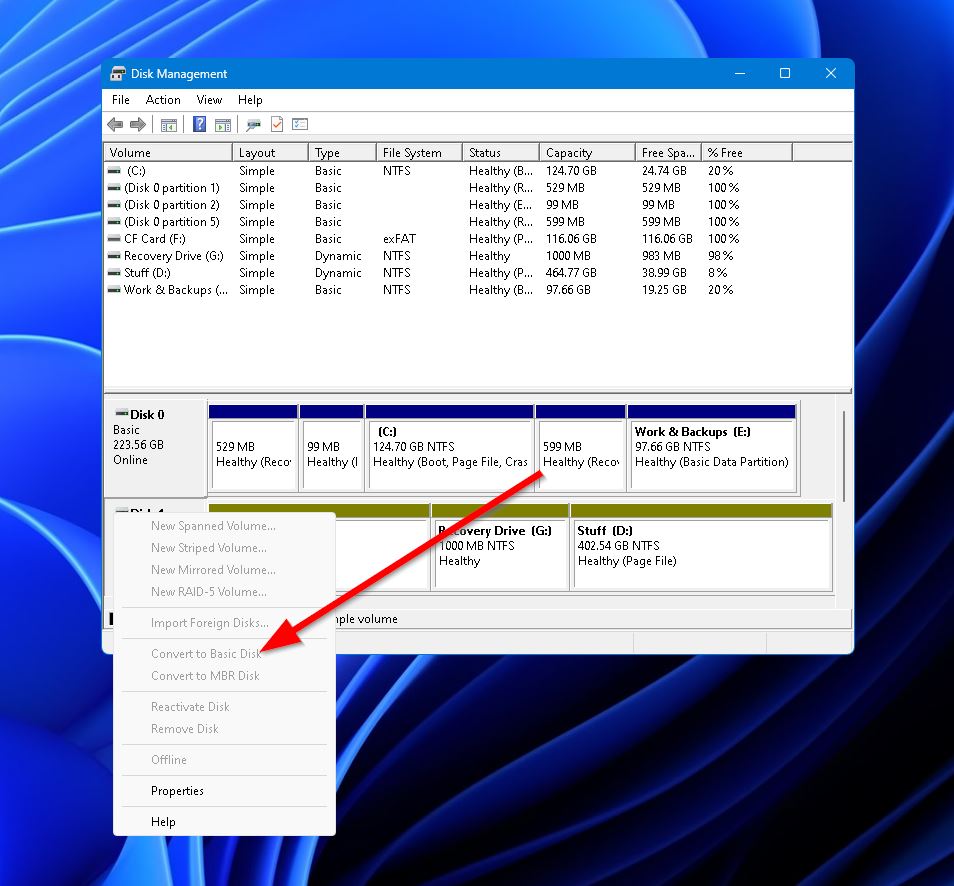
- In the bottom half of the window, locate the dynamic disk that’s invalid in disk management, then right-click it and select “Convert to Basic Disk.”
Conclusion
The “dynamic disk invalid” error is a serious issue that prevents users from accessing the contents of an entire hard drive. It generally occurs if you’ve upgraded to an unsupported version of Windows or moved your hard drive to another PC, though it can also be caused by device corruption. Fortunately, it isn’t a difficult problem to fix. Just follow the methods we’ve outlined above, and your drive should be running normally in no time.
