 Did you notice that a few or all files disappeared from your external hard drive on a Mac? Whether you’ve accidentally hidden them on the drive, erased them from the drive without realizing that, or it happened by itself because of the physical damage of the drive, there is a way to solve the problem.
In this article, we’ll cover the most effective methods that should help you bring back lost or erased files from your external hard drive on a Mac.
Why Do Files Disappear from External Hard Drive
Before getting to the main part of this article, it’s a good idea to try to figure out the reason why the files are missing from your external hard drive in the first place. The table located below can help you with that.
| Data loss reason | Description |
| 💾 Drive formatting | Whenever you format an external hard drive, you also erase all of the data from it. So if you’ve formatted your drive either on purpose or not, that’s the reason why your files disappeared. |
| 🦠 Malware | Viruses and malicious software can attack your external hard drive and delete, hide, or corrupt the files located there. |
| 📂 Set to hidden | It’s possible that you’ve mistakenly hidden a file on your external hard drive. If that’s the case, you should be able to easily unhide it using Method #3. |
| 👩💻 Human error | You can mistakenly delete a file from an external hard drive with only one wrong click of the mouse, even without noticing. |
| 🧟 Corruption | If the file system on your external HDD is corrupted, you won’t be able to access the data located there. But you can easily bring them back using a data recovery tool. |
| 🚑 Physical damage | Any type of physical damage can cause the components of your external hard drive to fail, which can lead to data loss. |
How to Recover Disappeared Files from External Hard Drive on Mac
The most effective and hassle-free method when it comes to recovering lost or missing files from an external hard drive on a Mac is using a specialized data recovery tool for the job. We recommend using Disk Drill since this application works with any external HDD brand (such as LaCie, SanDisk, WD, Seagate, etc.). Moreover, it is capable of recovering data from RAW hard drives and works with RAID configurations.
Follow these steps to recover deleted files from an external hard drive on a Mac using Disk Drill:
- Download Disk Drill and follow the onscreen instructions to install it on your Mac.
- Using a cable, connect your external hard drive to your computer.
- Launch Disk Drill and choose the connected drive from the list of available devices.
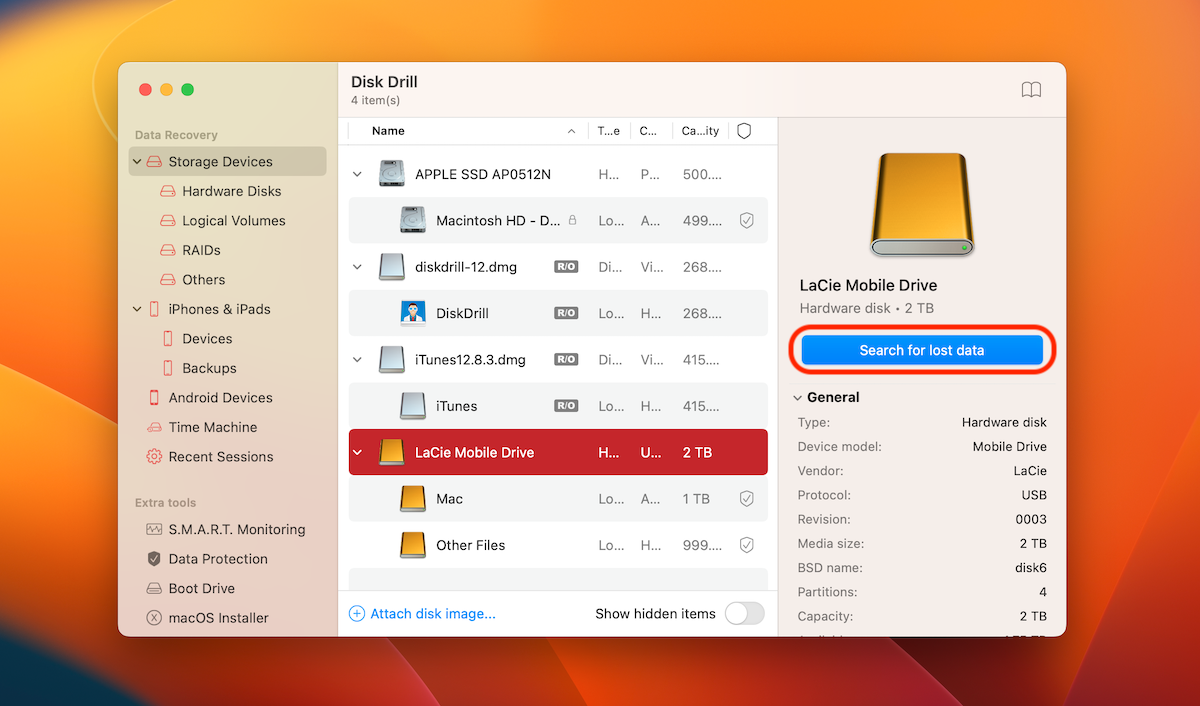
- Click the Search for lost data button to initiate the scan.
- Click the Review found items button at the top-left (you can start previewing the files as soon as they get discovered by the tool or wait for it to finish the scan).
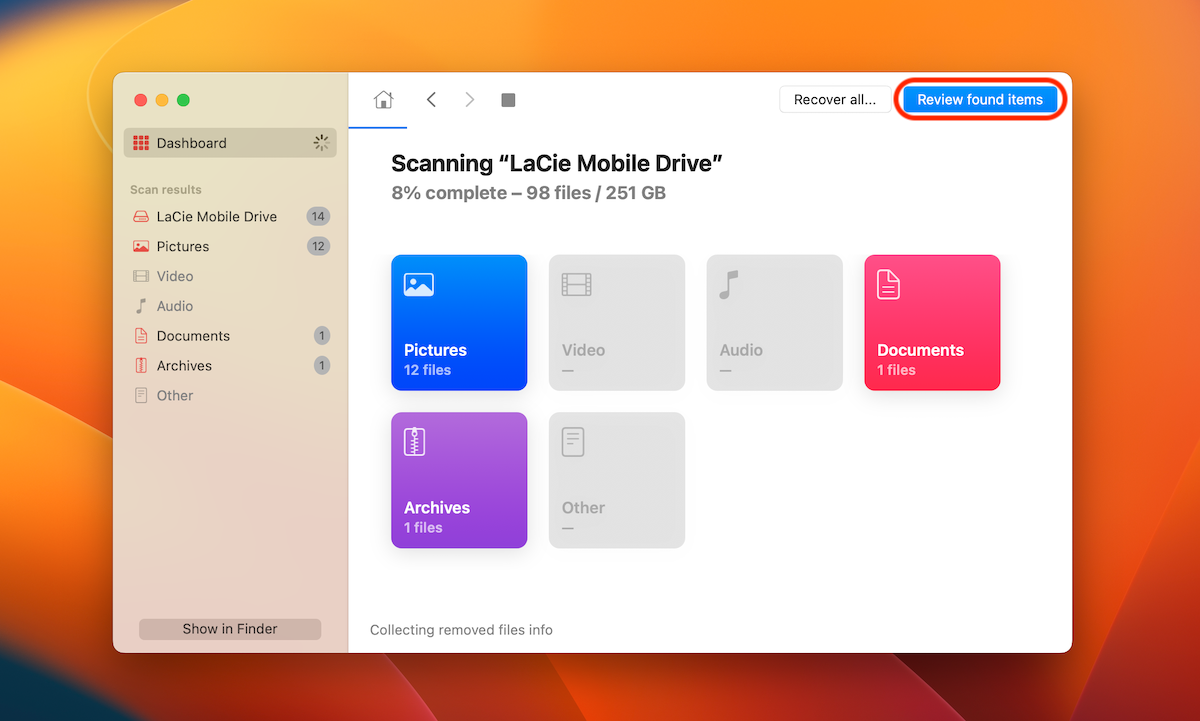
- Use the sidebar on the left to view only a certain type of discovered data (for example, pictures). Or use the search tool at the top-right to look for a specific file (you can use its name or the file’s extension).
- Click the eye icon near a file to preview it to ensure it’s the right one and use the recovery chances column to evaluate the recovery possibility.
- To select a file, click the box near it to place a checkmark.
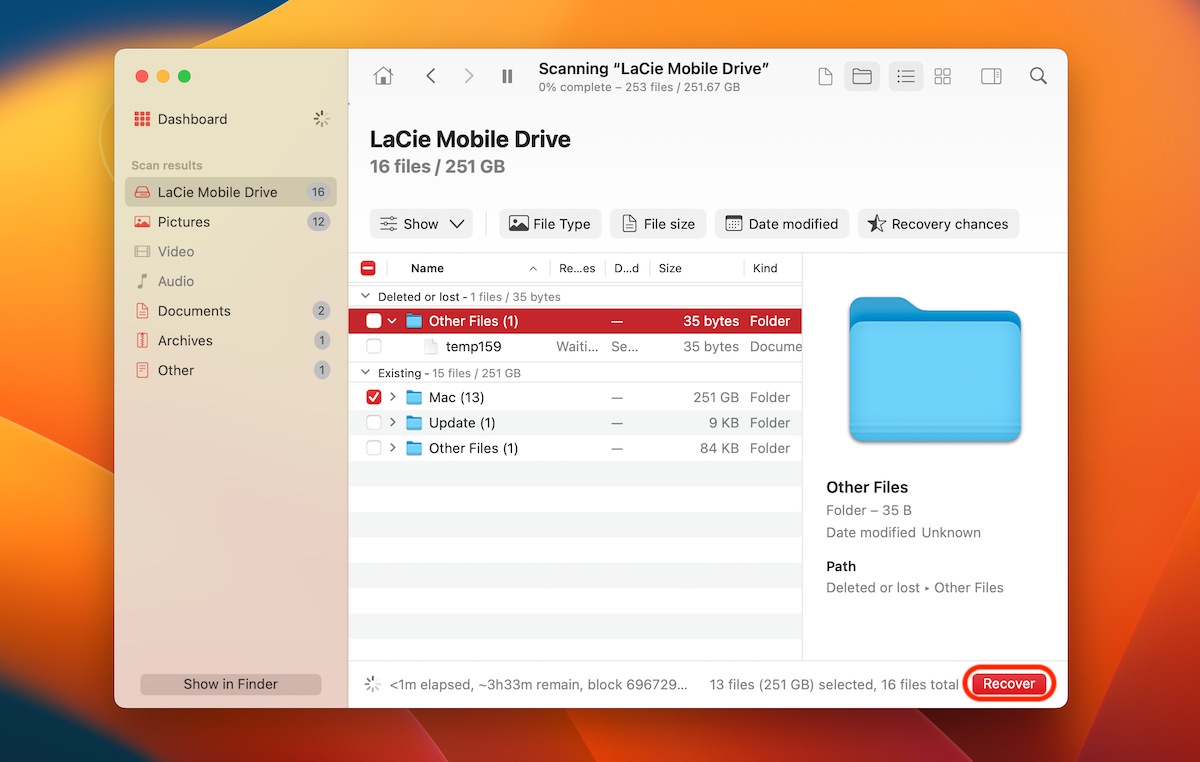
- When ready, click the Recover button to restore the selected data (make sure to choose the location for the recovered files different from the external HDD you were recovering from).
Note: The free Disk Drill version allows you to scan your device and preview the potentially recoverable files. However, to actually perform the recovery, you should upgrade the tool to the paid Pro version.
Other Methods to Fix Hard Drive on Mac
Once you’ve recovered the missing files from your external hard drive, it’s a good idea to try to fix the issue that caused this from happening in the first place. Here’s what you can try.
Method 1. Reboot Your Mac
If the external hard drive is not mounting to your Mac, and it’s the reason why you can’t view the files located there, you should try a simple solution – restart your Mac.
Follow these steps to reboot your MacBook:
- Click the Apple menu at the top-left of the screen.
- Select Restart from the drop-down menu.
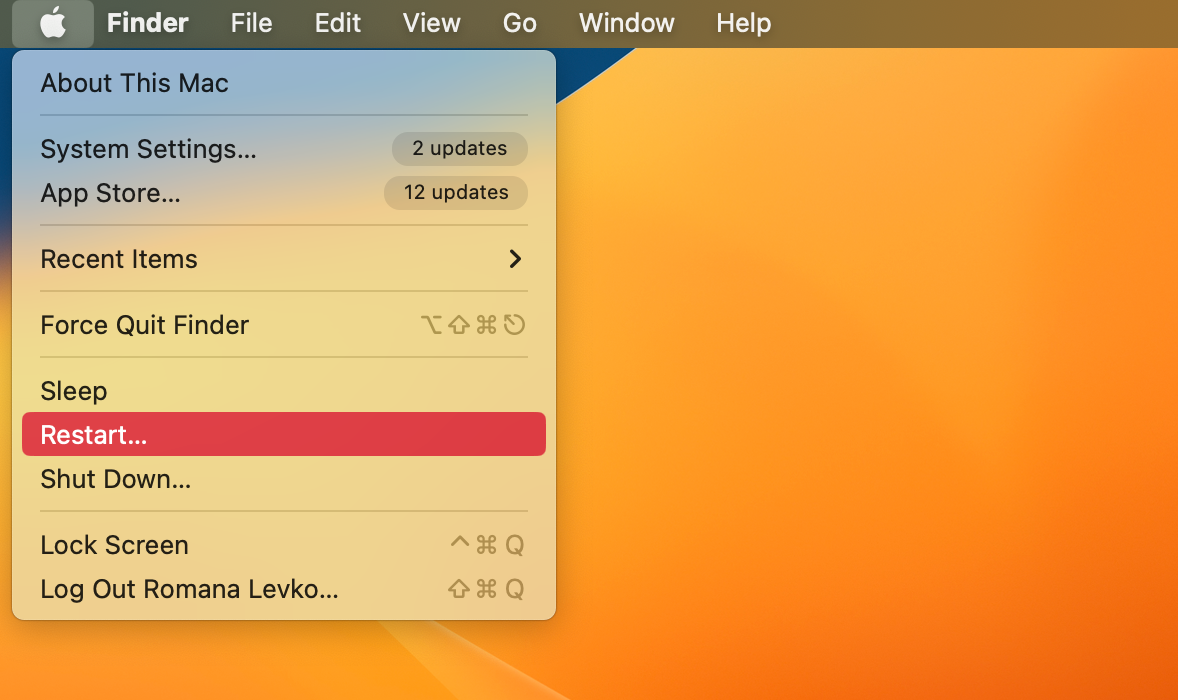
- Wait for the Mac to power back on.
Once your computer has finished rebooting, try to connect your external hard drive again to see if it will mount.
Method 2. Fix the External HDD with First Aid
Another solution that might help is to run First Aid on the faulty drive. This is a feature available on the Mac-native app called Disk Utility. It can find and repair disk errors related to the directory structure of your external hard drive and, therefore, can potentially bring you back access to the lost files and prevent files from disappearing again.
Follow these steps to run First Aid on your external hard drive:
- Connect the external hard drive to your Mac.
- Launch Disk Utility (go to Finder > Applications > Utilities and click Disk Utility).
- Select your external HDD from the list of available devices on the left.
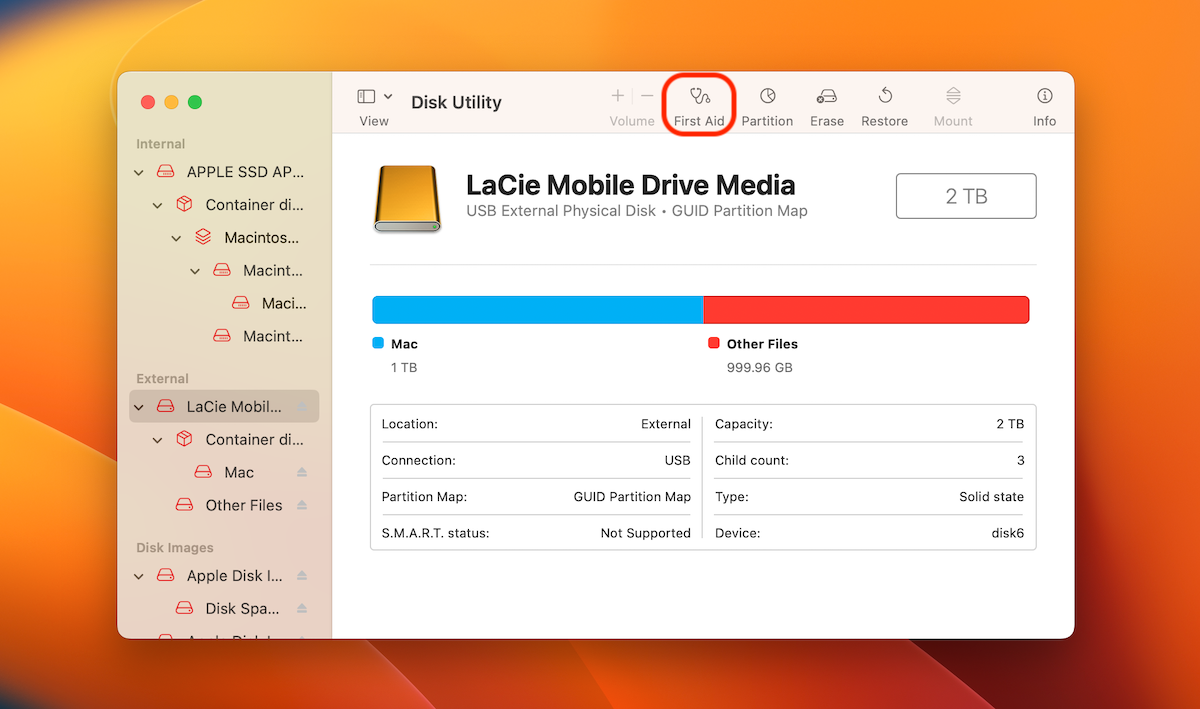
- Click the First Aid button.
- Click Run to confirm.
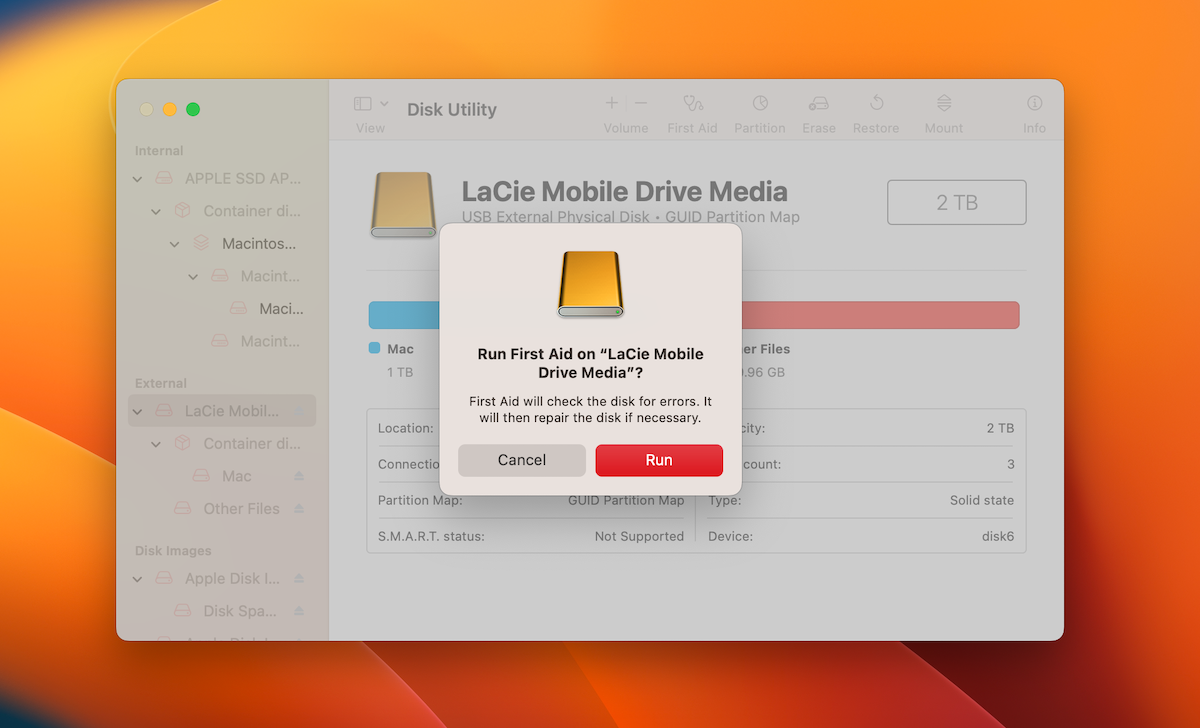
- Wait for the process to finish and eject the drive.
Method 3. Unhide Files on Your External HDD
It’s possible that you’ve hidden some files on your external hard drive by mistake. If that’s the case, you should try to unhide them. To do that, you should connect the external HDD to your Mac and open it. Then use the following key combination to show hidden files on your external hard drive on a Mac:
Command + Shift + .(period symbol)
Conclusion
Losing important files from an external hard drive is no joke. Sometimes you can’t even realize how that happened. But the good news is that it’s possible to recover lost or deleted files from almost any external hard drive using a Mac as long as you act quickly and stop using the drive after noticing the issue. If you don’t want to waste any time, using a data recovery tool is your best shot in dealing with such an issue.
FAQ:
- Accidental drive formatting
- Accidental file deletion
- Malware
- Corrupt file system
- Physical damage to the drive
- Connect the flash drive to your Mac.
- Download and install Disk Drill on your computer.
- Launch the app and choose your flash drive from the list of available devices.
- Click Search for lost data to scan it.
- Wait for the scan to finish and click Review found items.
- Preview the potentially recoverable files and choose the ones you need.
- Click the Recover button whenever ready.
