 CompactFlash is a type of memory card primarily used in electronic devices like cameras, camcorders, and audio players. For a time, they were the storage medium of choice for high-tier digital cameras before being overtaken by the likes of the superior CFexpress.
As with other storage devices, CompactFlash cards are susceptible to an error where the device is unrecognized by Windows or Mac computers. In this guide, we’ll walk you through the different ways you can fix the “CFcard not recognized” error, as well as how you can recover files from the device.
How to Recover Files From a CF Card that is Not Recognized
If you want to retrieve files from a Compact Flash card that is not recognized by your operating system, then your best bet is to use a capable data recovery program. The card just has to be visible in your OS and contains a proper volume.
Disk Drill is an excellent choice for Compact Flash card recovery software, given its superior recovery prowess, well-designed UI, and lightning-quick scans.
You can try out Disk Drill’s for Windows free trial version, which comes with all available features and a recovery limit of 500MB.
On Windows 10 / 11:
- Download the Disk Drill installation file from the Cleverfiles website and install it on your Windows PC to get started.
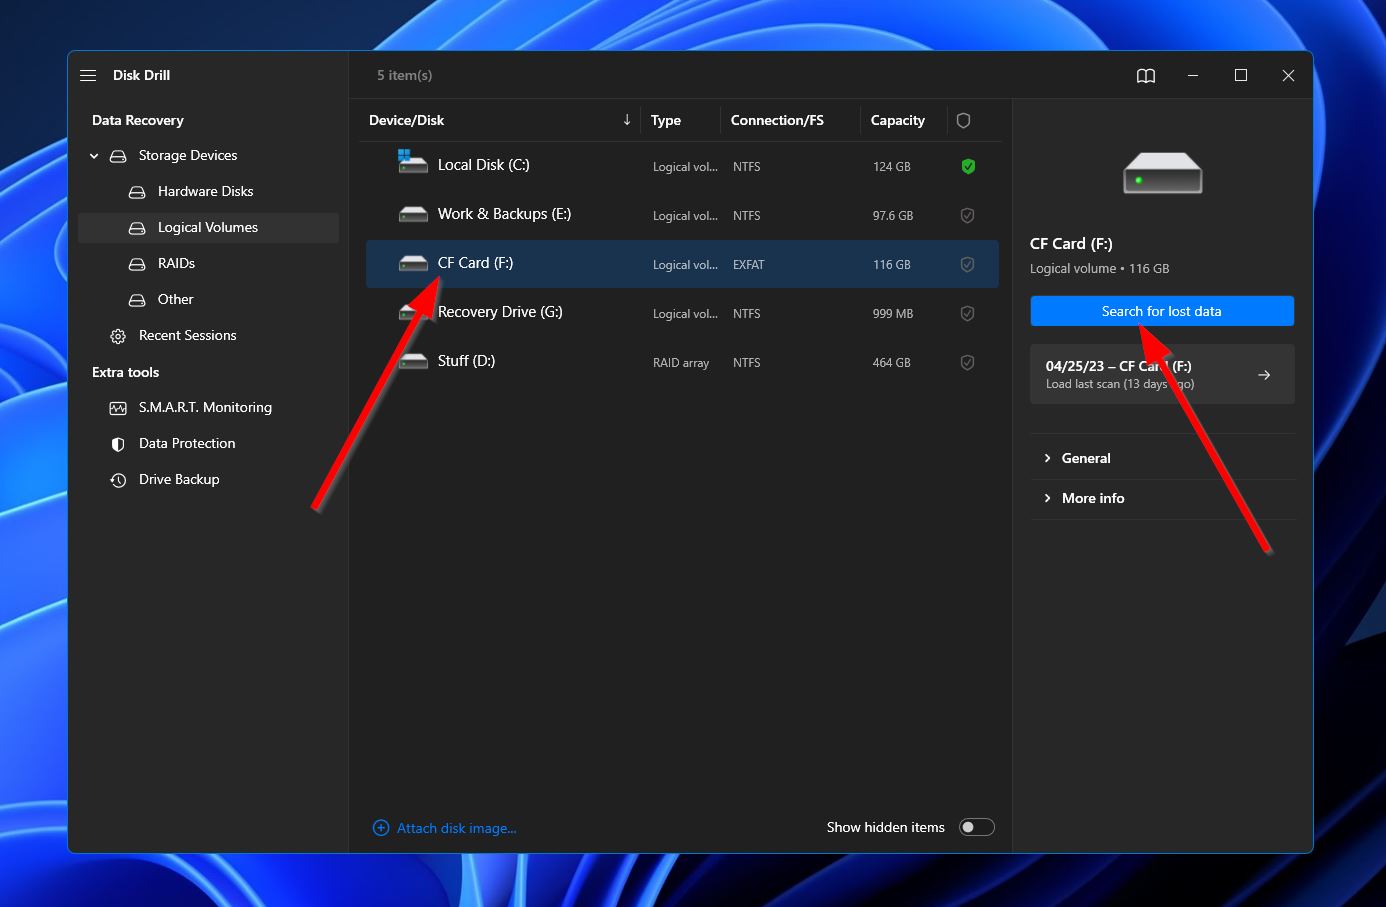
- Make sure your CF card is connected to your computer using a CF card reader. From there, launch Disk Drill and select your card from the list of available storage devices. Then, click the “Search for lost data” button to proceed.
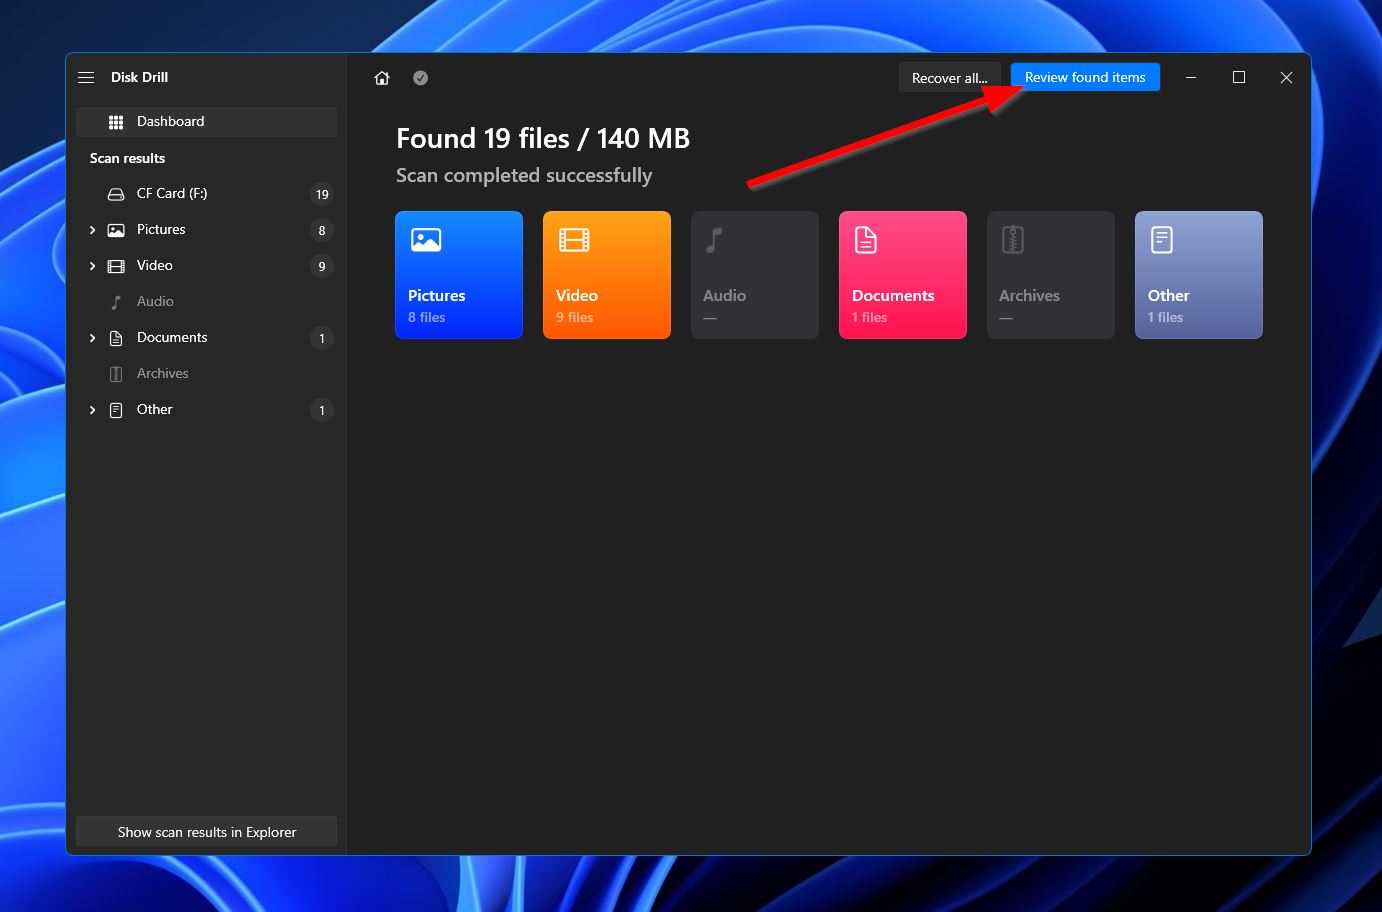
- After that, the app will start scanning your CF card for any recoverable files. While the scan progresses, you can view the files that have been found so far by clicking the “Review found items” button at the top right. Otherwise, just wait for the scan to end first and click the same button to continue.
- Once you get to the results section, you can use the filter options on the left-side panel or the search bar at the top-right corner to track down specific files. When you find the files you’re looking for, select them by ticking the checkboxes next to their file names, then click the “Recover” button to head to the next step.
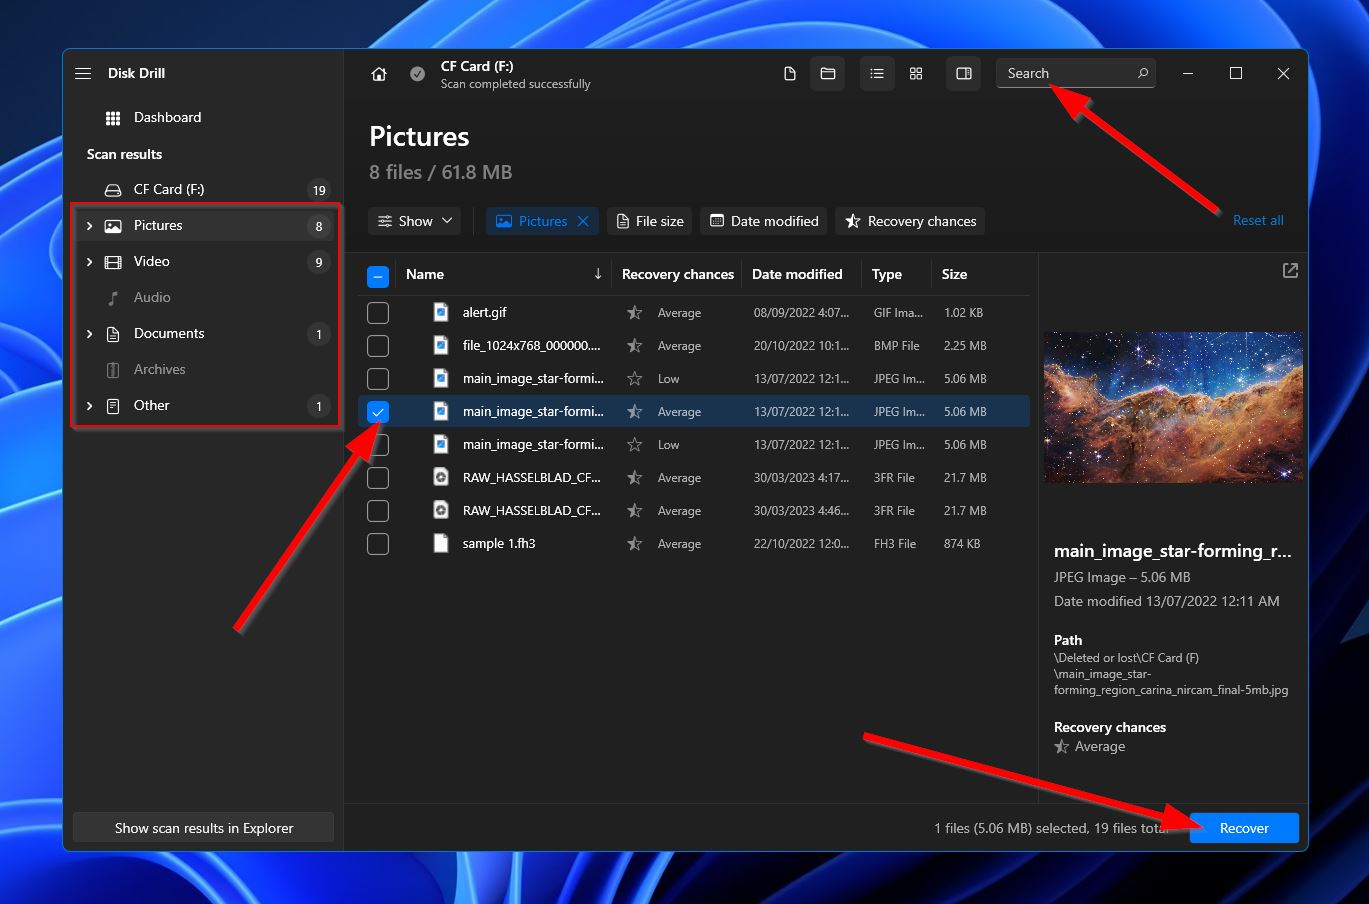
- A smaller window will appear upon clicking, asking you to choose a storage location for your recovered files. Keep in mind that this has to be on a different device than the CF card you’re recovering from. Click “Next” when you’re ready.
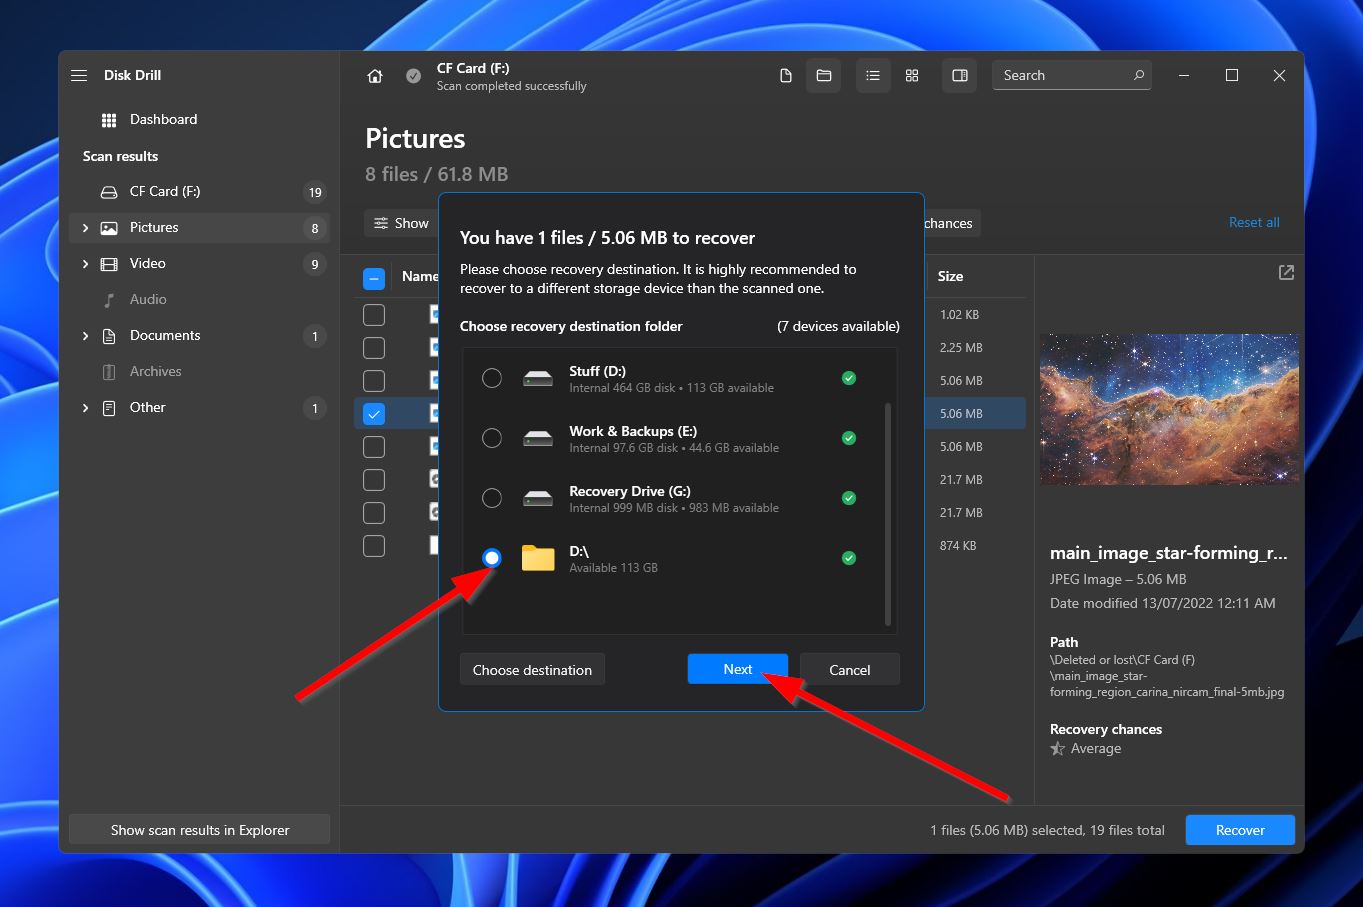
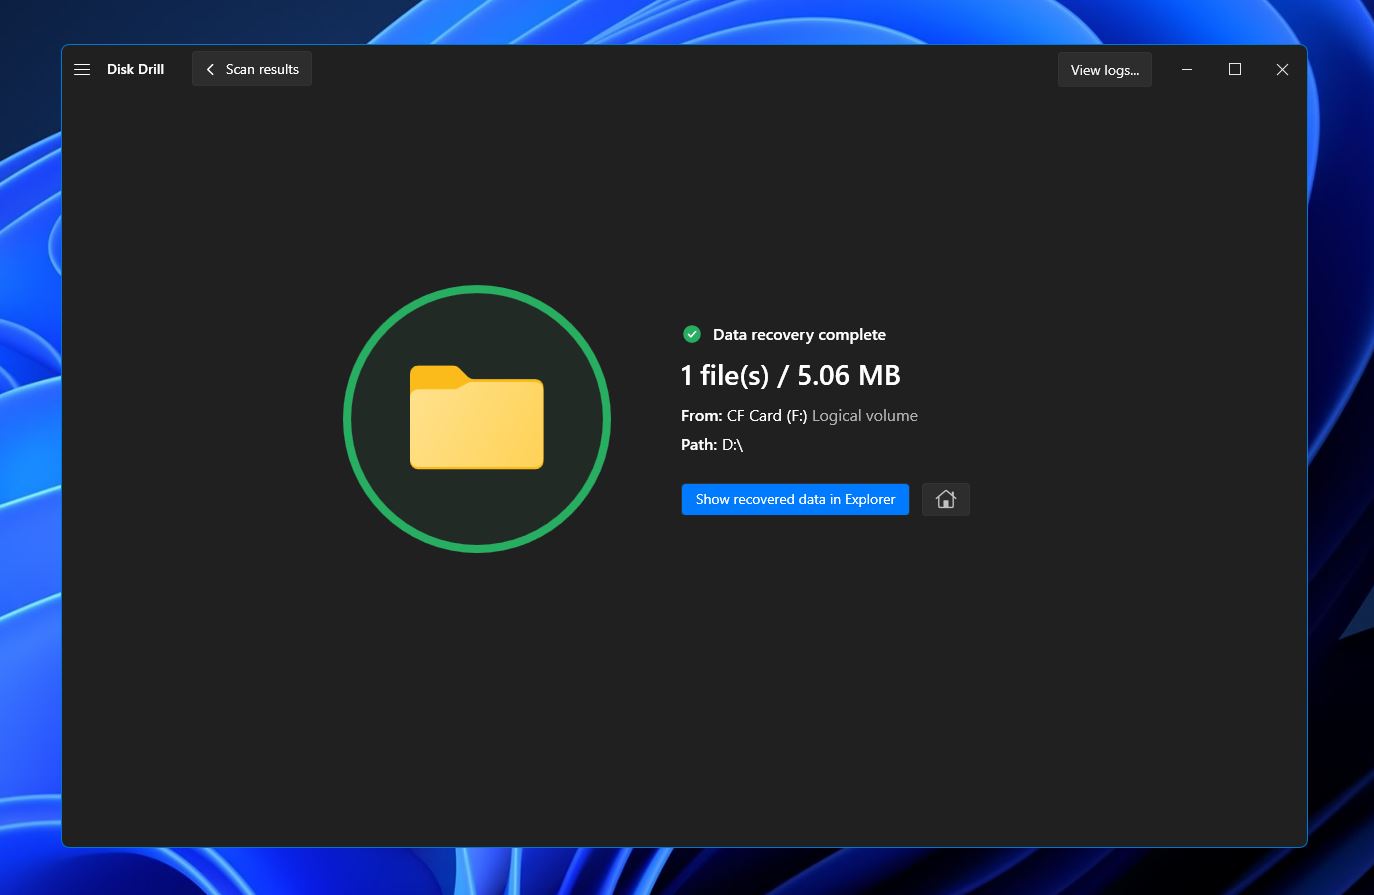
- Disk Drill will finally start attempting to recover your designated files. If successful, you’ll be greeted by a completion message and a button labeled “Show in Recovered Files in Explorer.”
On Mac:
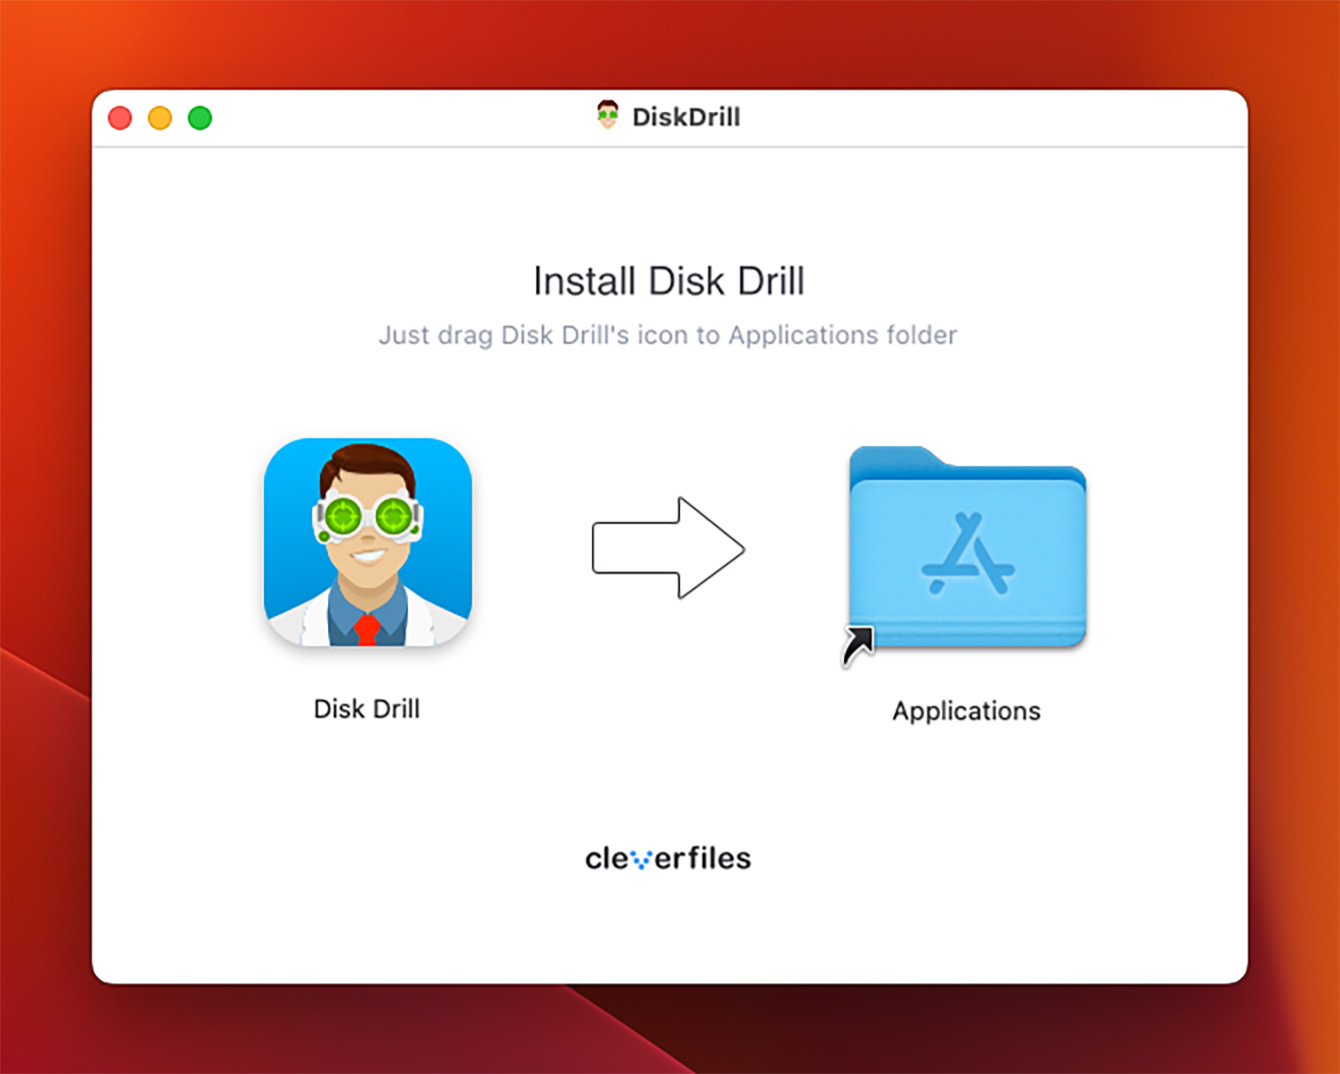
- First, download the Disk Drill installation file from the Cleverfiles website and install it on your Mac computer.
- Next, launch the program and find your CompactFlash memory card among the list of available storage devices. If you don’t see the card, you may want to try clicking the grid icon in the bottom right corner and selecting the “Show hidden items” option. Once you find the device, highlight it and click the “Search for lost data” button near the bottom of the window.
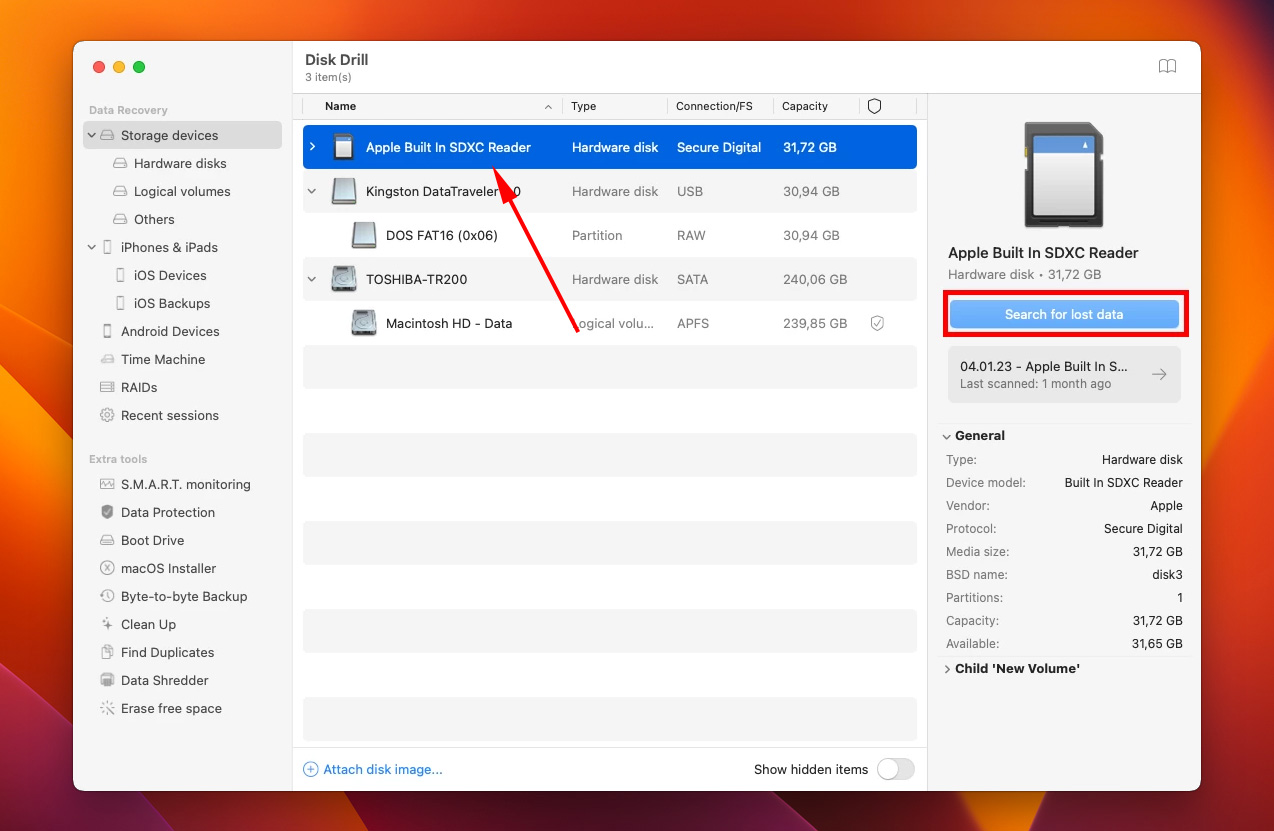
- Upon clicking, the app will start scanning your CF card for any recoverable files. You can click the “Review found items” button to check the results section while this progresses.
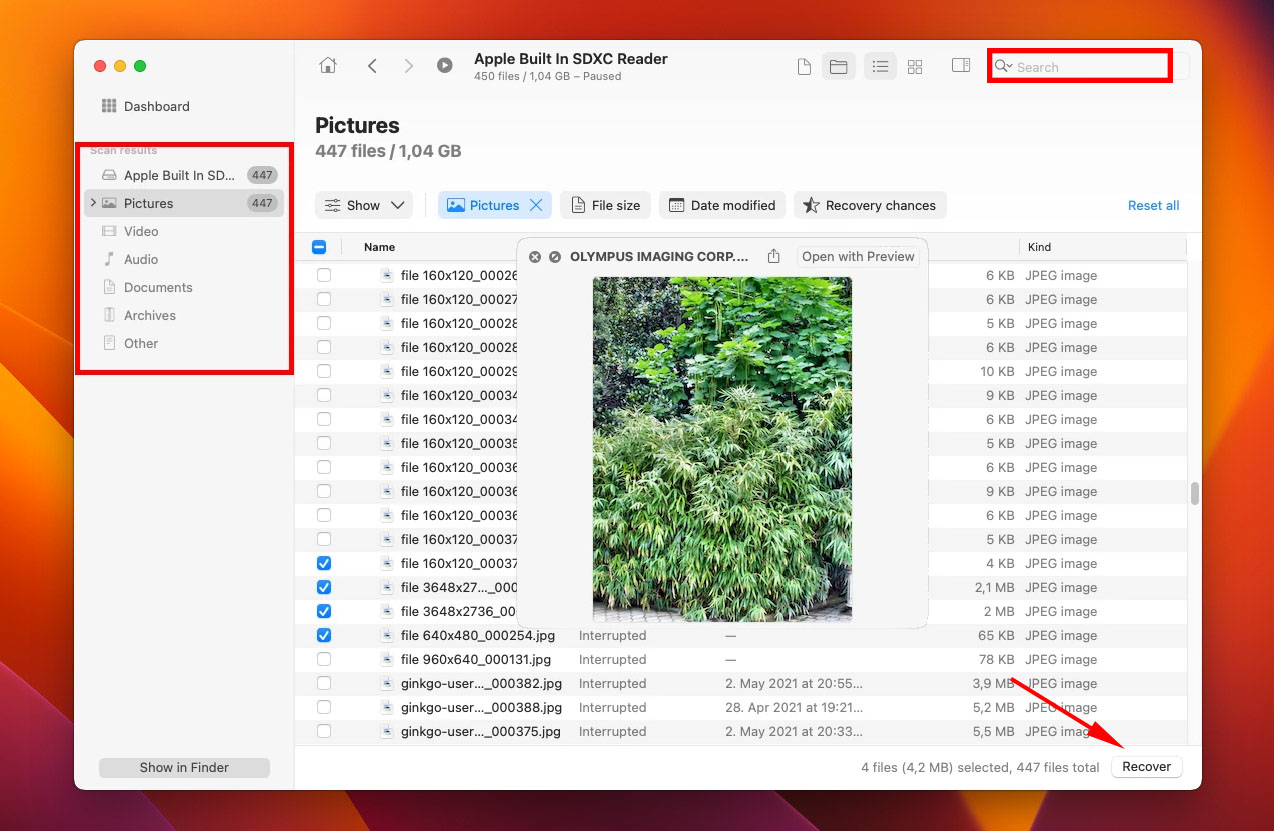
- On the results screen, filter out the found files using the categories on the left or the search bar in the top-right corner. Once you’ve located your files, mark the checkboxes beside their names and click “Recover.”
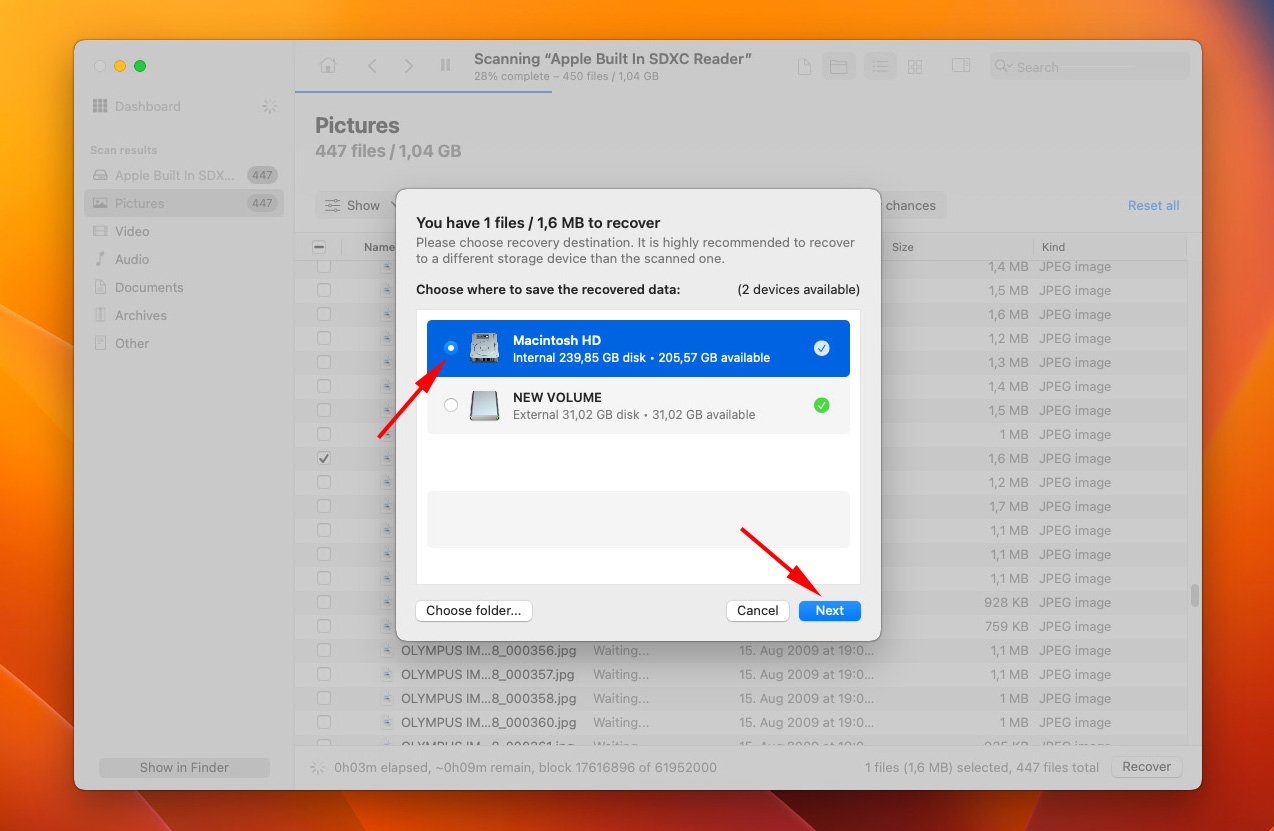
- Next, a small pop-up will appear where you’ll have to choose a folder to save the recovered files in. Click “Next” when you’ve decided.
- After that, Disk Drill will retrieve the chosen files.
How to Fix CF Card Not Recognized Error on Windows
There are quite a few fixes you can try in order to remedy the “not recognized” Compact Flash card. But before we dive into those methods, you should first try connecting the device to another computer since it may be that particular machine that’s having trouble recognizing the memory card.
Another thing you should cross off the list is connecting the CF card to a computer using a different memory card reader. That way, you can quickly identify the culprit before spending time on other fixes. If neither of these tips yielded any results, you can proceed with the fixes below.
Method 1: Enable Compact Flash Memory Card Readers
There are times when a CF memory card reader is detected by a computer but is actually disabled. This is why the compact flash card won’t read properly. In these cases, you simply have to enable the reader. Here’s how to do that:
- To start, press the Windows + X keys simultaneously and choose “Device Manager” from the list.
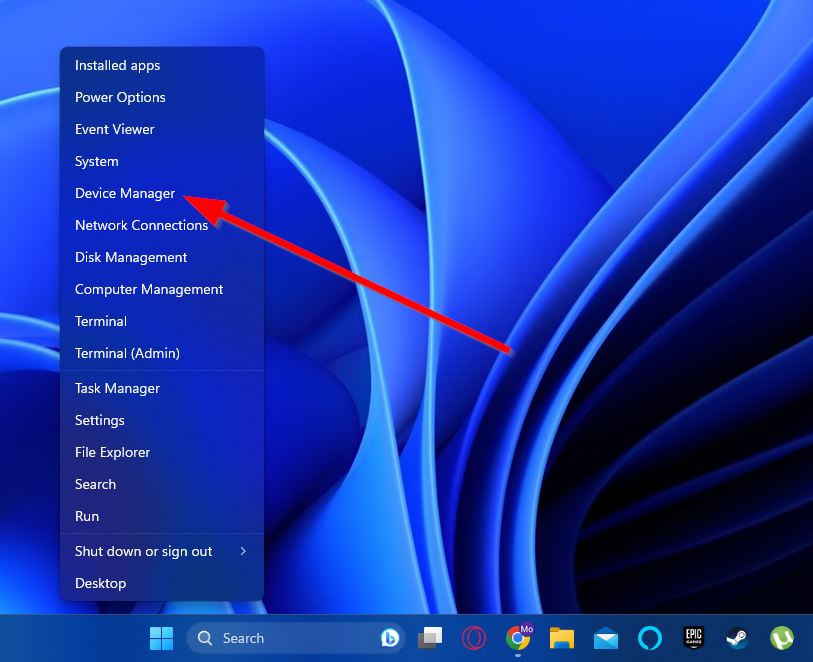
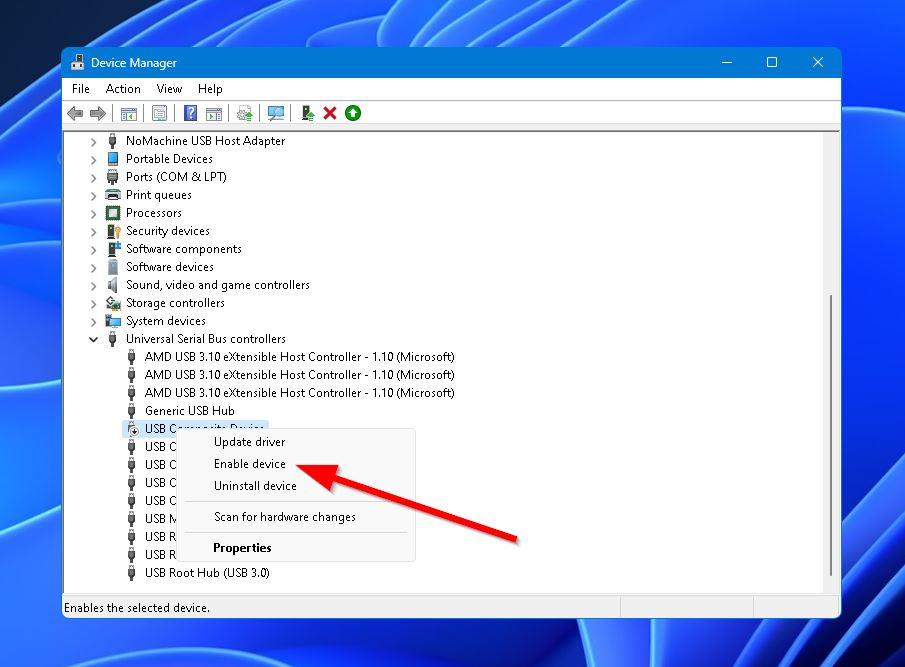
- Next, locate your CF card reader in the list of available devices, then right-click it and select the “Enable device” option.
Method 2: Update or Reinstall CF Card Reader Drivers
Bad or outdated card reader drivers are another reason for the CF card not recognized error. To correct this, you’ll need to update or reinstall the drivers. Here’s how:
- Press the Windows + X keys simultaneously and choose “Device Manager” from the list.

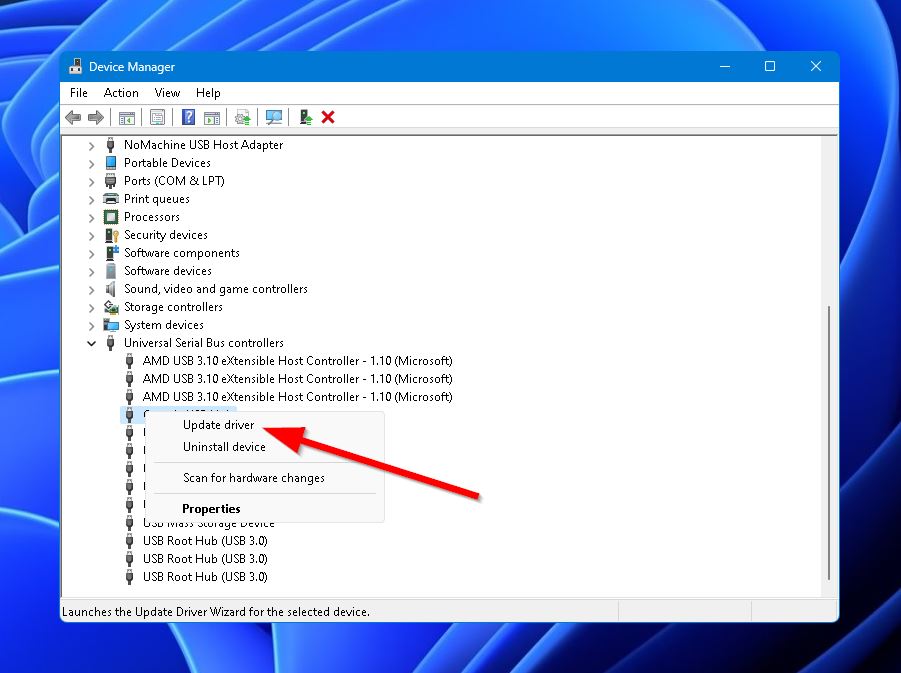
- Locate the CF card read in the list of devices, then right-click and select “Update driver”. From there, select the “Search automatically for drivers” option. If you’re looking to reinstall the driver, choose “Uninstall device” instead, then restart your PC. Windows will automatically identify and install it once more.
Method 3: Check CF Card Letter in Disk Management
If your CompactFlash card is not appearing in Windows Explorer, you should check if it’s showing up in Disk Management. If it is available in Disk Management, you should then make sure that a drive letter is assigned to it. The lack of a drive letter may be the cause of the PC not recognizing your SD card. To assign a drive letter to your CompactFlash card, simply follow the steps outlined below:
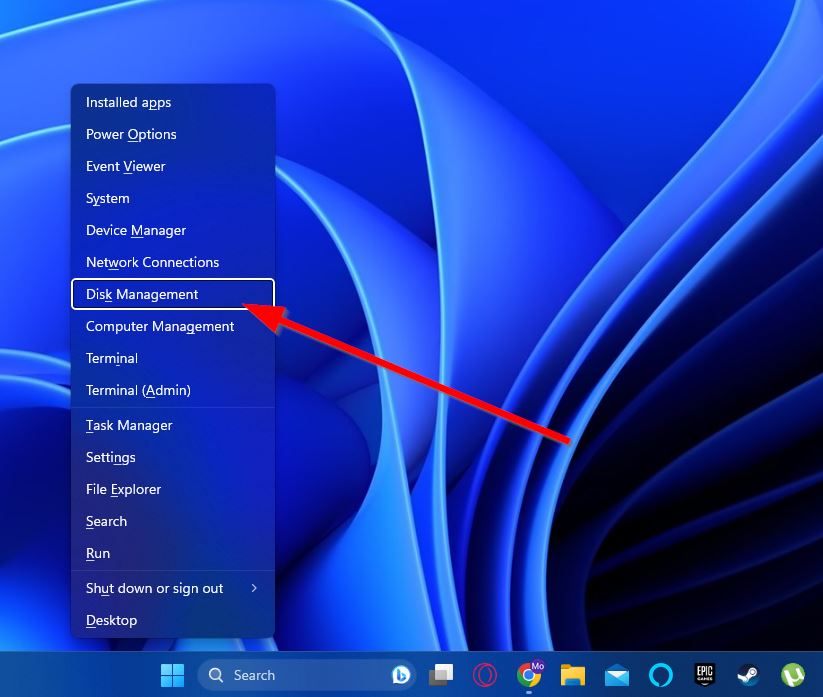
- First, press the Windows + X keys simultaneously and choose “Disk Management” from the list.
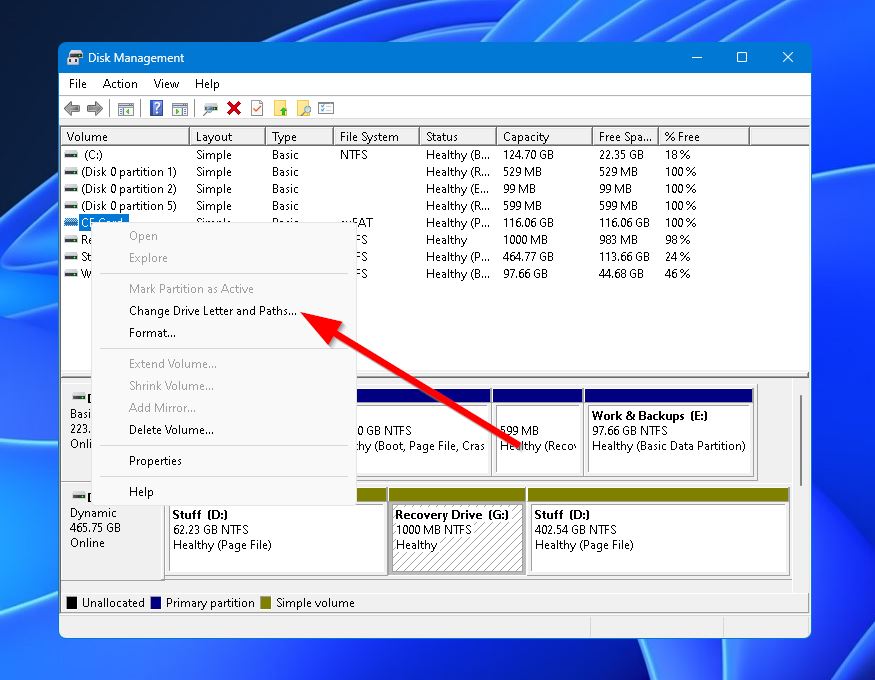
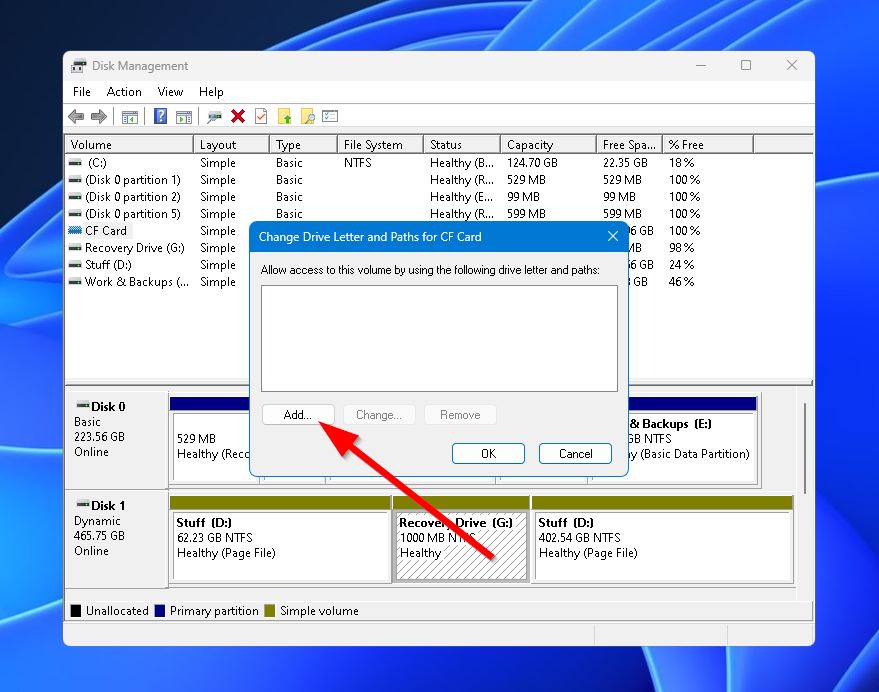
- Next, find your CF card reader in the list of available devices, then right-click it and select the “Change Drive Letter and Paths” option.
- When the pop-up appears, click the “Add” button.
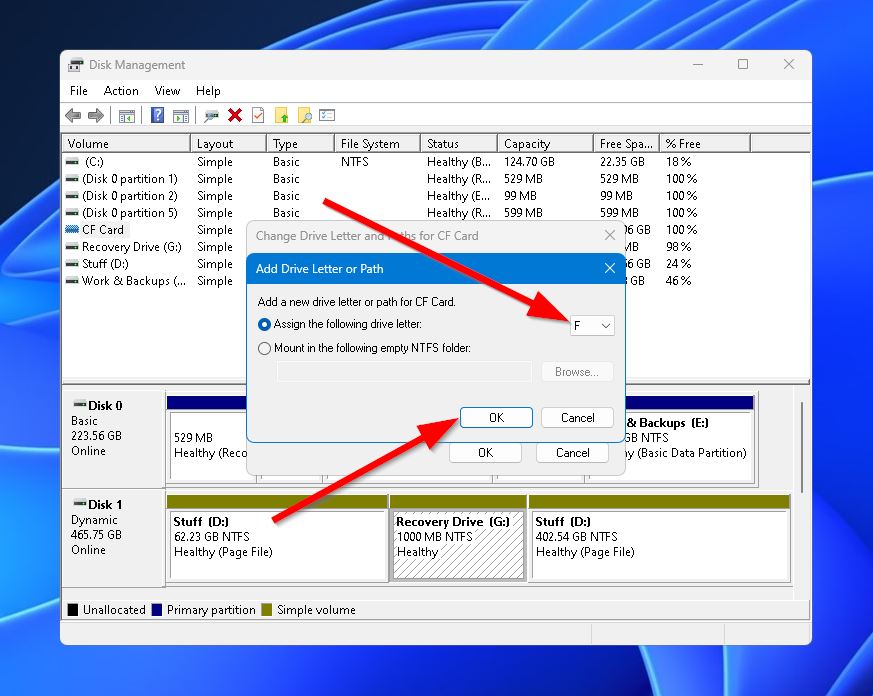
- Upon clicking, another pop-up will appear. Make sure the “Assign the following drive letter” radio button is selected, then choose a drive letter in the dropdown right next to it. Once done, click the “OK” button to finalize the process.
Method 4: Format CF Card in Disk Management
If your CF card is appearing in Disk Management as RAW, then it’s a good idea to format the device to a file system supported by your OS. Here’s a quick and easy step-by-step guide on how to do this:
- Press the Windows + X keys simultaneously and choose “Disk Management” from the list.

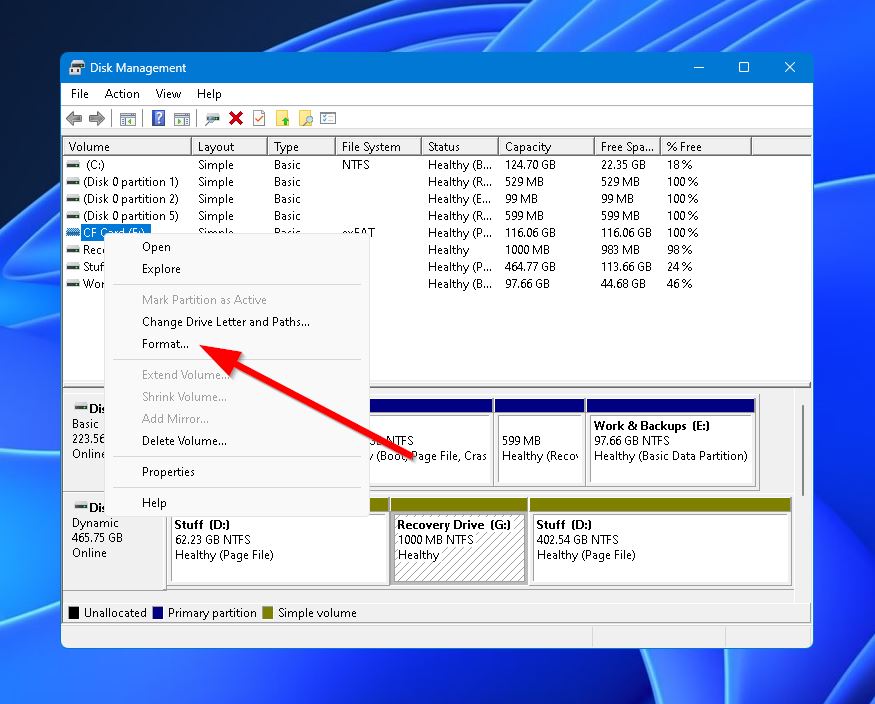
- Find your CF card reader in the list of available devices, then right-click it and select the “Format” option.
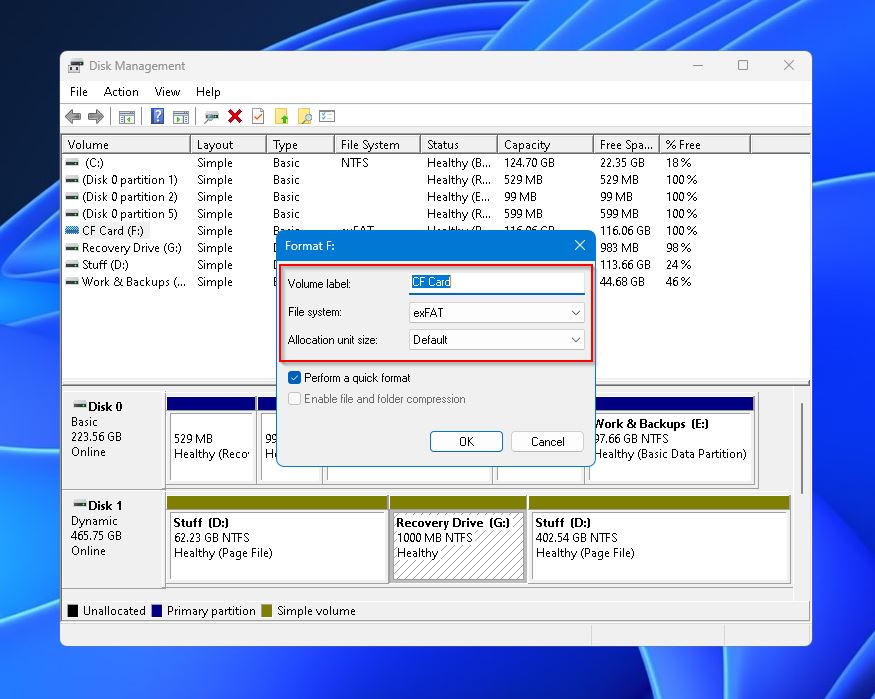
- After that, a small pop-up will appear where you can configure various formatting options, like the volume label and file system. Once you’re all set, click the “OK” button to finalize the format.
Method 5: Run Microsoft Support Diagnostic Tool
Windows has a built-in feature called the Microsoft Support Diagnostic Tool (MSDT) that’s capable of scanning all connected hardware and devices for errors. If any problems are found, it will attempt to resolve them. Follow these steps to run it:
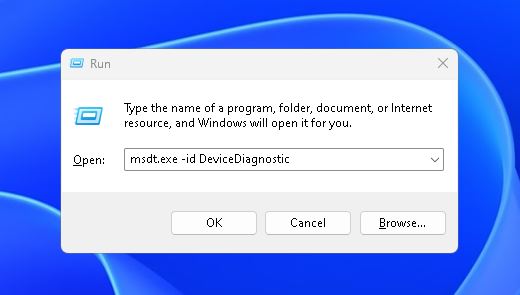
- Press the Windows + R keys to bring up the Run window. Then, type “msdt.exe -id DeviceDiagnostic” and hit Enter.
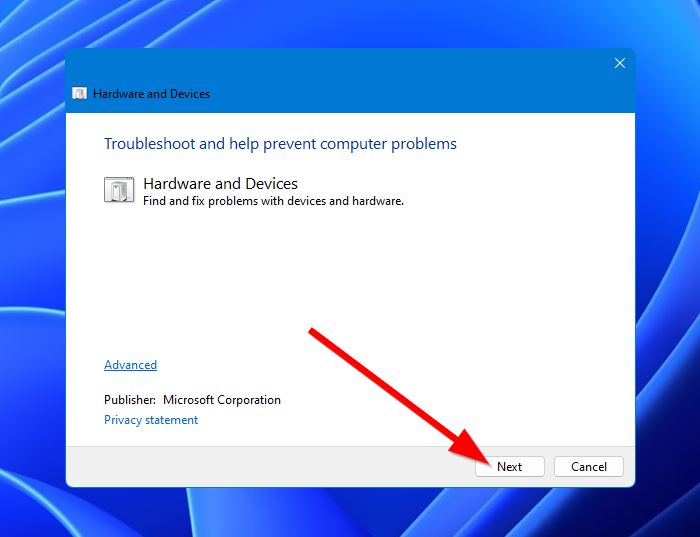
- The “Hardware and Devices” troubleshooter should appear on-screen. Click “Next” and Windows will scan and repair any hardware/device issues found on your computer.
Method 6: Fix CF Card Errors With CHKDSK Command
CHKDSK is a Windows tool that scans the integrity of a storage device and tries to repair any errors it detects. These errors could be the cause of your Compact Flash card not reading.
To fix CF card errors with the CHKDSK Command, follow these steps:
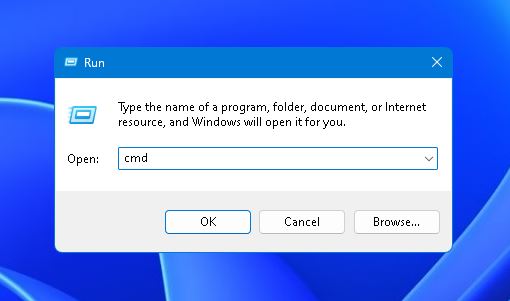
- Press the Windows + R keys to bring up the Run window to get started. Then, type “cmd” and hit Ctrl + Shift + Enter to run a command prompt as an admin.
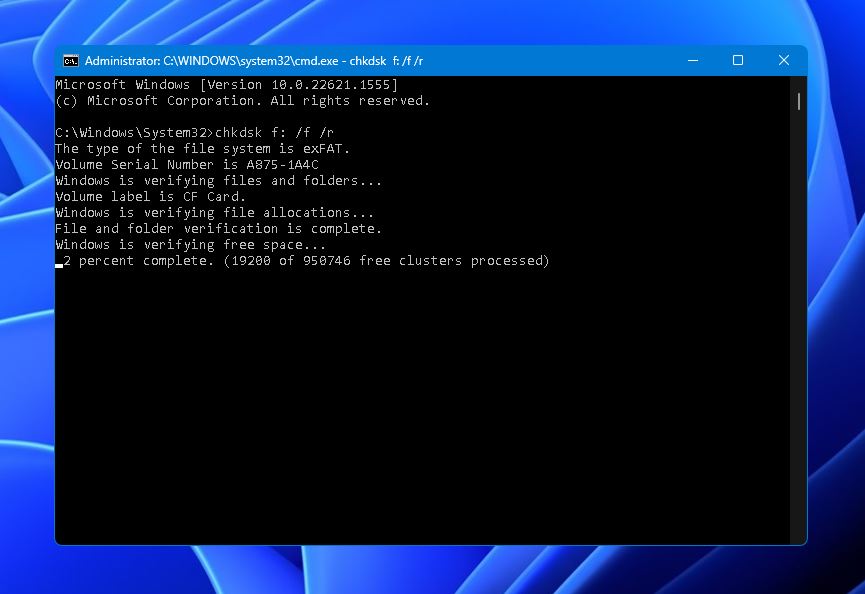
- Next, type in “chkdsk” and the drive letter of your CF card plus the colon symbol. Following the colon symbol, you can enter additional commands to perform on your device and hit Enter to execute. We’ll be using “/f” to tell CHKDSK to try fixing any bugs or errors encountered while scanning, as well as “/r” to try to repair bad sectors to make them readable again. Your end string should look something like this:
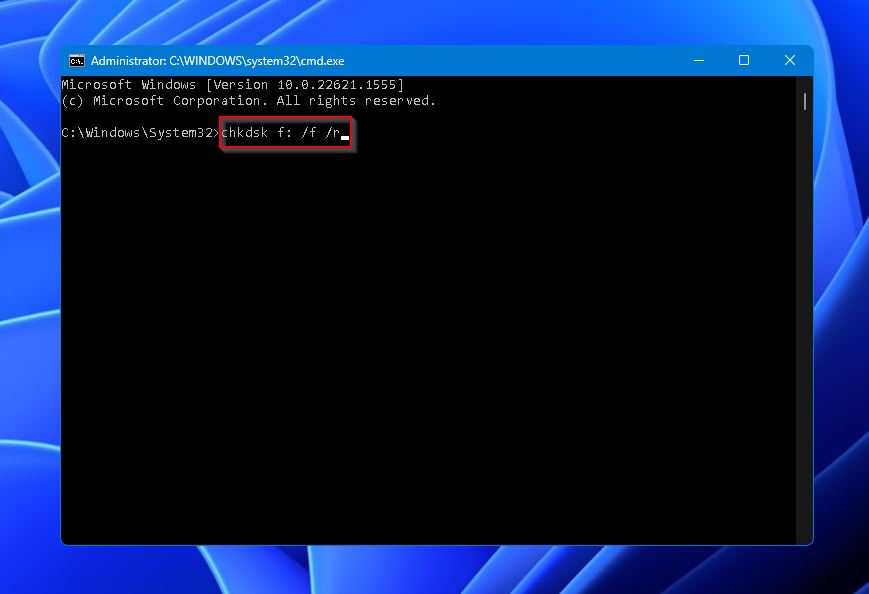
- After that, CHKDSK will now scan your CF card for errors and repair them if possible.
Method 7: Check For a Windows Update
Outdated Windows files could be causing your CF card to go unrecognized. Here’s how to check if there are any outstanding Windows updates that you should install:
- Type “updates” into your taskbar search feature and select the result labeled “check for updates.”

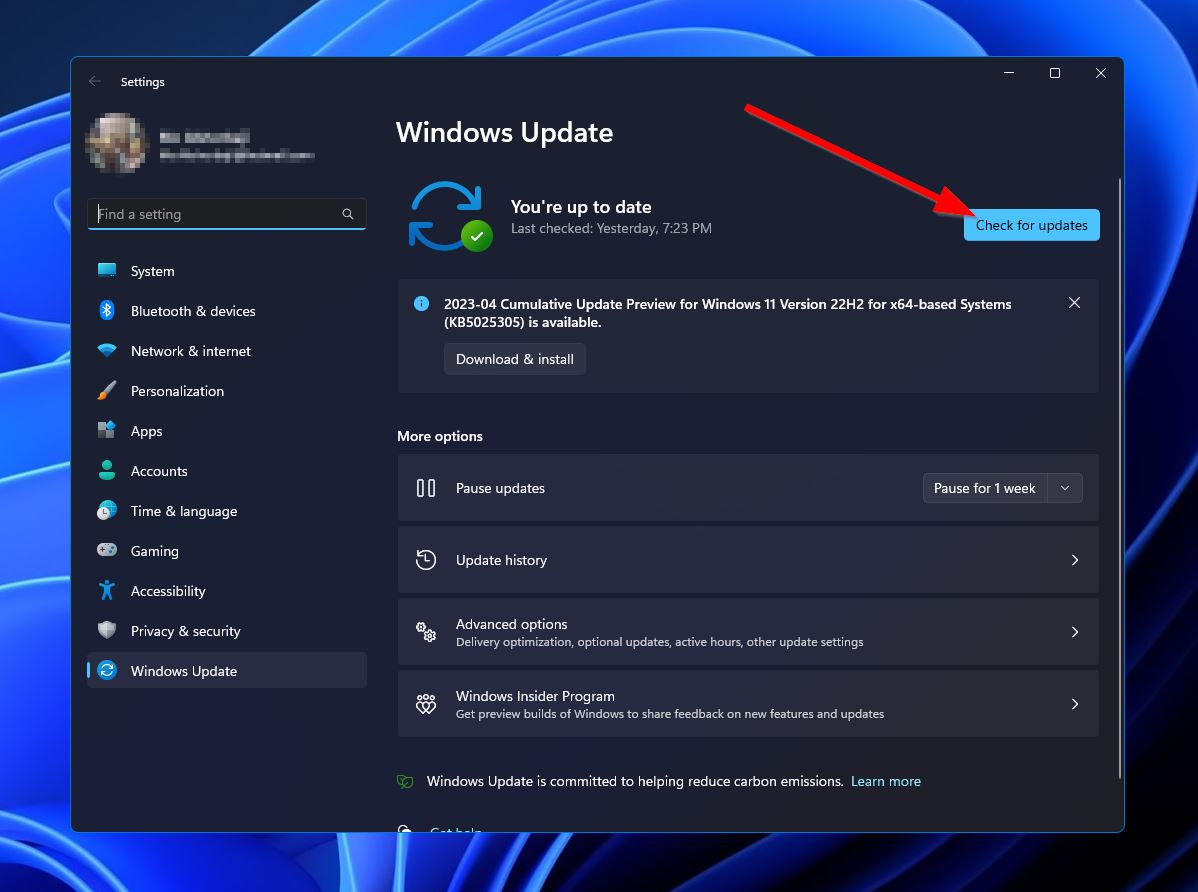
- Next, click the “Check for updates” button in the top-right corner.
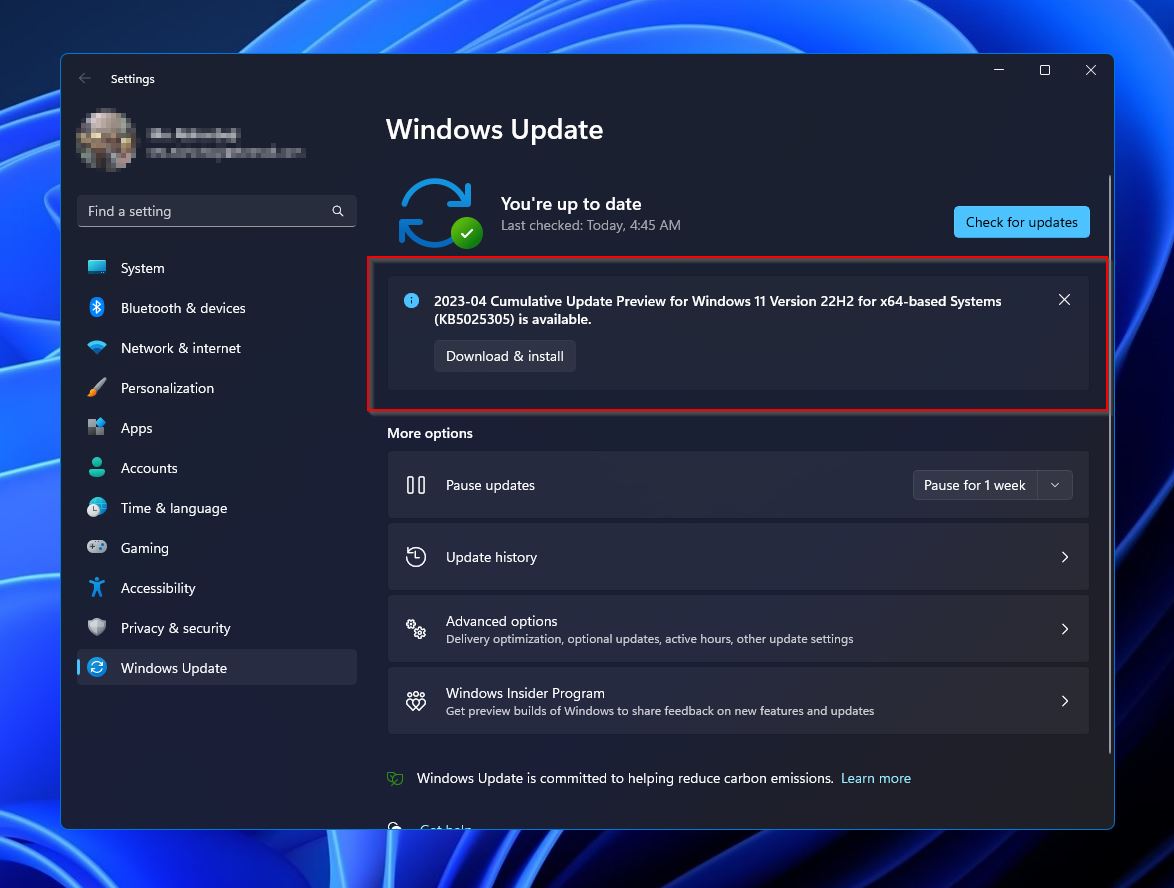
- After a few seconds, any available updates will appear in the window. Simply click “Download & install” for any outstanding updates.
How to Fix CompactFlash Card Not Reading On Mac
If you’re encountering the CF card “not recognized” error on a Mac computer, there are a few Mac-specific tools you can try to get your device working again. But before that, here are some things you should make sure of:
- Double-check your USB port or card reader hub connection to ensure it’s working properly. You can also try plugging the device directly into your computer’s card reader port if available.
- If you have a lot of devices connected to your computer, disconnect all non-essential ones and reconnect your card reader or memory card to see if that works.
- Restart your Mac to see if that solves the problem.
If your CF card is still unrecognized, proceed with the methods below.
Method 1: Check CompactFlash Card in Finder
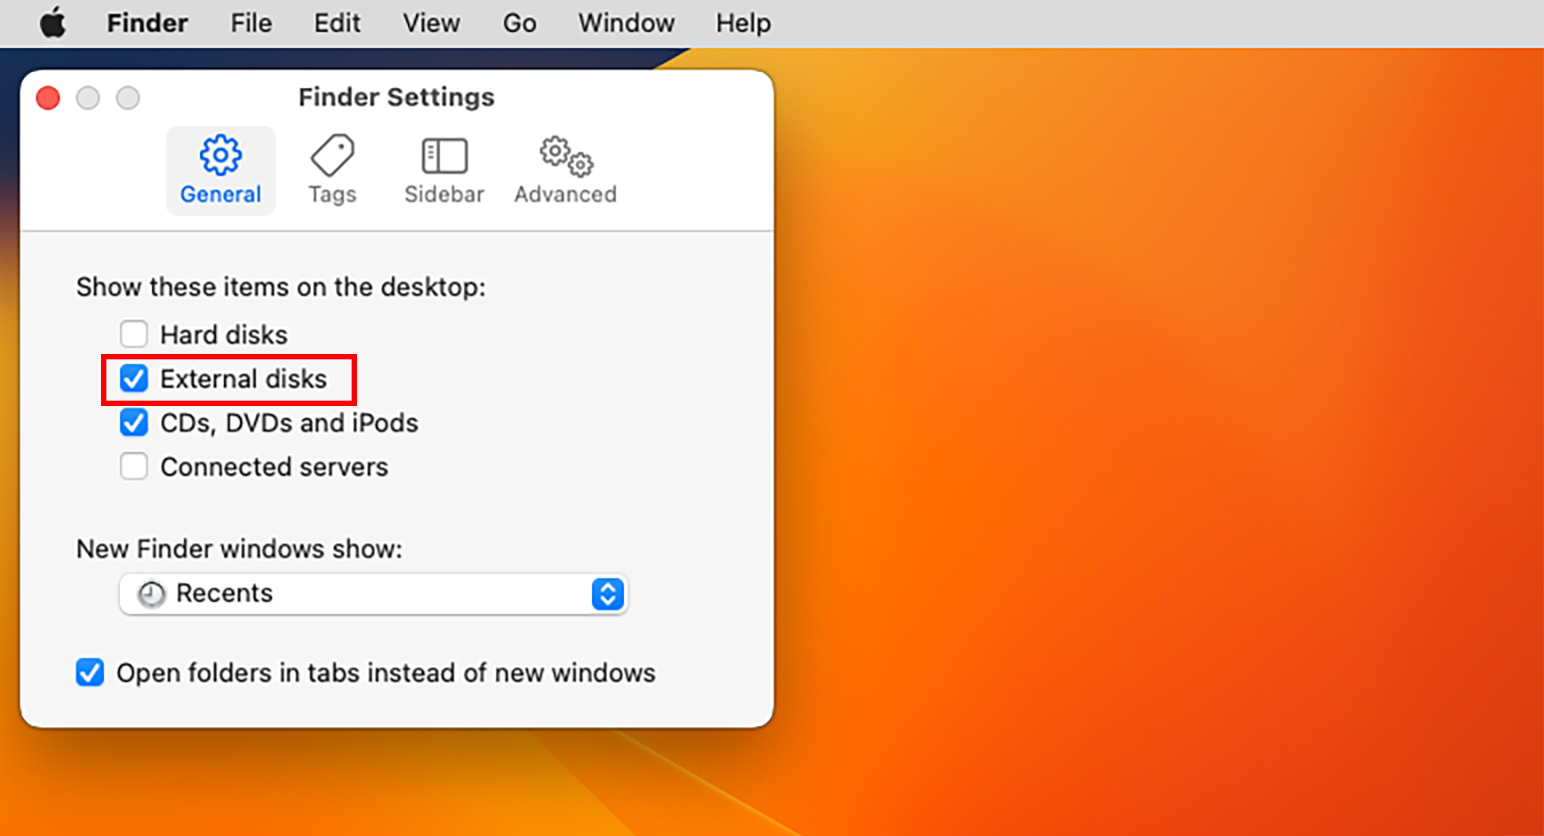
Your CF Card may not be appearing on your computer due to the settings of your “Finder” app. Follow these instructions to make sure the right setting is enabled:
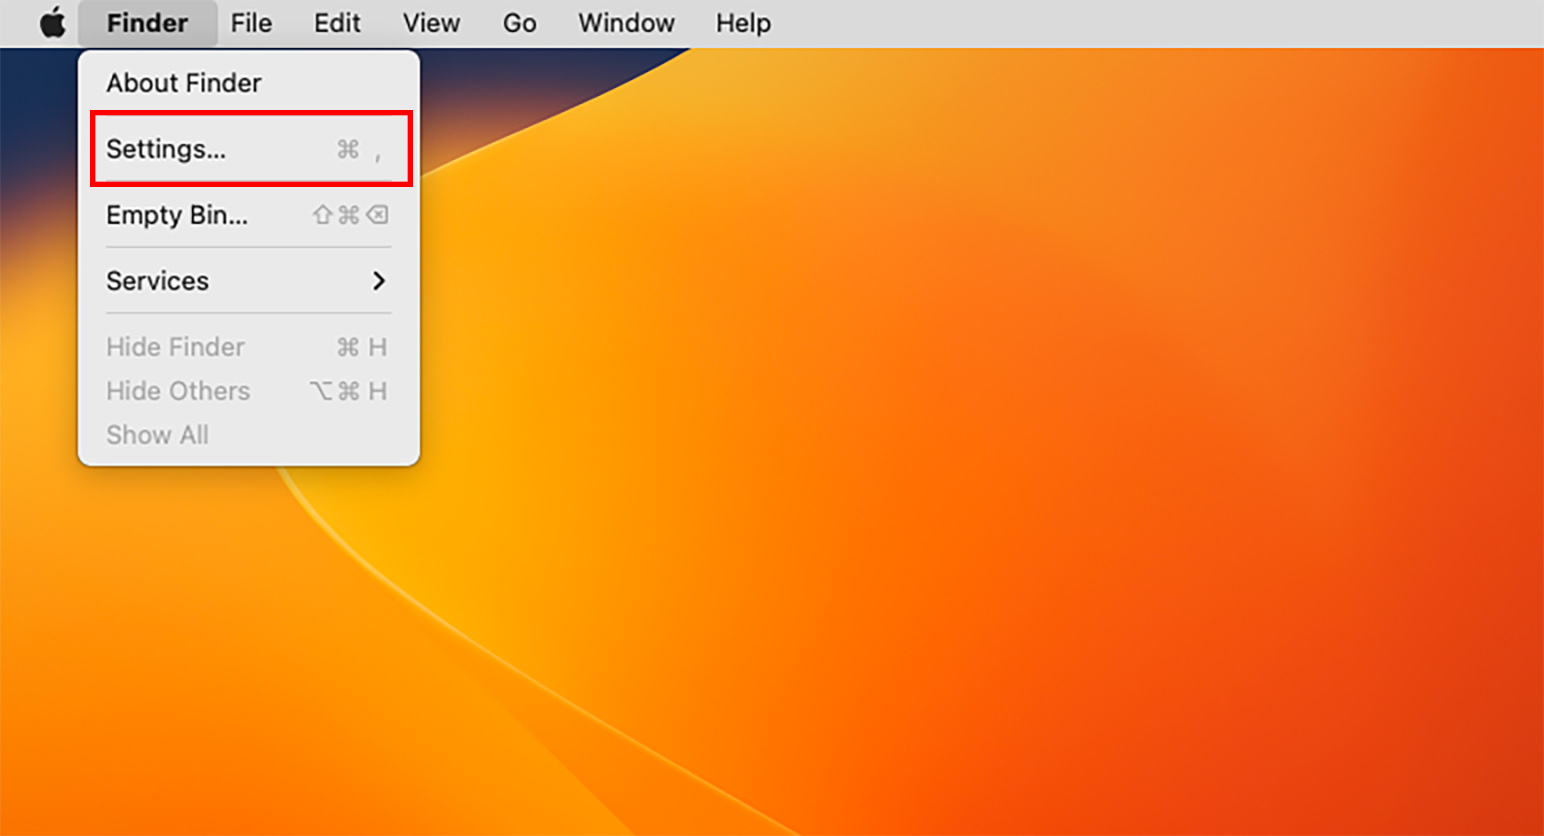
- From your desktop, click the “Finder” tab in the top-left corner of the screen and select “Settings…”
- While on the “General” tab, make sure the “External disks” option is ticked.
Method 2: Verify CompactFlash Card in System Information
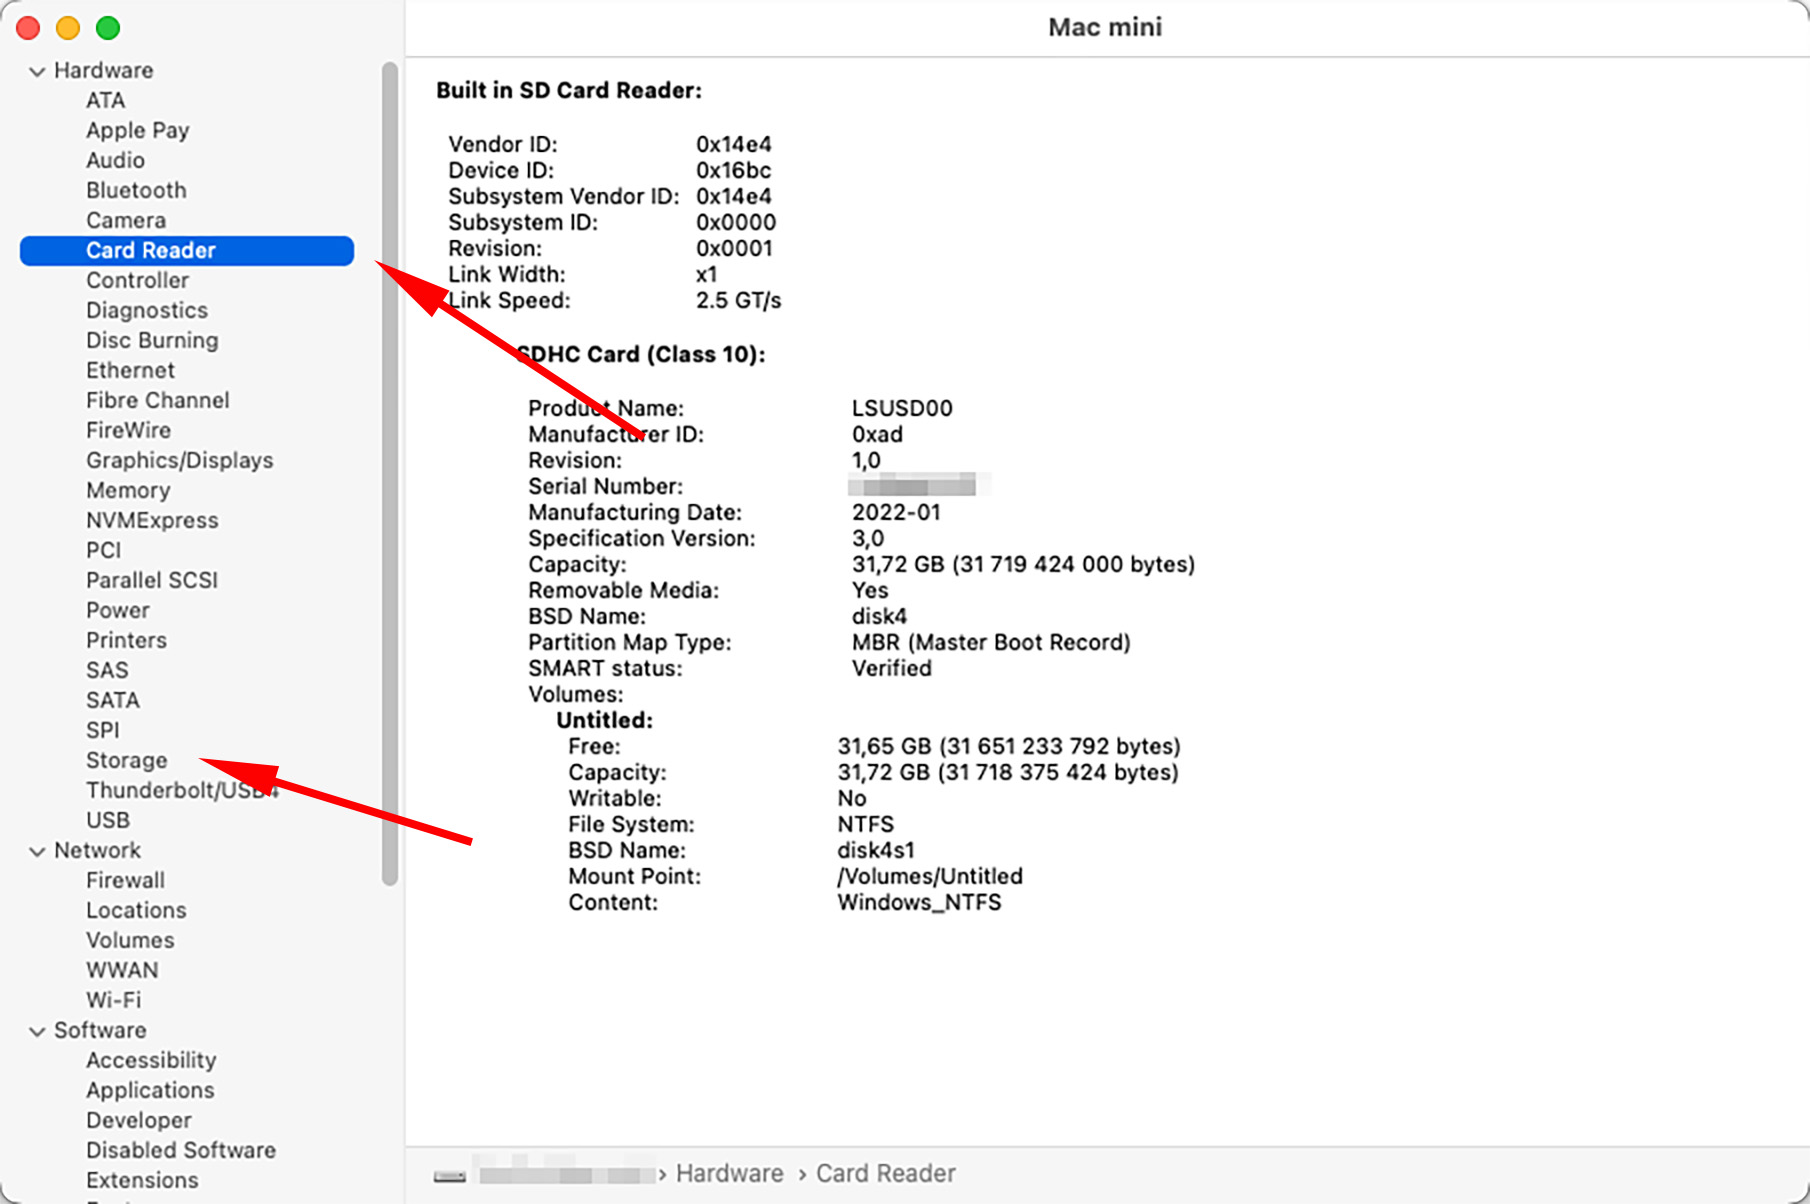
Another thing you do is check if the CompactFlash card is being detected properly by the computer, even if it’s not showing up as a storage device. You can do so by looking up the card in the Mac “System Information” tool. To check it, follow these steps:
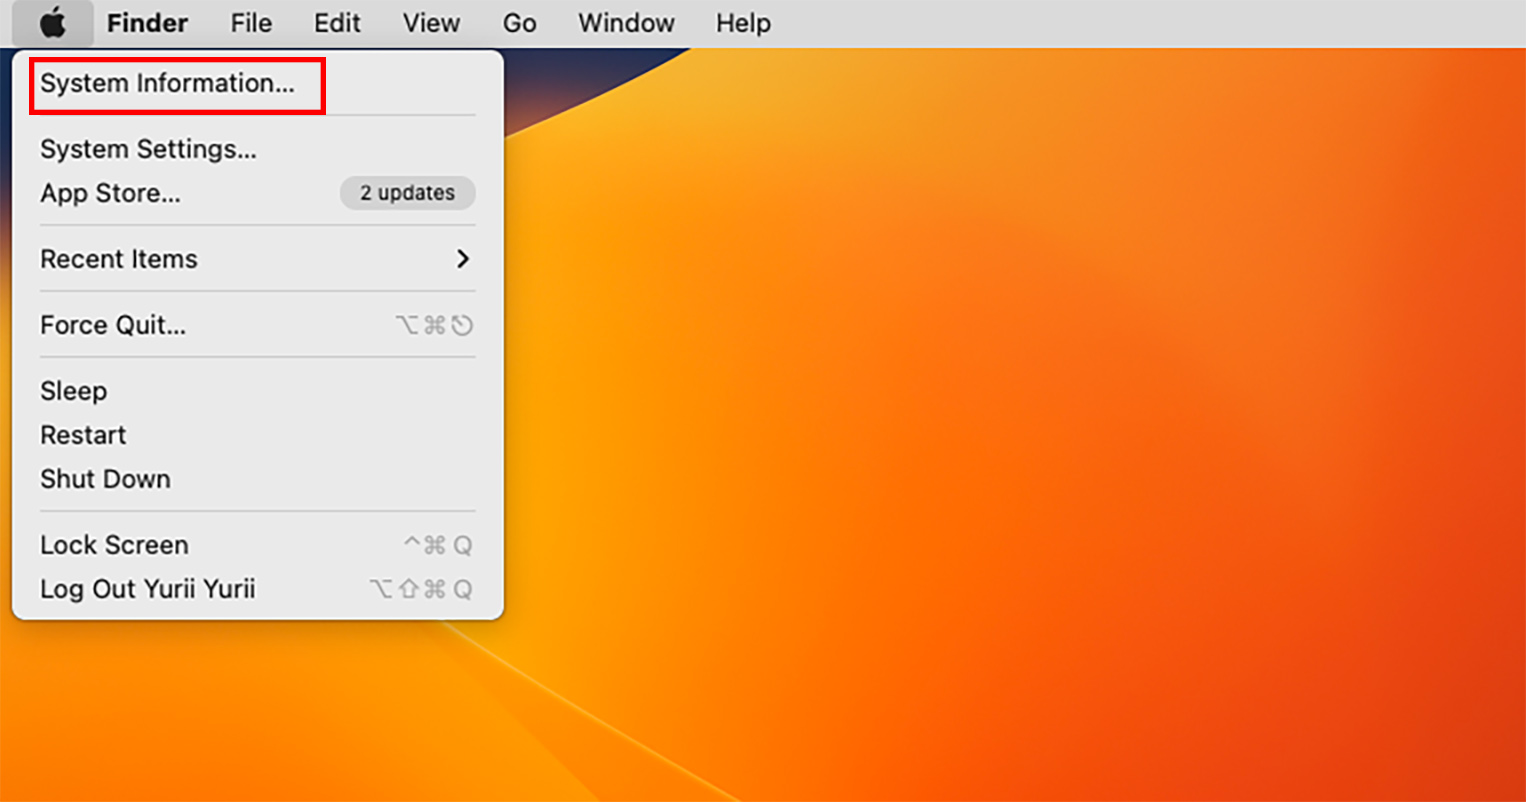
- Hold down the “Option” key on your keyboard and click on the Apple logo at the top-left corner of your screen. From there, select the “System Information” option.
- After that, go through the connected devices on your Mac to see if your CF card is being detected properly.
Method 3: Format CF Card
Performing a format can fix a lot of issues with your CF card, including the device not being read properly. If you were able to verify the card in the previous section, you could try formatting it using the steps below:
- First, open “Finder” and select “Applications” from the left-side panel.
- Next, open “Utilities” and select “Disk Utility.”
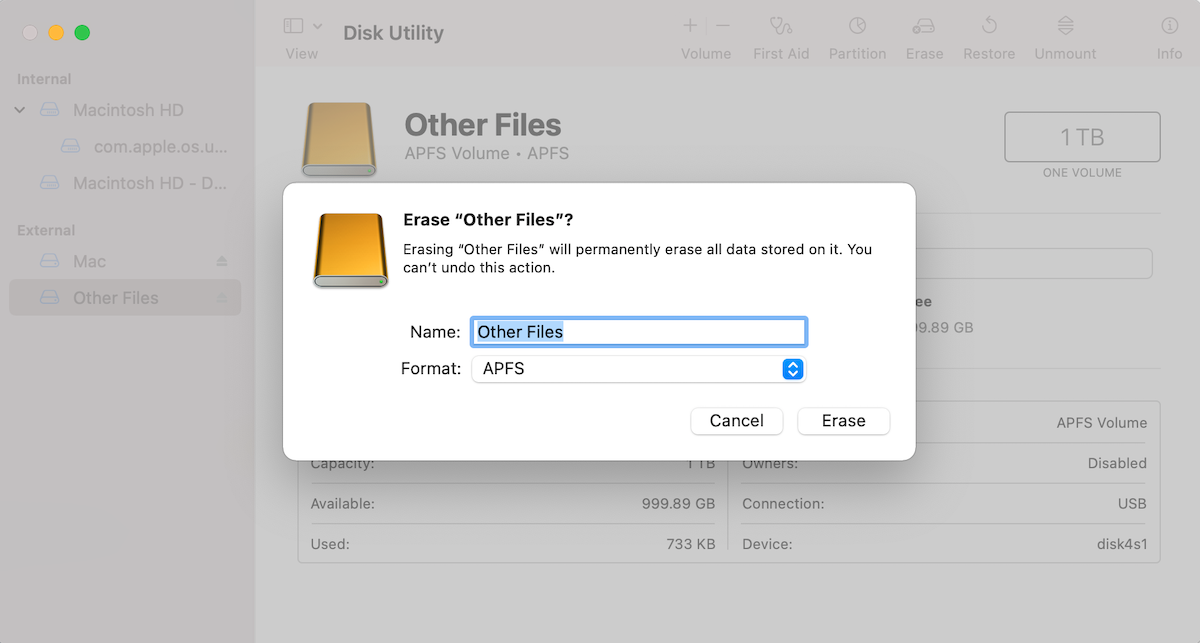
- Select your CF card from the available devices on the left, then click the “Erase” option near the top of the window.
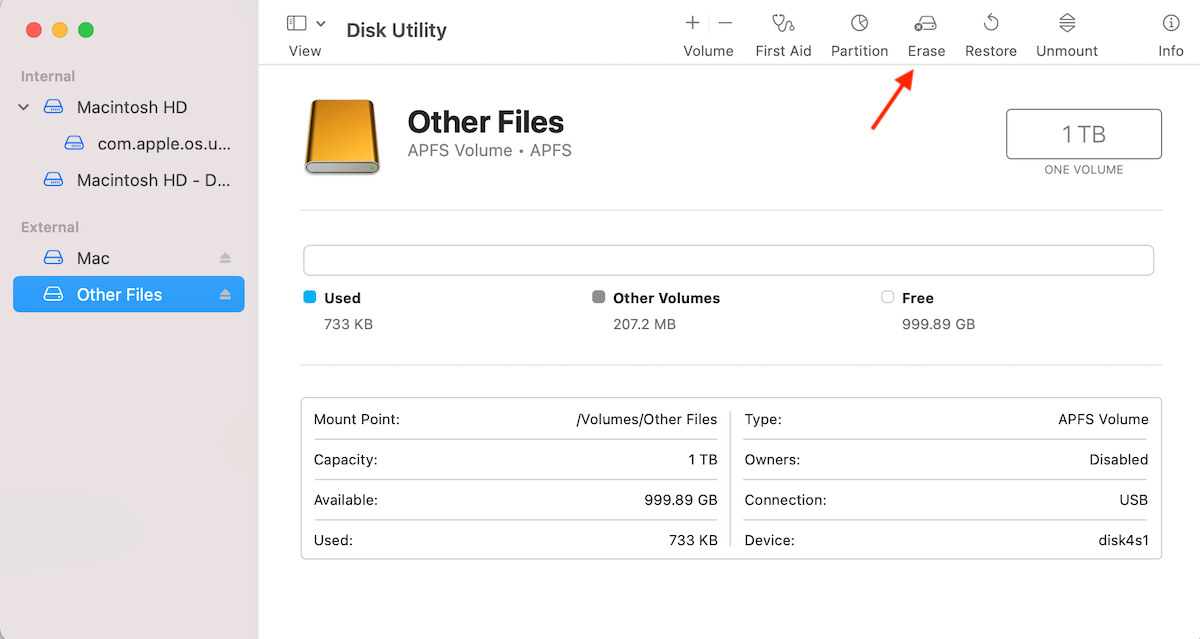
- A small pop-up will appear where you can select the new name and format for your CR card. Click the “Erase” button when you’re ready, and the Mac OS will take care of the rest.
Method 4: Try to Repair CF Card With First Aid
Similar to the Windows CHKDSK tool, Macs have a “First Aid” feature that checks storage devices for errors and repairs them if possible. These are the steps for scanning your CF card using the “First Aid” tool:
- First, open “Finder” and select “Applications” from the left-side panel.
- Next, expand “Utilities” and select “Disk Utility.”
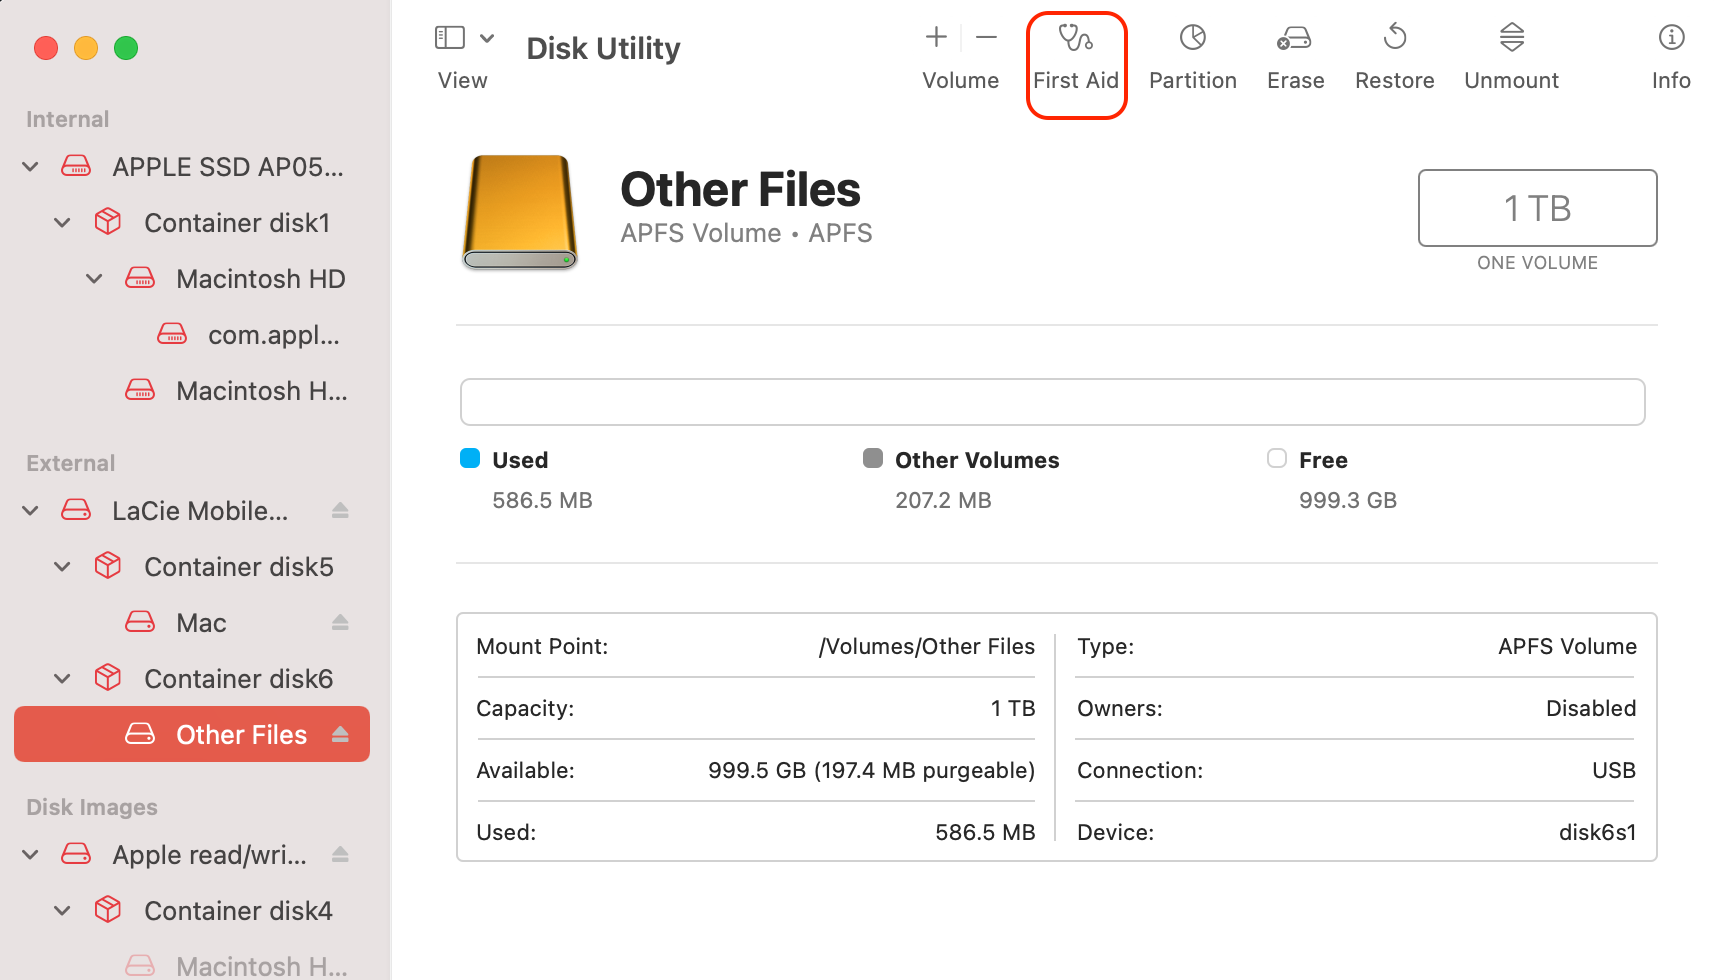
- Select your CF card from the available devices on the left, then click the “First Aid” option near the top of the window.
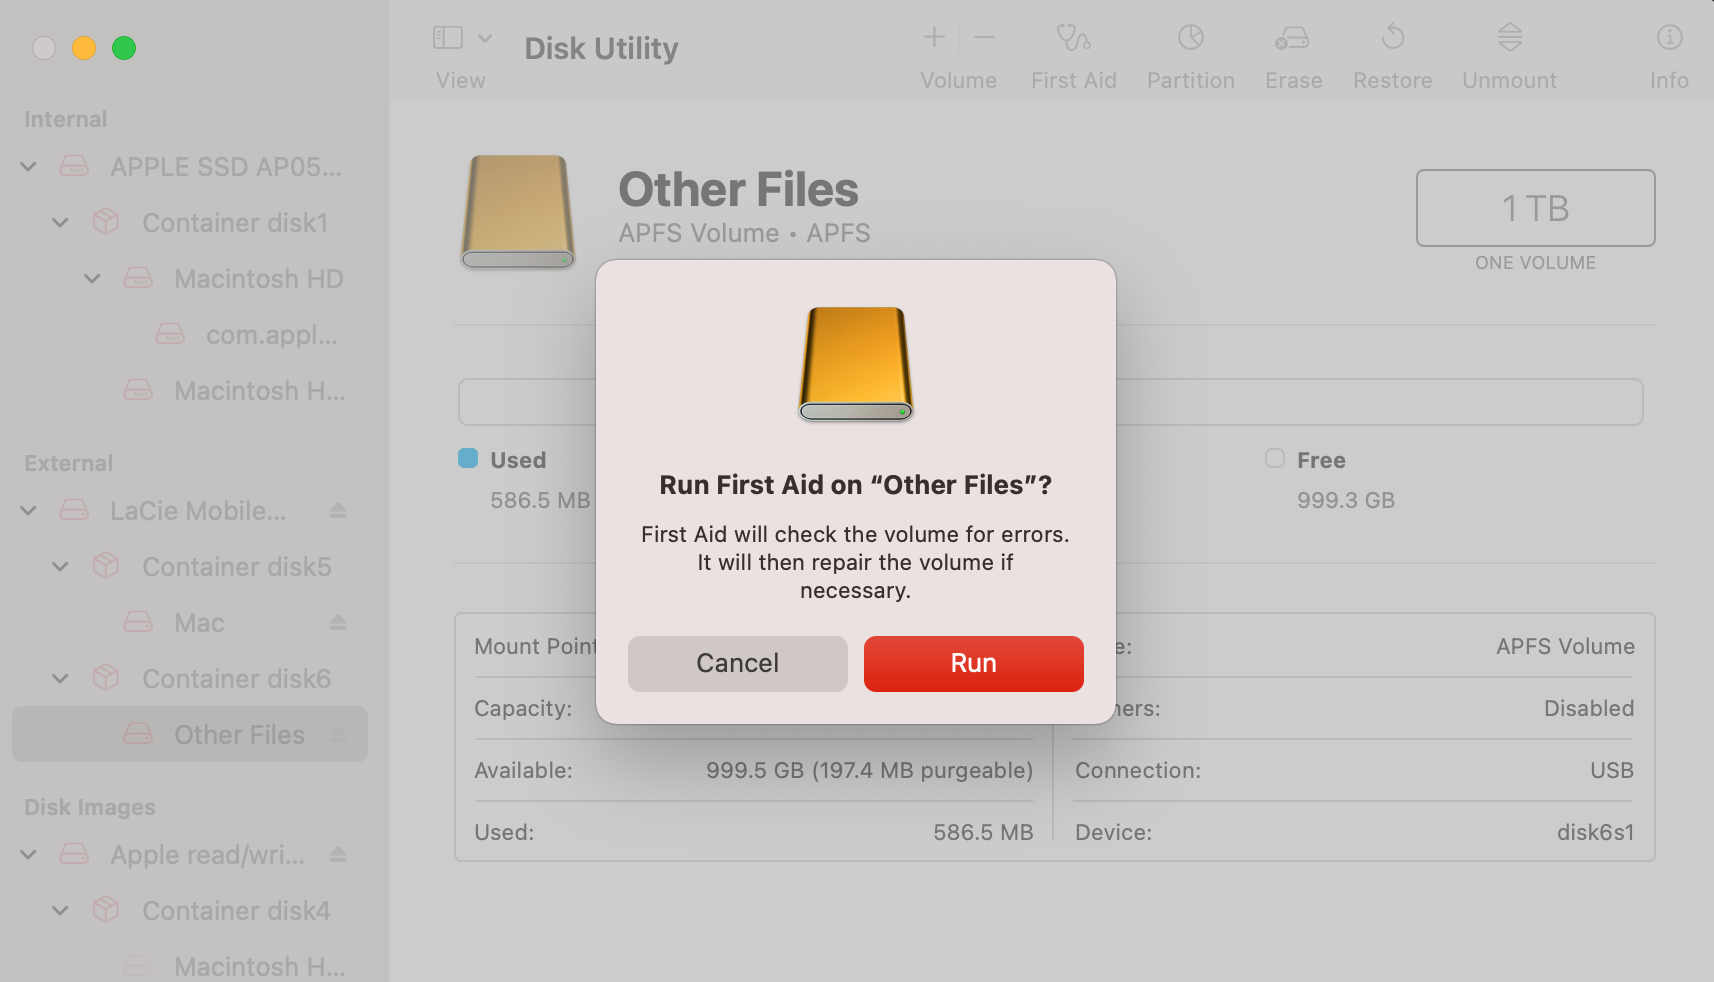
- Finally, click “Run” in the pop-up that appears.
FAQ:
- Driver issues
- Bad sectors
- File system incompatibility
- Physical damage
- Error during format
