
If you use your computer for more than just working in Microsoft Office, you may encounter a situation where you need to initialize a disk. This can happen with both external and internal non-system SSDs or HDDs. Naturally, the question arises whether this process will affect the data already stored on the disk (if you’ve just installed a new hard drive, you don’t need to worry about this–skip ahead to the initialization instructions).
Initializing a disk is a simple process, but not every user understands what exactly happens in the operating system during it. To clarify, in this article, we explain what initialization is, its impact on your files, and how to perform it without losing any data.
We’ll show the steps on Windows 11, but the process is the same on Windows 10, the only difference is in the names of certain functions.
What is Disk Initialization and How Does It Work?
Initialization is the process that applies a partition table to your disk so it can be recognized and used by the operating system. A partition table is a data organization scheme that allows the system to understand how the disk is divided into drives and which partition holds the active operating system. Without it, the disk remains inaccessible. To make a disk usable, you need to apply either MBR (used mostly for older drives) or GPT (the standard for most modern drives). That’s exactly what initialization takes care of.
To answer the common question, does initializing a disk erase data, you first need to understand the process itself. Initialization happens in two stages. The first is applying a partition style (MBR or GPT). At this stage, the existing data on the disk remains untouched. The second stage is formatting the disk. This is when all data is erased, as the system writes a new filesystem to the drive.
While it’s technically possible to recover files even after formatting, the more reliable practice is to protect your data before taking any action. The best way is to create a backup of the disk that needs initialization. You might wonder how this can be done if the disk appears inaccessible–that’s exactly what we’ll address in the following section.
How to Create a Backup of a Disk That Is Not Initialized
An uninitialized disk is not accessible through File Explorer, so you can’t simply open it and copy the files you want to keep. To back it up, you’ll need special software. There are dedicated programs for this task, but we’ll use Disk Drill as an example. The advantage of Disk Drill is that it not only allows you to create a complete backup of the disk but also gives you the ability to work with that backup later to restore files, without having to rely on additional tools.
We strongly recommend not rushing into initialization without creating a backup first. With HDDs, there are still chances to restore data even after formatting. However, when it comes to internal SSDs, once you initialize and format the drive, the TRIM command is applied almost instantly, which eliminates the possibility of data recovery. In such cases, the backup you created beforehand will be the only way to save your files.
Here’s how you can create a backup with Disk Drill:
- Download Disk Drill from the official website and install it on your computer.
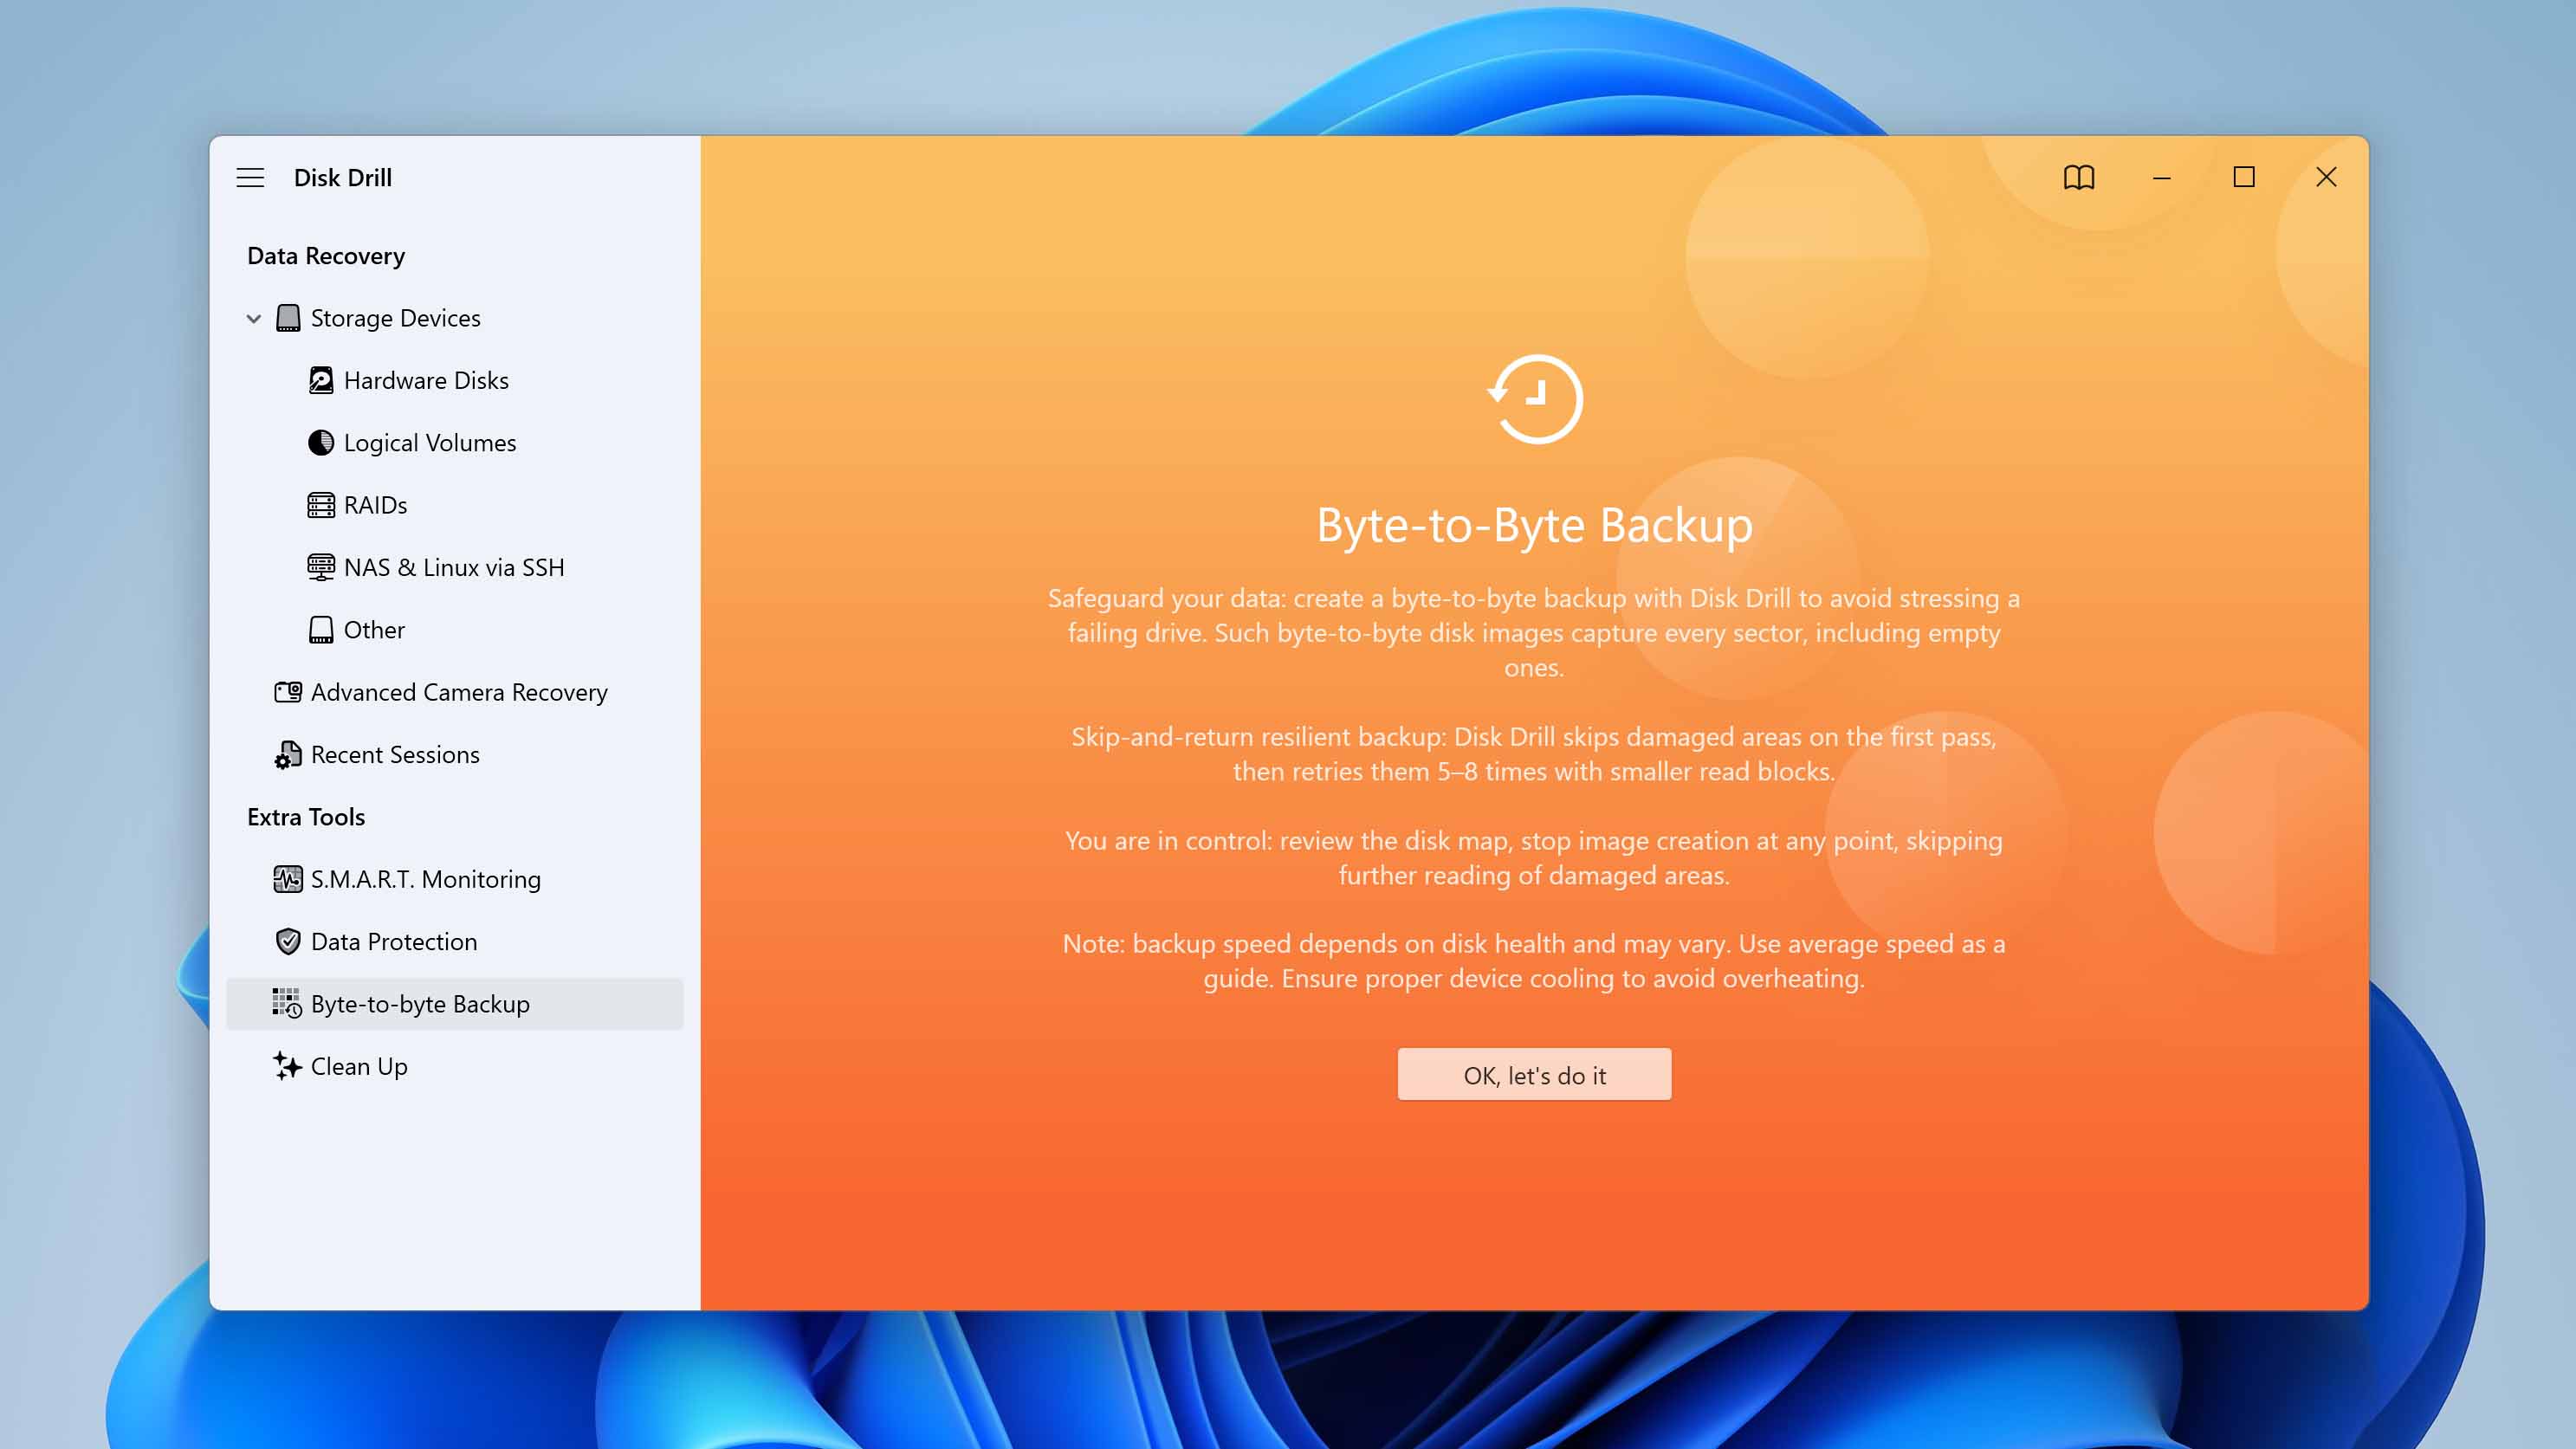
- Open Disk Drill and select the Byte-to-byte Backup option from the sidebar.
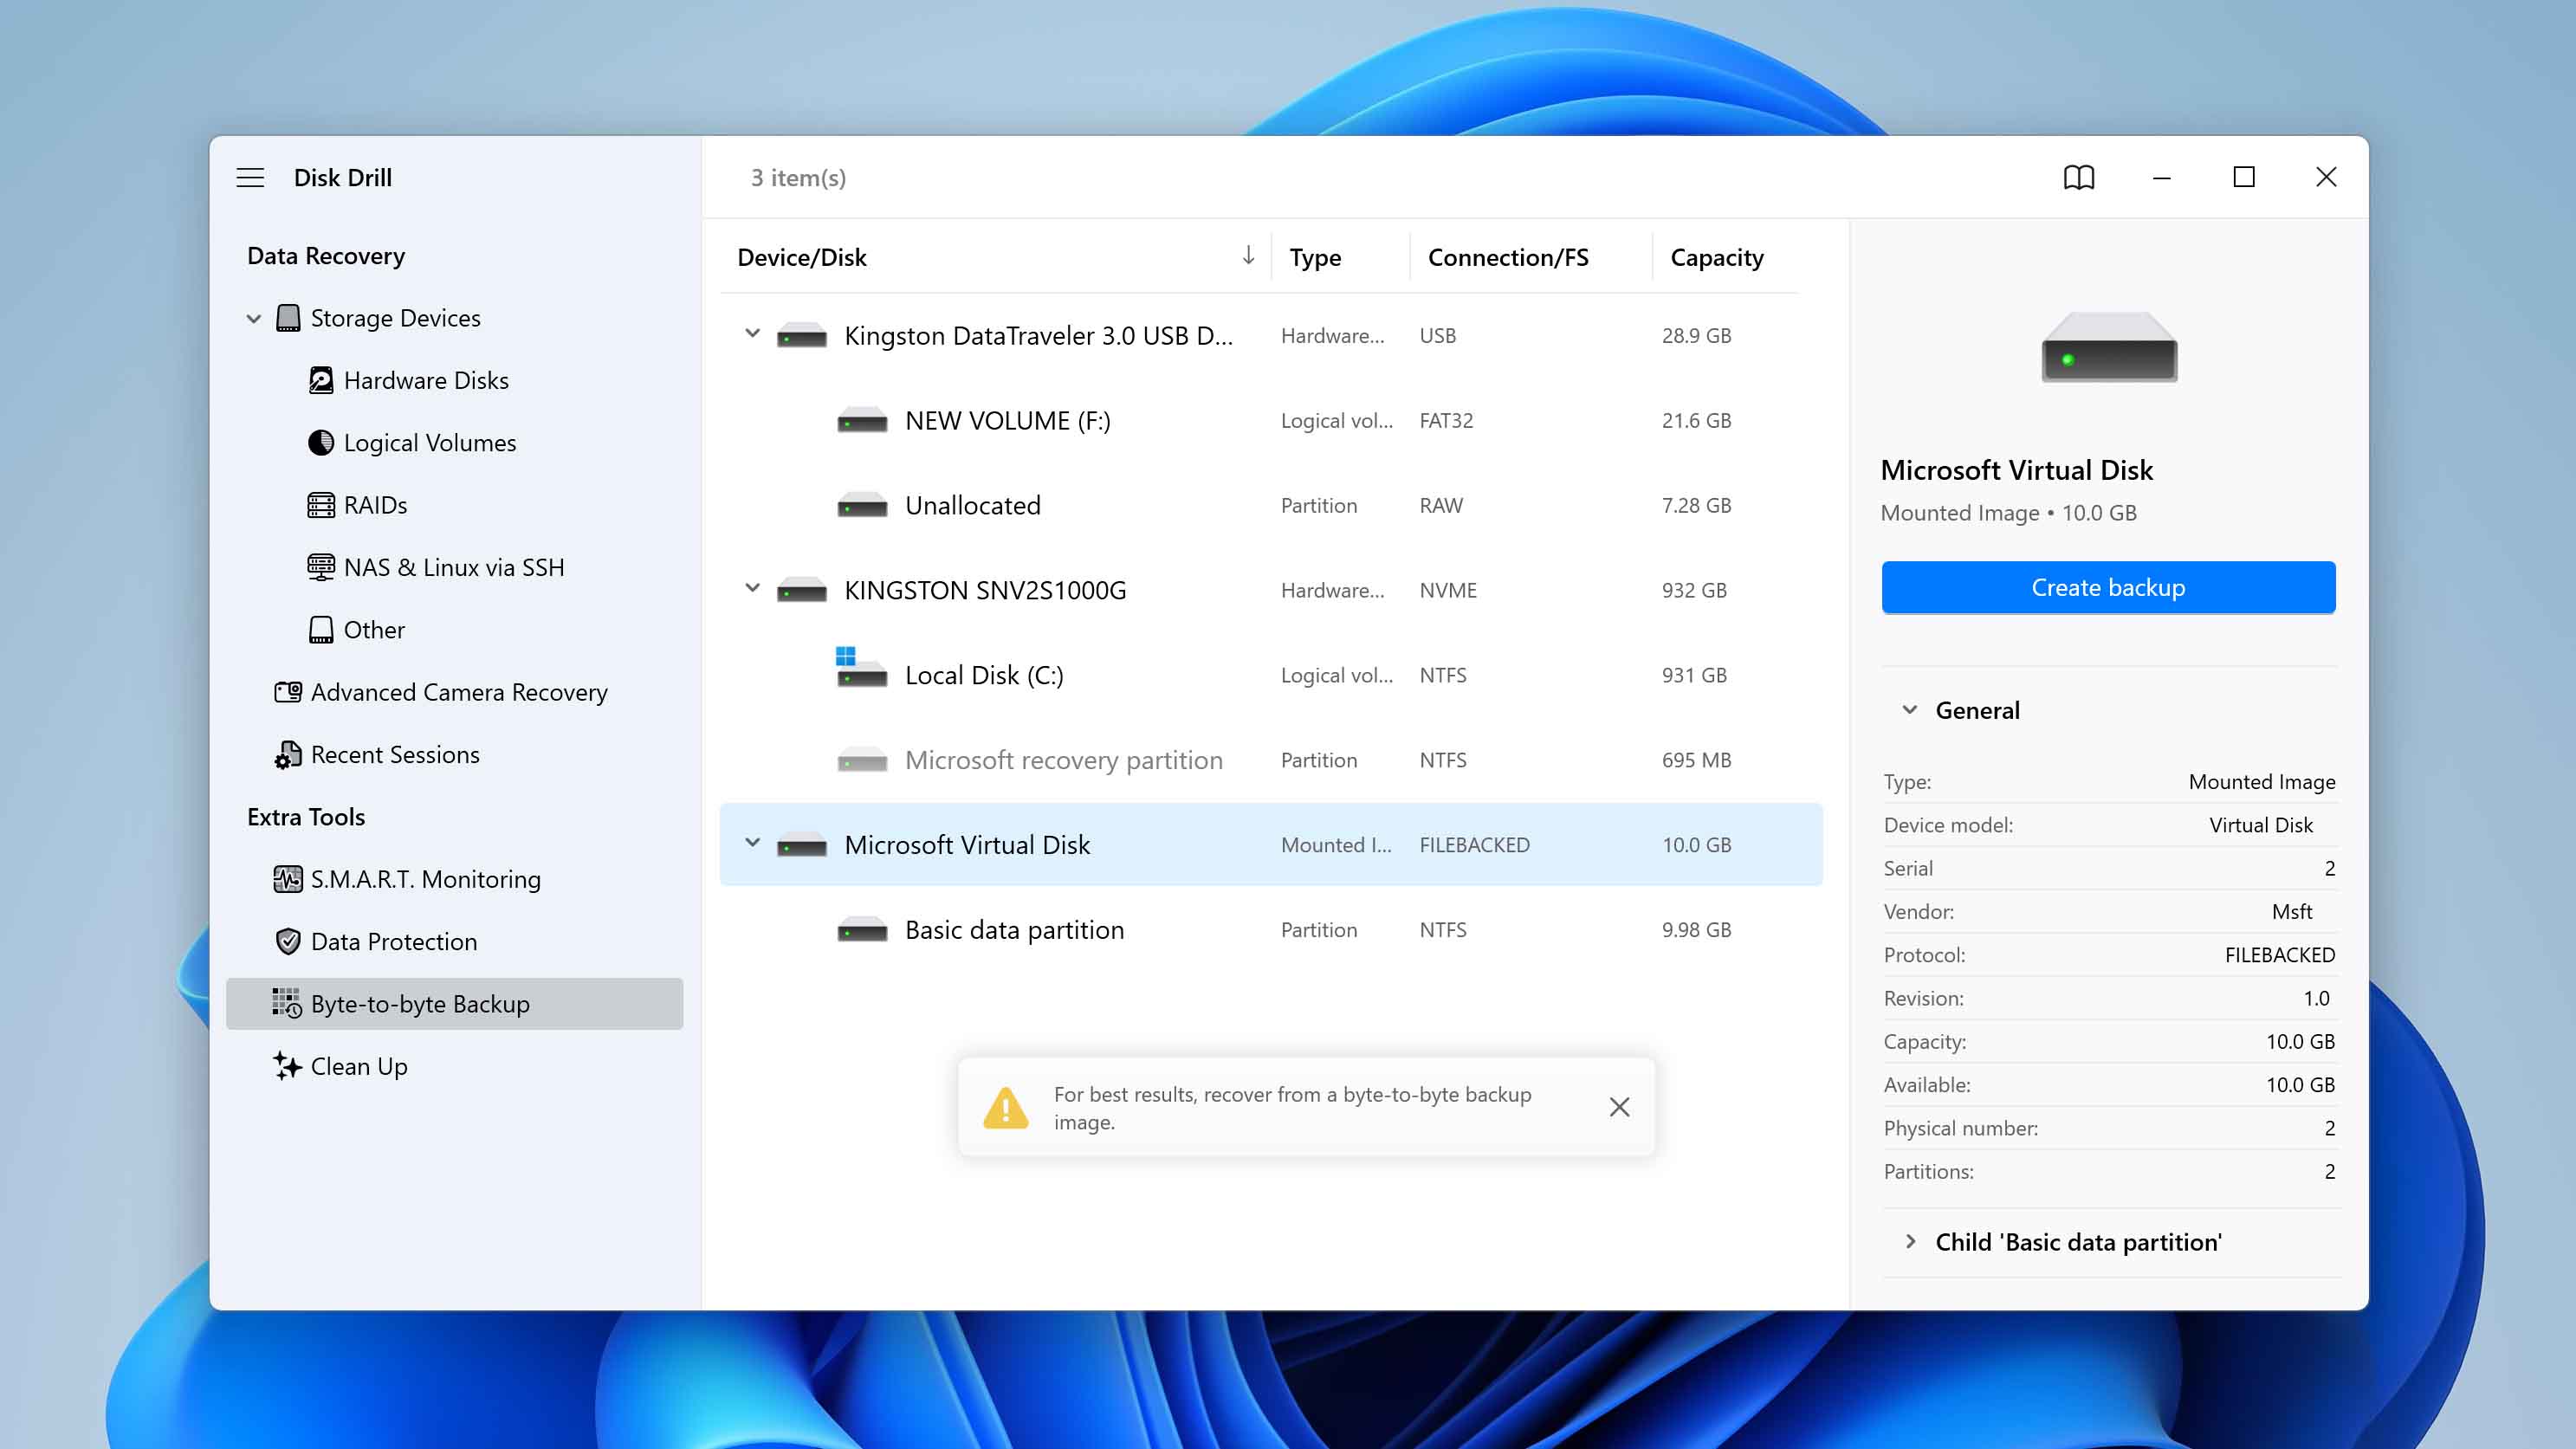
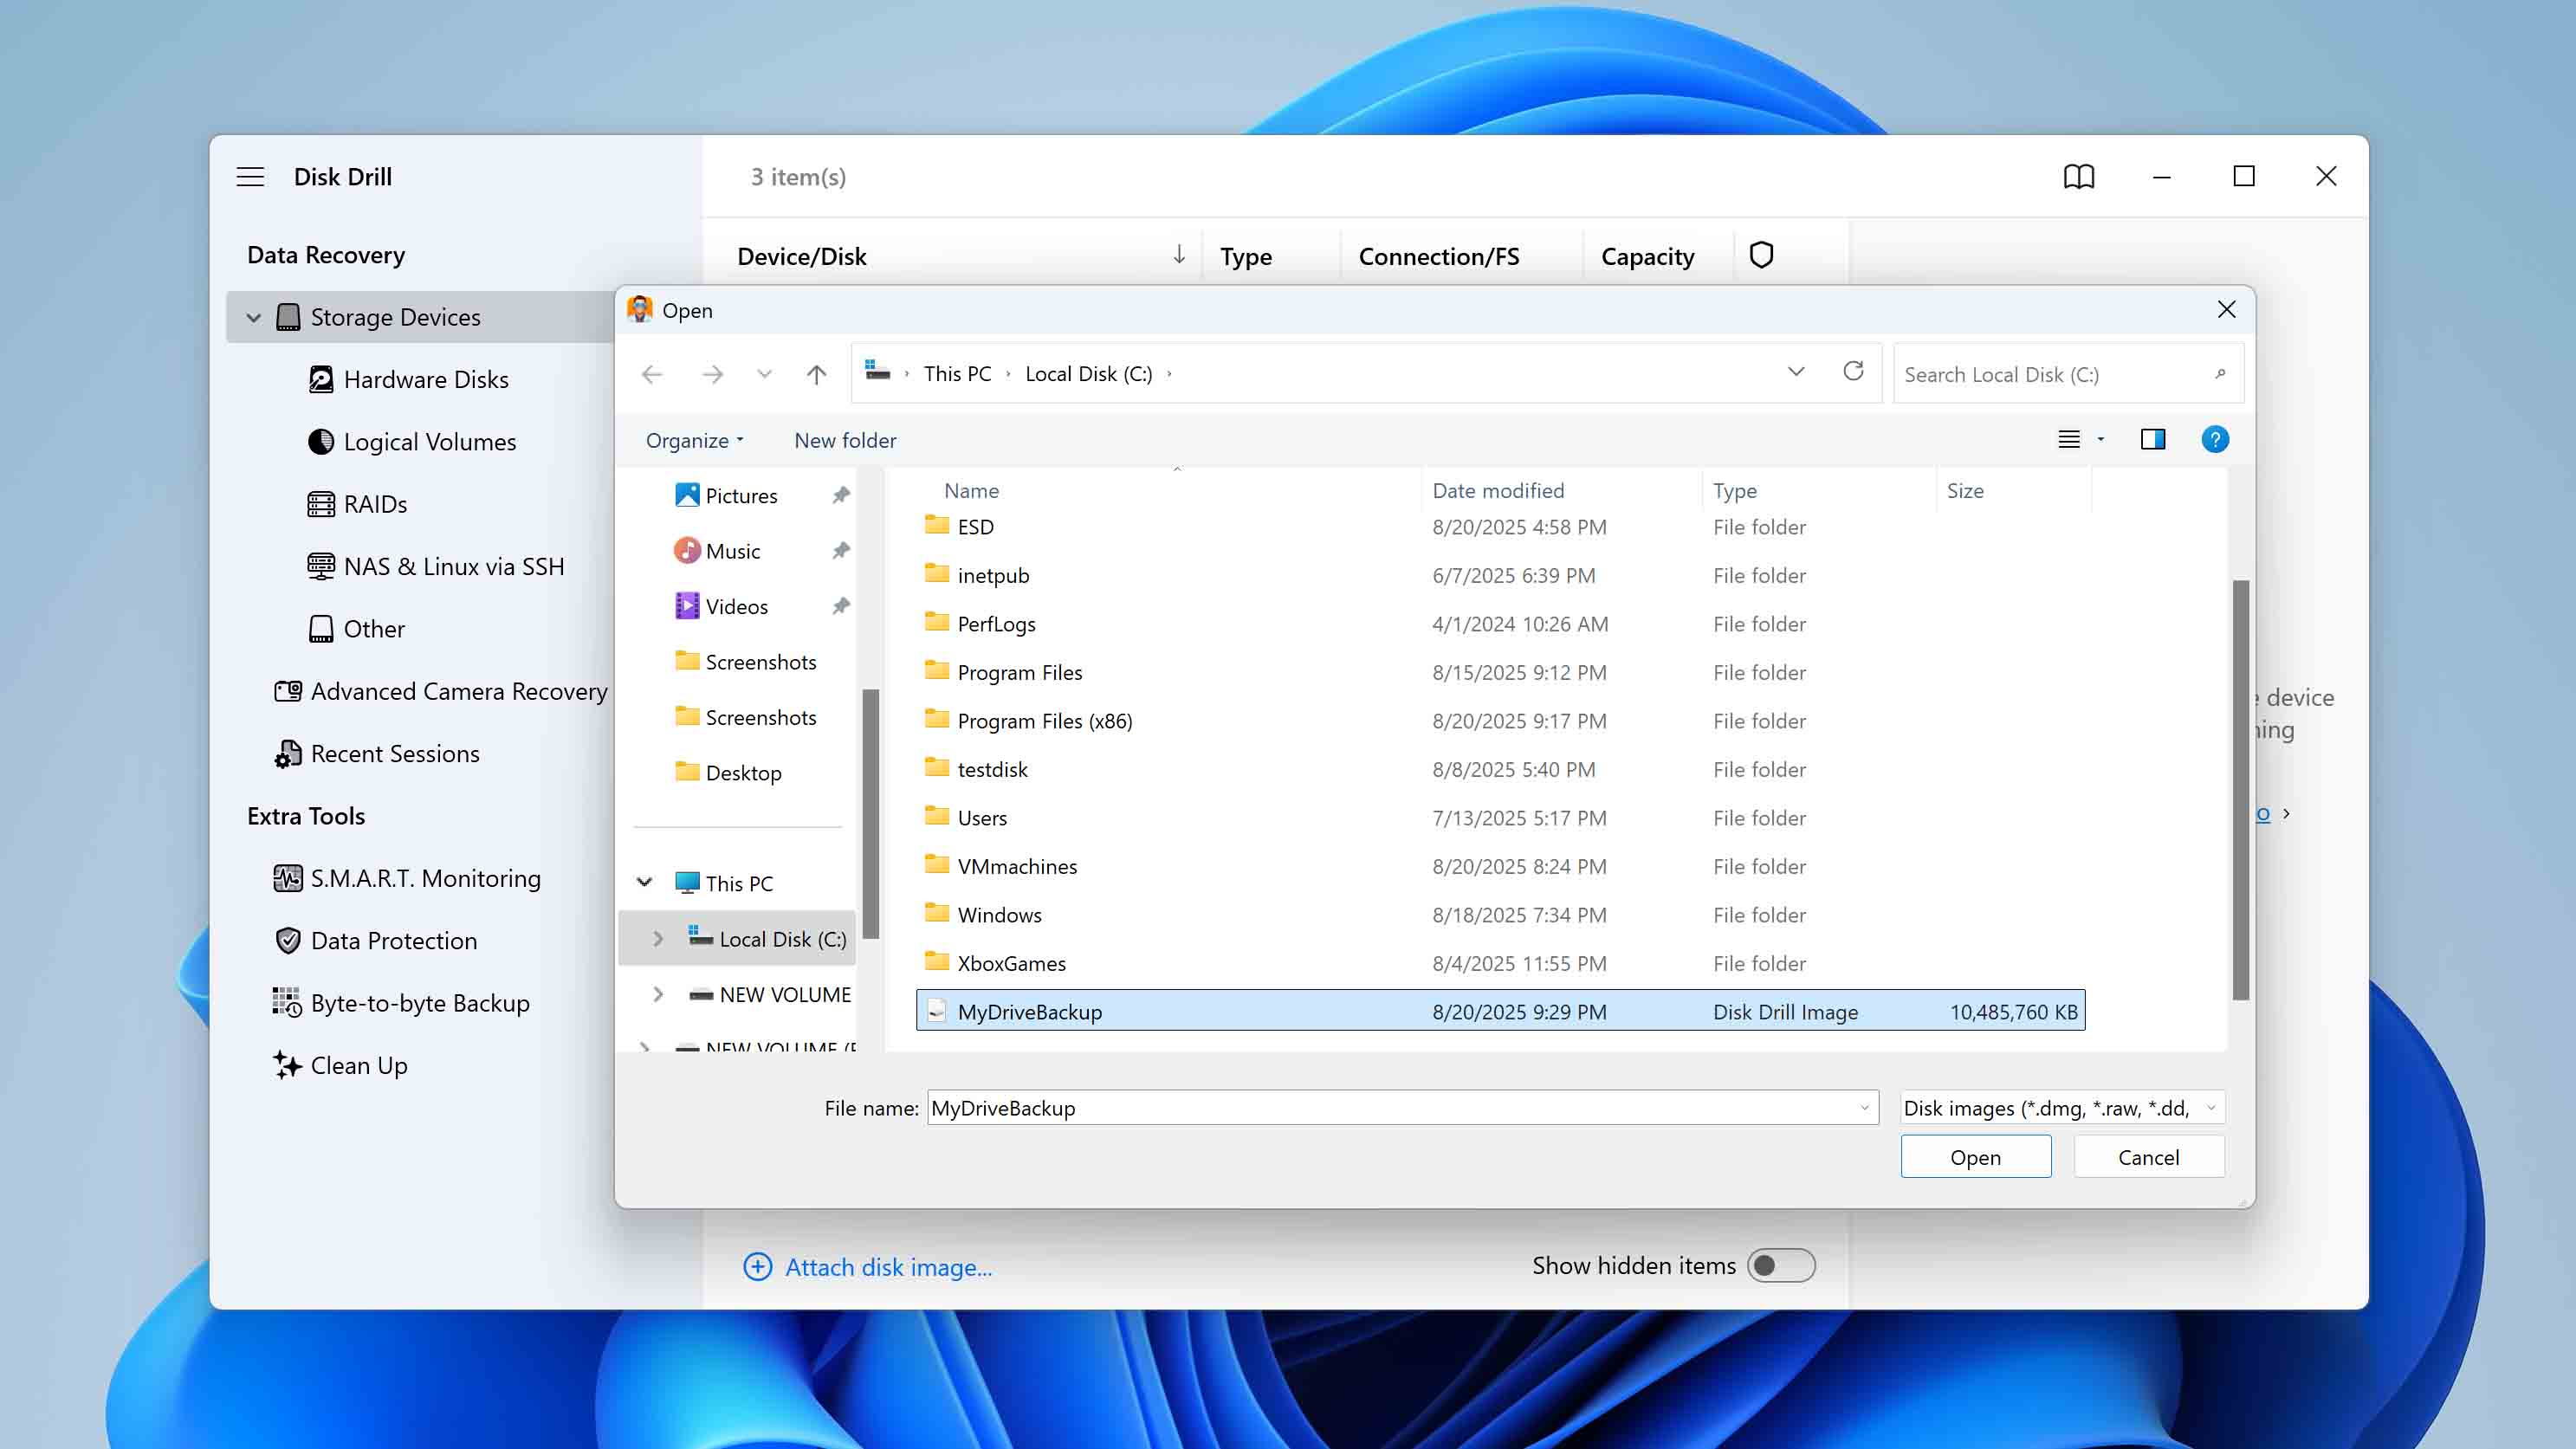
- From the list of available devices, select the disk that needs initialization and click Create Backup under the schematic image of your device on the right. If it’s an external disk, connect it first, and it will appear in the list along with other drives.
- A selection window will appear where you need to choose the folder where the backup will be saved. Make sure you do not save it on the same disk that requires initialization, and that the chosen location has enough free space.
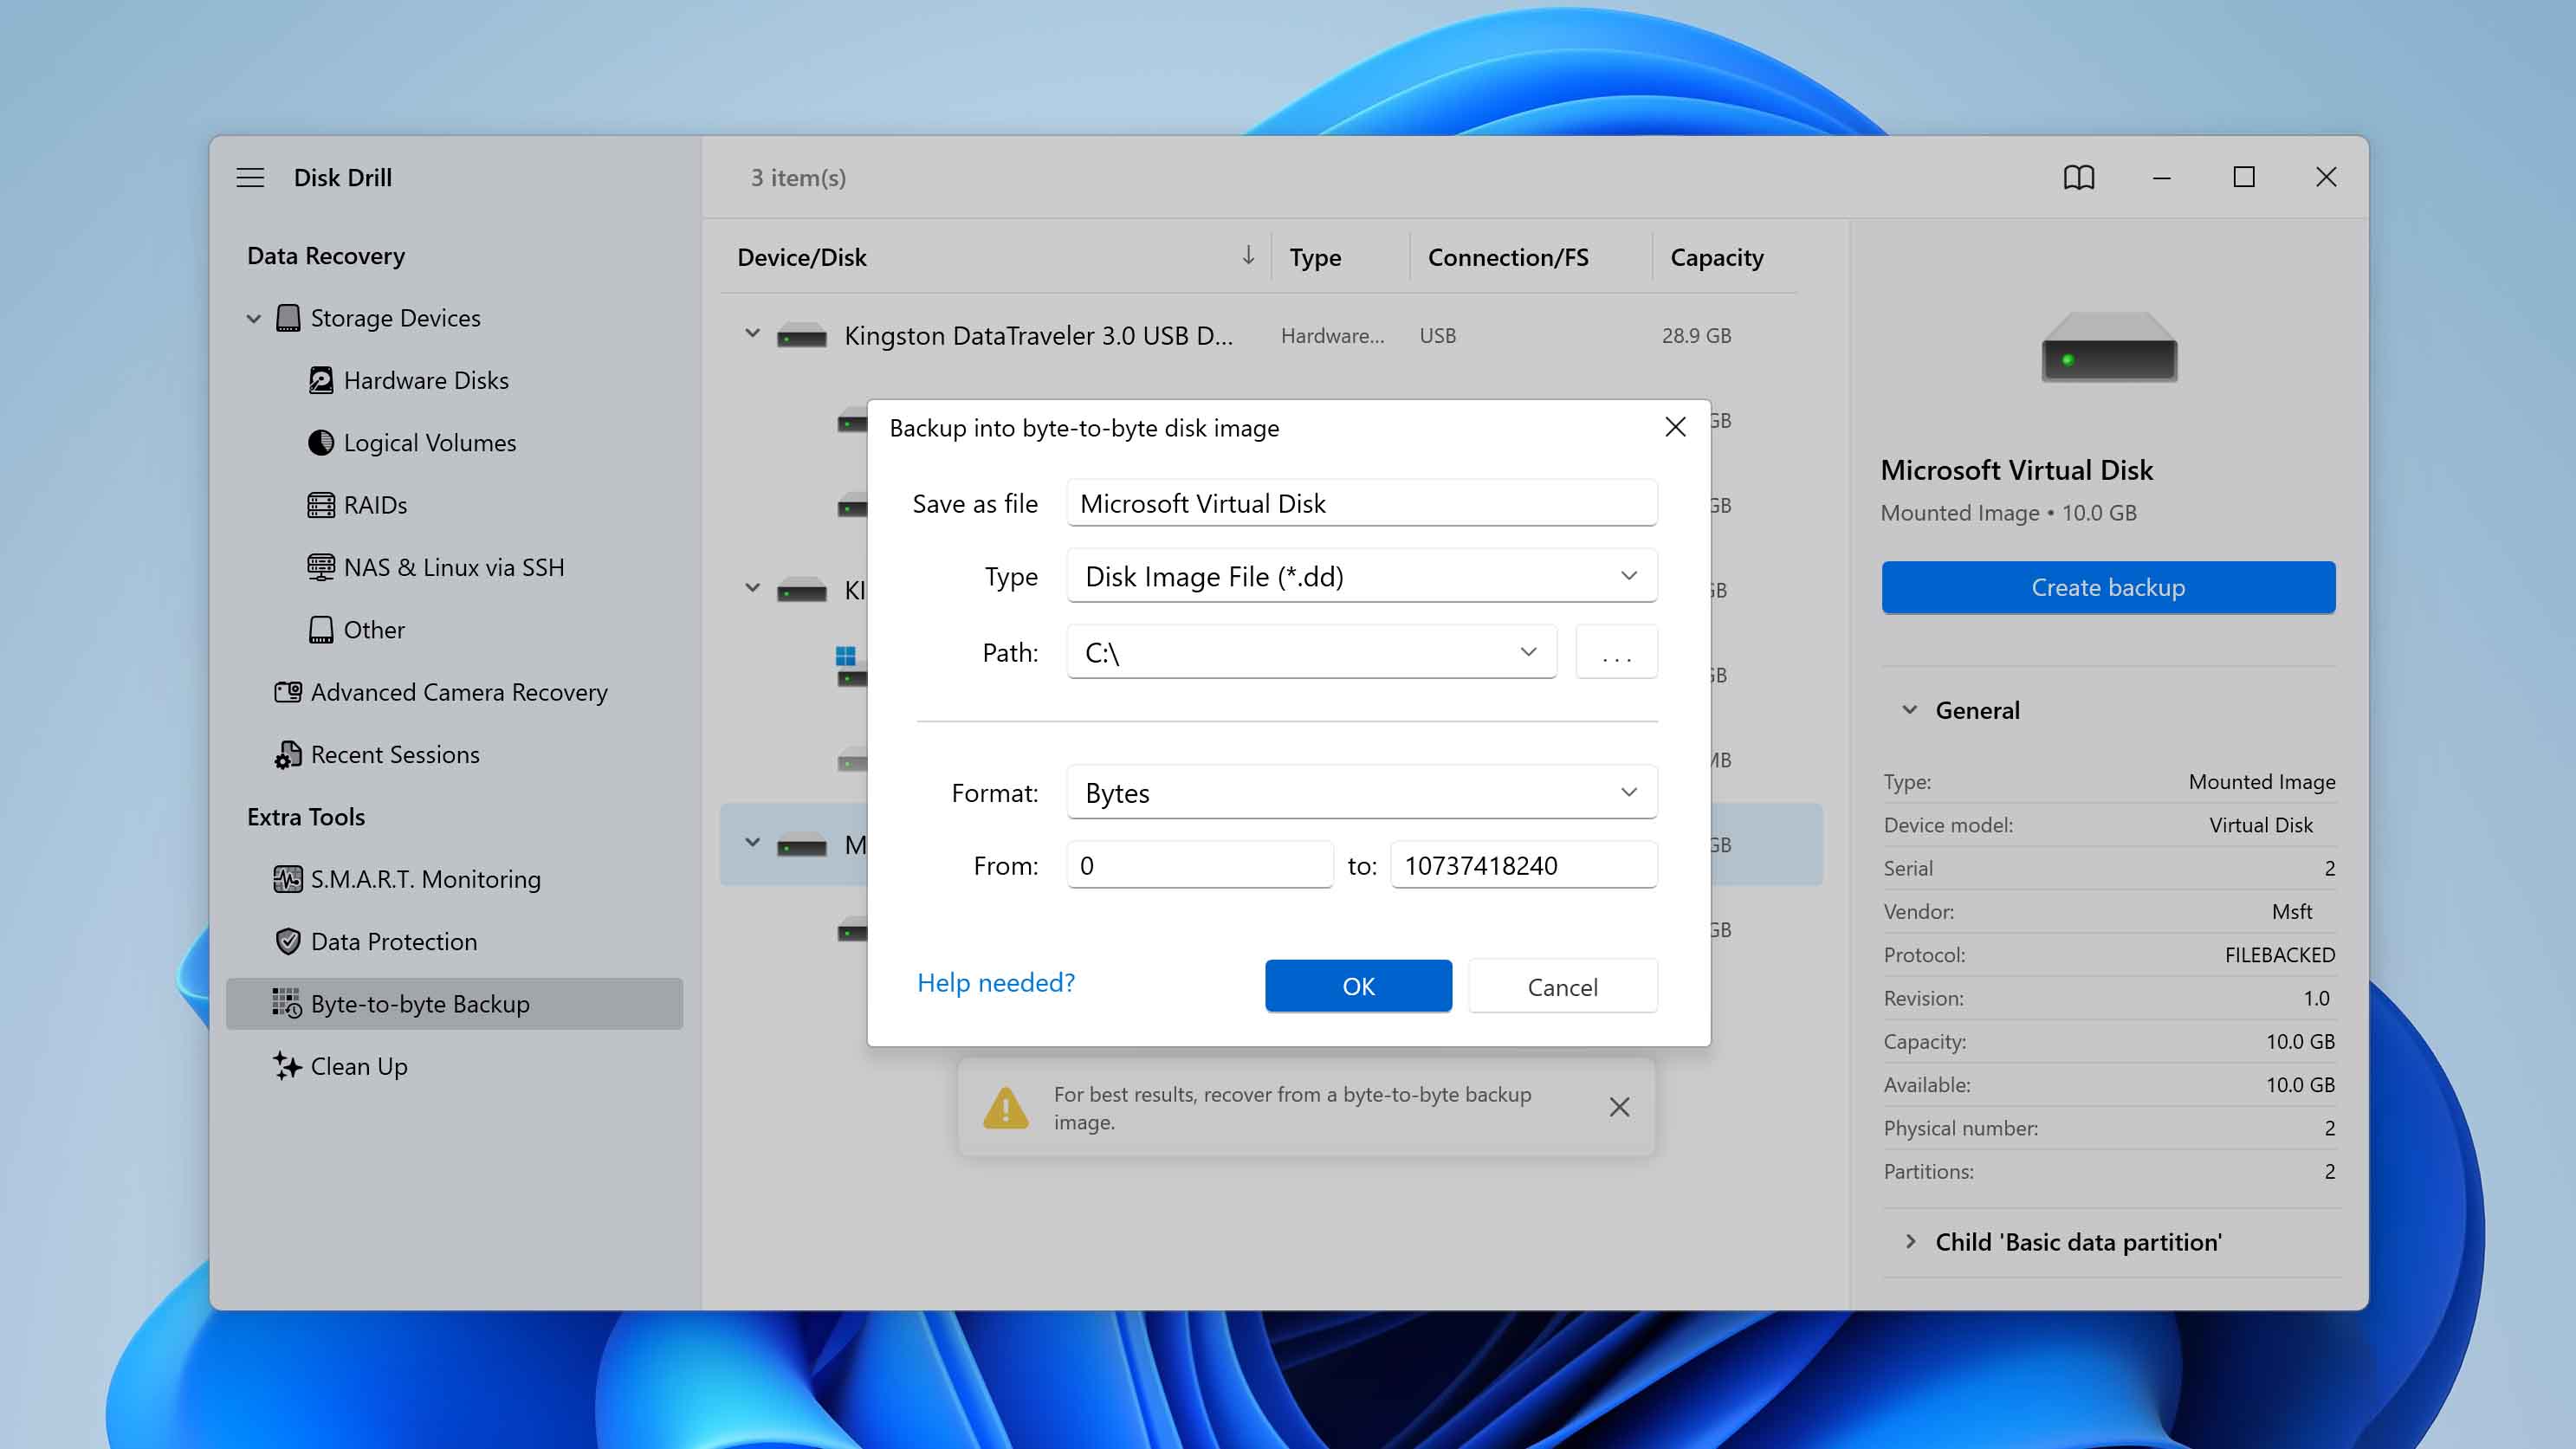
- Click the OK button to start creating the disk image. Depending on the size and condition of your disk, this process may take some time.
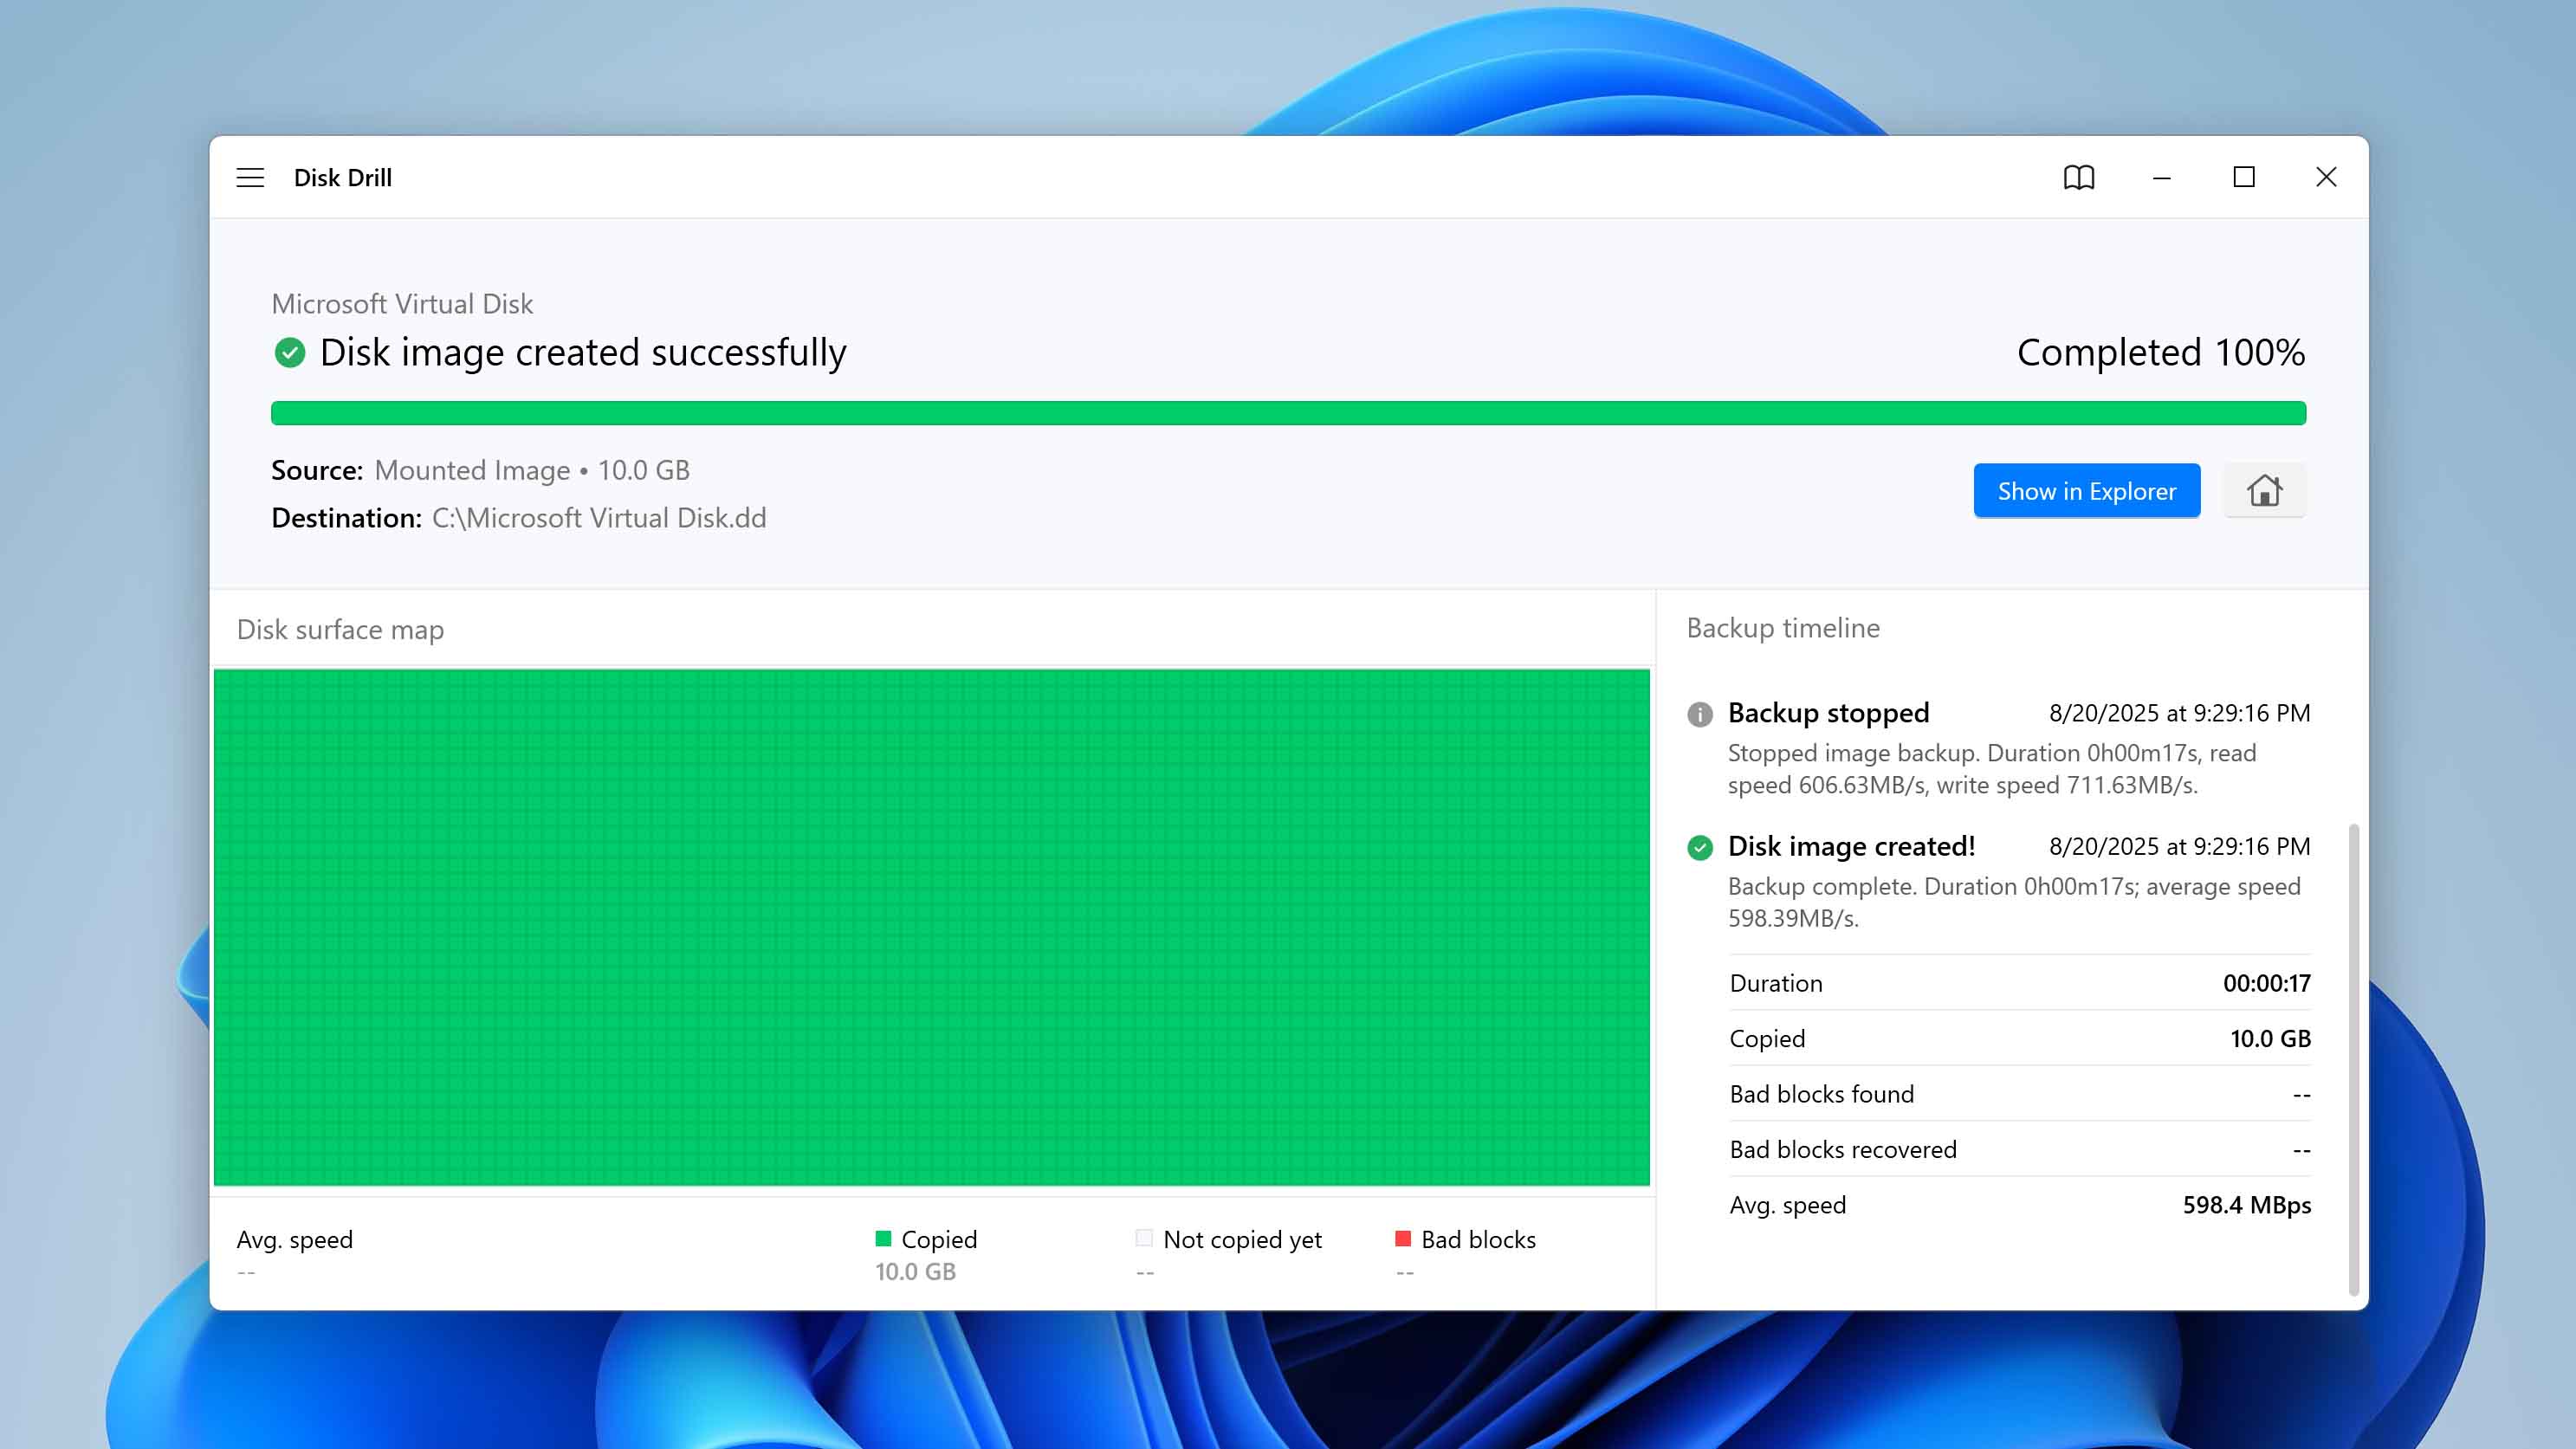
- Once the backup is complete, you’ll find the newly created disk image with the .dd extension in the folder you selected.
At this point, you can close Disk Drill and proceed to the disk initialization methods.
How to Initialize a Disk
Now that all your data is safely backed up, you can initialize your disk without worrying about losing it. Windows offers two ways to do this–either through the Disk Management tool or through the terminal. The result is the same in both cases, but the process looks different: Disk Management provides a graphical interface, while the terminal is better suited for those who prefer working with commands.
Since most users will likely choose the Disk Management option, we’ll start with that method first.
Method 1: Initialize a Disk from the Disk Management Console
The Disk Management tool is a built-in Windows utility that lets you manage connected drives. With it, you can create and delete partitions, change drive letters, format volumes, and, of course, initialize new or unrecognized disks.
Here is how you can initialize a disk from Disk Management:
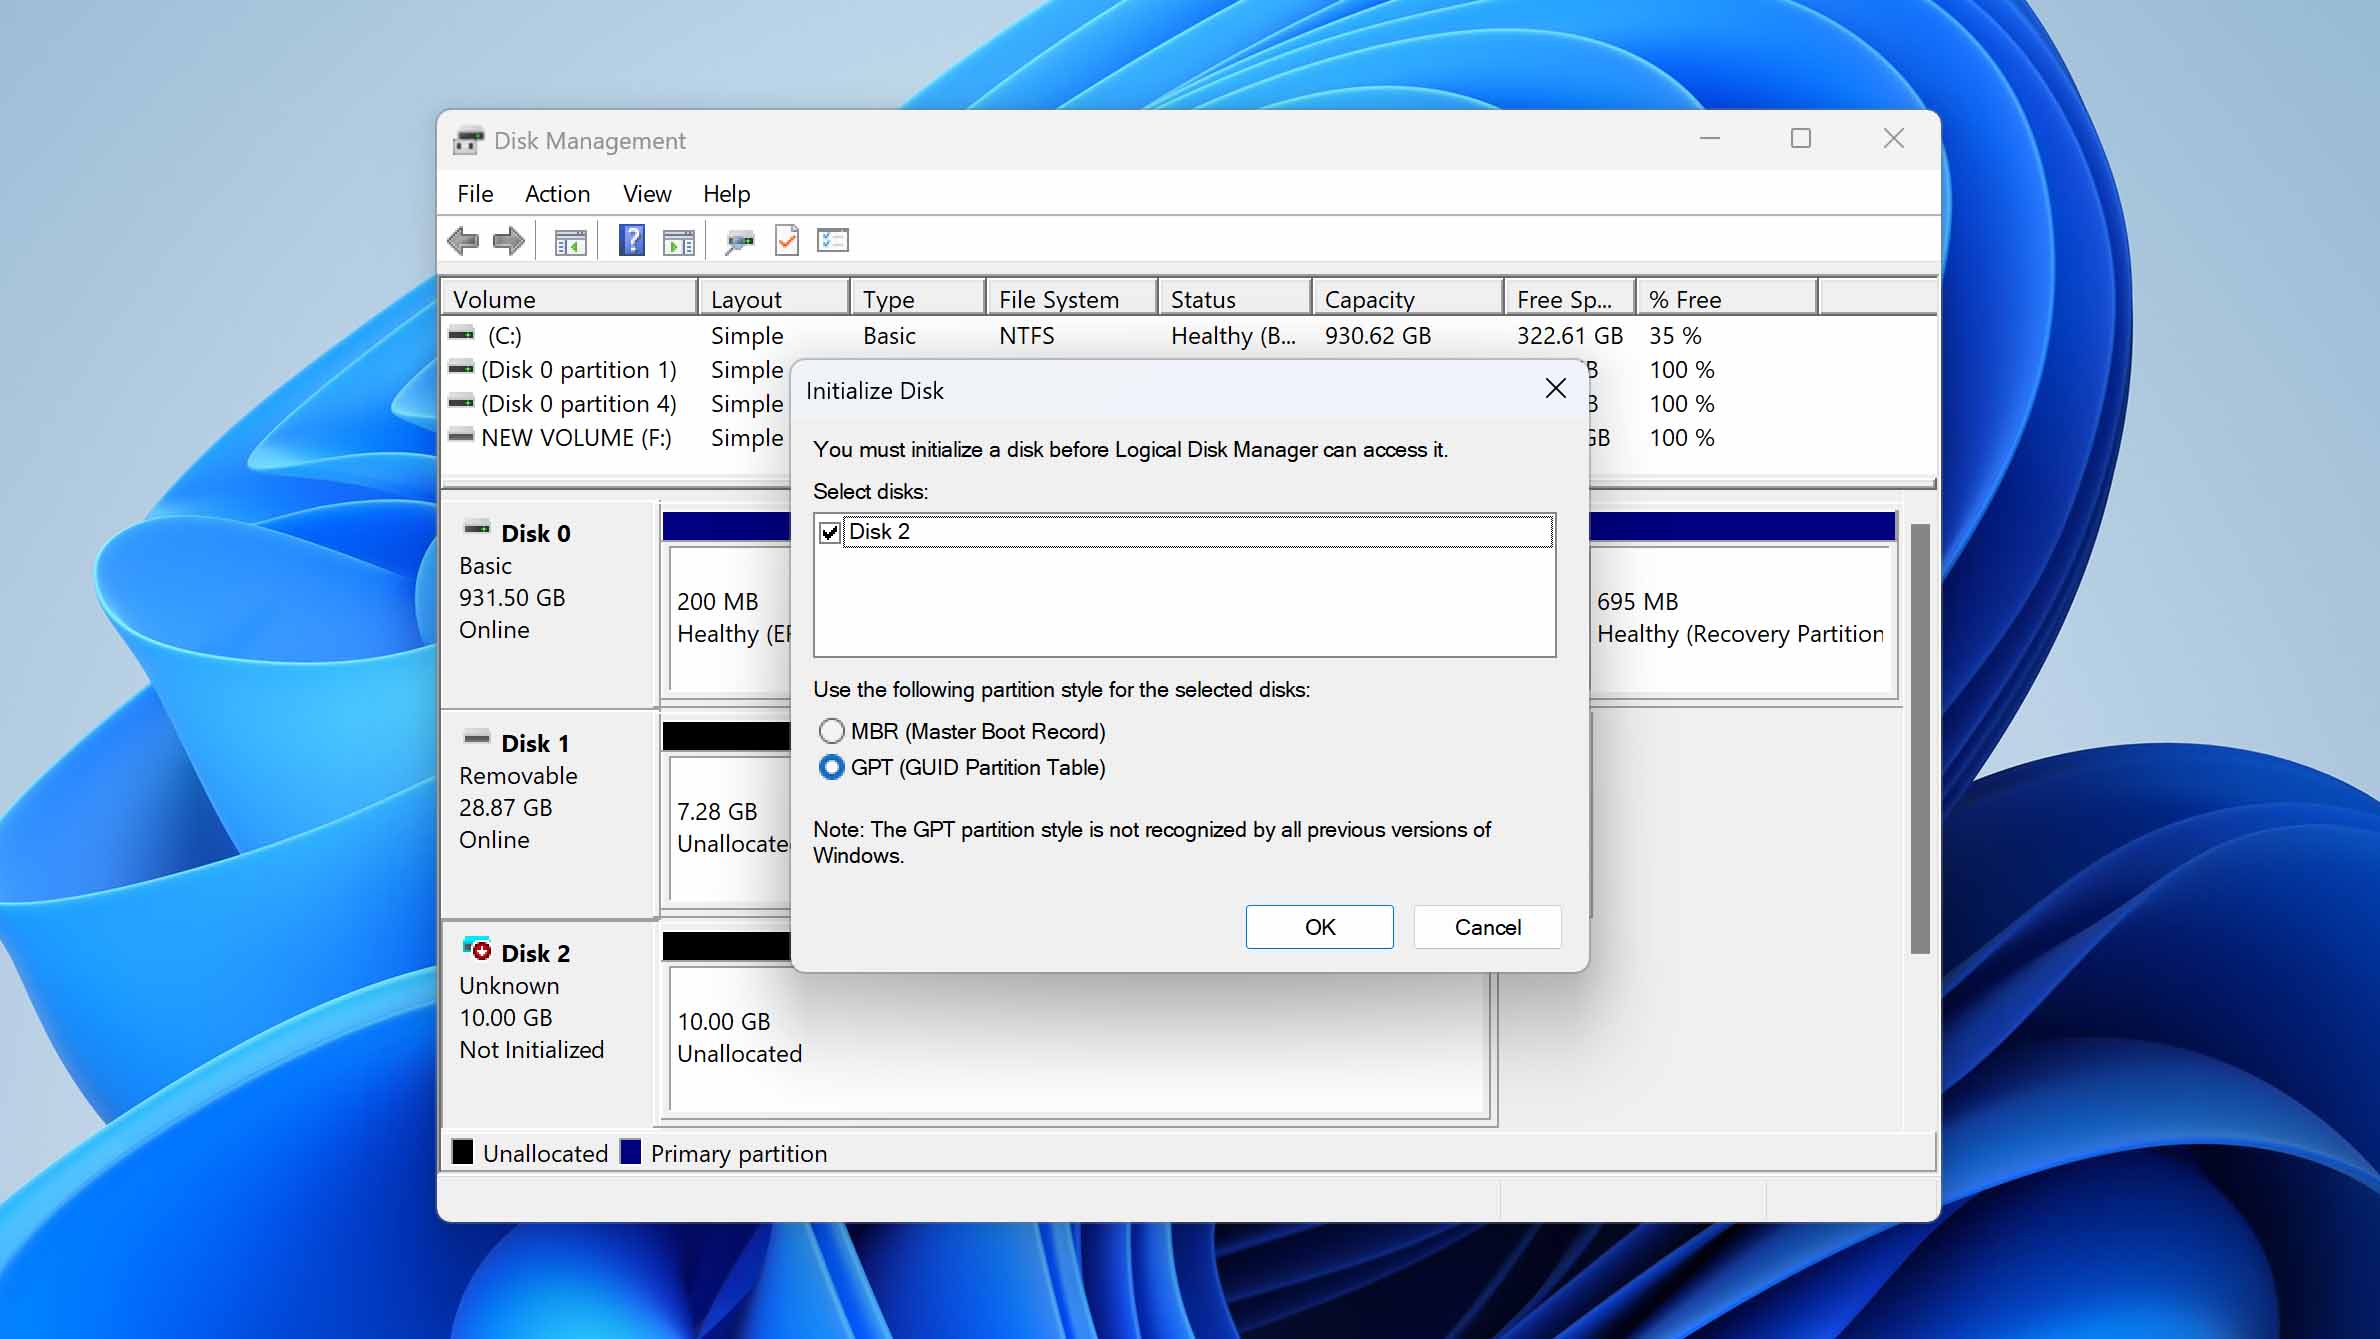
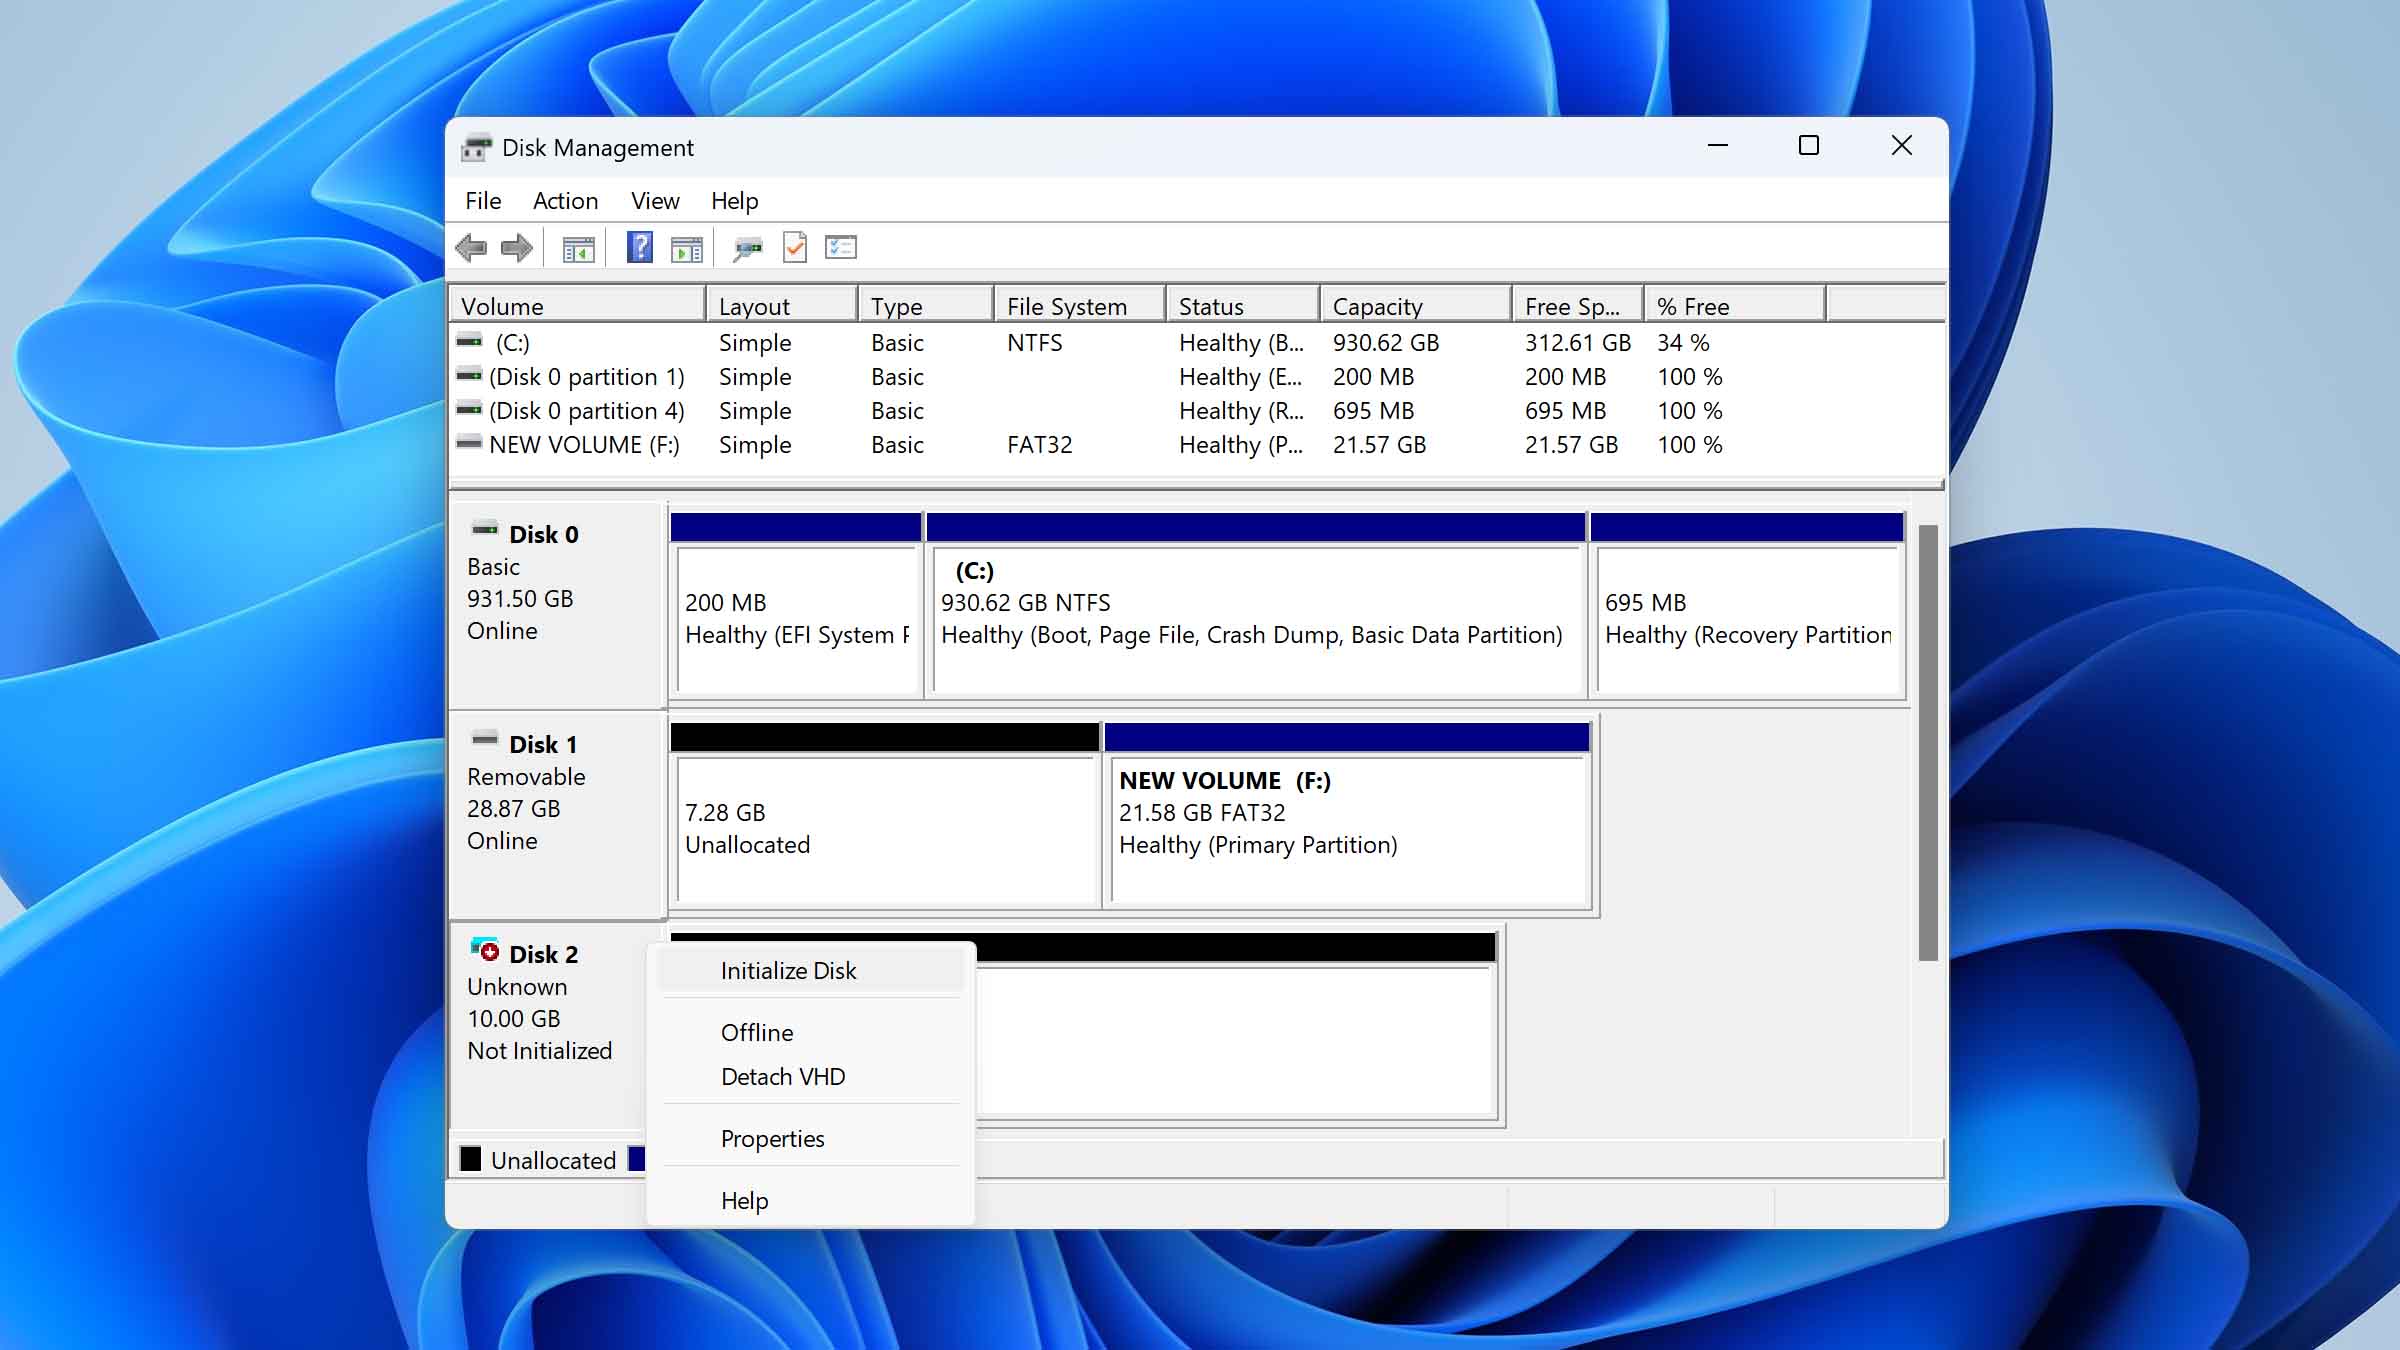
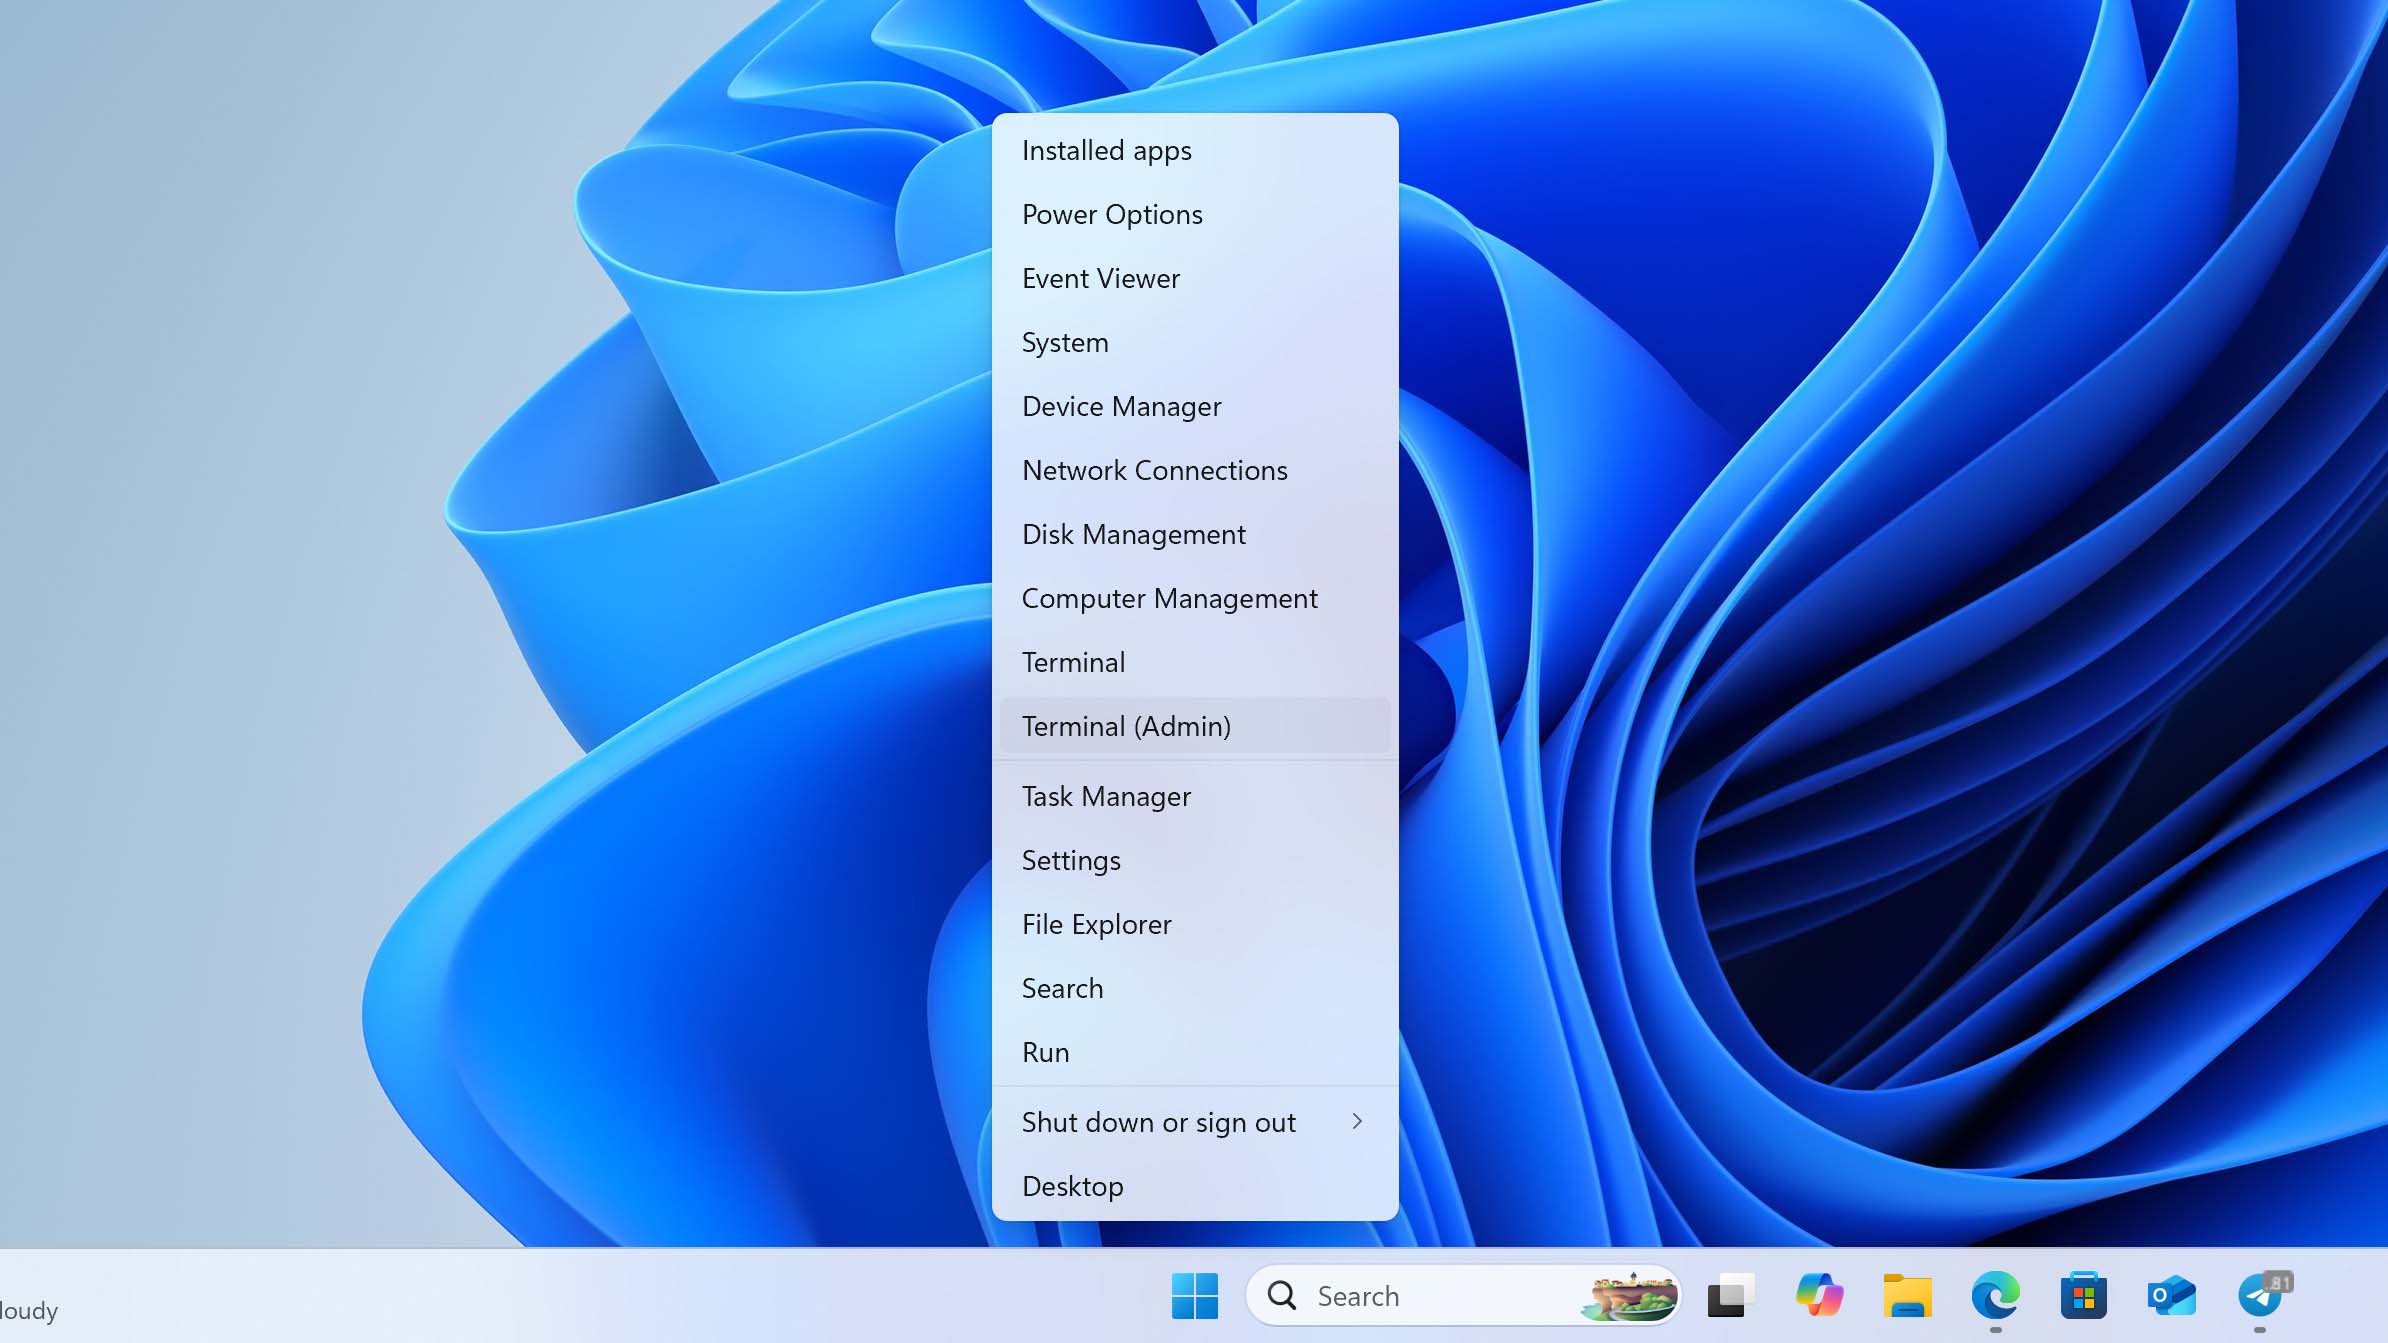
- Press Windows Key + X and select Disk Management from the menu.

- In the Disk Management window, find the disk marked as Not Initialized, right-click it, and choose Initialize Disk.
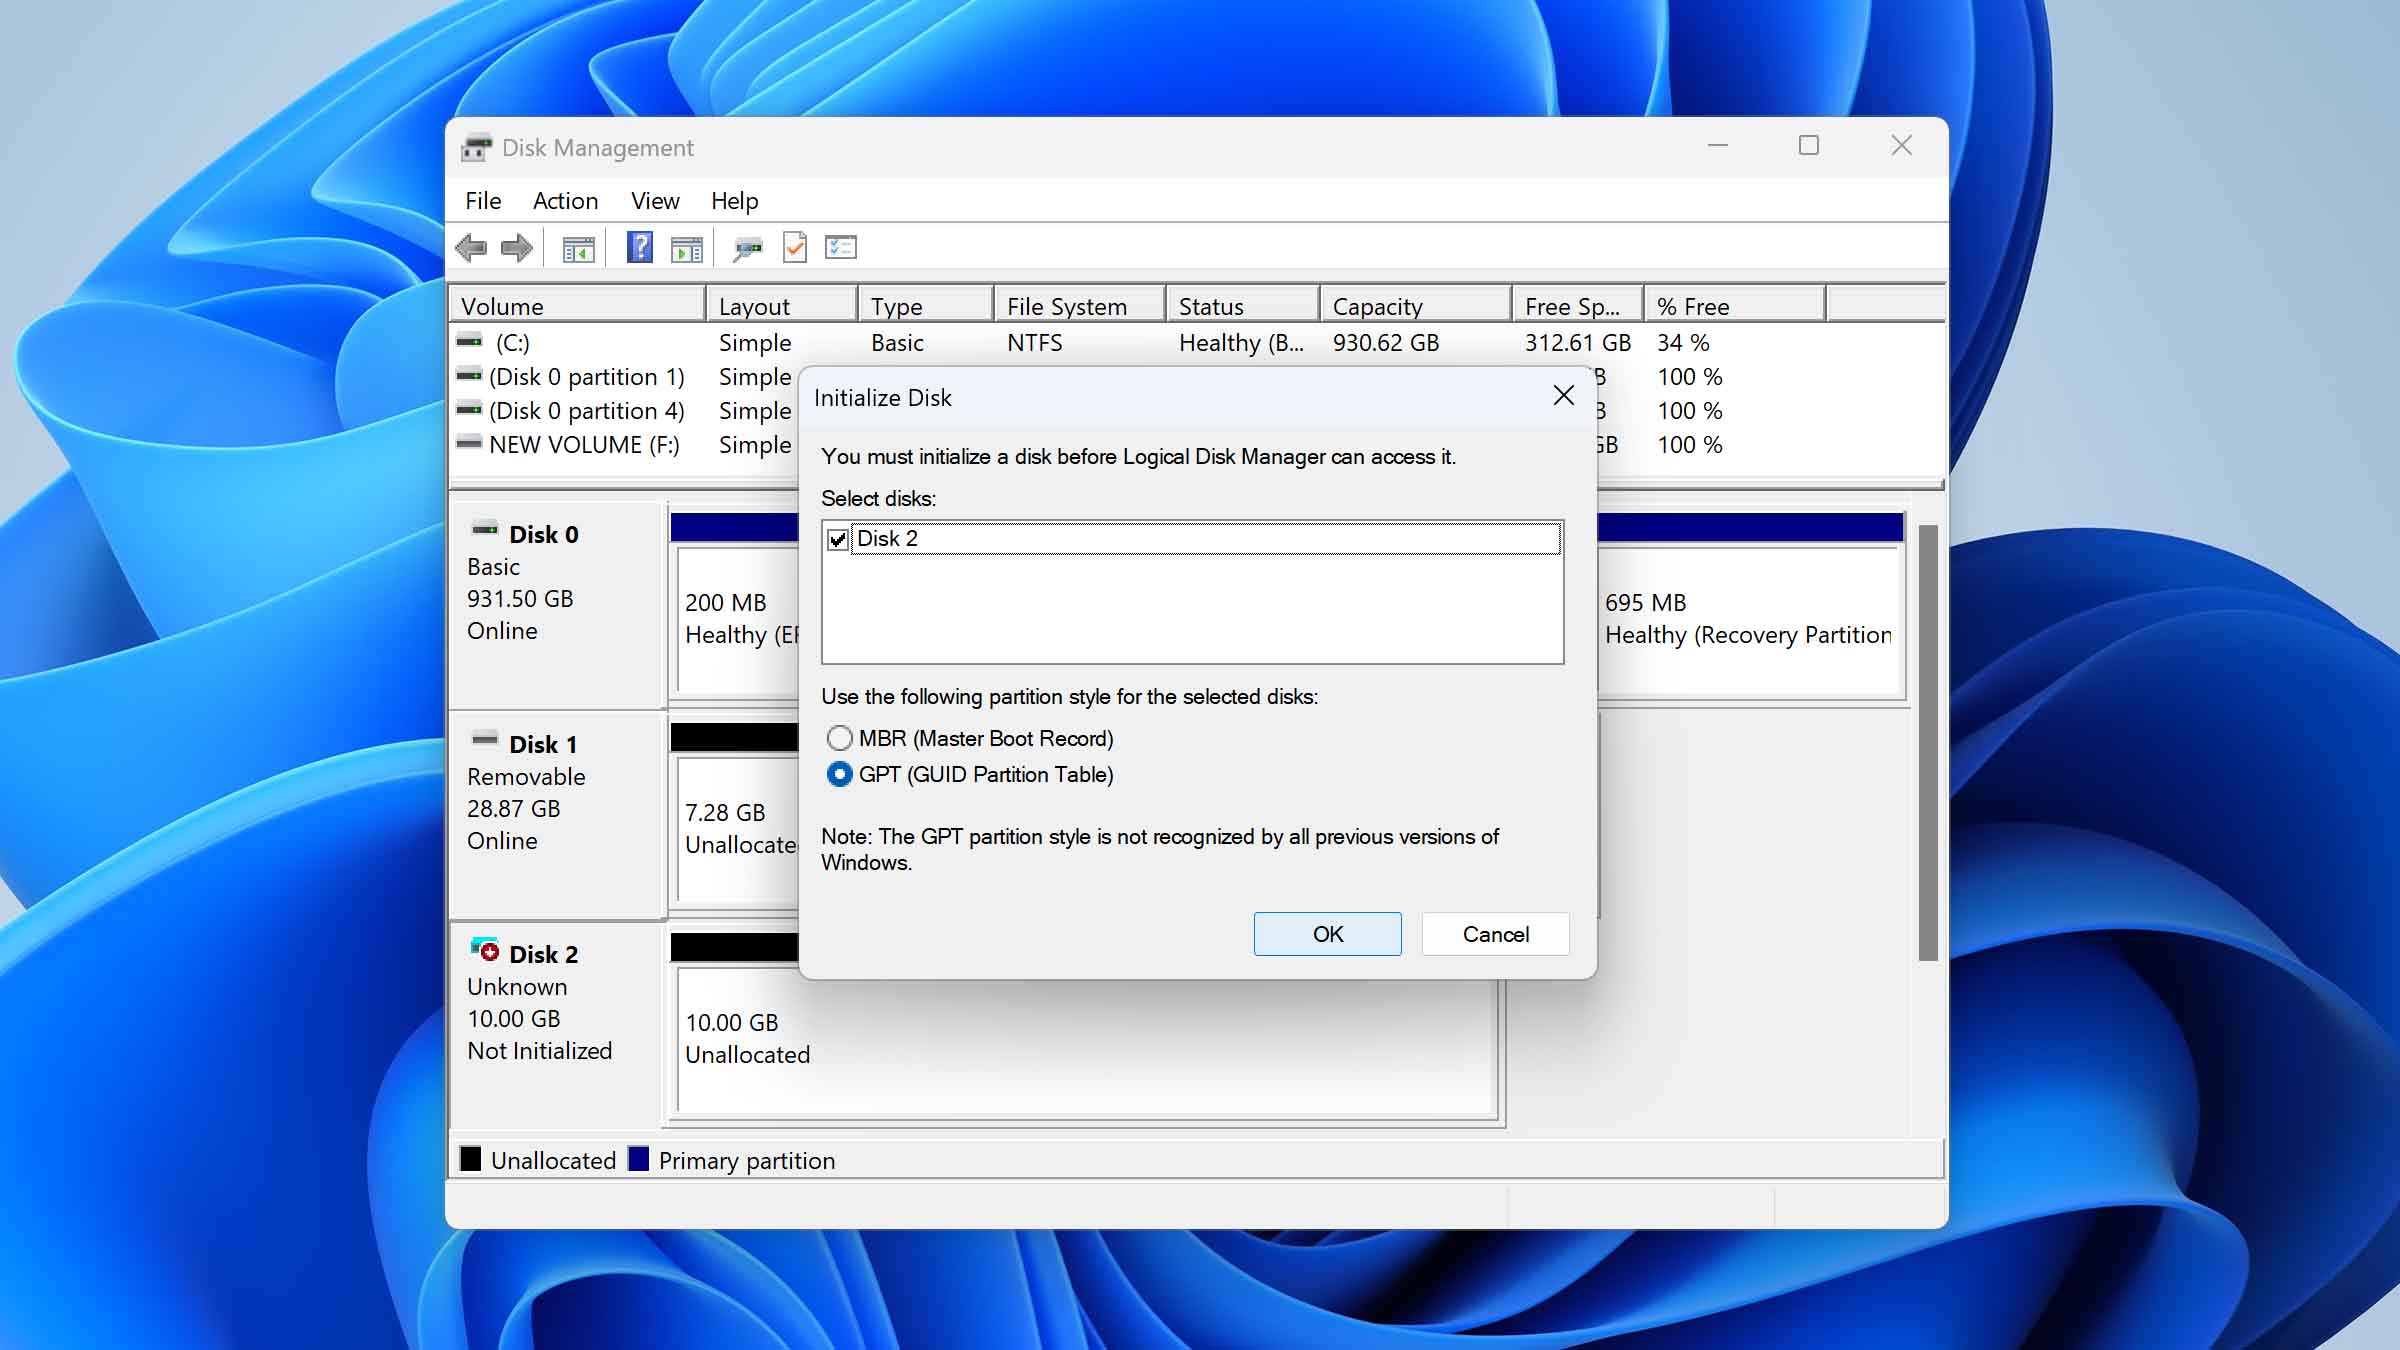
- Select a partition style–GPT is recommended for modern drives, while MBR is used for older ones. Click OK.
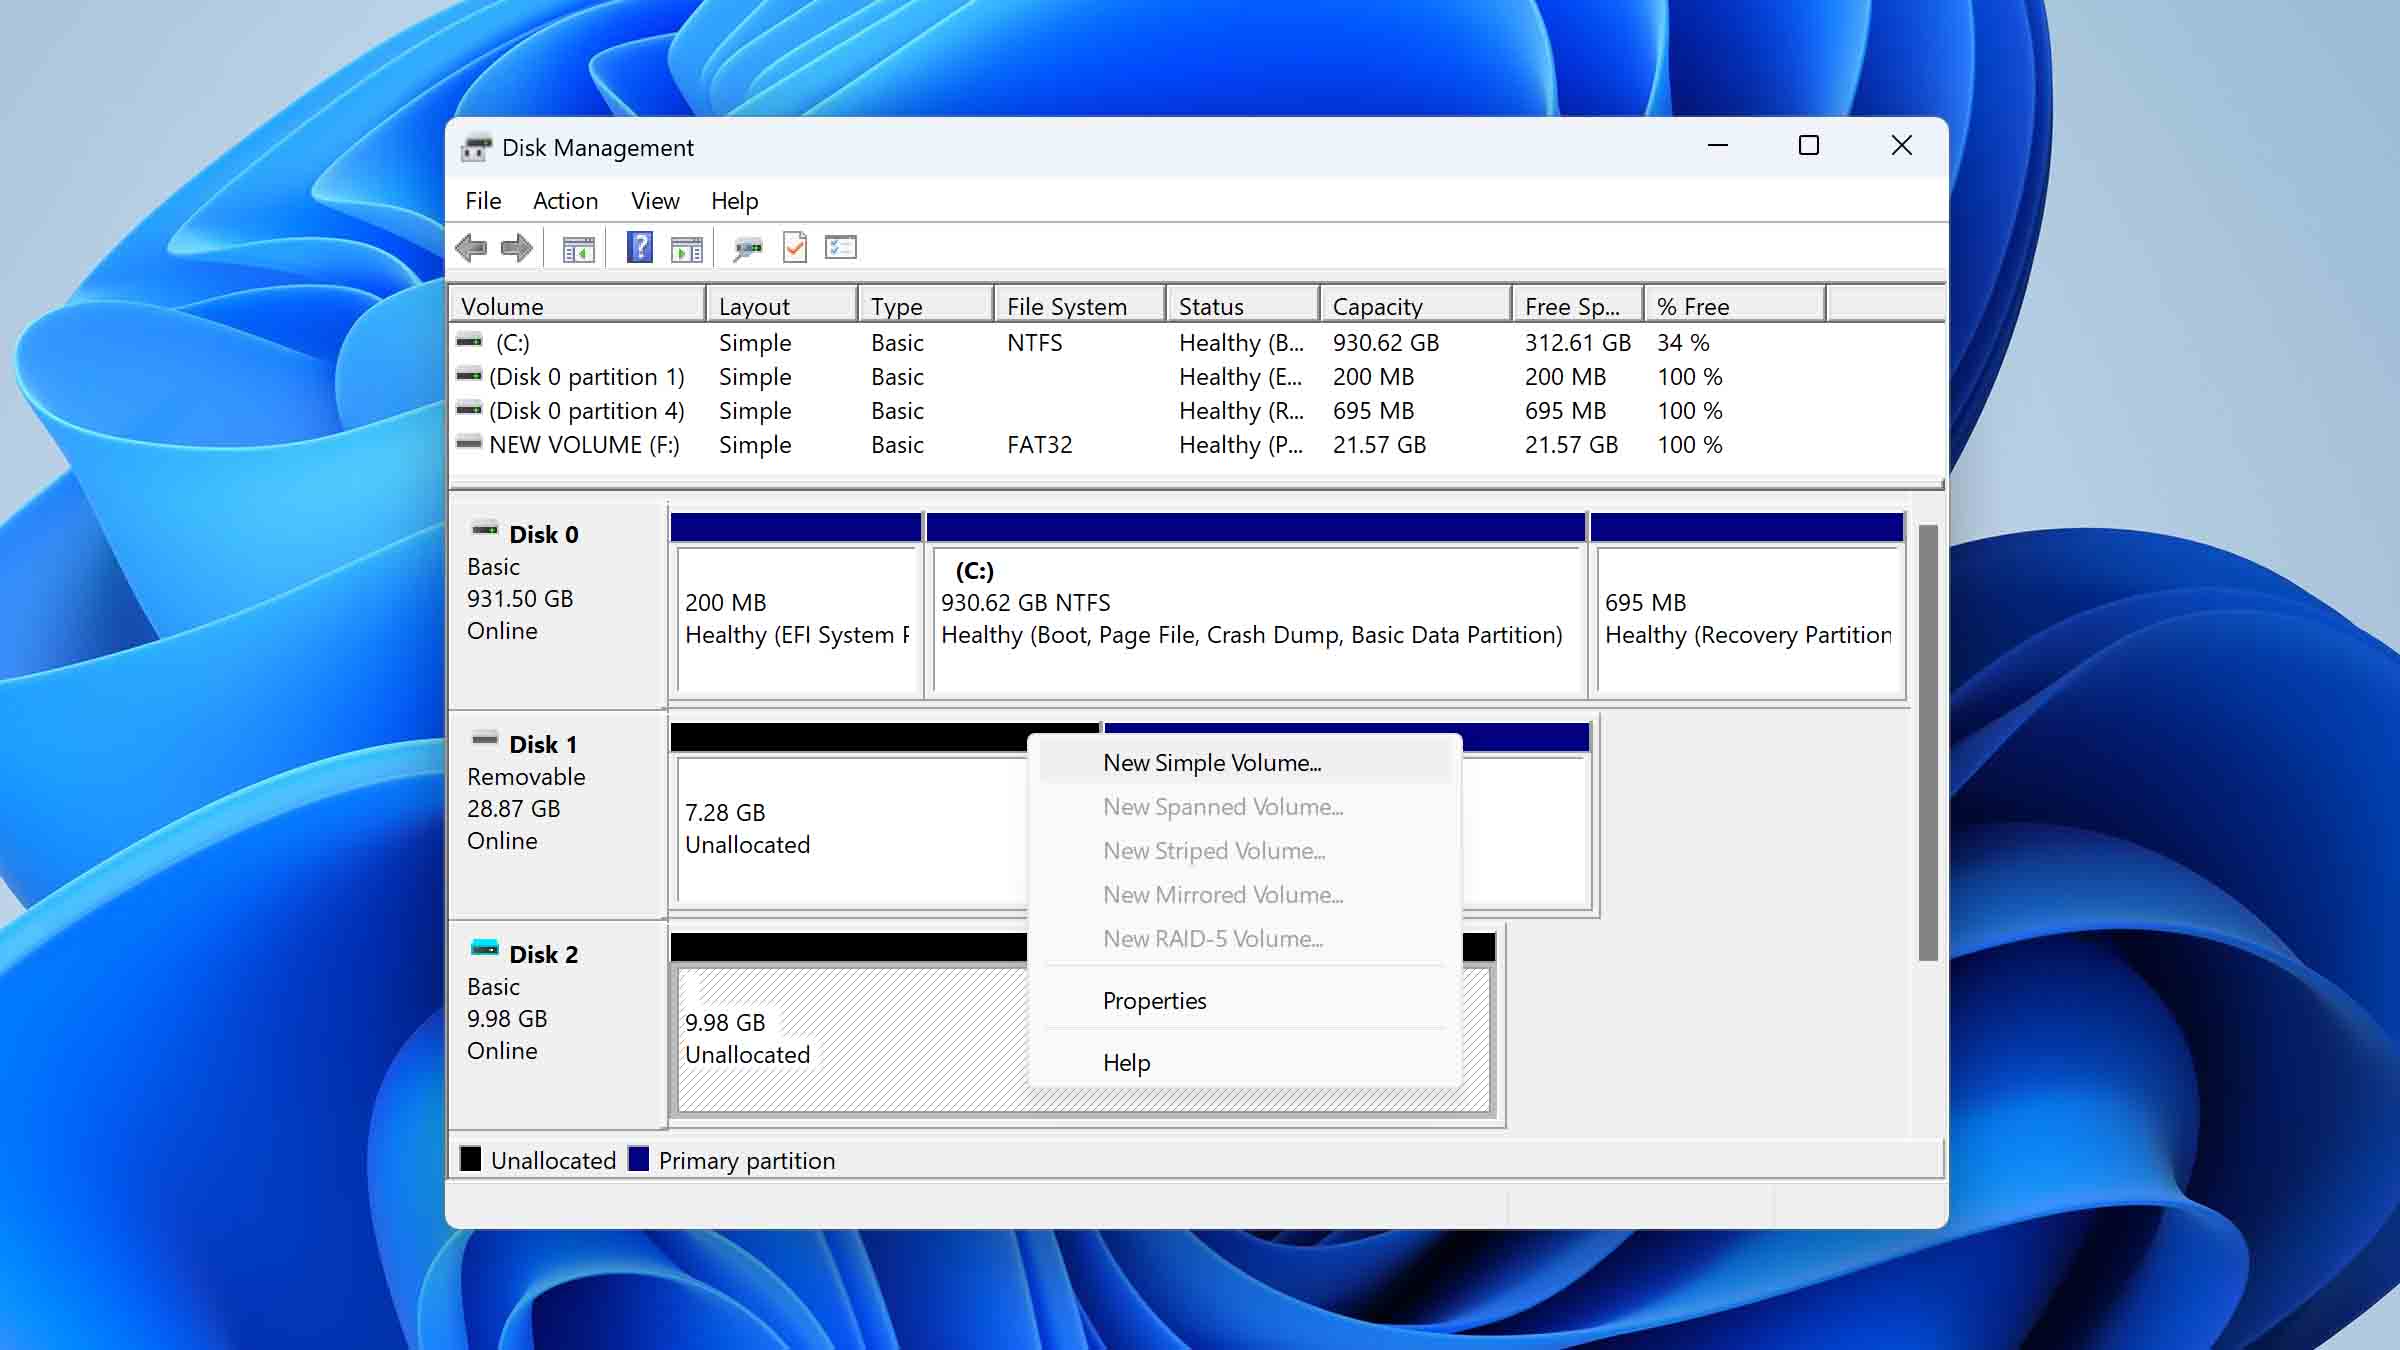
- Right-click the unallocated space of the disk and choose New Simple Volume.
- Follow the wizard: set the volume size, assign a drive letter, and select the file system (NTFS for Windows).

- Click Finish to complete the setup. The disk will now be ready and visible in File Explorer.
Method 2: Initialize a Disk Through Terminal
For those who prefer working with commands instead of graphical tools, Windows also lets you initialize a disk through the Terminal. The end result is the same as using Disk Management, but the process relies on typed commands rather than wizards and menus.
All you need to do is:
- Press Windows Key + X and choose Terminal (Admin).
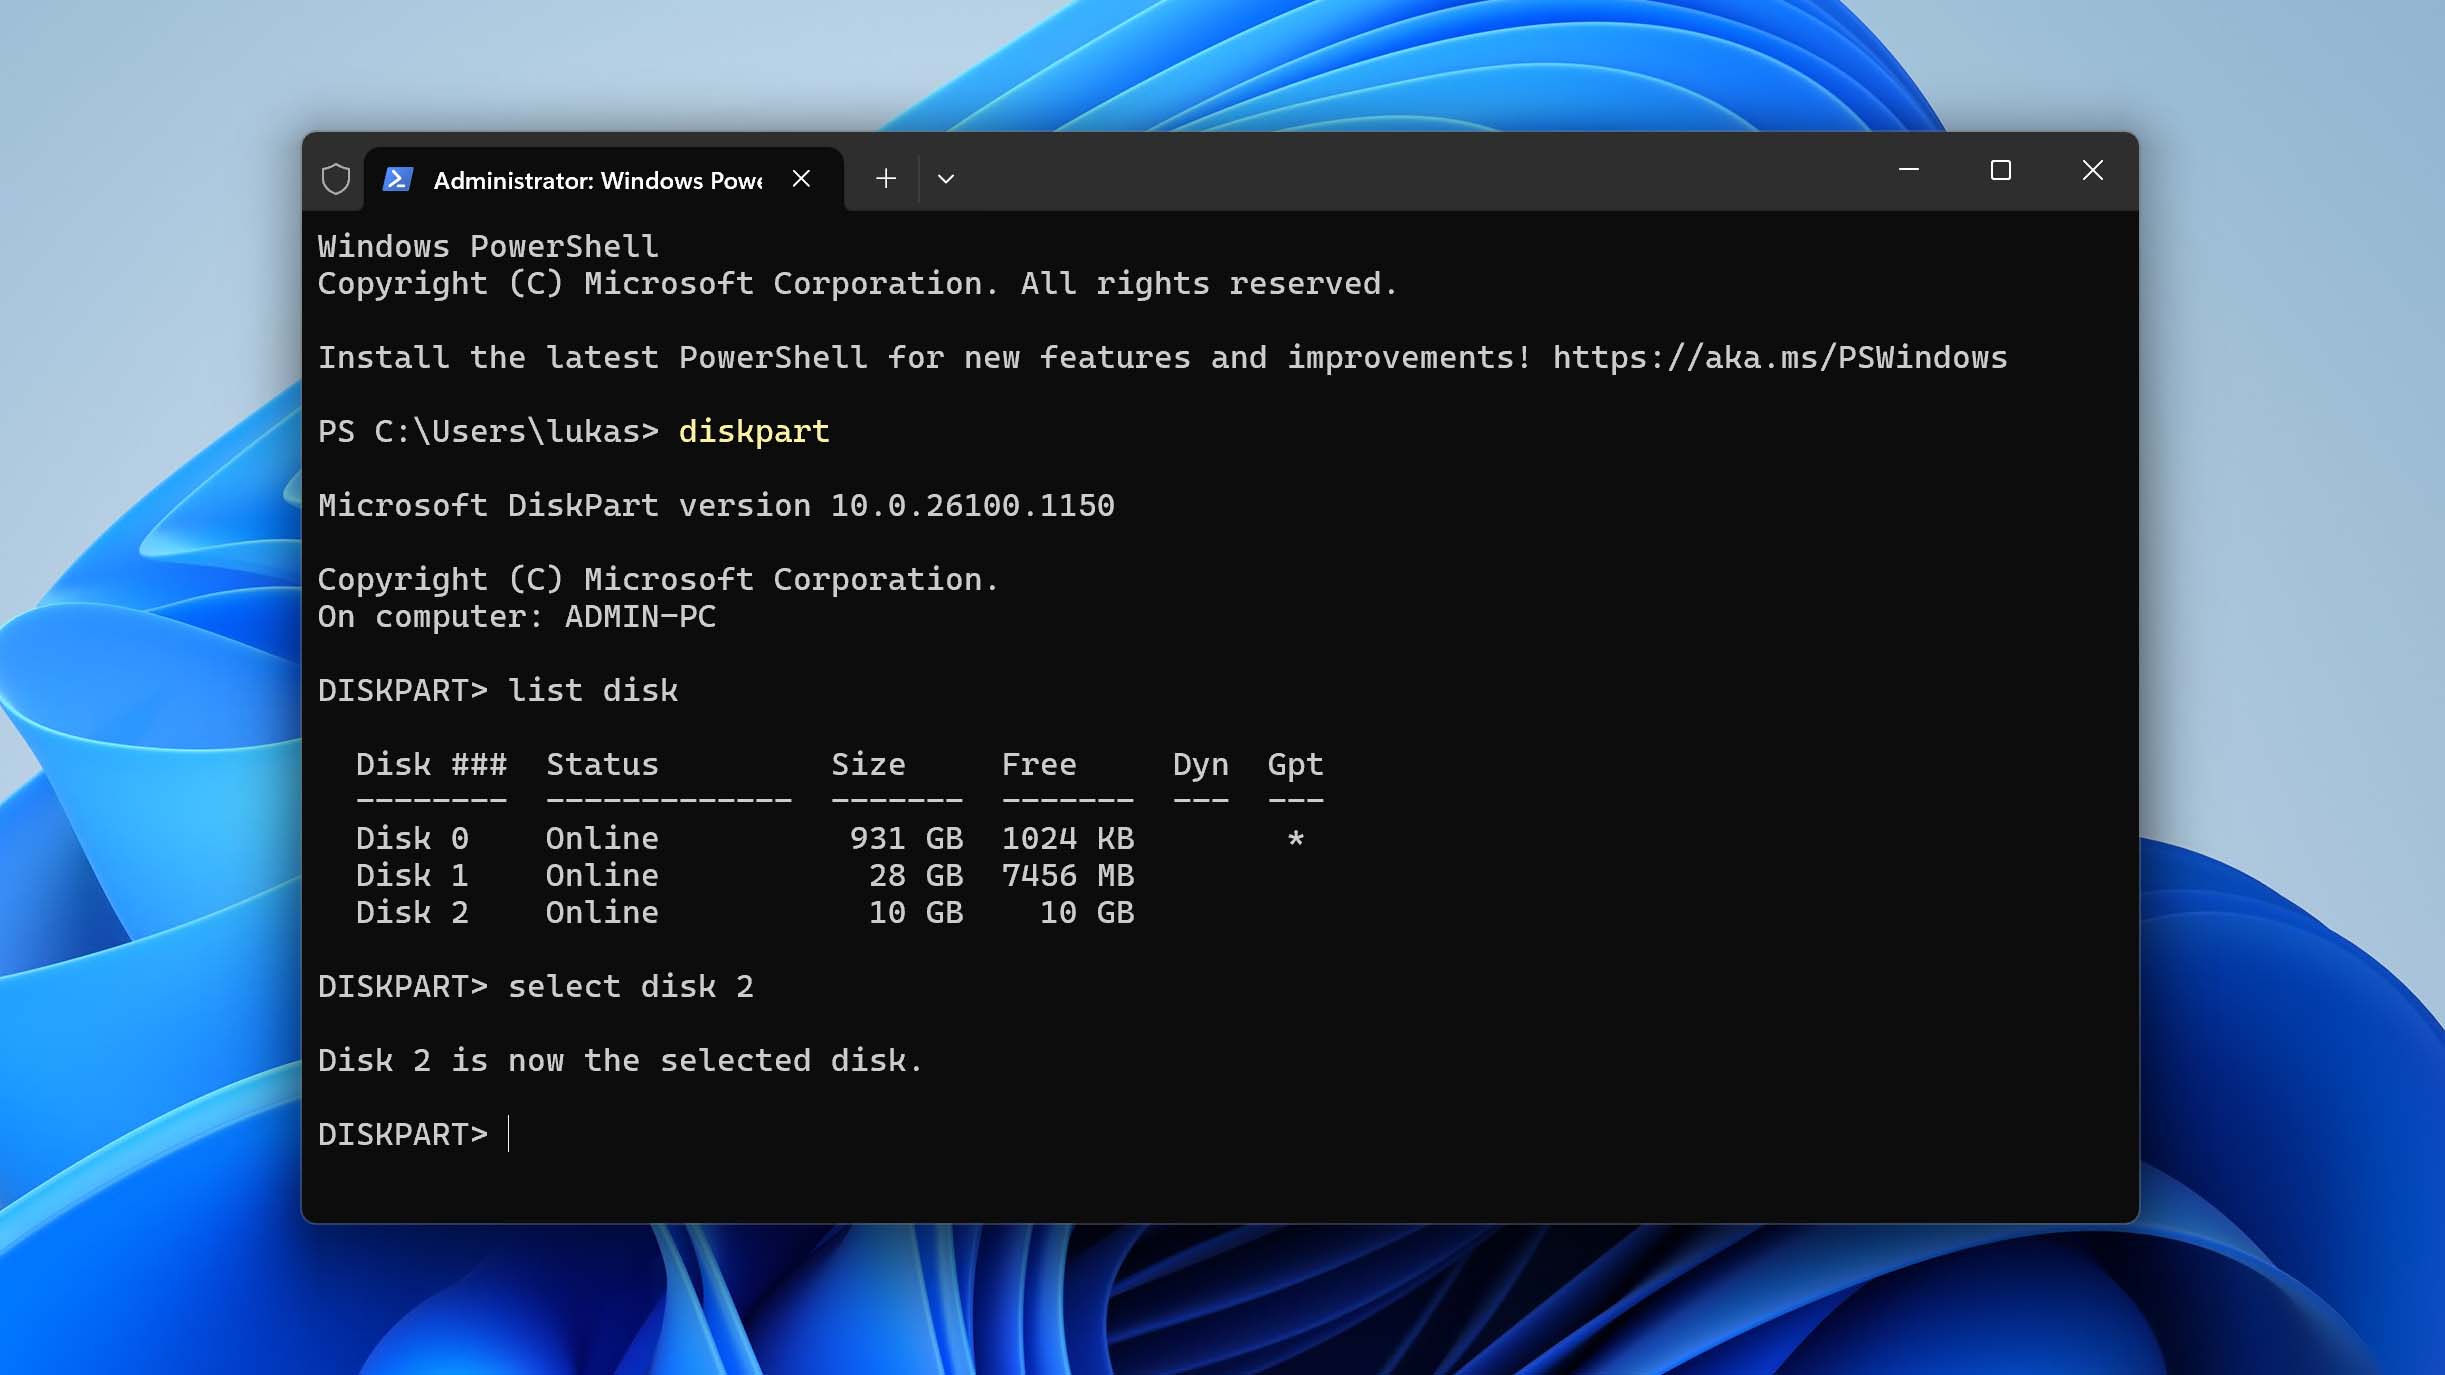
- In the window that opens, type diskpart and press Enter.
- Run the command list disk to display all drives connected to your computer. Note the number of the disk that you want to initialize.
- Type select disk <disk number> (replace <disk number> with the correct one from the list).
- Enter clean to remove all existing partitions and data structures from the disk.
- Then you need to choose a partition style. For this, type convert gpt for modern drives (recommended) or convert mbr if you’re working with an older system.
- Create a new partition by typing create partition primary.
- Format it with the NTFS file system by entering format fs=ntfs quick.
- Assign a drive letter with the command assign letter=L, but replace L with the letter you want.
- Finally, type exit to close DiskPart.

How to Recover Data After You Initialize a Disk
Regardless of which method you used to initialize your disk, the second stage of the process was formatting. This step deletes all files that were previously on the disk. However, if you followed our recommendation at the beginning of the article and created a backup with Disk Drill, there’s nothing to worry about—you can restore your files in just a few clicks.
It’s also worth noting that Disk Drill can attempt recovery even without a backup. Since the initialization process only performs a quick format, there is still a chance to retrieve files by scanning the disk directly.
Here’s how to recover your data using Disk Drill:
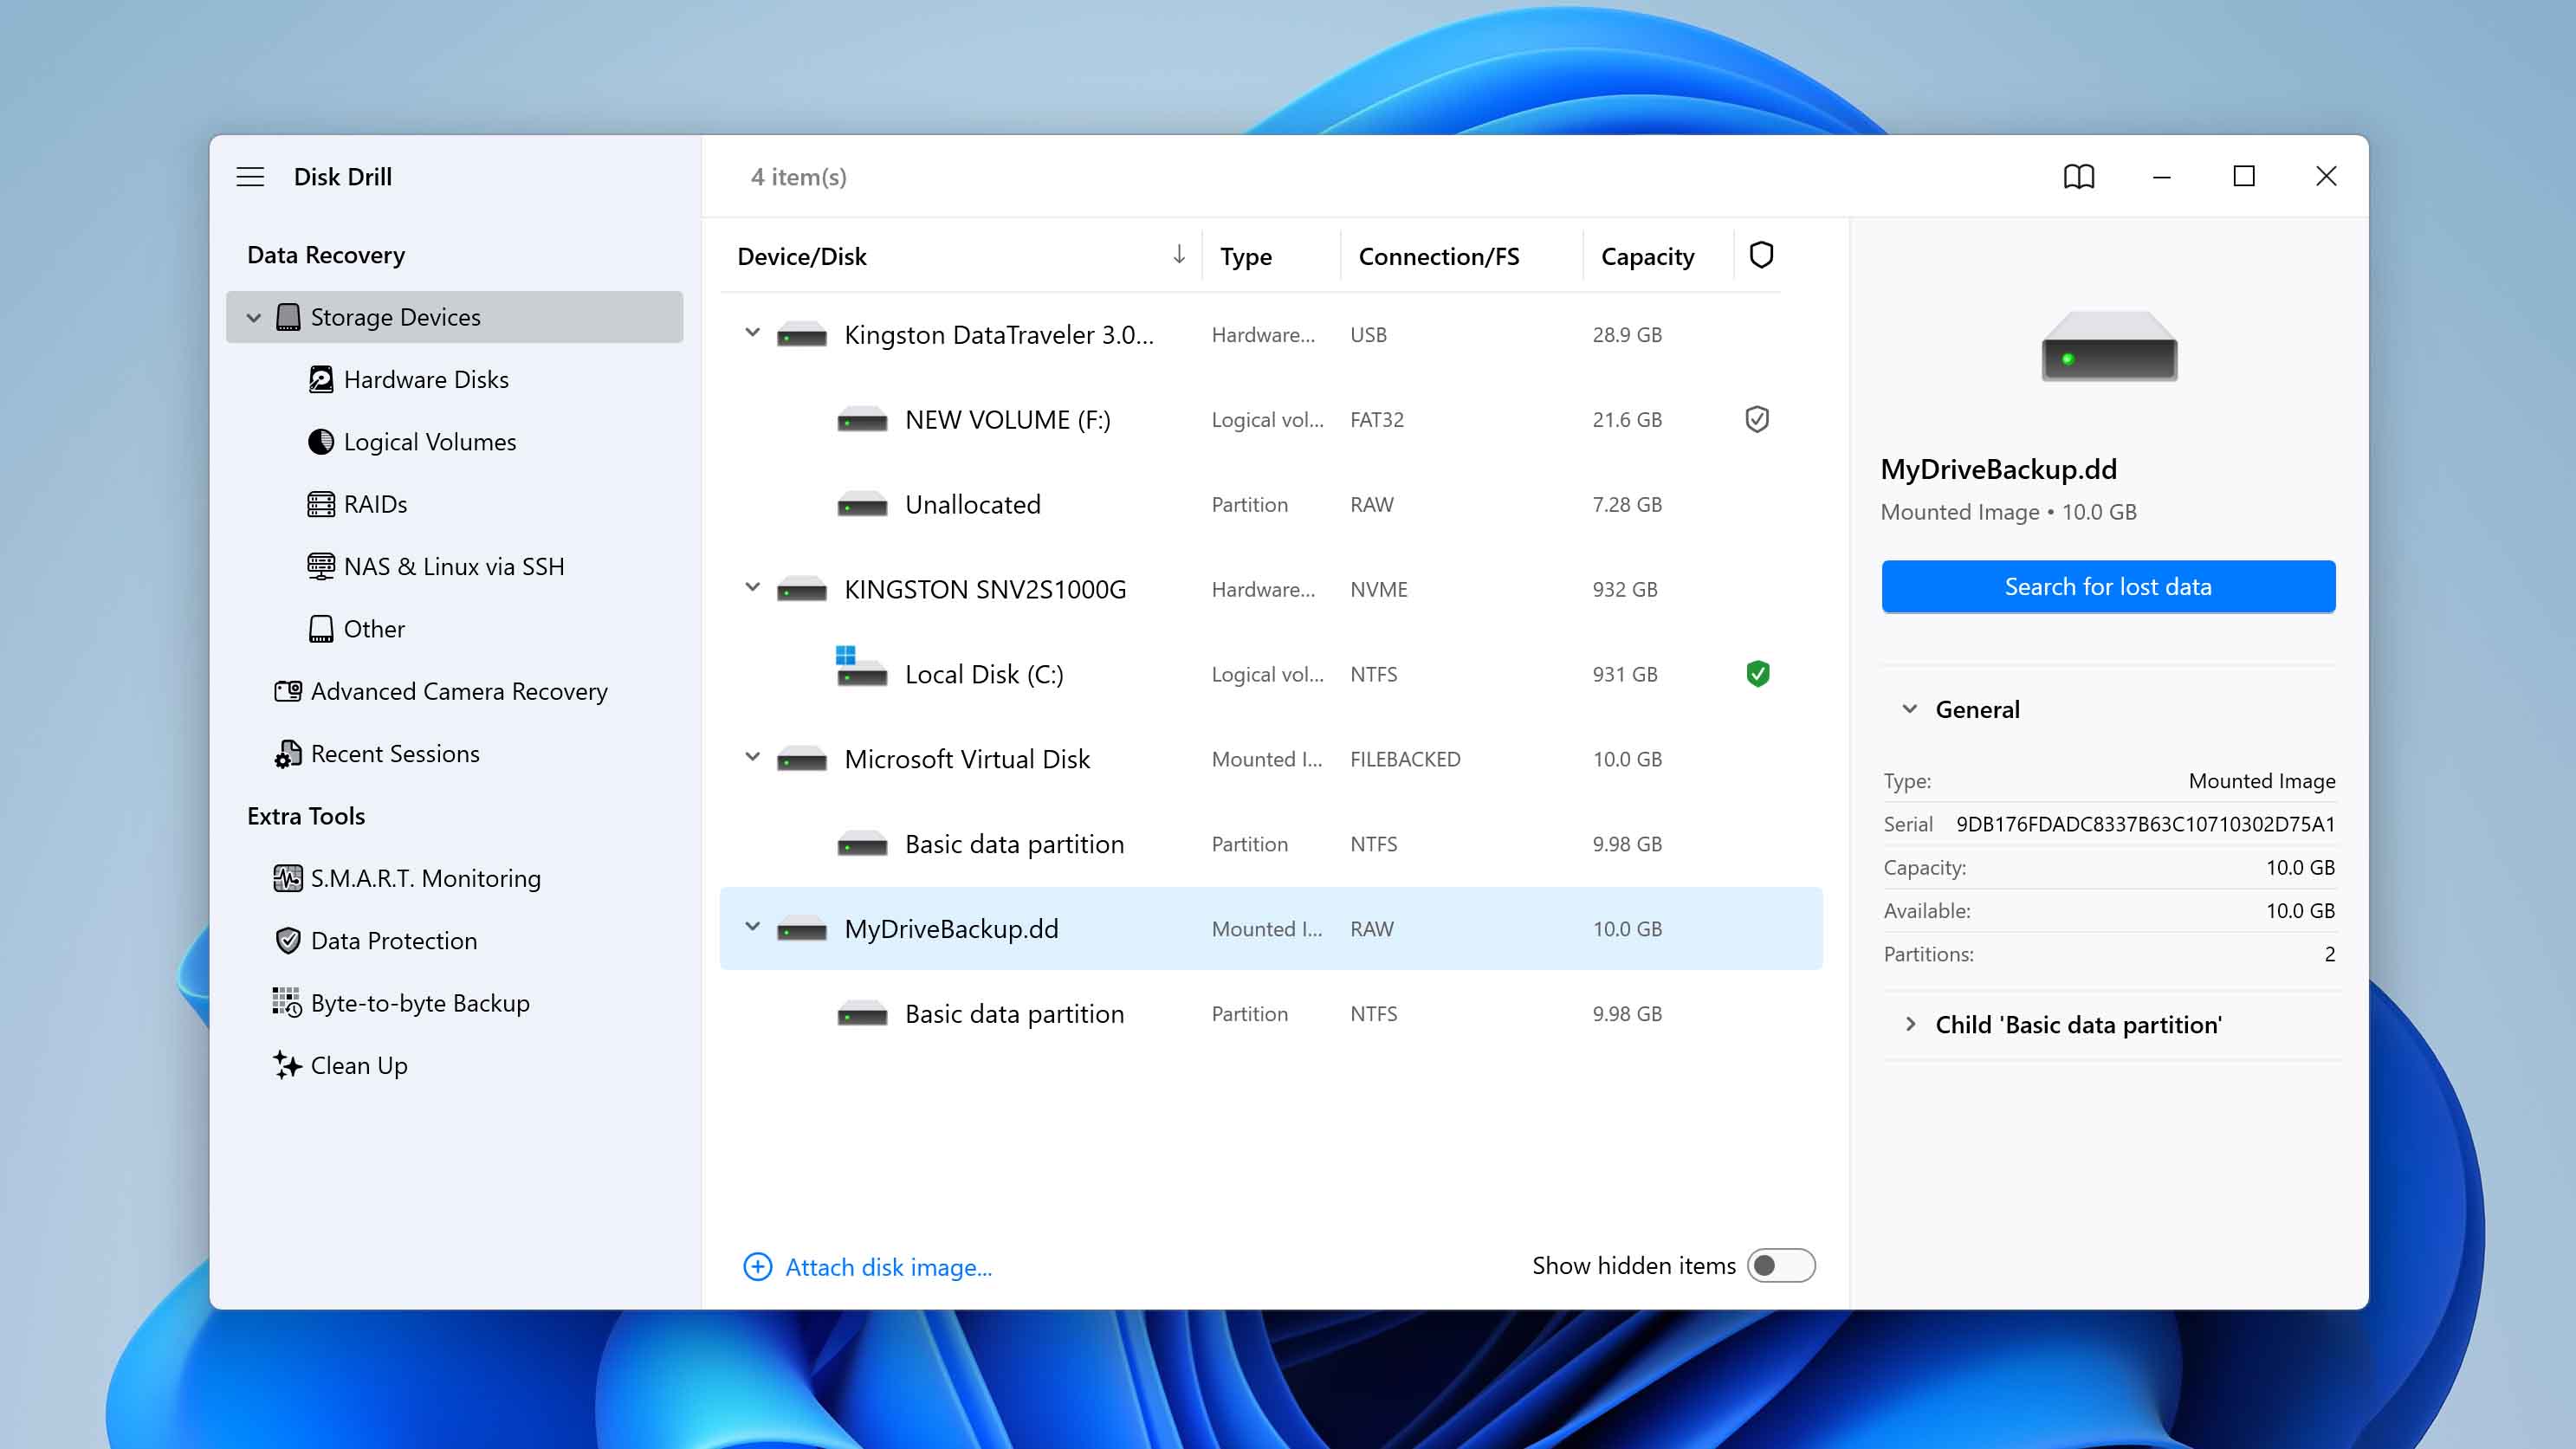
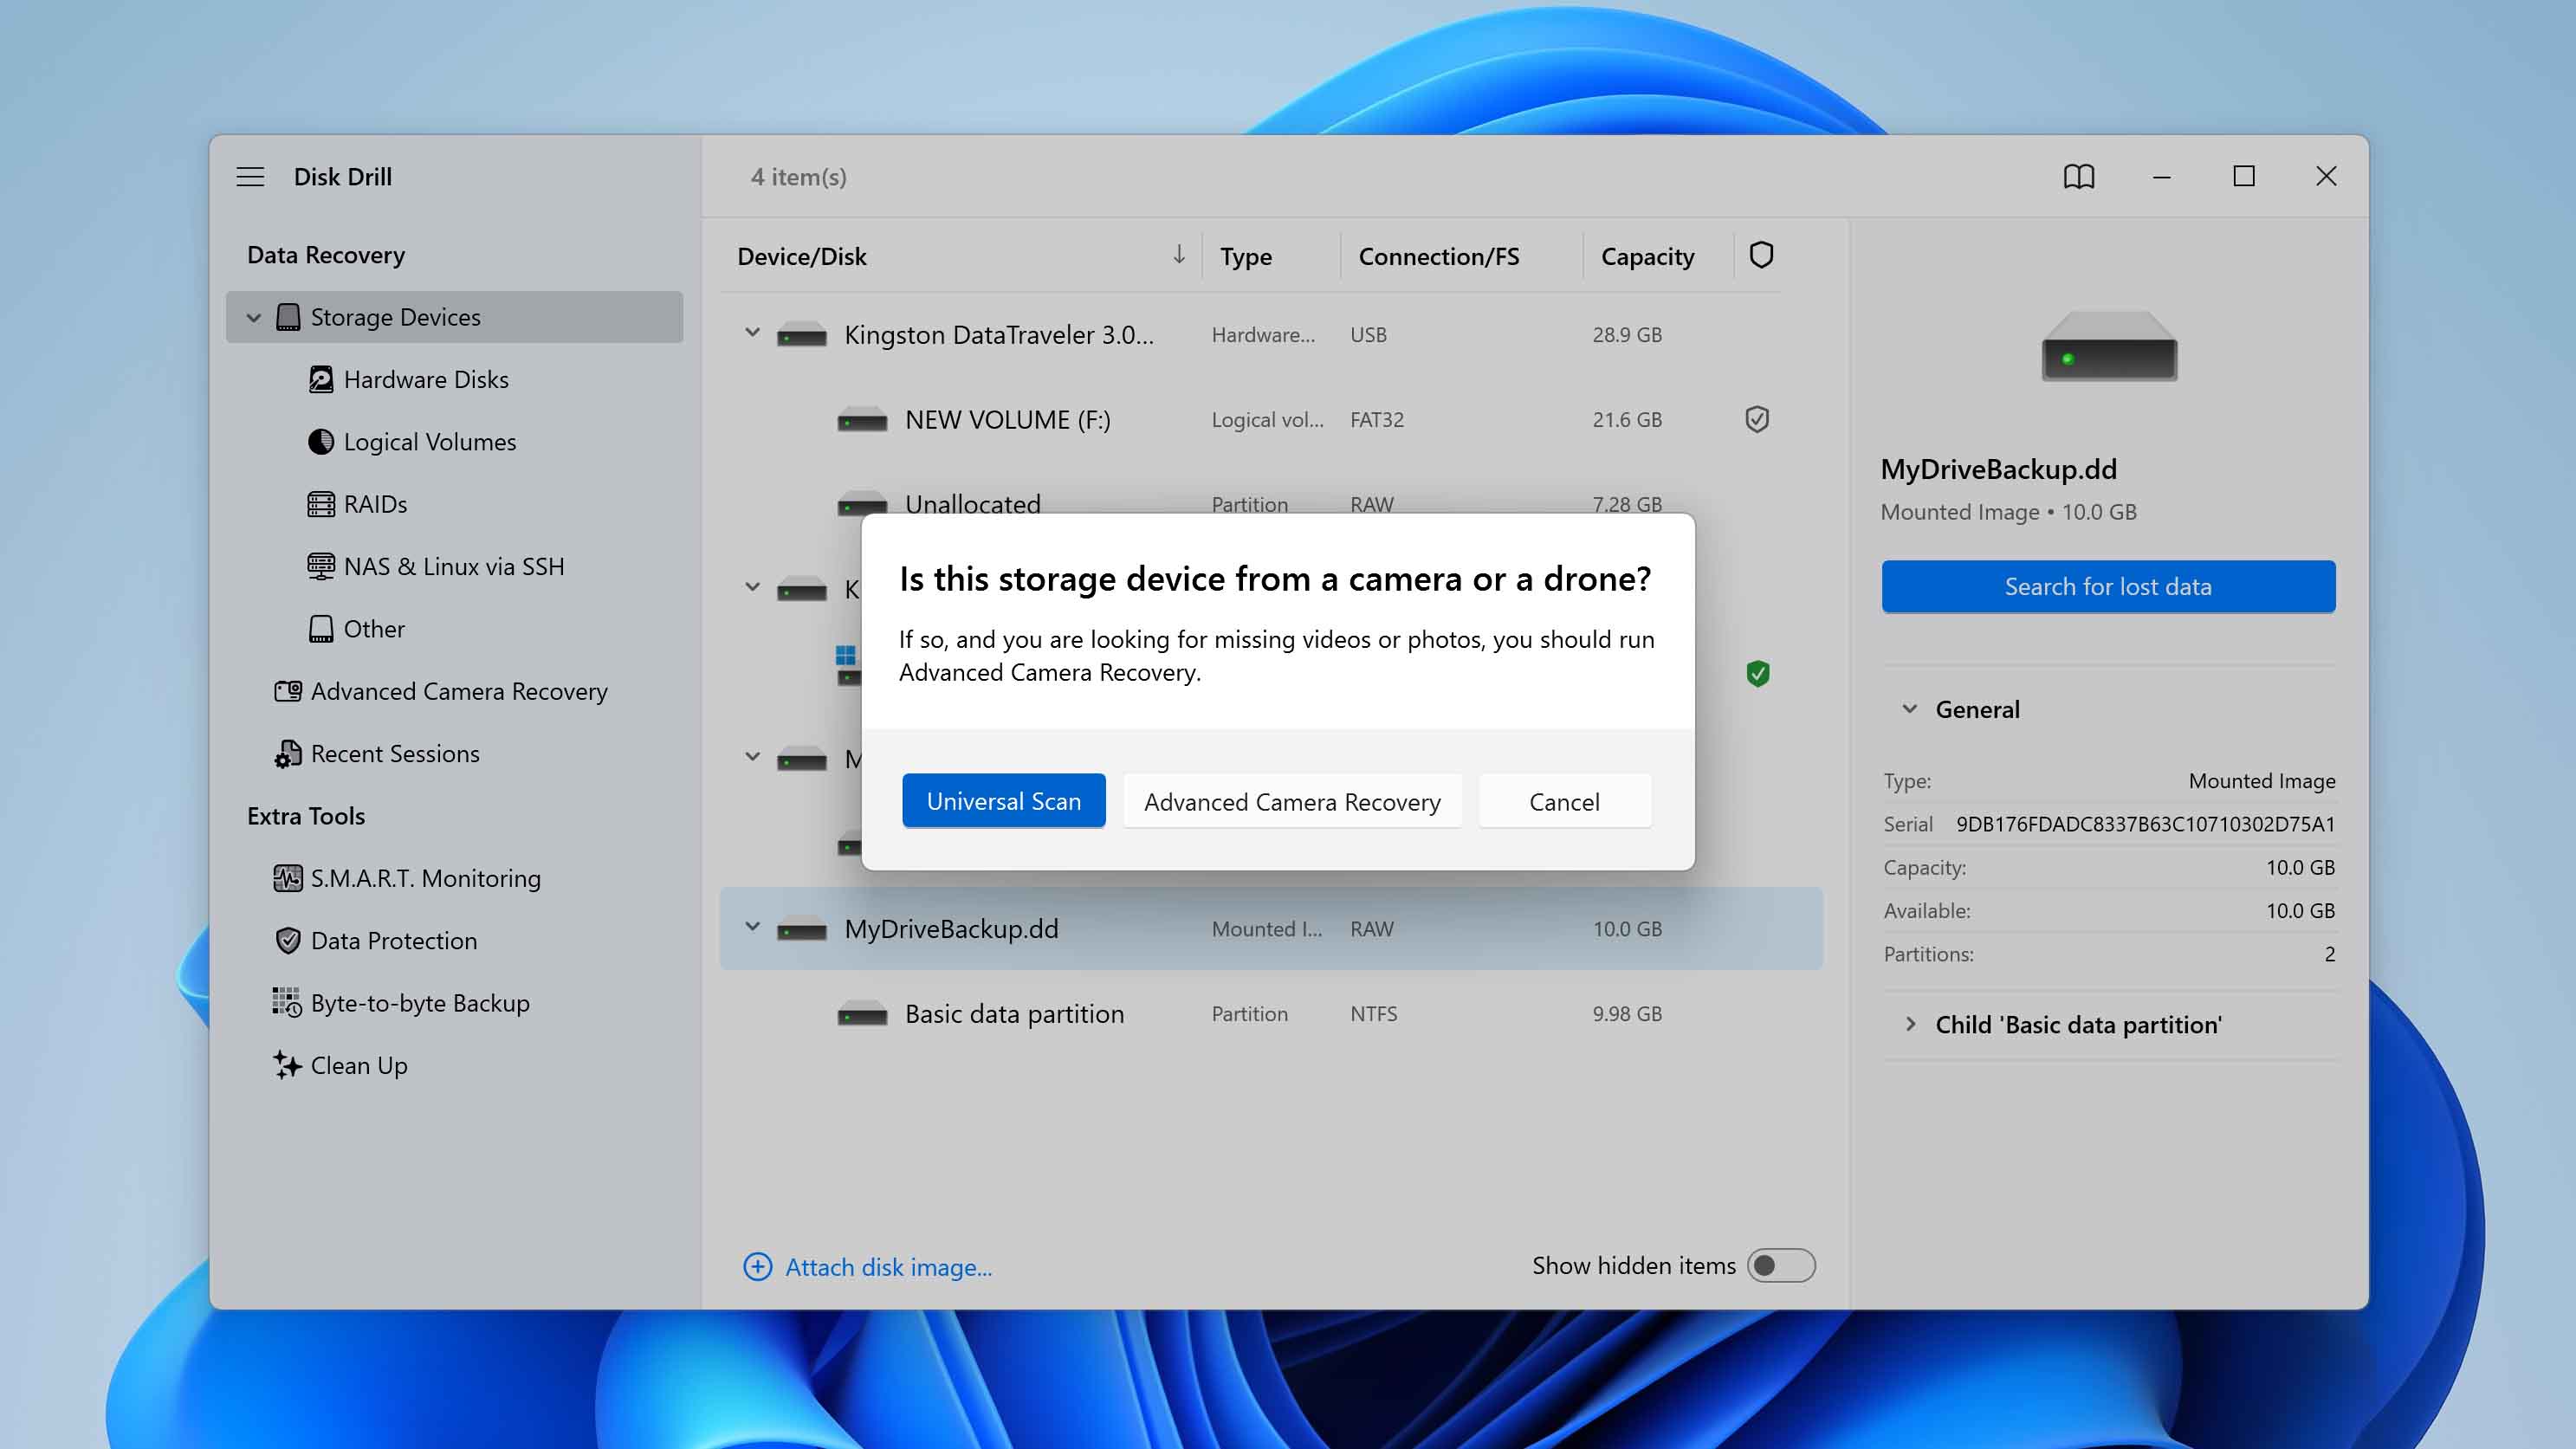
- Open Disk Drill and click Attach disk image in the bottom-left corner of the screen.
- The mounted image will appear as a new device in the list. Select it and click Search for lost data.
- A window will appear asking you to select the scan type. Choose Universal Scan (the Advanced Camera Recovery option is for recovering video from SD cards of cameras or drones).
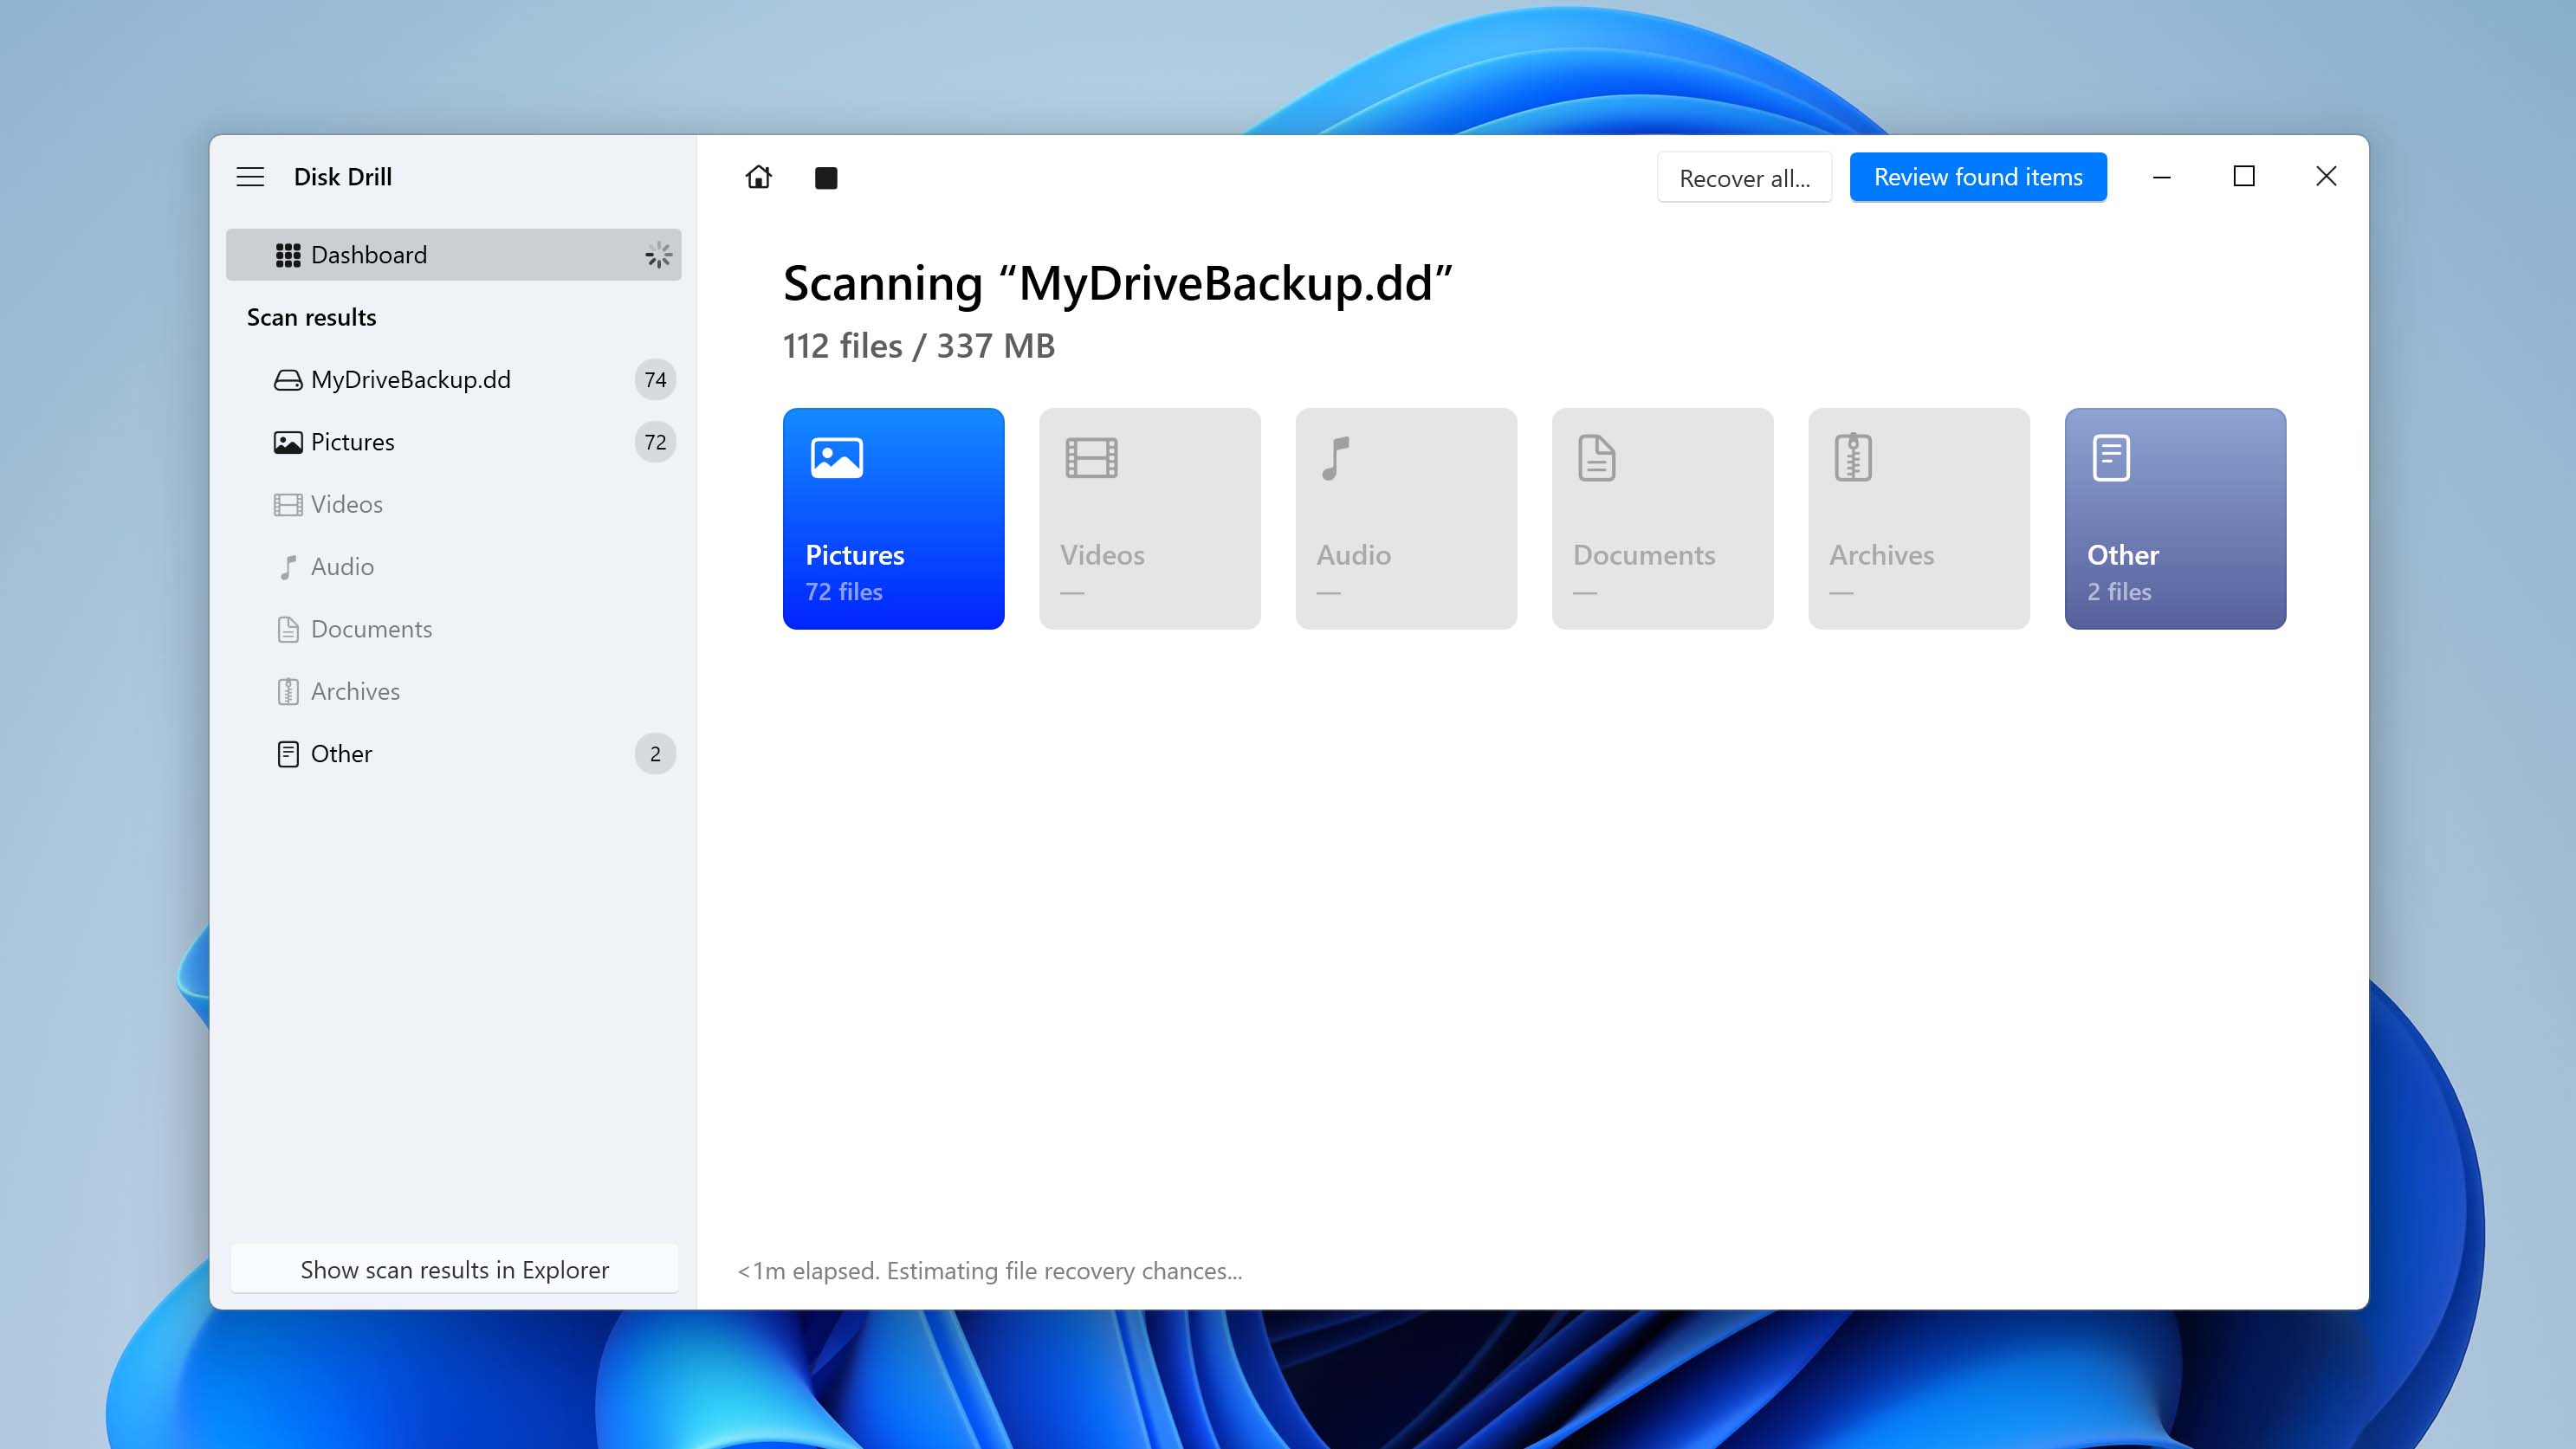
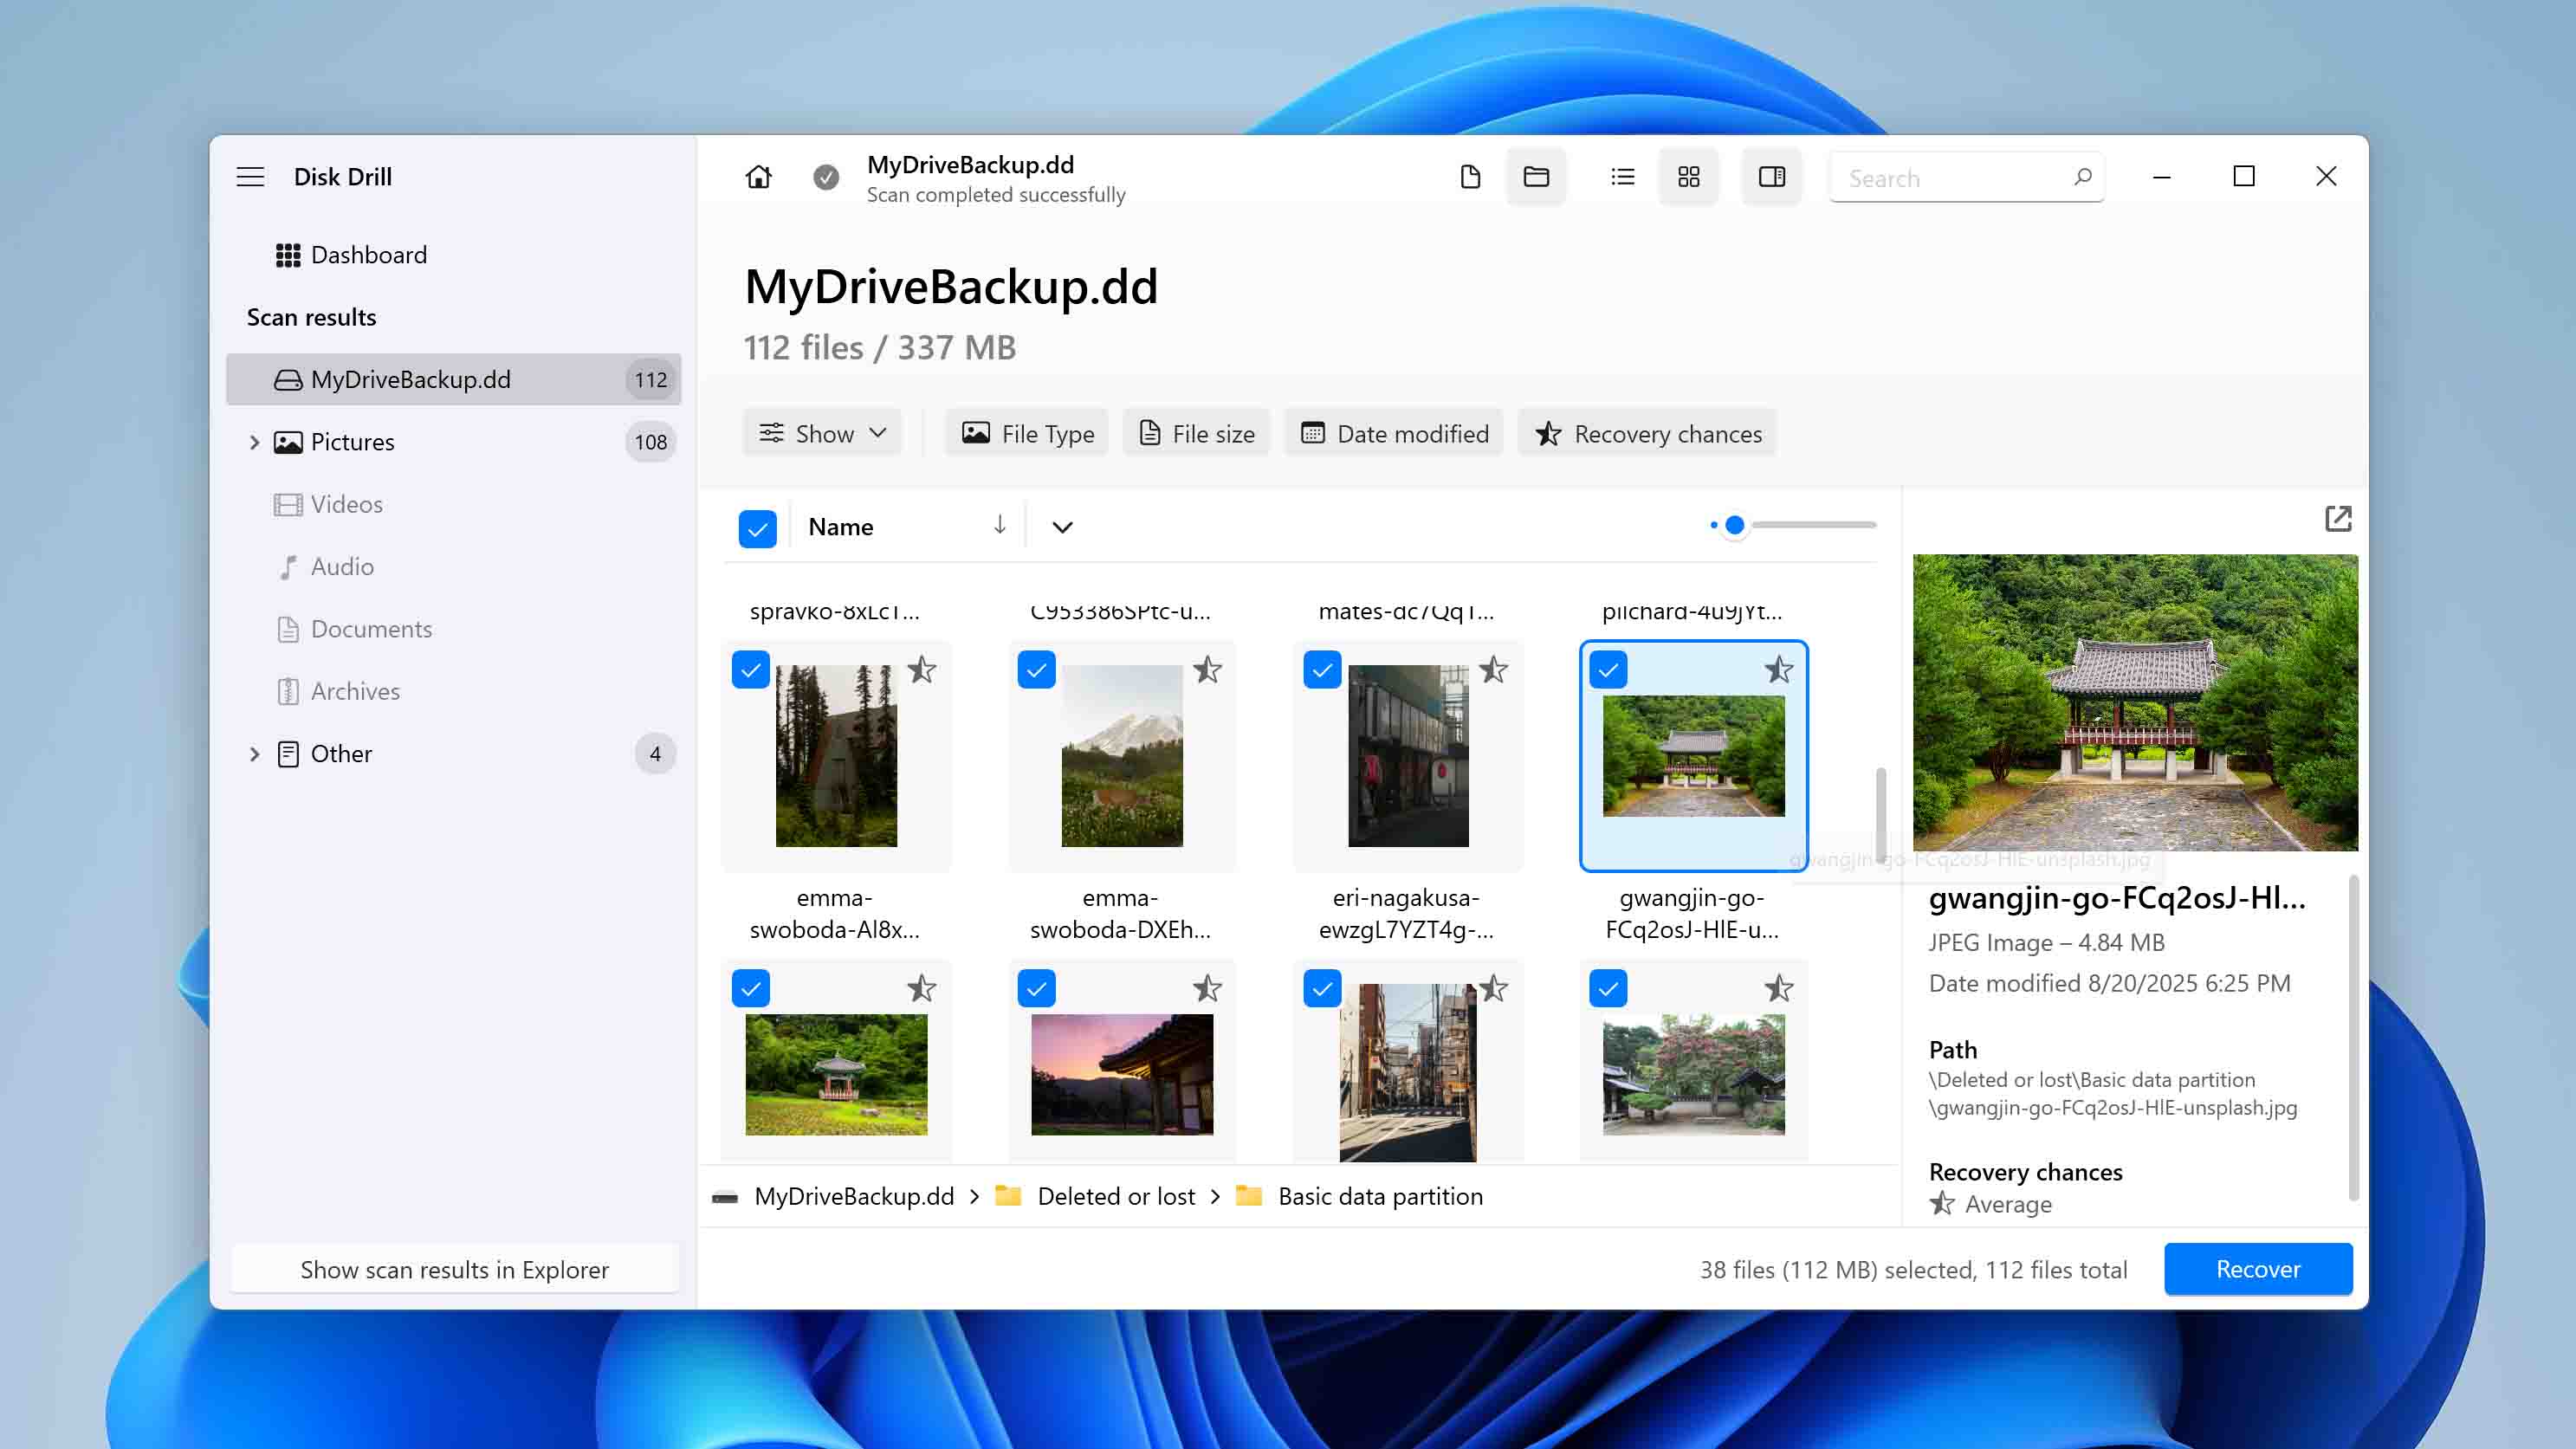
- Wait for the program to complete the scan of your backup. Once finished, click Review found items to pick specific files you want to recover. If you want everything, simply click Recover all.
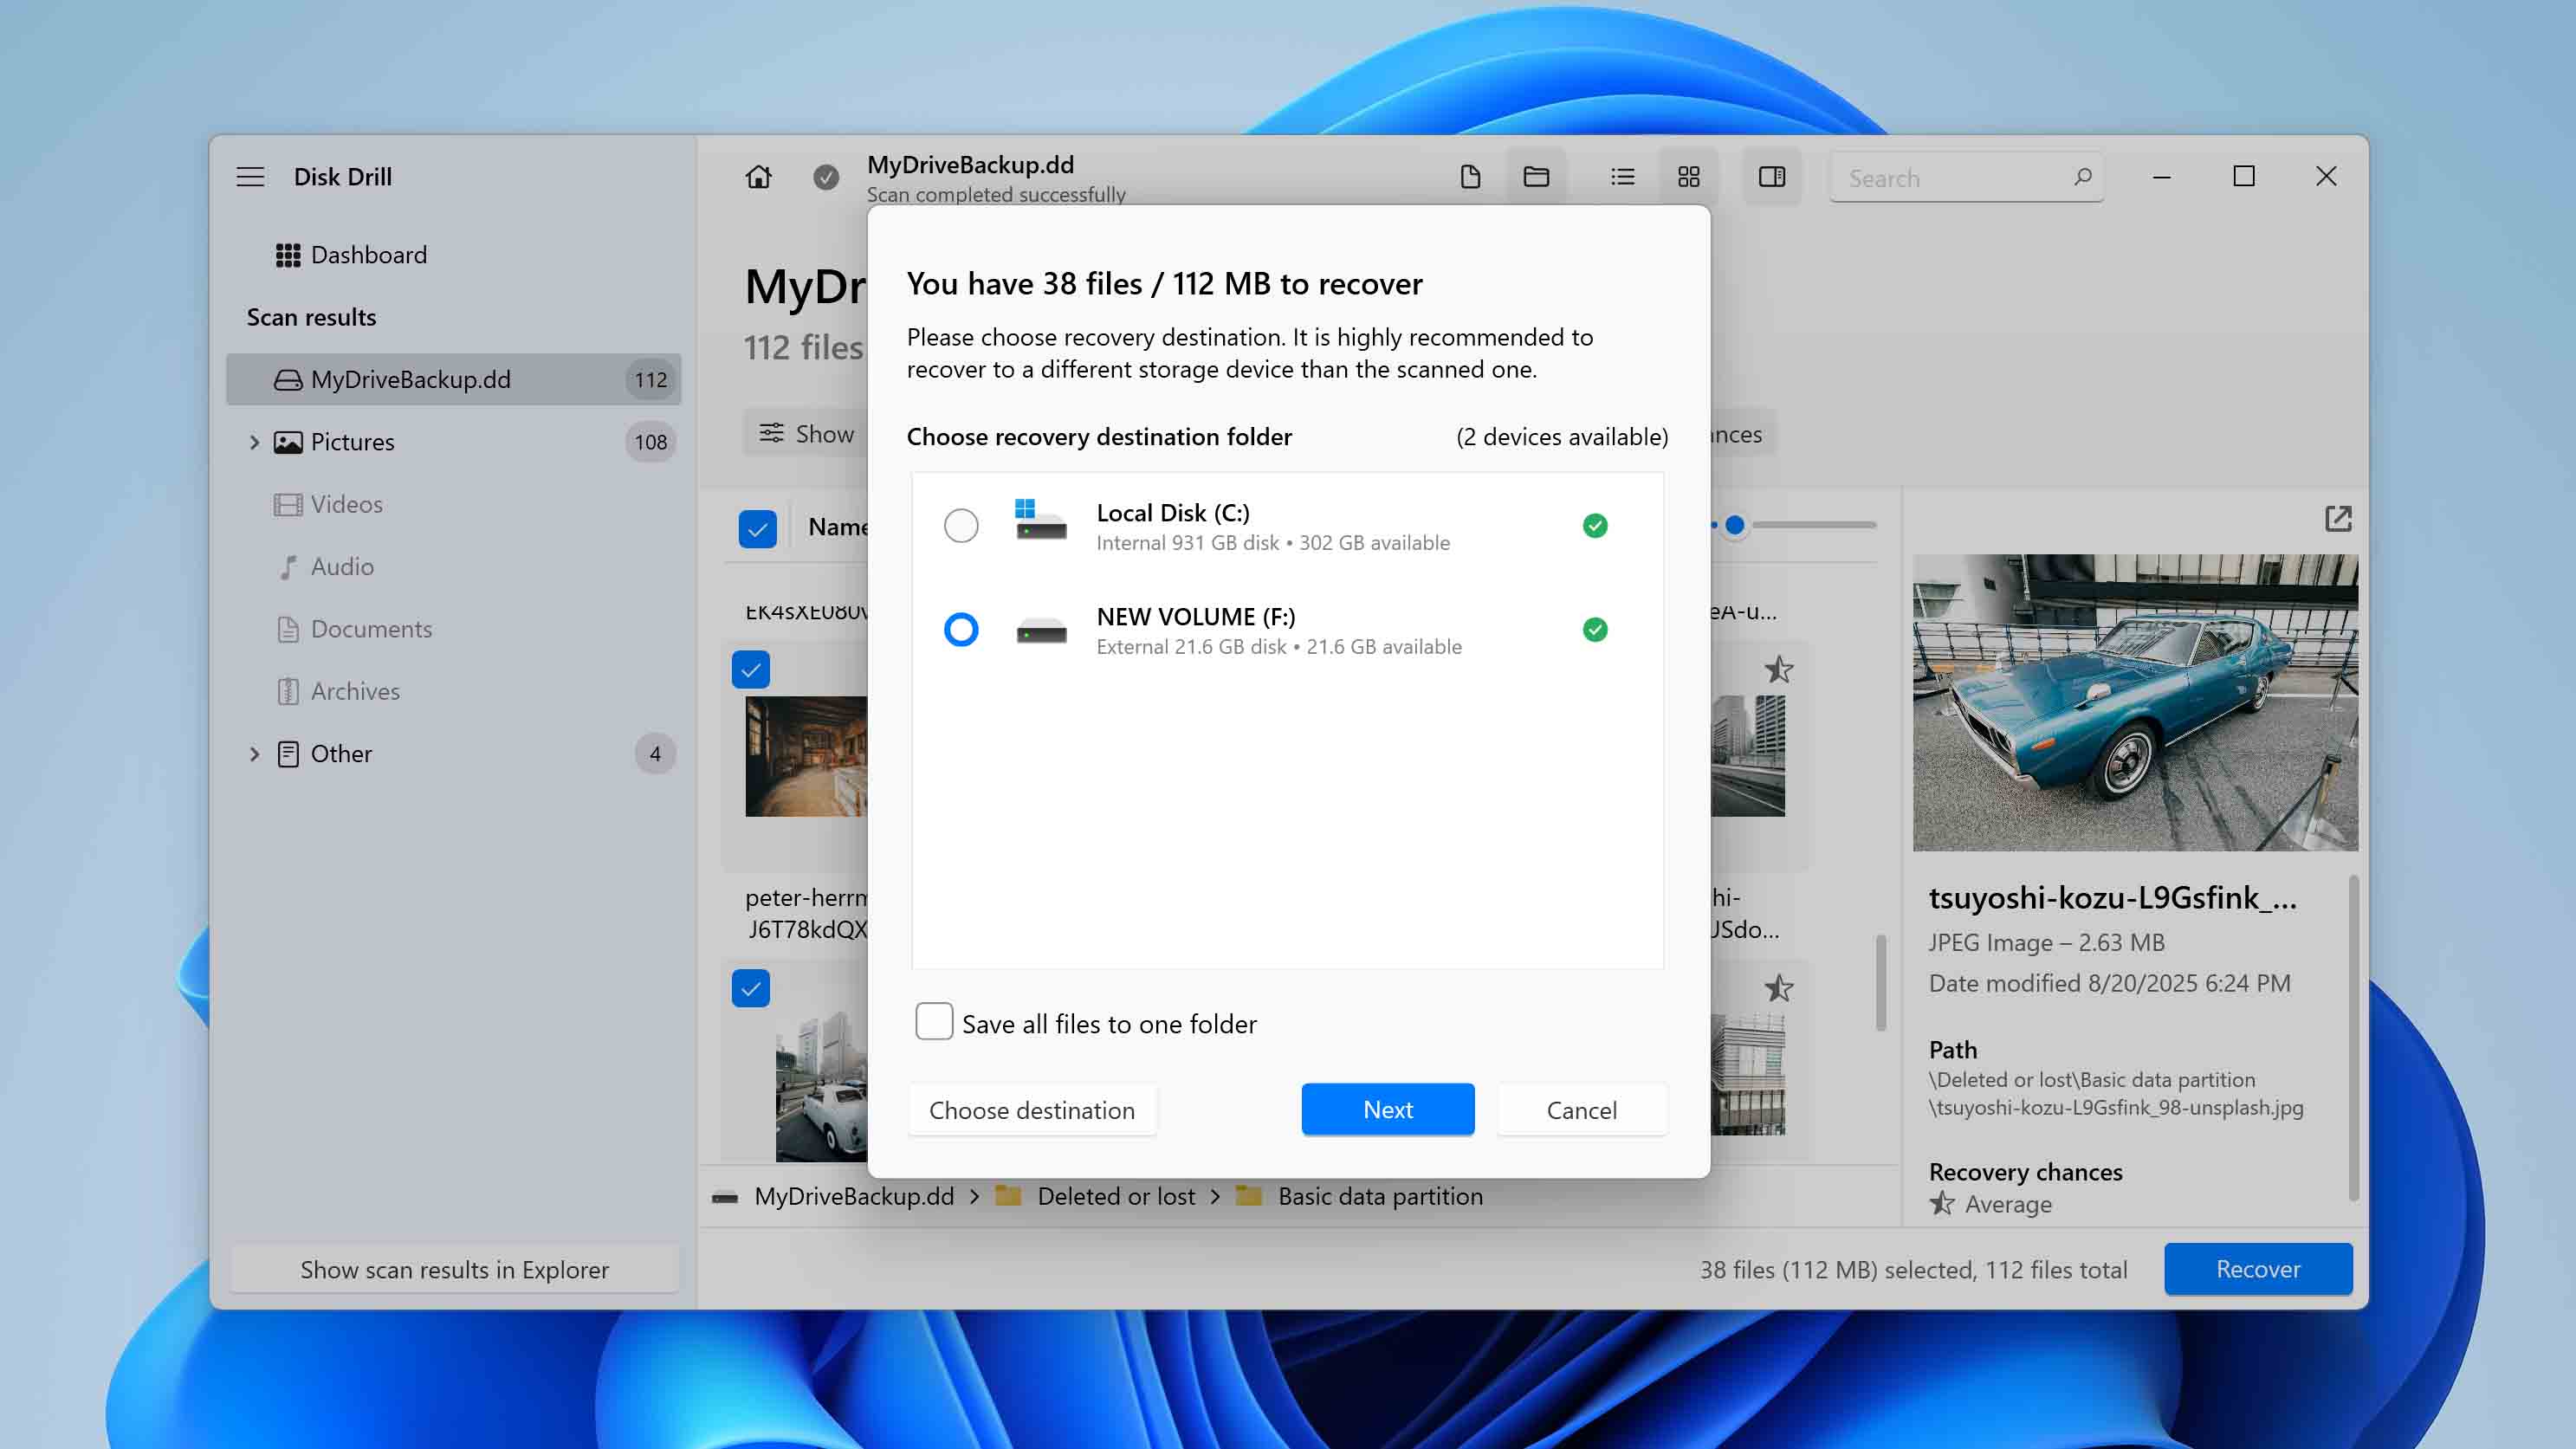
- Choose the initialized disk as the destination to restore your files to their original location. If you scanned the initialized disk directly instead of the backup, select a different location to avoid overwriting data.
- Click Next and follow the prompts. That’s it—your files will be restored and accessible again.
Disk Drill is available as a free download, and even in the free version, you can create a full backup, scan your disk, preview all recoverable files, and restore up to 500MB of data without paying anything. If you need to recover more than that, upgrading to the Pro version will be required.
Conclusion
Now you know everything about disk initialization—what it is, how it impacts your data, and how to complete the process while keeping your files safe. We hope this guide was helpful and that you successfully initialized your drive without losing anything important.
If it worked for you, let us know in the comments: which method did you prefer—Disk Management or the Terminal? And if you still have questions about data recovery or run into other Windows issues, feel free to check our other articles. We cover a wide range of topics, including how to recover permanently deleted files, how to reinstall Windows, reviews of recovery tools, many Mac guides, and more.


