 Suspect that your SSD is corrupt? Maybe some of your files have disappeared, a partition refuses to show up, or there are random freezes and disconnects. SSDs may seem like complex devices, especially if you’ve done your research, leading you to think that can you even fix a corrupted SSD in the first place? Well, you absolutely can as long as you follow our guide carefully. Your plan of action should be to recover all your files, before proceeding to fix the corrupted SSD. The expert-vetted sections below will take you through the entire process step-by-step.
Quick SSD Symptom Checker
Since SSD corruption can have various reasons, you may be confused as to what exactly to do if the SSD is corrupted. To make your life easier, we’ve added a table with some common scenarios, their symptoms, and the relevant SSD corrupted fix for each case:
| Scenario | Symptoms | Recommended Fix |
| SSD Mounts But Throws Errors | Random error messages when trying to access the drive. | Run CHKDSK. |
| SSD Has a Lost or Damaged Partition | One or more partitions are inaccessible, but the SSD remains detected. | First, try rebuilding the partition using TestDisk. If that doesn’t work, perform a full-format of the SSD using Diskpart. |
| SSD Doesn’t Show Up At All or Crashes the System | SSD doesn’t show up in the BIOS and Disk Management, randomly disconnects then reconnects, or leads to blue screen of death (BSOD) errors. | Double-check that the SSD is properly connected to your PC. We also suggest updating the SSD’s firmware. |
| System SSD Is Corrupted and the OS Won’t Boot | You get a missing operating system message when you boot your PC. | Use a bootable Windows/Linux USB to safely copy your files from the corrupted SSD to another drive. If that’s not an option, use an SSD enclosure to connect your SSD to another PC as an external drive. It might be worth running Windows Startup Repair, or reinstalling Windows once you’ve copied your files. |
Unless the drive is physically damaged, you should recover your data before attempting any of the corrupted SSD fixes listed below. You can use DIY data recovery methods as long as the drive is physically fine, and showing up in Windows Disk Management with its correct storage capacity. However, it’s impossible to predict when a corrupt SSD will fail completely, and when it does your only option is to contact a professional data recovery company to get back your files.
How to Recover Files From a Corrupted SSD
Believe it or not, you actually have a better chance of recovering data from a corrupted SSD than you would if the files were manually deleted from a perfectly fine SSD. This is because of the TRIM and garbage collection features in SSDs that permanently wipe data blocks that contain files marked for deletion. Once TRIM and garbage collection do their job, the files are irrecoverable by data recovery programs. However, on a corrupt SSD, your files are simply inaccessible because of logical/physical corruption. In such cases, TRIM usually won’t be activated.
Since a corrupt SSD’s file system is likely damaged, you need a data recovery program that can perform RAW recovery, which bypasses the file system entirely. That’s why we picked Disk Drill to perform corrupted SSD recovery—it supports RAW data recovery, is easy-to-use, and packed with additional features that make data recovery much smoother than it would be otherwise. It recognizes almost 400 file types, making it an excellent choice for most users. As long as the corrupted SSD is visible in Disk Management with its correct storage capacity, Disk Drill can recover your data from it.
In case it’s the primary SSD that’s corrupted (the one containing your OS), use an M.2/SATA to USB enclosure to connect the drive to another PC. Perform data recovery on this second PC.
Here’s how to recover your files from a corrupted SSD using Disk Drill:
- Download Disk Drill, and install it.
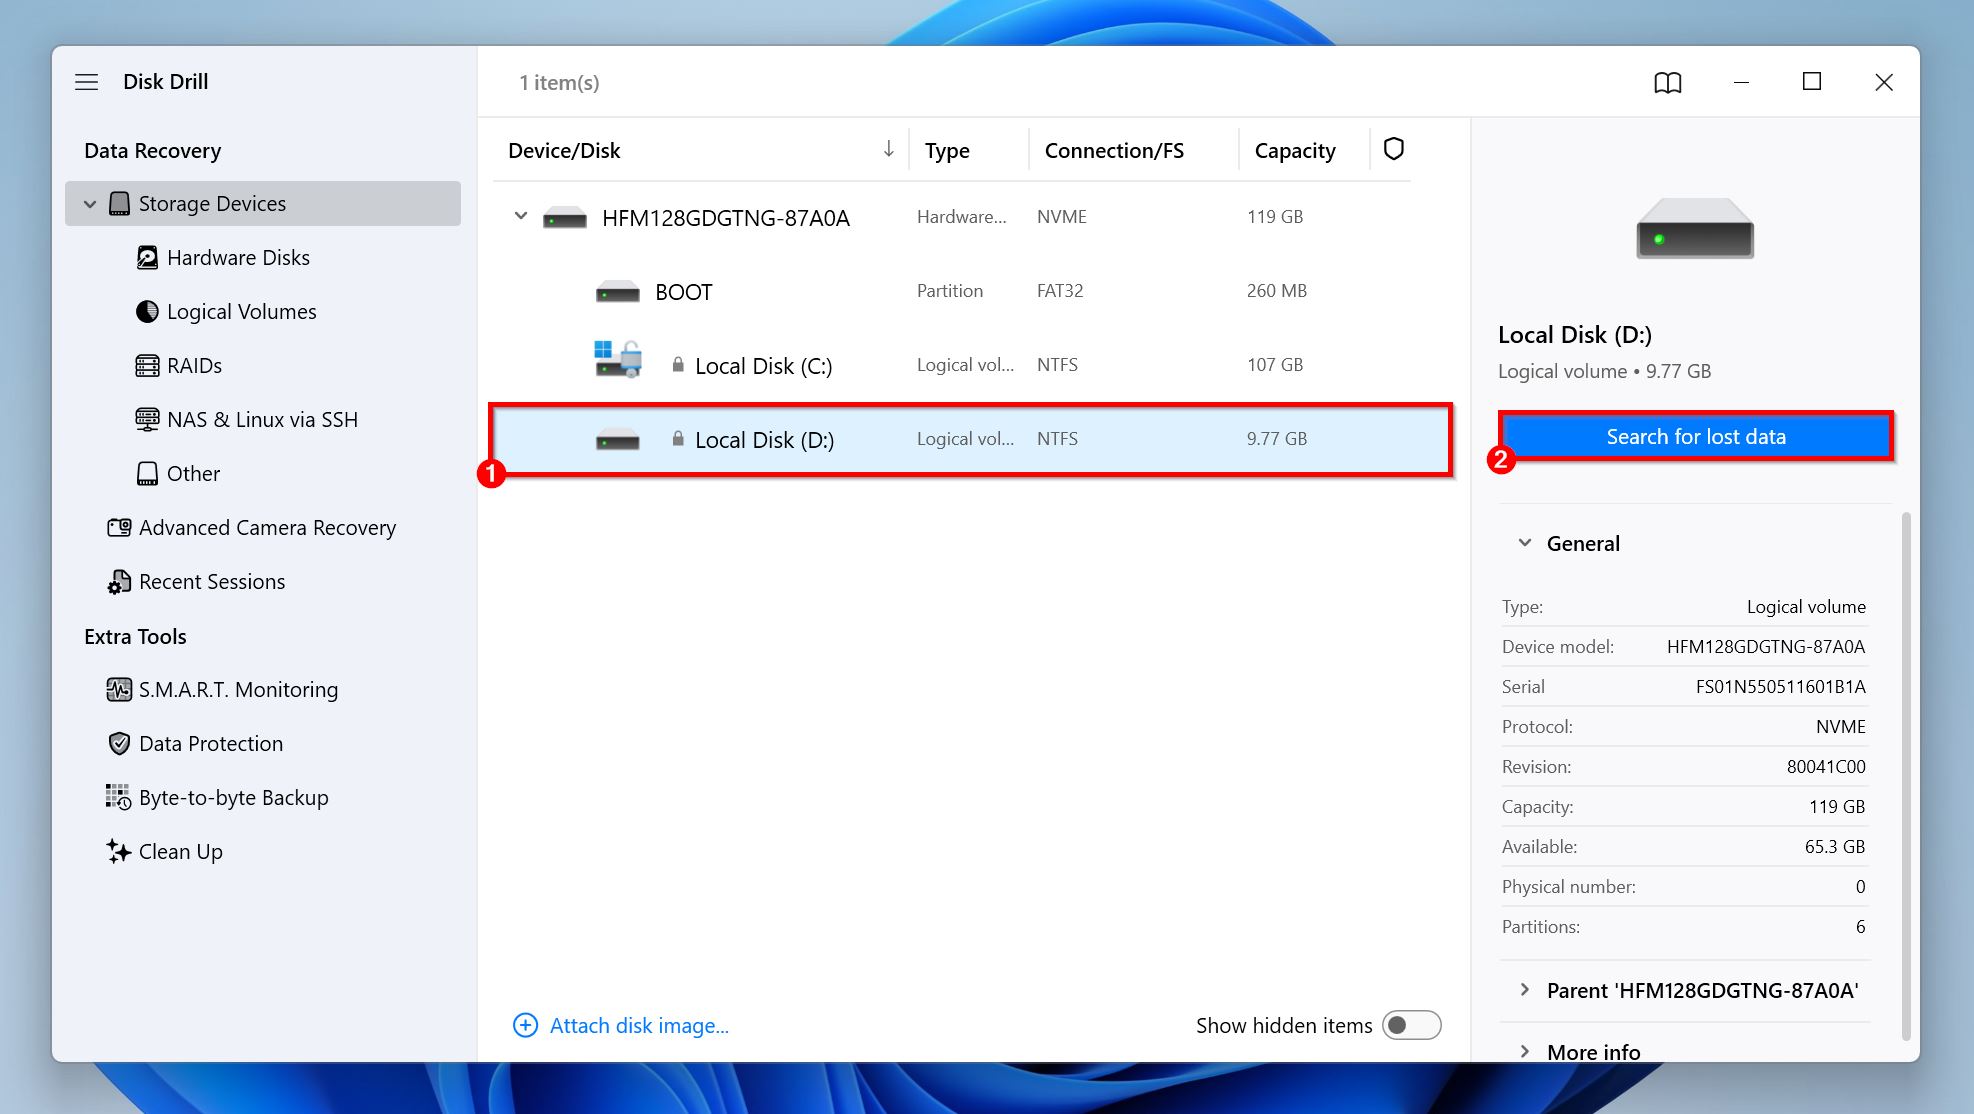
- Select the corrupted SSD or the partition you wish to recover data from, and click on Search for lost data to begin the data recovery scan.
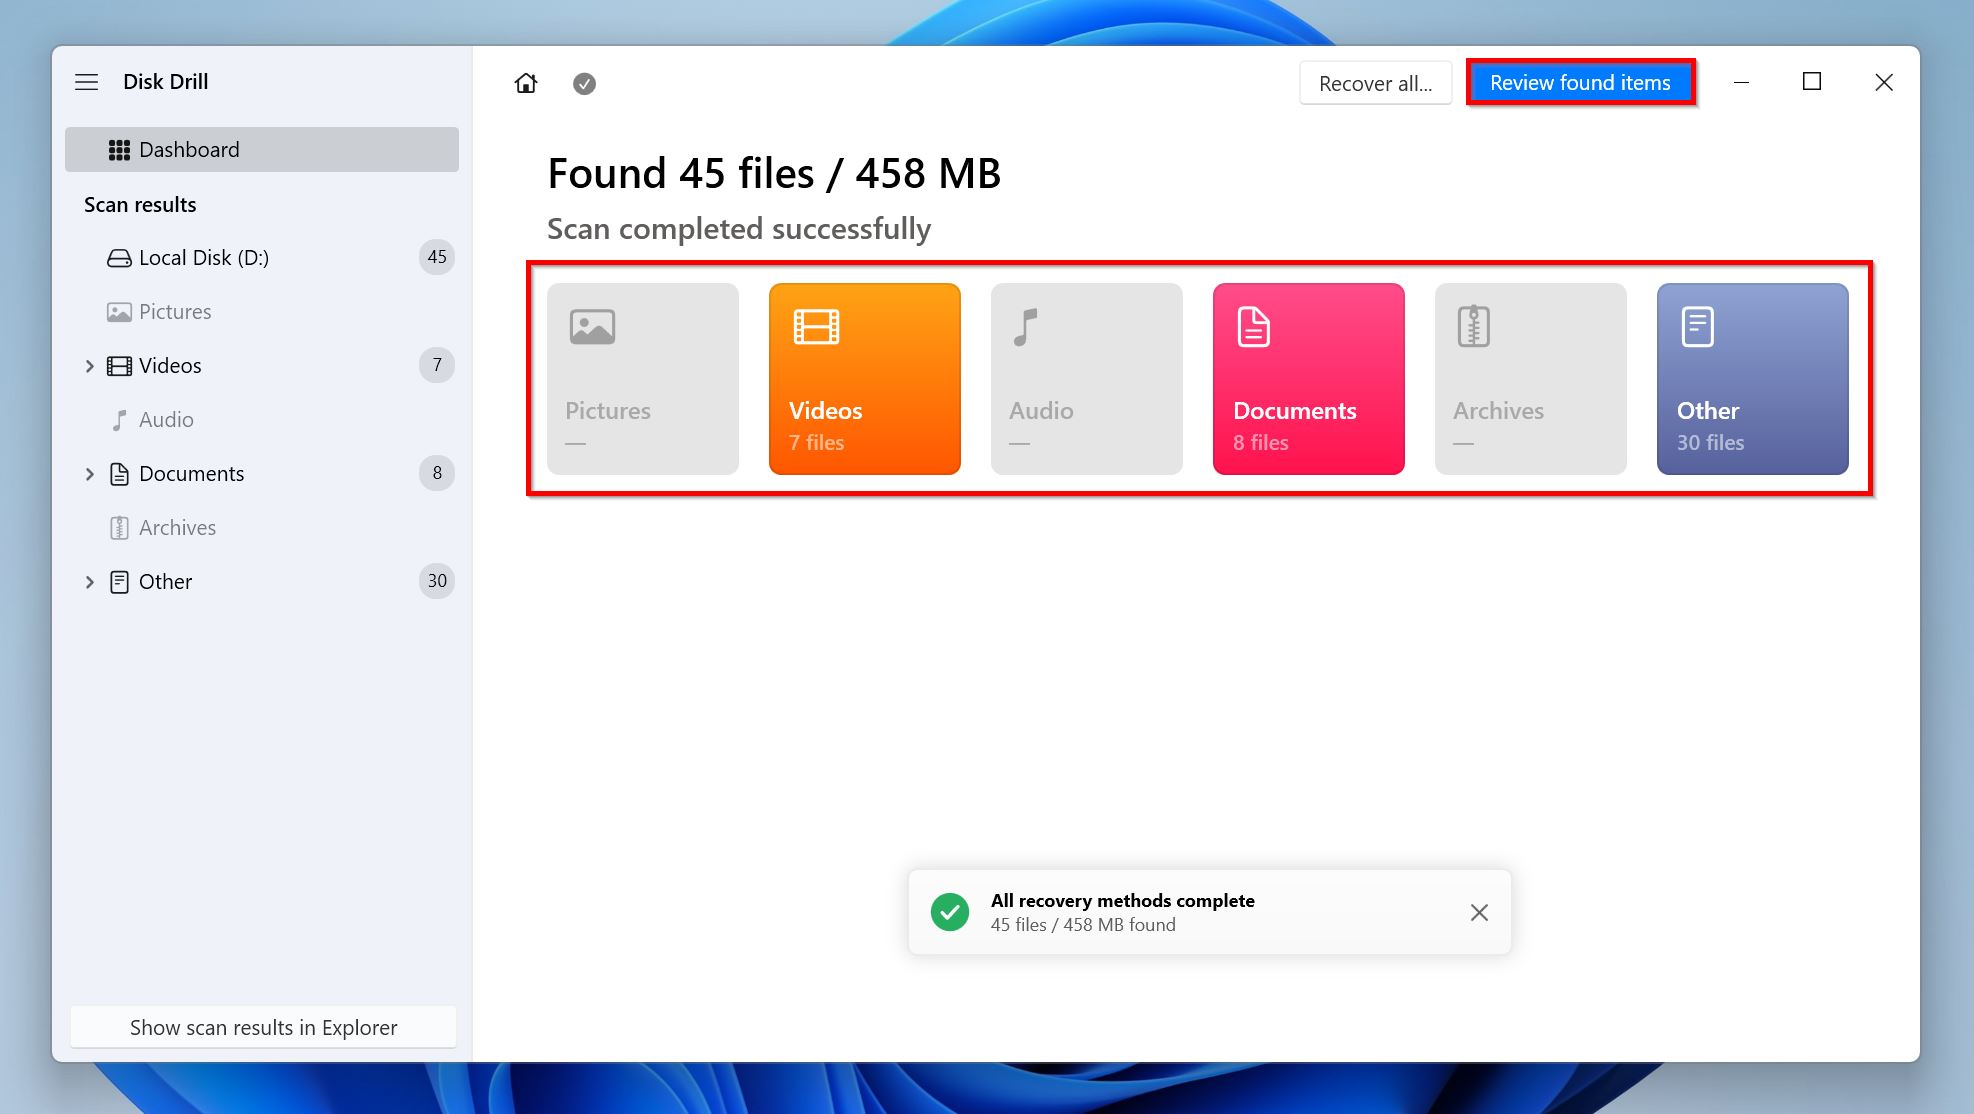
- Click on Review found items to see all the files Disk Drill discovered. If you’re looking for a specific file type, click on the relevant file type tile—Pictures, Videos, Audio, Documents, Archives, and Other—instead.
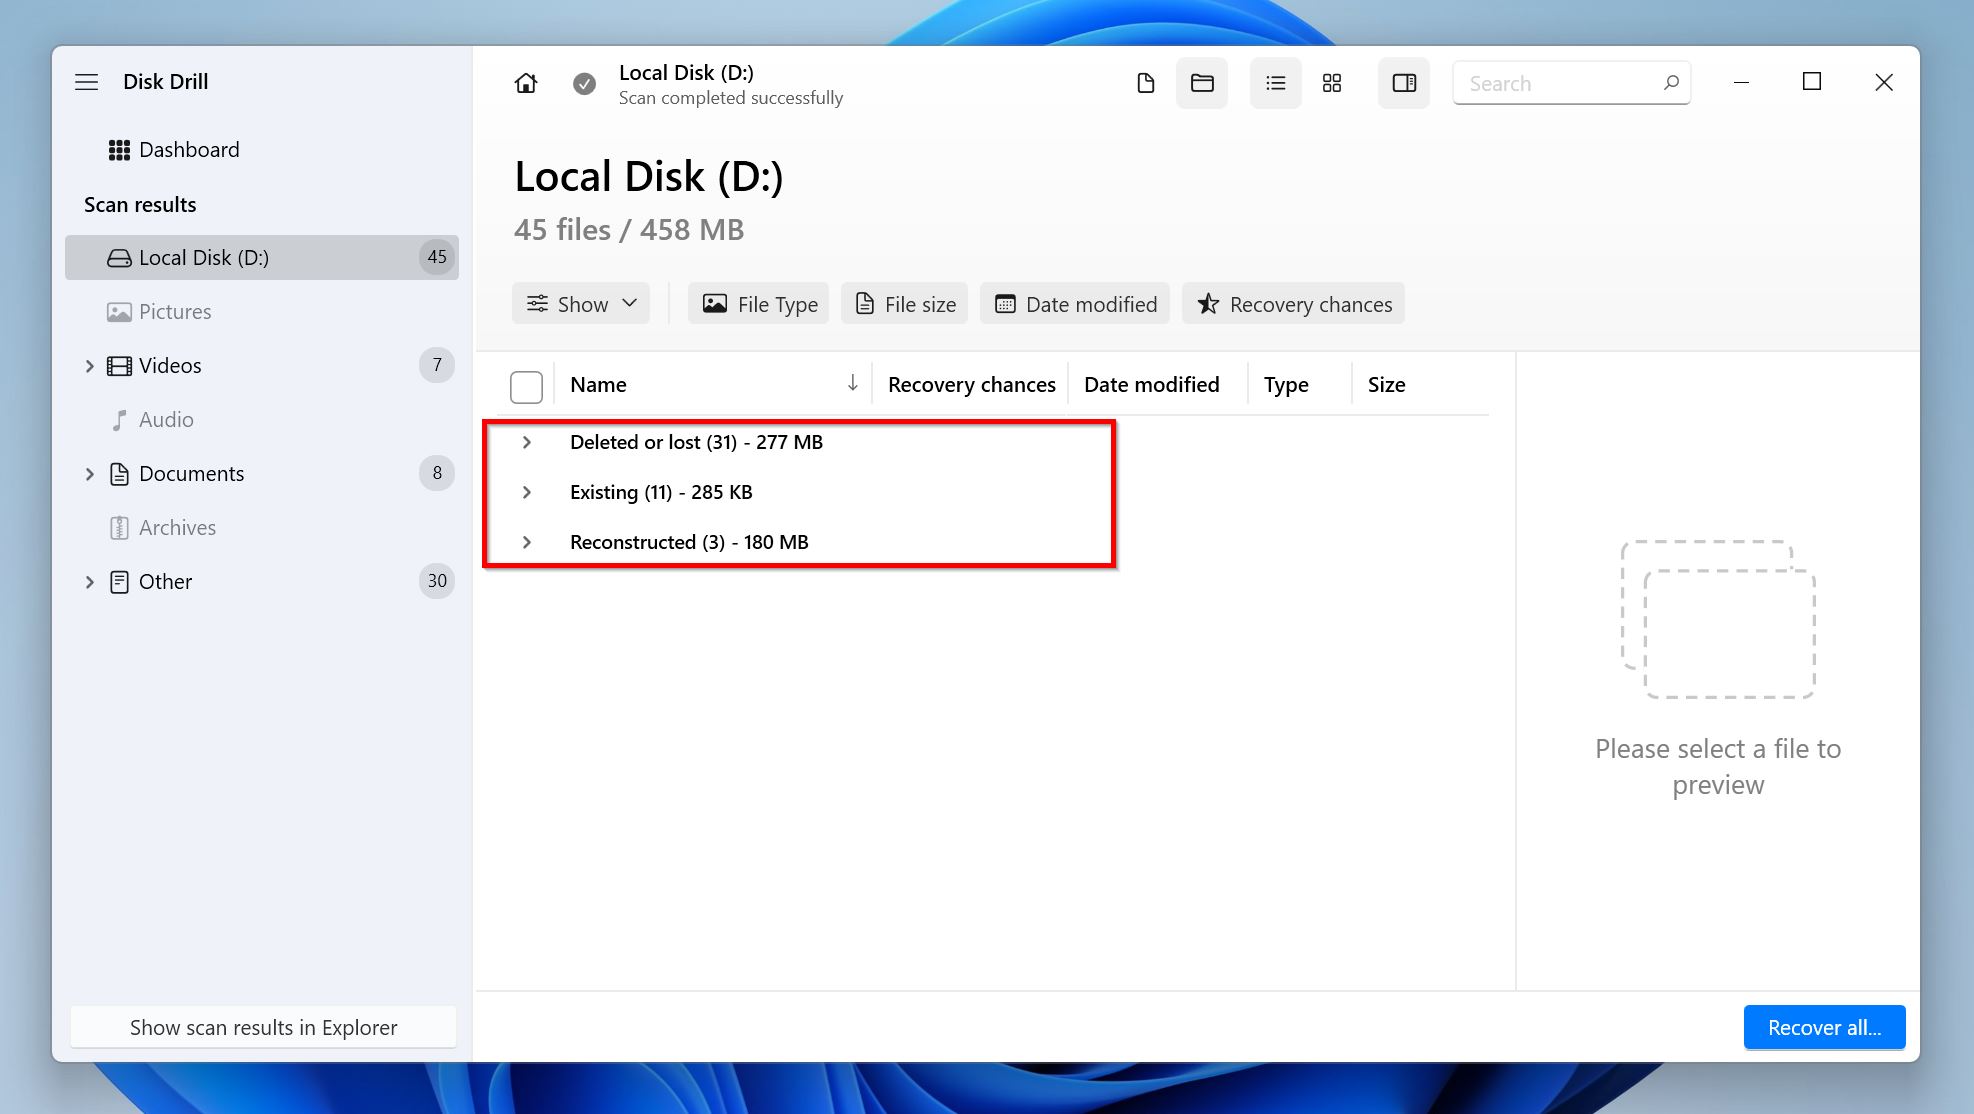
- Expand the Deleted or lost, and Reconstructed sections to view deleted files that Disk Drill discovered. But, in the case of a corrupted SSD, the files you’re looking for will usually be in the Existing section—which contains the files that are currently stored on the SSD.
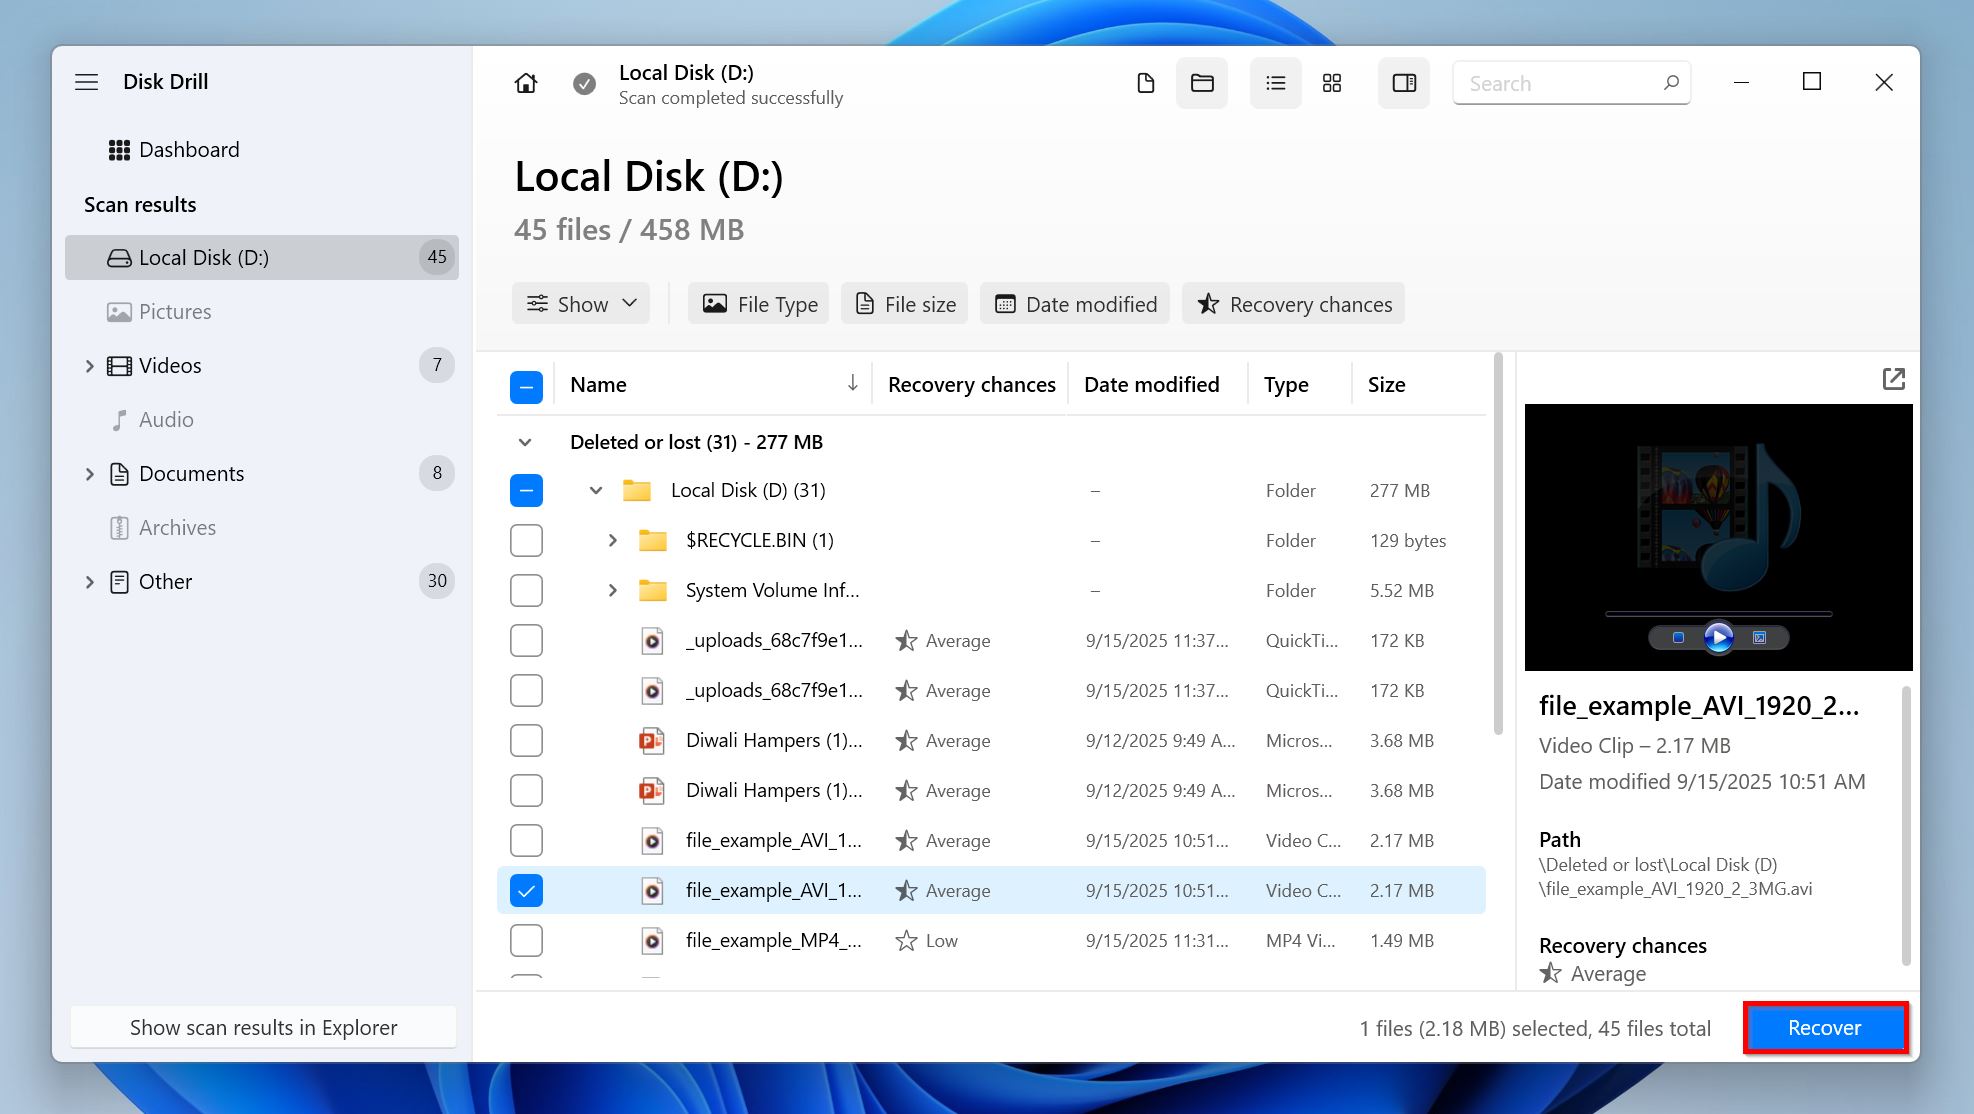
- Select the files you want to recover by ticking the checkbox next to them. Disk Drill’s preview feature comes in handy at this step, as the app automatically displays a preview of the currently selected file. Files with flawless previews have a much higher chance of recovery than those which don’t. You can also manually preview files by clicking the eye icon that appears when you hover your cursor near the filename. Click on Recover once you’ve confirmed your selection.
- Choose a recovery destination for the files, and click Next.
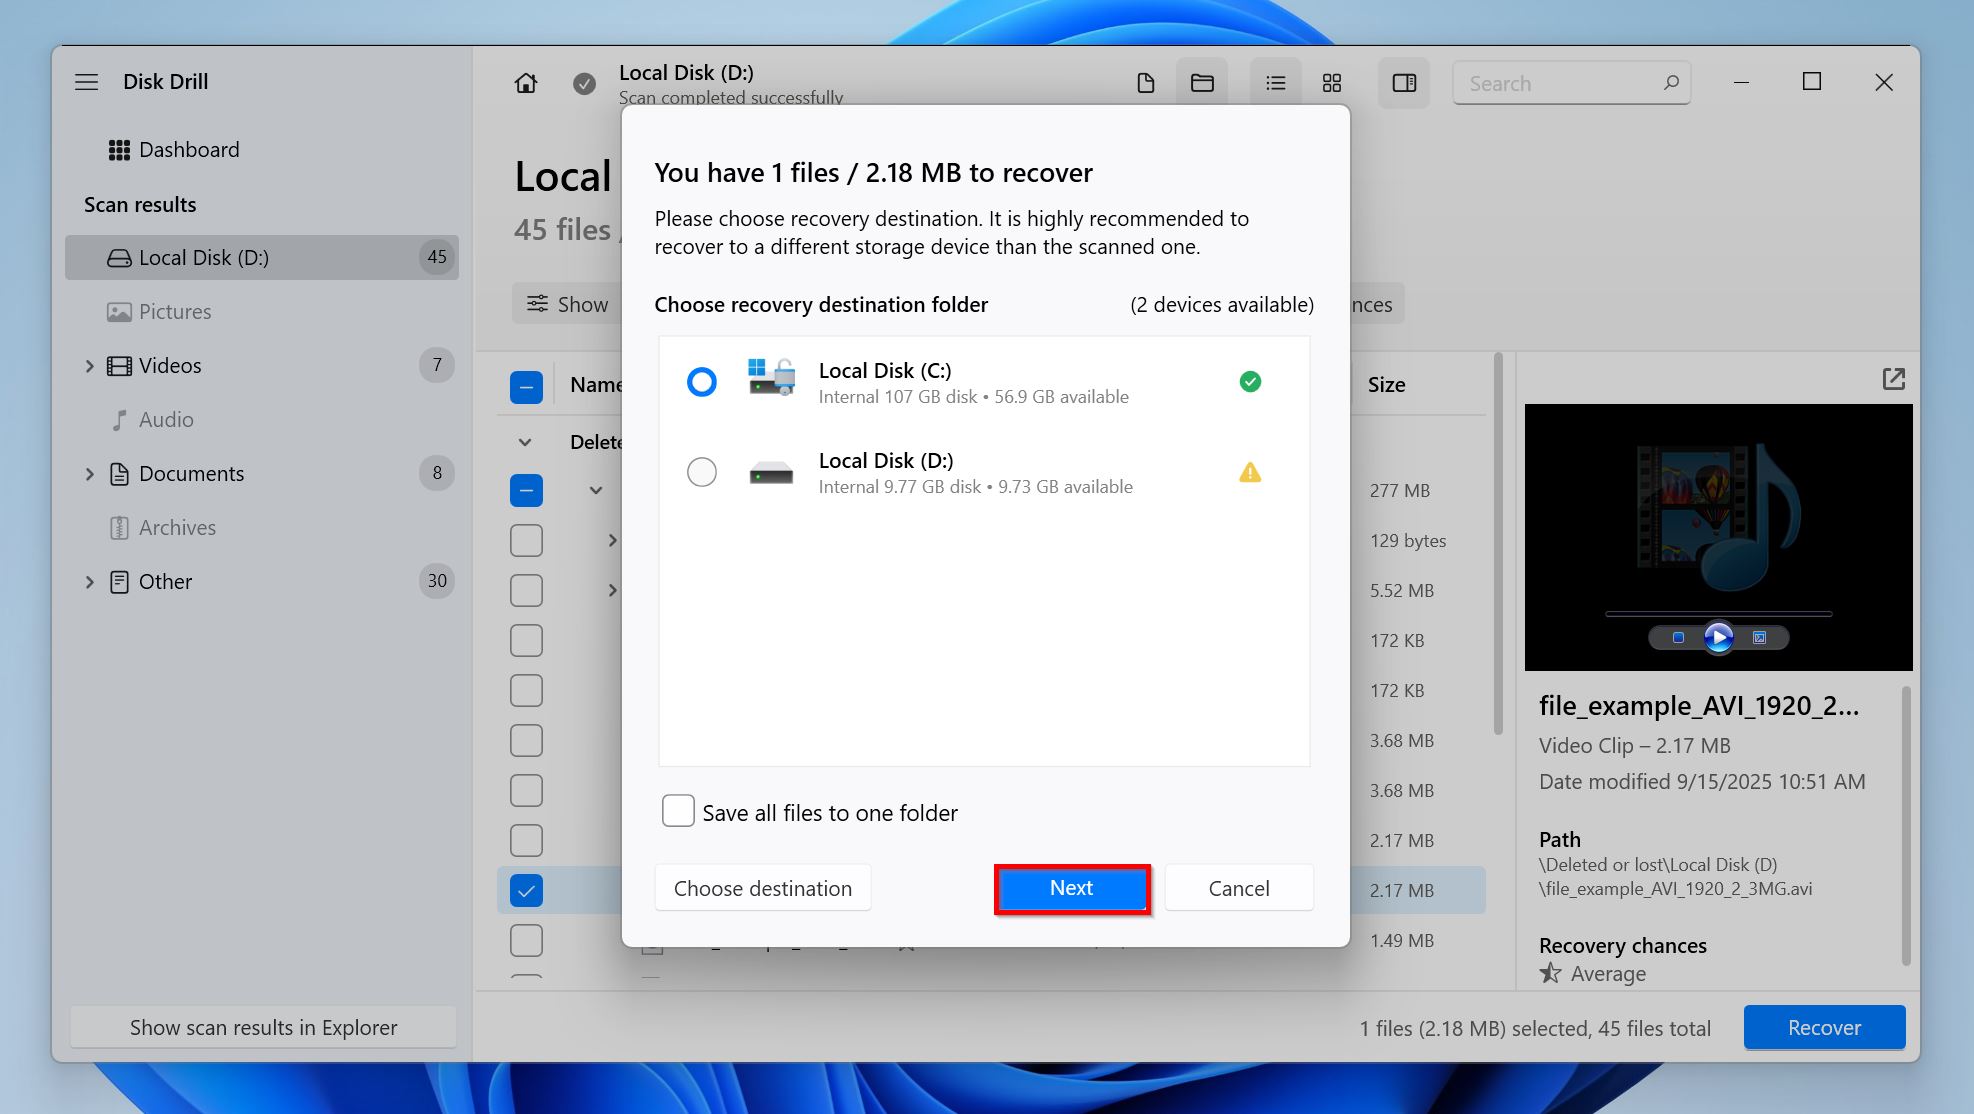
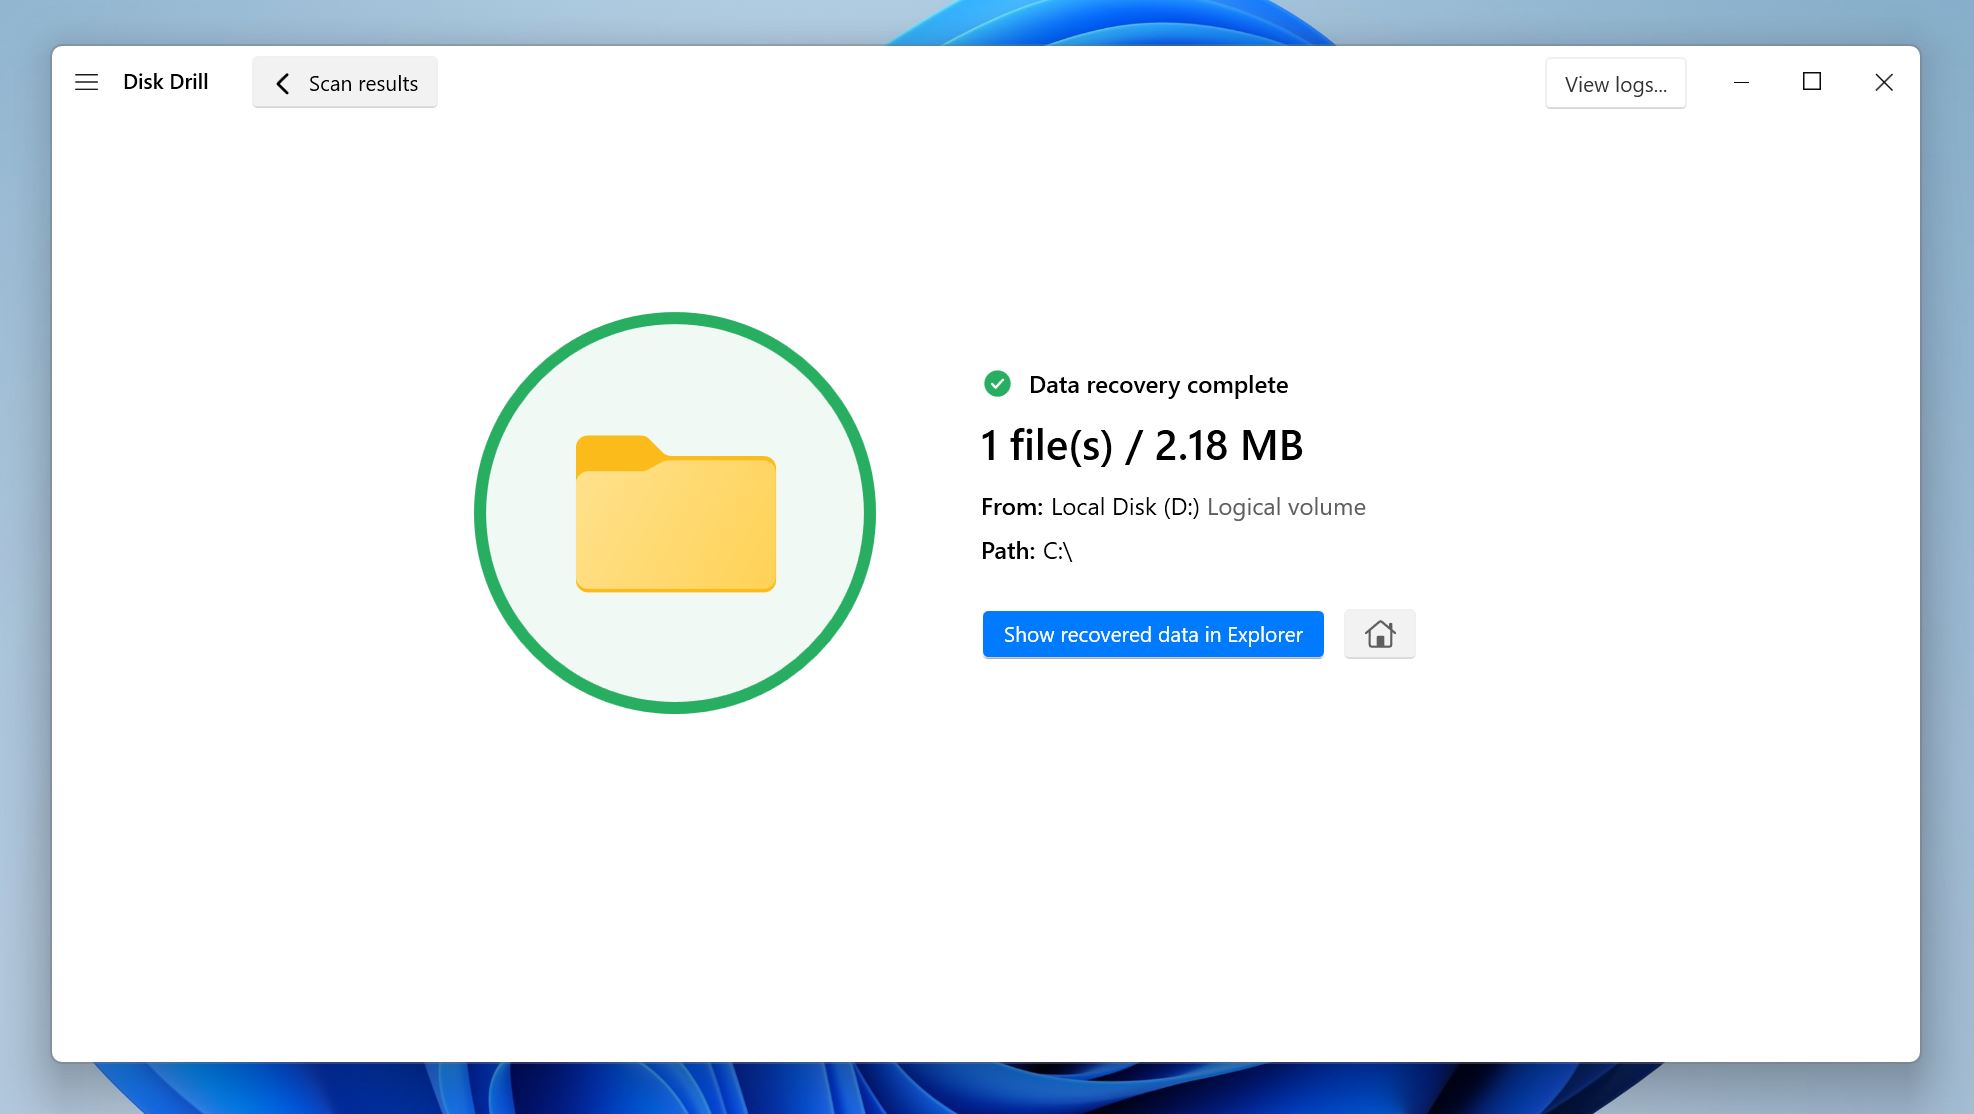
- Disk Drill will recover the selected files. The free version lets you restore 100 MB of data, which is enough if you’re looking to recover a few key documents or other files. Further recovery requires Disk Drill PRO.
Disk Drill also comes with additional features like S.M.A.R.T. Monitoring and Data Protection that can analyze your SSD’s health, predict failures, and protect your files in case it fails.
Scenario 1: SSD Mounts but Throws Errors
An SSD that mounts but displays an error each time you try to access it usually has file system issues, or an accumulation of bad sectors. The drive and its partitions may not show up in Windows Explorer, or you may get errors like “Data Error (Cyclic Redundancy Check),” and “X:\ is not accessible” when attempting to access its files.
Regardless, as long as the corrupted SSD’s file system isn’t damaged to the point of being unrecognizable, you can fix SSD corruption by running Windows’ in-built disk checking utility, CHKDSK, which finds and repairs bad sectors and other related errors on the drive. In case your disk shows up as RAW in Disk Management, we suggest rebuilding the partition table first, because CHKDSK doesn’t run on RAW drives.
Note: We suggest recovering your data before running CHKDSK, as it’s may cause minor data loss as collateral when reassigning bad sectors.
Here’s how to fix a corrupted SSD in Windows 10, and Windows 11 using CHKDSK:
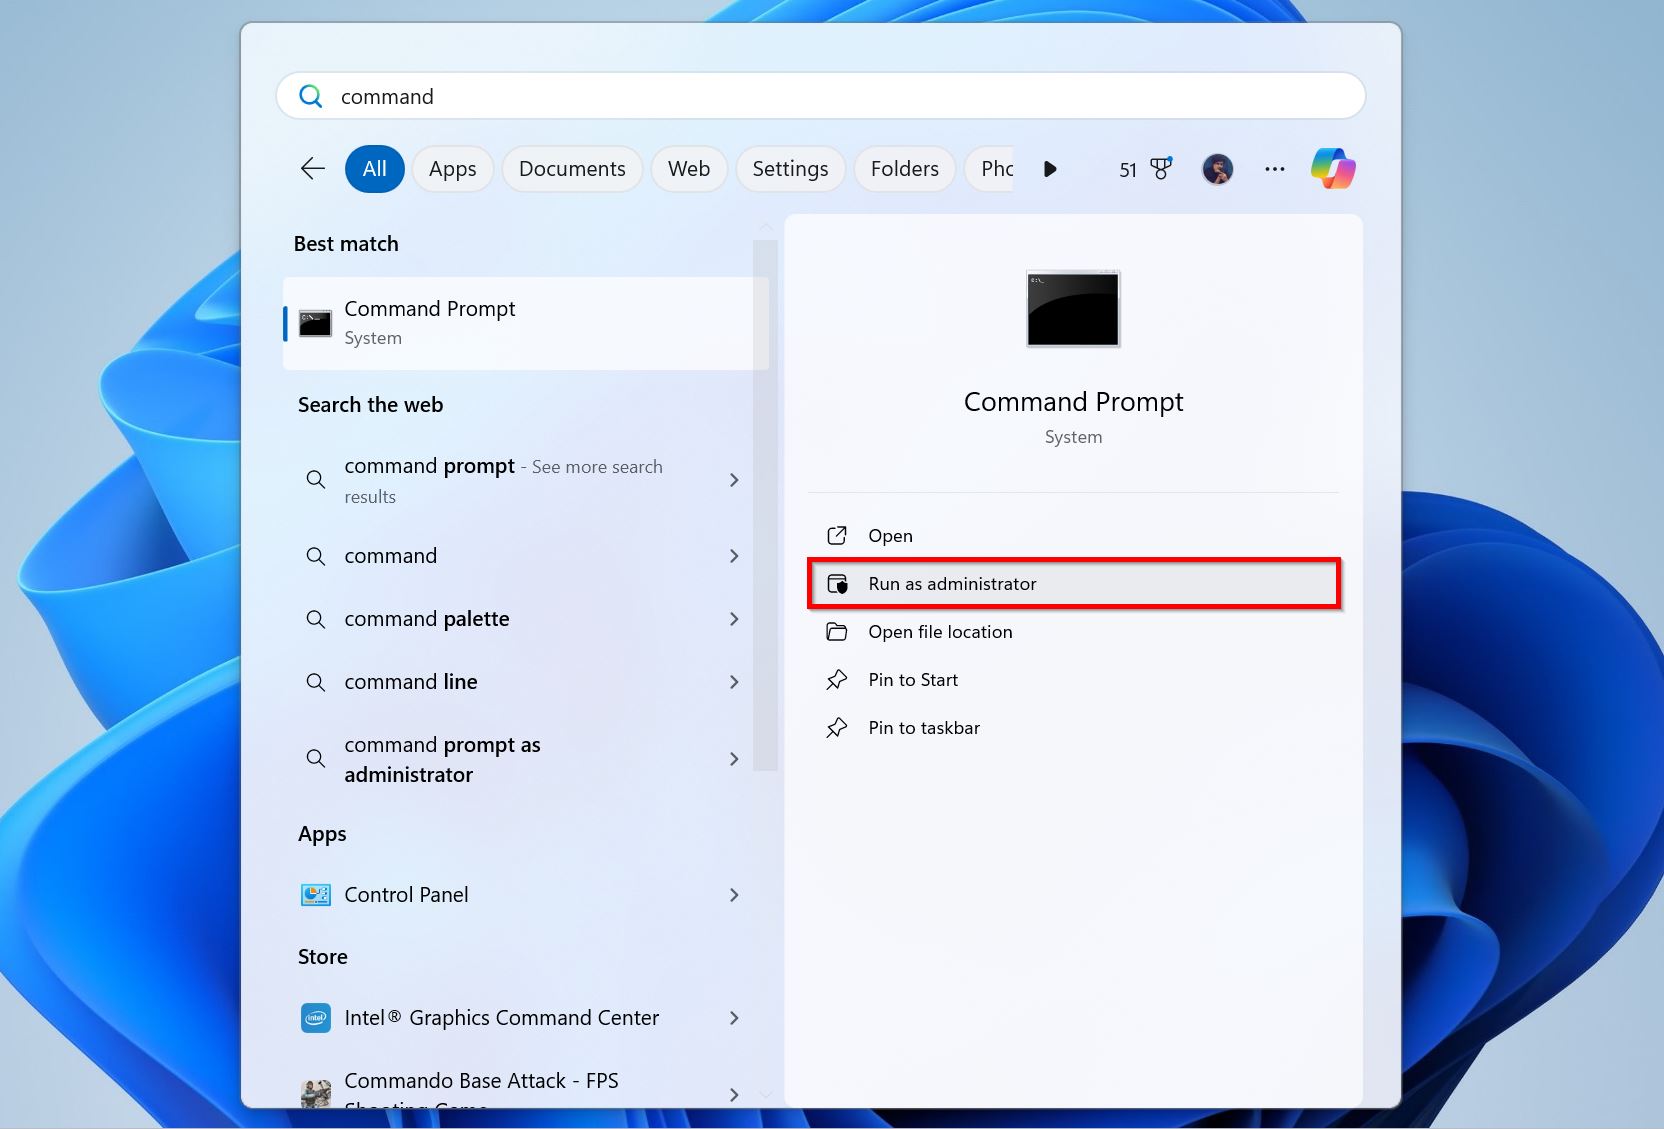
- Type “cmd” in Windows Search (Windows Key + S). Right-click on Command Prompt, and choose Run as Administrator.
- Type CHKDSK X: /R /x and press Enter. Replace X with the drive letter of the SSD (C:, D:, E:, etc.). This will check the SSD for file system errors, and identify bad sectors by reading the drive sector-by-sector. In case, you only wish to check and fix file system related issues, run CHKDSK X: /F /x, and press Enter. Whether you use CHKDSK /F or CHKDSK /R depends on the SSD’s condition. Keep in mind that CHKDSK /R contains CHKDSK /F’s functionality too.
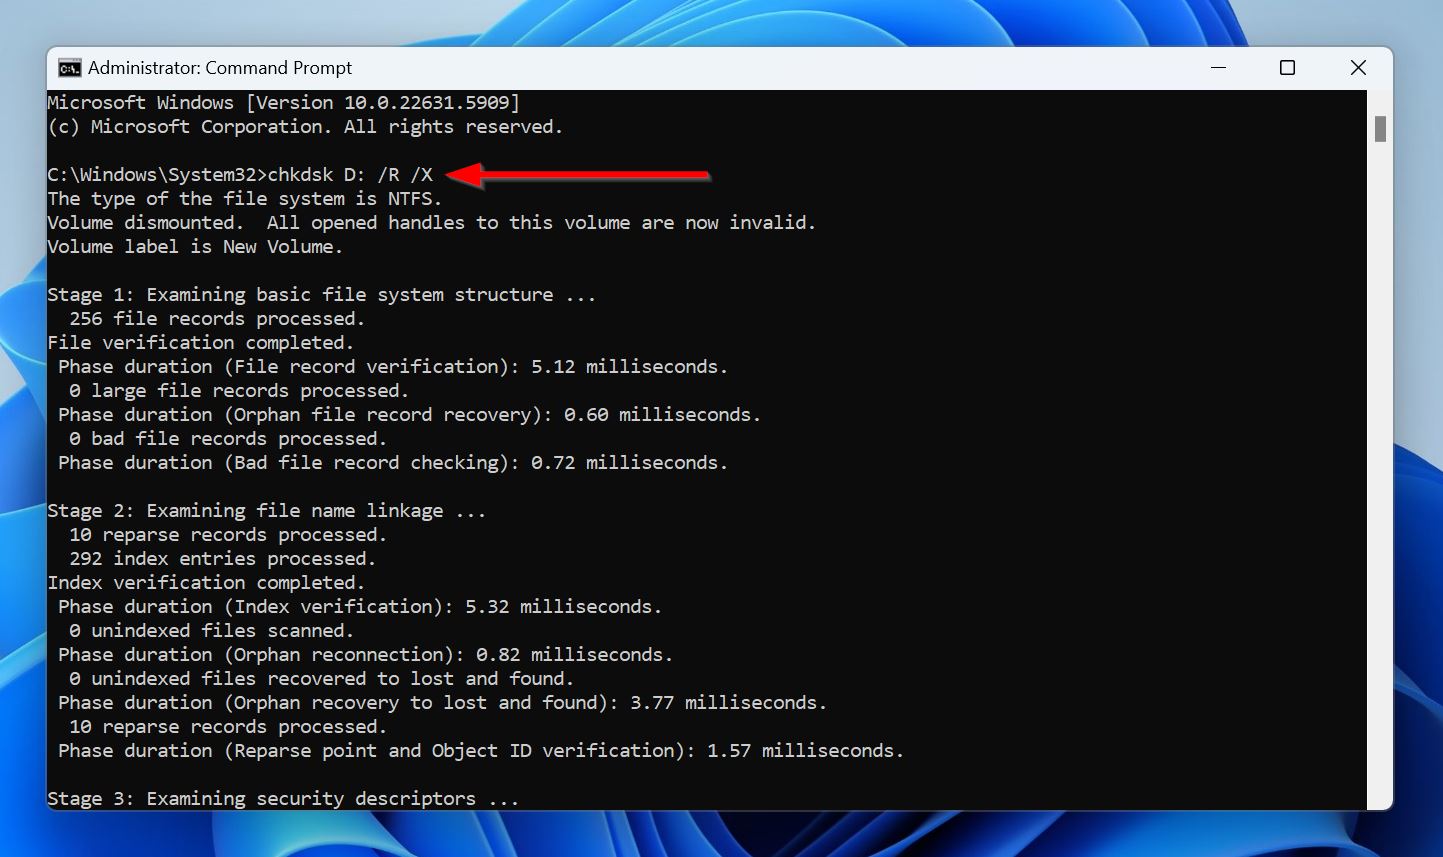
- Wait for CHKDSK to scan and fix the SSD corruption.
Scenario 2: SSD Has a Lost or Damaged Partition
SSDs with a damaged partition table will show up as unallocated, or RAW in Disk Management. You won’t be able to access one or more partitions on the SSD, even though the underlying data may be intact.
There are two ways to repair a corrupted SSD with a damaged partition table—rebuild the partition table using TestDisk, or reformat the SSD. Let’s take a look at how to do both:
Method 1: Try to Rebuild the Partition With TestDisk
TestDisk is our go-to choice for rebuilding a damaged partition table with the files intact. It’s free, open-source, and lightweight. However, it’s not the easiest program to use because of its lack of a GUI—you’ll have to navigate the command-line interface using your keyboard and select the options using Enter.
Here’s how to fix a corrupted SSD drive using TestDisk:
- Download TestDisk, and extract the archive. We recommend downloading the latest stable version of the program, which is 7.2 as of writing this. Do this on a separate drive, not the SSD, even if one of the partitions is working. Connect the SSD to another PC using a SATA/M.2 to USB enclosure if you have to.
- Run testdisk_win.exe from the extracted archive.
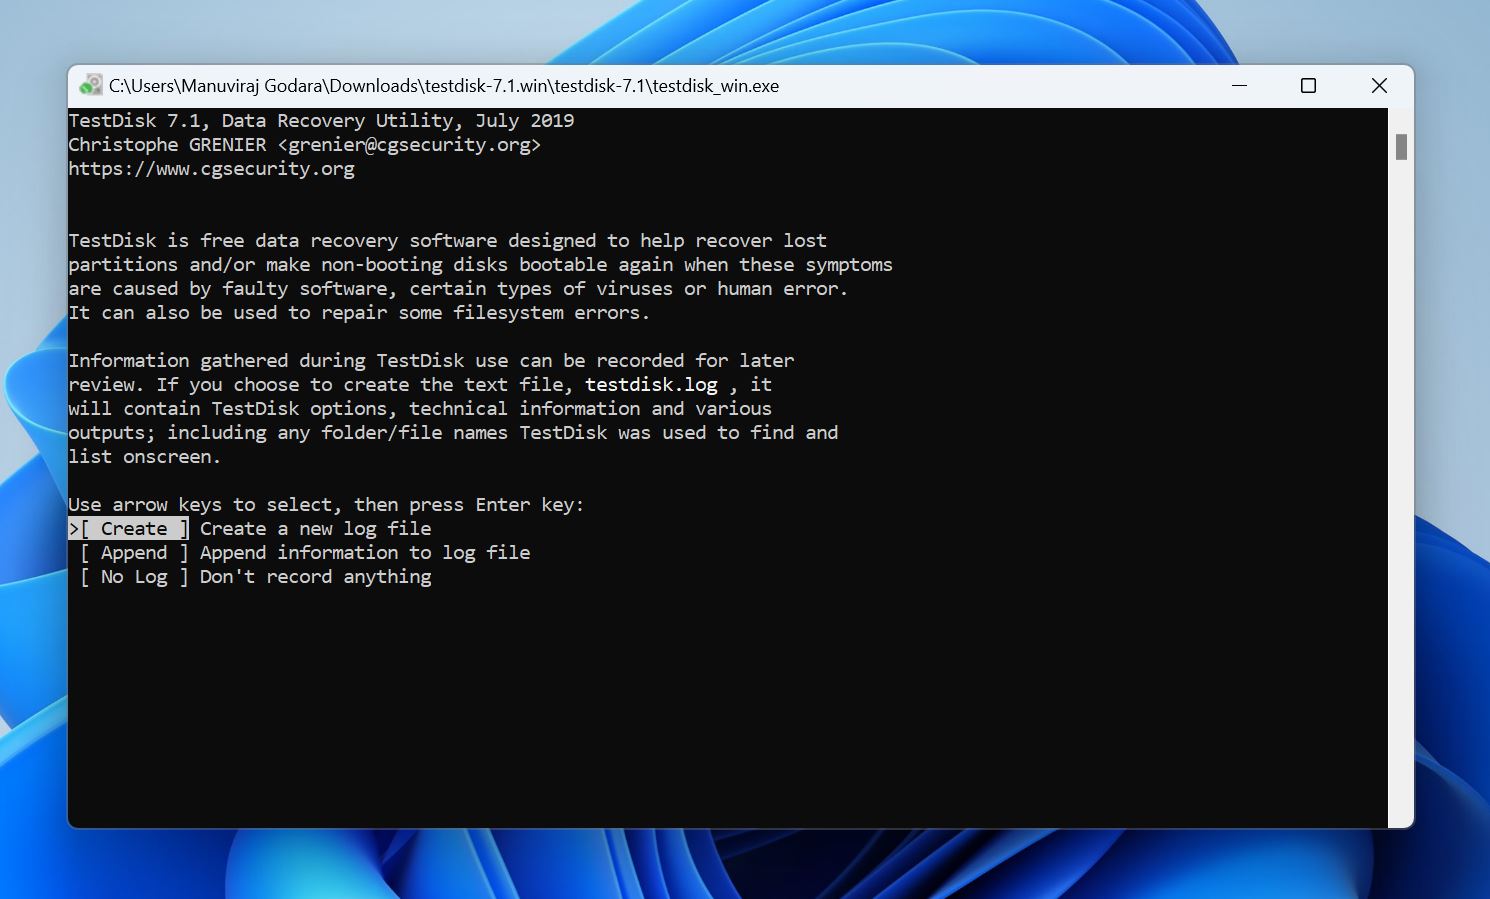
- Choose whether you wish to create a log file or not. This doesn’t impact the partition rebuilding process in any way.
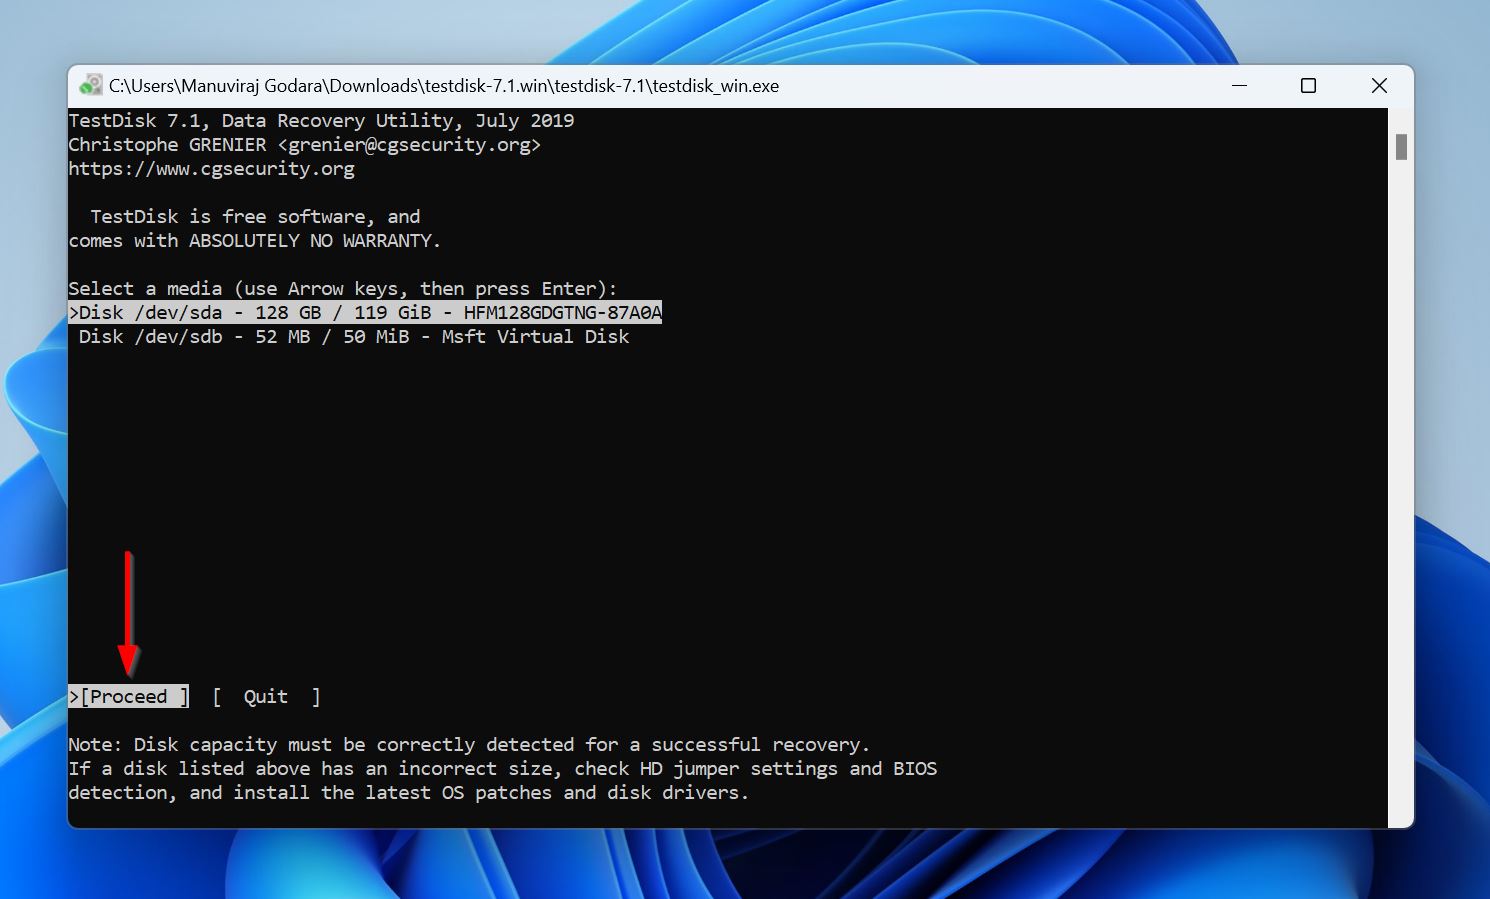
- Pick your SSD from the list of storage devices, and press Enter.
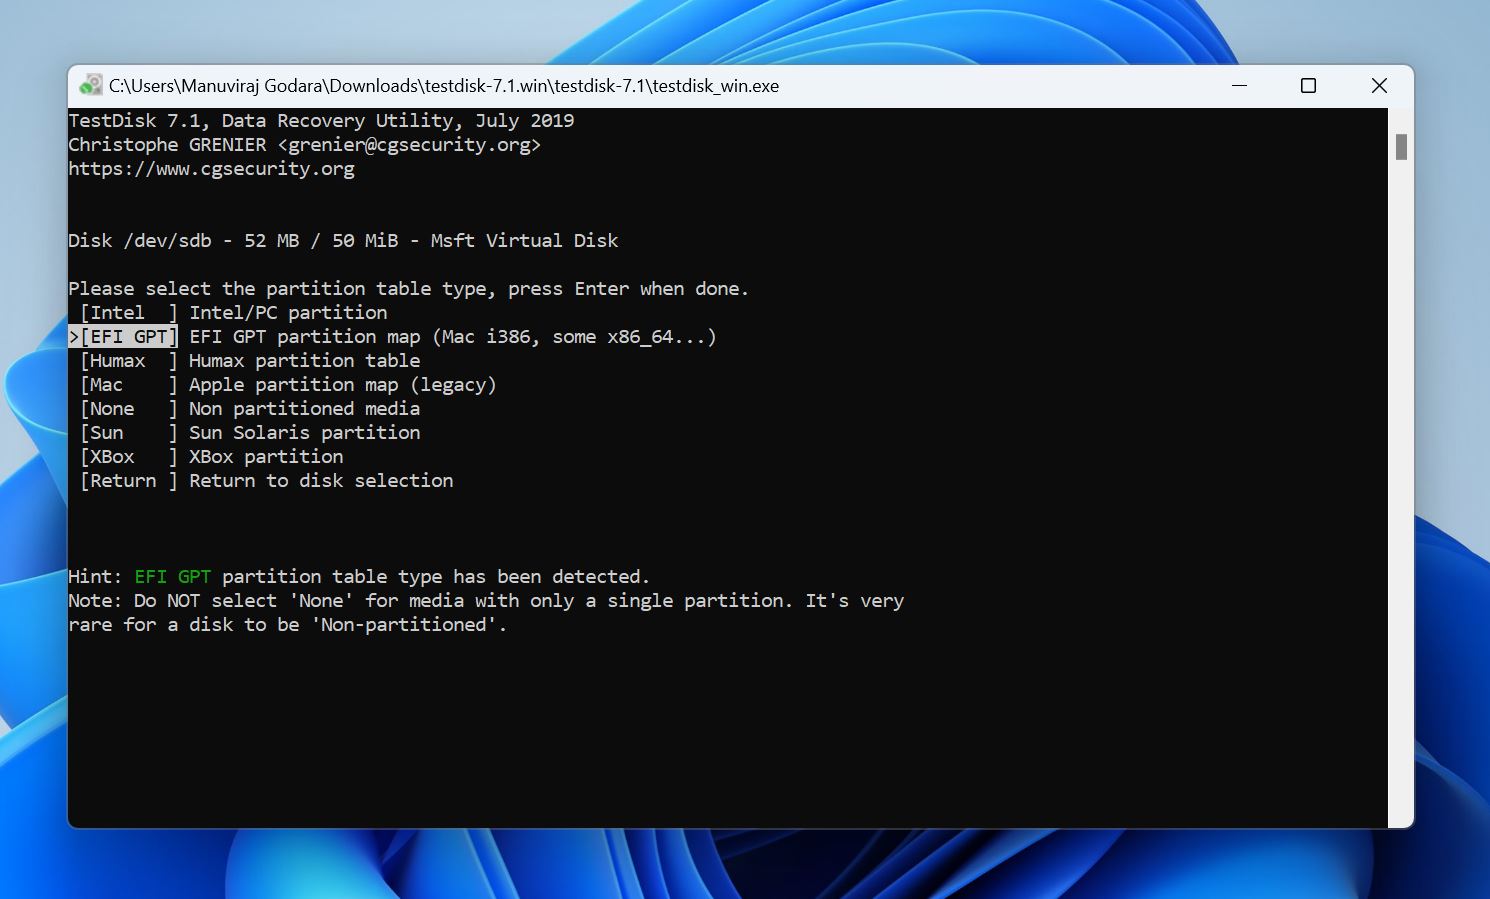
- Select the partition table type and press Enter. Since TestDisk auto-detects the partition table, it’s best to simply press Enter, unless you’re sure the SSD uses a different partition table.
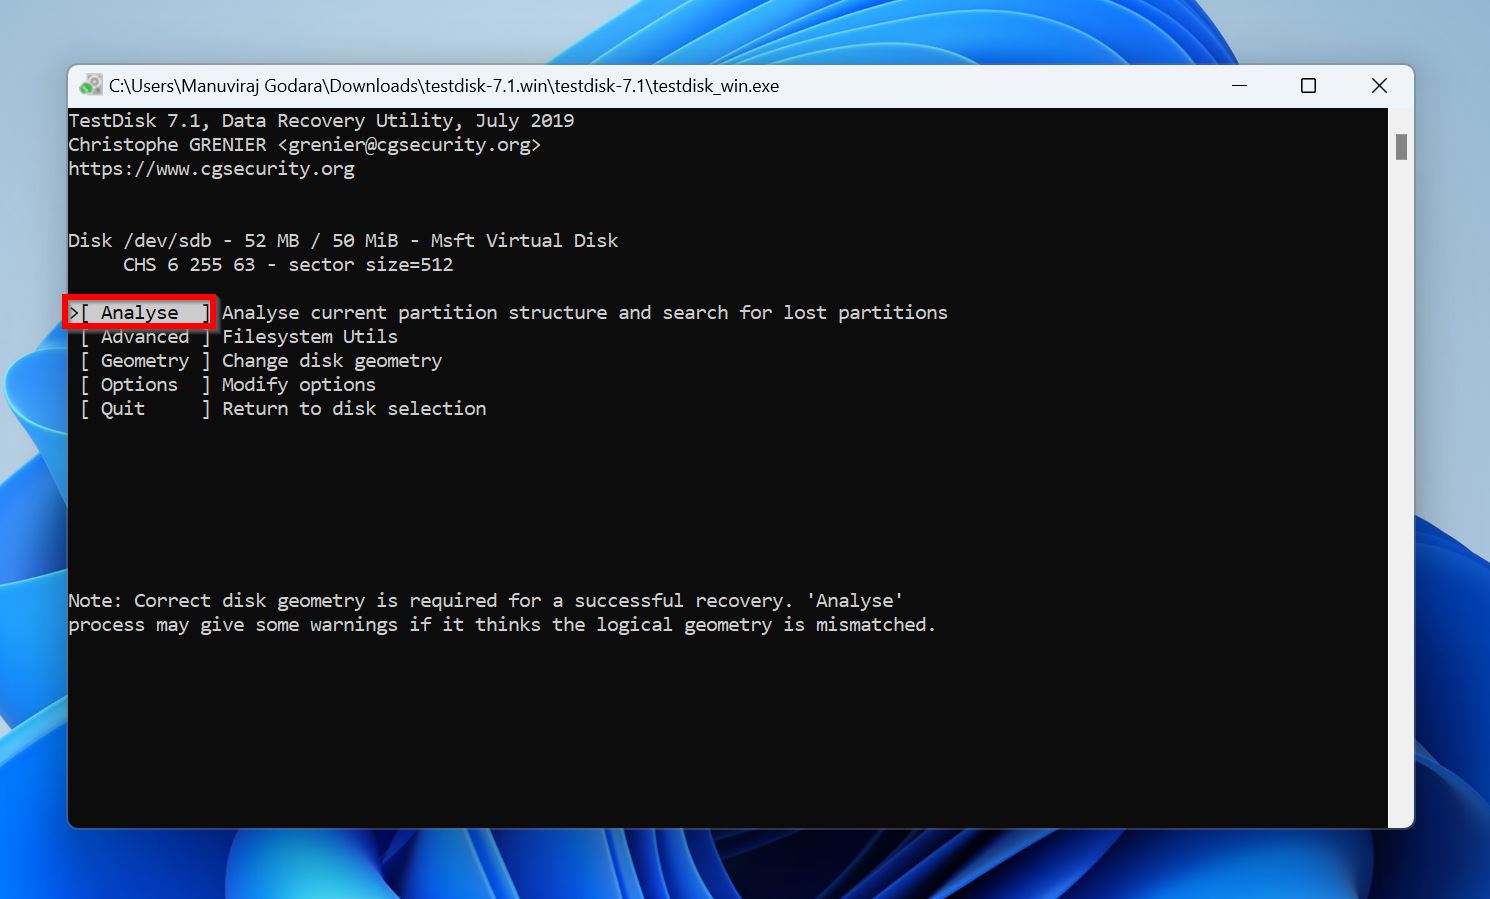
- Select Analyse and press Enter.
- Choose Quick Search and press Enter.
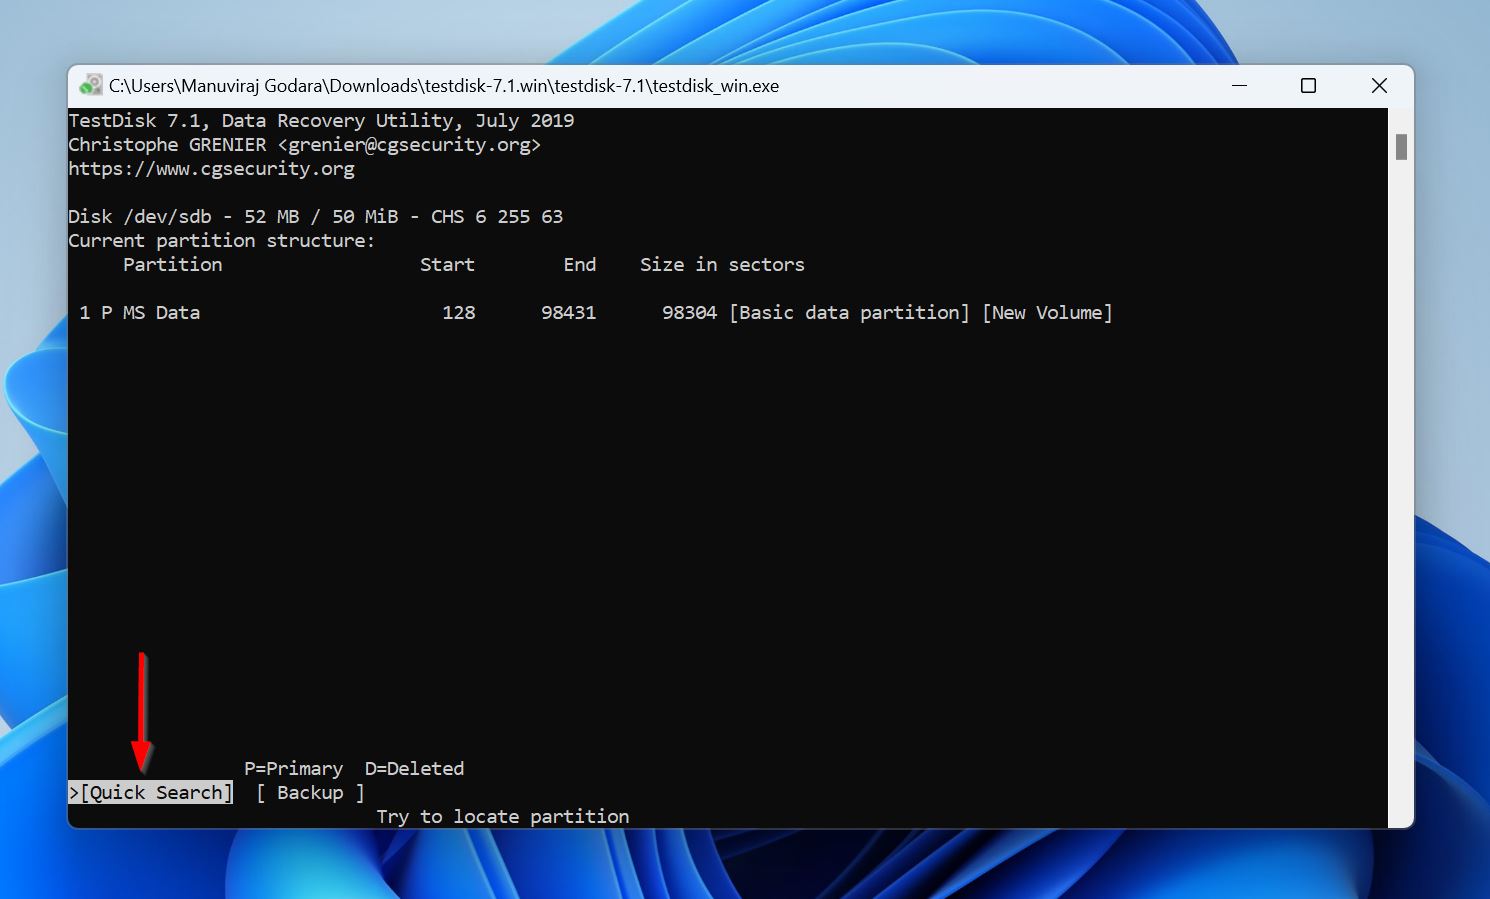
- TestDisk will list the SSD’s recoverable partitions. Highlight a partition and press P to list its files, see if all the files are there, then press Q to go back. Do this for all partitions on the SSD.
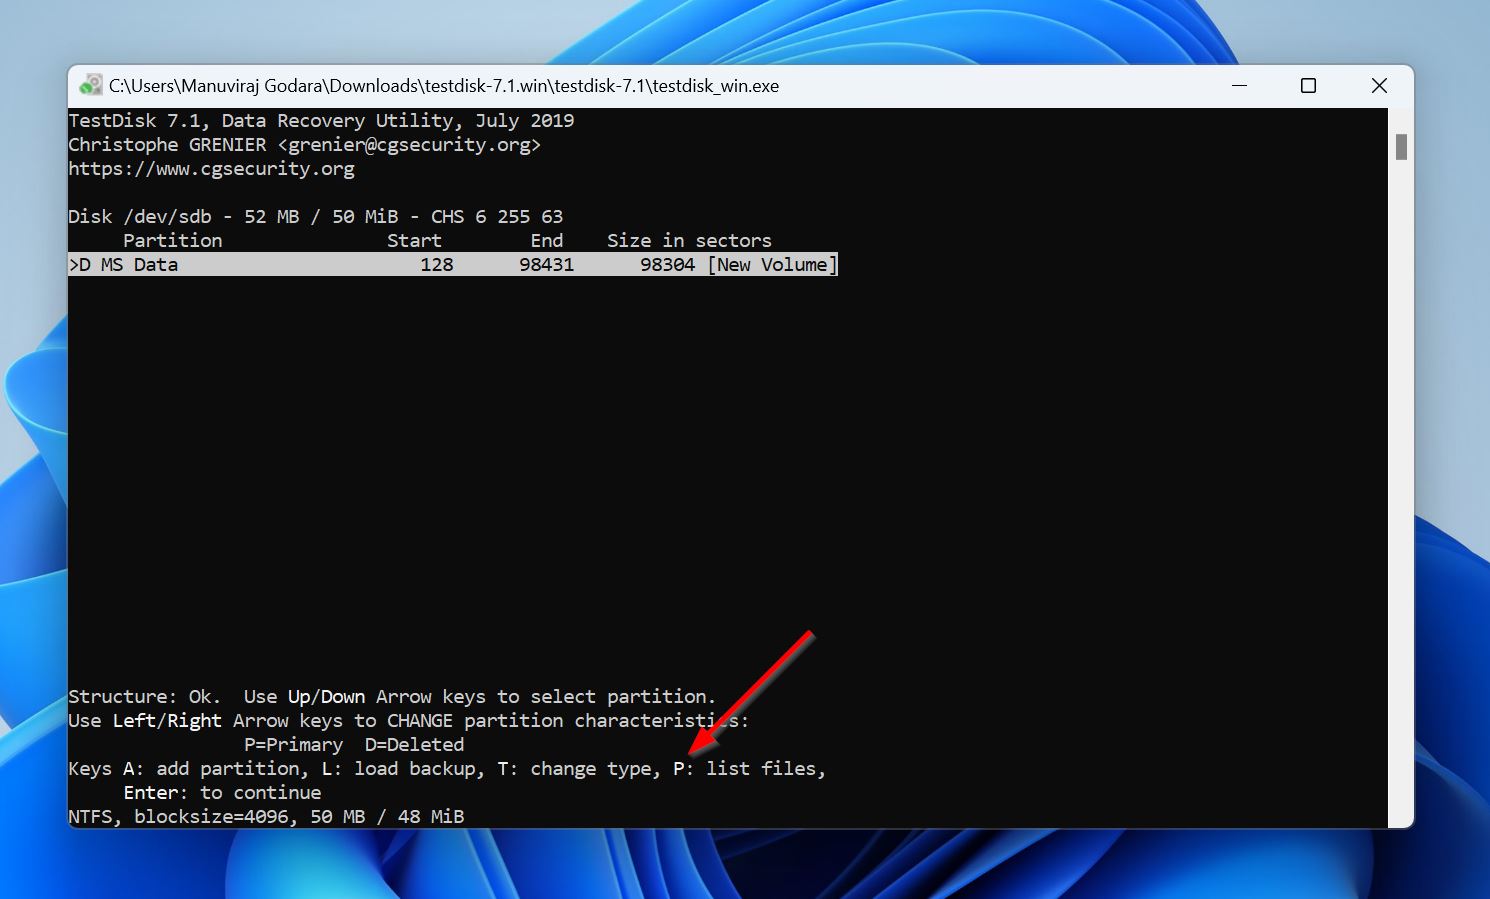
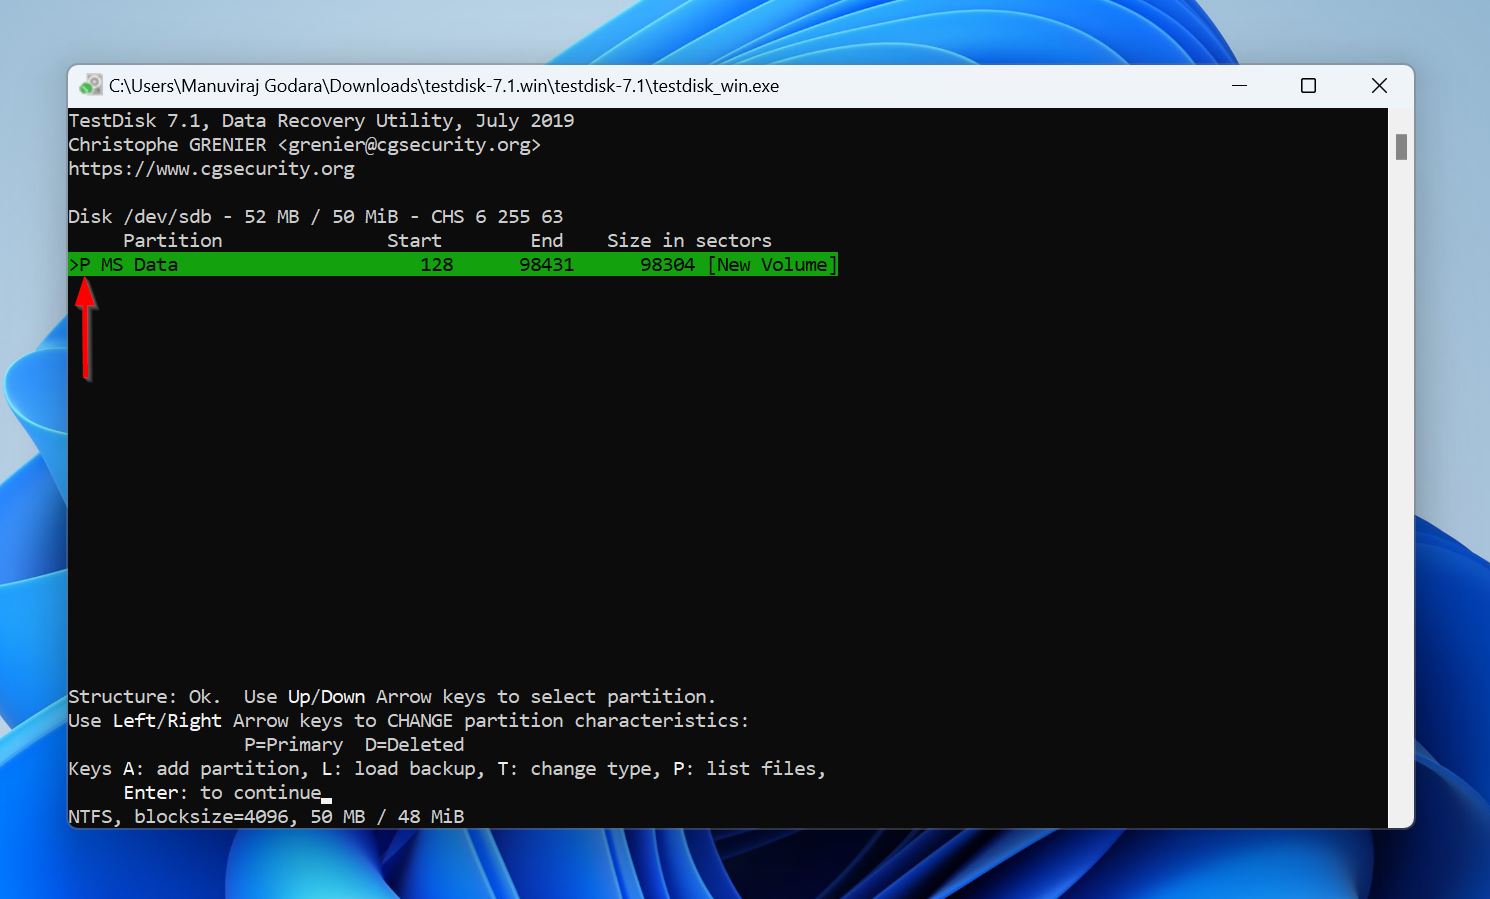
- Each partition will have a P, D, L, or * prefix before it, denoting Primary, Deleted, Logical, or Bootable, respectively. You can cycle through these prefixes by navigating to the partition and pressing the Left or Right arrow keys. Make sure that all the partitions have an L or P prefix before them. Once you’ve done this, press Enter.
- (OPTIONAL) In case you didn’t see all your partitions or noticed some missing files, select the Deeper Search option, press Enter, and follow the previous step again. Else, just skip to the next step.
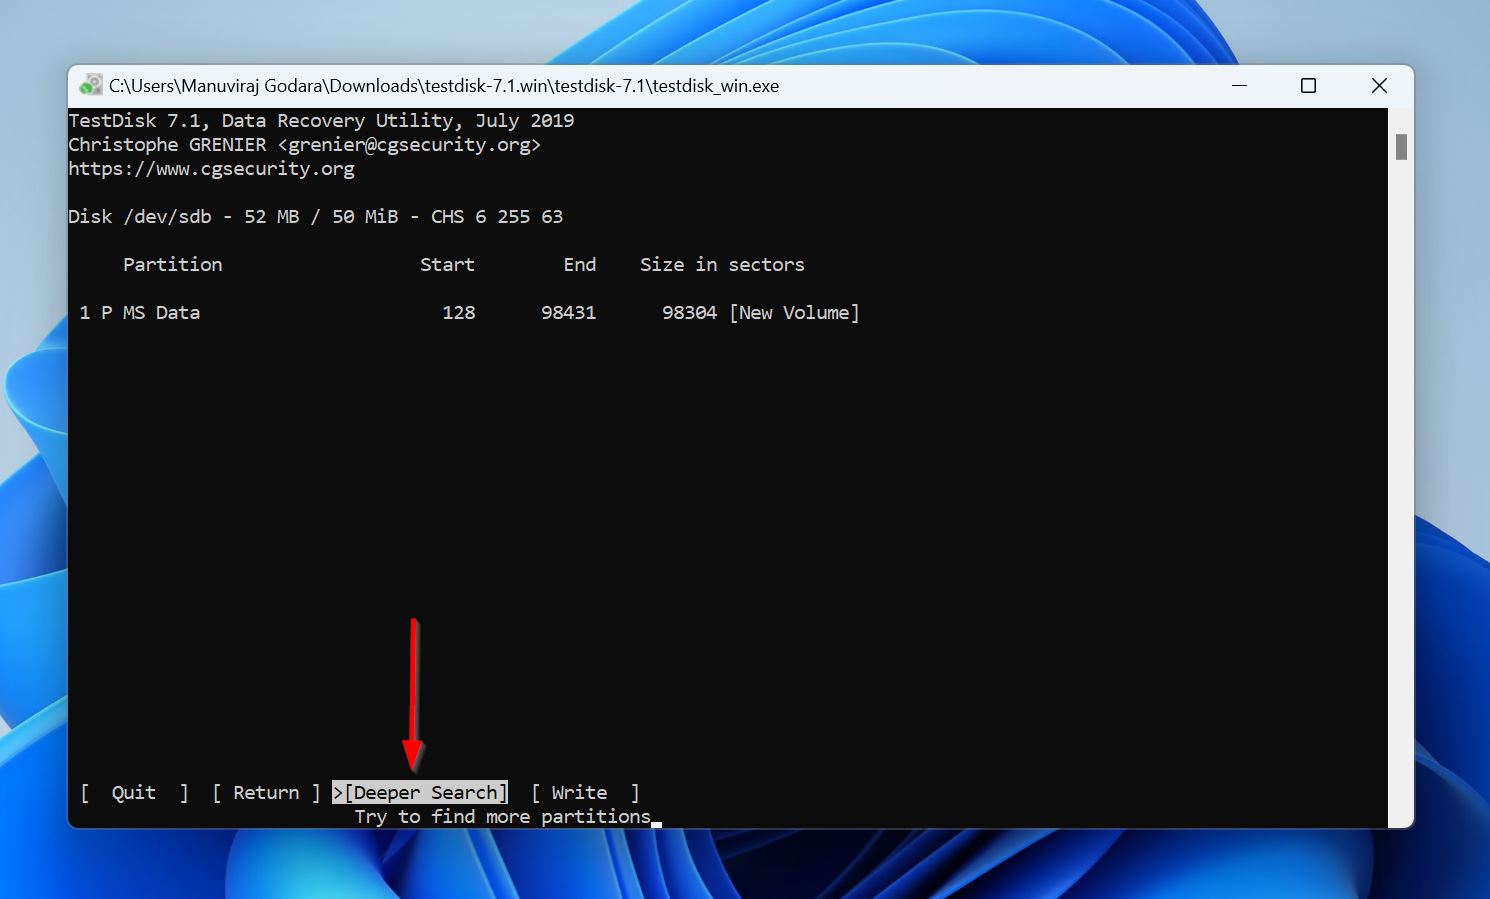
- Select Write, and press Enter.
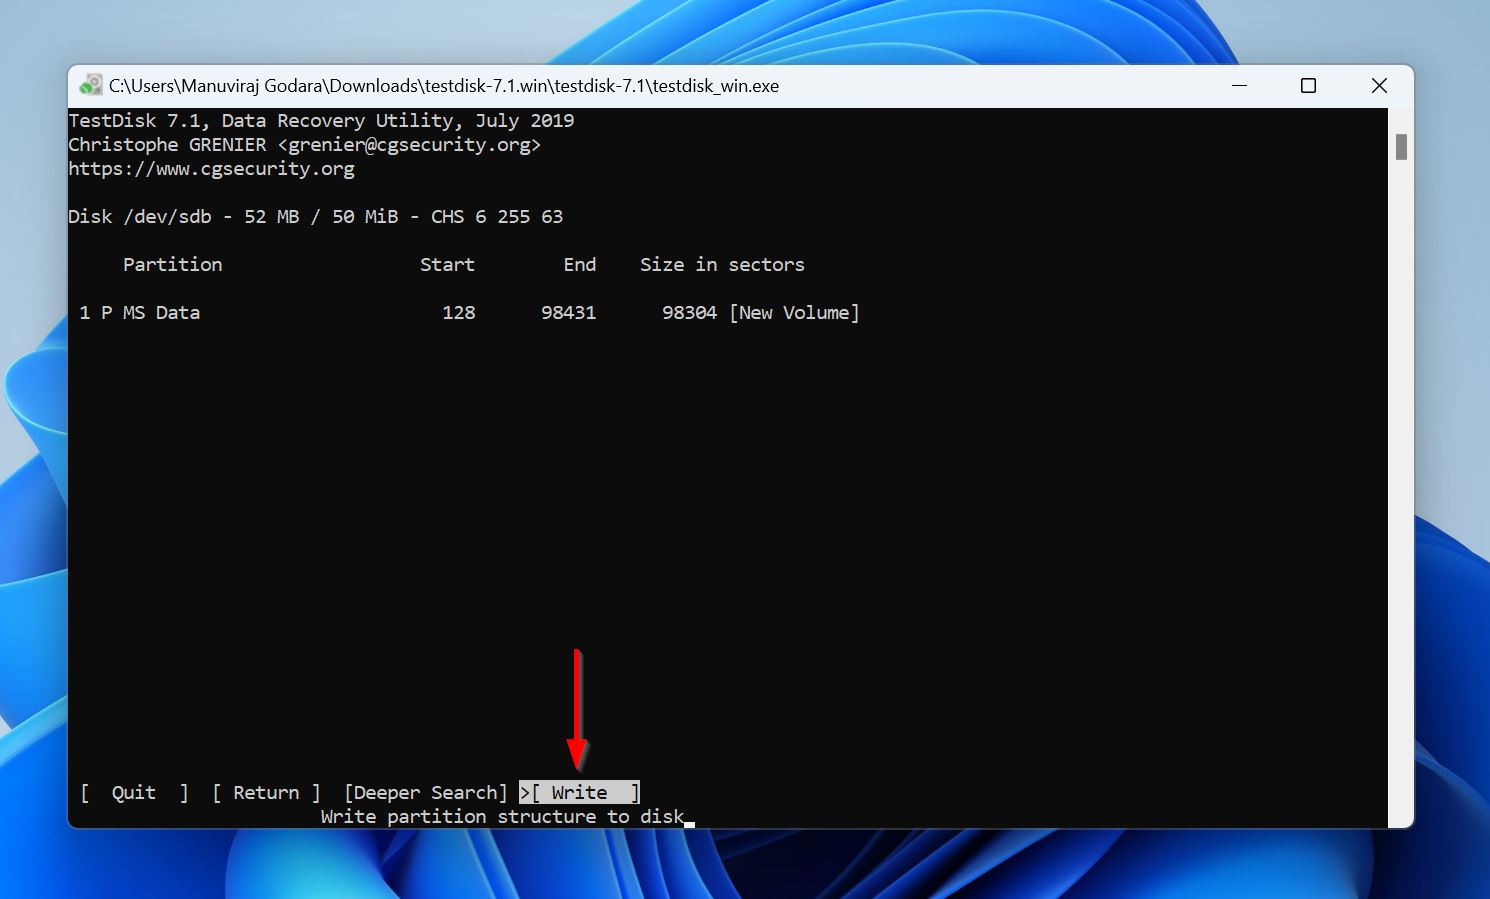
- Press Y in the confirmation screen.
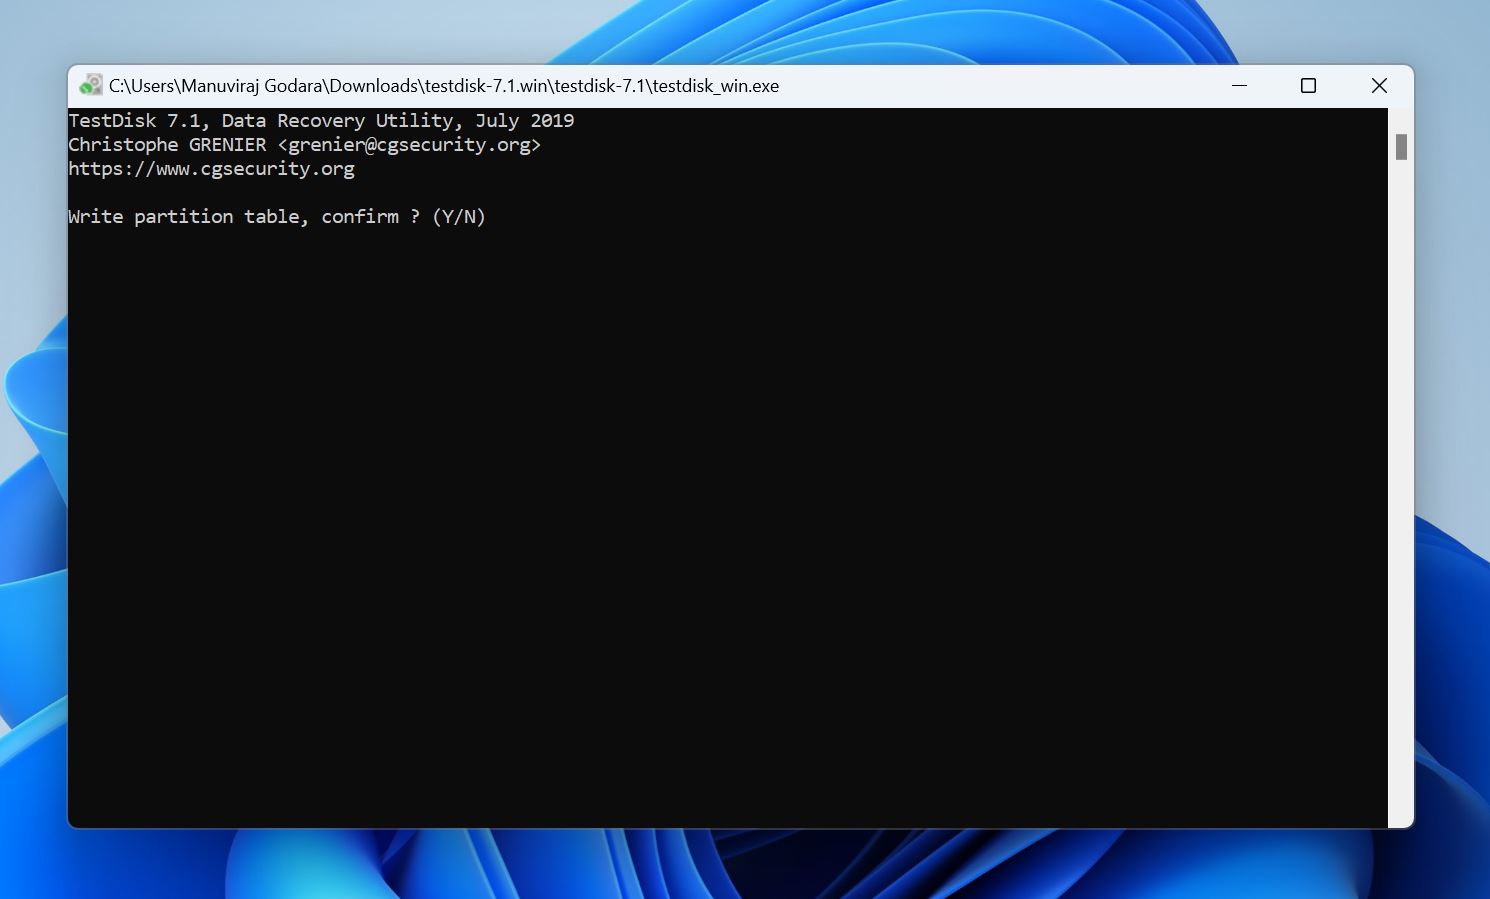
- TestDisk will recover the corrupt SSD’s partitions, and prompt you to reboot the PC.
The TestDisk installation package also contains a free, dedicated data recovery tool called PhotoRec. If you don’t wish to pay for a professional data recovery program, you can attempt data recovery using PhotoRec. However, the program isn’t as feature packed as other professional tools in the market, supports lesser formats, and doesn’t let you preview files before recovery.
Method 2: Perform a Full Format of the SSD
If TestDisk fails to rebuild the partition table, your only other option for corrupted SSD repair is to perform a full format. A full format rebuilds the file system, marks bad sectors, and erases the drive (overwriting all sectors with zeroes). It essentially gives you a clean slate to work with. But, your data will be gone for good—even professional data recovery services can’t get it back.
Here’s how to fix a corrupted SSD in Windows 11, and Windows 10 by full formatting it:
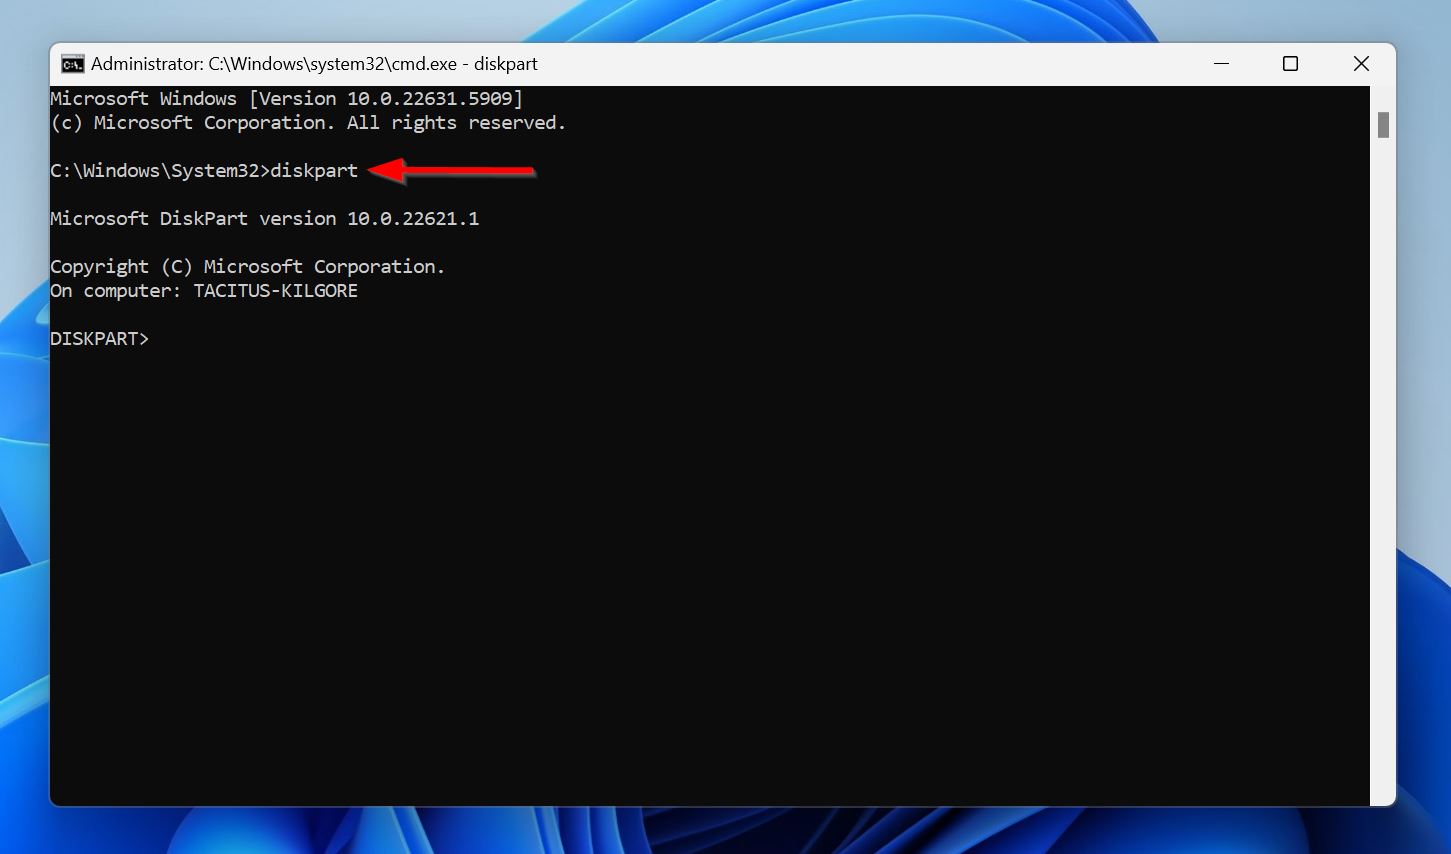
- Type “cmd” in Windows Search (Windows Key + S). Right-click on Command Prompt, and click Run as Administrator.
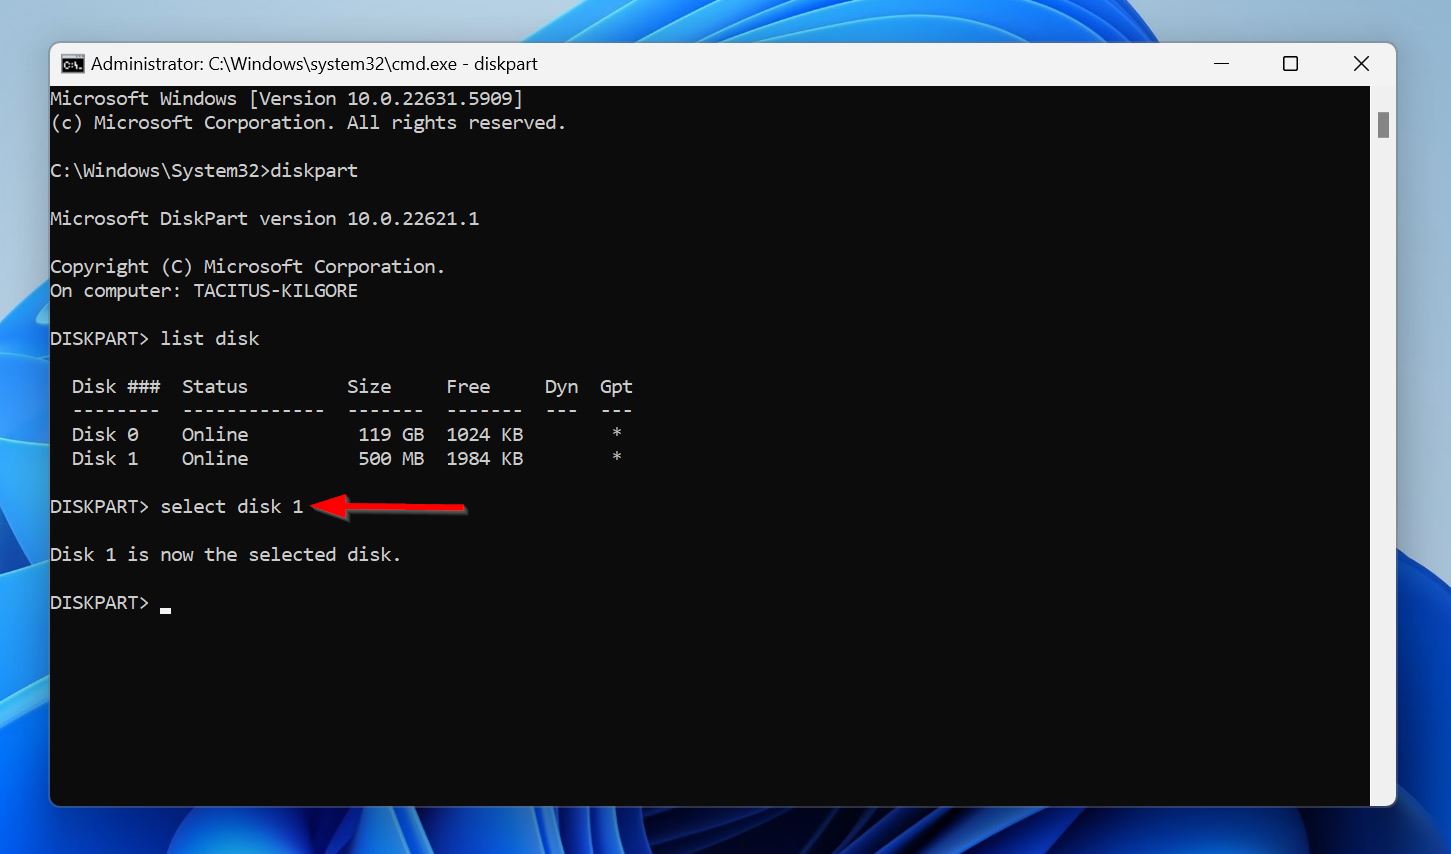
- Type diskpart and press Enter.
- Type list disk and press Enter. This will list the drives connected to your PC. Note the disk number of the SSD.
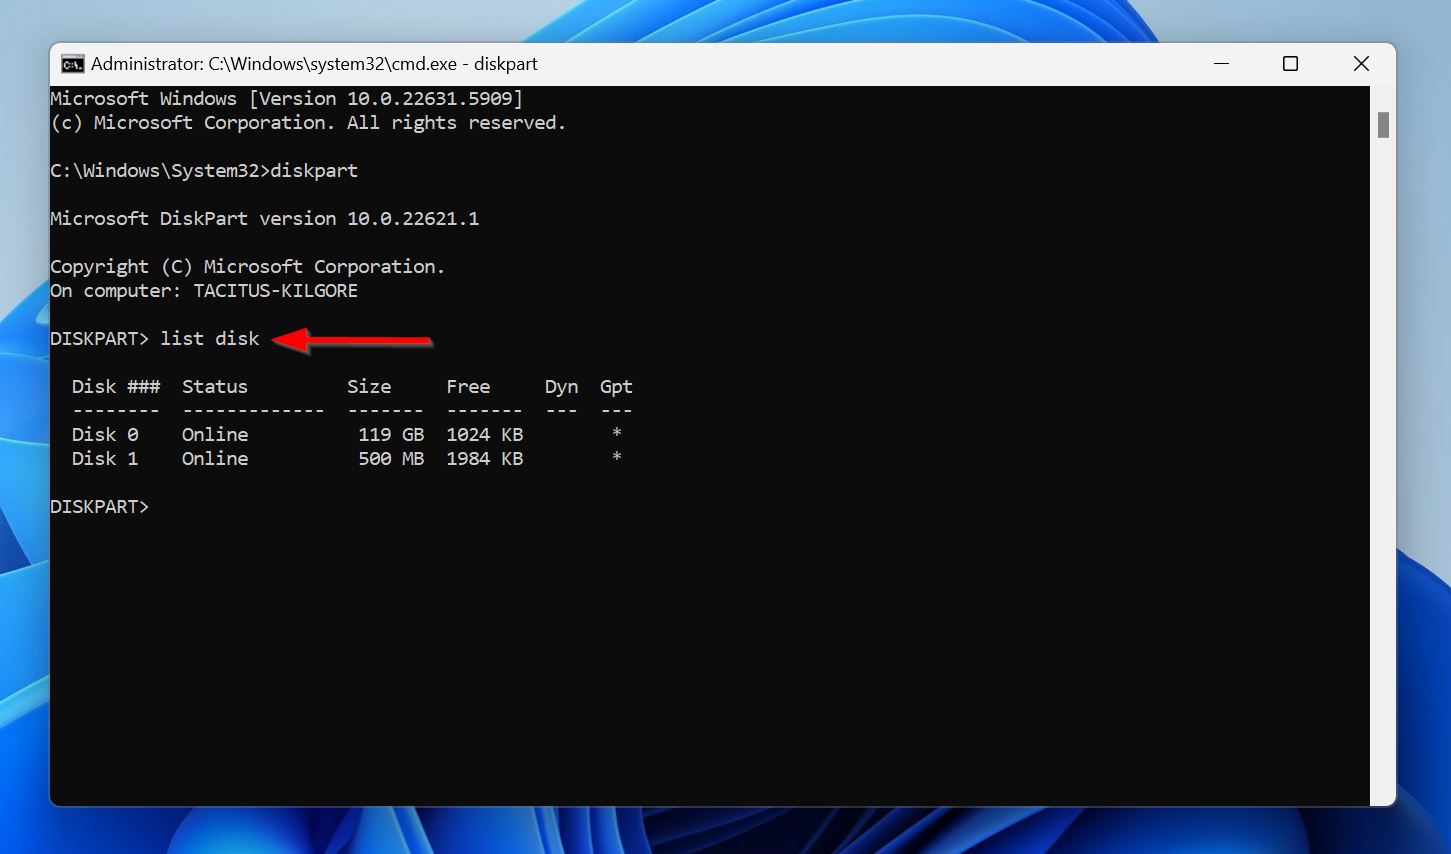
- Type select disk X (replacing X with the SSD’s serial number like 0, 1, 2, etc.).
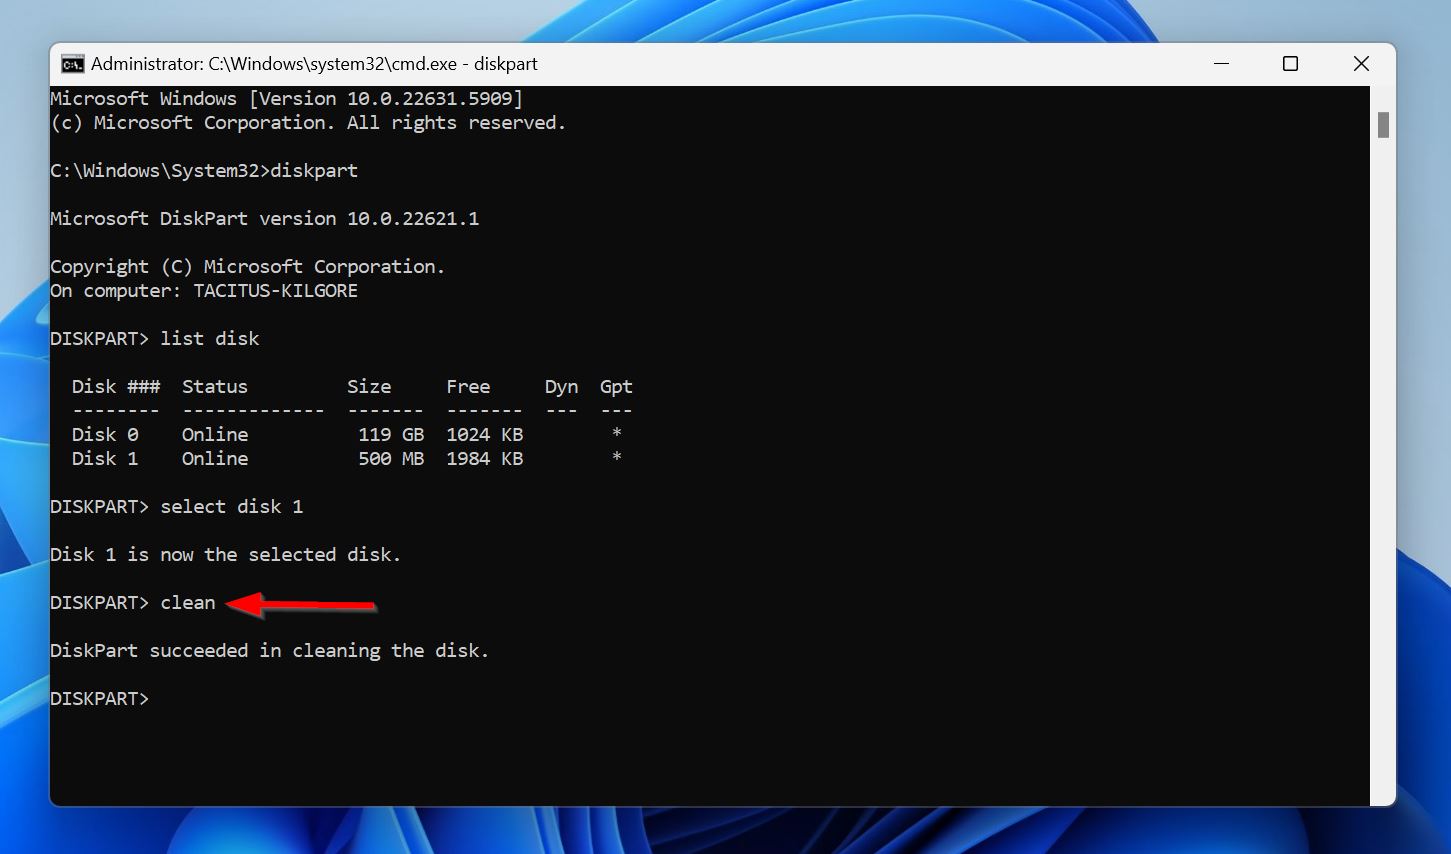
- Type clean and press Enter. This will unallocate the disk’s entire storage space.
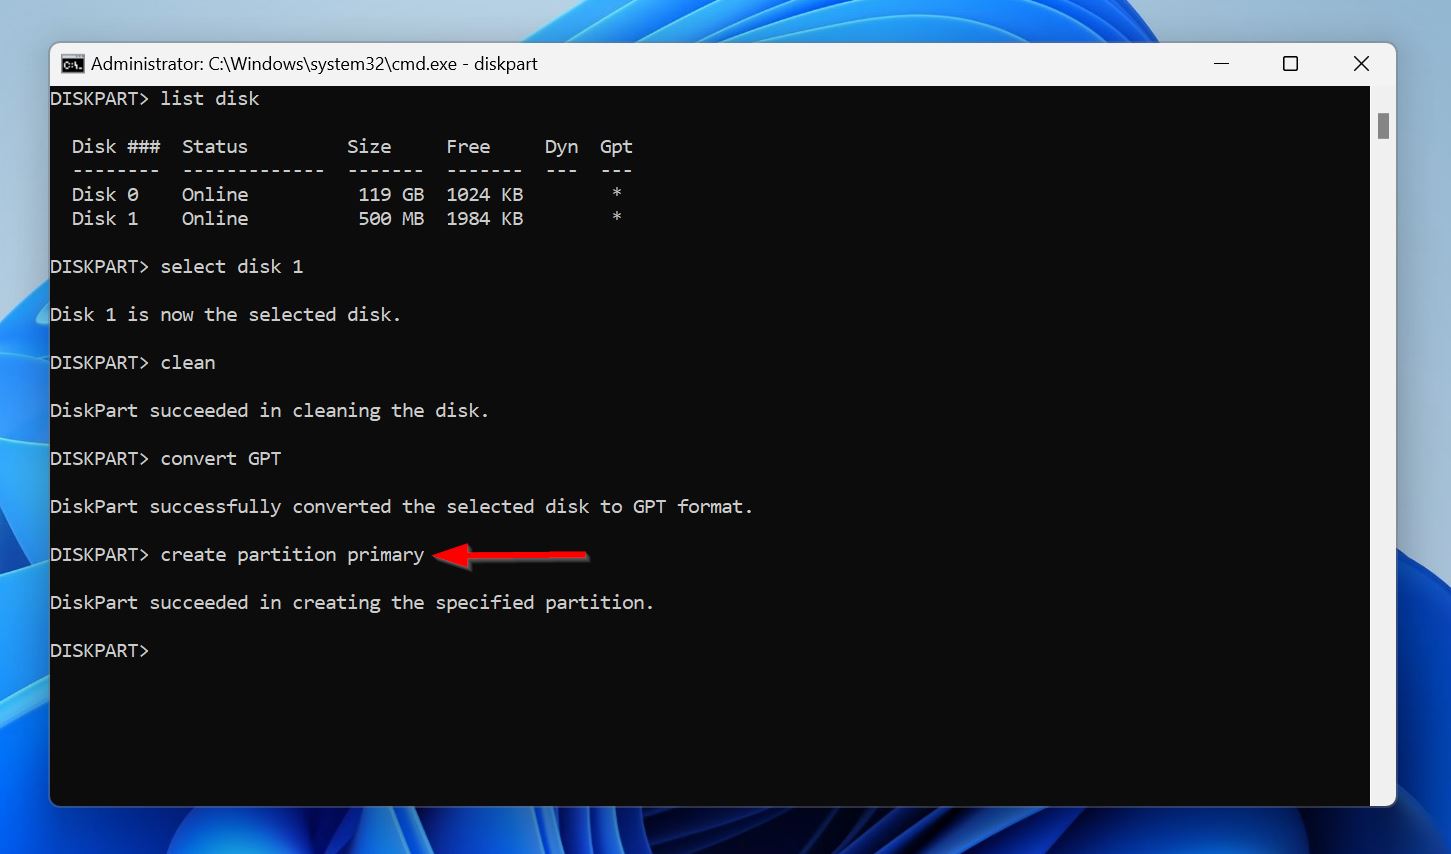
- Type create partition primary and press Enter.
- Type format fs=NTFS and press Enter.
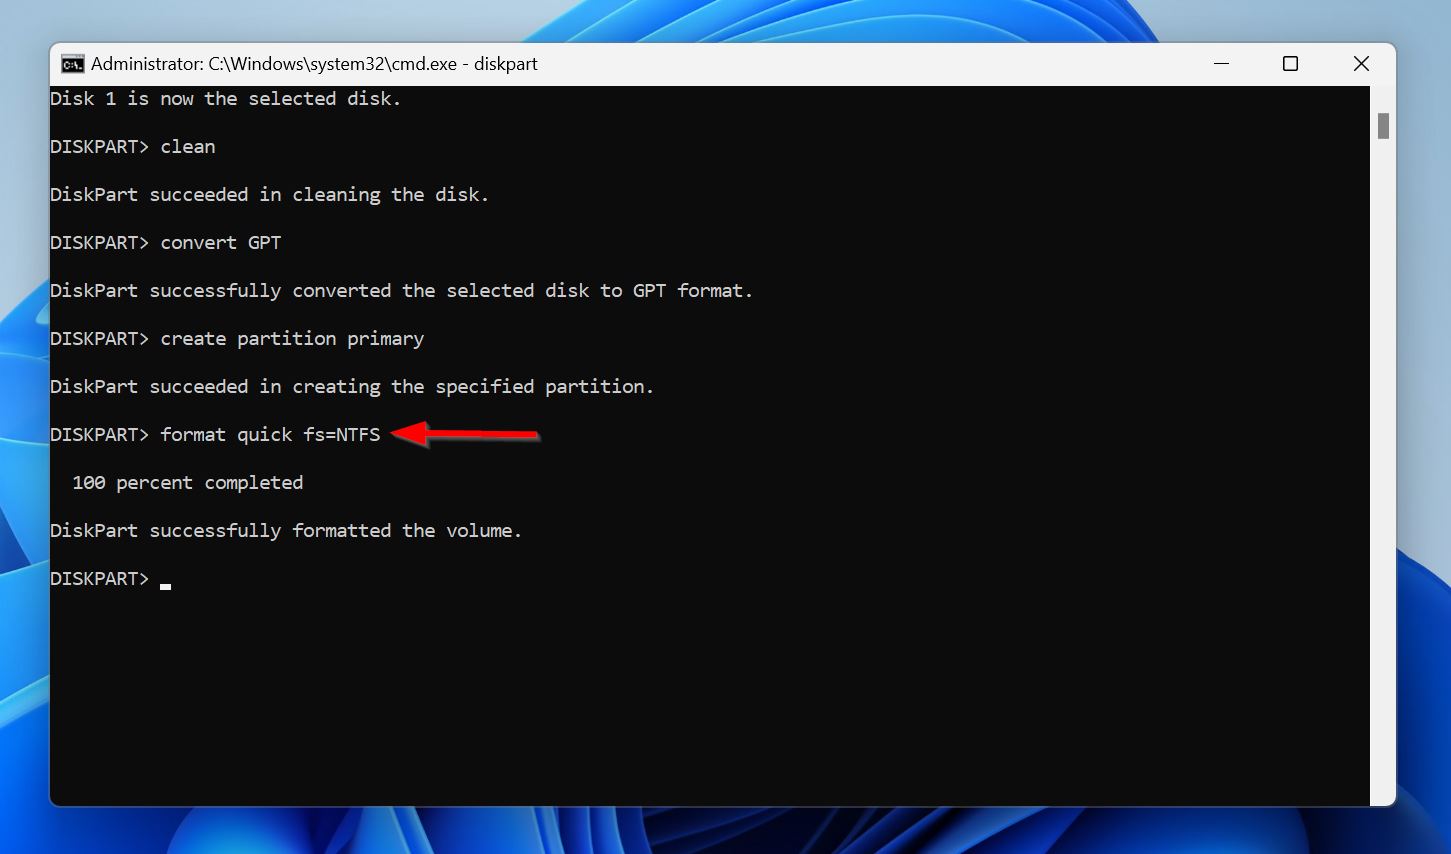
- The formatting process will begin. It may take more than an hour, especially if the drive’s storage capacity is large.
Scenario 3: SSD Doesn’t Show Up At All or Crashes the System
Sometimes, the reason behind SSD corruption isn’t a damaged file system or a corrupt file system, it’s something else in the chain. This could be a faulty connection, overheating, power delivery issues, or firmware bugs. In fact, we’ve even seen cases where faulty Windows 11 updates have caused massive slowdowns on certain SSDs.
So, how to recover a corrupted SSD in this case? First, diagnose if the SSD’s physical connection to your PC is working as it should. If everything checks out, then try updating the SSD’s firmware.
Here’s how:
Method 1: Check the SSD’s Physical Connection
SSD’s use SATA, NVMe/PCIe, or M.2 to connect to your PC’s motherboard.
SATA connections have more points of failure because there are cables involved. Double-check and see that the cable is not frayed, bent unnaturally, or damaged in any other way. Additionally, check the condition of the SATA connectors and ports on your motherboard. If possible, use another SATA cable to connect the SSD to your PC and see if the problem persists.
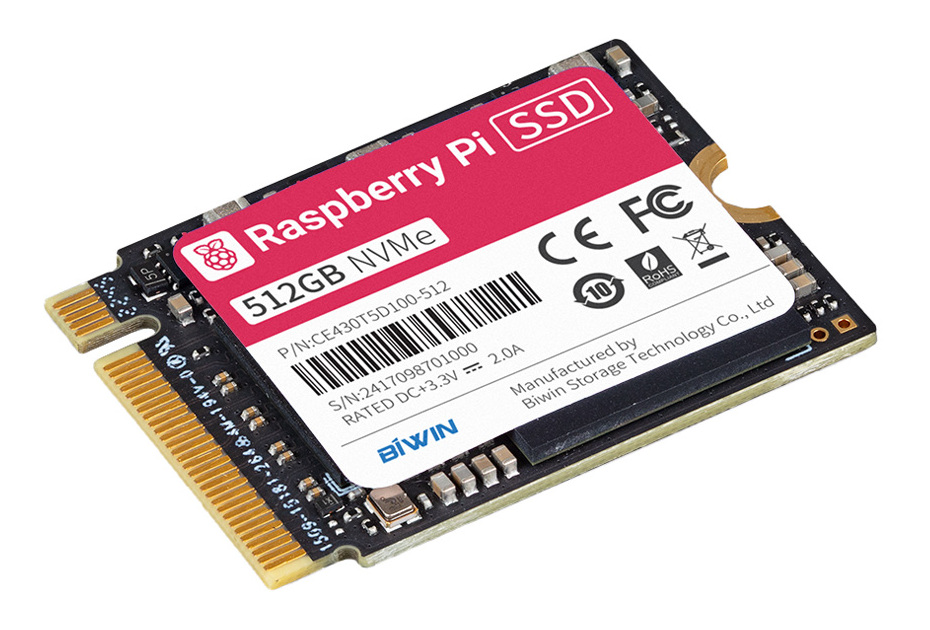
NVMe SSDs connect to your motherboard using a PCIe interface. Before anything else, check for signs of oxidization on the PCIe slot on your motherboard, and the gold contacts (pictured above) on your SSD. In case you notice oxidization, clean the contacts and the slot using a contact cleaner, then reseat the SSD. If there’s no oxidization, use an NVMe to SATA adapter to connect the SSD to your PC. If it’s detected, the problem lies with the PCIe slot on your motherboard. In case the SSD remains undetected, your SSD is the culprit.
M.2 connections are usually more reliable since the SSD is directly slotted into the motherboard, without any cables. A good way to check if the culprit is the slot on your motherboard, or the SSD, is to use a cheap M.2 to PCIe/M.2 to SATA adapter. Connect the M.2 SSD to the adapter, then connect the adapter to your motherboard. Check if your PC detects the SSD. If it doesn’t, the culprit may be your SSD. If it detects it, the culprit is the M.2 slot on your motherboard.
Depending on your SSD type, you can also purchase an enclosure that lets you connect your NVMe/M.2/SATA SSD to your PC via USB. If your computer still fails to detect it, you can be sure it’s the SSD that’s problematic.
Method 2: Update SSD Firmware
The firmware on your SSD is low-level software that controls all aspects of the SSD drive. This includes communicating with the PC, handling garbage collection, TRIM, wear-levelling, and more. Basically, it handles numerous essential functions that keep the SSD running smoothly.
While firmware corruption is rare, it can happen because of failed firmware updates, power-surges, and physical degradation of the SSD. Additionally, the firmware may have underlying bugs which may prevent the SSD from functioning like it should.
So, how to repair a corrupted SSD when its firmware is the culprit? Well, the best option is to update the firmware.
To do this, you need to know who manufactured your SSD. Each SSD vendor will have their own SSD management tool that you can use tocheck the SSD’s health, as well as check the firmware version and update it. SSD management tools for some common manufacturers include:

- SanDisk & WD Dashboard (Windows): Analyze drive health, check S.M.A.R.T. status, check drive capacity, serial number, and update firmware for SanDisk and WD SSDs.
- Kingston SSD Manager (Windows): Monitor and export drive health reports, check drive information, and update firmware for Kingston SSDs.
- Samsung Magician (Windows, macOS): Check SSD health, migrate data, secure erase, data protection, firmware updates, and more for Samsung storage drives (including SSDs).
Scenario 4: System SSD Is Corrupted and the OS Won’t Boot
If your primary SSD—the one containing Windows—is corrupted, your PC won’t boot at all. In this case, it’s possible that the issue is related to Windows, not your SSD. Either way, don’t panic, because your data is likely safe, you just need another way to access it. There are two ways of doing this: you could create a bootable Windows USB, or a live Linux USB and use that to access the drive, or you can use an external M.2/NVMe/SATA to USB enclosure to connect your drive to another PC as an external drive.
Regardless of the method you pick, you will need a second PC—whether it’s creating a bootable USB, or connecting the corrupted SSD as an external drive.
Creating a Bootable Windows USB
To create a bootable Windows USB, you’ll need a USB drive (at least 8 GB), and the Windows Media Creation tool. The tool will take you through the step-by-step process of creating the bootable Windows USB. Once it’s done, connect the USB drive to your PC, and start it up. Also connect the external drive where you’ll copy the files to. When you’re on the Windows installation screen, press Shift + F10 to open the Command Prompt, then use the robocopy command to copy your files. Using robocopy to copy your files can be overwhelming for new users, so use this detailed guide before running the command.
Creating a Live Linux USB
Opting for a live Linux USB is better if you prefer a GUI to copy your files to the other drive. The process will look like this: download the Ubuntu ISO, download the Linux Live USB Creator, and follow the instructions in the USB creator to create the live USB. Then, connect the USB drive to your PC and boot it up. Select Ubuntu from the list of operating systems, and copy your files to another drive of your choice.
Using an SSD Enclosure
The least cumbersome way of copying your files from the corrupted SSD containing Windows, is to use an external enclosure to connect it to another Windows PC. Make sure you pick the right one for your SSD, depending on its connection type (M.2, NVMe, or SATA). Once that’s done, you can simply copy your files to another drive.
Important: After you’ve copied all your files to a safe place, you can proceed to fix the corrupted drive using the methods outlined above. We suggest running Windows Startup Repair, and even reinstalling Windows for good measure.
When You Need Professional SSD Recovery and What to Expect
There are cases when you should avoid DIY corrupt SSD repair entirely.
These include:
- The SSD isn’t detected in the BIOS, nor does it show up when you connect it using an SSD enclosure.
- The S.M.A.R.T. attributes of the SSD show that its condition has severely deteriorated. You can check the S.M.A.R.T. status of the drive using a tool like CrystalDiskInfo.
- You suspect your SSD is physically damaged. This can happen due to power surges, overheating, short-circuits, and water.
If you notice any of the above, stop using your SSD immediately and contact a professional SSD data recovery service instead, especially if the data is really valuable. Good SSD data recovery labs know how to fix a damaged SSD, and can salvage some of your data in even the most dire circumstances.
Most companies have specialized hardware that lets them communicate directly with the SSD controller and the NAND chips on your SSD. In fact, they can even perform chip-off data recovery, removing the memory chips from your SSD and recovering RAW data from each of them. However, this kind of recovery can put a big dent in your wallet, with recovery costs ranging from $300 to more than $1500.
Here’s what to expect when using a professional data recovery service to recover a corrupted SSD:
- Contact a good, local SSD data recovery service and explain what happened to your SSD. Be as detailed as possible. Most companies have a 24*7 hotline you can use for emergency cases.
- You’ll then need to ship the SSD to the data recovery service, or drop it off at a collection center.
- The data recovery company will analyze the drive—usually free of cost—and get back to you with a quote and how much data can be recovered.
- You can then choose whether you wish to proceed further or not.
- If you do go ahead, the data recovery company will recover your corrupted SSD and ship the data to you in a new drive. You can opt to get the old drive back, or have it destroyed. Recovery time may range from a few days to a few weeks.
How to Avoid Losing Data Due to SSD Corruption in the Future
SSDs are notorious for failing shortly after they start displaying symptoms of corruption. It’s best to stick to a regular data backup schedule for the best protection against data loss in the future. If you notice any of the following symptoms on your SSD, back up your data as soon as possible:
- 🐌 Slow read and write speeds.
- 🗂️ Randomly appearing and disappearing files.
- 💥 Frequent crashes and freezing.
- ⚠️ Error messages like error code 0xc000014cm, and the “Drive is not accessible” pop-up.
Keeping an eye out for the aforementioned symptoms will ensure you can take timely action.
Have Questions We Didn’t Cover?
Dealing with a corrupted SSD can be stressful, but in most cases you can get back your data and potentially fix the corruption. As long as the SSD is physically fine, your priority should be to recover your data from it. Then identify the particular symptoms your SSD is showing, and choose the appropriate method to fix it. We’ve answered the most common related questions users have about SSD corruption in the FAQ below. However, we also understand that each SSD corruption case is unique, and we suggest you describe your problem in the comments below in case the above guide didn’t work for you, or you’re stuck at some step.
FAQ
- Sudden power loss, or improper shutdowns.
- Accumulation of bad sectors over time.
- Overheating.
- Excessive read/write cycles.
- Malware infections.


