 Can’t find that screenshot you swear you saved on your Mac? Or maybe you deleted it, by accident or on purpose, and now need it back? You’re not the first, and definitely not the last. Our team has dealt with just about every type of data loss on macOS, and today we want to share everything we know with you.
You’ll learn how to quickly locate screenshots you’ve taken, how to recover deleted screenshots on Mac, and what roadblocks you might hit along the way.
Where Are Screenshots Stored on Mac?
First thing, let’s talk about where screenshots are saved on Mac by default.
When you take a screenshot, your Mac saves it under a name similar to the following: Screenshot 2025-08-10 at 19.11.43. So every screenshot will be labeled with the exact date and time it was made. By default, your Mac will save the screenshots to your desktop. But if you want your computer to save them elsewhere, you can easily change the setting. It’s possible to choose any folder on your Mac as the destination.
Here’s how to change the default location for screenshots on your Mac:
- Launch the Screenshot app (open Launchpad on your Mac and type Screenshot in the search field at the top of the screen or press Command + Shift +5).
- Click Options for a menu to appear.
- Under Save to choose any of the locations or click Other Location if the needed folder is not listed there (then open the folder that you wish to use as the destination for your screenshots and click Choose to confirm).
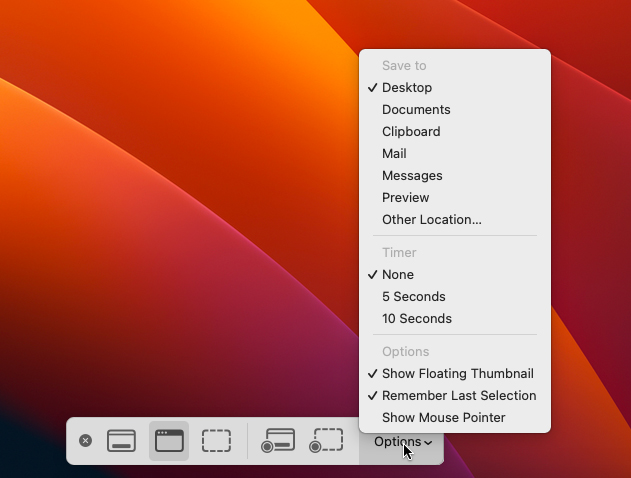
Now, all of the screenshots that you take will automatically get saved to the new location.
Note: If your Mac says screenshots are saved to the Desktop, but you don’t see any, check if Stacks is turned on. When Stacks is enabled, your screenshots might be automatically grouped into a single pile labeled Images or Screenshots. Just click that stack to expand and view them.
How to Find Screenshots on a Mac
If you didn’t find the screenshots on your Mac in the expected places, that’s fine – there are still plenty of spots to check. Just because the file isn’t sitting on your Desktop doesn’t mean it’s gone. Sometimes screenshots disappear on your Mac simply because they were saved somewhere else or renamed.
That’s what we’ll cover next: how to find screenshots that are still hiding somewhere on your Mac. And if it turns out they really are gone, we’ll walk you through your options for getting them back.
Option 1:Recents Folder
If not much time has passed since you’ve taken a screenshot on your Mac, the easiest way to find it would be in the Recents folder.
Here’s how to find recent screenshots on Mac:
- Launch Finder (click the first icon on your Launchpad).
- Choose Recent from the sidebar on the left.
- Look through the files located under Images.
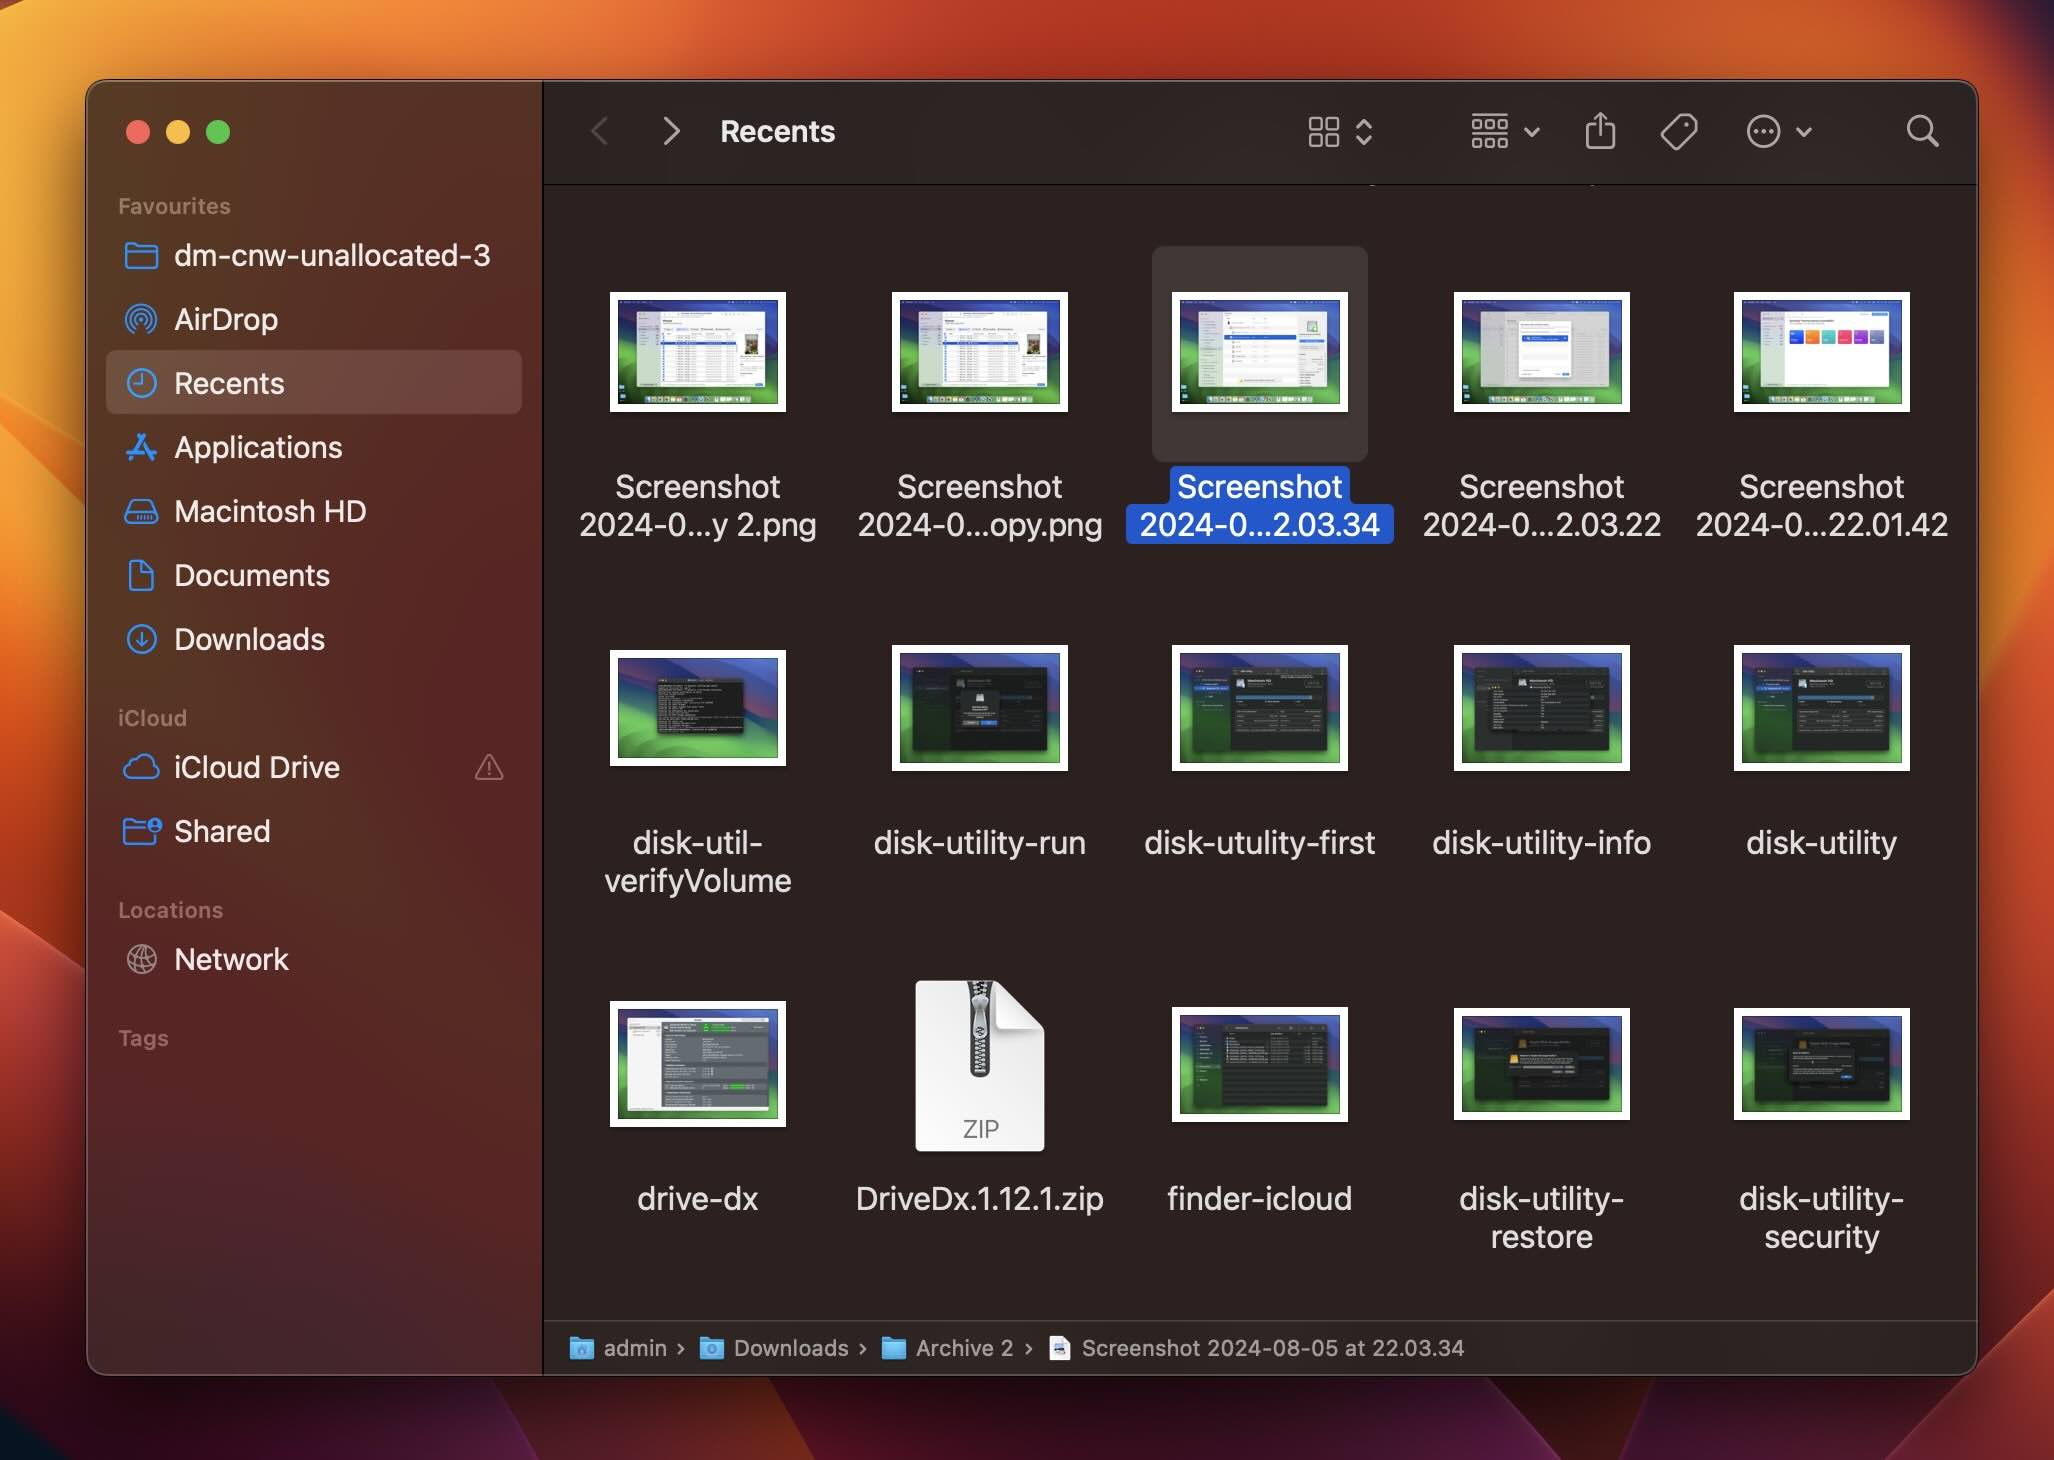
- If you’ve found the needed screenshot, simply drag and drop it into any other folder.
Tip: Found the screenshot and want to know where it’s actually stored? Just right-click the file in Recents and choose Show in Enclosing Folder. This will open the exact location where the screenshot is currently saved on your Mac.
Option 2:Finder Search Bar
If you want to view all of the screenshots located on your Mac, then all you need to do is open Finder and use a specific screenshot search tag. Here’s how to find screenshots on a Mac with Finder:
- Launch Finder (click the first icon on your Launchpad).
- Click the magnifying glass icon on the top right for a search field to appear.
- Copy-paste this search tag into the field
kMDItemIsScreenCapture:1and hit Return (click Save under the search field to create a smart folder and add it to the Finder’s sidebar for easy access).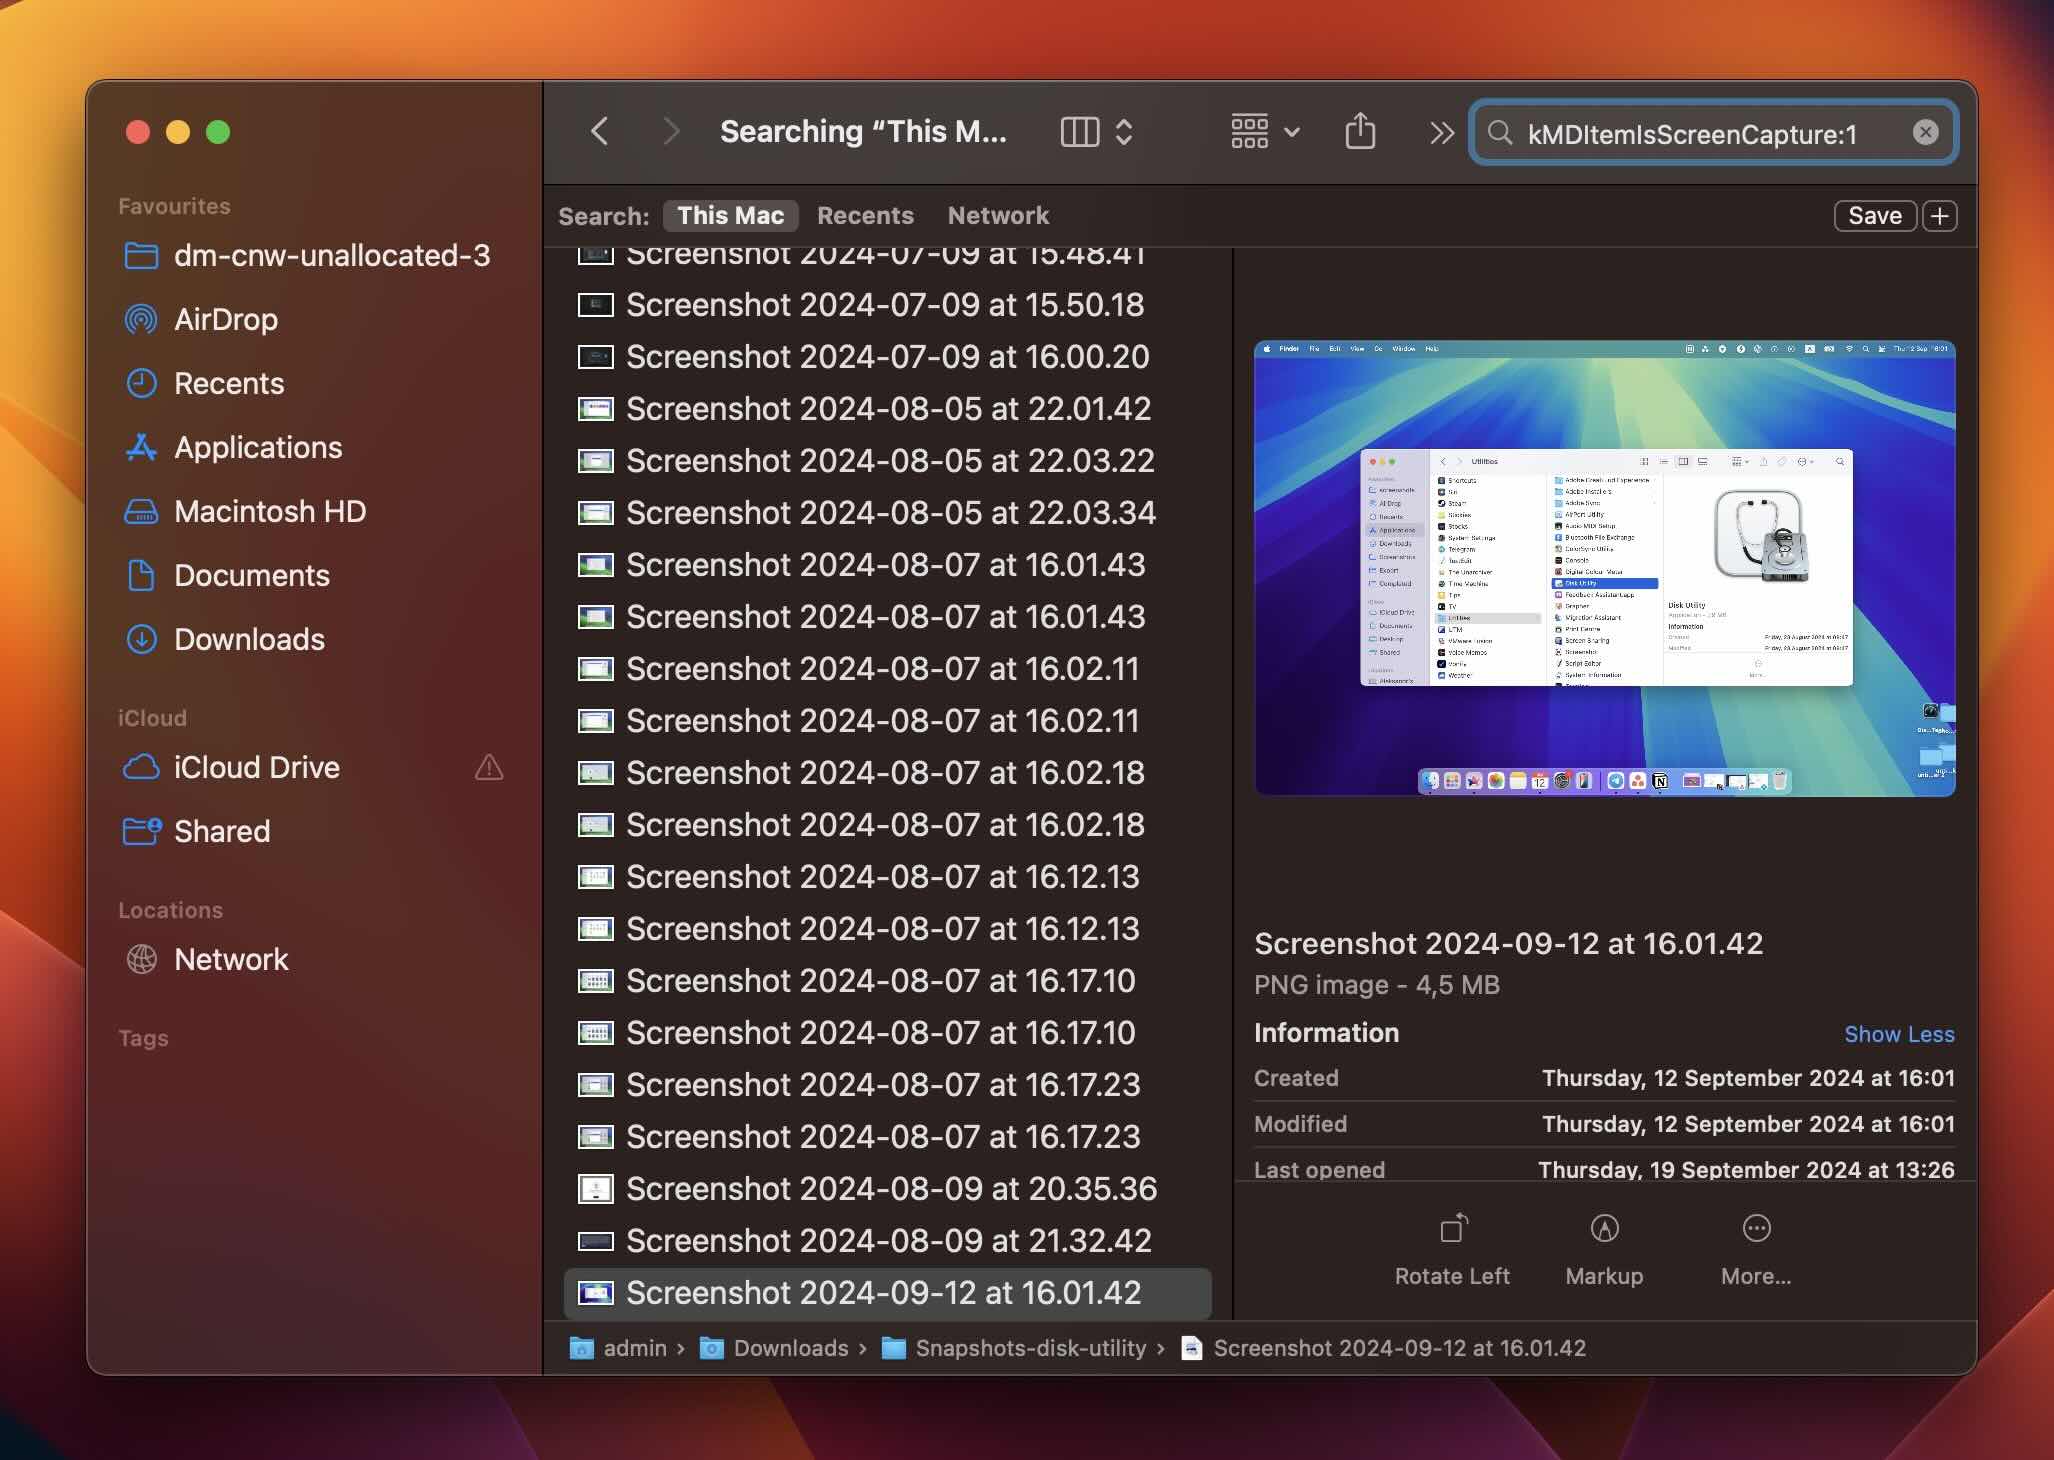
If you remember the exact name of the screenshot (or at least the date you took it), you can use that to speed things up. For example, if it was taken on April 1, just type “Screenshot 2025-04-01” into the Finder search bar. Since screenshots follow the same naming format by default, this makes it much easier to view screenshots on Mac without digging through a huge list of files.
Option 3:Spotlight Search
Another way to search for screenshots on a Mac is with the help of Spotlight. So if you’re one of those people who are more comfortable using this tool compared to Finder, follow these steps to access the screenshots on a Mac:
- Launch Spotlight (either click the magnifying glass icon in the menu bar or press Command + Spacebar).
- Copy-paste this
kMDItemIsScreenCapture:1into the search field and hit Return.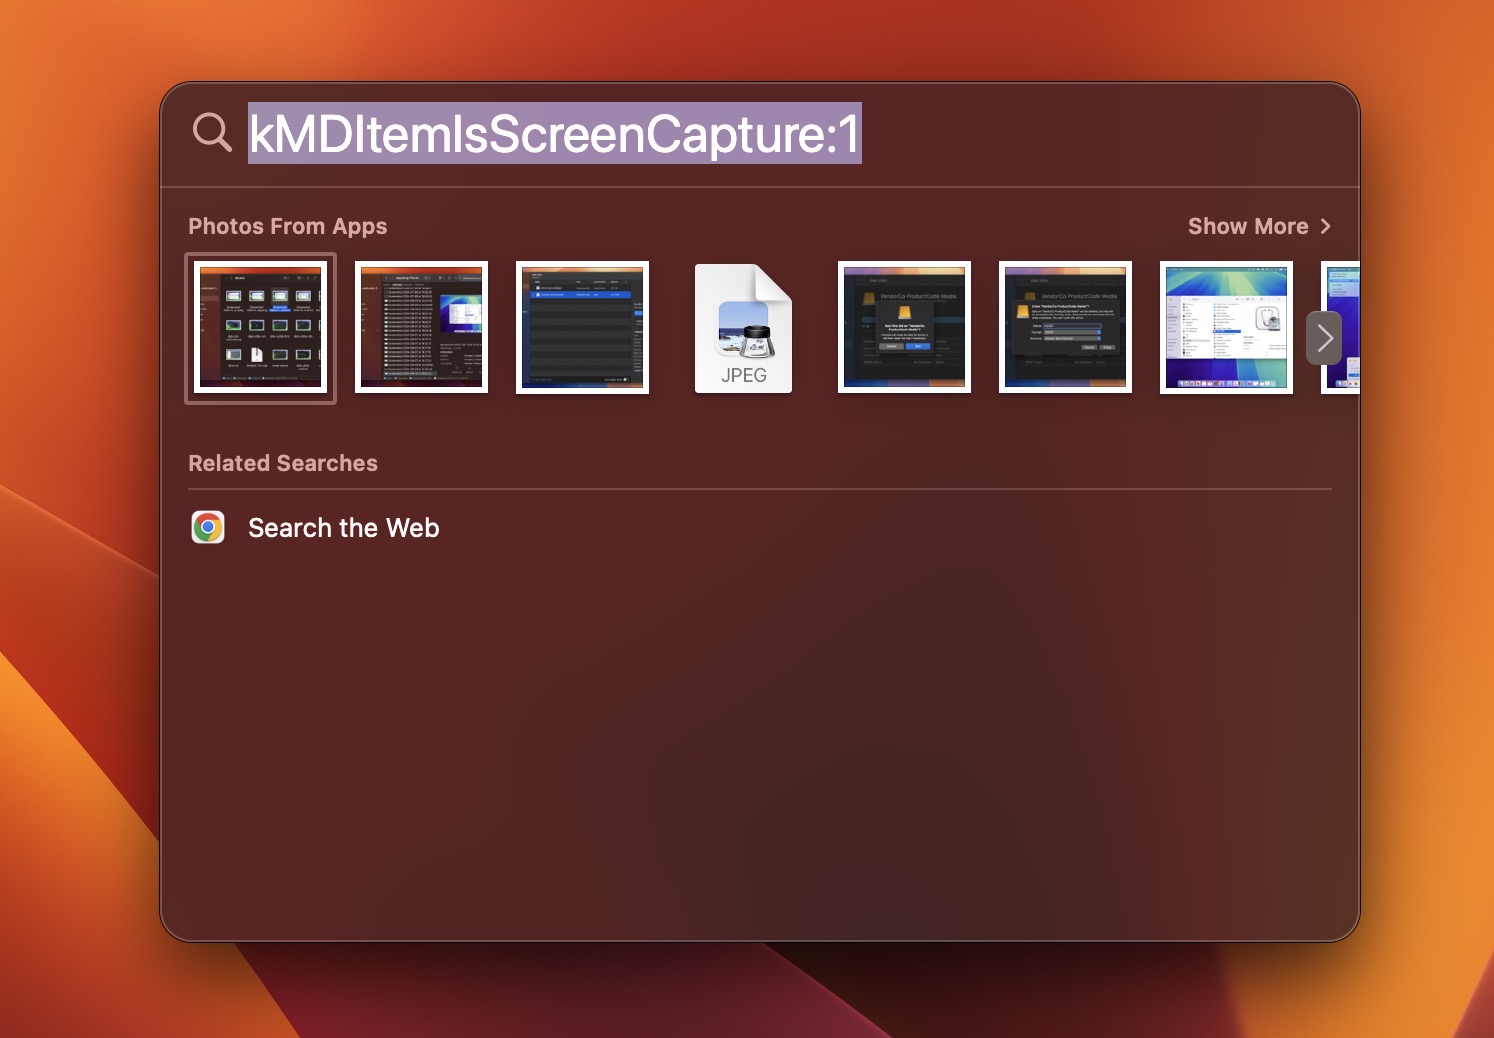
- Click a file to preview it or double-click it to open.
- If you want to see where exactly a specific screenshot is located, then click it and press Command + Return.
Option 4:Terminal Commands
And finally, you can locate screenshots on a Mac using Terminal. Handy if, for some reason, you can’t use Finder or Spotlight. This method is especially useful when you want to retrieve screenshots on a Mac by directly pulling their file paths.
But as you may know, it’s impossible to actually see the screenshots on a Mac via Terminal since it’s a command-line application. It only lists file paths, so you won’t be able to visually confirm which screenshot is which.
Here’s how to use Terminal to access your screenshots:
- Launch the Terminal app (open Launchpad and click Terminal to open it).
- Copy-paste the following command
mdfind kMDItemIsScreenCapture:1and hit Return.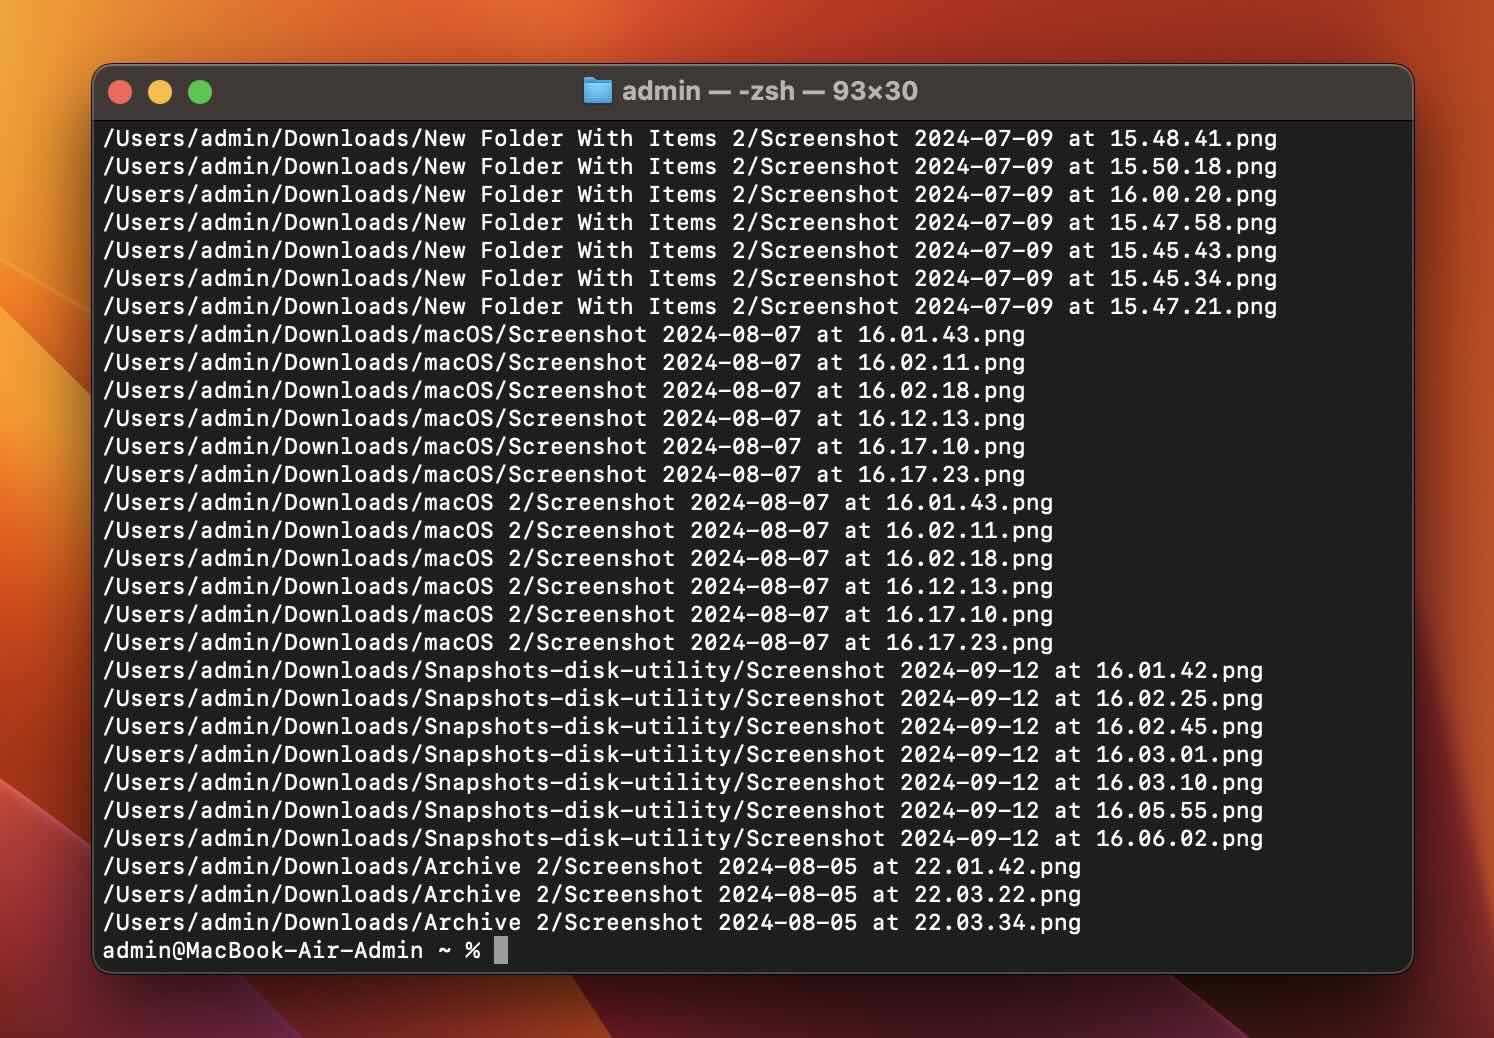
- You’ll see a list with paths to all of the screenshots located on your Mac. To view screenshots on a Mac, copy its path. Then go to Finder > Go > Go to Folder, paste the path in the search field, and click Go.
Important: Terminal is case-sensitive! If you’re typing the file path manually instead of copy-pasting it, be extra careful. For example, “/Users/YourName/Desktop” is not the same as “/users/yourname/desktop”.
Even one lowercase letter in the wrong spot can cause the command to fail. You need to match the exact casing you see in Terminal.
How to Recover Deleted Screenshots on Mac
Now let’s get into the recovery methods: ways to retrieve screenshots on Mac that were actually deleted, whether permanently or not-so-permanently.
Some of these options (like the Trash) you’ve probably already tried. But we’re covering everything, from the obvious first steps to the more advanced recovery tools, so you don’t miss a single chance to get those files back.
Method 1:Restore From Trash
When you delete a file, it gets instantly moved to Trash on your Mac, so as soon as you notice that you’ve mistakenly deleted the wrong screenshot, the first place where you should look is there.
If you haven’t emptied Trash after deleting the screenshot, then you can simply “undelete” it either by dragging it out of Trash into any other folder or by using the Put Back feature.
Important: If you’ve set Trash to automatically empty files after 30 days, and that’s approximately how much time has passed since you deleted the screenshot, then try the next data recovery method.
Here’s how to restore deleted screenshots via Trash on Mac:
- Open Trash on your Mac (click the Trash icon on the Dock).
- Look through the deleted files to find the needed one.
- Once you’ve found the screenshot, either drag and drop it into a different folder or right-click it and choose Put Back from the drop-down menu.
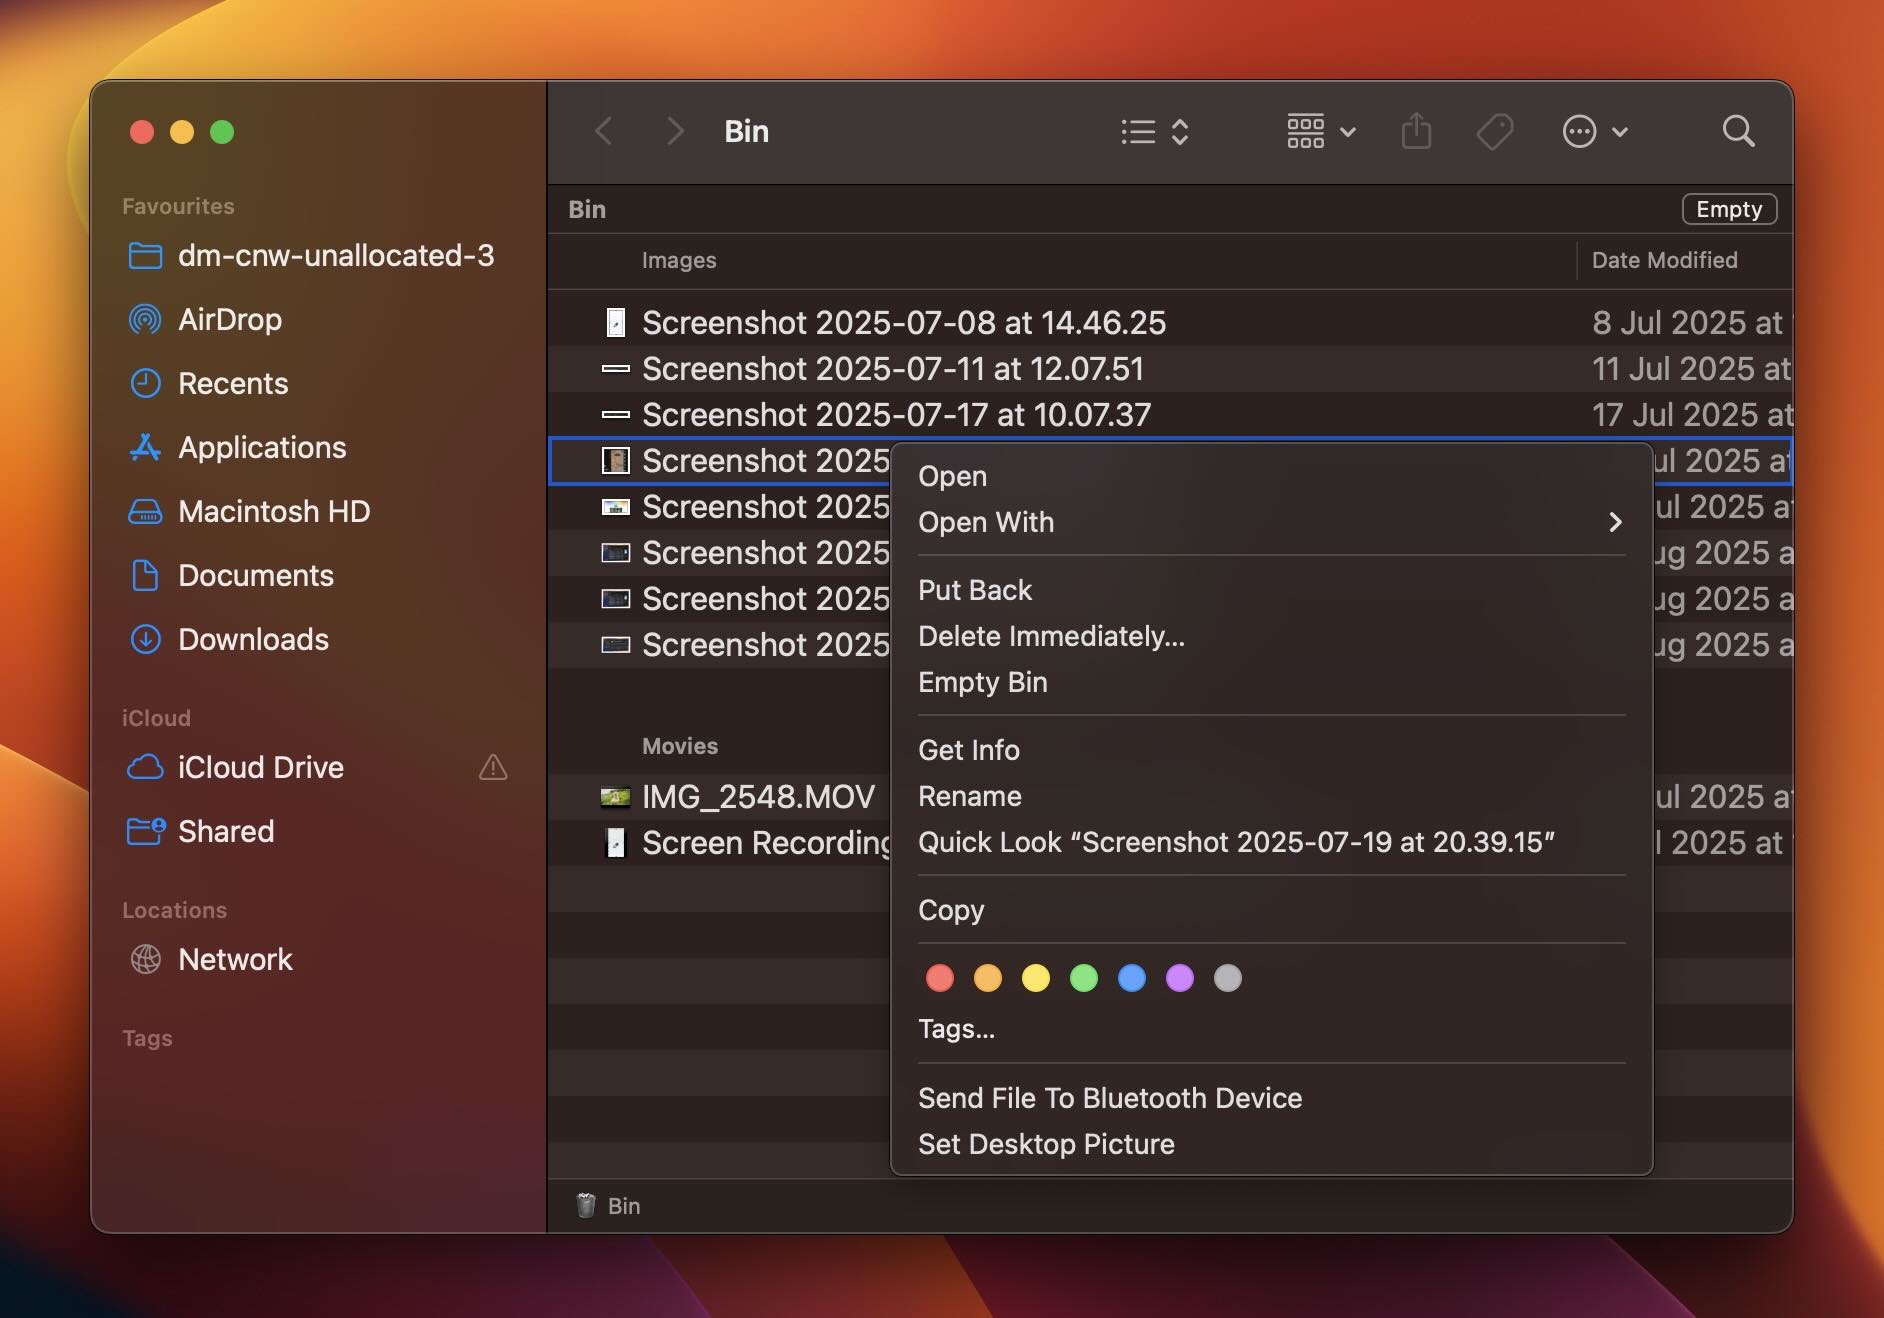
If you choose to recover the screenshot with the Put Back feature, the file will be returned to the location where it used to be stored before deletion.
Note: To preview a screenshot directly from the Trash, you can open it just like any other file. Simply right-click it and select Quick Look (or press the spacebar) to view the image without restoring it.
Method 2:Use Data Recovery Software
If the screenshot is no longer in the Trash and has been permanently deleted, you’re left with two main options: data recovery software or backups. And since most people don’t have reliable backups (or forget to use them), we’ll move to recovery apps first.
There are plenty of tools that can recover screenshots on Mac (or other file types), but frankly, not all of them deliver the same results.
Our team has tested literally dozens of available options, running them through real-world data loss scenarios on macOS. If you’re curious, we’ve put together a full ranking of the best Mac data recovery software here.
For this guide, we’ll focus on the one that consistently ranked near the top: Disk Drill. It’s fast, works great on all recent macOS versions (including the latest macOS Sequoia), and has an excellent track record when it comes to deleted images.
Important: To increase your chances of successful data recovery, it’s critical to stop using your Mac as soon as you notice that you’ve deleted the wrong screenshot. The longer you use the drive, the higher the risk that macOS will overwrite the deleted data.
Also, If you have a newer Mac with a solid-state drive (SSD), you need to know about something called TRIM. It’s a background process macOS uses to help SSDs run efficiently, but it can also wipe deleted files almost instantly. This makes screenshot recovery on internal SSDs much harder (and sometimes impossible), especially if some time has passed since deletion.
But that doesn’t mean recovery is hopeless. You won’t know for sure until you scan the drive.
Here’s how to recover deleted screenshots on Mac using Disk Drill:
- Download the Disk Drill app and follow the onscreen instructions to install it. If possible, install and run it from a different drive than the one where your screenshots were stored before deletion. This helps avoid overwriting the very data you’re trying to recover. But if you only have one internal drive, don’t worry. It’s still worth trying recovery.
- Choose the Storage devices tab on the sidebar and then click the drive which used to contain the deleted screenshot. In most cases, this will be your internal system drive, usually labeled something like Macintosh HD or Apple SSD.

- Click the Search for lost data button. This tells Disk Drill to begin scanning the drive for all recoverable files.
- You don’t have to wait for the entire scan to finish before looking for your deleted screenshot. Disk Drill lets you explore results in real time while it scans your drive. Just click the Pictures category. This will show all image files Disk Drill has already found (screenshots included). The list updates live as the scan progresses, so you can start searching immediately.
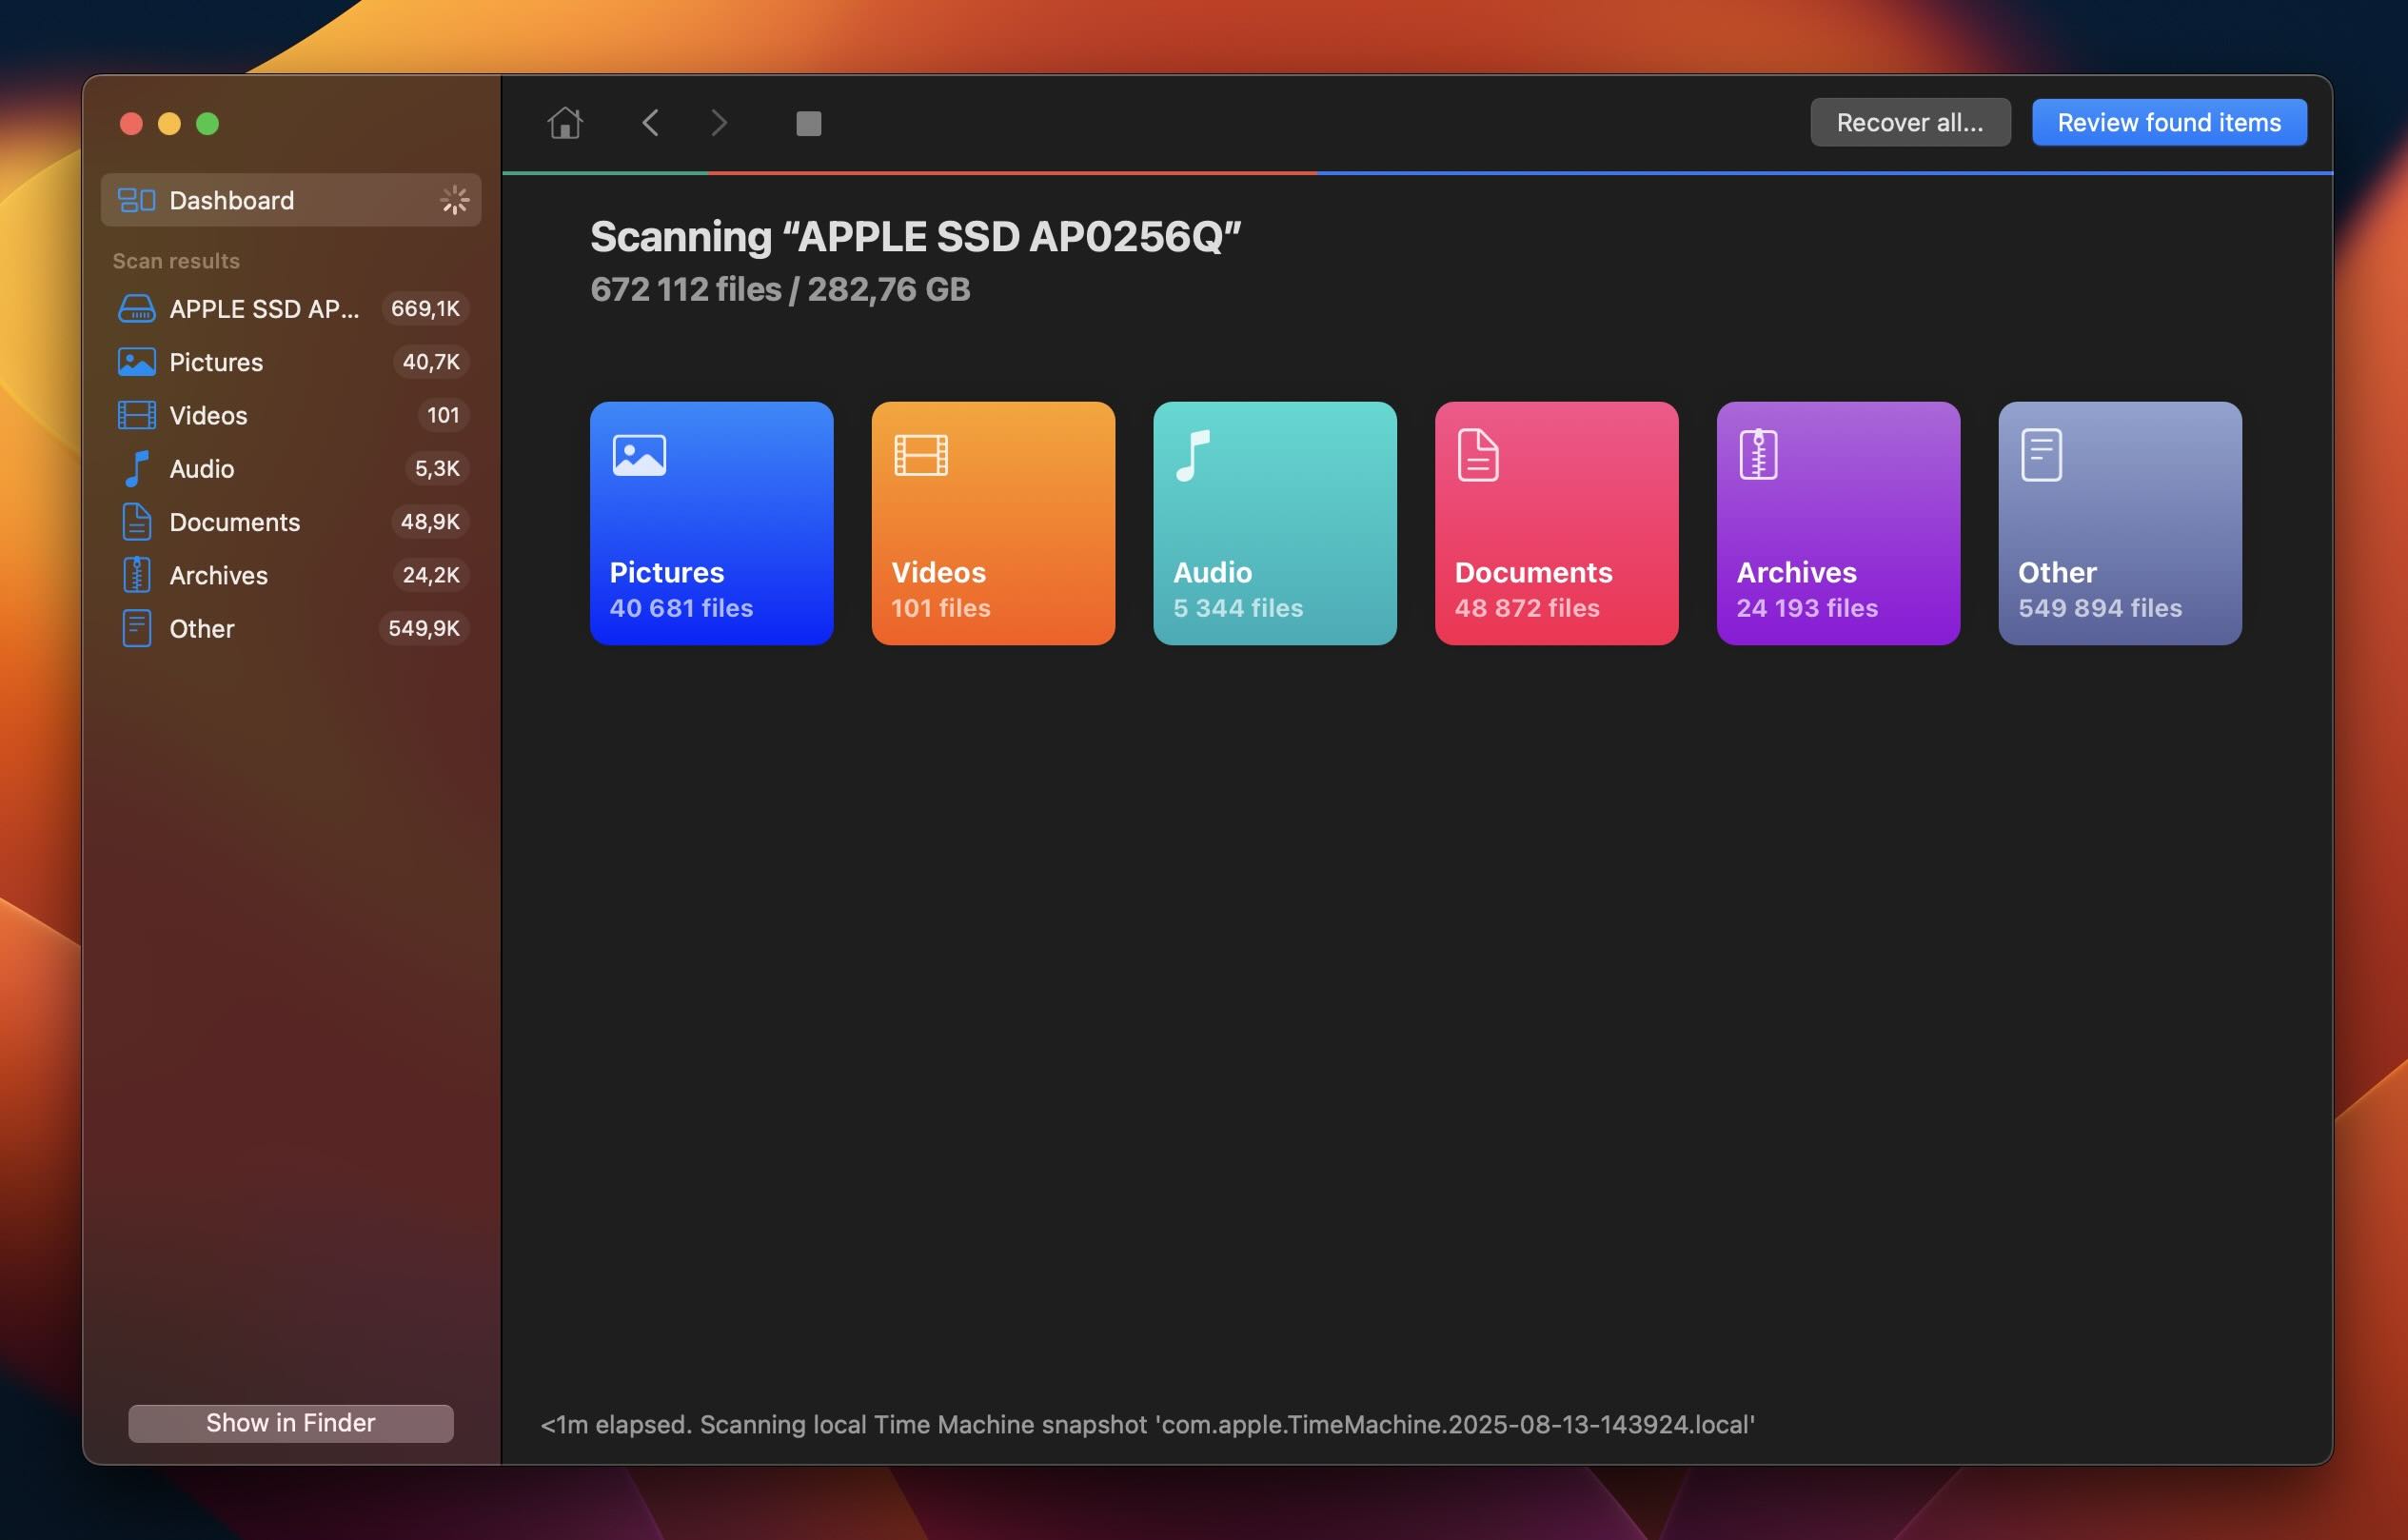
- To narrow things down even further, you can filter by file type. Since macOS saves screenshots in PNG format by default, select PNG from the list of file types.
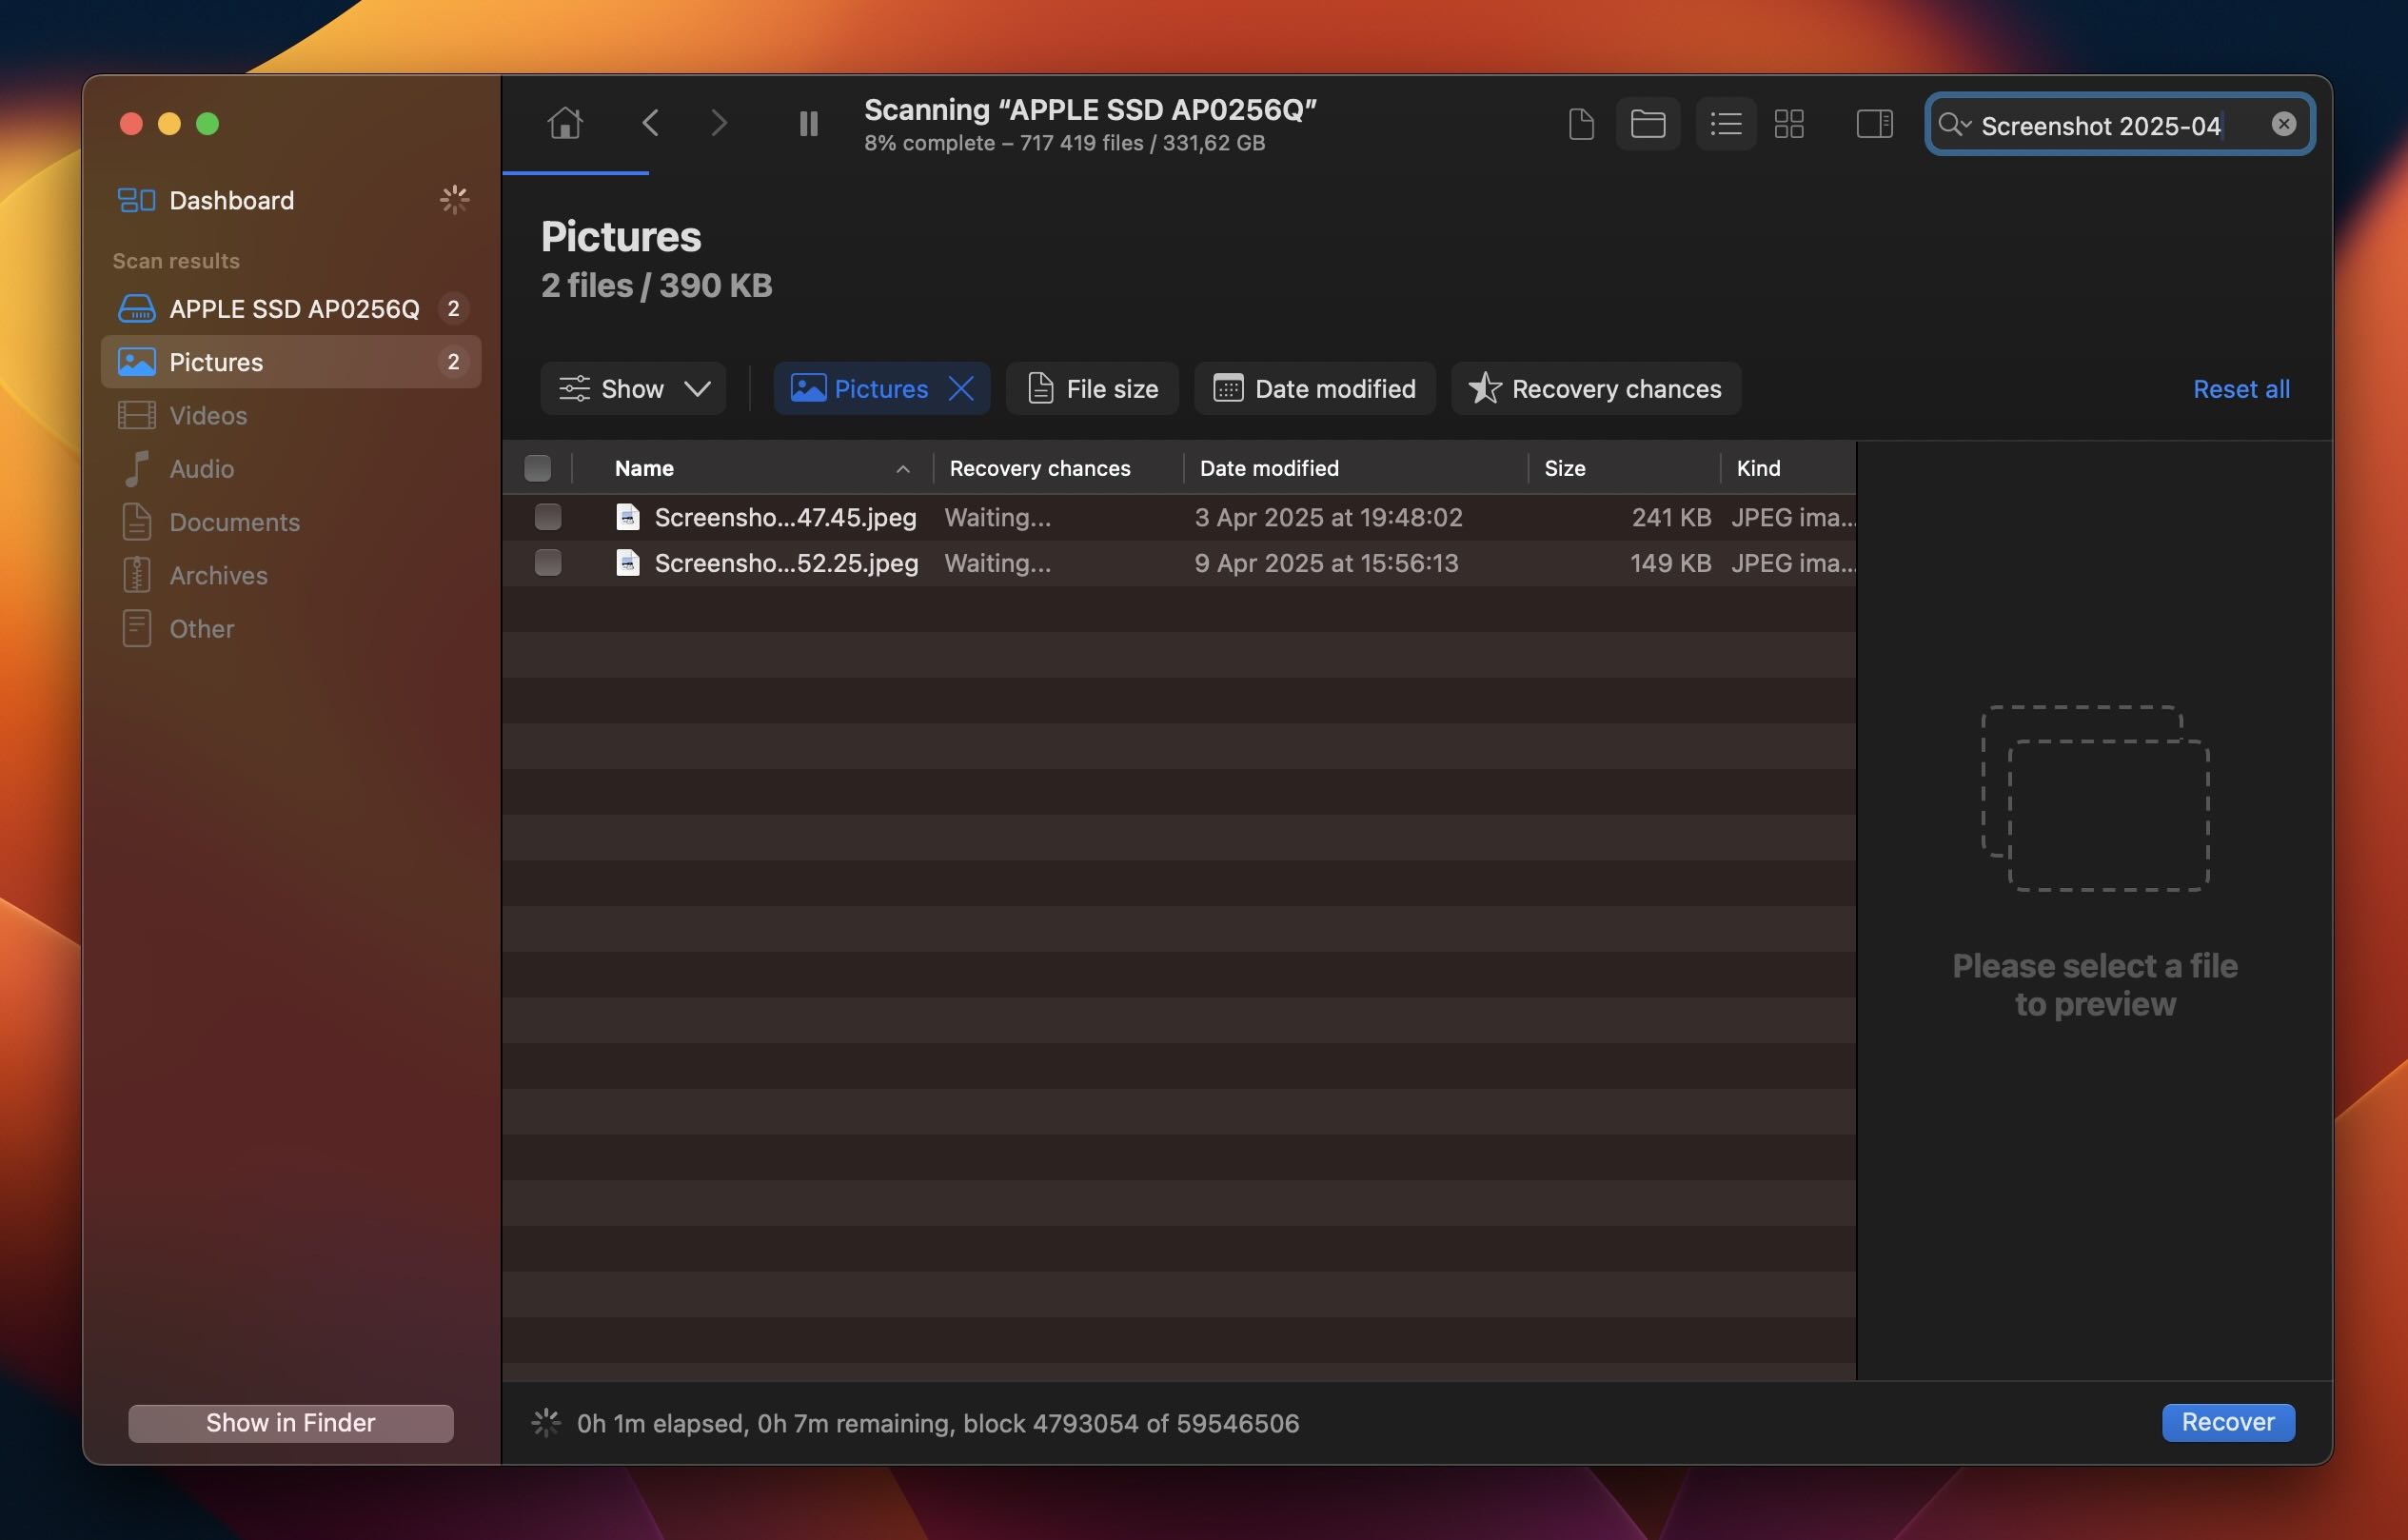
- You can also use the search bar in the top-right corner, just like in Finder. If you remember the filename (or even just part of it, like “Screenshot 2025-04”), type it in to instantly filter the results.
- As you click on any file in the results list, you should see a preview panel on the right side of the window. This helps confirm whether it’s the screenshot you’re looking for.
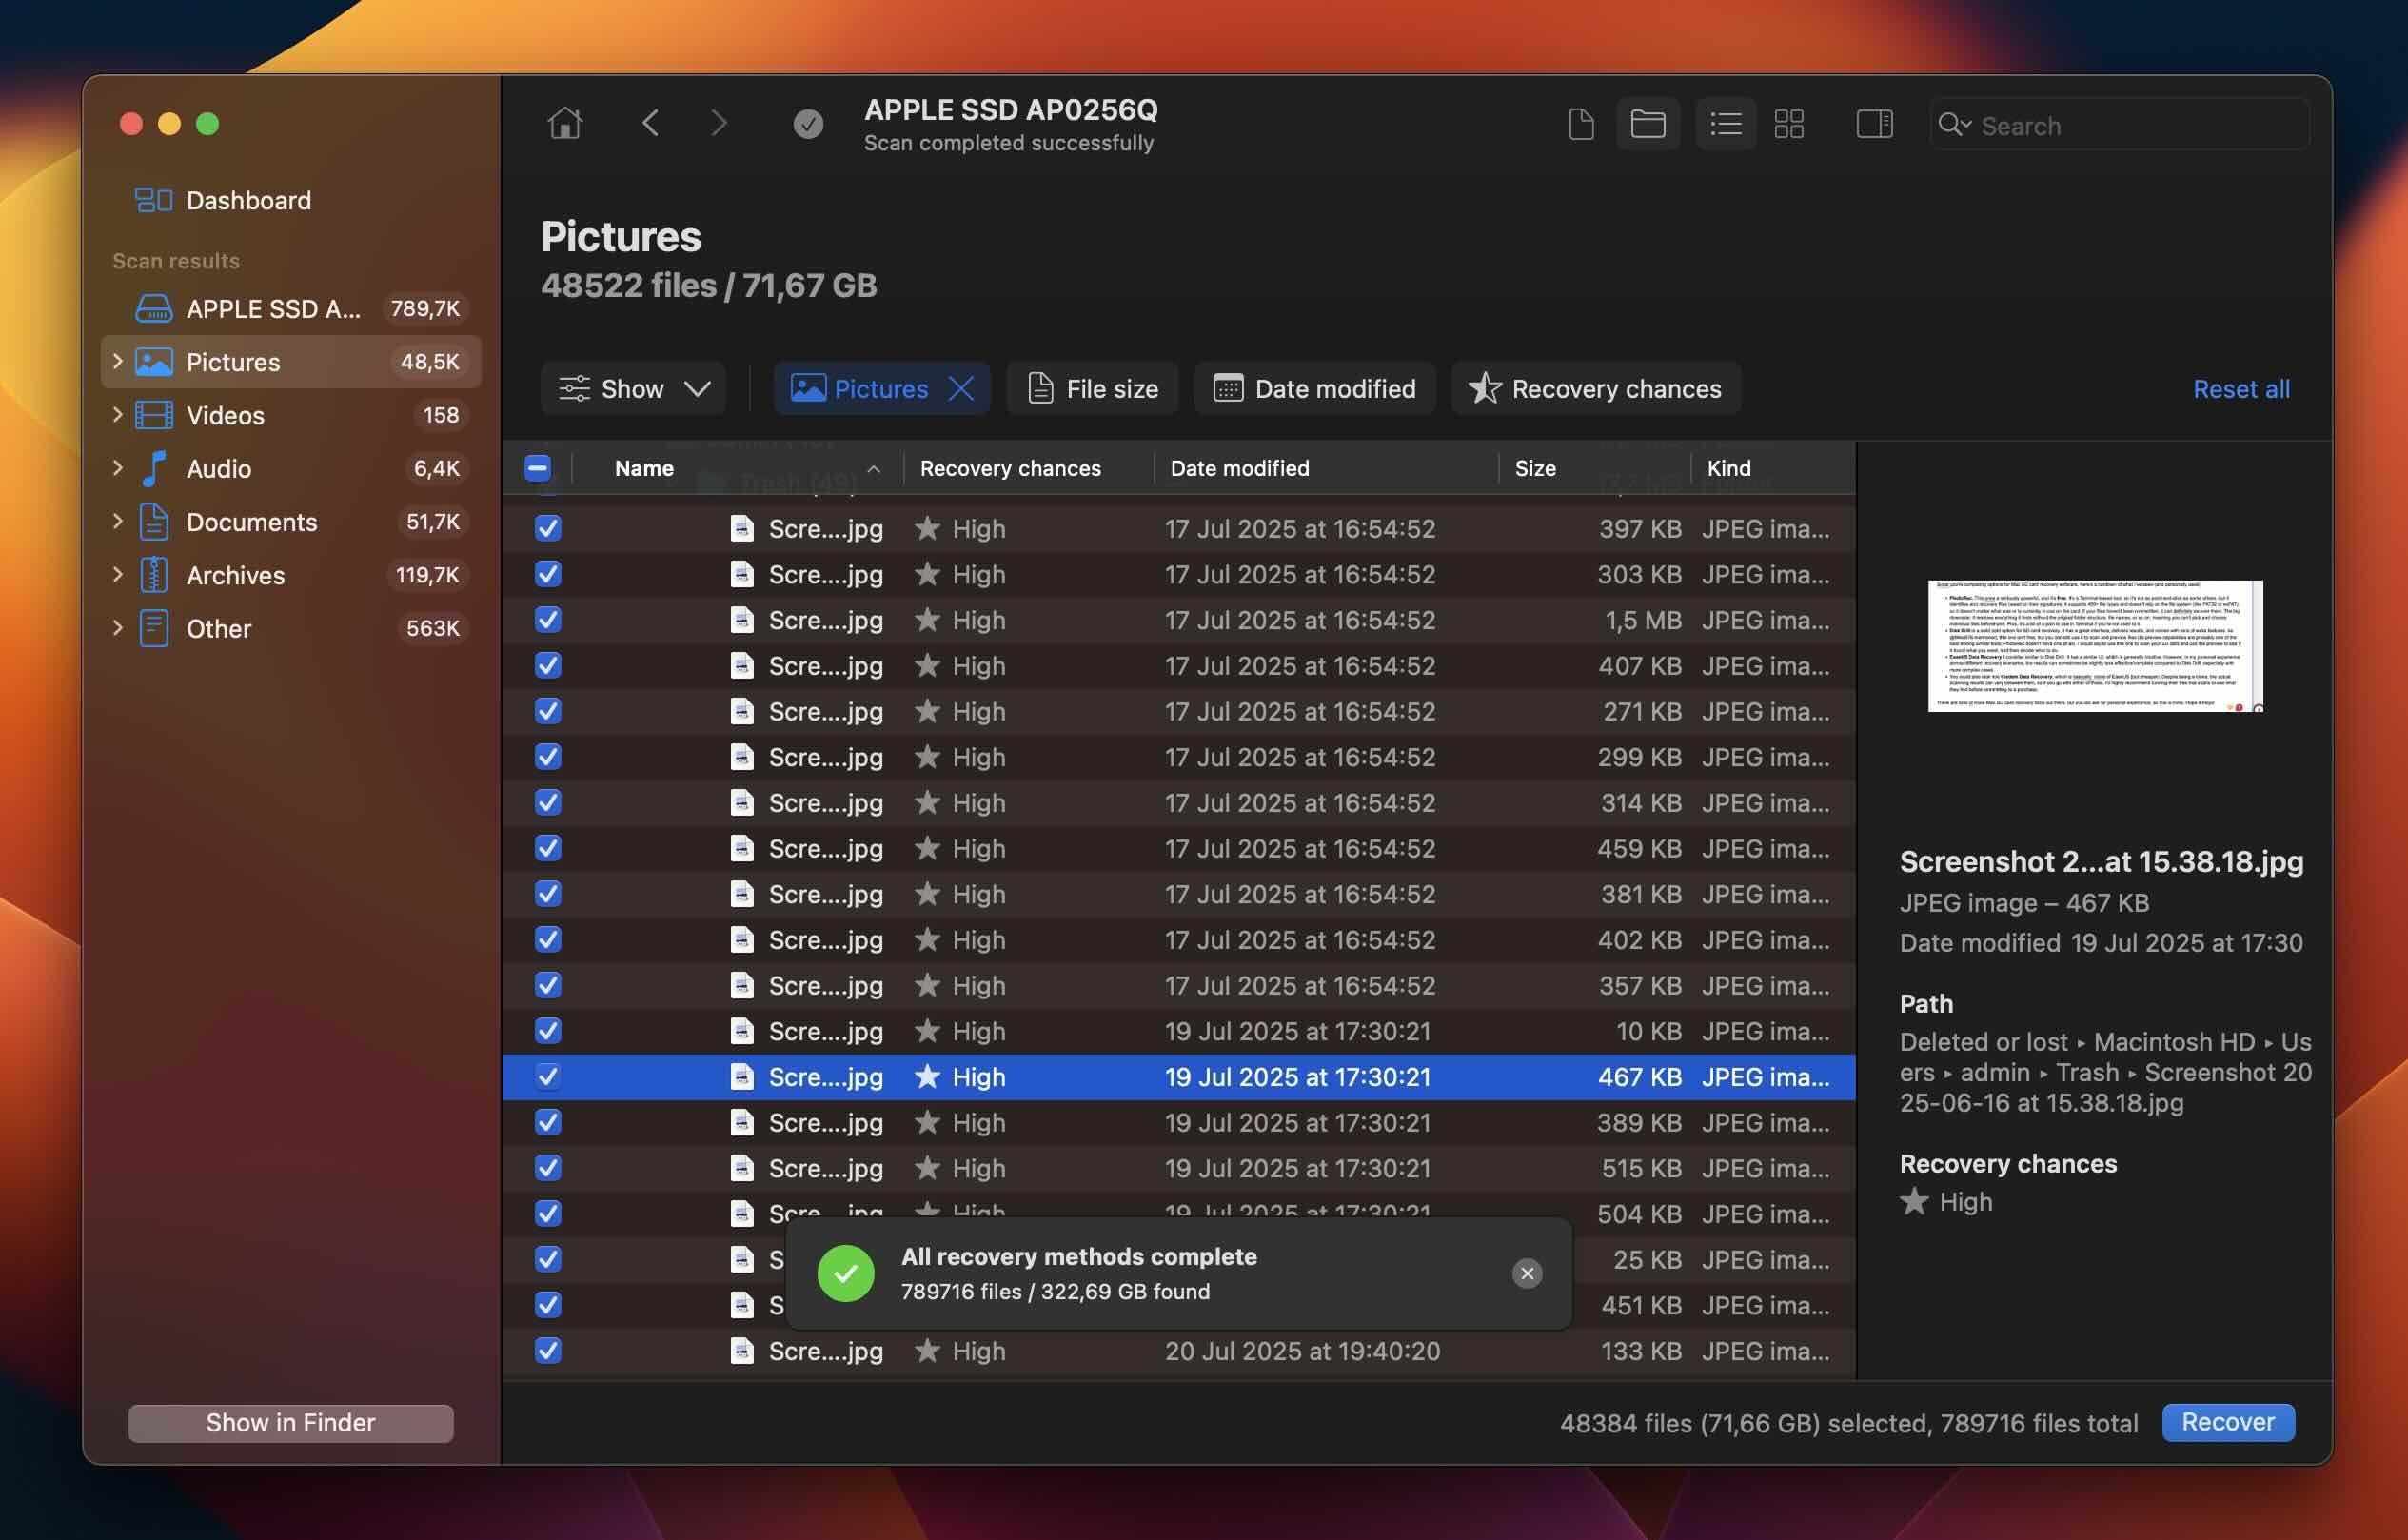 If you don’t see a preview automatically, look for the small eye icon next to the file name and click it. That will open a quick look-style preview inside Disk Drill. If the preview opens and looks correct, the file is most likely in good shape and fully recoverable.
In its free version, Disk Drill lets you scan/preview as many files as you want, with no limits. But to actually save the files, you’ll need to upgrade to the PRO version. - Once you’ve found the needed screenshot, choose it and click the Recover button.
- Select the destination folder for your file (It’s best to select a different drive from the one you’re recovering from, if that’s an option for you) and click Next to confirm.
Now all you need to do to access the file is open the chosen folder.
Method 3:Recover From a Time Machine Backup
If you’re one of the few people who actually think about backups ahead of time – props to you. Time Machine, Apple’s built-in backup tool, may already have a copy of your missing screenshot tucked away in one of its snapshots.
You can use it to restore deleted photos, videos, Pages documents, Excel spreadsheets, etc. So it’s only natural that you can also use your Time Machine backups to recover a missing screenshot.
Note: If you’ve been regularly backing up your Mac with Time Machine, you should be able to restore the deleted screenshot from one of those backup versions. But if the application didn’t back up your computer before you permanently deleted the needed file, this method won’t bring any results.
Time Machine is especially helpful in cases when you need to recover old deleted screenshots on a Mac.
Here’s what you should do to restore a screenshot using Time Machine:
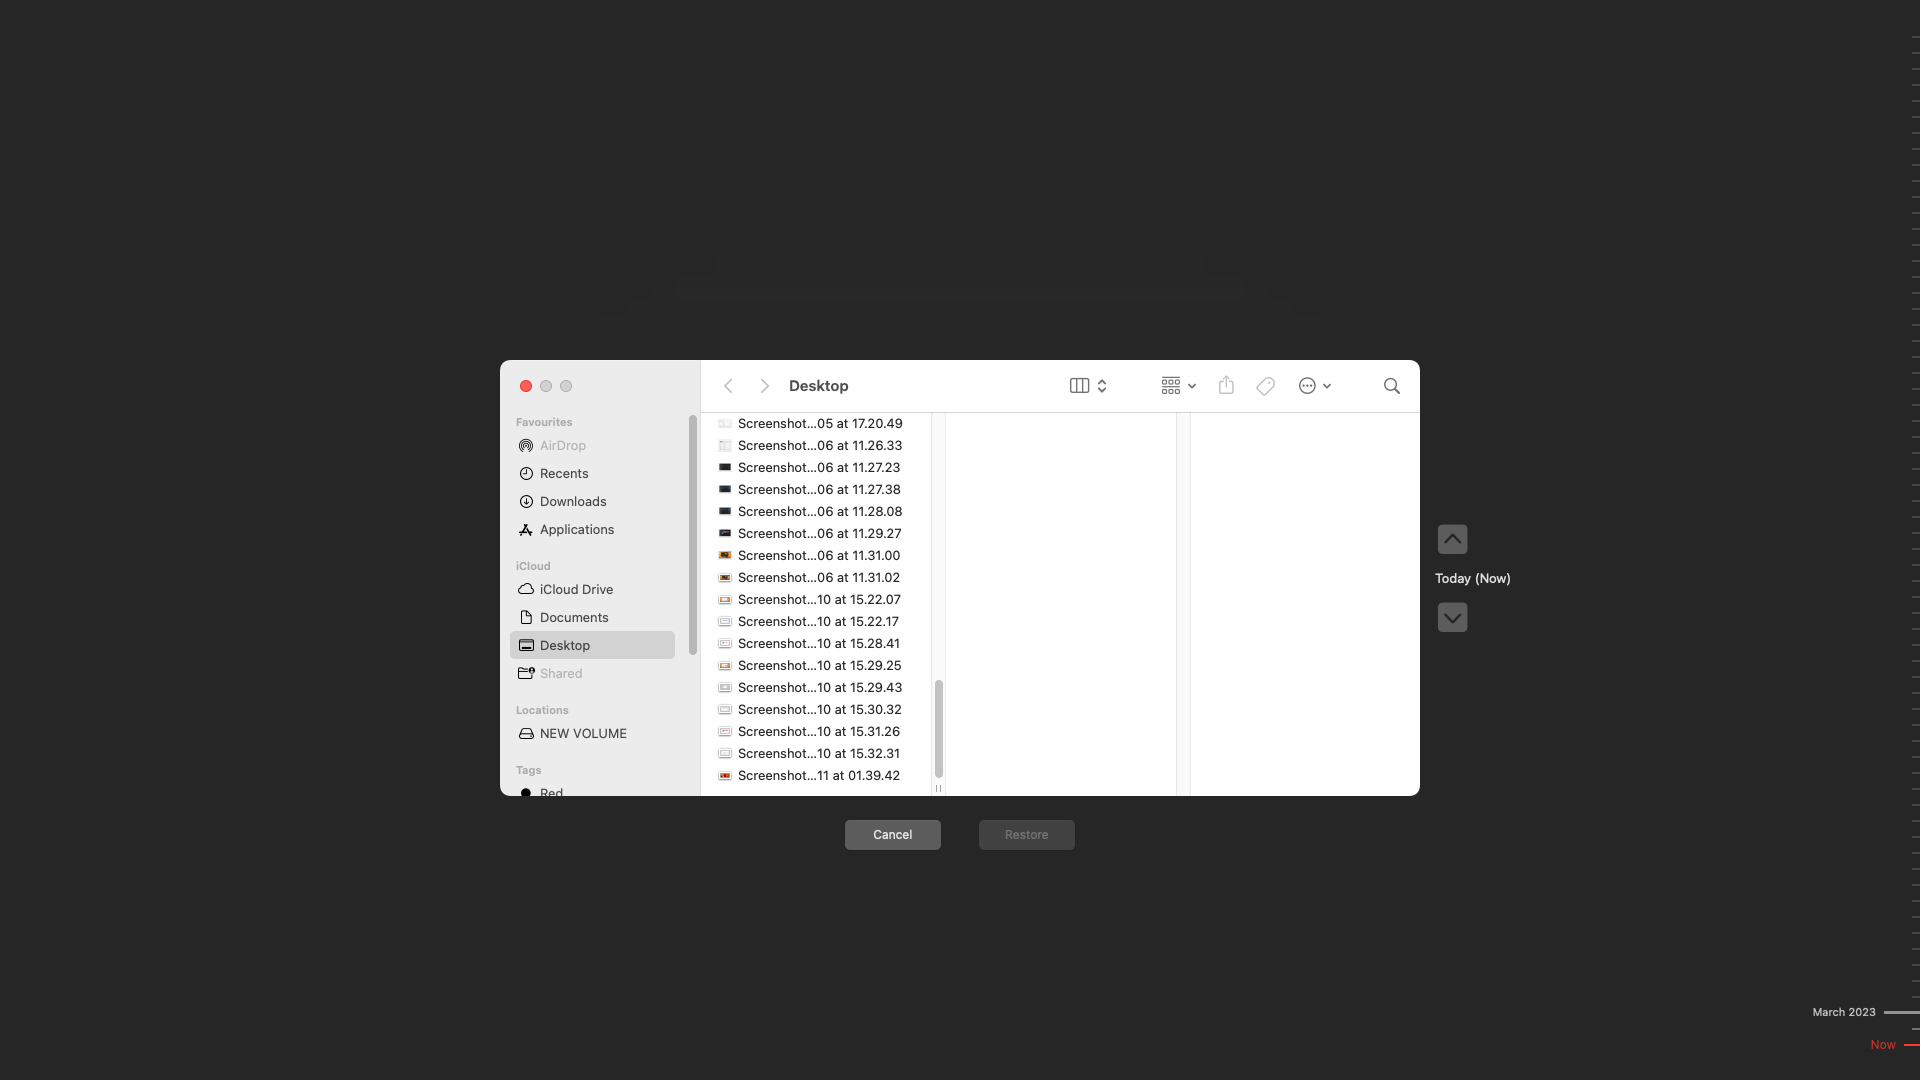
- Connect the external drive containing your Time Machine backups to your Mac. Or, if you don’t have it with you right now, you can still proceed – macOS may have saved local snapshots directly on your system drive, especially if not much time has passed since the screenshot was deleted.
- Click the Time Machine icon on the menu at the top of the screen and choose Enter Time Machine from the drop-down menu.
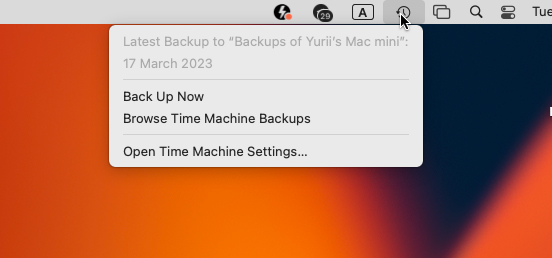
- Choose a backup version using the timeline on the right.
- Go to the folder where the deleted screenshot used to be located.
- Click the needed file to choose it and click Restore.
That’s it! The recovered screenshot should be placed back in its previous location.
Method 4:Recover Deleted Screenshots from iCloud
Depending on how your Mac’s sync settings were configured, you can recover deleted screenshots using your iCloud drive. This method will only work if you’ve enabled iCloud sync on your Desktop folder. Here’s how to get back deleted screenshots using iCloud:
- Open a web browser and visit iCloud.com. Log in.
- Click on Drive to open iCloud Drive.
- Click on Browse and open the Desktop folder, which is the default save location for screenshots.

- Select the screenshots you wish to recover and click on the Download button.
If you’re unable to locate your screenshots in the Browse tab, it’s recommended you check the Recently Deleted tab. But keep in mind that iCloud Drive syncs deletions across devices. That means if you delete a synced screenshot on your Mac (and then also empty the Trash), it will usually be removed from Recently Deleted in iCloud as well. The two trash bins are synchronized, so if it’s gone from one, it’s gone from both.
Why Screenshots May Disappear From Your Mac
There are several things that could lead to missing screenshots on your Mac. The most common reasons include:
| Reason | Description | Solution |
| Accidental deletion | In an attempt to clean out your Mac and organize your files, you may accidentally delete the screenshots you require. | If you deleted the screenshots less than 30 days ago, you can restore them from the Trash, provided you didn’t empty it. |
| Logical errors on your disk | If your Mac’s storage disk is not working as it should and is throwing up random errors, there could be logical issues on the drive. Data loss is also a symptom of a logically damaged drive. | Use the First Aid feature on your Mac’s Disk Utility to fix any errors on the drive. You can then attempt to restore the screenshots using a data recovery program. |
| Formatting the wrong disk | In an attempt to get a fresh start on your macOS, you may format the wrong disk, or forget to back up your screenshots beforehand. | As long as you didn’t pick the “Secure Erase” option while formatting, and you didn’t write a lot of new data to the disk, a capable data recovery program should be able to recover your screenshots. |
| Physical damage of the drive | Factors such as physical shock, water, power surges, and heat can all cause damage to the storage drive. This impacts hard drives more since they have numerous moving parts. | Physically damaged drives are best dealt with by experts. We recommend you contact a professional data recovery service to recover data in this scenario. |
Quick Recap
If we had to give you an express guide on how to find screenshots on Mac and recover them in just a few words, it’d go something like this:
- If you’re sure the screenshot wasn’t deleted and it’s just misplaced: Use Finder search, check Recents, try Spotlight, or even run a quick Terminal command. Also make sure it didn’t land in a random folder (or get grouped into a stack on your Desktop).
- If it was deleted recently: Check your Trash first. If it’s still there, use Put Back to restore it to its original location.
- If it’s not in Trash and you don’t have backups: You’ll need to try a data recovery tool. The sooner you do it, the better your chances (especially if you’re using an SSD).
- If you do have backups (Time Machine, iCloud, or otherwise): Go check them! That’s exactly what backups are for, and restoring a screenshot this way usually takes just a few clicks.
FAQ
- Download and install a Mac-compatible data recovery program. Make sure to install it on a different drive than the one where your screenshots were deleted (if possible) to avoid overwriting recoverable data.
- Launch the software and select your Mac’s drive.
- Allow the tool to scan through the drive for deleted image files.
- Review the results. Most tools let you filter by file type and also offer a preview feature, so you can open screenshots and confirm their contents.
- Select the screenshots you want to recover.
- Choose a location to restore them to. Ideally, save recovered files to an external drive or separate partition to avoid overwriting anything else.
- Recover the files.
- Check iCloud Drive’s Recently Deleted folder (if Desktop & Documents syncing is on).
- Use Time Machine, even if your external backup drive wasn’t connected. macOS may have created local snapshots that allow you to restore deleted files from earlier versions of a folder.
- Use data recovery software. Tools like Disk Drill or PhotoRec can scan your disk for deleted screenshots, especially if they were recently removed. The sooner you act, the better your chances.
- Press Command + Space to open Spotlight.
- Type kMDItemIsScreenCapture:1 in the search bar.
- All your screenshots will show up in Spotlight.
- Right-click on your Desktop and see if “Use Stacks” is enabled. If it is, screenshots might be grouped into a single “Images” stack. Click it to expand and reveal them.
- Press Shift + Command + 5, click Options, and check the “Save to” setting. If it’s set to a custom folder, your screenshots may go there instead of the Desktop.
- If you held Control when taking the screenshot, the image went to your Clipboard, not your drive. Try pasting (Command + V) into Preview or Notes.
- Use Finder’s search bar and enter kMDItemIsScreenCapture:1 or search kind:screenshot in Spotlight to locate all screenshots, regardless of where they’re stored.
- Some third-party cleaners or system maintenance tools might delete screenshots automatically if they’re in temporary folders. Check app settings or disable auto-cleanup features.


