 Although XQD cards aren’t as common as they used to be, they remain a reliable and convenient method of storage for cameras that support them. However, they are not invulnerable to data loss, and you must act quickly if you want to recover your lost photos and videos should they disappear. Read on to learn how you can recover deleted files from XQD cards.
What Is an XQD Card
XQD cards were developed as the successor to CompactFlash. They were created to fulfill the growing needs of camcorders and cameras that were beginning to shoot in high definition and high resolution. As they are designed for prolonged heavy use in various environments, their durability is exceptional, being shockproof, magnet-proof, anti-static, and more resistant to physical damage. Additionally, they offer transfer speeds up to 1 GB/s (version 2.0), ensuring they don’t bottleneck the performance of higher-end cameras.
Although XQD cards were succeeded by CFexpress cards, they remain a durable and reliable form of storage for videographers and photographers alike. However, they’re not impervious to data loss. If you have an XQD card that has recently faced data loss, you need to begin XQD card data recovery immediately.
What Factors Affect Data Recovery
Every case of data loss is unique, but one thing is for certain: there is never a guarantee that your data will be recoverable. This is due in part to several factors:
- Continued card usage – Using any drive after it has sustained data loss will decrease your chances of recovering the data. XQD cards are no exception. In a deleted state, every action risks new data overwriting that which you want to recover, permanently erasing it.
- Type of data loss – All data loss is bad, no doubt. However, the type of data loss also plays a role in determining your chances of data recovery. In essence, this can be split into two categories: logical and physical, with data loss due to physical damage being the more severe of the two.
- Data recovery method used – Not all data recovery software is created equal. You’ll find that some tools specialize in certain recovery methods, while others may only work when scanning certain file systems.
- Condition of the XQD card – You shouldn’t recover data directly from an XQD card in a damaged state. Instead, make a copy of it and recover the data from that. This is because the added stress of scanning the card may cause it to become unusable.
That isn’t to say that data recovery shouldn’t be attempted; rather you should keep these factors in mind before you attempt data recovery to both improve your chances and manage realistic expectations.
How to Recover Files Deleted From an XQD Card
For XQD card data recovery, you’ll need a recovery solution that excels in recovering data from FAT32 and exFAT file systems. If the card’s file system is in an unusable state, then the ability to recover a multitude of file formats by signature is the next best option. Ideally, the software you use will include both.
For this, Disk Drill is a good option. It’s able to quickly and effectively recover data from FAT32 and exFAT file systems, and it also includes a very capable signature scanner that it can fall back on if the file system records prove unusable to find data. While it can be considered free XQD card recovery software if you stay under the 500 MB limit, a Disk Drill PRO license is required for anything above that.
If your XQD card is in an unstable state, it’s a good idea to create a byte-to-byte copy and scan that instead.
Follow these steps to recover files from an XQD card with Disk Drill:
- Download and install Disk Drill.
- Connect your XQD card to your computer and select it from the device list (or select the byte-to-byte copy if you created one). Click Search for lost data.
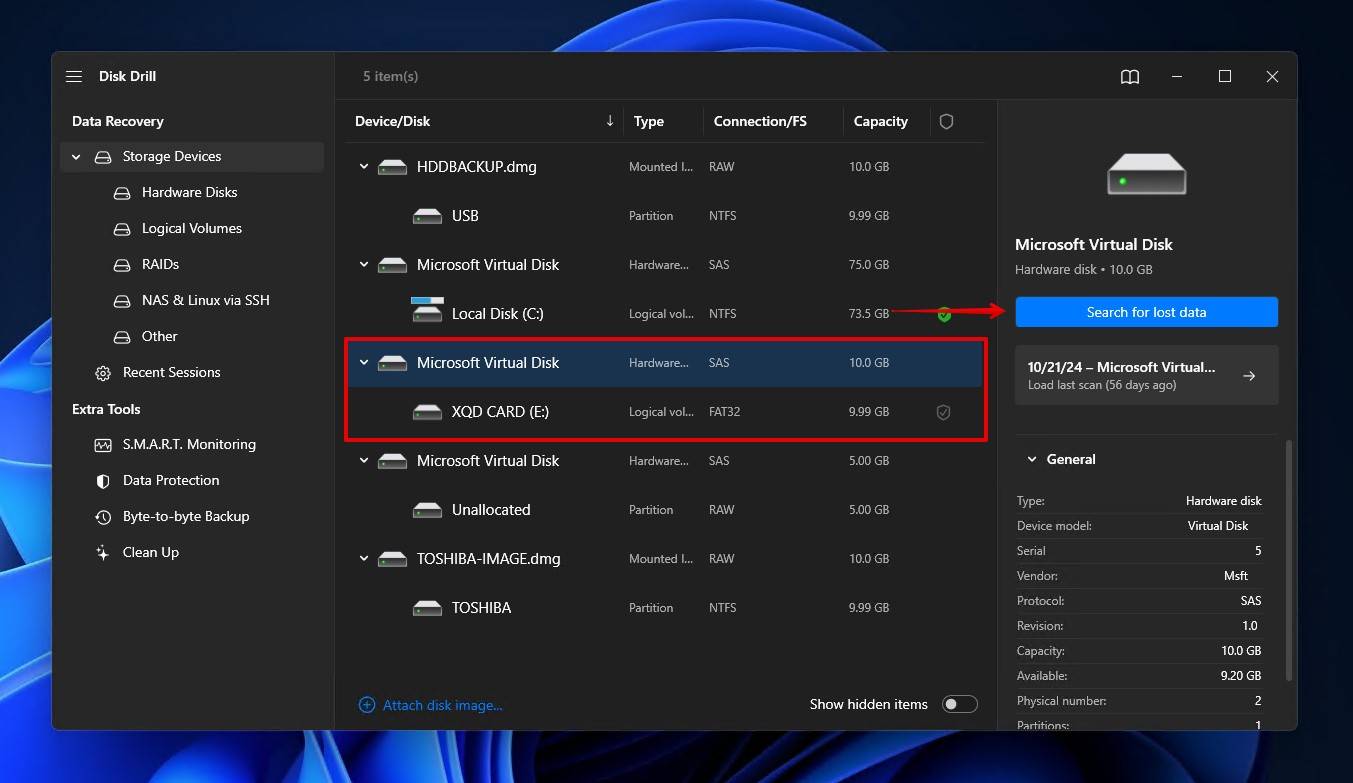
- Click Review found items once the scan is finished. Alternatively, if you just want to recover everything that was found, click Recover all.
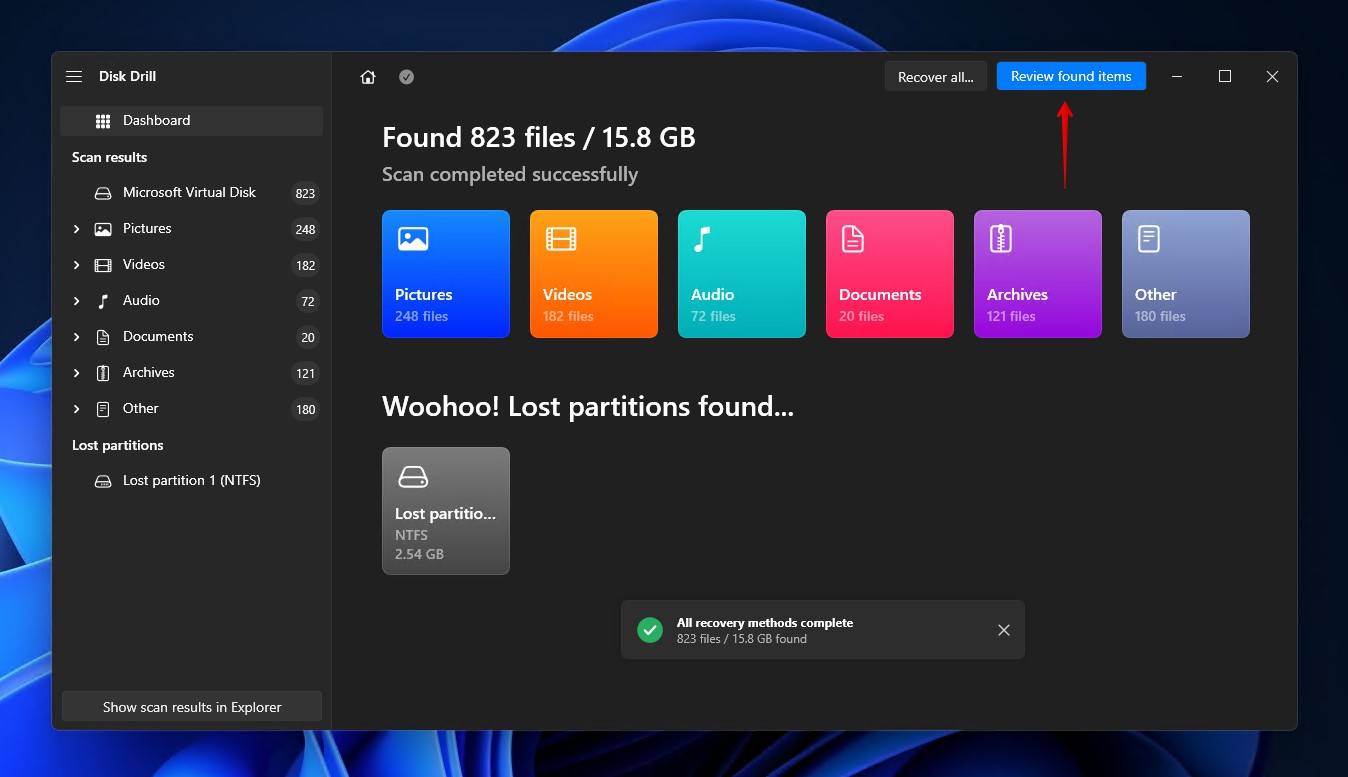
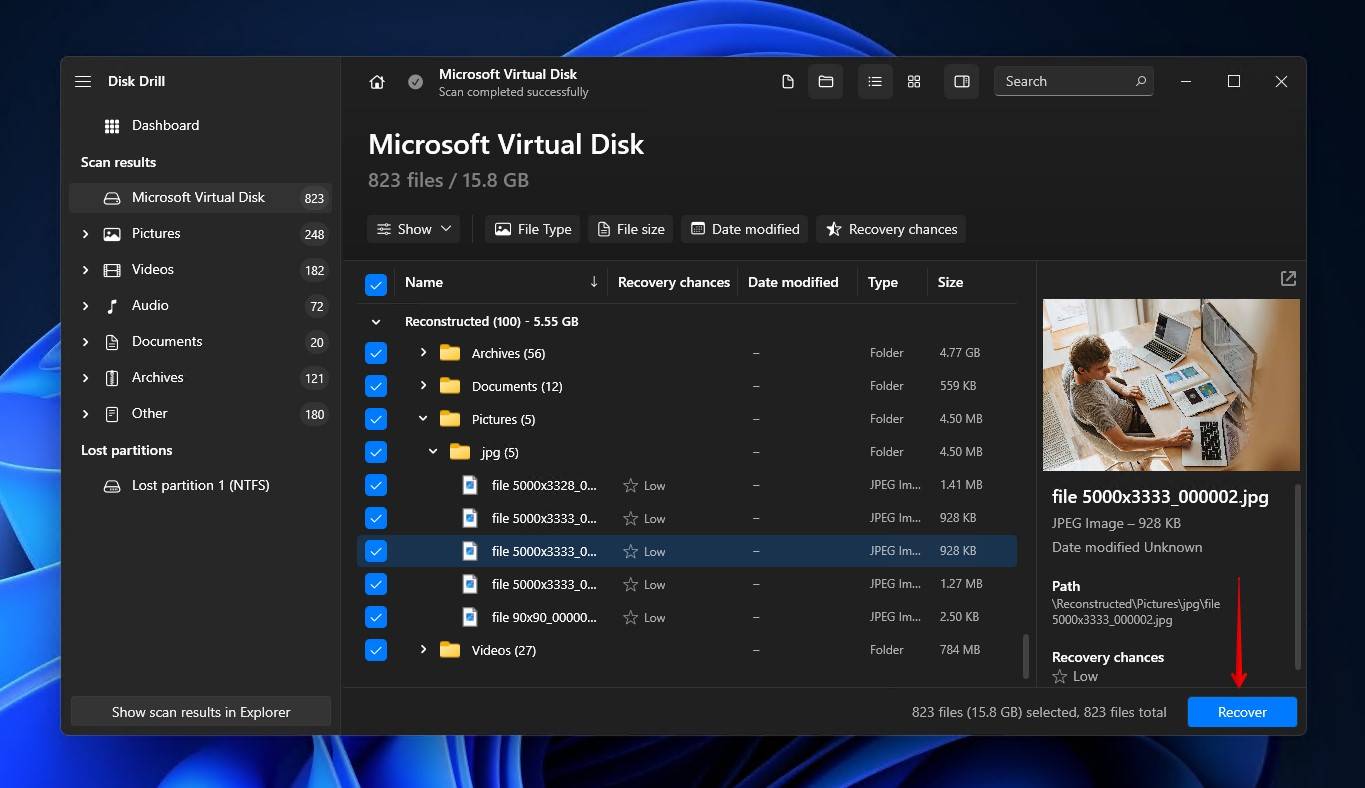
- Mark the files that you want to recover. Make use of the preview function to confirm your files are intact. When you’re ready, click Recover.
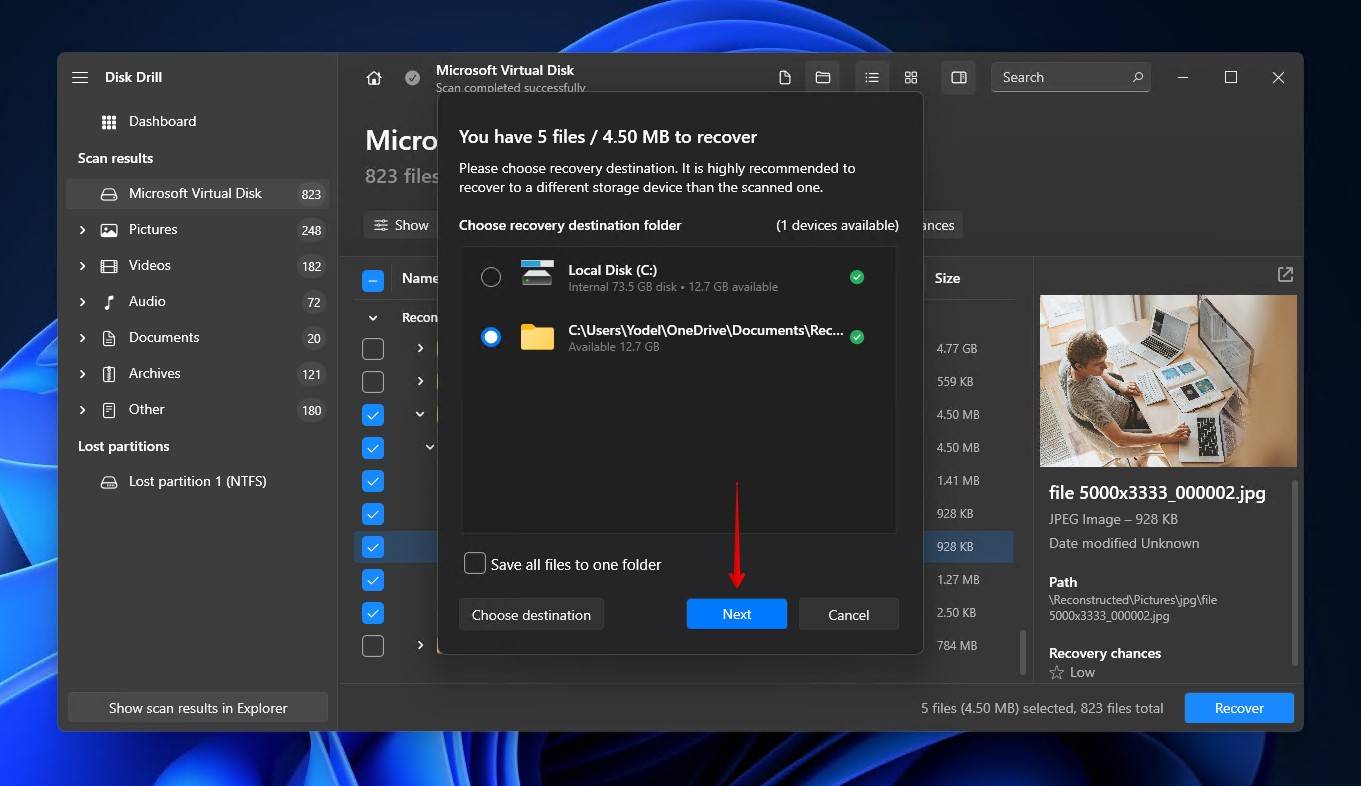
- Select an appropriate recovery location. Do not choose a location on the same XQD card you’re recovering from. Click Next to complete recovery.
Because SD cards share many similarities with XQD cards, Disk Drill is also a great option for recovering deleted photos from SD cards that have suffered from data loss.
How to Recover Data from a Corrupted XQD Card
Severe corruption, whether logical or physical, can lead to the data becoming unrecoverable through the use of data recovery software. This is because something has stopped the XQD card from being recognizable, not only in File Explorer but also in Device Manager and BIOS. In cases like this, your only option is to rely on a data recovery service.
Sending your card off to a data recovery service is considered the last resort because, while it does yield the best results, it is by far the most expensive option. This is because you’re employing a professional to recover the data using industry-grade equipment in a controlled environment.
This is the process typically used by a data recovery service:
- Complete a work order detailing what the problem is, the type of storage media, and what you hope to recover from the card.
- You pack and ship the XQD card off to the recovery center.
- A quote will be created based on the assessment of the damage.
- After your approval, the data is recovered and returned to you on a healthy storage device.
How to Prevent Data Loss From XQD Cards
There are actions you can take to actively care for your XQD card and the data stored on it to reduce the chances of a data loss event occurring. Take a look at our recommended tips below:
| Suggestion | Description |
| 💽 Make backups | Backing up your data is the only guaranteed way of protecting it against data loss. If your XQD card faces a similar event in the future, a copy of your data can easily be restored, saving you the time it takes to perform data recovery. |
| ⏏️ Eject safely | When disconnecting your XQD card from your computer, always be sure to eject it safely. Doing so will ensure delicate read-write operations have been stopped. Immediately removing the XQD card without doing so safely can result in data or file system corruption. |
| ❄️ Be wary of temperatures | XQD cards have a specified operating temperature range. Anything outside of this can damage the card. For example, a Sony XQD card (G Series) has an operating temperature of -13 to 149°F / -25 to 65°C. Therefore, if you’re a traveling photographer, take note of the conditions you’re shooting in. |
| 🗃️ Store it somewhere safe | Although XQD cards are made to be rigid and durable, going the extra mile to keep them safe can prolong their life. Consider getting a storage case for your XQD cards and other portable flash media, so they’re always organized and protected. |
Of all of the suggestions mentioned above, making backups is the most important. You can do this simply by copy/pasting your files to another storage medium, uploading copies to a cloud service like OneDrive or Google Drive, or using a Windows backup utility like File History or Backup and Restore.
Conclusion
Lost or deleted files can be recovered from an XQD card using a data recovery tool, or in worse cases, a data recovery service. The recoverability of your data depends on a number of factors, including how much the card has been used since the data loss occurred, what type of issue caused the data loss, and the data recovery algorithms used for recovery.
The recovery process is easy enough, whether you choose to do it yourself with software or enlist the help of a professional. Once your data is recovered, it’s a good idea to create a regular backup schedule to ensure a safe copy of your data is always on hand.
FAQ:
- Connect the XQD card to your computer.
- Right-click Start and open Disk Management.
- Right-click the volume of your XQD card and click Format.
- Choose the desired file system and make sure Perform a quick format is selected. Click OK.
- Click OK.
