 SD card errors are one of the most frequently encountered issues by Canon users. While these problems usually crop up in old memory cards that are at the end of their lifetime, relatively new cards aren’t immune to these errors either. Fortunately, Canon memory card errors typically have an error code accompanying them, which makes diagnosing the problem easier. If your Canon camera is displaying any such error, read on to know what it means and what you can do about it.
Common Memory Card Error Codes and What They Mean
The memory card error on your Canon camera will have an error code. You can use the error code to figure out what type of SD card problem you’re facing and the potential ways to fix it.
Here’s a table to guide you through the errors:
| Error Code | Description |
| Err 02 | The camera is unable to access the SD card. This usually happens when the SD card is physically damaged or improperly connected to the camera. |
| Err 03 | The folder structure is too dense, i.e., there are too many folders on the memory card. |
| Err 04 | The SD card is out of free storage space. |
| Err 10 | A data file problem has occurred. This can be an indicator of a corrupt, incompatible, or missing file system. |
| Err 99 | The camera is unable to shoot. This can either indicate problems with the SD card, or lens connection issues. |
How to Avoid Losing Your Photos When Fixing the Canon Memory Card
It’s recommended that you back up all your photos from the SD card, as some fixes in the next section include formatting your SD card, which deletes all its files. Additionally, if the memory card is severely corrupted and irreparable, it’s best to move your data to a secure place as soon as possible.
The ideal way to back up your photos is to create a disk image of the memory card. A disk image is essentially a soft copy of the storage drive. If your memory card is corrupted, it may be impossible to manually copy your files, and you can also use the disk image to recover data from the SD card, without stressing it further.
The most user-friendly way to create a disk image of your Canon memory card and recover data from it is to use Disk Drill. It lets you create, mount, and scan disk images for data within one interface. The cutting-edge data recovery algorithm maximizes the chances of a complete data recovery, even if the SD card is corrupt. It also recognizes all major photo and video formats, including CRW files.
Step 1: Create a Disk Image
- Download Disk Drill and install it.
- Connect the SD card from the Canon camera to your PC.
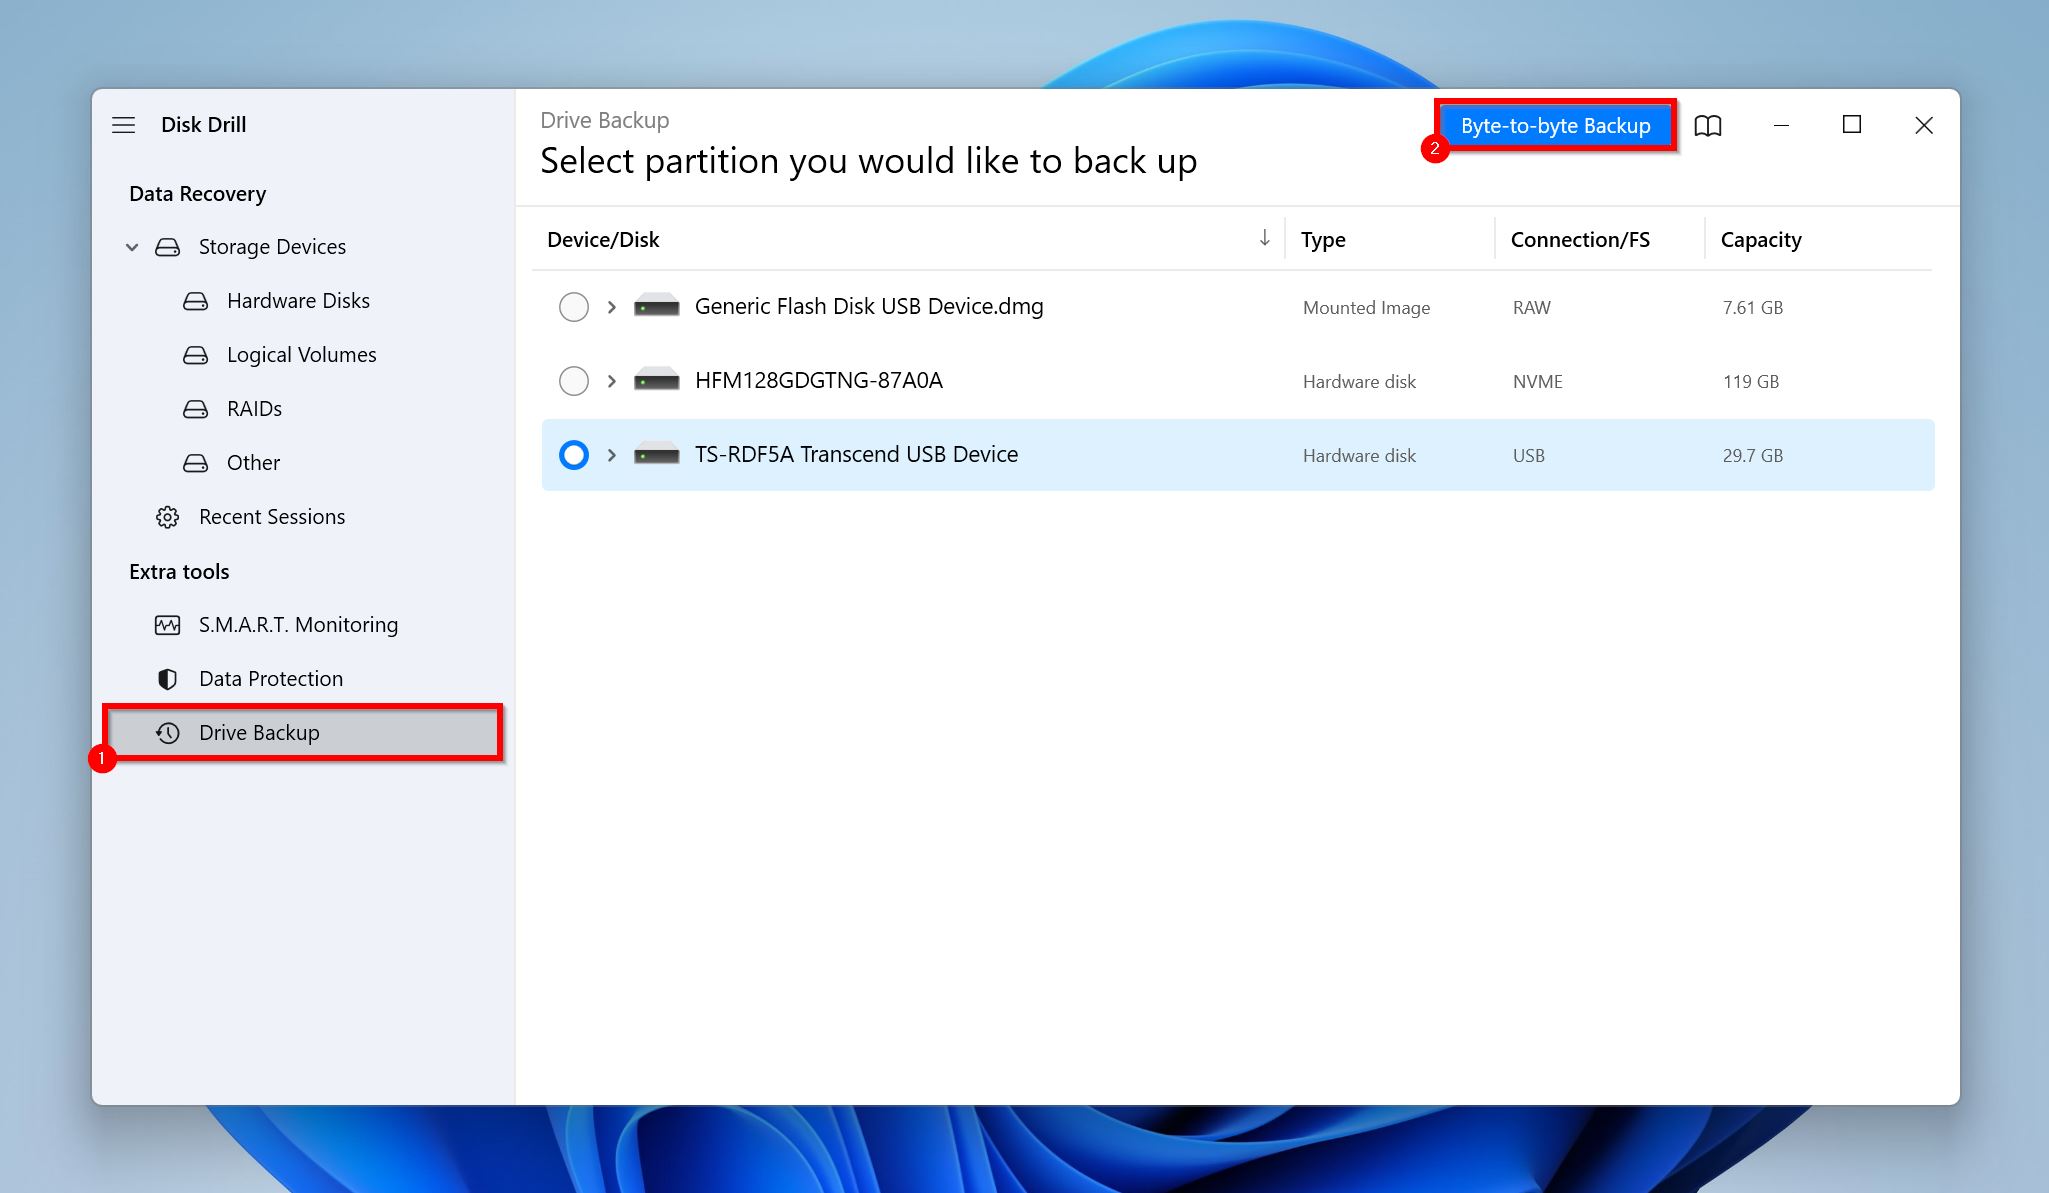
- Open Disk Drill, and click on Drive Backup under Extra Tools.
- Select your memory card and click on Byte-to-byte Backup.
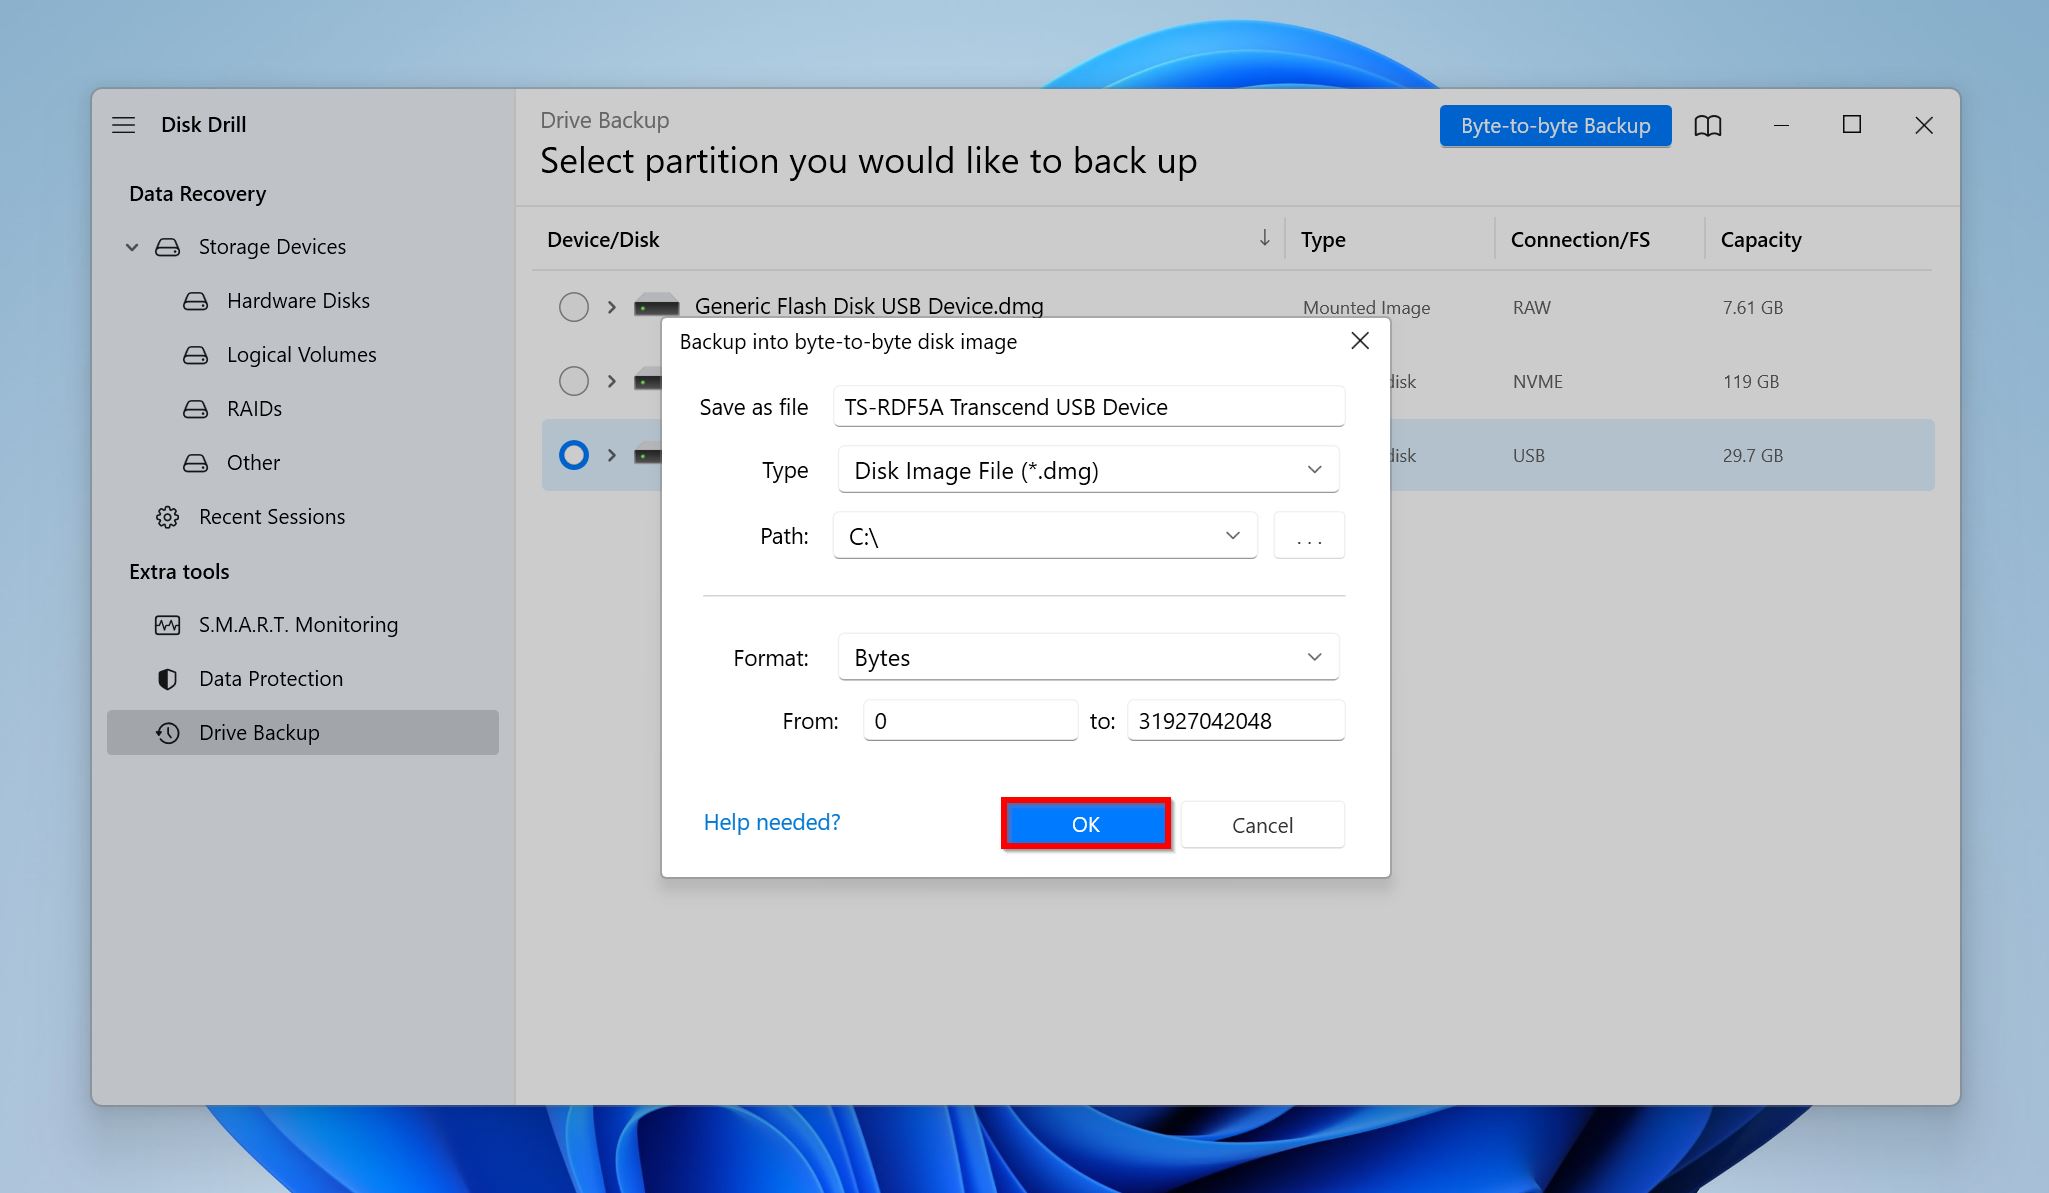
- Choose where you wish to save the disk image and click OK.
- Disk Drill will create the disk image.
Step 2: Scan the Disk Image for Recoverable Data
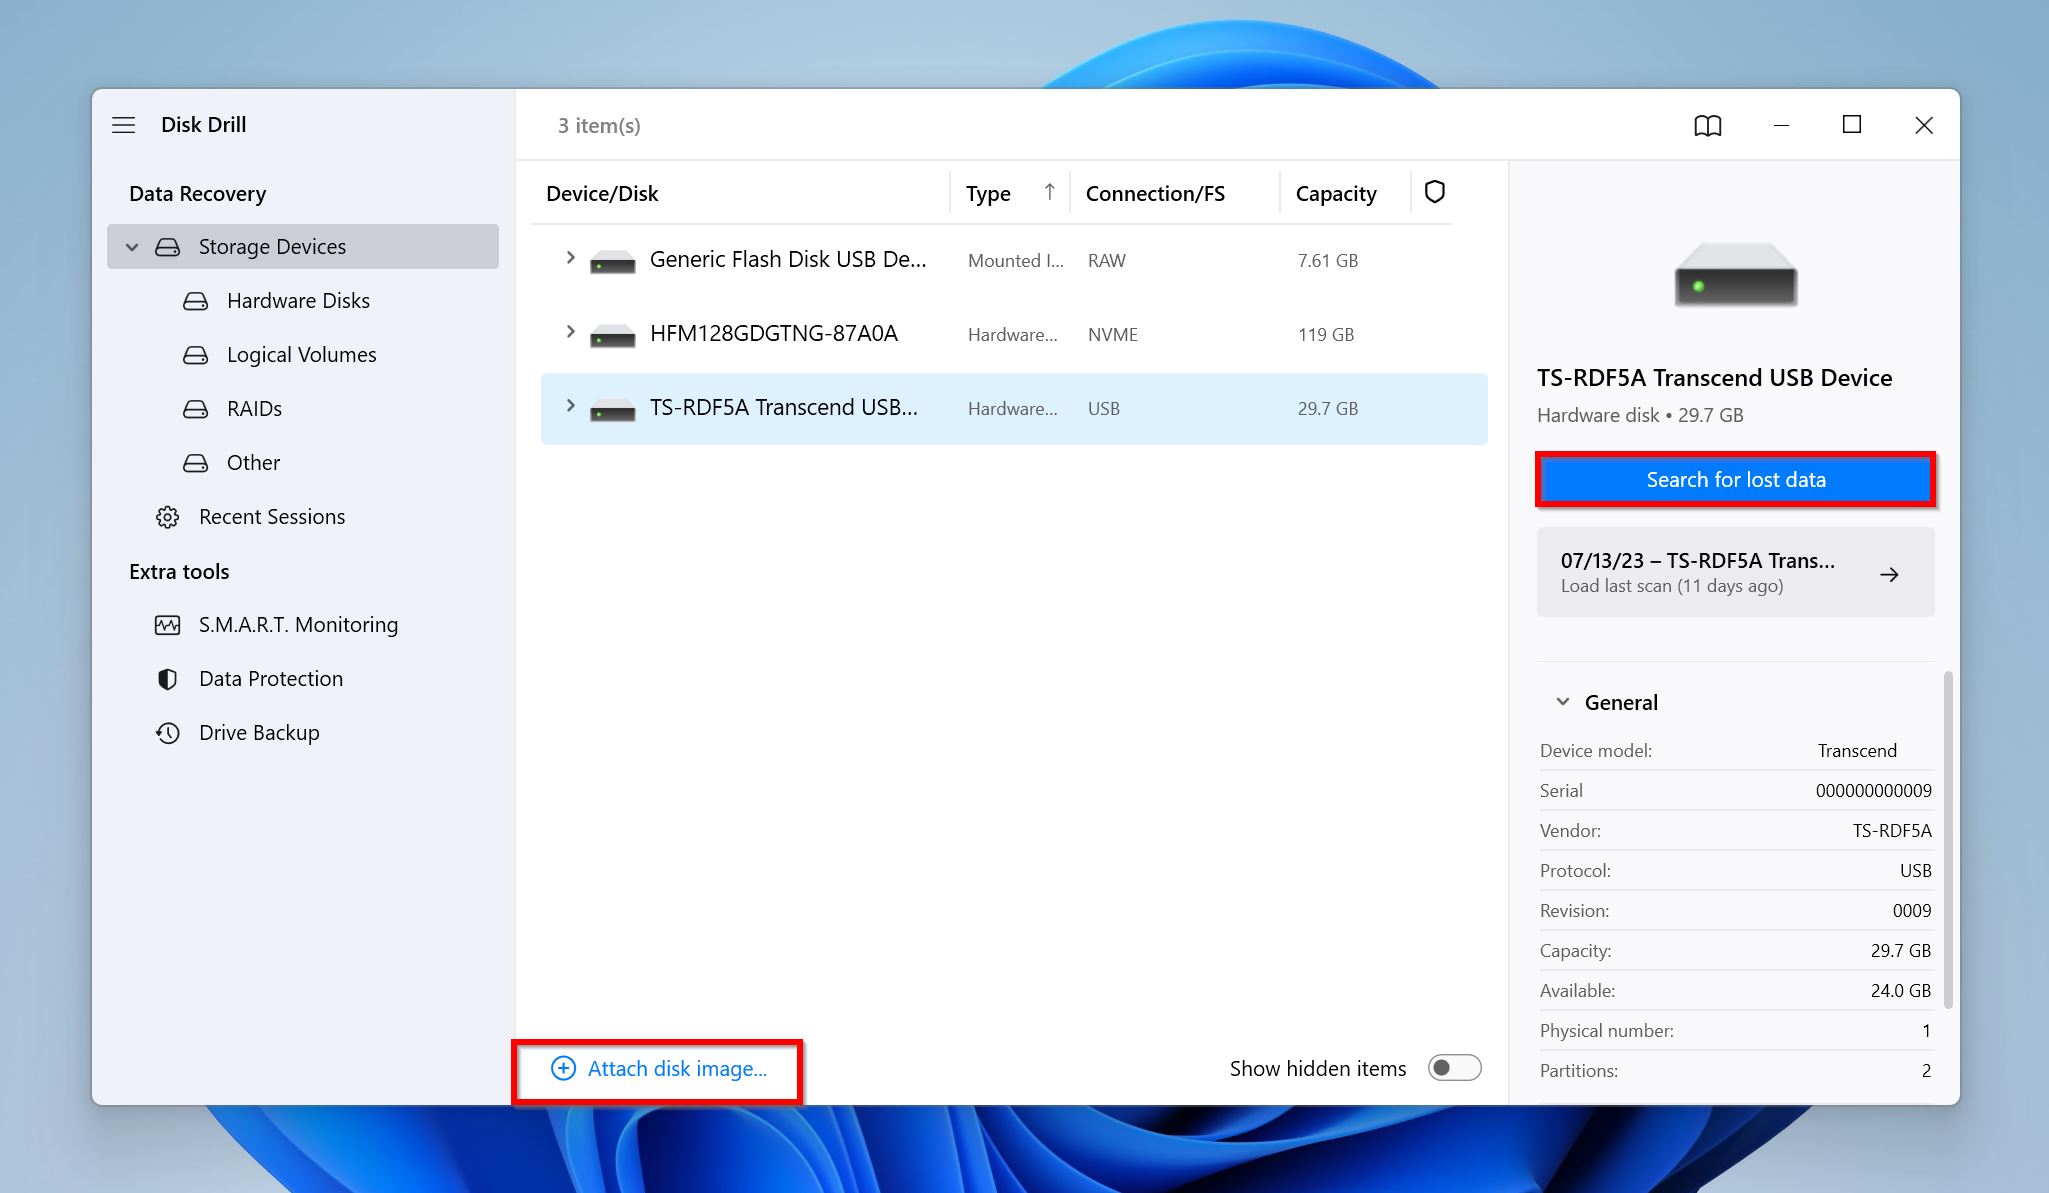
- Open Disk Drill and ensure you’re on the Storage Devices screen.
- Click on Attach disk image, browse for the disk image you’d created earlier and double-click on it.
- Select the mounted disk image and click on Search for lost data.
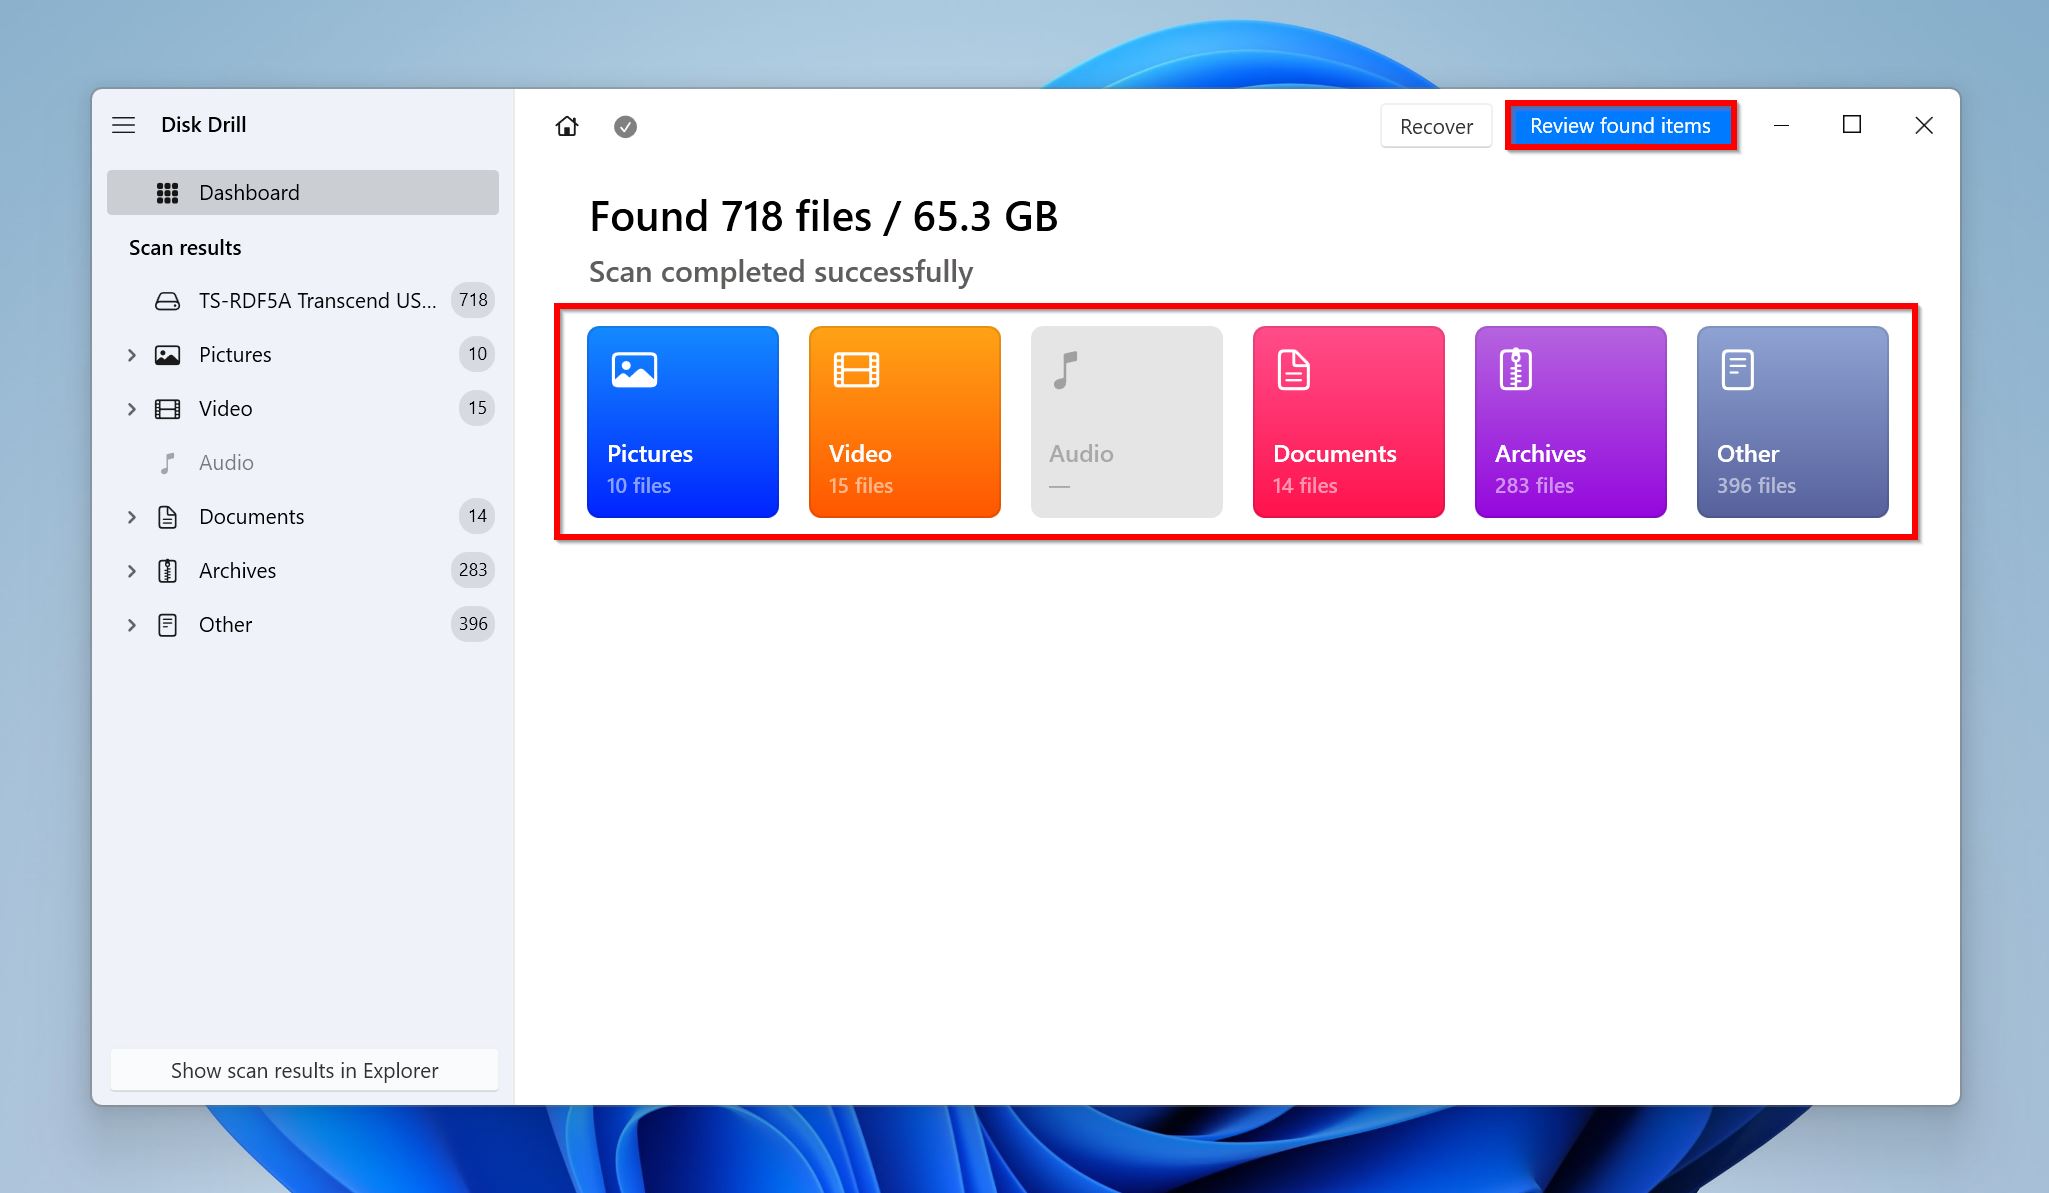
- Click on Review found items to view all recoverable files on the memory card. Alternatively, you can click on the Pictures or Videos option to filter out the results.
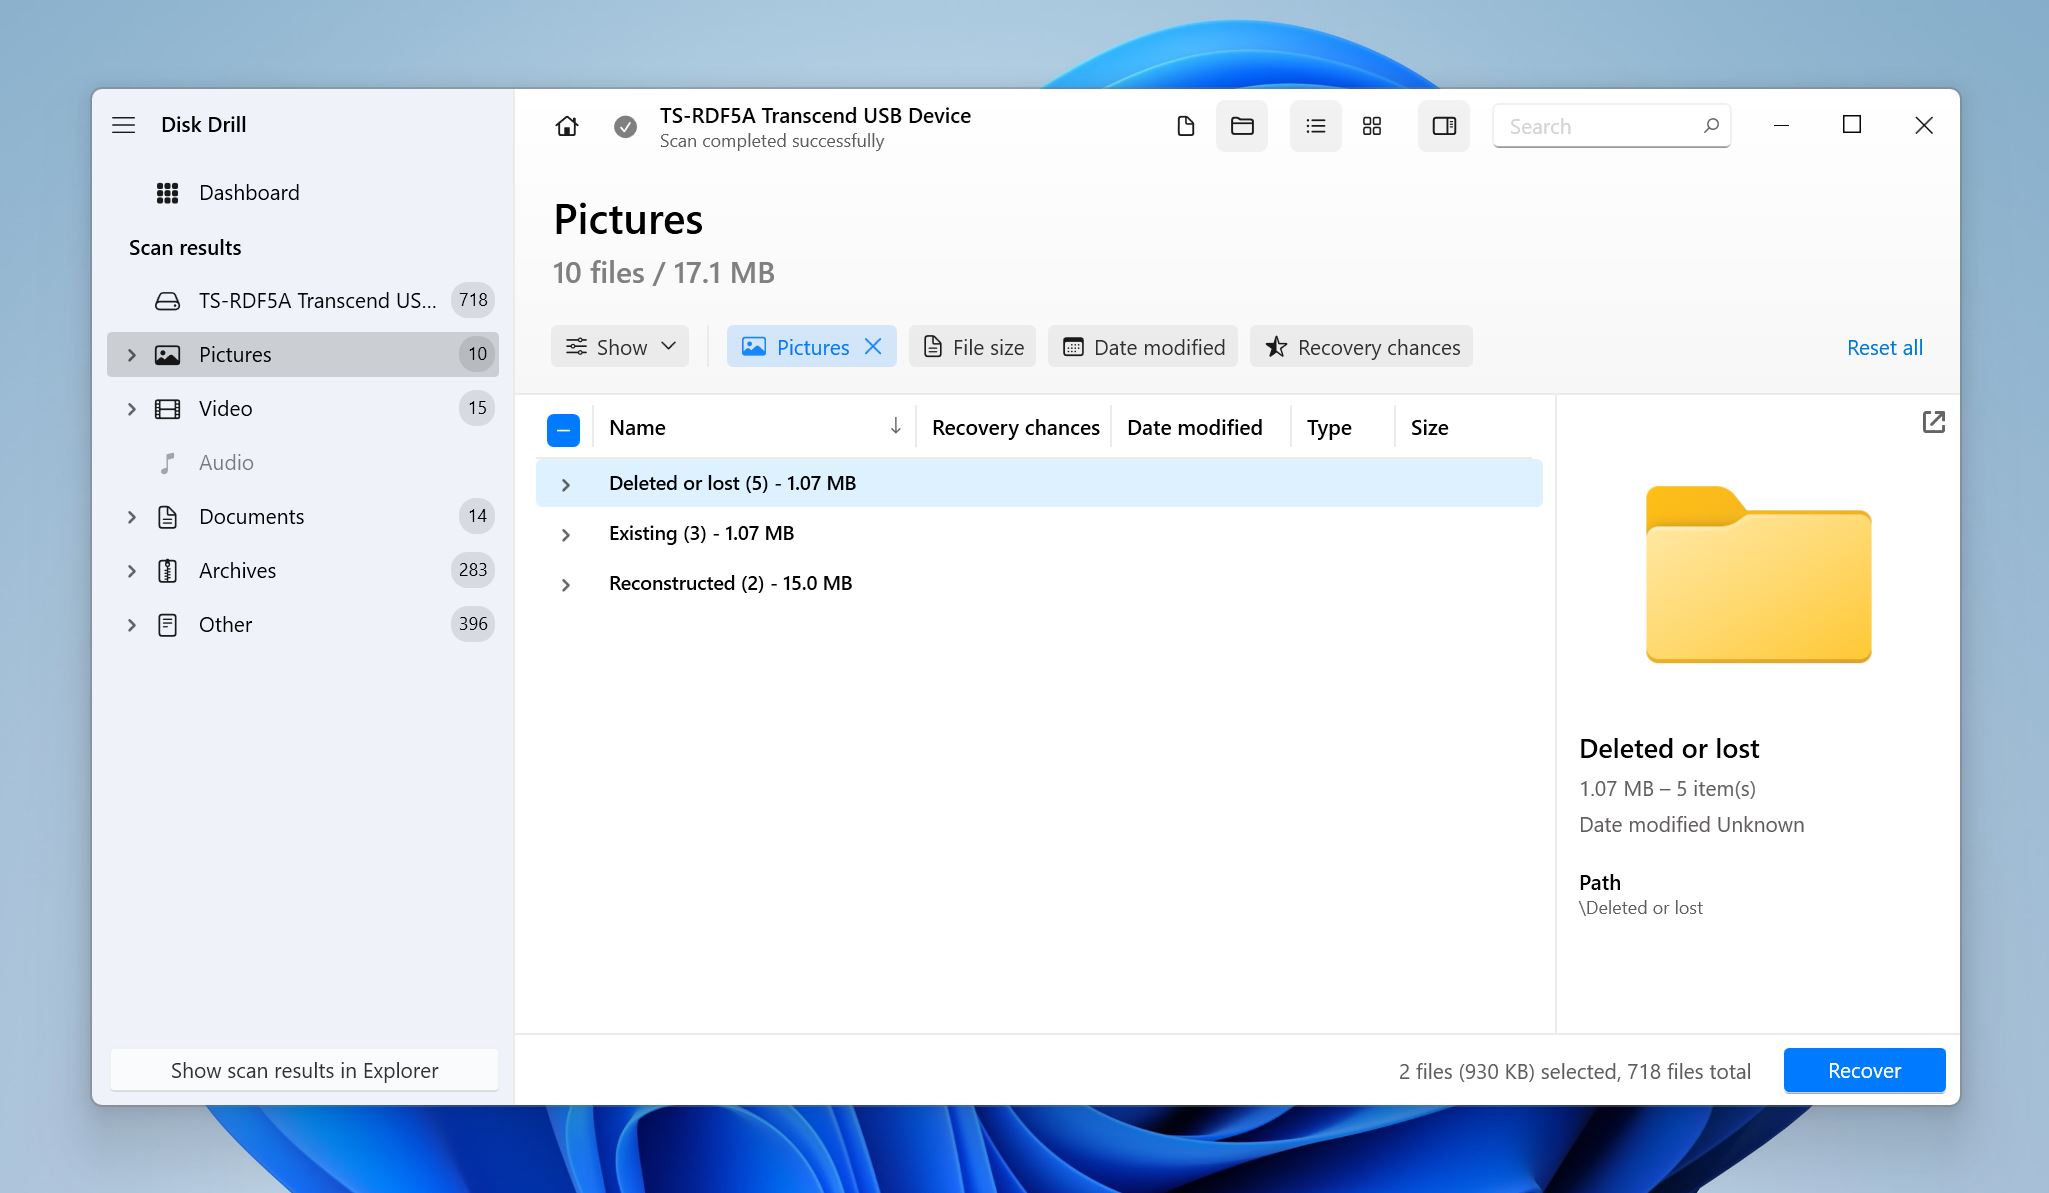
- Expand the Existing section to view the currently stored files on your SD card. If you wish to recover data that was deleted or went missing earlier, expand the Deleted or lost and Reconstructed sections.
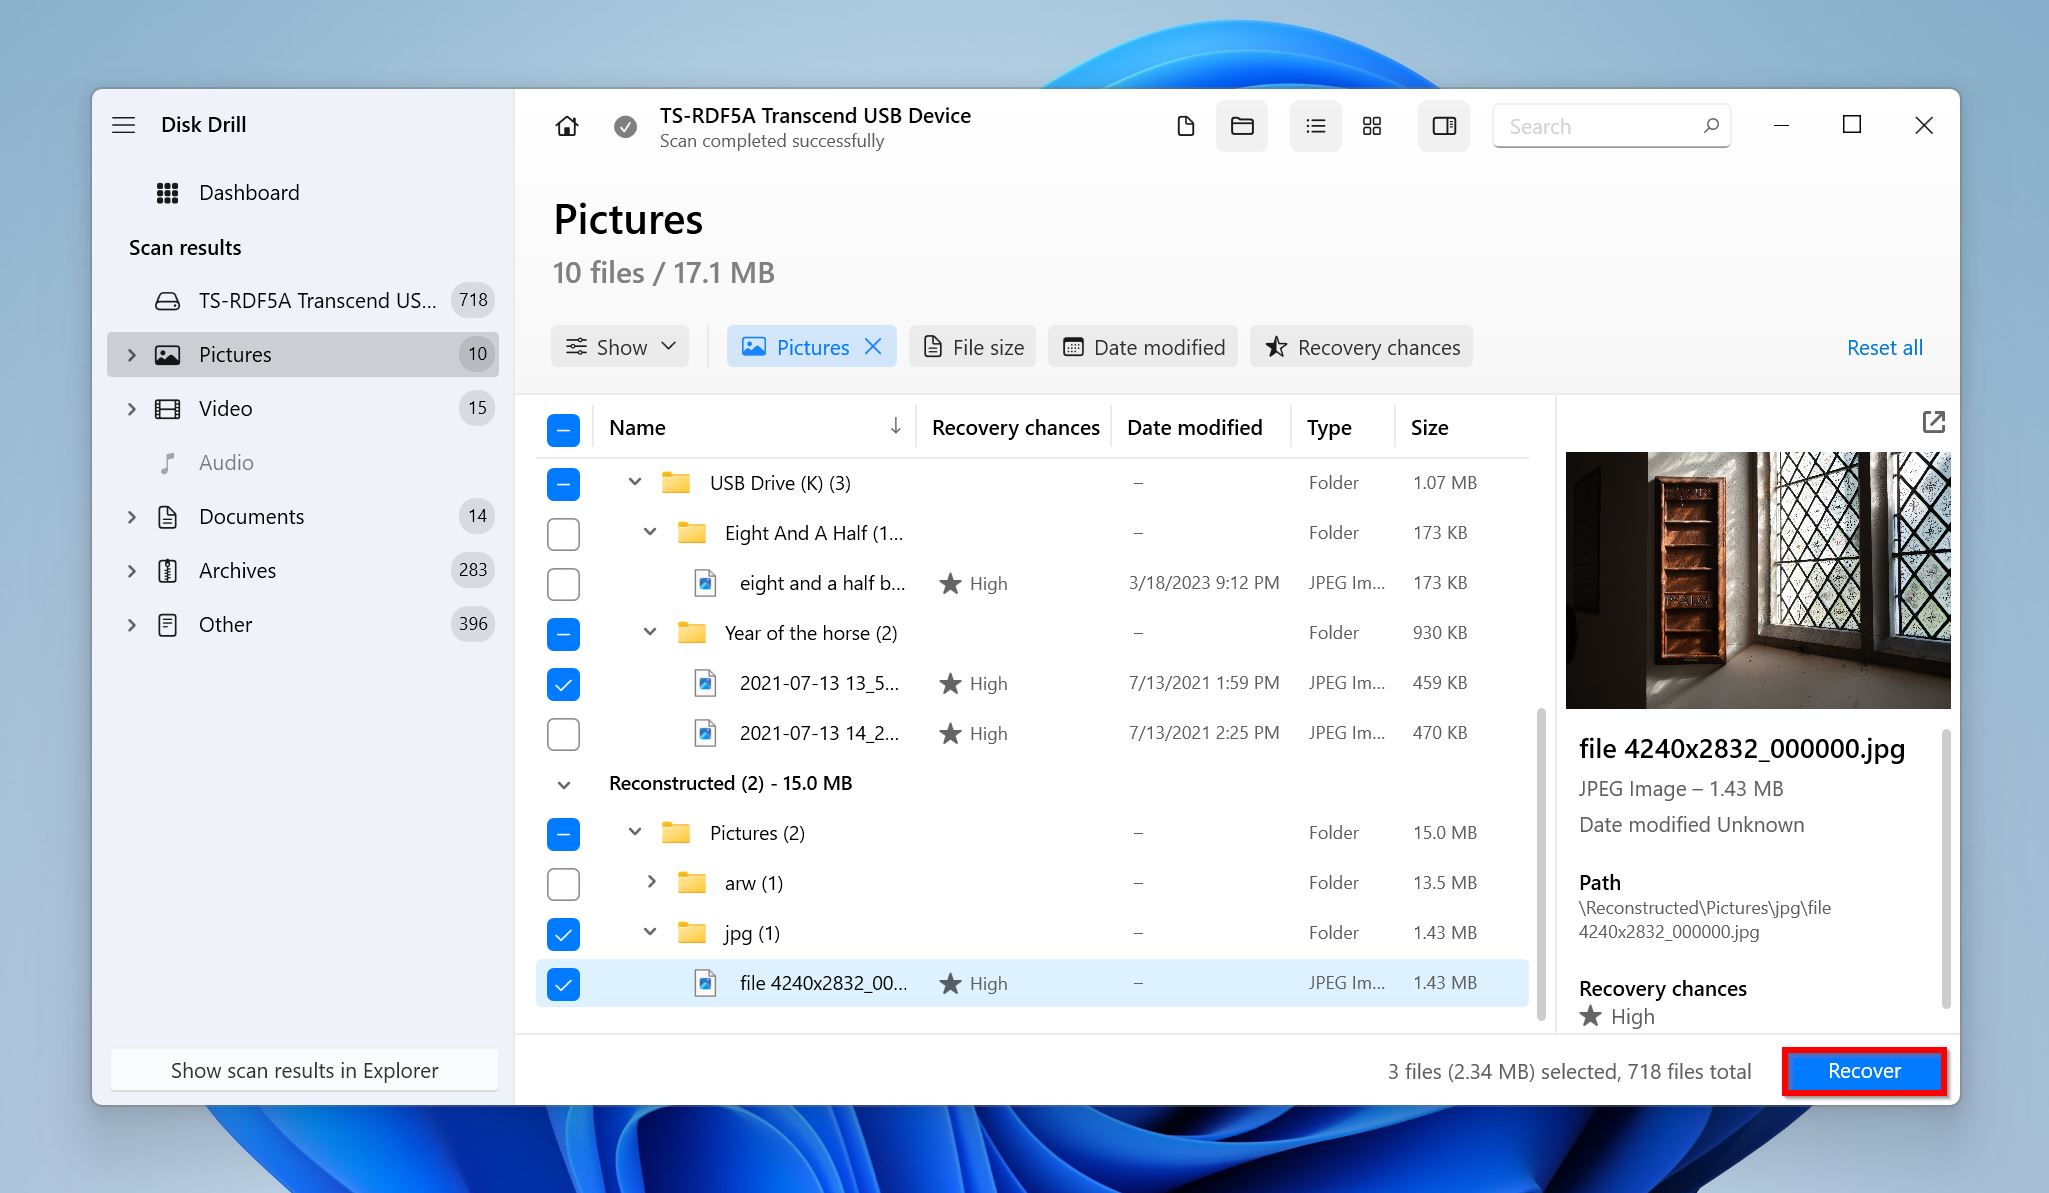
- Select the files you wish to recover. Disk Drill displays a preview of the currently selected file, but you can manually preview files by clicking the eye icon next to their filename. Click on Recover.
- Pick a recovery destination for the files and click Next.
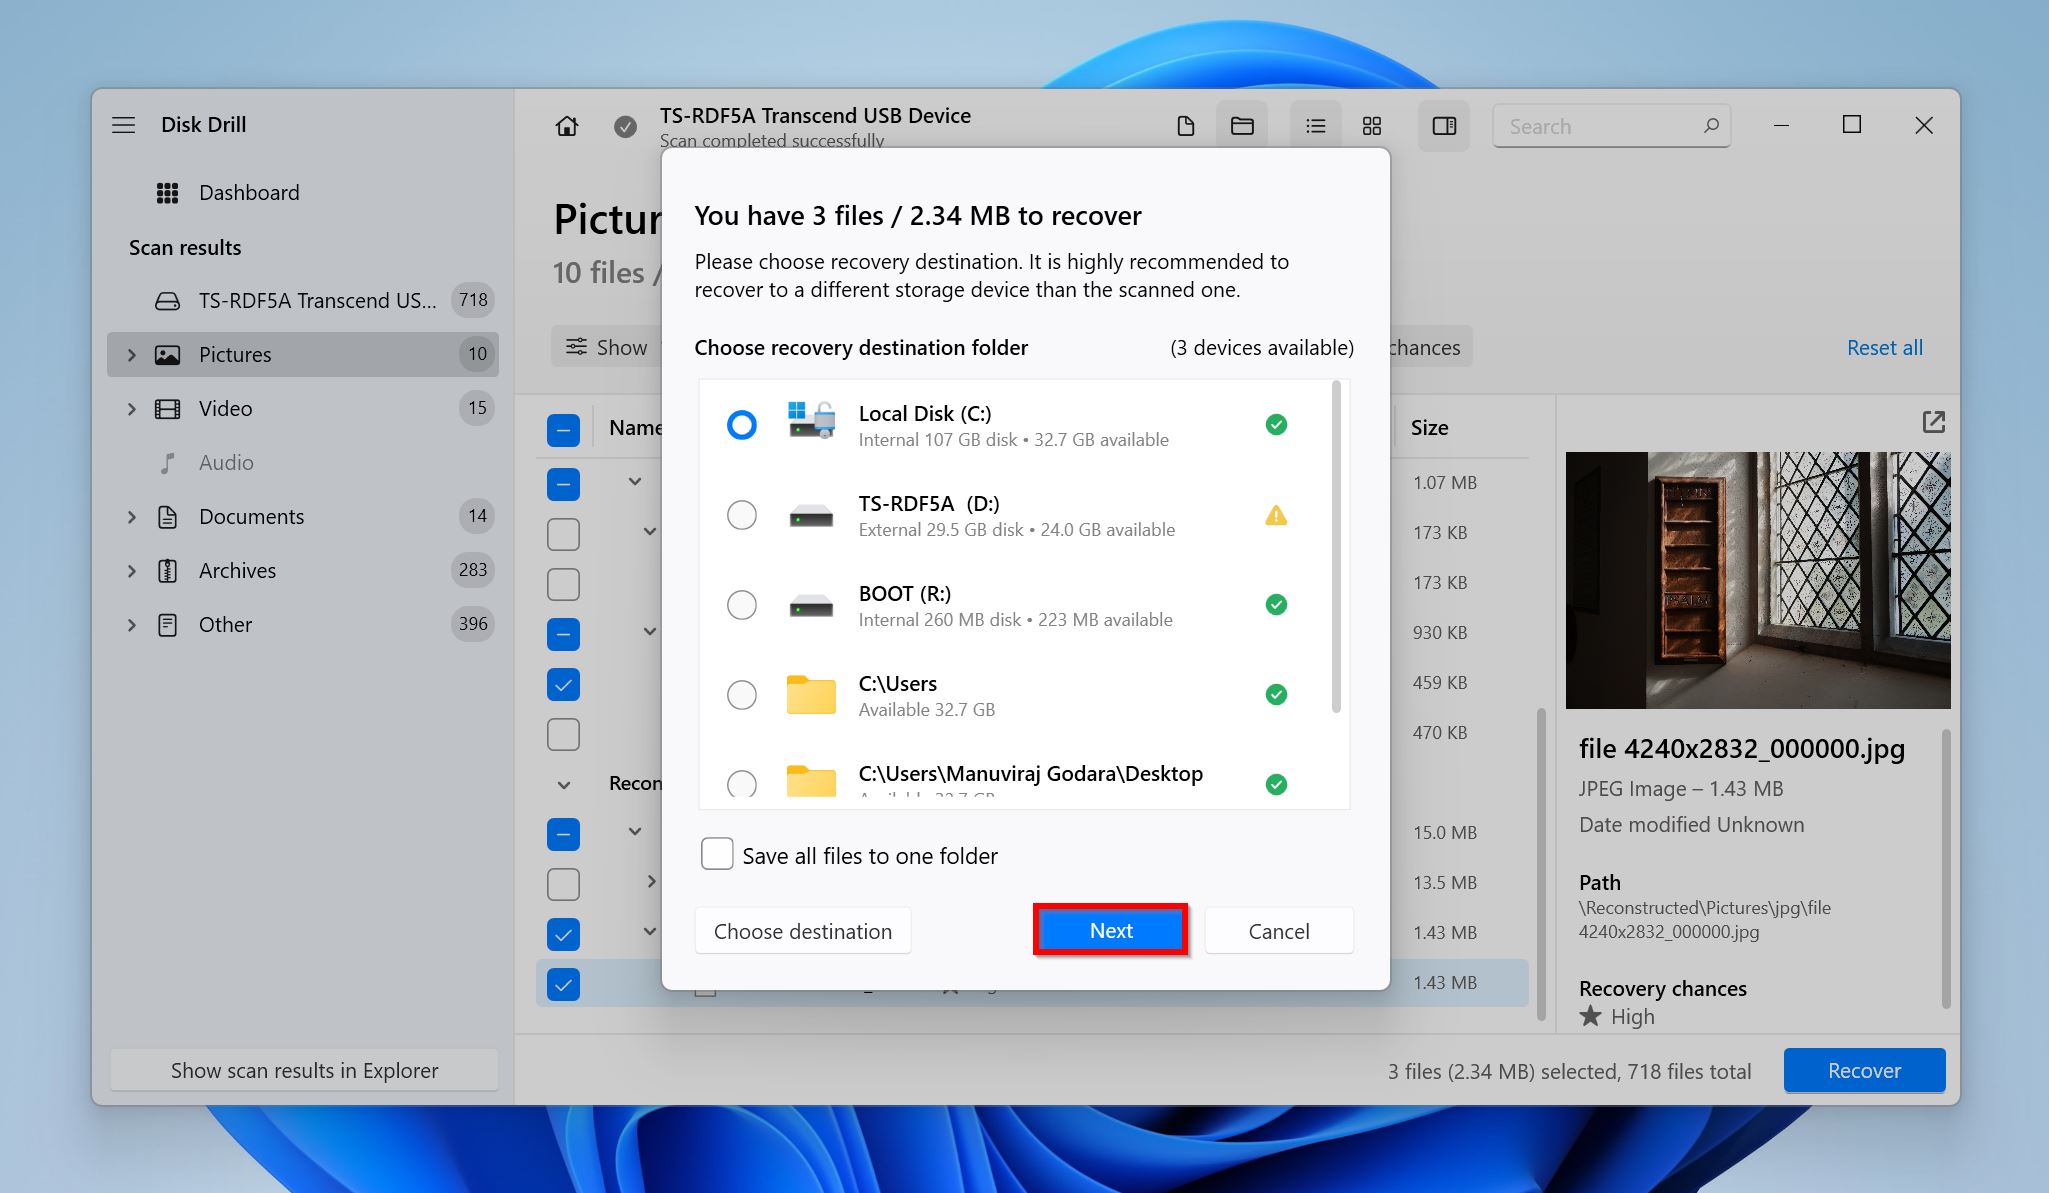
- Disk Drill will recover the selected files. You can recover up to 500 MB of data for free on Windows. Further recovery requires a paid license.
How to Fix Canon Memory Card Errors
Depending on the Canon memory card error code, there are different ways to resolve the issue.
However, before proceeding further, ensure that the memory card isn’t locked, i.e., the write-protect switch is in the OFF position and the memory card itself is supported by the Canon camera.
How to Fix Canon Memory Card Err 02
The first thing you should do is power off the camera, disconnect the SD card, wait for a few minutes, and then power on the camera and reconnect your memory card. If the Canon memory card with error code Err 02 persists, check the SD for any damage, and carefully examine the SD card slot itself. Ensure there’s no dirt and it wasn’t exposed to water.
If there’s no physical damage, you’ll need to format the SD card using the camera. First, get any important photos off the memory card–by manually copying them, or creating a disk image. Then, insert the memory card in your camera and format it. The exact steps will differ, depending on your Canon camera model. It’s best to refer to the user manual for your particular camera.
In the case of a brand new SD card that’s not working on your camera, it’s best to just get it replaced under warranty.
How to Fix Canon Memory Card Err 03
Too many folders on your memory card are the culprits behind Err 03. To fix it, connect the SD card to your PC and remove any unnecessary folders. Avoid branching out the folders into more subfolders, unless it’s absolutely necessary.
You can opt to Quick Format the SD card to reset the folder structure on your memory card, but it removes your files. So, ensure you back up the data before formatting.
Here’s how you can perform a Quick Format on Windows:
- Connect the SD card to your PC.
- Open Windows Explorer (Windows Key + E).
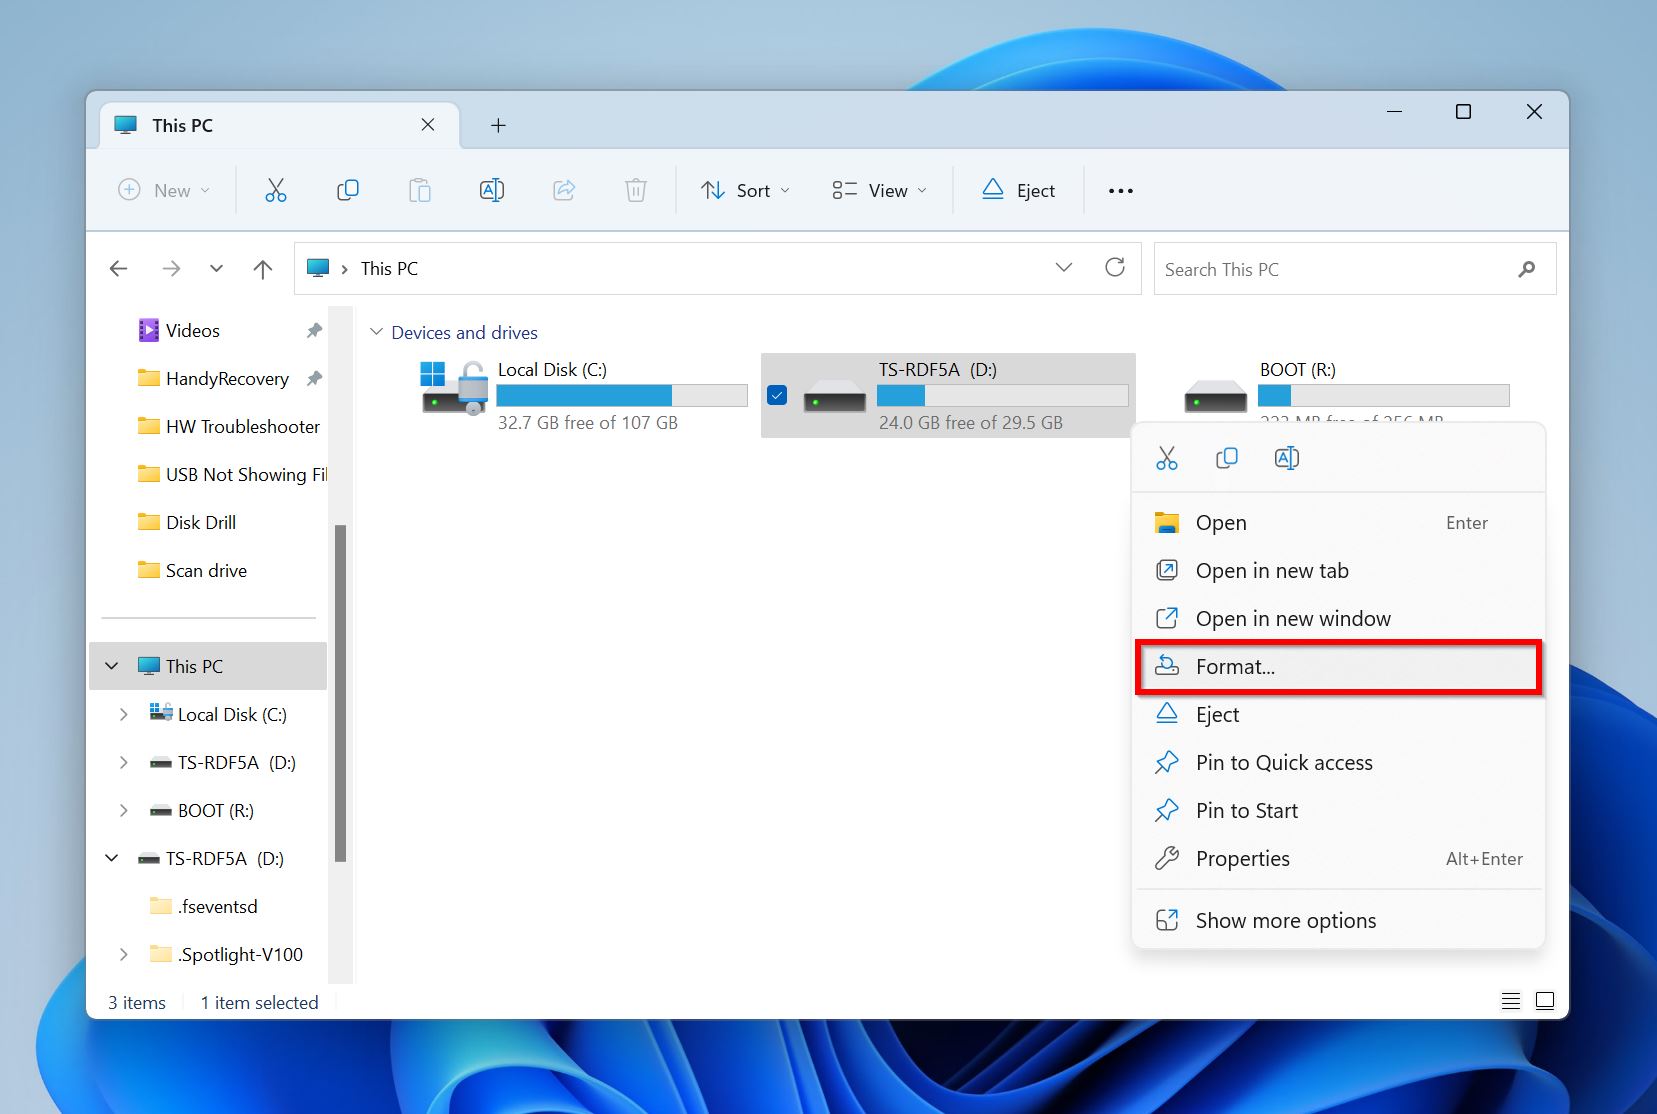
- Go to This PC, right-click on your memory card and choose Format.
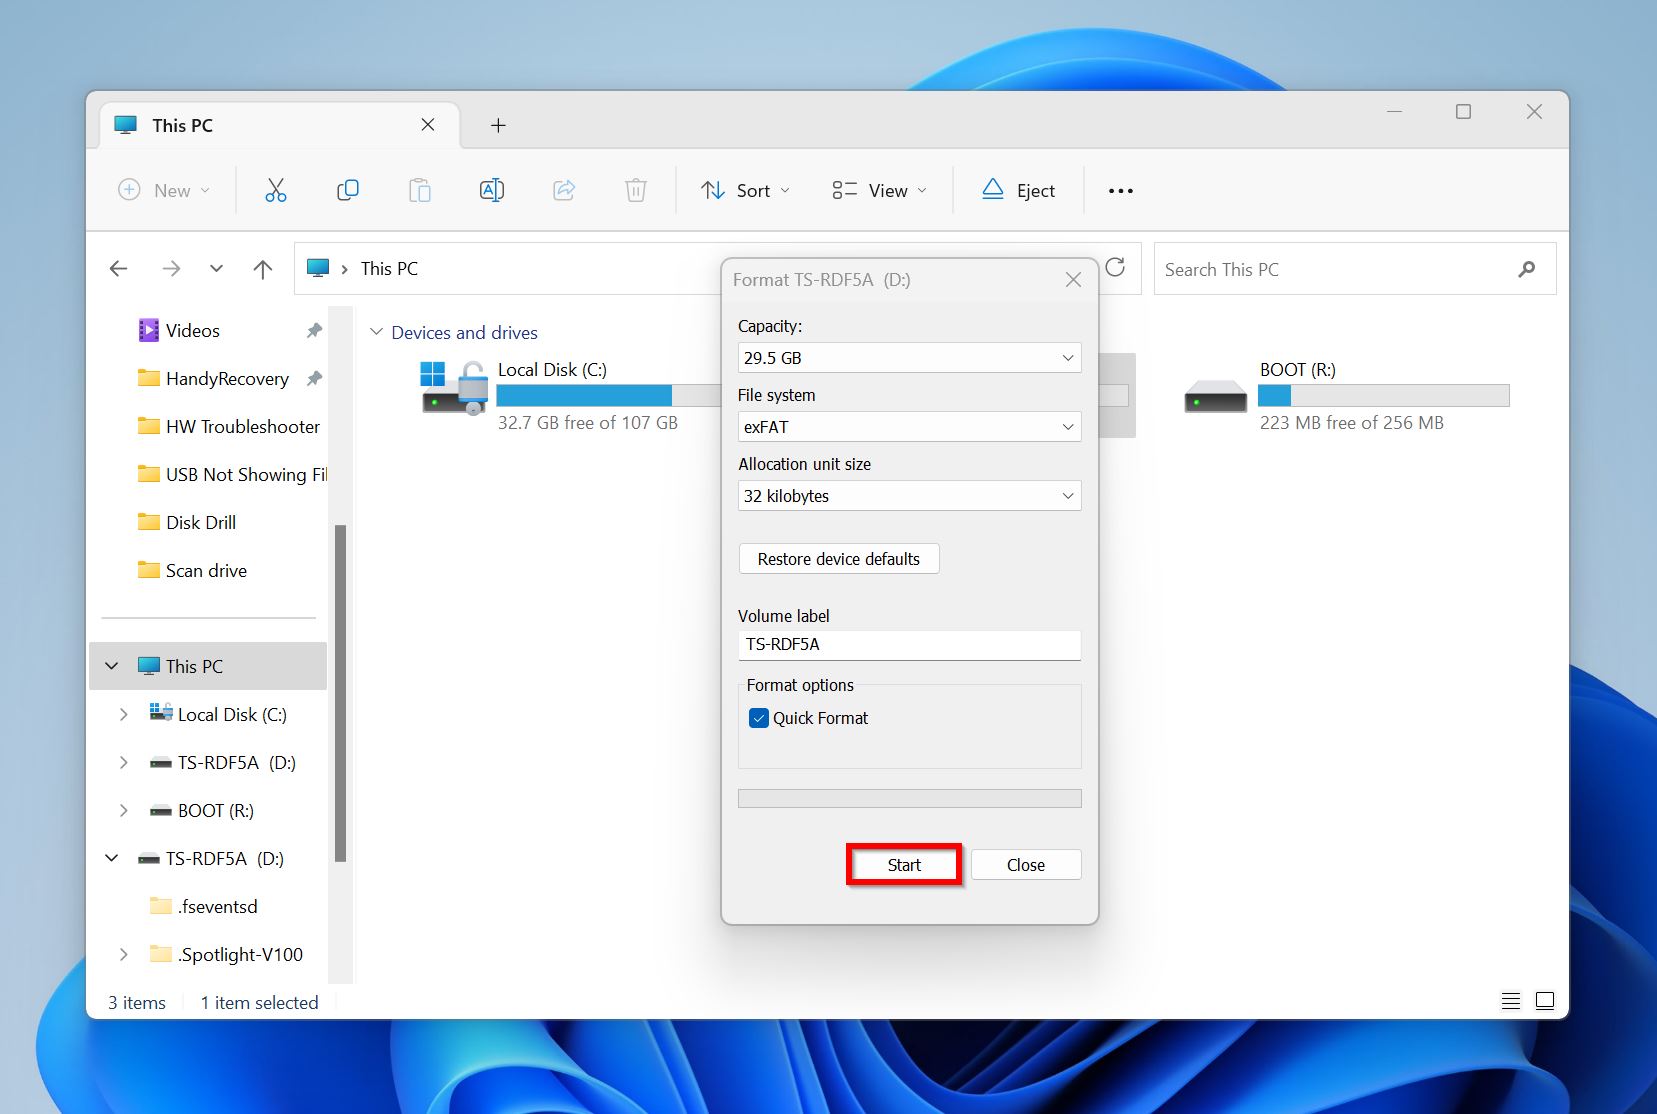
- Choose the format parameters. Ensure that the Quick Format checkbox is ticked and click Start.
How to Fix Canon Memory Card Err 04
Err 04 indicates that the memory card is full. To fix this, delete some photos/videos, or move them to a different location. We recommend you connect the SD card to a PC and do this, for more control and a clearer view of the media you wish to move/delete.
In case you already have a backup of the photos, you can simply format the SD card using your camera. If the error persists, there may be an issue with the memory card, and it’s best to use a new one.
How to Fix Canon Memory Card Err 10
Similar to Err 02–power off the camera, eject the SD card, turn on the camera and reconnect the SD card.
If the previous step doesn’t resolve the issue, reformat the drive (back up your data first), to fix any file system issues.
We also recommend you run a CHKDSK scan on the SD card:
- Search for “cmd” in Windows Search (Windows Key + S). Right-click on the Command Prompt > Run as administrator.
- Type
chkdsk X: /rin the console and press Enter. Replace X with the drive letter of your Canon SD card.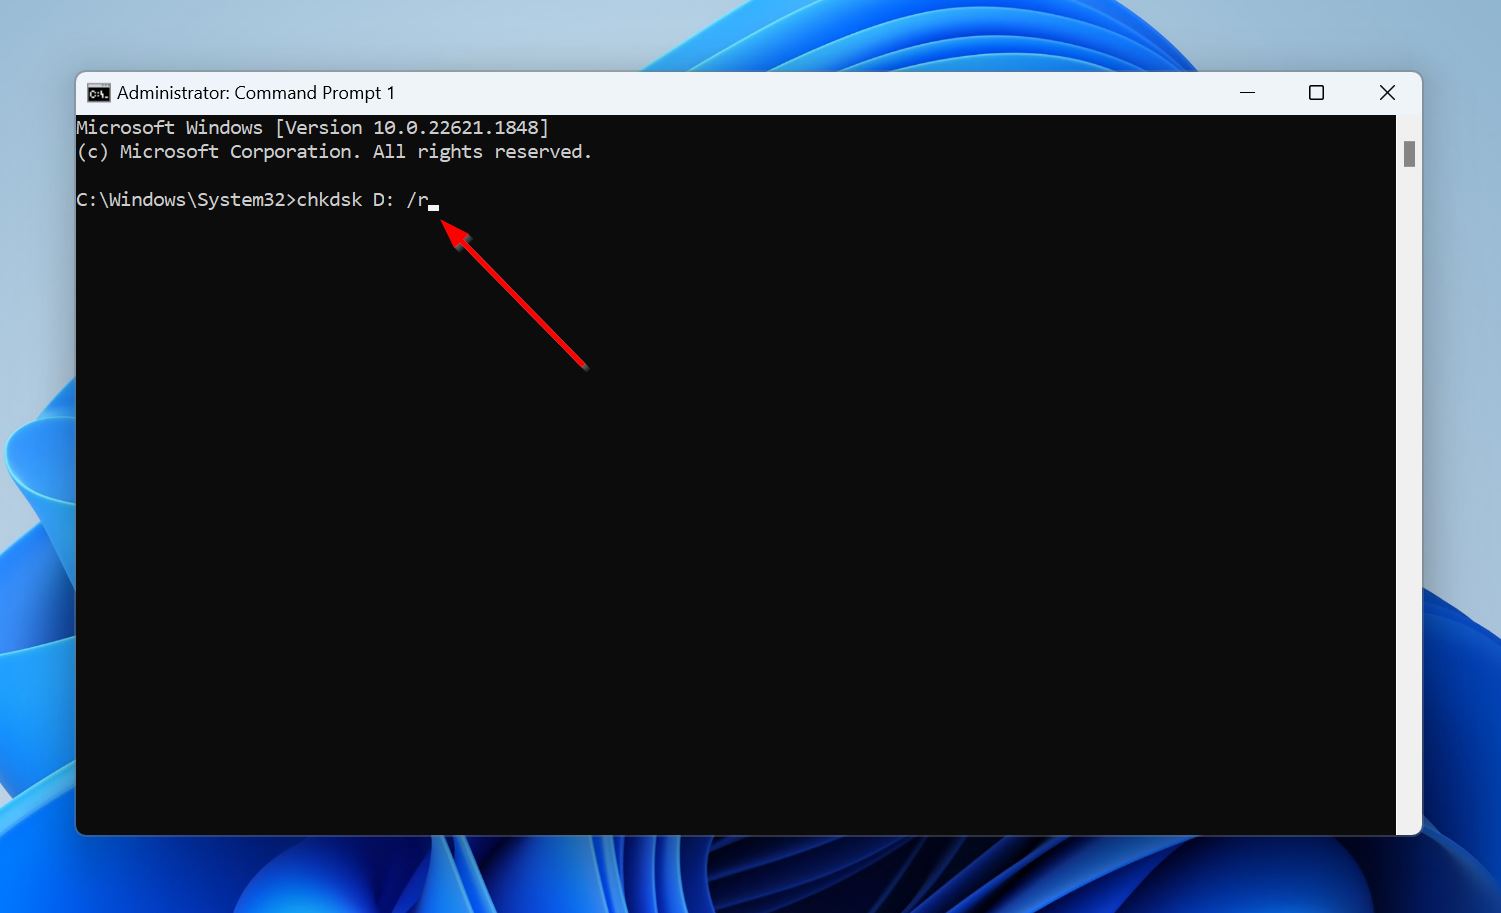
- Wait for CHKDSK to scan and fix your SD card.
Note: CHKDSK won’t work on RAW SD cards, i.e., SD cards with no file system.
If the SD card’s file system is damaged to the extent that it’s unreadable or listed as RAW, you can attempt to repair the file system using a tool called TestDisk.
The program doesn’t have a GUI, so follow these steps carefully:
- Download TestDisk and extract it.
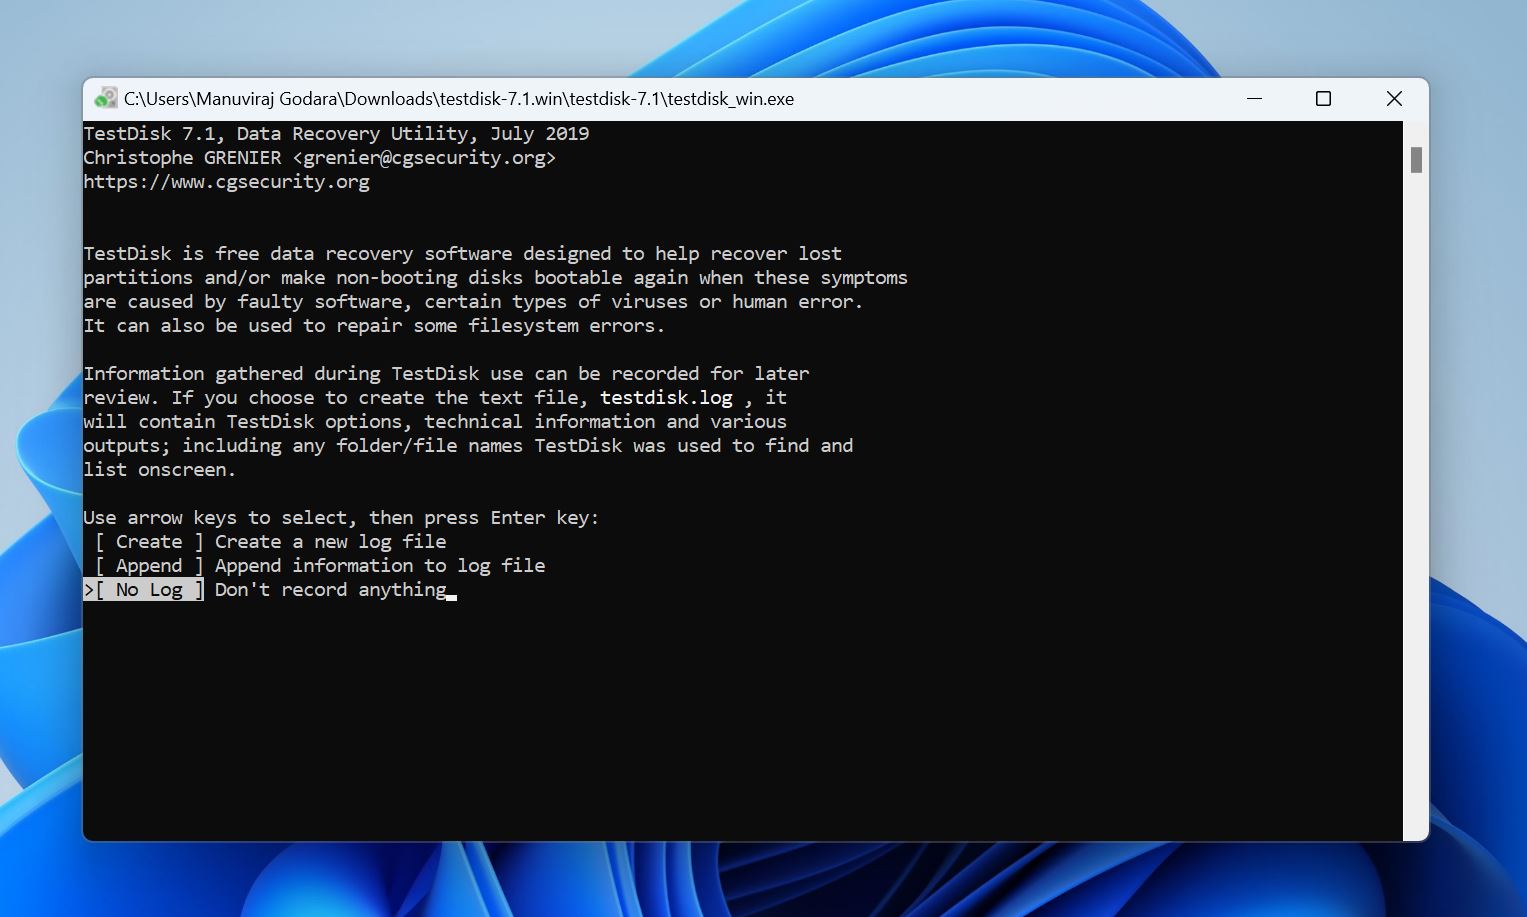
- Run TestDisk and choose whether you wish to create a log file or not. Use the arrow keys to navigate and the Enter key to select the desired options.
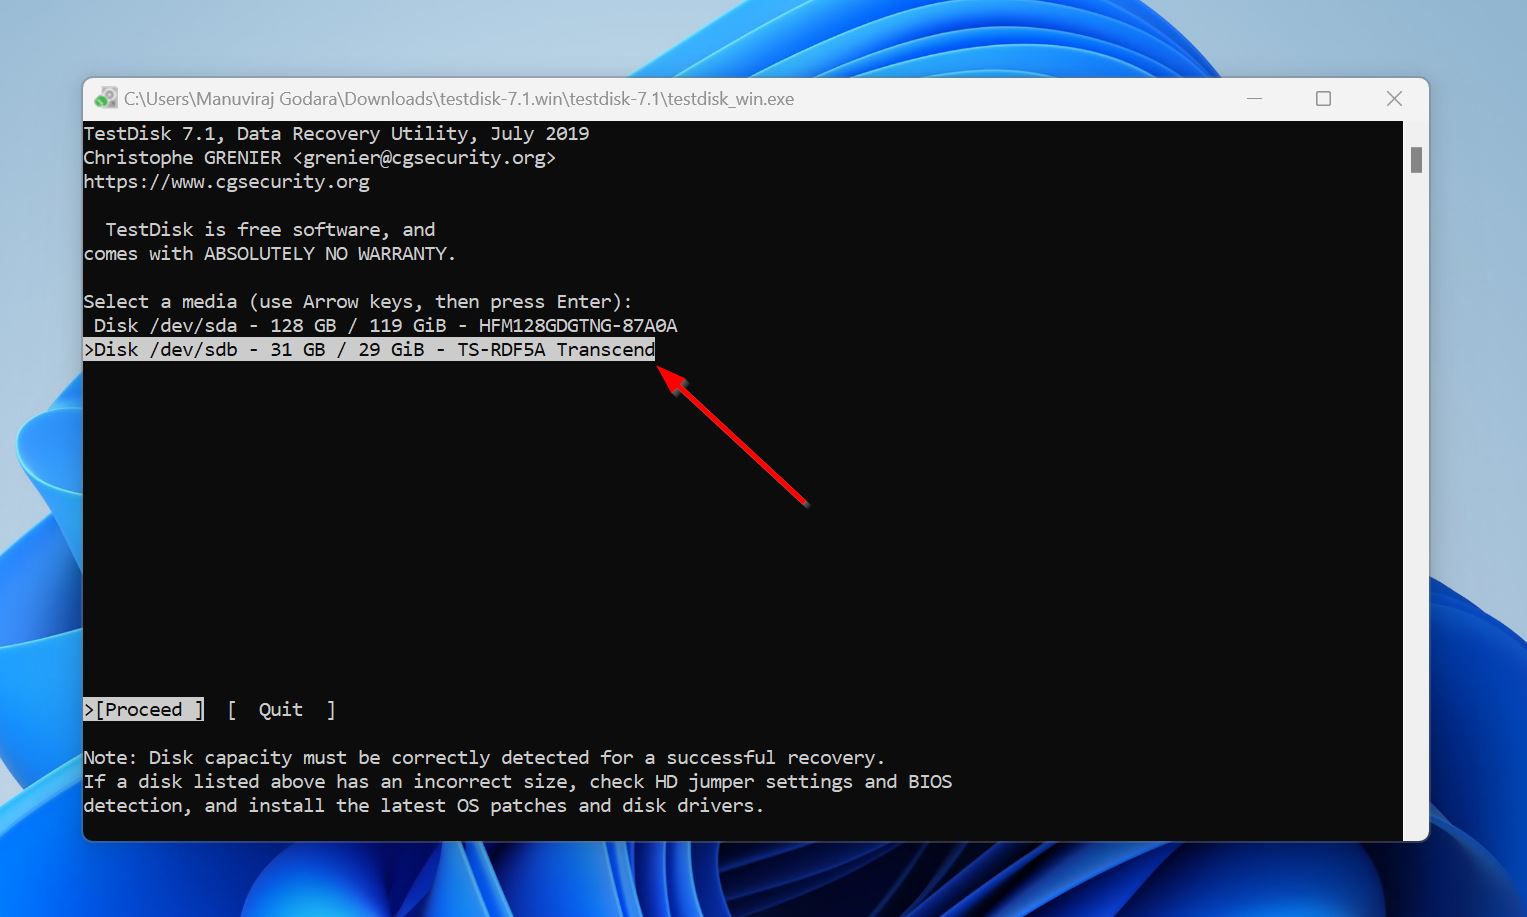
- Select your SD card and press Enter.
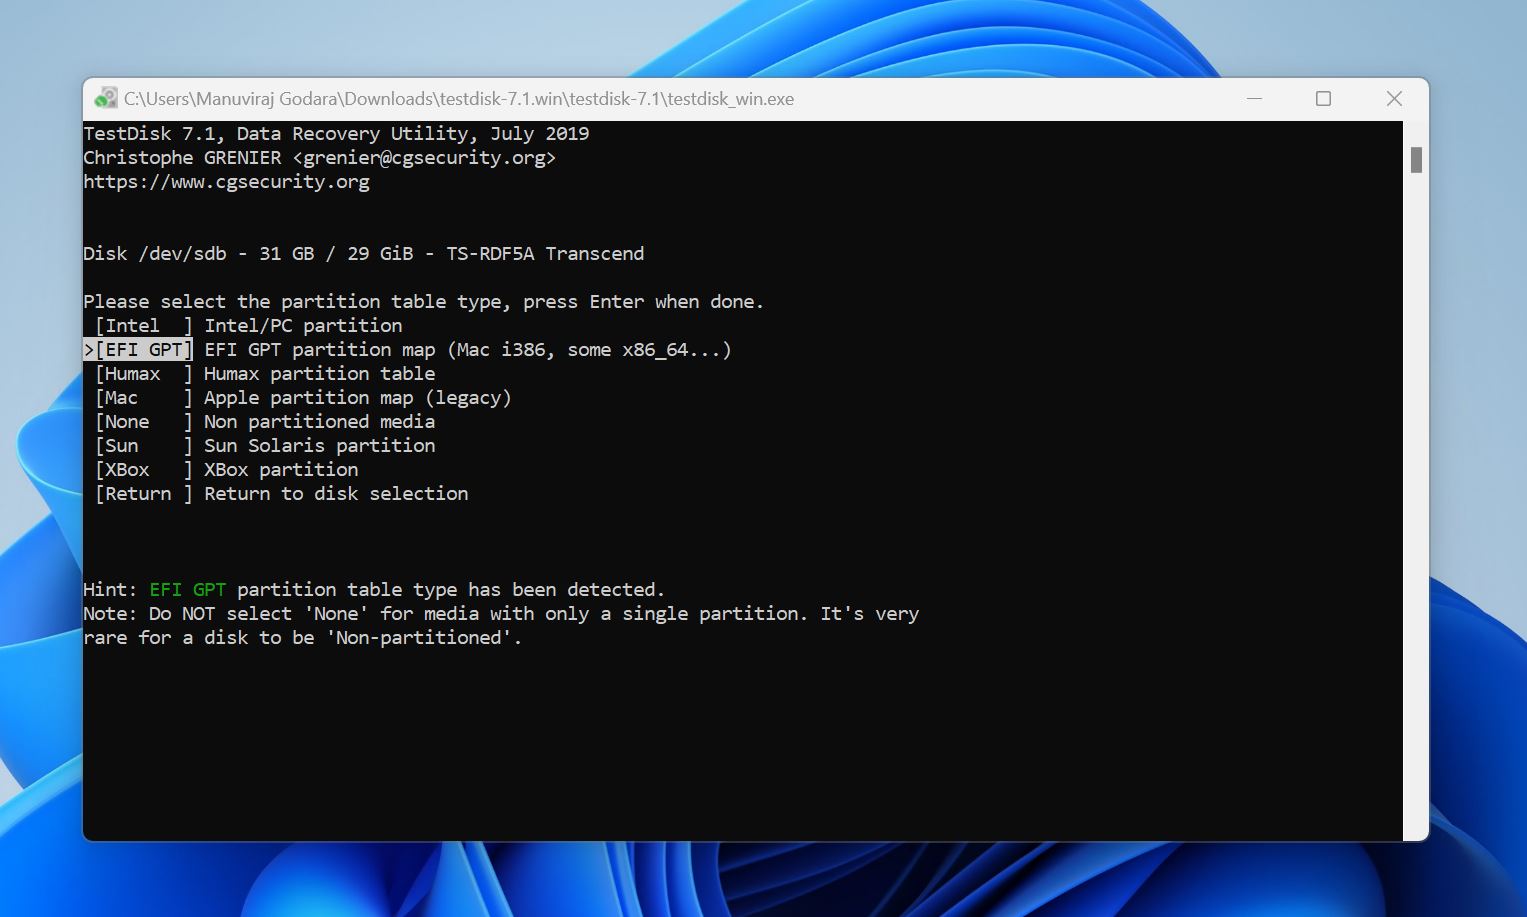
- Choose the partition table type. TestDisk automatically detects this, so you can simply press Enter on this screen.
- Navigate to Advanced and press Enter.

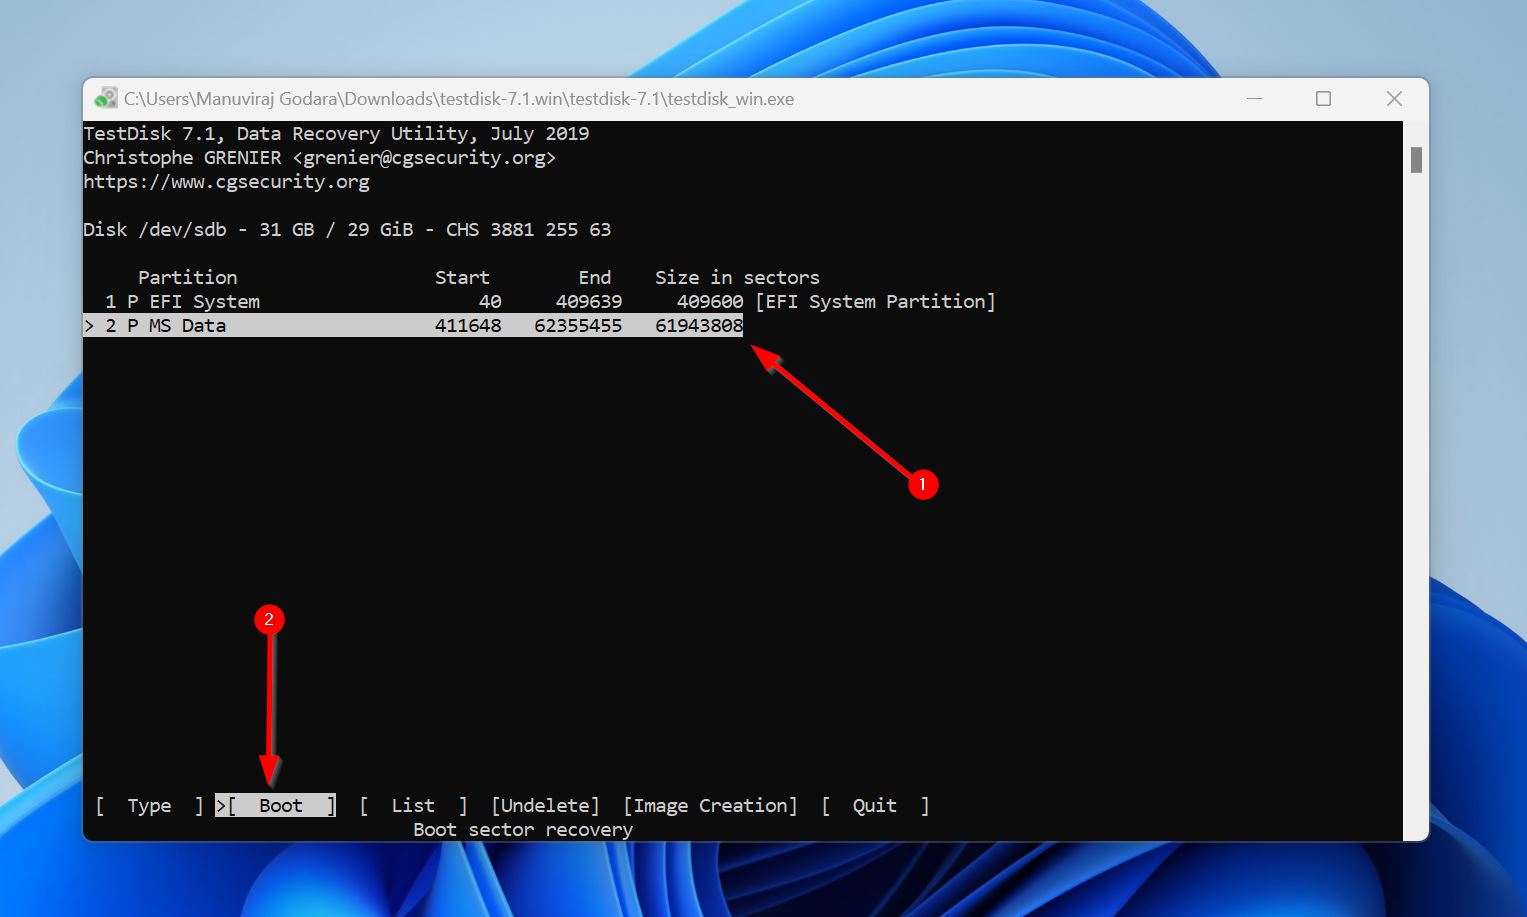
- Choose the SD card partition, select Boot and press Enter.
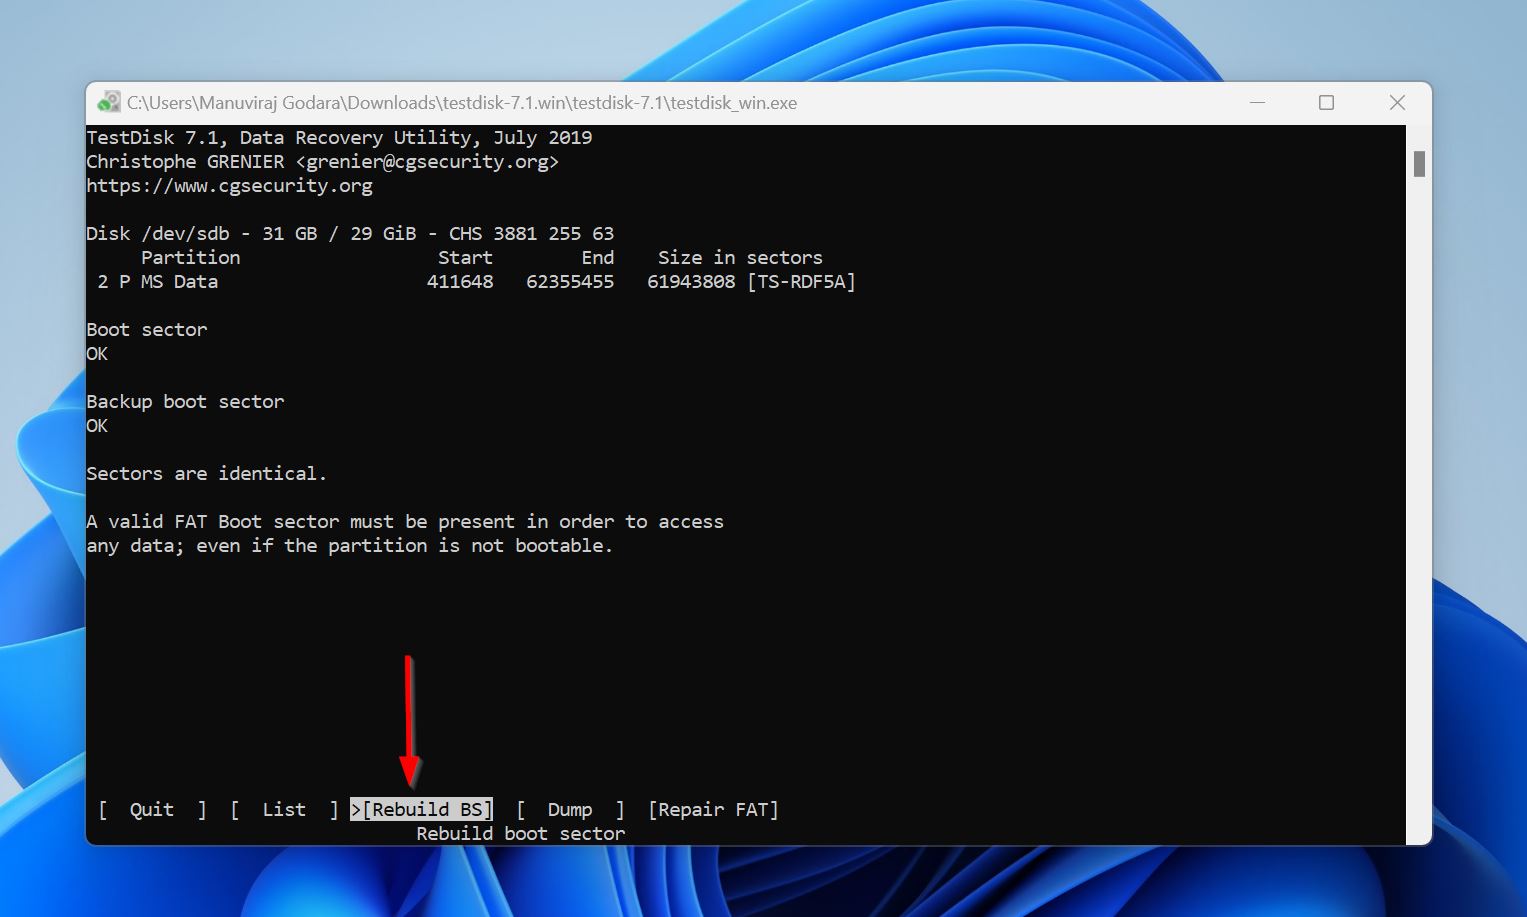
- Select Rebuild BS and press Enter.
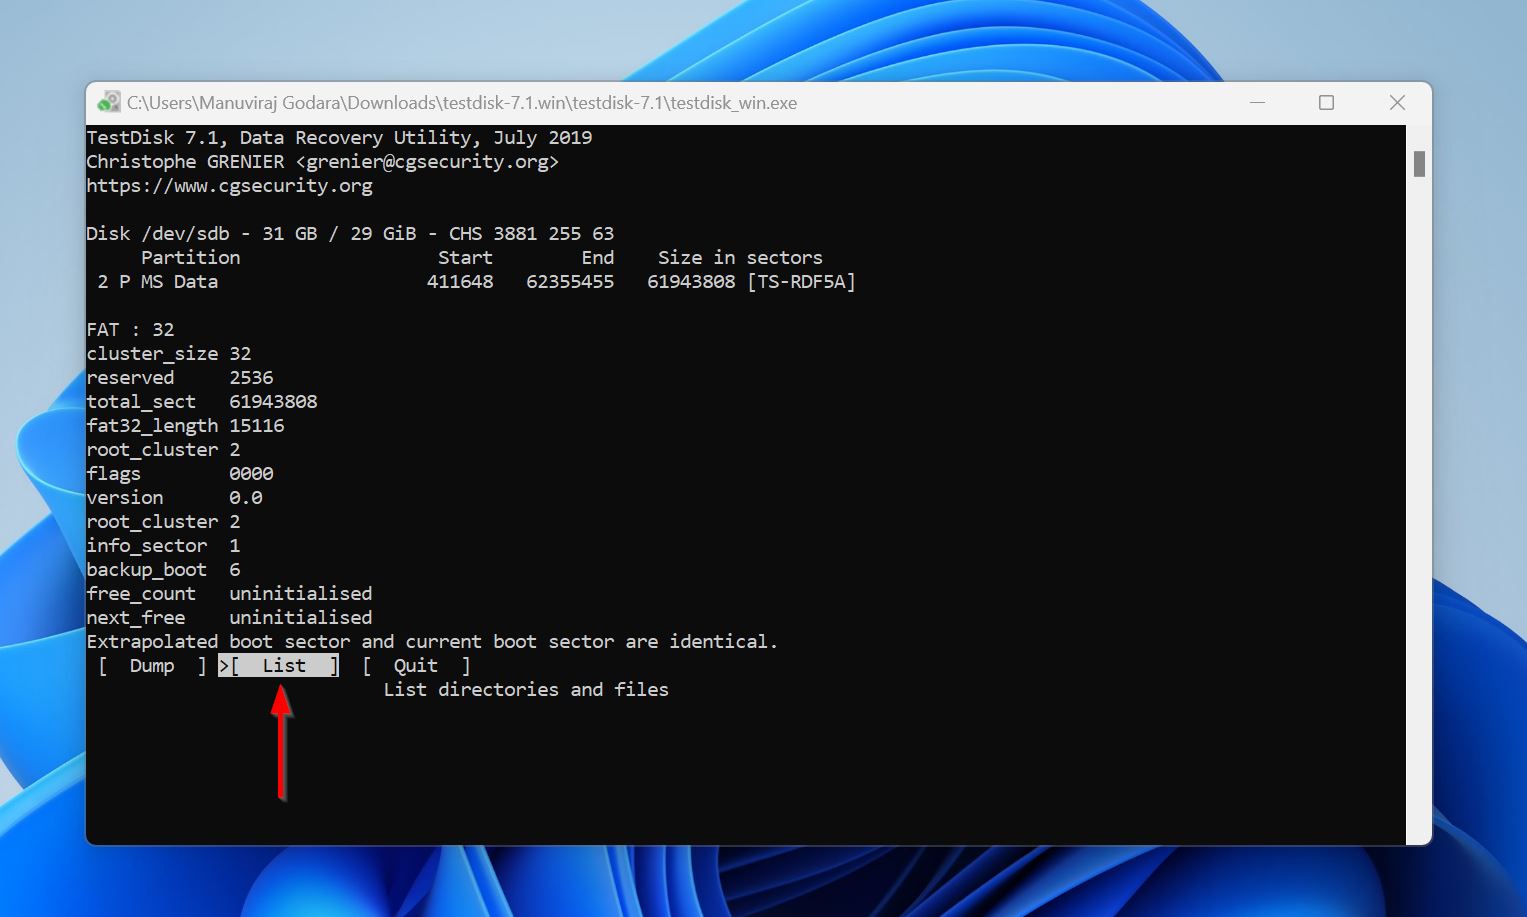
- Choose List and see if your files are visible.
- If they are visible, press Q to go back and choose the Write option. If the files aren’t visible, it’s likely you’ll need expert assistance to repair the SD card.
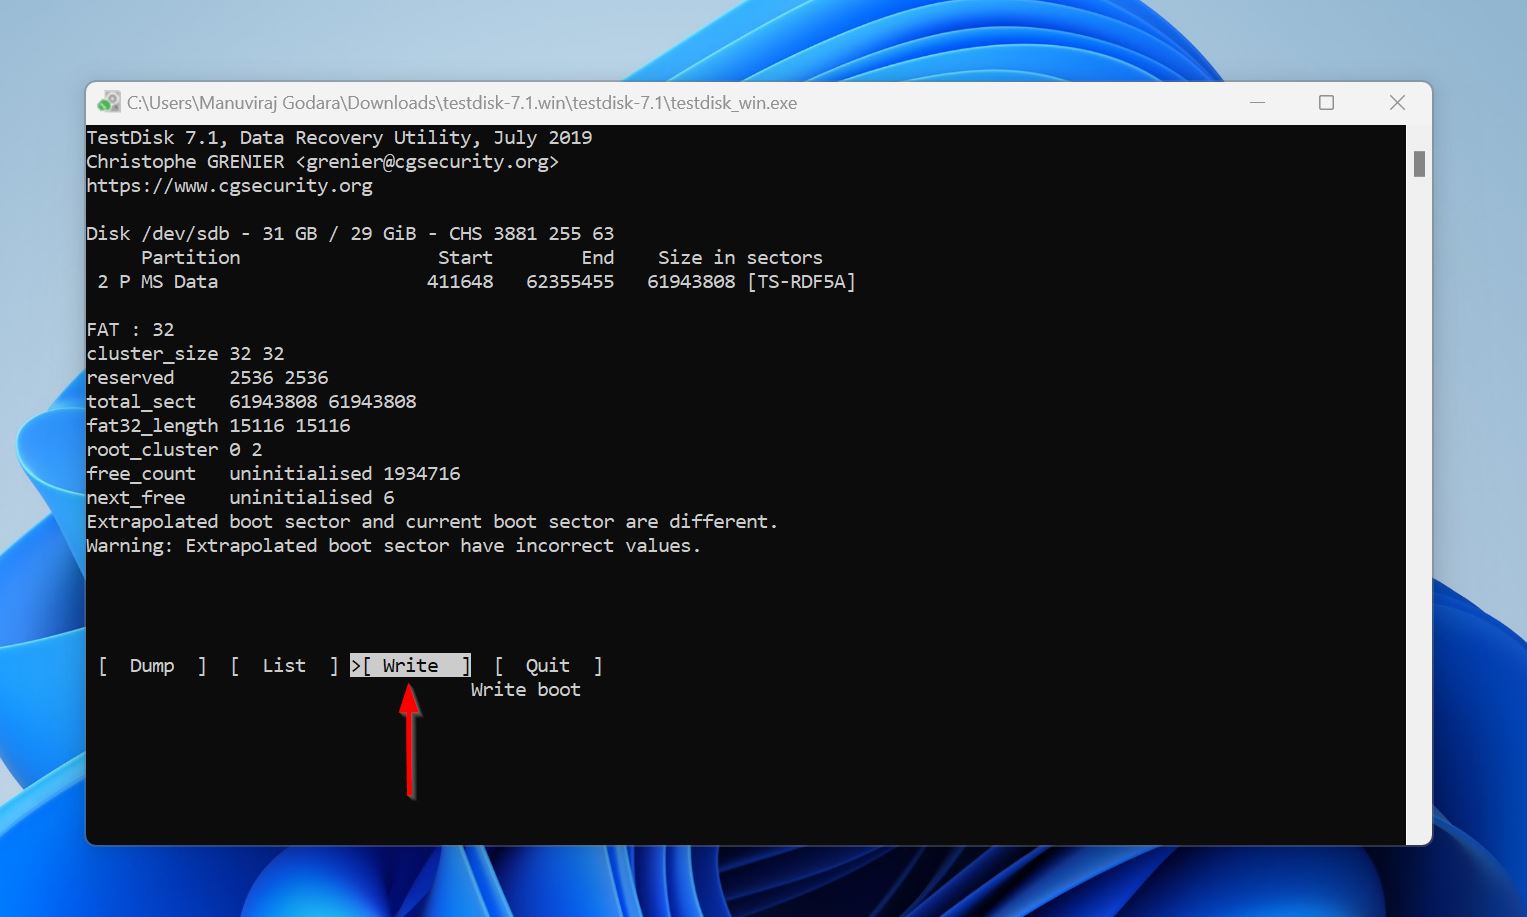
- Confirm the operation.
- Quit and restart your PC.
How to Fix Canon Memory Card Err 99
To determine the reason for Err 99, remove the SD card and insert another one in its place. Then, attempt to click some photos.
If the error is resolved, and you’re able to click photos normally, the original SD card is likely corrupted. You can attempt to repair it using CHKDSK or by reformatting it. However, it’s still better to simply replace the SD card and use another one.
If the error persists, double-check the lens. Ensure that it isn’t tilted, and is properly connected to the camera. We also recommend you dismount the lens, and clean the lens itself as well as its contact points with the camera.
Conclusion
Be sure to use the appropriate solution for the exact Canon memory card error code that’s displayed on your camera. But, regardless of the error code, it’s always best to back up all your files beforehand. Not only so you can protect your files when fixing the memory card, but also because an SD card that’s frequently facing issues will most likely fail sooner rather than later.
