 A corrupt master file table can prevent you from accessing your files, using utilities like CHKDSK, and even booting into Windows. But, fixing the error and regaining access to your data is not as tough as you think. One of the methods, listed in our in-depth guide, is sure to work for you.
What Causes a Corrupt Master File Table on Windows
Before we proceed to the reasons behind a corrupt MFT, it’s important to know what is the master file table and how it works.
On an NTFS formatted drive, the Master File Table (MFT) is the file that contains information about all files and directories on the disk. The type of stored information includes the file’s size, type, date and time of modification, and author. Interestingly, the MFT increases in size as more files and directories are written to the drive, but when these files are deleted, their entries in the MFT are cleared and reused (not deleted). This means the MFT doesn’t decrease in size when files are deleted from the NTFS volume.
You will usually encounter the “Corrupt Master File Table” message when attempting to fix “The Disk Structure is Corrupted and Unreadable” error using the CHKDSK utility. Rarely, you may encounter the error when Windows fails to load. Here, Windows will prompt you to run CHKDSK, and upon doing that you’ll again encounter the same error.
A corrupt MFT prevents you from accessing the files on your NTFS volume or disk, but the actual files are still there, and you can get them back using a data recovery program.
Let’s take a look at the various reasons that lead to this error:
| Reason | Description |
| 🦠 Virus attack | Malware can wreak havoc on your computer, damaging its files, locking you out of your data, and even corrupting the master file table. |
| 🗄️ The hard drive is too fragmented | The files on your hard drive aren’t necessarily stored as one unit. An individual file may be split into fragments and stored across the disk. Fragmentation is a part of how hard drives work, and there’s little you can do to prevent it. If you’re low on disk space, areas from the MFT zone will be used to store fragments of user files and in case the MFT reserved zone is fully occupied – the unreserved space on the disk will be used to store MFT entries. Regardless, this means that your disk is too fragmented and you need to run defragmentation. |
| 💿 Bad sectors | Bad sectors are unreadable areas on your disk. They are part of hard drives’ normal wear and tear, but can develop exponentially faster due to factors like malware and improper usage. Accumulation of bad sectors can result in data corruption, including that of the master file table. |
| 🔌 Improper disconnection of the drive | Physically removing a drive while it’s in use can cause data corruption, if data was being written to it at the time of removal. Specifically, if the MFT was being written to, it could become corrupt. |
| ⚡ Power outage during the writing process | If the writing process was interrupted due to an abrupt power cut, it could result in MFT corruption, and data loss in general. |
How to Fix a Corrupted Master File Table
We’ve compiled several methods that can help you repair a corrupted master file table. In case you notice that your hard drive is physically damaged or is not detected by your PC at all (even in Disk Management) – we recommend that you stop using the drive and contact a professional data recovery service directly if you want to get back data from the drive.
Additionally, some methods may require you to create Windows installation media. Here is a guide on how to do this.
Fix 1: Defrag the Drive
If you’re using an internal or external hard disk drive (HDD), it’s a good idea to defragment it. This can fix the corrupt master file table, while simultaneously improving the read speeds of your files.
Note: Only perform defragmentation if you’re using a physical hard disk drive, don’t try to defrag an SSD or any other form of flash storage. Doing so will reduce the lifespan of the storage drive.
Here’s how you can defrag a hard drive:
- Type “defrag” in Windows Search (Windows Key + S) and click on Defragment and Optimize Drives in the search results.
- To determine if the disk needs to be defragmented or not, click Analyze disk.
- Select the NTFS volume you want to defragment and click on Optimize.
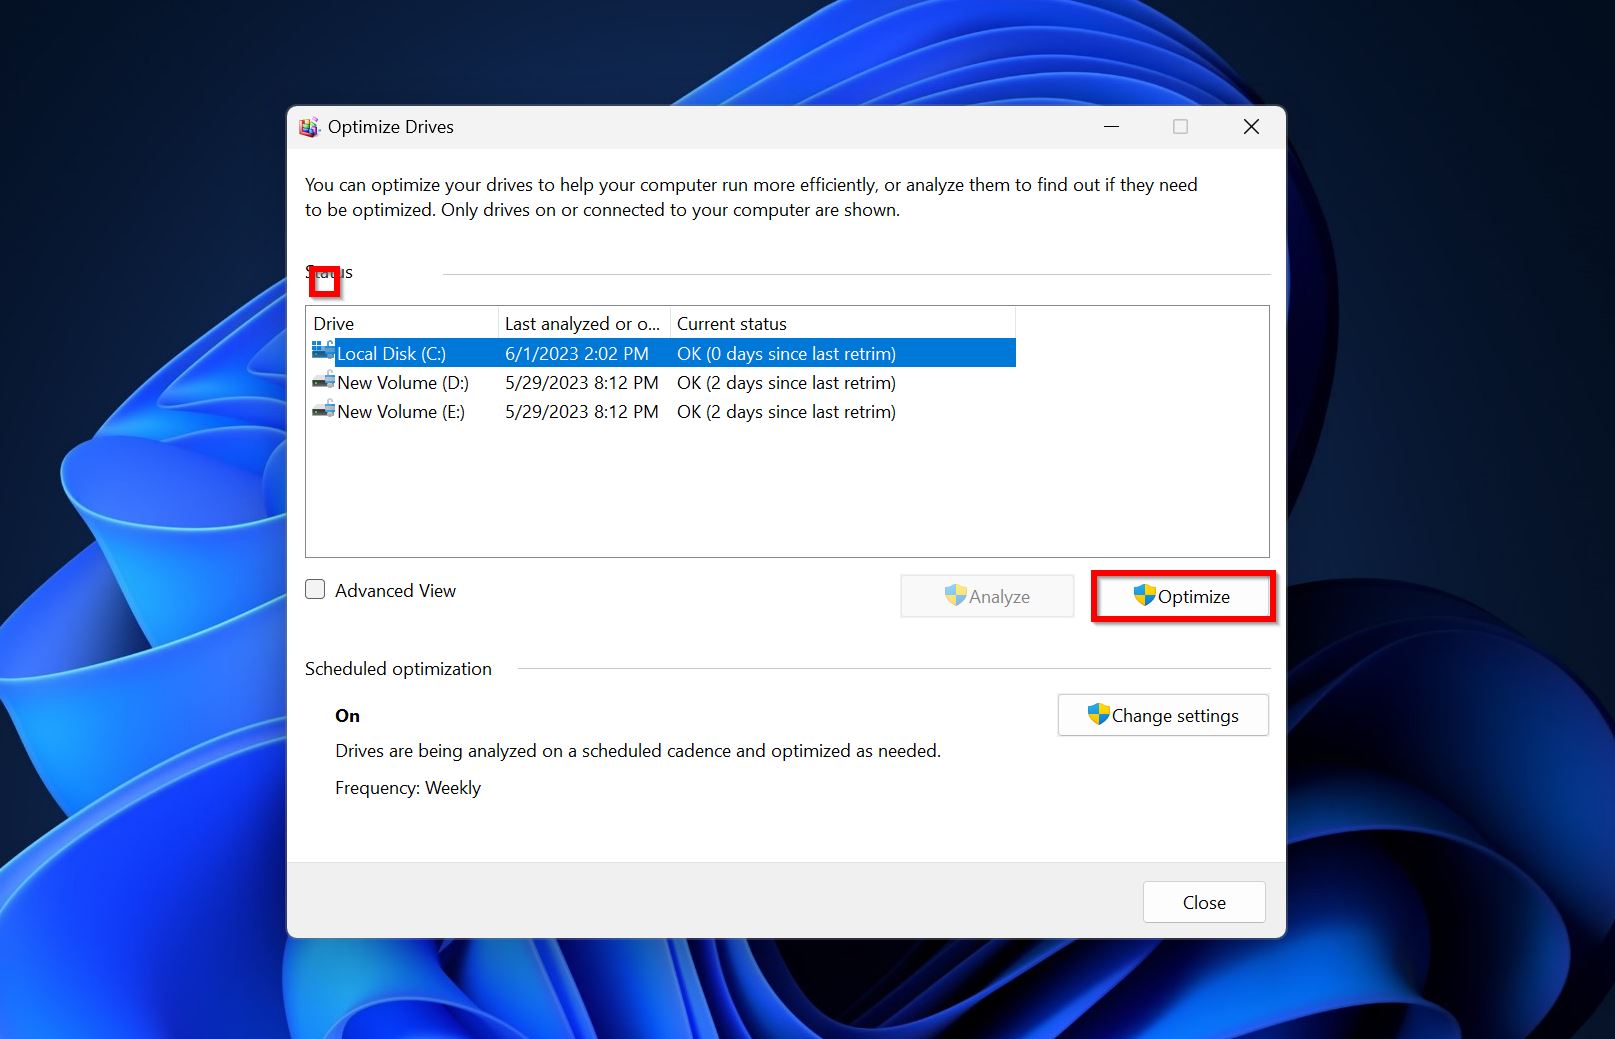
- Wait for Windows to defragment the drive. You’ll see OK under Current Status after the defragmentation is complete.
Fix 2: Reinstall the Drive
Simply uninstalling from the OS and then reinstalling the affected drive can sometimes resolve the corrupt MFT error by allowing the OS to rescan the drive as a new device. To complete this, you don’t need to physically remove the drive. Simply follow the steps below and you should be good to go:
- Press Windows Key + R to open the Run application. Type devmgmt.msc in the text box and press Enter.
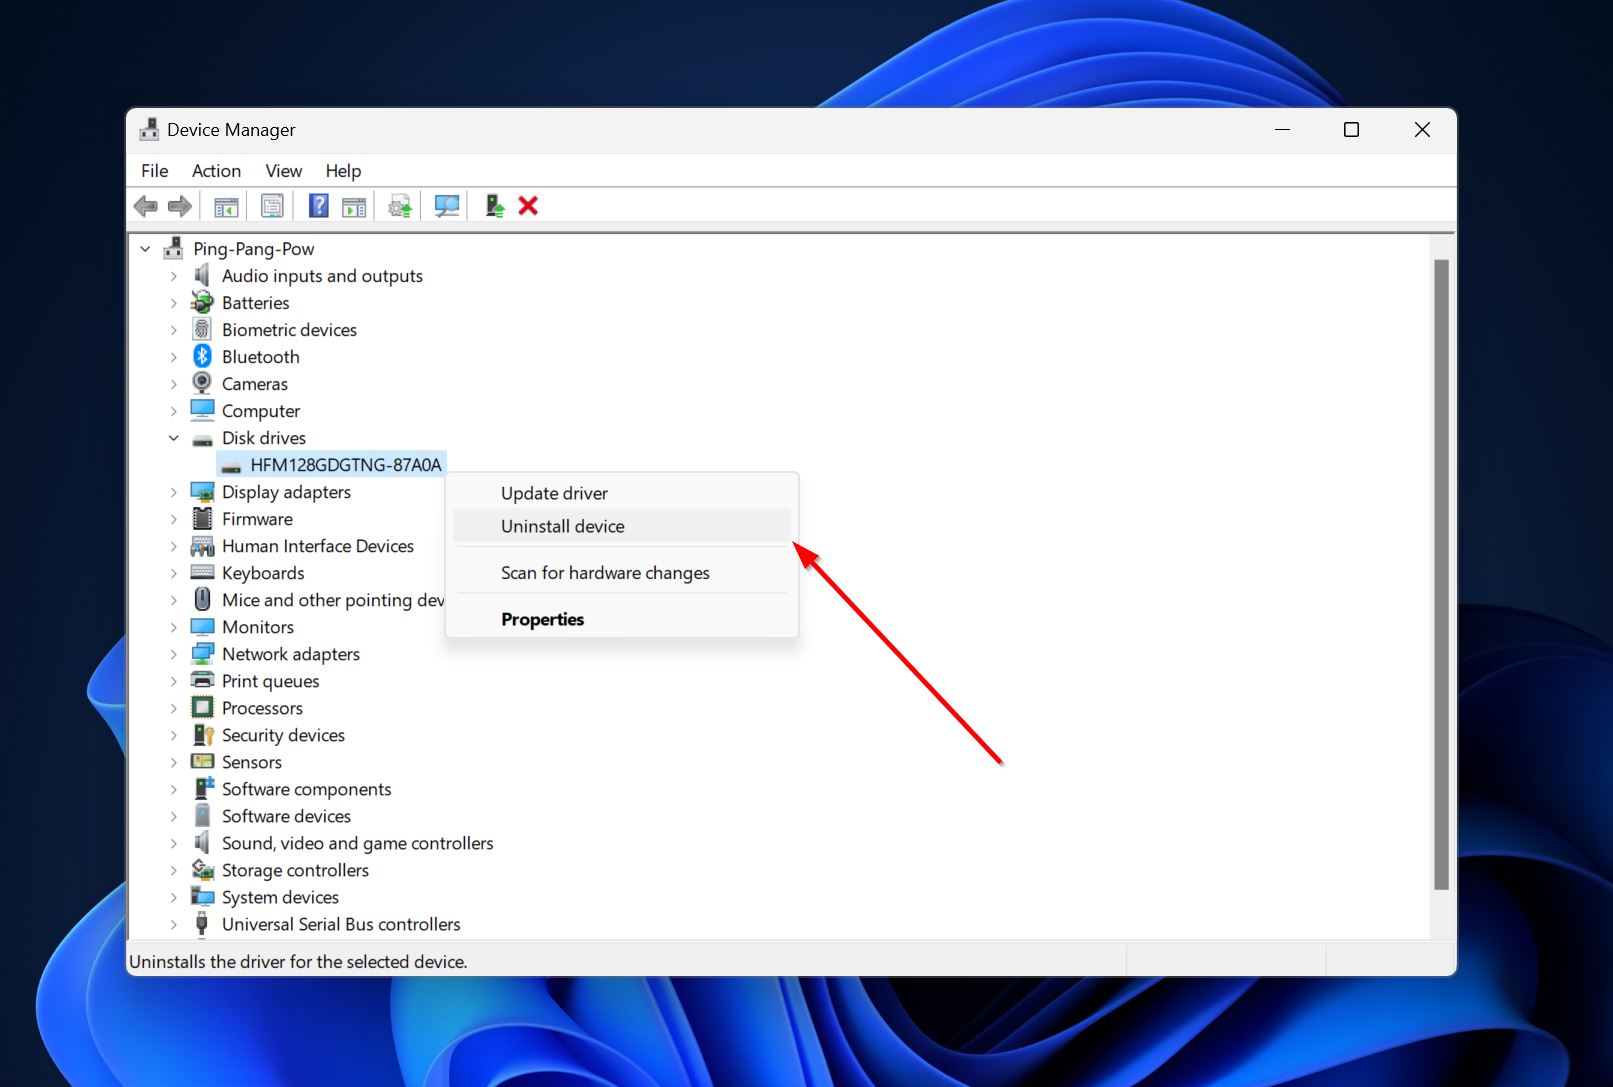
- Expand the Disk Drives section, right-click on the drive with the corrupt master file table, and choose Uninstall device.
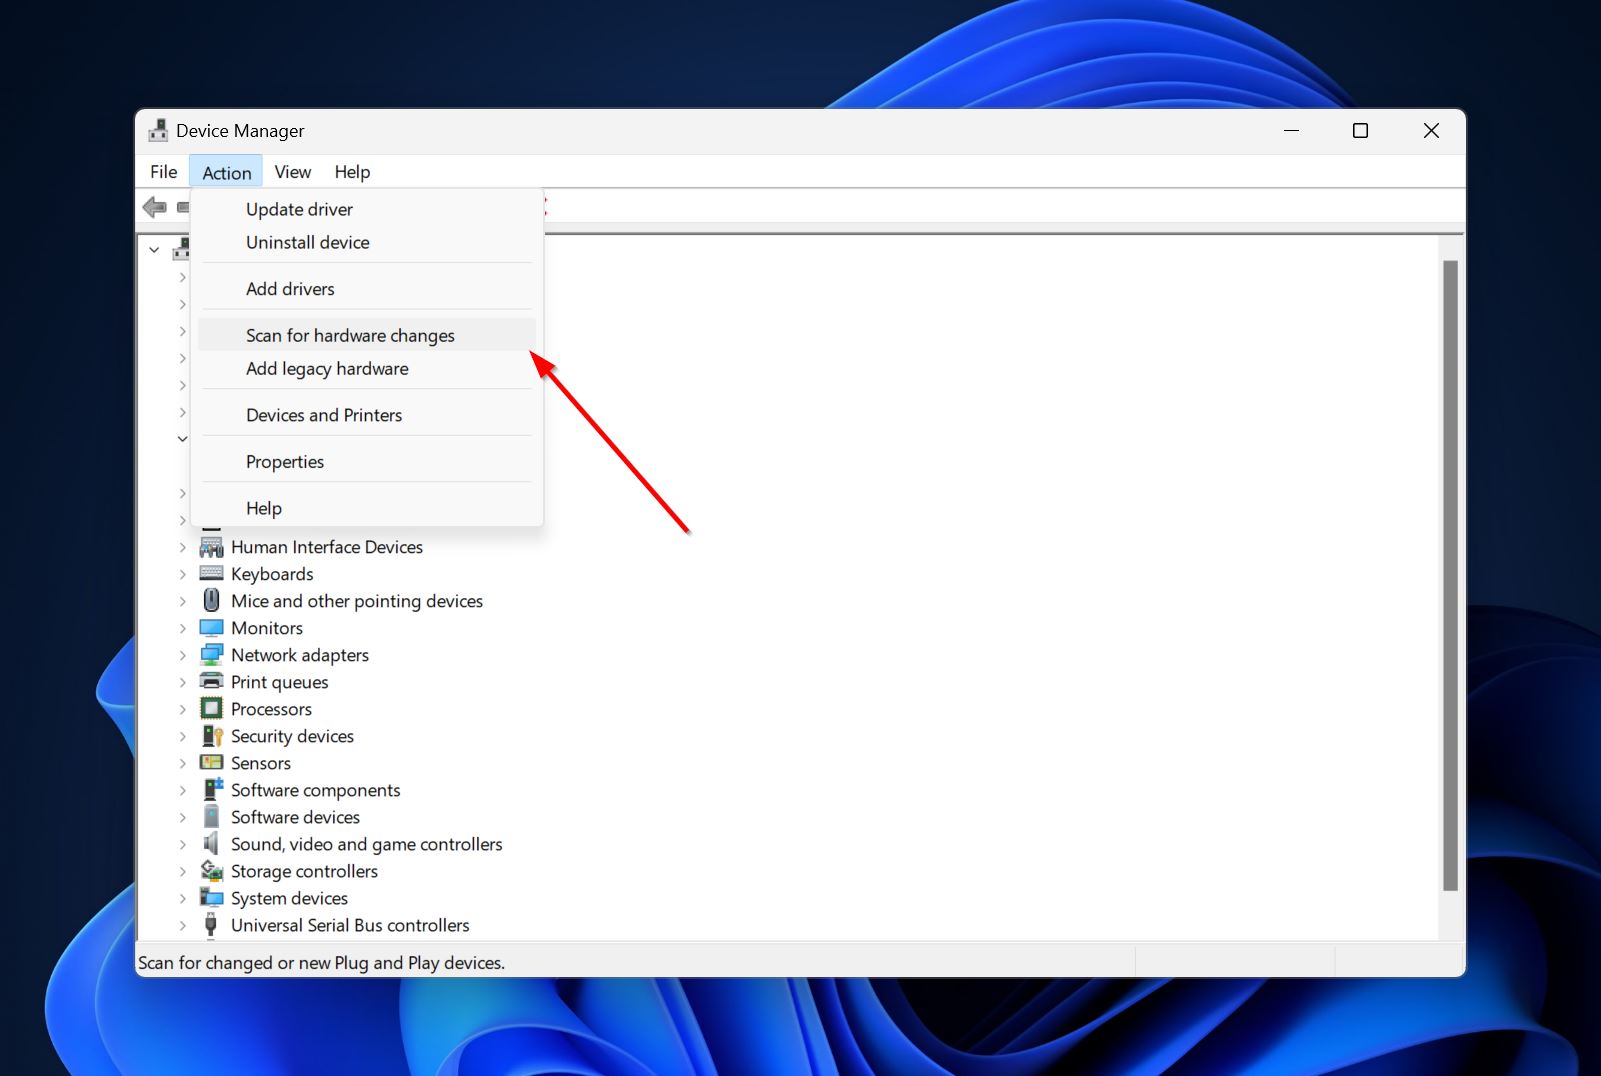
- After this, ensure that the Disk Drives section is selected and click on Action > Scan for hardware changes at the top of the window.
Fix 3: Use CHKDSK from Recovery Mode
If running CHKDSK after booting into Windows is throwing up the corrupt master file table message, you can try running the utility in Windows Recovery Environment (WinRE). There are several ways to enter the Windows Recovery Mode, but the easiest one is to click on Start > Power and hold down the Shift key while clicking on Restart.
Once you’ve booted into the Windows Recovery Environment, follow these steps:
- Click on Troubleshoot then choose Advanced options.
- Here, click on Command Prompt.
- In the console, type CHKDSK *: /r /x and press Enter. Replace “*” with the drive letter of the NTFS volume.
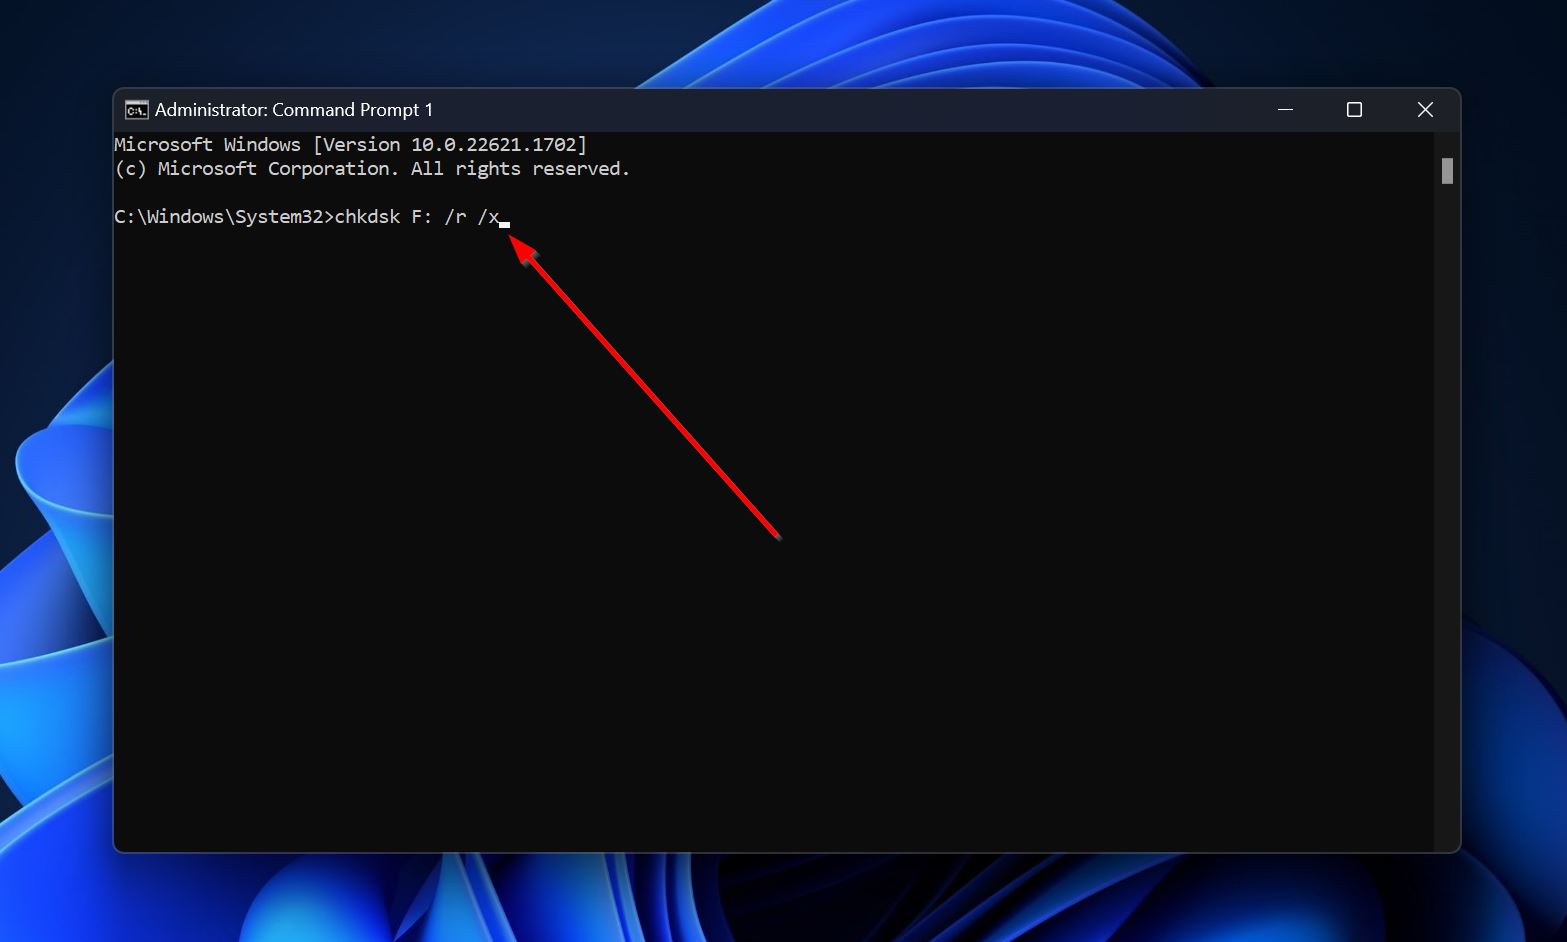
To access the Command Prompt in Windows 7, go to Advanced Boot Options > Repair your computer > Command Prompt.
Fix 4: Repair the MFT Using TestDisk
In situations where CHKDSK was unable to repair the MFT, you can use a third-party master file table repair software, TestDisk, to help you out. Windows has a copy of the MFT, called MFTMirr and TestDisk compares both of them to fix the corrupt MFT.
The tool doesn’t have a GUI, so follow these instructions carefully:
- Download TestDisk and extract the contents of the archive.
- After extraction, run the testdisk_win.exe file.
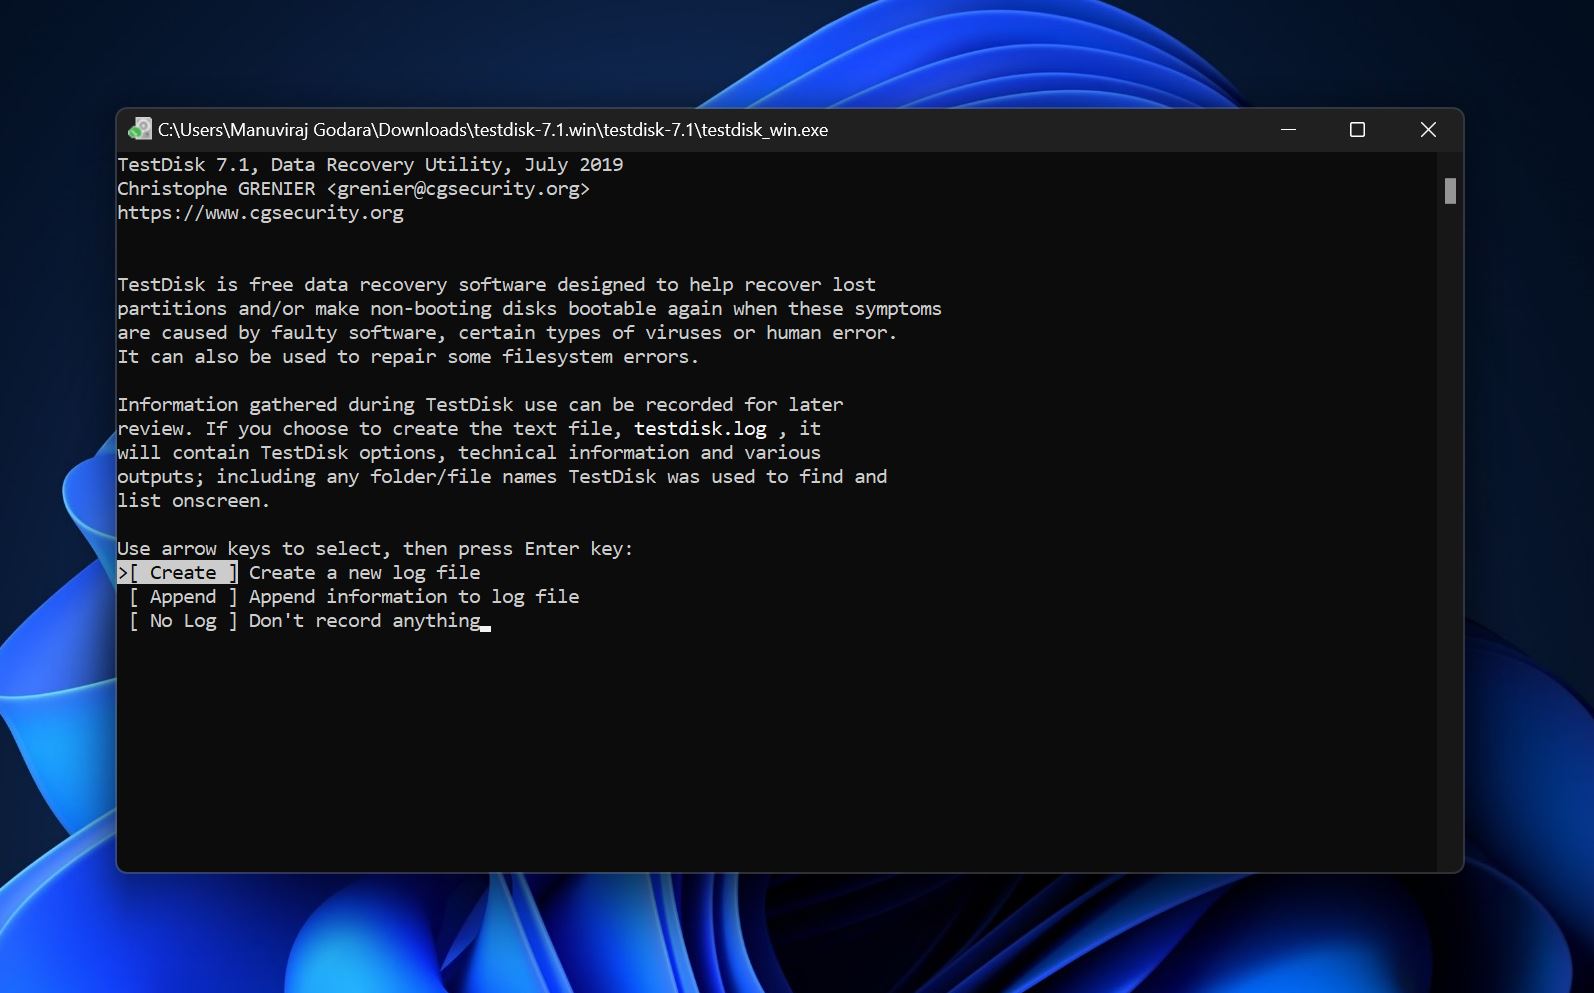
- Decide whether you want to create a log file or not. Use the Arrow keys to highlight the relevant option, and press Enter to confirm.
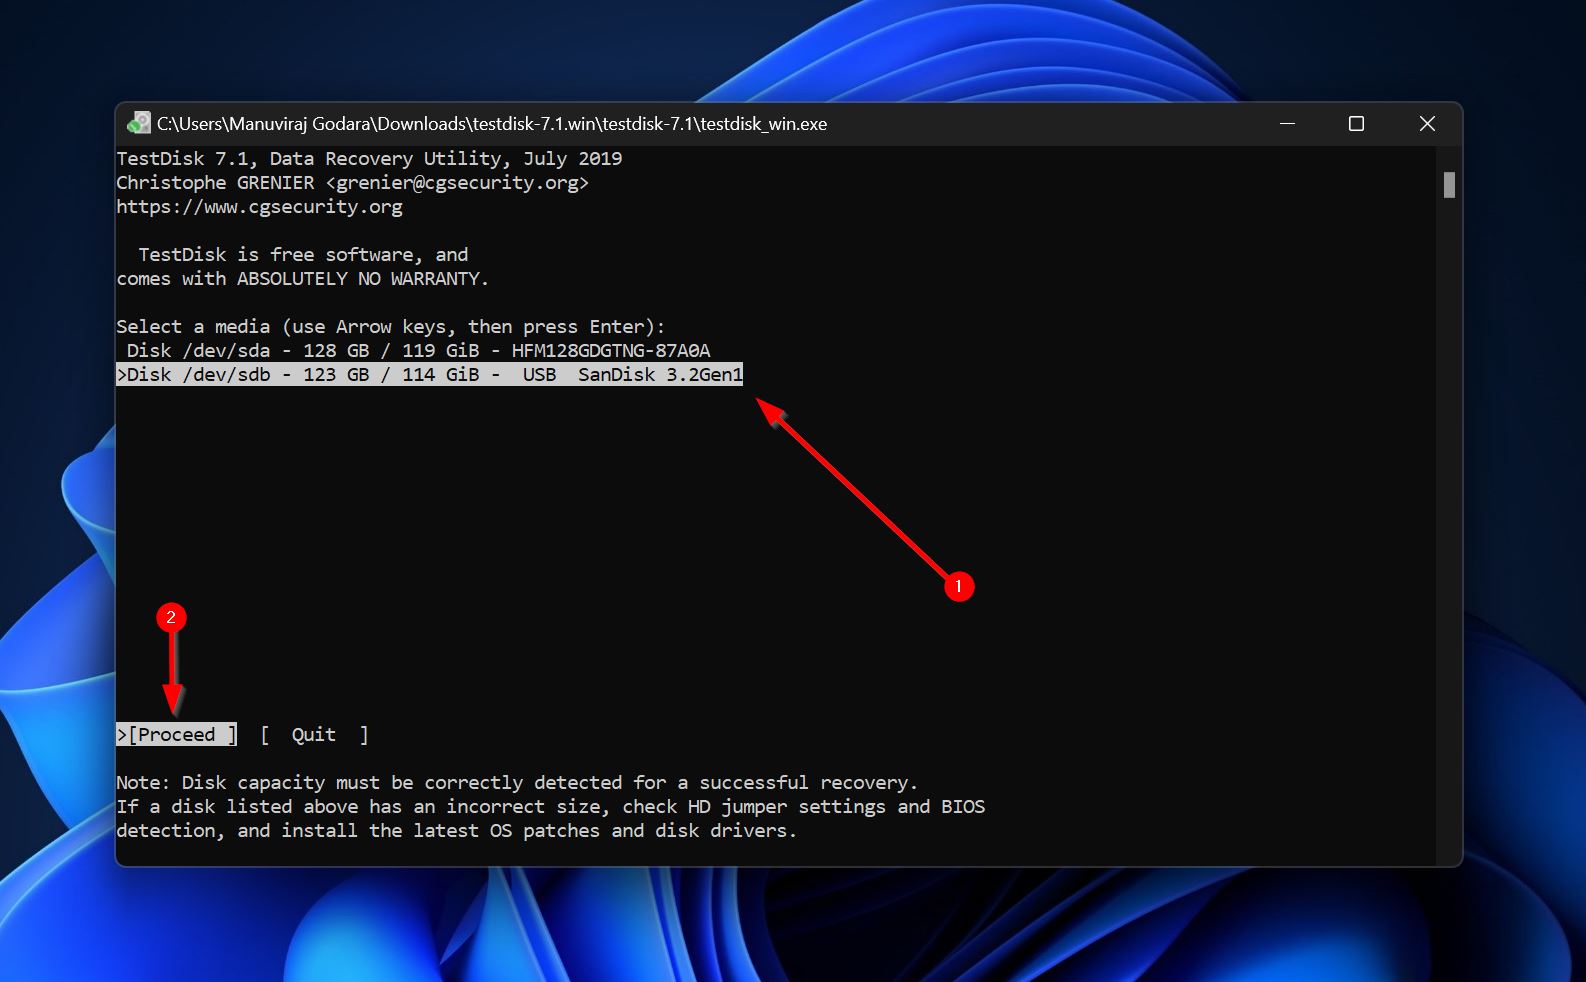
- Select the drive with the NTFS volume and select Proceed.
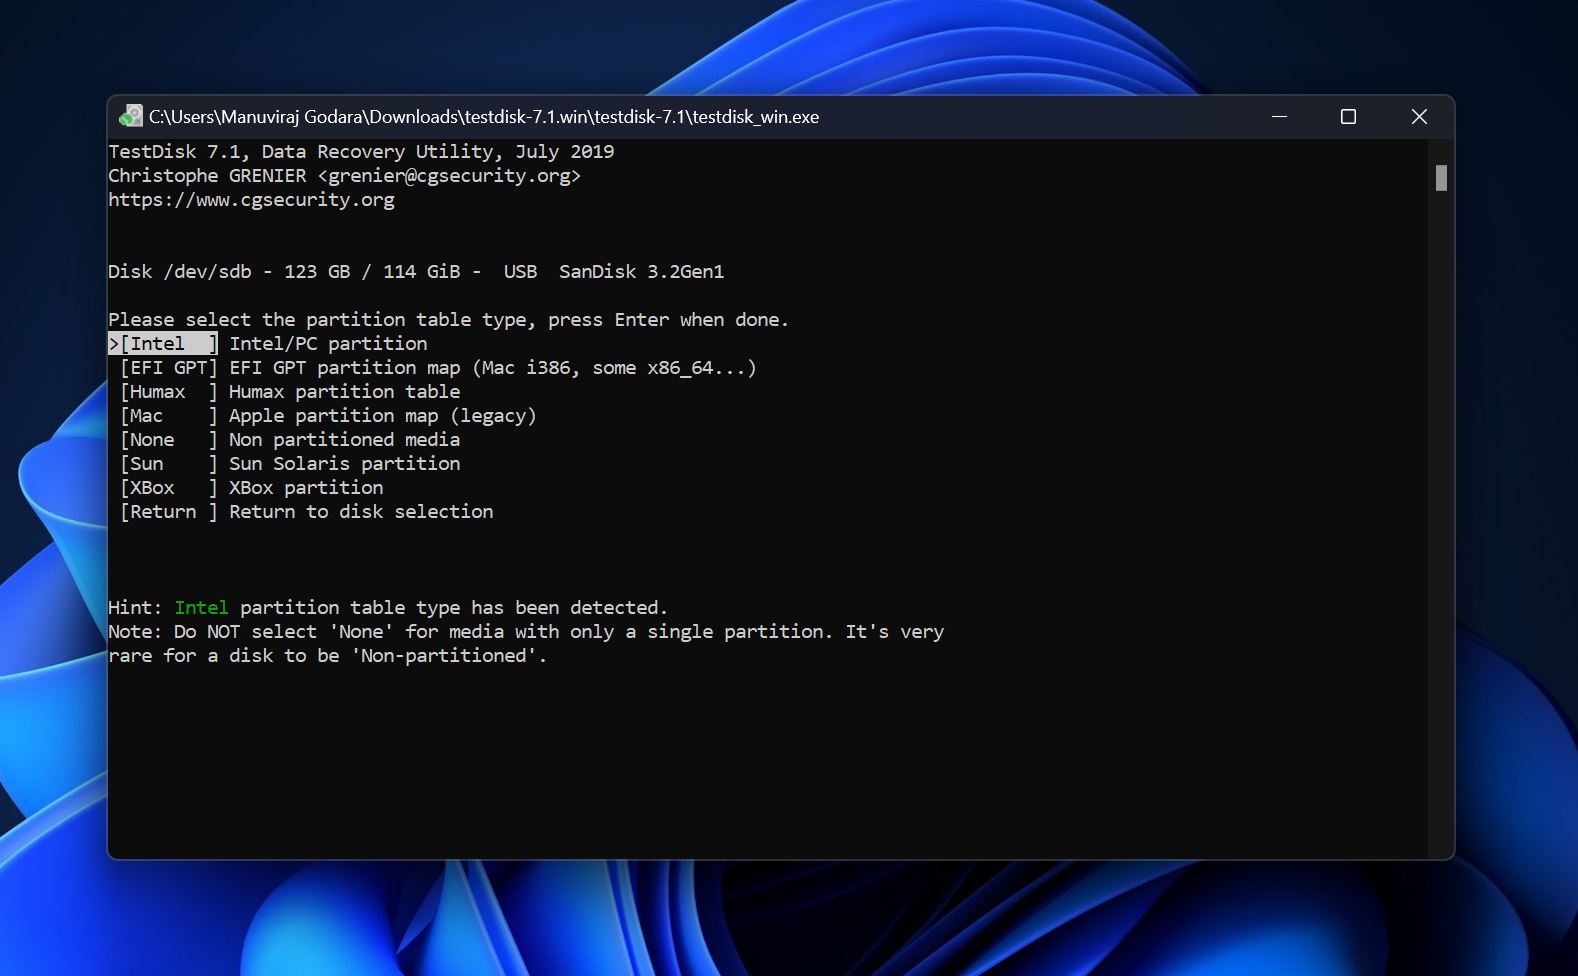
- Select the partition table type. It’s best to simply press Enter on this screen since TestDisk automatically detects the partition table.
- Highlight Advanced and press Enter.

- Choose the NTFS partition using the Up and Down arrow keys, then select the Boot option and press Enter.

- Select the Repair MFT option and press Enter.
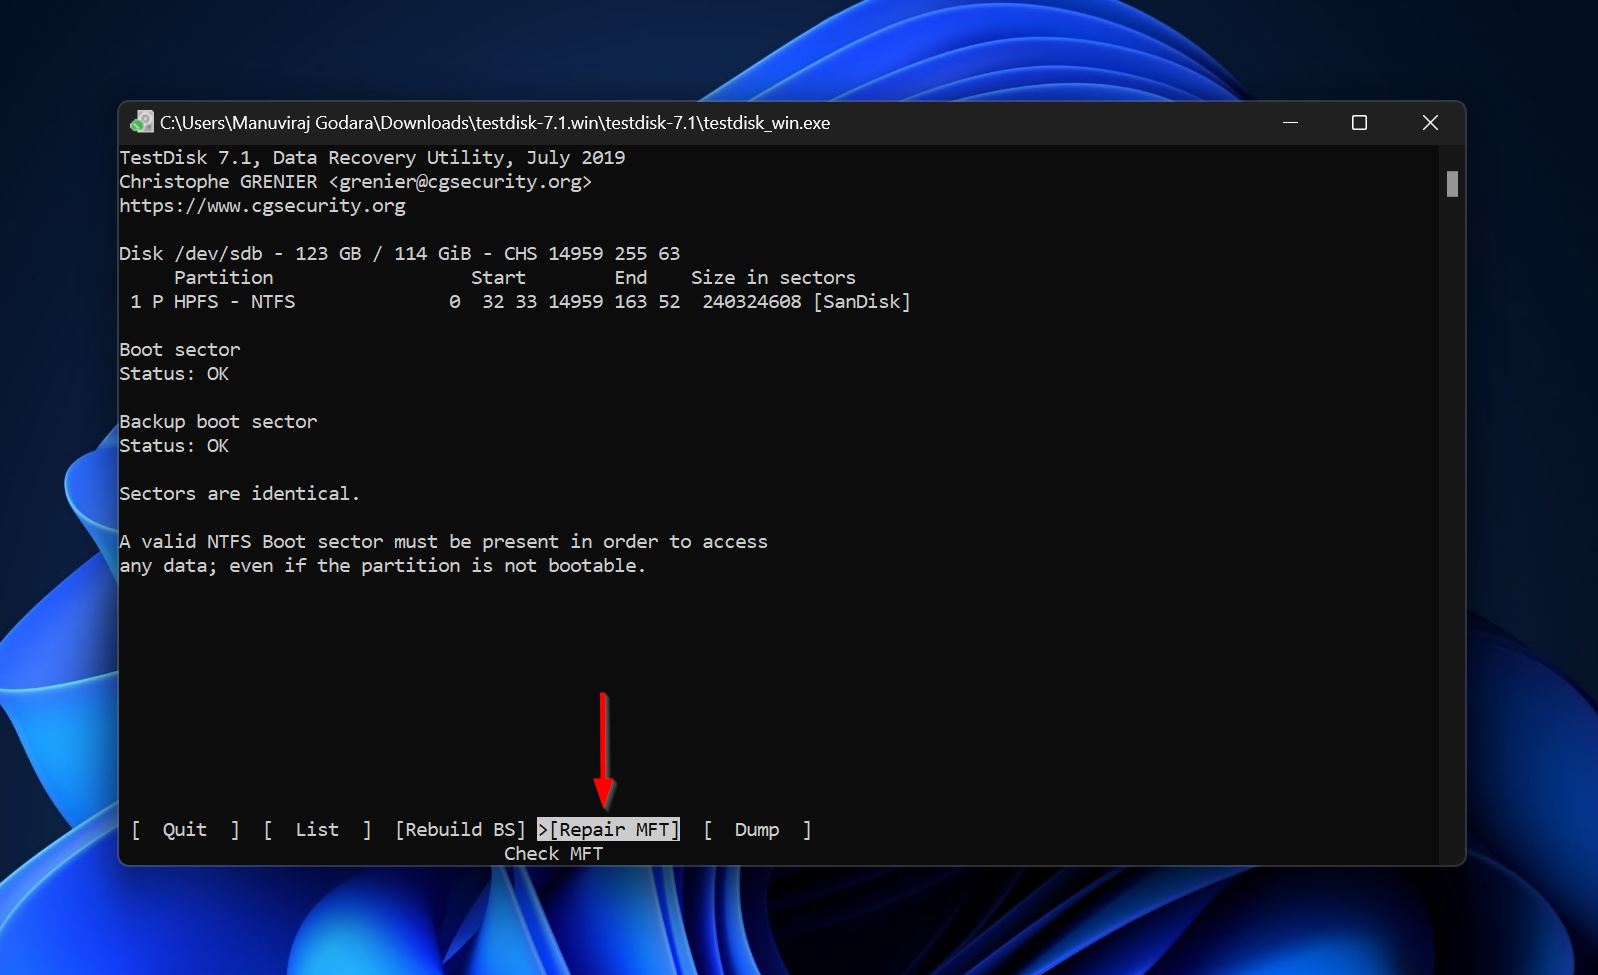
- TestDisk will restore the master file table. However, if both the main MFT and MFTmirr are damaged, it won’t be able to fix the issue.
Fix 5: Repair the Master Boot Sector (MBR) Using Bootrec
The Bootrec utility in Windows lets you repair the entire boot sector of your drive and this can sometimes resolve issues with the MFT as well. You can use Windows installation media to run Bootrec, in case you’re unable to boot into Windows.
To repair the MFT using Bootrec, follow these steps:
- Connect the Windows installation media to your PC and power it on.
- On the Install Windows screen, choose Repair your computer.
- Click on Troubleshoot > Advanced options > Command Prompt.
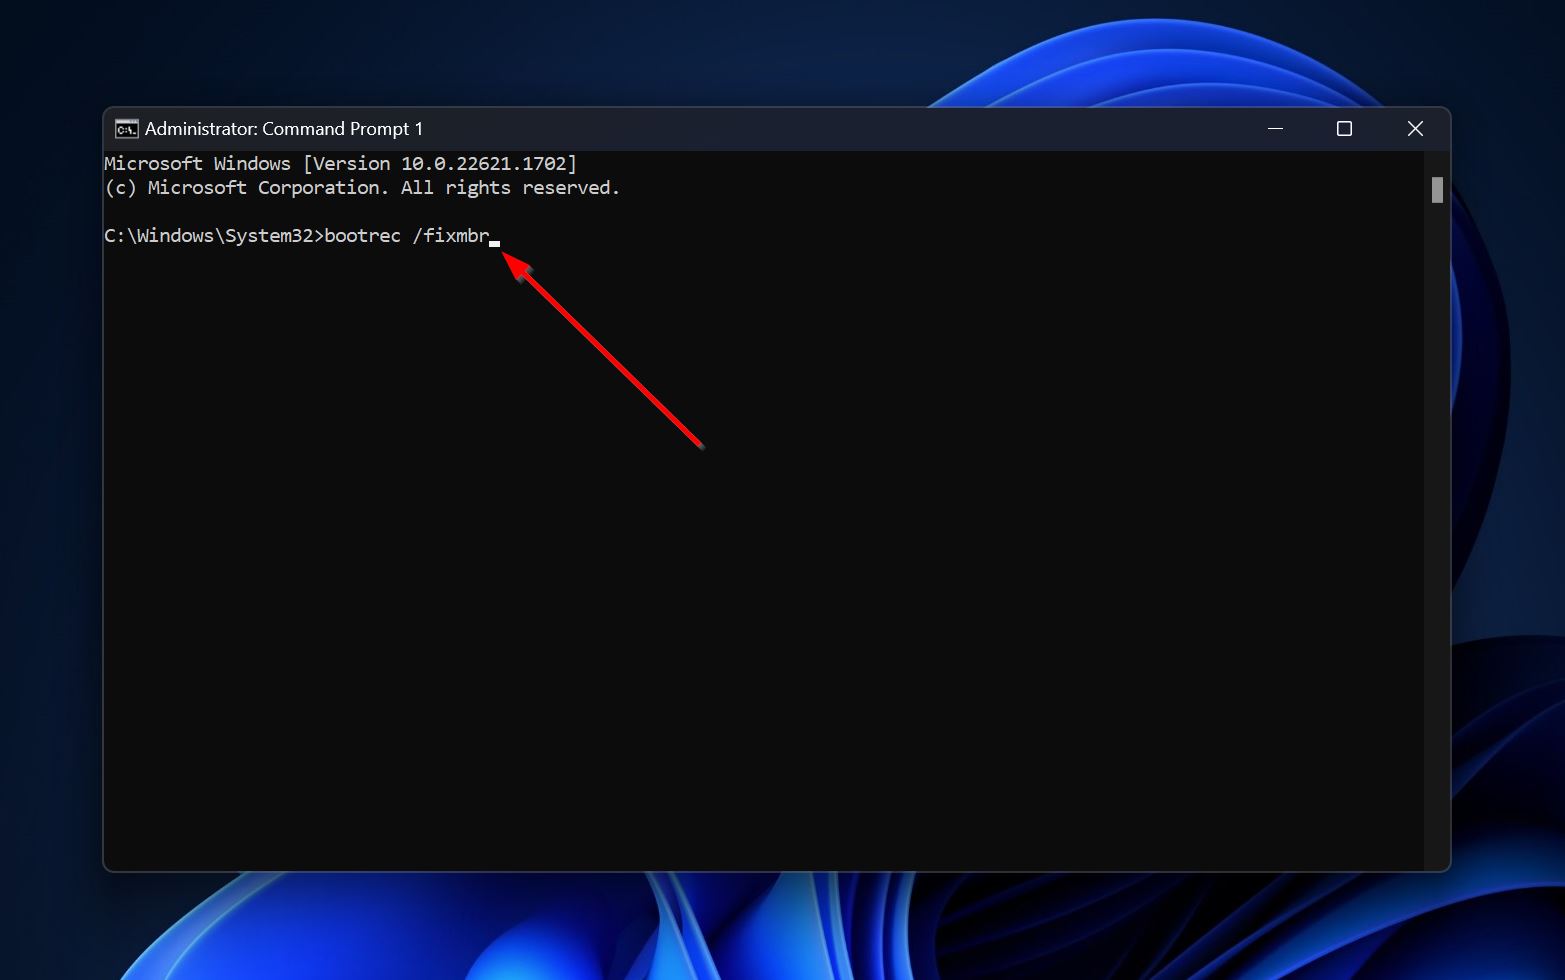
- Type bootrec /fixmbr in the console and press Enter.
Fix 6: Reformat the Hard Drive
If your drive is in good physical condition and none of the methods above worked for you, it’s best that you format it. This will repair the corrupt master file table, at the cost of erasing all your data. That’s why it’s best to recover your data before proceeding with this fix.
If the MFT issue appears on a system drive, you’ll need to use Windows installation media and choose to format the drive in the Windows installation screen. If it’s an external drive or a non-system internal NTFS drive or volume, you can format it using Disk Management:
- Search for “disk management” in Windows Search (Windows Key + S). Click on Create and format hard disk partitions from the search results.
- Right-click on the volume with the corrupt MFT and click on Format.

- Select the format parameters, such as the file system and label. Click on OK.
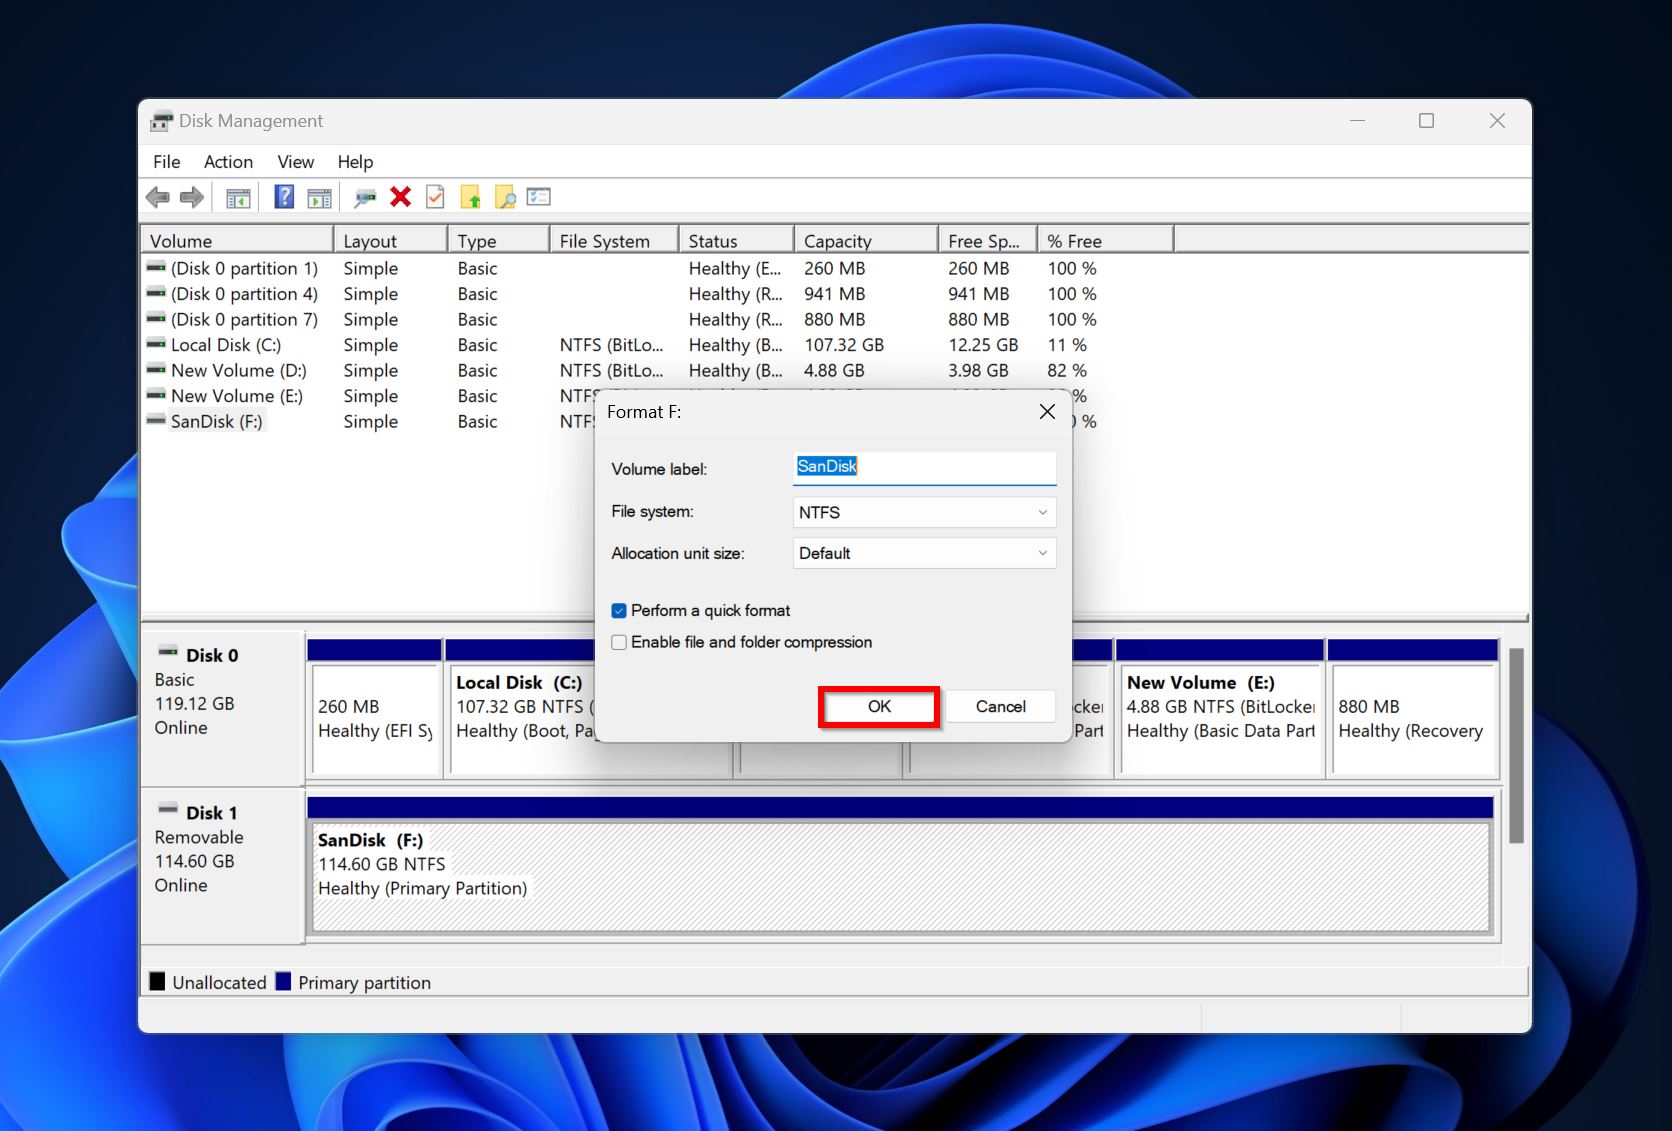
If the Perform a quick format option was left checked, you can recover data from the drive even after it was formatted. Just ensure that you don’t write many new files to the drive, as it can reduce the chances of a complete recovery.
Fix 7: Replace the Drive
If none of the methods above bore any fruit, your drive may simply be too corrupted. In such a case, it’s best to attempt data recovery – using a DIY tool, or a professional data recovery service, and then replace the drive.
How to Recover Data from a Corrupted Drive
If you opted to format the drive, or you’re unable to repair the MFT, you can still recover your data from the hard drive using third-party data recovery programs.
In case you want to recover data from an internal system drive, it’s best to use a disk enclosure and connect it to a working computer using a SATA to USB cable. Here is an excellent guide on how to do this.
When it comes to data recovery programs, you’re spoiled for choice. In our tutorial, we opted for Disk Drill – thanks to its advanced data recovery algorithm, and unmatched ease of use. It works with all types of drives and can recover data from your drive even if it has no file system at all, i.e., it is RAW. The best part is, you can try the program for free and recover up to 500 MB of data without paying a penny.
Here’s how to recover data from a drive with a corrupted MFT, using Disk Drill:
- Download Disk Drill and install it.
- Open Disk Drill, select the NTFS drive with the corrupt master file table, and click on Search for lost data.
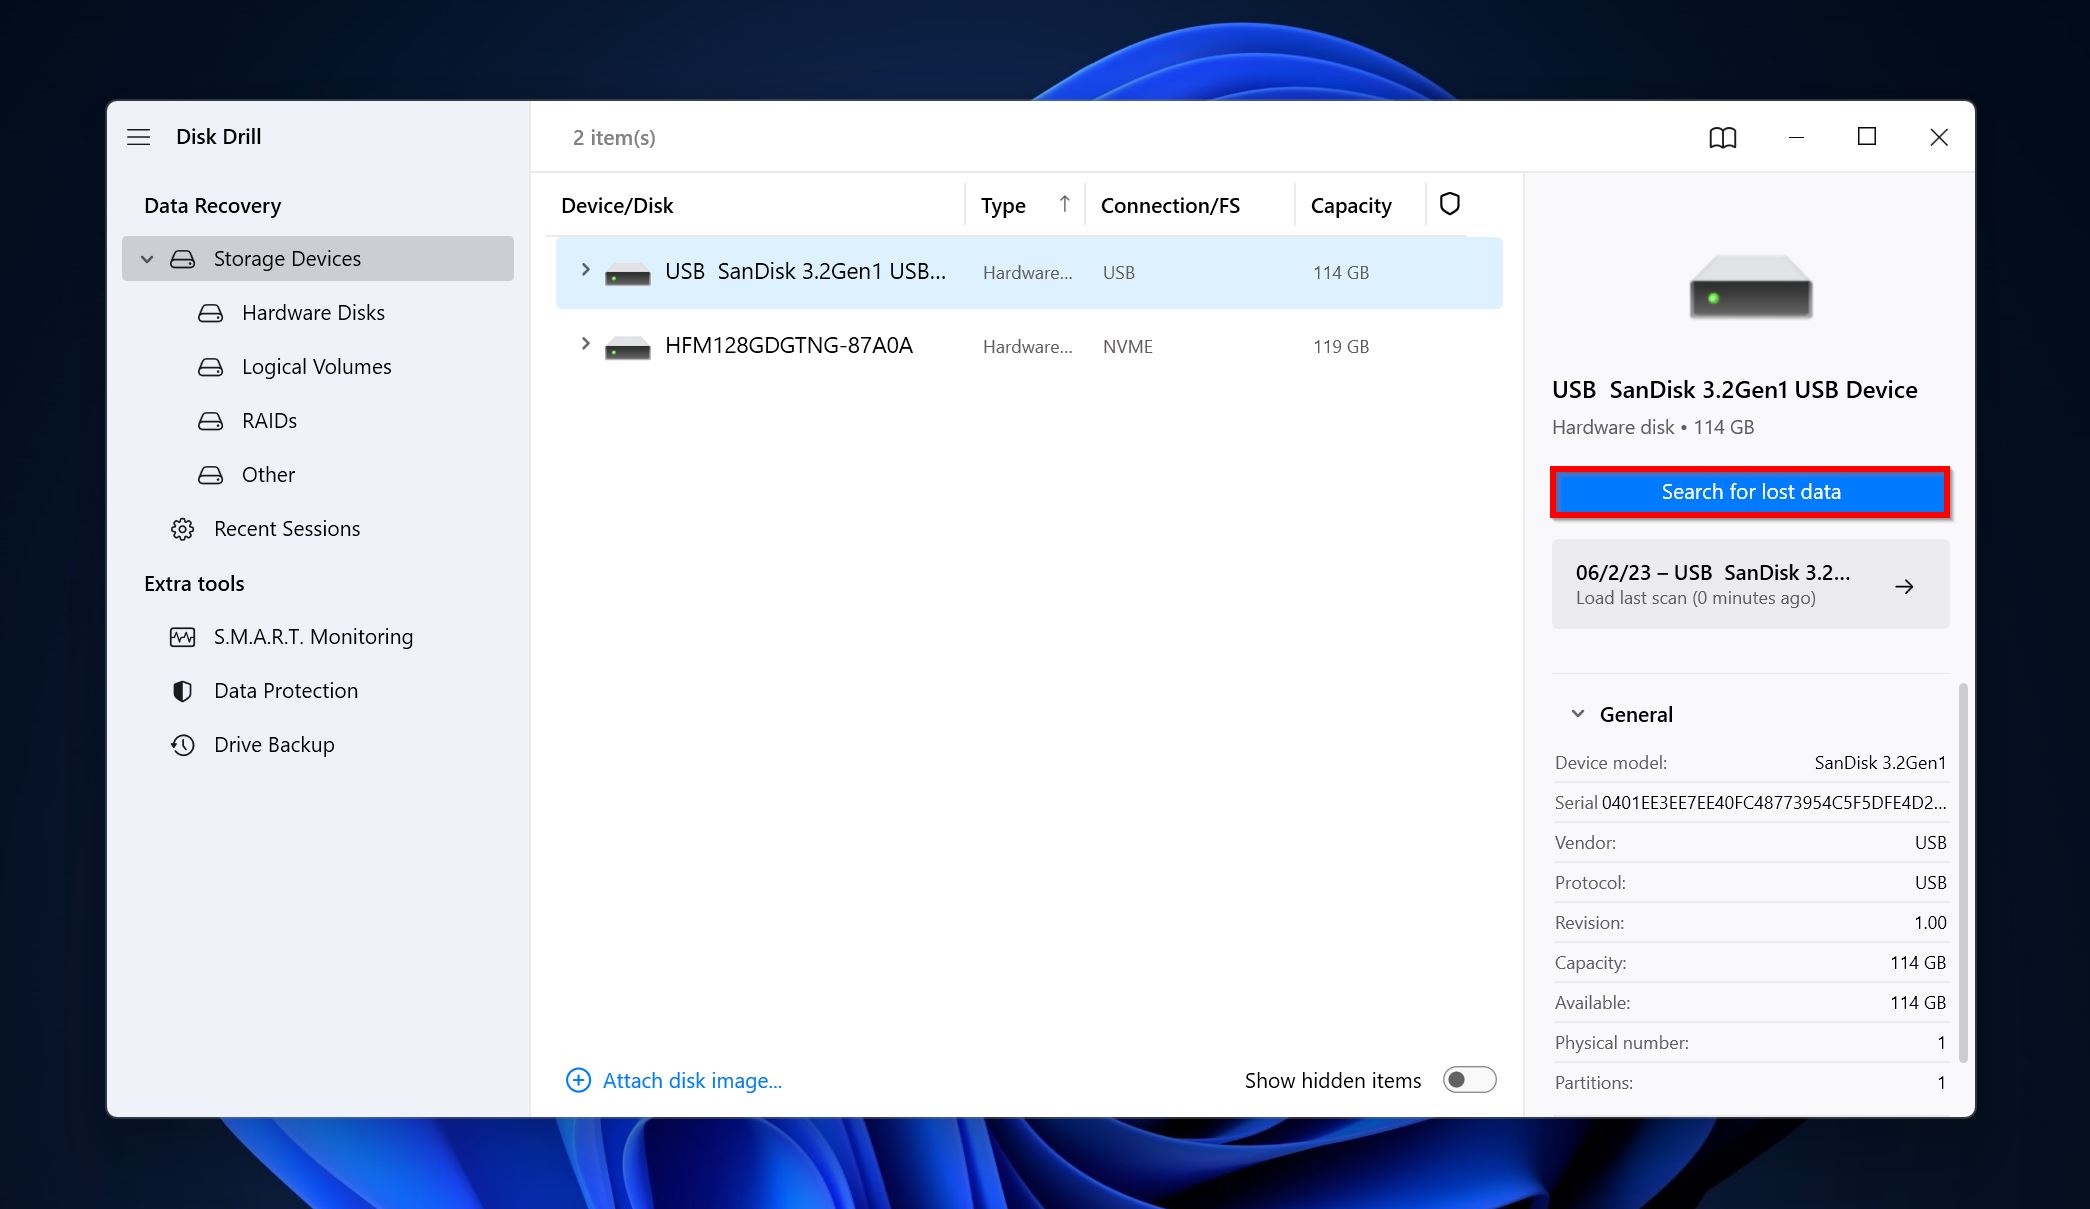
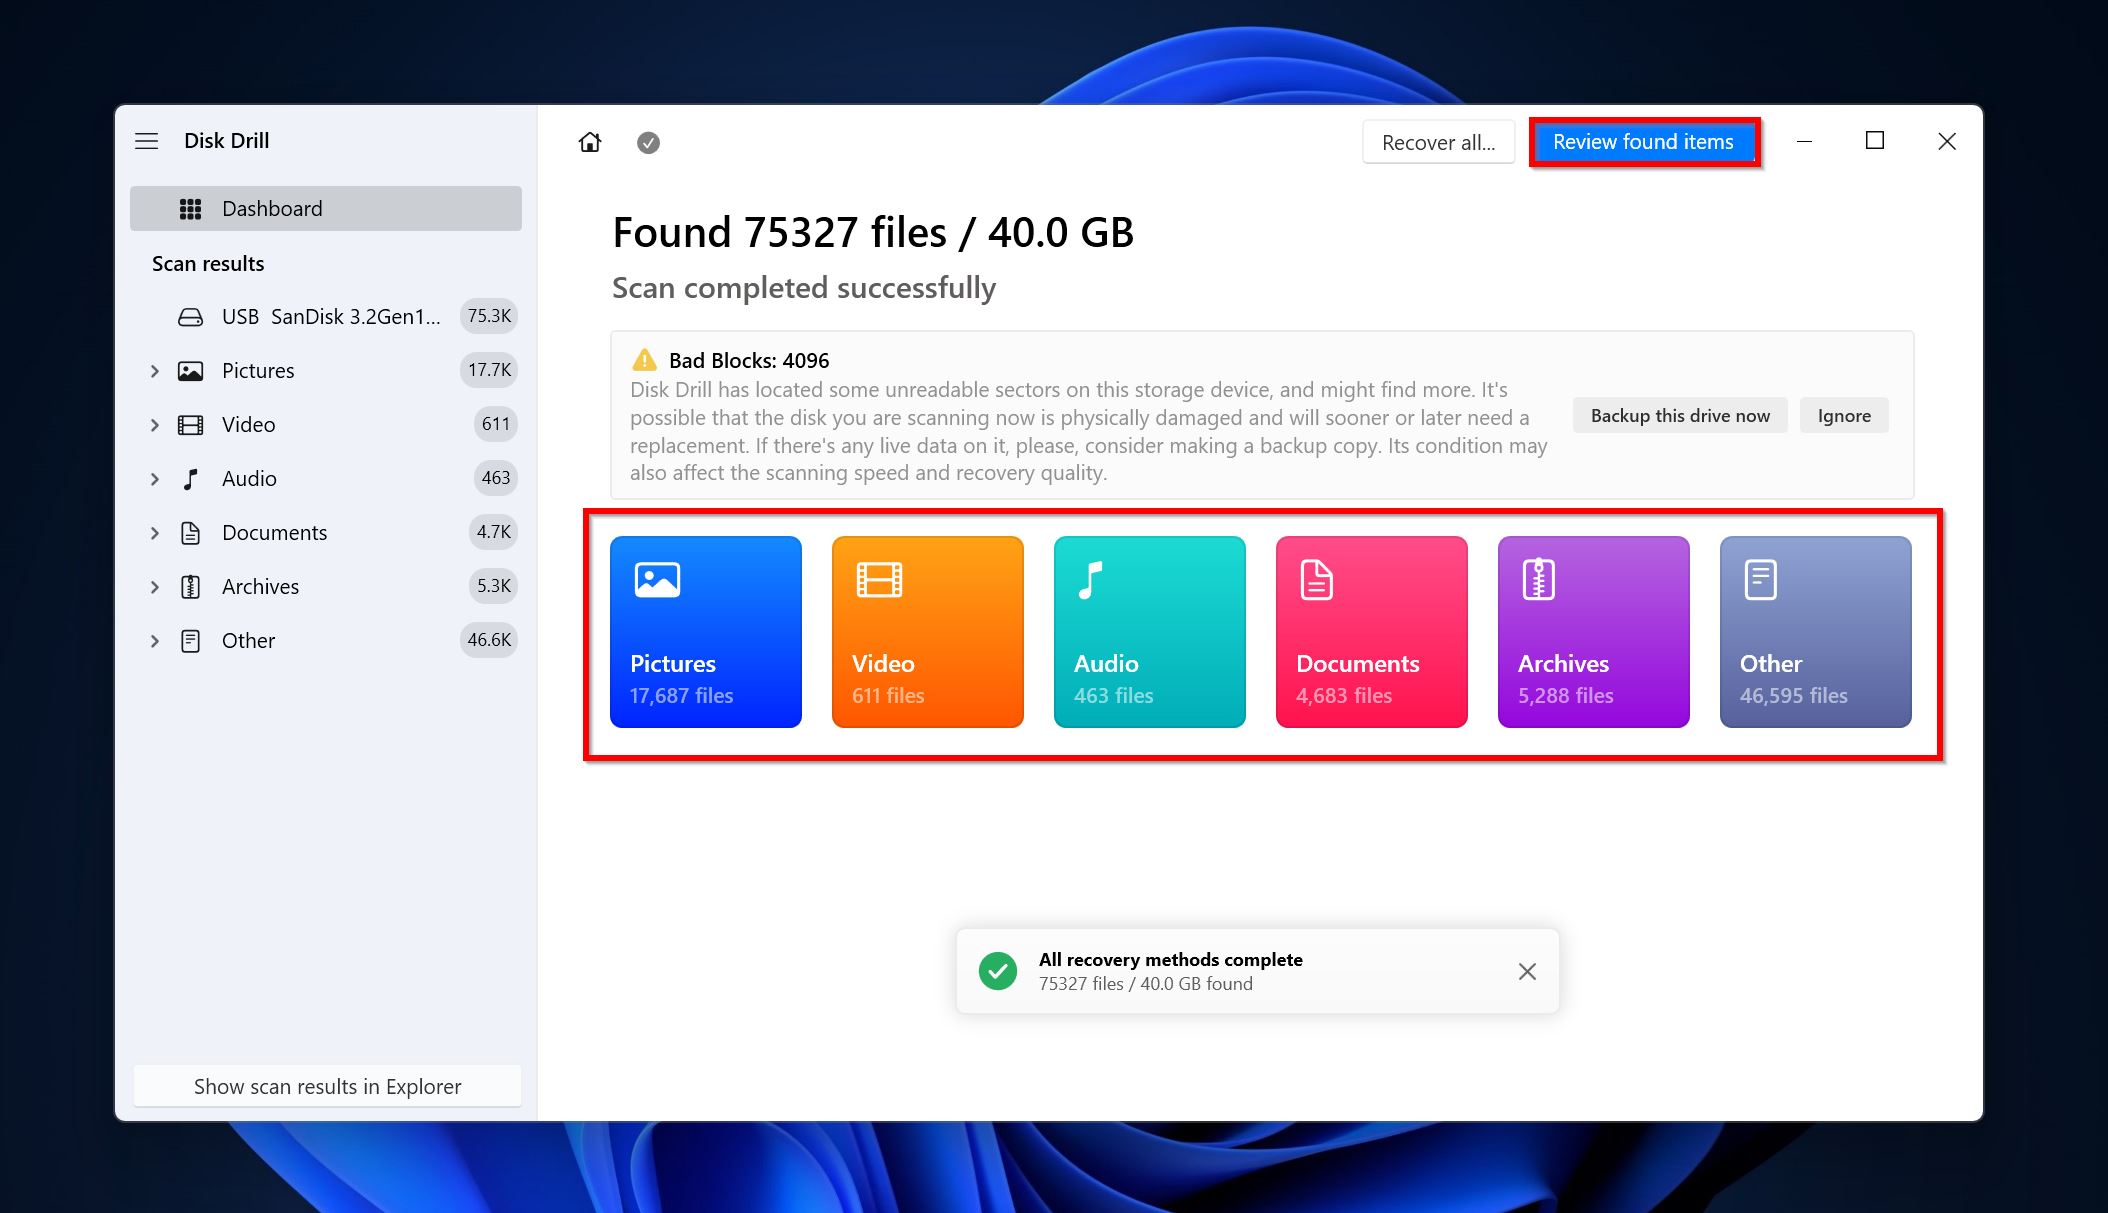
- Click on Review found items to view the data that Disk Drill discovered on the disk. You can opt to directly filter out the results by clicking on the relevant filetype you wish to recover (Pictures, Video, Audio, Documents, Archives, and Other).
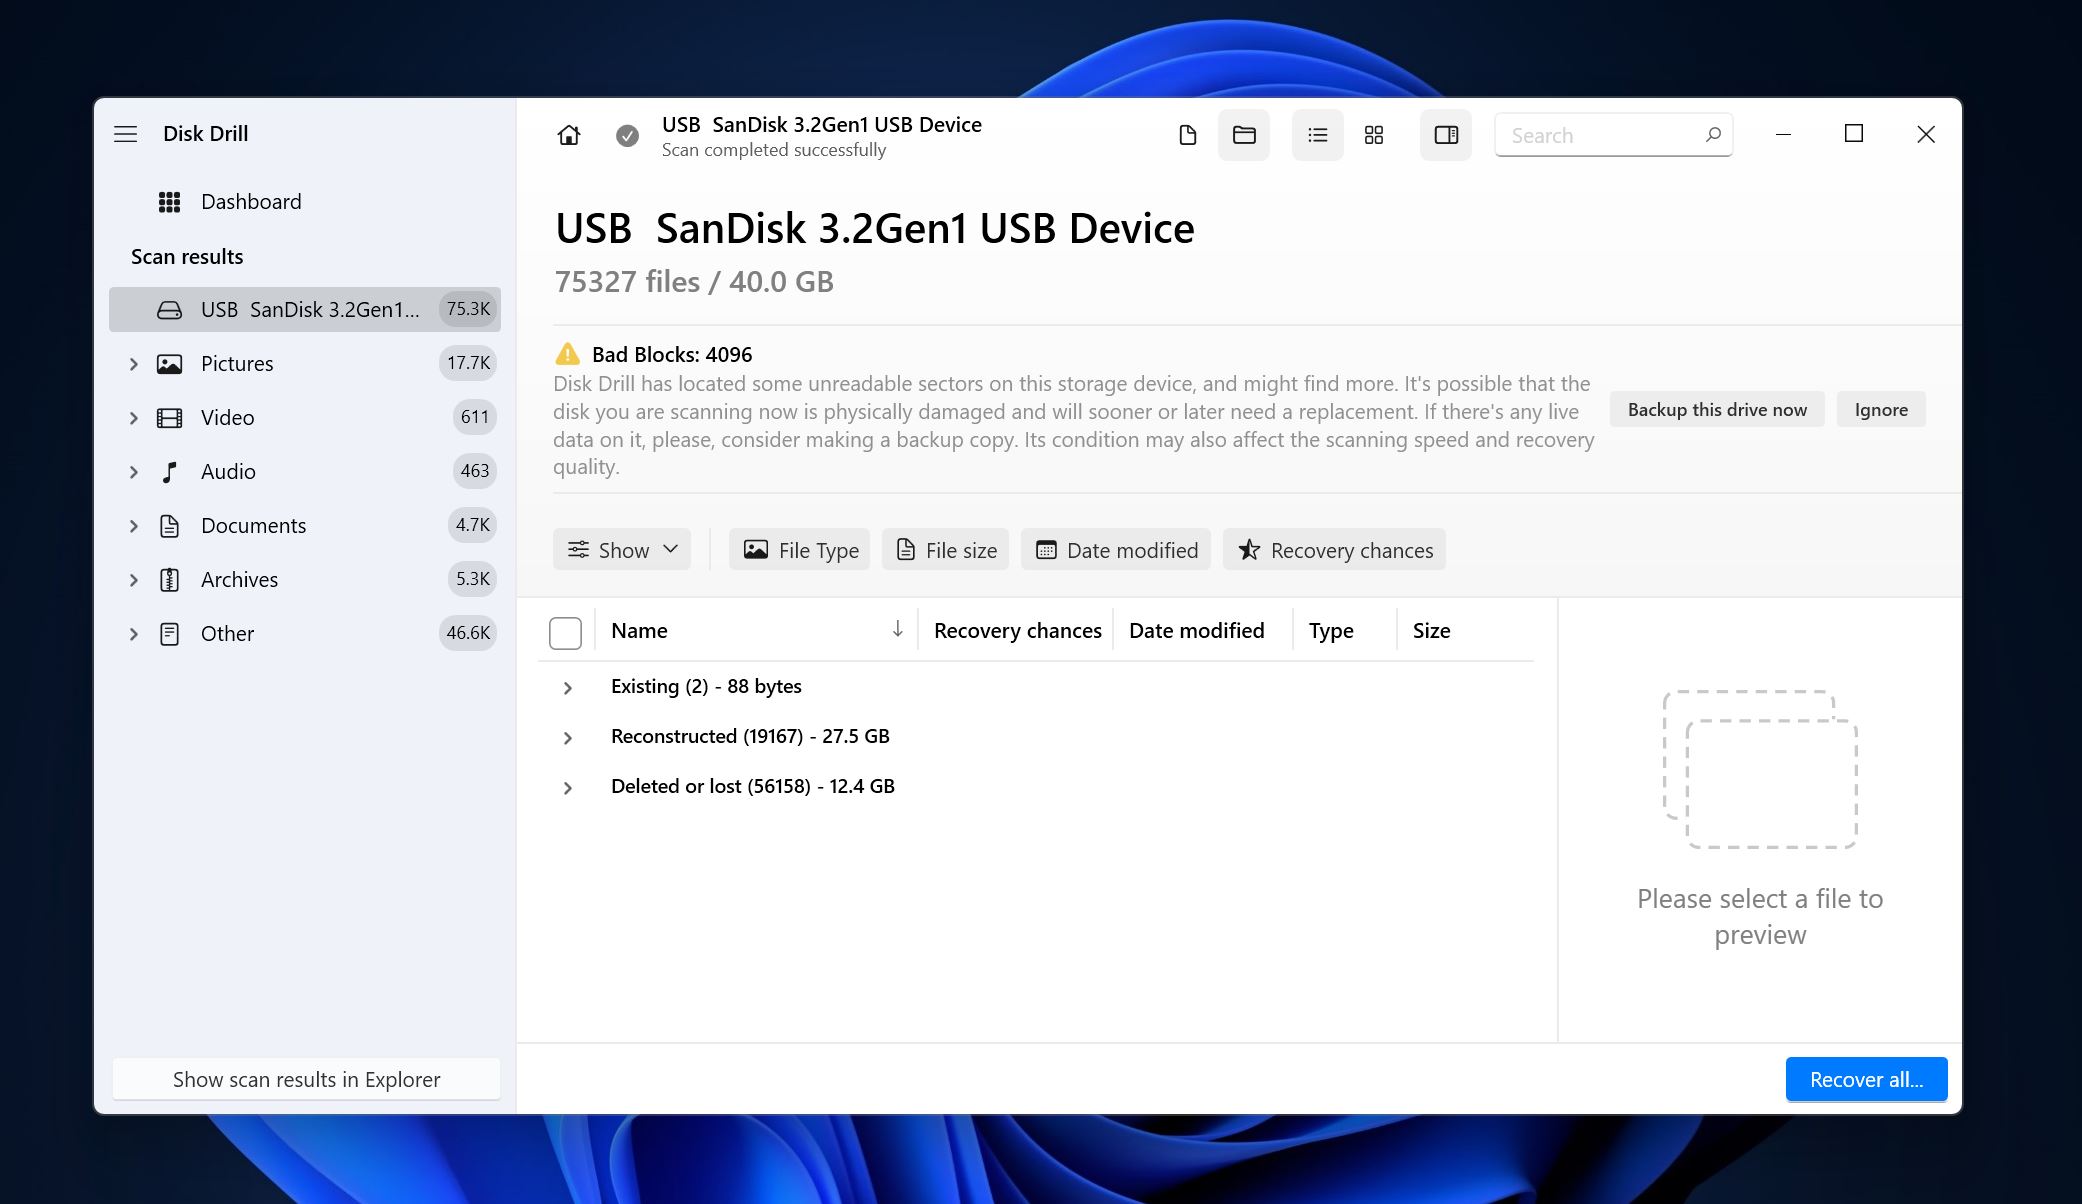
- Expand the Existing section to view the currently stored files on the disk. Click on Deleted or lost and Reconstructed to display files that were deleted earlier but are still recoverable by Disk Drill.
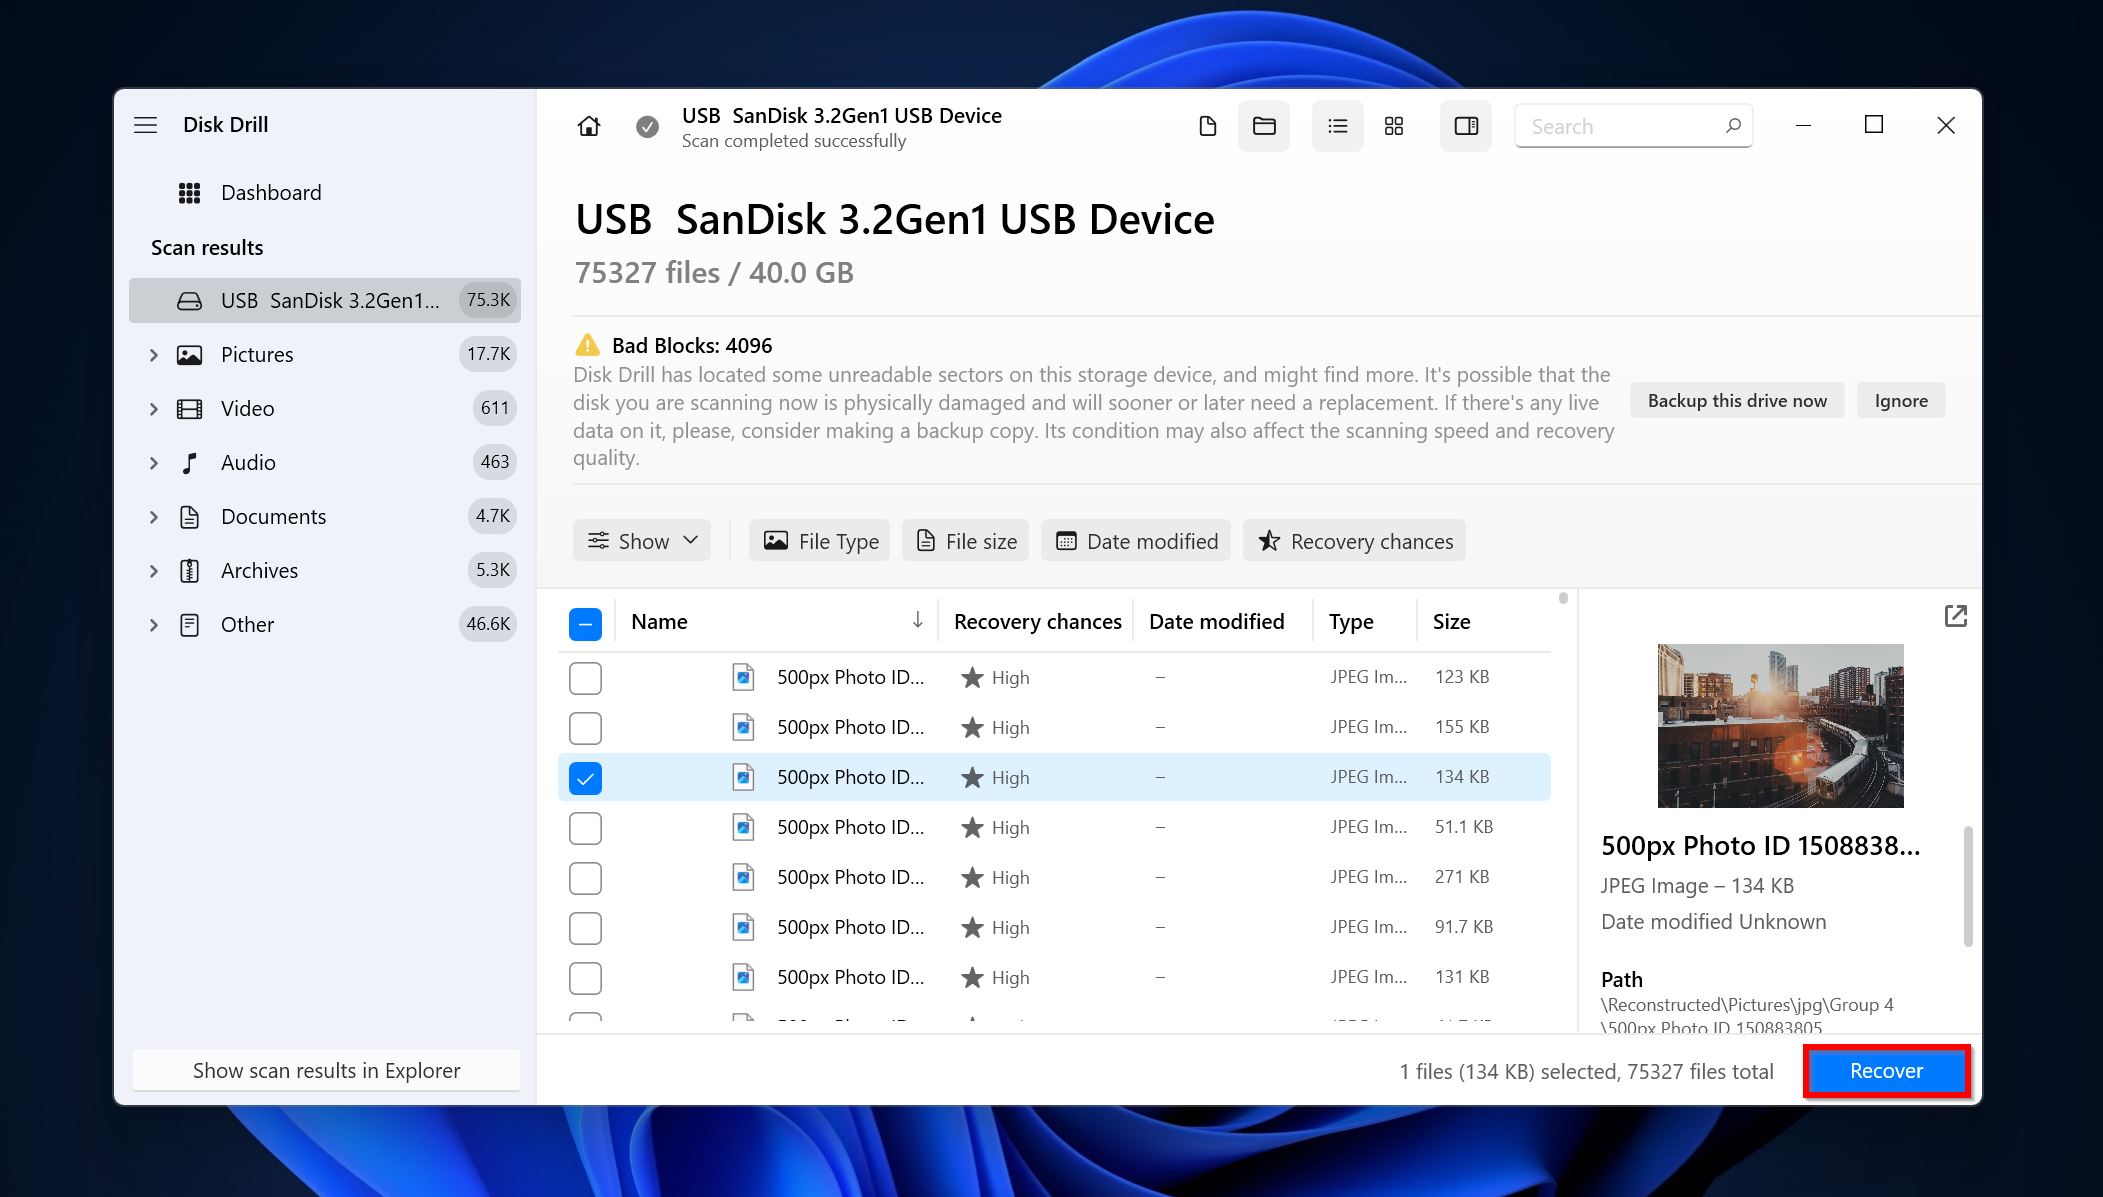
- Use the checkboxes to select the files you want to recover. Disk Drill displays a preview of the currently selected file automatically. However, you can click on the eye icon next to the file’s name to manually preview it. Click on Recover after confirming your selection.
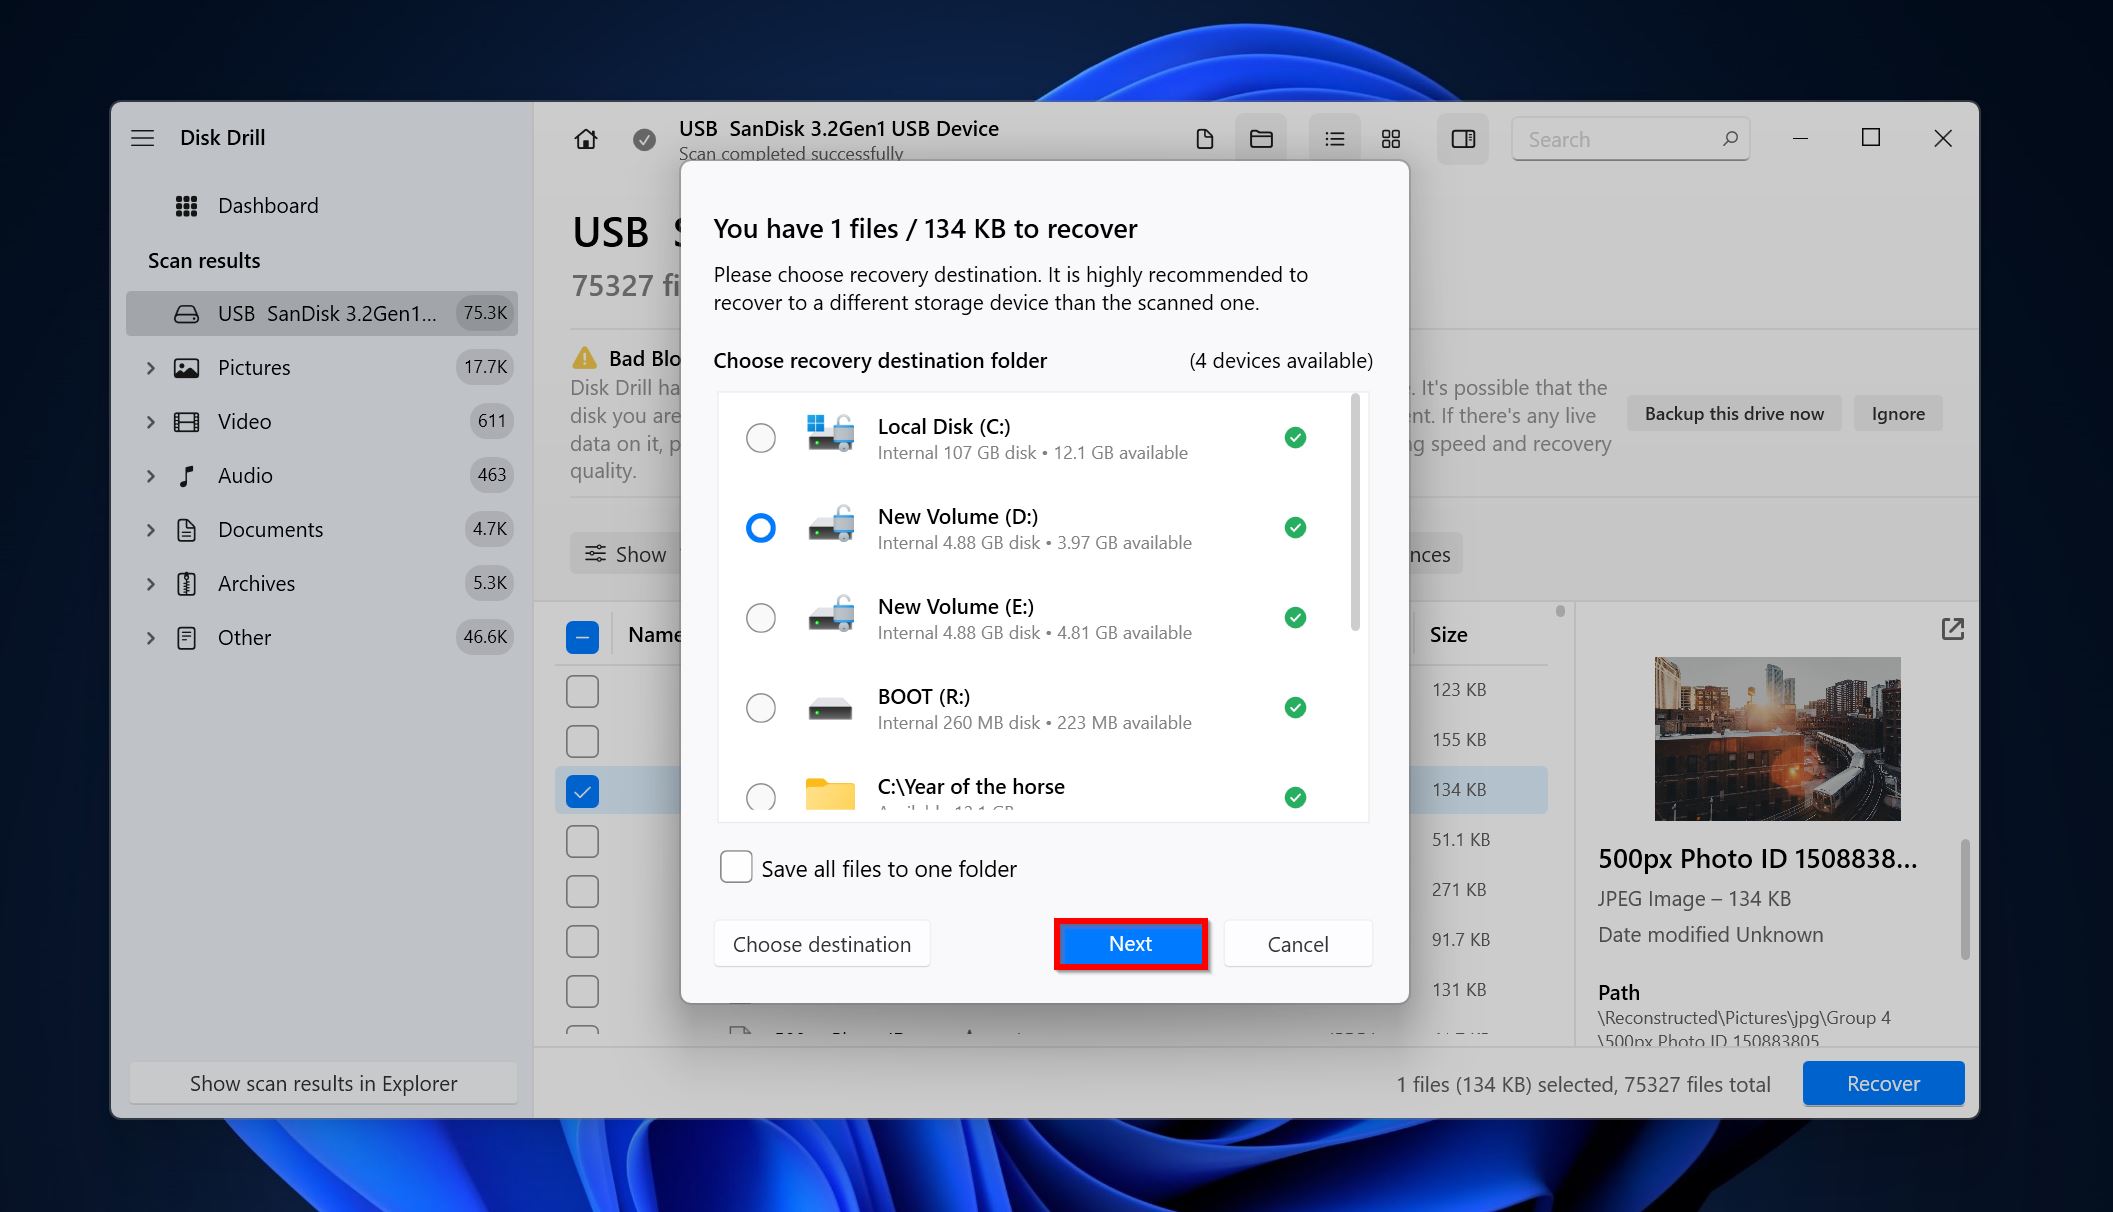
- Choose a recovery destination for the files and click Next.
- Disk Drill will recover your data.
Conclusion
In disk corruption errors, you can lose access to your data and occasionally the only way to resolve the problem is to format the disk. While data recovery programs can help, the only sure shot way to shield yourself against data loss in scenarios such as a corrupt MFT – is to create regular backups. Ideally, schedule weekly backups to the cloud and a local storage drive.
