 Hard drive corruption is one of the worst types of data loss, and it can strike at any moment. While there are steps you can take to minimize the chances of it happening, there’s no guarantee that you’ll be completely safe.
If your hard drive has become corrupted, you need to act quickly in order to safely recover your data and restore the hard drive to working order. Read on to find out how to fix hard drive corruption.
What to Do If a Hard Drive Becomes Corrupted
There are two critical actions you must take when you find your hard drive has become corrupted:
- Stop using it (and preferably unplug it safely).
- Recover the data from it.
The reason why you should stop using the drive is that your data isn’t actually gone, it’s just in a vulnerable state. For example, if you need to recover data from an internal hard drive, refrain from using it until you’re ready to perform recovery to reduce the chances of your data being overwritten and becoming unrecoverable.
How to Get Data From a Corrupted Hard Drive
Before you attempt to repair a corrupted hard drive, you should look at recovering the data from it first to avoid losing it in the process.
The method you use to get data from your corrupted hard drive will depend on your situation.
Scenario 1: The Drive Is Visible and Reading the Correct Size
As long as your hard drive is visible in Disk Management and it is showing the correct size, there’s a good chance you’ll be able to recover your data with little issues. To do this safely, we’ll be using Disk Drill Data Recovery to create a disk image of the corrupted hard drive, eliminating the risks involved with performing data recovery on the live drive.
- Download and install Disk Drill.
- Click Drive Backup.
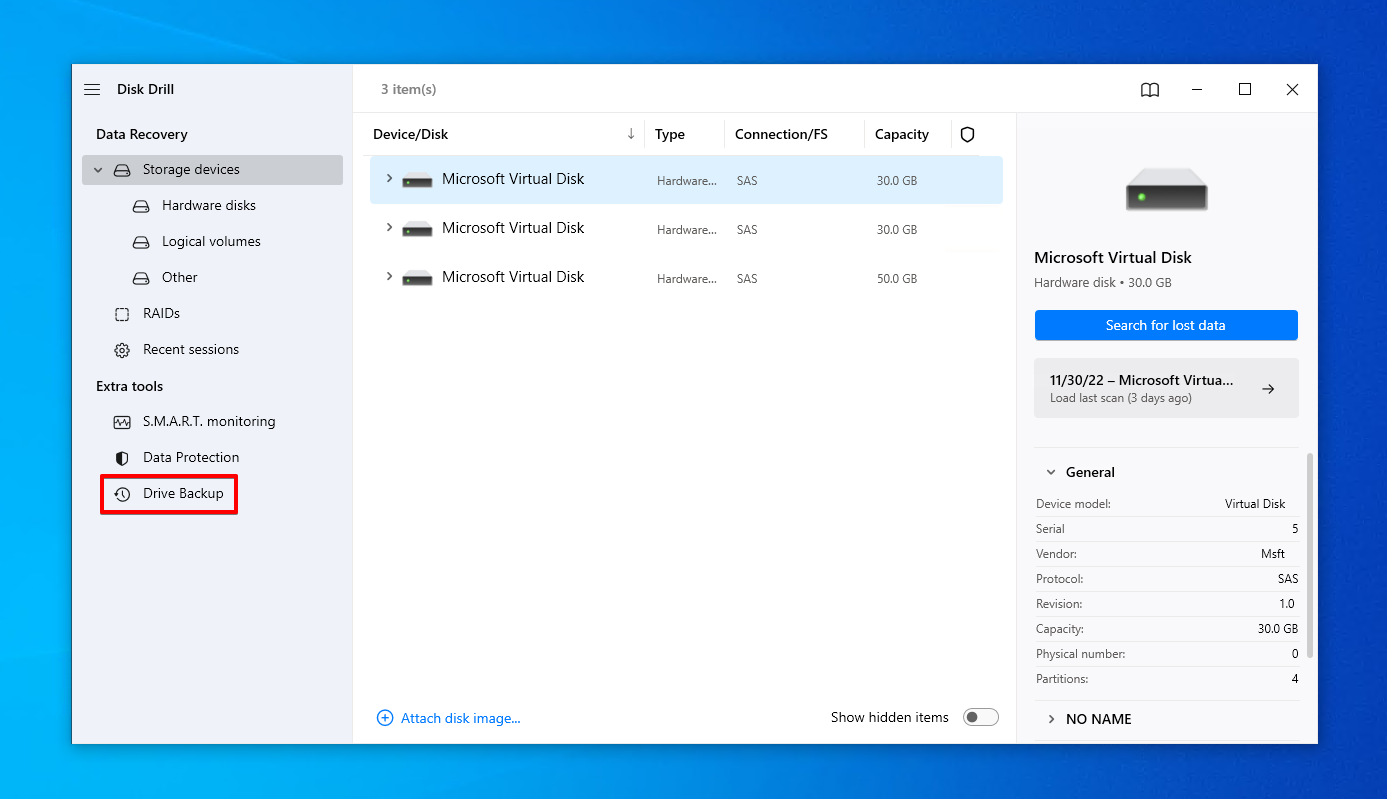
- Select the drive, then click Byte-to-byte Backup.
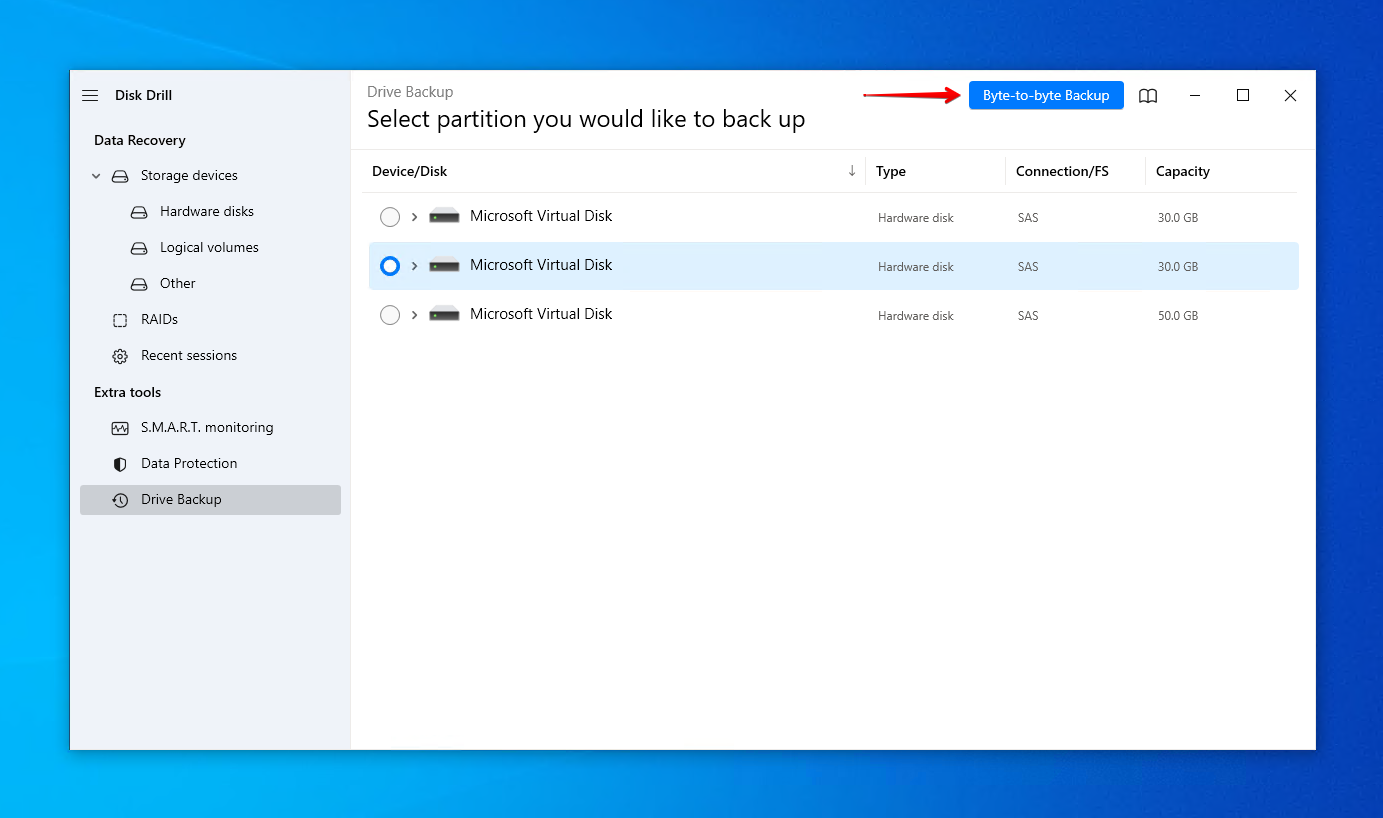
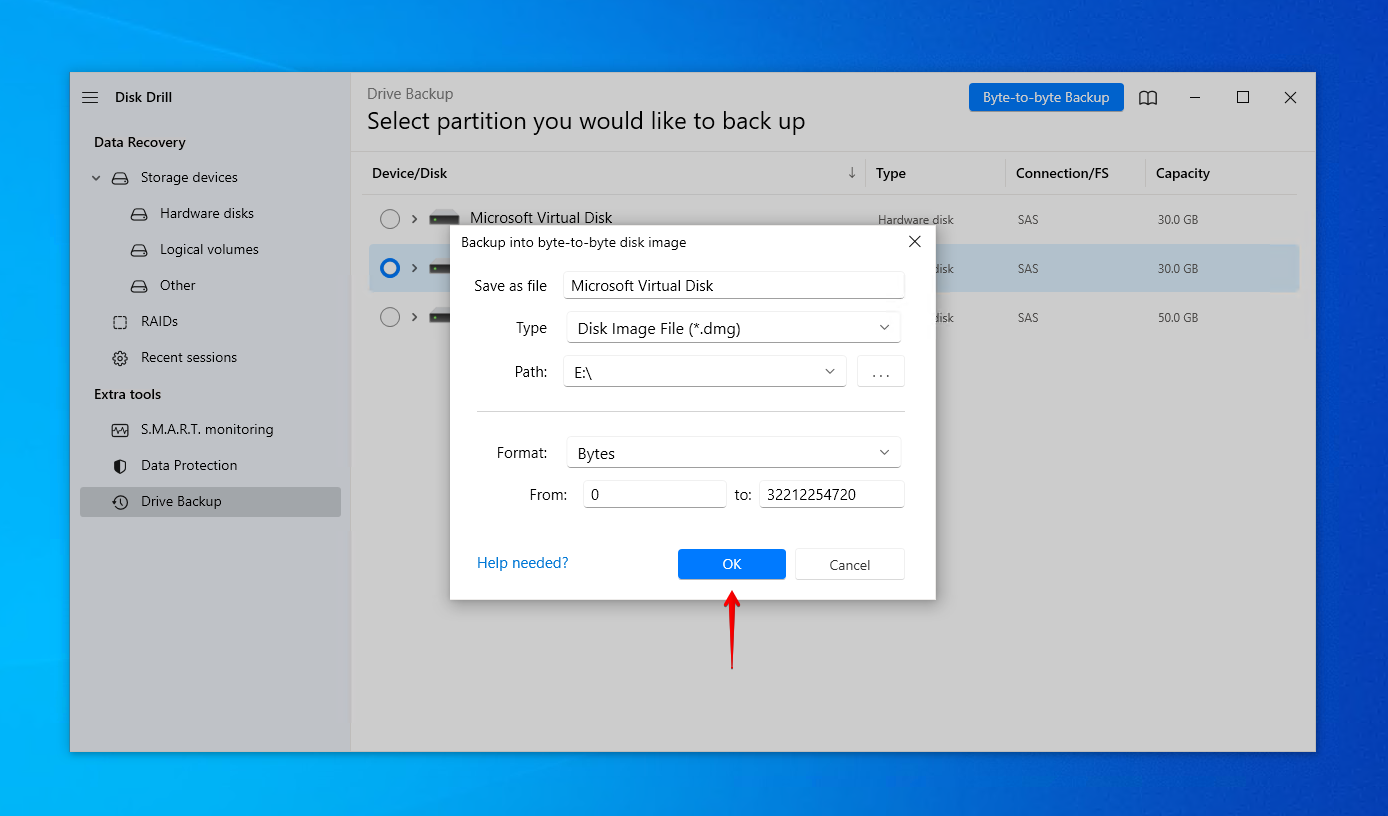
- Choose a path for the backup, then click OK.
- Return to Storage devices and attach the disk image.
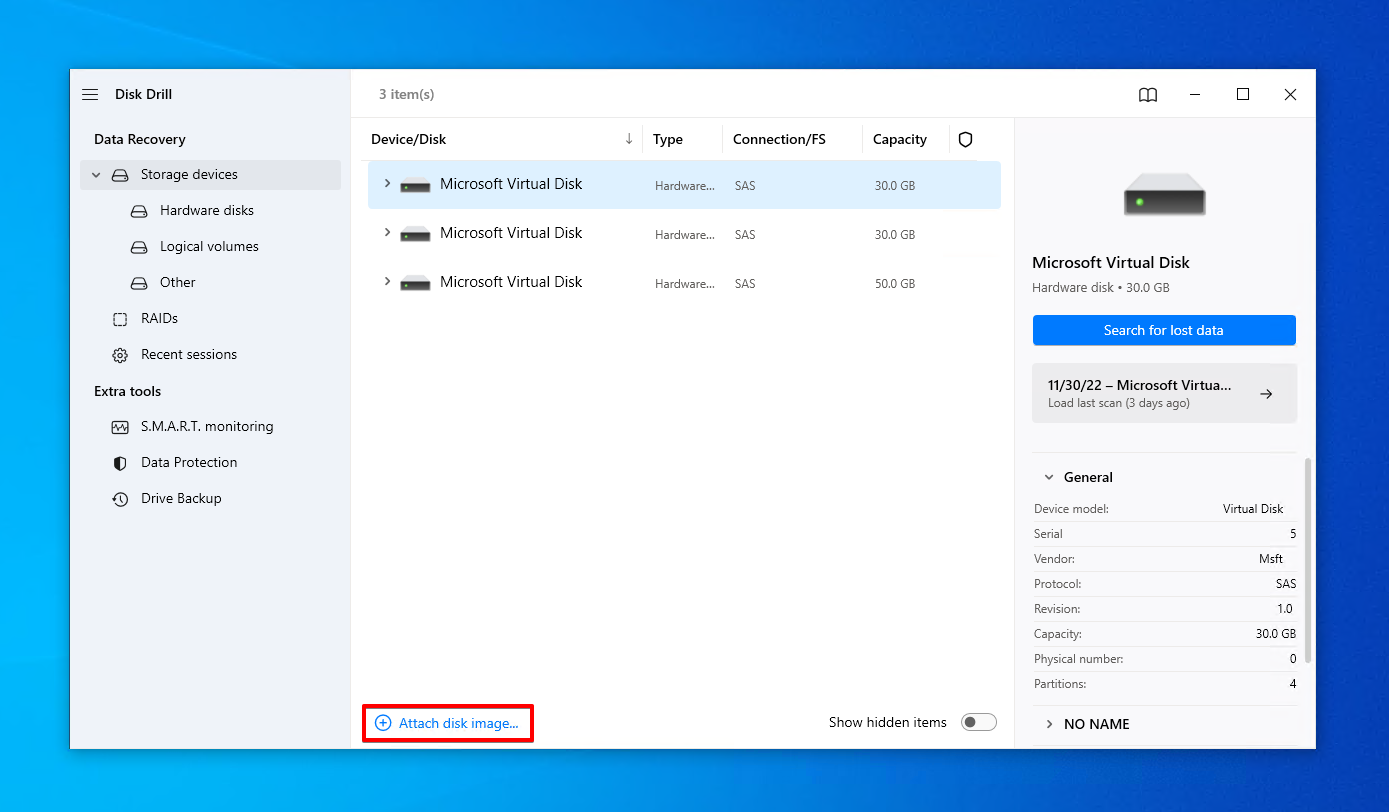
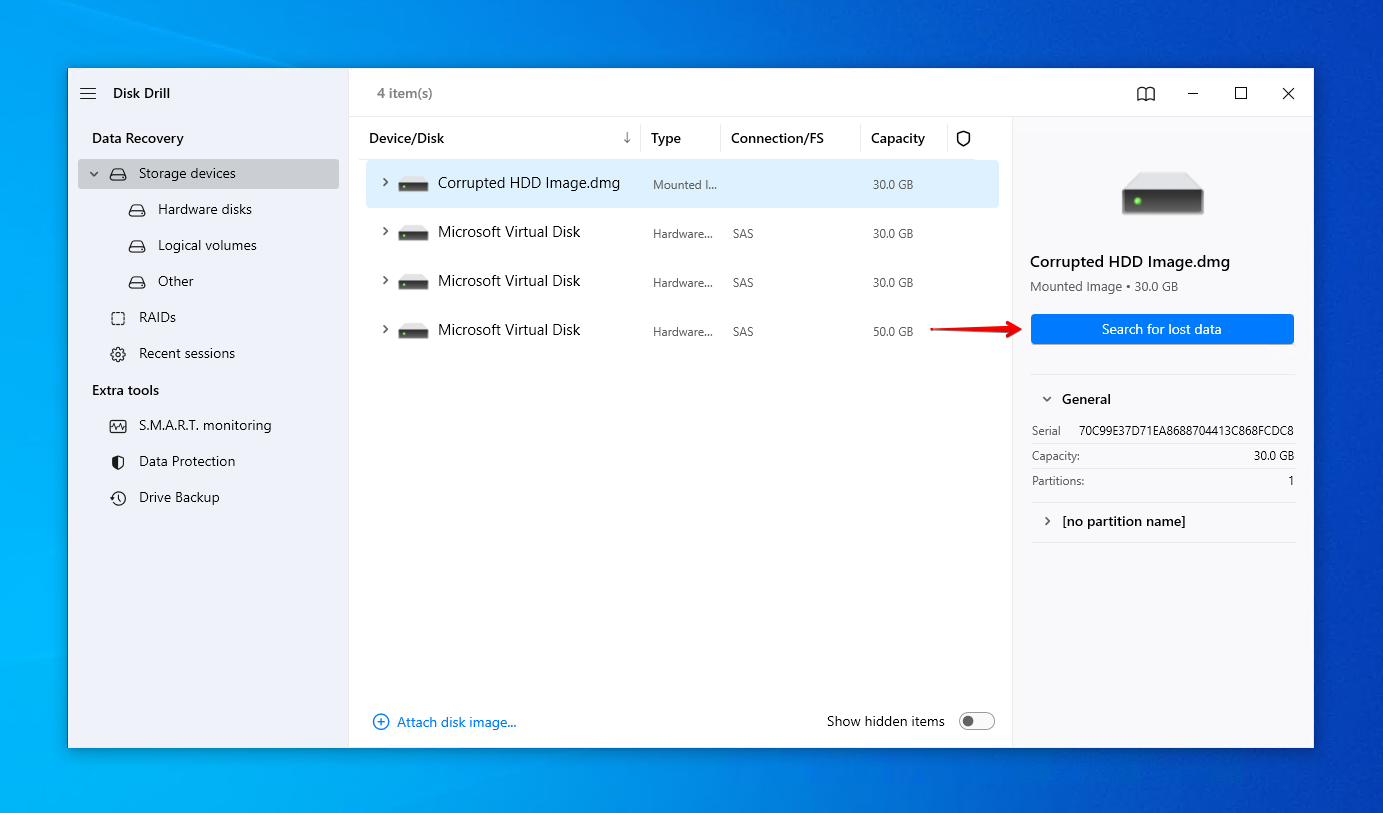
- Select the disk image, then click Search for lost data.
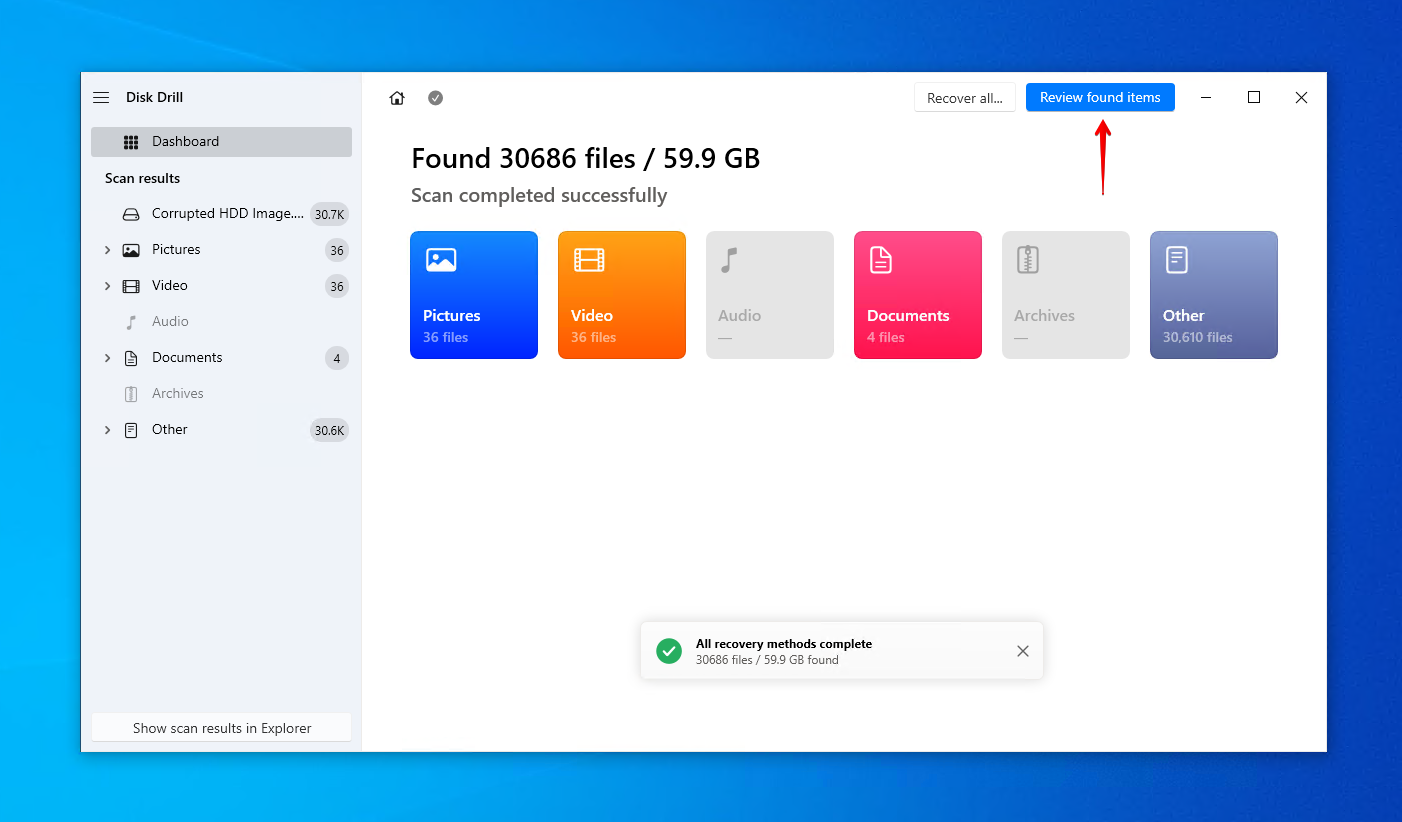
- Click Review found items when the scan is finished. If you want to recover everything immediately, click Recover all instead.
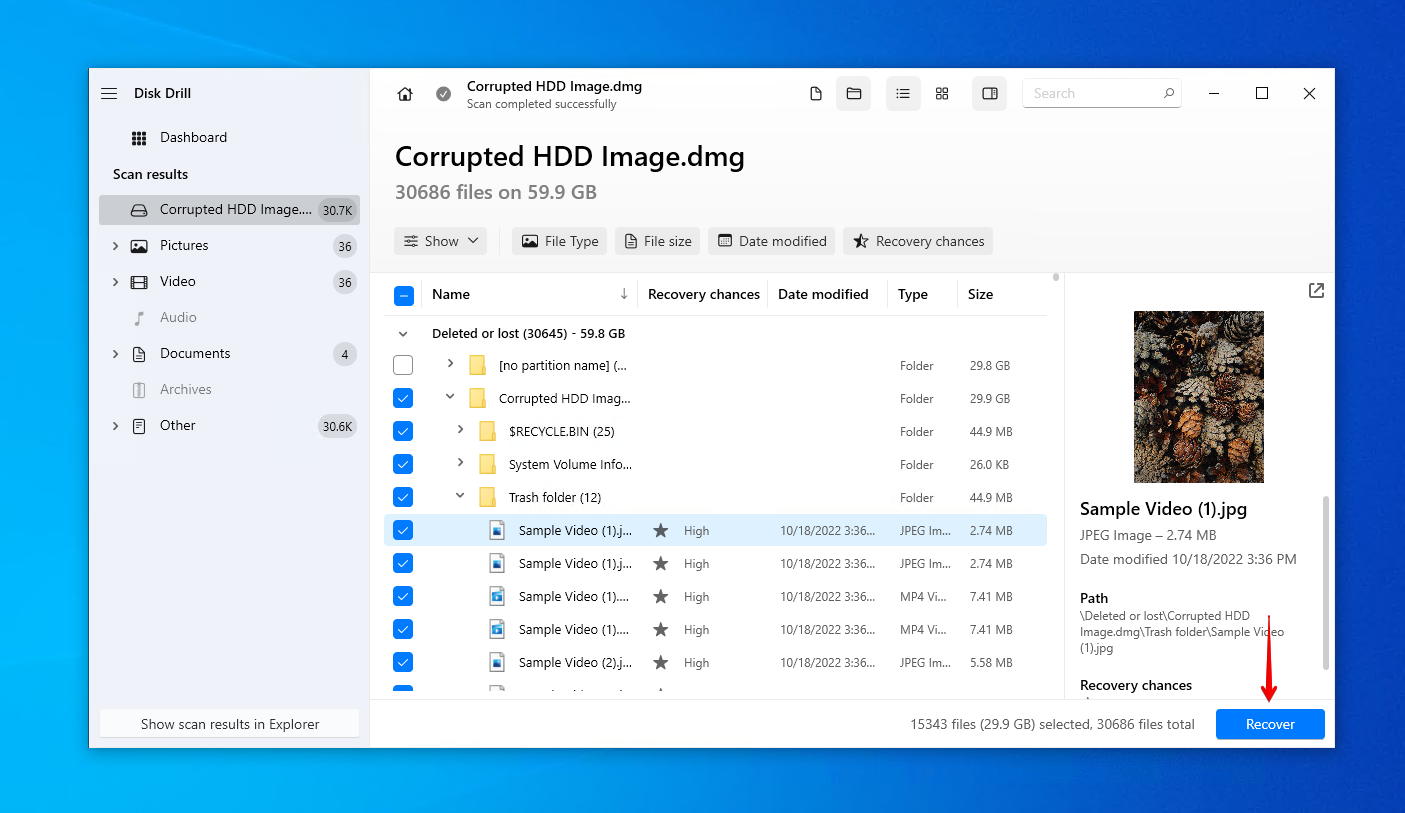
- Select the files you want to recover from the corrupted disk image. Use the filter buttons to organize the results and find what you’re looking for faster. When you’re ready, click Recover.
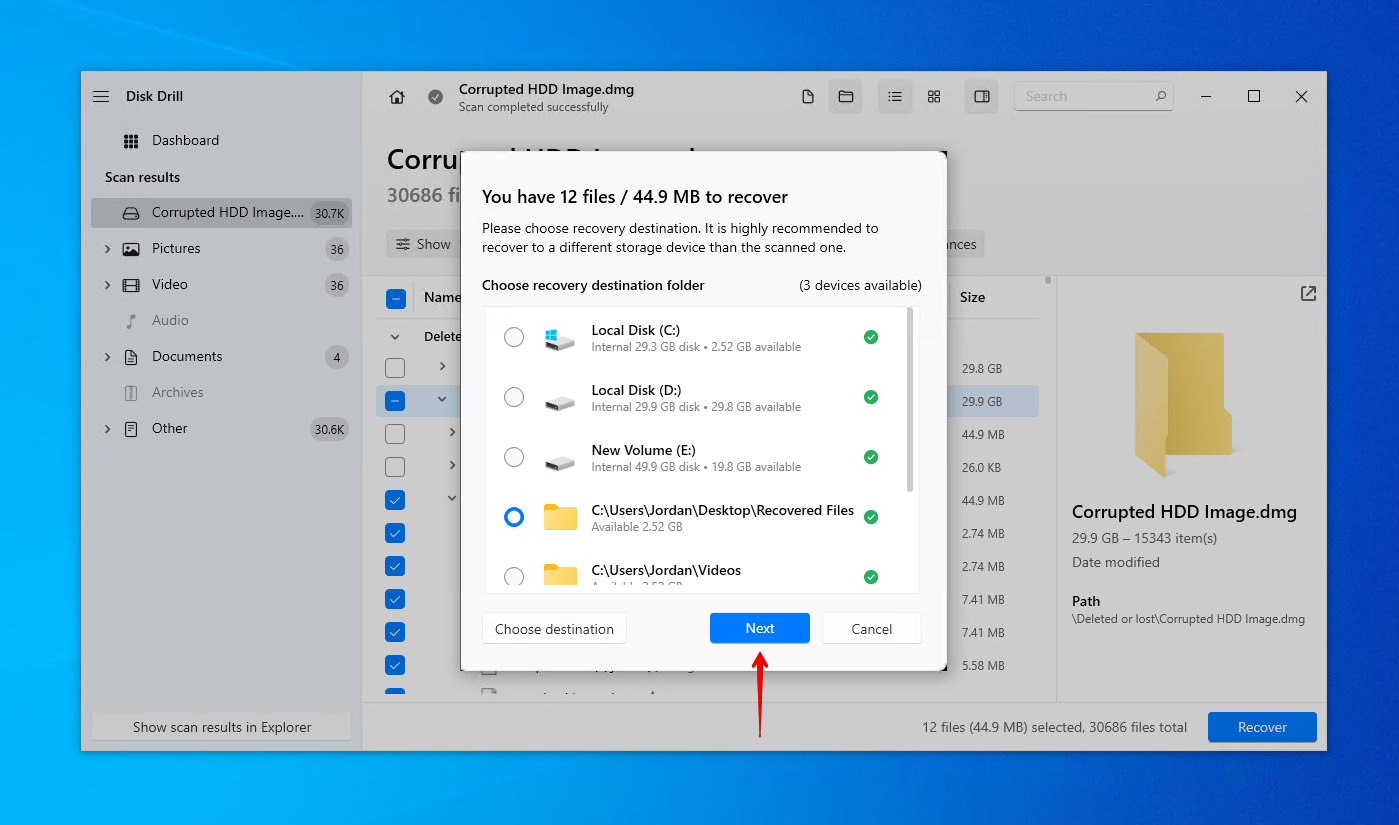
- Choose a safe recovery location and click Next.
Scenario 2: The System Drive Is Corrupted and Won’t Boot
It is possible to fix a corrupted hard drive that won’t boot, but recovering data from it is a little bit trickier (though still possible). When Windows won’t launch correctly, this is an indication that some essential system files have become corrupted.
In this case, you will need to remove the hard drive from your computer and connect it to a working computer as an external hard drive. Once connected, you will be able to perform recovery with Disk Drill like normal.
Scenario 3: The Drive Is Physically Corrupted
Physical corruption is typically the worst type of corruption, as physically damaged disks may not show up when you connect them. In such cases, a data recovery service is your best option, as they specialize in recovering corrupted hard drives. Relying on the services of a data recovery professional means you’re giving yourself the best chance at getting your data back. This is the best possible way to recover your data, but it is also the most expensive. Here’s a quick look at the process:
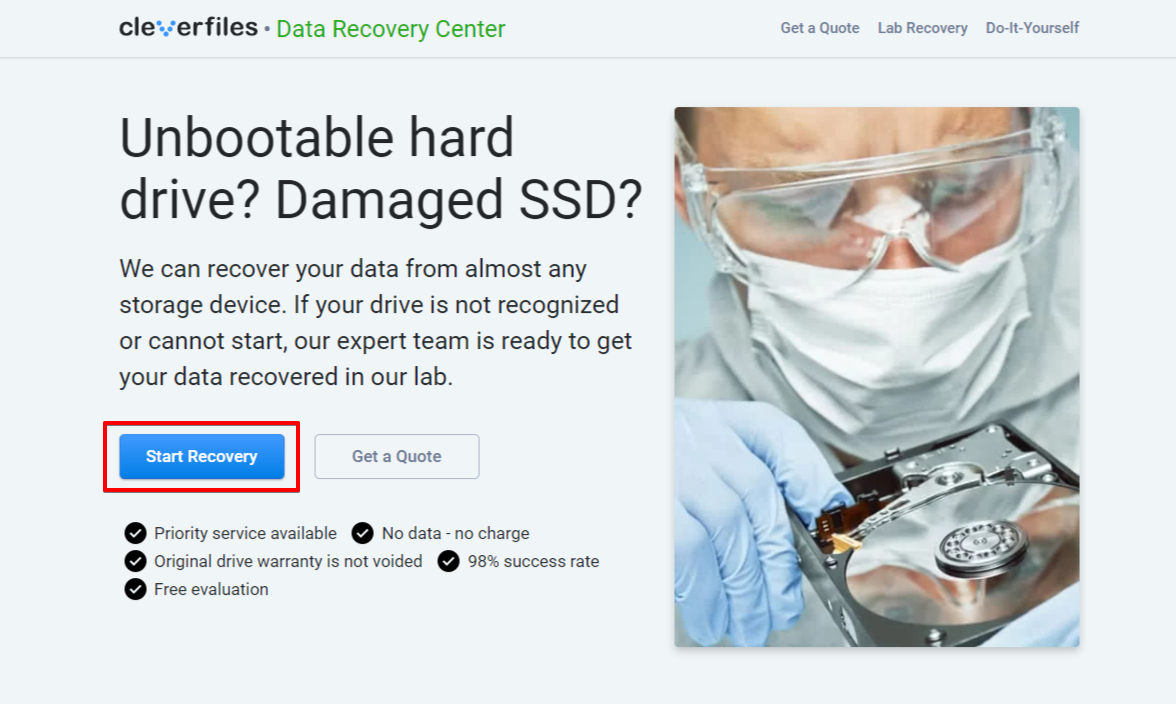
- Click Start Recovery.
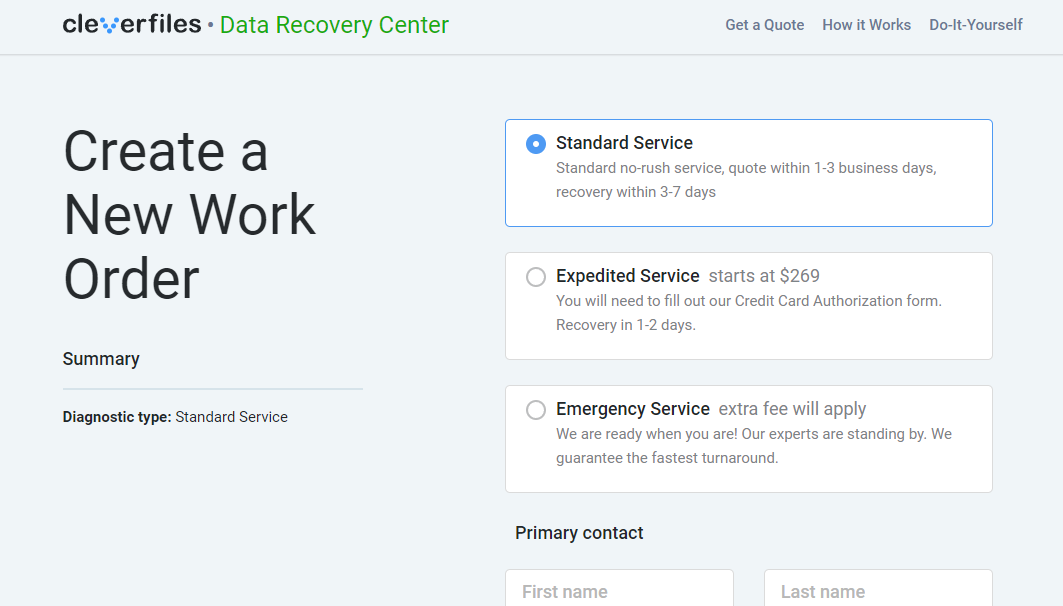
- Choose the type of service you want and fill out your information.
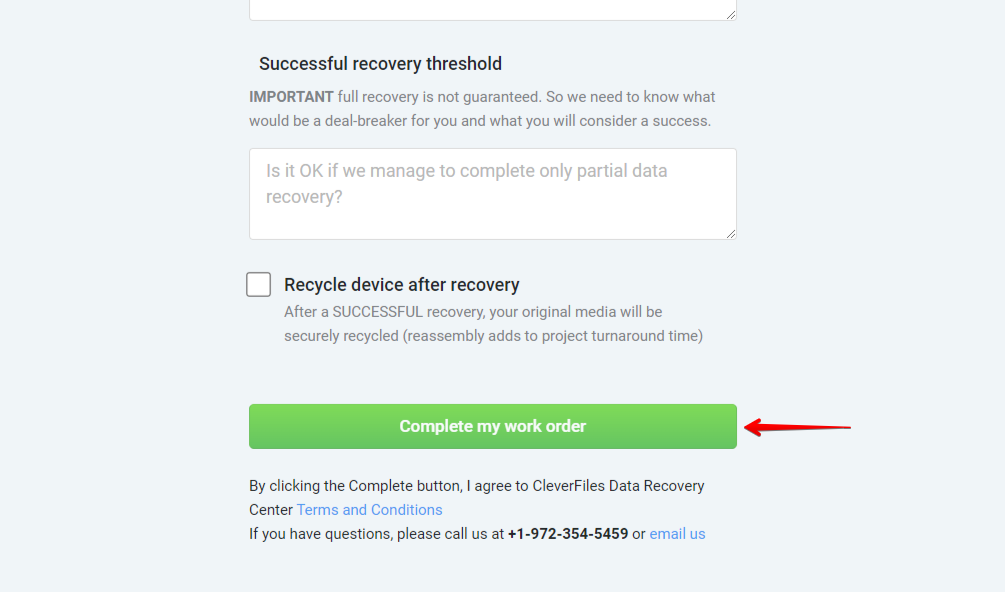
- Submit the work order.
Once recovery is complete, your data will be returned to you on a healthy storage device, ready for backing up.
How to Fix a Corrupted Hard Drive on Windows
Once your data is safely recovered from the corrupted hard drive, you can look at performing corrupted hard drive recovery. There are many different ways of fixing a corrupted hard drive, many of them being very easy (especially with our instructions).
Check out these methods on how to fix a corrupted hard drive.
Method 1: Try Another Cable or Port
Sometimes a corrupted hard drive is just the result of a faulty cable or port. This is especially true if your external hard drive is corrupted, seeing as your cable is frequently connected and disconnected. If the damage is indeed being caused by a faulty connection, it’s a fast and easy way to fix a corrupted external hard drive without formatting.
Try another cable, then try connecting the drive to another port. If you want to be extra thorough, test the hard drive in another computer entirely. If the fault persists, move to the next solution.
Method 2: Repair Using CheckDisk
CheckDisk is a hard drive repair tool that allows you to repair corrupted hard disks using CMD. In instances where your disk structure is corrupted and unreadable, CheckDisk is one of the many ways you can fix it. Furthermore, it is a great way to fix corrupted hard drives without losing data.
Follow these steps to repair a corrupted hard drive using CheckDisk:
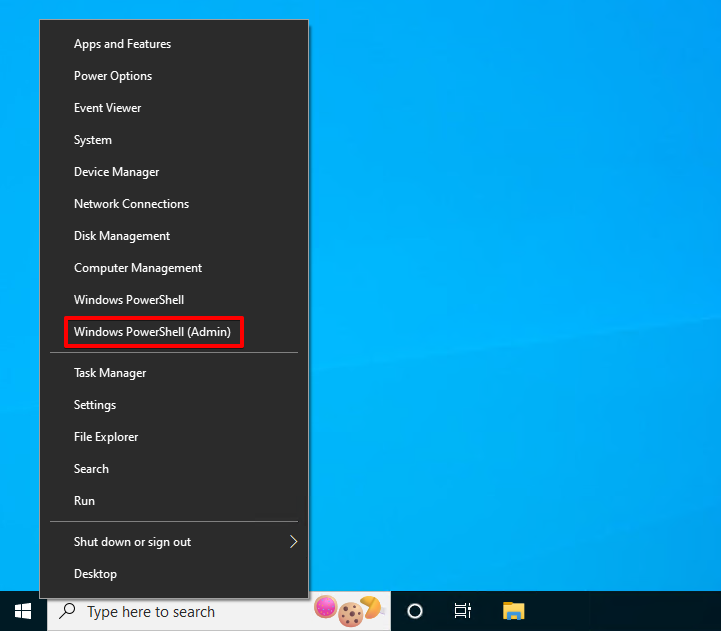
- Right-click Start and click Windows PowerShell (Admin). On Windows 11, this will be Terminal (Admin) instead.
- Type
chkdsk *: /r. Replace * with your own drive letter. Press Enter.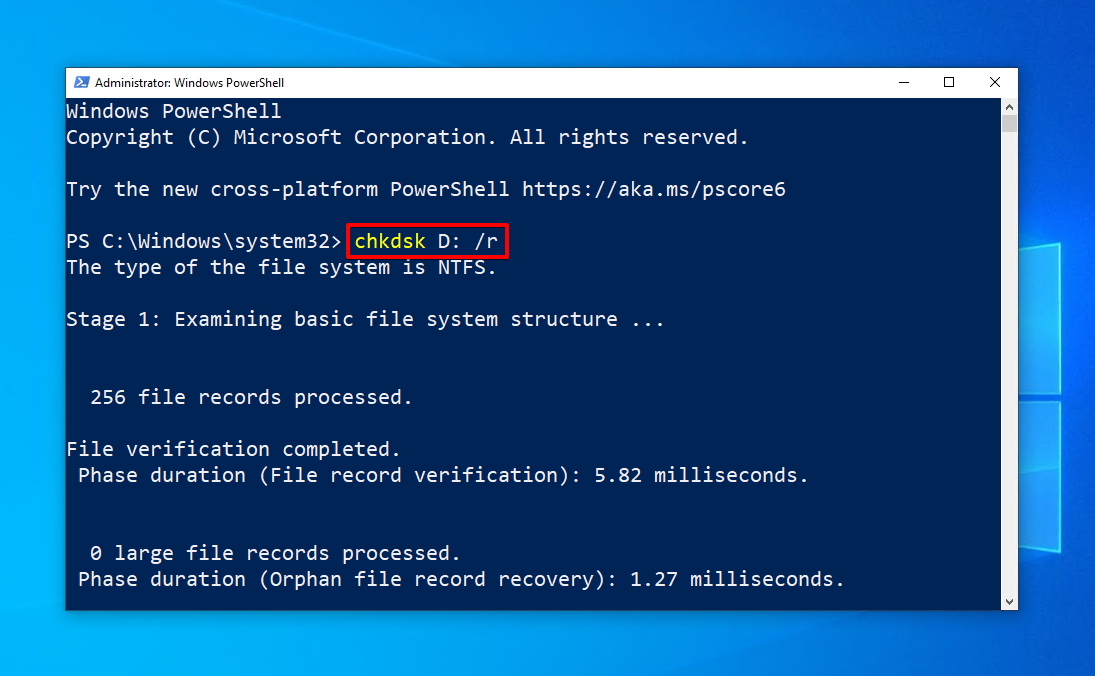
Method 3: Scan for Viruses
Viruses intend to harm your computer by design. If a virus has managed to infect your computer, perform a scan to remove it before it can do more harm. To do so, you can use any antivirus program. We’ll be using the antivirus program that’s built-in to Windows 10 and 11, Microsoft Defender Antivirus.
Follow these instructions to scan for viruses on your Windows computer:
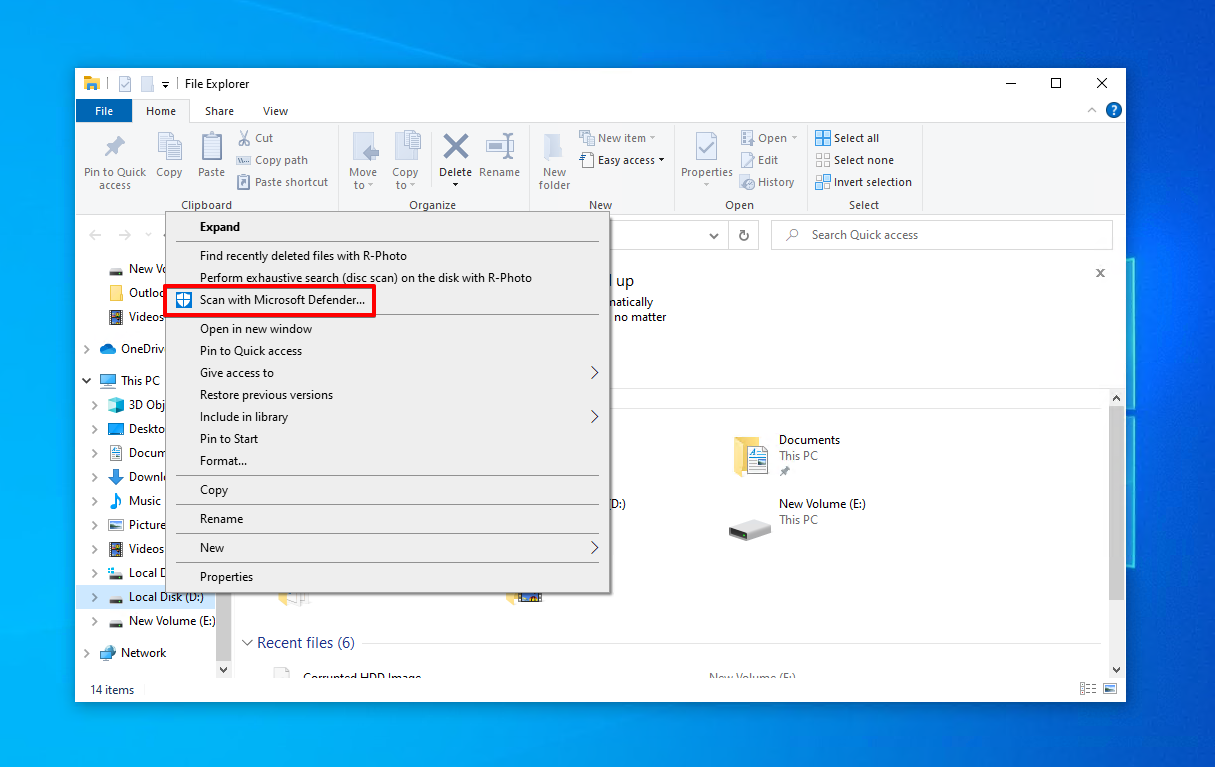
- Right-click your drive and click Scan with Microsoft Defender. This will perform a quick scan.
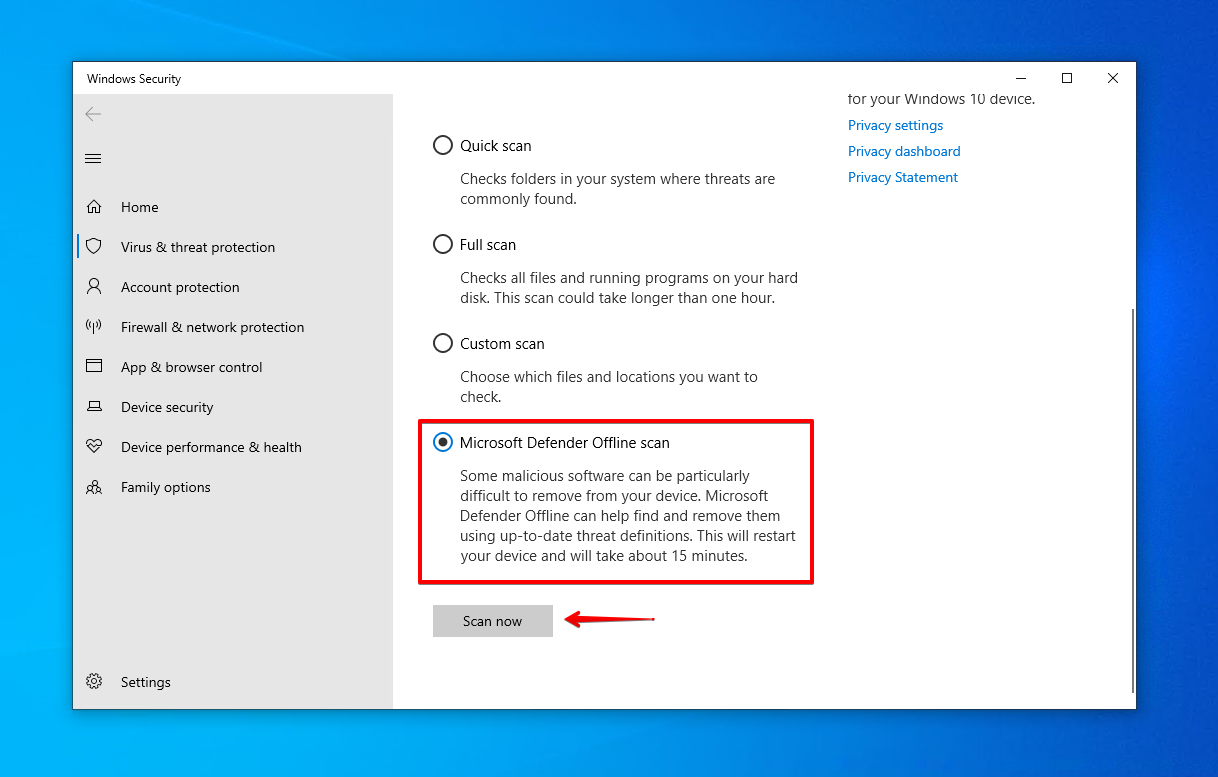
- To perform a more thorough scan, select Microsoft Defender Offline scan and click Scan now. Ensure all your work is saved, as this will scan will restart your computer.
Method 4: Run SFC and DISM
If your hard drive is preventing the computer from booting, it’s likely because some of your Windows system files have been damaged or corrupted. In some cases, Windows can corrupt your hard drive due to an interrupted installation or update. SFC (System File Checker) and DISM (Deployment Image Servicing and Management) are two commands that can check the integrity of your Windows system files and repair them if necessary.
Here is a quick overview of what each command does:
- SFC – This will scan your system files and verify they are in working order. Should it find any that are damaged or corrupted, it will attempt to replace them with working versions.
- DISM – If SFC is unable to fix it, DISM can repair the underlying Windows system image using Windows Update to pull the necessary files. Seeing as it relies on Windows Update, it does need an internet connection.
Follow these instructions to execute SFC and DISM to repair any corrupted system files:
- Right-click Start and click Windows PowerShell (Admin).

- Type
sfc /scannow. Press Enter. If the drive is still corrupted, try the next step.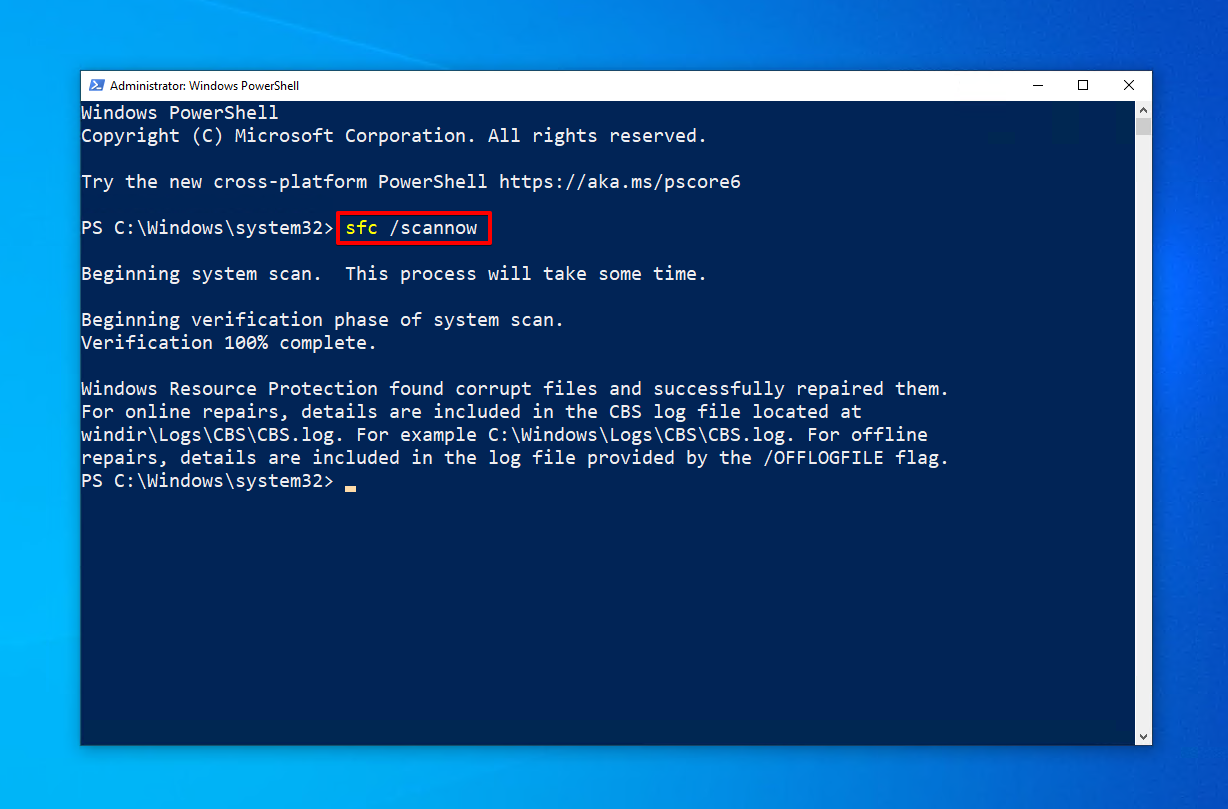
- Type
dism /online /cleanup-image /restorehealth. Press Enter.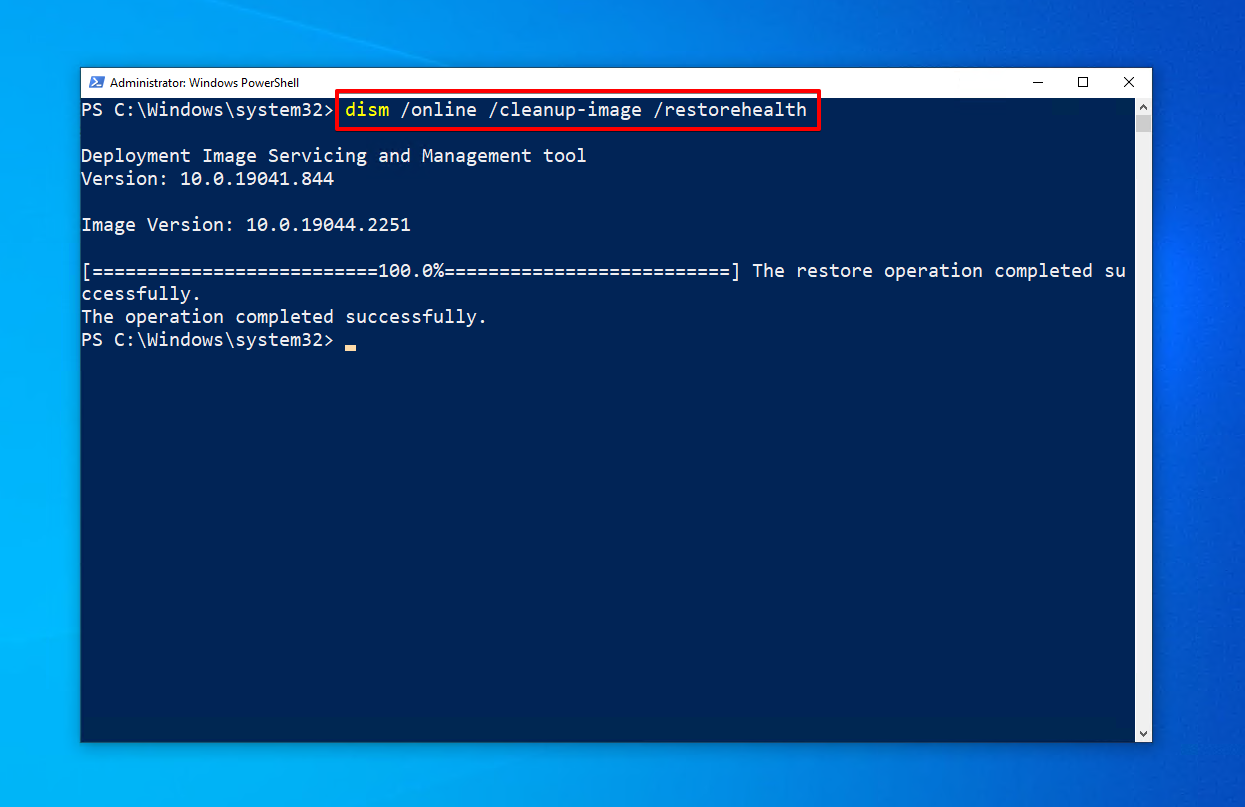
Method 5: Format the Drive
One of the most effective ways to recover a corrupted hard drive is through formatting it with a new file system. When you format a corrupted hard drive, it essentially deletes the file system currently used by the corrupted volume and provides it with a new one to store data again.
Although all of your data will be deleted, it will still be recoverable afterwards using Disk Drill, so long as you perform a quick format instead of a full format.
- Right-click Start and click Disk Management.

- Right-click the volume of your corrupted hard drive and select Format.
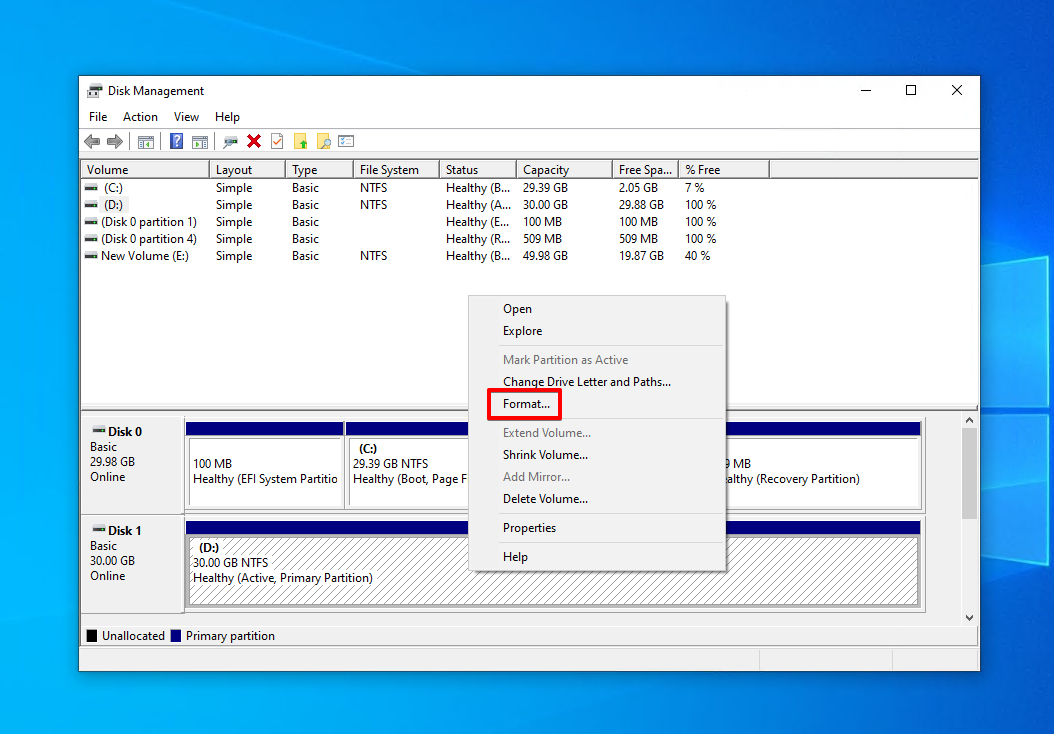
- Ensure Perform a quick format is selected and click OK.
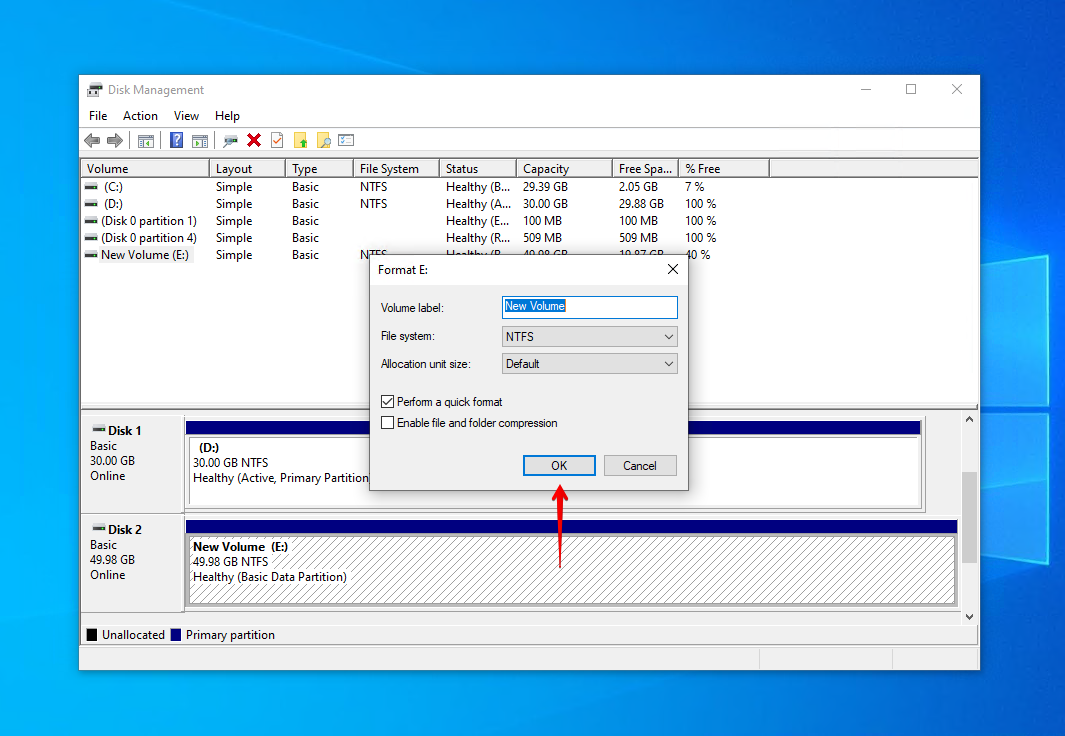
- Click OK again to confirm the action.
Method 6: Reconfigure With DiskPart
In cases where the corruption is so severe that you’re unable to repair a corrupted hard drive by formatting, you can prepare the disk manually using DiskPart. Similar to Disk Management but at the command-line level, DiskPart allows you to manage your computer’s drives and gives you more control over how you want to set them up.
This method will delete any data and partitions you have on the drive.
- Right-click Start and click Windows PowerShell (Admin).

- Type
diskpartand press Enter.
- Type
list diskand press Enter. Make note of your corrupt disk number.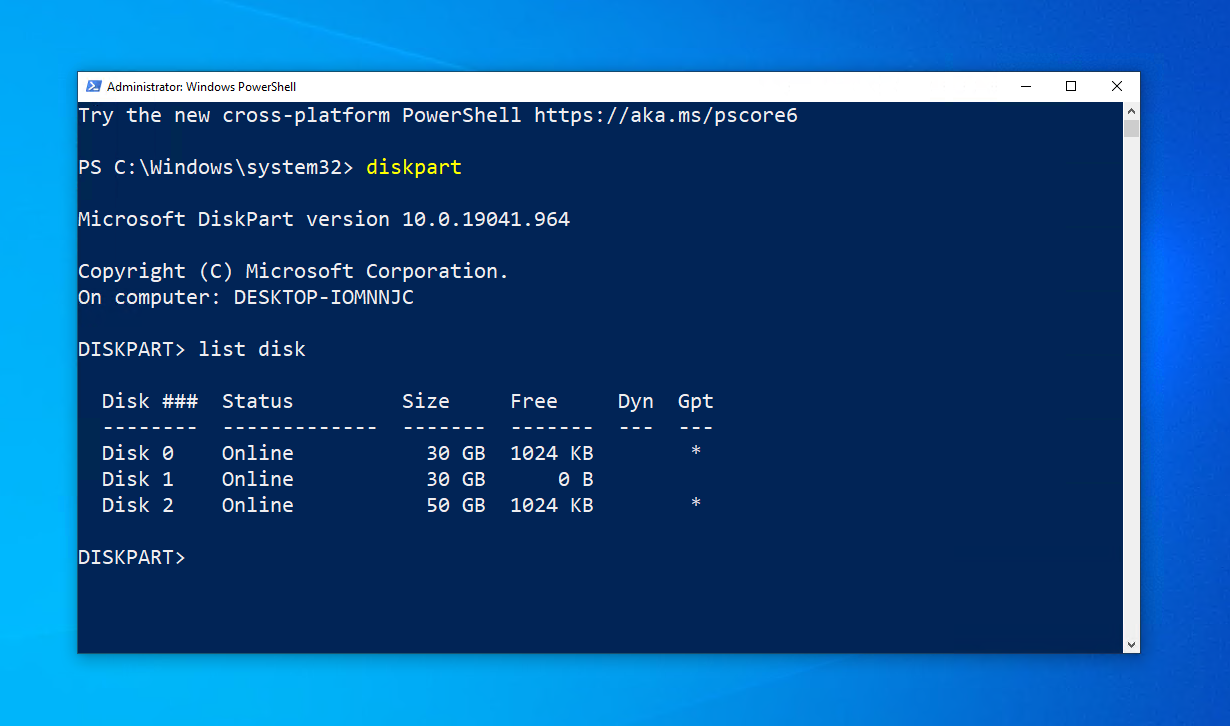
- Type
select disk *. Replace * with your disk number. Press Enter.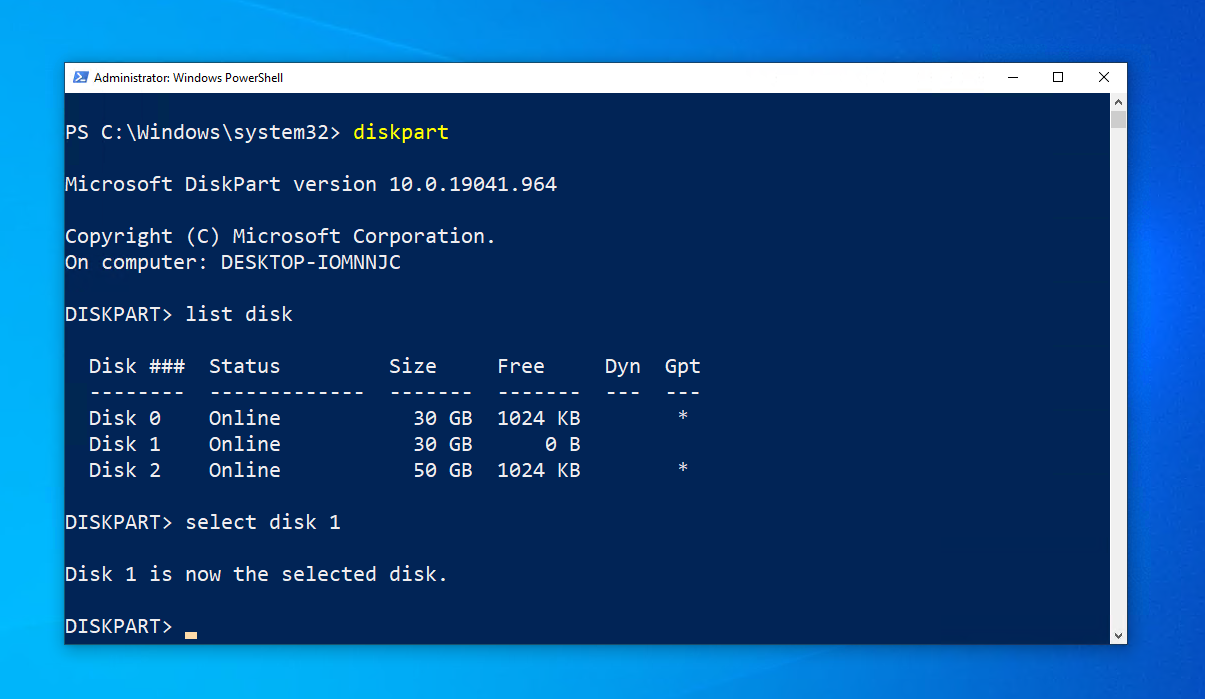
- Type
cleanand press Enter.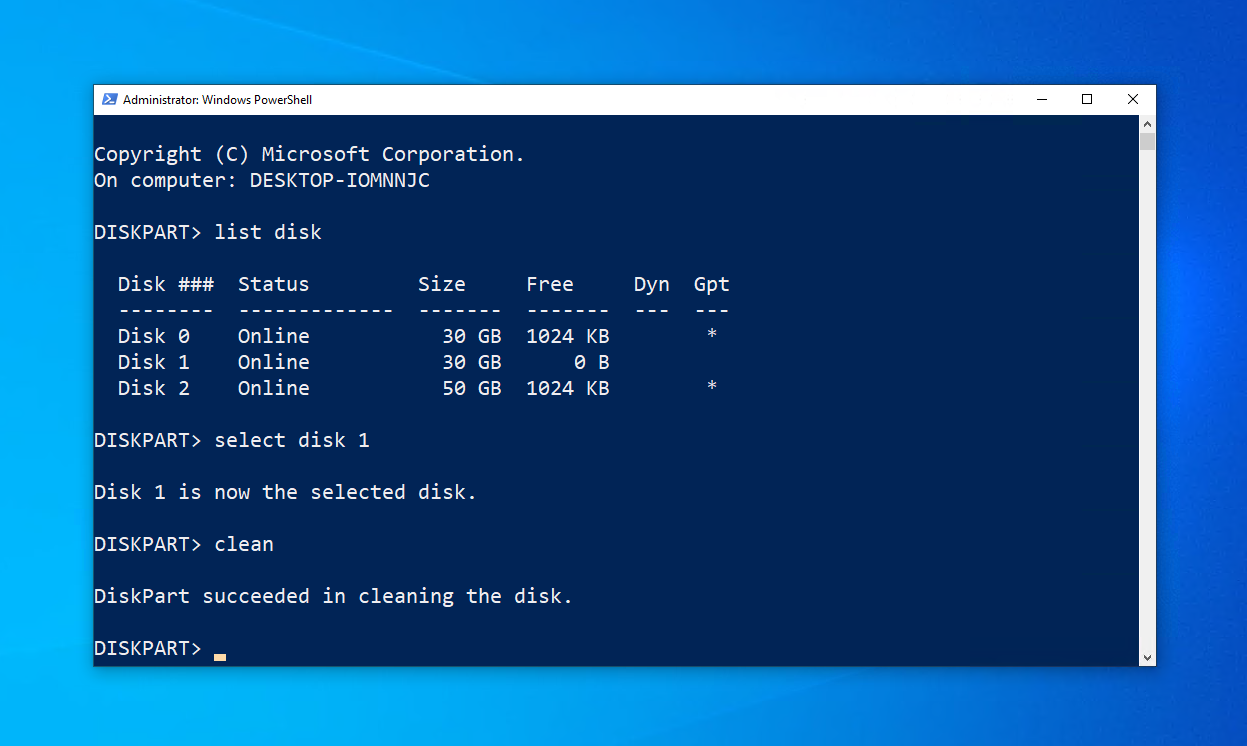
- Type
create partition primaryand press Enter.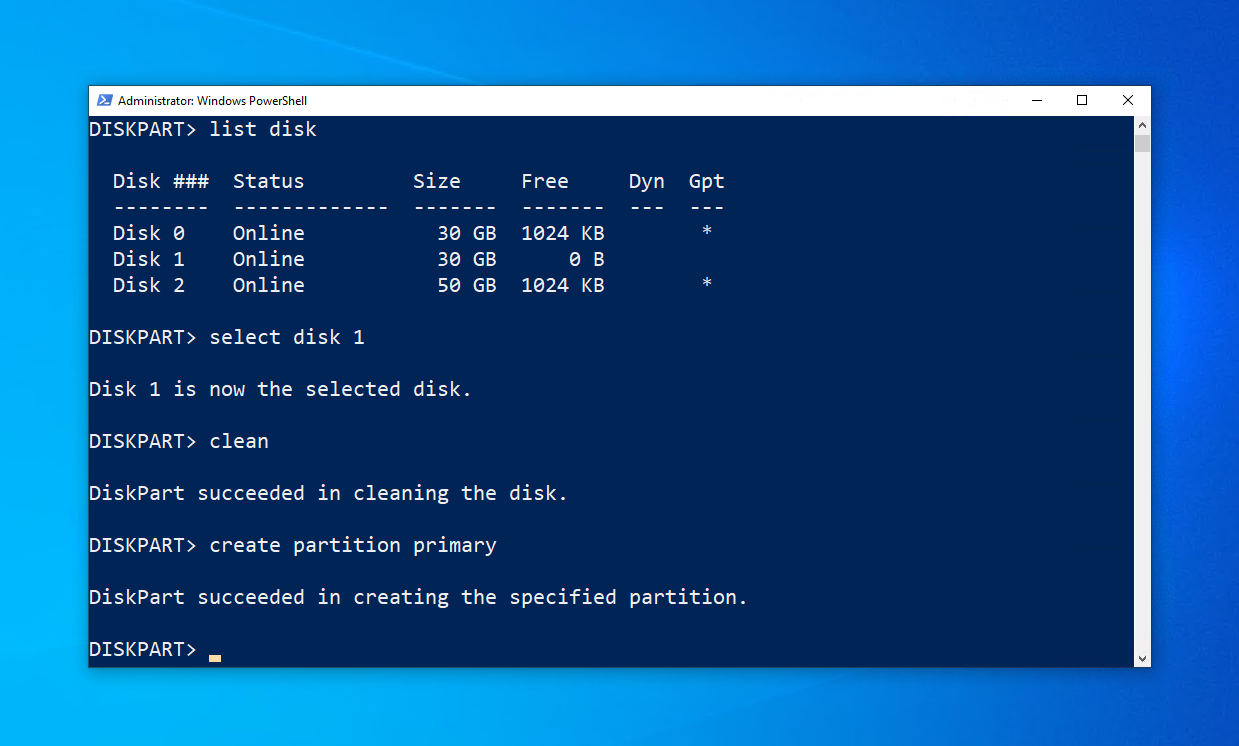
- Type
activeand press Enter.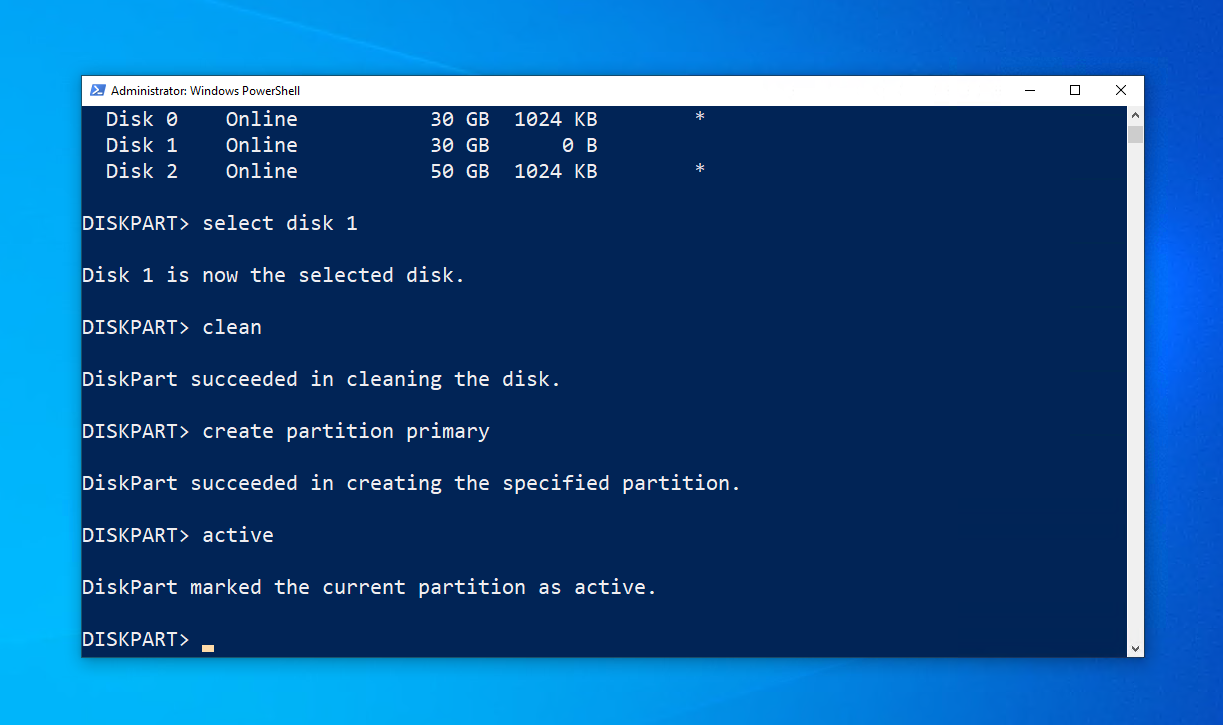
- Type
select partition 1and press Enter.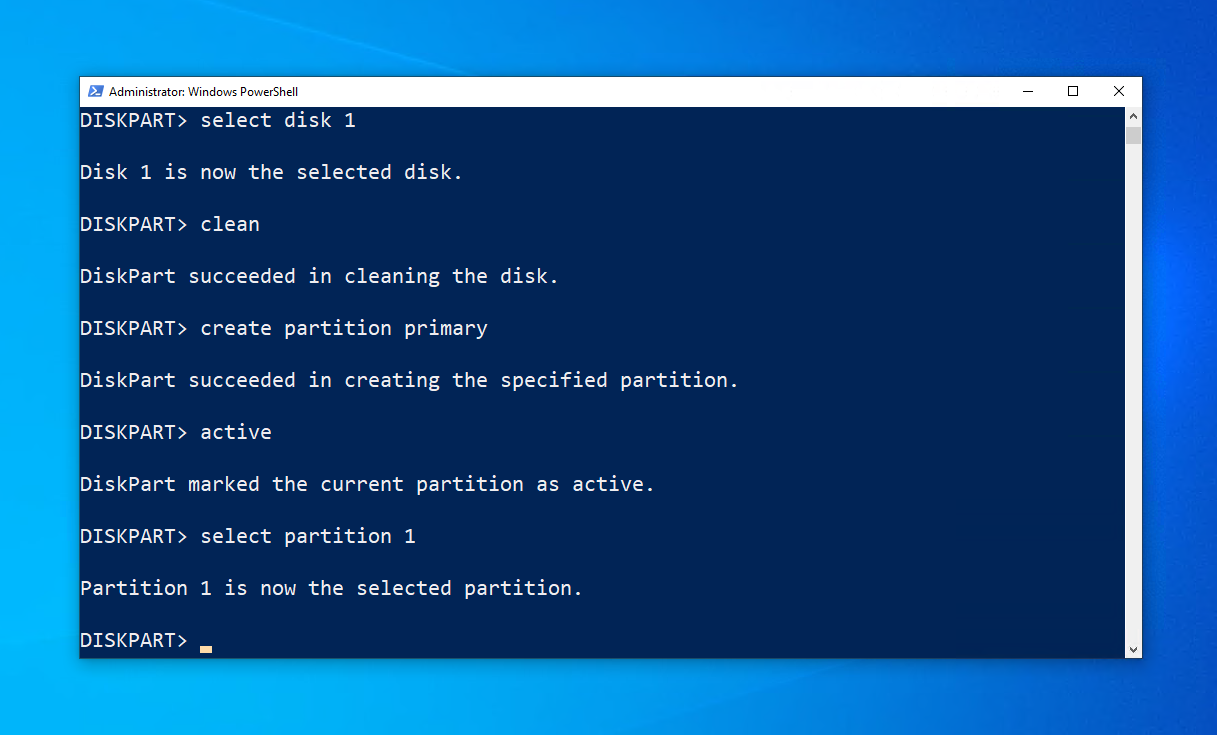
- Type
format fs=ntfsand press Enter.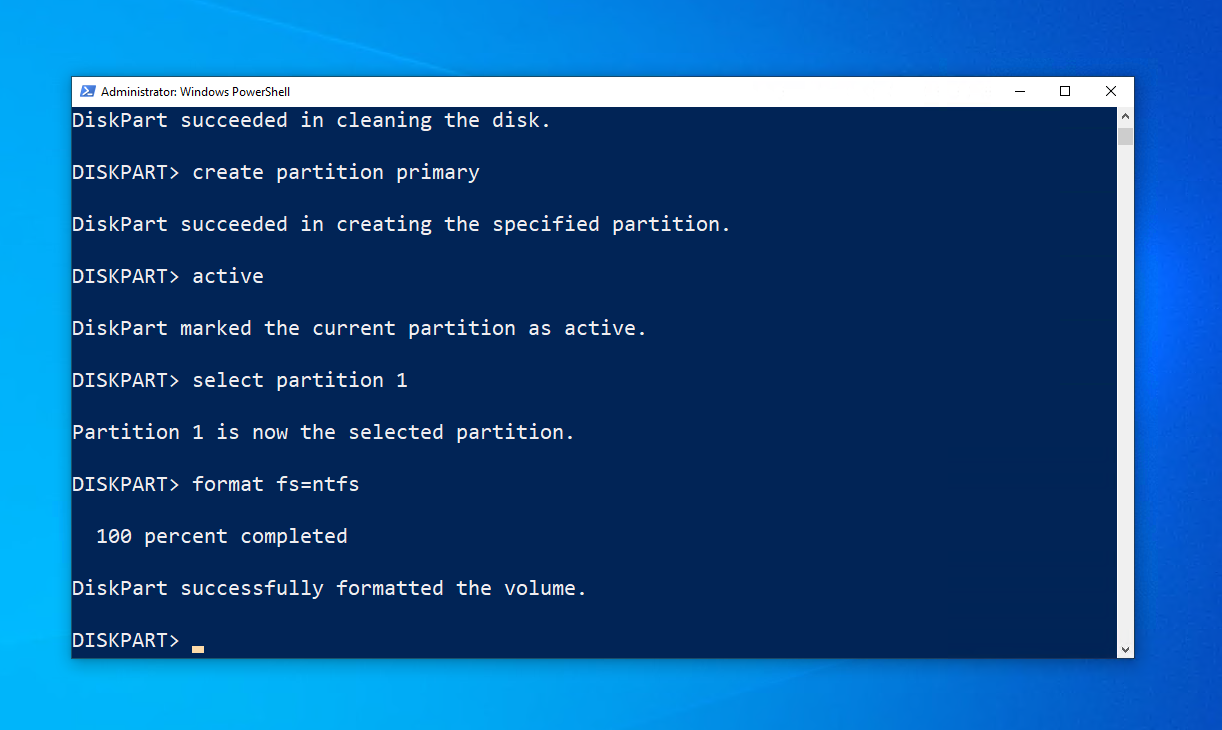
- Type
assignand press Enter.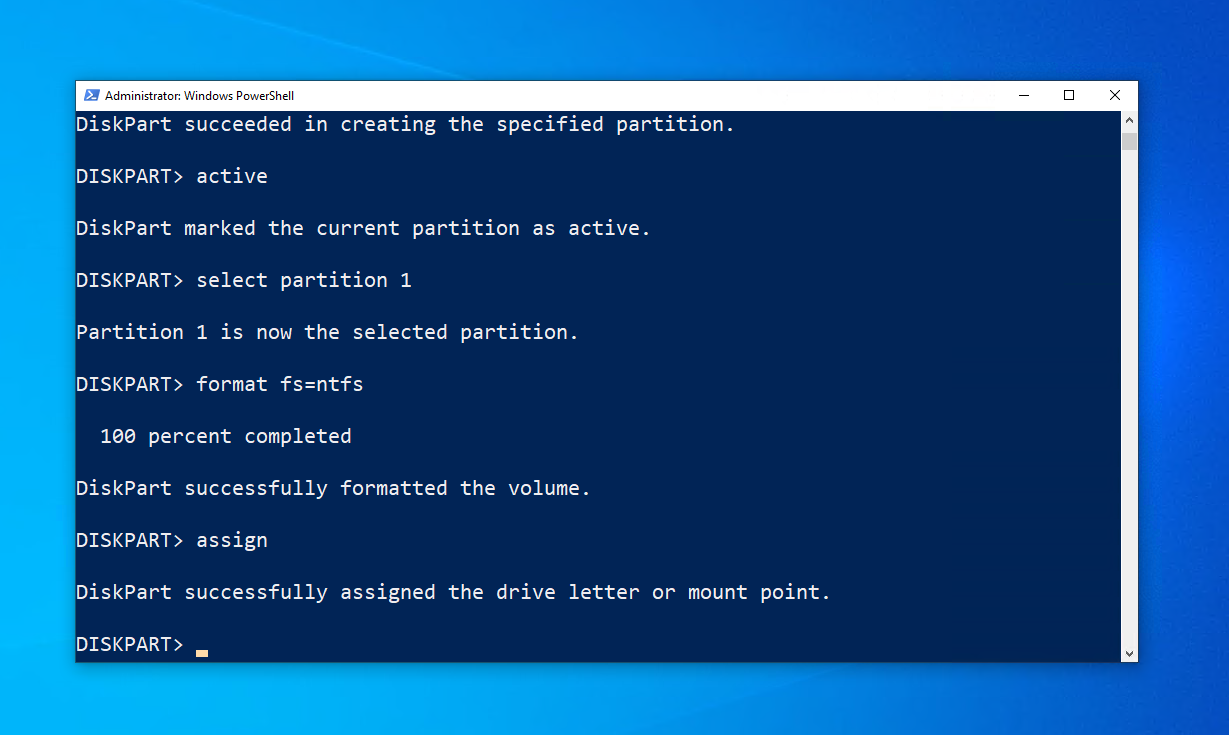
What Causes a Hard Drive to Be Corrupted?
Even though you’re unable to absolutely guarantee the protection of your hard drive against corruption, you can actively reduce your chances of it happening by knowing what causes it. Here are a few common causes behind hard drive corruption.
| Cause | Description |
| 🪟 Blue screen of death (BSoD) | The infamous blue screen of death is how Windows alerts you to fatal system errors. It indicates something that has gone wrong and caused your computer to crash. |
| ⏏️ Improper removal/ejection | Removing your external drive while it is handling read-write processes can cause corruption of the file system, preventing you from accessing your data. |
| 🔌 Sudden power failure | Immediate power failure can also interrupt delicate read-write processes. Additionally, a power surge that follows a power outage can short out the hard drive’s control board. |
| 🚫 Bad sectors | Bad sectors occur naturally in drives as time goes on. However, a sudden influx of bad sectors can point towards a drive in critical condition, and may even render a sector used by your operating system unusable. |
| 🦠 Virus attacks | A boot-sector virus is capable of accessing the boot sector of your drive, which executes automatically upon startup. If this becomes infected, it can prevent you from accessing your drive. |
Conclusion
Hard drive corruption is devastating. Should you be unfortunate enough to encounter it, you should stop using your drive immediately and recover your data from it at your earliest convenience. Recover your data using a data recovery application like Disk Drill if the disk is readable and showing the correct size. If the drive is physically damaged, use a data recovery service instead.
Once your data is safe, you can safely repair the drive. Start by checking the cables and connection points for faults. Next, try repairing the drive with CheckDisk and clearing the drive of viruses with Microsoft Defender Antivirus. If neither works, repair any corrupted Windows files using SFC and DISM. Should functionality still not be restored, format the drive with a new file system to reset it.
FAQ
- Click Start and search “PowerShell”.
- Right-click Windows PowerShell and click Run as administrator.
- Type chkdsk *: /r. Replace * with your own drive letter. Press Enter.
