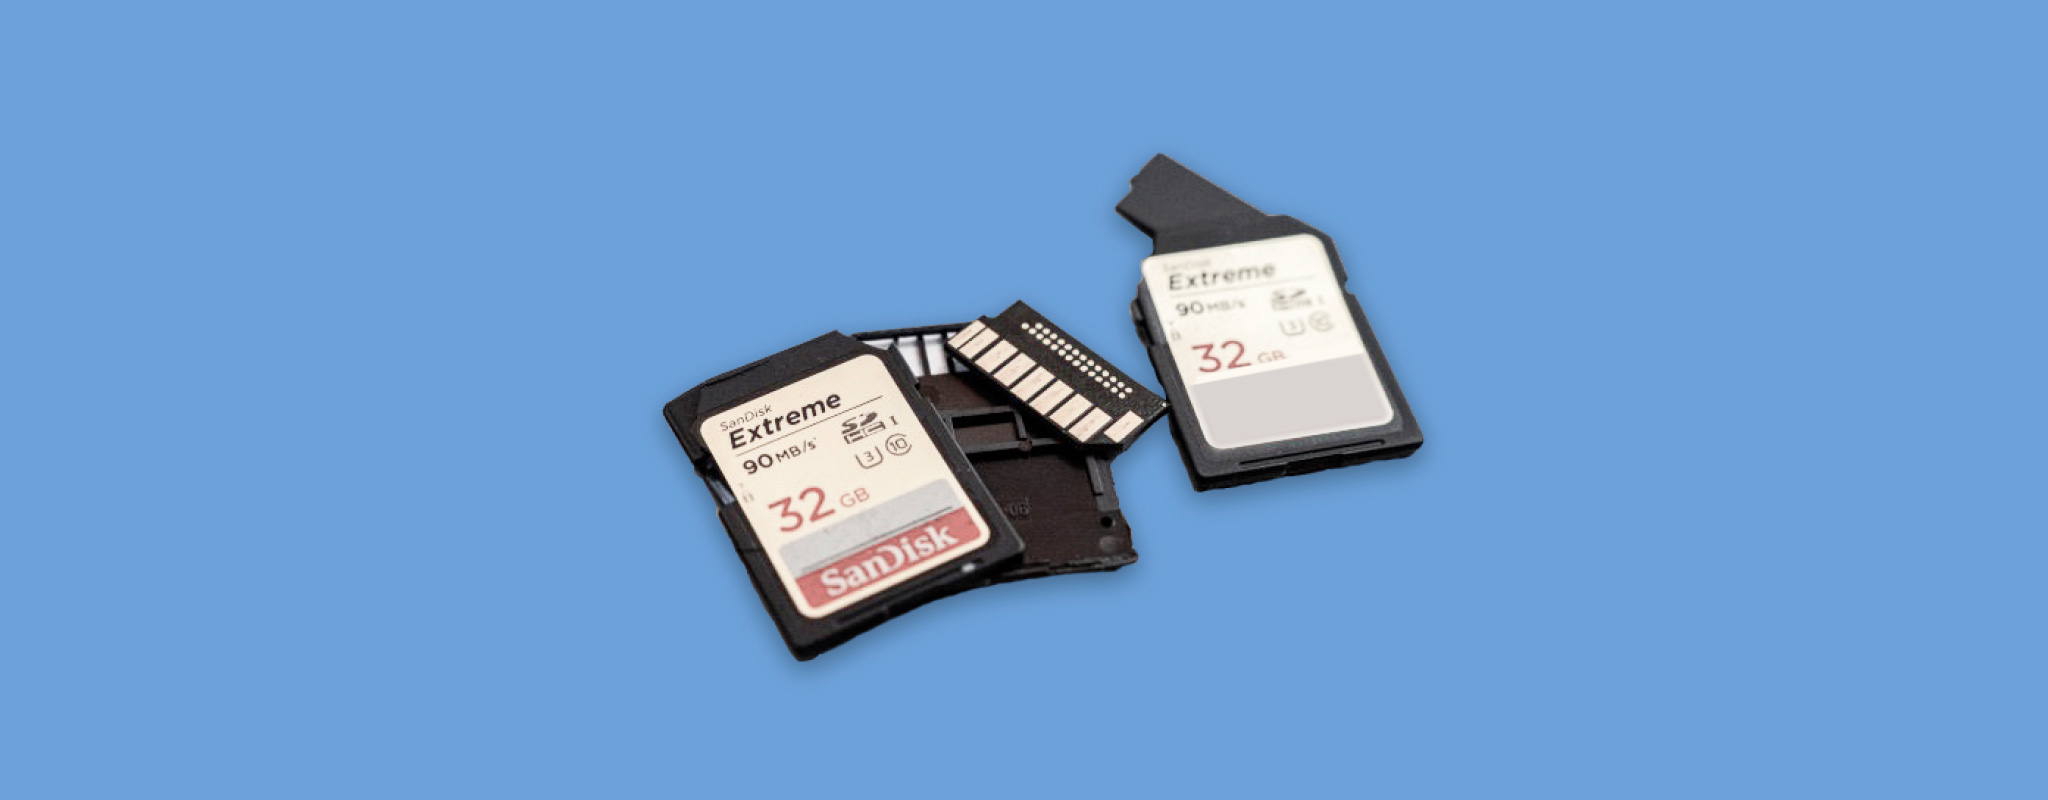
 Issues with SD card corruption affect countless people every day and, in many cases, cause the loss of important files. If you’re reading this article because your SD card has become corrupted and you’re wondering how to recover a corrupted SD card or repair the damage, then you’re in the right place because we cover multiple tried-and-tested ways to fix a corrupted SD card and recover lost data from it.
What We Mean When We Say an SD Card Is Corrupted
A corrupted SD card has suffered logical damage that prevents normal access to some or all of its stored data. This corruption can happen at three main levels:
- At the flash memory level, which is the physical storage medium inside your SD card, individual memory cells or blocks can become damaged or unreliable, leading to data integrity issues. Flash memory corruption most typically happens when memory cells exceed their lifespan, or when cheap SD cards use lower-quality flash memory that degrades more quickly than advertised.
- Corruption can also occur at the file system level, where the organizational structure that keeps track of your files becomes damaged while the underlying data remains intact. Malware is one possible cause of file system-level corruption, especially on Windows, and improper partitioning is another one.
- Individual files can become corrupted even when both the flash memory and file system are perfectly fine. This typically happens when applications or devices crash while saving data, and it leads to incomplete writes.
📝 Note: This guide focuses specifically on how to repair SD card file system issues. If you’re looking to recover corrupted files that are already damaged (like unplayable videos or unopenable documents), that’s a different problem. We have a separate guide on recovering corrupted files that covers those scenarios.
How to Recover Data from a Corrupted SD Card
Before you attempt any fixes for your corrupted SD card, you should recover your data first. Why? Because many repair methods, including formatting and repartitioning, can potentially overwrite your existing data, making recovery much more difficult or even impossible.
To maximize your chances of successful data recovery:
- Stop using the SD card right away. Every read or write operation risks overwriting your data.
- Don’t format the card, even if your device or operating system prompts you to do so.
- Create a byte-to-byte backup of your SD card if possible (I’ll show you how below).
As long as you follow this advice and the step-by-step instructions below, the chances of recovering your files are quite high.
Quick Overview of Your Recovery Options
Here’s a quick comparison of the three main methods to recover a corrupted SD card:
| Method | Convenience | Success Rate | Cost | Pros | Cons |
| PC Data Recovery Software | Medium to High (needs a computer) | High for logical damage | Often free to try, $30 – $100 | • Works with deep corruption • File previews • High chance of success |
Requires PC |
| Android Data Recovery App | High (mobile-based) | Low to moderate | Free – $30 | • No PC needed • Simple interface |
• Root is often required • Poor with file system damage |
| Professional Recovery | Low | High (esp. with physical damage) | $300+ | • Handles worst cases • No DIY risk |
• Expensive • Takes days |
Now, let’s walk through each method in detail so you can effectively restore your corrupted SD card.
Method 1: Using PC Data Recovery Software
When it comes to recovering data from corrupted SD cards, Disk Drill is my favorite solution because it offers the perfect balance of powerful recovery capabilities and a user-friendly design.
In situations where your SD card’s file system is completely corrupted, Disk Drill can scan the raw data on your card for traces of around 400 different file signatures, from common formats like JPG and MP4 to specialized formats like CR2 and NEF raw photos.
Two other features I appreciate when dealing with corrupted SD cards are Disk Drill’s recovery chances indicator and built-in file preview. Before you commit to recovering any files, you can see their likelihood of successful recovery and preview many file types directly within the application for a reassuring visual confirmation of recoverability.
Disk Drill comes with several useful extra tools, including a byte-to-byte backup utility that can create perfect copies of corrupted storage devices, and this tool should be your first step when dealing with a corrupted SD card because it’s always better to play it safe when dealing with corruption. Here’s how to use it:
- First, download and install Disk Drill on your computer (not on the SD card!).
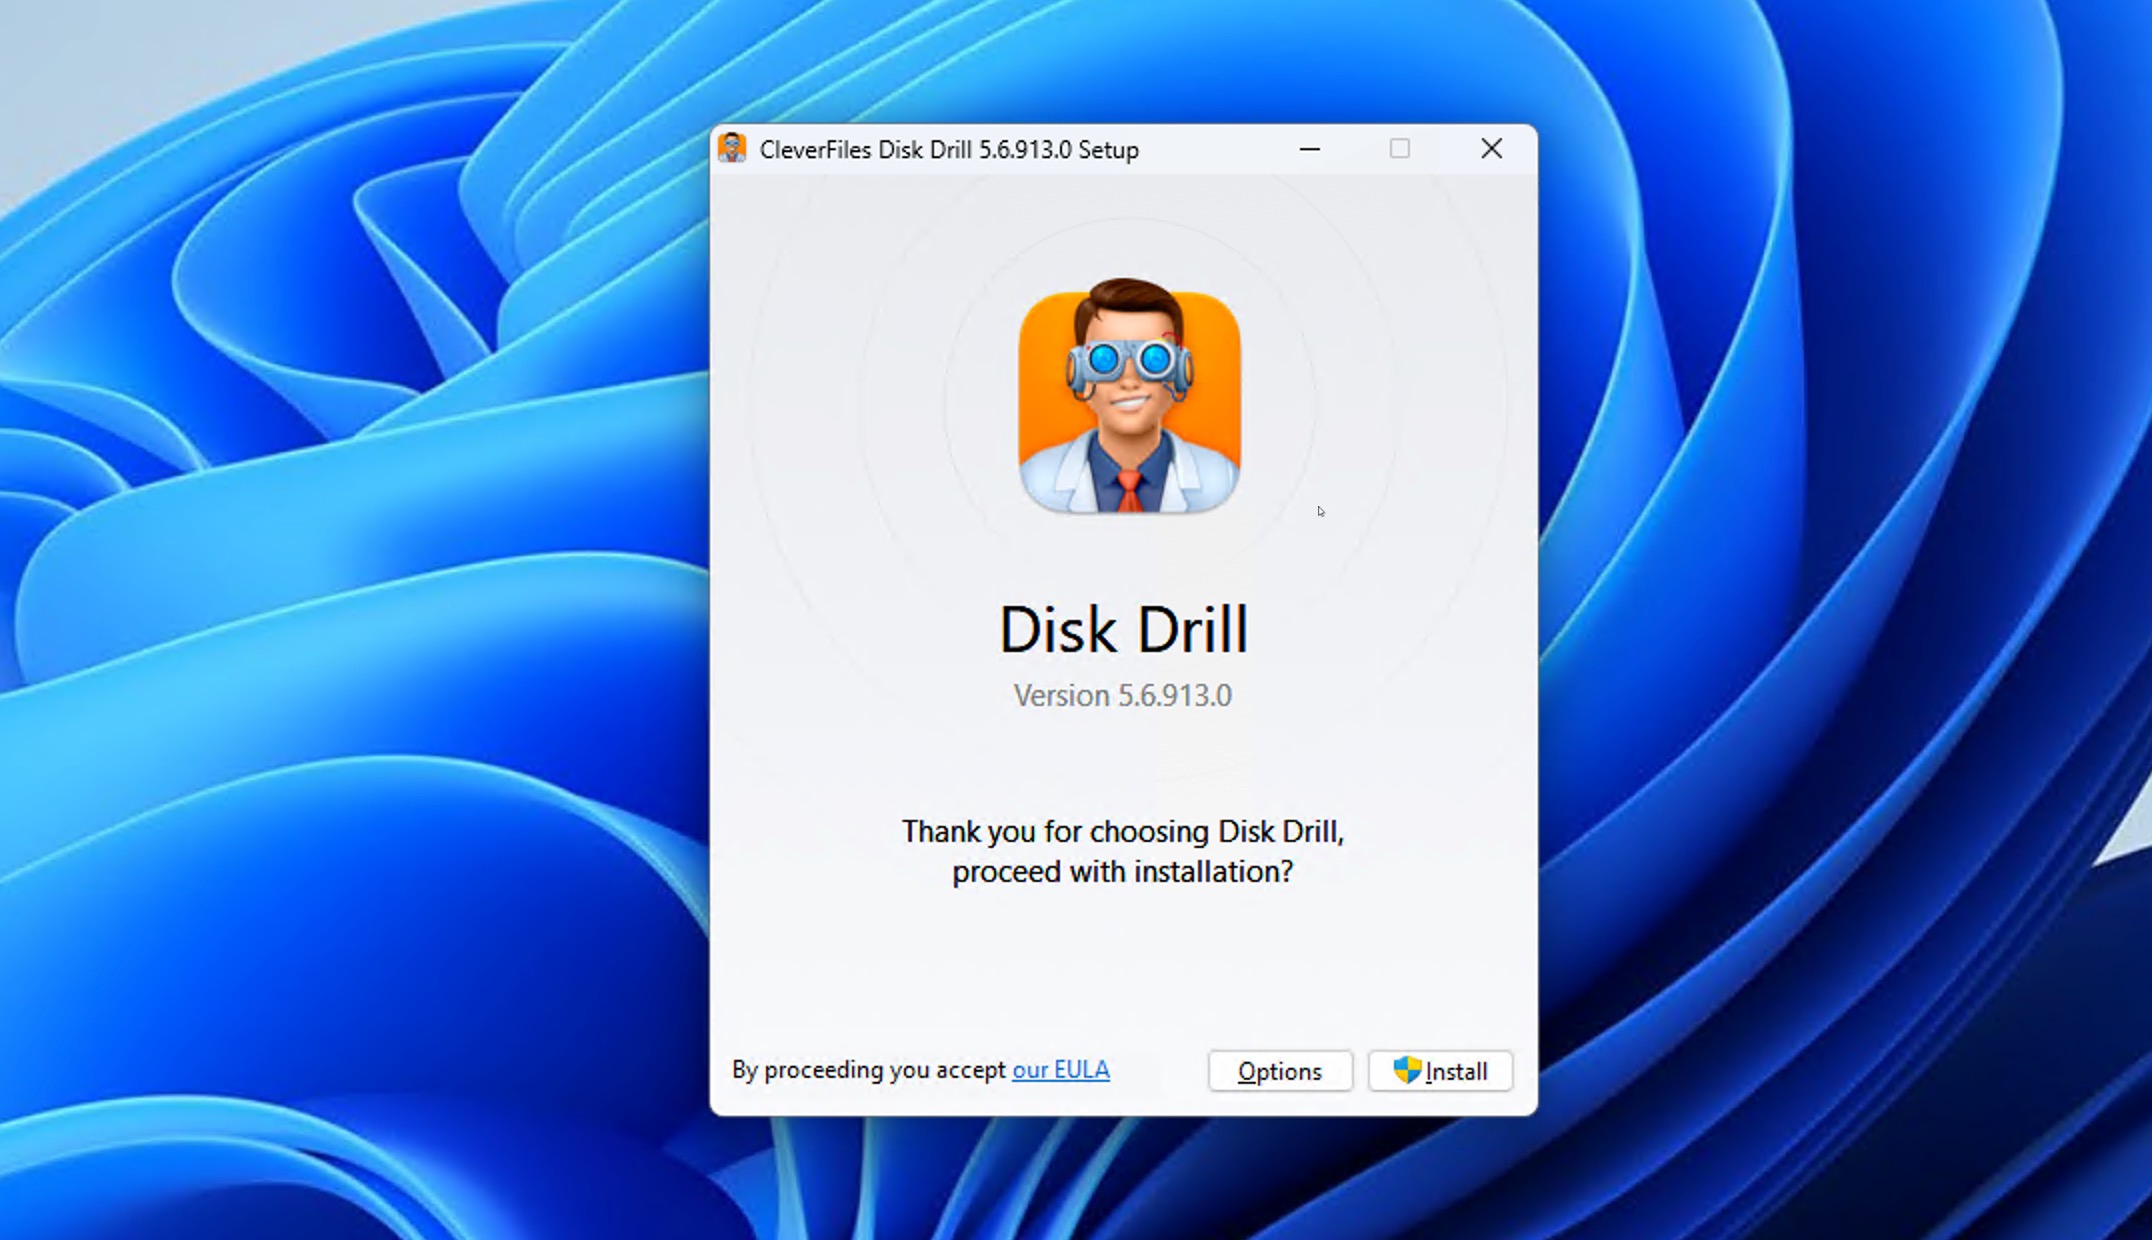
- Connect your corrupted SD card via a card reader.
- Launch Disk Drill and look for Byte-to-Byte Backup in the left sidebar.
- Select your SD card from the list of available devices.
- Click the Create backup button in the top-right corner.
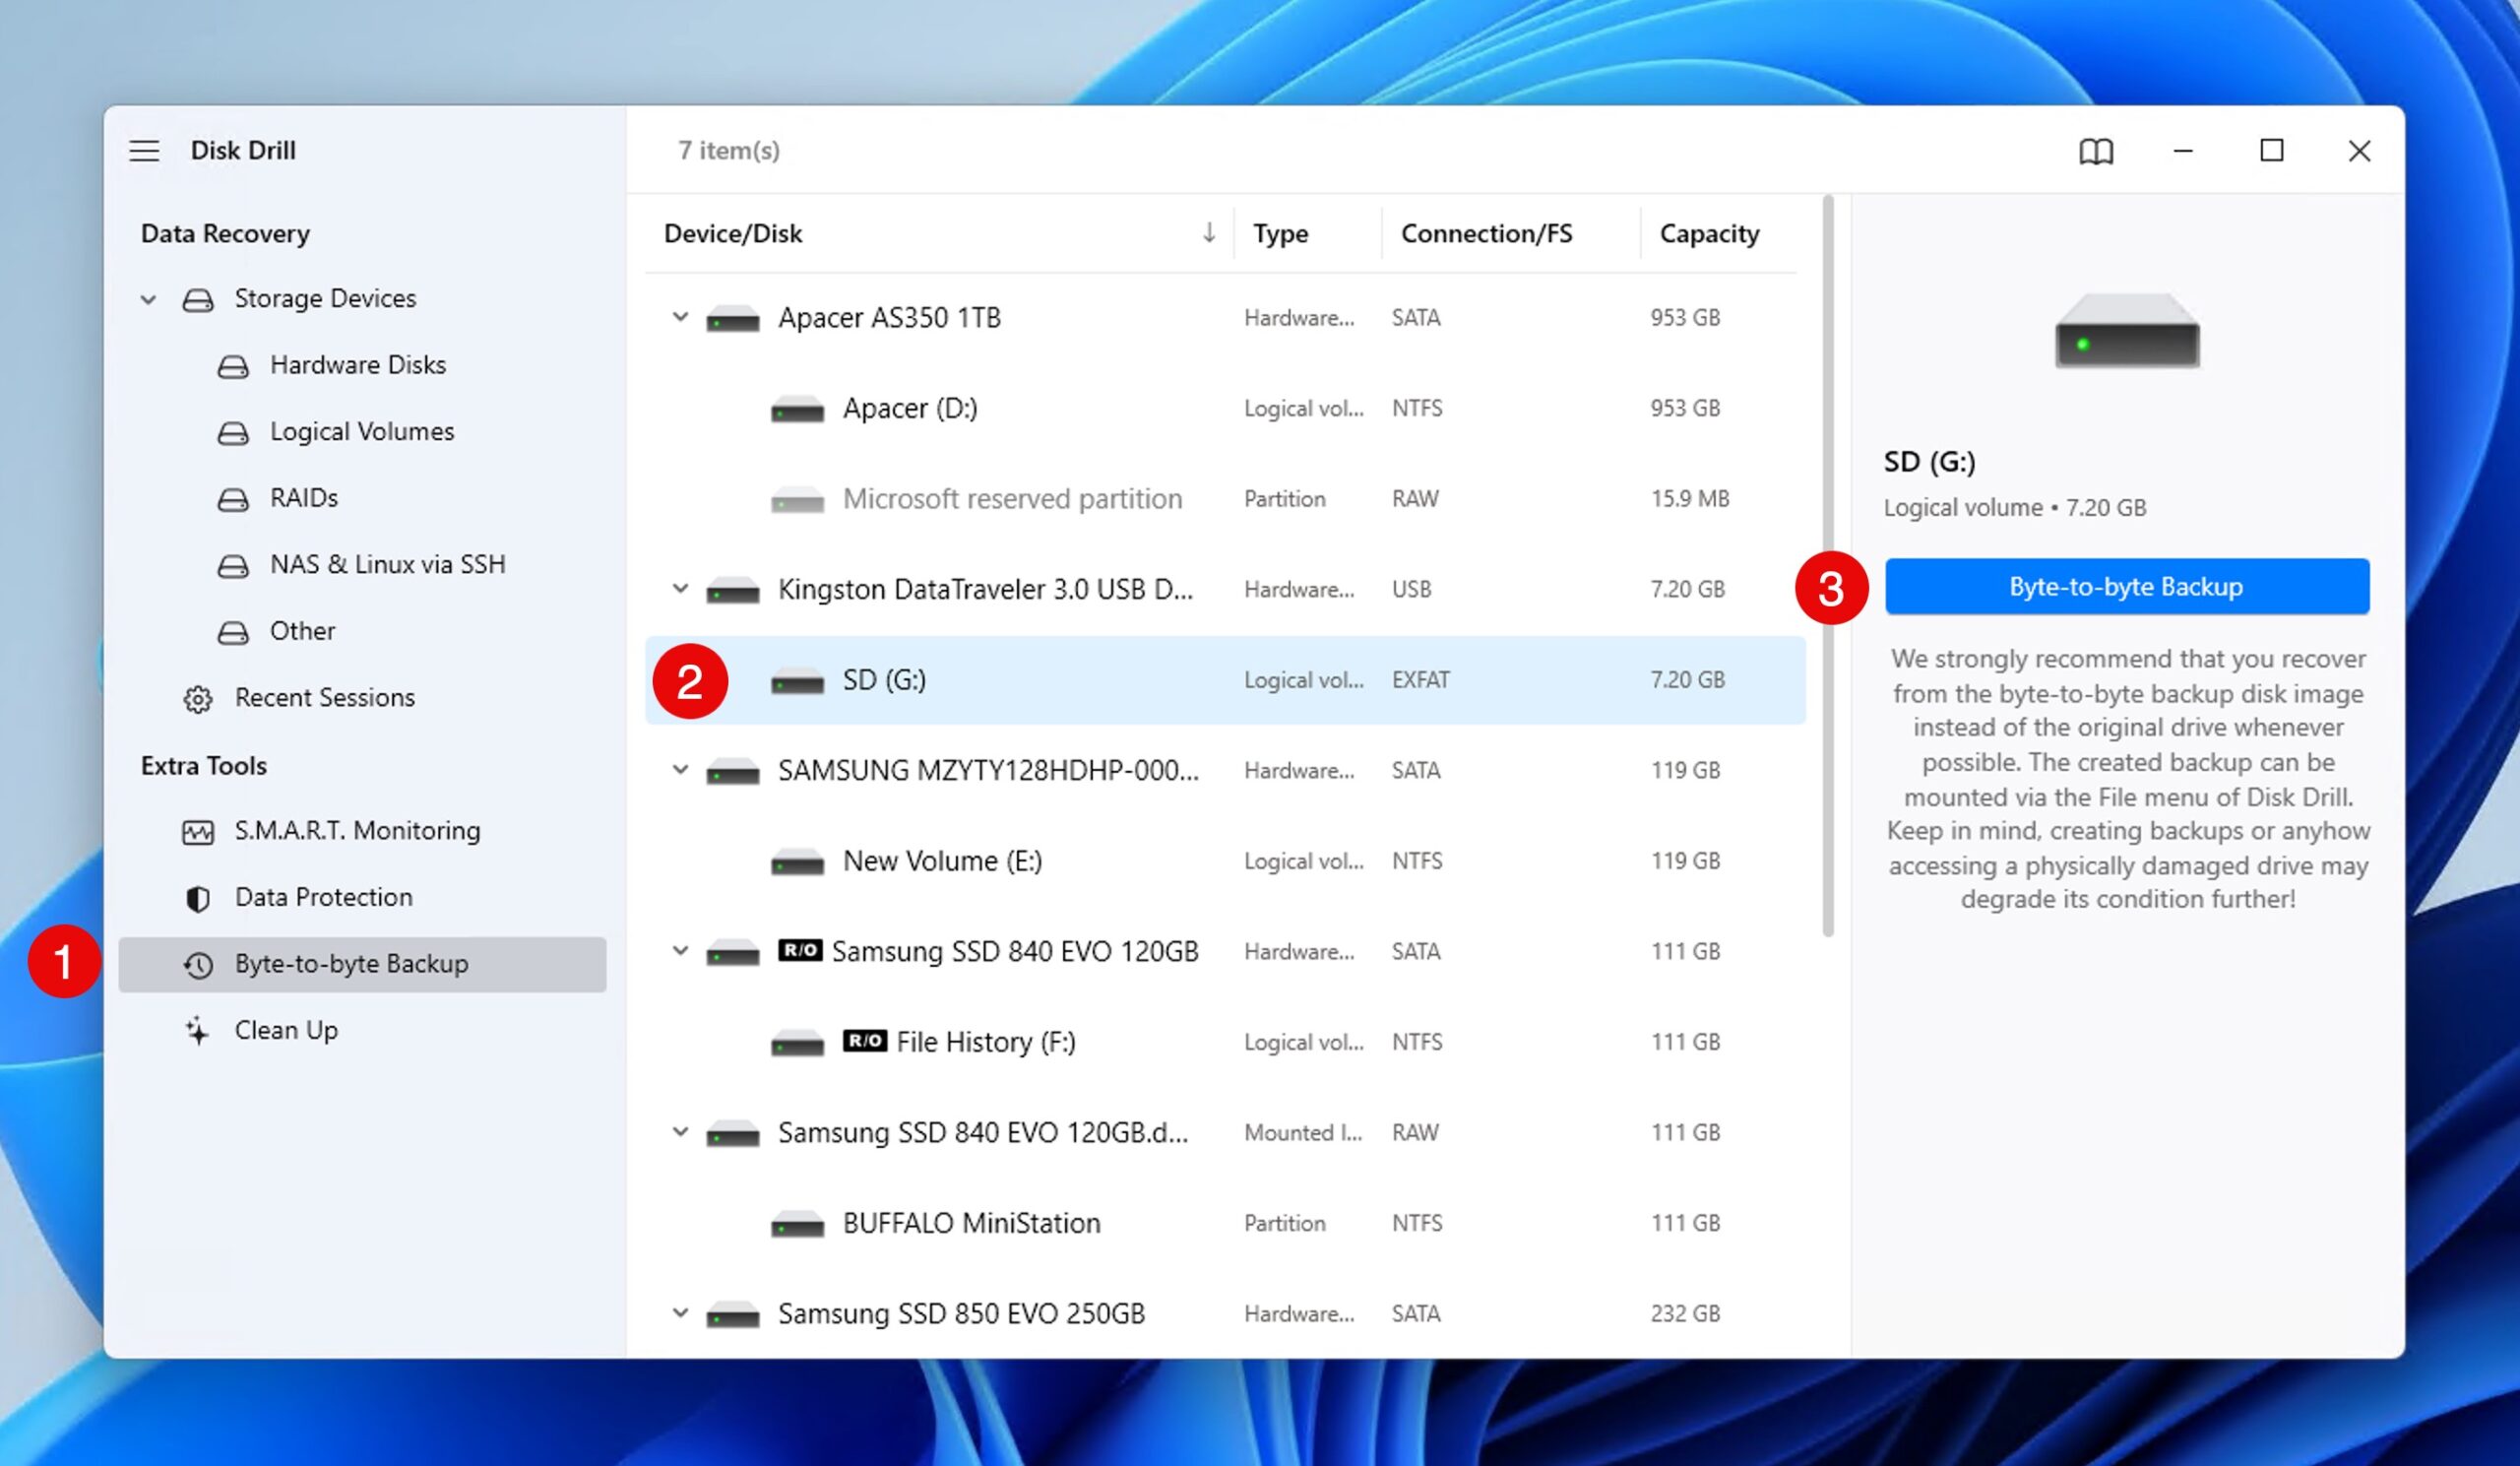
- Choose a location on your computer to save the backup (make sure you have enough free space as the backup will be the same size as your SD card’s capacity).
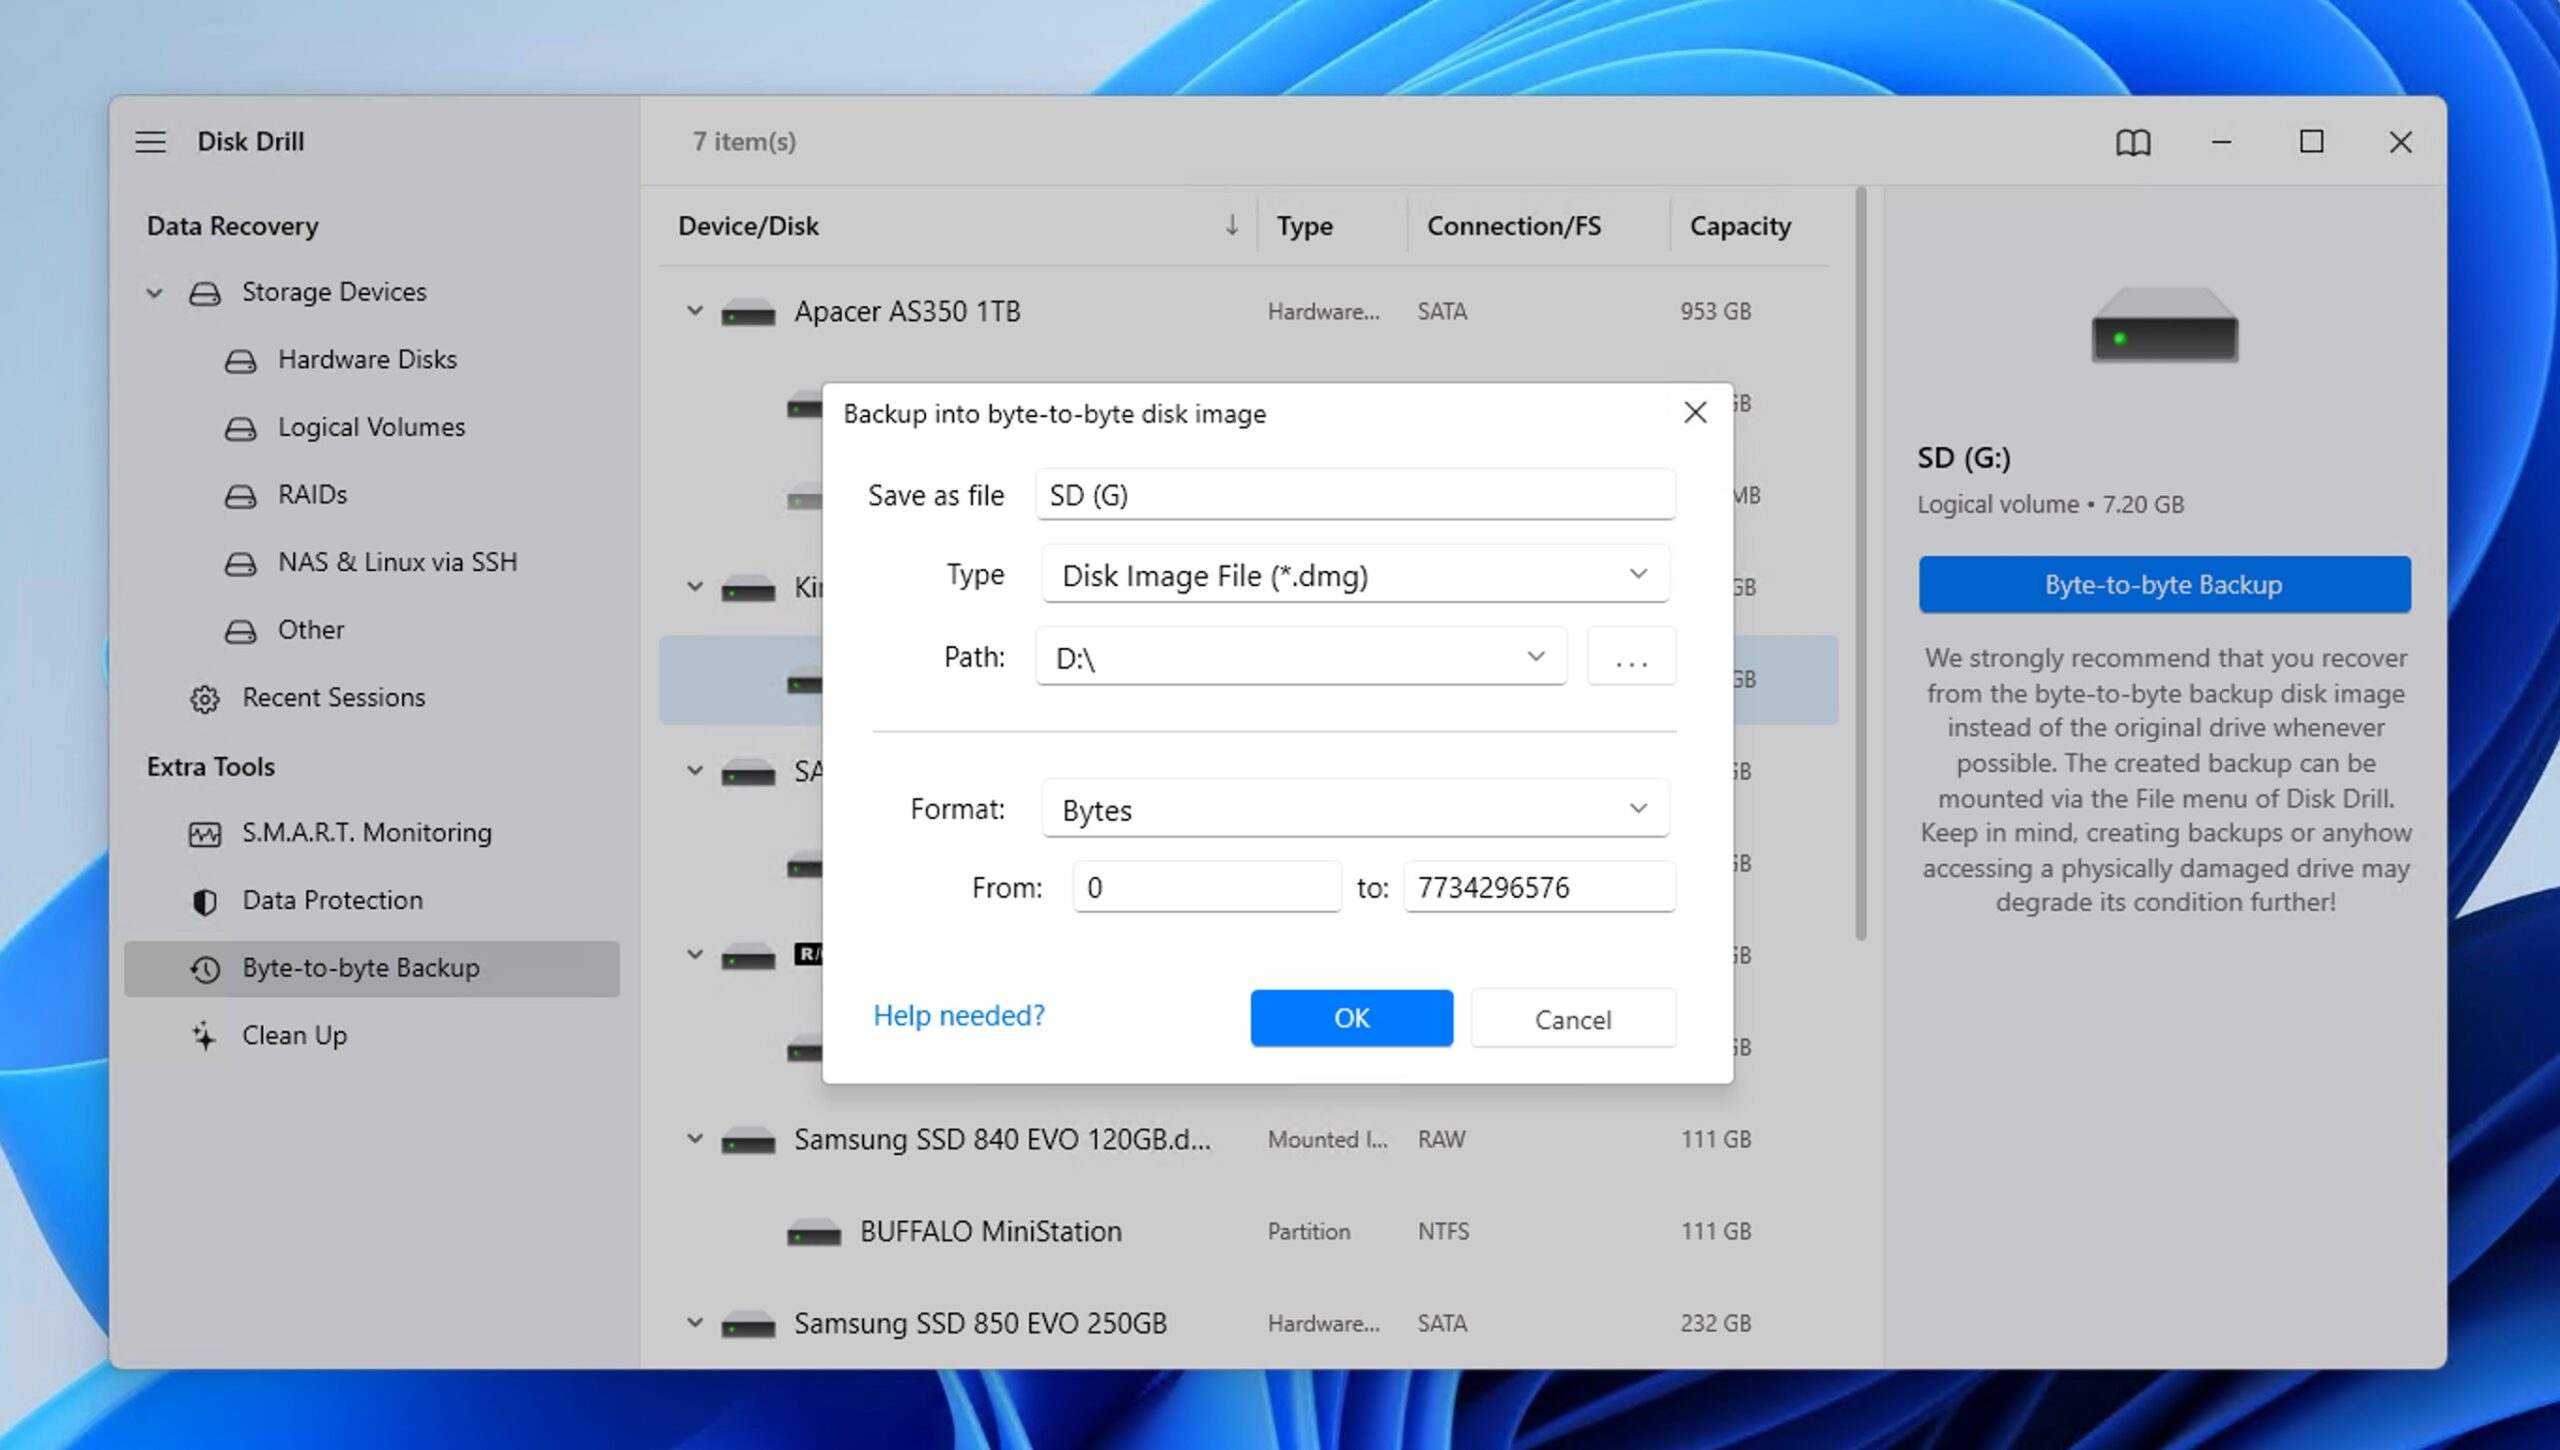
- Wait for the backup process to complete.
Once you have your backup, it’s time to recover your files. Here’s the step-by-step process:
- Navigate to the Storage Devices section in Disk Drill and click Attach disk image at the bottom of the device list.
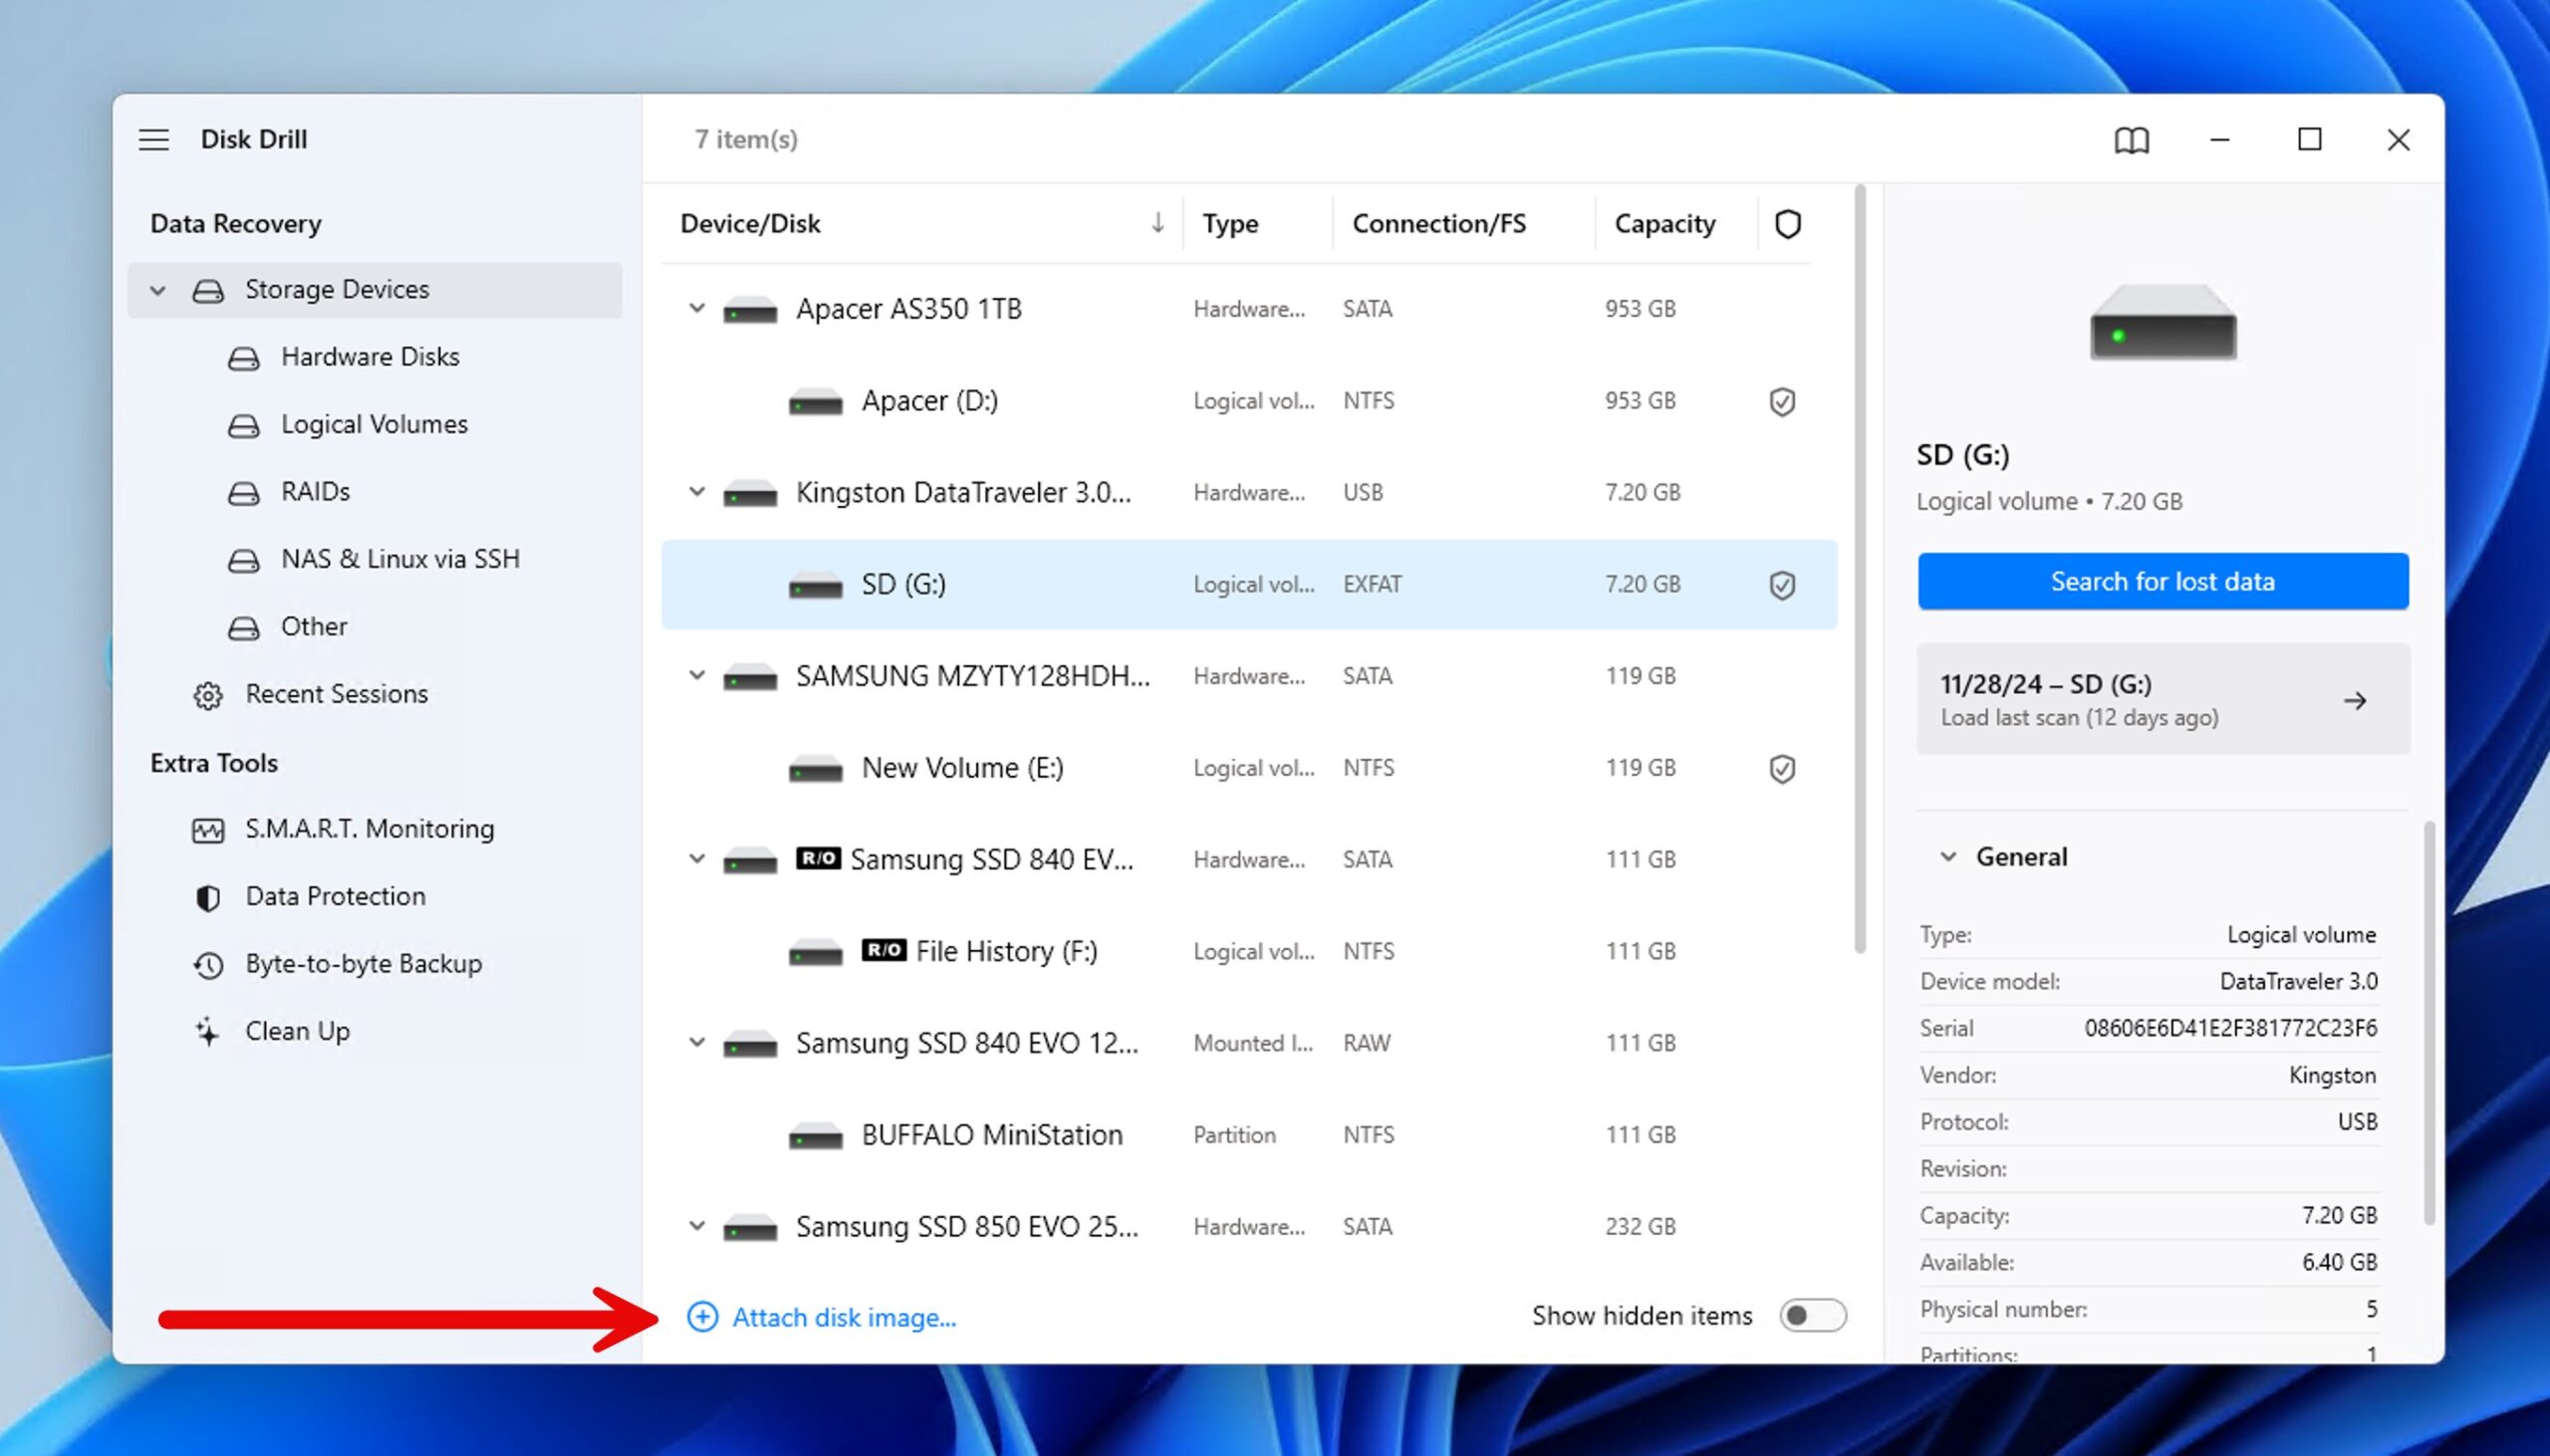
- Select the byte-to-byte backup you just created and click Search for lost data to begin scanning.
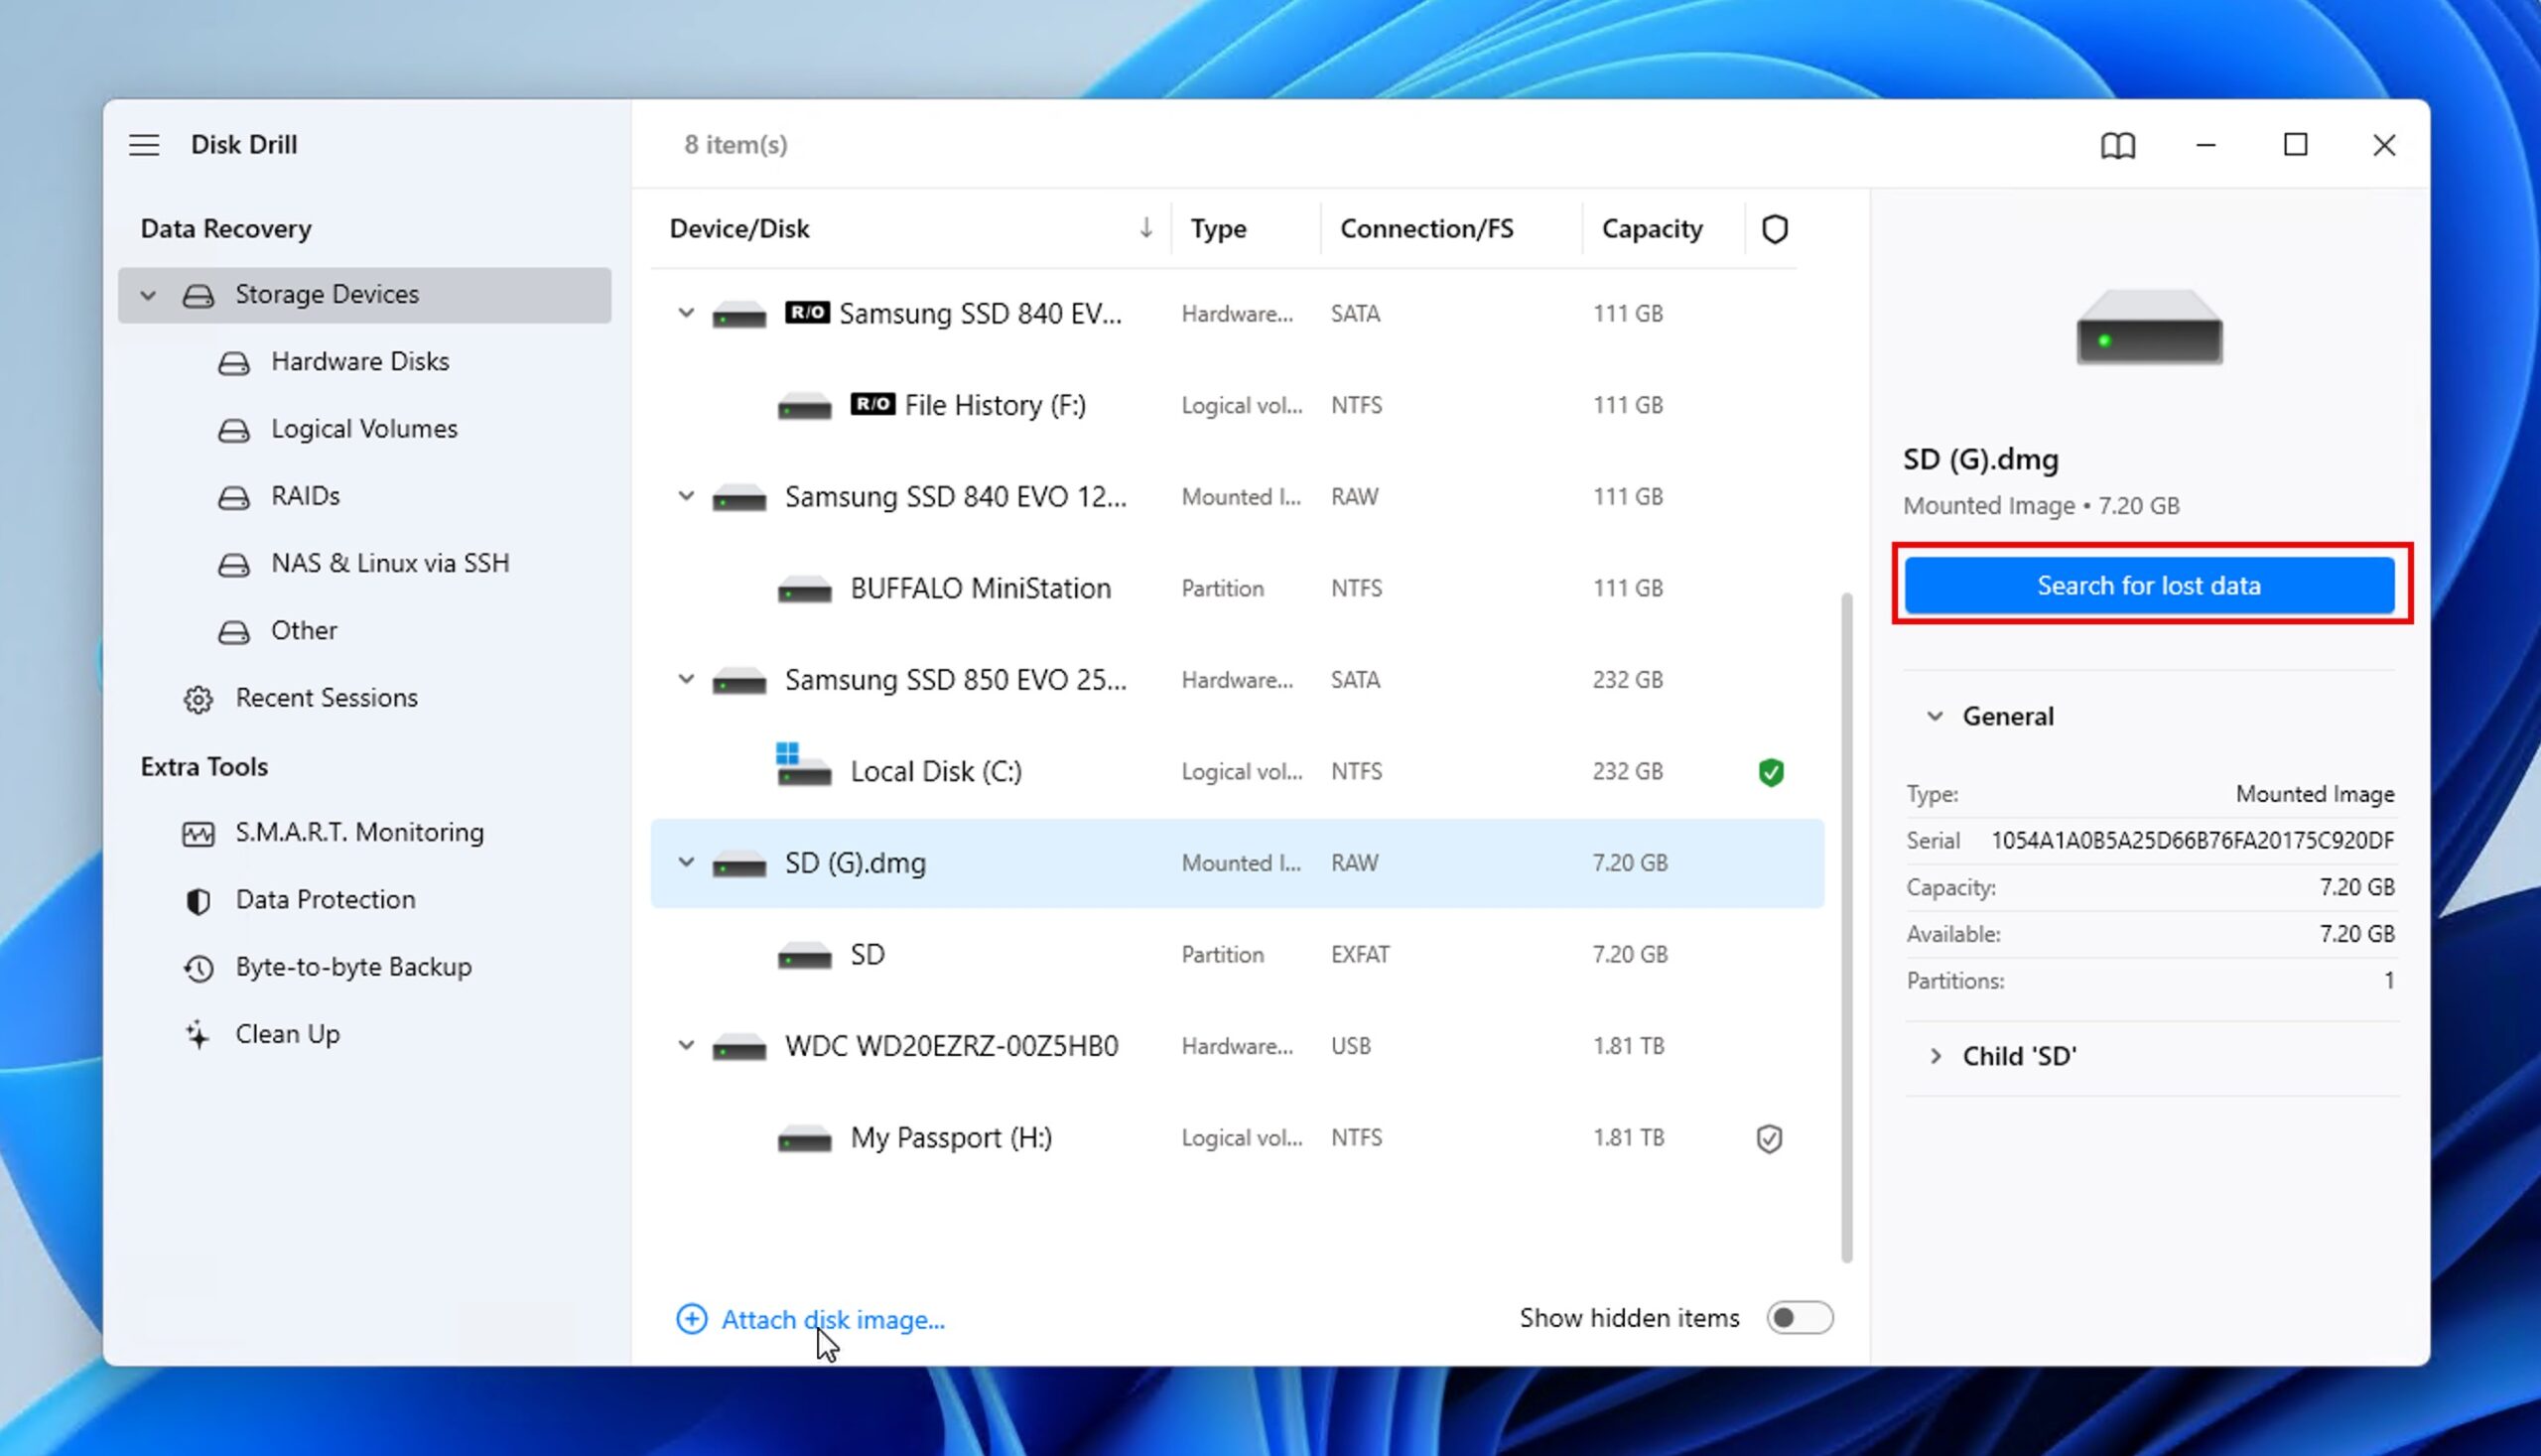
- Wait for Disk Drill to finish scanning the backup or click the Review found items button to see recoverable files as soon as they’re found (scanning will continue in the background).
- Go through the backed-up files and select everything you want to recover. You can use the filters at the top to narrow down results by file type.
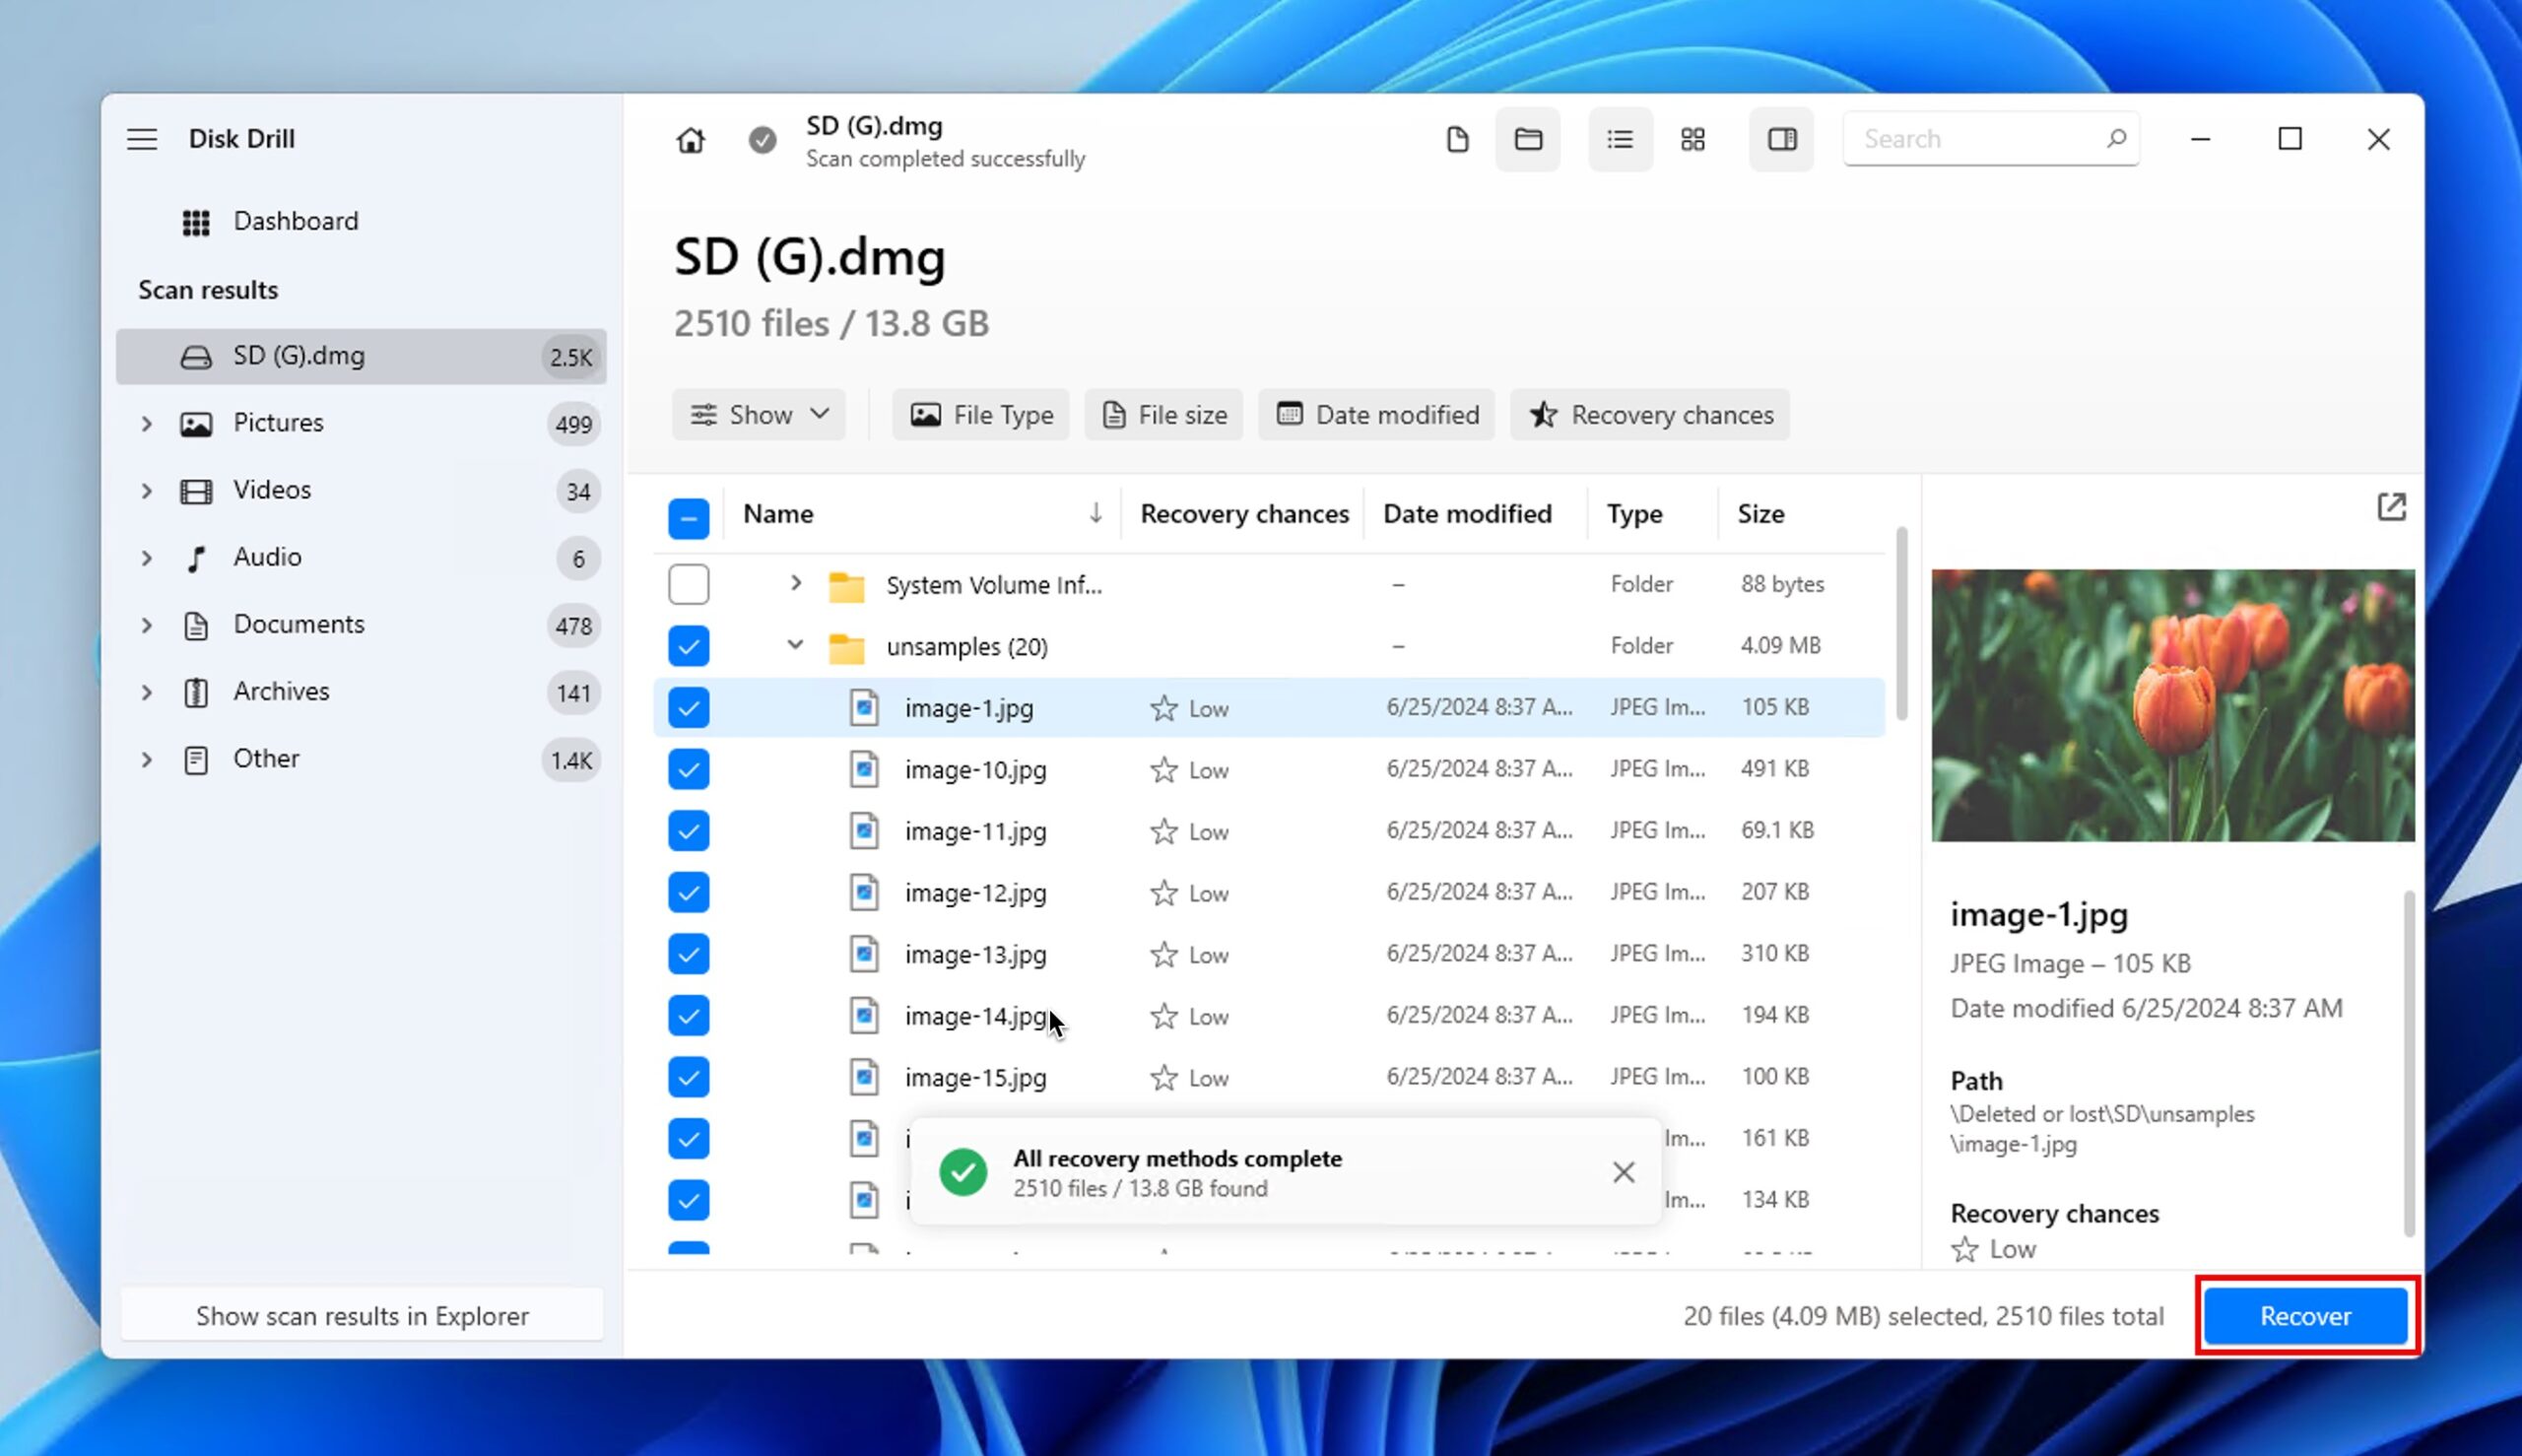
- Click Recover and choose a recovery location on a different drive (never recover to the same SD card!)
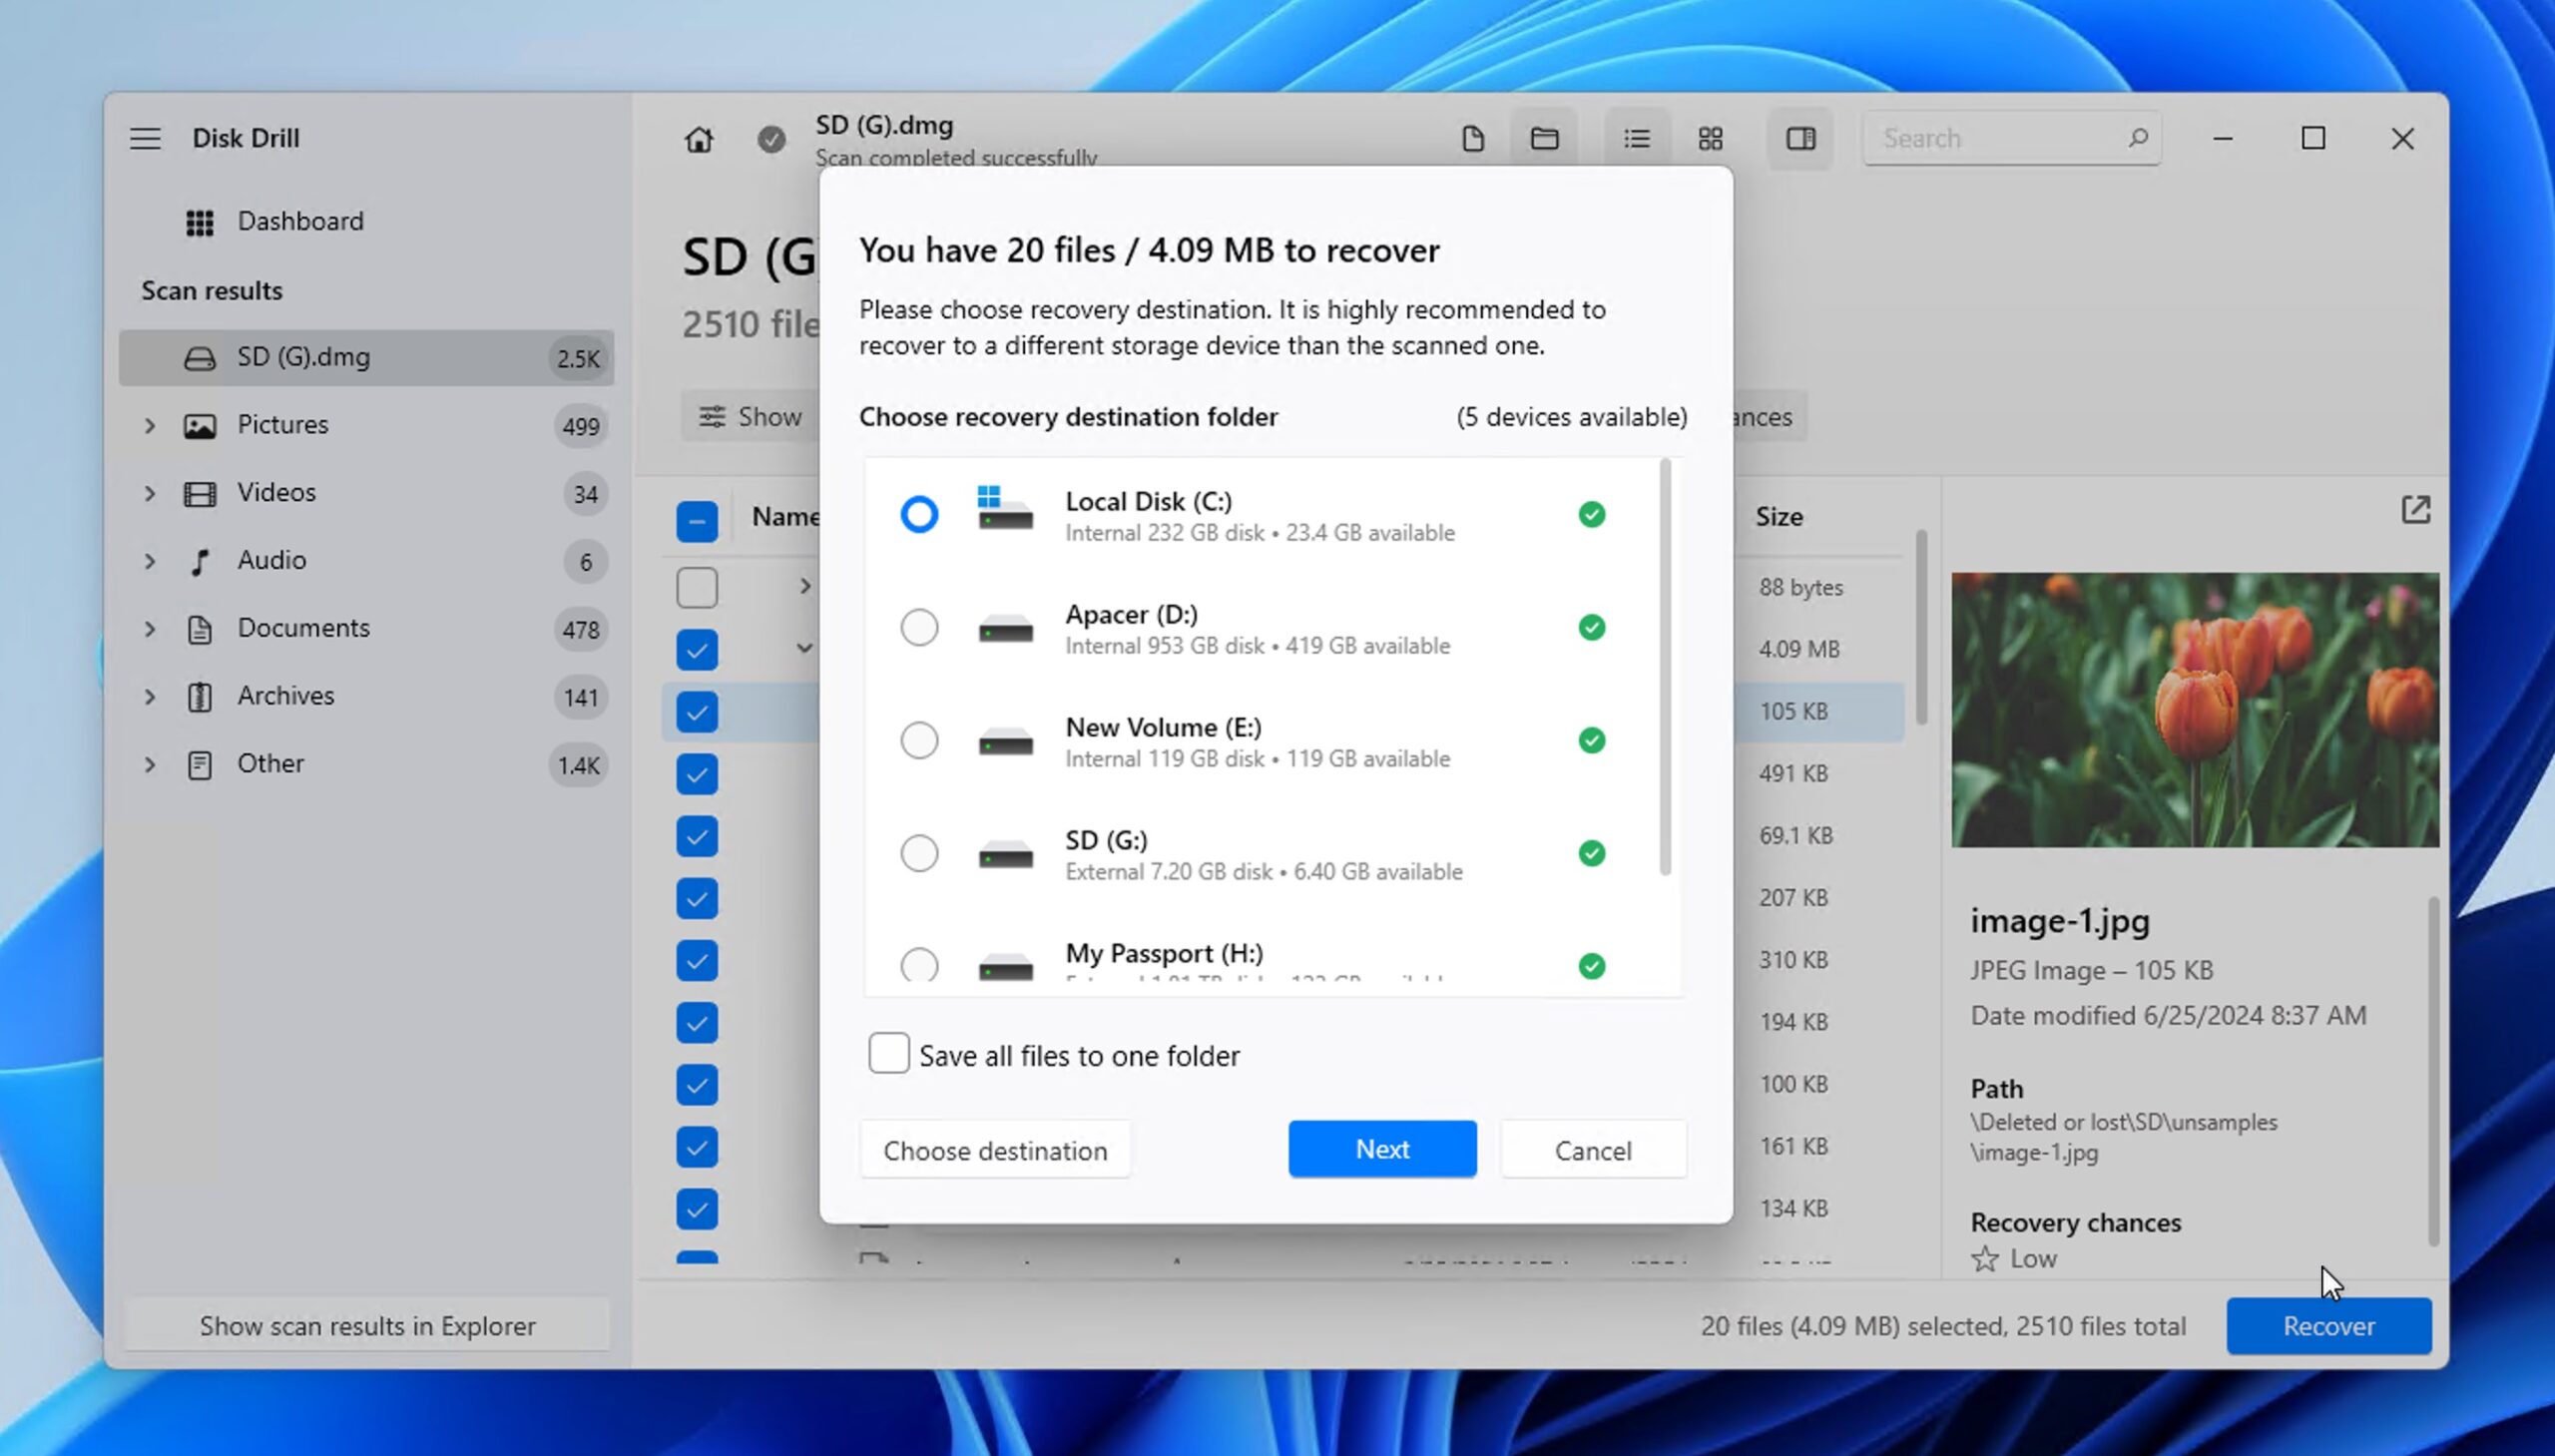
The free version of Disk Drill lets you recover up to 500 MB of data on Windows (100 MB on the Windows version), which is often enough for recovering your most important files and testing whether your data can be saved from the card. If you need more, you can upgrade to Disk Drill Pro for unlimited recovery.
📝 Note: In our testing, Disk Drill has proven to be exceptionally capable when it comes to corrupted SD card recovery, which is why it ranks at the top of our SD card recovery software ratings. You’ll find other capable options there too, but not all of them include the disk imaging feature that makes Disk Drill so reliable for corrupted memory card scenarios.
Method 2: Using Android Data Recovery App
Don’t have access to a computer? In that case, you can attempt to recover data from a corrupted SD card using Android data recovery software like DiskDigger. While not nearly as effective as data recovery on a computer, this app for Android devices lets you recover data with a few simple taps, so it’s worth a try.
Just know that the free version can only recover photos and videos, and video recovery only works on rooted Android devices. The Pro version can recover other file types besides photos and videos, but, again, recovering any types of files besides photos is not possible without root.
Here’s how to recover files from a corrupted microSD card using DiskDigger:
- Install the app from the Google Play Store.

- Make sure the SD card is inserted in your Android device.
- Launch DiskDigger.
- Depending on which version of the app you have, begin either Basic or Full scan. The latest version of DiskDigger let’s you search for lost photos, videos, and other files (the last option is still in beta).
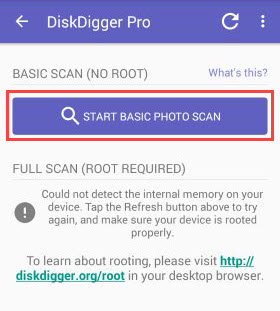
- Select all files you want to recover and transfer them to your phone.
- Tap the Recover button and choose where you want to save the selected files.
If you didn’t find your files with this method or they look blurry, we recommend trying recovery on a computer instead. As we mentioned at the beginning, Method 1 is a much better option for corrupted SD card recovery.
📝 Note: DiskDigger isn’t the only option for Android users. Check out our complete Android data recovery software ratings for other tested solutions that might work better for your specific situation.
Method 3: Pay for Professional Data Recovery
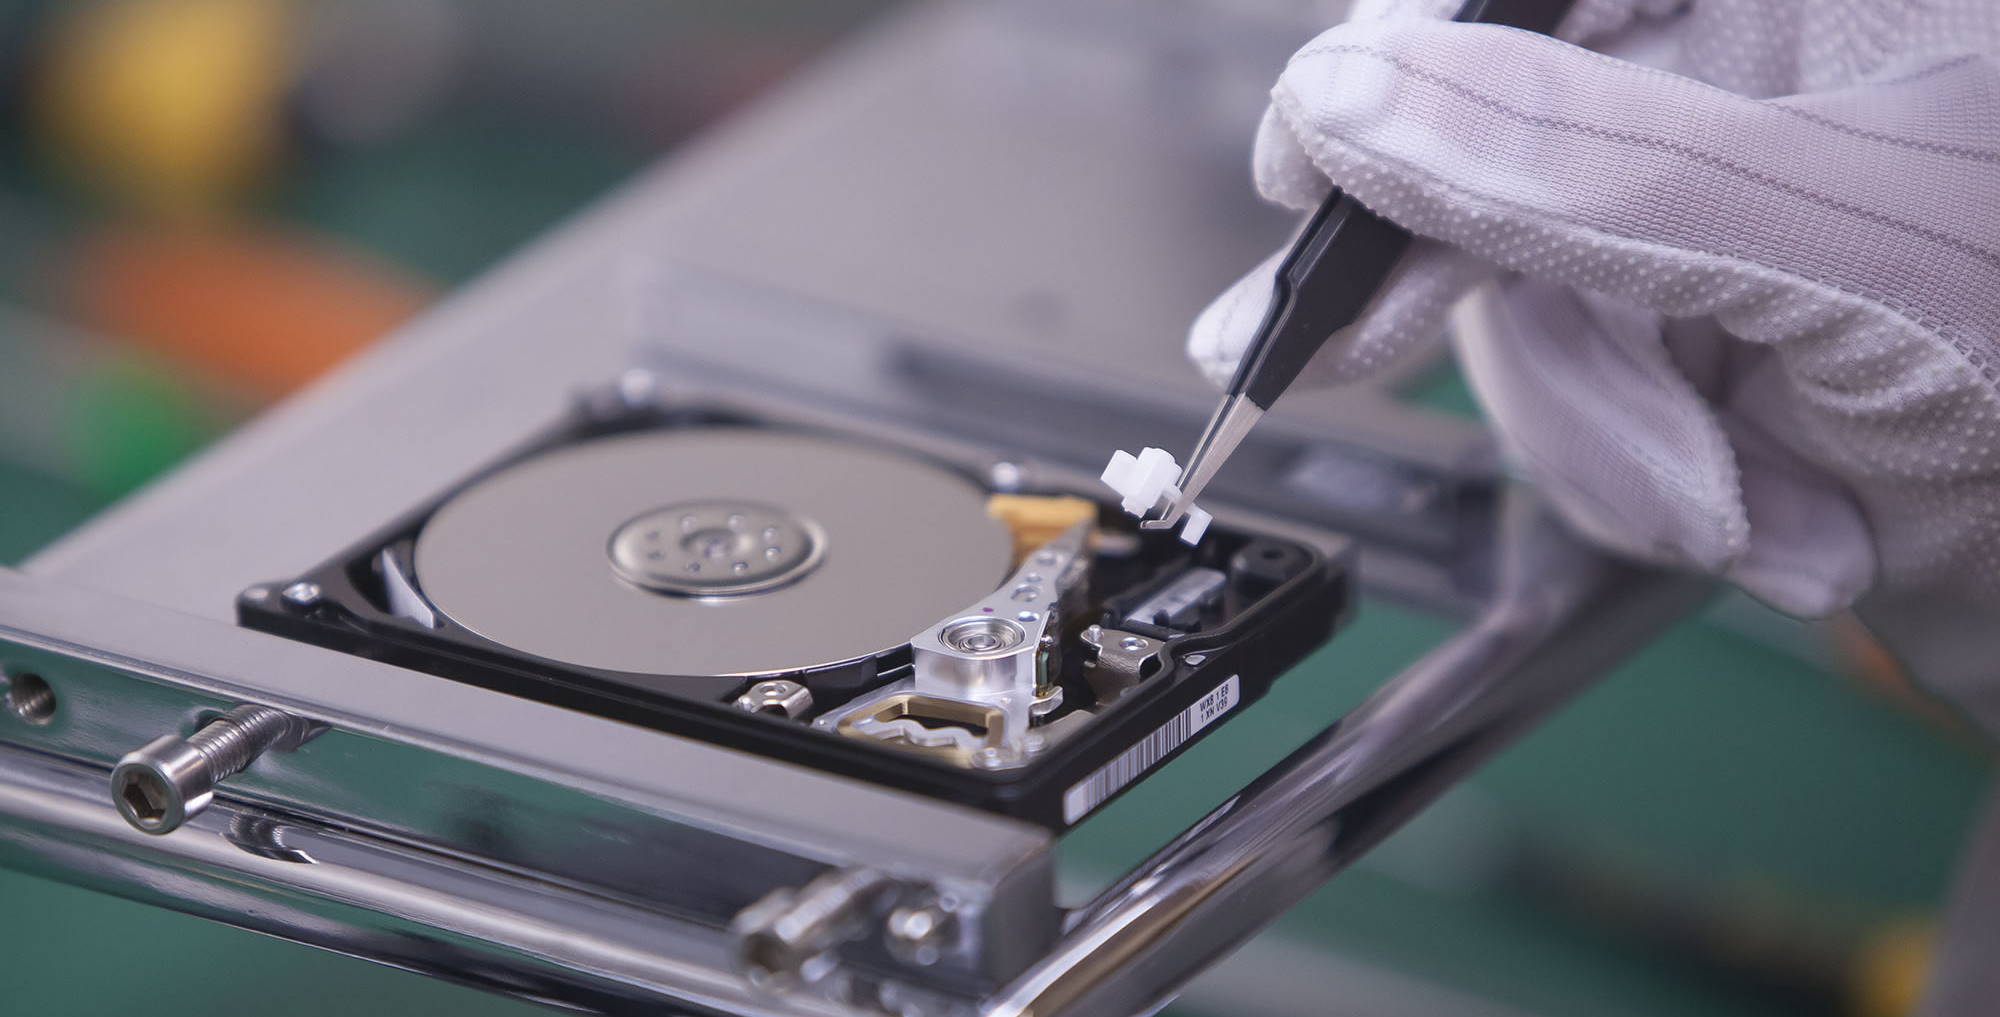 Professional data recovery is the most expensive way to recover data from a corrupted SD card, but it’s also most likely to deliver great results.
Professional data recovery centers employ experienced professionals equipped with state-of-the-art hardware tools and software applications that allow them to address even the most complicated data loss scenarios out there.
The best data recovery centers can not only repair corrupted SD cards that have been logically damaged but also recover files from corrupted SD cards that are not in top physical shape, making them well worth the price if you need to recover highly valuable data, such as irreplaceable family photos or business documents that took you weeks to put together.
We recommend professional SD card recovery services primarily for physical issues (things like broken connectors, water damage, or cards that won’t spin up at all) since there’s not much you can do with physical damage on your own unless you’re equipped well and have the necessary technical skills.
However, if your SD card is detected by your computer and shows its correct storage size, DIY recovery is usually doable. Here’s how to check:
To check your SD card in Disk Management (Windows):
- Press Windows + X and select Disk Management.
- Look for your SD card in the list of drives (it will show the capacity).
- Check if the displayed size matches your card’s actual capacity (e.g., a 64GB card should show around 59-60GB).
If your card appears with the correct size (even if it says RAW or asks to be formatted), you can likely recover your corrupted SD card data using Method 1. In our experience, most logical corruption issues are handled successfully with DIY software recovery.
How to Fix a Corrupted SD Card on Windows
In this section, we will guide you through several effective methods aimed at restoring the functionality of your SD card. From simple troubleshooting steps to more advanced repair techniques, these methods are designed to help you make your SD card usable again.
Method 1: Access the SD Card from Another Device
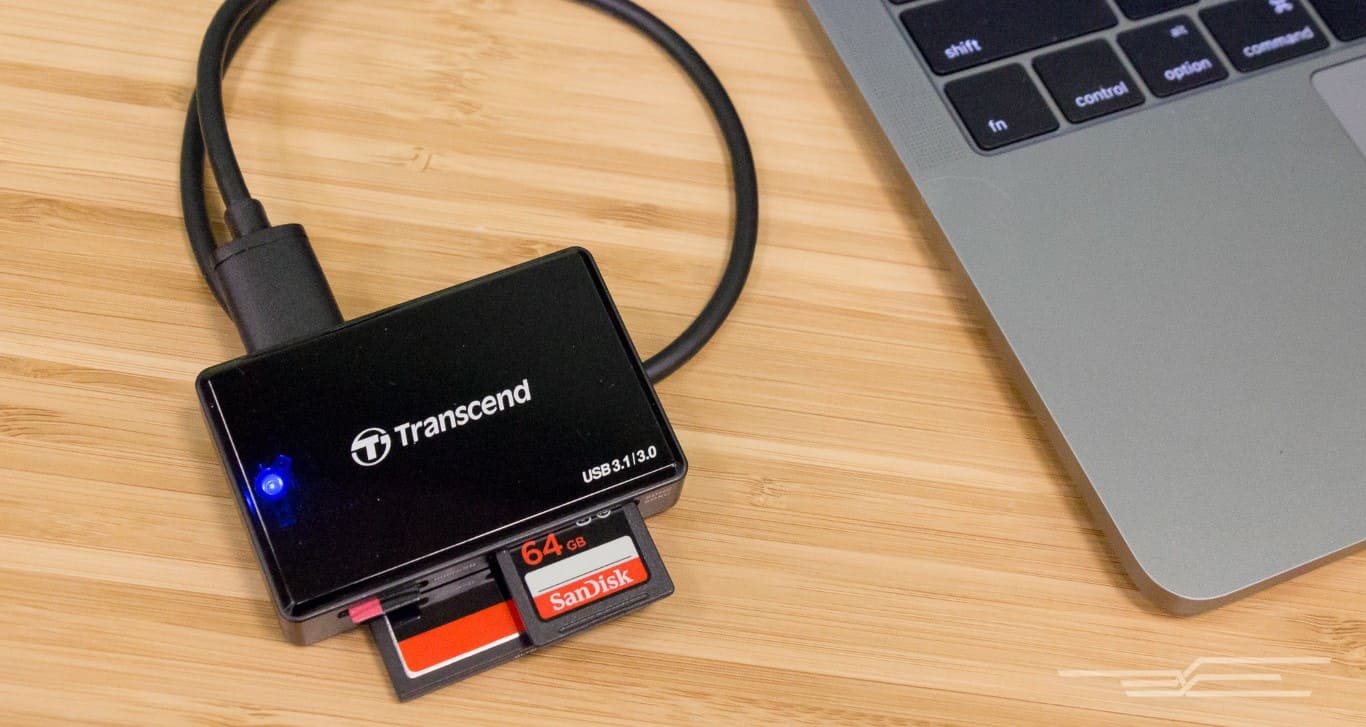 To rule out the possibility of your computer being the cause of the corruption, we recommend you start by connecting your SD card to another device. If you don’t have access to another computer, you can use a smartphone or a smart TV with an SD card slot.
If you can access the content of your SD card just fine from another device, then there’s something wrong with your computer or its memory card reader. Again, the simplest solution is to get a new memory card reader and try again. If that doesn’t help, then you should check the integrity of your operating system because your issues could be caused by missing or faulty drivers.
Method 2: Fix File System Errors Using Windows’ Built-in Repair Tools
Windows provides two ways to check and repair corrupted SD cards: the graphical Error Checking tool and its command-line counterpart, CHKDSK. Both tools can diagnose and fix file system errors, locate bad sectors, and recover readable information from them.
⚠️ Important: Before using these repair tools, make sure you’ve already recovered your important data. Built-in repair tools like CHKDSK can sometimes cause data loss, which is why we started this guide with data recovery methods.
Option 1: Using the Error Checking Tool (Graphical Interface)
If you prefer using a graphical interface, Windows includes an easy-to-use Error Checking tool:
- Open Windows Explorer and select This PC from the left panel.
- Right-click on your SD card and select Properties.
- Switch to the Tools tab and click Check.
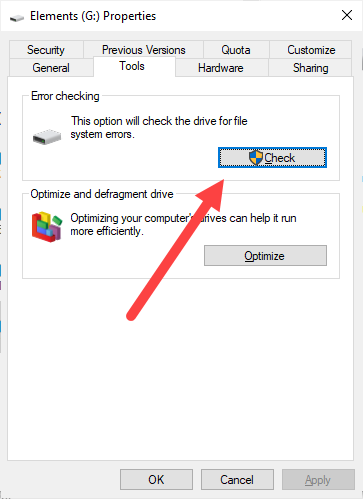
- Select Scan and repair drive even if no errors are found.
Option 2: Using CHKDSK (Command-Line)
The Error Checking tool actually uses CHKDSK behind the scenes. Using CHKDSK directly gives you more control over the repair process and provides detailed information about any problems it finds. Here’s how to use it:
- Note your SD card’s drive letter in Windows Explorer.
- Press Windows + X and select Windows PowerShell (Admin).
- Type the following command and press Enter (replace X with your SD card’s drive letter):
chkdsk X: /r.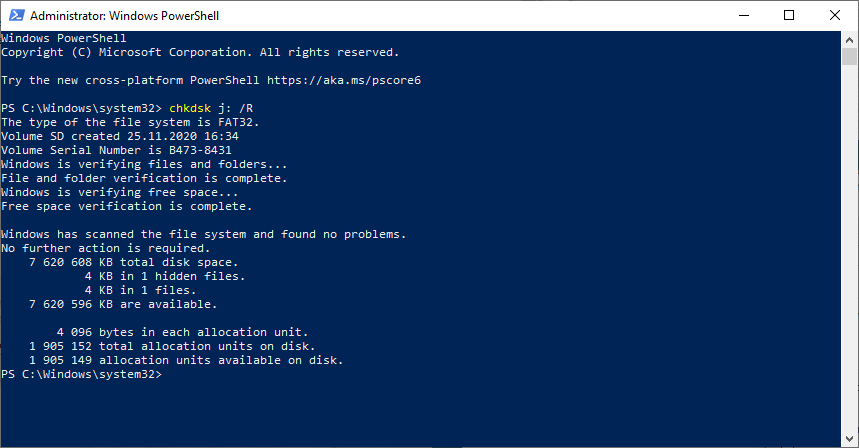
- If prompted about forcing a dismount, type Y and press Enter.
The /r parameter tells CHKDSK to locate bad sectors and recover readable information. You can also use /f to fix file system errors without checking for bad sectors. Not sure which one to use? Check out our detailed guide on CHKDSK /F vs /R parameters to understand the difference and choose the right option for your corrupted SD card.
Method 3: Change the Drive Letter of the SD Card
When an SD card becomes corrupted, Windows may fail to automatically assign it a drive letter, which can cause it to appear completely inaccessible in File Explorer. By manually assigning a new drive letter, you can sometimes restore access to the card and its contents. Here’s how to change the drive letter:
- Press Windows + X and select Disk Management.
- Right-click on your SD card and select the Change Drive Letter and Paths option.
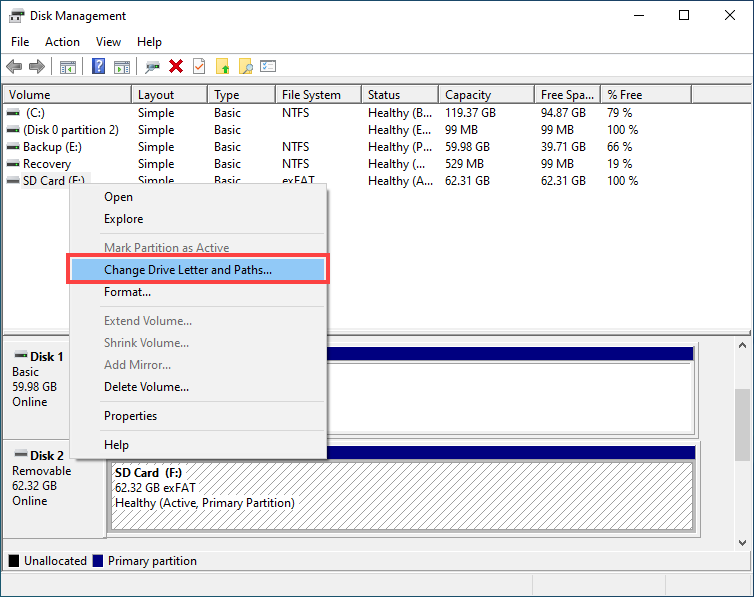
- Click Change and assign a different letter to your SD card. Click OK to confirm your choice.
Of course, if your SD card has really been corrupted, it will take more than a drive letter change to fix the corruption and restore corrupted SD card data, which is where the next method comes in.
Method 4: Recover Corrupted SD Card Partition Using TestDisk
When an SD card’s partition table becomes corrupted, Windows might not be able to recognize it properly. TestDisk is an open-source tool that can help you recover lost partitions and repair corrupted partition tables. While its command-line interface might look intimidating at first, the tool actually follows a logical step-by-step process:
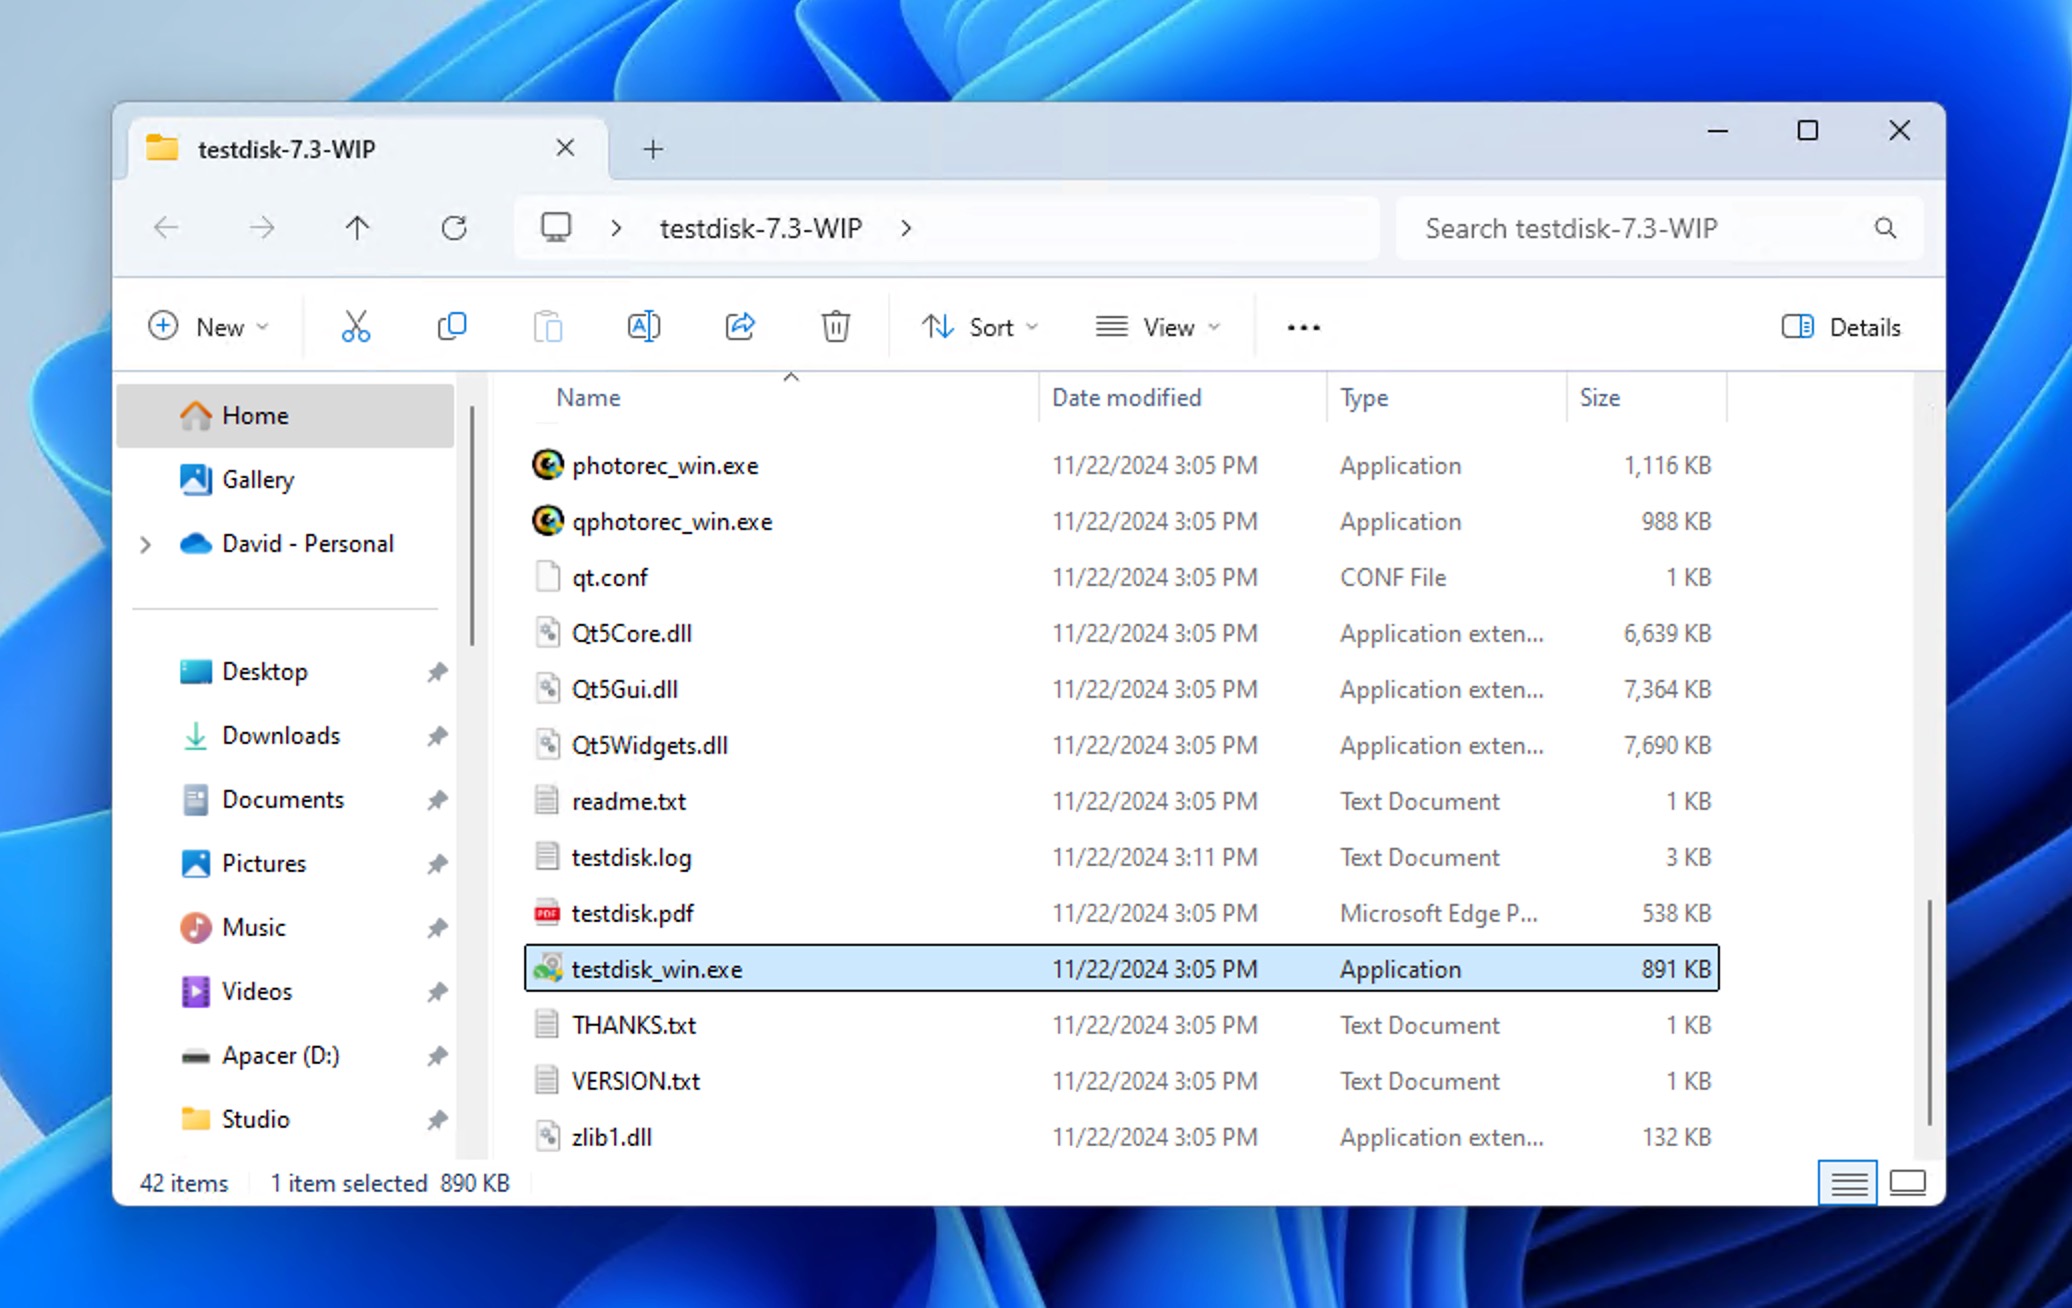
- First, visit the TestDisk website and download the latest version. After extracting the downloaded archive, you’ll need to run testdisk_win.exe with administrator privileges (right-click and select Run as administrator). When prompted, choose to create a new log file.
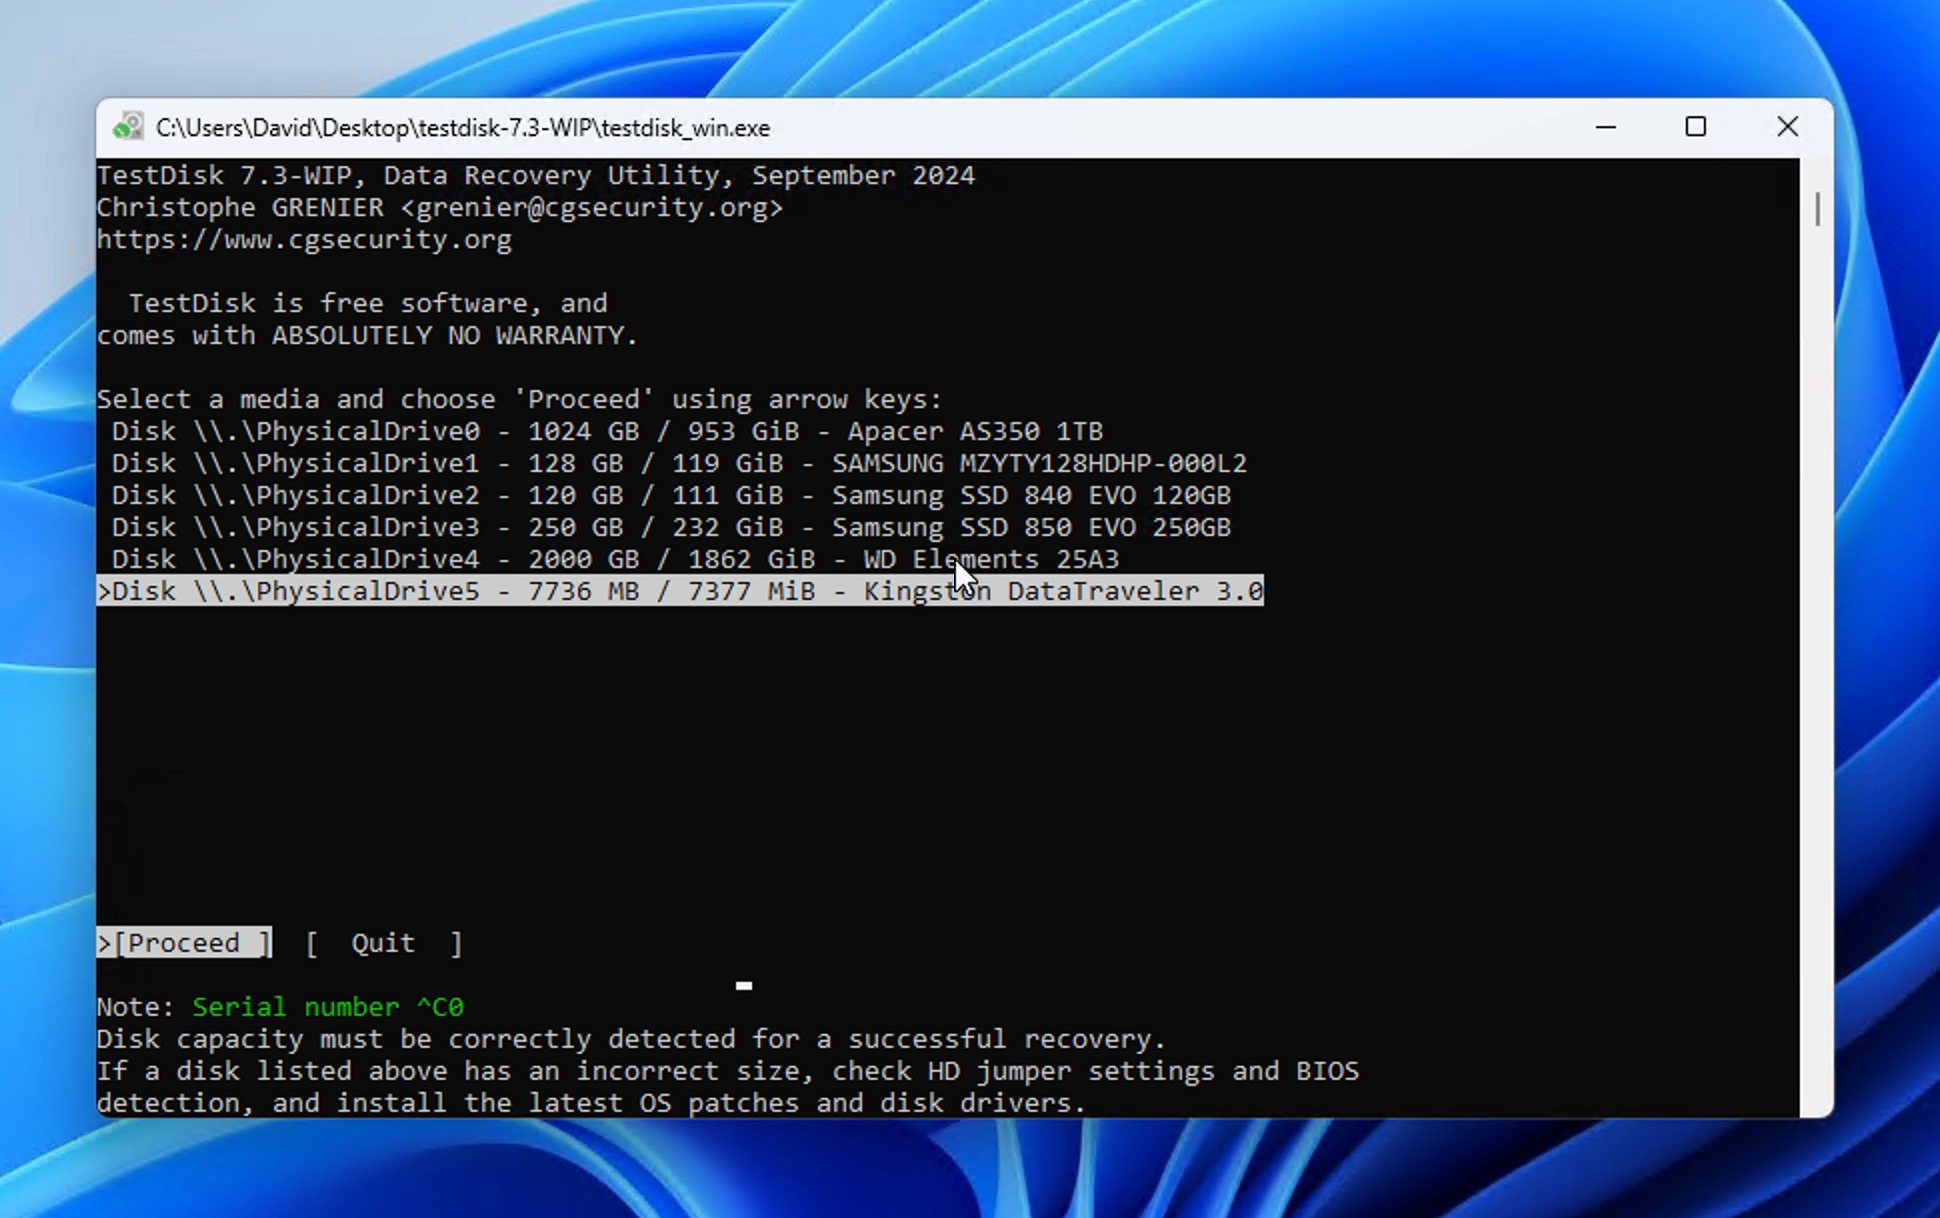
- Use the arrow keys to select your SD card (you can verify it’s the correct device by checking the listed storage capacity). Press Enter once you’ve highlighted the right device.
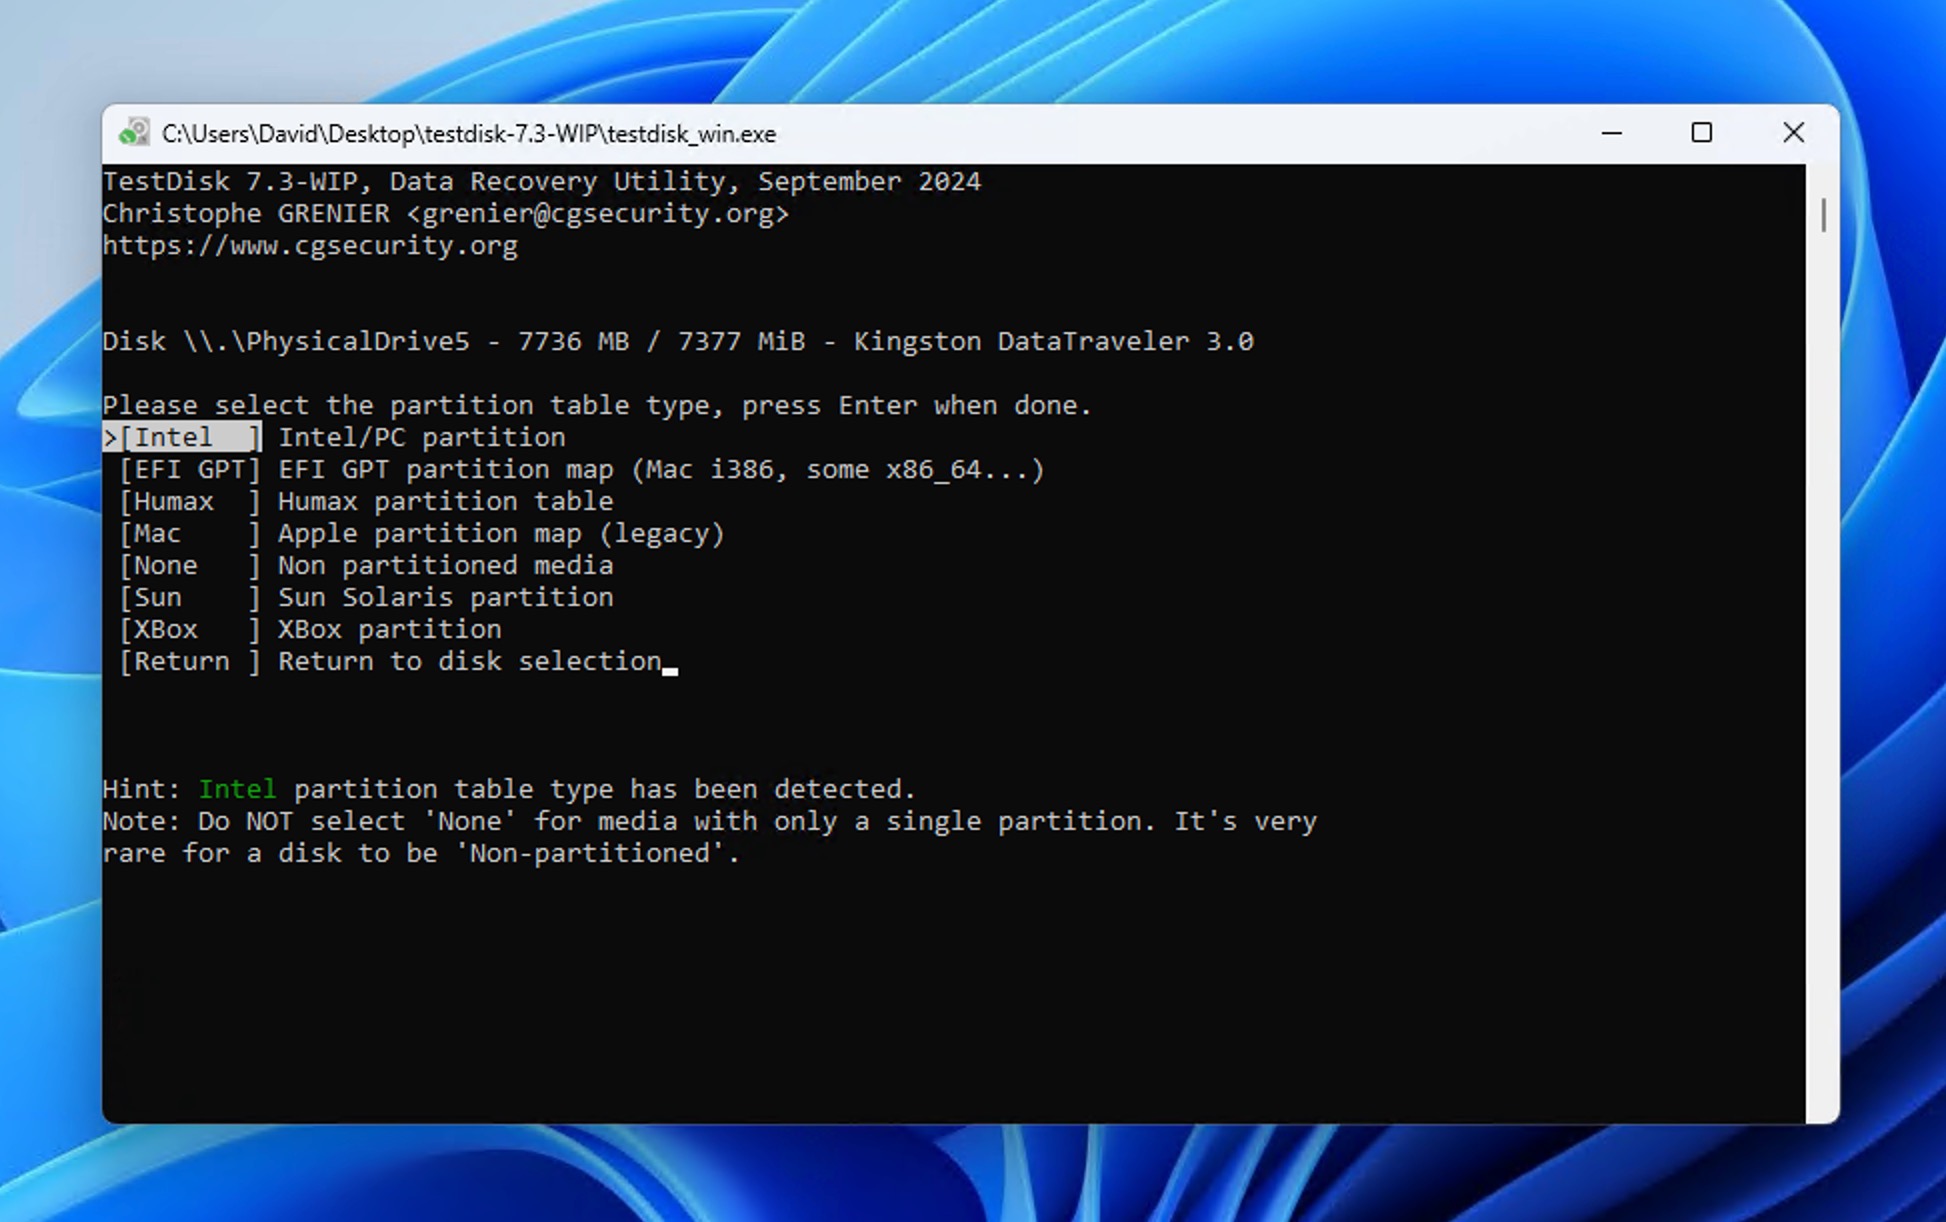
- TestDisk will attempt to detect your SD card’s partition table type automatically. For most SD cards, this will be Intel (MBR). Unless you have a specific reason to change it, accept the detected type by pressing Enter.
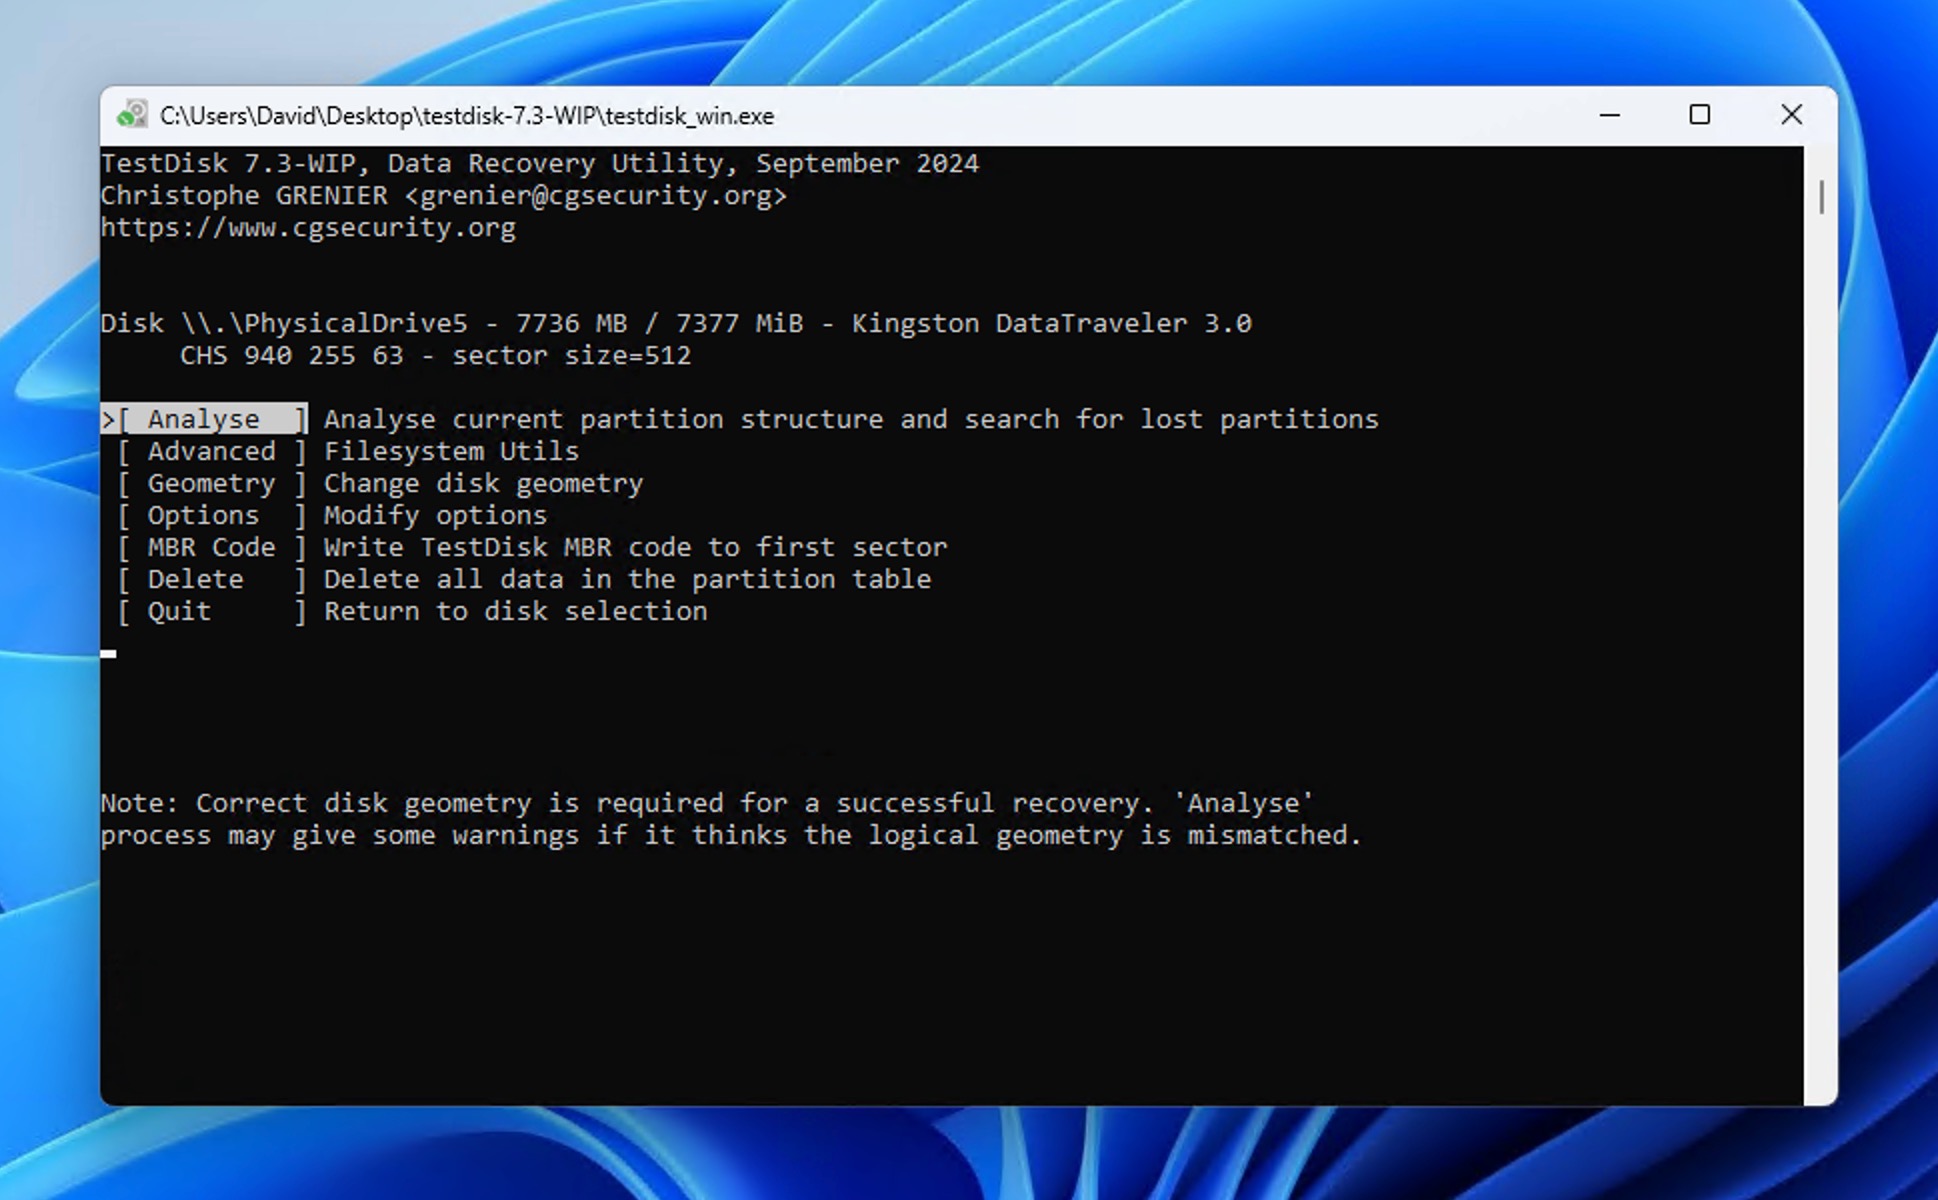
- Select Analyse to begin examining your SD card’s partition structure. TestDisk will show any partitions it can currently detect.
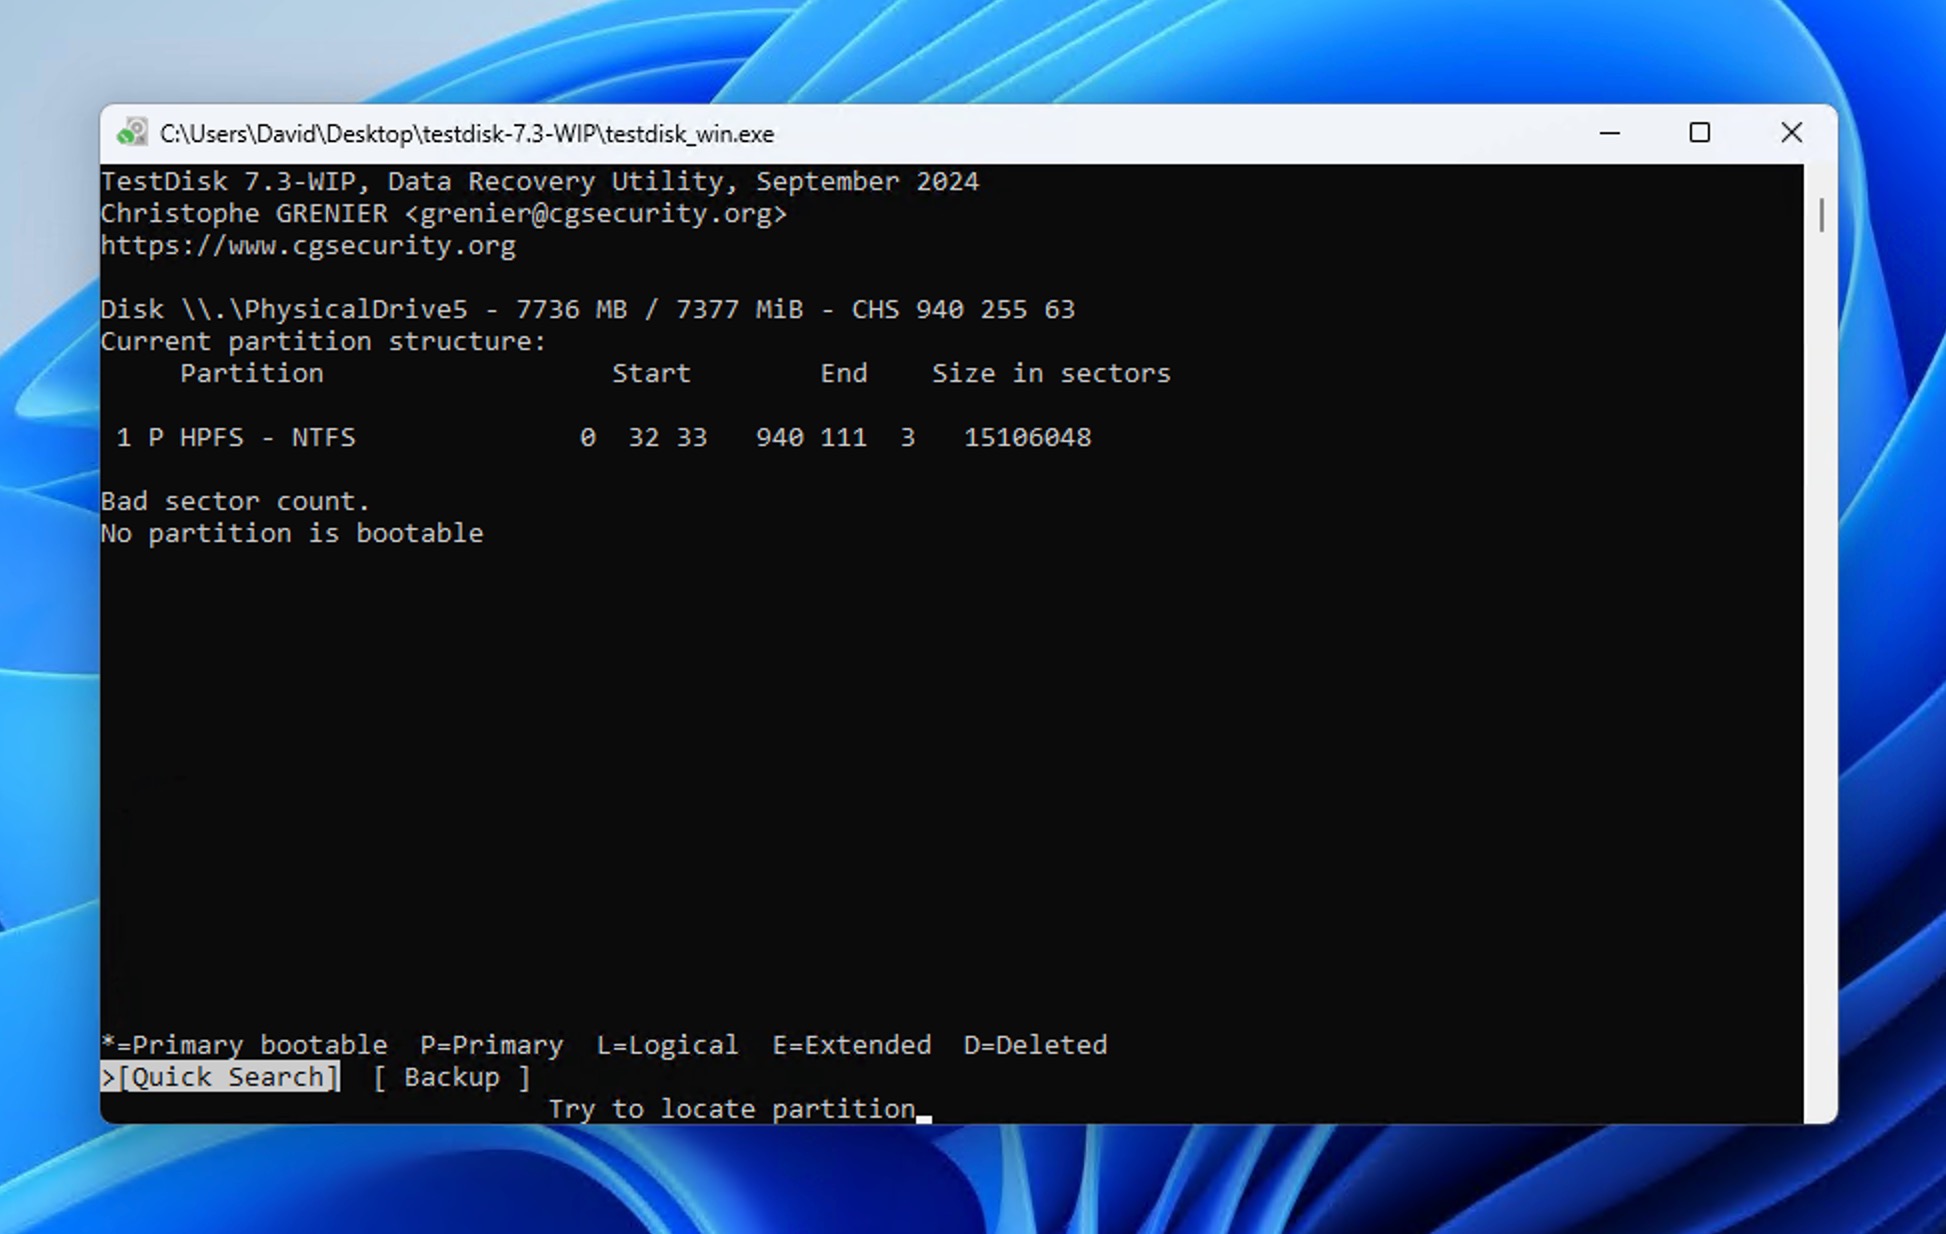
- Choose Quick Search to start scanning for lost or deleted partitions. TestDisk will display a list of all found partitions, including deleted ones. For each partition, you can press P on your keyboard to preview its contents.
- When you find the correct partition, use the left/right arrow keys to change its status from Deleted to the appropriate type (usually Primary for SD cards). Once you’ve correctly marked all the partitions you want to recover, select Write from the menu. After TestDisk finishes writing the new partition table, restart your computer to ensure Windows recognizes the changes.
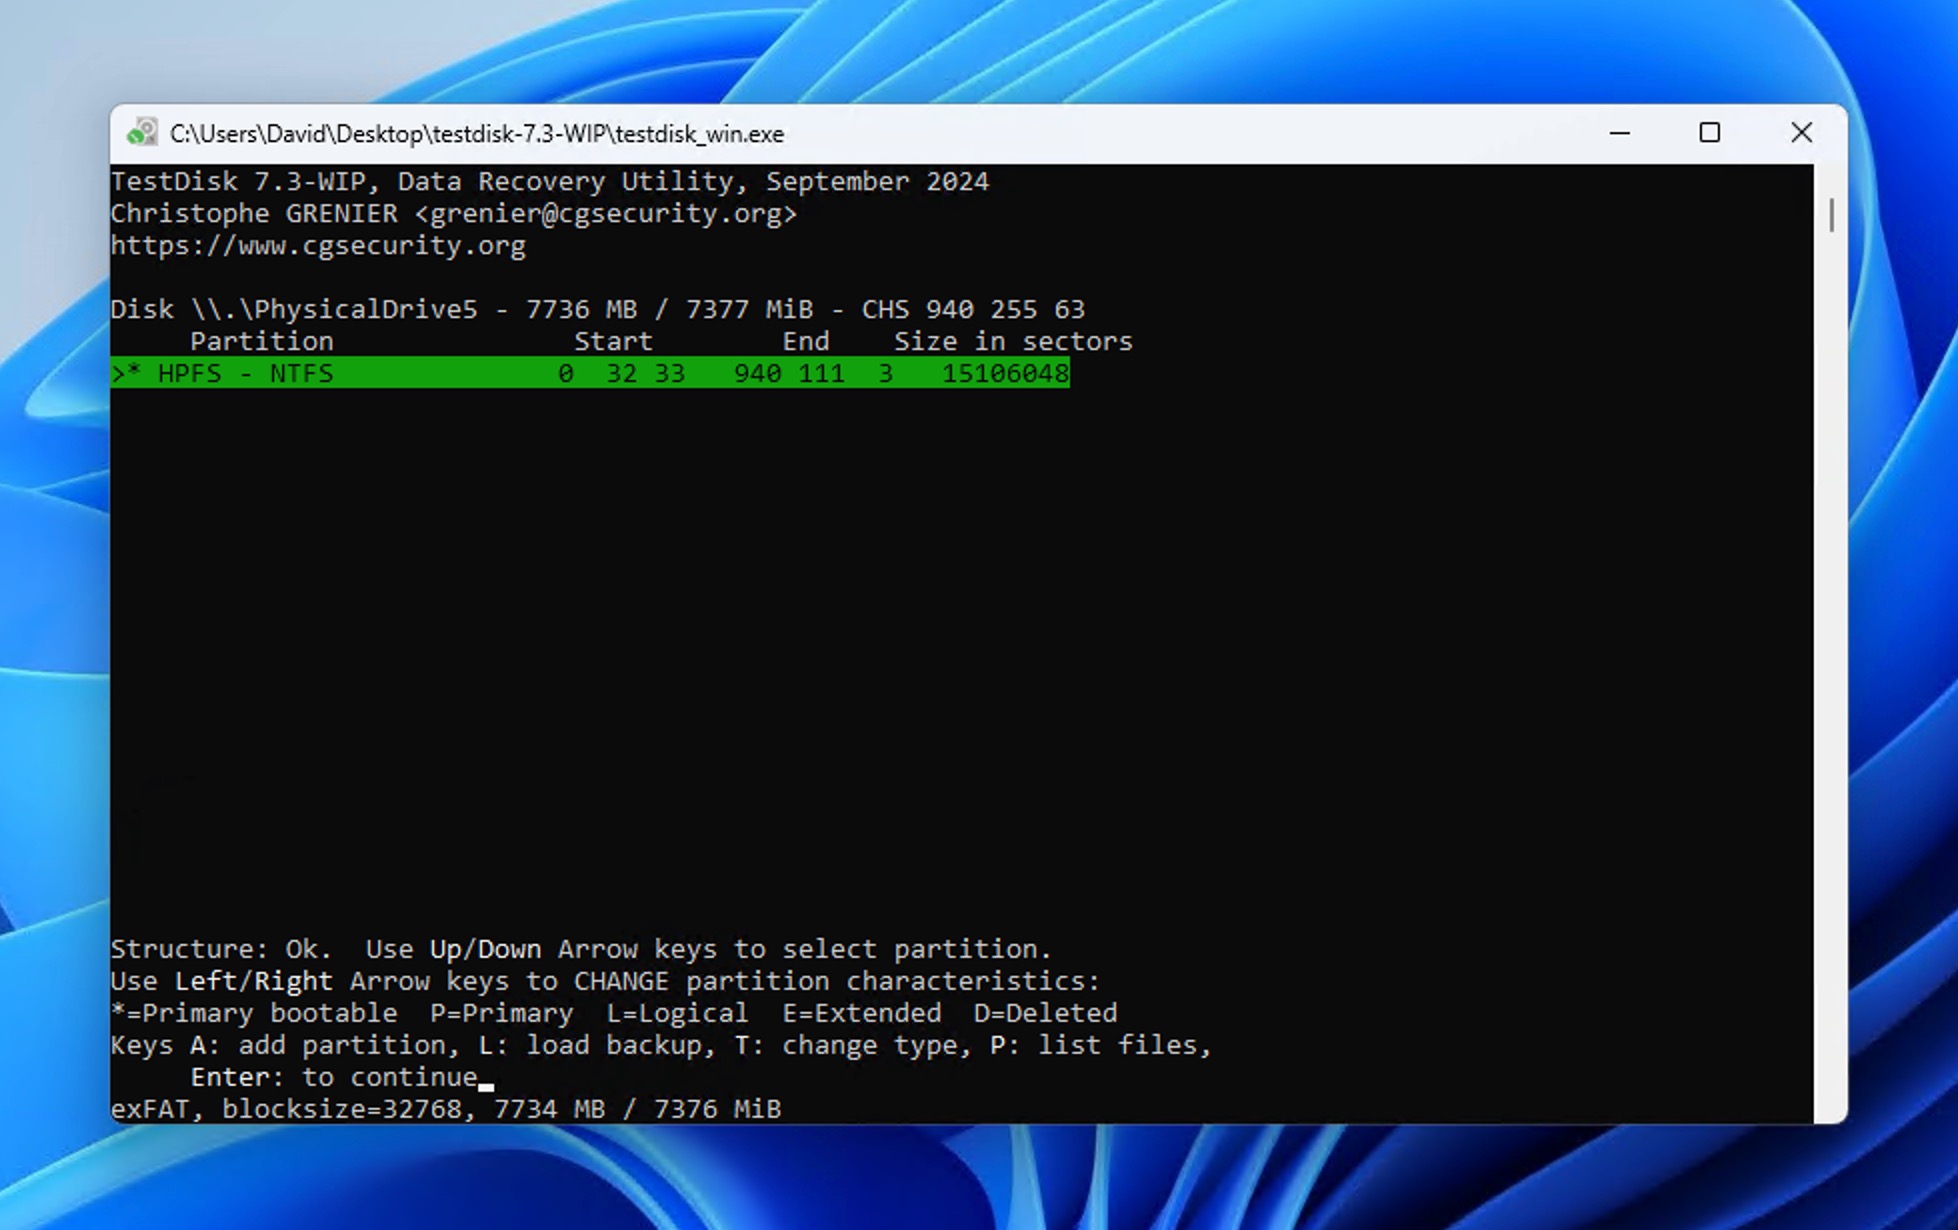
Should the Quick Search option fail to deliver any results, then you can continue with Deeper Search. While it will likely take a long time to complete, it should theoretically find any partition that’s still recoverable.
📝 Note: TestDisk ranks high on our list of the best SD card repair tools, and it comes in a package with PhotoRec, which is another data recovery software tool. Unlike TestDisk, PhotoRec works by scanning for known file signatures, so it’s useful when your SD card’s file system is severely damaged or completely missing.
Method 5: Check if the SD Card is Legit
There are surprisingly many fake SD cards sold on sites like Amazon and AliExpress. Such SD cards promise a large storage capacity but deliver only a small fraction of it. Because fake SD cards are programmed to display a different storage capacity than the one they actually offer, your device won’t be able to use the card correctly, so data corruption may occur.
We’ve seen plenty of cases like this, especially with deals that seem too good to be true. “Two friends instead bought 1TB cards for $30. Yes, both of these people bought fake SD cards,” wrote one Reddit user. The scammers bank on you not noticing until it’s too late. However, once you write more data than the card’s real capacity, it starts overwriting your existing files, leading to corrupted SD card problems.
To check if your SD card is legit, you can use a free tool such as FakeFlashTest, which works by writing large random files to the free space and then verifying their integrity. When the tool encounters a file whose integrity has been compromised, you know that’s where the real storage capacity ends.
- Download and launch the tool.
- Select your SD card and click the Quick Size Test button (make sure there are no important data on the SD card because they will be erased).
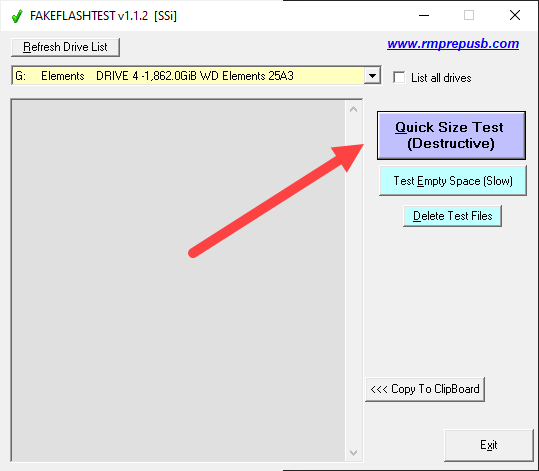
- Wait for FakeFlashTest to determine the true capacity of the SD card.
While it’s possible to use a fake SD card, we strongly recommend you avoid doing so because the risk of data corruption is simply too high. In extreme cases, the SD card could even become dead, and it’s not always possible to recover a dead SD card.
Method 6: Create a Partition on the RAW SD Card
If your SD card has become so corrupted that it now has no file system (=is RAW), then you need to create a new partition on it to be able to use it again. Just know that this method involves re-partitioning and formatting the card, which can restore its functionality but can make the recovery of lost data more difficult.
Therefore, it’s critical to attempt data recovery before proceeding with this fix. If you’ve already recovered as much important data from the SD card as possible, then you can proceed with creating a new partition on your RAW SD card:
- Press Windows + X and select Disk Management.
- Locate the RAW SD card and right-click on the unallocated space.
- Select the New Simple Volume option.
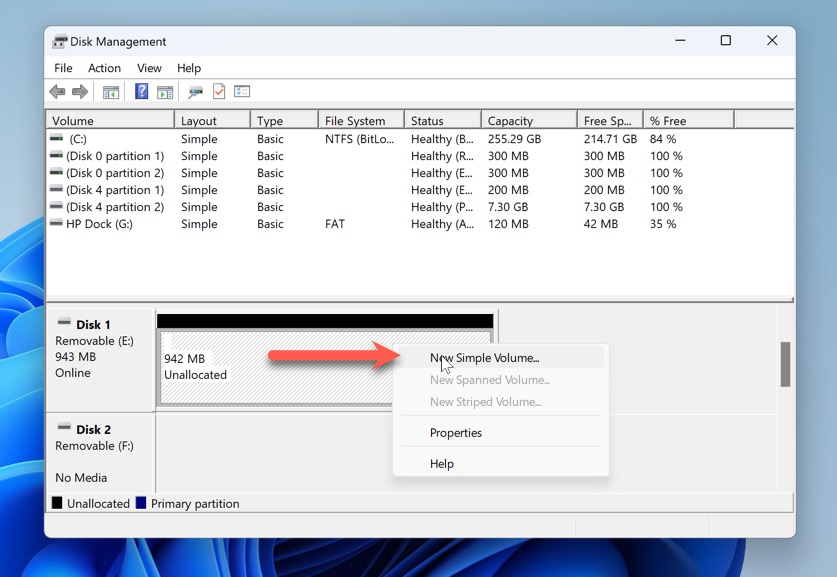
- Go through the partition creation wizard. When asked to select your desired file system, choose FAT32 or exFAT (if your SD card is larger than 32 GB).
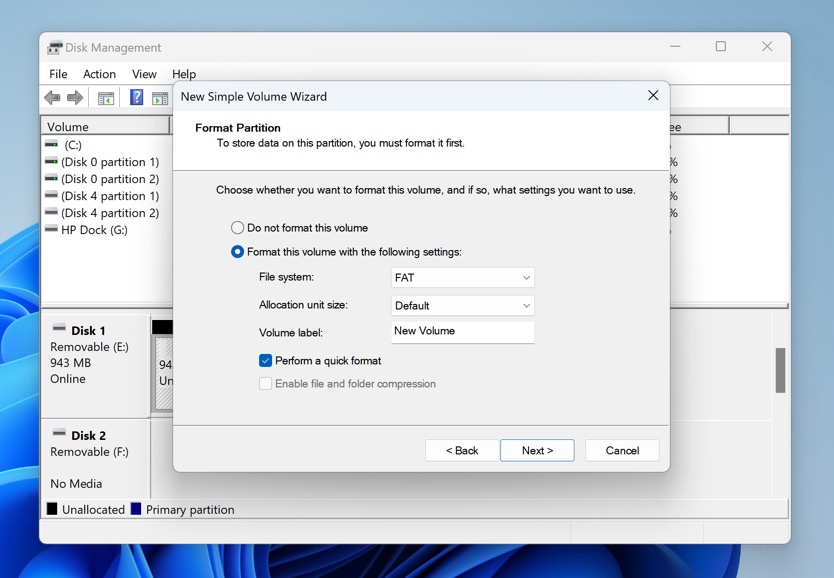
- Click Finish to close the partition creation wizard.
If you need more help with RAW SD cards, then you can check out our detailed guide on how to recover RAW SD card data for additional recovery methods and troubleshooting steps specific to RAW file system issues.
Method 7: Fix the SD Card by Reformatting It from Scratch
If you don’t care about the data stored on your SD card and you just want to fix the corruption that’s preventing you from using it (or you’ve recovered everything important already), you can recreate the file system by performing a quick format using the built-in format tool in Windows:
- Open Windows Explorer and select This PC from the left panel.
- Right-click on your SD card and select the Format option.
- Choose your preferred file system. The best file systems for SD cards are FAT32 and exFAT. The former is supported by the vast majority of devices that accept SD cards, while the latter can store extremely large files, which comes in handy when recording high-resolution videos.
- Make sure the Quick Format option is checked and click Start.
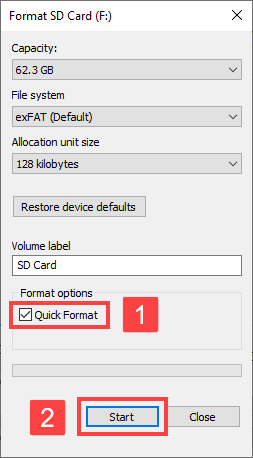
Quick Format simply erases the file system structure and marks all space as available. If you uncheck the Quick Format option, Windows will perform a Full Format instead, which thoroughly scans the entire SD card for bad sectors and rewrites every storage location.
We recommend you do Quick Format first because it doesn’t overwrite existing data, so data recovery remains possible. Full Format makes data recovery completely impossible, but it can be better for corrupted SD cards, so it’s good to know about it and use it if Quick Format alone won’t do it.
📝 Note: If you’re having trouble formatting your SD card using this method, check out our detailed guide on what to do when your SD card won’t format for additional solutions.
Do SD Card Manufacturers Offer Their Own Recovery Tools?
While most SD card brands don’t develop full-featured recovery software, several major companies do provide branded utilities that can help retrieve data from corrupted SD cards:
- RescuePRO / RescuePRO Deluxe: SanDisk-branded recovery utility offered via LC Tech. The free trial version shows what’s recoverable, while the paid version restores files from SD and other flash media.
- RecoveRx: Transcend’s own recovery app for SD/microSD, USB, and more. It offers a simple wizard to scan and restore deleted files.
- Lexar Recovery Tool: Available for Windows and macOS, the official recovery tool by Lexar has an easy-to-understand user interface, but its performance isn’t the best.
- Sony Memory Card File Rescue: Sony’s software supports recovery of photo files such as JPEG and RAW and 4K/HD video files such as MOV, MP4, and XAVC recorded by digital cameras.
- PHOTORECOVERY PNY Edition: Despite its name, PNY’s official recovery tool is designed to scan PNY devices and recover all kinds of lost files from them, including photos, videos, music, text files, and spreadsheets.
Generally, most manufacturer recovery tools work best for their own brand cards but may work with others.
Besides the above-mentioned recovery tools, we also want to point your attention to the SD Memory Card Formatter application, which is the official formatter recommended by card makers. Use it when the format utility in Windows is unable to get the job done for one reason or another.
Is It Possible to Recover a Corrupted SD Card to Its Full Working State?
In our experience, it’s more often than not possible to restore a corrupted SD card to 100% working condition and save your data in the process using the methods outlined in this guide.
When we say that full data recovery is often possible, we’re talking exclusively about logical corruption (things like damaged partition tables, file system errors, or accidentally formatted cards).
Physical corruption, on the other hand, involves actual hardware problems like broken connectors, damaged memory chips, or worn-out flash cells. This kind of corruption, unfortunately, makes it significantly more difficult to recover the SD card to its full working state. Even when it’s technically possible to repair the damage, the effort required is often not worth it for financial reasons.
To keep it that way and prevent future corruption, it’s key to:
- Always use the Safely Remove Hardware option on Windows or eject the card from your device’s menu before physically removing it.
- Avoid constantly switching an SD card between different devices (camera, phone, computer), which increases the risk of file system conflicts and corruption.
- Keep at least 10-15% of your SD card space free as a completely full card is more prone to write errors and corruption.
- When preparing a card for a camera or phone, format it in that device rather than on your computer for optimal compatibility.
- Keep SD cards in protective cases when not in use and avoid exposing them to extreme temperatures, moisture, or magnetic fields.
Of course, every corrupted SD card situation can be unique and prevention may not always be possible. If you’re facing a specific issue not addressed here, check out the FAQ section below. You can also reach out directly in the comments section below, or connect with us on our social channels: Facebook, X (Twitter), or LinkedIn. We monitor these channels regularly and enjoy helping readers solve their data recovery challenges.
