If you lost some files on your USB drive or can’t access them, and for some reason need to use CMD (Command Prompt) specifically (or simply want to see what CMD has to offer for USB repair), this guide will help. We gathered every practical method you can run to recover files from USB in CMD, restore flash drives, and fix common USB issues in Windows 10 and 11.
Let’s take a closer look at how to recover a USB drive using CMD.
When to Use Command Prompt for Flash Drive Recovery
While most people rarely run CMD for anything on Windows 10 or 11, there are a couple of situations where it actually makes sense. The Command Prompt offers quite a few built-in tools for flash drive recovery on Windows systems.
Here are some situations when using CMD for recovery is a good choice:
- When you can’t or don’t want to install additional software. Arguably, the biggest advantage of CMD recovery tools in Windows is that they ship with the operating system. This is especially useful when working on a computer where you don’t have administrator rights, such as when dealing with security-restricted corporate environments.
- When performing a remote recovery. Let’s say you’re helping someone you know recover data from their USB flash drive via remote access to the command prompt (such as through SSH). In a situation like that, CMD commands are ideal because they don’t require you to have access to the Windows GUI and work reliably even on slow connections.
- When your system is unstable. After malware attacks, failed system updates, or customization attempts go wrong, third-party software might not run properly. In fact, you might not even be able to boot into Windows. However, CMD recovery commands can still be executed from your Windows installation medium or Safe Mode.
So, if you’re wondering how to recover deleted files from USB using Command Prompt, CMD is a solid option in these cases, especially when your recovery needs are straightforward or when you’re working in environments where graphical interfaces are unavailable or impractical.
How to Recover USB Files Using CMD Commands
There are a few key CMD methods that every Windows user should know. I’m going to walk you through them one by one while providing you with step-by-step instructions that you can easily follow, even if you don’t have any previous experience with CMD USB flash drive recovery.
At the start of each method, I’ll explain the situation where it makes sense to use it and highlight a couple of extra things you should know about how it works.
Let’s begin with the simplest one: the Recycle Bin.
Method 1: Recycle Bin
Note: The Recycle Bin method makes sense if your deleted USB files were recent and Windows actually redirected them there. This usually happens when you delete from a drive that behaves like local storage, but with removable USB sticks it doesn’t always work that way – many deletions bypass the bin completely and are removed instantly.
![]() This method helps you recover files that are still in the Recycle Bin. Use it when you can’t open the Recycle Bin by double-clicking its desktop icon, such as when the icon has disappeared, or when nothing happens when you click on it.
This method helps you recover files that are still in the Recycle Bin. Use it when you can’t open the Recycle Bin by double-clicking its desktop icon, such as when the icon has disappeared, or when nothing happens when you click on it.
Here’s how to recover flash drive files from the Recycle Bin using CMD:
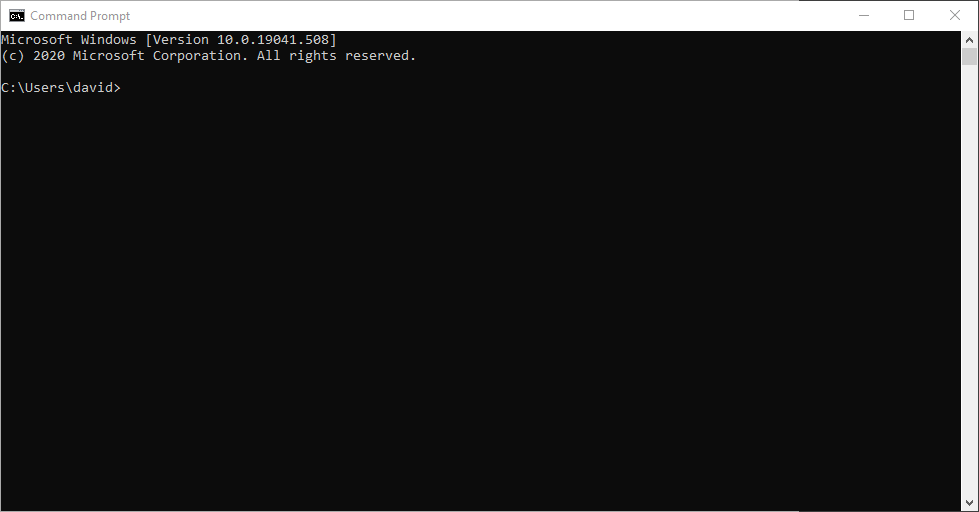
- Open the Start menu and type “cmd”. Open Command Prompt from the list of results (it should be at the top).
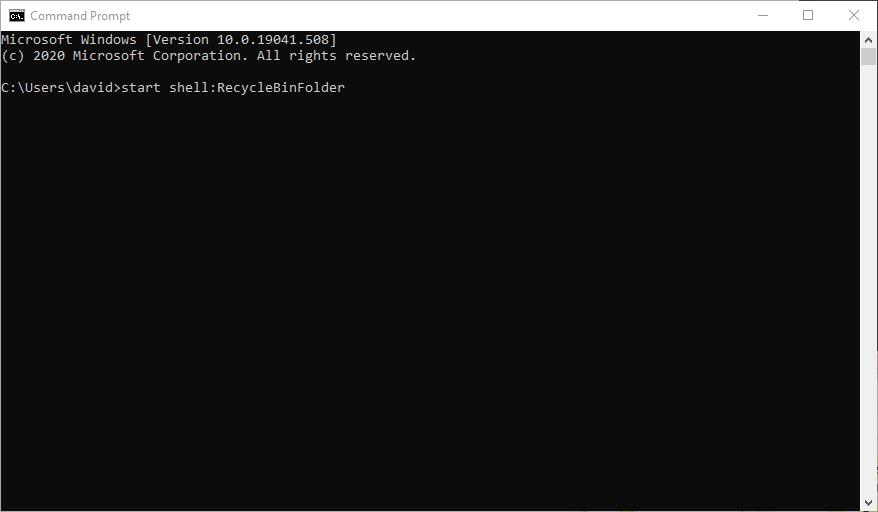
- Paste the following command into the Command Prompt window and press Enter: start shell:RecycleBinFolder
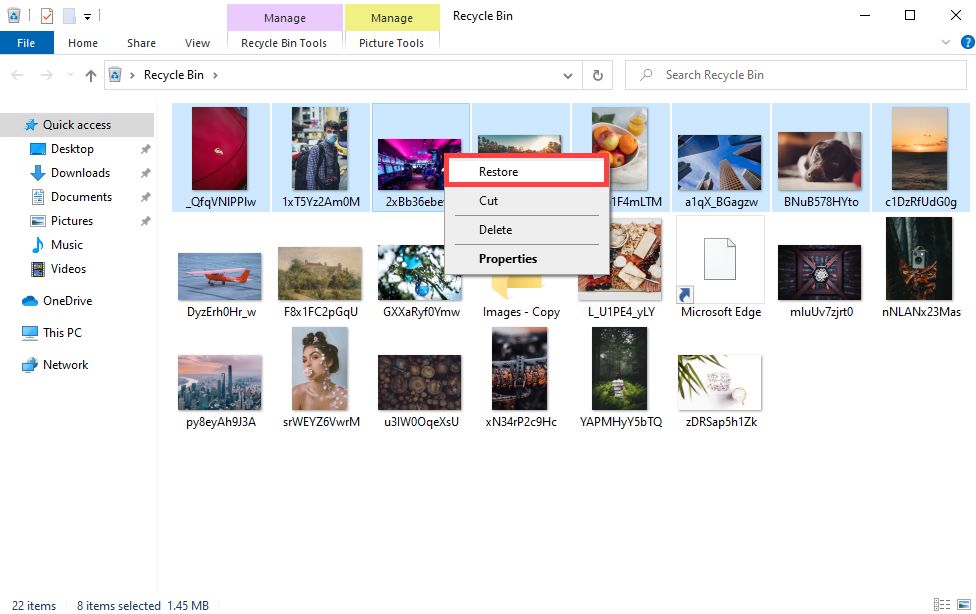
- The Recycle Bin folder should now open. From here, you can select the files you want to restore, right-click on them, and select Restore. Alternatively, you can drag them back to the USB flash drive or any other location on your computer.
Keep in mind that this method simply provides an alternative way to open the Recycle Bin, one that doesn’t depend on the Recycle Bin icon.
If the above command doesn’t open the Recycle Bin, you can try accessing it using its GUID (Globally Unique Identifier) instead. Copy & paste the following command into CMD and press Enter:
explorer ::{645FF040-5081-101B-9F08-00AA002F954E}
Again, this should open the Recycle Bin in File Explorer, where you can then move the deleted files to a safe location.
Method 4: Windows File Recovery
Note: Windows File Recovery is worth using when files were permanently deleted from a USB drive and they aren’t in the Recycle Bin, which is often the case since most deletions on removable drives skip the bin entirely and erase the entries right away.
 If your deleted USB files aren’t in the Recycle Bin, then you’ll need data recovery software. Windows doesn’t ship with one by default – not in CMD, not anywhere in the system. However, Microsoft does provide its own tool, simply called Windows File Recovery, which works right inside Command Prompt. It’s a free download from the Microsoft Store and is designed to recover deleted files from hard drives, SSDs, and USB flash drives.
Here’s how to recover permanently deleted files in CMD with Windows File Recovery:
- Install Windows File Recovery from the Microsoft Store.
- Launch the Command Prompt (CMD).
- Enter the following command (replace DRIVE_LETTER with the letter of the drive where your deleted files were located, and C: with the drive where you want to save recovered files) and press Enter: winfr DRIVE_LETTER: C: /x
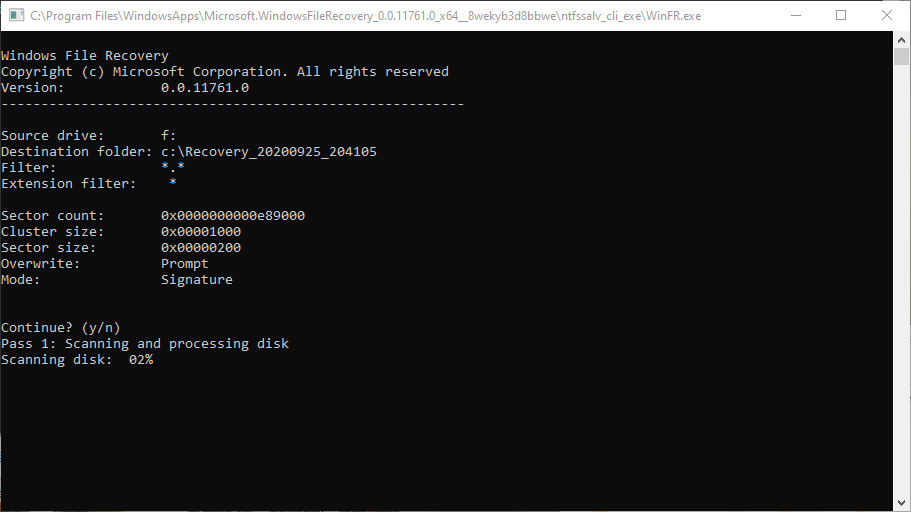
- Wait for Windows File Recovery to finish scanning your USB flash drive and recovering permanently deleted data from it.
- Open File Explorer and navigate to the destination folder.
Microsoft’s own command-line tool is designed to bring back permanently deleted files on all local storage devices that use NTFS, FAT32, exFAT, or even ReFS file systems, which means most USB flash drives are covered.
That said, the tool is still fairly limited. It can handle only a narrow range of file formats and doesn’t deliver the same success rates you’d see with more mature recovery apps. Compared to something like Disk Drill (which we’ll talk about later), Windows File Recovery often feels basic and, at times, troublesome. A lot of people online mention the same kinds of headaches: scans that drag on forever or results that come back incomplete.
On the upside, it’s completely free, and for a CMD tool, it’s actually pretty straightforward to use. You don’t need to memorize dozens of complicated commands – just a couple of core ones get you going.
By the way, we’ve put together a full guide on Windows File Recovery if you’d like a complete list of commands and examples.
Method 2: ATTRIB (Attribute) Command
Note: The attrib command is useful when your USB files are still there but marked as hidden or system files.
It’s important to understand that attrib doesn’t recover files that were truly deleted or corrupted – it only changes attributes. If you run it and nothing shows up, the files may have been deleted or damaged beyond this method’s scope.
 Files and entire directories on your USB flash drive can have various attributes that control how they are accessed. What sometimes happens is that a user makes a mistake or malware infects a USB flash drive and changes the attributes of all files stored on it, making it seem like your files have disappeared.
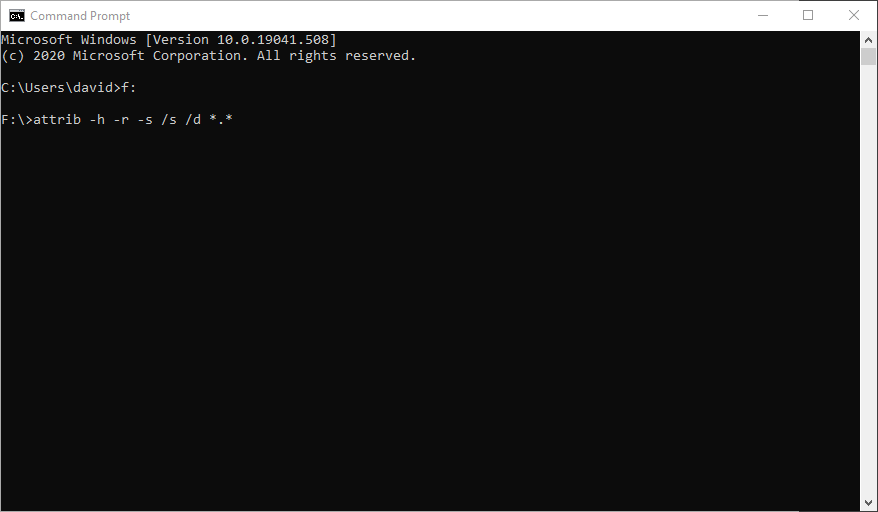
In reality, the files are still present on the USB flash drive – it’s just that they’ve been hidden from view. To fix this issue and regain access to your files, you need to perform command prompt flash drive recovery using the ATTRIB command.
To recover files from a USB using CMD ATTRIB, follow these steps:
- Launch the CMD by searching for it in the Start menu.
- Type the letter assigned to your USB flash drive followed by a colon (such as “E:” or “D:”) and hit Enter.
- Paste the following command into the Command Prompt window and press Enter: attrib -h -r -s /s /d *.* (make sure to replace DRIVE_LETTER with the letter assigned to your USB flash drive)
- Open File Explorer and navigate to your USB flash drive. All lost files should be right there, and you shouldn’t have any trouble opening them.
Here’s a detailed explanation of the command you’ve just used:
- -h clears the Hidden file attribute.
- -r clears the Read-only file attribute.
- -s clears the System file attribute.
- /d applies attrib and any command-line options to directories.
- /s applies attrib and any command-line options to matching files in the current directory and all of its subdirectories.
- *.* specifies that you want to apply the attrib to all files in the current directory.
As you can see, the command isn’t nearly as complicated as it seems at first. It simply performs multiple file management operations at the same time, saving you time and allowing you (at least in theory) to instantly regain access to lost files.
Note: If you’re sure you didn’t hide the files yourself, there’s a good chance it was caused by malware. If that’s the case, I strongly recommend running an antivirus scan. Otherwise, the malware might hide your files again or cause further problems.
Method 3: CHKDSK (Check Disk) Command
Note: The chkdsk command is useful when your USB drive becomes unreadable, gives error messages, or you suspect light file system corruption. It doesn’t recover deleted files – but it can fix problems that stop the drive from opening or make certain files unresponsive.
Keep in mind: chkdsk scans the drive and attempts to repair the file system. In doing so, it may move corrupted files or create fragments in a folder like FOUND.000. It’s safe in most cases, but if your USB contains important or irreplaceable files, I suggest using a data recovery app first, before running chkdsk. There’s always a small chance the repair process could make things worse.
![]() Sometimes, the data stored on a USB flash drive becomes corrupted and, as a result, impossible to access. This can happen if files are transferred between different operating systems, if the USB flash drive is very old, or if some strange data transfer issue has occurred.
Sometimes, the data stored on a USB flash drive becomes corrupted and, as a result, impossible to access. This can happen if files are transferred between different operating systems, if the USB flash drive is very old, or if some strange data transfer issue has occurred.
Fortunately, there’s a handy command-line utility called CHKDSK included in Windows that you can use to check your USB flash drive for logical issues.
Follow these steps to repair files on a USB flash drive with CHKDSK:
- Open the Start menu and type “cmd”. Hit Enter on your keyboard.
- Enter the following command (make sure to replace DRIVE_LETTER with the letter assigned to the hard drive you want to fix) and press Enter: chkdsk DRIVE_LETTER: /r
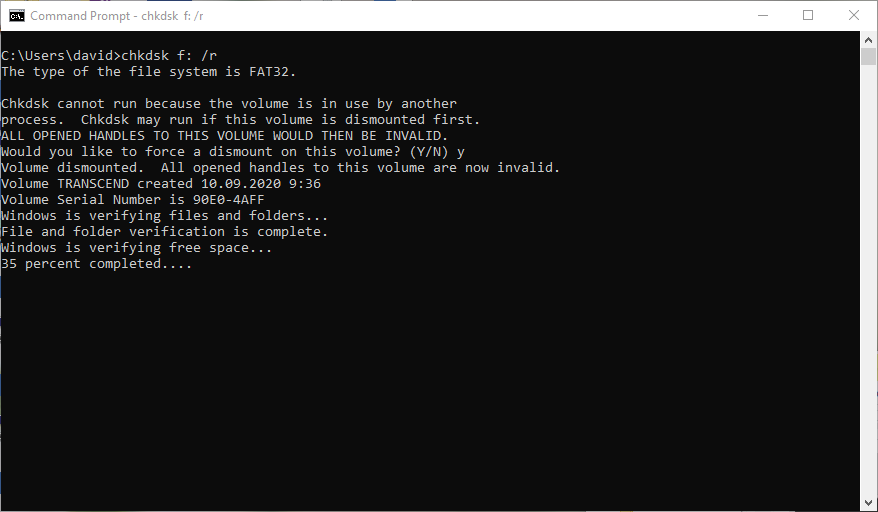
- Wait for CHKDSK to finish.
The /r parameter tells CHKDSK to locate bad sectors, attempt to recover readable information, and repair errors. You can also use the /f parameter if you only want to fix errors, without scanning for bad sectors. If CHKDSK identifies lost file fragments, it will save them as .chk files on the USB flash drive.
Tip: There are many utilities that you can try to recover usable data from the .chk files created by the CHKDSK /r parameter, including UnCHK, FileCHK, and CHK-Mate. They all do more or less the same, so it doesn’t matter too much which one you try first.
Method 5: TestDisk
Note: TestDisk can help when your USB drive has lost its partition, won’t mount properly, or shows up as RAW. It works from the command line and is best used when the problem is more serious – like a damaged partition table or file system structure that simpler tools like chkdsk can’t fix.
![]() TestDisk is an open-source data recovery tool that runs in the command line, where it provides a simple but interactive interface that makes it reasonably easy to recover USB flash drives that appear blank or unformatted.
TestDisk is an open-source data recovery tool that runs in the command line, where it provides a simple but interactive interface that makes it reasonably easy to recover USB flash drives that appear blank or unformatted.
Its key feature is the ability to quickly locate and recover partitions that were deleted or corrupted from all USB flash drives recognized by the Windows operating system.
Follow these steps to recover a lost partition from your USB flash drive:
- Download TestDisk from the official website and extract the files. You’ll see a few different versions available. I went with Version 7.3. It’s still marked as work in progress, but in my experience, it worked without any issues and handled USB recovery just fine.
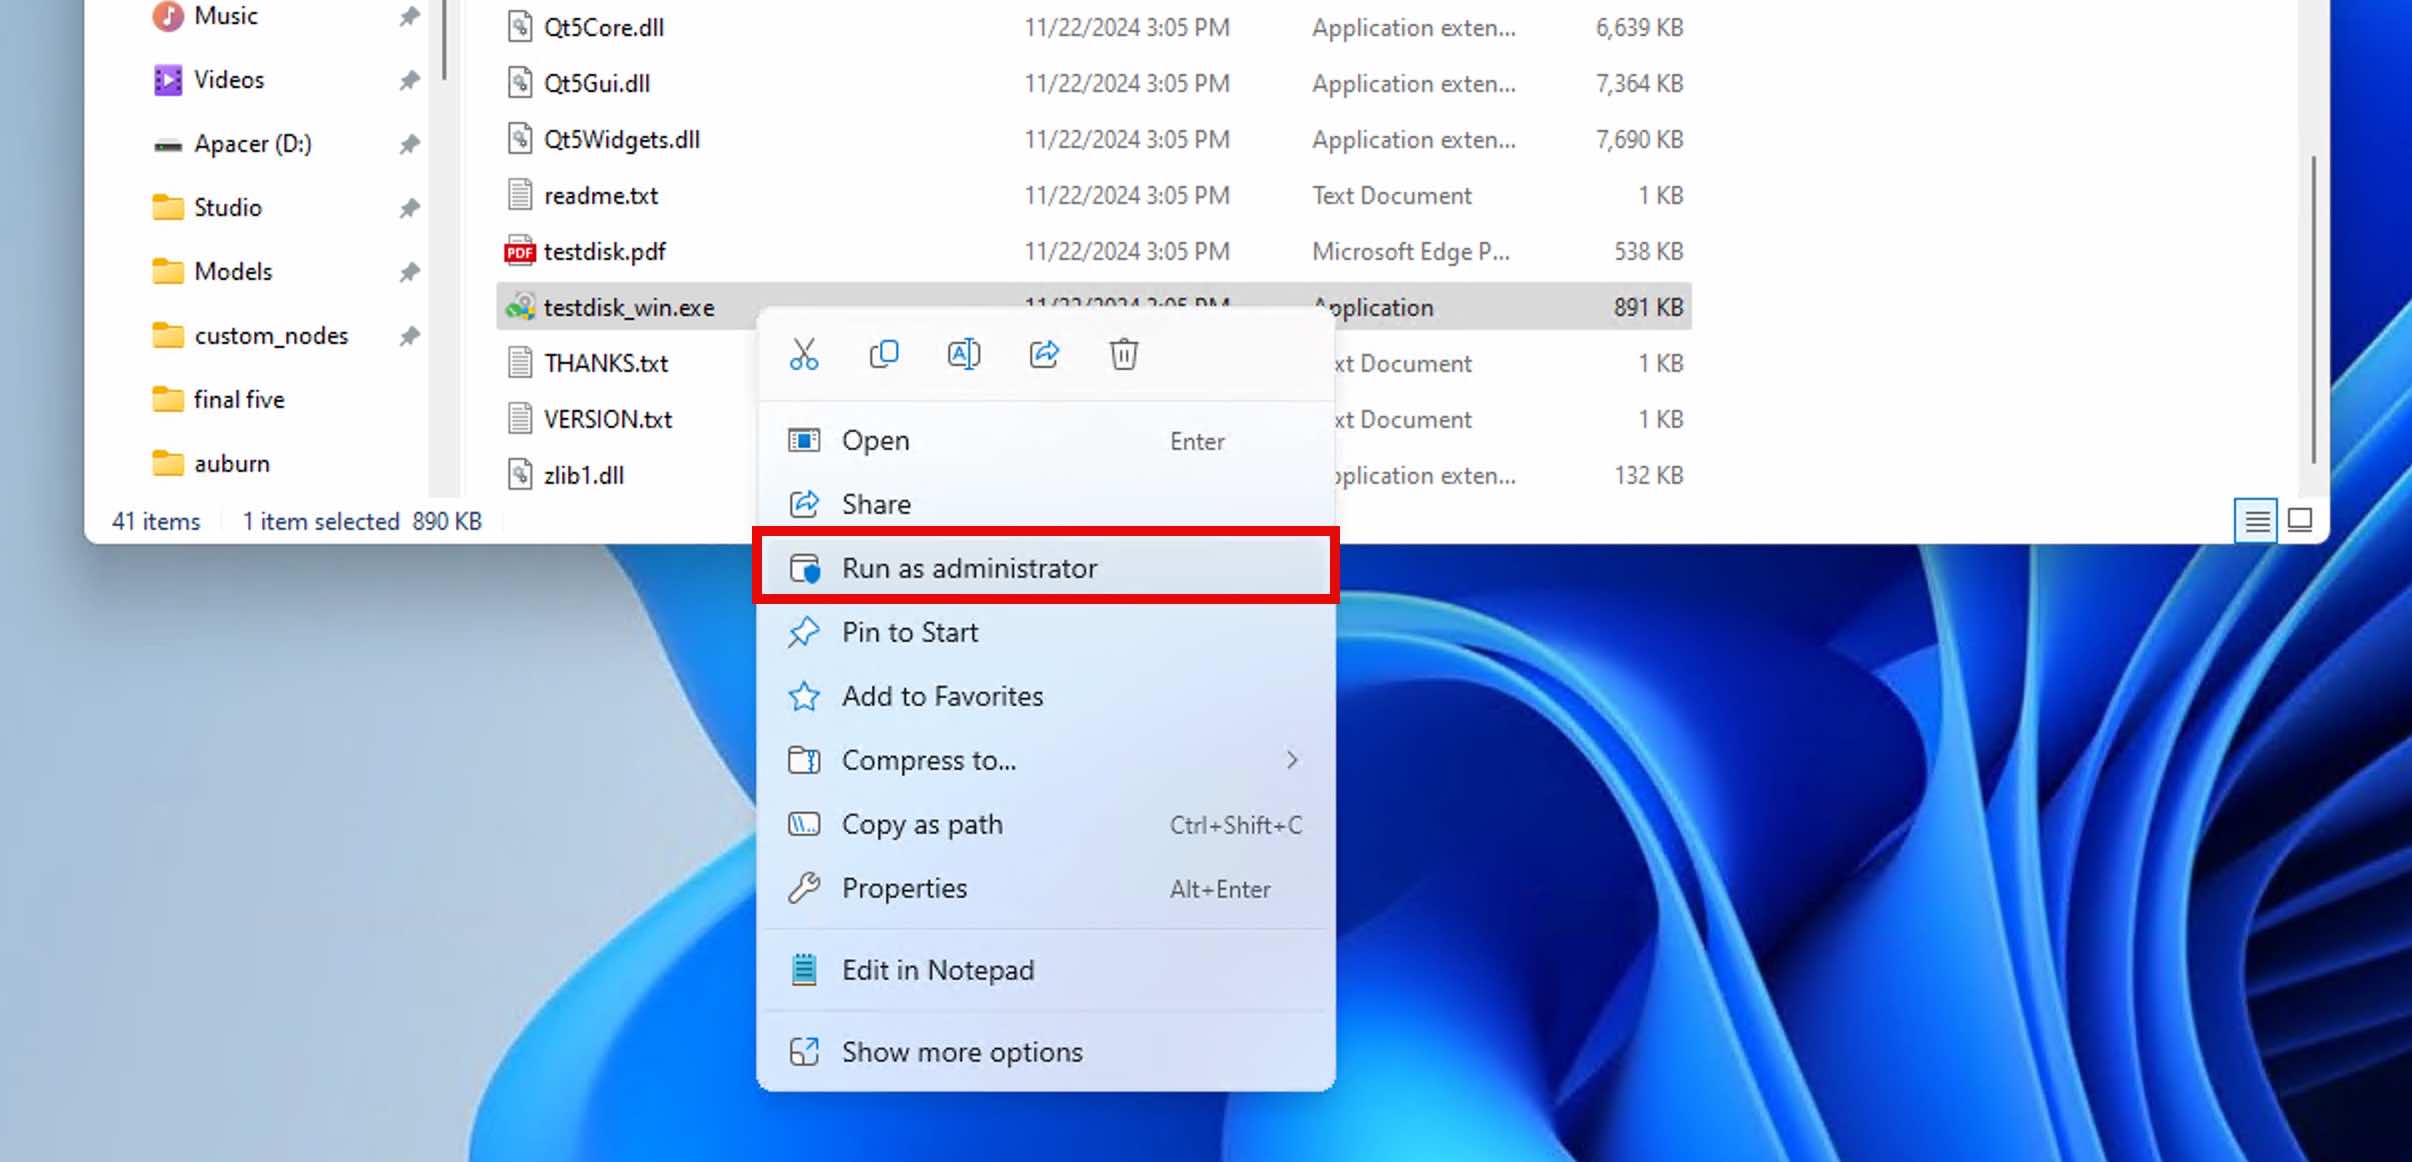
- Launch testdisk_win.exe as administrator from the TeskDisk folder.
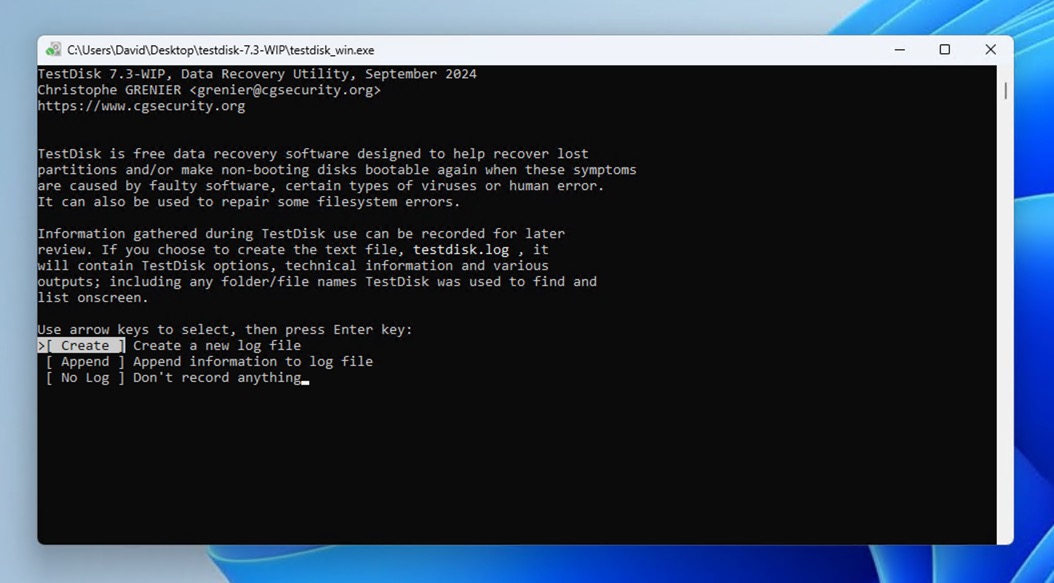
- Select Create when asked about log file creation.
- Choose your USB drive from the list and press Enter.
- Select your partition table type (usually “Intel” for USB drives).
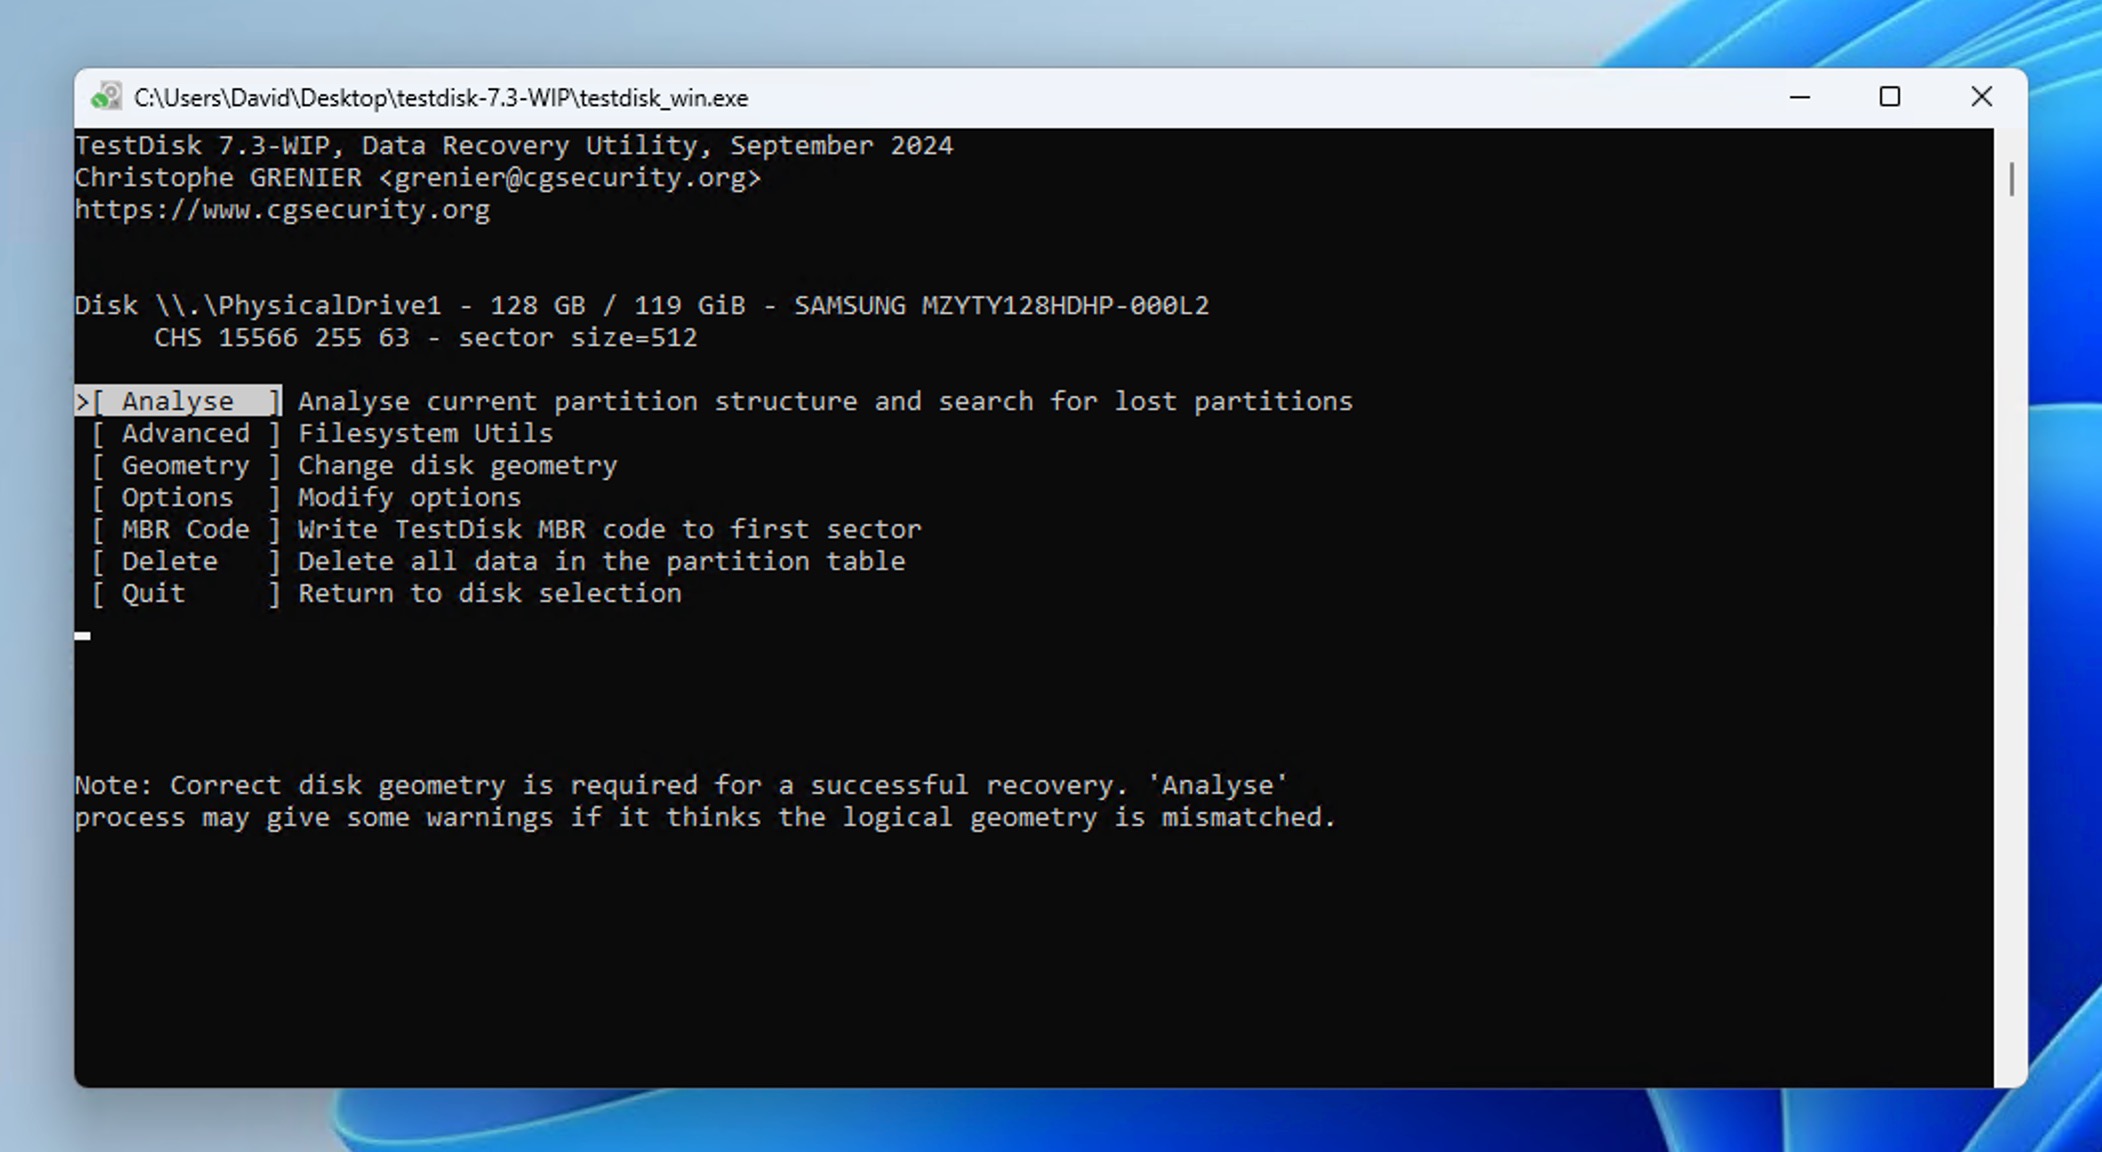
- Choose Analyse and press Enter to start scanning for lost partitions.
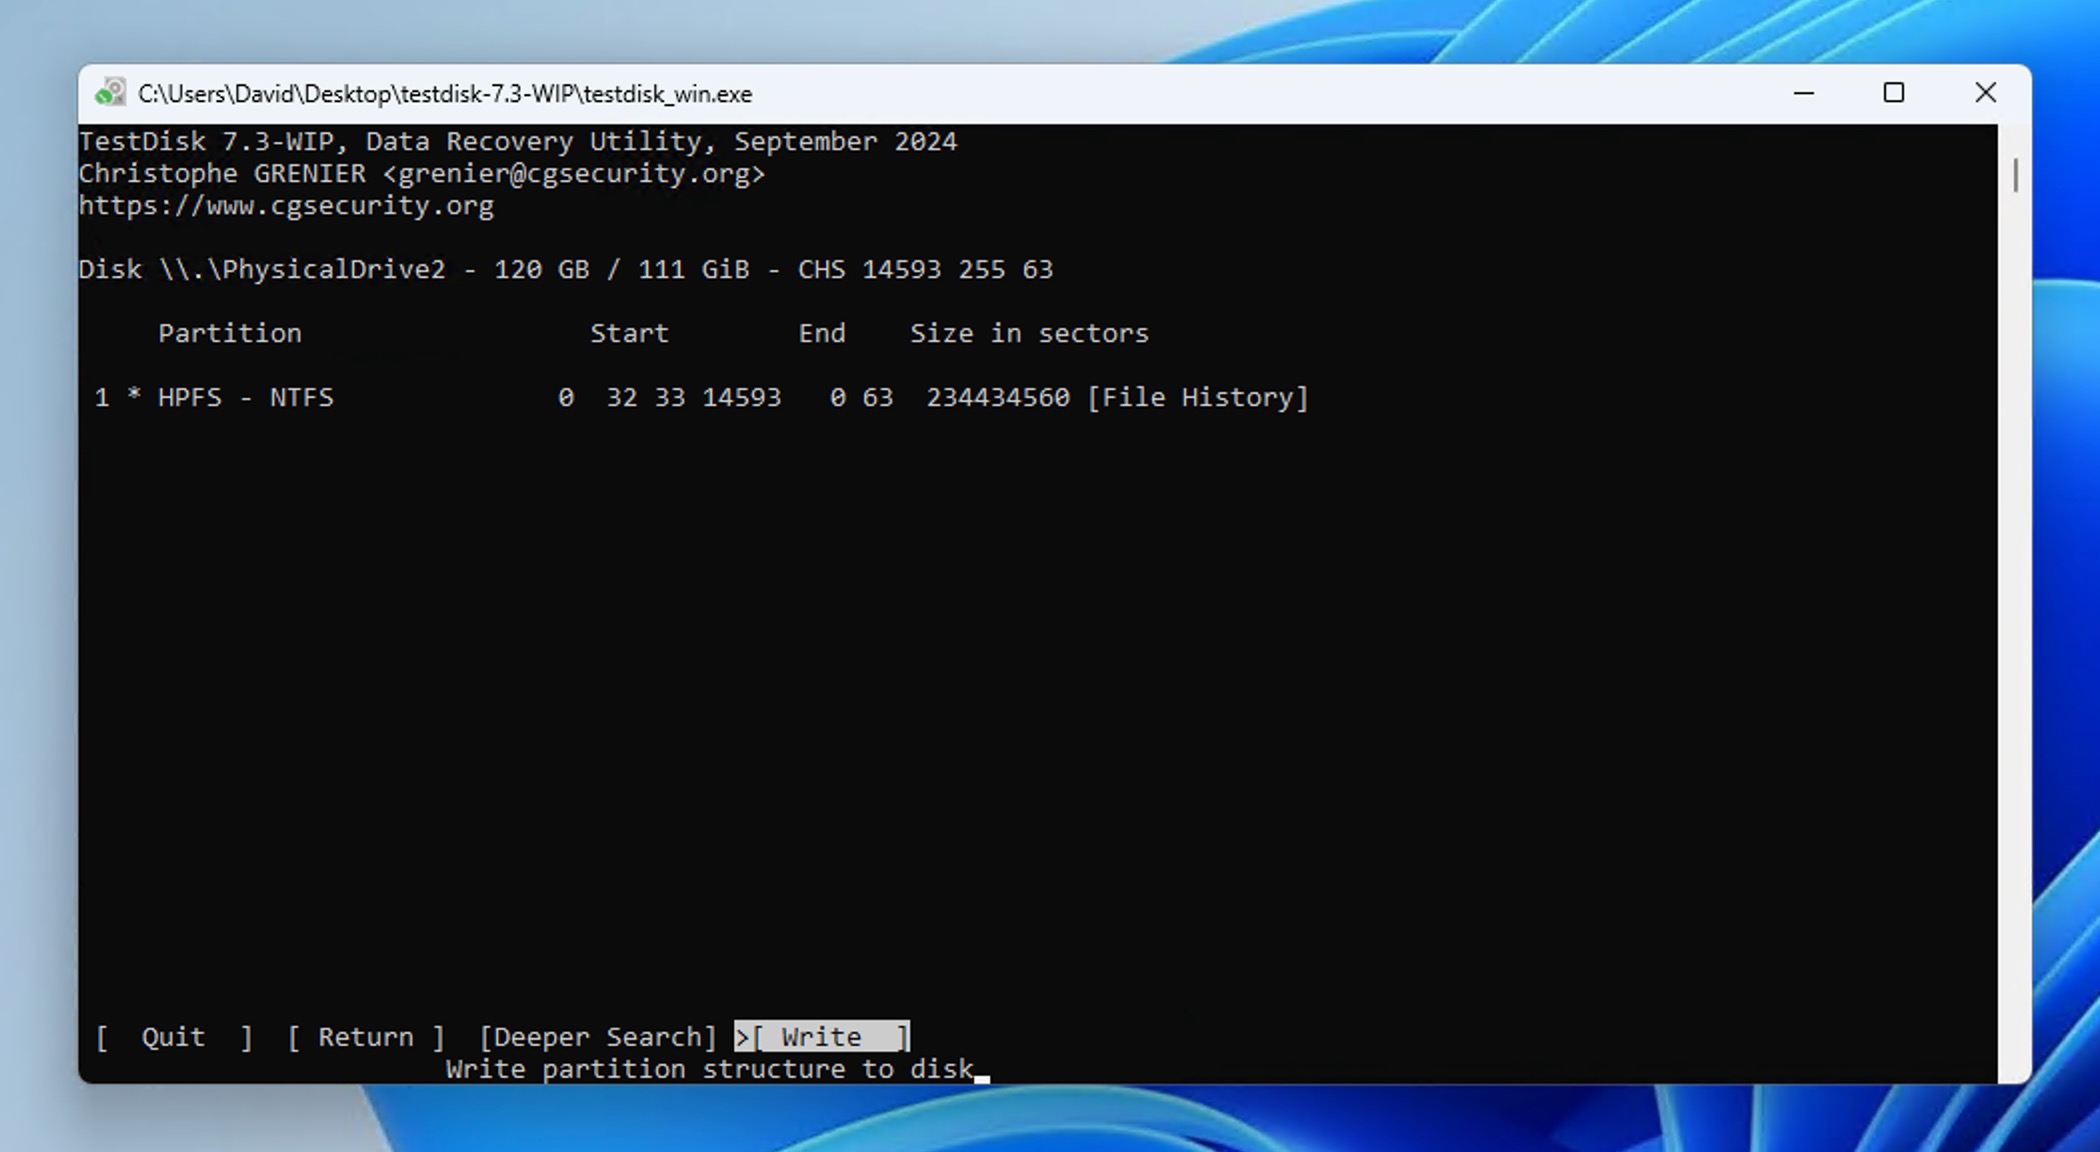
- After the scan completes, press P to list files in any found partitions.

- If the files are found, select Write to save the recovered partition table.
If TestDisk reports that your USB drive’s file system is severely damaged, you may want to try PhotoRec (included with TestDisk) instead. PhotoRec can recover files even when the file system is beyond repair by scanning the drive’s raw data.
Method 6: PhotoRec
Note: PhotoRec is a file recovery tool included with TestDisk. While TestDisk focuses on fixing partitions, PhotoRec is more like a dedicated file recovery app – similar to Windows File Recovery, but much more powerful when it comes to actually pulling data off a drive.
That said, PhotoRec has a trade-off: it can’t recover original file names or folder structure. It works by scanning raw disk space and pulling out anything it recognizes based on file signatures. So if you have a lot of files on your USB, expect to get a long list of recovered items with generic names like f12345678.jpg, f12345679.docx, and so on. You’ll need to manually go through them and figure out what’s what.
![]() PhotoRec operates pretty much like TestDisk – it runs in the same text-based interface, and you navigate it using your keyboard.
PhotoRec operates pretty much like TestDisk – it runs in the same text-based interface, and you navigate it using your keyboard.
Here’s what USB file recovery in CMD looks like with PhotoRec:
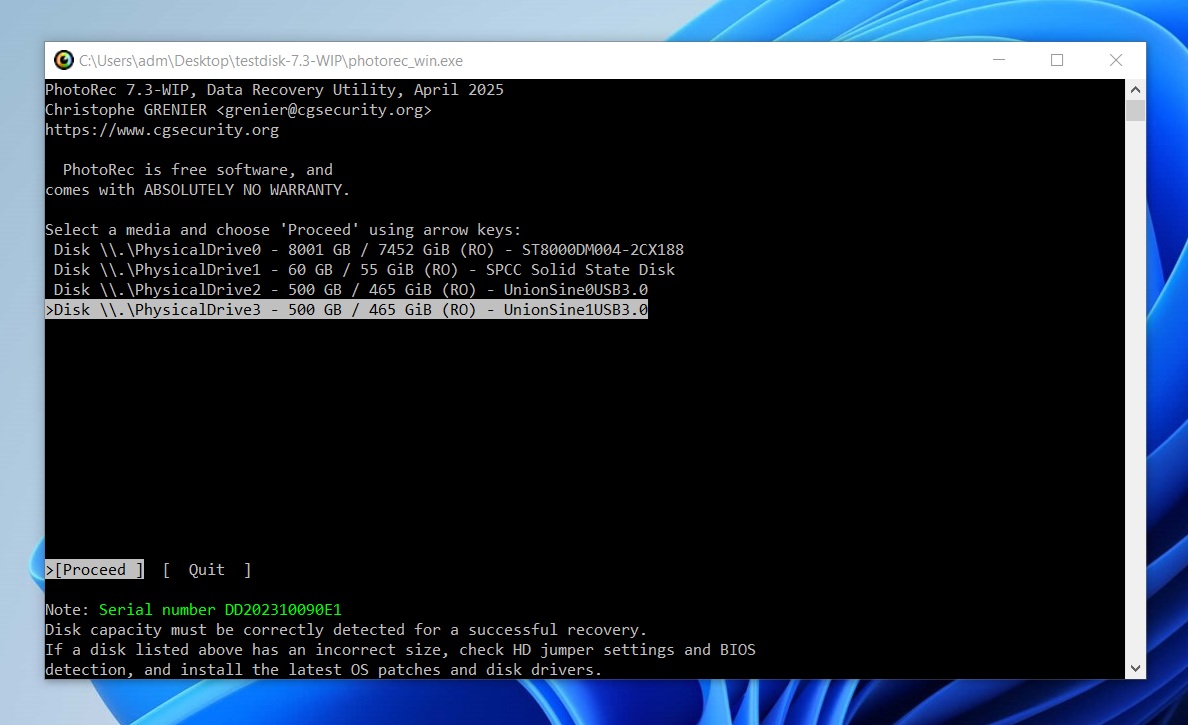
- Launch photorec_win.exe from the folder where you extracted TestDisk.
- It will open a terminal-style window. Use the arrow keys to select your USB drive from the list of detected disks.
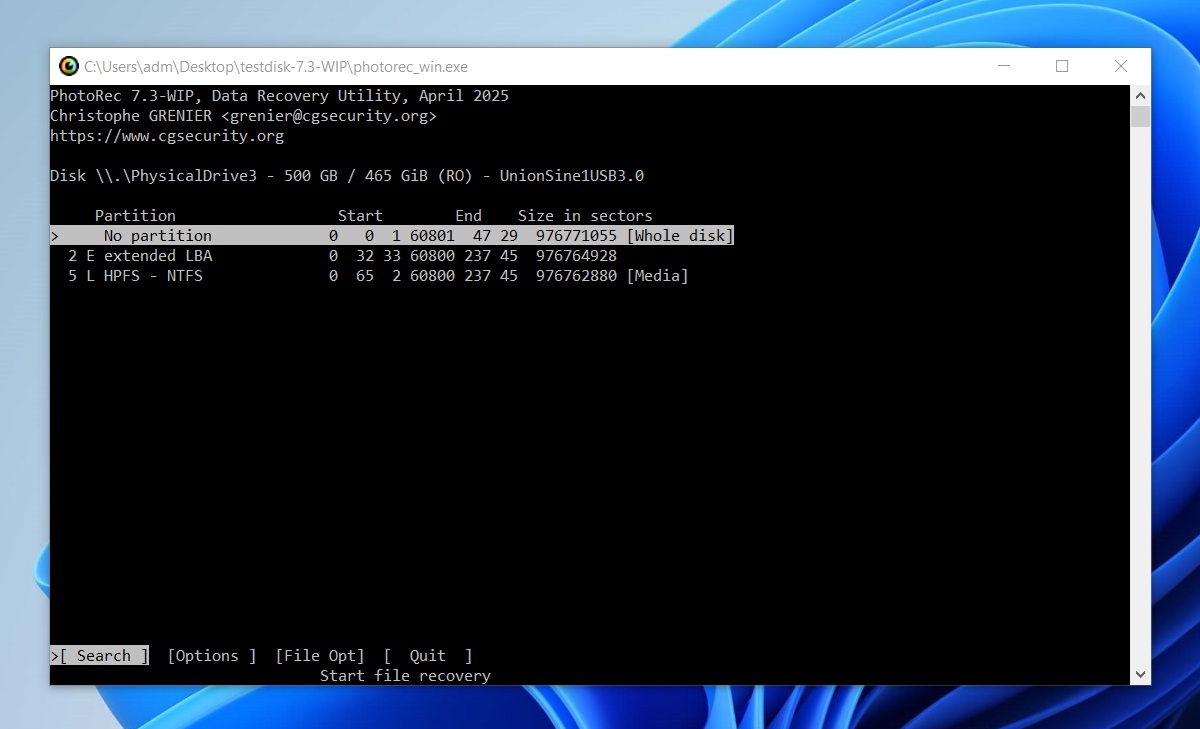
- Next, choose whether to scan the whole drive or just free space (for deleted files only).
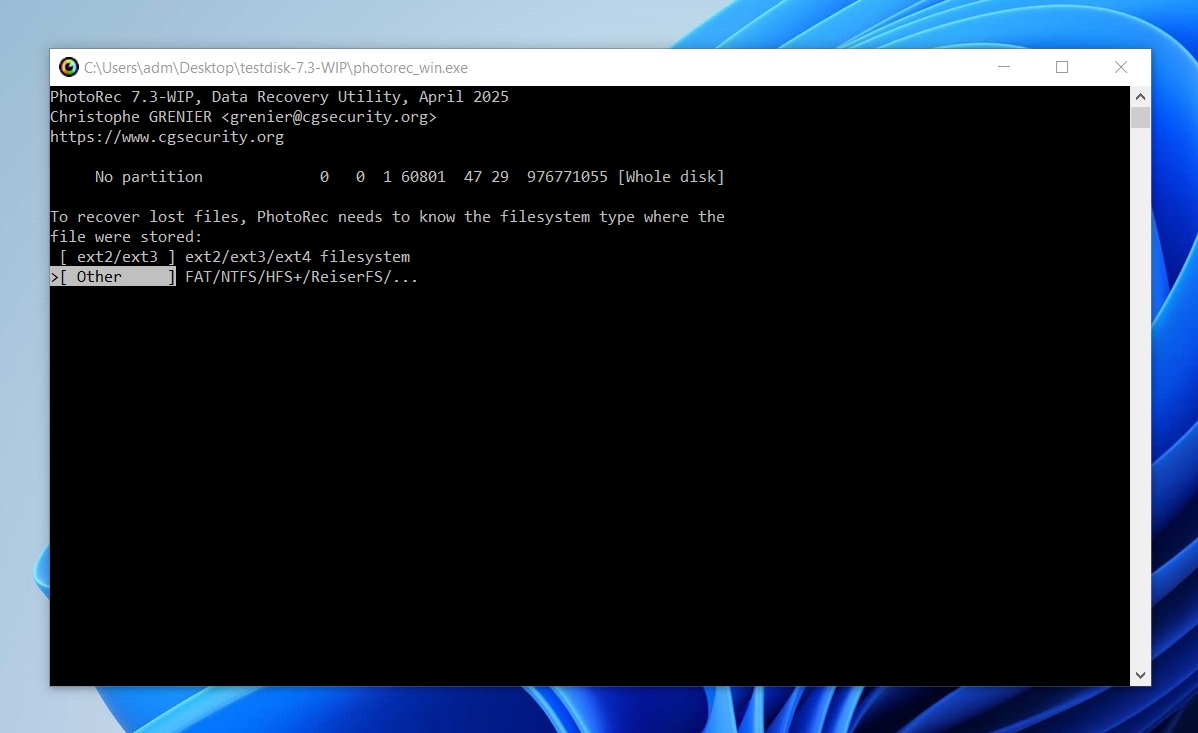
- When prompted, select the file system type. For USB drives, this is usually FAT32 or exFAT, so choose Other unless you know it’s NTFS.
- Pick a destination folder where recovered files will be saved. It’s best to use a different drive than the one you’re recovering from.
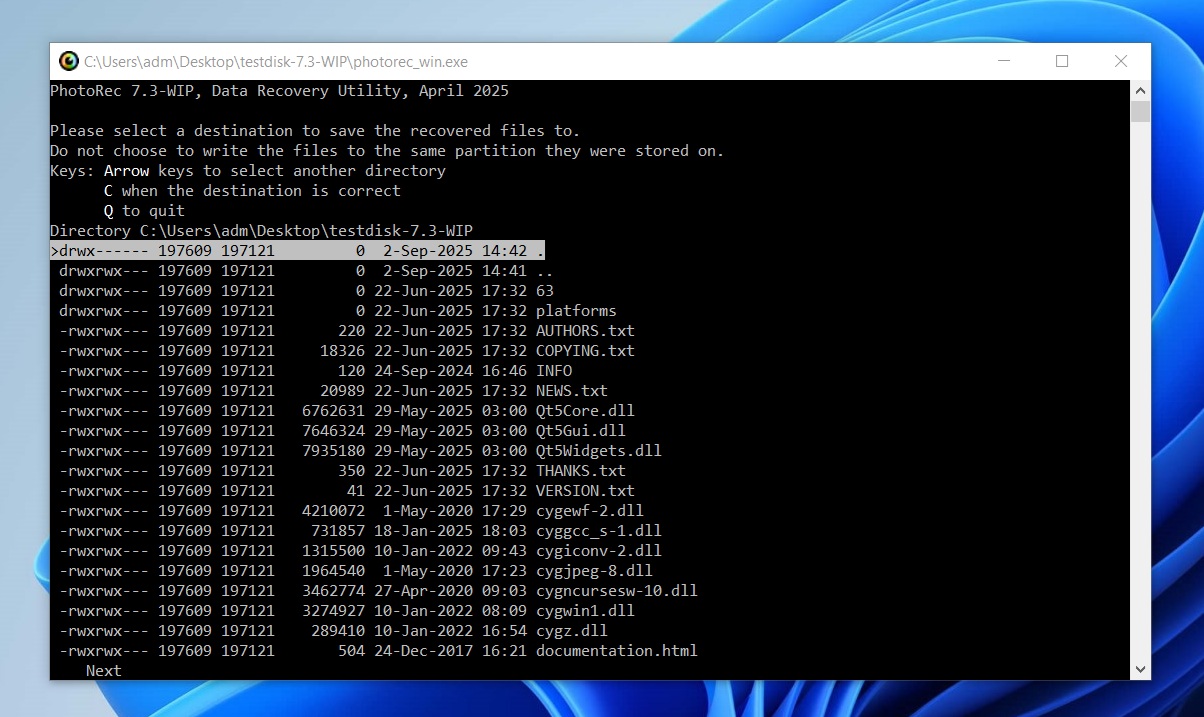
- PhotoRec will start scanning. As it runs, you’ll see a live counter of how many files it’s recovered so far.
That’s it. Once it finishes, you’ll find a long list of recovered files in the folder you picked – no names, but hopefully a lot of usable content.
Alternative to CMD USB Flash Drive Recovery
CMD recovery tools are handy in many situations, but they often leave a lot to be desired when dealing with complex data loss situations. If you’re looking for something more capable (or just more user-friendly) with better recovery success rates, Disk Drill is an excellent alternative that I can recommend based on my extensive personal experience with it.
Disk Drill offers several advantages over CMD recovery tools, starting with its intuitive interface that makes data recovery accessible even to those who fear the command line and data recovery in general.
However, the real star of the show are Disk Drill’s impressive USB flash drive recovery capabilities:
- The tool supports all file systems Windows users typically rely on when it comes to USB flash drives, including FAT, FAT32, exFAT, and NTFS.
- It performs recovery using both the existing file system (ideal when file system structures are intact) and file signatures (which scans the raw data for file signatures, perfect for recovering lost or corrupted files when the file system is damaged).
- It supports around 400 different file formats, including all the common types found on USB flash drives, such as documents (.docx, .pdf, .txt), images (.jpg, .png, .gif), videos (.mp4, .mov, .avi), and audio files (.mp3, .wav).
The USB flash drive recovery process involves just five simple steps when you use Disk Drill:
- Download Disk Drill from its official website and install it on your computer (not on the USB drive you’re trying to recover). Once installed, launch it either from the Start menu or using its desktop icon.
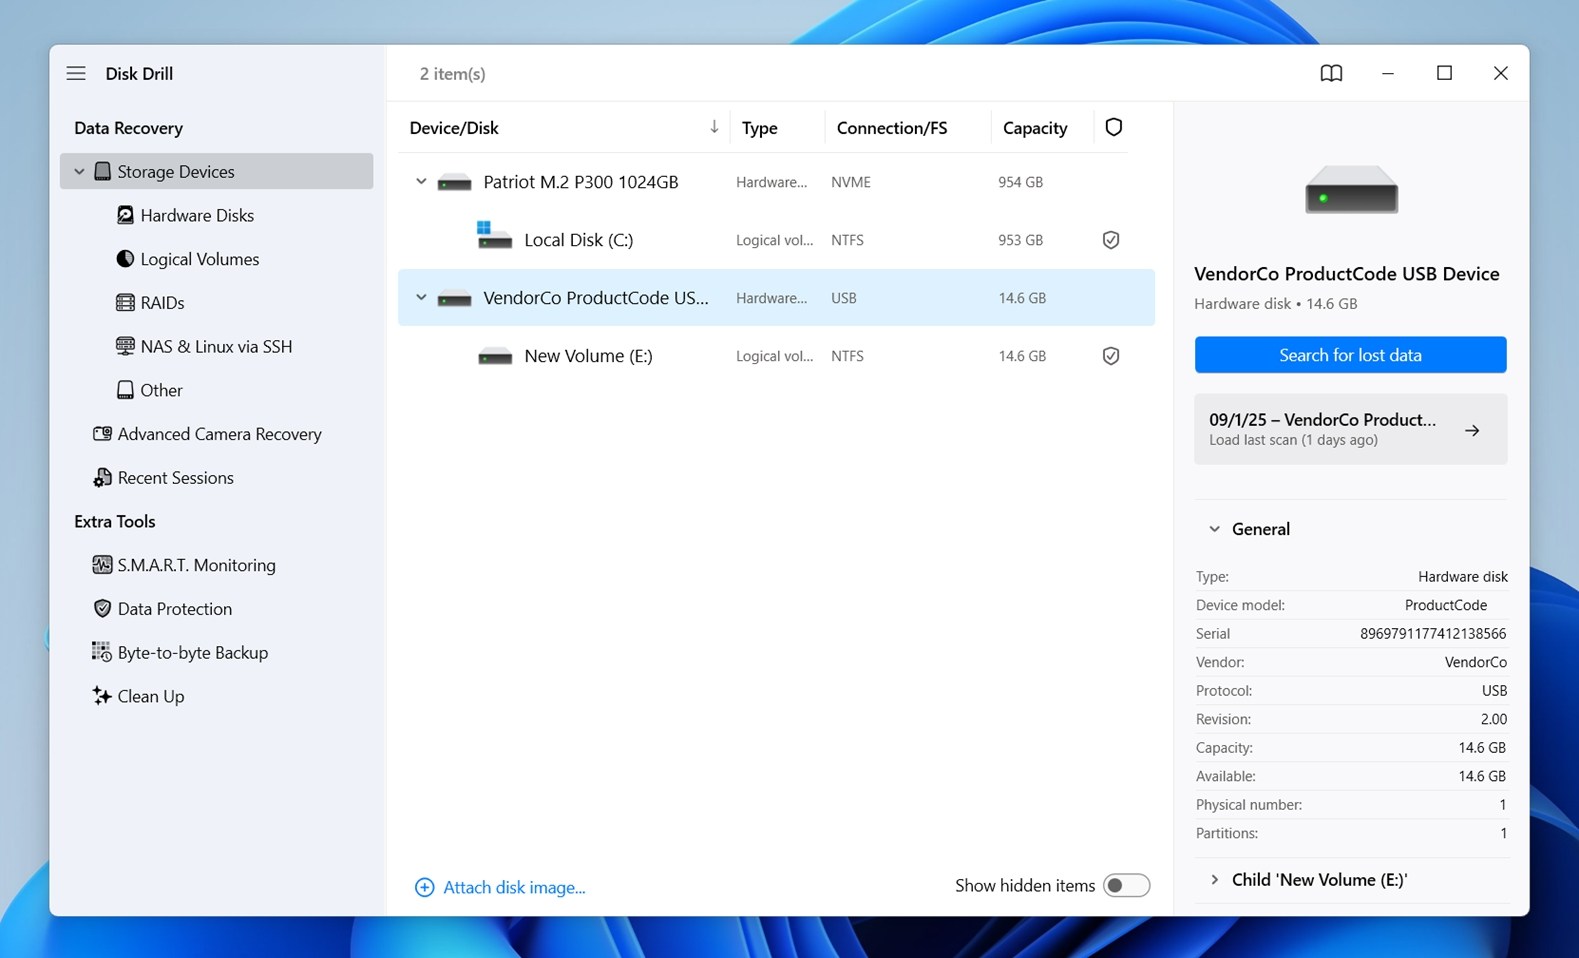
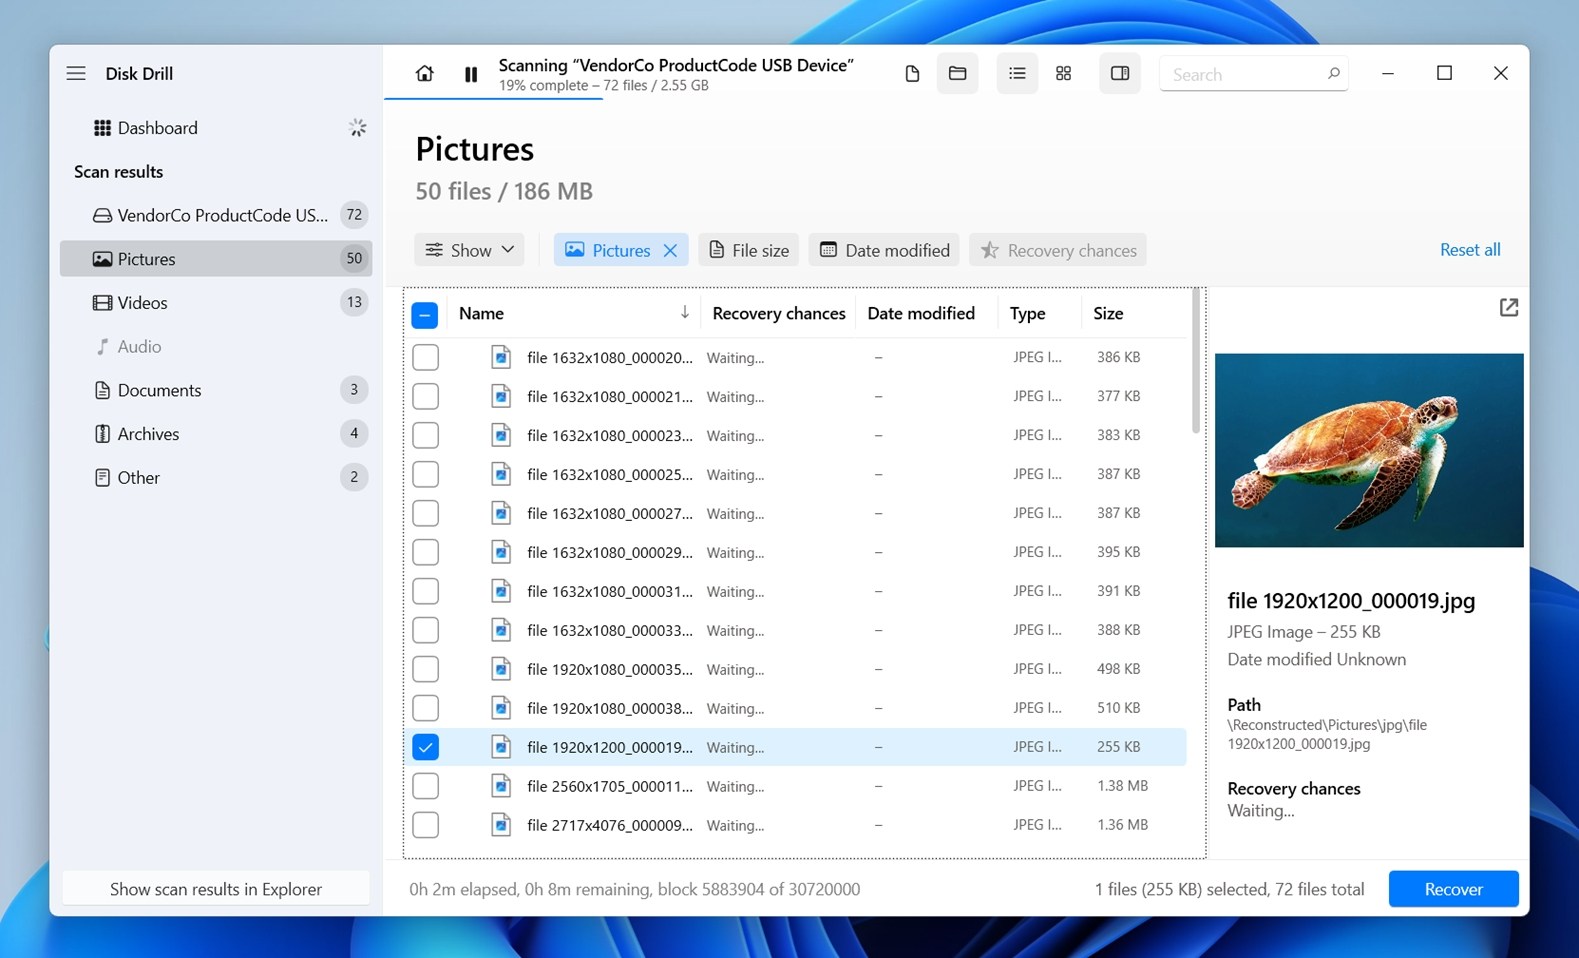
- Select your USB flash drive from the list of available storage devices listed on the main screen and click the Search for lost data button.
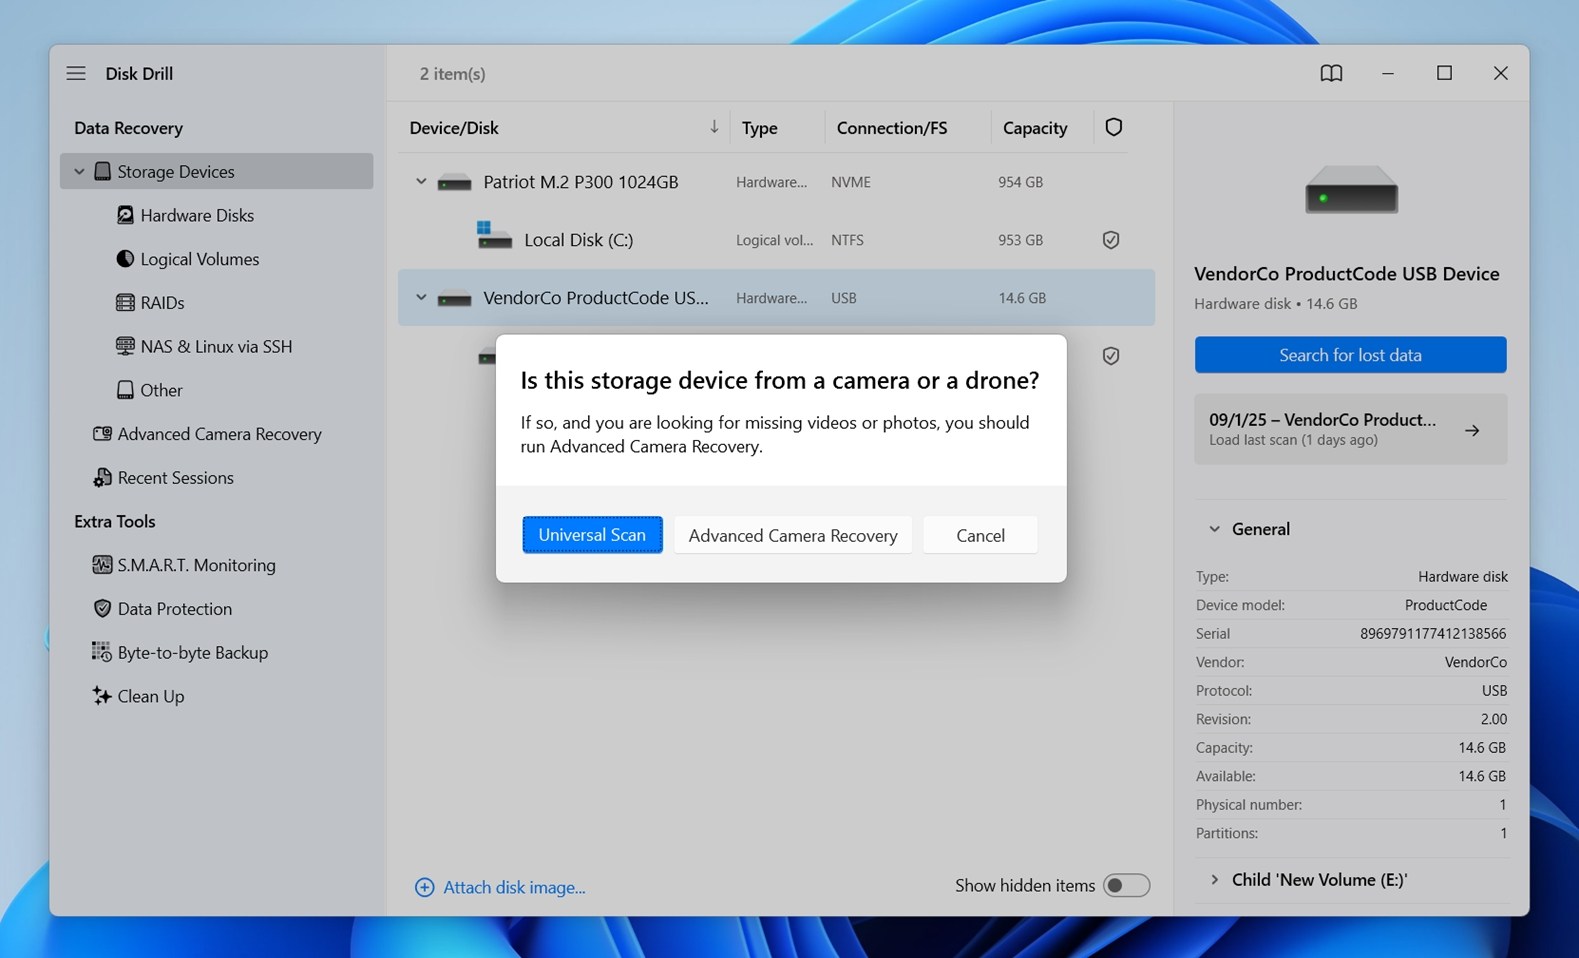
- When prompted to choose a scan type, go with Universal Scan – this will run all available recovery methods in one pass for the best chance of finding your files.
- Once the scan is complete, Disk Drill will display a list of recoverable files. You can filter the results by file type or search by file name to make finding your lost files easier. Select the files you want to recover by clicking on the checkboxes next to them. You can preview many file formats directly in Disk Drill to verify that you’ve selected the right files and that they are recoverable.
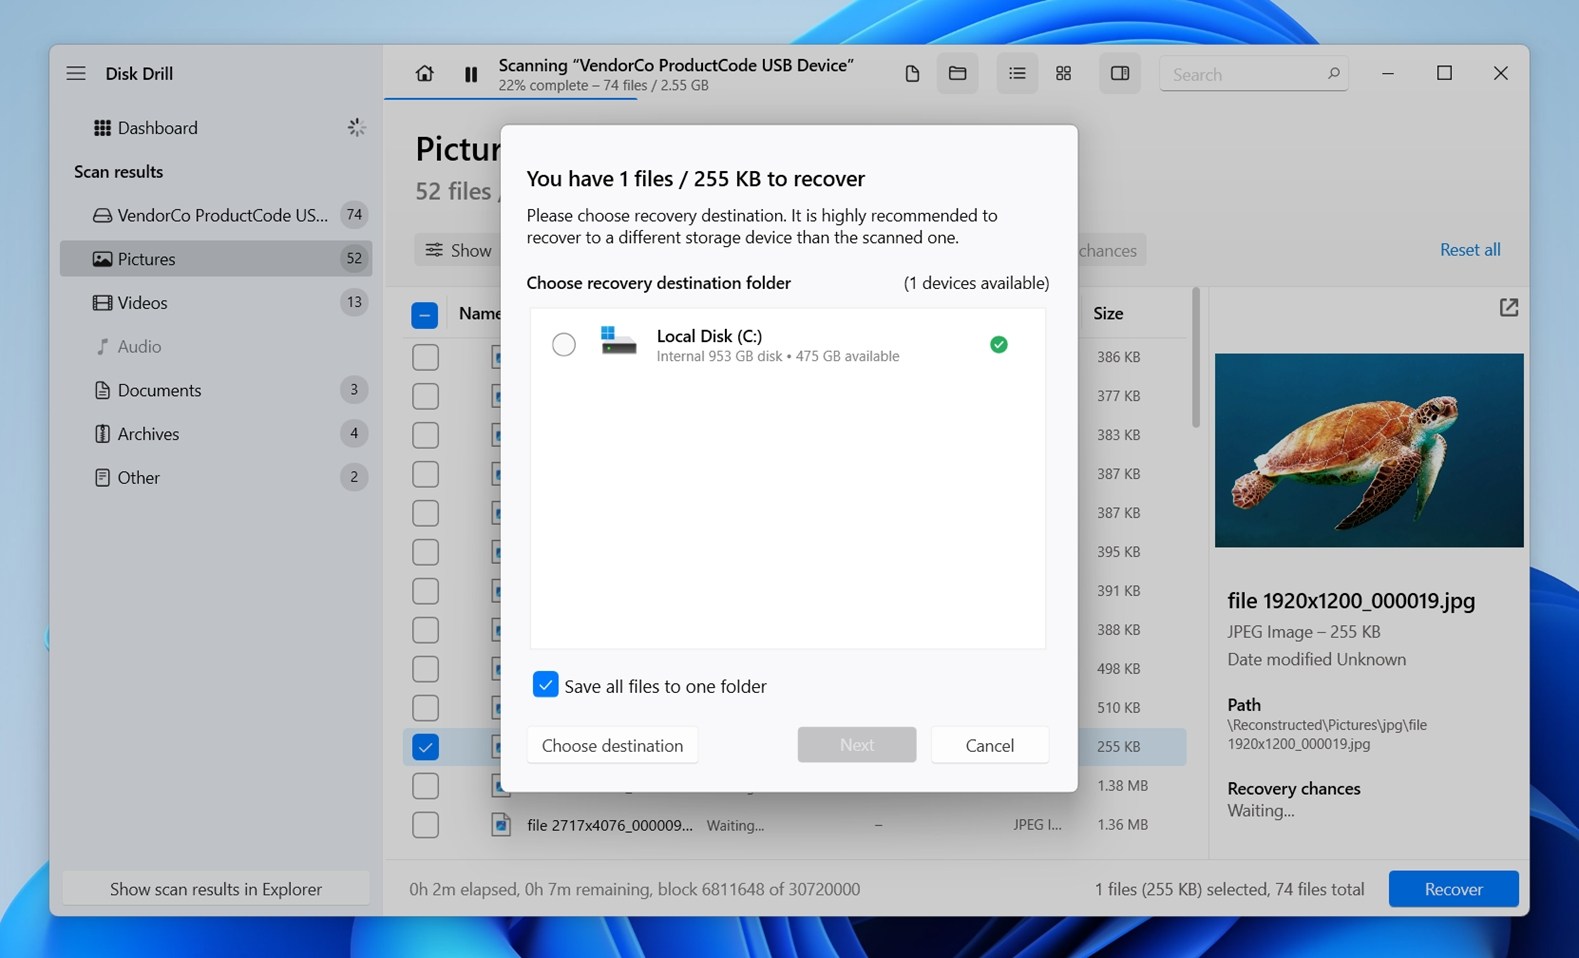
- Click the Recover button and choose a directory where the recovered files will be saved. To prevent overwriting any data on the flash drive, select a location on your computer or a different external storage device.
- Confirm to move the selected files to the specified recovery location.
 When the recovery is done, open the recovery directory you specified and check if your files are all there. You should now have access to all the recovered data, and you can restore it to your USB flash drive or another device as needed.
You can use the free version of Disk Drill to recover up to 500 MB for free from your USB flash drive, which might just be enough to let you retrieve everything you need. To recover more than 500 MB, you’ll need to upgrade to Disk Drill PRO.
Note: If you want to learn more about Disk Drill’s advanced features – like byte-to-byte backups or S.M.A.R.T. monitoring (can be very useful in some data loss cases) – check out our full Disk Drill review. It breaks down everything the tool can do, including features that aren’t available in any CMD method.
And if Disk Drill doesn’t fit your needs, we also put together a ranked list of the best USB recovery software based on hands-on testing by our team.
Final Words
I think that about does it. We’ve tried to cover every practical way you can use Command Prompt to bring a USB flash drive back to life – whether you’re dealing with hidden files, corruption, or permanent deletions.
If you still have questions, scroll down to the FAQ section below. I’ve added answers to some of the common things people run into when using CMD tools for USB recovery. And if you don’t find what you’re looking for there, feel free to leave a comment – our team reads every one and would be glad to help out.
FAQ
- However, you can recover files from USB using CMD tools like Microsoft’s Windows File Recovery, which works through Command Prompt. It’s a separate app you install from the Microsoft Store.
- Or you can try PhotoRec, which comes bundled with TestDisk. It also runs in CMD and can recover many types of files.
- By default, many users run WFR in /regular mode, try to use /extensive mode instead.
- If you added a /n filter (like /n *.jpg) and got no results, try removing the filter entirely to allow a full scan. Or, double-check the pattern - one typo can return nothing.
- Try PhotoRec. It is more aggressive and doesn’t rely on the file system the way WFR does. It can recover files even from severely damaged or reformatted USB drives. The tradeoff is that it won’t recover filenames or folder structure.
- Use a more capable recovery app. Tools like Disk Drill can scan USB drives more deeply and give you file previews, filters, and better recovery options. It’s especially helpful if you’re not comfortable with command-line tools or didn’t have luck with WFR.


