 Losing important files from a hard drive is something that almost all users face at one point or another. If you’ve been the victim of data loss, fret not because there are numerous ways you can recover data from your hard drive. We take a look at all these methods below.
Common Reasons for Data Loss in Hard Drives
It’s essential to know what caused data loss on your hard drive, as the data recovery method you use will depend on it. The actual chances of data recovery will radically vary as well.
Here are the most common reasons for data loss in hard drives, their description, and the recommended solutions:
|
Data Loss Reason |
Description |
Solution |
| 🚨 Accidental deletion | You could accidentally delete essential files from your hard drive. This kind of data loss is easily reversible. | Look for your files in the Recycle Bin or Windows File History. If you’re unable to find them, use a data recovery program to restore data from the hard drive. |
| 🦠 Malware | Computer viruses can delete, steal, or lock your files. Viruses typically enter your computer via downloads from untrustworthy sites or phishing scams. | Scan your PC using an antivirus program. Windows Defender is good enough in most scenarios. After finding and removing the malware, use data recovery software to scan your hard drive and get back any deleted data. |
| 🗃️ Formatting | Formatting your hard drive wipes out all data from it. On Windows, you can perform a Quick Format or a Full Format. The chances of recovering data from a formatted drive depend on the type of format performed. | Data deleted during a Quick Format can be recovered by using a good data recovery tool. A Full Format is irreversible, and only a professional data recovery service can help you out. |
| 🔨 Physical damage | Any damage to the physical components of your hard drive can be devastating to your data. Symptoms include clicking, grinding, or beeping noises from the drive. Physical damage is typically caused by dropping the drive, water, power surges, and overheating. | It’s best to get in touch with a data recovery professional for data retrieval from a hard drive that’s physically damaged. Attempting DIY recovery can worsen things. |
Is it Possible to Recover Data from a Hard Drive
Yes. Both, data recovery programs and professional data recovery techniques have exponentially improved over the years. There are very few scenarios in which data recovery will not be possible, such as a stolen hard drive or a severely damaged hard drive platter.
However, the success of a data recovery procedure will depend on various factors:
- ❌ Reason for data loss: It’s relatively easier to get data off of a hard drive that was logically corrupted than one which was physically damaged. Even then, a professional data recovery service will be able to replace the damaged parts on your drive and restore some, if not all, of your data.
- ⌛ Time elapsed since data loss: Generally, the more recent the data loss, the easier it is to pull data from the hard drive. This is because old, deleted files have a higher chance of being overwritten by new data you may have created. Of course, this won’t apply if you haven’t used the drive at all since noticing the data loss.
- 🕒 Drive usage: Continued usage and creation of new files on the drive will obliterate any chances of data extraction because the new information overwrites your previously deleted files. Thus, it’s best to stop using your drive when you notice data loss and only use it when performing the actual data recovery procedure.
- ✅ Choice of data recovery software: I cannot overstate the importance of choosing a good data recovery program to scan your disk. The first data recovery scan is usually the most successful, and repeated scans can do more harm than good. We also recommend that you create a disk image of your drive and scan the image for lost data, instead of the physical drive.
The most important action you can take to increase the chances that you can recover data from a hard drive that has experienced logical or physical problems is to stop using the device immediately. Until recovery is complete, using the hard drive risks overwriting data that could potentially be recovered. Failure to follow this advice will diminish the chances of a successful recovery.
How to Recover Data from a Hard Drive
You have plenty of options when it comes to retrieving data from your hard drive. Most methods are simple enough to follow, but we still recommend you double-check each step carefully.
Before proceeding to more elaborate methods, you can press CTRL + Z to undo the last operation you performed on Windows. This will work if you deleted the file recently and haven’t performed any clipboard-related operations after that.
Method 1: Restore Your Files from the Recycle Bin
If you deleted your files by right-clicking and selecting the Delete option, or using the Delete key, your files will be available in the Recycle Bin. This method is not applicable if you used the Shift + Delete shortcut to delete your file, or if the Recycle Bin is disabled.
Here’s how you can restore your data from a hard drive, using the Recycle Bin:
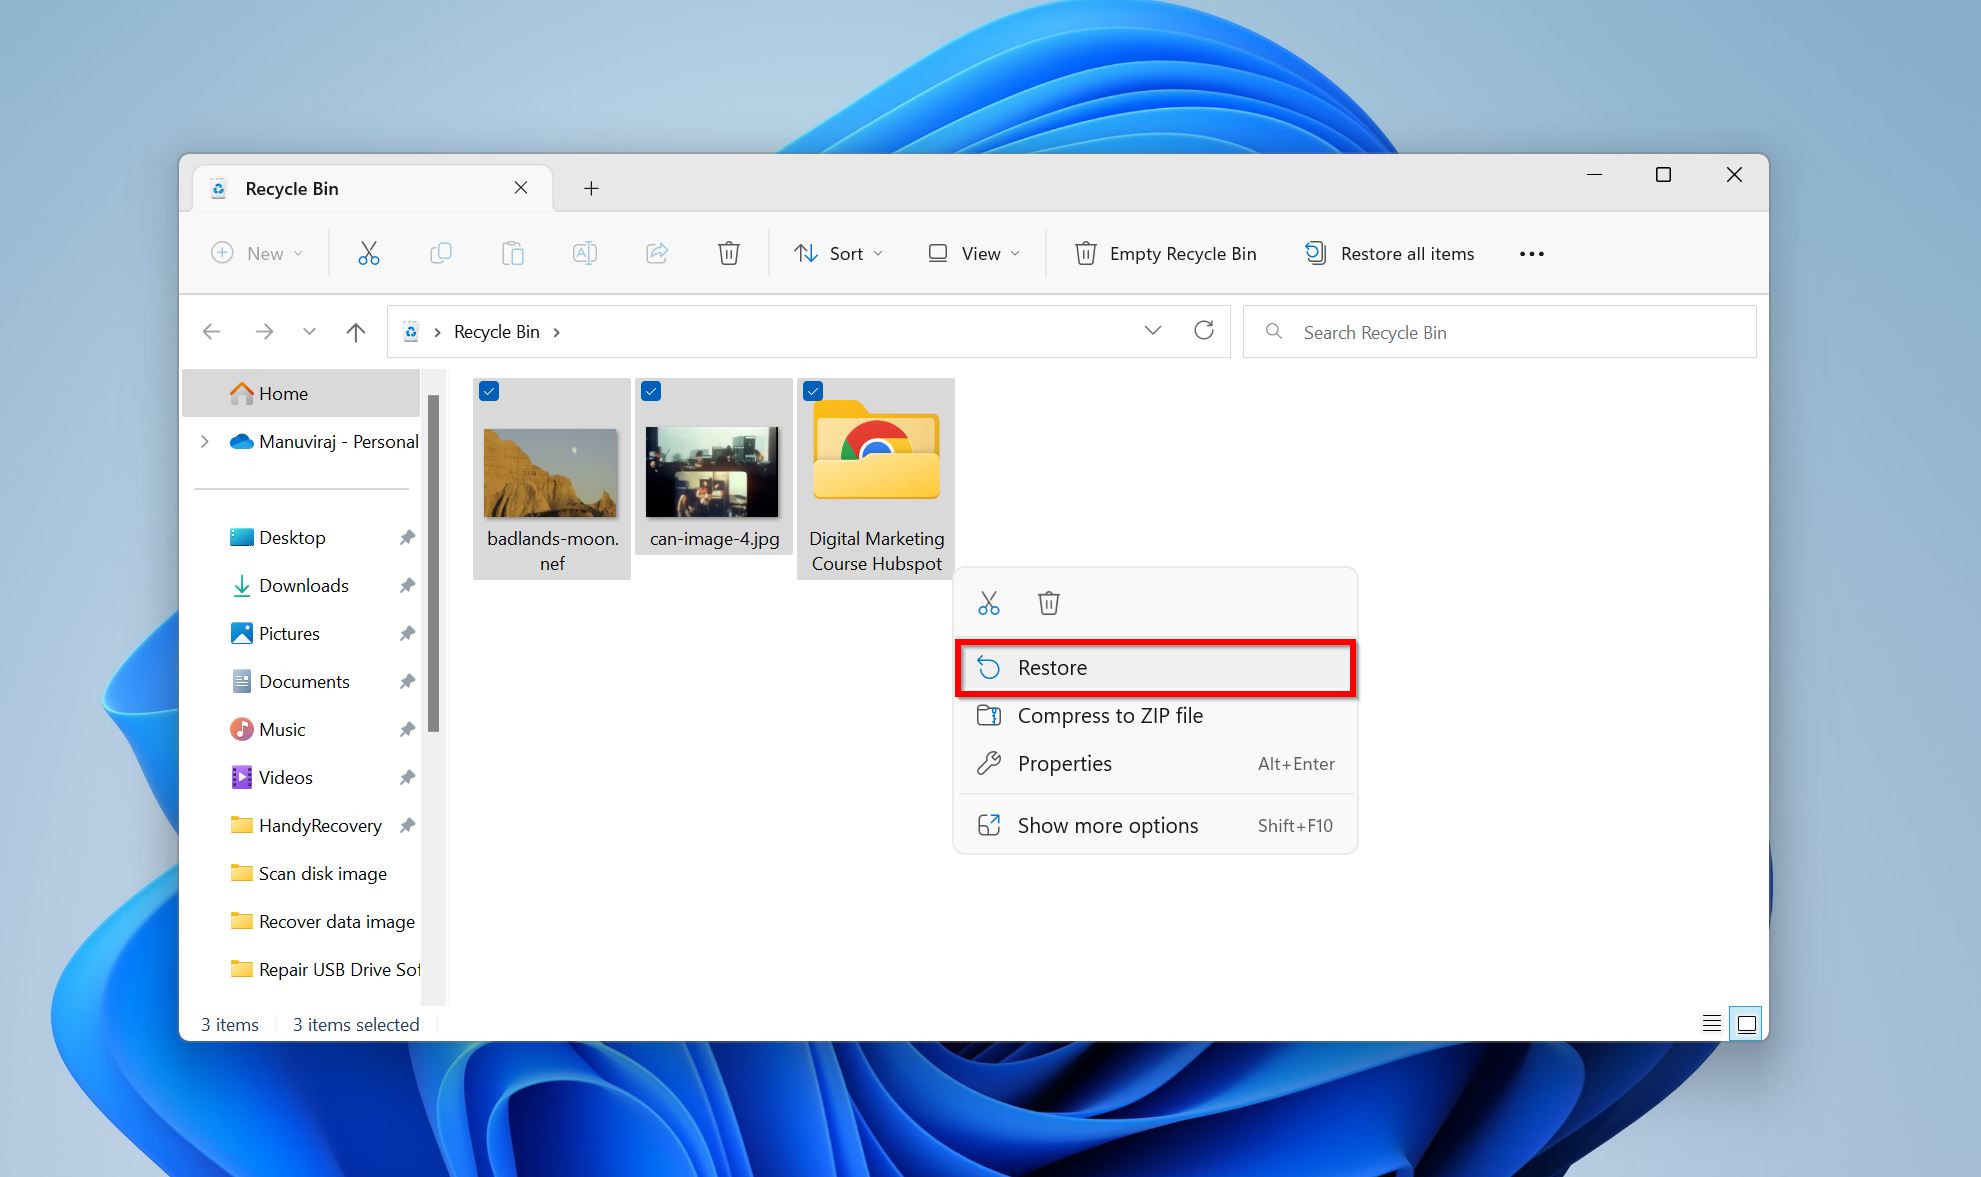
- Double-click on the Recycle Bin icon on your desktop.
- Select your files, right-click, and click on the Restore option as shown in the screenshot.
Method 2: Use Data Recovery Software
When it comes to recovering deleted files from a hard drive, third-party data recovery apps are your best friends. A good hard drive data recovery software will be able to get back your files if they were permanently deleted, you performed a quick format, or your drive suffered logical corruption but is still detected by your PC.
For this tutorial, I decided to use Disk Drill to recover data from a hard disk. It’s an excellent choice for new and expert PC users alike, as it has a simple UI while not compromising on any cutting-edge features. It detects and recovers over 400 file formats across all file systems such as FAT32, NTFS, exFAT, APFS, and HFS+.
To recover deleted files from your hard drive using Disk Drill, follow these steps:
- Download Disk Drill, and install it. We recommend you download and install the program on a drive apart from the one which suffered data loss.
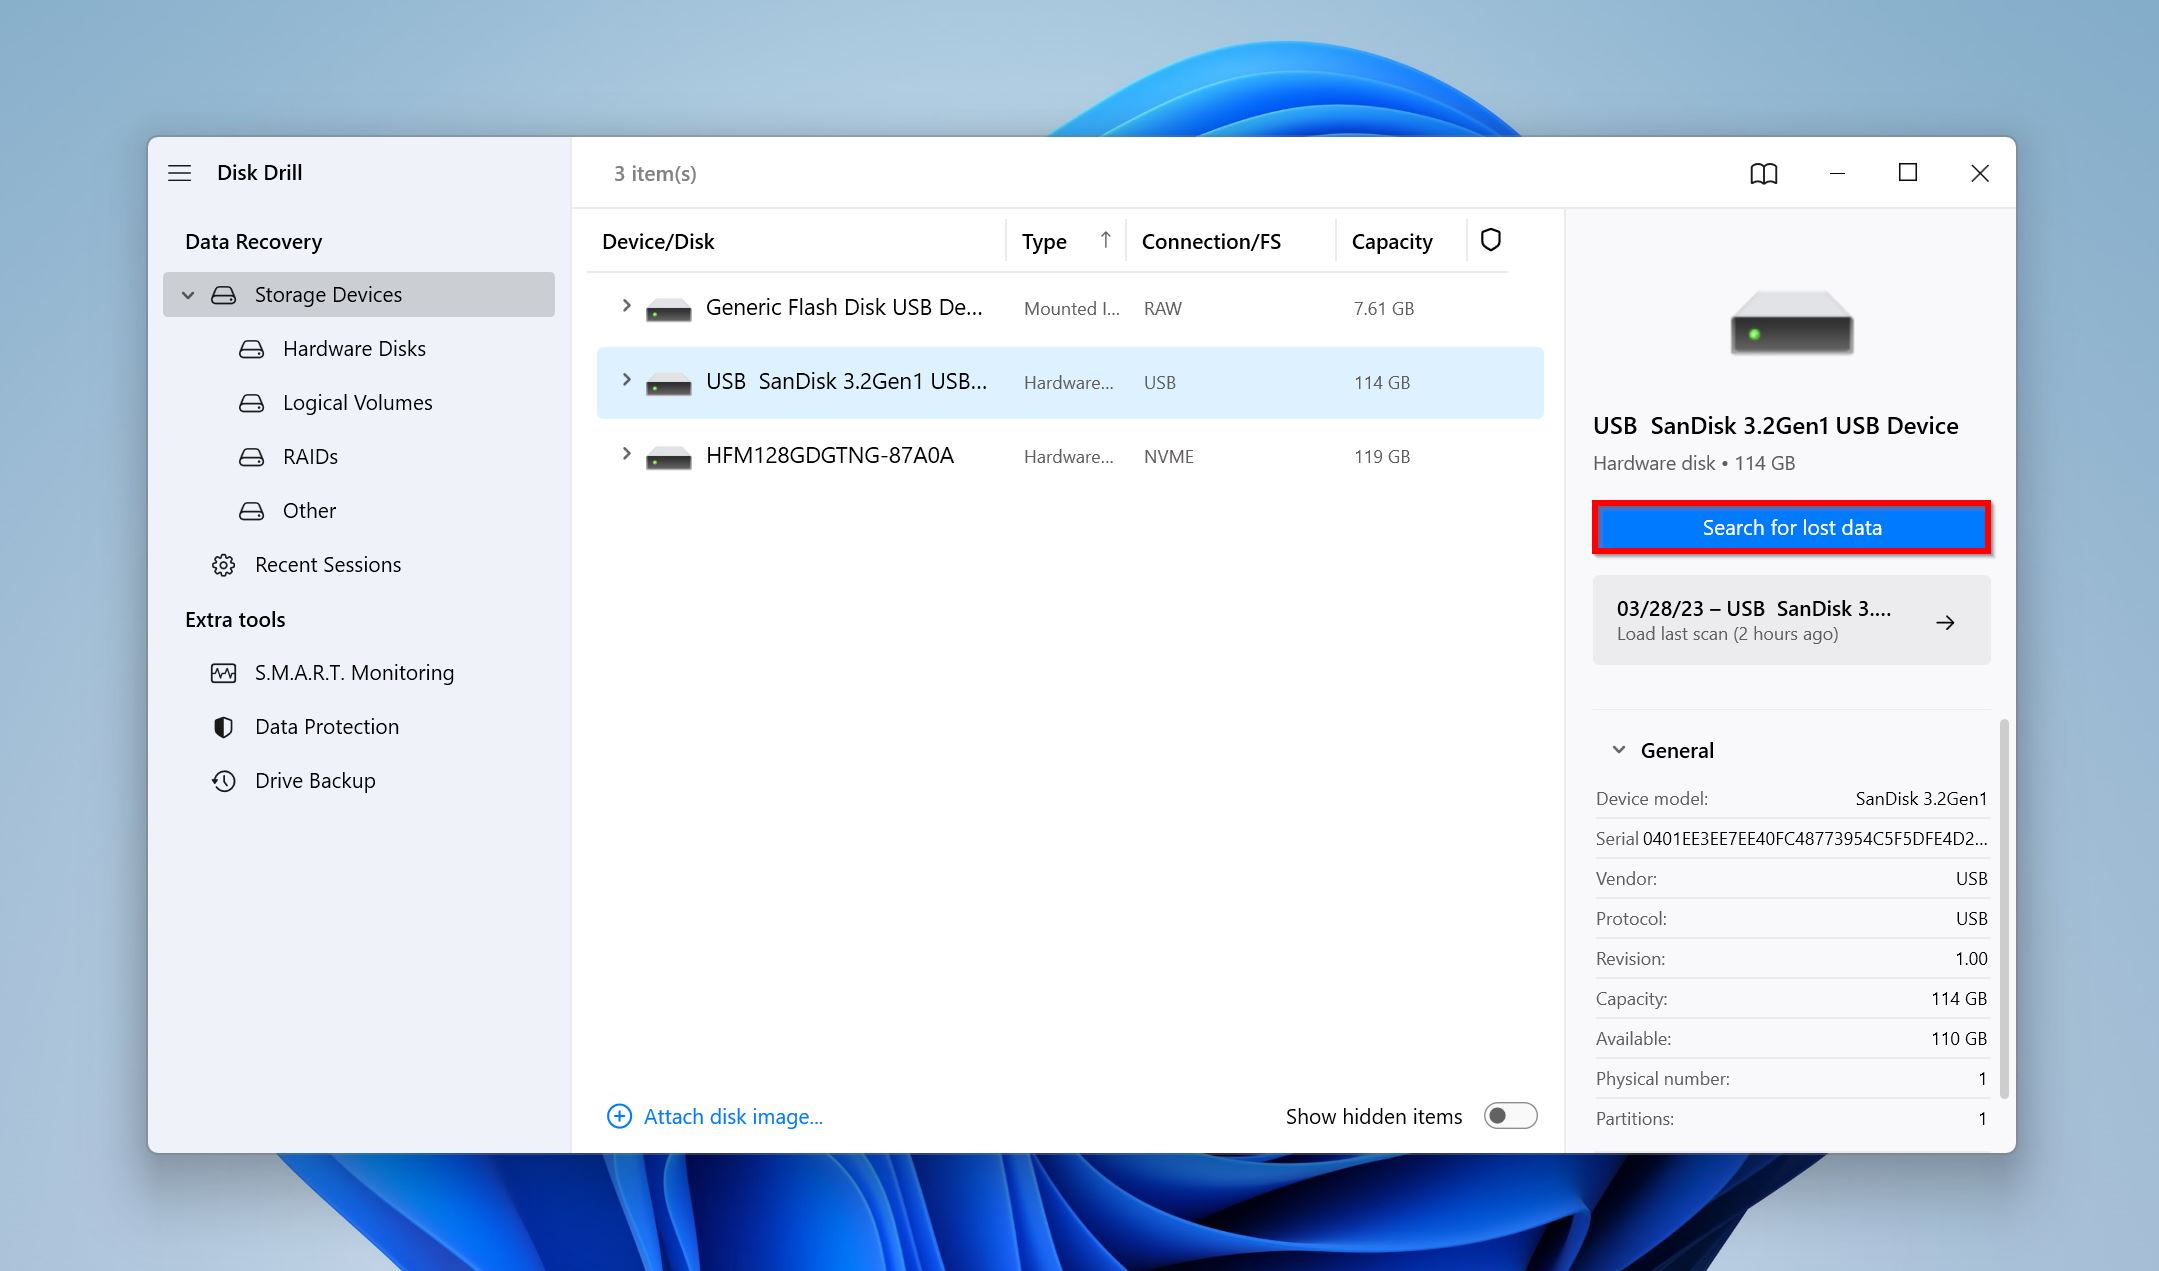
- Open Disk Drill, select your hard drive, and click Search for lost data.
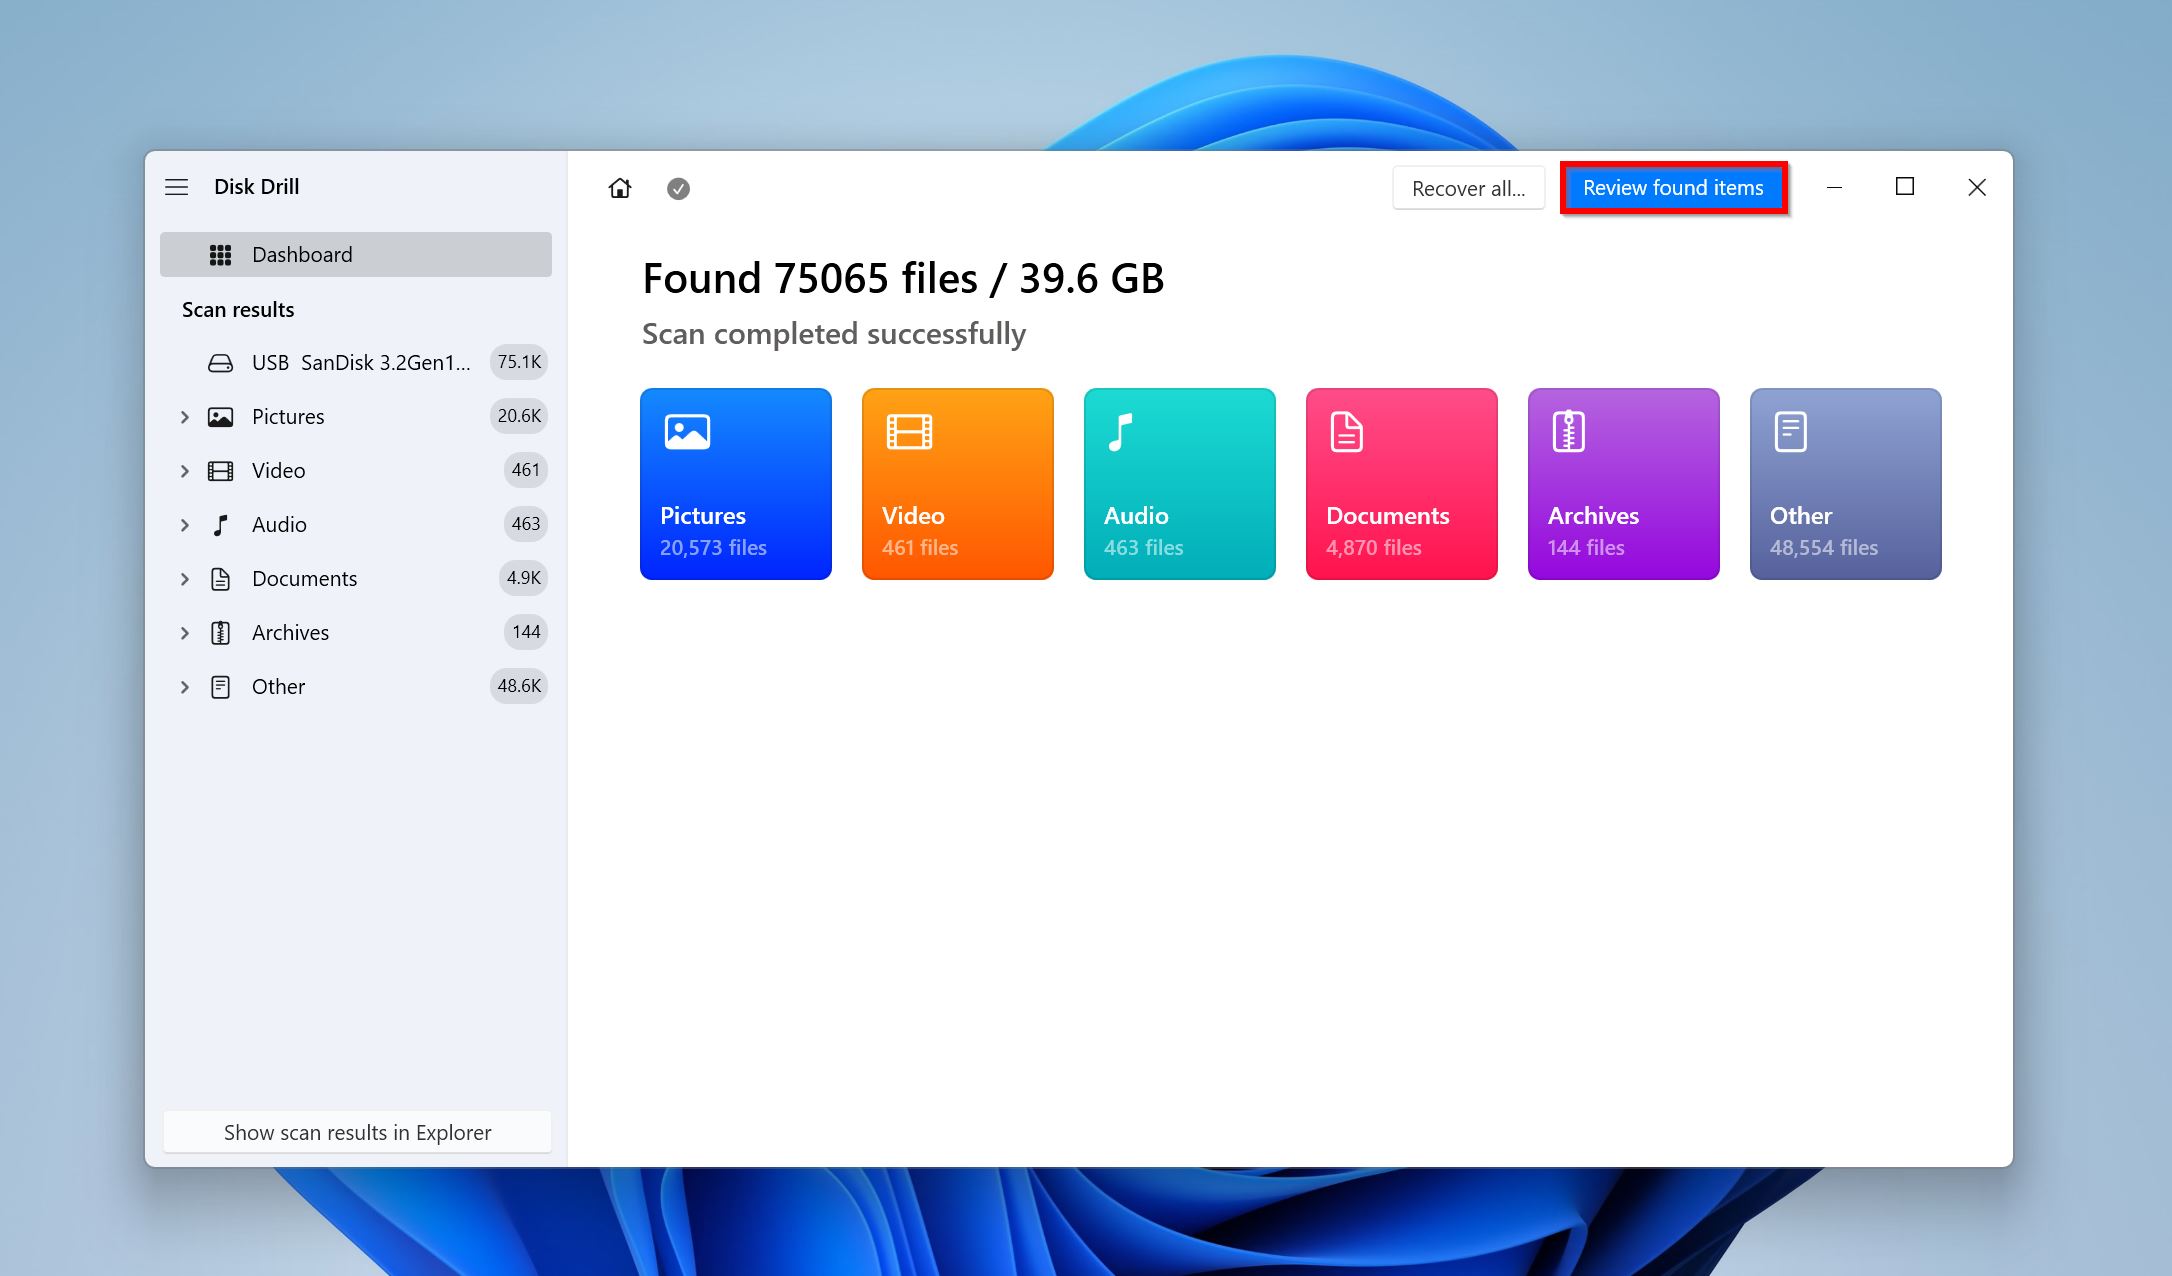
- Click on Review found items to view the recoverable files. Alternatively, you can directly click on the file type you want to recover to filter out the results (Pictures, Video, Audio, Documents, Archives, and Other).
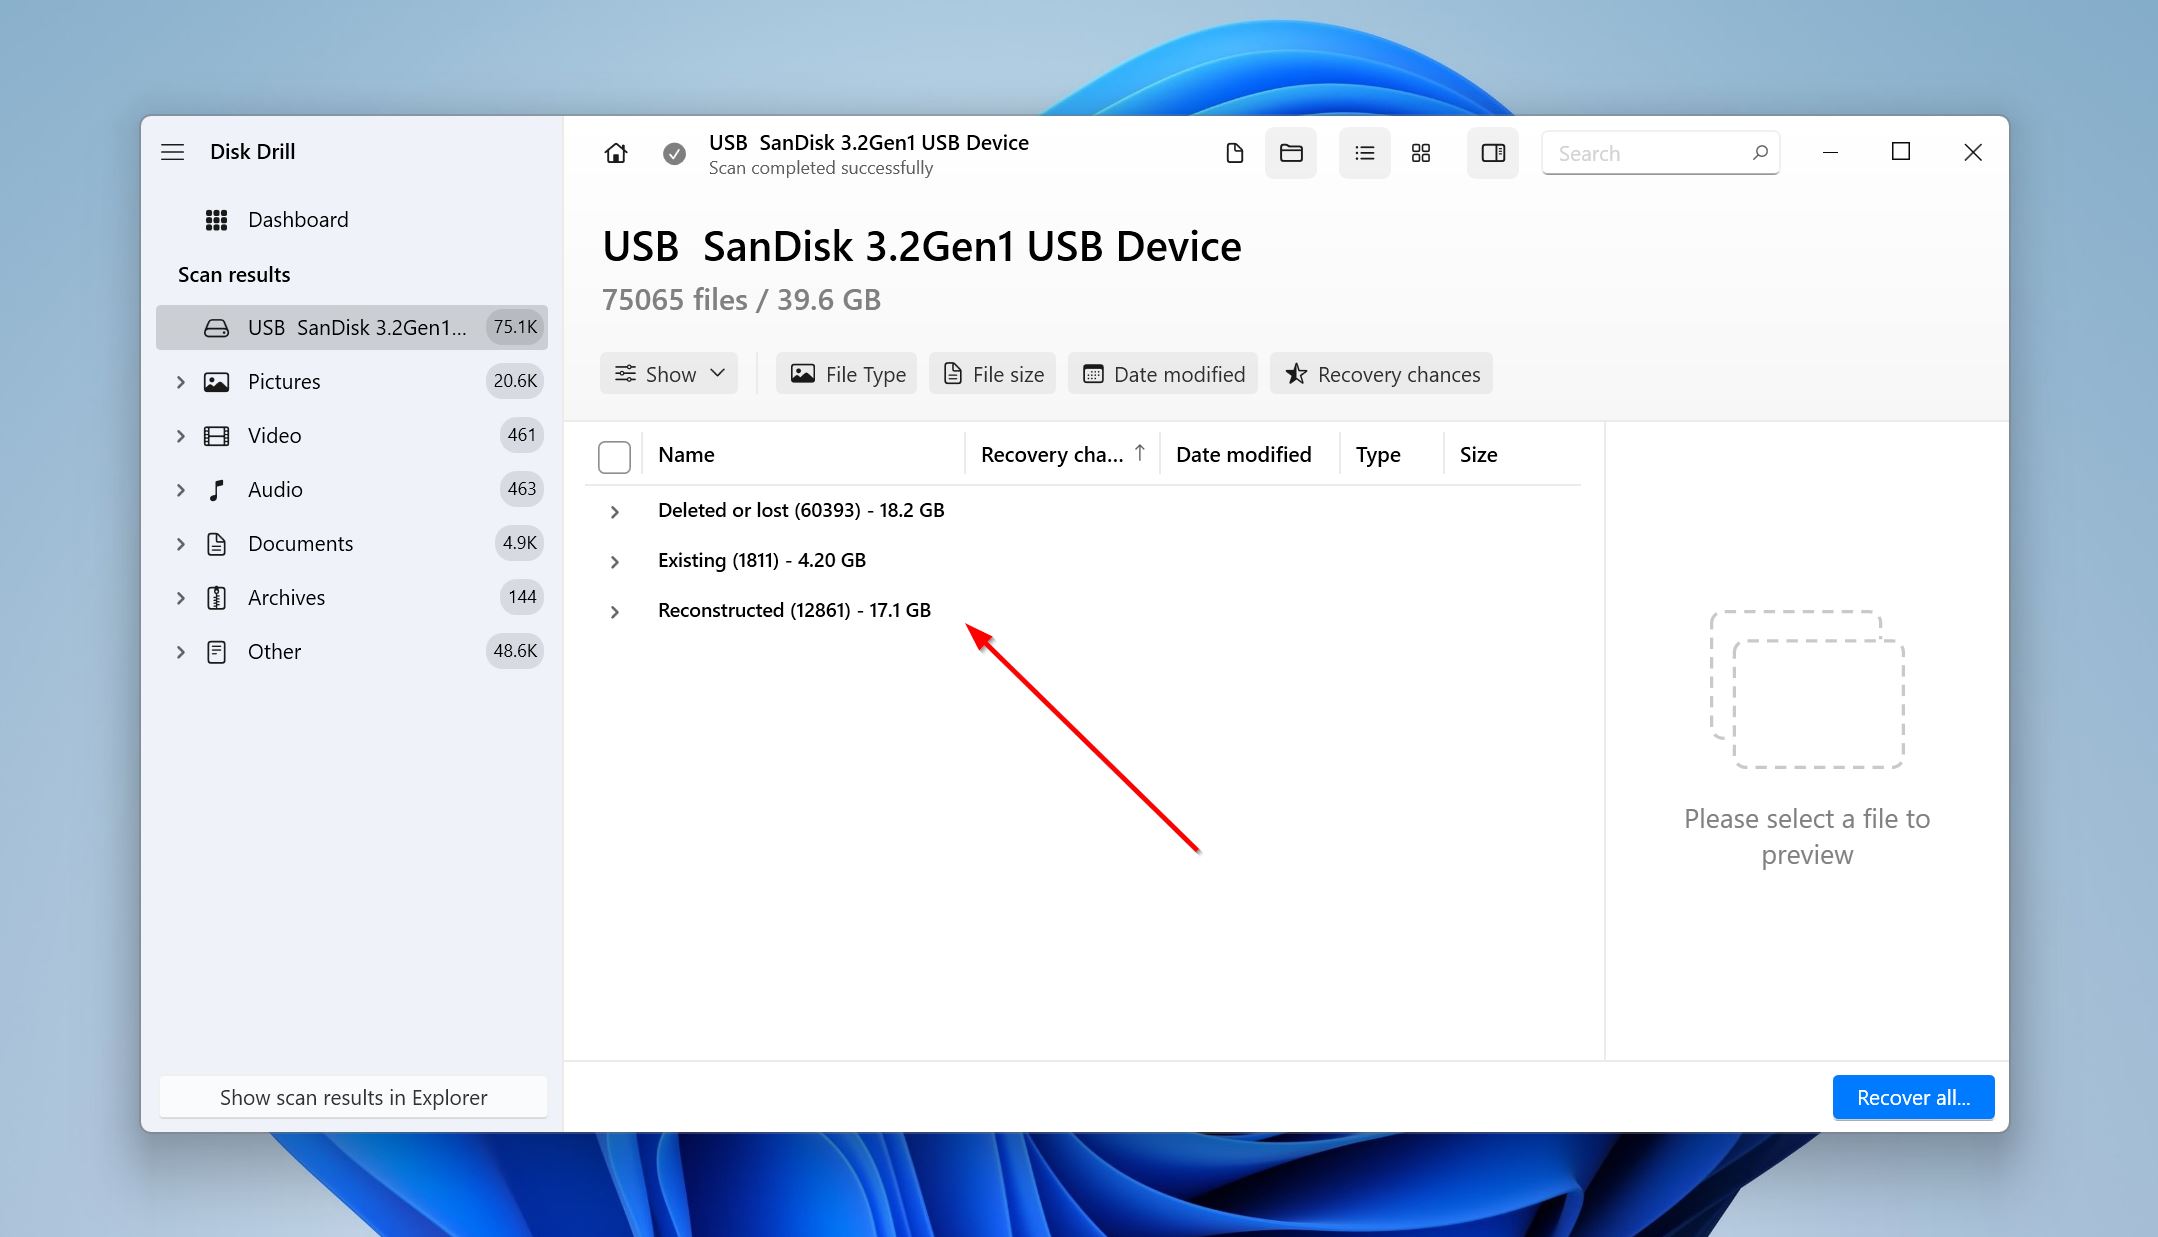
- Expand the Deleted or lost and the Reconstructed sections to view files that were deleted from the drive. Expand the Existing tab to view files that are currently present on the HDD.
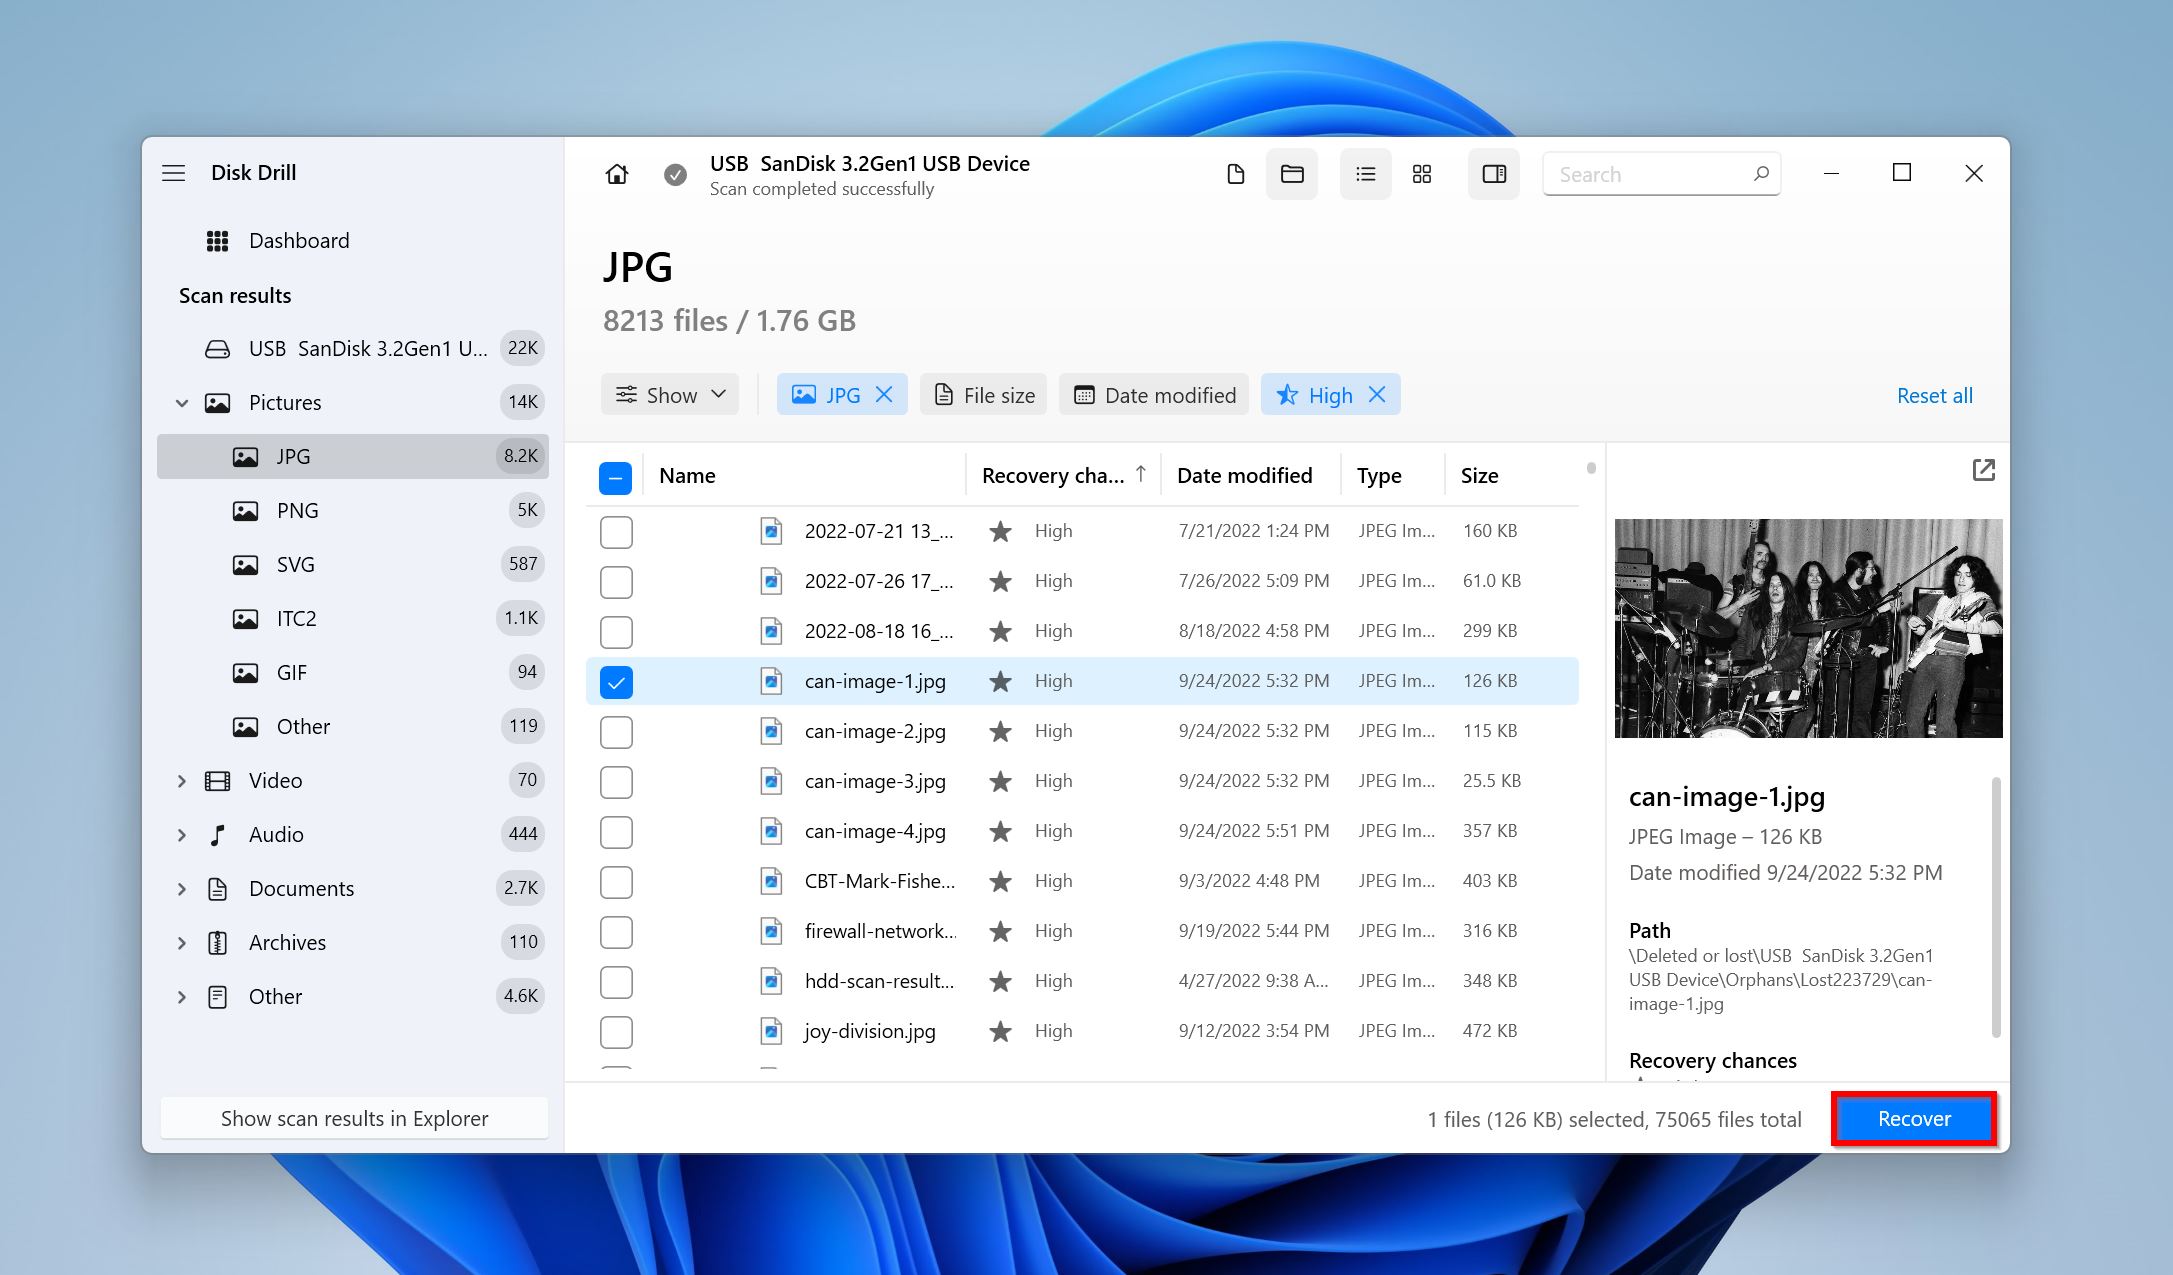
- Use the checkboxes to select the files you wish to recover. Click on the eye icon next to a file to see a preview of it. Click Recover after you’re done with the selection.
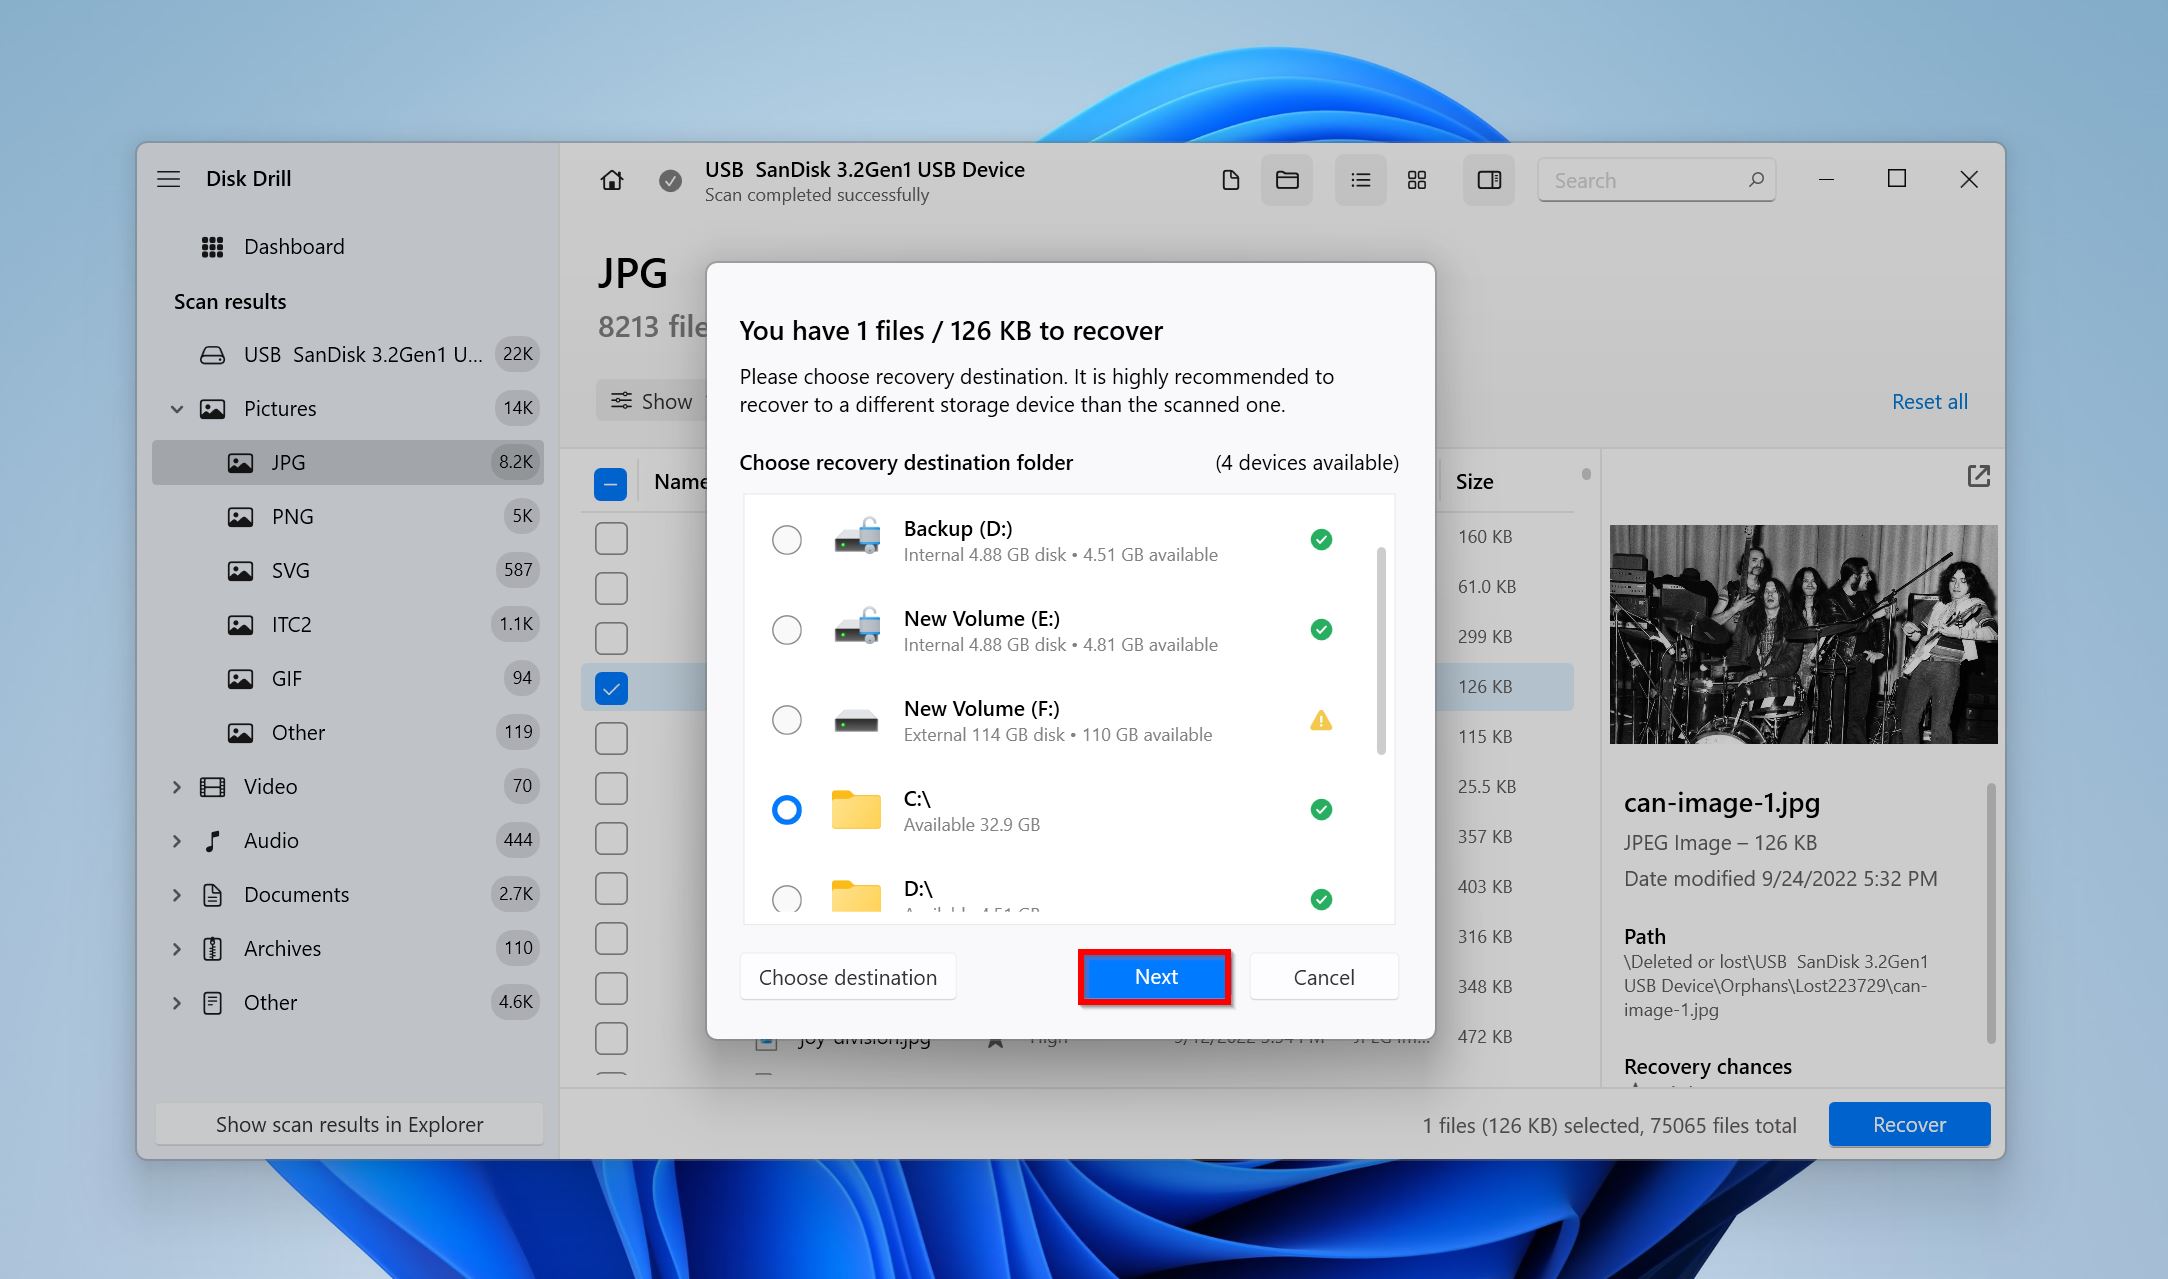
- Choose a recovery destination for the files. Don’t recover the files to the same hard drive. Click Next. As a Windows user, you can recover up to 500 MB of data at no cost. Further recovery requires you to purchase a license.
- Disk Drill will recover your hard drive’s files.
Method 3: Use Windows File Recovery Tool
If you’re willing to forego some ease of use, the Windows File Recovery tool is a free method to perform hard drive data recovery. Its functionality is not as great as third-party data recovery programs, but if you’re looking to recover recently deleted data from a FAT or NTFS drive, it gets the job done.
The program is only available for computers running Windows 10 2004 and above.
Here’s how to use the Windows File Recovery tool to find deleted files on your hard drive and get them back:
- Download Windows File Recovery using the Microsoft Store.
- In the console, type
winfr X: Y:\RecoveryFolder /regularand press Enter. Replace X with the drive letter of the drive where you want to recover data from, and Y with the drive to which you would like to save the recovered files. Microsoft recommends you use the /n parameter followed by the file type or the folder path when recovering data from the system drive (typically C:). For example,winfr C: E: /regular /n \Users\<username>\Documents\, andwinfr C: E: /regular /n *.pdf /n *.docx.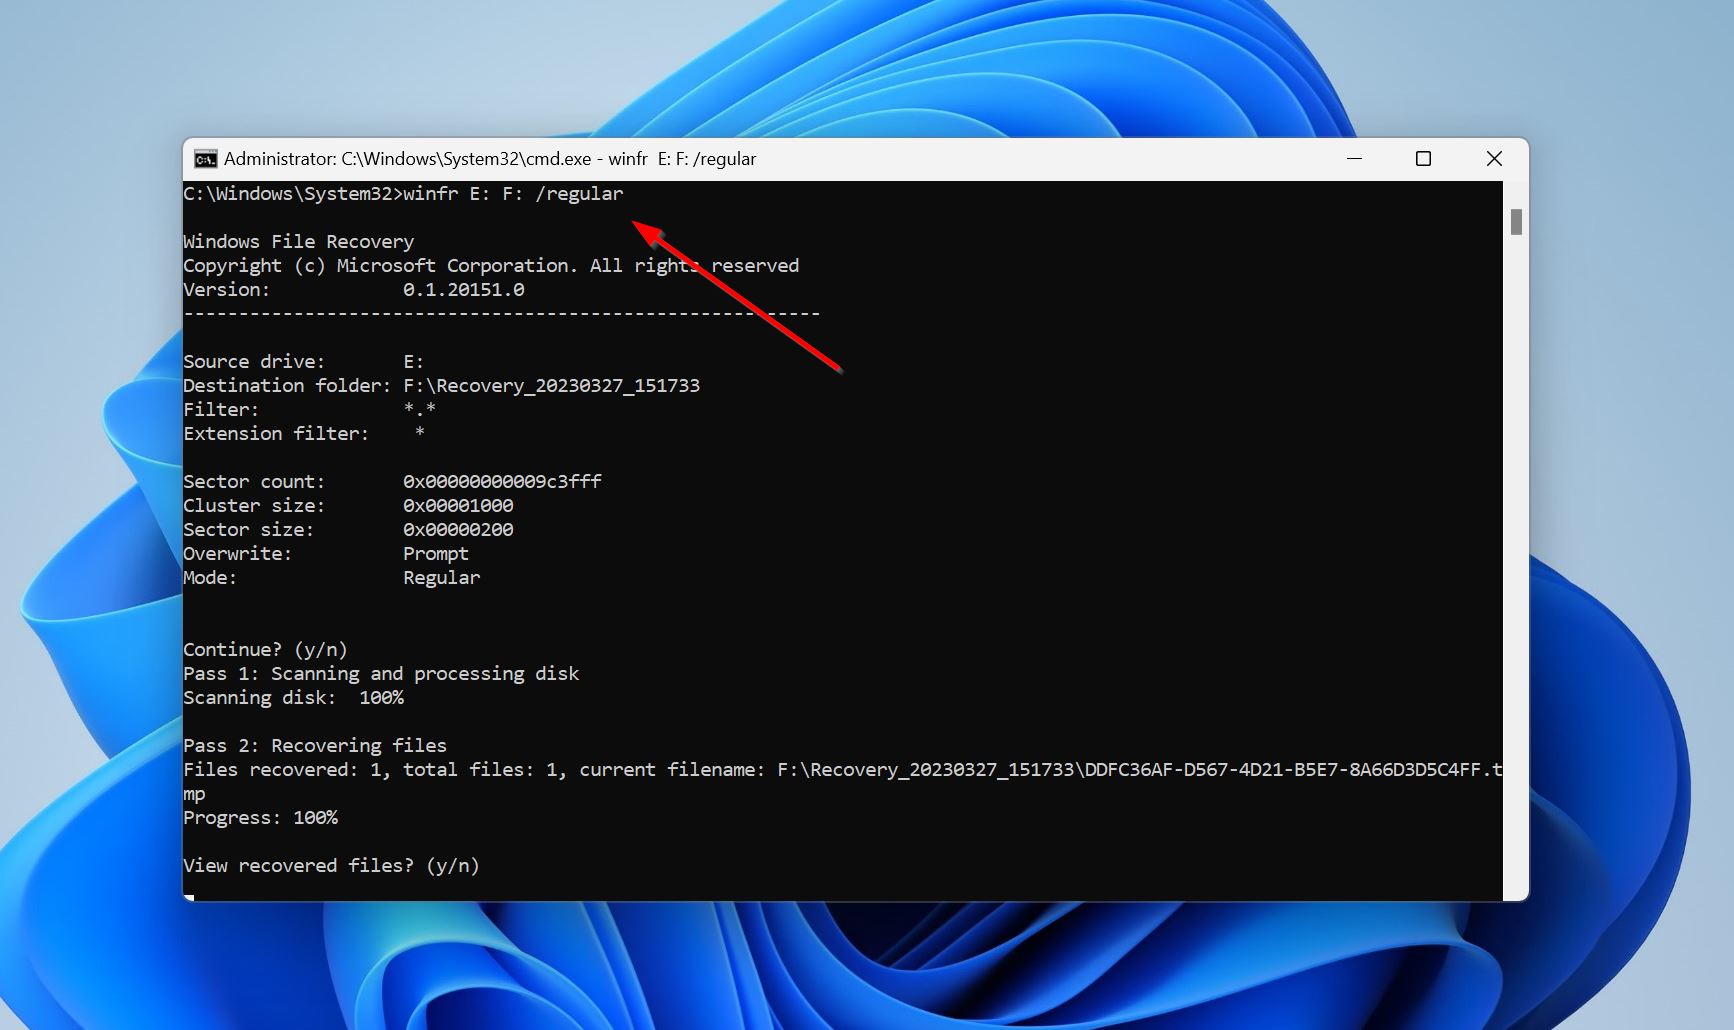
- Press Y on the confirmation prompt.
- You can now choose whether you wish to view the recovered files or not.
There are numerous parameters you can use to fine-tune the data recovery process, as well as filter out the results. The complete info about these parameters is available on the Windows File Recovery help page.
Method 4: Recover Files from Windows File History
Windows File History is Windows’s automatic backup feature. If you’d set it up before incurring data loss, you’ll easily be able to get back your deleted files using one of Windows File History’s backups. For this method to work, the drive which suffered data loss should’ve been selected in Windows File History while setting it up.
Instructions on how to recover your files from a hard drive using Windows File History:
- Make sure the drive that stores Windows File History backups is connected to your PC.
- In Windows Search, type “file history.” From the search results, select the Restore your files with File History option.
- Use the navigation buttons to scroll through the available backups until you find one that contains the required files. Select the files you want to recover, and click on the green recover button.
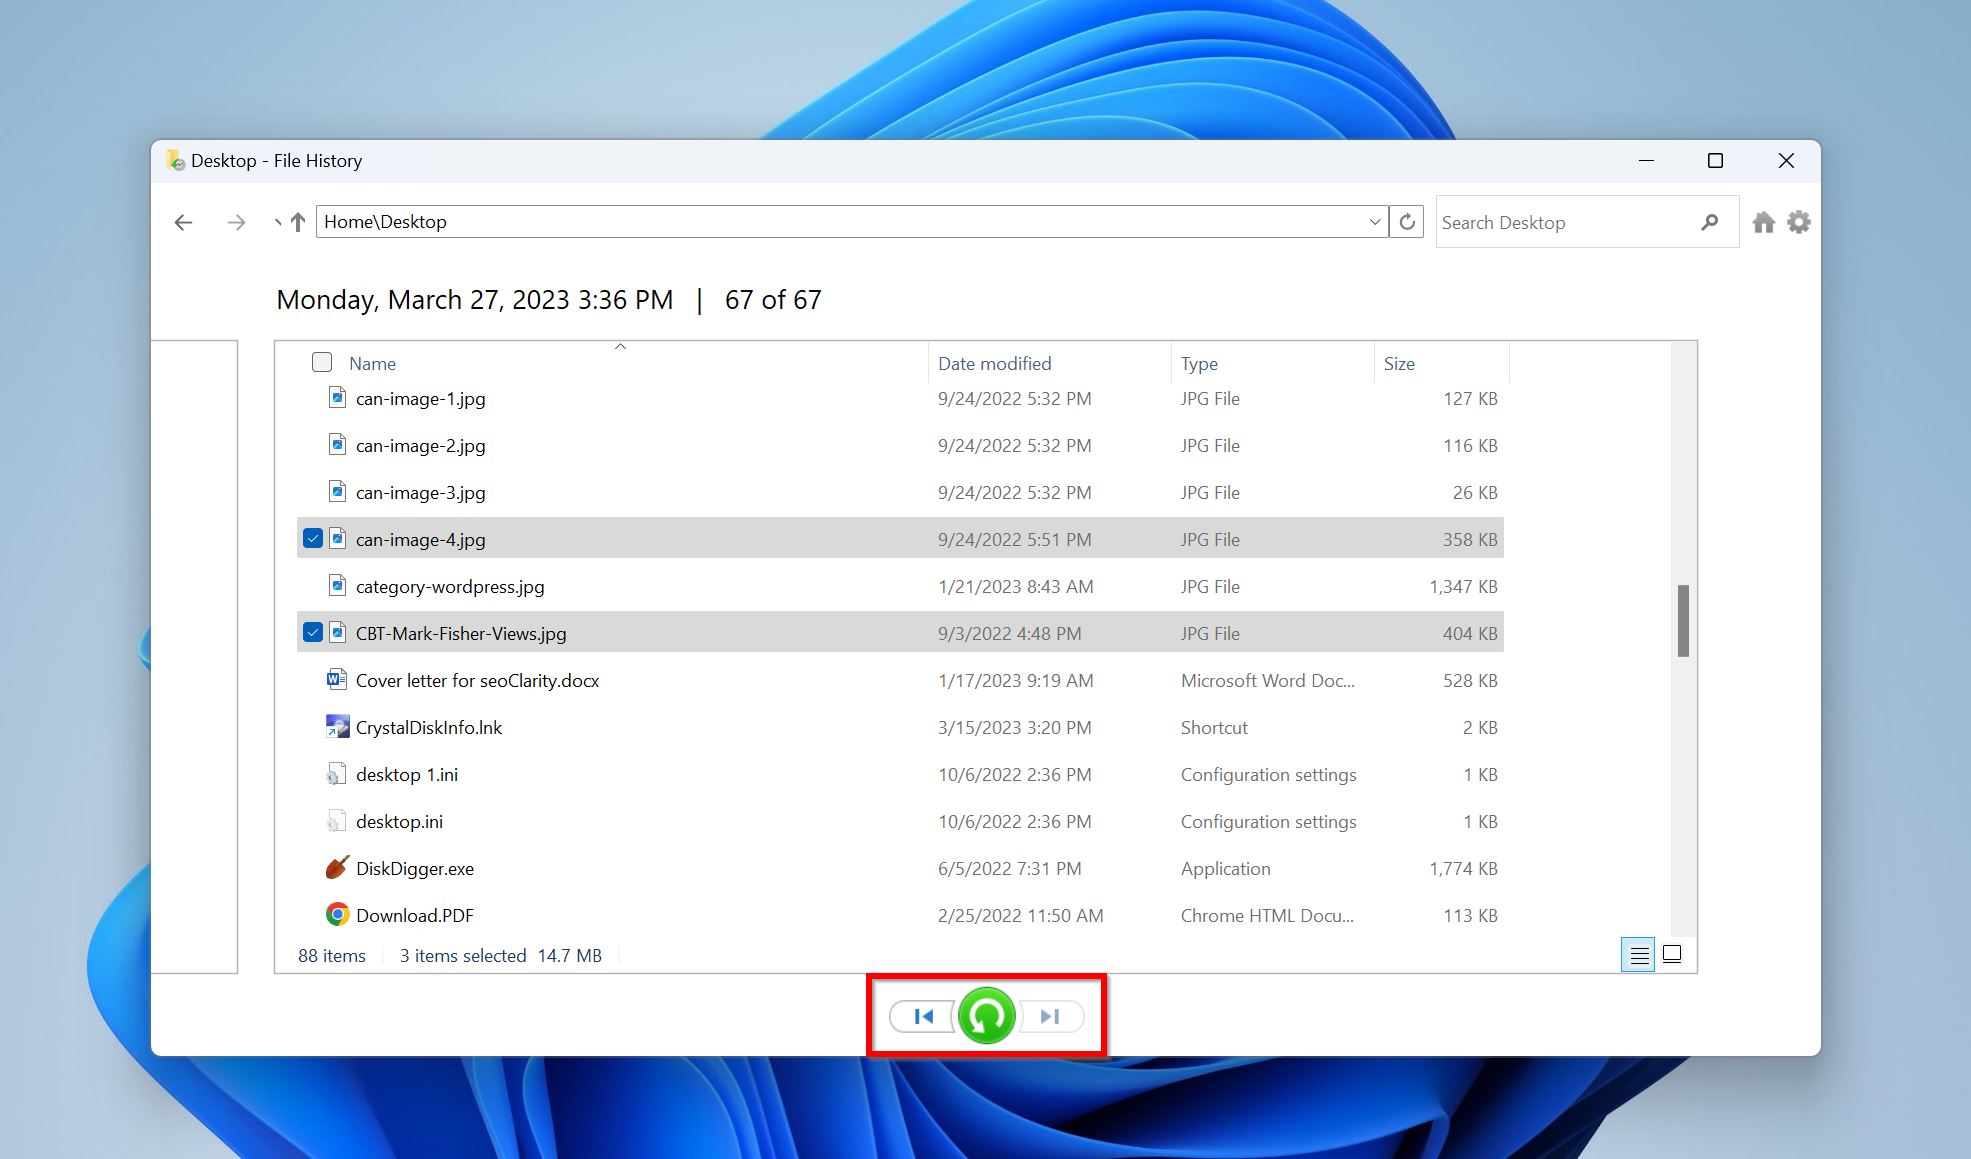
- File History will recover the files to their original location.
Method 5: Restore Data from OneDrive Cloud Backup
If enabled, Windows backs up your user folders from your internal hard drive, such as Desktop, Documents, Music, Pictures, and Videos to OneDrive at regular intervals. These files can be accessed on any device and restored to your computer as and when needed. OneDrive backup is enabled by default on Windows.
If the missing files in your drive were located in one of the user folders, it’s worth looking for them in the OneDrive folder on your PC. Simply open File Explorer and open the OneDrive – Personal folder to access all backed-up files. You will need an active internet connection to do this.
Method 6: Apply to Professional Data Recovery Service
In case your hard drive is physically damaged, or your PC does not detect it at all, it’s best to contact a professional data recovery service. While not as cheap as downloading a third-party data recovery app, you have a higher chance of recovering your data if you contact a professional data recovery company.
Here are some reputable data recovery services that will handle your damaged hard drive and recover as much data as possible from the device. They all will try to recover your data and will not charge you if they are unsuccessful.
- CleverFiles Data Recovery Center – CleverFiles offers standard recovery in three to seven days as well as an expedited option that gets your data back in two days. They have a 98% success rate and repairs do not invalidate the drive’s original warranty.
- DataTech Labs – DataTech has recovery centers in over 40 U.S. cities and specializes in recovering deleted files from crashed hard drives and failed RAID arrays. All data recoveries are performed in an ISO 5 Certified Class 100 cleanroom.
- Gillware Data Recovery Services – GIllware has been solving data recovery issues for customers since 2003. They will give you a free in-lab examination and firm price quote. All recoveries are done in house with no outsourcing to other labs.
When using a professional data recovery service you can expect a following proceedure:
- Submit a data recovery request using the company’s website or its phone number. Most companies have a 24*7 hotline.
- Tell the company about your exact data loss scenario, when it occurred, whether you used the drive, the amount of data loss, etc.
- Ship the drive to the data recovery service or drop it off at a drop-off point.
- The data recovery service will evaluate the drive and get back to you with the cost, and the extent of data recovery.
- You can then choose whether to proceed with data recovery or not.
- The company will recover your data and ship it back to you.
What is the Average Hard Drive Recovery Price?
The price of a hard drive recovery varies based on the extent of damage and the volume of data that is being recovered. You can expect to pay between $100 and $300 per hour for the expertise required to perform the recovery. If parts are needed, there may be an additional charge.
A reliable recovery service will provide an estimate but will not give you a final price on recovery until they have examined the drive. Be careful of services that advertise a price per gigabyte recovered type of cost structure. It is essentially impossible to make this kind of claim without examining the damaged device.
How to Protect Files on Your Hard Drive From Accidental Deletion
There are several tactics that you can use to guard against files being accidentally deleted from your hard drive. They include:
🖨️ Back up your hard drive – Creating backups of your hard drive is one of the best ways to protect your valuable data. A backup can be used to recover lost data no matter what the cause. The only prerequisite is that the backup contains the data you want to recover. For this reason, frequent and regular scheduled backups are your best defense against data loss.
💧 Avoid heat and moisture – Excessive temperatures or too much moisture can cause physical damage to your hard drive. Avoid subjecting your computer or external storage devices to these conditions.
🦠 Steer clear of malware and viruses – Malware and viruses can be the cause of logical damage such as file corruption. To minimize your chances of this issue affecting your hard drive, always use a reliable and updated antivirus tool.
🏥 Be careful – Accidentally formatting a drive or emptying a Recycle Bin or Trash that contains important data is in your control. Take a few seconds and verify your actions before doing anything that involves deleting data from your hard drive.
Conclusion
There are many ways to find and recover deleted files from your hard drive, but none can replace creating regular backups. It’s best to store important data in two physical locations and one cloud location to adequately protect yourself against data loss.
