
Did you delete files from your USB flash drive and now realize it was a mistake? Or maybe you already tried some USB data recovery tools, but they didn’t give the results you expected and you still need help? No matter what situation you face, this guide is exactly what you need.
USB flash drives remain one of the most common ways to add extra storage to a computer or other devices, or to move data from one place to another. Because of that, it’s not surprising when files disappear, whether you click the wrong button or the drive misbehaves on its own. Fortunately, recovering data from a USB flash drive is usually one of the simplest tasks in data recovery. So don’t worry, read this guide to the end and you’ll know how to recover deleted files from a USB drive using several methods.
Before you begin any recovery steps, avoid using the flash drive. You can keep it connected to your computer or laptop, but do not add any new files to it. Moving files off the drive is safe, but adding new ones is not. Below, we explain why this matters.
Can Files Deleted From a Flash Drive Be Recovered?
Yes, deleted files can still be recovered from a flash drive using different data recovery methods. However, the cause of the data loss will determine your chances of successfully getting your files back.
Data that is lost due to accidental deletion usually goes to the Recycle Bin first. However, on USB pen drive, files are immediately tagged as permanently deleted if you didn’t manually enabled Recycle Bin.
These permanently deleted files (due to emptying the Recycle Bin, pressing Shift+Delete for deletion, etc.) still exist but are only hidden from your system and marked as free space.
And as you use your device over time, these files will be overwritten by incoming data and internal processes. This is why it’s important to perform data retrieval using data recovery tools as soon as possible. The same can be said for other data losses caused by software issues such as data transfer interruptions, file corruptions, file system errors, and virus infections, among others.
If you need to recover deleted files from a flash drive but the device shows visible signs of physical damage (cracks in the casing, bent connectors, or scratches that affect the structure) do not attempt the DIY methods listed in this article. In this situation, the safest option is to contact a professional data recovery center. These specialists have the tools and expertise required to work on physically damaged USB drives. You can read more about this in Method 4.
How to Recover Deleted Files From a USB
Alright, now that we covered the basics, it’s time to move on to the actual methods that help you recover deleted files from a USB drive. Each method listed below has the same final goal (restoring your lost data), but the process, requirements, and conditions for successful recovery vary. Because of that, we recommend checking all options and choosing the one that fits your specific USB file-deletion scenario.
Method 1: Check the Recycle Bin
By default, deleted files from a USB flash drive do not go to the Recycle Bin. When you delete a file from a removable device, Windows usually marks it as permanently deleted right away. However, if you manually enabled Recycle Bin support for removable drives through the Registry (or if your computer came preconfigured that way), then your flash drive will contain a hidden folder named $RECYCLE.BIN. This folder stores deleted items, just like the regular Recycle Bin on your system drive.
If your USB drive supports Recycle Bin, you can reveal the folder and check whether your deleted files are there:
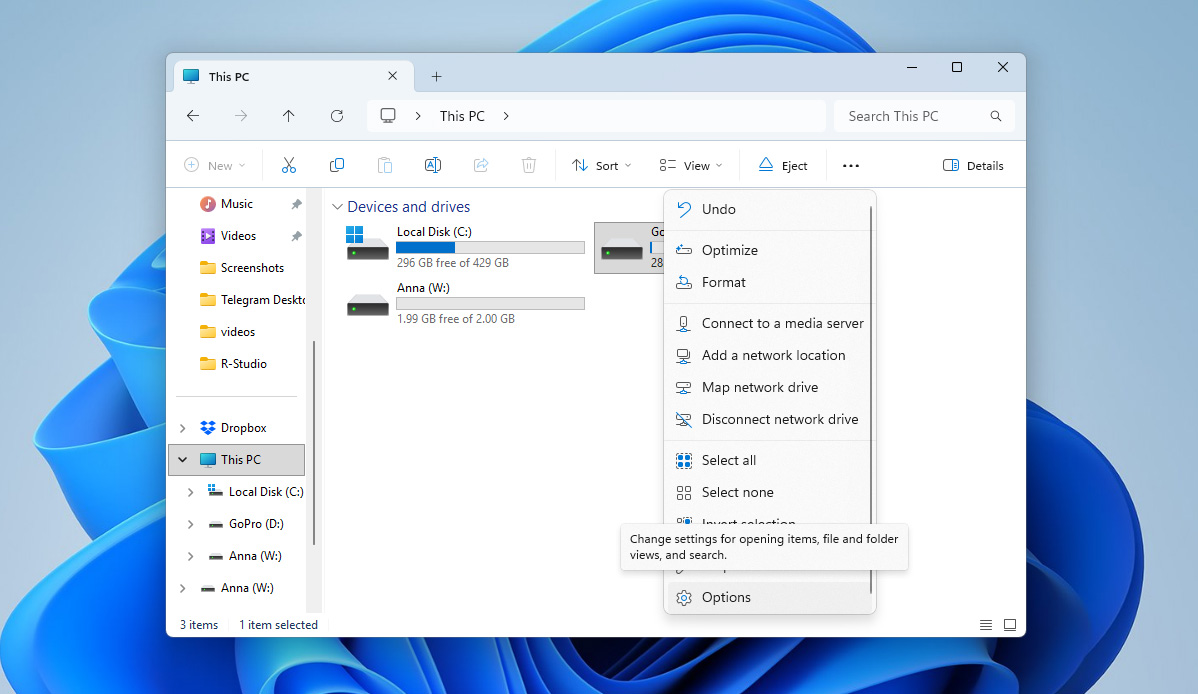
- Open File Explorer and click the three dots in the top menu.
- Select Options, then open the View tab.
- Enable Show hidden files, folders, and drives. Uncheck Hide protected operating system files (recommended).
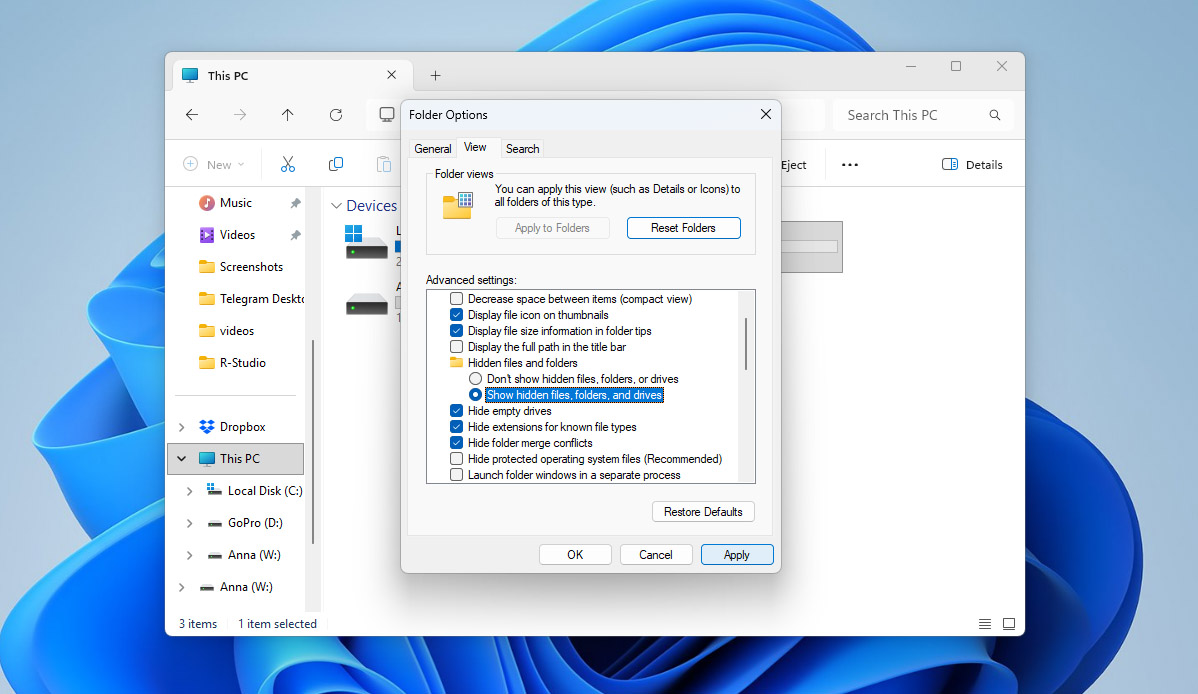
- Confirm the warning prompt. After that, open your USB drive.
You can also click View > Show > Hidden items in File Explorer. If the $RECYCLE.BIN folder exists, this shortcut will make it visible as well.
- If Recycle Bin is enabled on this device, you will see one of these folders: $RECYCLE.BIN, BIN, RECYCLER, or RECYCLED (exact name depends on the file system).
Open the folder, locate your deleted files, and drag them to any safe location on your computer.
If you used your USB flash drive on multiple operating systems and deleted files while on macOS, the deleted items may be stored inside another hidden folder, named .Trashes, located in the root of the drive. To view its contents, repeat the same visibility steps listed above.
If Recycle Bin (or .Trashes on macOS) was never configured on your USB flash drive, these folders will not exist. In that case, proceed to the next methods in this guide to find an alternative way to recover deleted files from your USB flash drive.
Method 2: Use a USB Data Recovery Program
If your USB flash drive doesn’t have a Recycle Bin, you will need a data recovery tool to restore deleted files. A program like Disk Drill (one of the best in this area) scans the file system of your device (in this case, the USB flash drive) and searches for lost data in two stages. First, it attempts to locate files through file system metadata. If that information is missing or damaged, it switches to a signature-based search to detect file patterns directly on the drive. This layered algorithm allows Disk Drill to recover files under almost any deletion scenario. You also don’t need to be a computer expert to use Disk Drill effectively. Its interface is intuitive and user-friendly, so the entire recovery process comes down to just a few simple clicks.
To recover deleted files from a USB drive:
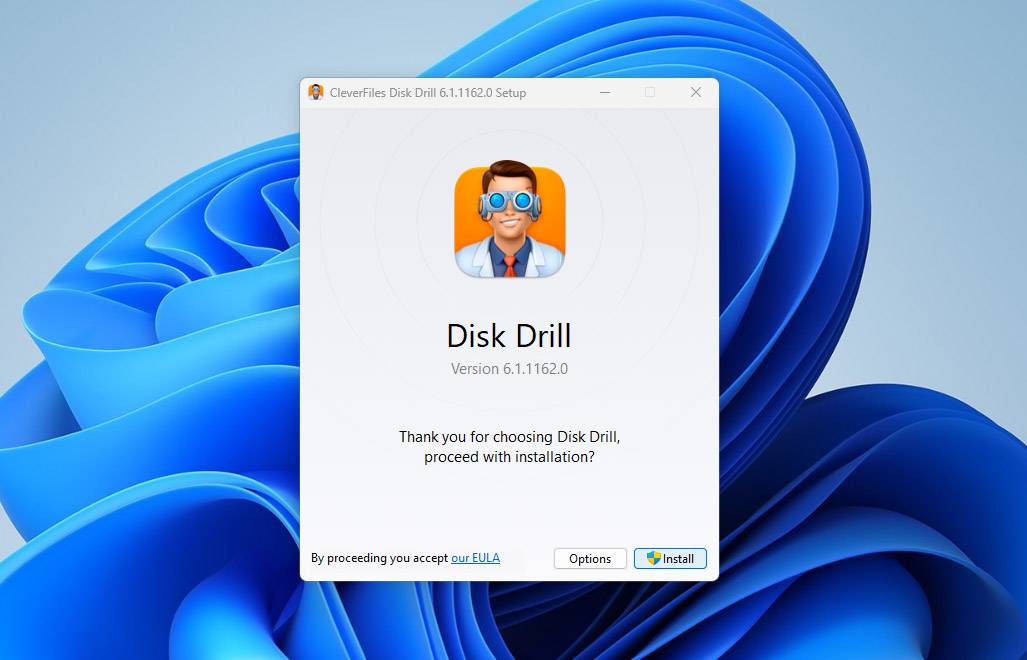
- Download and install Disk Drill on your computer. During installation, the system will ask for administrator credentials. Disk Drill may also request permission changes in System Preferences so the software can access storage devices properly. Follow the on-screen prompts, the installer guides you through every step.
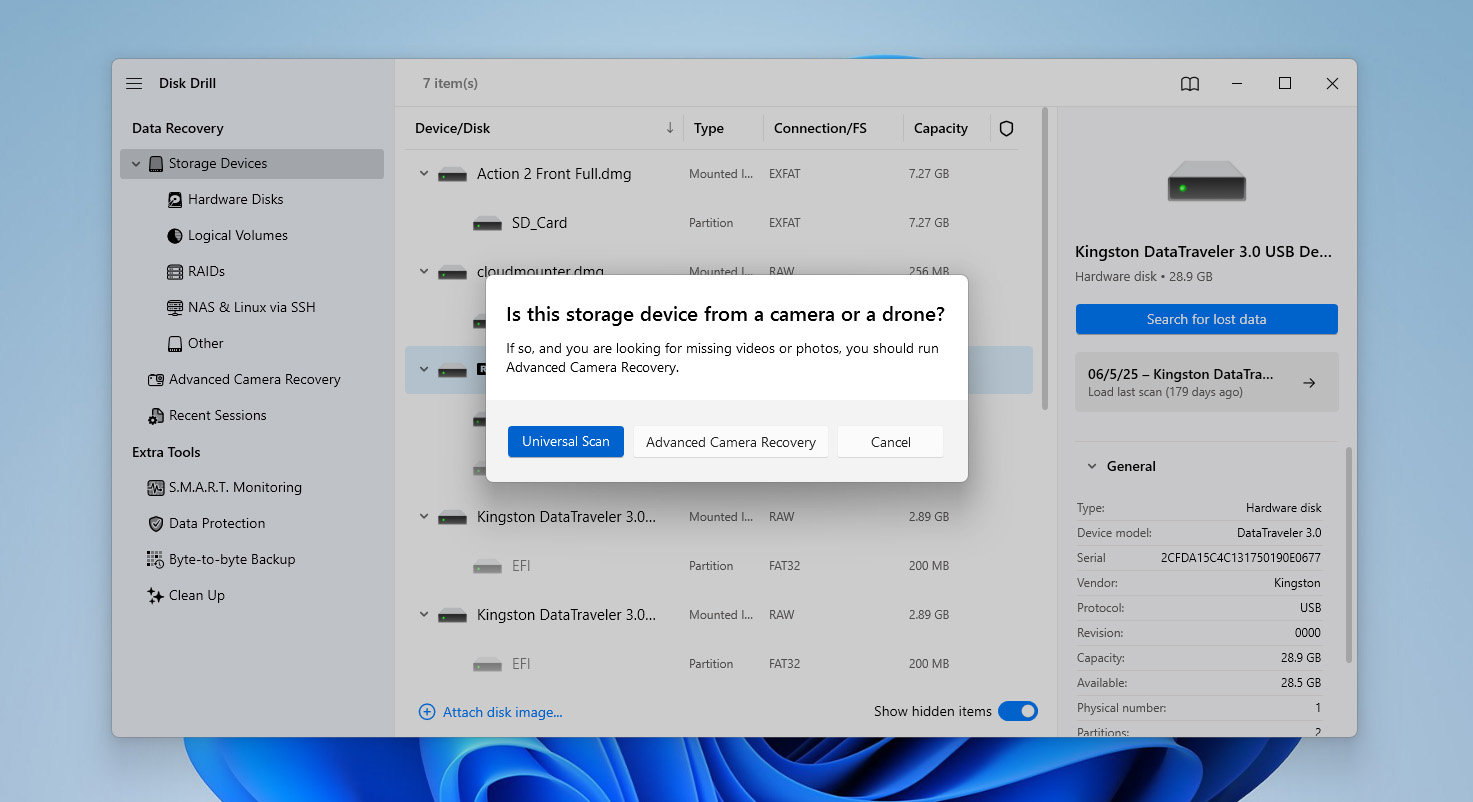
- Connect your USB flash drive. Make sure the operating system detects it. If the drive doesn’t appear, resolve the connection issue first. When the flash drive shows up, launch Disk Drill and select it from the list of available devices and click Search for lost data.

- Disk Drill will offer two scan types: Universal and Advanced Camera Recovery. Choose Universal – it is designed for general USB data recovery. (Advanced Camera Recovery is meant for restoring fragmented video files from camera or drone SD cards, so it’s not suitable for this scenario.)
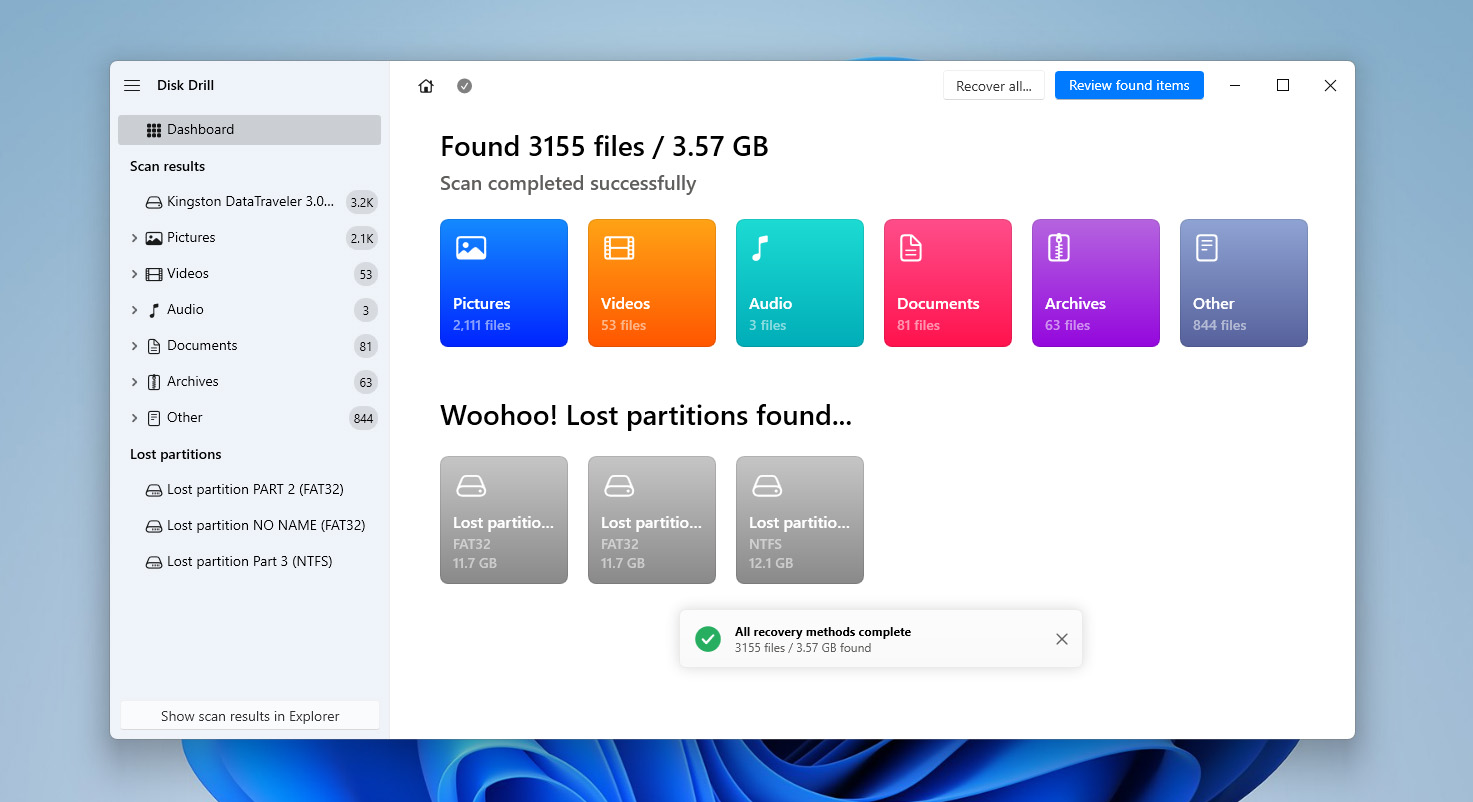
- You can view results in real time, but it’s better to allow the scan to finish. Once completed, Disk Drill will show recovery chances for each file so you know which items are likely to be restored successfully.
- You can browse results by category (Pictures, Video, Audio, Documents, Archives) or click Review found items, where you can apply filters such as file extension, modification date, size, and more.
- If a filename doesn’t help you identify the content, use the Preview feature. Double-click the file or click the eye icon to see what’s inside before recovering it.
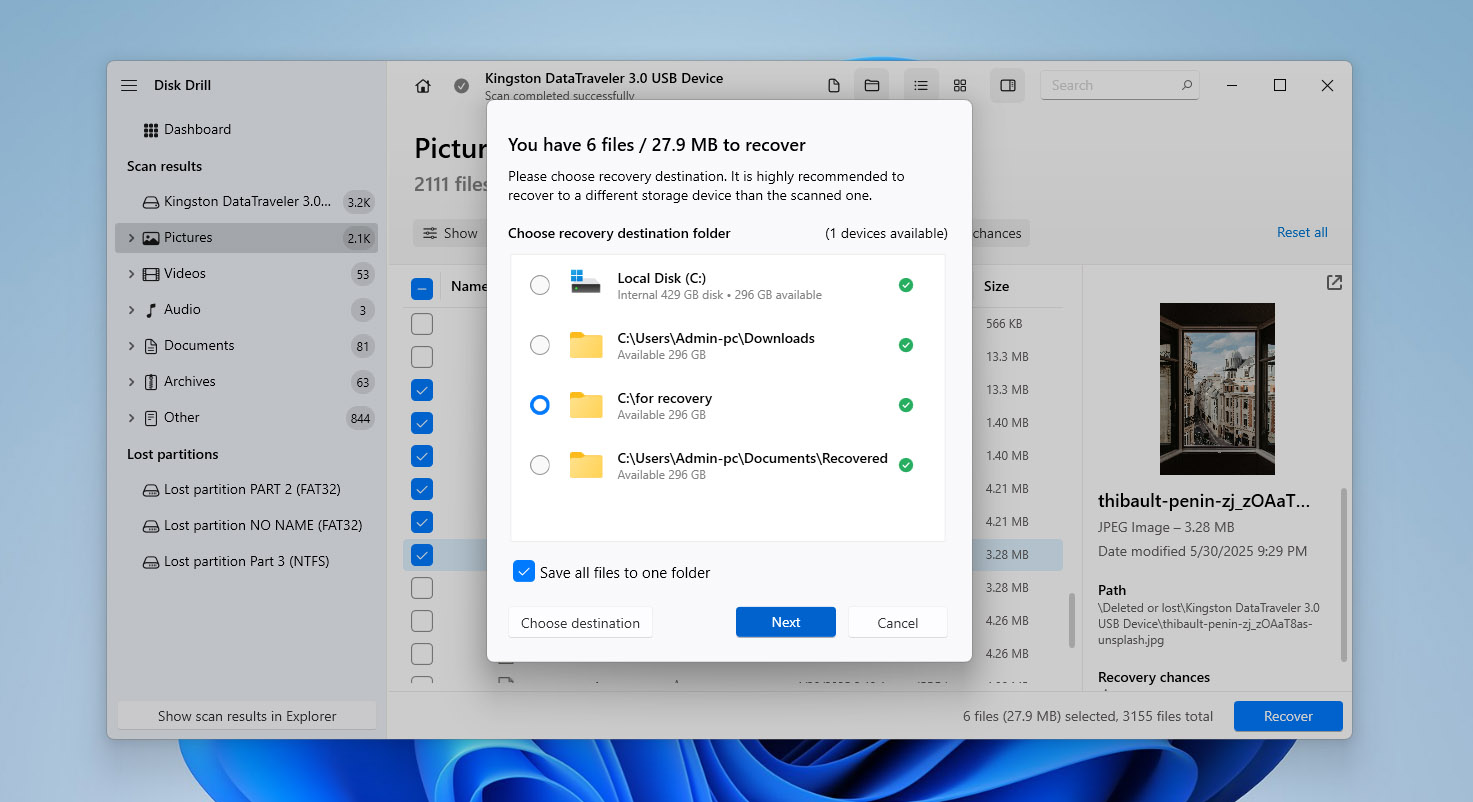
- Place checkmarks next to the necessary items and click the Recover button in the bottom-right corner.

- Disk Drill will ask where to save the restored files. Do not save them back to the same USB flash drive (this may overwrite the very data you’re trying to recover). Pick any folder on your system drive, or connect an external SSD, HDD, or another flash drive. Click Next and let Disk Drill complete the process.
You can take advantage of the free trial version of Disk Drill which allows you to restore up to 100 MB of data without the need to upgrade the software. The free version also lets you use the data protection features of the application. It’s a great way to recover deleted files from a flash drive and see the power and utility of this valuable software tool.
Method 3: Recover Files From a Backup
If you want to recover deleted files from a USB without software, this is only possible if you previously enabled File History and have a valid backup. File History automatically backs up files stored in user directories such as Documents, Desktop, Pictures, Videos, Music, and other libraries that you added manually.
However, this has one major limitation, as most users never back up their USB flash drives directly, because they use them as temporary or portable storage. In many cases, the USB drive never becomes part of File History’s backup locations. Still, there is one exception. Many users transfer files from a flash drive to their PC or laptop, and those copied files may end up in the backed-up folders mentioned above. This means that even if the USB itself wasn’t backed up, the files you previously moved to your computer might exist in a File History snapshot.
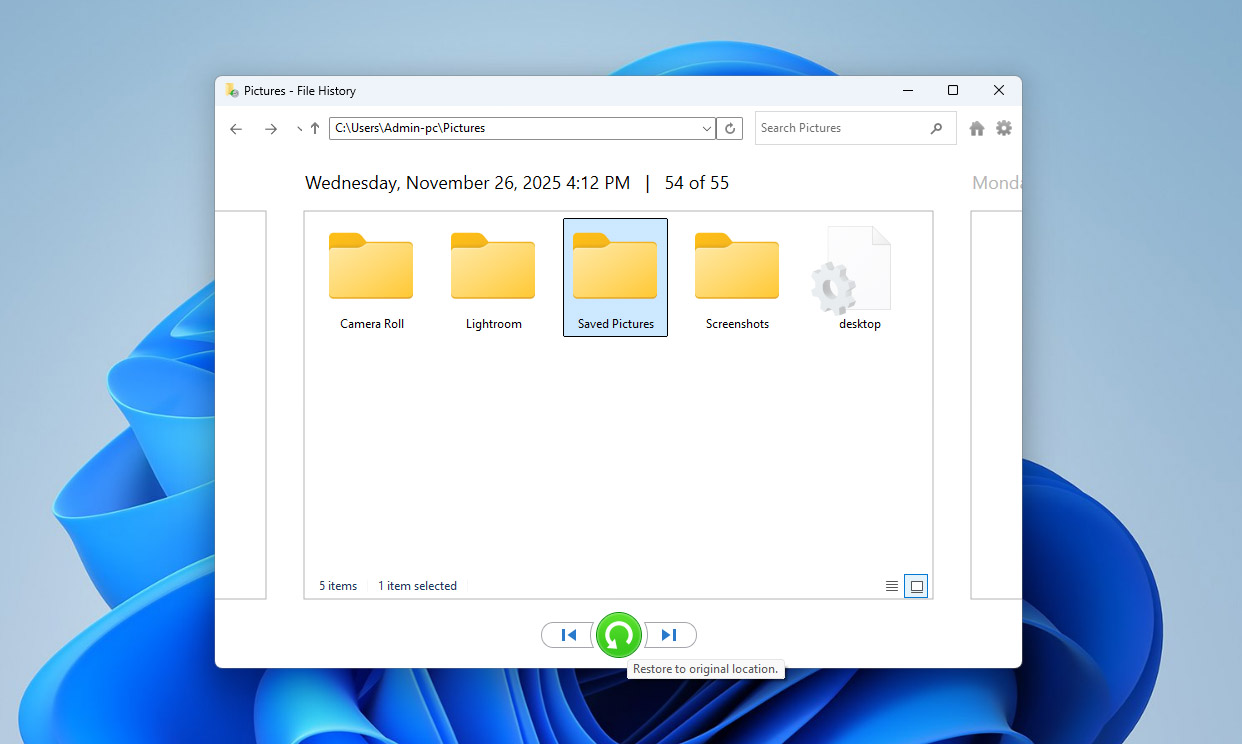
If this sounds like your situation, you can try recovering your data through the File History backup:
- Make sure the external HDD, SSD, or network location that stores your File History backups is plugged in and accessible. Without it, Windows won’t be able to show your files.
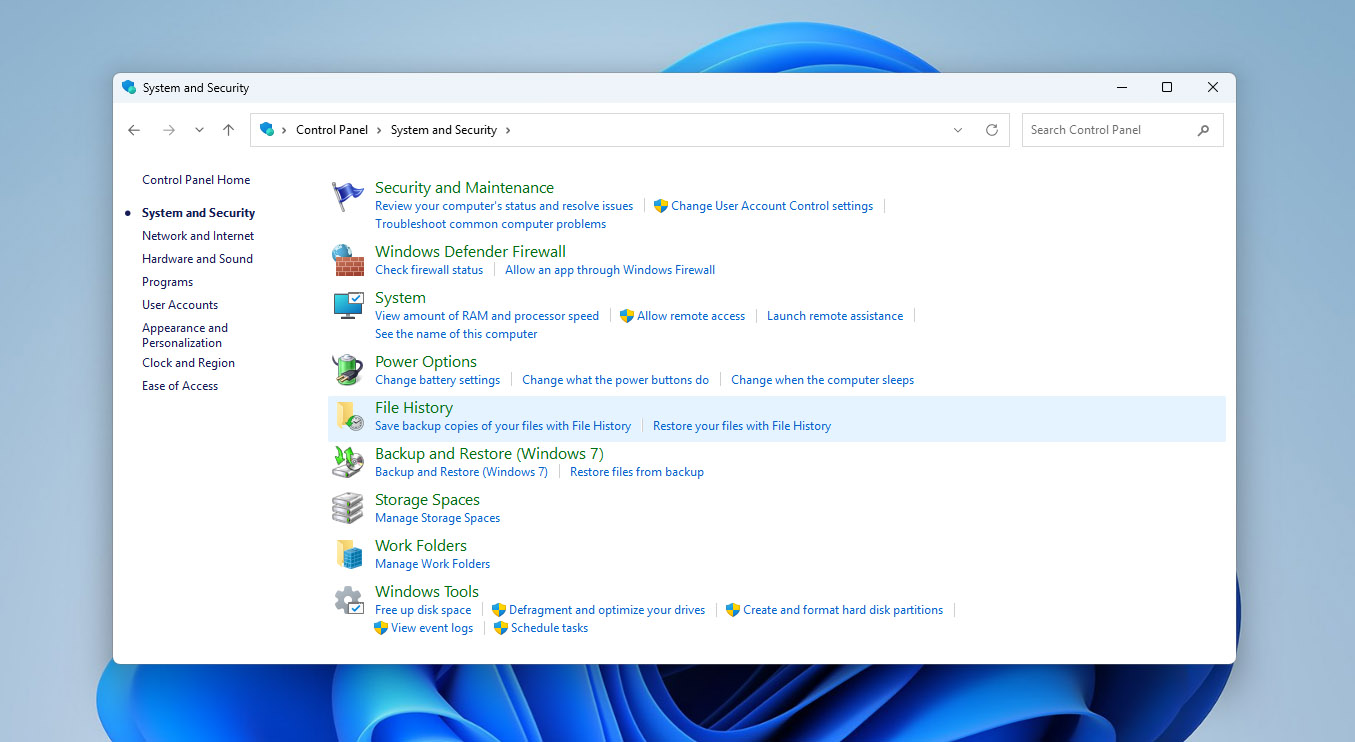
- Open the Start Menu, type Control Panel and launch it.
- Go to System and Security and click File History.
- In the left sidebar, click Restore personal files. This will open the interface that displays all folders and items backed up by File History.
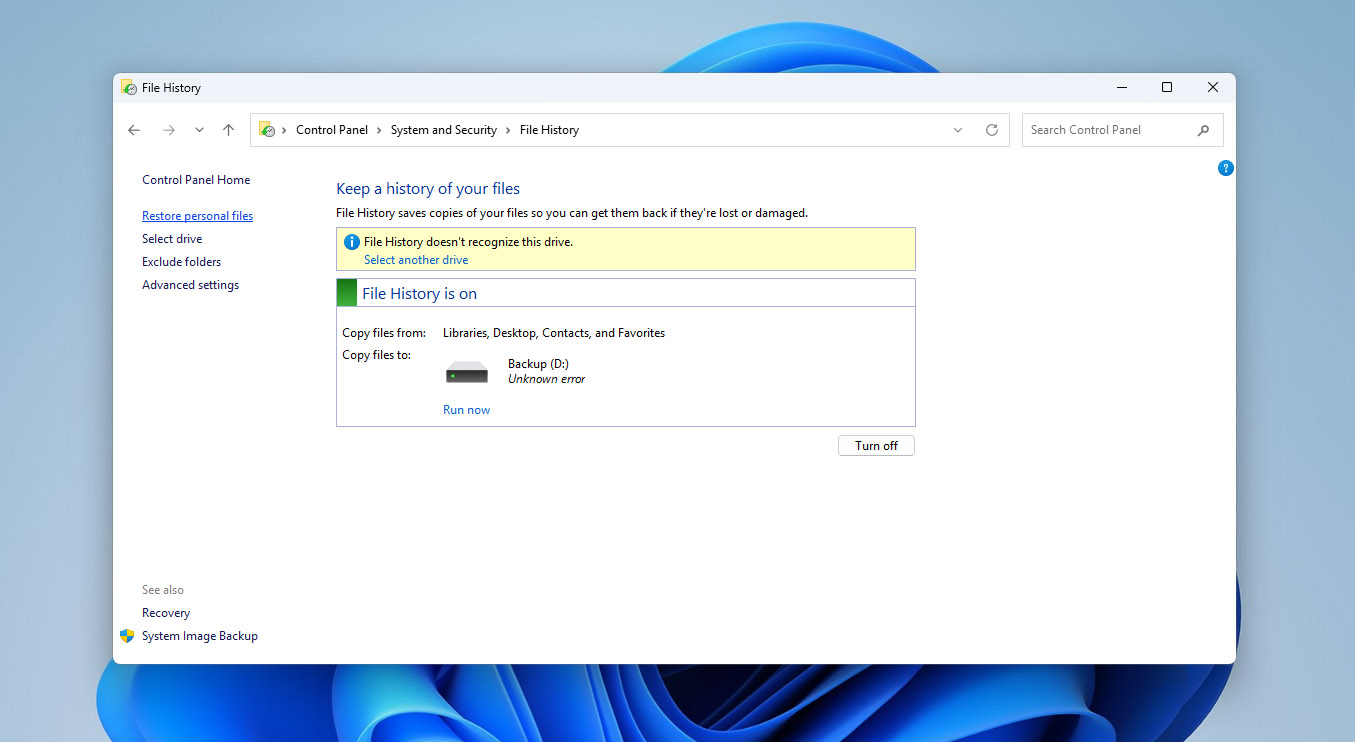
- Browse the folders (Documents, Desktop, Pictures, etc.) to locate the files you want to recover. Use the arrows at the bottom to switch between different backup versions (dates).
- Select the file or folder you want to recover and click the green Restore button at the bottom. The item will be restored to its original location. If a file with the same name already exists, Windows will offer options to replace it, skip it, or save both versions.
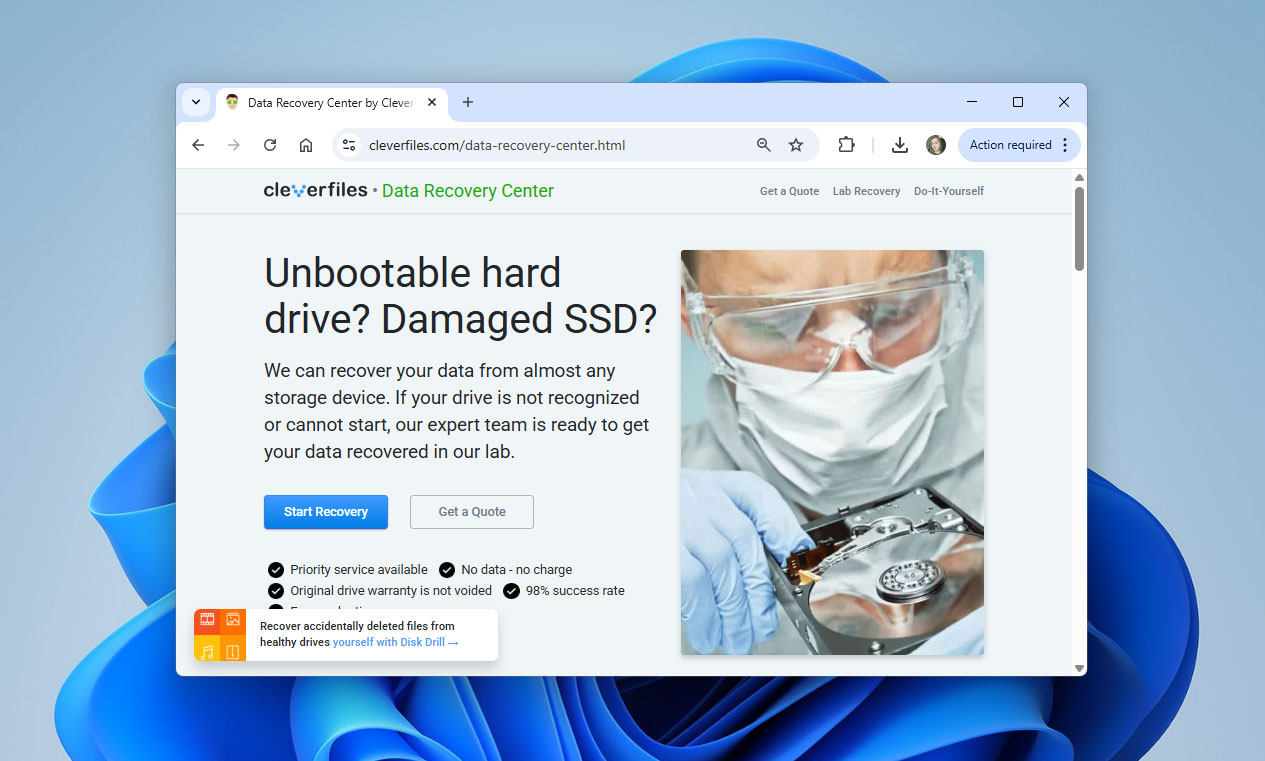
Method 4: Engage a Data Recovery Center
If your USB flash drive is broken, shows clear signs of physical damage, isn’t recognized by your computer at all, or you simply prefer not to deal with the recovery process yourself, then the only real option left is to use a professional data recovery center. These services have the specialized equipment and expertise required to work with USB drives.
Still, it’s important to choose a provider you trust, for example, CleverFiles Data Recovery Center, which follows a no-data-no-charge policy if your deleted files cannot be recovered (unfortunately, that scenario is also possible, because recovery engineers are skilled professionals, not magicians, and data recovery isn’t always possible).
Since every recovery service operates differently, we cannot provide exact step-by-step instructions. However, the general process usually looks like this:
- Choose a data recovery center based on reputation, reviews, certifications, and overall transparency.
- Contact the service and schedule an initial consultation. During this stage, you describe what happened to your USB flash drive. This can typically be done through a website form, mobile app, or phone call.
- Receive confirmation on whether they can take your case, along with a price estimate. Be prepared that professional recovery often costs several hundred dollars. You will also get instructions on how to safely ship or deliver your USB drive.
- Wait for the assessment and recovery attempt. Once they receive the device, the engineers will perform the recovery and extract whatever data is possible.
- Get your restored files on a new storage device or through a secure cloud download link.
Conclusion
As you can see, recovering deleted files from a USB flash drive is absolutely possible. Since several recovery methods depend on prior system settings (which most users never configure) and a bit of luck, using a dedicated data recovery tool like Disk Drill remains the most reliable option. The most important rules are to avoid using the flash drive after data loss and to start the scan as quickly as possible. We hope this guide helped you, and hopefully, this will be the first and last time you need it.
If you want to avoid going through the USB data recovery process again, consider a few simple habits:
- Avoid deleting files impulsively. Create a temporary “To Delete” folder and move doubtful files there first. Review them later when you have time.
- Keep backups. Yes, it sounds basic, but it works. Store copies of your important files on your computer, an external storage device, or use third-party tools to create full drive images as an extra safety layer.
If this guide was helpful, feel free to leave a comment and share which method worked for you. And if you still have questions, ask them too. We also recommend checking the other sections of our website. We have guides not only for USB flash drives but also for SD cards, external hard drives, and both Windows and macOS systems.


