 Losing your files is never a pleasant experience, especially if an antivirus program is what caused it. If you use Avast Antivirus, you’ll likely be able to restore your files from the Avast quarantine folder. We’ll also guide you through other ways to get back your files, using easy-to-use methods.
What is the Avast Virus Chest (Quarantine) and How It Works
The Avast Virus chest is the place where suspicious and potentially infected files are quarantined. All quarantined files are isolated from the computer, which means no process, virus, or program can access them. This prevents malware from spreading on your computer. Files moved to the Avast Virus Chest are renamed and encrypted.
The address of the Avast Virus Chest on your computer is C:\ProgramData\AVAST Software\Avast\chest.
Avast moves a file to its Virus Chest based on two scan types:
- Signature Scan: This checks the file signature of a file and compares it to its existing database of malware file signatures. If there’s a match, the file is moved to the Avast Virus chest. Signature scanning is sometimes also called the traditional scan.
- Heuristic scan: This scan type detects viruses that may not be in the database. It uses various criteria to determine if a file is attempting to perform a potentially harmful activity. For example, overwriting the Master Boot Record (MBR). Therefore, a heuristic scan can detect new viruses, but there’s a high likelihood of it returning false positives, i.e., flagging safe files as malware.
How to Recover Quarantined Files from Avast
It’s important to confirm that the file you wish to restore from the Avast Virus Chest is actually safe. If you downloaded the file from an untrustworthy source, it’s best to let it be quarantined and search for a safe alternative instead.
If you’re sure of its safety, here’s how you can restore a file from the Avast Virus Chest:
- The easiest way of accessing the Avast Virus Chest is by right-clicking on the Avast icon in the System Tray and choosing Quarantine. You can also access the Virus Chest by opening the Avast Antivirus dashboard, then clicking on Protection > Quarantine.
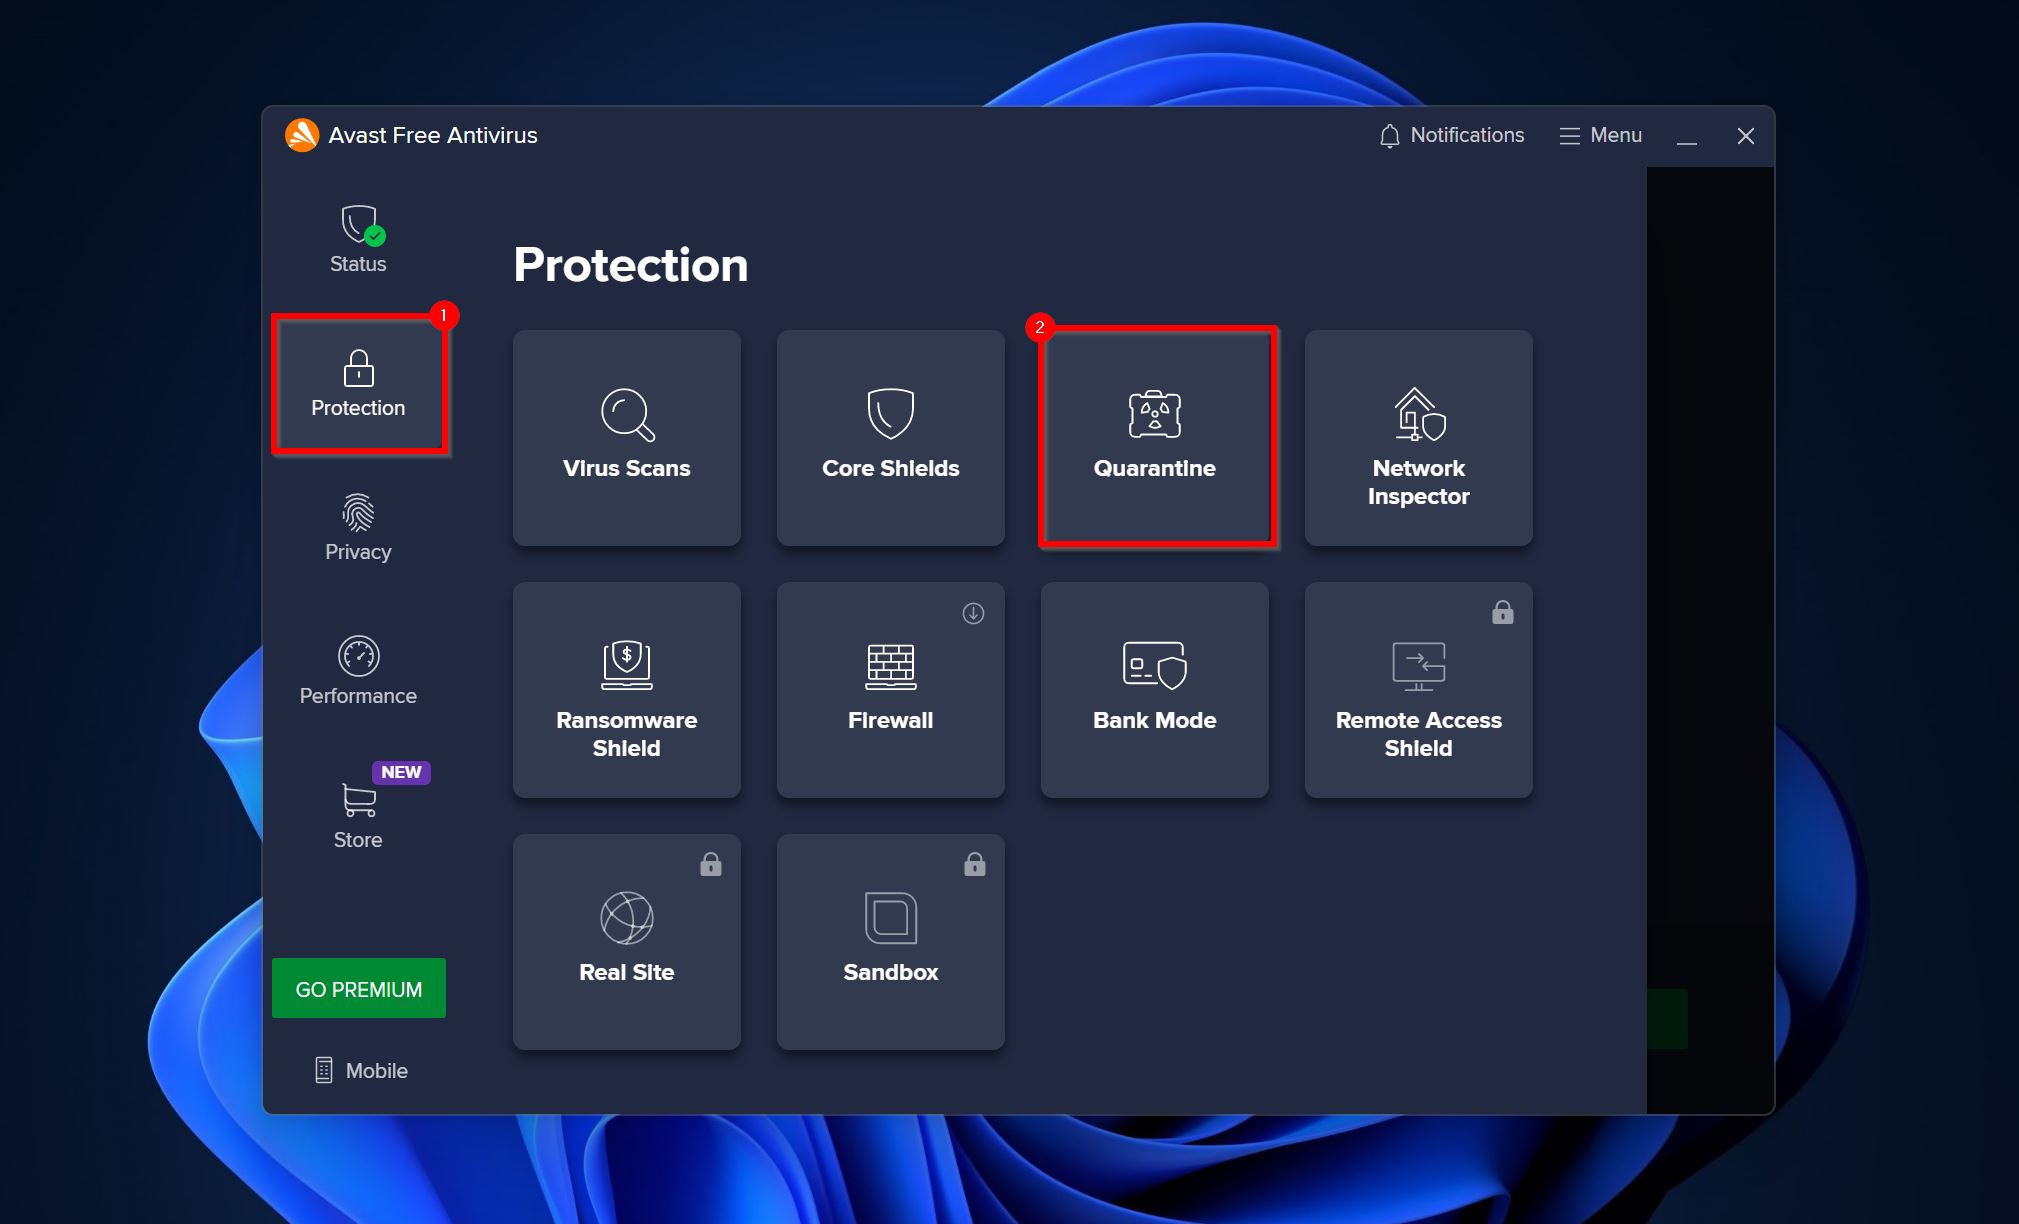
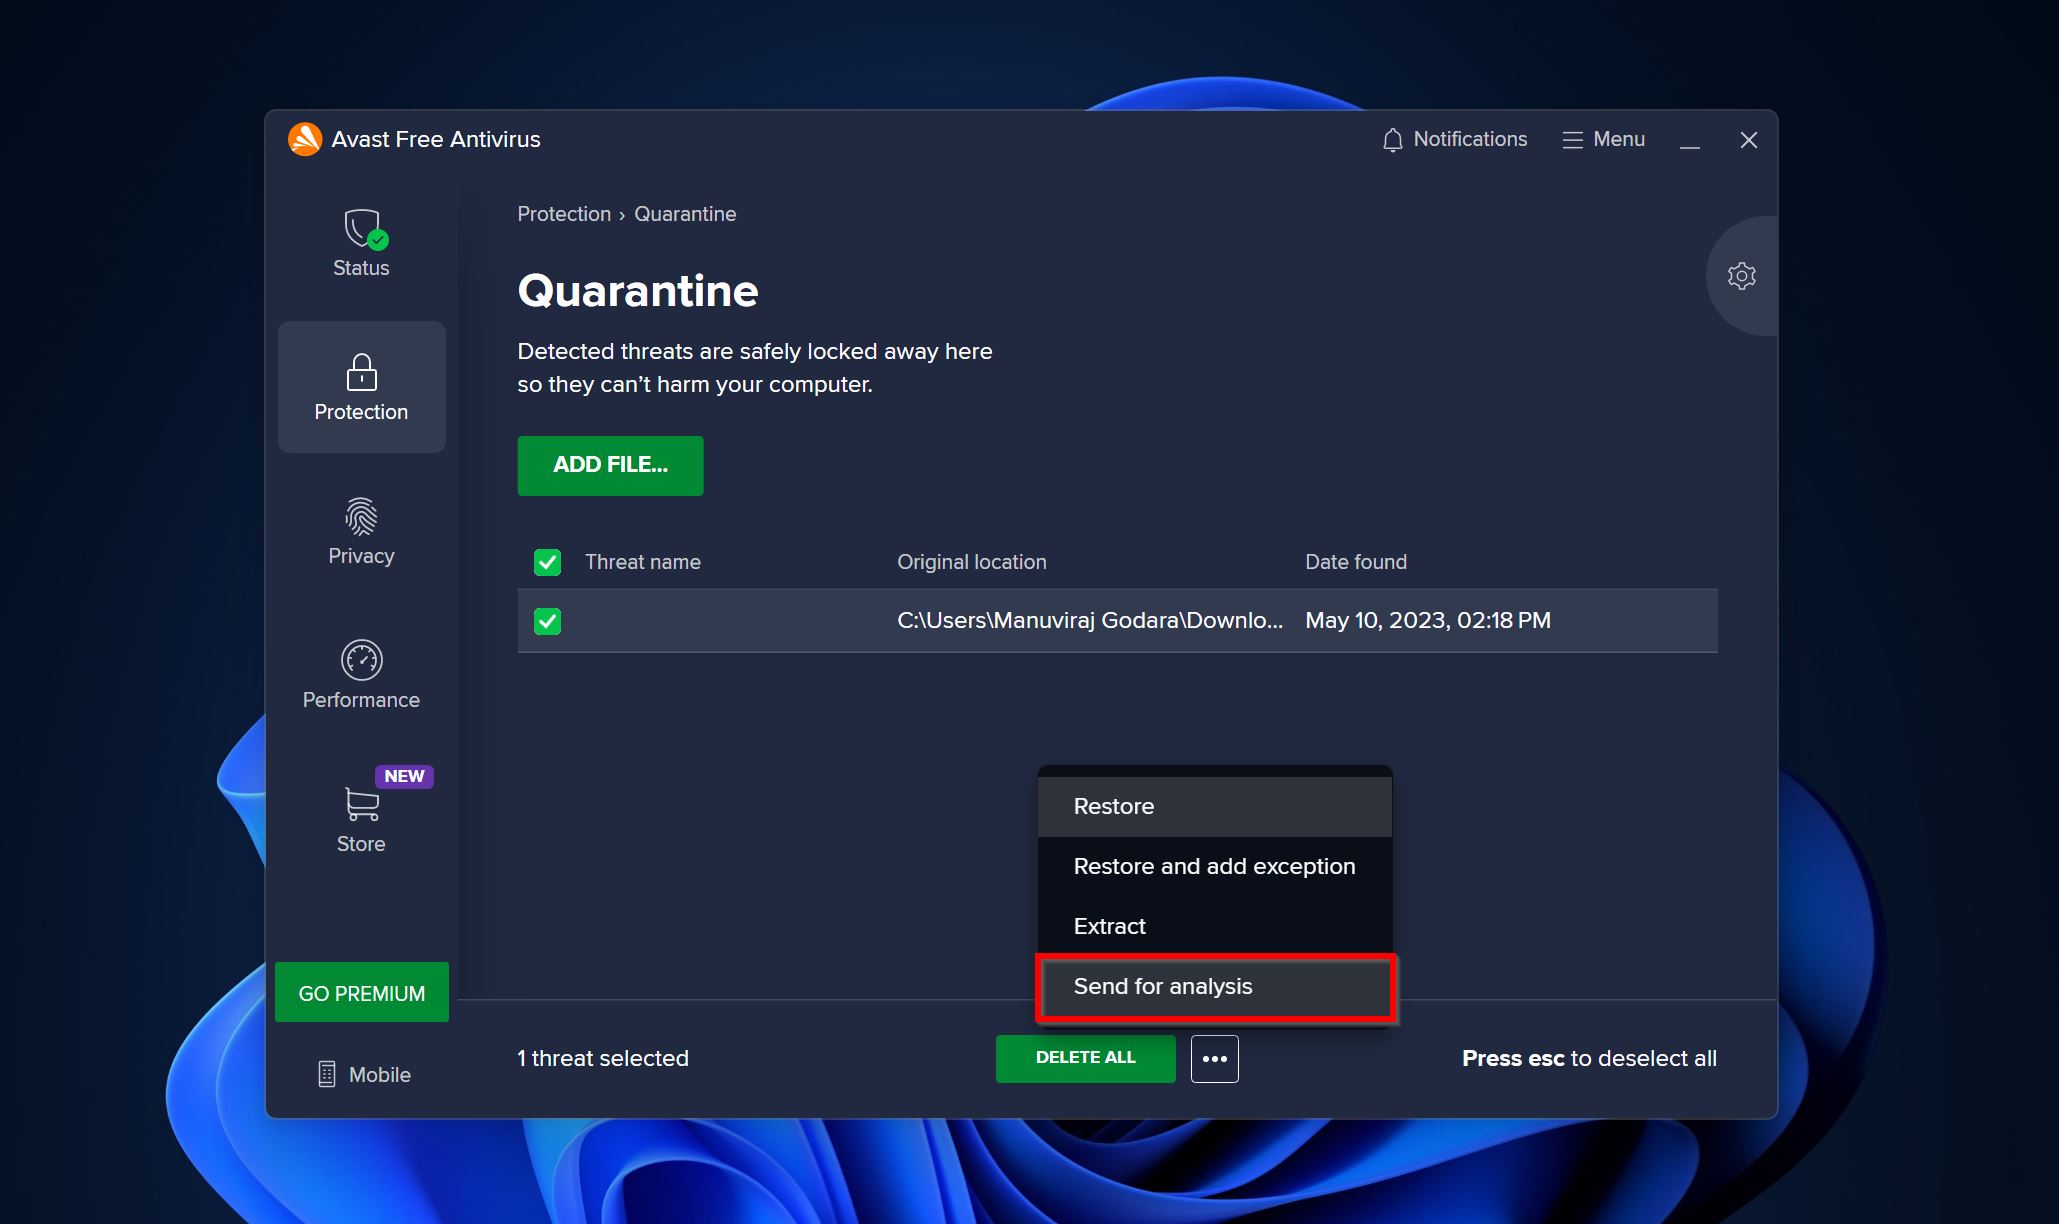
- Select the files you wish to restore and click on the three dots next to the Delete All button.
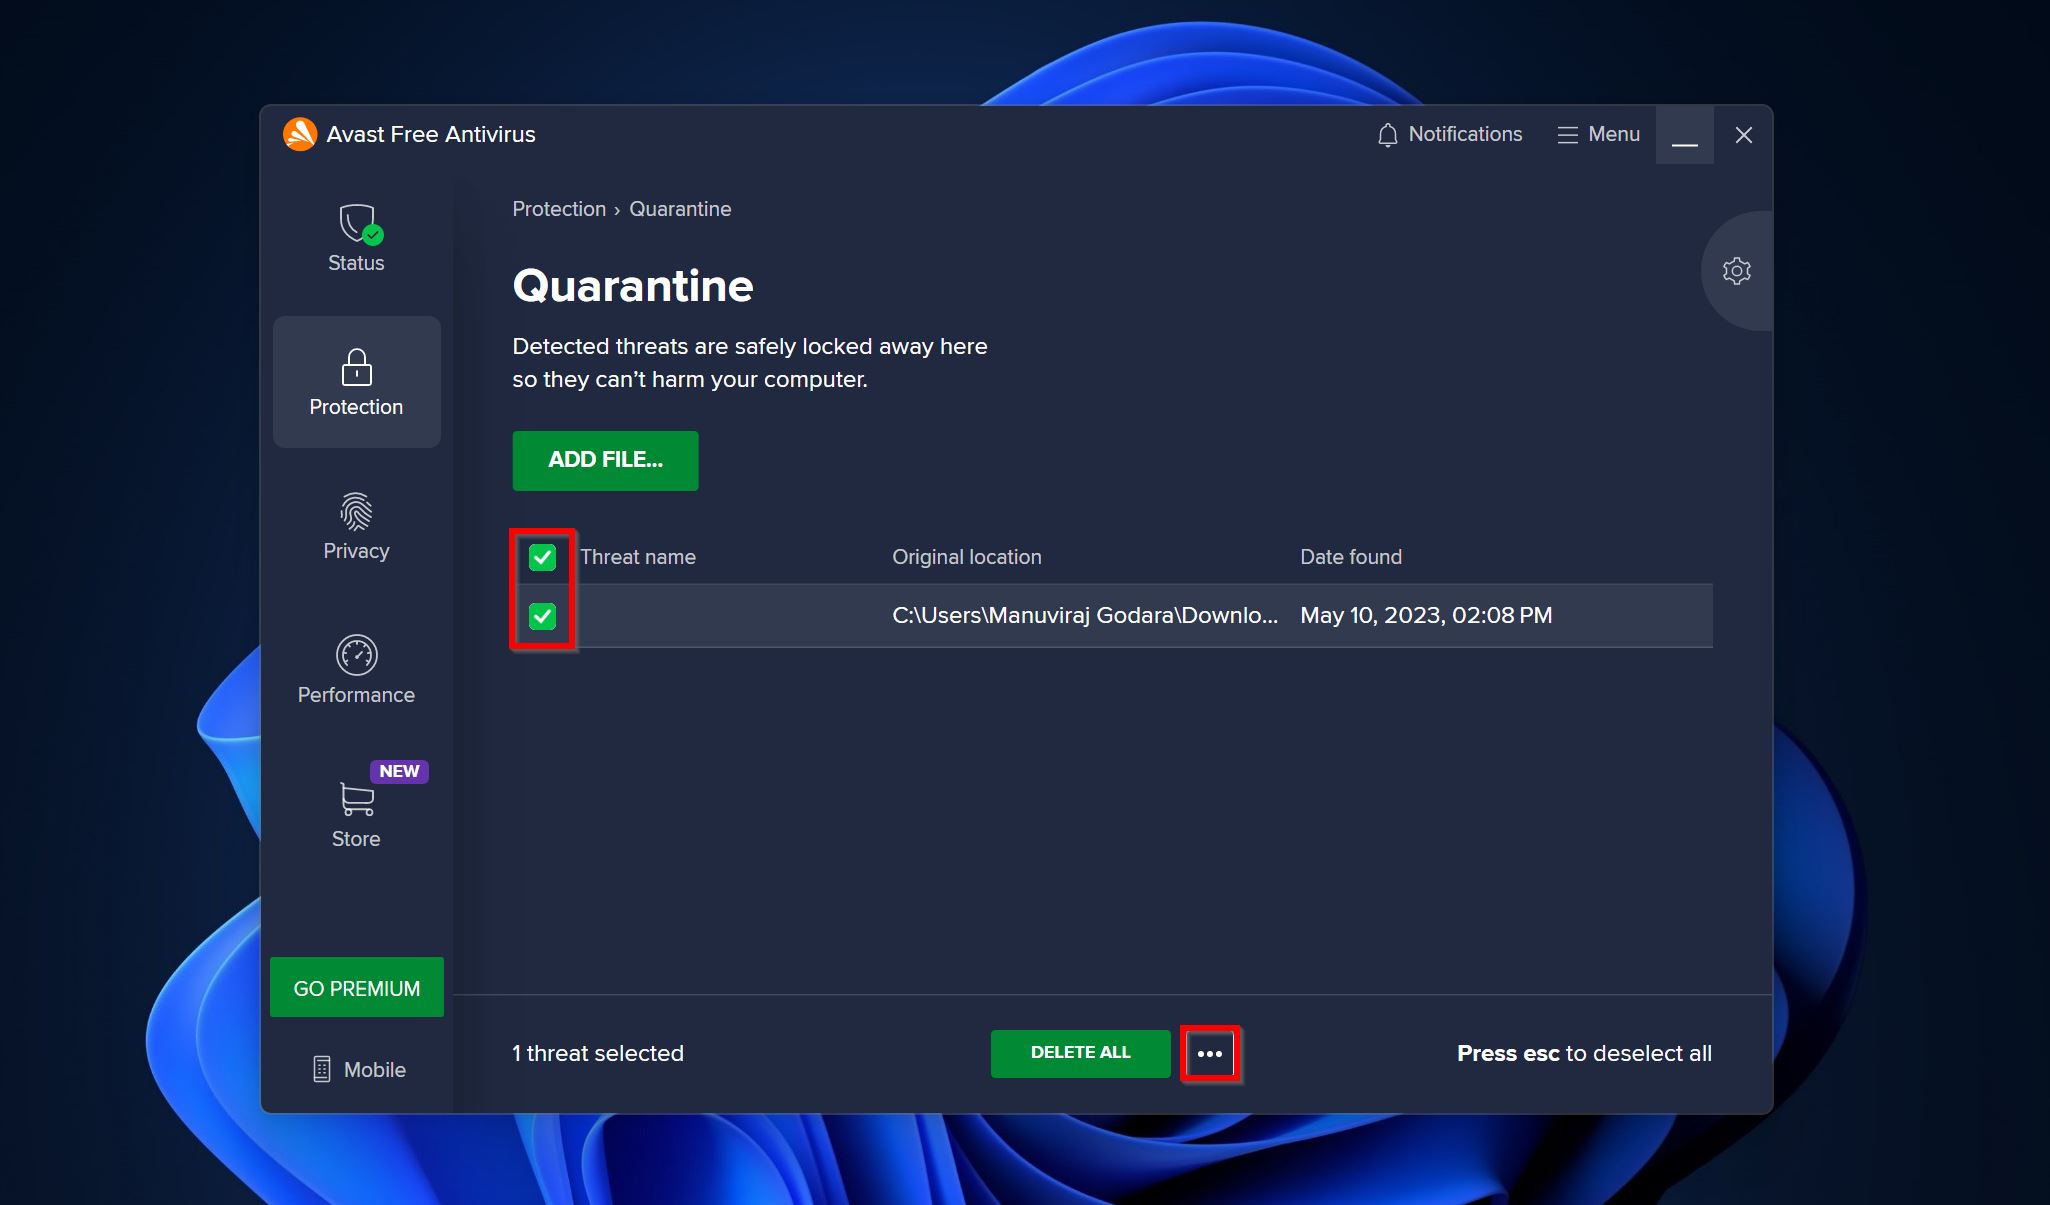
- Here, you can restore it using one of these three options–
- Restore: Removes the file from quarantine and moves it to its original location.
- Restore and add exception: Restores the file to its original location, and also adds an exception for it in future scans.
- Extract: This moves the file to a location of your choice.
- Choose the desired option and Avast will move the file out of the quarantine folder.
How to Recover Files Deleted from the Avast Virus Chest
There are times when Avast may delete suspicious files instead of moving them to quarantine. If you’re unable to locate the desired files in the Avast Virus Chest, they’ve likely been deleted permanently. If you notice that Avast removed your files from the Chest, you can still recover them using a cloud backup, or a data recovery program.
We’ll take a look at both these methods below:
Method 1: Use Data Recovery Software
There are numerous data recovery programs on the web that can help you restore deleted files. Not all of them are worth your time and money. It’s important to select a program that is easy to use, has a proven track record, and works with a variety of file types and file systems.
One program that checks all these boxes, is Disk Drill. It has an intuitive interface that delivers a comfortable experience for new and expert users alike. With support for over 400 file formats, it’s likely that Disk Drill will be able to discover files that other programs may not. The advanced data recovery algorithm can recover files from various storage device types – HDDs, SSDs, USB drives, SD cards, and more.
Here’s how you can use Disk Drill to recover files that Avast deleted from its Virus Chest:
- Download Disk Drill and install it.
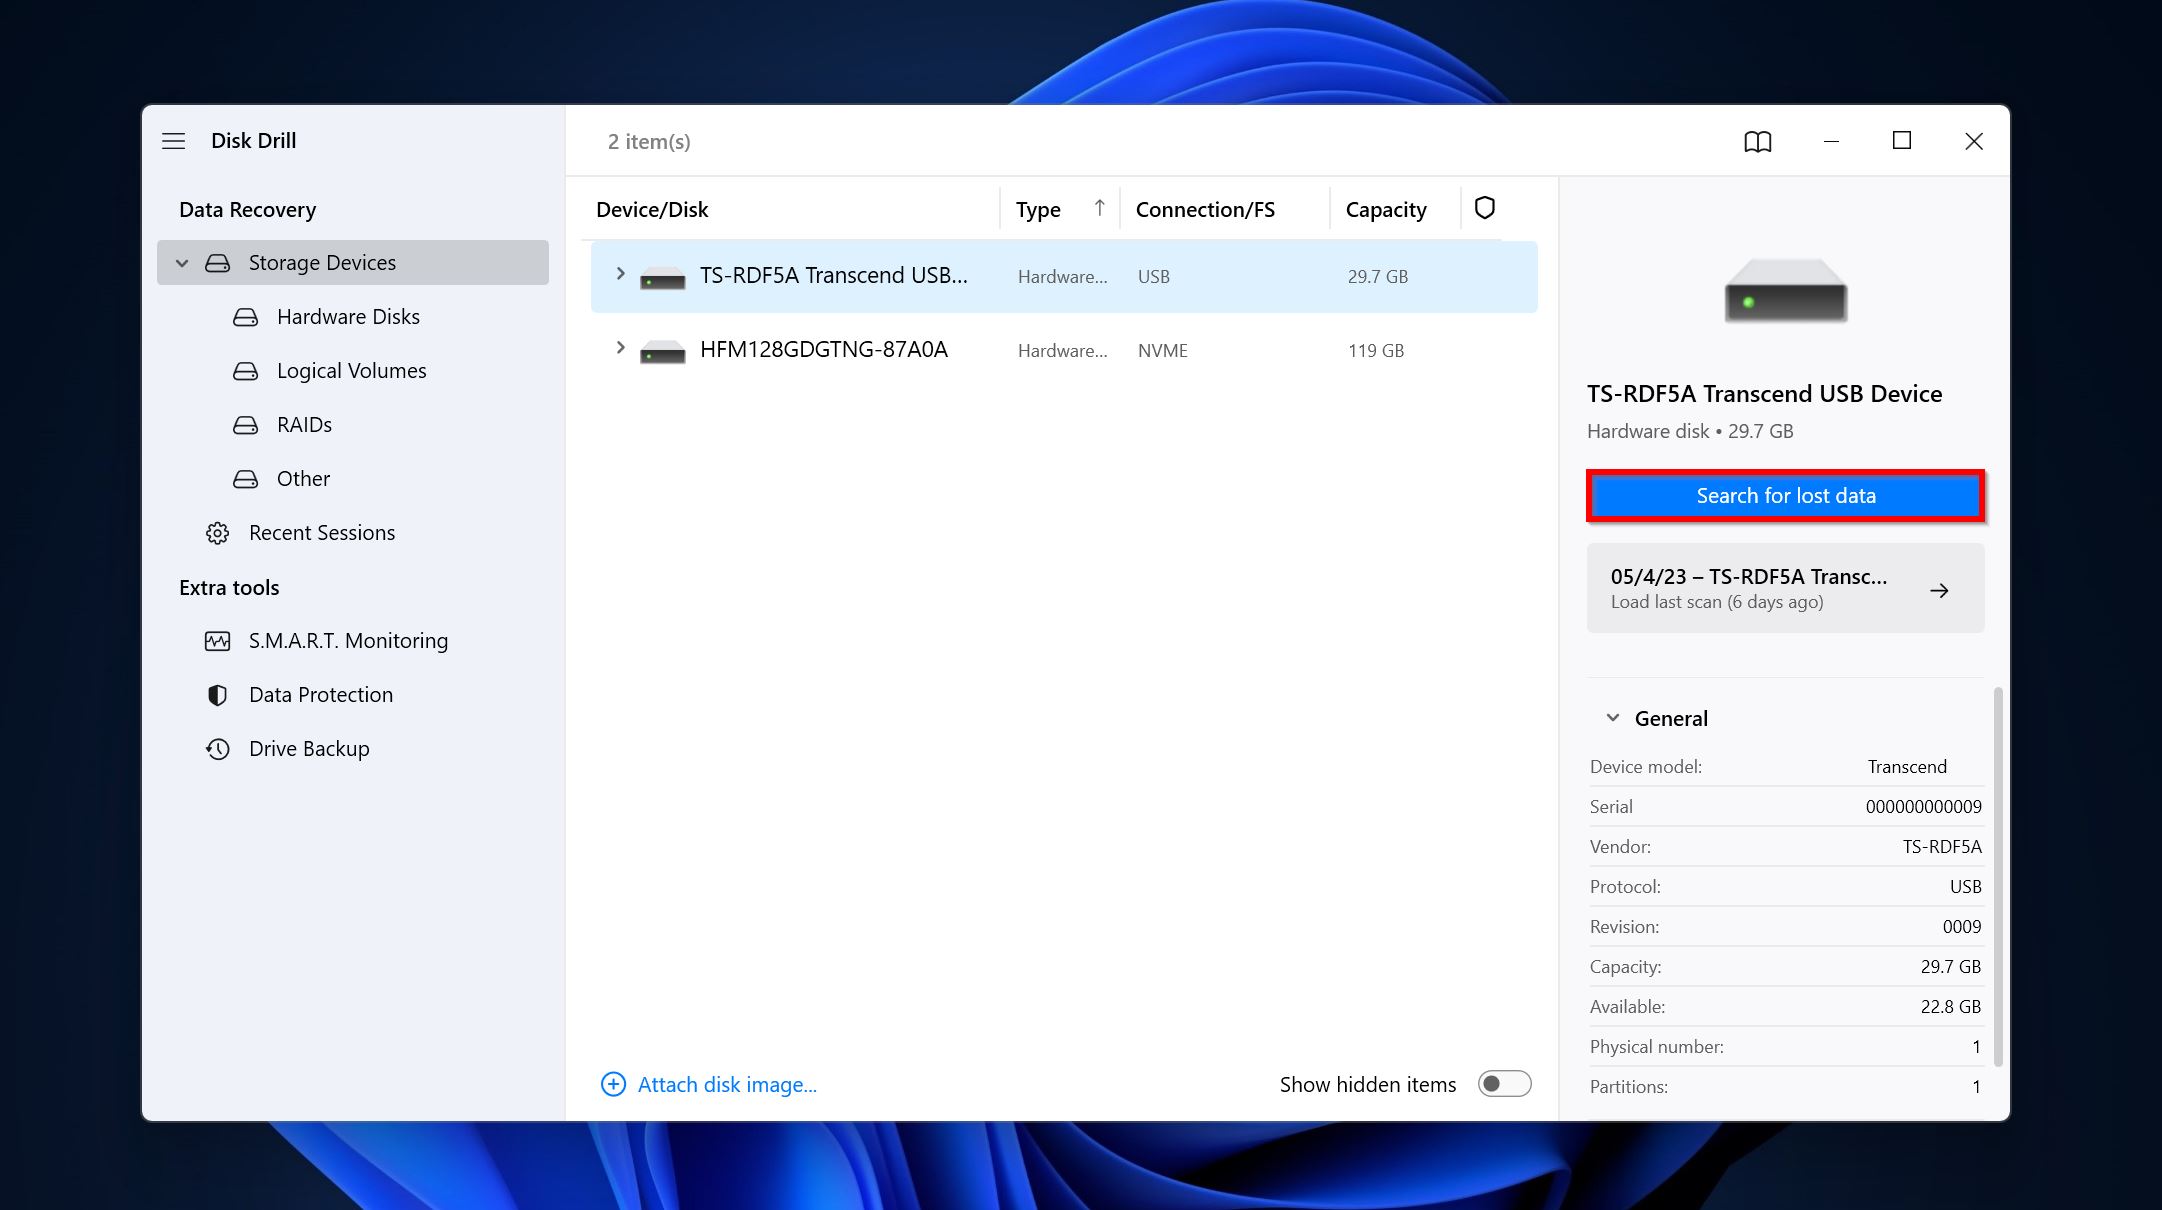
- Open Disk Drill, select the drive which contained the files Avast deleted, and click Search for lost data.
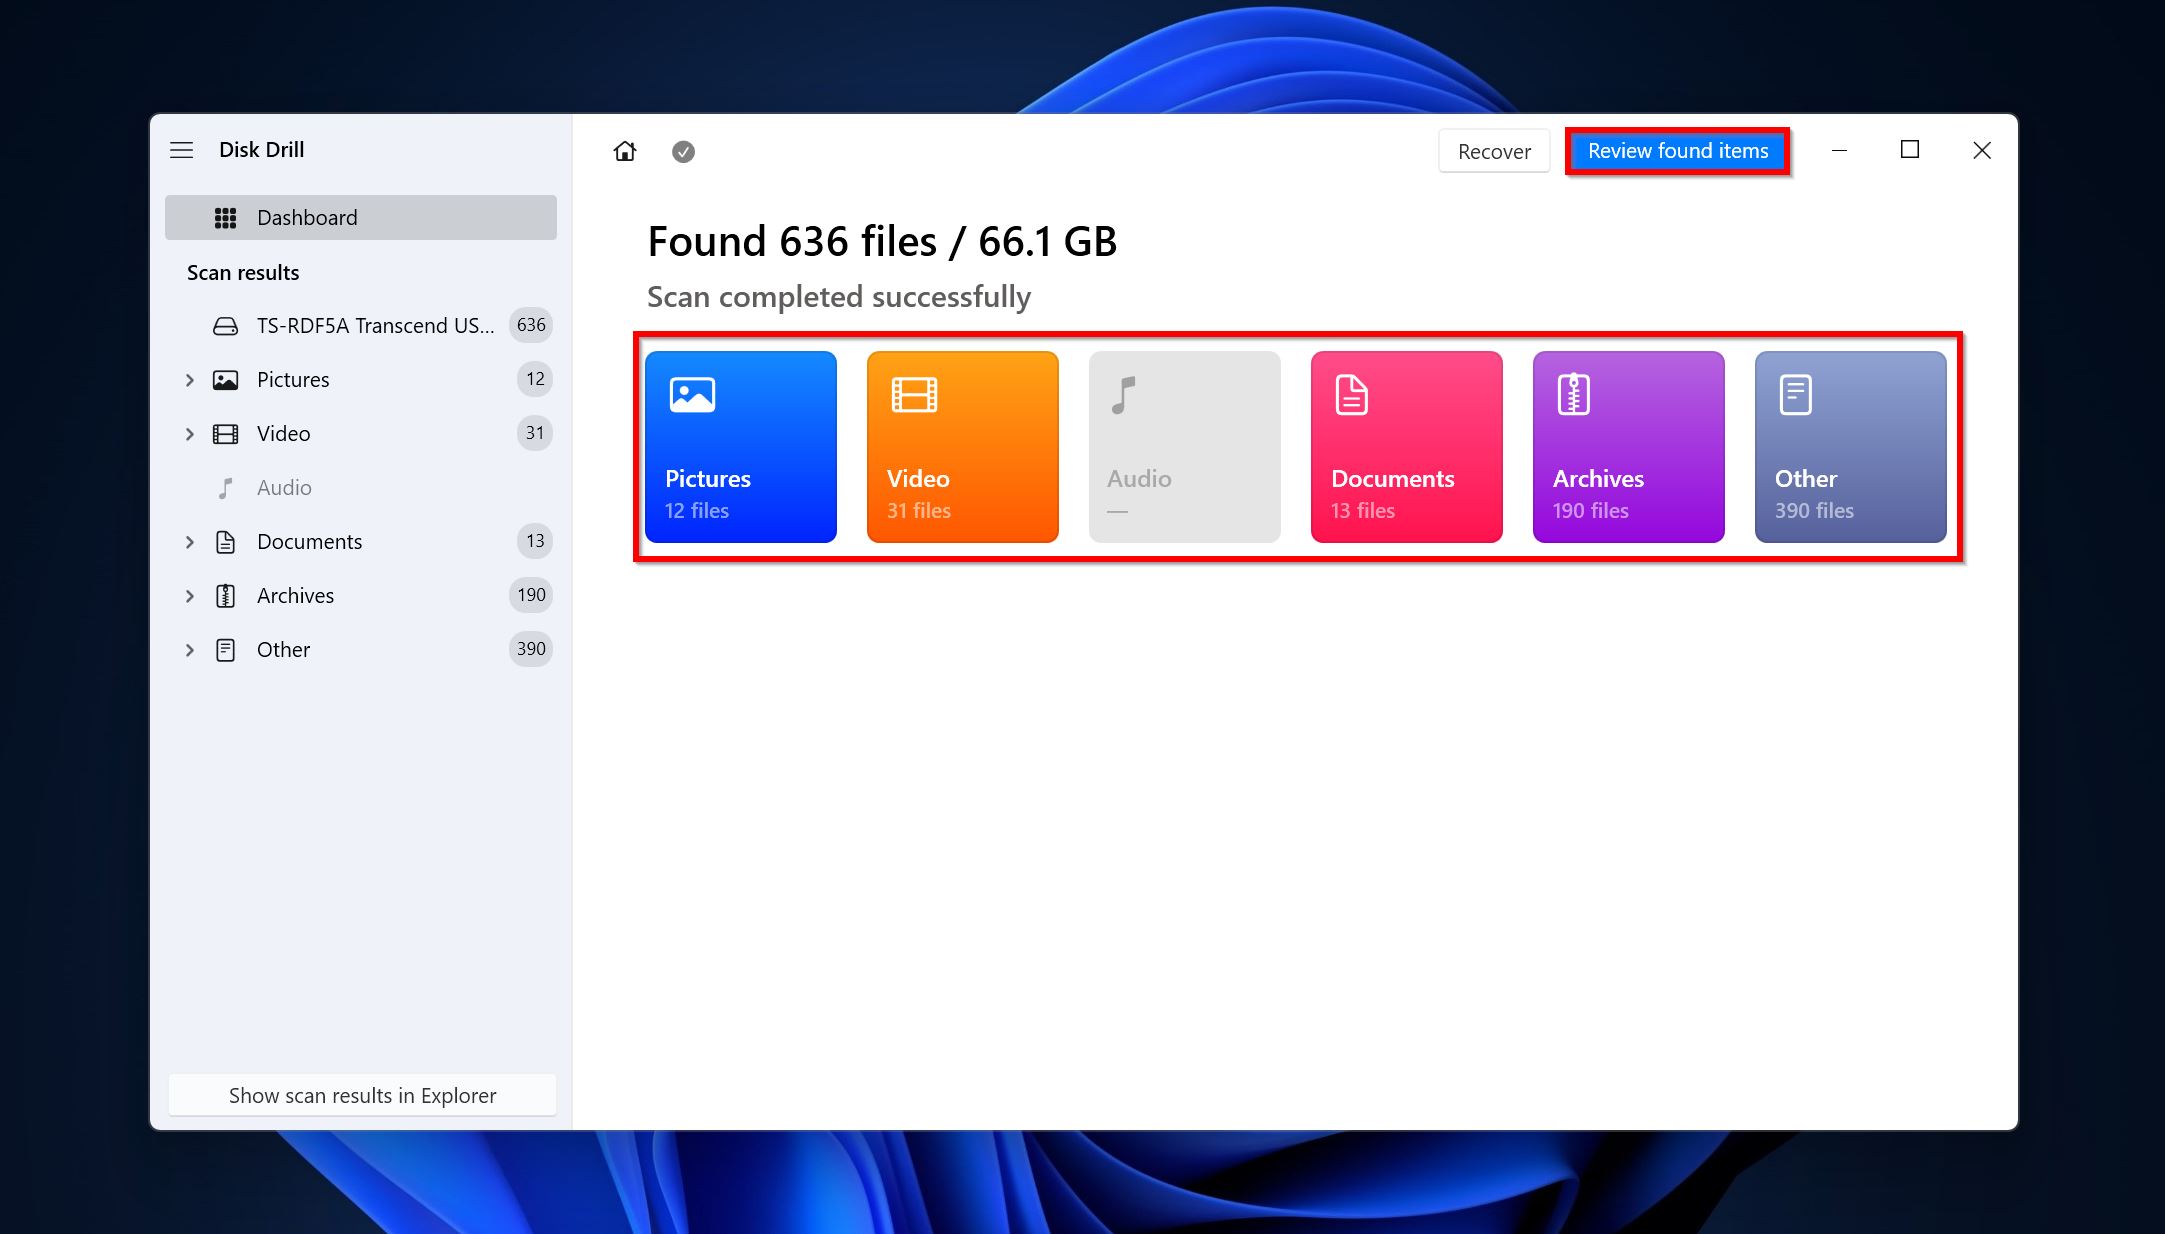
- Click on Review found items to view all recoverable files. To filter out the results, click on the relevant file type you wish to recover (Pictures, Video, Audio, Documents, Archives, and Other).
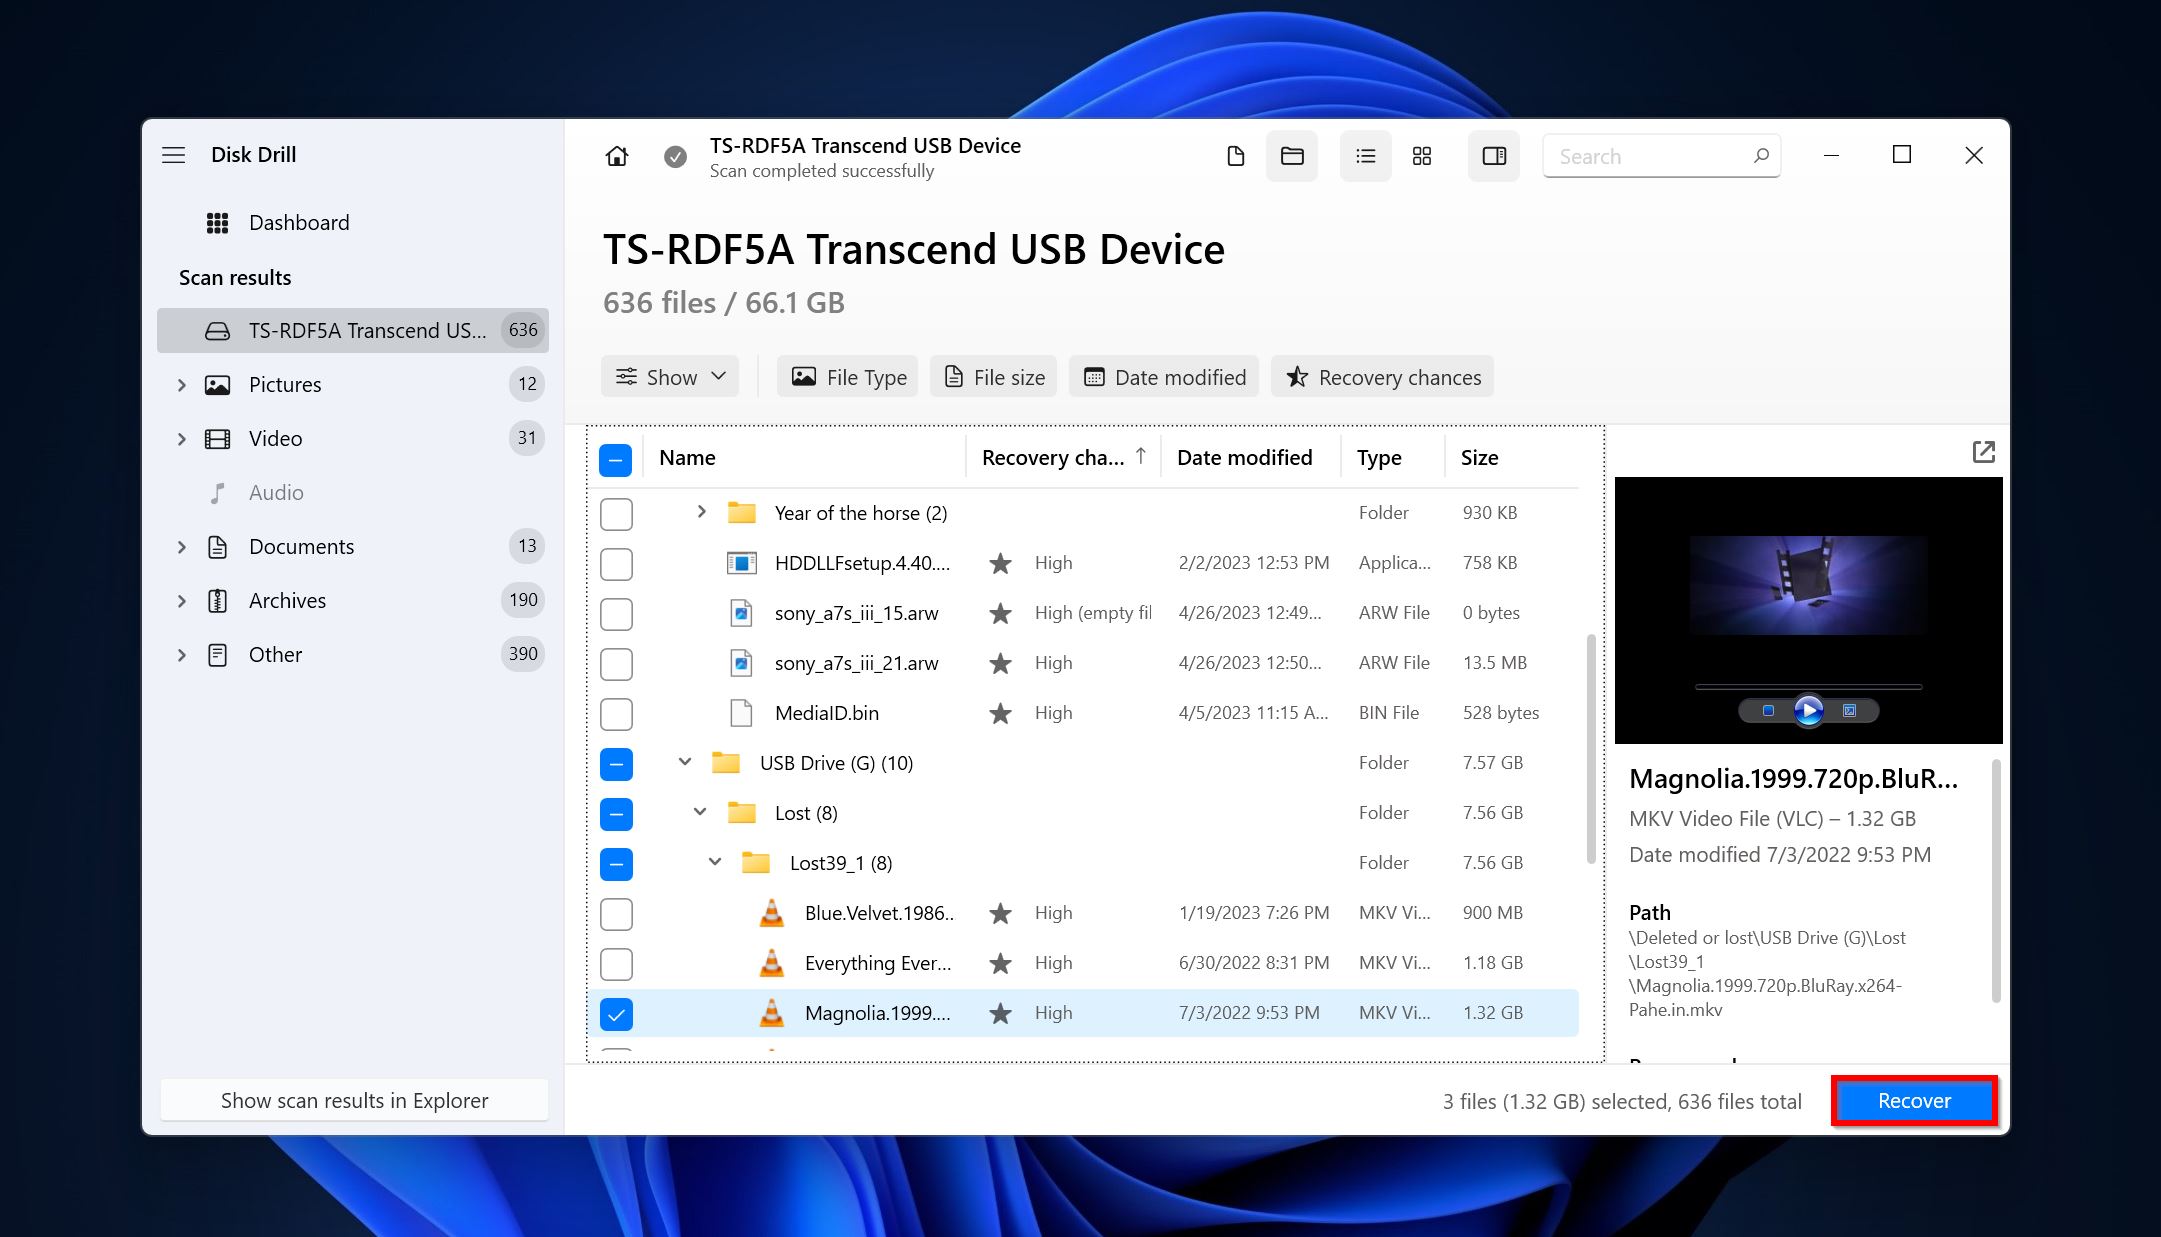
- Select the files you wish to recover by using the checkboxes next to their name. Disk Drill will display a preview of the currently selected file. To manually preview a file, click on the eye icon next to its name. Click on Recover after you’ve confirmed your selection.
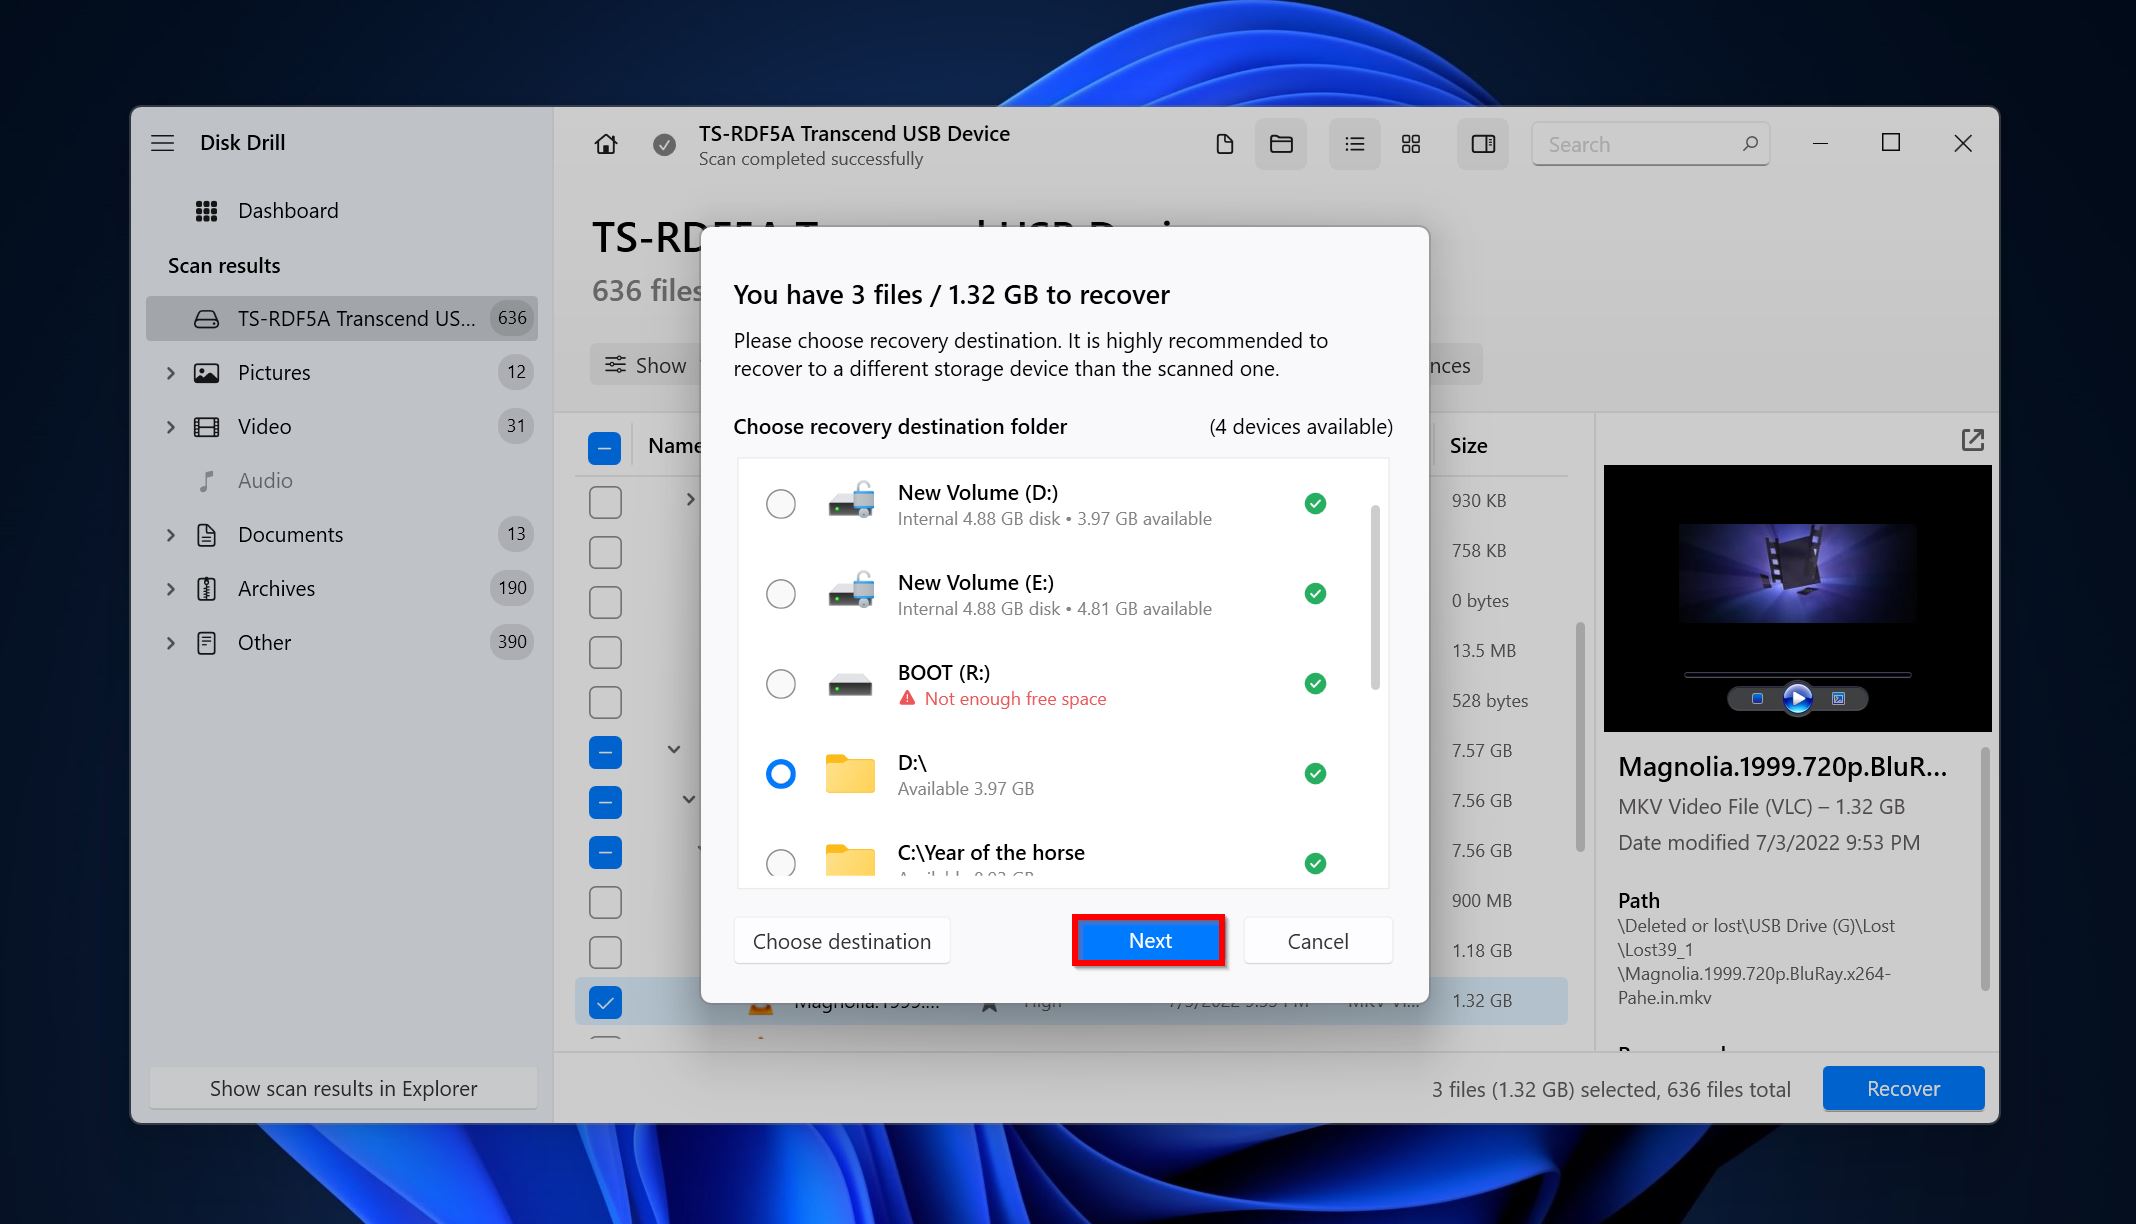
- Select a recovery destination for the files and click Next. It’s important to choose a recovery destination on a different drive from the one you’re recovering data from.
- Disk Drill will recover your files. You can recover up to 500 MB of files for free as part of Disk Drill’s Windows trial.
Method 2: Use a Cloud Backup
It’s always a good idea to have automatic cloud backup set up on your computer. If the Avast deleted file was located in one of the user folders, such as Pictures, Documents, or Videos, it’ll likely be backed up to OneDrive (if you’d set it up).
To restore a file from OneDrive, follow these steps:
- Open Windows Explorer and click on the OneDrive folder. It’ll typically be labeled as YourName – Personal.
- Navigate to the folder which contained your file, select the file, and simply copy it to a location on your local drive.
For other cloud storage services, you can visit their website, and download the backup from there.
What to Do If Avast Virus Chest File Cannot Be Restored
Sometimes, Avast cannot restore a file, even if you located it in the quarantine folder. It’ll typically show you an error message. There are a few things you can do to address this.
Method 1: Restart Avast Antivirus
A simple restart of the Avast Antivirus process can help resolve issues involving Avast not restoring files from quarantine. Since Avast doesn’t offer a convenient “Quit Program” option, you’ll have to restart the program by stopping and starting its local service. Here is how:
- Press Windows Key + R, type services.msc in the text box and press Enter.
- Look for an entry labeled, “Avast! Antivirus,” and right-click on it. Click on Stop.
- Wait for a few moments, then right-click on the same entry again, and choose Start.
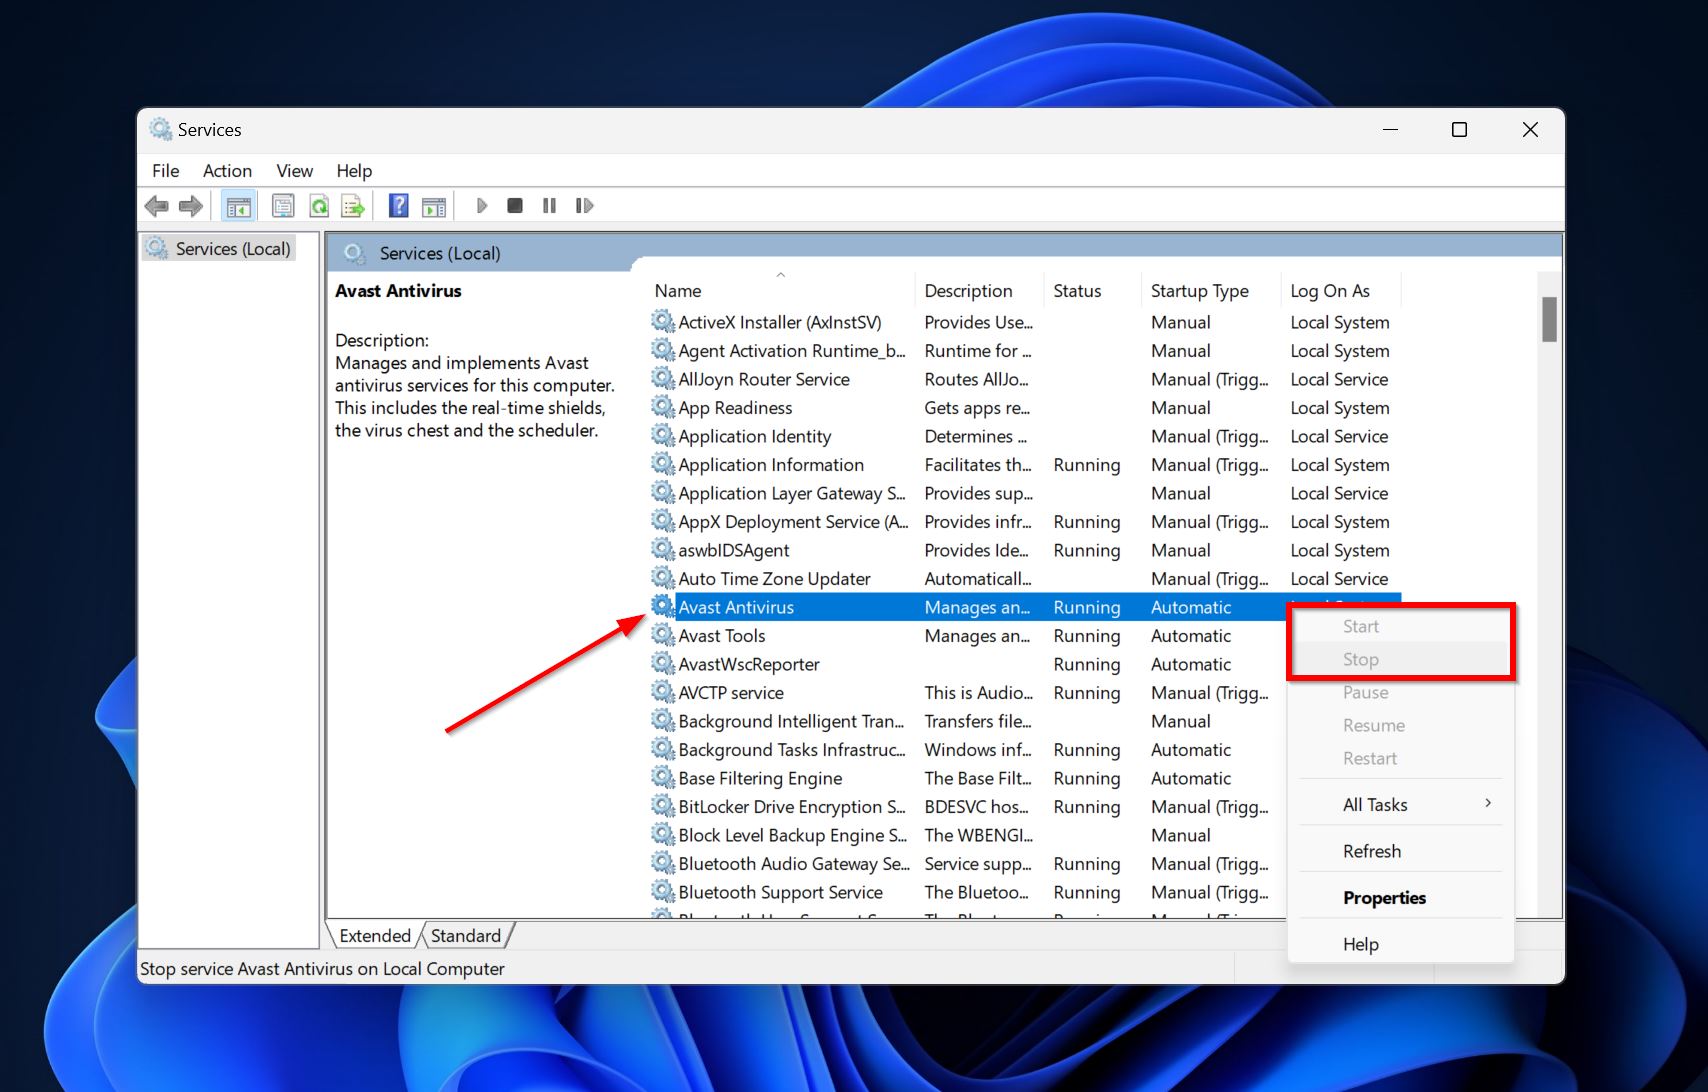
If the Start and Stop options are greyed out, you’ll need to reboot your PC to restart Avast.
Method 2: Repair Avast Antivirus
Avast Antivirus has an in-built repair feature that checks file integrity and ensures that the program is working smoothly. It can be a useful way to fix the Avast quarantine folder and prevent Avast from deleting files without asking, even though you’ve configured the settings correctly.
Here’s how to repair Avast:
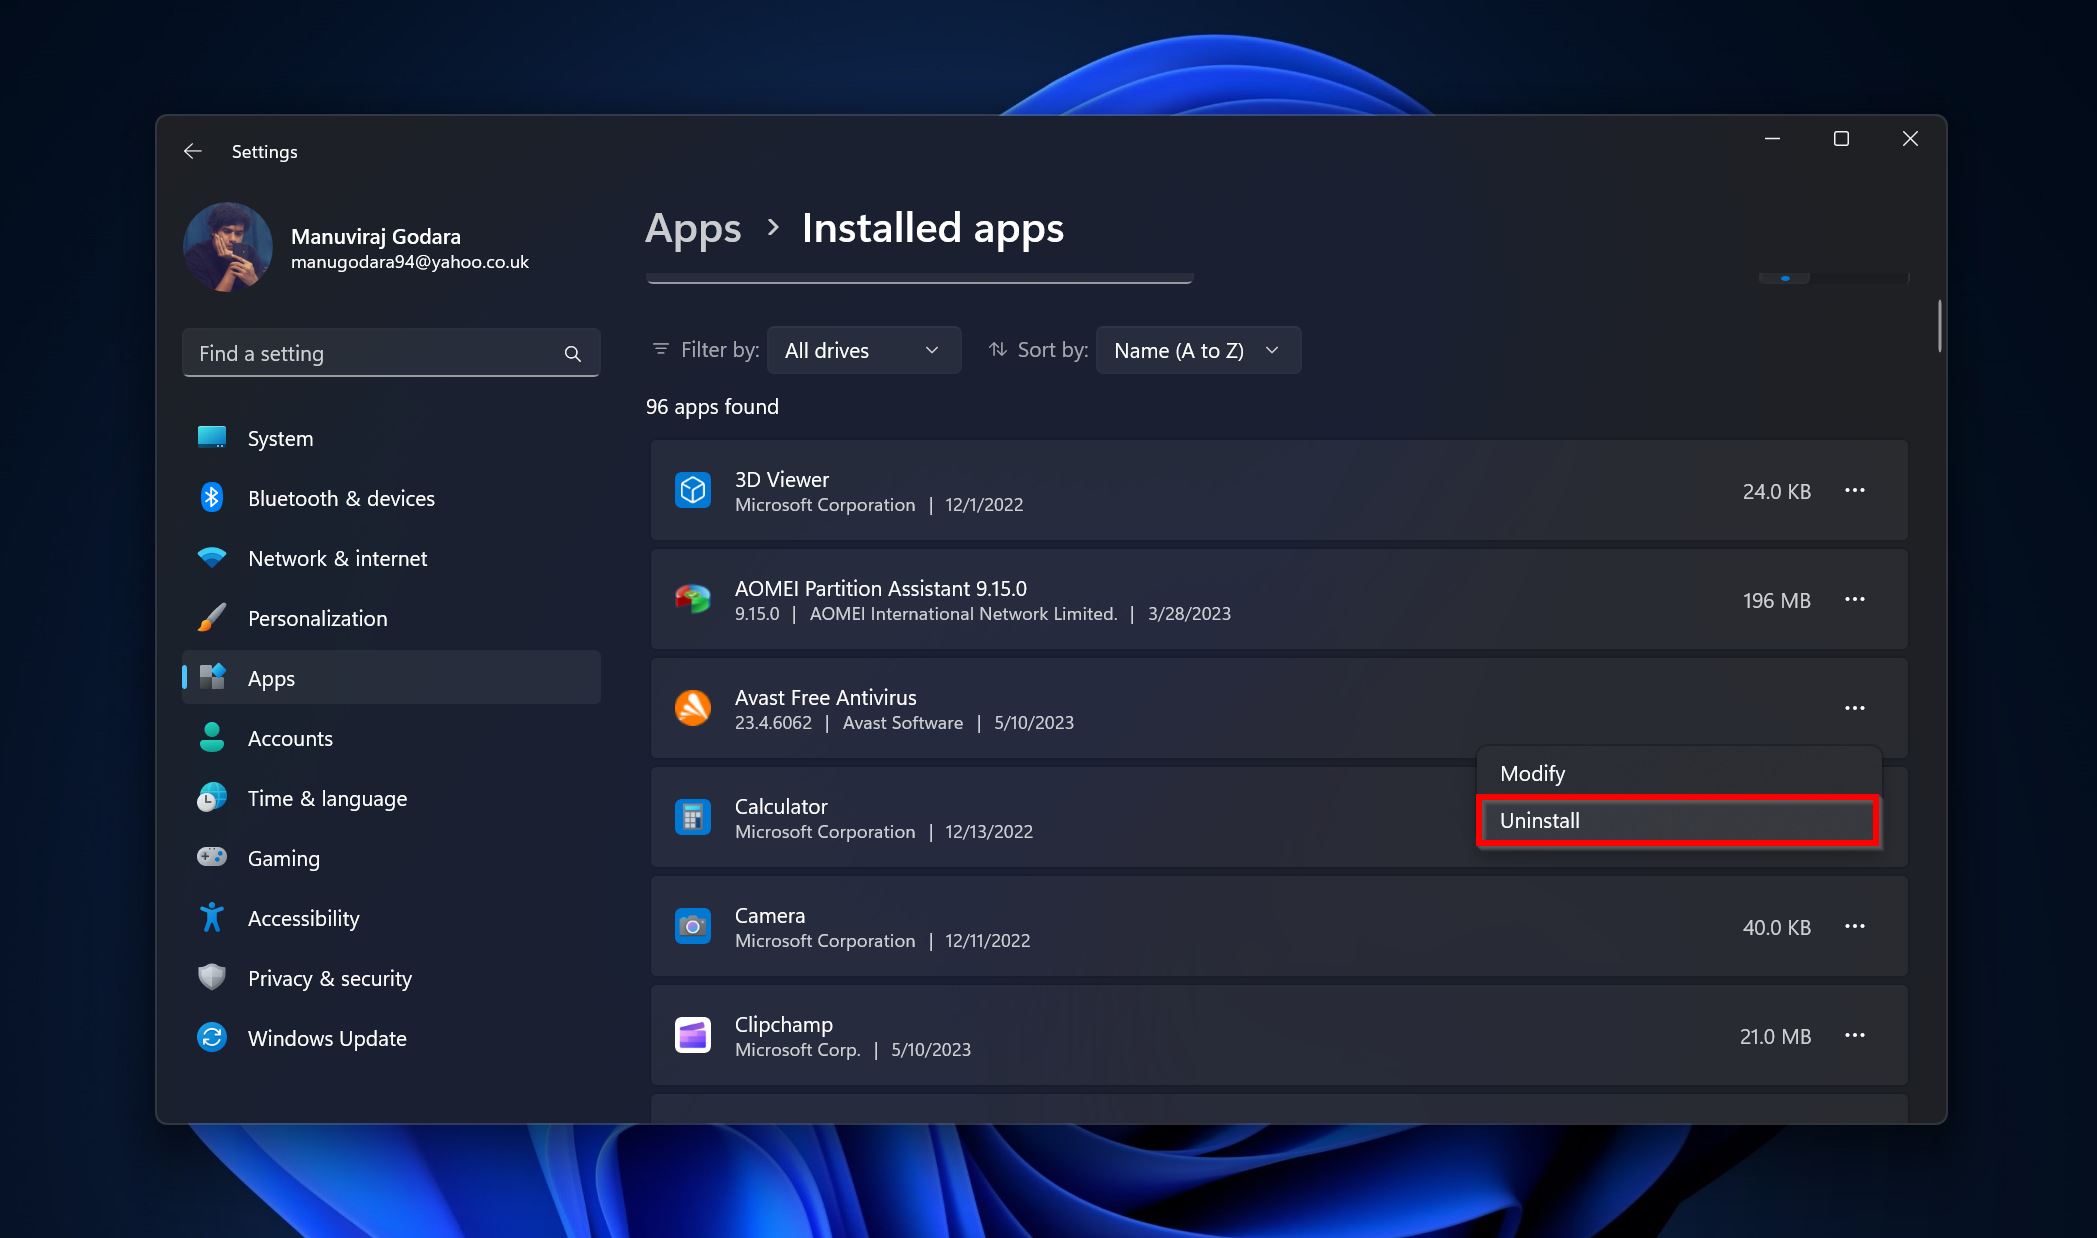
- Right-click on the Start button and click on Installed apps. The option will be labeled “Apps and Features” in Windows 10.
- Expand Avast Antivirus, click on the three dots, and select Uninstall. Click Yes on the UAC prompt.
- Click on the Repair option and click Yes on the authorization prompt that pops up.
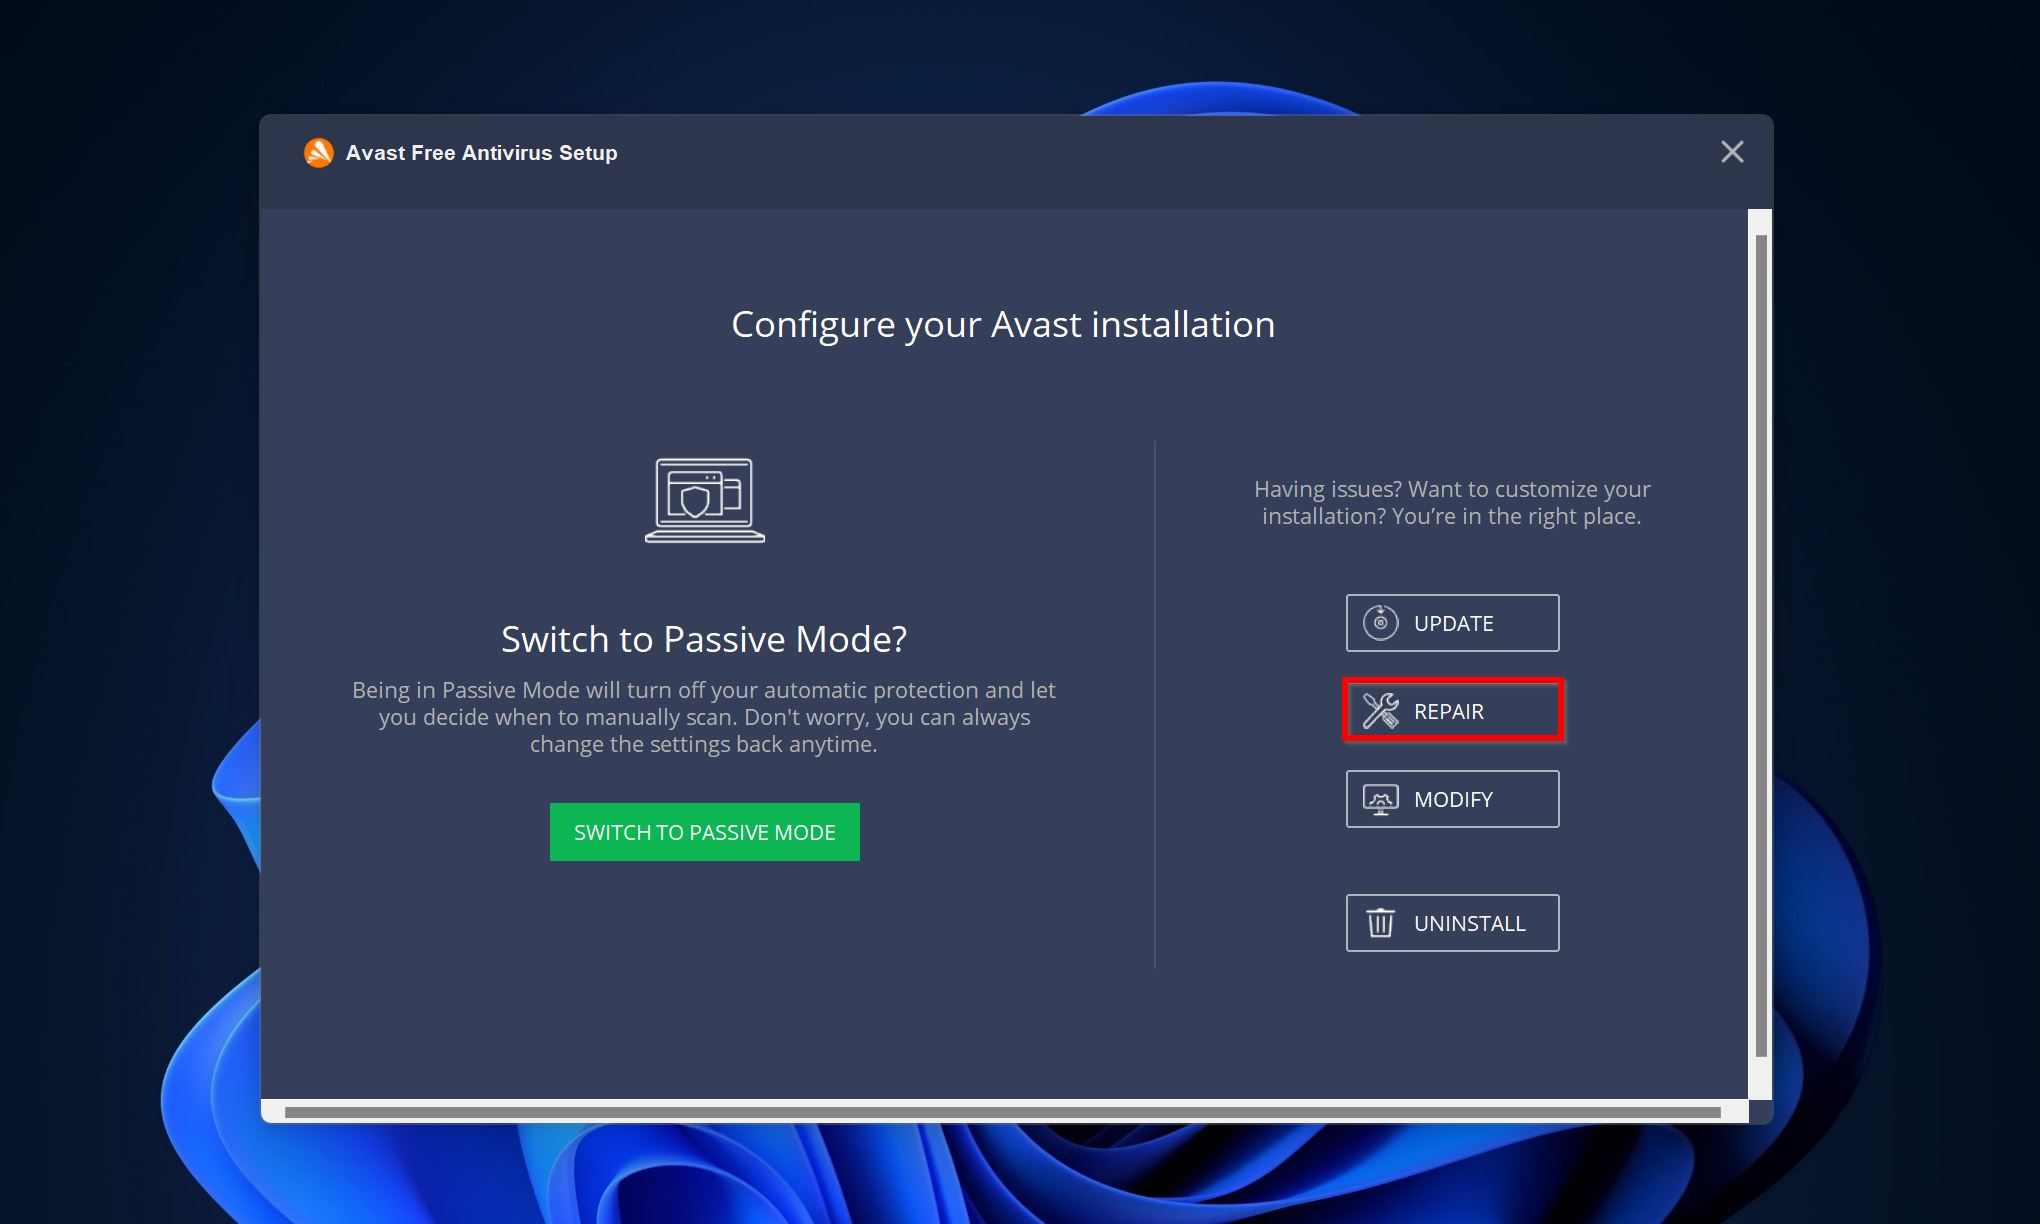
- Click on Done after the repair process is complete.

Method 3: Mark the Files as False Positives and Send Them for Analysis
Since Avast uses a combination of signature and heuristic malware detection, it can label perfectly safe files as dangerous. If Avast is not letting you restore these files and repeatedly deleting them, it’s advisable to send them to Avast support and let them know it’s a false positive. You’ll typically get a response in 2-3 days.
Here’s how you can send files for analysis to Avast support:
- Open Avast Antivirus, and go to Protection > Quarantine.
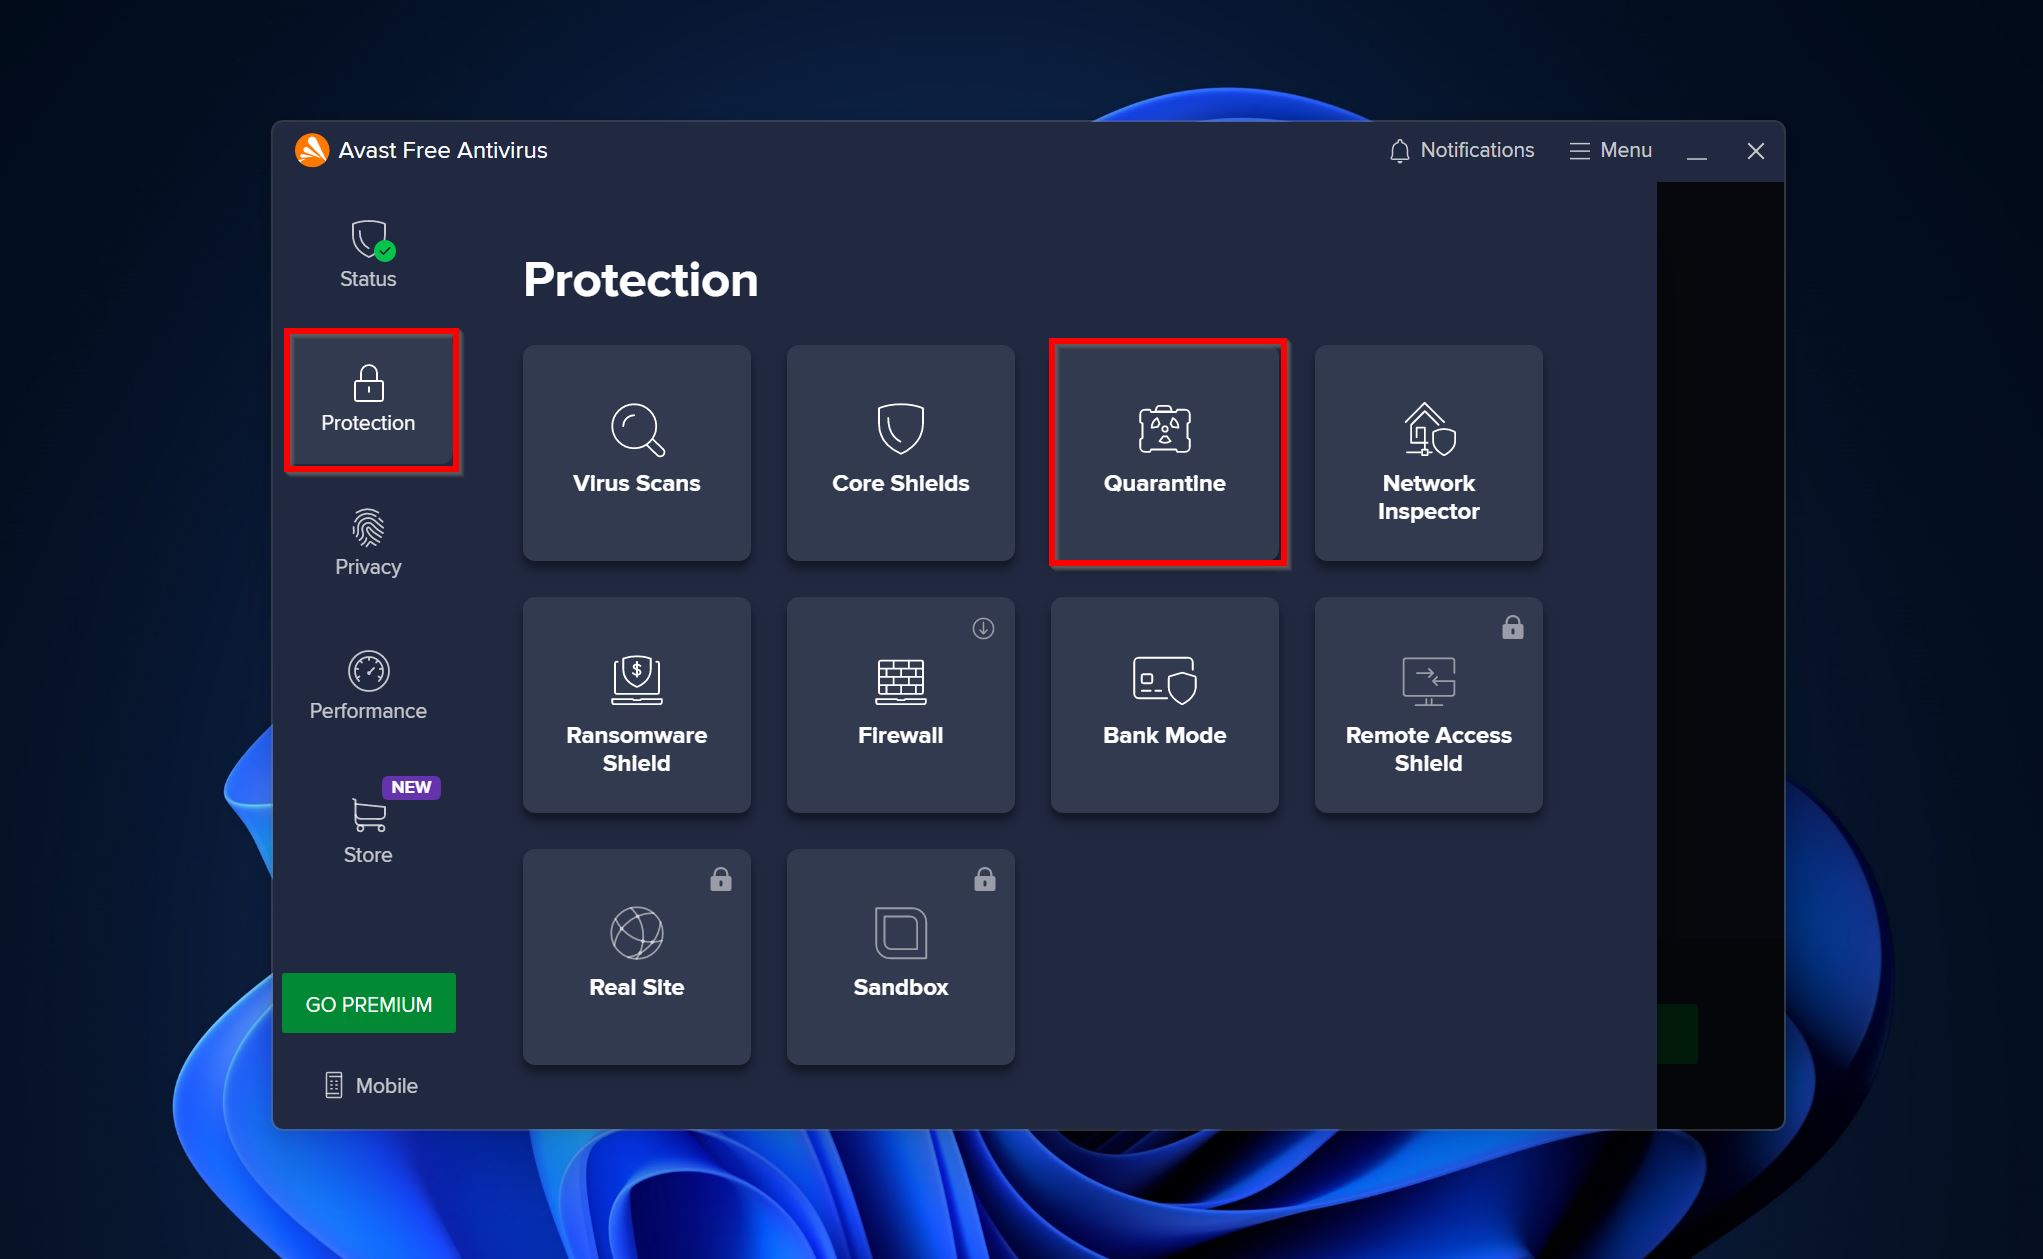
- Select files that you want to send for analysis, and click on the three dots at the bottom of the screen. Choose Send for analysis.
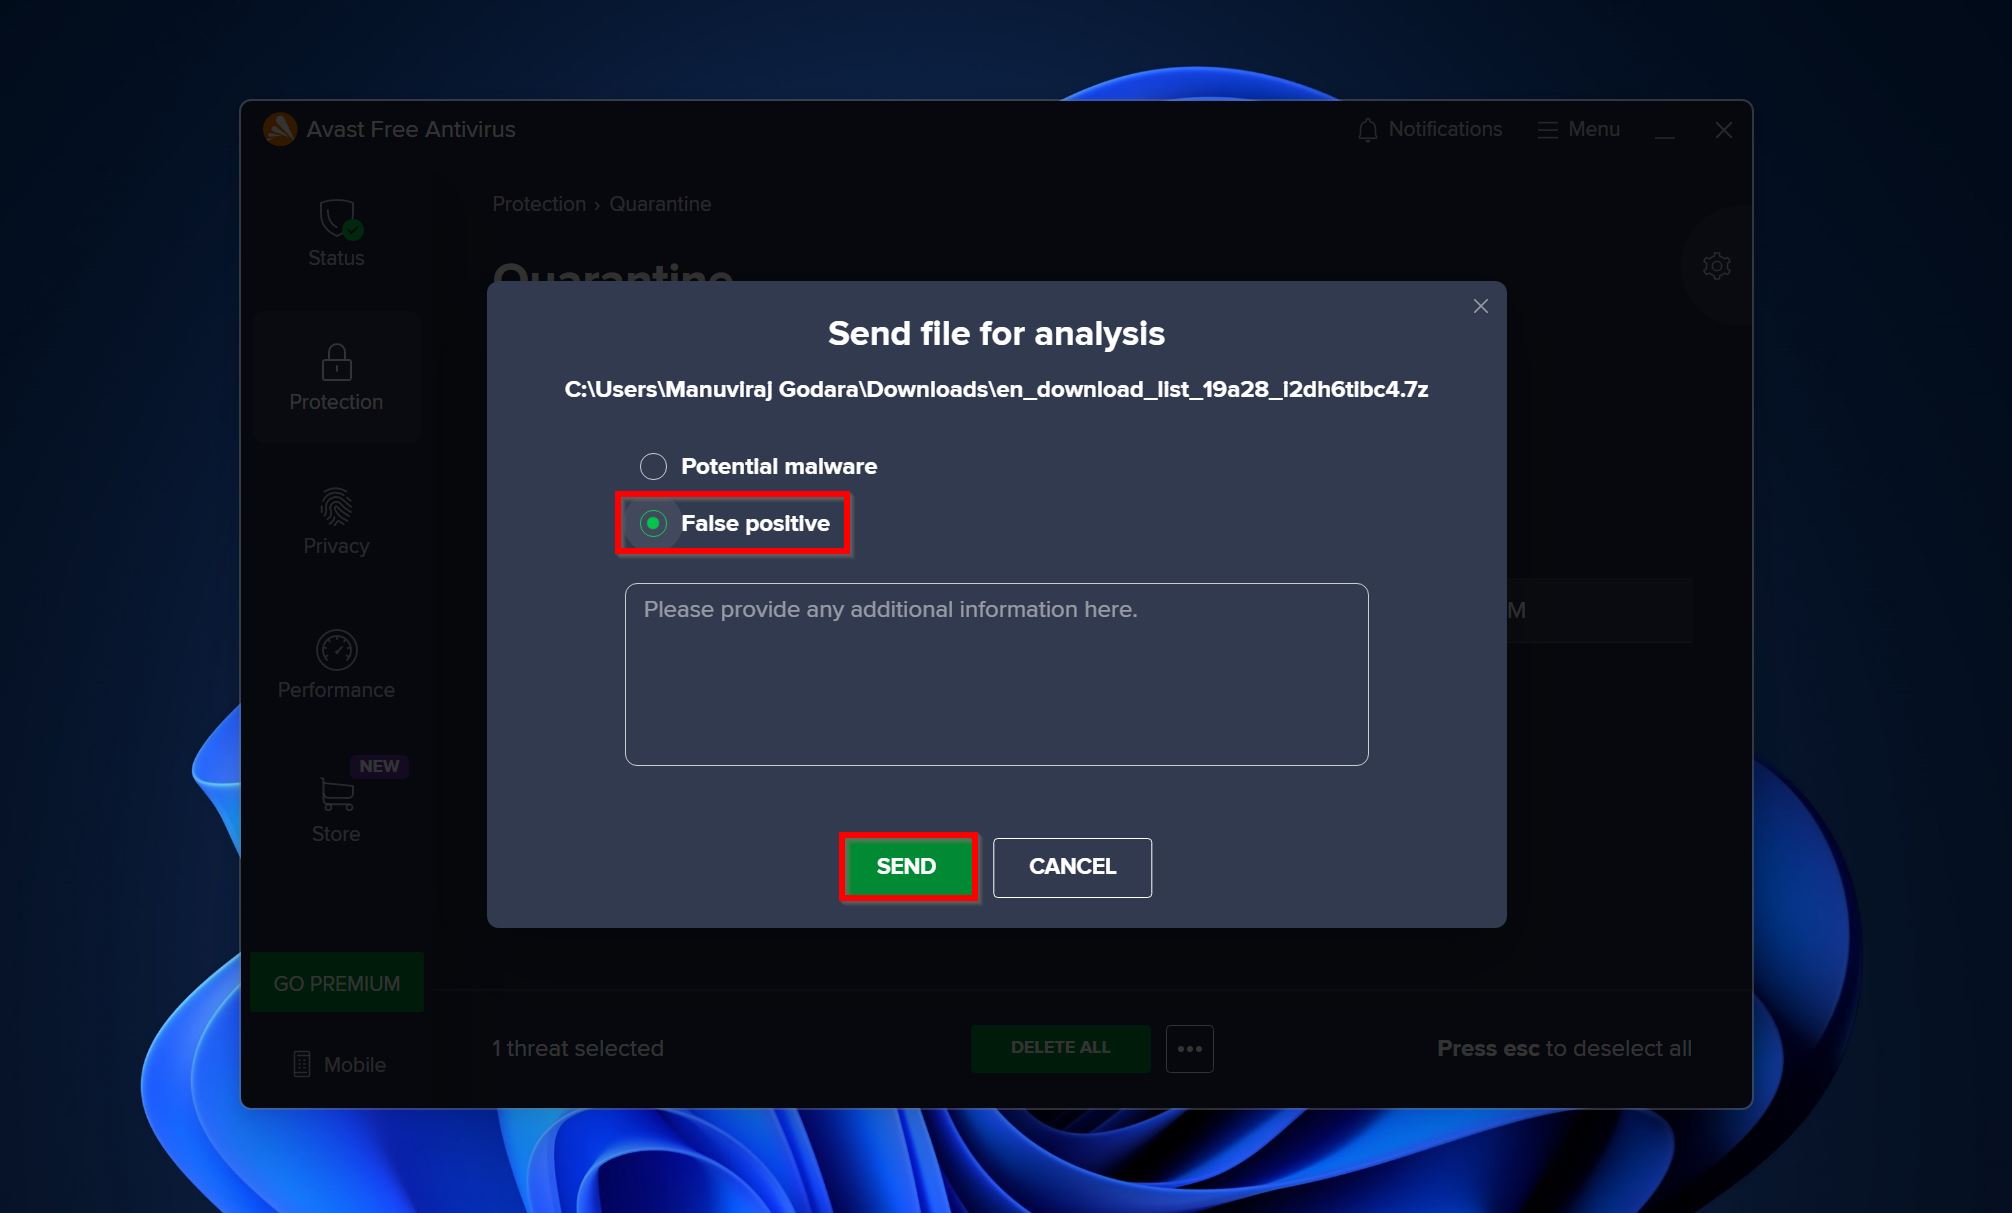
- Select the False positive option. It’s recommended you enter the file version and source in the description column. Click on Send.
How to Stop Avast from Deleting Files
Instead of repeatedly restoring files from the quarantine folder, you can add an Avast virus chest exception. This will let the antivirus know that the files are safe and are incorrectly being detected as malware.
To add exceptions to Avast Antivirus, follow these steps:
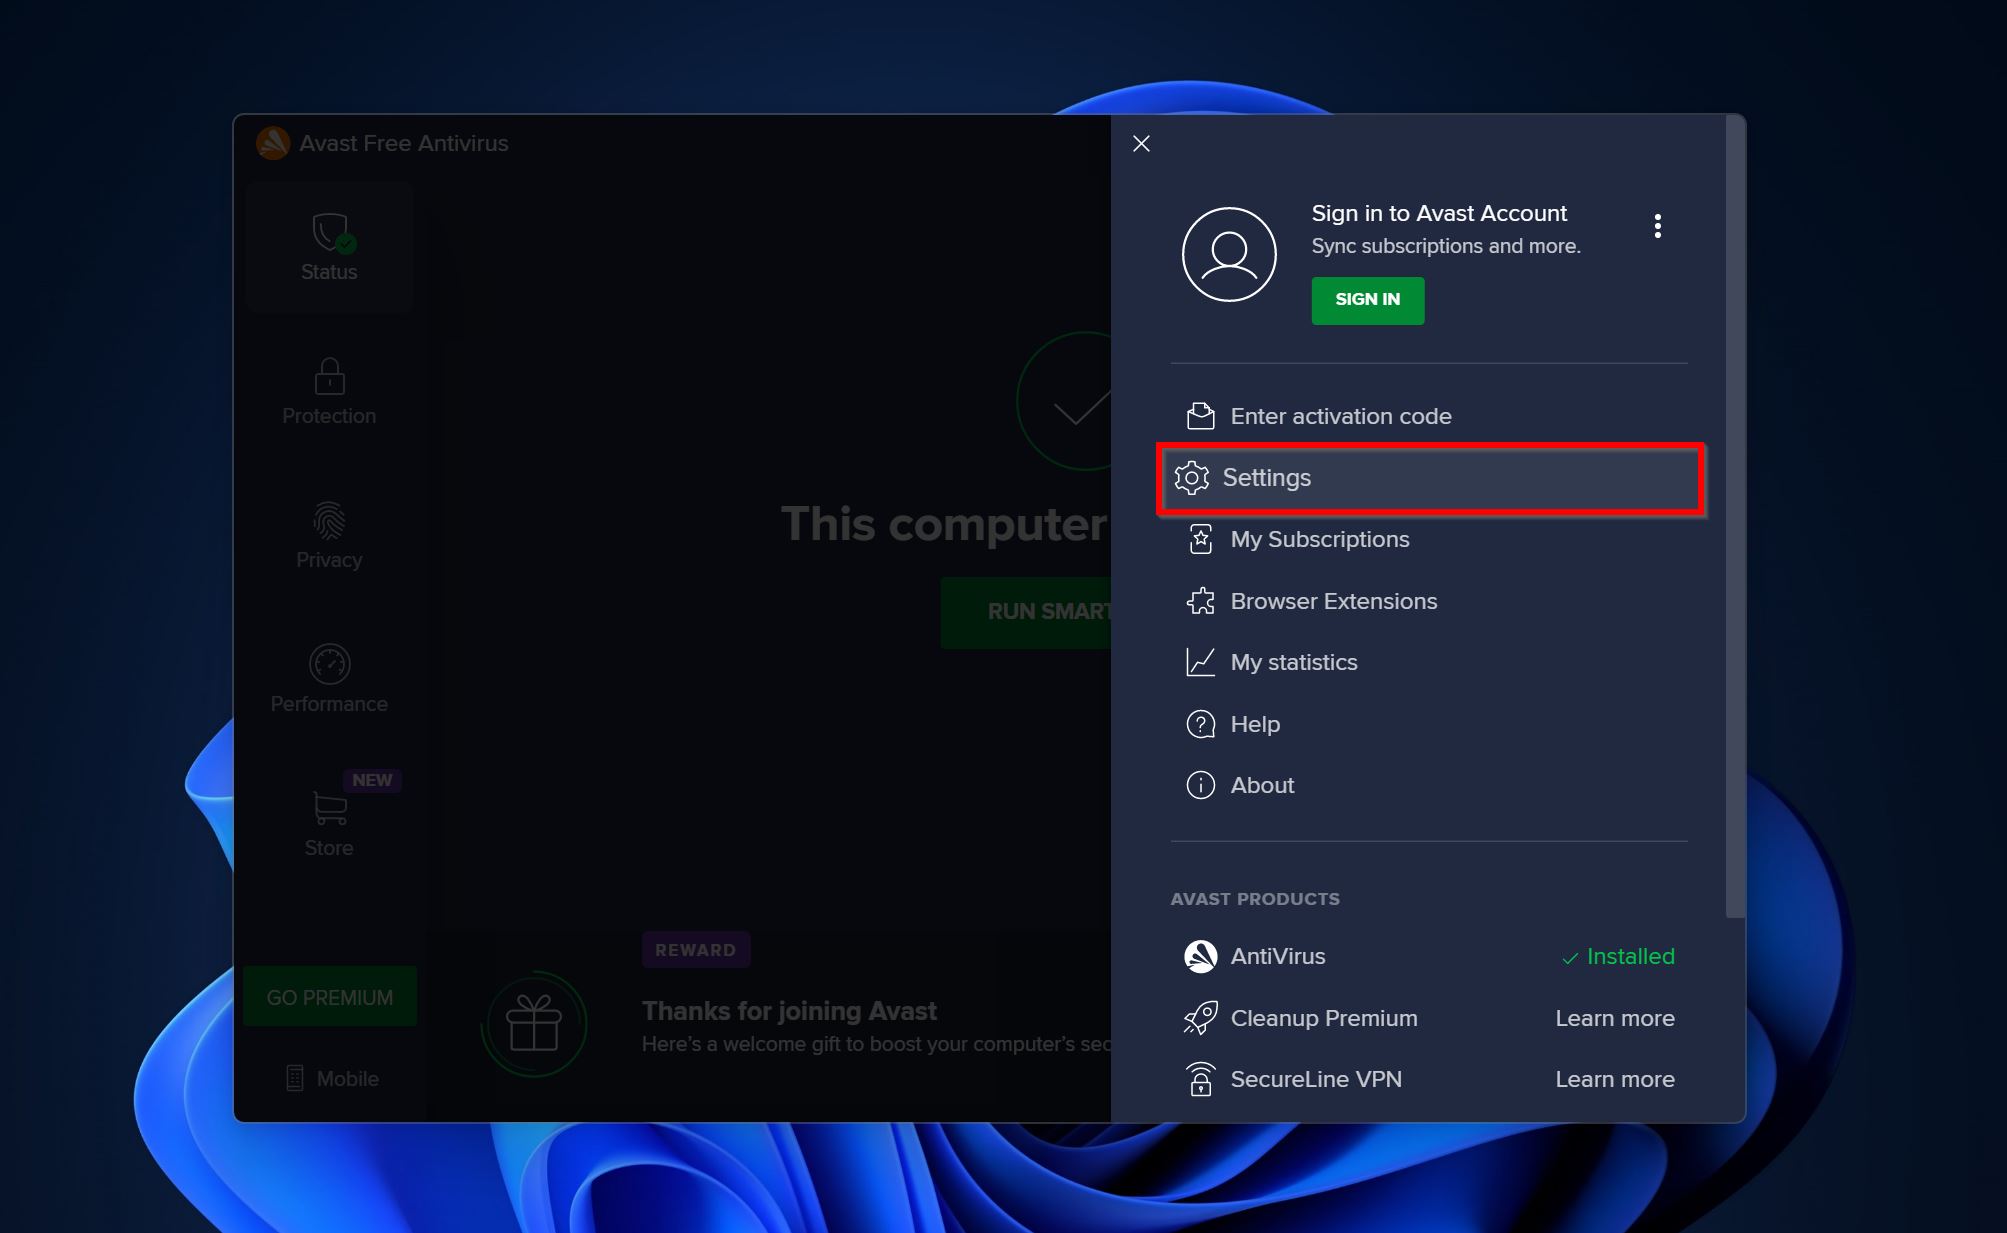
- Open Avast and click on the Menu option. Choose Settings.
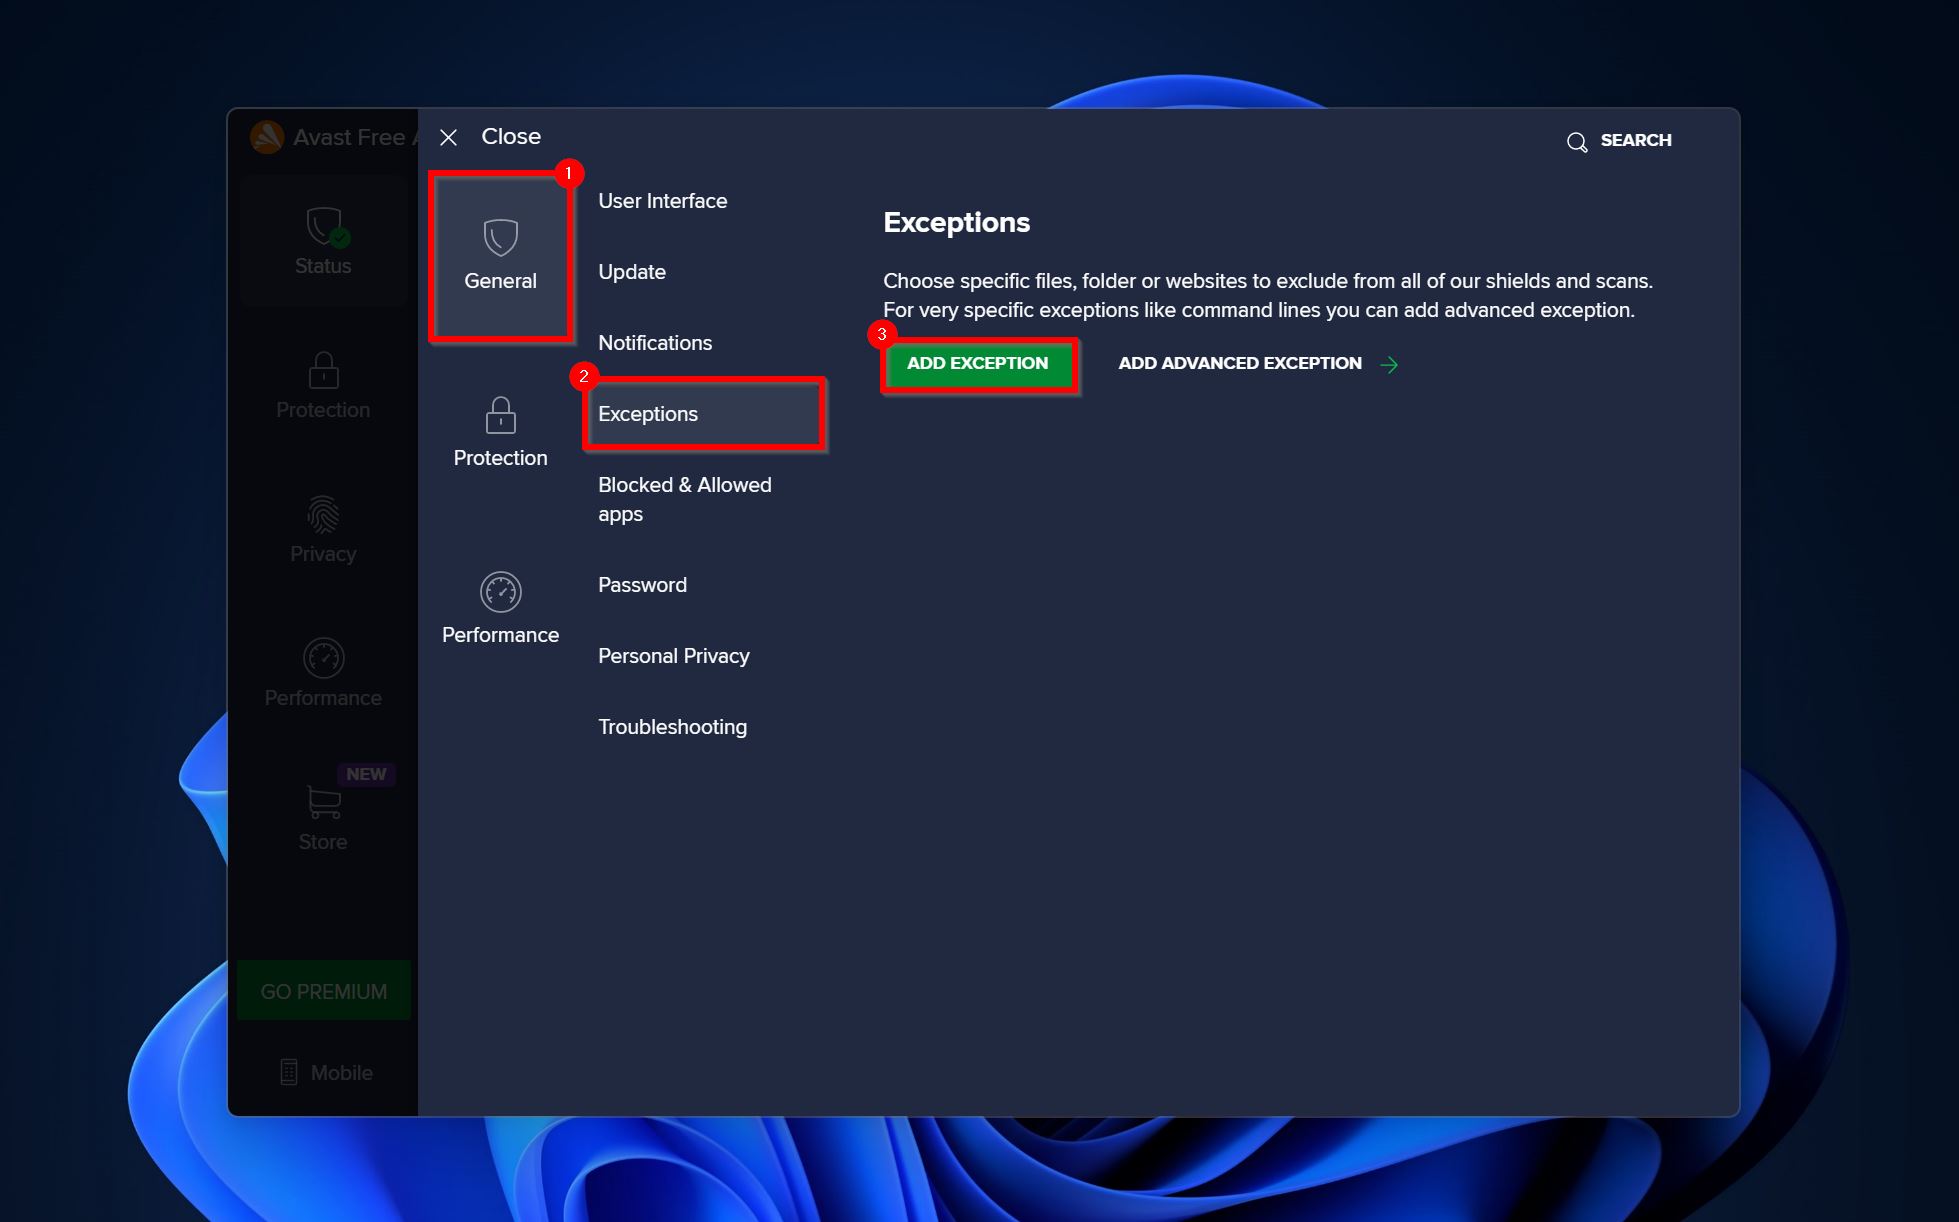
- Click on the General tab and go to Exceptions > Add exception.
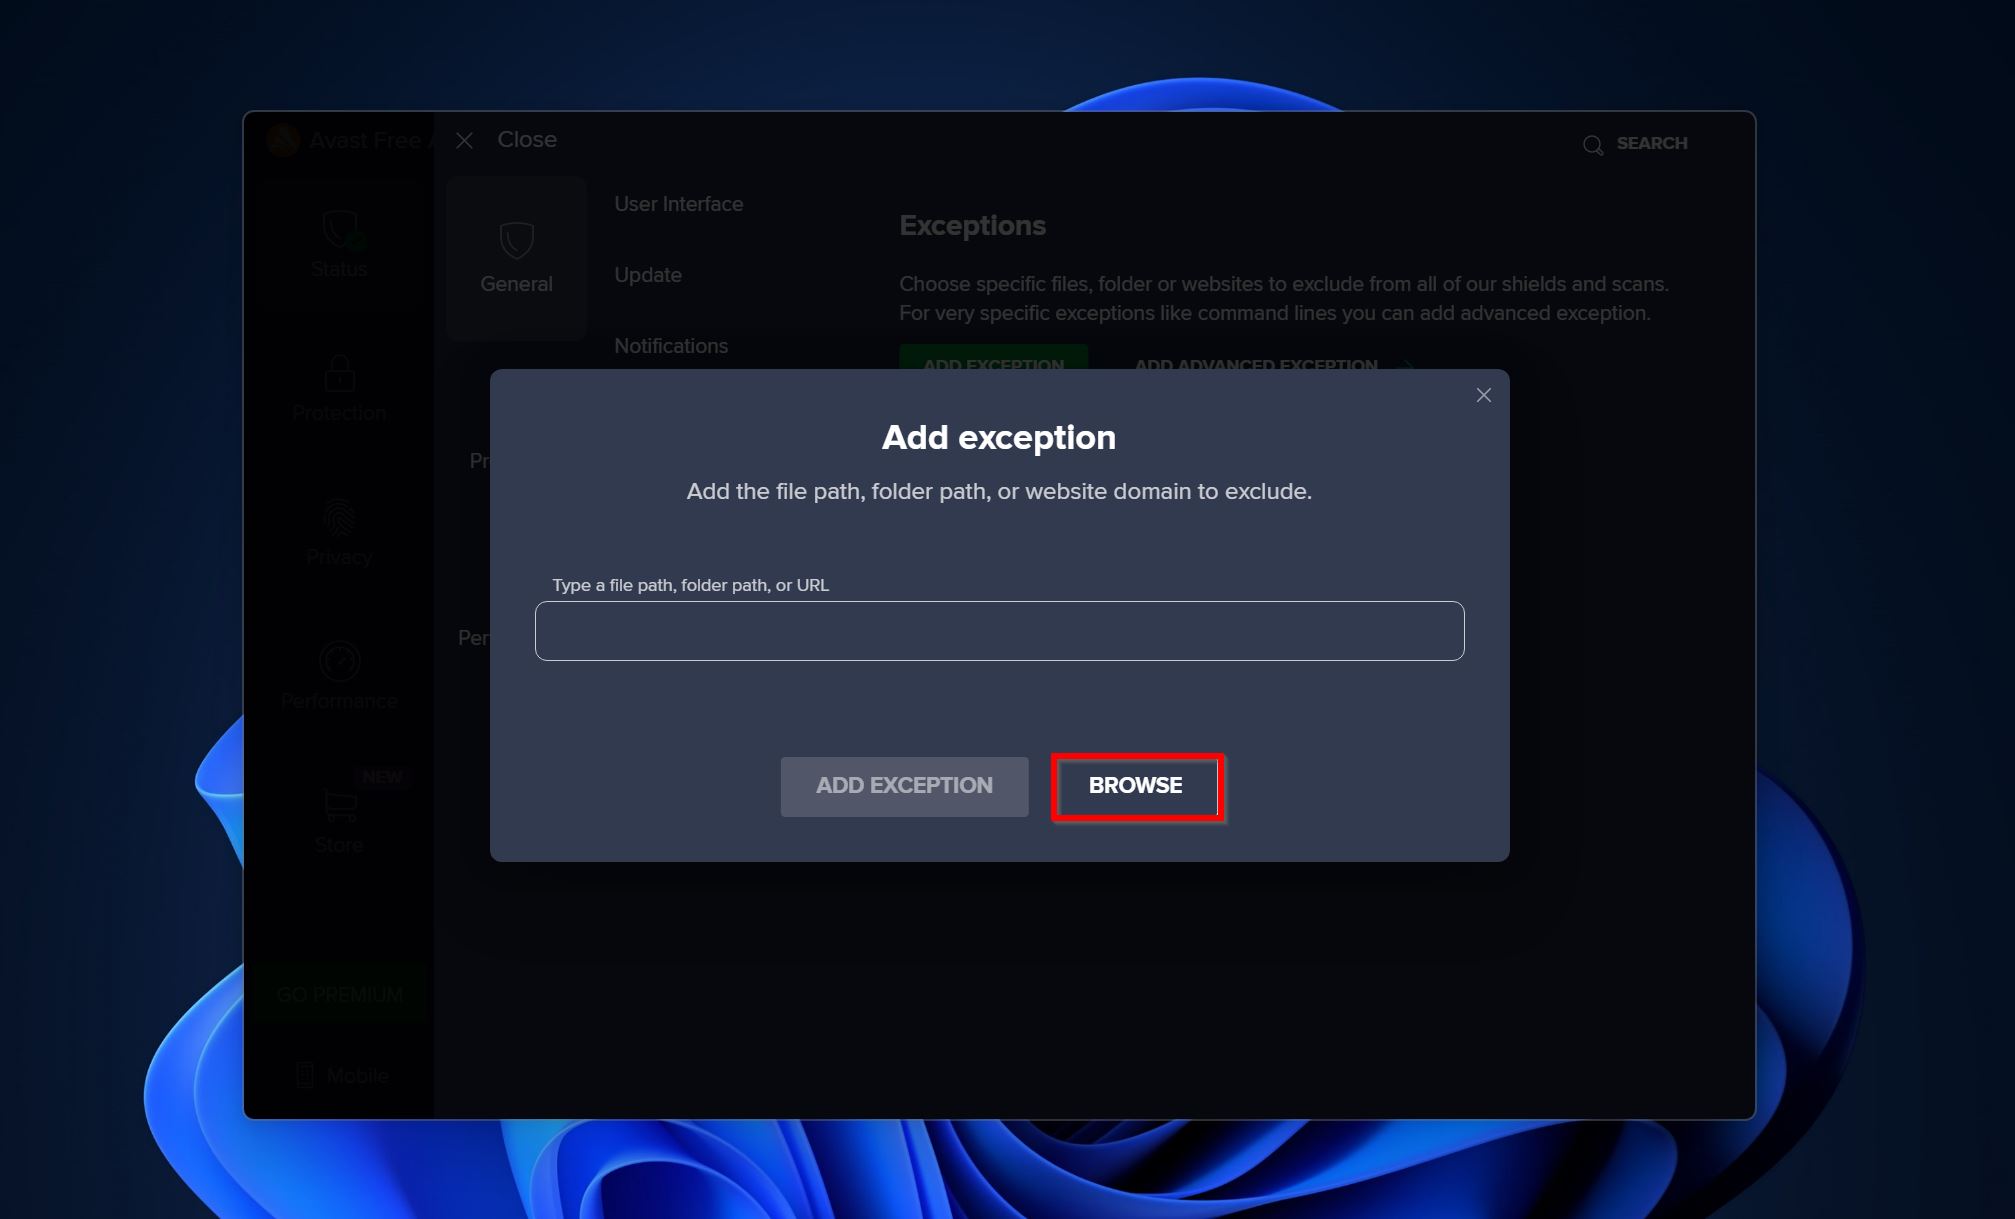
- Click on Browse.
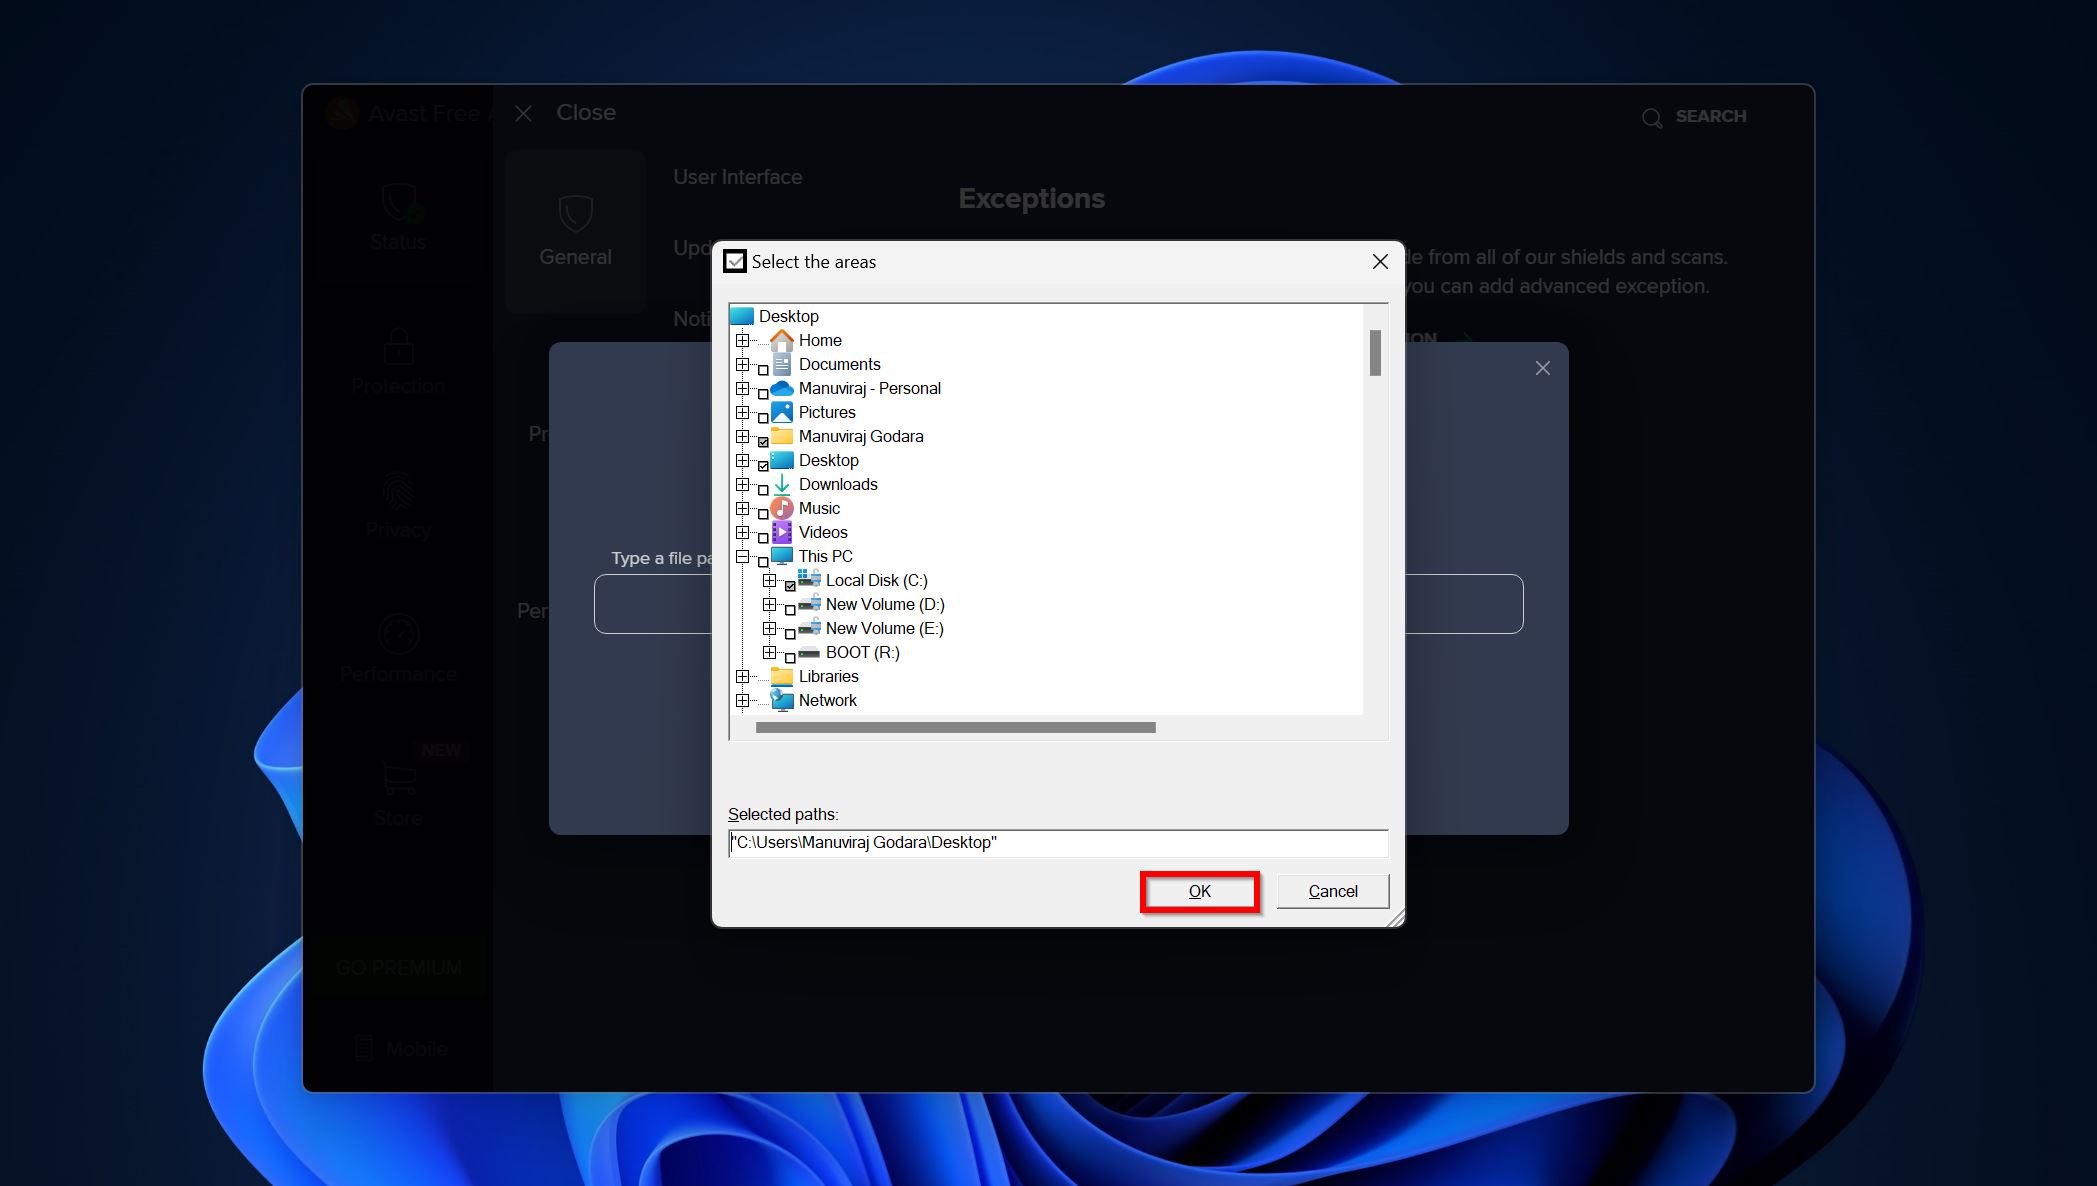
- Navigate to the folder/file you want to exclude, and tick the checkbox next to it. Click on OK.
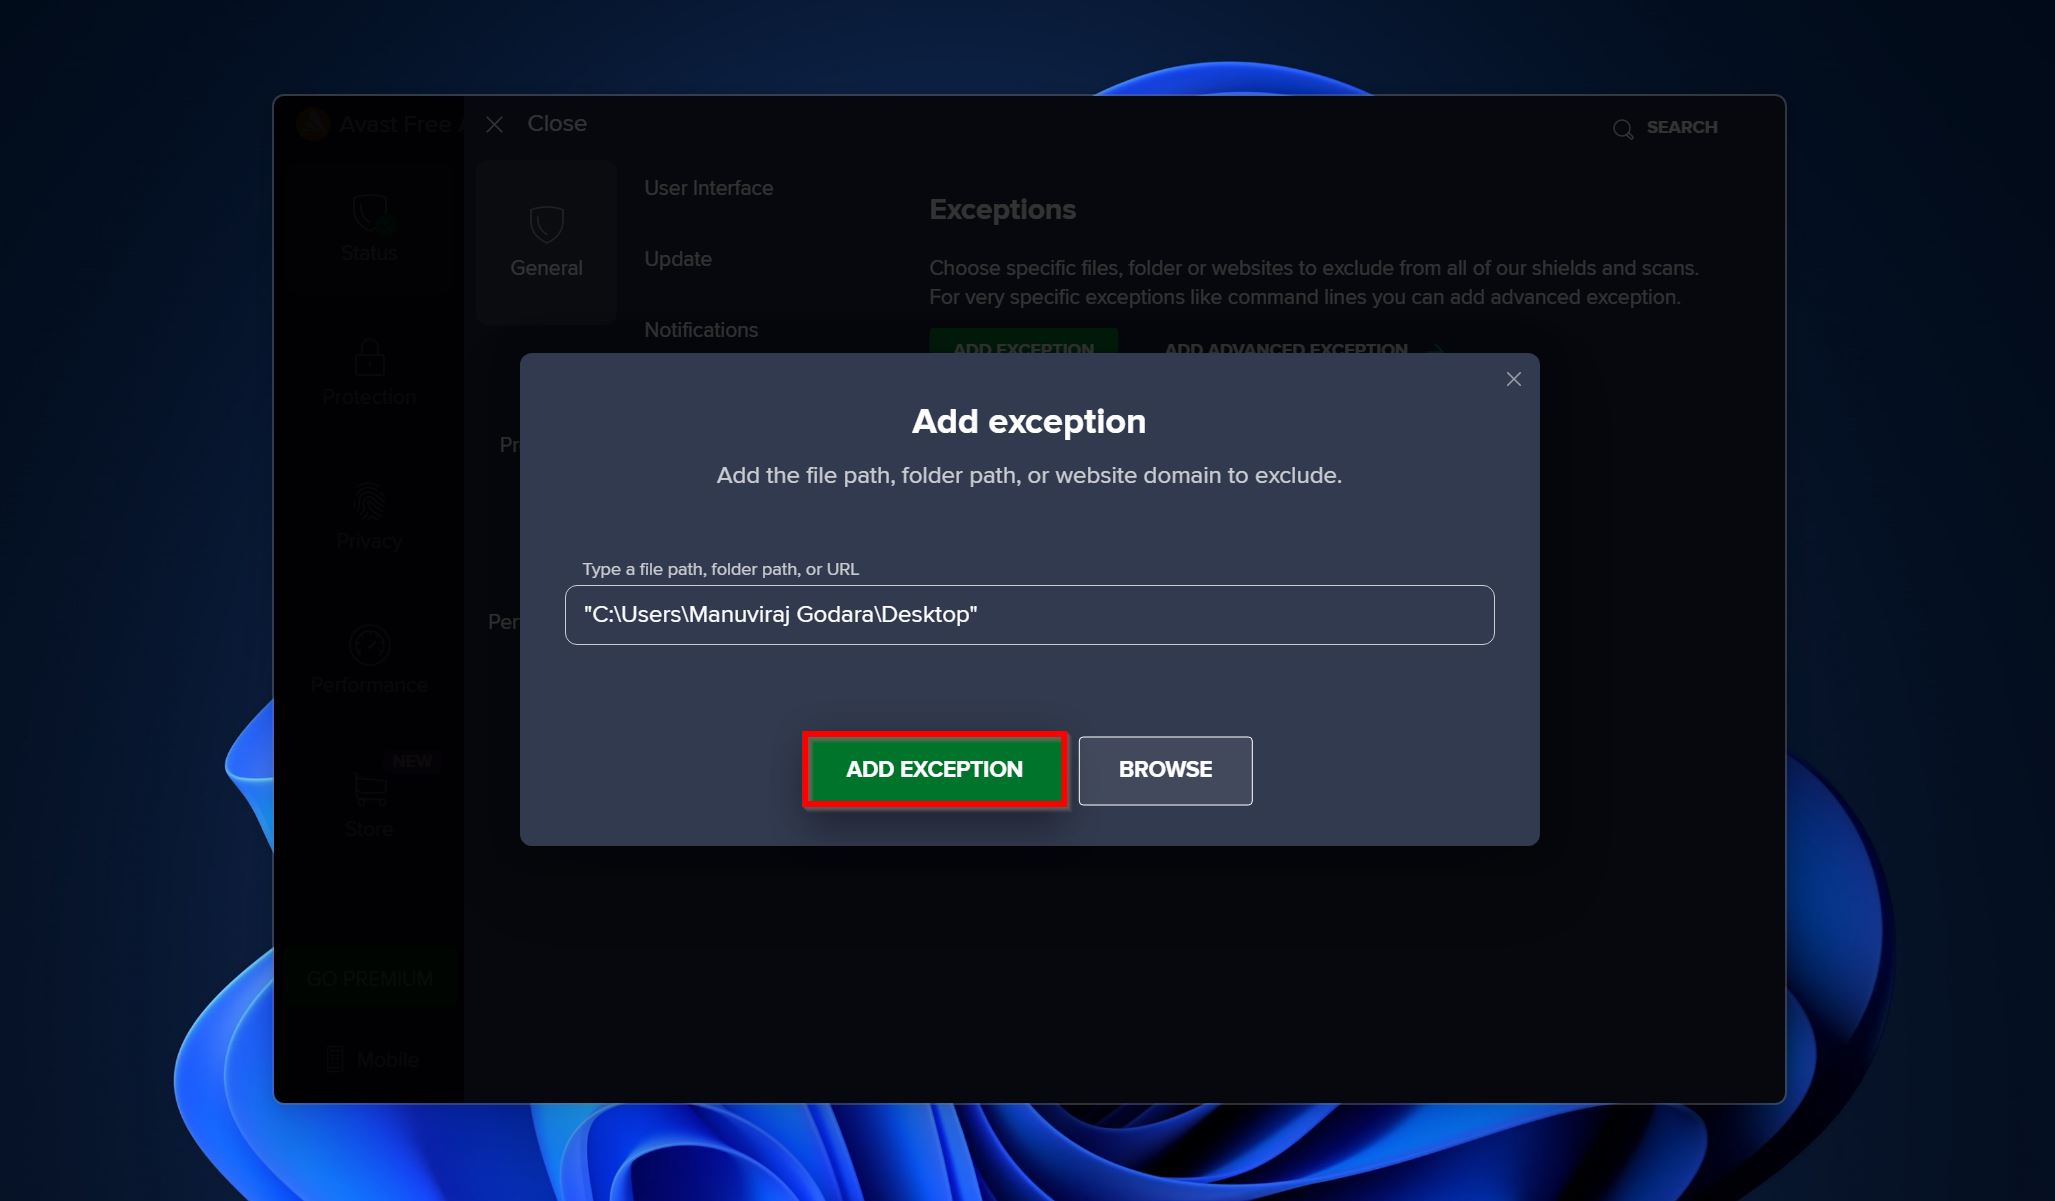
- Click on the Add exception option to add the folder/file.
Conclusion
It can be frustrating to lose files because Avast falsely flagged them as malware and deleted them. However, data recovery software can help you recover these files. To prevent Avast from deleting your files, be sure to add an exception for them. Additionally, it’s a good idea to create regular backups so that you’re protected against data loss because of any reason.
FAQ
- Open Avast and go to Protection > Quarantine.
- Check the app you want to restore.
- Click on the three dots next to the Delete all button and choose Restore.

