 The Microsoft Sticky Notes app is a lightweight note-taking solution that enables you to jot down ideas or make quick notes in no time at all. But, your sticky notes are just as susceptible to data loss as any other file on your computer.
If you clicked on this article, chances are you need to recover deleted Sticky Notes. You may have realized that the undo command (Ctrl + Z) doesn’t bring them back, and they weren’t sent to the Recycle Bin. Does this mean they’re gone for good? Actually, no. There are several ways you can recover deleted Sticky Notes on Windows, and we’ll show you how.
Check the Notes List Before Assuming Your Sticky Notes Are Deleted
Not entirely sure if the note was deleted? You may have just closed it by mistake. It’s best to check first, as it can save you a lot of time trying to recover Sticky Notes that haven’t been deleted. Follow these steps to access your Notes list.
Since Sticky Notes 3.0, it’s possible for notes to be synced to your Microsoft account. As such, make sure that you’re logged in to the correct account.
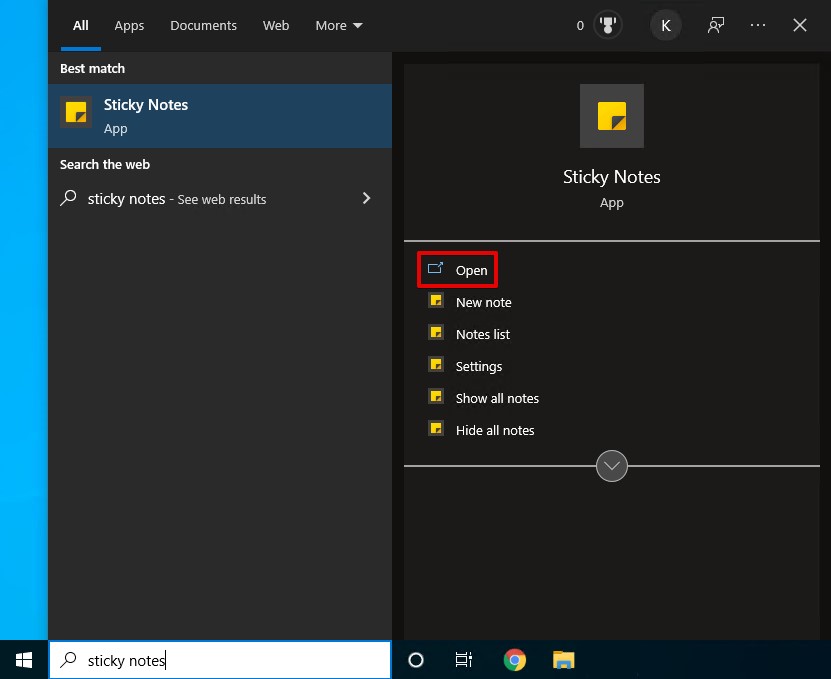
- Open Sticky Notes.
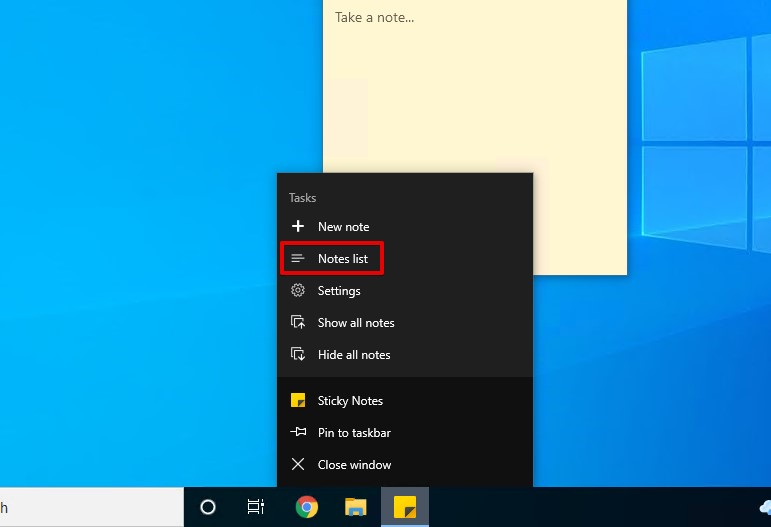
- Right-click the icon in your taskbar and click Notes list.
- Open a note from your Notes list by double-clicking it or right-clicking it and selecting Open note.
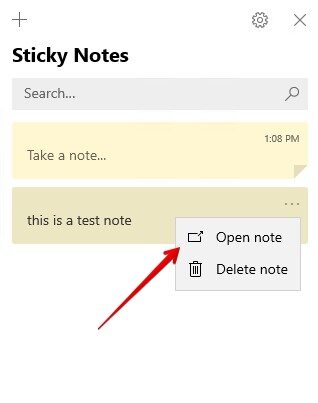
Checking your Notes list first is a great way to find lost sticky notes. If your sticky note wasn’t there, read on to find out ways to recover lost sticky notes.
Where Sticky Notes Are Stored on Windows 10
Before we move on to recovering deleted Sticky Notes, we must first learn where they’re stored. Knowing the path to the Sticky Notes folder is essential, as it’s involved in basically all of the methods we mention below.
In Windows 7, 8, and 10 (version 1511 or earlier), your Sticky Notes can be found in the following folder with the filename StickyNotes.snt:
%AppData%\Microsoft\Sticky Notes
For users with Windows 10 (version 1607 or later), the Sticky Notes file can be found in the following folder with the filename plum.sqlite:
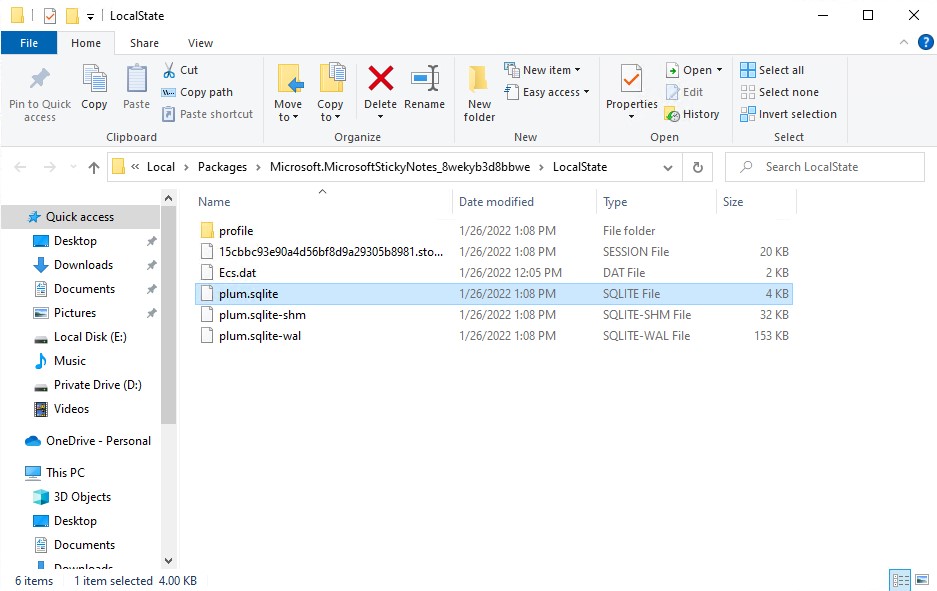
%LocalAppData%\Packages\Microsoft.MicrosoftStickyNotes_8wekyb3d8bbwe\LocalState.
Don’t see the necessary file in the folder? It may be lost or deleted, and we’ll show you how to recover Sticky Notes data in the next section.
How to Recover Deleted Sticky Notes
If you’ve found that your Sticky Notes have disappeared, here are a few methods you can use to find sticky notes that are missing.
Method 1: Check the Deleted Items Folder in Your Outlook Account
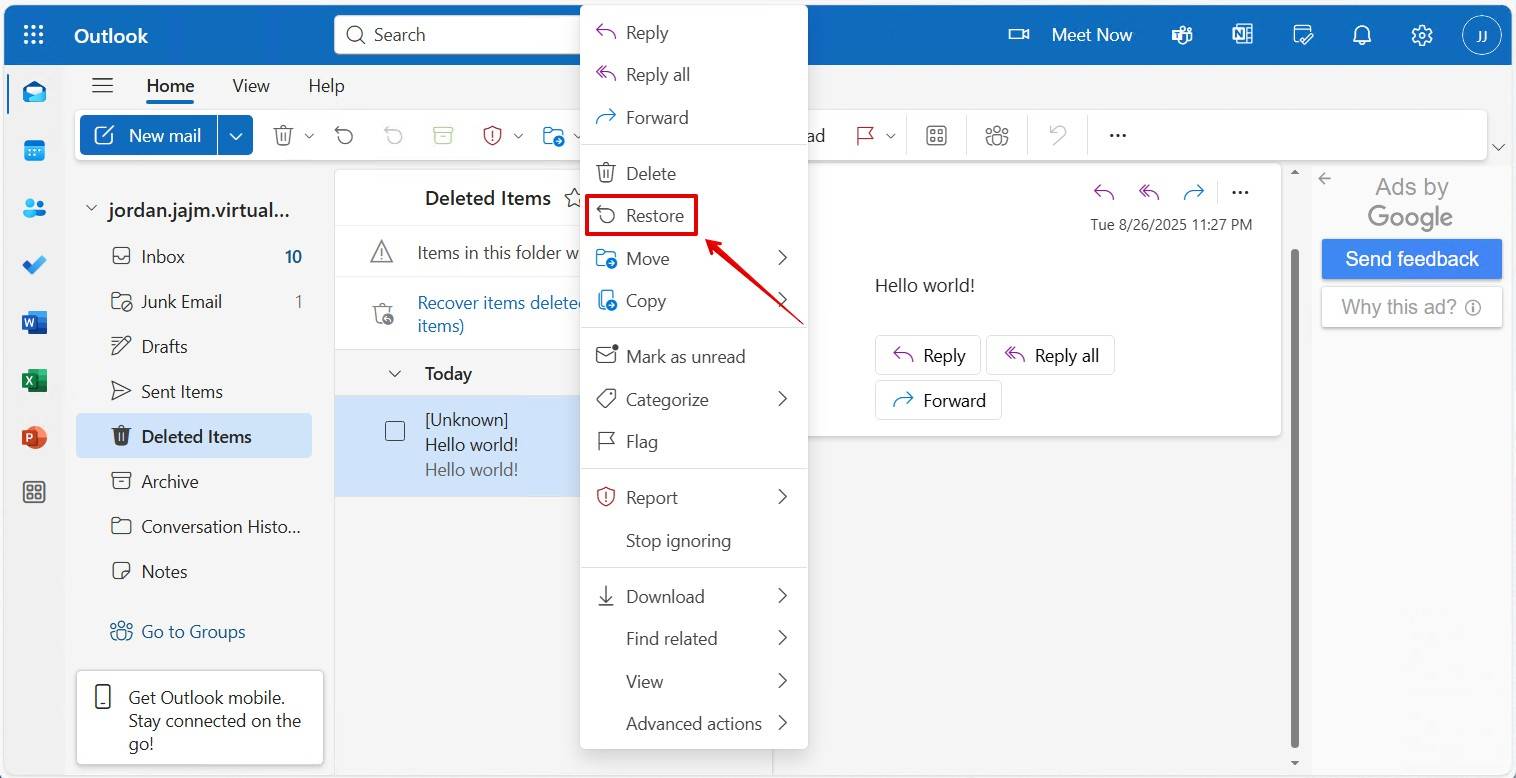
Sticky Notes are automatically synced with your Microsoft account. If you delete a note, rather than go to the Recycle Bin, it actually gets sent to the Deleted Items folder in Outlook. Keep in mind, however, that Outlook clears this folder every 30 days.
Don’t see the note in Deleted Items? Your device may not have synchronized with Microsoft’s servers. In which case, check the Notes section instead.
Here is how to retrieve deleted Sticky Notes by restoring them from Outlook:
- Go to Outlook.com and sign in to your account.
- Click Deleted Items.
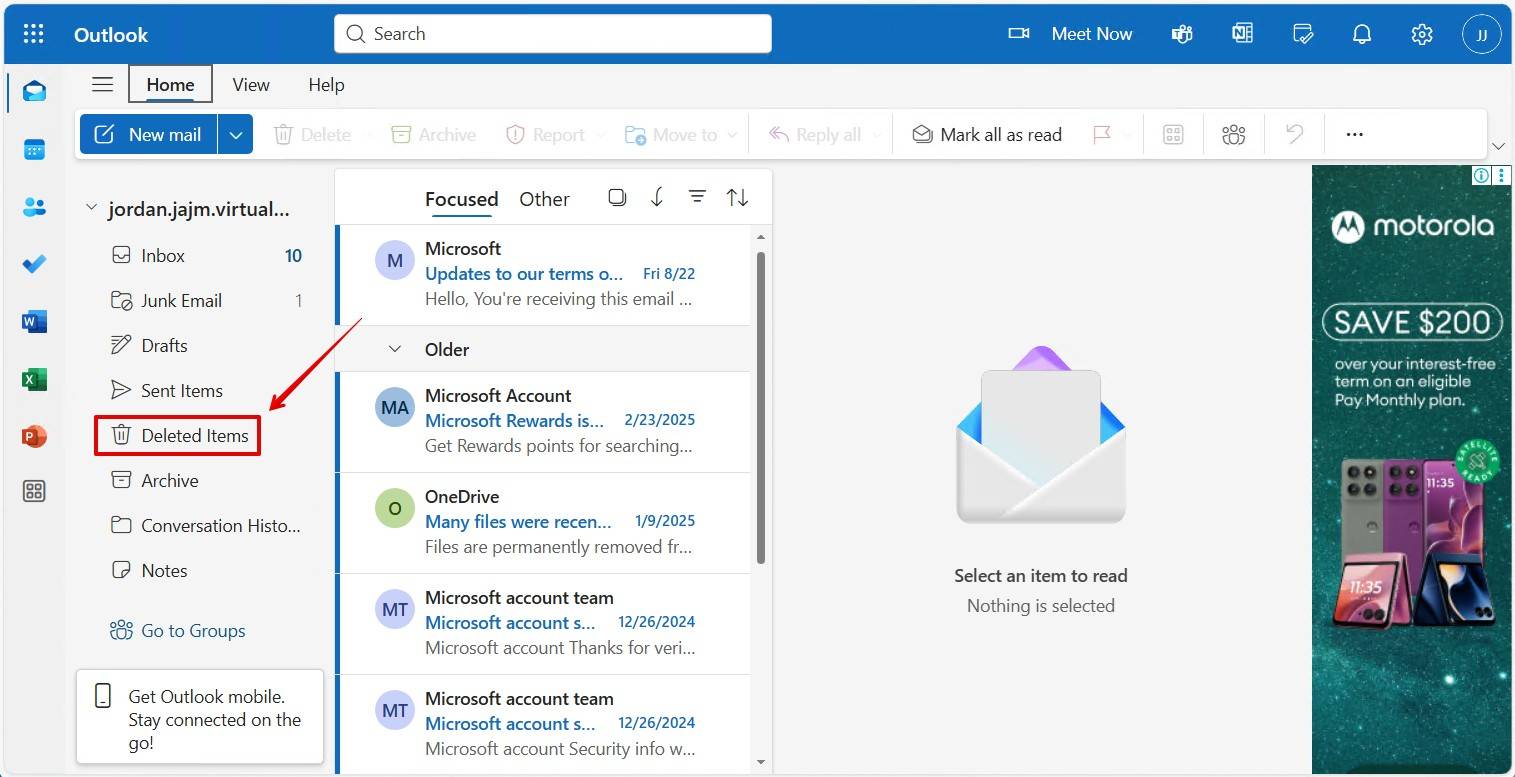
- Locate your deleted Sticky Note. Right-click it, then click Restore.
Method 2: Recover Using Data Recovery Software
When your Sticky Notes are deleted, and you don’t have a backup, the only way to get those Sticky Notes back is with data recovery software. Such software is capable of scanning your drive and locating the data used by Sticky Notes. For such cases, we recommend Disk Drill.
Disk Drill uses an all-in-one scanning algorithmto sweep your drive and find data that your operating system can’t see. From there, you can restore your Sticky Notes by recovering a single file or the entire folder.
The steps below will show you how to recover Sticky Notes on Windows 10, but the steps will be the same for Windows 11.
- Download and open Disk Drill.
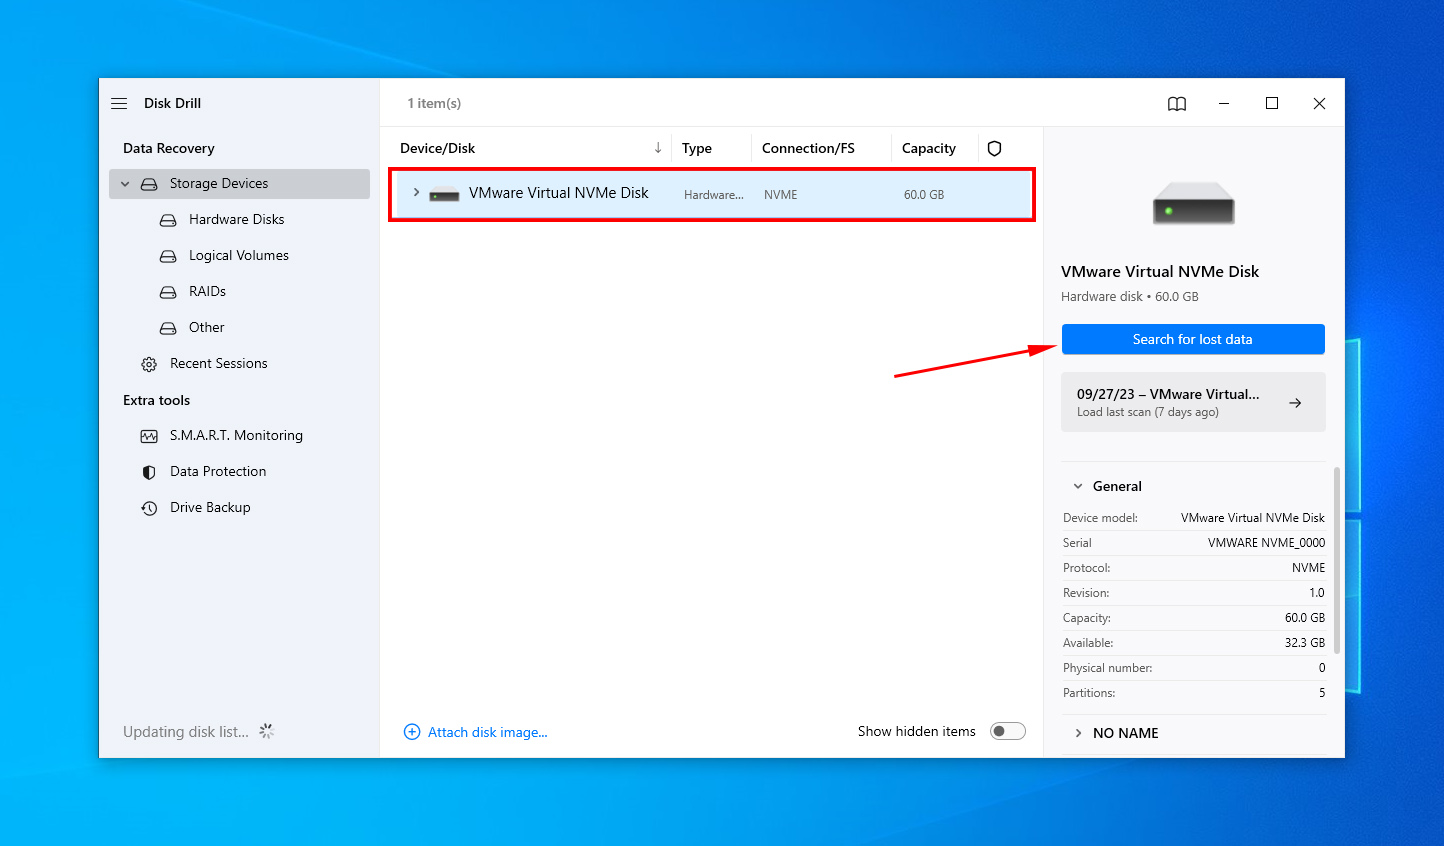
- Select your drive that contains the Sticky Notes files and click Search for lost data.
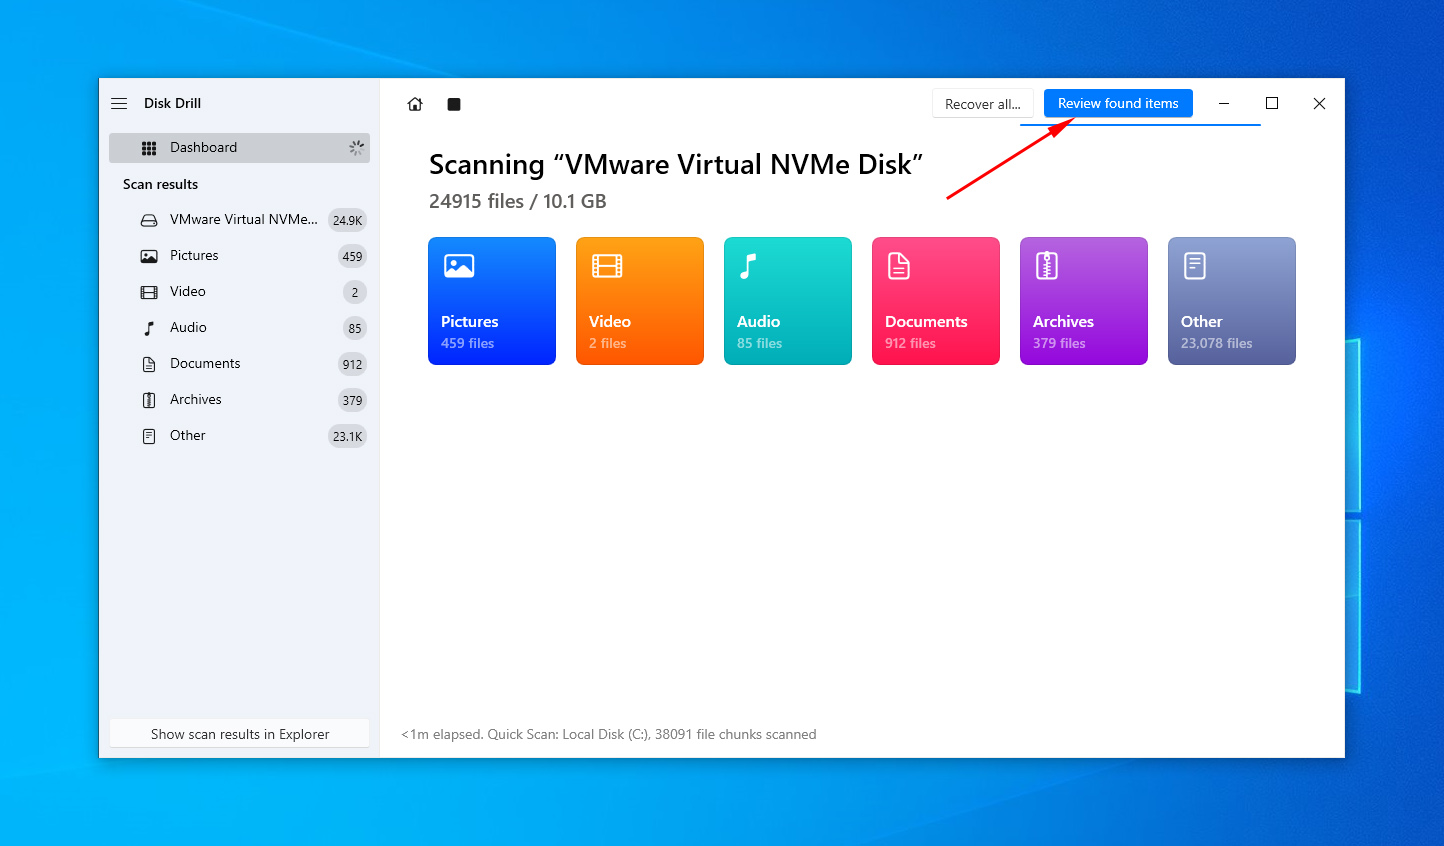
- Click Review found items once the scan is complete.
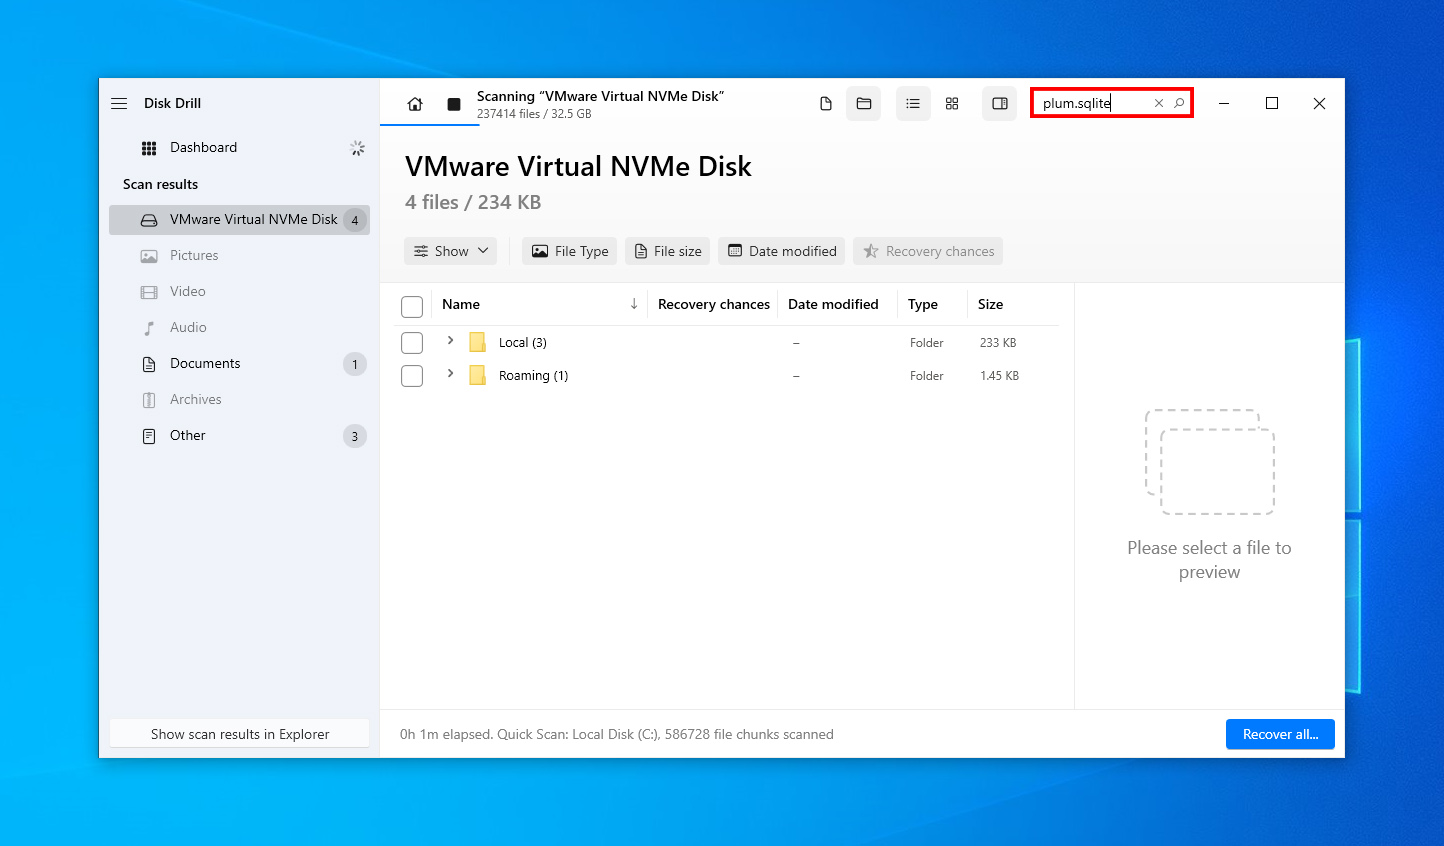
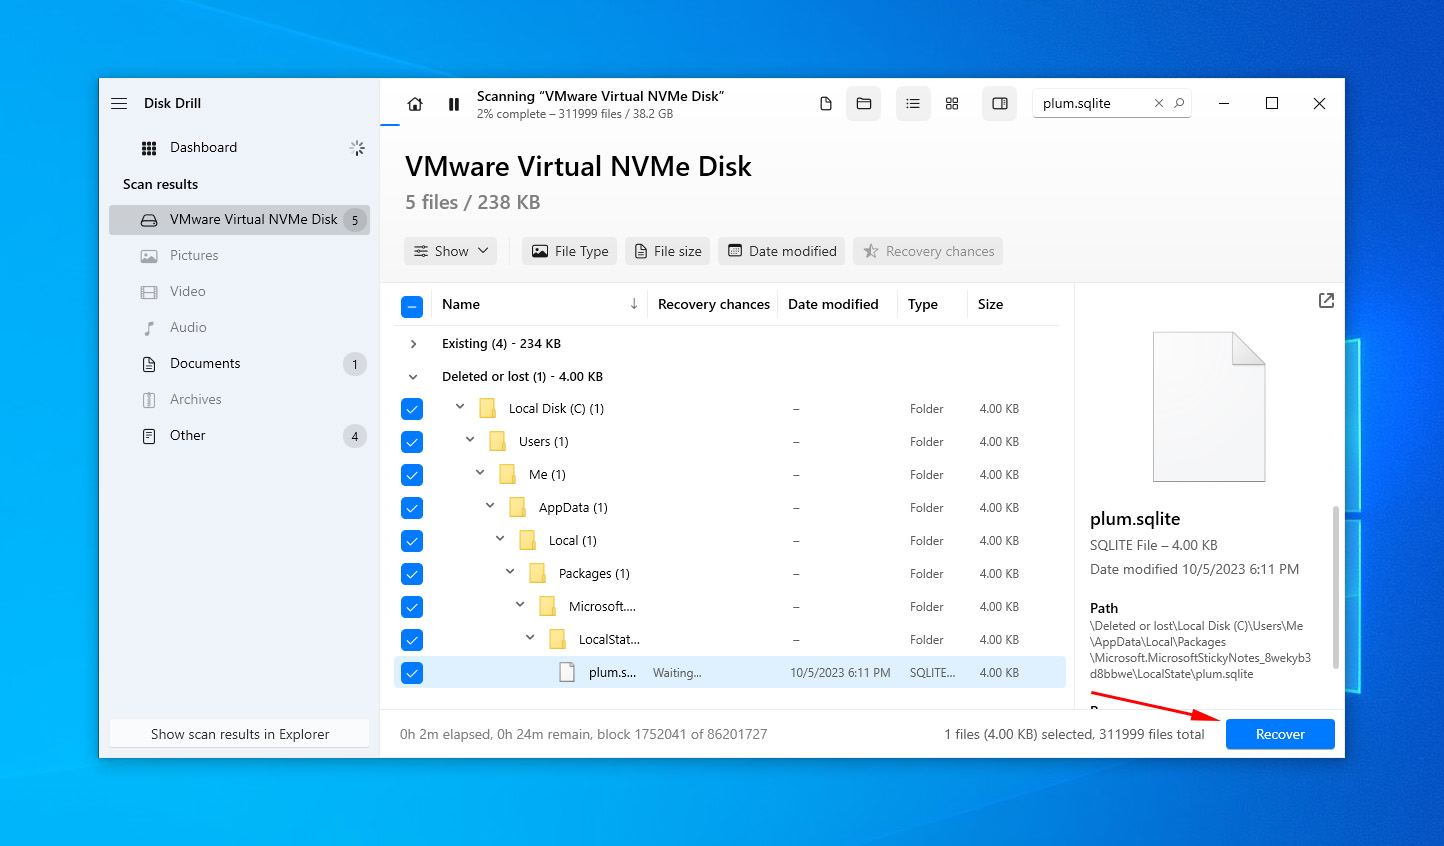
- Locate the Sticky Notes file. Rather than sift through all the files that Disk Drill found, use the search bar to find the exact file by typing the filename.
- Mark the file for recovery, then click Recover.
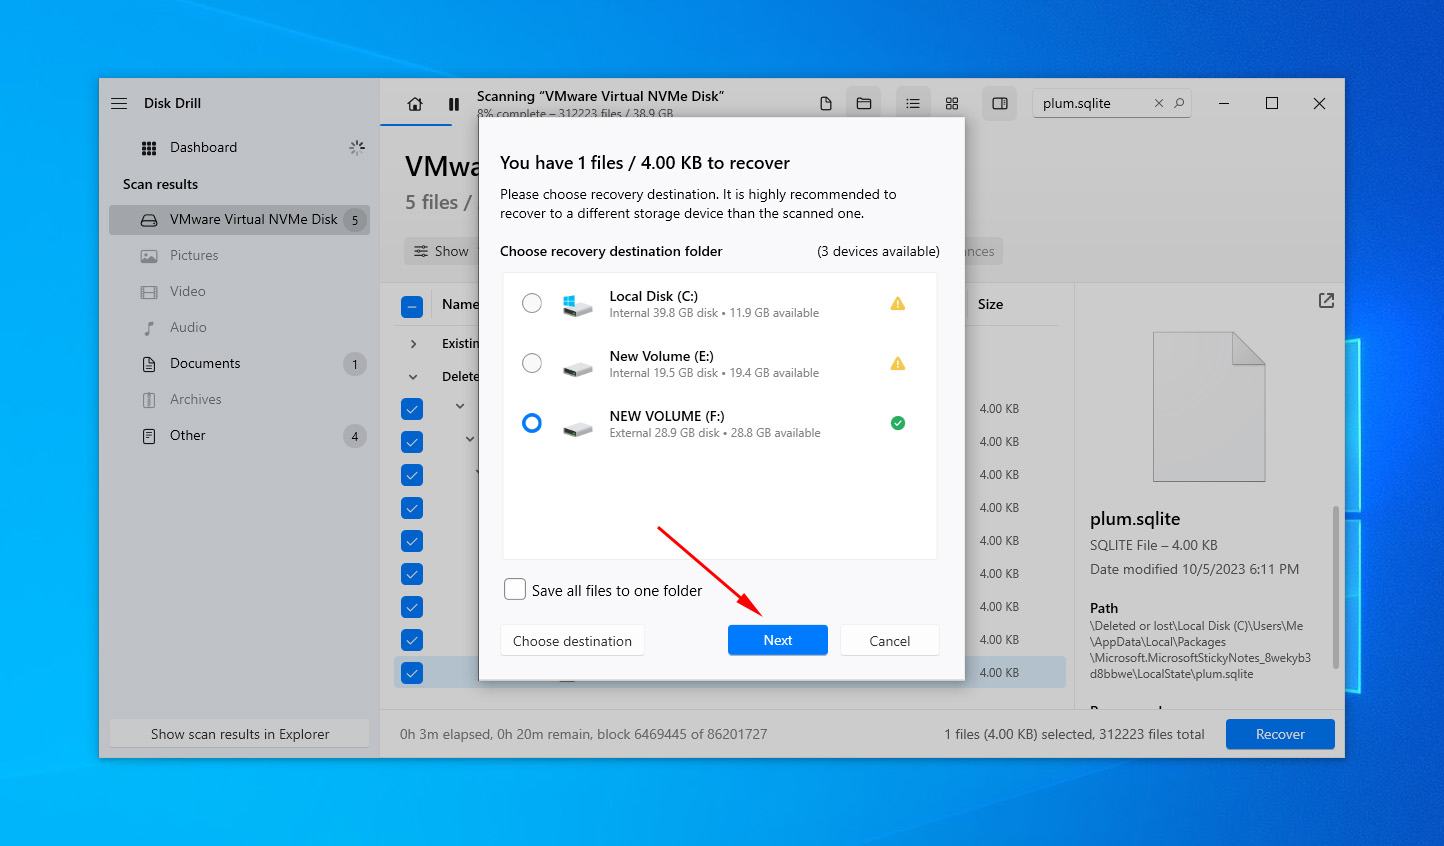
- Choose a separate physical location for recovery, then press Next.
- Move the Sticky Notes file to its original location to restore your sticky notes.
If you’re looking for a way to retrieve deleted sticky notes without downloading third-party software, take a look at the following solutions.
Disk Drill lets you recover some data for free with its free version. Anything more will require you to upgrade to a Disk Drill PRO license.
Method 3: Use the Restore Previous Version Option for Deleted Sticky Notes
No luck with the previous methods? This method will explain how to recover deleted Sticky Notes by restoring the file or folder to a previous version, but only if you’ve enabled the Windows File History backup feature and manually added the Sticky Notes app database file location (see above) to the backup list. If these conditions are met, you can restore the Sticky Notes file to a previous version, effectively rolling back to a point in time when the deleted sticky notes were still present.
Follow these steps to recover deleted sticky notes on Windows 10 by restoring the file to a previous version.
- Navigate to your Sticky Notes folder.
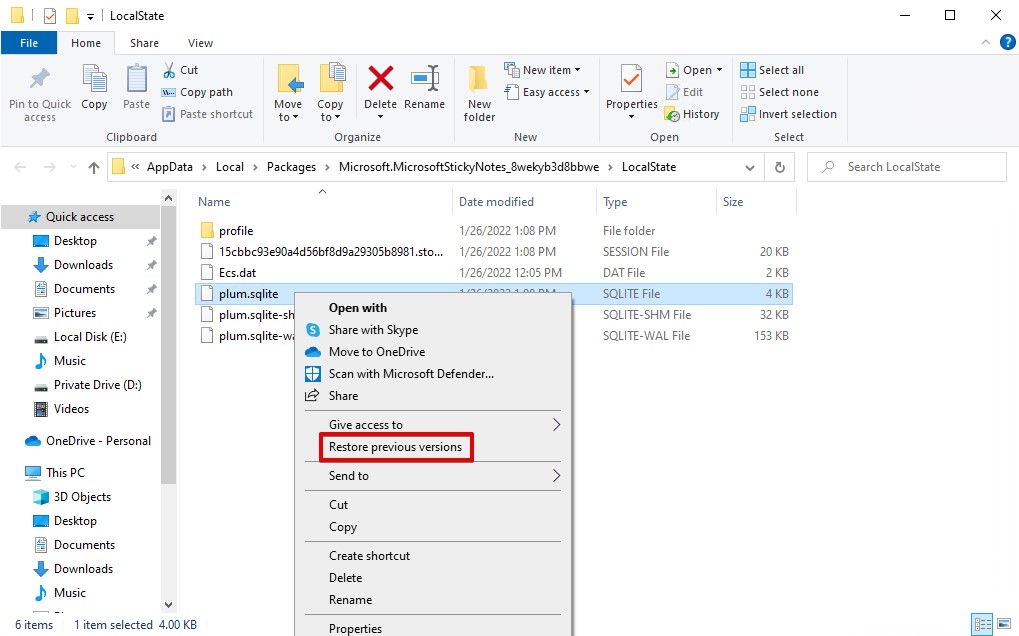
- Right-click the Sticky Notes file (either StickyNotes.snt or plum.sqlite) and click Restore previous versions.
- Select a previous version of the file and click Restore.
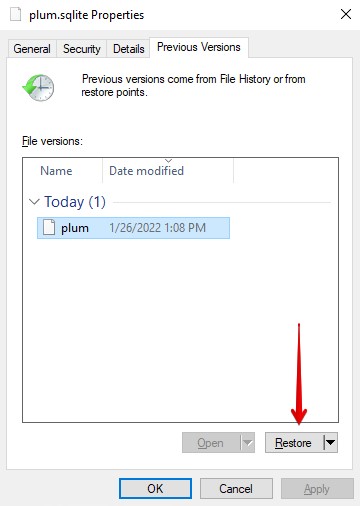
Is your file versions list empty? Unfortunately that means no previous versions of your Sticky Notes file were backed up. In this case, you need to try other recovery methods.
Method 4: Try to Restore the Content of a Note from a Sticky Notes File
If you’re running an earlier version of Windows 10, you can manually restore the contents of your notes directly from the hidden Sticky Notes file if it’s still intact.
Follow these steps to recover your notes from the StickyNotes.snt file:
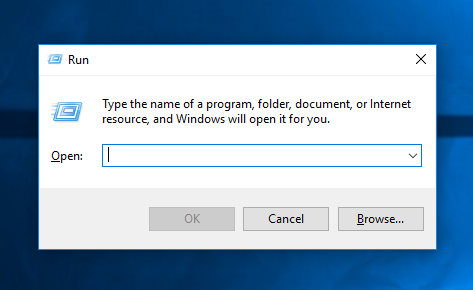
- Press Win + R on your keyboard to bring up the Run interface.
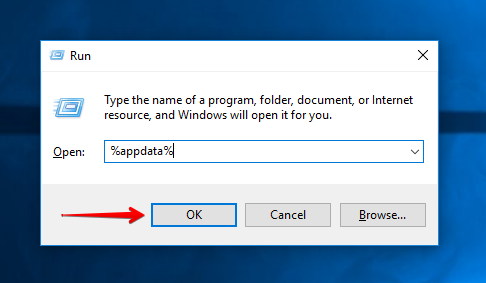
- Type %appdata% and press Enter or press OK.
- Open the Microsoft folder, then open the Sticky Notes folder.
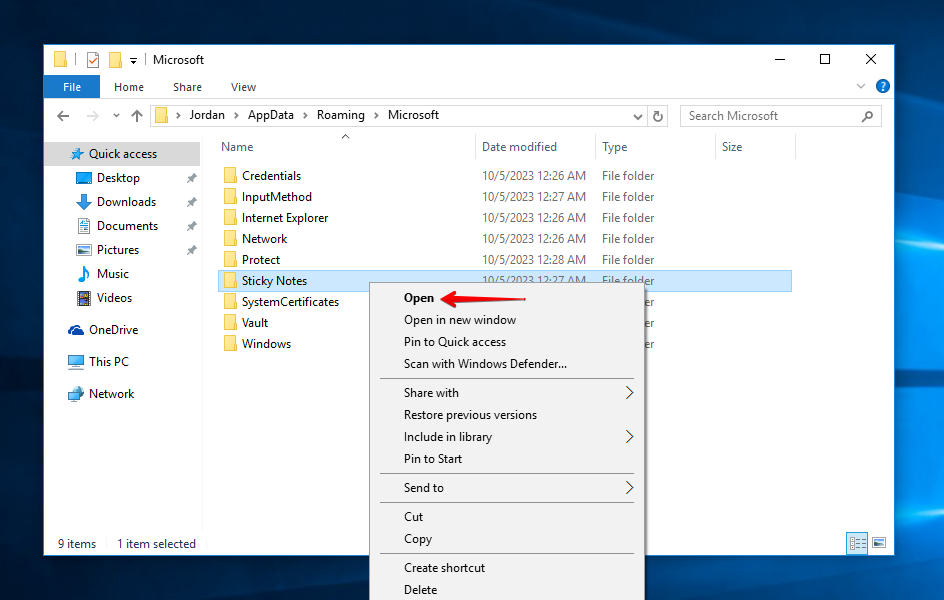
- Right-click StickyNotes.snt and open it with Notepad.
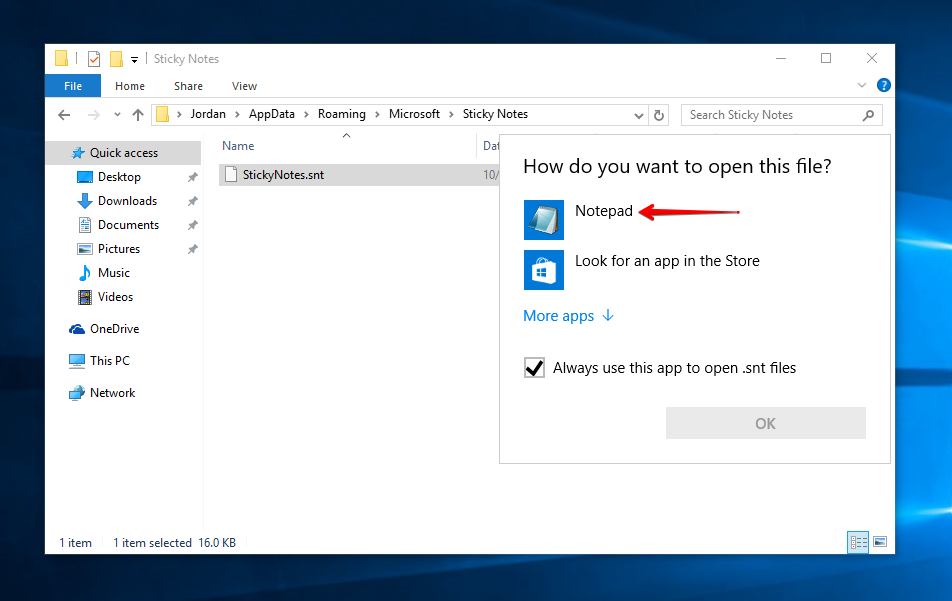
- Find your notes. You can use the Find function (Ctrl + F) to scan the document for keywords to find your notes.
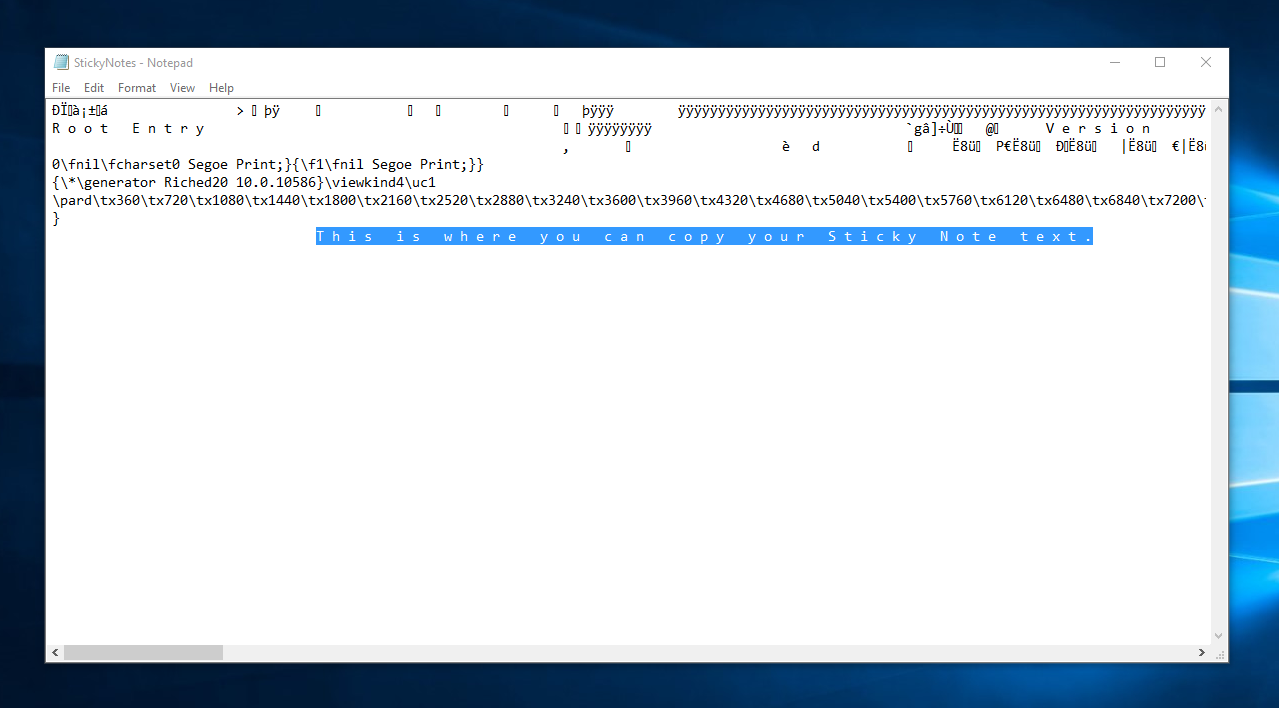
- Copy the contents to new notes and fix the formatting.
What You Can Do to Be Ready for Sticky Notes Deletion in Windows 10
The easiest way to recover from a data loss is preparation. Essentially, make sure a copy of your Sticky Notes data is stored elsewhere. This way, you can find deleted Sticky Notes even if they’ve been lost locally.
Method 1: Turn On Synchronization With Your Microsoft Account
Synchronization is the easiest way to add another layer of protection against data loss when it comes to your Sticky Notes. When sync is enabled, your Sticky Notes will be uploaded to your Outlook account in the cloud. Then, whenever one is deleted, it will be sent to your Outlook’s Deleted Items folder, where it can be restored within 30 days.
Sync sessions happen periodically. That means that, if you have a Sticky Note that is deleted before it’s synced, it won’t appear in Outlook. To combat this, there is the option to manually sync within the Sticky Notes app.
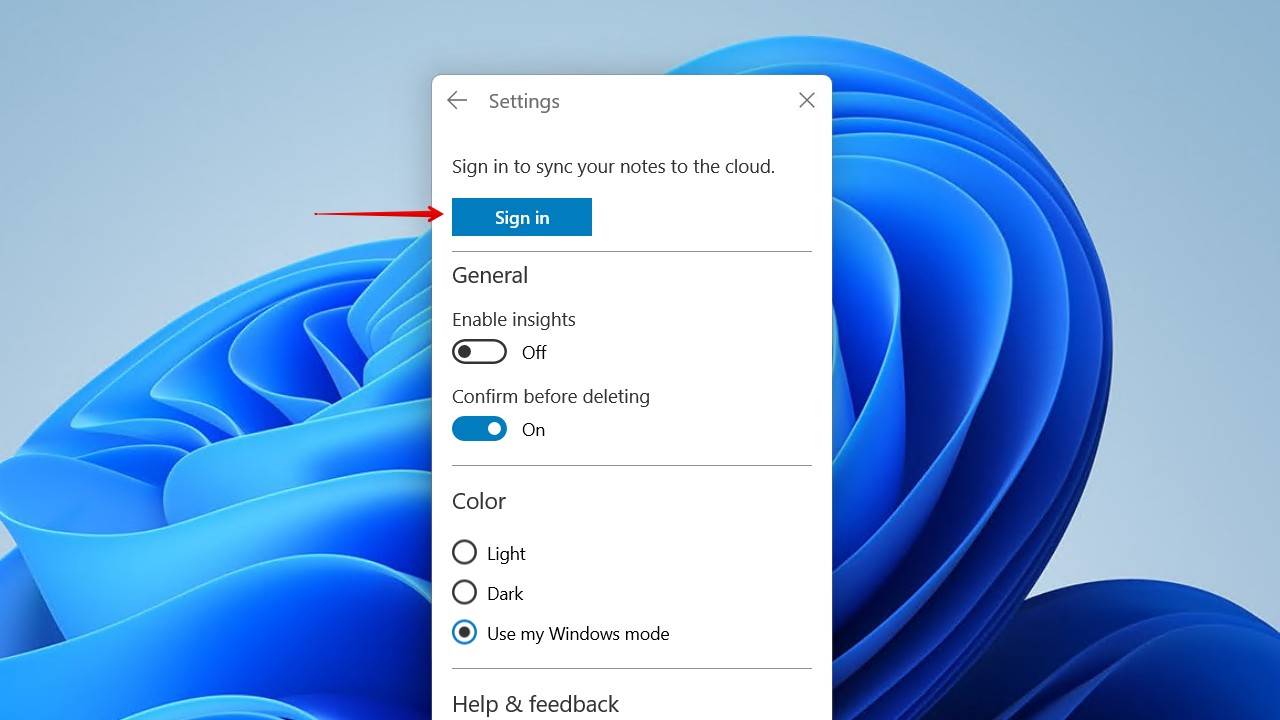
To enable sync, you just need to sign in to your Microsoft account through Sticky Notes. Like this:
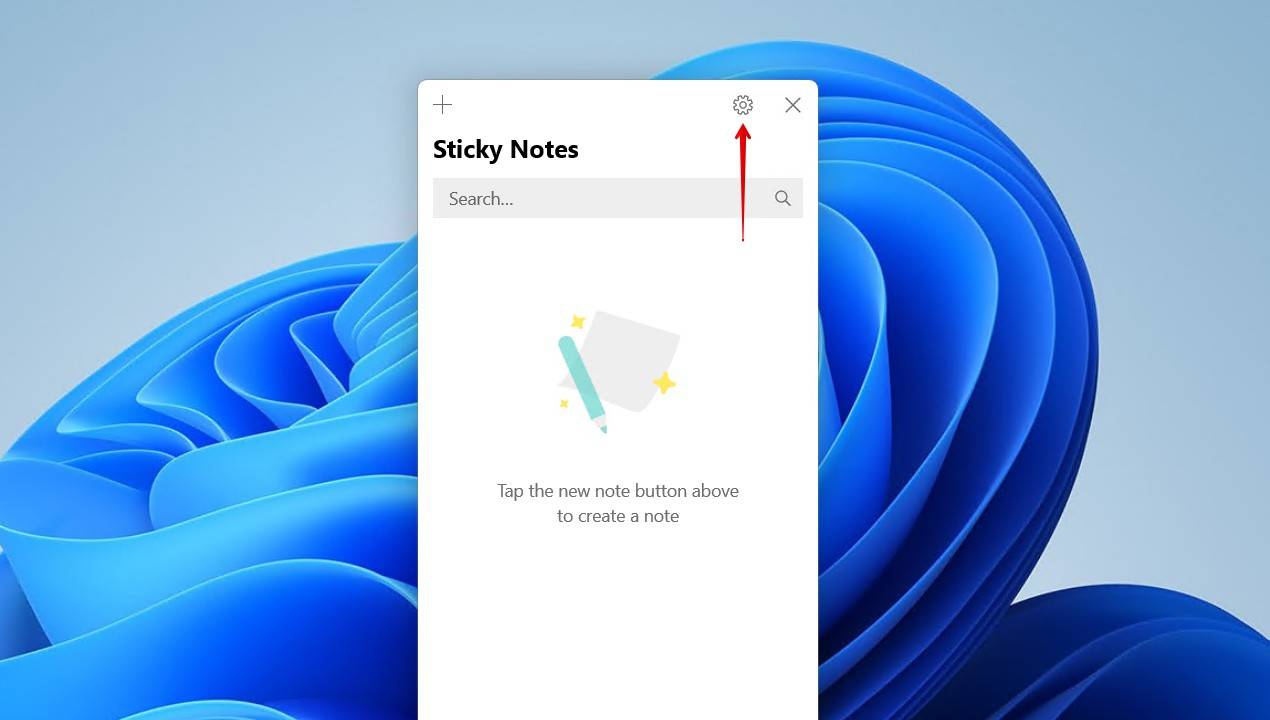
- Open the Sticky Notes app.
- Go to Settings section at the top.
- Sign in.
Method 2: Create a Backup Copy of Sticky Notes
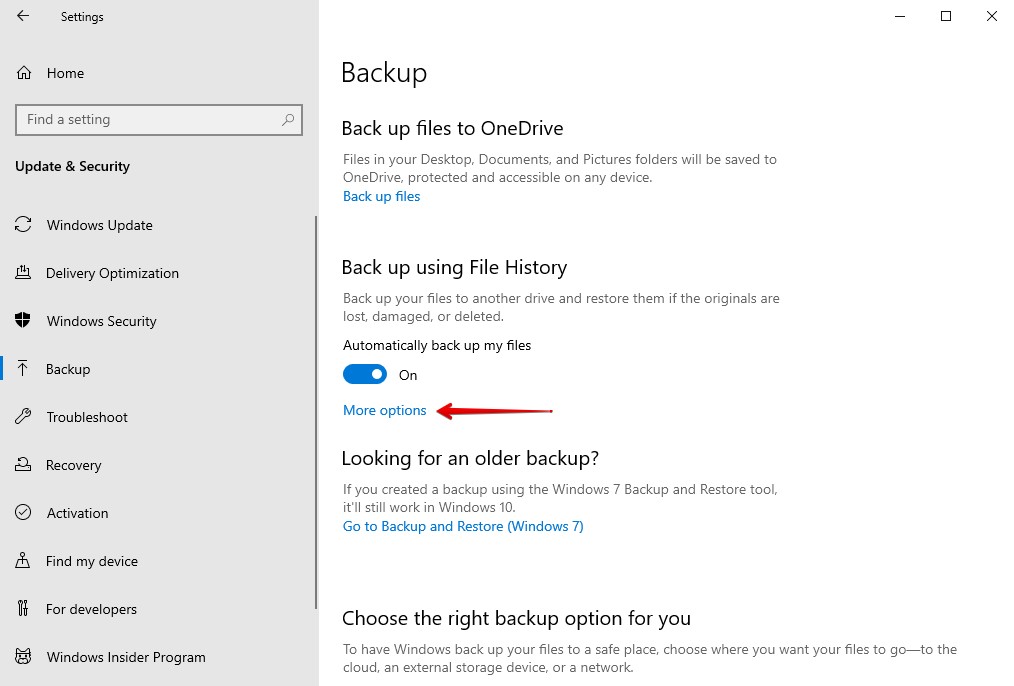
Keeping a backup of your Sticky Notes file ensures you can easily restore it to working order following a data loss situation. The steps below will guide you through backing up the Sticky Notes file using File History, a backup utility that’s built-in to Windows. From there, you can use it as a Sticky Notes recovery option. If you have it set up already, you can ignore these steps.
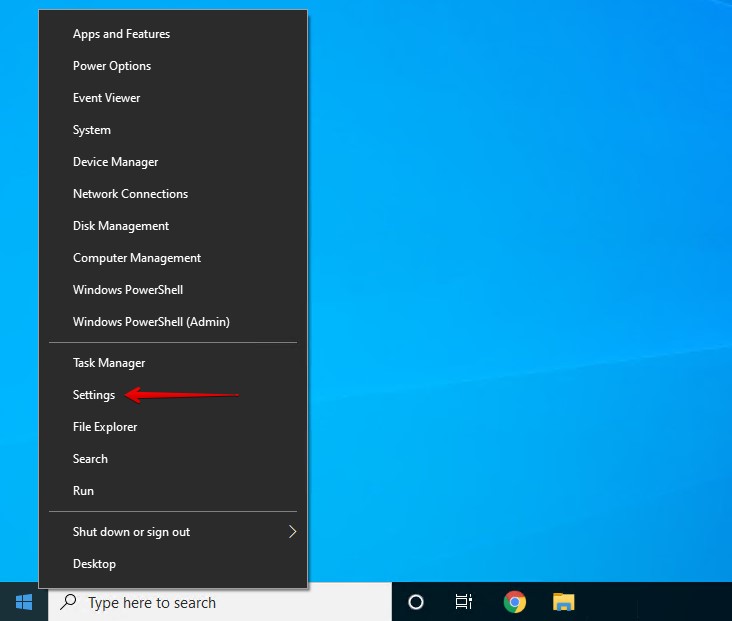
- Right-click Start and click Settings.
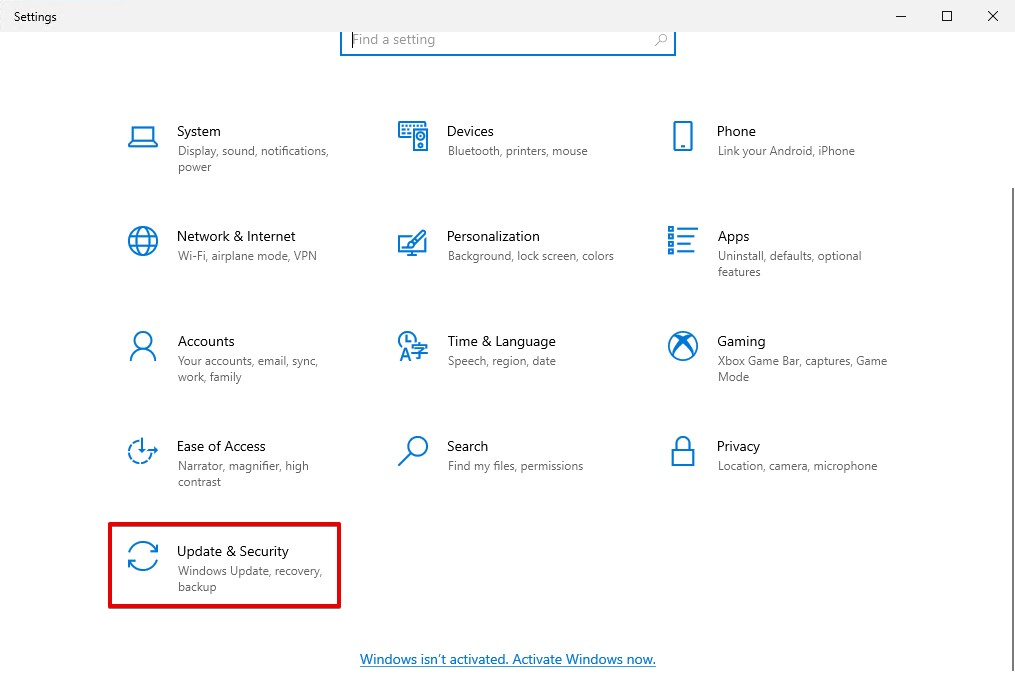
- Select Update & Security.
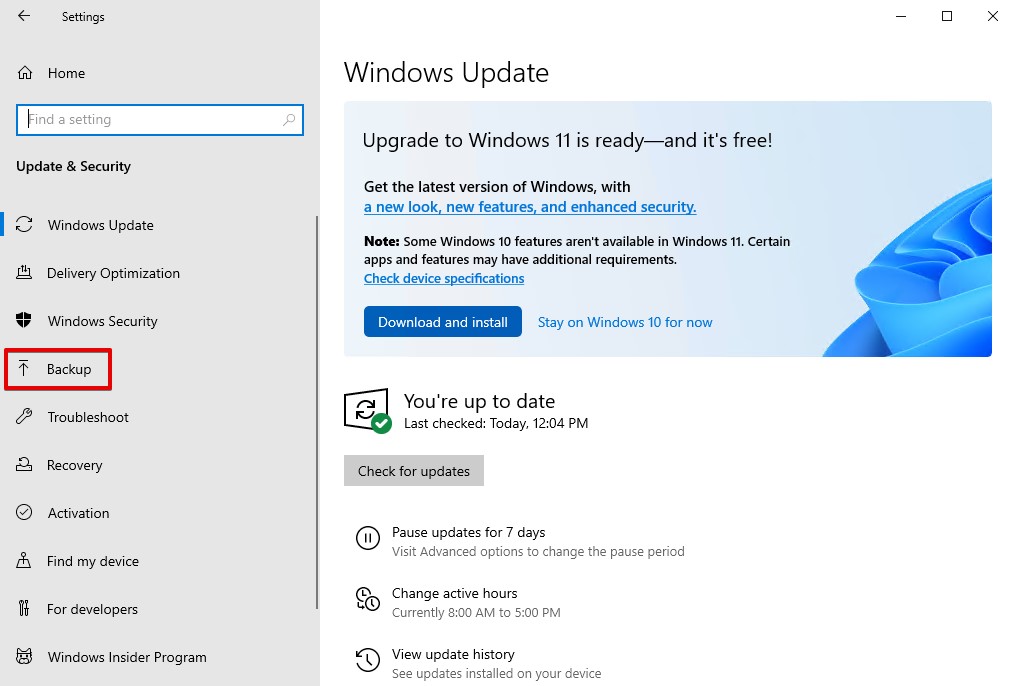
- Click Backup.
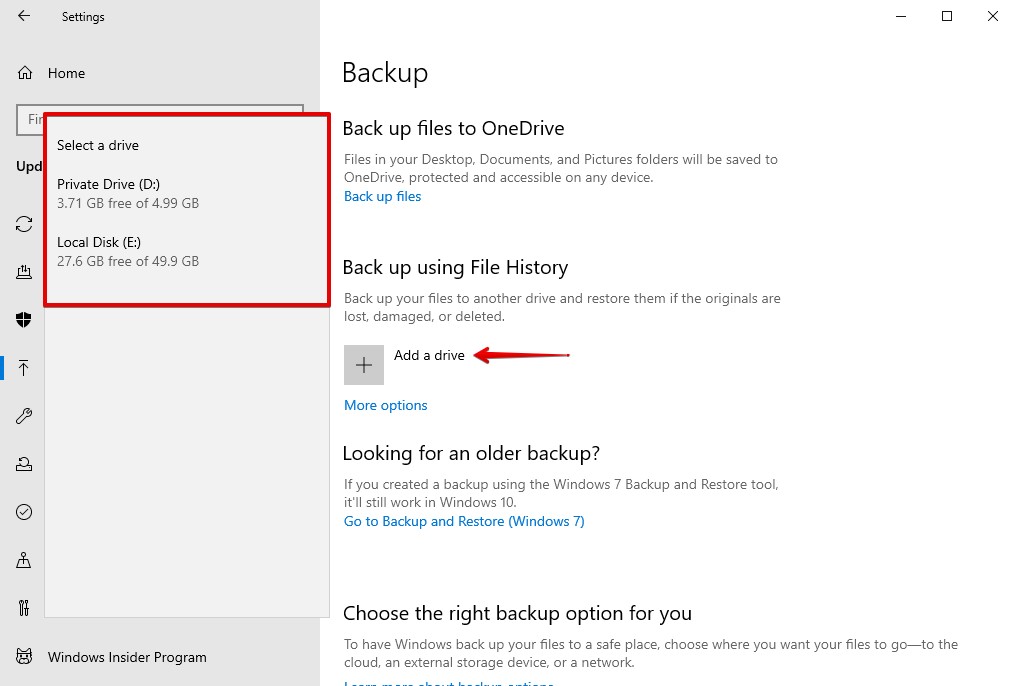
- Click Add a drive and select a drive.
- Click More options.
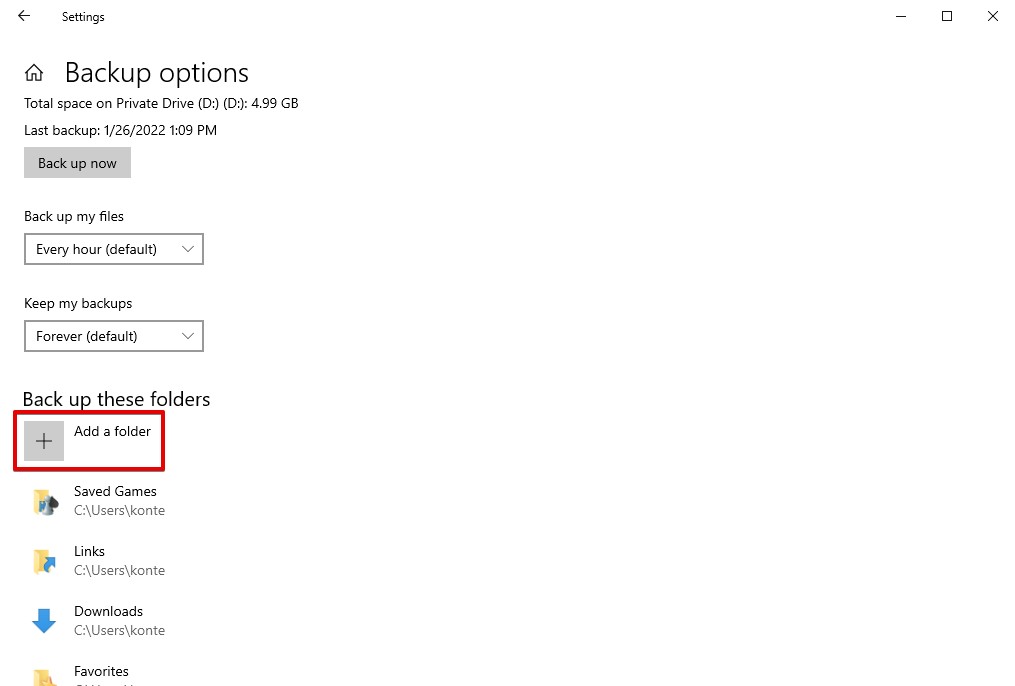
- Click Add a folder.
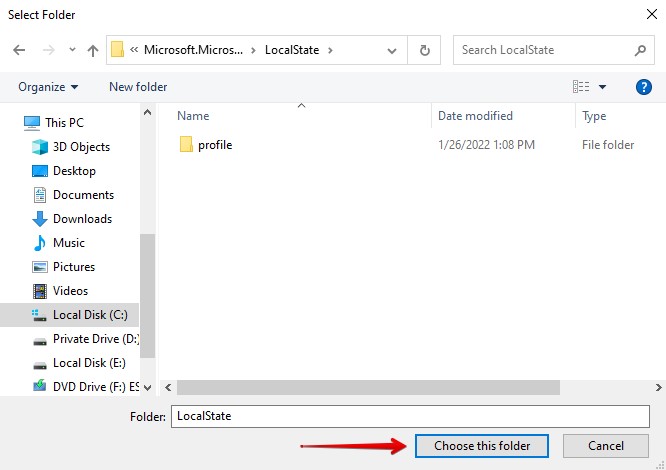
- Navigate to the Sticky Notes folder located at either %AppData%\Microsoft\Sticky Notes or %LocalAppData%\Packages\Microsoft.MicrosoftStickyNotes_8wekyb3d8bbwe\LocalState and click Choose this folder to add it to the list of folders that are backed up by File History.
Conclusion
If you accidentally deleted your Sticky Notes notes, or otherwise lost them following a data loss event, the methods outlined in this article will teach you how to recover Sticky Notes. The key here is to recover your plum.sqlite file (or StickyNotes.snt on older Windows versions) which contains all of your notes.
Let us know how useful these methods proved to be. Did you manage to get your data back? Were there any setbacks? Leave a comment below. Check out our other Windows guides for help recovering something else, or our macOS guides if you’re a dual-user.
FAQ:
- Go to Outlook.com and sign in to your account.
- Click Deleted Items.
- Right-click your sticky note and select Restore.
- Download and install Disk Drill to a separate physical partition.
- Select the drive that contains your Sticky Notes folder and click Search for lost data.
- When the scan is complete, click Review found items.
- You can either search for the file manually or use the search bar to find StickyNotes.snt or plum.sqlite (based on your Windows version).
- Mark the file for recovery, then click Recover.
- Select an output location (on a separate physical partition), then click OK.


