 Can’t edit, delete, or add any data to your SD card? These are some telltale signs that indicate your card is stuck in read-only mode. While memory cards can be configured to read-only mode manually, there are times when this setting gets unintentionally triggered or when errors cause it.
So how do you fix an SD card stuck in read-only mode? In this article, we have gathered all the common fixes you can try when your SD card is read-only.
Why is Your SD Card in Read-Only Mode?
Your SD card might be stuck in read-only mode for a reason that can simply be turned around with a switch — or something more complicated. Nevertheless, understanding the root cause will guide you in effectively resolving the SD card’s read-only issue.
Here are some of the common reasons why your SD card is stuck in read-only mode:
| Reason | Description |
| 🎚️ Write protection switch | Some cards come with a tiny write protection switch on the side. If you accidentally turned the switch on, your card would be accessed in read-only mode, which would be hard to override on the software side. |
| 💻 Operating system restrictions or settings | Tools like diskpart in the Command Prompt can set the read-only attribute of your SD card via commands. This aims to prevent potential SD card corruption or unauthorized access. |
| 🗃️ Corrupted file system | A corrupted file system might be the underlying reason why your micro SD card is in read-only mode. Interrupted file transfers, sudden power loss, or other factors can corrupt your system. The SD card and its contents are usually salvaged using data recovery and repair apps when it has a corrupted file system. |
| 🔨 The card is damaged or failing | Any physical damage, often caused by mishandling or exposure to moisture or extreme temperatures, can cause your SD card to fail. Hardware failures can cause your card to open in read-only mode to prevent further damage and data loss. |
How to Fix SD Card Stuck in Read-Only
With a rough idea of what got your SD card stuck in read-only mode, you can proceed to try simple methods on how to change your SD card from read-only. In most cases, if you encounter this error with an SD card inserted in an Android device, you have to remove the SD card from your phone. Then, connect the card to your PC to start repairing it.
Method 1:Check the Switch on Your SD Card
Some SD cards come with a convenient write-protection switch as a safety precaution. If the switch is turned on, your card will be accessed as read-only regardless of where you connect your storage device.
The ON switch for write protection is usually indicated by an arrow with a “LOCK” text. Oftentimes, if the switch is in the “UP” position, then your SD card is not write-protected. If it is in the “DOWN” position, then the write protection is activated.
To remove write protection on your SD card, inspect your SD card for a physical write-protection switch. If your card has one, make sure that it is not turned on.
Method 2:Check Your SD Card for System Errors
For Windows users, you can use the Error Checking tool to scan and repair file system errors that might be causing an SD card read-only error.
To check your card for errors, connect your SD card to your computer and follow these steps:
- Open File Explorer and find your SD card in the list of available drives.
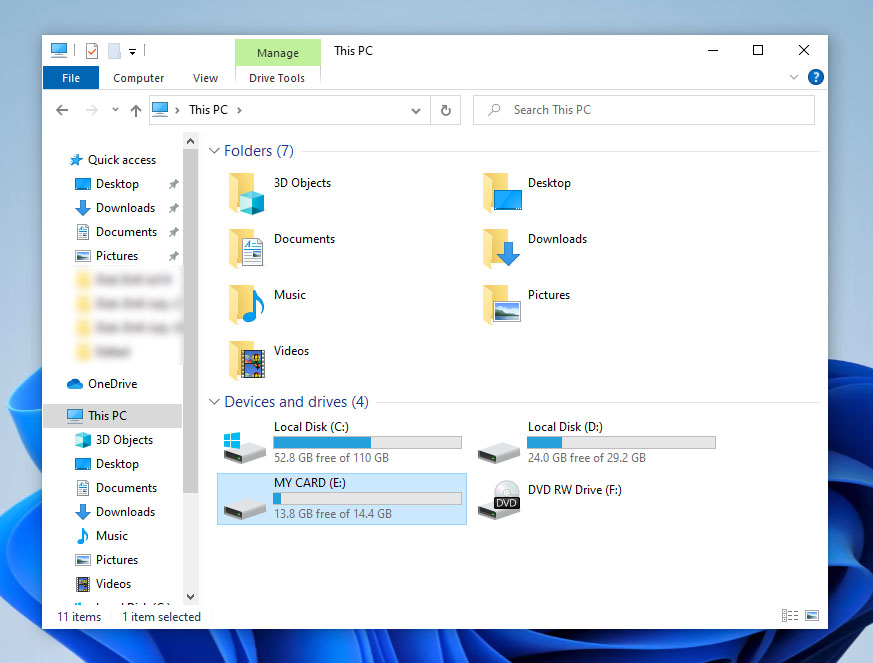
- Next, right-click on your device and select Properties from the dropdown menu.
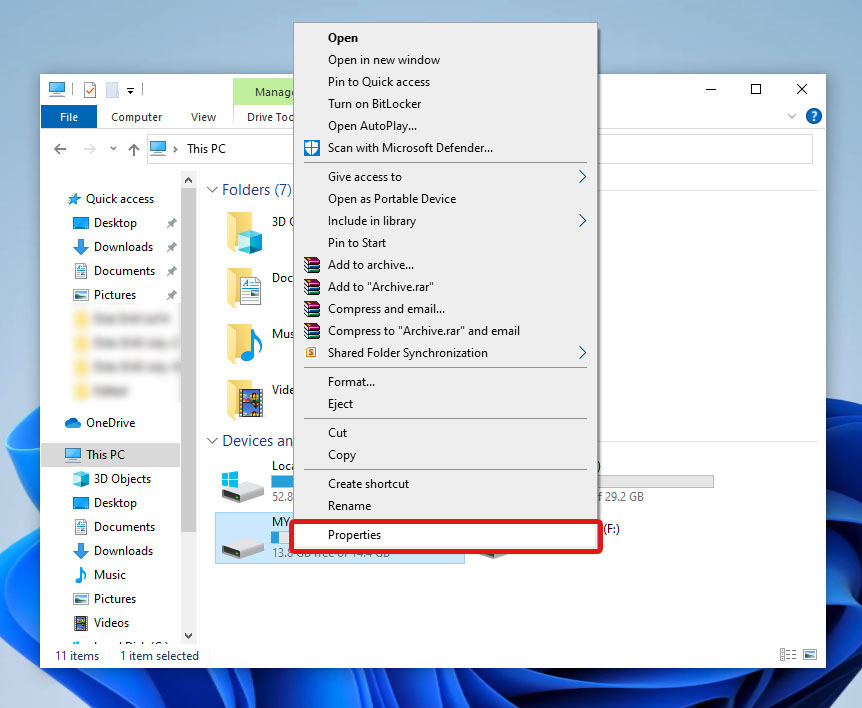
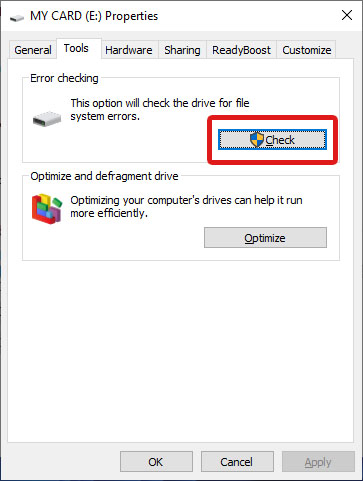
- Go to the Tools tab. Under the Error checking section, click the Check button and follow the tool’s instructions.
Method 3:Remove Read-Only Attributes Using CMD
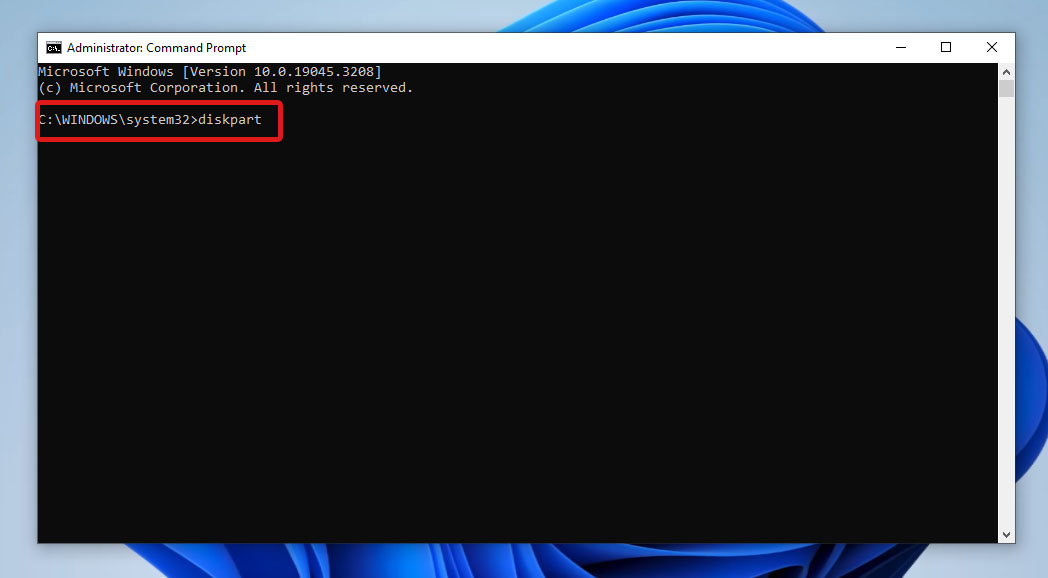
The Diskpart utility also has features to fix the SD card read-only Windows 10 error. This tool is accessible via the Command Prompt (CMD). Remove the read-only setting from your card by doing the following:
- Open the Command Prompt in Administrator mode.
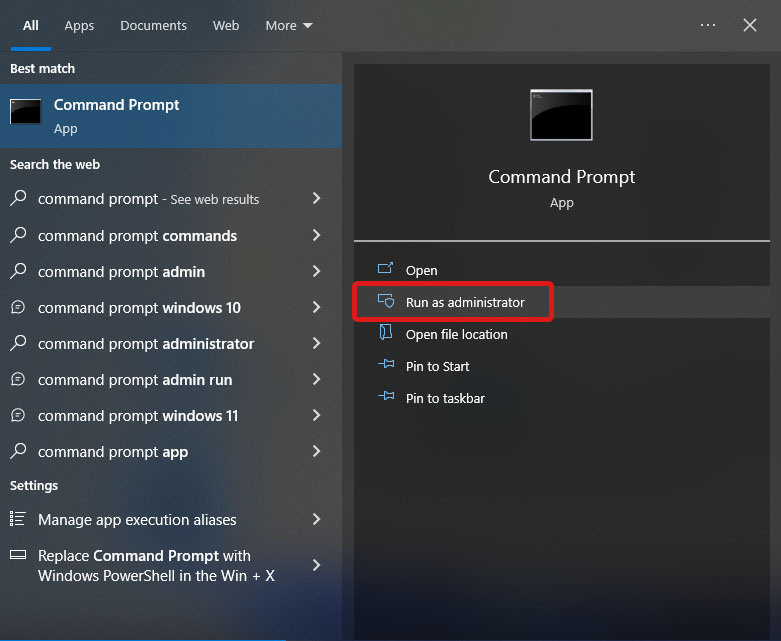
- Type
diskpartand press Enter.
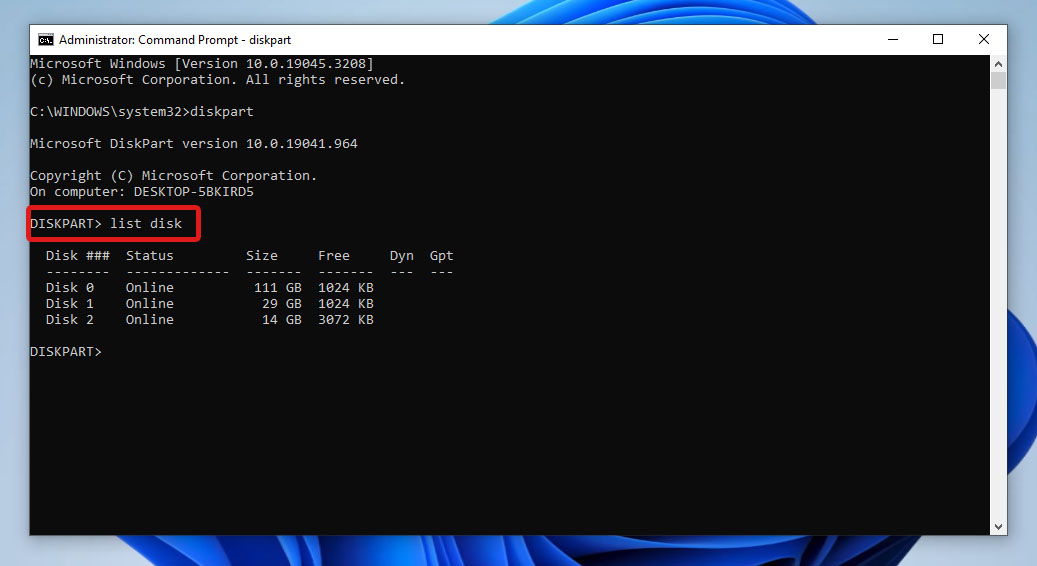
- On the new window, type
list disk, and press Enter to execute the command. This will display all the drives available. Take note of the Disk number of your SD card.
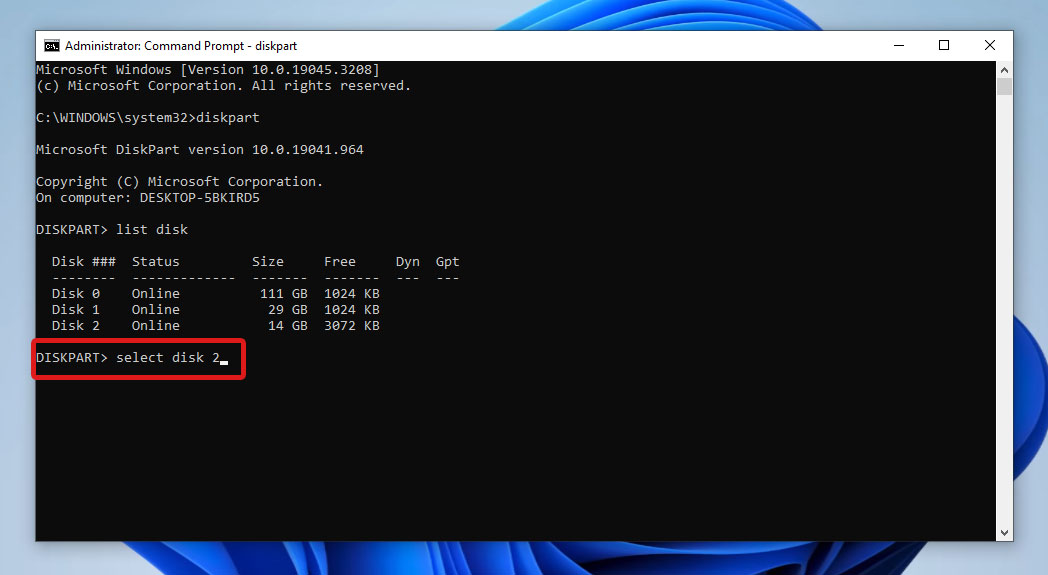
- Next, type
select disk x, where x is the disk number of your SD card. Then, press Enter.
- Type
attributes disk clear readonlyand press Enter to clear the read-only attribute set on your card. If you want to verify the status of your SD card afterward, typeattributes diskand press Enter.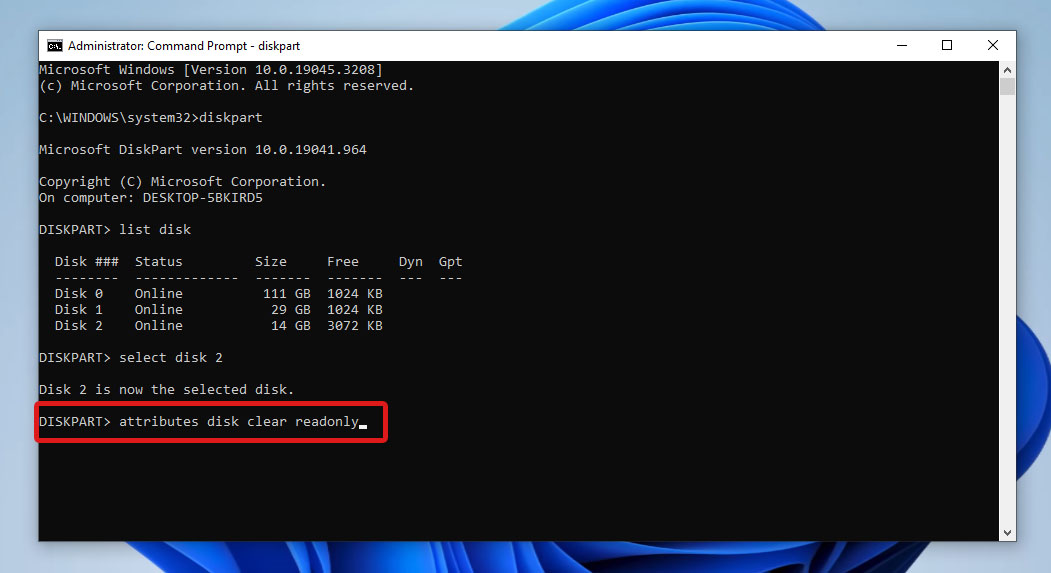
Once you’re done using Diskpart, simply type and enter exit to quit Command Prompt.
Method 4:Change Storage Device Policies
If Diskpart does not work, you can try to change the Group Policy settings on your computer. The Local Group Policy Editor (gpedit.msc) is a built-in tool used for viewing and editing different group policy settings on Windows. This set of policies applies to different users on your computer. It also includes advanced settings on your computer.
To disable the read-only attribute of your SD card by editing a group policy, simply follow the steps outlined below:
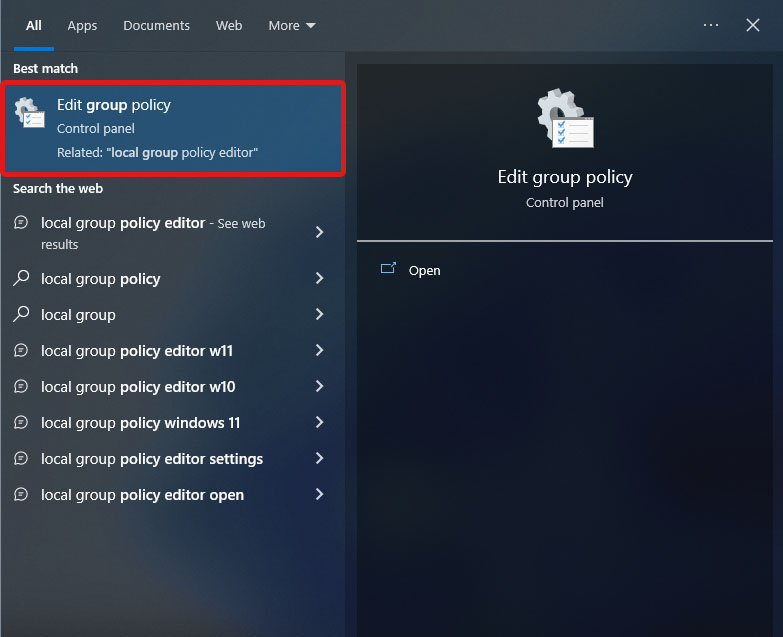
- First, open Local Group Policy Editor by searching it in the Start menu or opening the Control Panel.
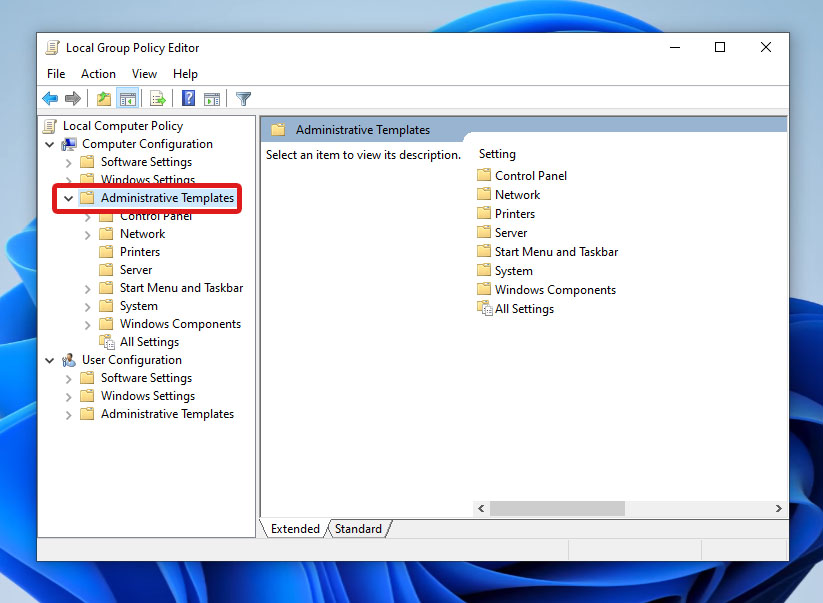
- Under Local Computer Policy > Computer Configuration, expand the Administrative Templates drop-down.
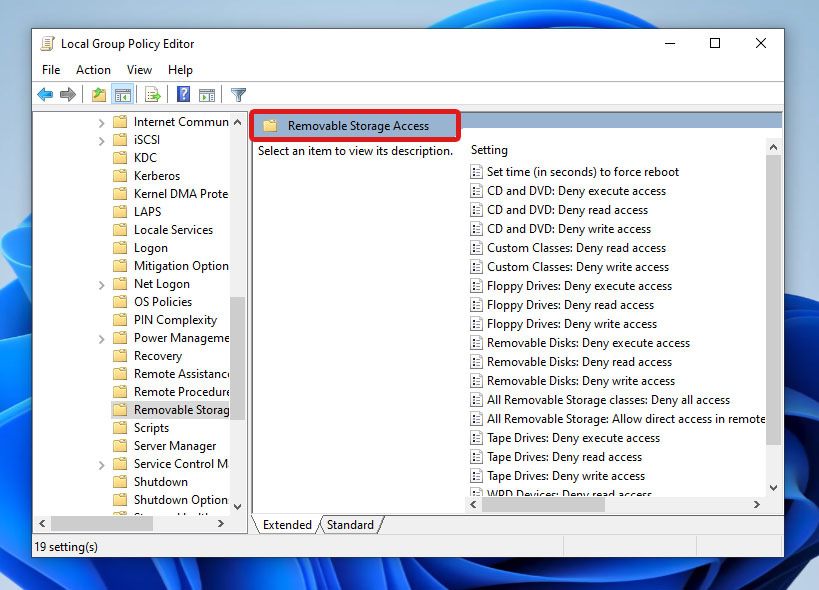
- After that, select System > Removable Storage Access.
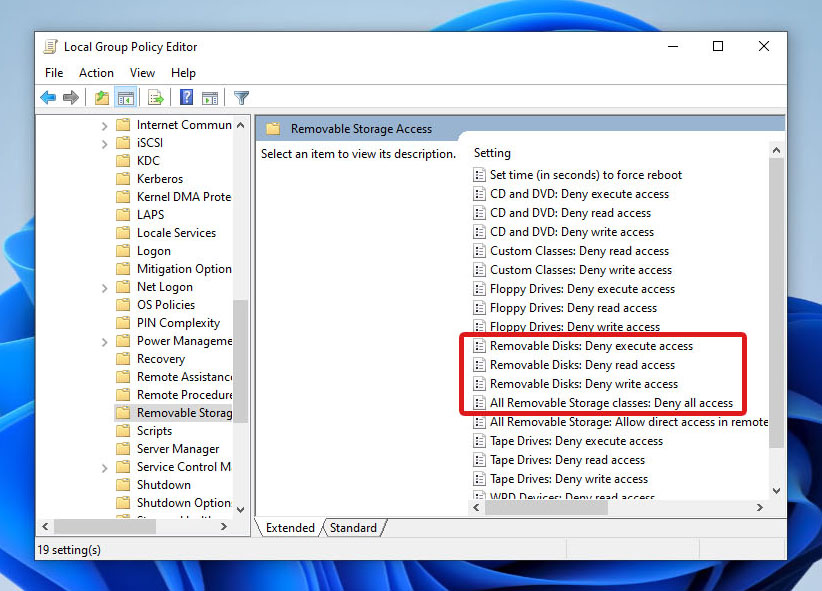
- Disable the following settings:
- Removable Disks: Deny execute access
- Removable Disks: Deny read access
- Removable Disks: Deny write access
- All Removable Storage classes: Deny all access
Alternatively, you can do the same thing using the Registry Editor. Simply open the Registry Editor app and navigate to \HKEY_LOCAL_MACHINE\SYSTEM\CurrentControlSet\Control\StorageDevicePolicies. Then, check for the WriteProtect DWORD and set its value to 0.
Method 5:Format the SD Card
Consider formatting your SD card only if the previous methods were unsuccessful. To format read-only SD card, connect your device to your PC with a memory card reader and do the following:
- Open File Explorer and find your memory card.
- Right-click on the card and select Format.
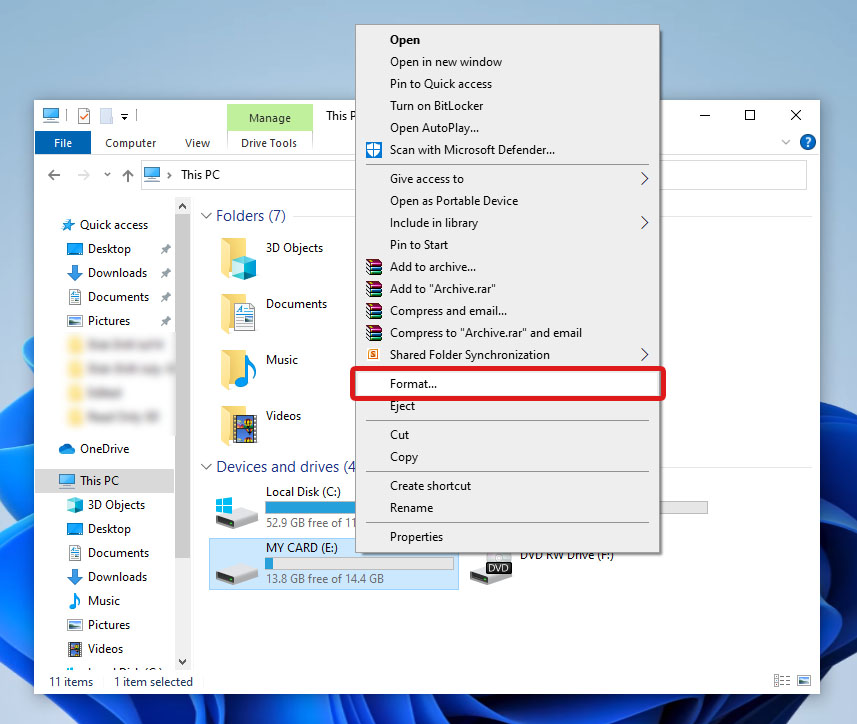
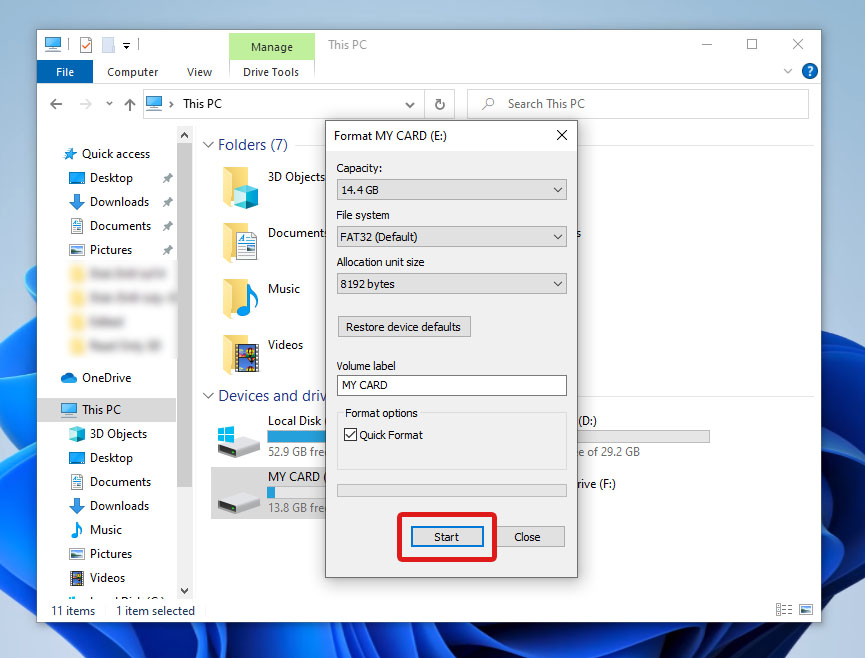
- After that, set the File system to the appropriate one for your drive and click the Start button to start the format process.
For Android SD card read-only error, you can also format your card even without removing it from your Android device. This method will vary based on your device, but will generally follow these steps: Open Settings > Storage > SD Card > Format. However, you should connect your card to a PC to perform other methods to fix a corrupted Android SD card.
Method 6:Clean the SD Card in CMD
In cases where formatting your SD card is not possible, try using the Command Prompt to clean your card and write a new file system. Here’s how to do this using Diskpart:
- Open the Command Prompt in Administrator mode.

- Next, type
diskpartand press Enter.

- After that, type
list disk, and press Enter. This will display all the drives available. Take note of the Disk number of your SD card.

- Type
select disk x, where x is the disk number of your SD card. Then, press Enter.

- Type
clean allto remove all partition and volume information on your memory card.
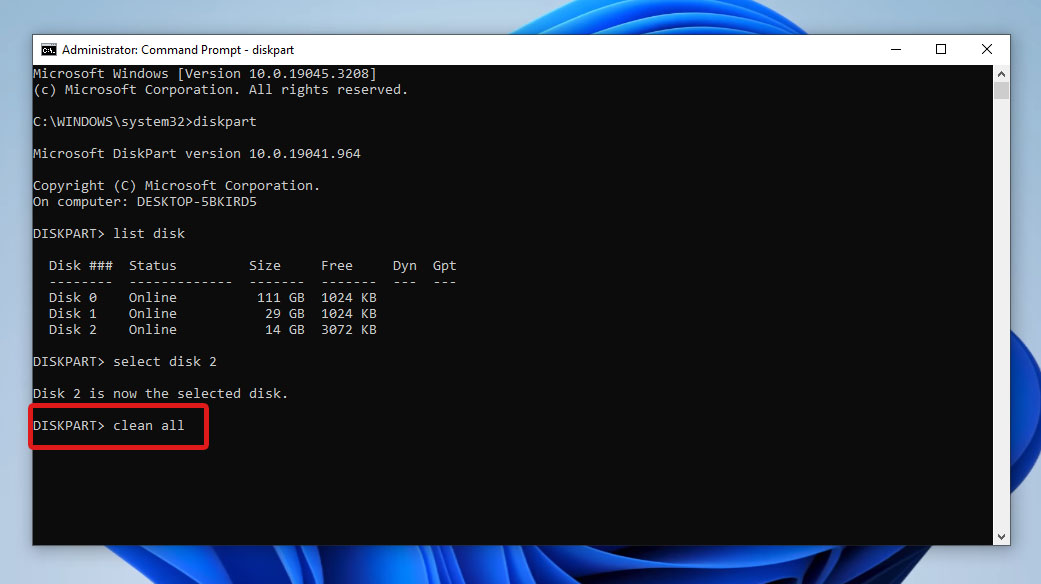
- Once the command is finished, enter
exitto close the CMD window.
Note that cleaning the SD card also erases all of its data. After executing the clean command, you can then create a new partition and file system for your SD card.
How to Recover Data After Fixing Read Only SD Card
If you formatted or cleaned your SD card, you’d need a way to get back your deleted files. For data recovery, we recommend using Disk Drill. It is a powerful, reliable, and easy-to-use data recovery software with deep scanning algorithms to successfully retrieve lost files from your SD card.
Disk Drill scans all commonly known file systems, including exFAT and FAT32, which are commonly used in SD cards. On top of that, it can also scan and recover files from corrupted storage devices.
This data recovery software is available for both Windows and Mac users. For Windows, you can try out Disk Drill’s data recovery with up to 500 MB worth of data you can recover for free.
Here’s a simple step-by-step guide on how to recover deleted files after fixing the read-only SD card using Disk Drill:
- Download and install Disk Drill to get started. Once successfully installed, connect your SD card to your computer and launch the app.
- From the list of drives you can scan, choose your SD card and click the Search for lost data button to begin the scanning process.
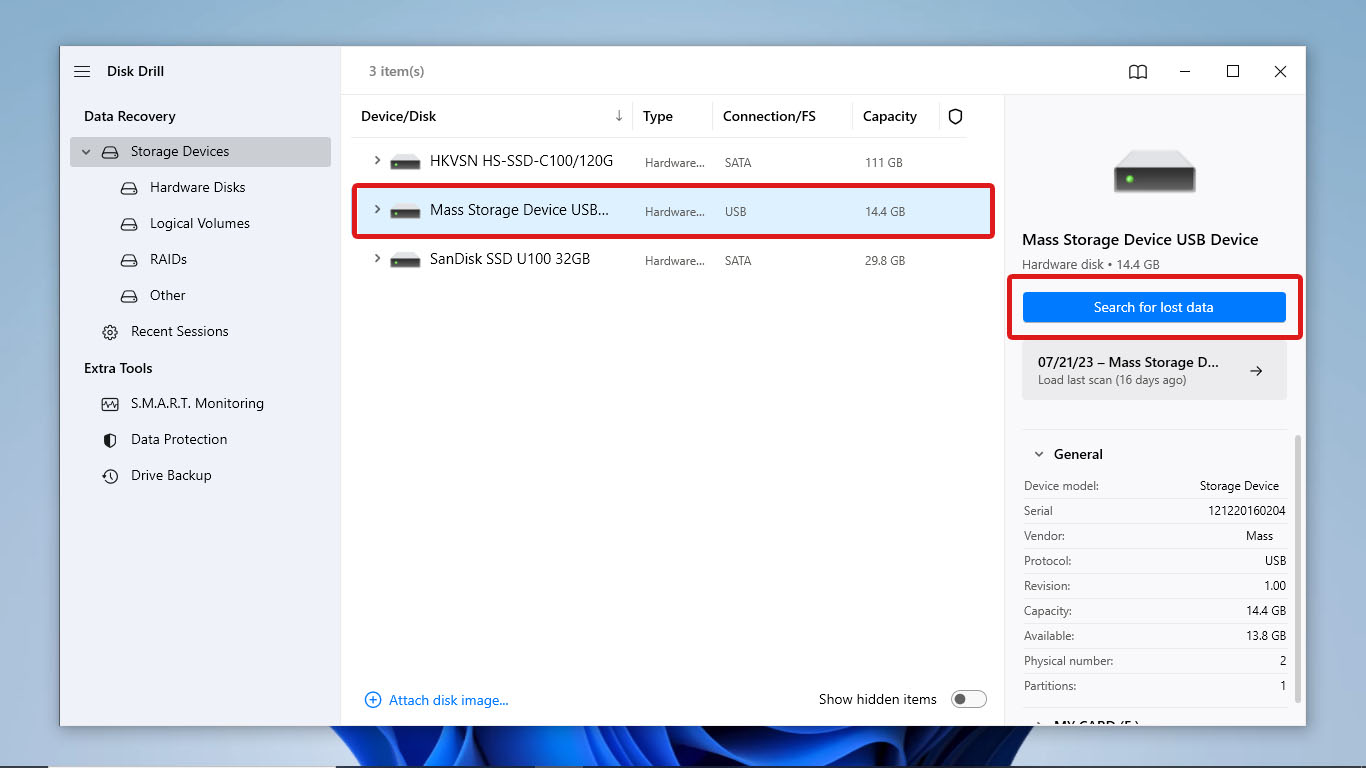
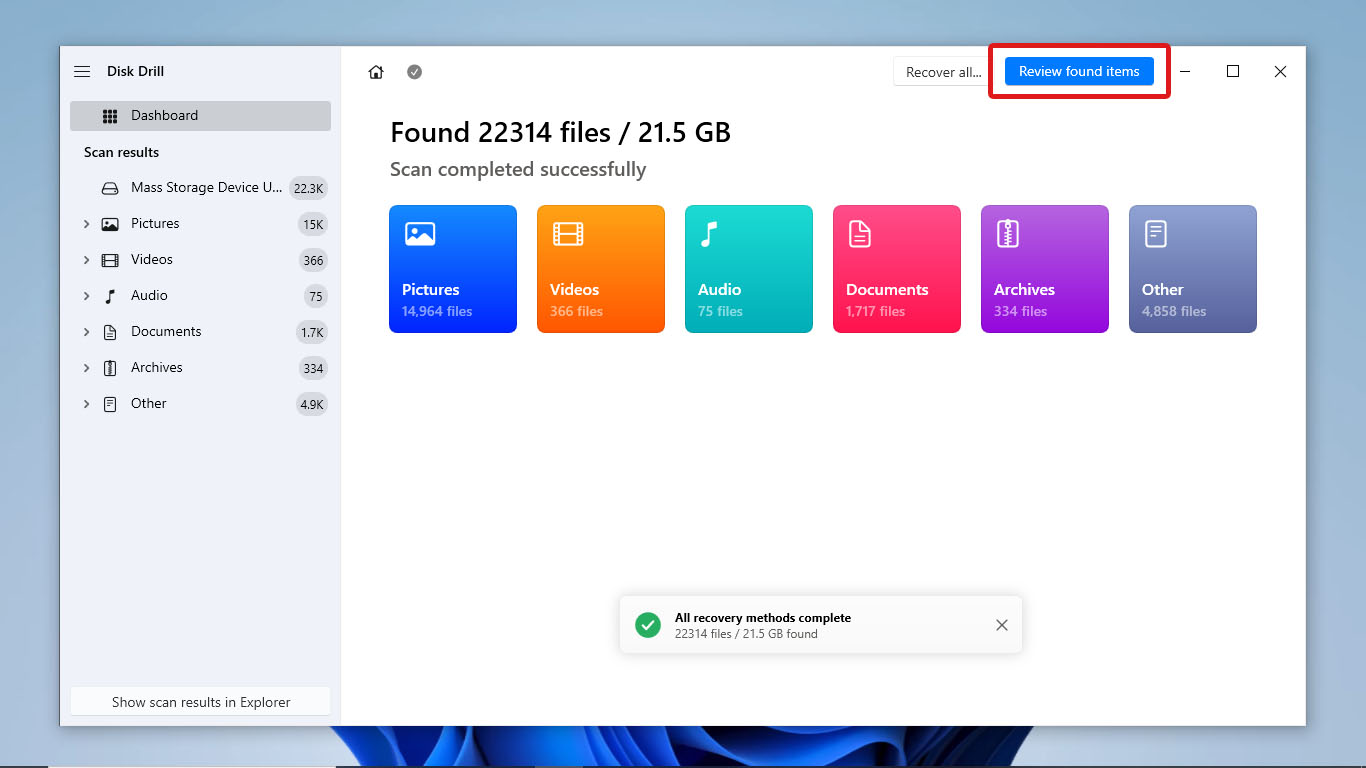
- Once Disk Drill has finished scanning your device, click Review found items on the top-right side of the window.
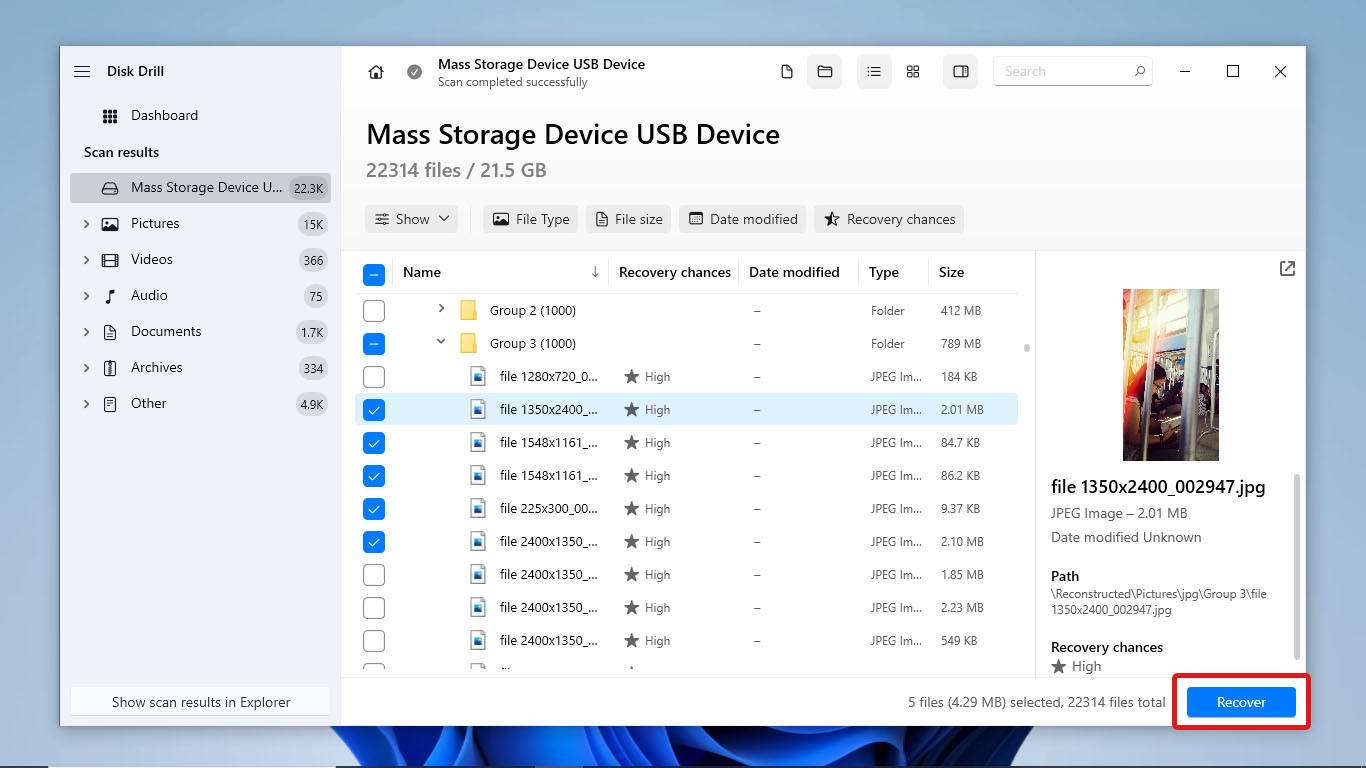
- Next, find and select all the files you want to recover. Use the search bar to search files by file name. You can also preview media files by selecting the individual file and checking the Preview tab on the right side of the list of files. After selecting your files, click Recover.
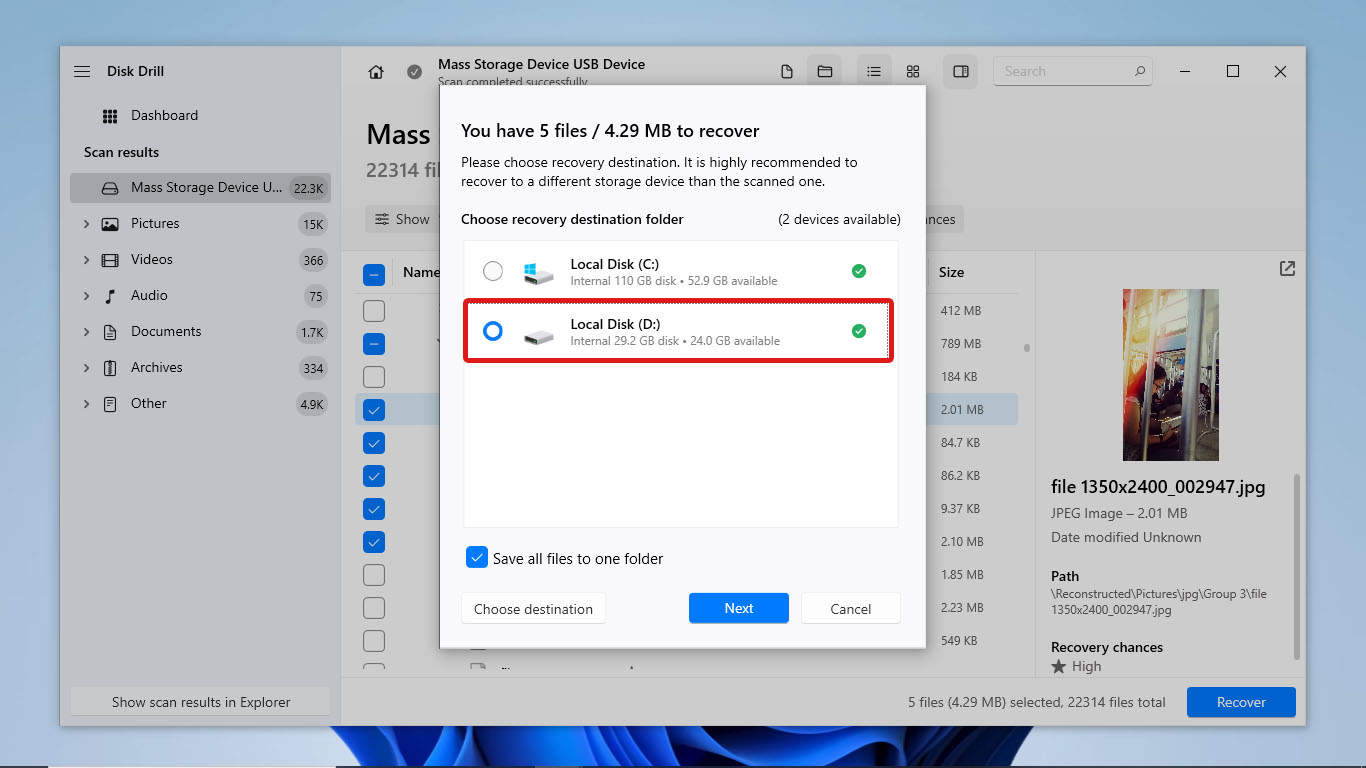
- After that, select where you want to place the recovered files and click Next.
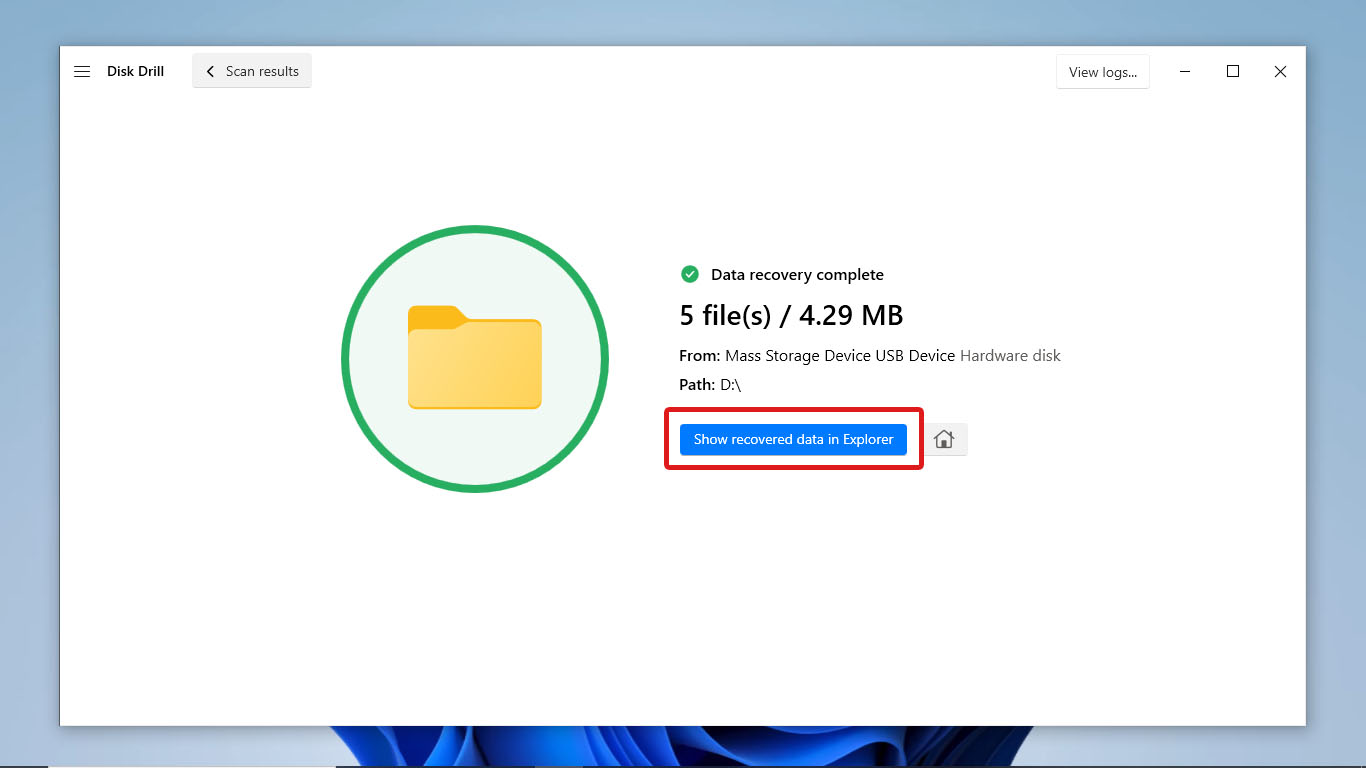
- Once the data recovery process is finished, Disk Drill will show you how many files were successfully recovered. Click Show recovered data in Explorer to check the retrieved files
Conclusion
There are different reasons why an SD card can get stuck in read-only mode. It may be due to a physical write protection switch, operating system settings, a corrupted file system, or a failing or damaged card. Regardless of the cause, your card can be turned into read-write mode simply by tweaking its settings or attributes.
If your memory card has a physical write protection switch, you can simply turn the switch off. You can also use built-in tools on Windows like Error Checking or Diskpart on CMD. Otherwise, use the Local Group Policy Editor or Registry Editor to disable related settings to storage device access.
You may or may not lose all your files in the process of turning off write protection on your storage device. In case your SD card suffers data loss, use reliable data recovery software like Disk Drill for a better chance of successful data recovery. Always try the safer methods first to avoid data loss altogether
