 It’s very common to unintentionally format your SD card while fixing errors or repairing a failed SD card. In some cases, you might format the SD card to a different file setting. Either way, formatting wipes out all your data from the card.
The good news is that you can recover data after a format and essentially “unformat” SD cards. This article will show you how to unformat an SD card on Windows, Android, or a Camera.
Is it Possible to Unformat an SD Card?
Note that there is no “unformat” or reverse format function available on any device. However, you can attempt to restore the formatted data by employing various techniques. First, you need to determine the method used to format the SD card.
A quick format leaves the actual partitions containing your data untouched and marks the storage space as available for writing new files. Thus, you can use the period between the quick format and saving new files to your SD card to recover data from it.
📜 However, when you perform a full format, your PC erases all data permanently. Unlike a quick format, the full format writes and overwrites zeroes to the drive and scans for bad sectors to exclude them from being used as storage space. In such cases, the SD card unformat becomes impossible. Devices like cameras usually perform a full format by default – thus making data recovery impossible.
How to Recover Data from a Formatted SD Card?
The easiest way to recover data from a formatted SD card is to use a third-party data recovery program. Often, it’s the only choice you have, besides contacting an expensive professional data recovery company. You can perform data recovery on your Android phone or your Windows or macOS computer.
Method 1: Recover Data from a Formatted SD Card on a PC or Mac
The most efficient method to unformat (nullify the format’s effect) or recover data from a memory card is to use professional data recovery software. These tools are designed to recover your lost data efficiently. While several tools are available on the market, Disk Drill is a reliable option to recover data from your SD card.
Disk Drill is an industry-leading data recovery tool with an intuitive interface that first-time users can adapt to quickly. Moreover, it can help retrieve about 400+ file types. What’s more, the Windows version offers up to 500MB of data recovery for free!
If you’ve ended up formatting your SD card and want to retrieve data, remember to stop using the SD card immediately. If you continue using the formatted SD card, your deleted files will get overwritten – complicating data recovery and making it impossible.
Here’s how to unformat SD card for free using Disk Drill on Windows:
- Download and Install Disk Drill for Windows.
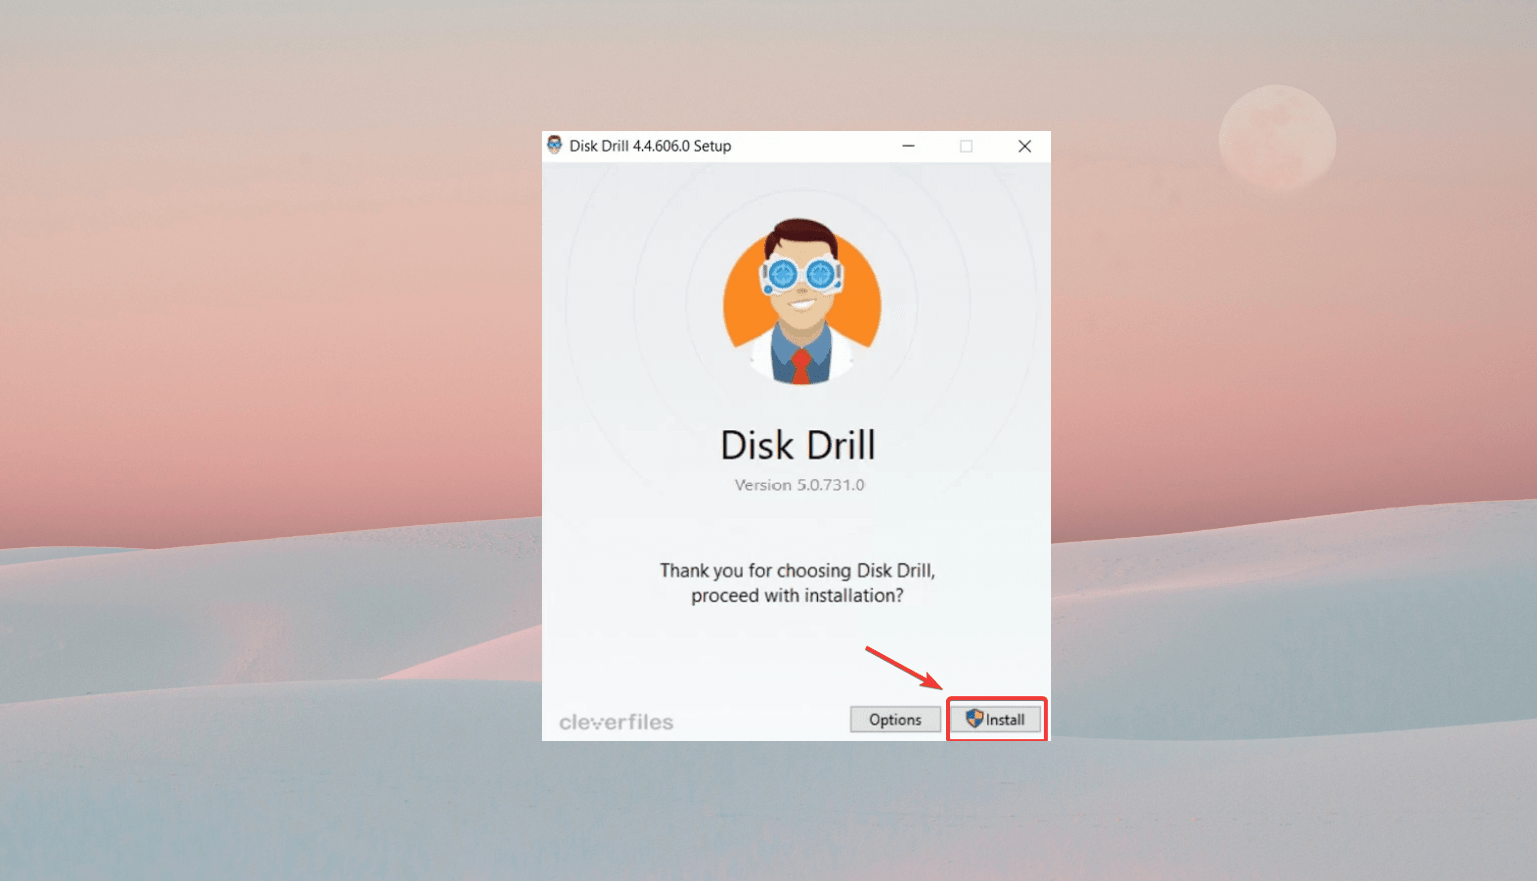
- Connect your SD card to the computer, and launch Disk Drill.
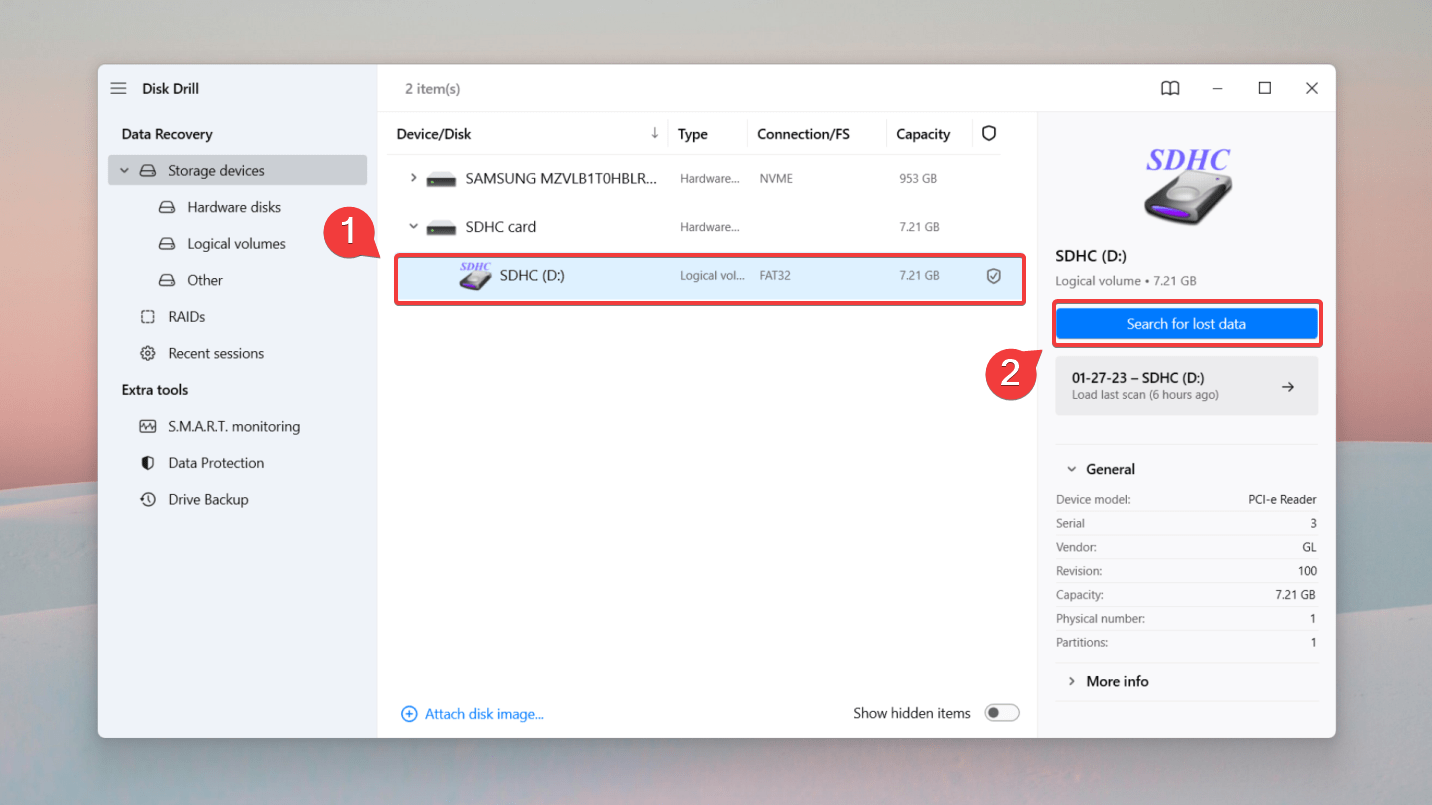
- Select the formatted SD card from the list of devices. Then, click Search for lost data to begin the scanning process.
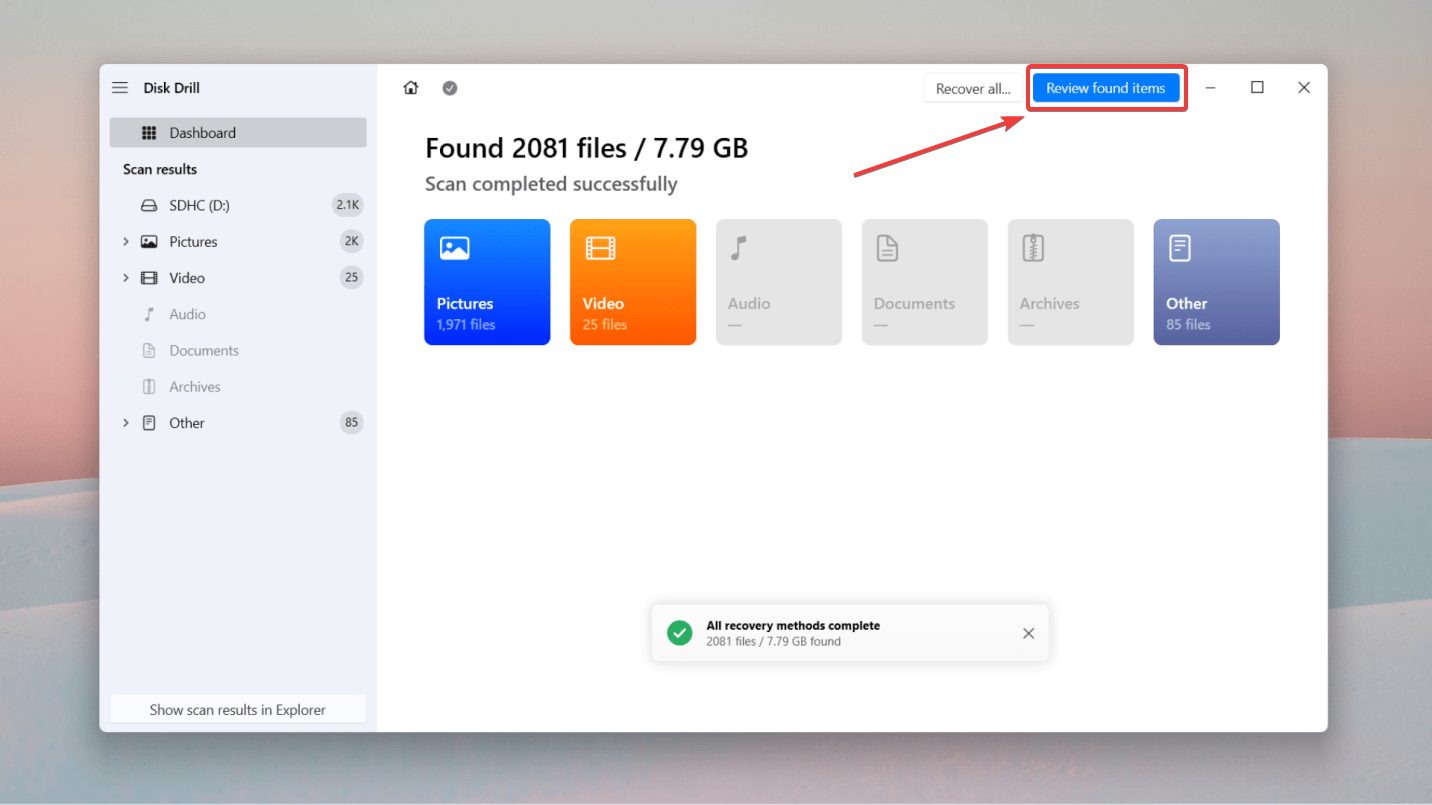
- Disk Drill’s advanced algorithm may take some time to scan your SD card properly. Once the scan is complete, click the Review found items button to check for recoverable data.
- You can filter through the search results for specific files via the search bar at the top-right corner or by file type. You can also preview the file by hovering over it and clicking the eye button.
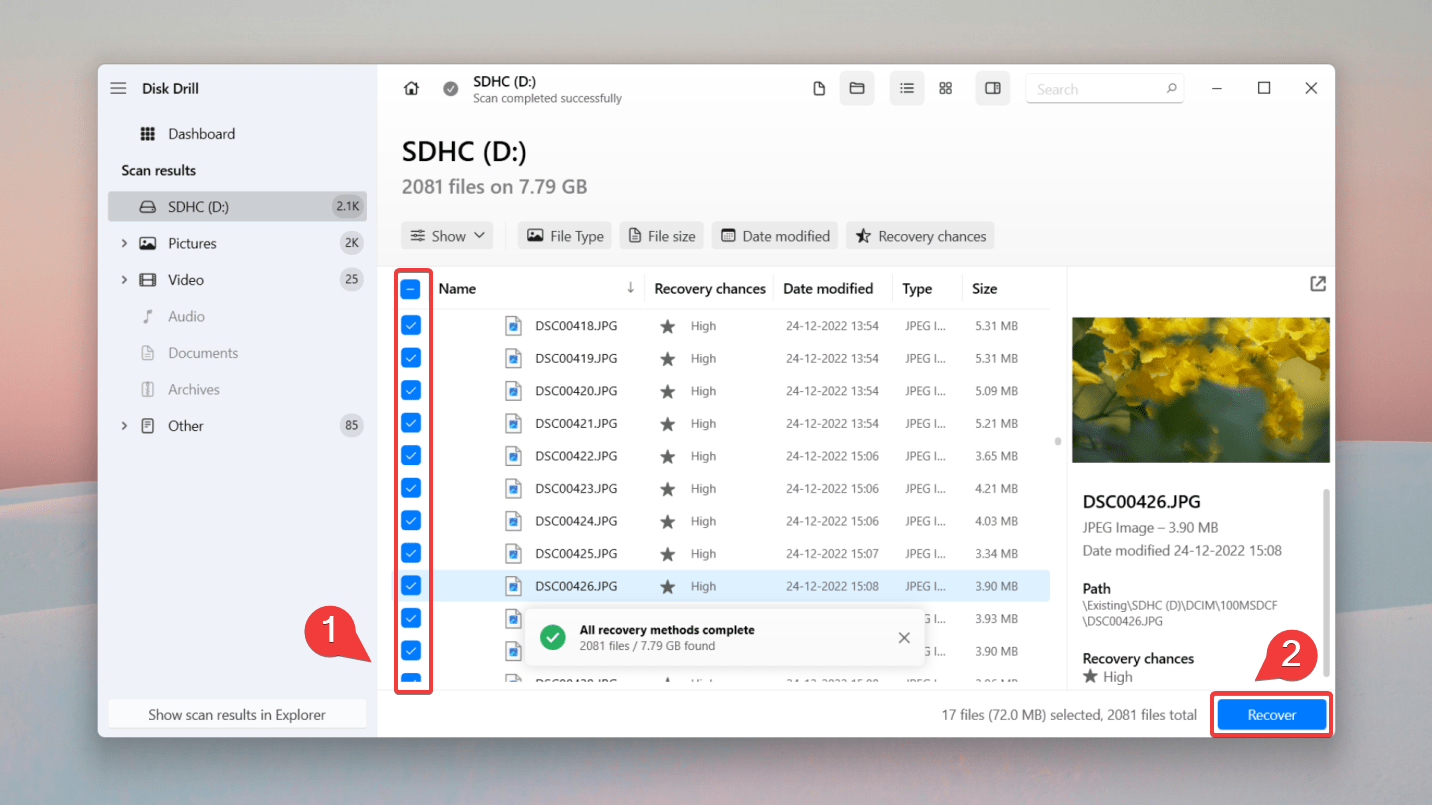
- Once you’ve selected the files you want to recover from your formatted SD card, click the Recover button. Alternatively, you can leave all boxes unticked and click Recover all.
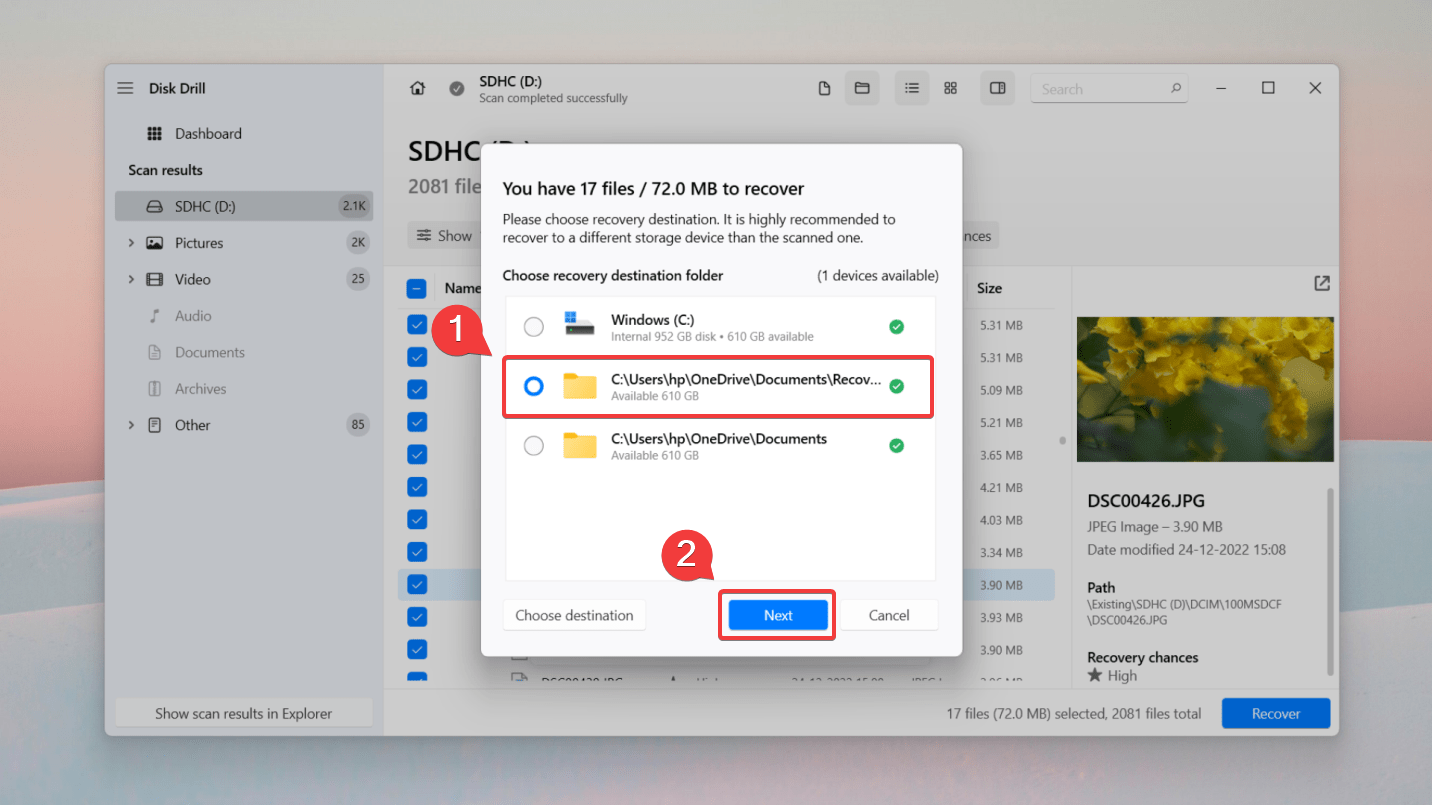
- You will be prompted to choose a storage location where the recovered data can be saved. We strongly recommend saving them in a separate location to avoid overwriting the existing data. Finally, press Next to unformat the SD card and recover your data.
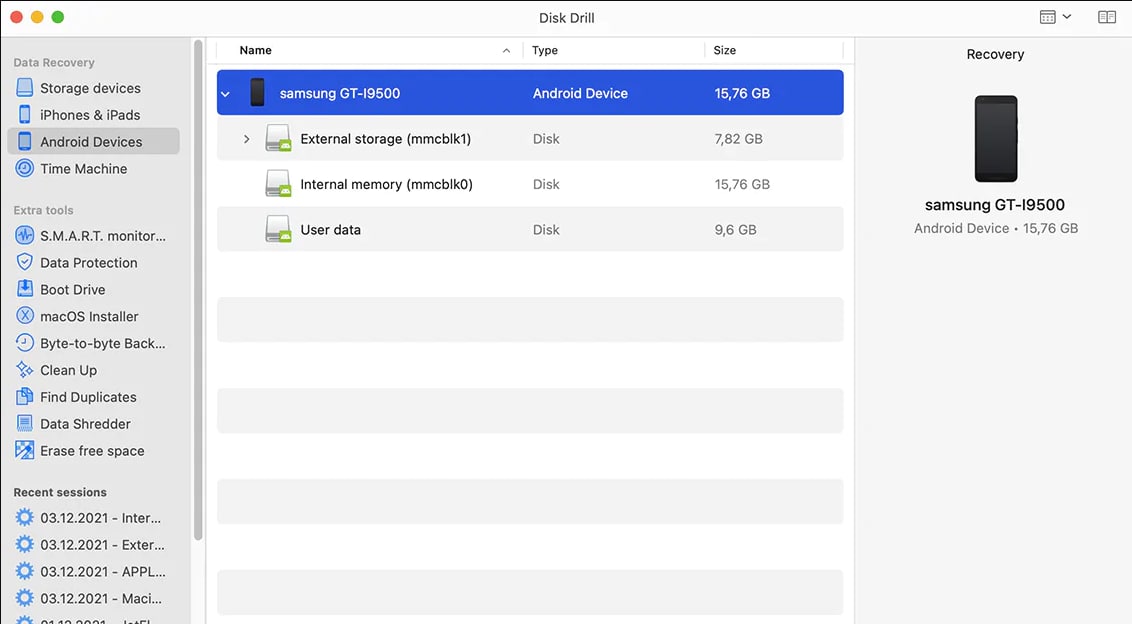
It’s also possible to recover data from a formatted SD card without disconnecting it from the smartphone. To achieve this, you need to connect your Android smartphone to a Mac and use Disk Drill for macOS.
Here’s an overview of the process:
- Ensure your Android phone is rooted.
- Enable USB debugging on your Android device.
- Download and install Disk Drill on your Mac.
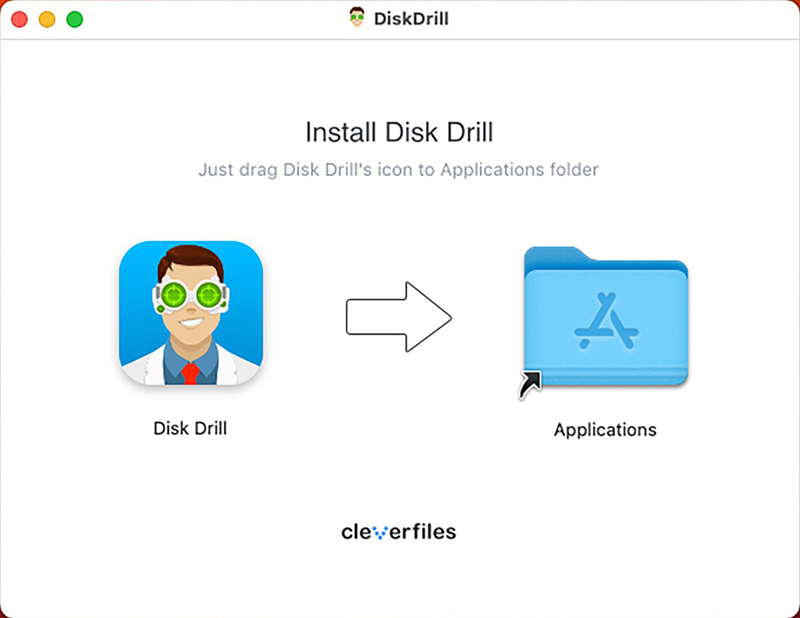
- Connect your smartphone to the Mac, open Disk Drill and grant it the necessary permissions to access your Android device.
- Scan the Android device and recover your files.
Method 2: Use an Android Data Recovery App
Unable to connect your SD card or Android device to your PC? You can recover your data using an Android data recovery app, DiskDigger. While, it’s not as effective as full-fledged data recovery apps for Windows and macOS, it will get the job done in most cases.
There are two scan types you can perform using the DiskDigger Android app—Basic Scan, and Full Scan. Basic Scan is free, but can only recover deleted photos. It also doesn’t require the Android device to be rooted. On the other hand, the paid Full Scan can recover all file types, but it requires the device to be rooted.
Here’s how to use Disk Digger to recover data from a formatted SD card on an Android device:
- Download DiskDigger from the Google Play Store.
- Launch the DiskDigger app.
- Tap Start Basic Photo Scan, or select the SD card from the Full Scan menu (requires rooting), depending on your needs.
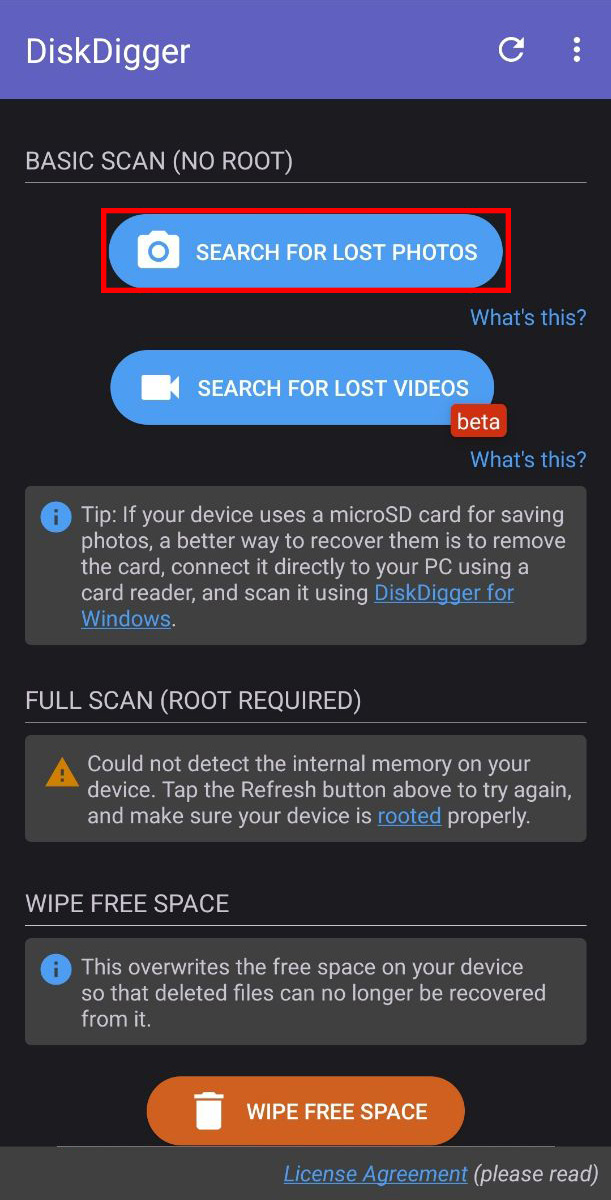
- Choose the file types you wish to recover and tap OK.
- Select the files you wish to recover and tap Recover.
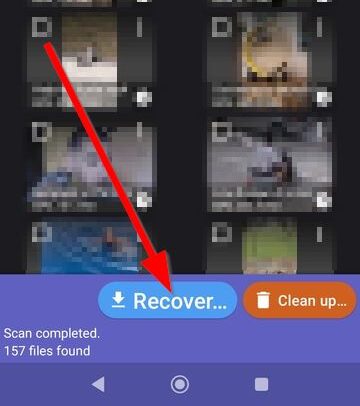
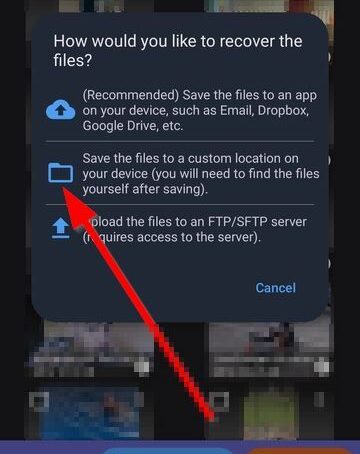
- Choose whether you wish to save the files locally, save them to an app, or upload them to an FTP server.
How to Reformat an SD card?
Since you’ve recovered the lost data, try to reformat the SD Card to ensure compatibility with portable devices (smartphone, camera, etc.) Reformatting reverts the SD card’s file system to the previous state – thus facilitating smooth read/write cycles.
You can reformat the SD card on Windows, your Android phone, or in-camera:
How to Format an SD Card on Windows
There are several methods to reformat the SD card for free on Windows. Let’s take a look at them.
File Explorer
You can use File Explorer to reformat the SD card to change the file system type and perform a high-level format. Just follow these steps:
- Connect the SD card to your PC or laptop via the SD card slot or an external memory-card reader.
- Open Windows File Explorer. Now, select This PC.
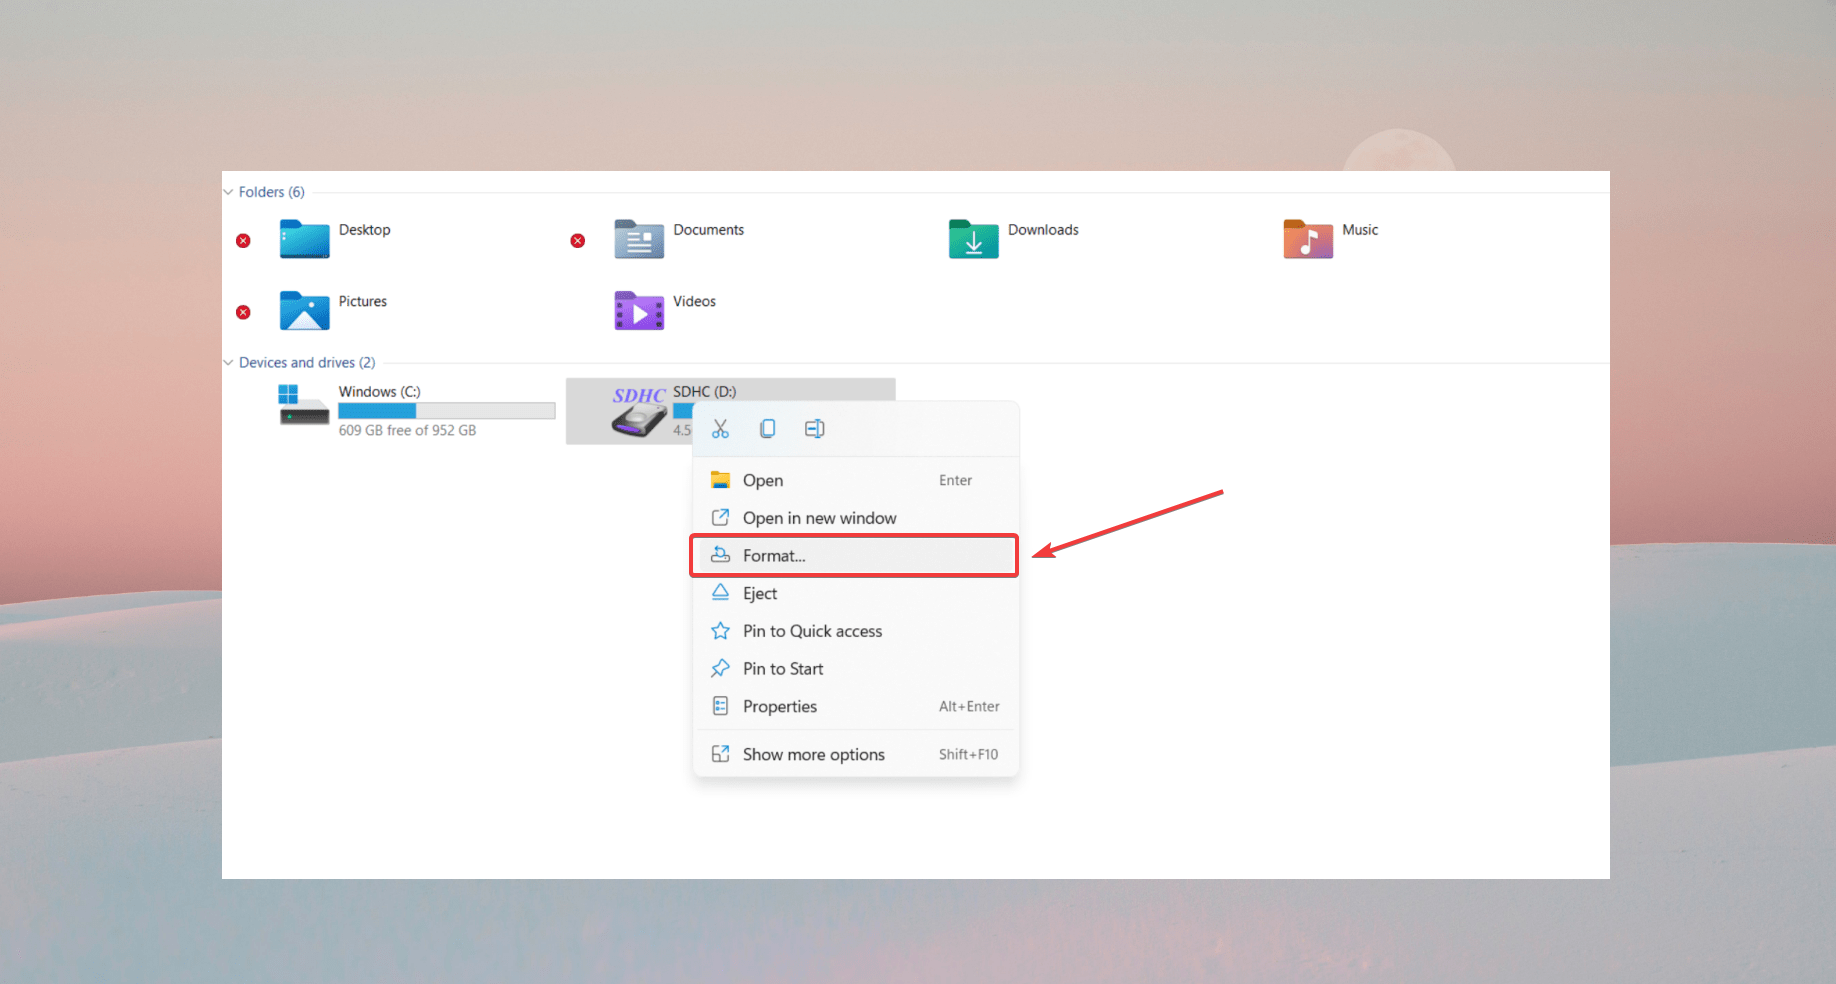
- Right-click the SD card and select Format.
- In the Format SD Card dialog box, select the File System dropdown arrow and choose the suitable format. If you decide only to use the memory card on Windows systems, select NFTS, and if you’ll be using it on multiple types of devices, select FAT32.
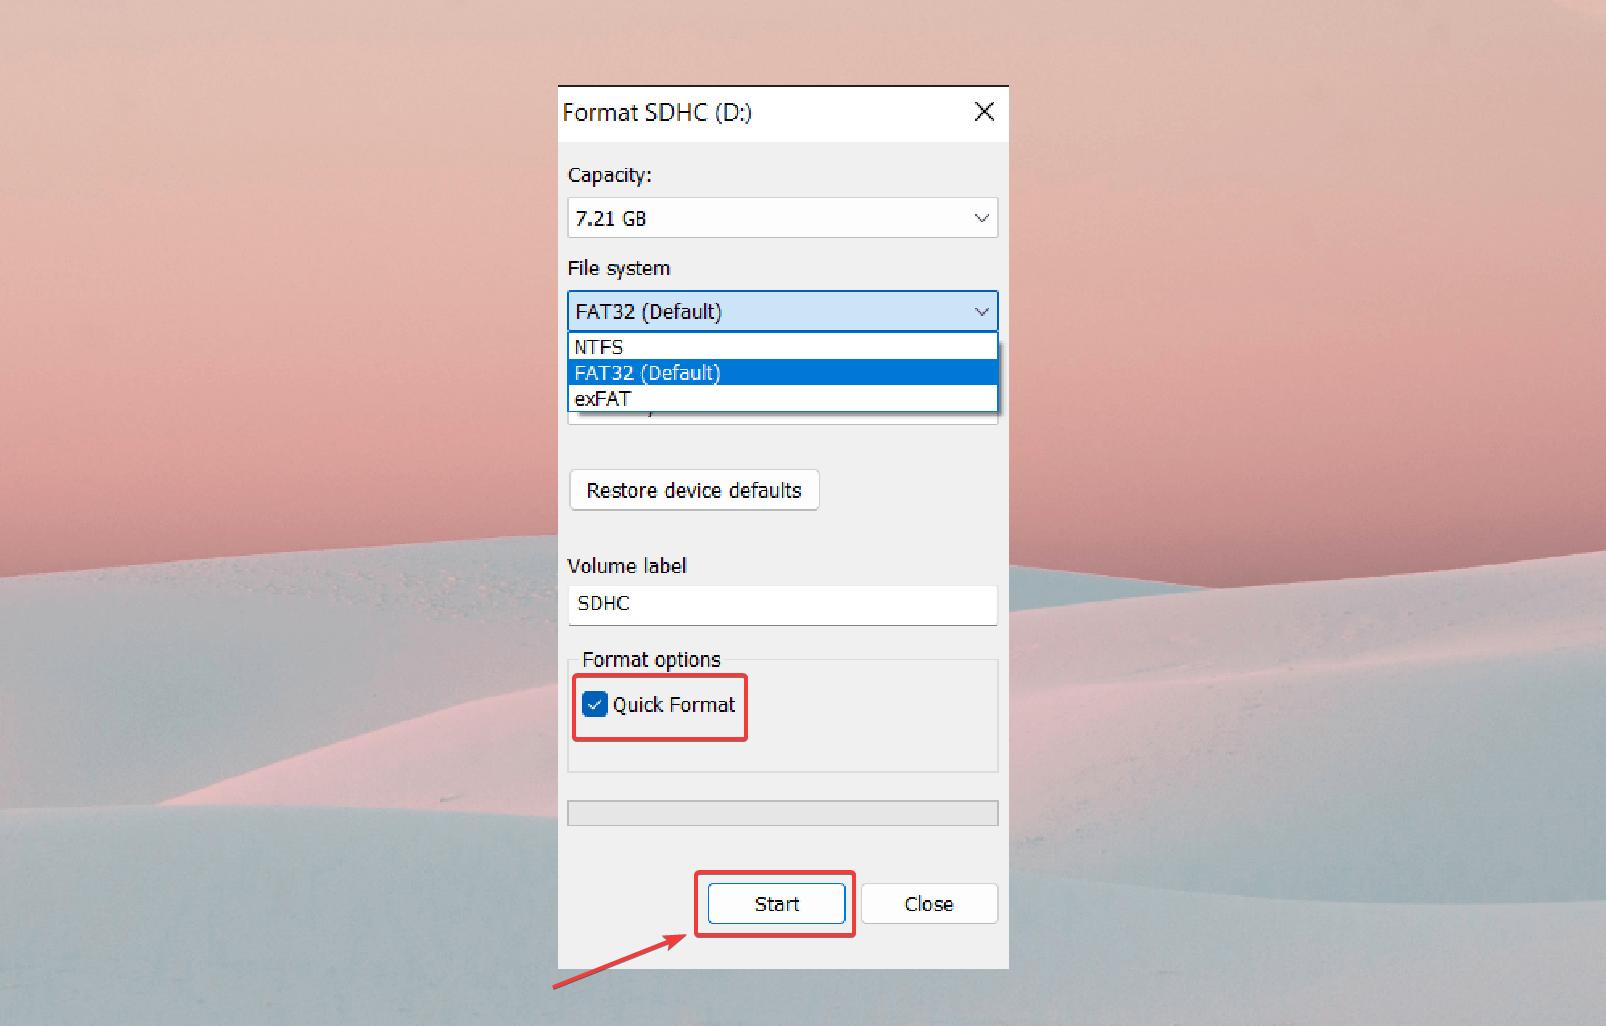
- Now, select the ‘Quick Format’ checkbox, and click Start.
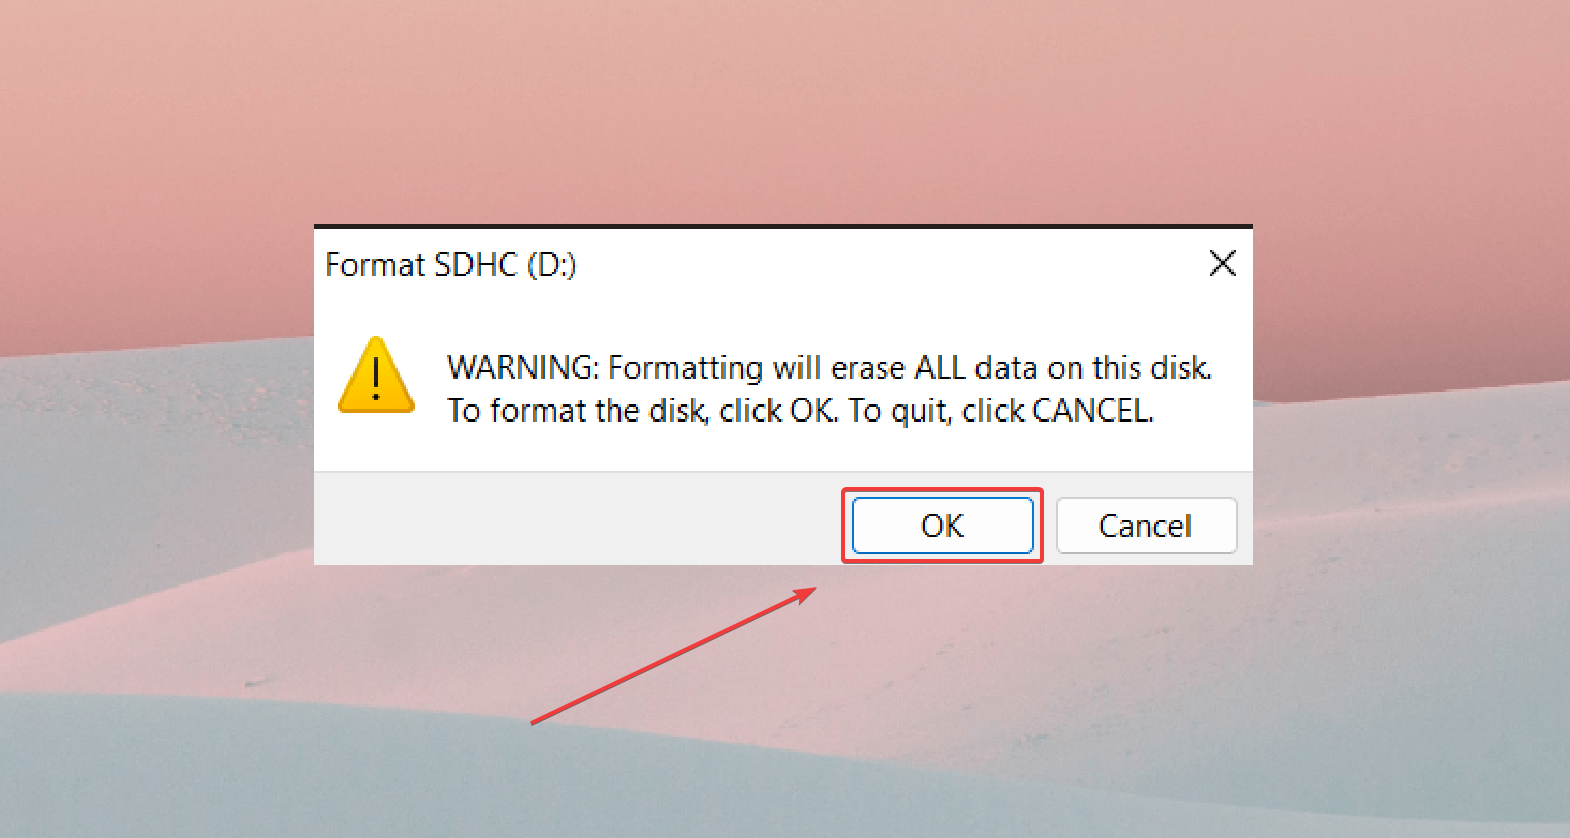
- When the warning dialog box appears, click OK.
Disk Management
You can also use Disk Management to reformat the SD card seamlessly. Just follow these steps:
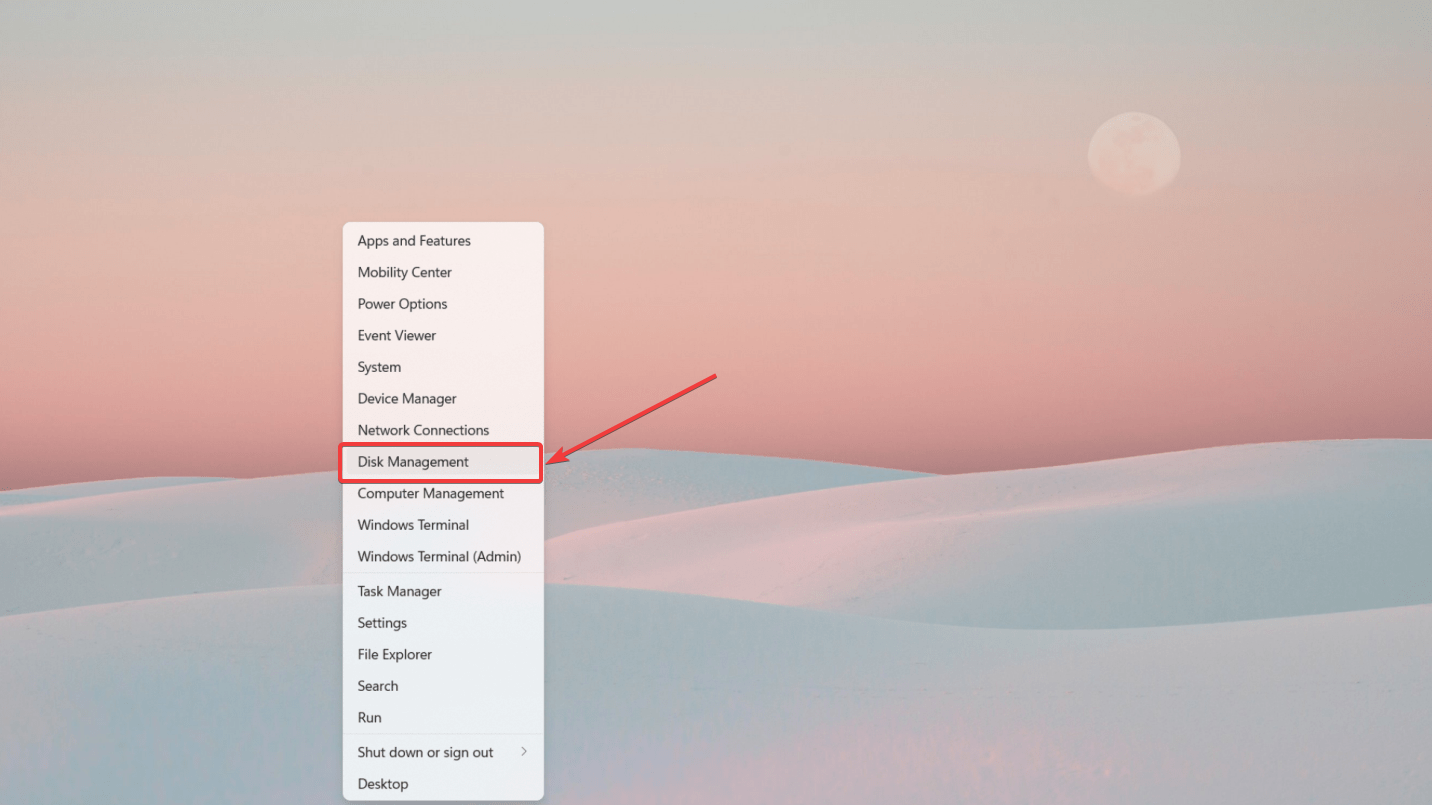
- Right-click the Start Menu and choose Disk Management.
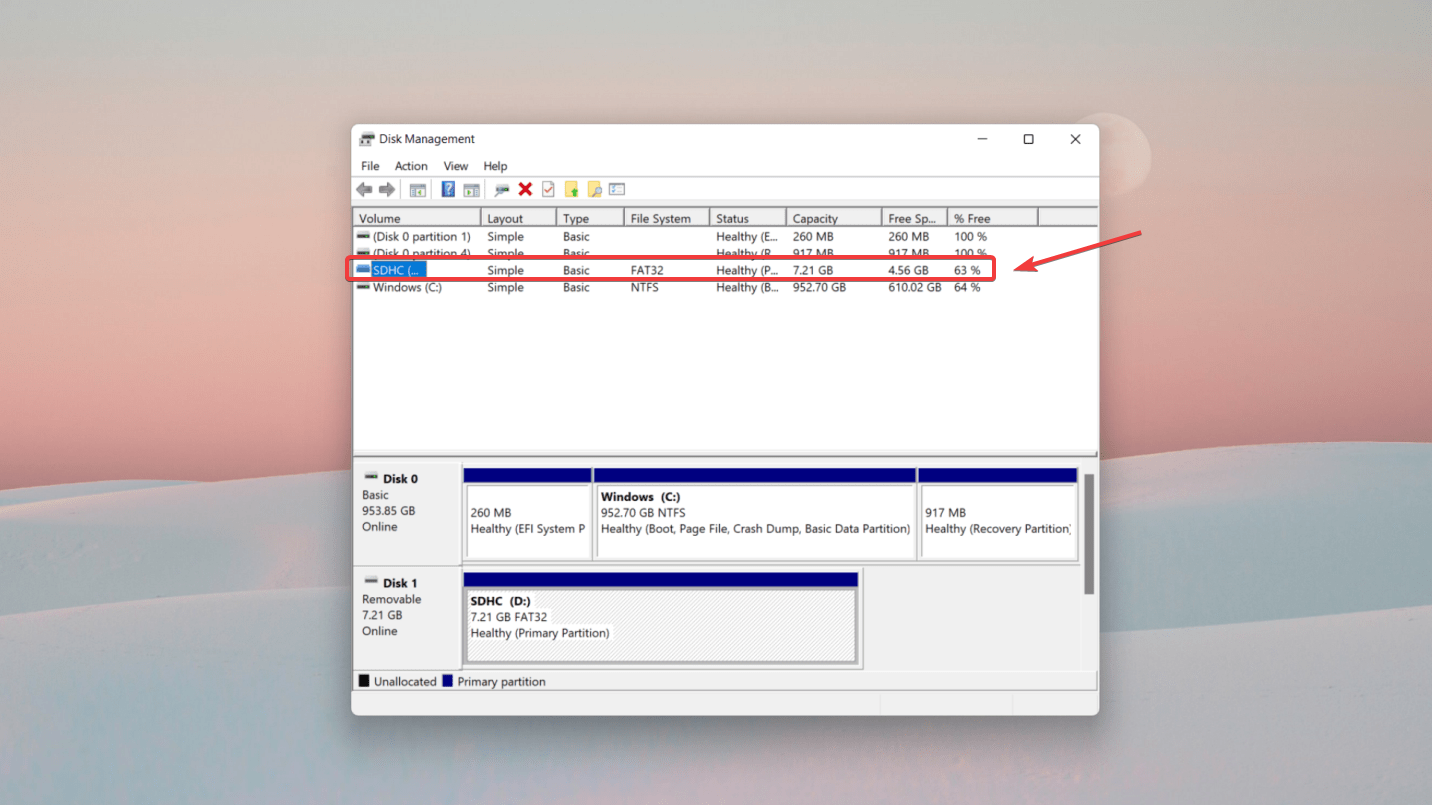
- Once the dialogue box opens, select your SD card from the list of drives/partitions.
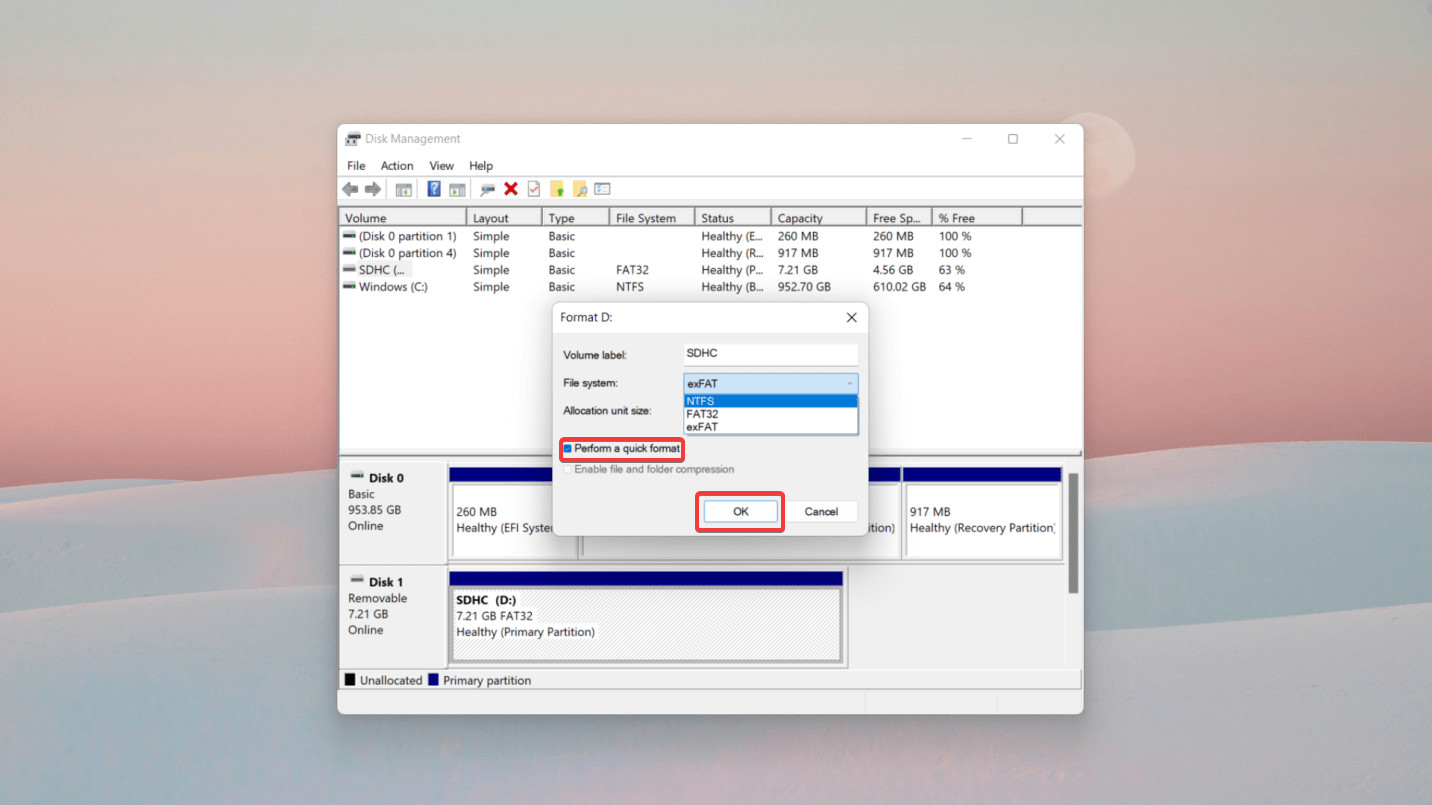
- Right-click the SD card and choose Format.
- Choose a file system and allocate the unit size. Ensure that you have checked the ‘Perform a quick format’ box. Now, click OK.
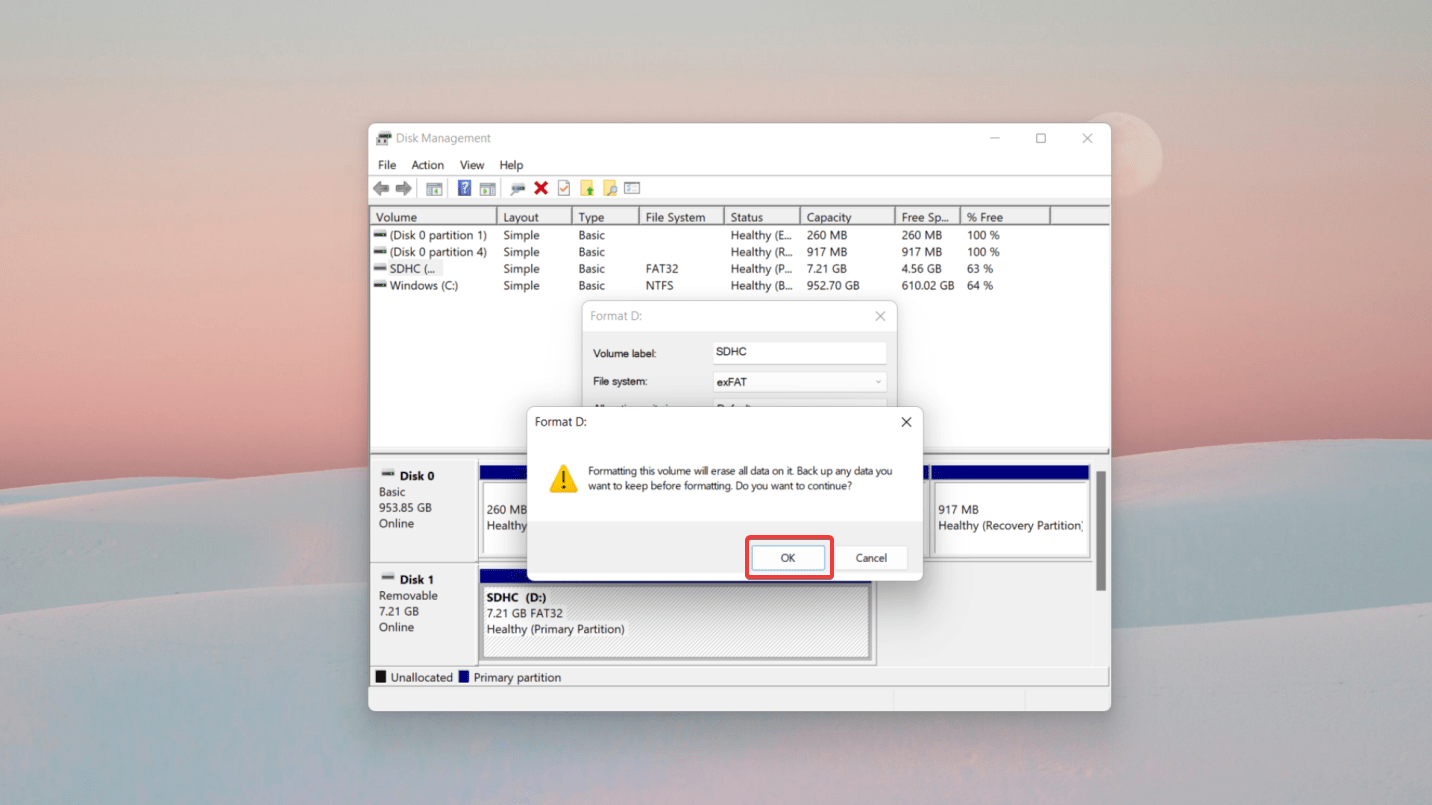
- When the warning appears, press OK again to begin the formatting process.
SD Memory Card Formatter for Windows
The official, SD Association (SDA) approved formatting tool for SD/SDHC/SDXC cards, is called the SD Memory Card Formatter. The tool is light and fairly easy to use. Since it’s SDA approved, it’s unlikely anything will go wrong during the formatting process.
Here’s how to use the SD Memory Card Formatter to format your SD card on Windows:
- Download and install the SD Memory Card Formatter.
- Connect the SD card to your PC and launch SD Memory Card Formatter.
- Choose your SD card from the Select card drop-down menu.
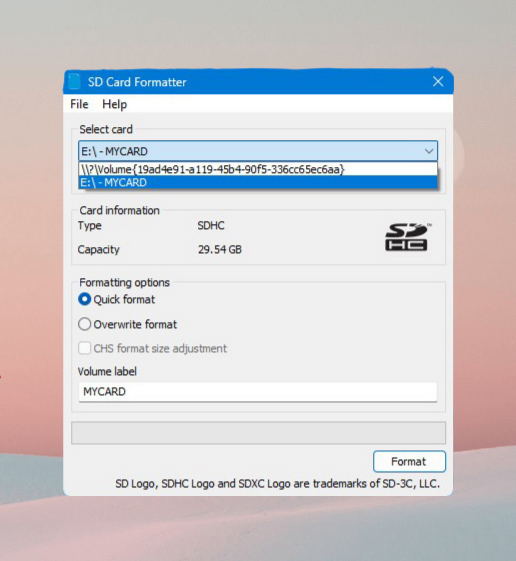
- Pick Quick Format or Overwrite Format from the Formatting options section. Remember, you cannot undo an Overwrite Format.
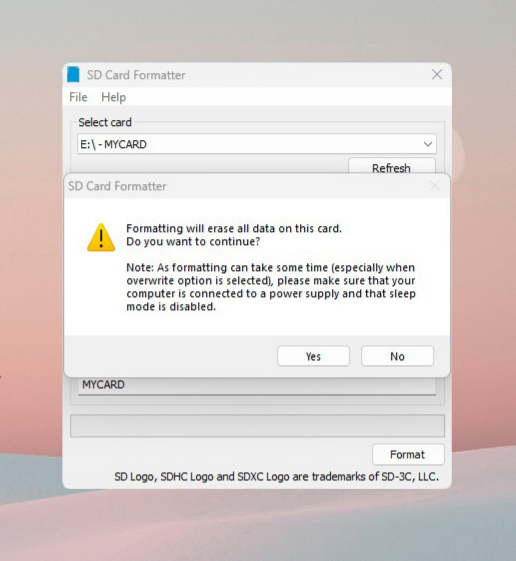
- Choose a Volume label (name) for the SD card and click Format.
How to Format an SD Card in Android Phone
Several Android phones have an external microSD card. While you cannot choose a specific file system in these cases, you can reformat the SD card on the phone after backing up your files. Just follow these steps:
- Go to Settings > Device care.
- Tap Storage. Then, tap Advanced.
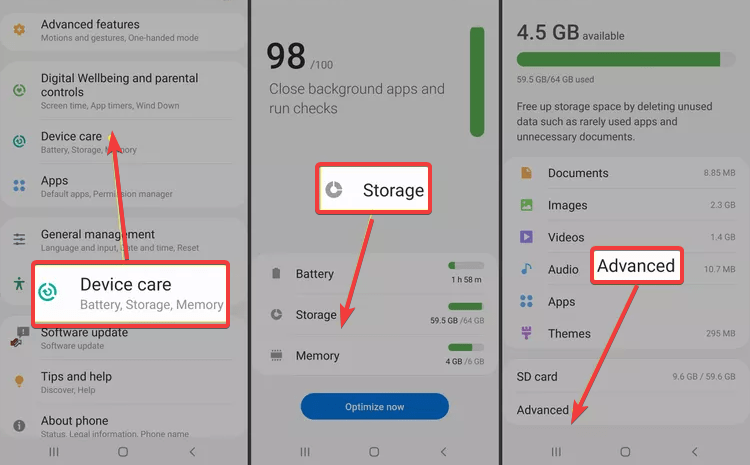
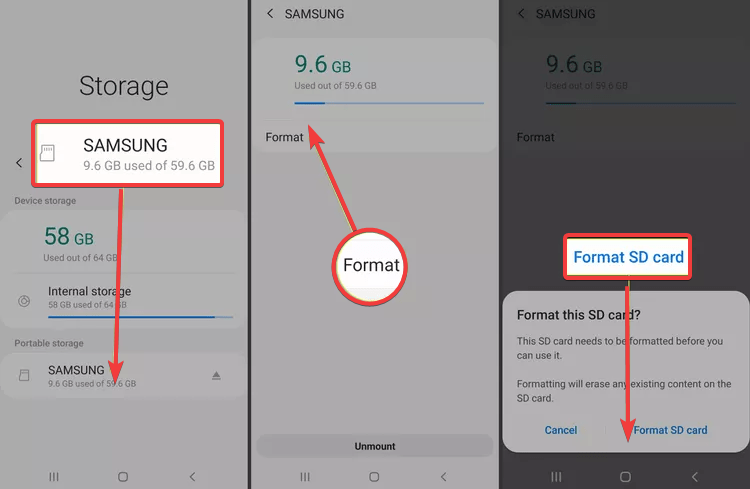
- Under Portable storage, select your SD card.
- Tap Format.
- Finally, tap the Format SD card option.
How to Format an SD Card on Camera
The steps to format a camera SD card vary depending on the camera brand. For this article, we are formatting using a Canon camera:
- Turn on the camera with the SD card inserted. Now, press Menu.
- Select the wrench icon, and then choose the card you want to reformat.
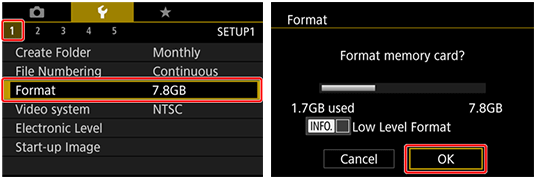
- Now, select Format. To perform a quick format, select OK directly. But to perform a full format, press the INFO button to checkmark ‘Low-level format‘ and then choose OK.
Conclusion
Although there is no native unformat option available on any device, you can attempt to recover lost data from an SD card using data recovery software like Disk Drill.
To prevent significant data loss, you must create backups of your files before formatting. You can do this using cloud storage, storage devices, or byte-level backups from Disk Drill and keep your data safe.
FAQs
- If you don't have a prior backup, download an SD card recovery app on your Android phone and use it to retrieve your lost data.
- Recover your data by downloading a Google Drive backup on your phone. This way, you can recover all your pictures, videos, chats, music, and other files from Google Drive.
- Back up all the data on your device. Now, decrypt the SD Card from the Android Internal Memory.
- On your phone, go to Settings > Storage > Storage Settings.
- Tap Format as portable.
- Then, tap "Format."
- Now, unmount the SD card from your Android after making it portable again.
- Finally, use SD card recovery software to retrieve lost data and unformat the SD card.

