
Losing a PowerPoint presentation can undo hours of hard work, and could impact you professionally too. Whether you deleted the presentation accidentally or it went missing due to other reasons, it’s often possible to recover it. But, how? Well, that’s where this guide comes in. The following sections contain all you need to know about recovering a deleted PowerPoint presentation using easy-to-follow methods.
What Caused the PowerPoint Presentation to be Deleted
There could be several reasons behind a deleted PowerPoint presentation. It’s recommended you diagnose what caused the deletion, so you can choose the appropriate recovery method.
Here are some possible reasons why your PowerPoint presentation was unexpectedly deleted:
| Reason | Description | Solution |
| 🚨 Accidental deletion | It’s possible you deleted the PowerPoint presentation accidentally. Maybe it was located in a folder that had other files you actually wanted to delete. |
|
| ⚠️ PowerPoint crashed | PowerPoint can sometimes freeze up and crash. In this case, it may not save the PPT file, especially if you force close it using the Task Manager. | |
| 💾 Closing PowerPoint without saving | Some versions of PowerPoint don’t have the autosave feature, and it’s possible you close the app without saving your progress first. | |
| 💻 Windows malfunction | Abrupt shutdowns and crashes because of a Windows malfunction can cause you to lose your PPT presentation, as PowerPoint may not be able to save your progress in such cases. | |
| 💿 Hard drive issue | If you notice randomly disappearing files, sluggish performance, and random freezes, there might be a logical issue with your hard drive. If these symptoms are accompanied by clicking, beeping, and whirring sounds, the hard drive is physically damaged, |
As you can see, most causes of PPT deletion can be matched to a specific method that can help you restore your work — and we’ll cover those solutions in the next section. But before diving in, make sure you’ve checked the Recycle Bin. Many users look past it in the panic of losing a file, so this moment is a great reminder to check it now — just in case your presentation is sitting right there.
How to Recover a Deleted PowerPoint Presentation
There’s no single reason why a PowerPoint presentation disappears — and there’s no single fix either. Some files vanish because they were removed by mistake, others because Windows or PowerPoint had a bad moment. To keep things practical, we’ll begin with the approach that solves most PowerPoint-loss scenarios. After that, we’ll move into methods that apply to more specific cases. Even if they feel less likely, they’re still worth a quick check before writing off your hard work as “gone.”
Every method below can be done in just a few minutes, and if one doesn’t help, the next often will.
Option 1: Recover Your Presentation with Data Recovery Software
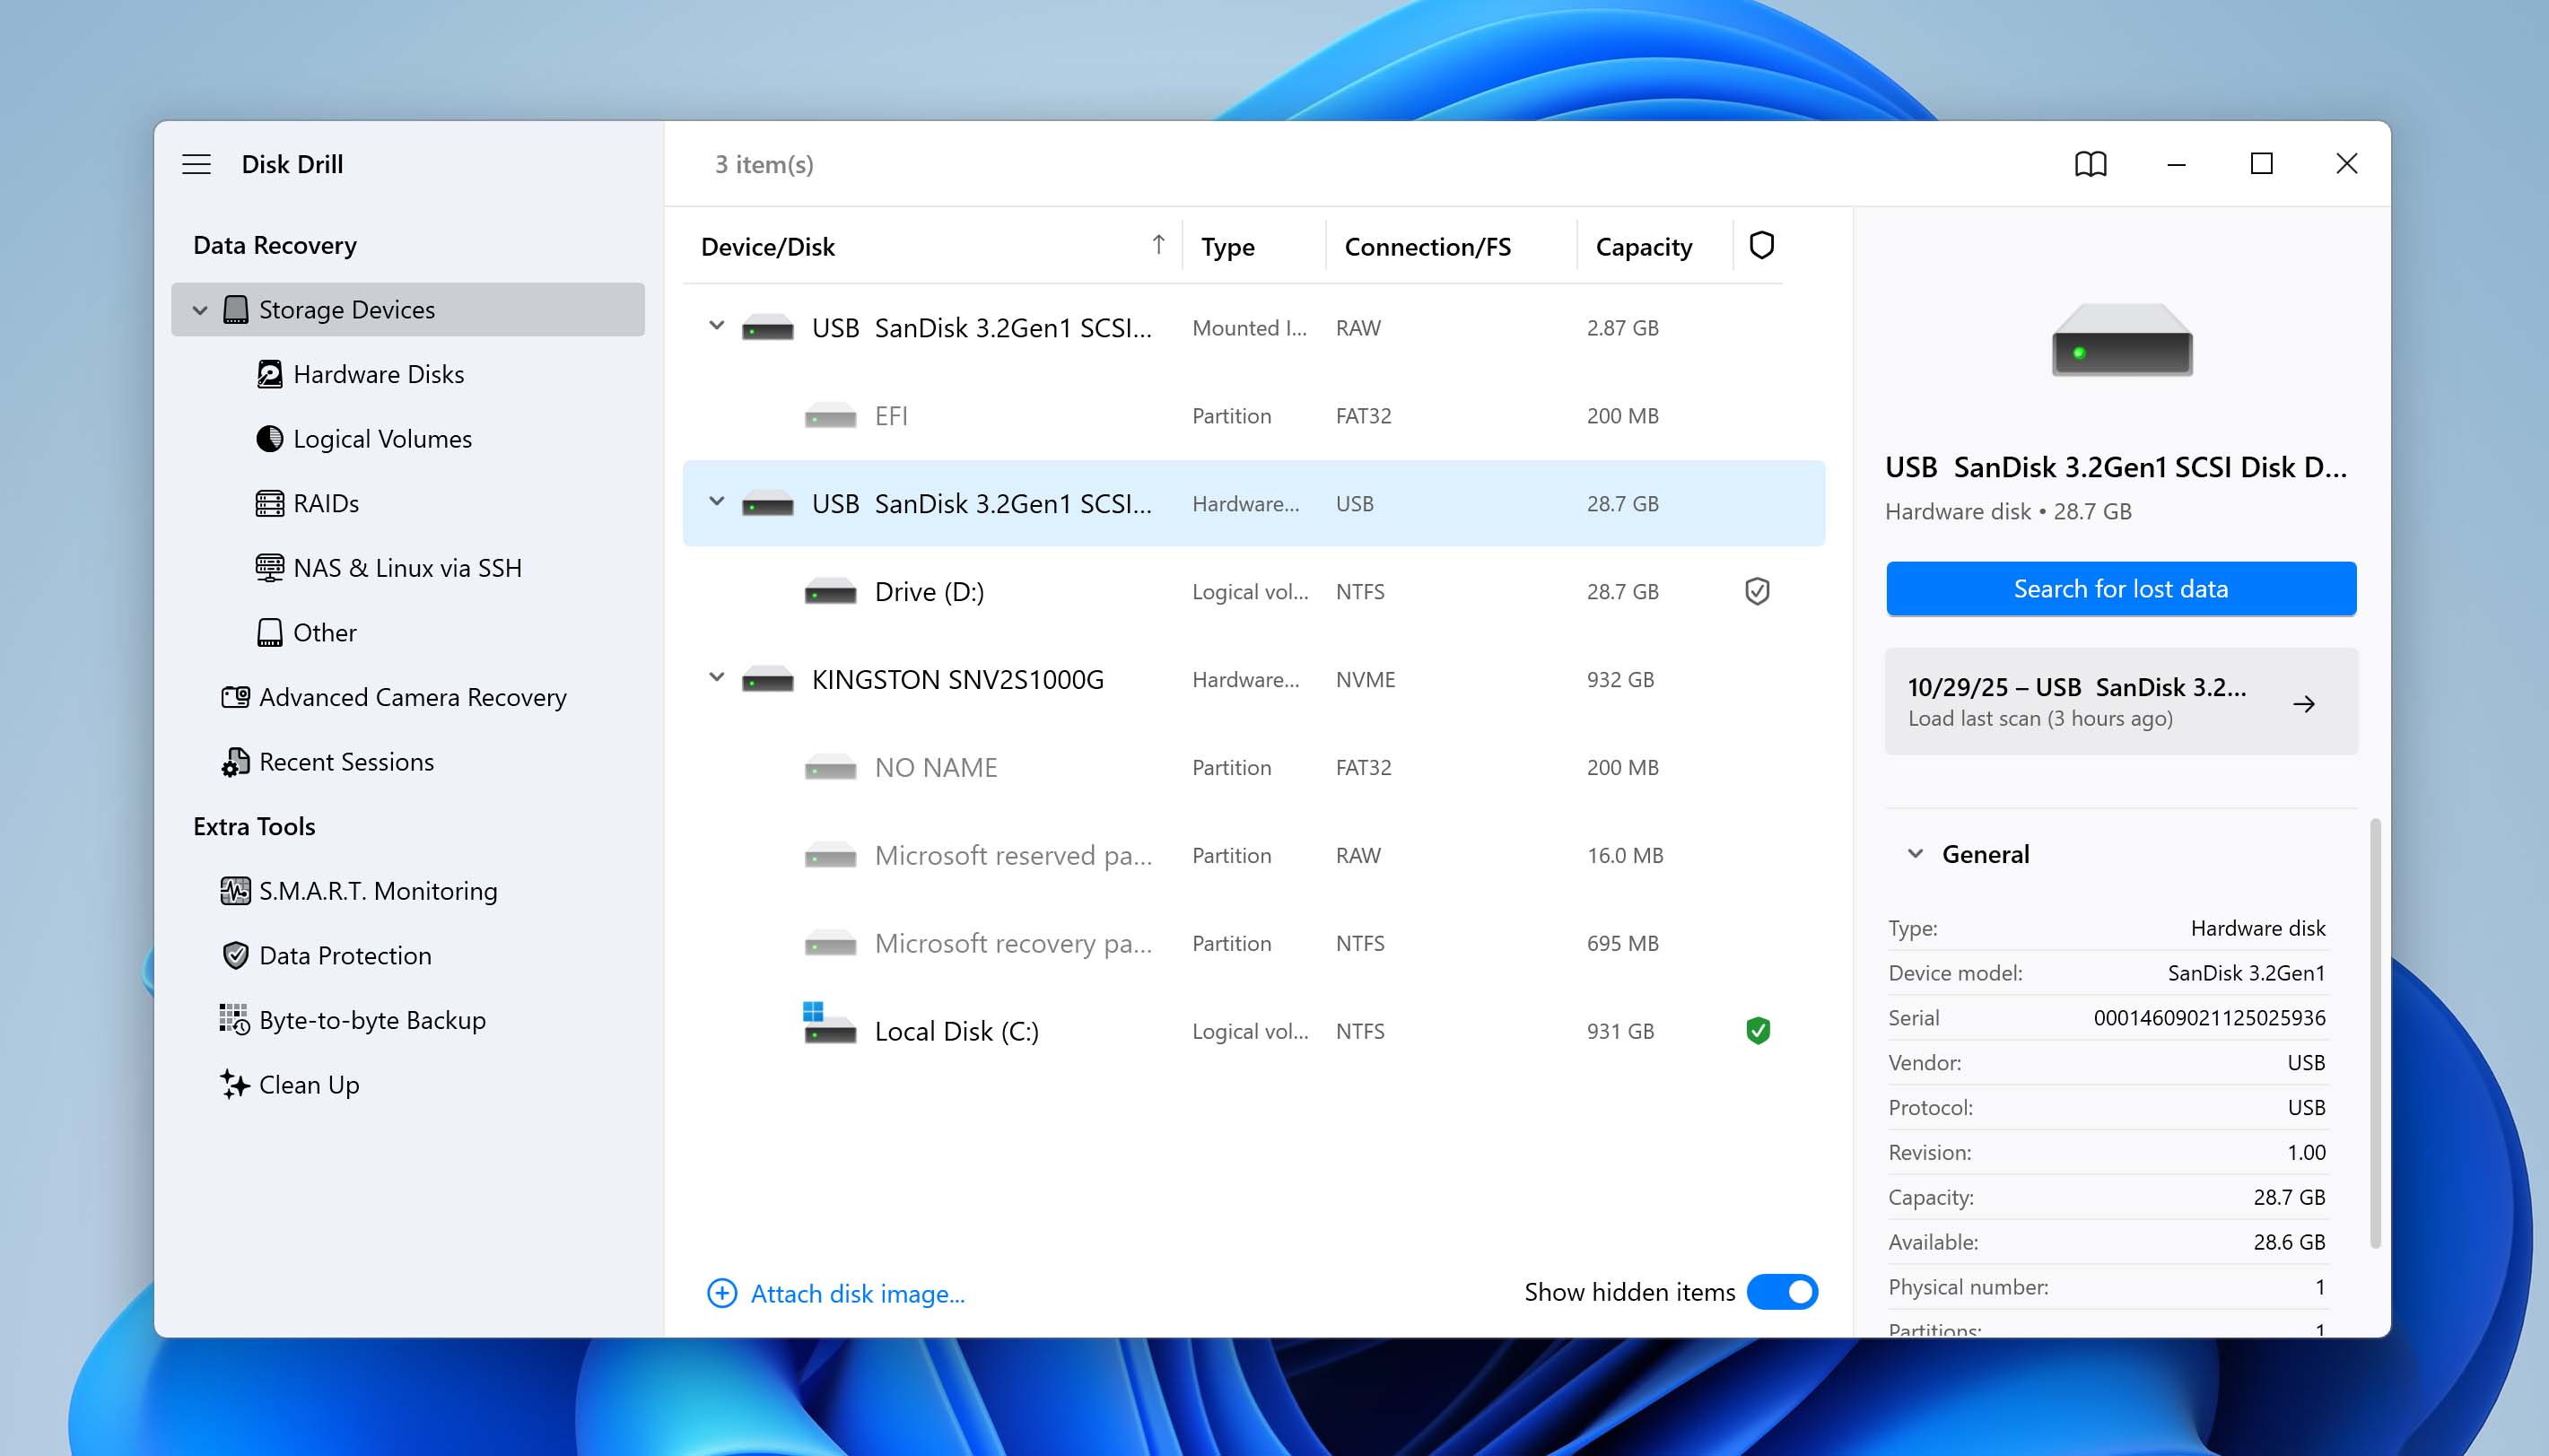
If your PowerPoint file has vanished and you can’t locate it anywhere on your computer, the most reliable and time-efficient solution is to use a professional data recovery tool. We recommend Disk Drill for Windows because of its strong recovery algorithms and broad support for Windows storage devices. It works equally well whether your presentation was stored on the system drive, a USB flash drive, or external storage.
The software analyzes the file system’s metadata to locate recently deleted files, and it also performs a deep signature scan that recognizes .ppt and .pptx formats, even if the file system structure has been partially damaged.
- First, download and install Disk Drill for Windows. If the missing file was on your main system drive, install the app on a different disk or a USB stick — it helps prevent deleted data from being overwritten while you work.
- Open Disk Drill and choose the drive that originally held your presentation. Hit Search for lost data, choose Universal Scan, and let the scan run. Bigger or slower drives will naturally take longer.
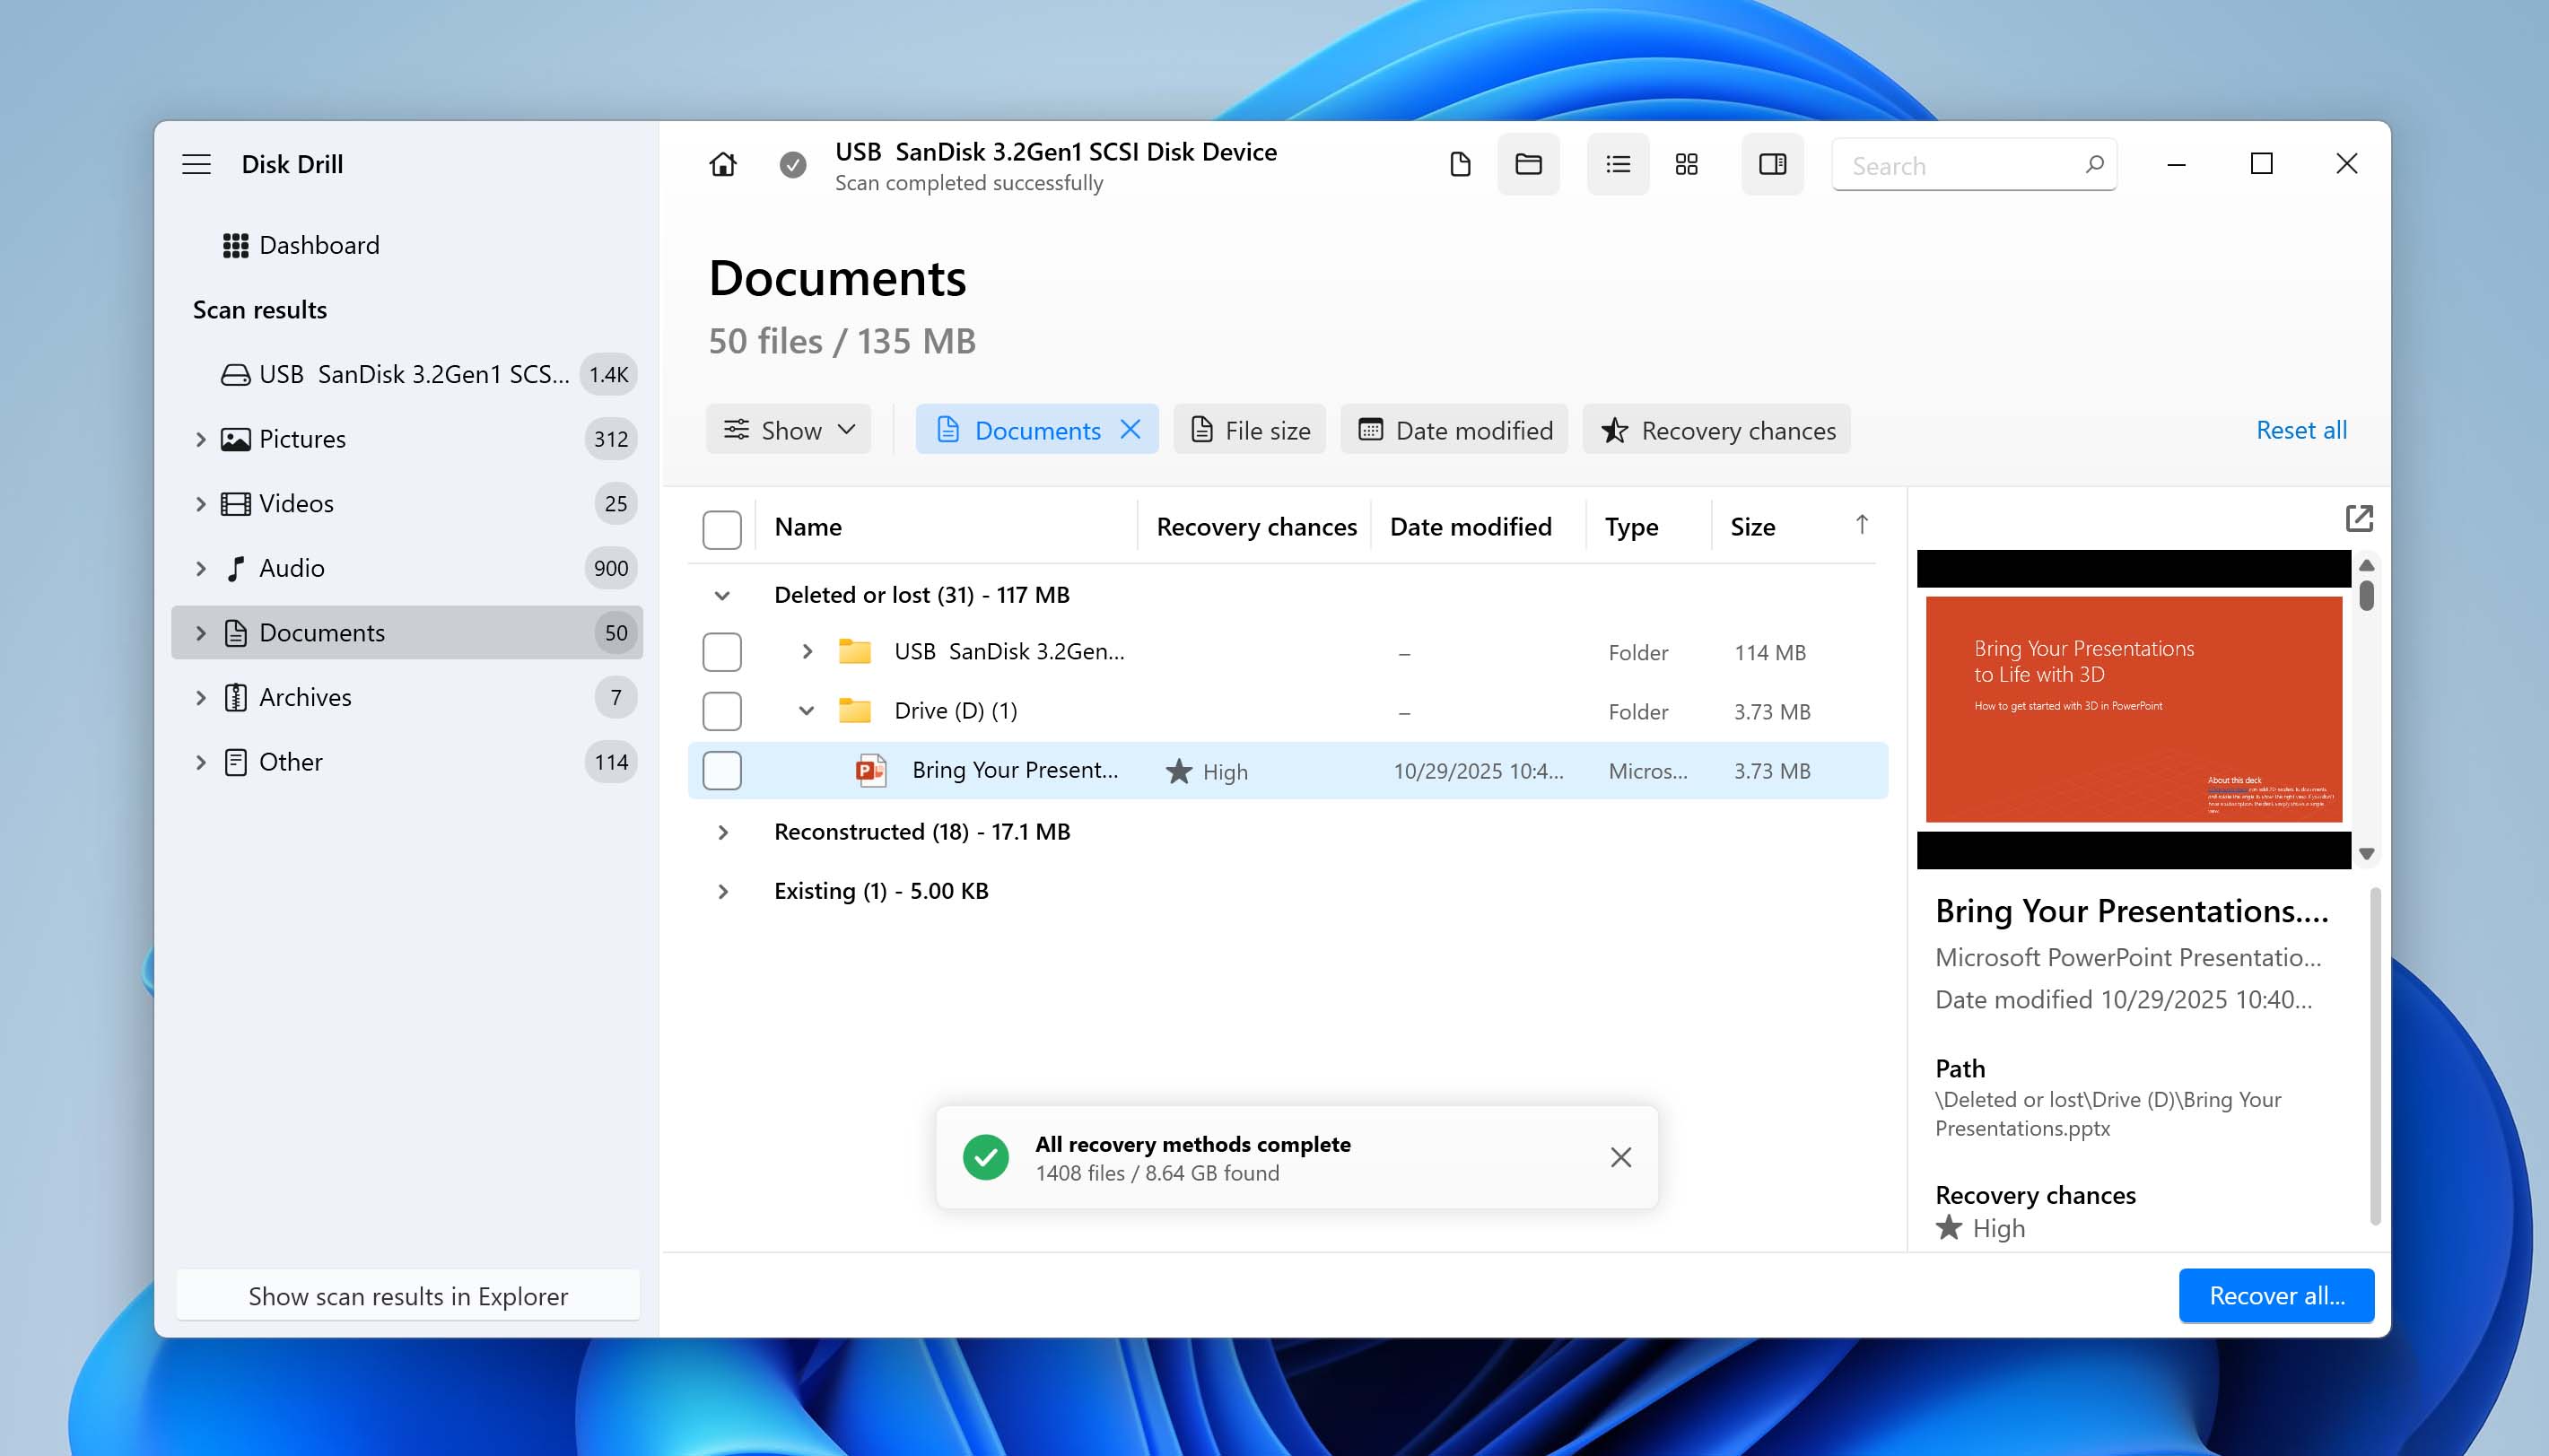
- When results appear, use the search bar to narrow things down by typing part of the presentation’s name — this usually speeds things up a lot.
- Find the .ppt or .pptx version you want back, and mark it for recovery.
- Pick a new and safe location for the restored file — ideally not the same drive you’re scanning.
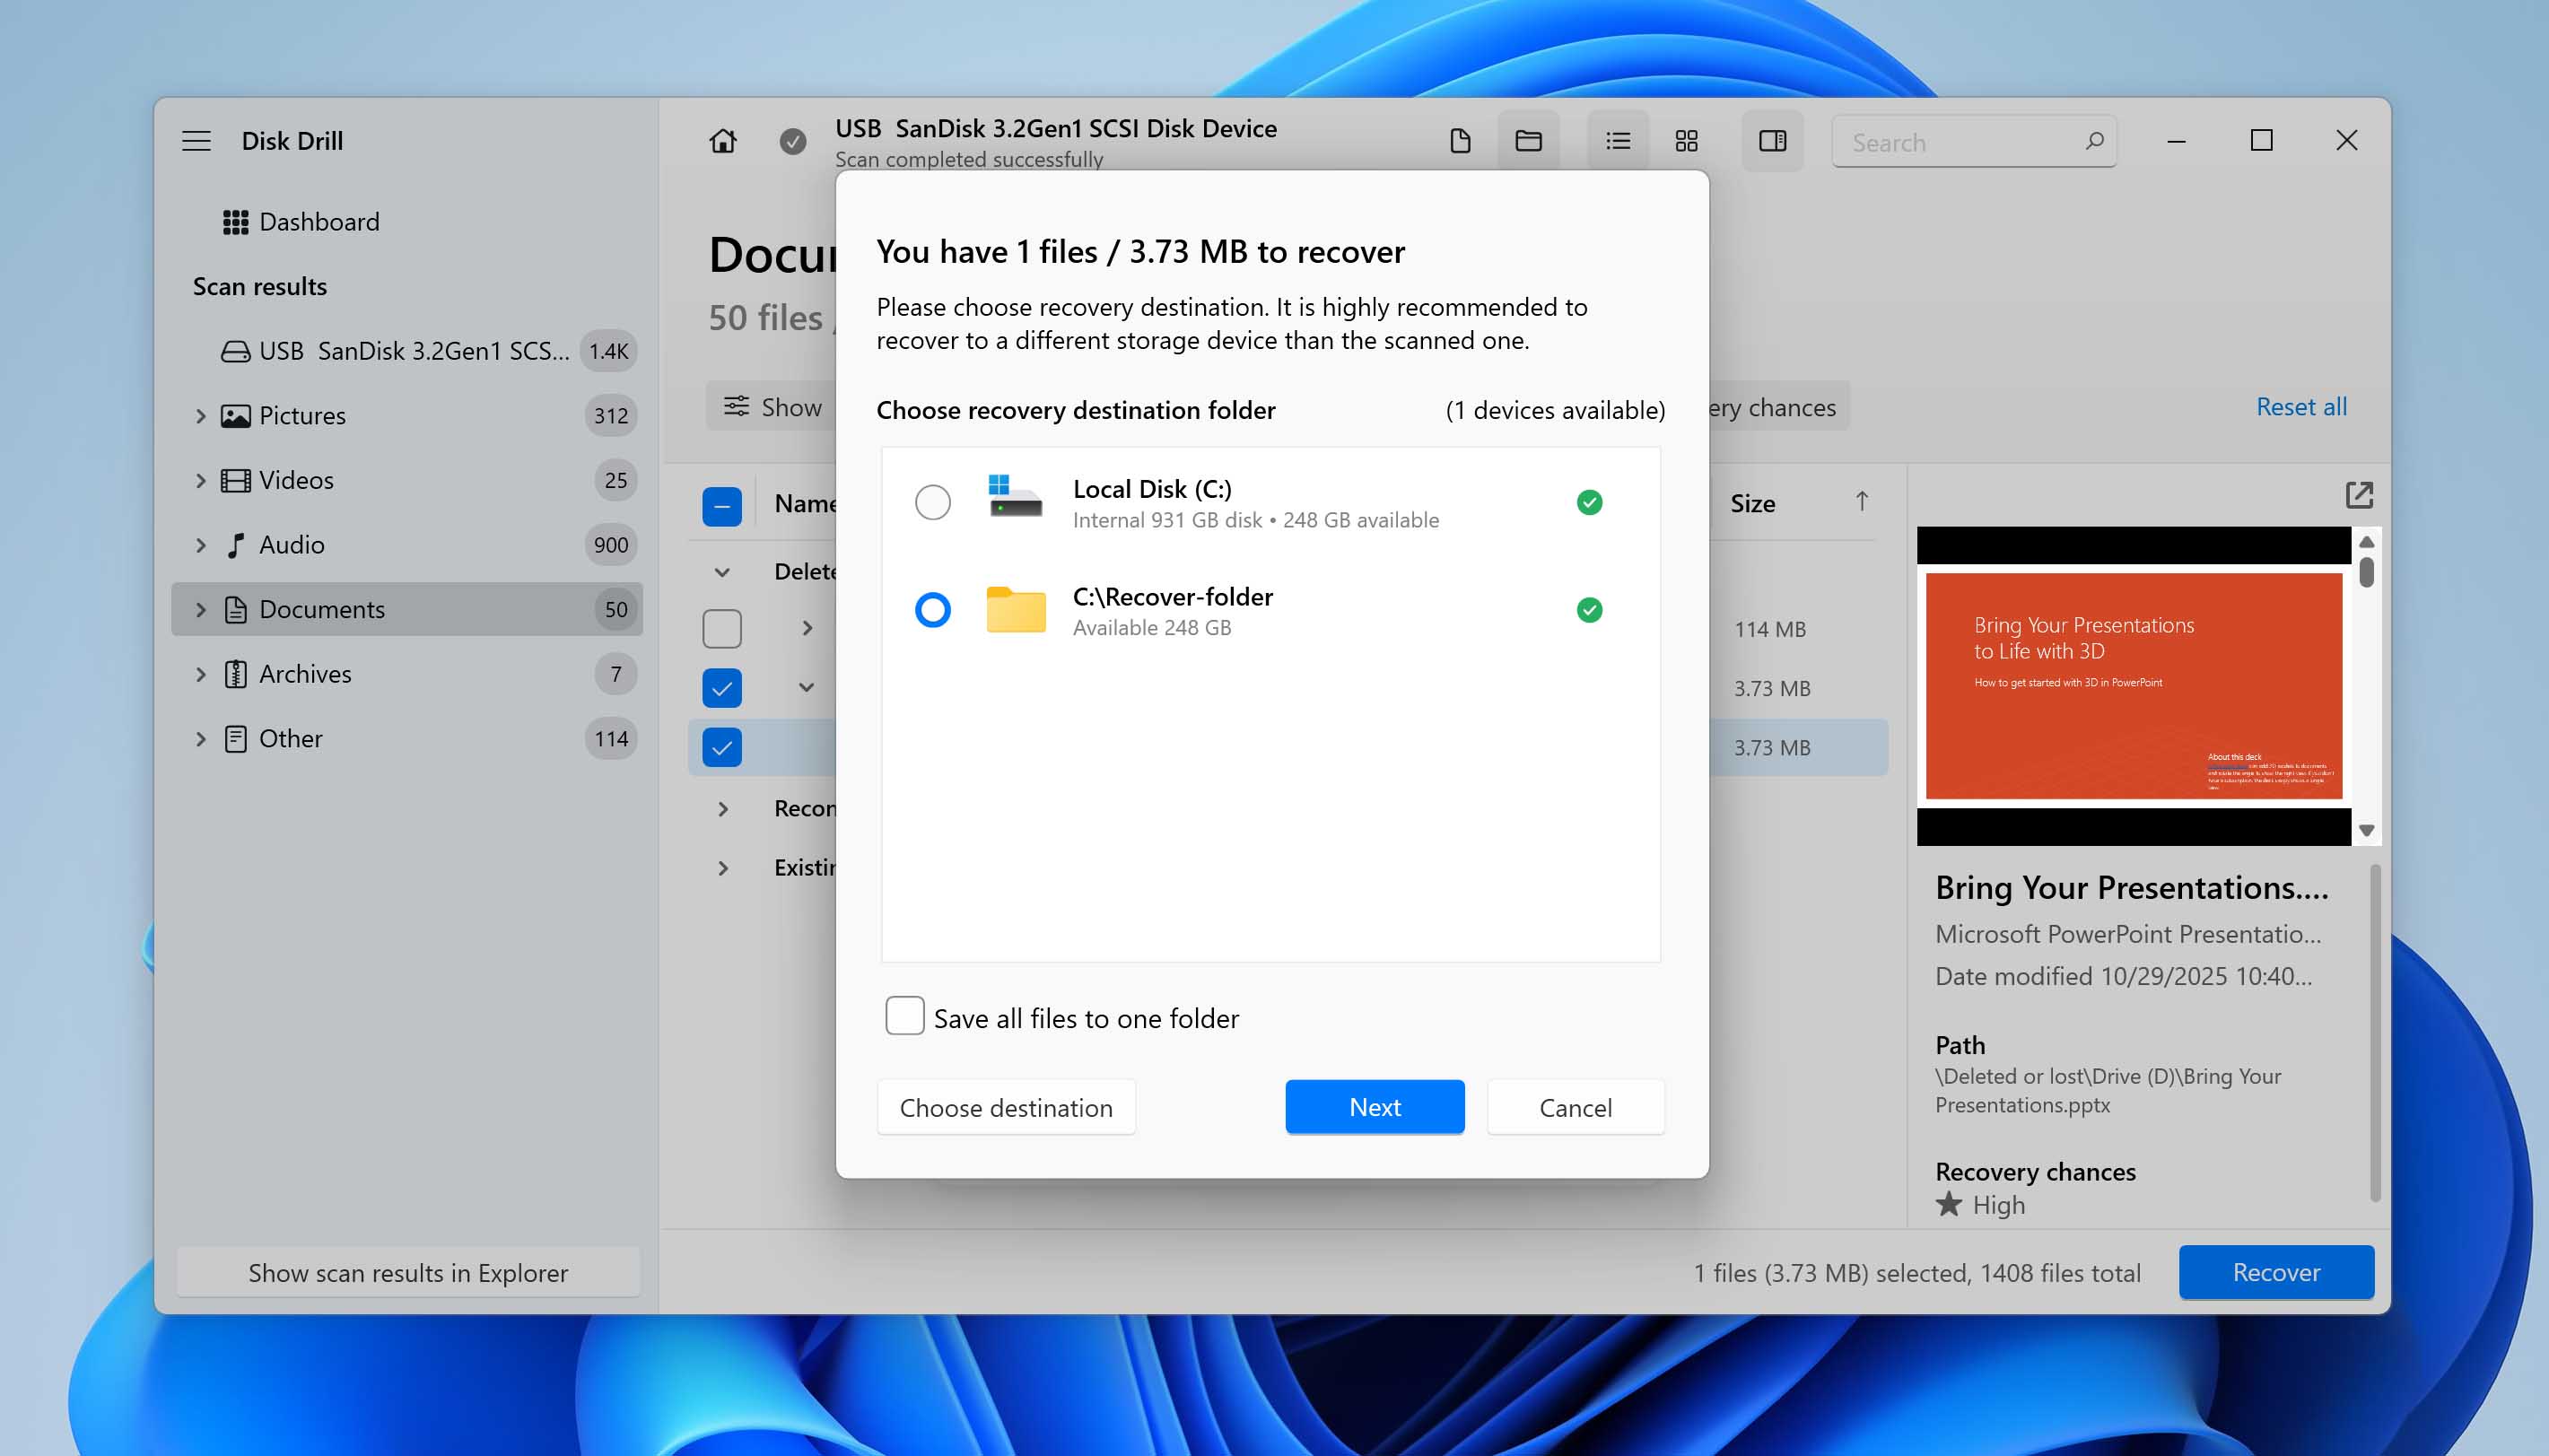
- After the recovery completes, Disk Drill will prompt you to open the folder where the presentation was saved.
The good news is that Disk Drill for Windows includes a free recovery allowance of up to 100 MB of data. That’s usually more than enough to rescue several presentations — even the ones packed with images and graphics — so you can often get your work back without spending anything at all.
Option 2: Recover your PowerPoint from a Windows Backup
When backups exist, they’re usually the easiest way to get a deleted file back — no scanning, no guessing, just restore the exact version you had earlier. The only catch is that many people don’t set them up at all, or they forget about them until something goes missing. If you’ve ever switched on File History in Windows, your presentation might still be sitting there. You can check it this way:
- Open the Start menu, type Control Panel, and launch it.
- Head to System and Security, then File History.
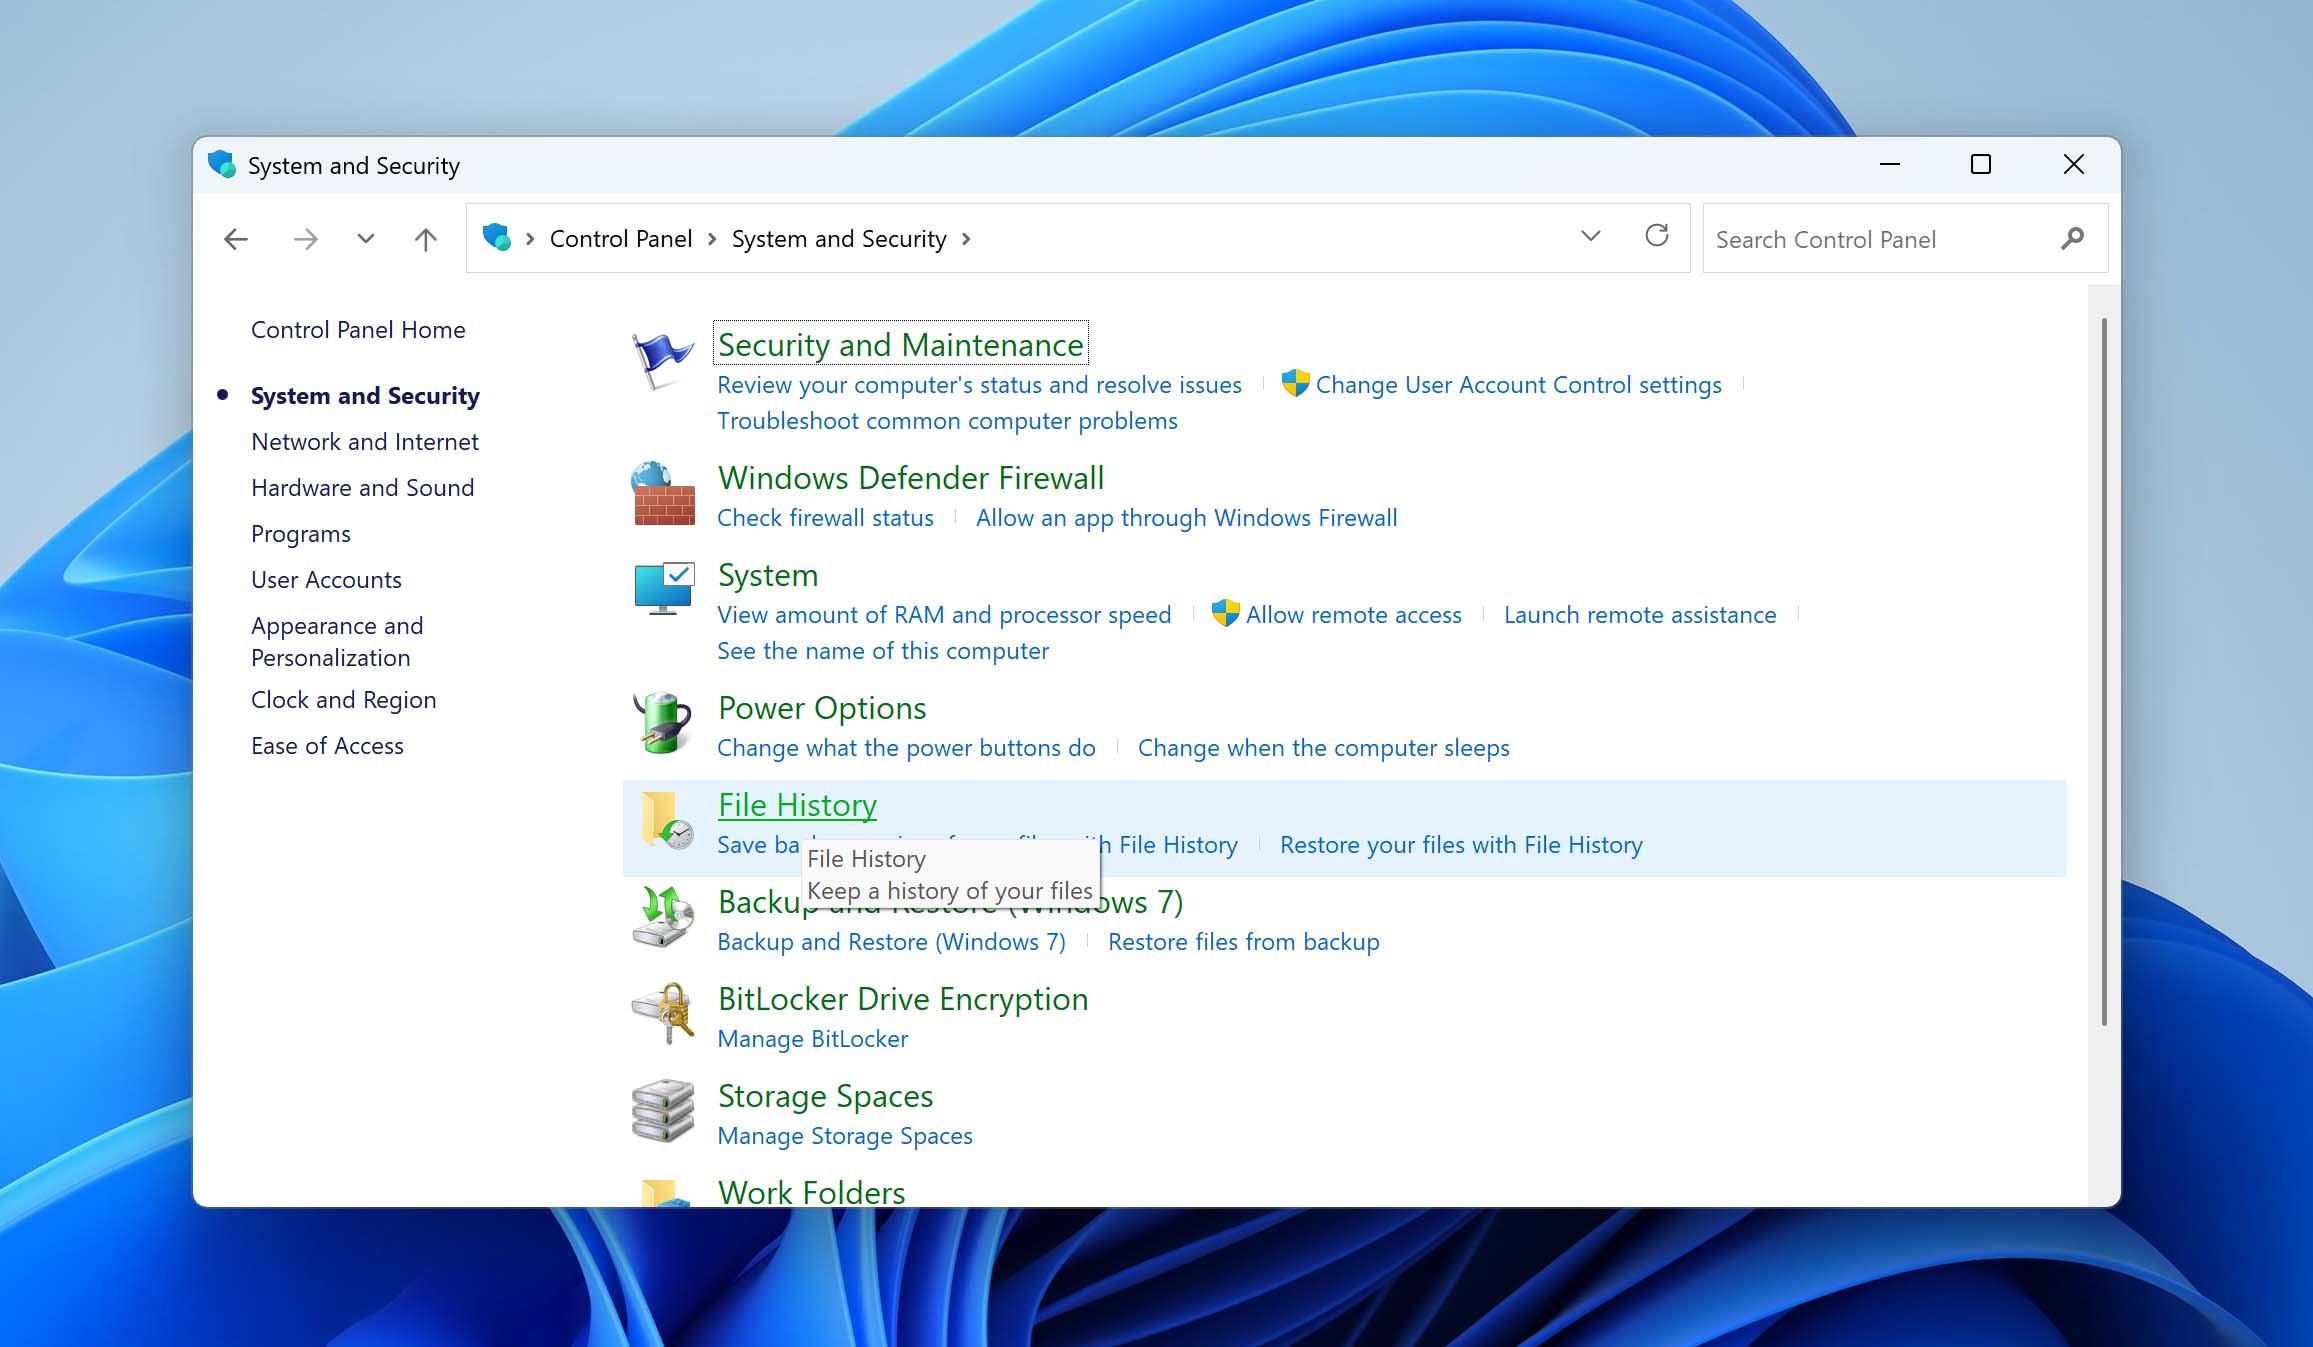
- If the feature was turned on, you’ll see an option on the left called Restore personal files — click that.
- A window will appear with your backed-up folders. Look for the one where you usually save PowerPoint files — often Documents.
- Use the arrow buttons at the bottom to flip through past snapshots until you spot the version you need.
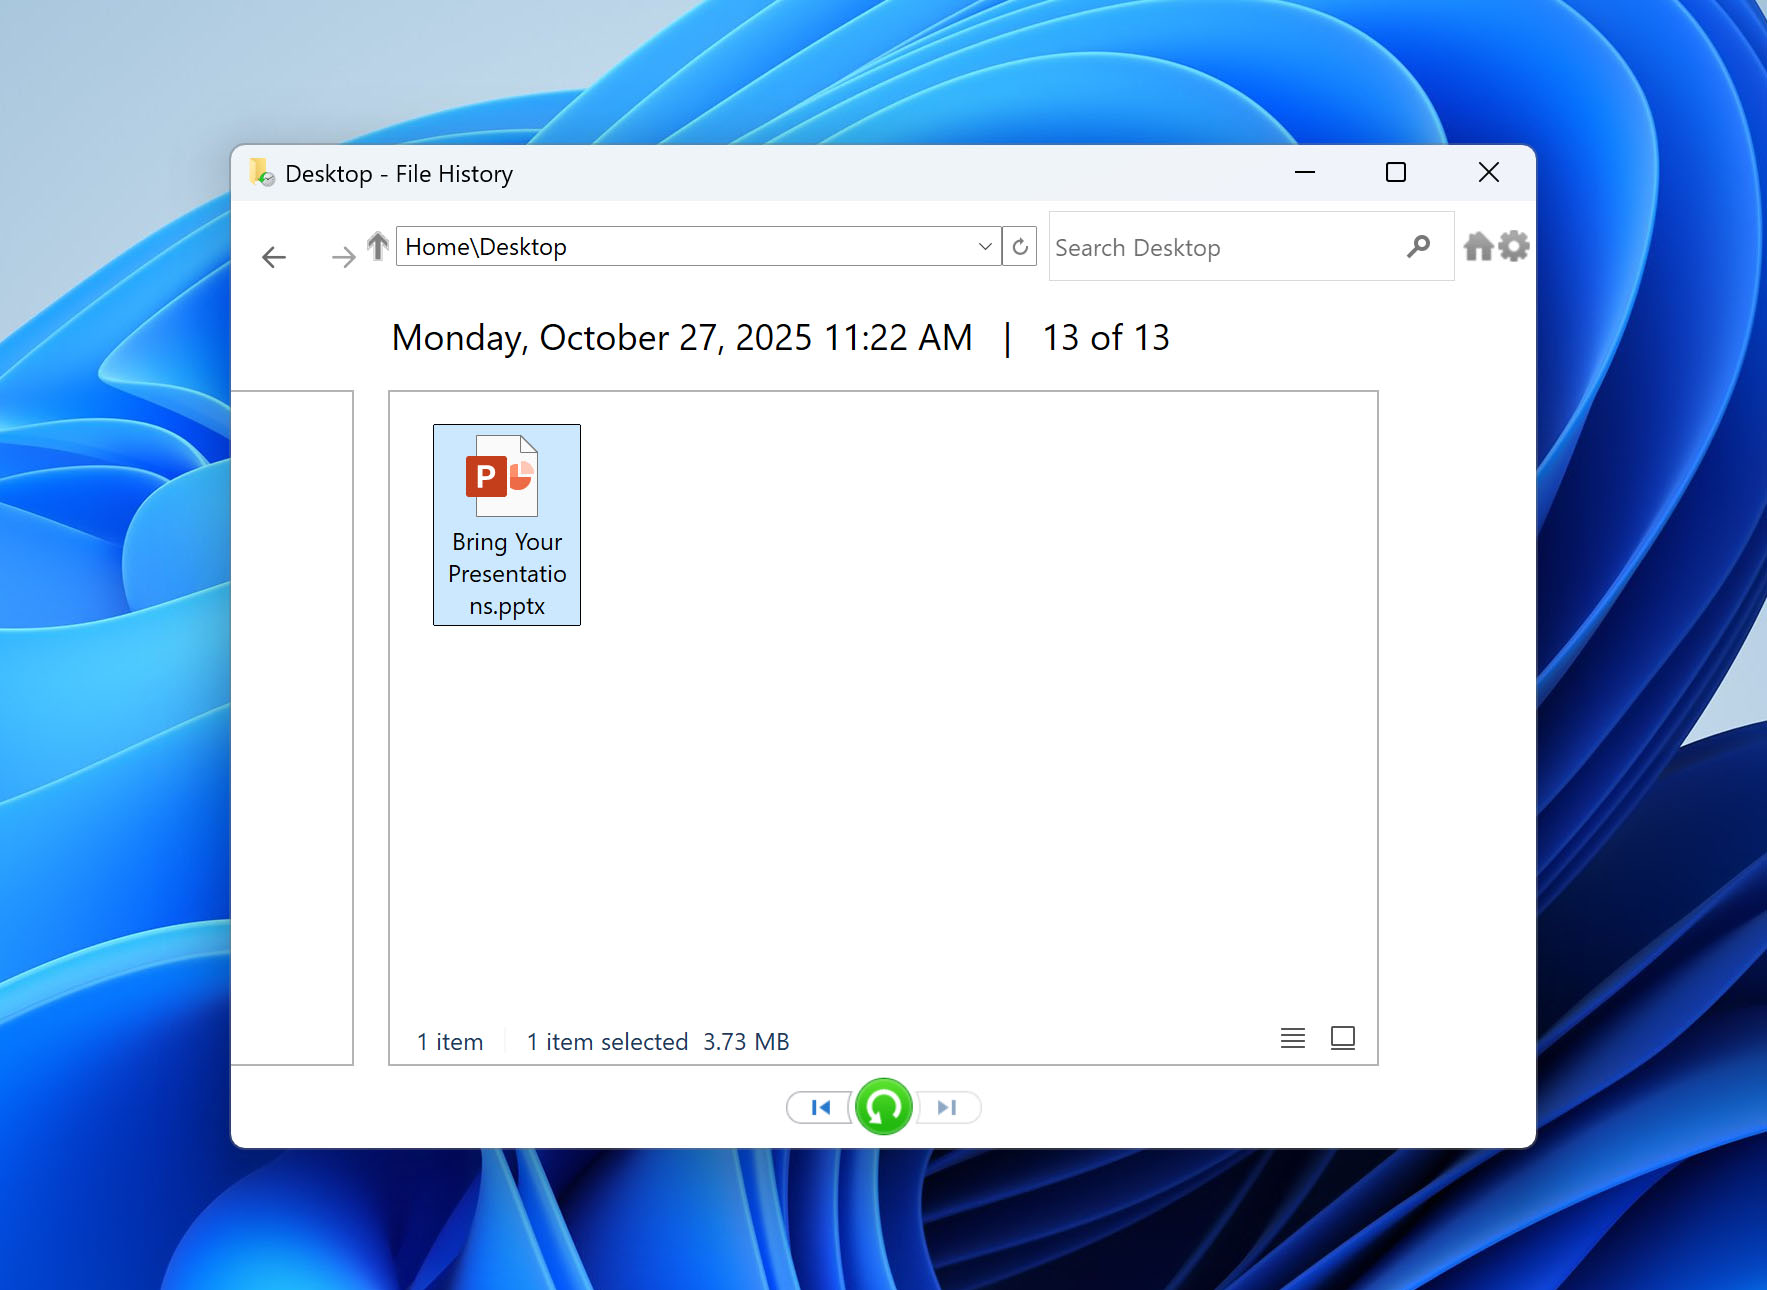
- Select the file and click the green Restore button. Windows will drop the presentation back into its original folder.
If File History was active, there’s a solid chance this brings your deck right back without much work.
💡 One more thing
Windows also has an older feature called Backup and Restore (Windows 7). It still functions, but Microsoft doesn’t really push it anymore, so we’re not diving into a full walkthrough here. If you used that tool instead, Microsoft’s support pages cover the steps in detail.
Option 3: Look Through the Temporary Files Folder
If PowerPoint or Windows misbehaved while the file was open, there’s a small chance a backup copy ended up in the Temp folder. Windows creates a bunch of temporary files whenever you’re editing documents, and sometimes they stay behind long enough to save the day.
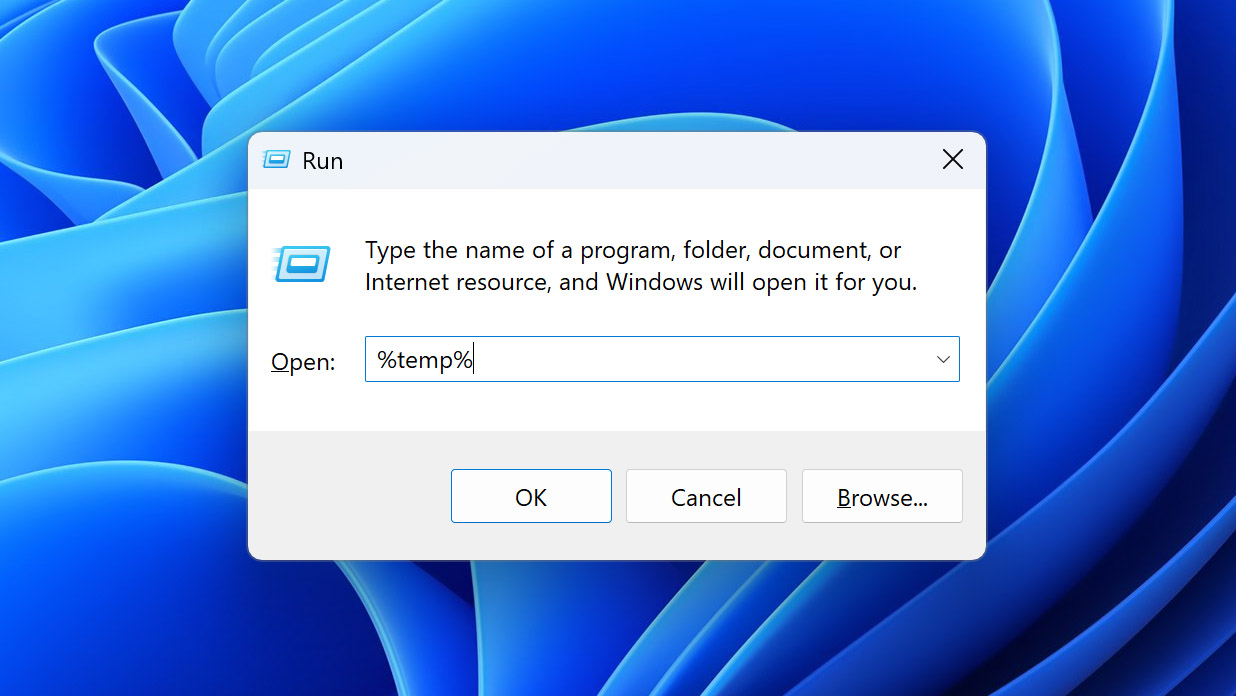
- Hold Windows Key + R on your keyboard.
- Type %temp% into the little box that appears, then hit Enter.
- A folder should open — and yes, it will look like chaos.
- Sort everything by Date Modified so the newest stuff is grouped together.
- Go through the list and see if anything resembles your presentation’s name.
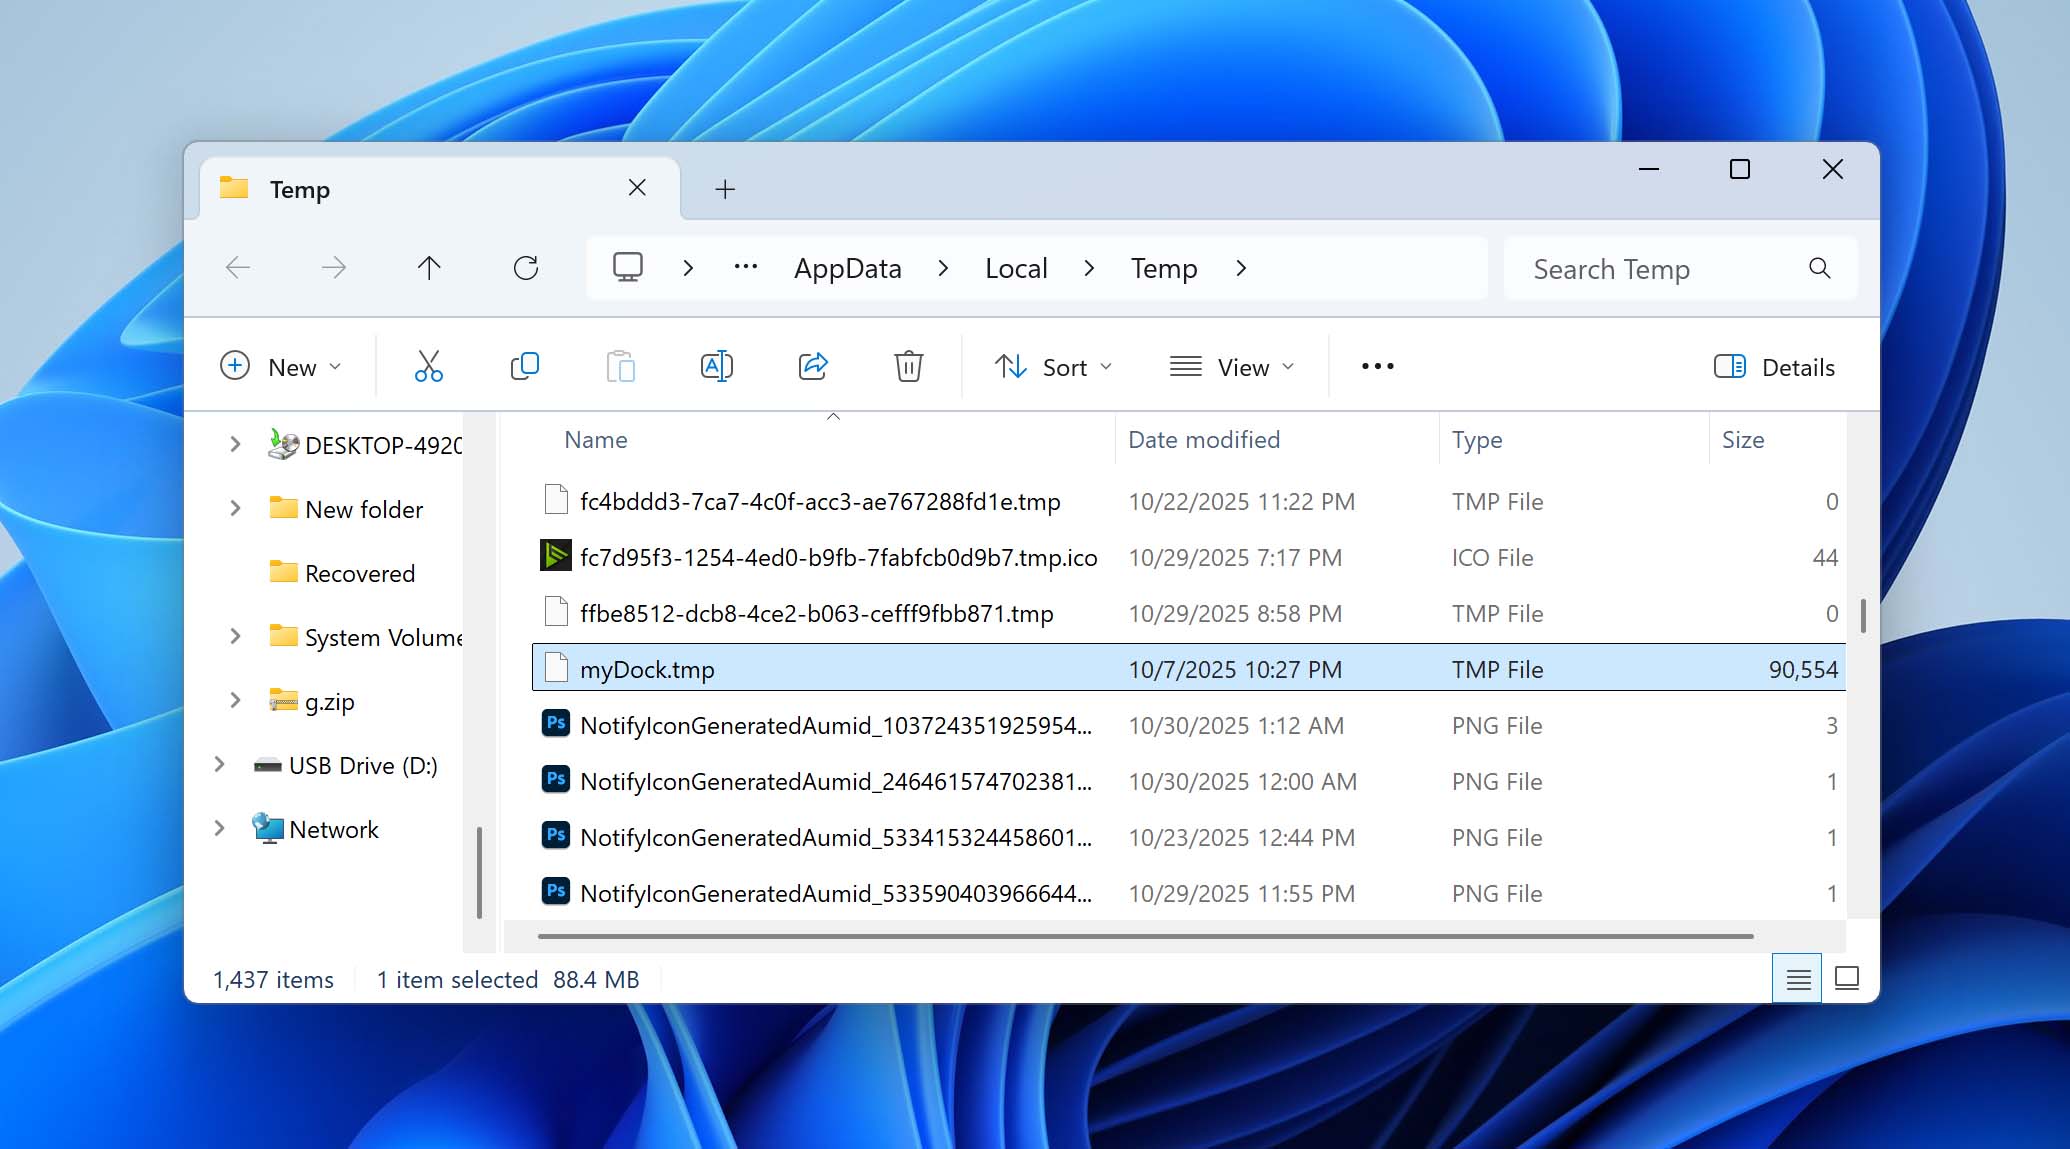
- You’re basically hunting for leftovers from your last editing session.
Sometimes the file won’t show up as a normal .pptx. PowerPoint likes to stash work-in-progress as .tmp files, and they often contain part of your original filename. If you find one that seems like a match, try renaming the extension to .pptx and then double-click it.
Option 4: Use the Built-in AutoRecover Feature
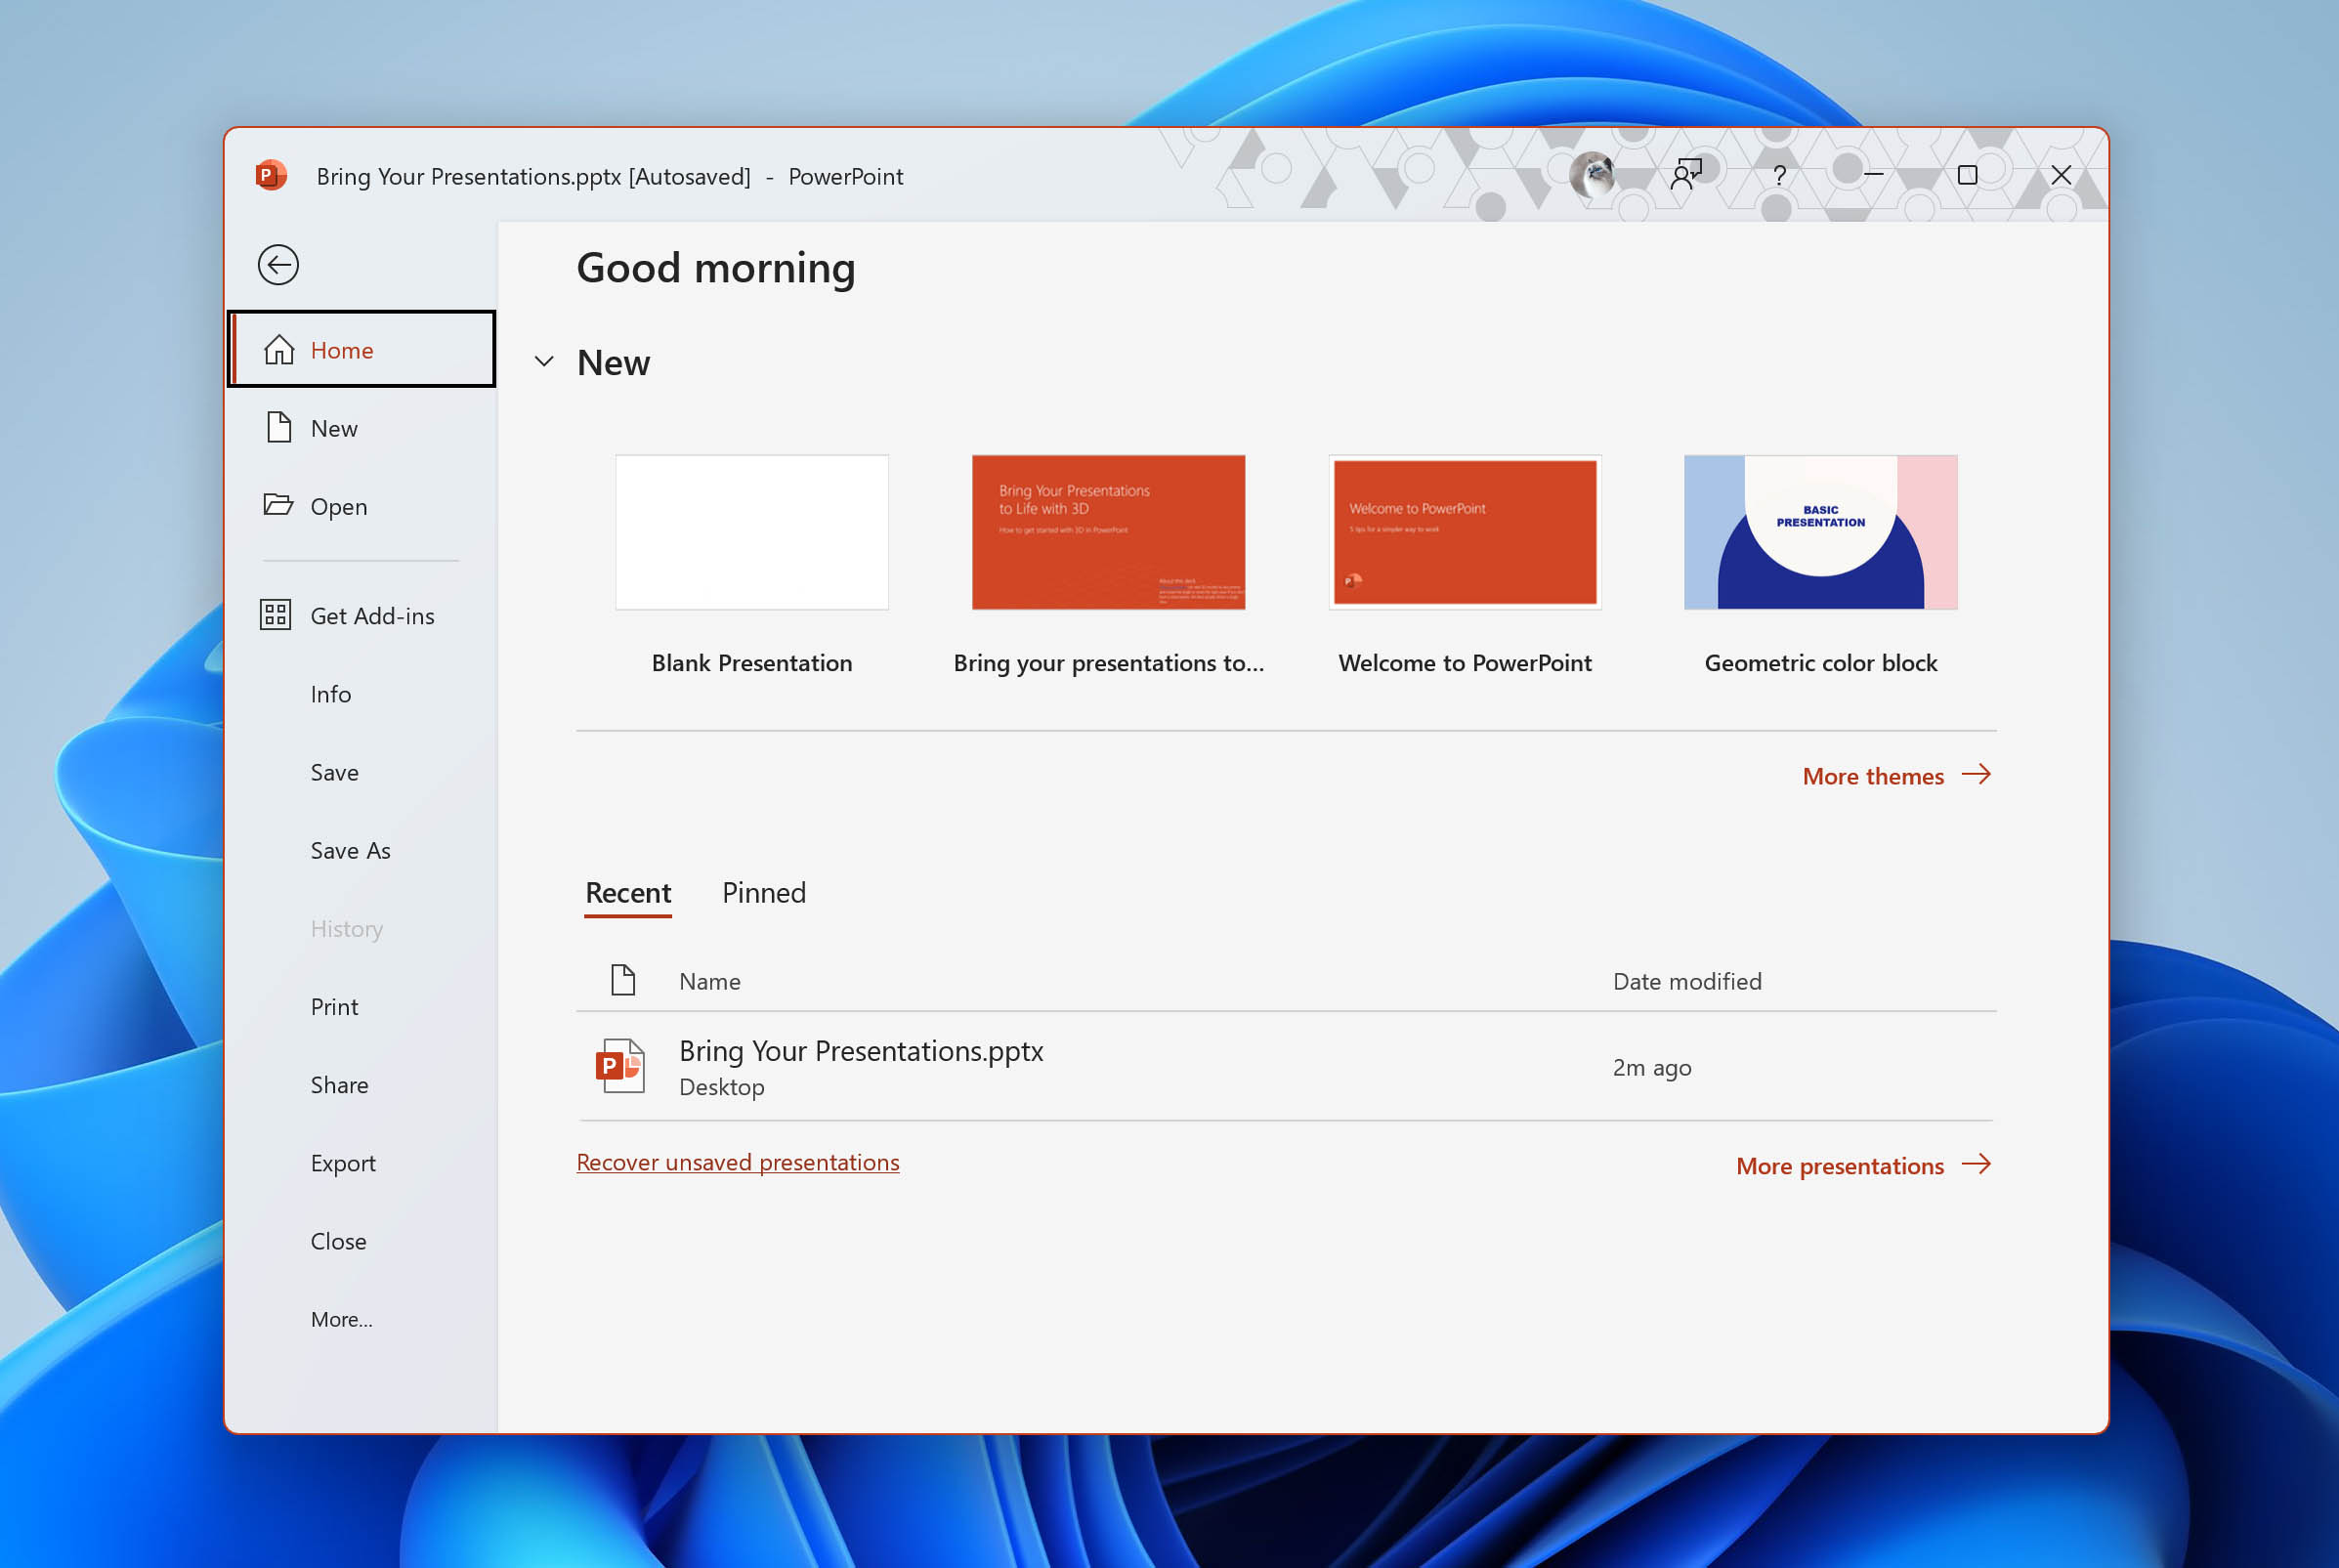
PowerPoint quietly protects your work in the background through a feature called AutoRecover. It’s built in, and it’s turned on by default in most versions of Microsoft Office. The app saves a hidden copy of your presentation every so often (the timing depends on your settings), so if PowerPoint freezes or crashes while you’re editing, the last AutoRecover version usually survives.
When you reopen the program after a crash, keep an eye out for your file in the recovery pane that appears on the left — it often shows up with [AutoSaved] in the title. Even if your last manual save was a while ago, this copy can help you pick up almost exactly where you left off.

AutoRecover isn’t perfect, of course — if PowerPoint didn’t have time to make its latest save before something went wrong, there might be a little progress missing. But compared to starting from nothing, it’s usually a big relief.
Option 5: Use the Built-in Unsaved Presentation Feature
If PowerPoint didn’t automatically pop up a recovered version of your deck after the crash, don’t panic just yet. The program keeps a small stash of files that were never manually saved, and you can check that location yourself.
- Launch PowerPoint on your PC.
- Click “File” in the upper left-hand corner of the screen and then you will see a “Recent” option located under “Open”.
- Scroll down to the bottom and select “Recover Unsaved Presentations”.
The “Recover Unsaved Presentations” folder only saves these PowerPoints for a short period of time. If you need to recover a lost PowerPoint Presentation, act fast!
Conclusion
If a presentation disappears, the goal is simply to track down where PowerPoint or Windows might have left a copy of it. That can be a backup, a temporary file, or a recovered version that only shows up once. After the file is restored, it’s a good moment to check whether AutoSave and File History are actually enabled, since those features can prevent the same issue next time.
If you have a method that worked well for you or you noticed something in this guide that could be clarified, leave a comment below. Many users refer to shared recovery experiences when searching for a solution, so your input may be useful.
FAQ
How do I recover a PowerPoint presentation that is not in the Recycle Bin?
If you can’t locate a deleted PPT in the Recycle Bin, look for it in Windows File History, and the Temporary folder. If you still can’t find it, you can use a data recovery tool like Disk Drill to get it back:
- Download Disk Drill and install it.
- Open Disk Drill, select your drive and click Search for lost data.
- Click on Review found items.
- Find your lost file, select it, and click Recover.
- Choose a recovery destination and click Next.
Can I recover deleted PowerPoint slides?
You can recover deleted PowerPoint slides by using the Undo feature (CTRL + Z) in PowerPoint. You can restore an older version of the slideshow in OneDrive:
- Go to the OneDrive website and log in using your Microsoft Account.
- Right-click on the PowerPoint file and choose Version History.
- Click on the ellipses next to the version you wish to restore and click Restore.
How do I recover an overwritten PPT File in Windows 11?
To recover an overwritten PPT file in Windows 11, use the OneDrive file history feature. If the PPT is saved locally, your best bet is to use Windows File History to restore an older version of the PPT file:
- Search for “file history” in Windows Search (Windows Key + S). Click on Restore your files with File History in the search results.
- Browse through the backups until you find one that contains the required version of your PowerPoint file.
- Select the PPT and click on the green restore button.
Can OneDrive or SharePoint version history help recover a PowerPoint presentation?
Yes — if your presentation was saved in OneDrive or SharePoint, version history can be an easy recovery method because it stores earlier versions of the file. Open the file in PowerPoint (or OneDrive/SharePoint online), select File, then Info, then Version History, and review and restore the version you need.

")


