 Is your Mac having trouble recognizing your SD card? Or maybe the files on the memory card display an error when opened? Well, it’s possible that you’re experiencing such issues because of SD card corruption. If that’s the case and you’re unable to access the data stored on your card, we have a solution for you.
In this article, we’ve covered everything that you should know to successfully recover a corrupted SD card on Mac.
Main Reasons for SD Card Corruption
What does it mean when your SD card is corrupted and why did it get corrupted in the first place?
If your SD card is corrupted, it typically means that the device has some kind of logical damage (for example, an error in the file structure). Such non-mechanical damage can be either self-inflicted or caused by a human error.
Here are the main causes of SD card corruption:
| Cause | Description |
| 🦠 Malware | Just like other removable media, SD cards can also get infected by a virus or malware. Almost any type of malicious code may cause undesired effects such as corruption, damage to the file structure, or data loss. |
| ✍🏽 Interruption of the read/write processes | If you interrupt an important process on your SD card (for example, by removing the card from your Mac while writing files), it can lead to severe consequences, such as data loss or card corruption. |
| 🔥 Physical influence | Exposure to heat, water, or high humidity can damage your SD card. |
| 🔌 Power outages | Power outages may interrupt the read/write processes on your card and therefore cause logical damage to the SD card and be the reason for data loss. |
| ⏏️ Improper removal of the SD card | It’s impossible to stress enough the importance of properly ejecting an SD card from a computer. If you simply disconnect the card from your computer, it can corrupt the file system on the SD card. |
| 💾 Aging | SD cards have a limited lifespan. Depending on how you use your SD card, it can last for 10 years or more. The older your memory card gets, the higher the chances of getting it corrupted. |
| ❌ Bad sectors | Extensive or improper usage can damage the SD card memory blocks. If that happens, your whole card can become inaccessible. |
Note: If you suspect that your SD card is corrupted, it’s important to stop using it immediately. Continuing to use a memory card with such an issue may worsen the situation and increase the risk of overwriting data and, therefore, make it unrecoverable.
What to Do if Corrupted SD Card is Unreadable
If your SD card is unreadable, it’s a good idea to try to troubleshoot it to see whether you might be able to access those files before without resorting to more complex data recovery methods.
Here’s what you can try:
- Connect the SD card to a different device: Maybe the issue isn’t connected with the card itself. To rule out this, try inserting the SD card into another computer or a different device like a camera or phone.
- Try to use another USB port (if you’re using an external card reader) or a card slot: It’s possible that the port you were using to connect the SD card is damaged, therefore you should try to use a different one.
- Reboot your computer: Sometimes a simple action like restarting your computer might help to make your SD card readable again. It’s possible that the applications that are running on the background of your Mac are interfering with the SD card and stopping you from reading it. Therefore, by restarting your computer, you’ll eliminate this issue and reestablish the connections between your Mac and the SD card.
- Get your software and firmware up-to-date: There is a chance that your SD card is incompatible with your computer because of outdated software.
- Reset PRAM/NVRAM and SMC (M1-based Macs and newer have these features reset after reboot automatically): So if that’s what making your SD card unreadable, resetting them might bring back the access to your files.
How to Recover Data from a Corrupted SD Card on Mac
Having to deal with a corrupted SD card can be quite frustrating. If you want to do both, repair the card to continue using it and get access to the data stored there, you should always start with recovering the data first. This way, you’ll have higher chances in gaining back your photos, videos, and all other files since usually even if you make one single attempt at repairing the card, you risk overwriting data and losing your files forever.
Below we’ve described the best two options for restoring data from a corrupted SD card on a Mac: the first one is a DIY method that involves using a specialized data recovery tool and the other one involves getting help from a data recovery service. Both of the methods should provide exceptional results.
Method 1: Use a Data Recovery Software
Note: Keep in mind that Disk Drill for Mac isn’t entirely free. The trial version will let you scan your SD card and preview files that were discovered by the tool. If a file can be previewed, it means that it can be potentially recovered with Disk Drill. This way, you’ll be making an informed decision about whether you should buy the software and upgrade to the Pro version.
It’s possible to recover files from a corrupted SD card on a Mac using specialized data recovery software. However, this method will work only if your memory card is mountable and you can access the corrupted SD card on your Mac. If it’s impossible to connect the card to your computer, check out Method #2.
There are not many options when it comes to choosing a data recovery tool for restoring files from an SD card since not all applications support this type of device, and not all of them are compatible with the Mac operating system.
Our recommendation is Disk Drill since it’s user-friendly, reliable, and has a free trial version. Moreover, Disk Drill can restore over 400 file types, so it will be able not just to recover photos from a corrupted SD card on a Mac, but handle almost any type of file (whether it’s an image, video, audio file, etc.).
To minimize the chances of overwriting the lost data and preventing the corruption from worsening, it’s a good idea to clone your SD card by creating a DMG image of the data stored there and then using it to restore the files (once you scan the backup or the SD card itself, you’ll find not only the currently present files on the corrupted SD card but also deleted ones).
Here’s what you should do to recover a corrupted SD card on a Mac using Disk Drill:
- Download Disk Drill and follow the onscreen instruction to install it on your Mac.
- Connect the SD card to your computer and launch the app.
- Choose Byte-to-byte Backup from the sidebar on the left.
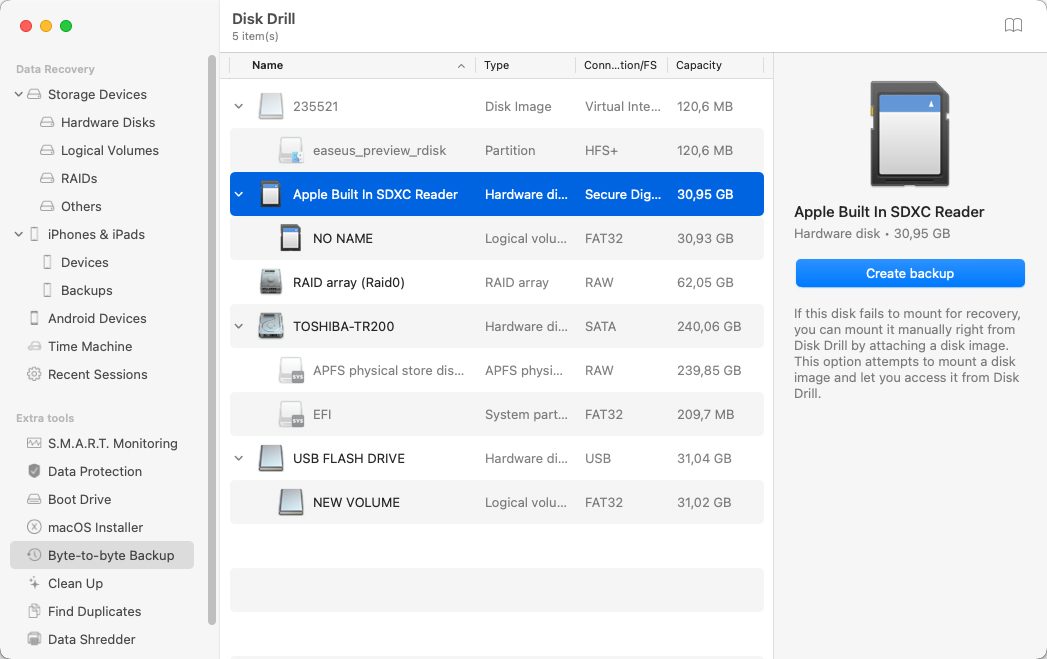
- Select the SD card from the list of available devices and click the Create backup button on the bottom right.
- Type in a name for the backup file near Save As and click the arrows near Where to select a preferred location. Click Save when ready.
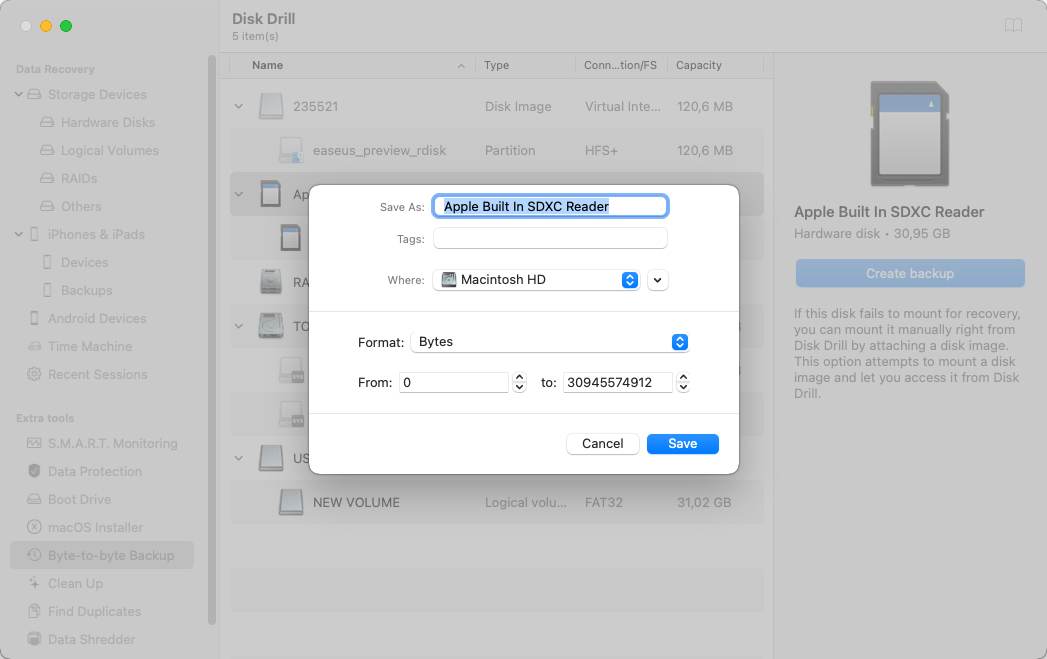
- Once the process is finished, eject your SD card.
Once the process is finished and the backup of your SD card is ready, you can scan it with the tool to reveal the data and recover the needed files. Here’s what you should do next:
- Choose the Storage devices tab from the menu on the left.
- Click Attach disk image on the bottom of the window.
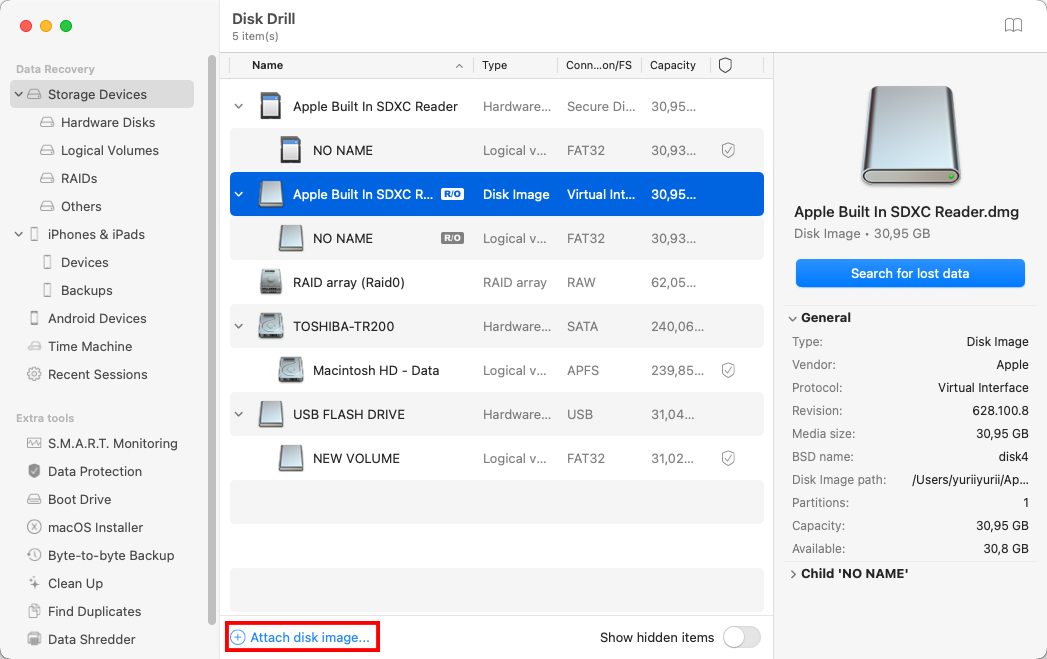
- Select the DMG image that you’ve previously created and click Search for lost data to initiate the scan.
- Click Review found items to look through the files found by the application.
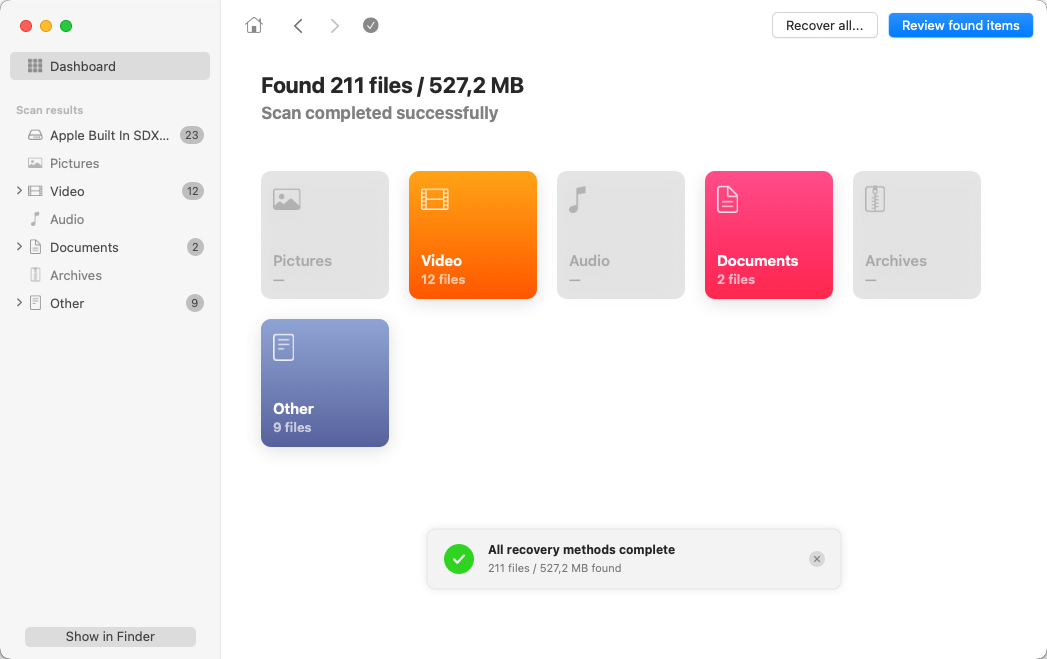
- Preview any file to see whether it is the one you’re looking for by simply clicking it. Choose the files you want to recover or, if you want to recover all of the data, click the box on the top left of the file list to select all of the files.
- When ready, click Recover.
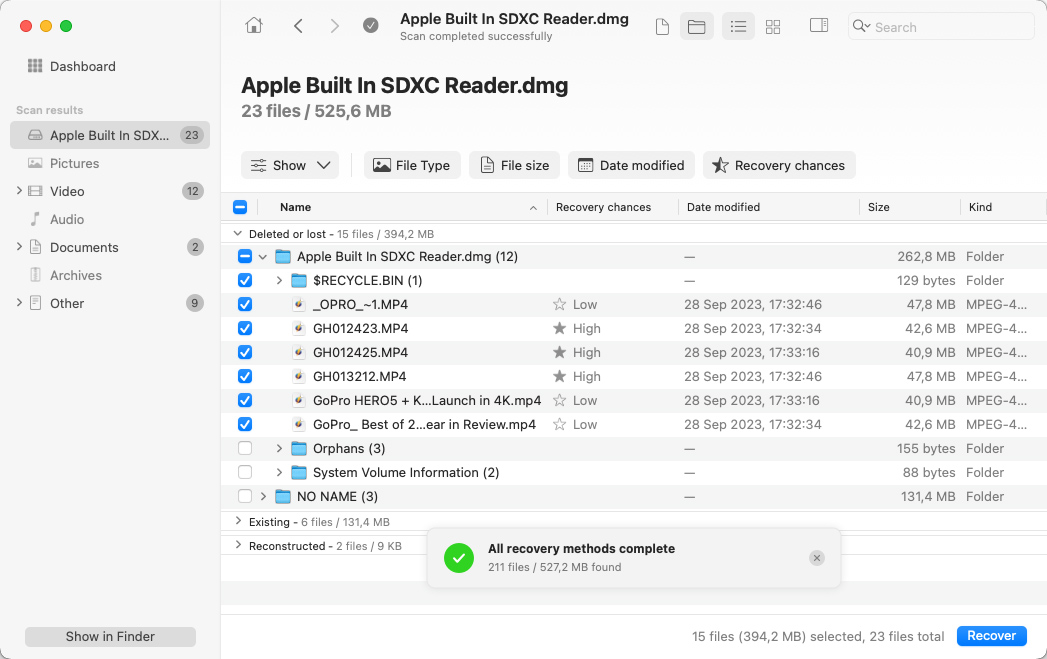
- Choose a destination for the recovered files and click Next to confirm (to avoid overwriting data, make sure to save the recovered files on a different drive).
Method 2: Contact a Data Recovery Service
If you aren’t able to make your SD card readable and it’s still not showing up on your Mac, or you are simply worried that you might mess up when trying to recover the data by yourself using the DIY method, you can let professionals handle this issue and let them take matters into their own hands. Data recovery experts know how to make an SD card mountable again and can use advanced techniques to access the data on it.
Cleverfiles Data Recovery Center is one of the best options out there since it’s a reputable company that has helped many with such issues. Also, they offer a free evaluation of the damaged device and won’t charge you if they fail to recover the data from your SD card.
Here’s what you should do if you choose to recover data from a corrupted SD card with a data recovery service:
- Contact the data recovery center and go over the problem you’re experiencing.
- Pack and send the SD card to the company’s lab.
- Receive a price quote.
- Let the center know that you wish to start the data recovery process if the price is acceptable.
- Get the recovered data shipped back to you on a new media.
How to Fix Corrupted SD Card on Mac
Once you’ve retrieved the data from your corrupted SD card, you can try to repair it. It’s incredibly important to extract the files from the memory card before moving forward with the repair process to avoid losing all of the data stored there.
So how to fix a corrupted SD card on a Mac? Here are the methods that may help if the corruption of the SD card is logical by nature.
Method 1: Run First Aid
Disk Utility’s feature called First Aid can check for corruption or errors and repair any device connected to a Mac, including an SD card. Follow these steps to repair a corrupted SD card on a Mac using First Aid:
- Connect the SD card to your Mac.
- Open the Disk Utility app (go to Launchpad and type Disk Utility in the search field).
- Select your SD card from the list of devices on the sidebar on the left.
- Click First Aid at the top of the window.
- Click Run to start the process.
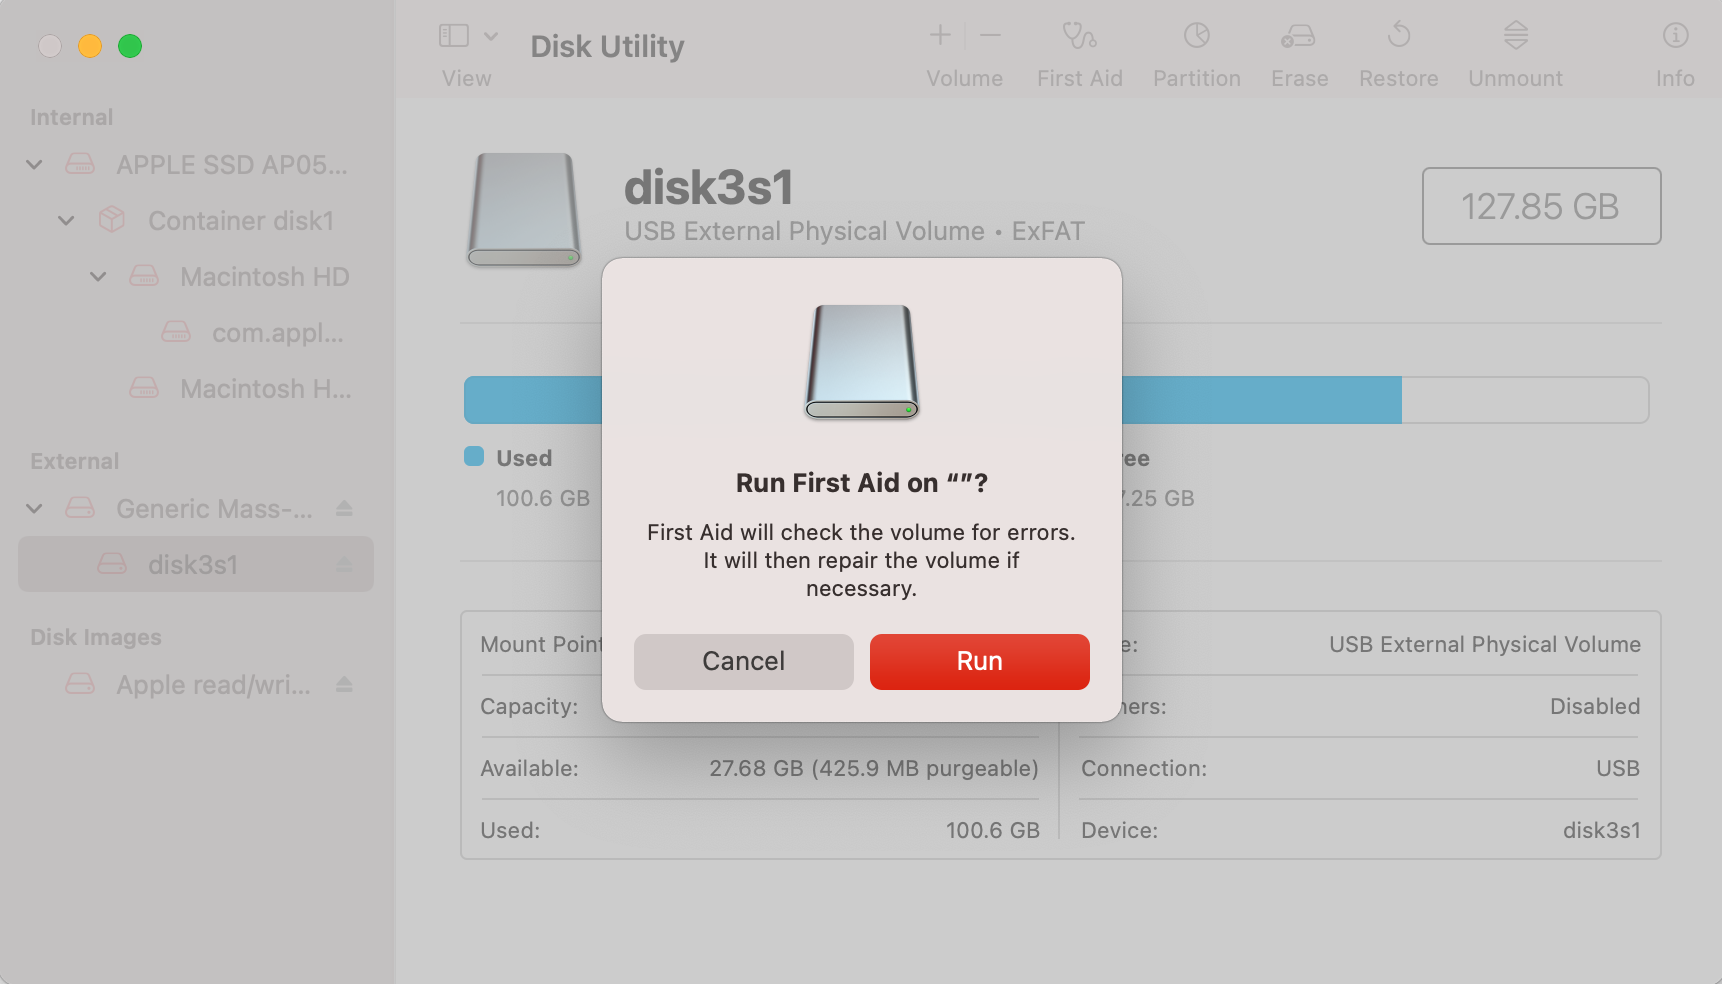
- When the process is complete, click Done and eject your SD card.
Method 2: Check for Errors Using Terminal
If, after running First Aid, your SD card continues to show signs of corruption, you can use the Terminal app on your Mac to check for possible errors. However, this method is a bit more complicated since you’ll be using a command-line tool to see what’s the issue with your SD card. Here’s what you should do:
- Connect the SD card to your Mac.
- Launch Terminal on your Mac (go to Launchpad, type Terminal in the search field, and click the app’s icon to open it).
- Type in diskutil list and hit the Return key to view your drives’ identifiers.
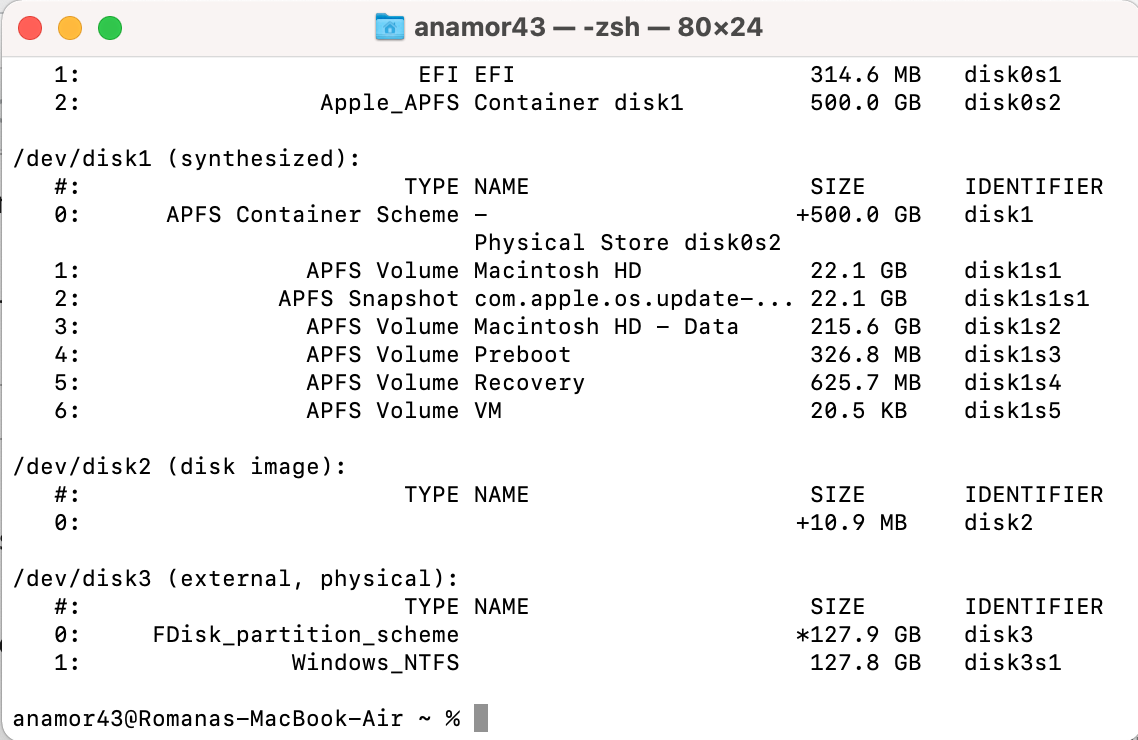
- Copy-paste the following command into the Terminal window: diskutil verifyVolume [your drive’s identifier]. Press the Return key to run the command.
- Look through the results to find out if the SD card is still corrupted.
Method 3: Format the SD Card
Formatting a corrupted SD card is an effective way to repair it. But it should be done only when you’ve successfully retrieved the data from the device since after you format the memory card, all of the files stored on it will get erased.
Follow these steps to format your SD card on a Mac:
- Connect the SD card to your Mac.
- Open the Disk Utility app (go to Launchpad and type Disk Utility in the search field).
Select your SD card from the list of devices on the sidebar on the left. - Click the Erase button at the top of the window.
- If you want, type in a new name for your SD card and choose a preferred format.
- Click Erase to format the SD card.
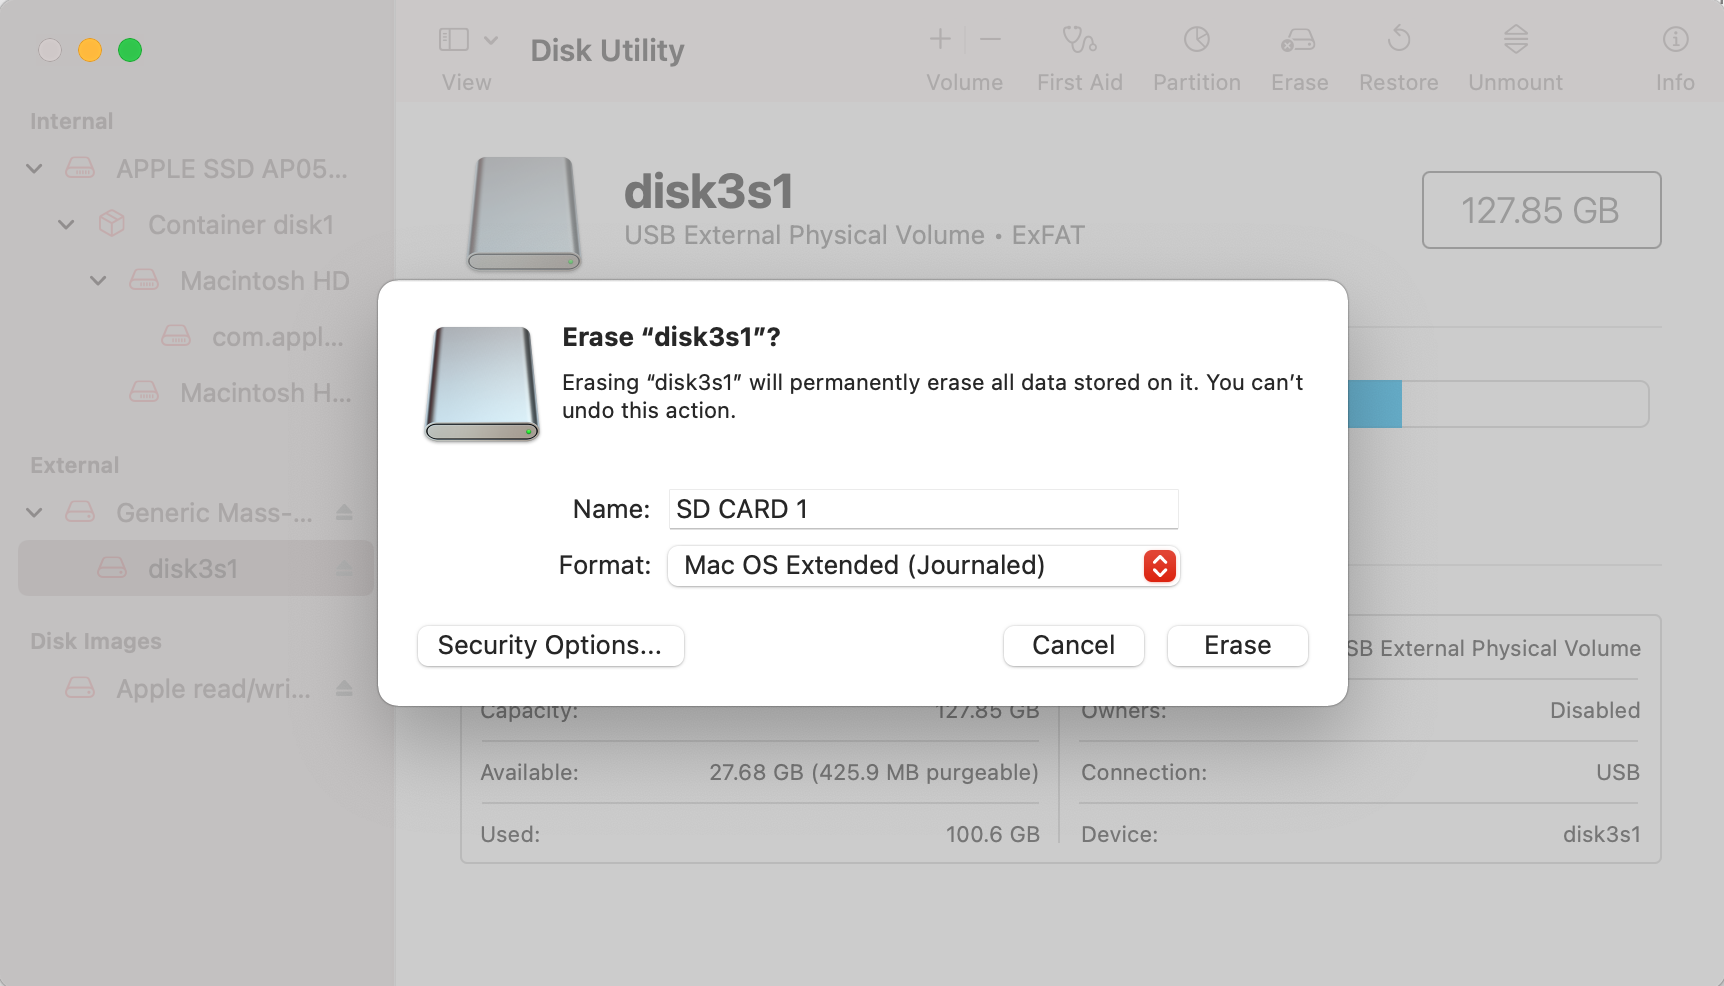
- Once the process is finished, click Done.
Conclusion
Having to deal with a corrupted SD card can be pretty overwhelming. And even though there is not much that can be done to retrieve the data stored on such a device, the methods described in this article should help you achieve it.
However, even if you were able to recover data and fix the card, it’s better to replace the SD card. In such a case, it’s possible that the issue will reoccur, and by getting a new memory card, you’ll be able to protect yourself from all of the unnecessary stress.
FAQ:
- Insert SD card in the reader.
- Open Terminal app using launchpad or use cmd+space and type “terminal”.
- Type “diskutil” list to find your SD card.
- Look for “external” and match the storage capacity.
- For 32 GB or smaller cards, type sudo “diskutil eraseDisk FAT32 SDCARD MBRFormat /dev/disk4”.
- For larger than 32 GB cards, type “sudo diskutil eraseDisk ExFAT SDCARD MBRFormat /dev/disk4”.
- Enter your password if required.
- Wait for the command to complete.
- Insert your SD card into the card reader.
- Open the Disk Utility app.
- Select your SD card.
- Click the "First Aid" button.
- Click "Run" and wait for completion.
- Safely eject SD card.

