 The Recycle Bin is the first place you should look for accidentally deleted files. But what if your files are not available there? There’s no need to panic because it is possible to recover deleted files that are not in the Recycle Bin. In our guide, we’ll take a look at multiple ways to help you accomplish the same.
Why are Deleted Files Not in the Recycle Bin
There can be several reasons why your deleted files are not going to the Recycle Bin. In most cases, you can fix the issue and prevent it from happening again by modifying the Recycle Bin’s settings.
Use the following table as a guide:
|
Reason |
Description |
| 🗑️ The Recycle Bin was emptied. | If Storage Sense is enabled, Windows automatically deletes all files from the Recycle Bin after a predetermined period of time (by default, 30 days). Furthermore, it’s possible you right-clicked the Recycle Bin and clicked on the Empty Recycle Bin option. |
| ⌨️ You deleted your files using the Shift + Delete shortcut. | The Shift + Delete shortcut bypasses the Recycle Bin and deletes your files permanently, unlike simply pressing the Delete key or using the Delete option after right-clicking. |
| 🥛 The Recycle Bin is full. | By default, Windows allocates 5% of your HDD or SSD’s total storage space to the Recycle Bin. When this limit is reached, deleted files no longer go to the Recycle Bin. |
| ⏸️ The Recycle Bin is disabled. | The Recycle Bin can be disabled using its Properties menu. If disabled, deleted files are no longer moved to the Recycle Bin, even if you didn’t use the Shift + Delete shortcut. |
| 🖱 The files were deleted from a removable storage device. | Any files that are deleted from external storage devices like pen drives, external HDDs, or SD cards don’t go to the Recycle Bin. |
| 📏 Files were too large for the Recycle Bin. | If you attempt to delete a file that’s larger than the available storage space in the Recycle Bin, Windows displays the message, “This file is too big to recycle, Do you want to permanently delete it?” If you click Yes, the file will not be moved to the Recycle Bin. |
Where Do Deleted Files Go If Not to the Recycle Bin
It’s logical to assume that deleted files that are not showing in the Recycle Bin have been permanently removed and there’s no way to get them back. But, file deletion in Windows doesn’t exactly work that way.
When a file is deleted, the space that it occupies is marked as available for use and free to be overwritten by new files. The file is simply hidden from view, but is still there on your PC until new data overwrites it.
However, SSDs have a feature called TRIM that periodically cleans up these deleted files permanently to promote better longevity and performance. This makes data recovery from SSDs exponentially more difficult. If the TRIM command wasn’t executed before data recovery, you still stand to recover most if not all of your data.
What to Do if Your Files are Not in the Recycle Bin
Before proceeding to full-fledged data recovery, there are some things you can do to ensure that the files actually didn’t go to the Recycle Bin. We’ll delve into methods that’ll allow you to see if the files are not hidden, as well as ways to prevent your files from being permanently deleted in the future.
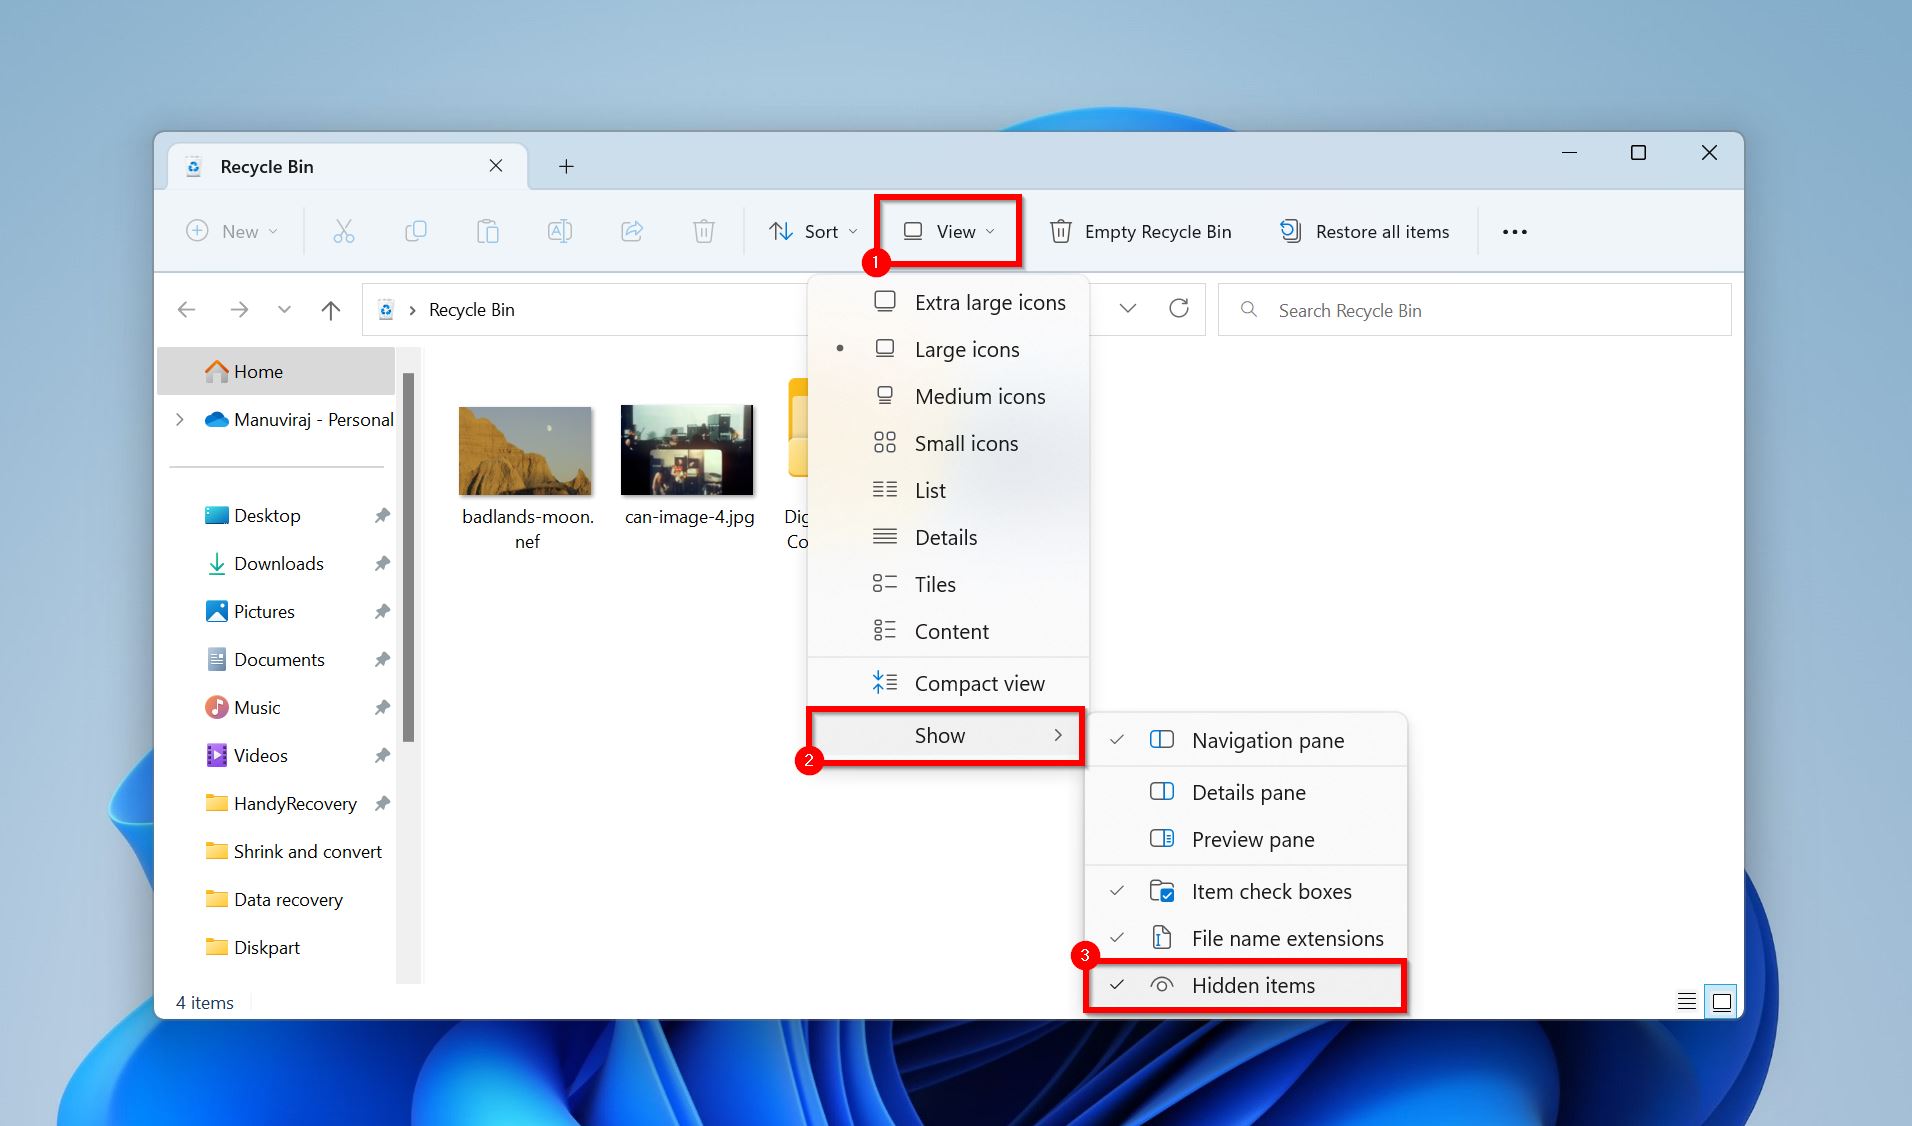
Method 1: View hidden files in the Recycle Bin
- Open the Recycle Bin.
- Click on View > Show more and ensure that the Hidden items option is ticked.
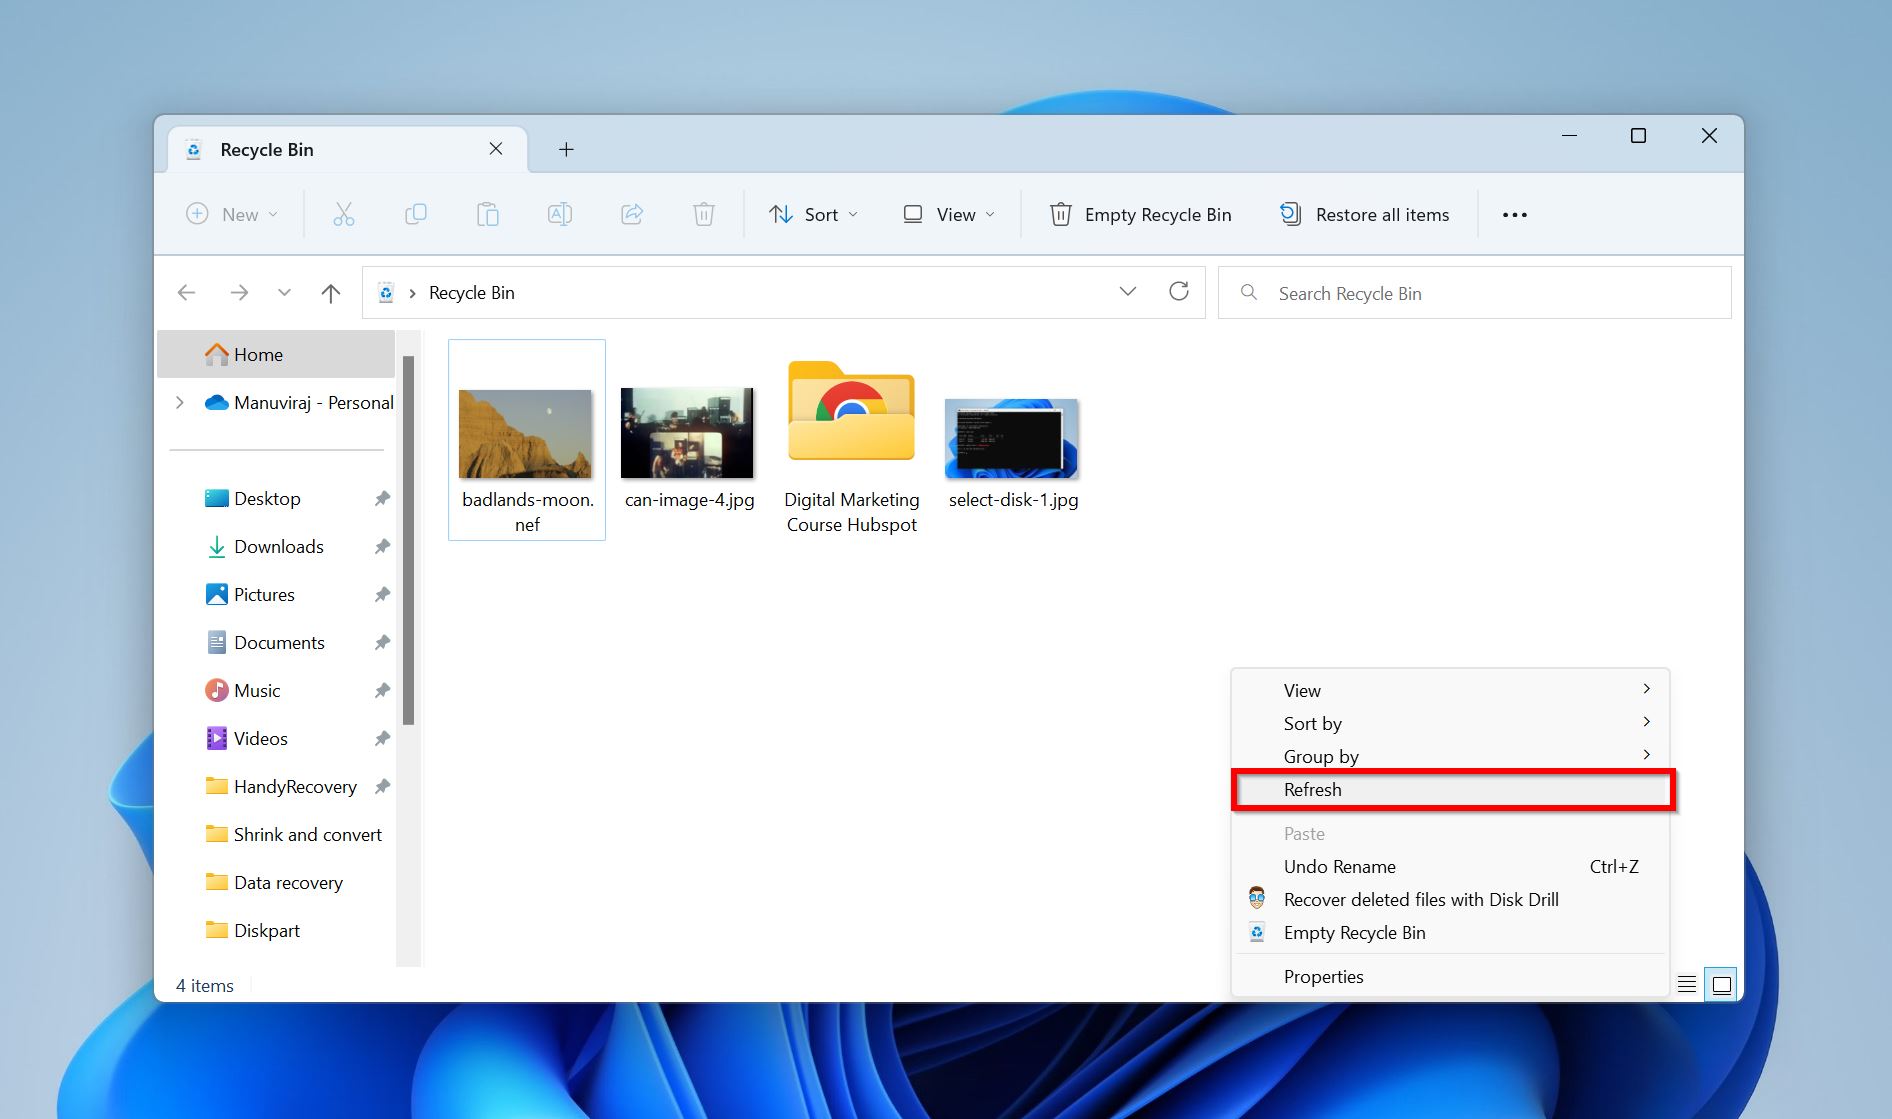
Method 2: Refresh the Recycle Bin
- Open the Recycle Bin.
- Right-click on the empty white space in the window and click Refresh (Windows 10). In Windows 11, you’ll have to right-click, then choose Show more options and then click Refresh.
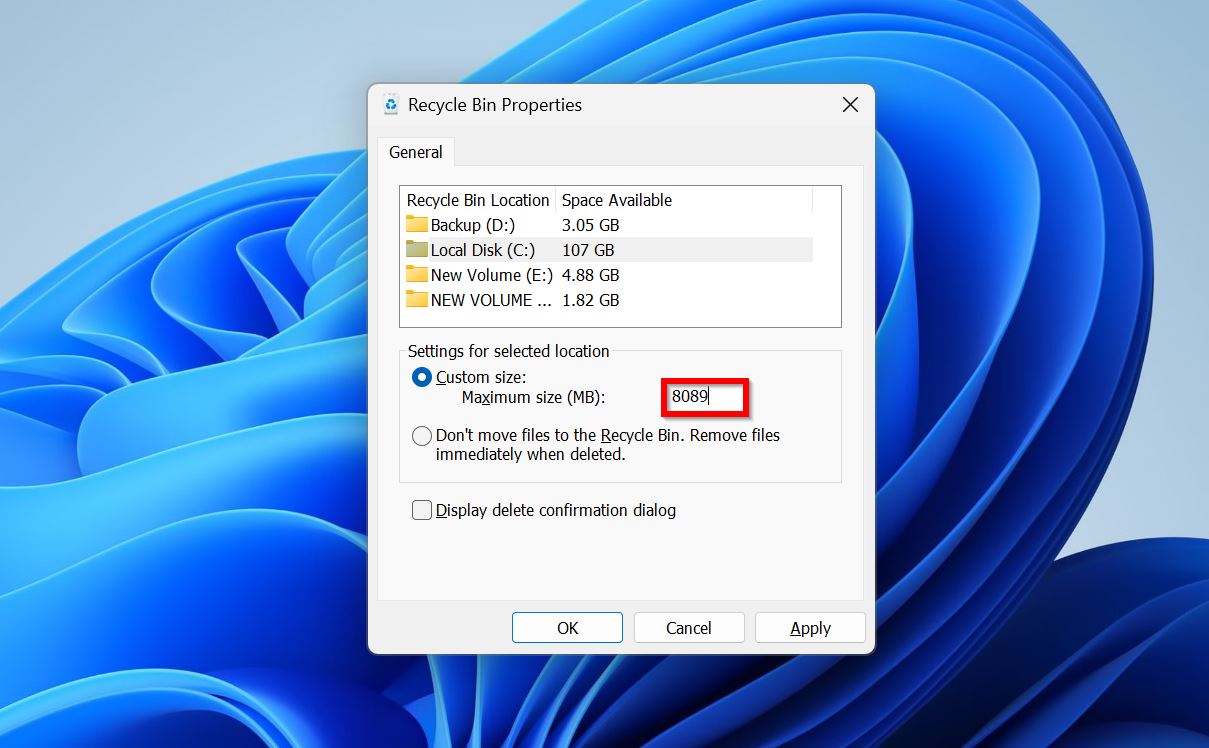
Method 3: Check the Size of the Recycle Bin
- Right-click on the Recycle Bin and click Properties.
- Check the storage space value in Custom size: Maximum size (MB): and set it to a higher value if you want the Recycle Bin to store more data. You’ll need to select each partition individually and set the Recycle Bin size for it.
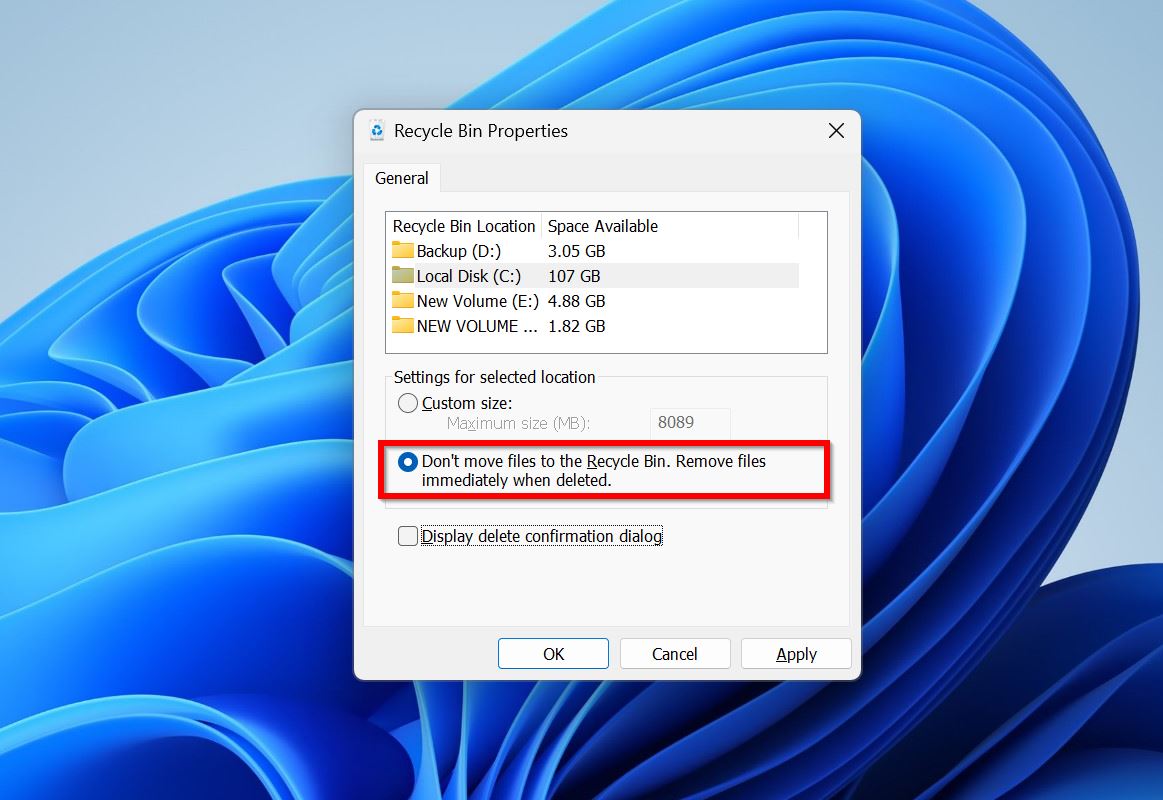
Method 4: Check the Recycle Bin’s Properties
- Right-click on the Recycle Bin and choose Properties.
- Under Settings for selected location, see if the second option is selected. If yes, the Recycle Bin is disabled. To enable it, select the Custom size option and enter a value for the Recycle Bin’s maximum storage size.
Method 5: Reset the Recycle Bin
If Windows displays the “Recycle Bin is corrupted” error message, you’ll need to reset the Recycle Bin to regain access to it. This will delete the Recycle Bin folder and Windows will create a new one for you the next time you boot your PC.
Here’s how you can reset the Recycle Bin in Windows 10/11:
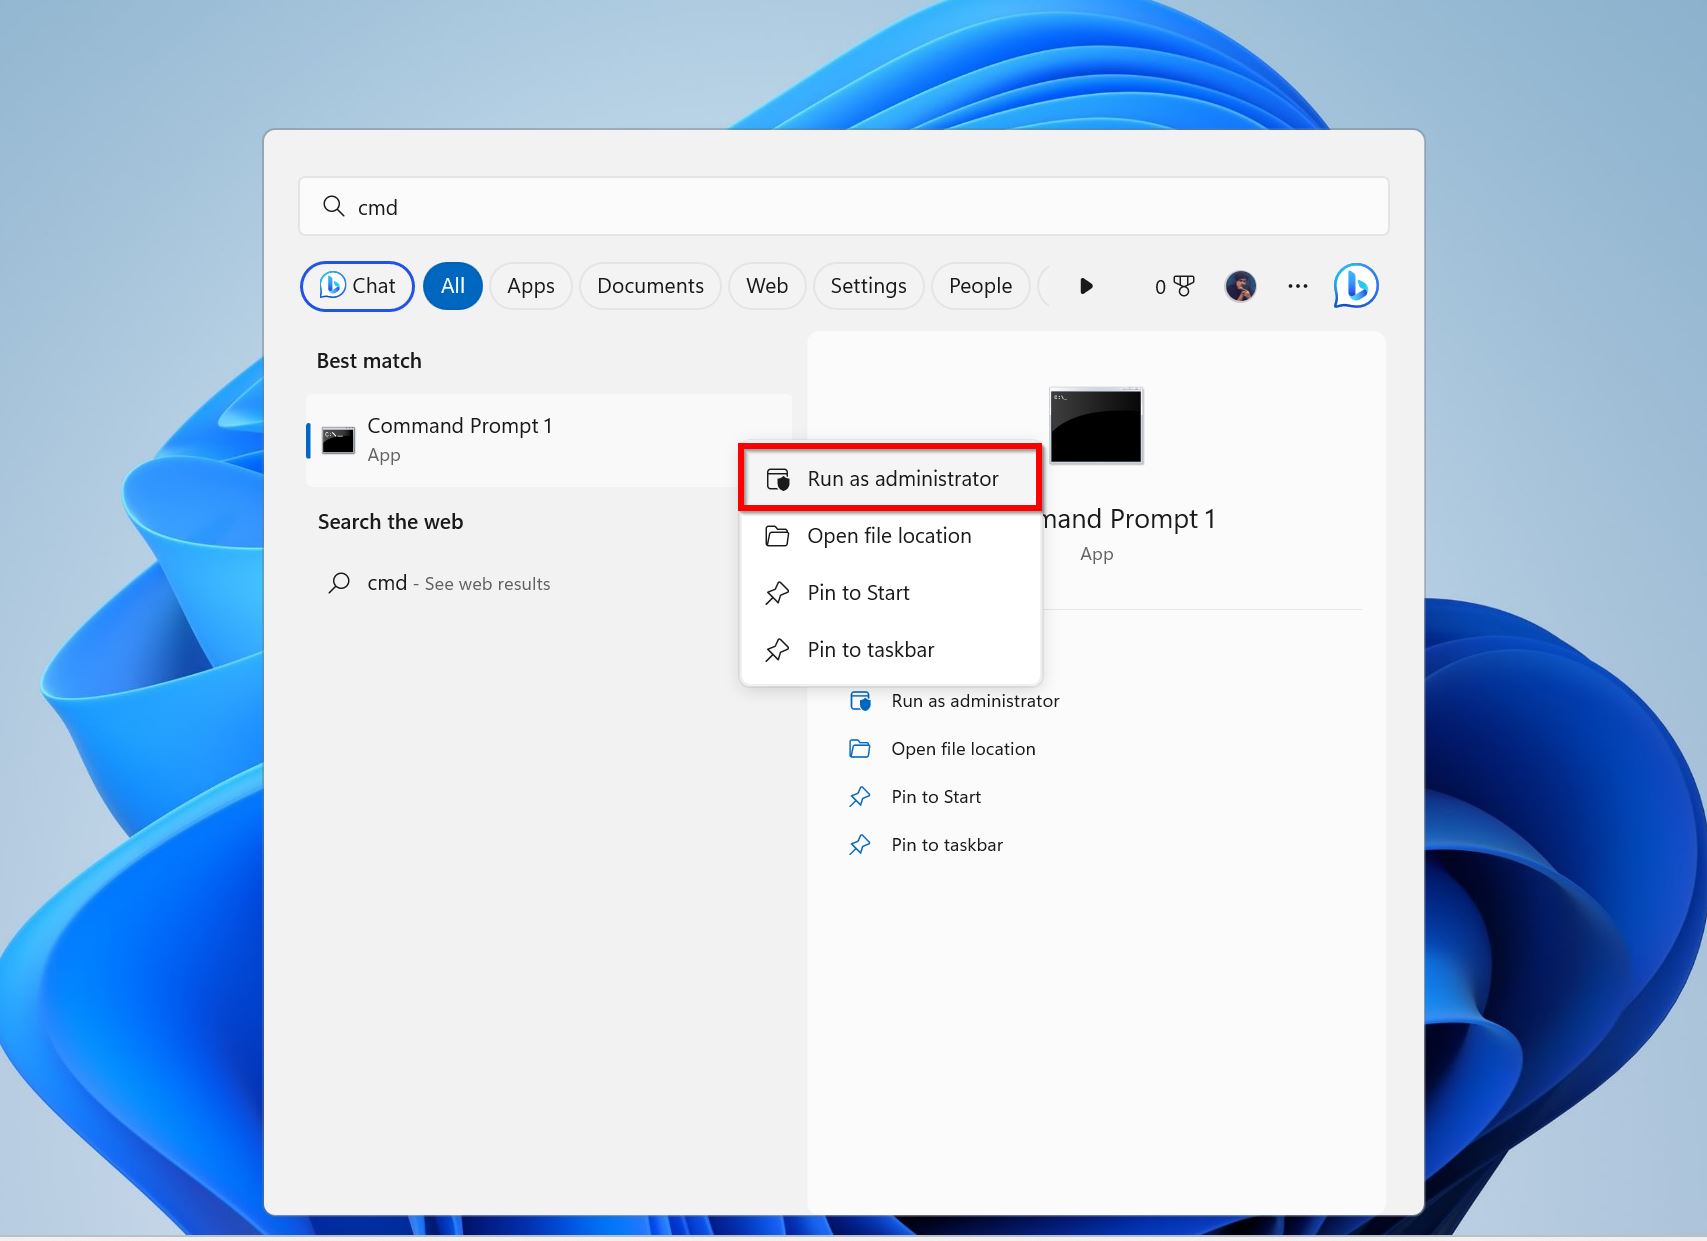
- Type “cmd” in Windows Search (Windows Key + S). In the search results, right-click on Command Prompt > Run as administrator.
- Type rd /s /q X:\$Recycle.bin and press Enter. Replace X with the drive letter of the partition whose Recycle Bin you want to reset.
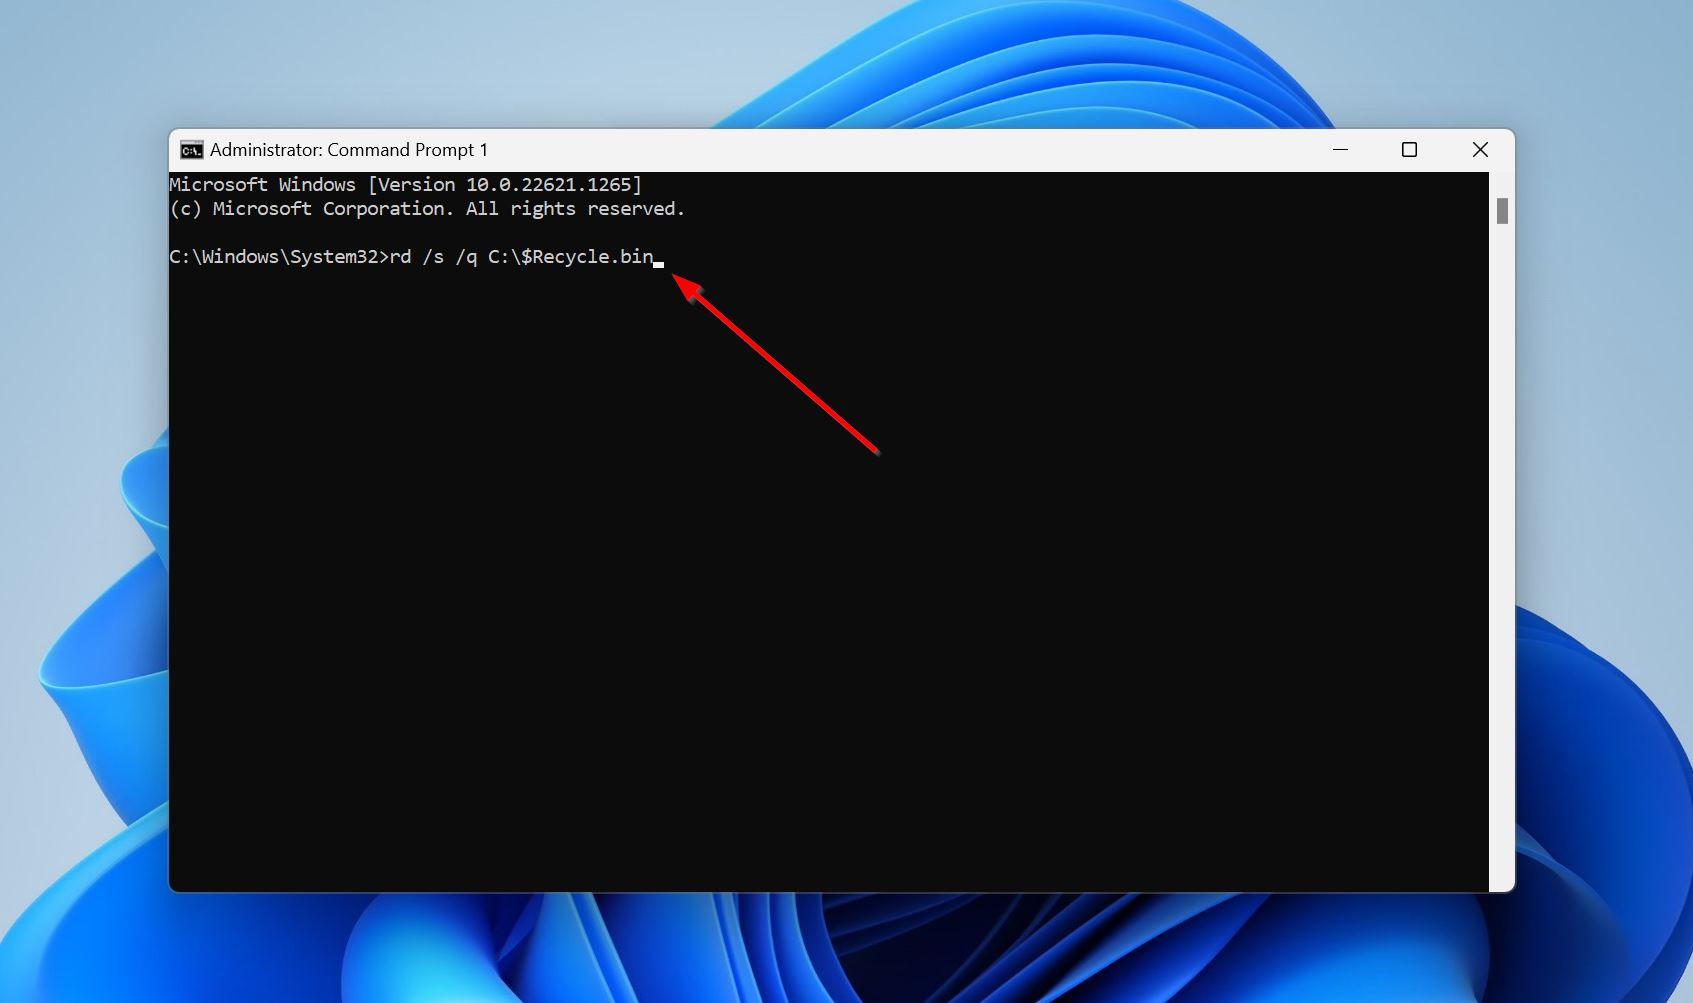
- Reboot your PC.
How to Recover Deleted Files Not in the Recycle Bin
You can use third-party data recovery software and, if enabled, Windows backup features to recover a deleted file that is not in the Recycle Bin. In the case of data recovery software, the sooner you perform data recovery, the better your chances of getting back all your data. We also recommend not writing new data to your storage drive.
Method 1: Recover Deleted Files Not in Recycle Bin with Data Recovery Software
Third-party data recovery programs are a cost-effective way to find deleted files that are not in the Recycle Bin and recover them. If you didn’t create prior backups of your data, this is the only way to get back your deleted files, barring professional data recovery services. But which data recovery program should you use?
For this tutorial, we picked Disk Drill. It’s easy to navigate through, has an excellent data recovery rate, and comes with a free trial that lets you recover up to 500 MB of data at no cost (for Windows users). It works with all popular file systems and recognizes over 400 file formats. And honestly, that’s all you need.
Here’s how to restore deleted files that are not in the Recycle Bin, using Disk Drill:
- Download Disk Drill and install it.
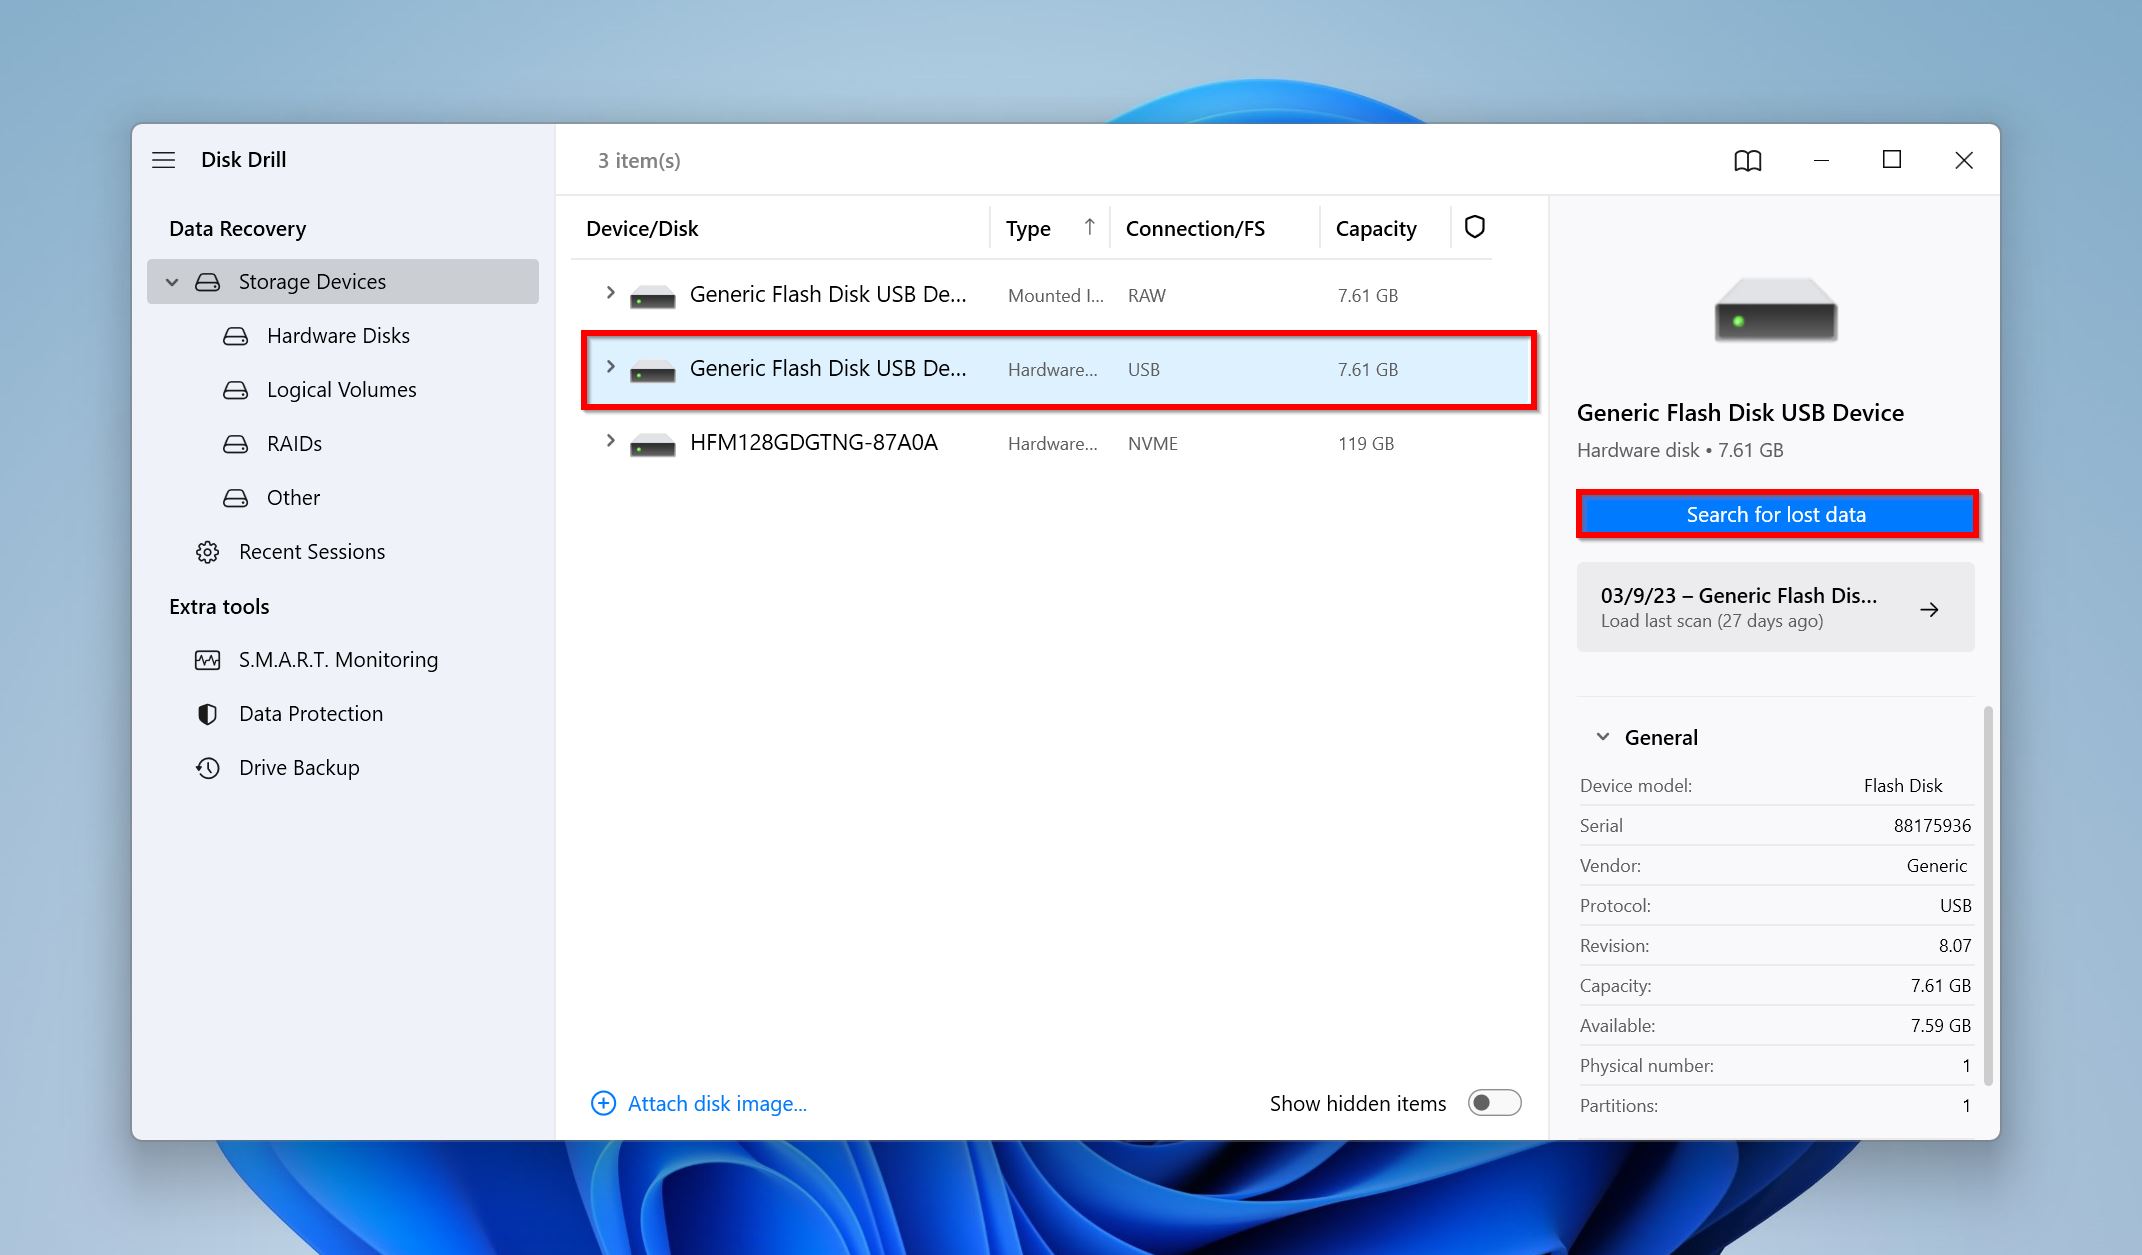
- Open Disk Drill, select the drive or partition that contained the deleted files, and click Search for lost data.
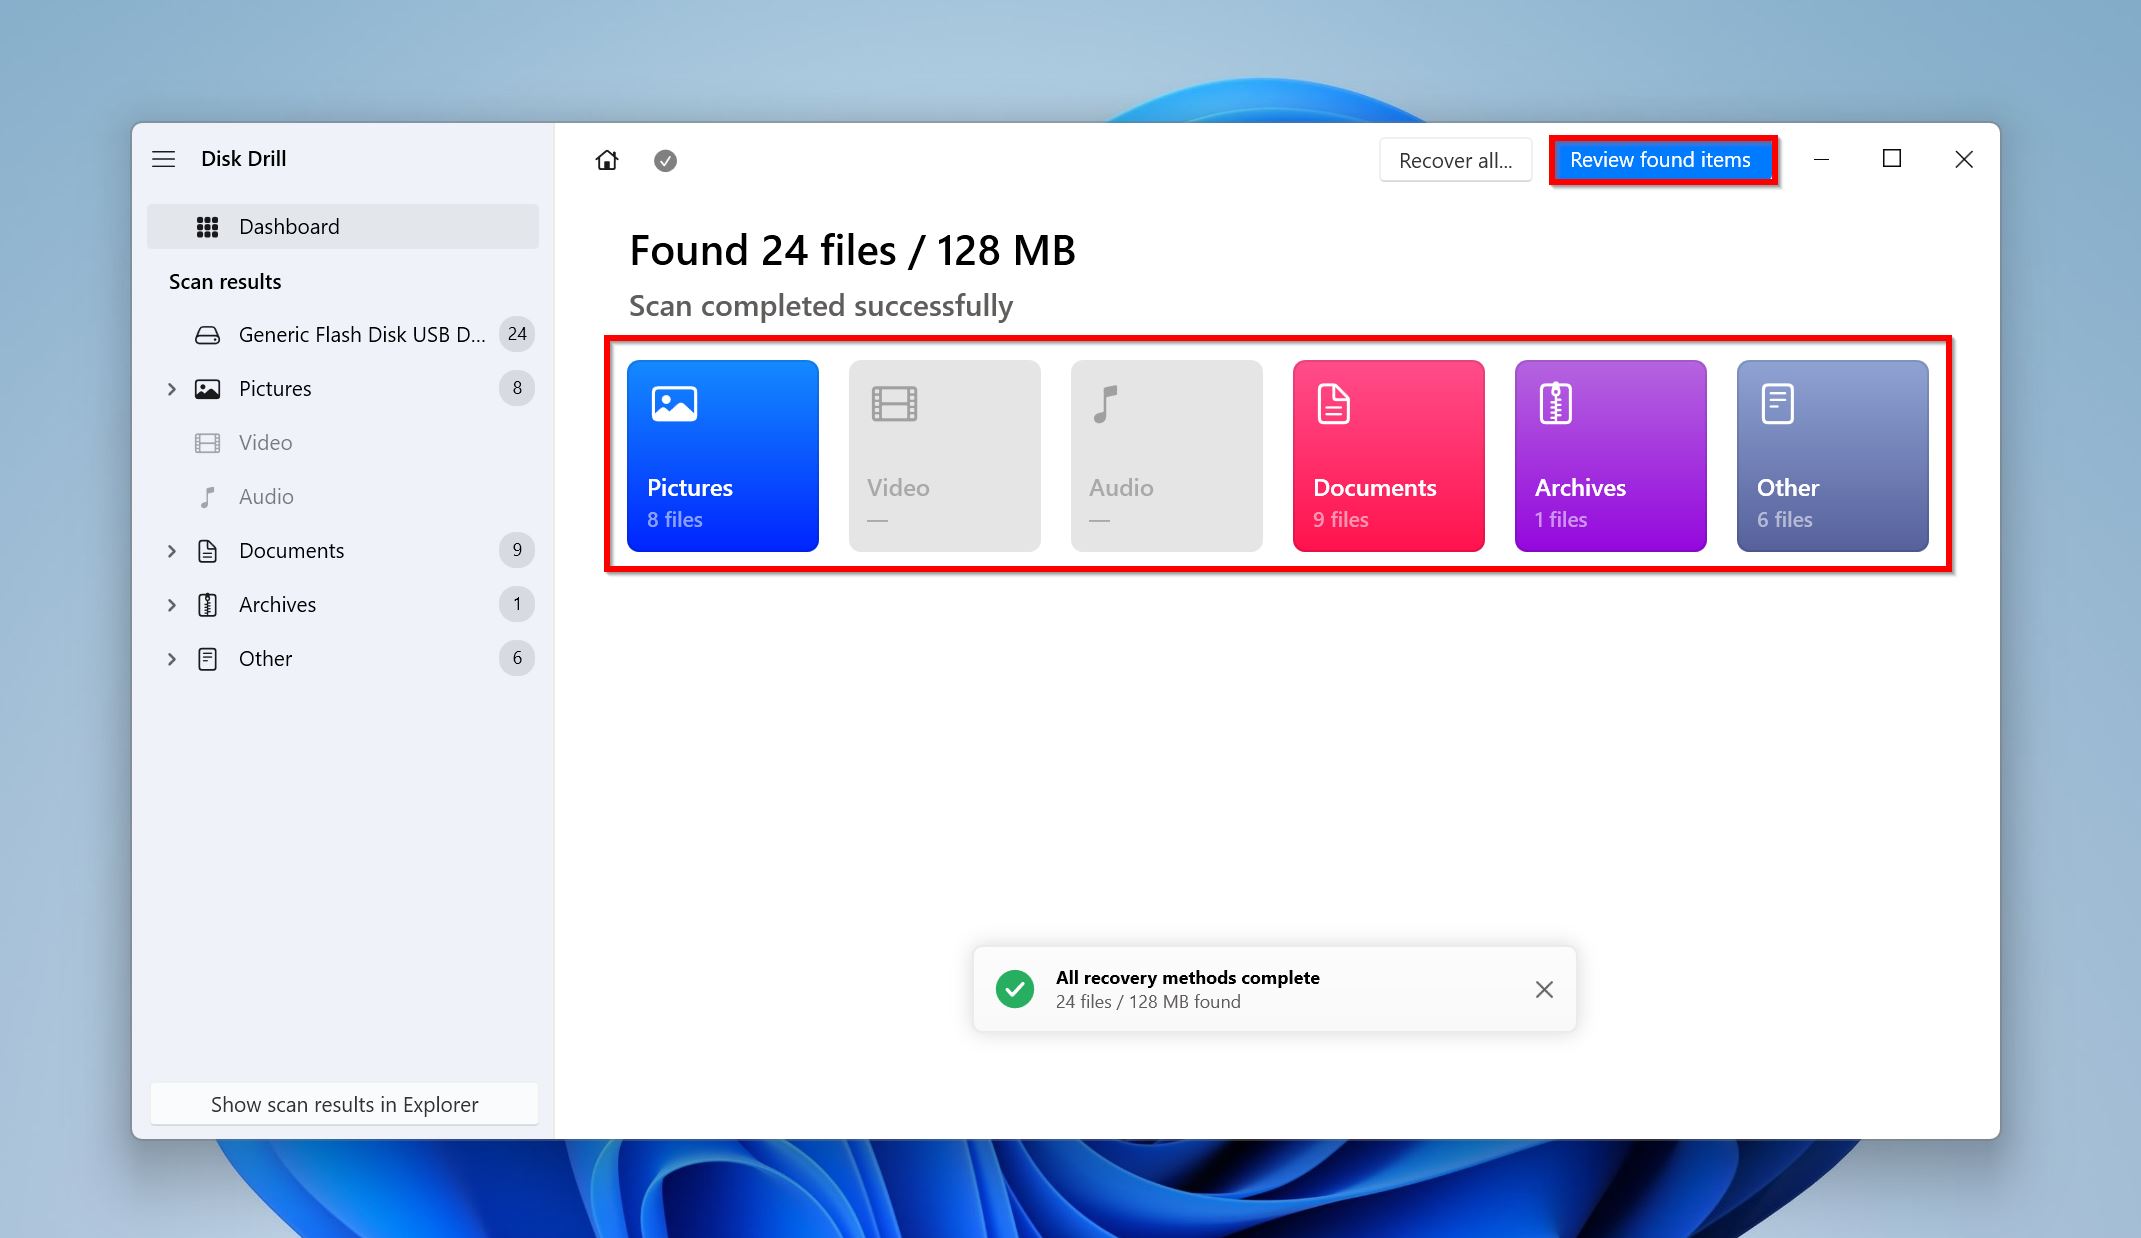
- Click on Review found items to view all the recoverable files Disk Drill discovered. Alternatively, you can click on the relevant file type to filter out the results (Pictures, Video, Audio, Documents, Archives, and Other). For example, if you want to retrieve a deleted Excel file that’s not in the Recycle Bin, click on the Documents option.
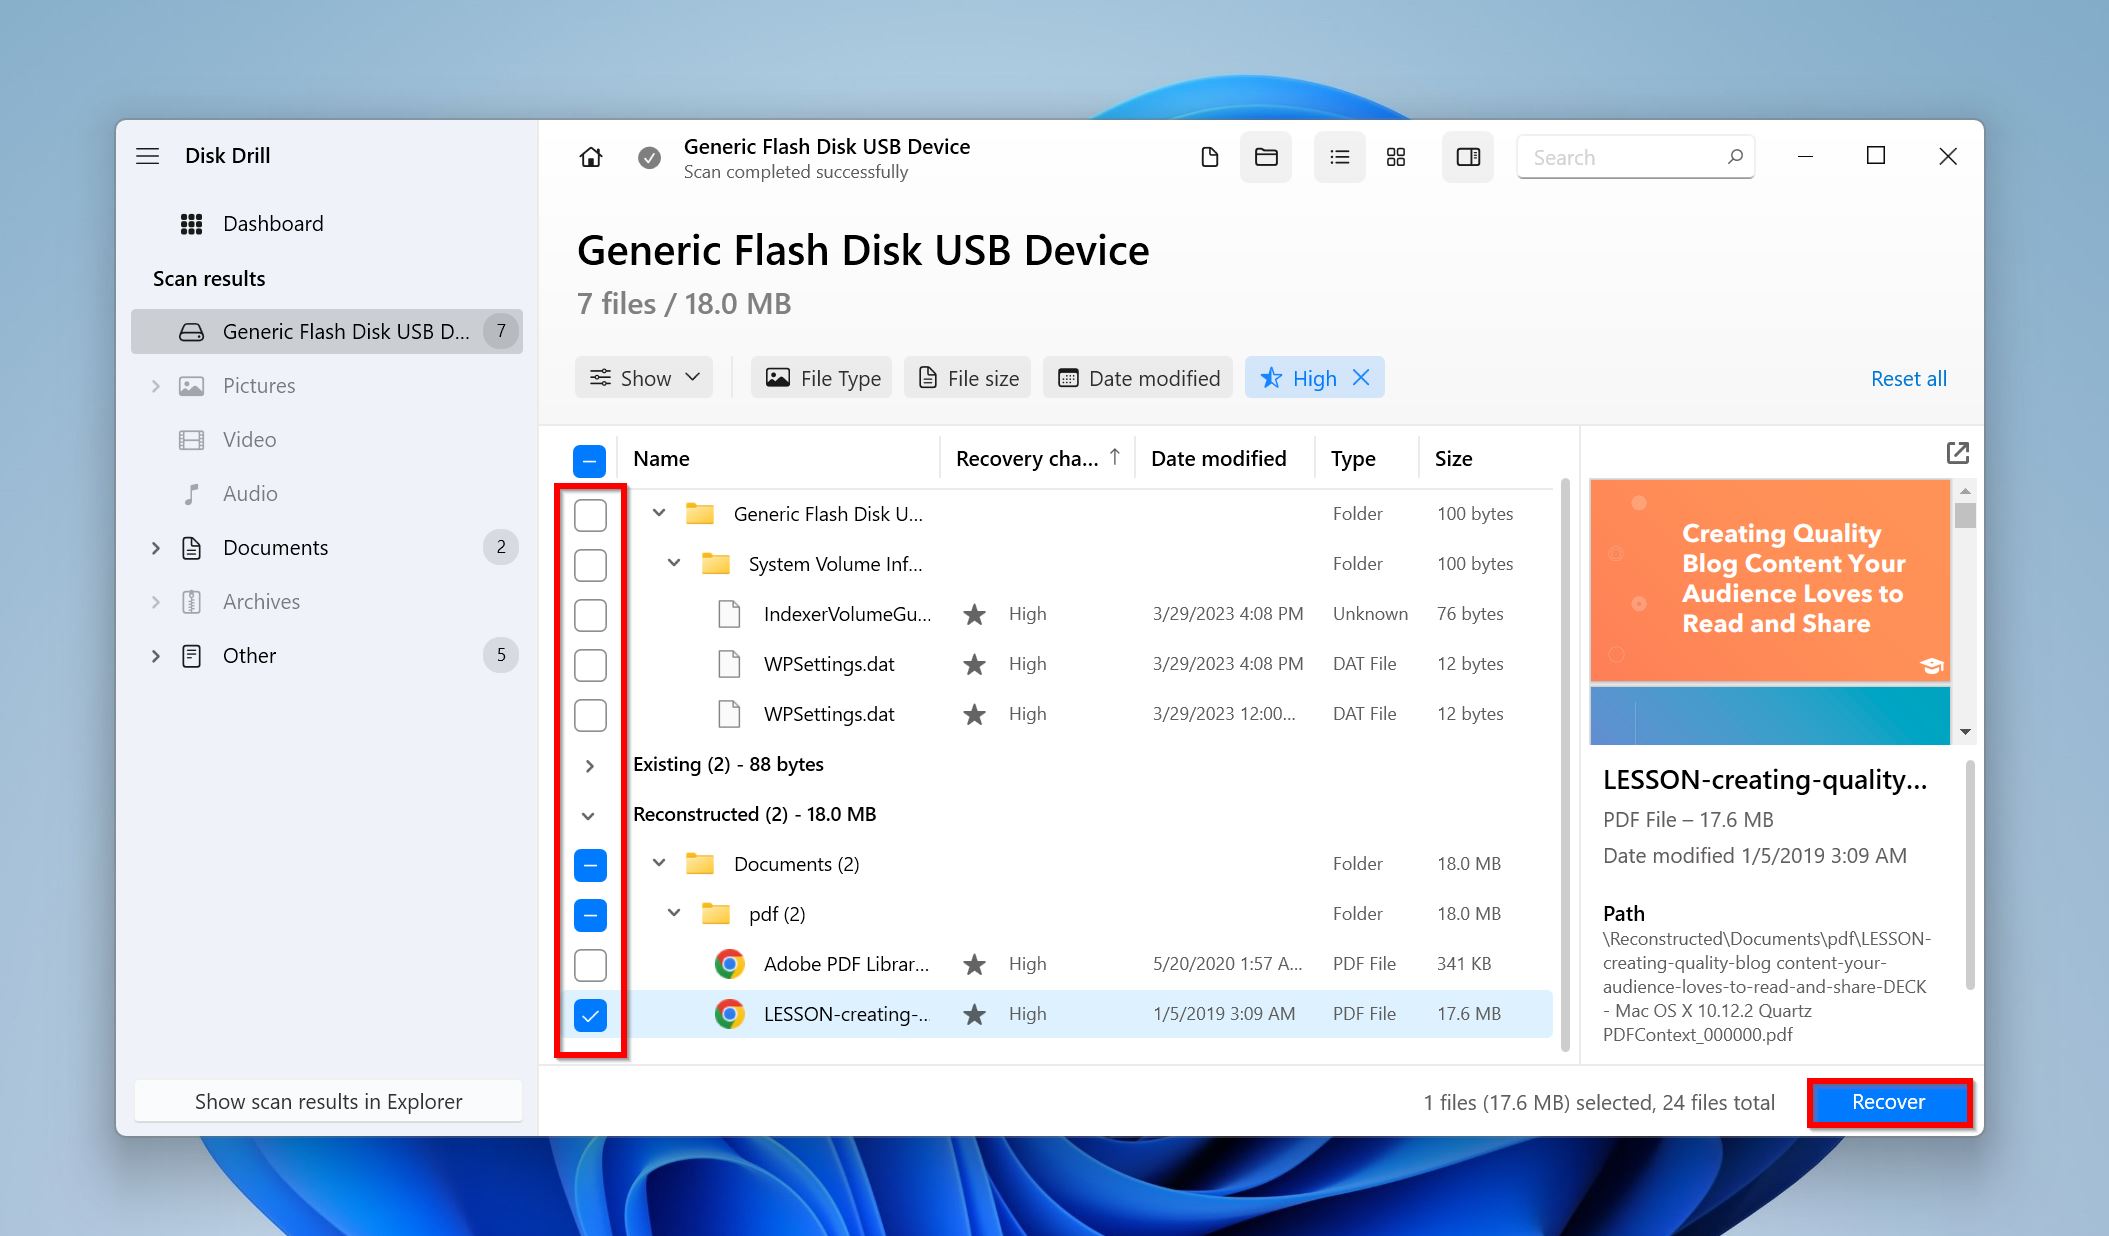
- Use the checkboxes to select the deleted files you wish to recover. Disk Drill displays a preview of the currently selected file (you can click on the eye icon next to the file name to see a preview). Click Recover after confirming.
- Pick a recovery destination for the files and click Next.
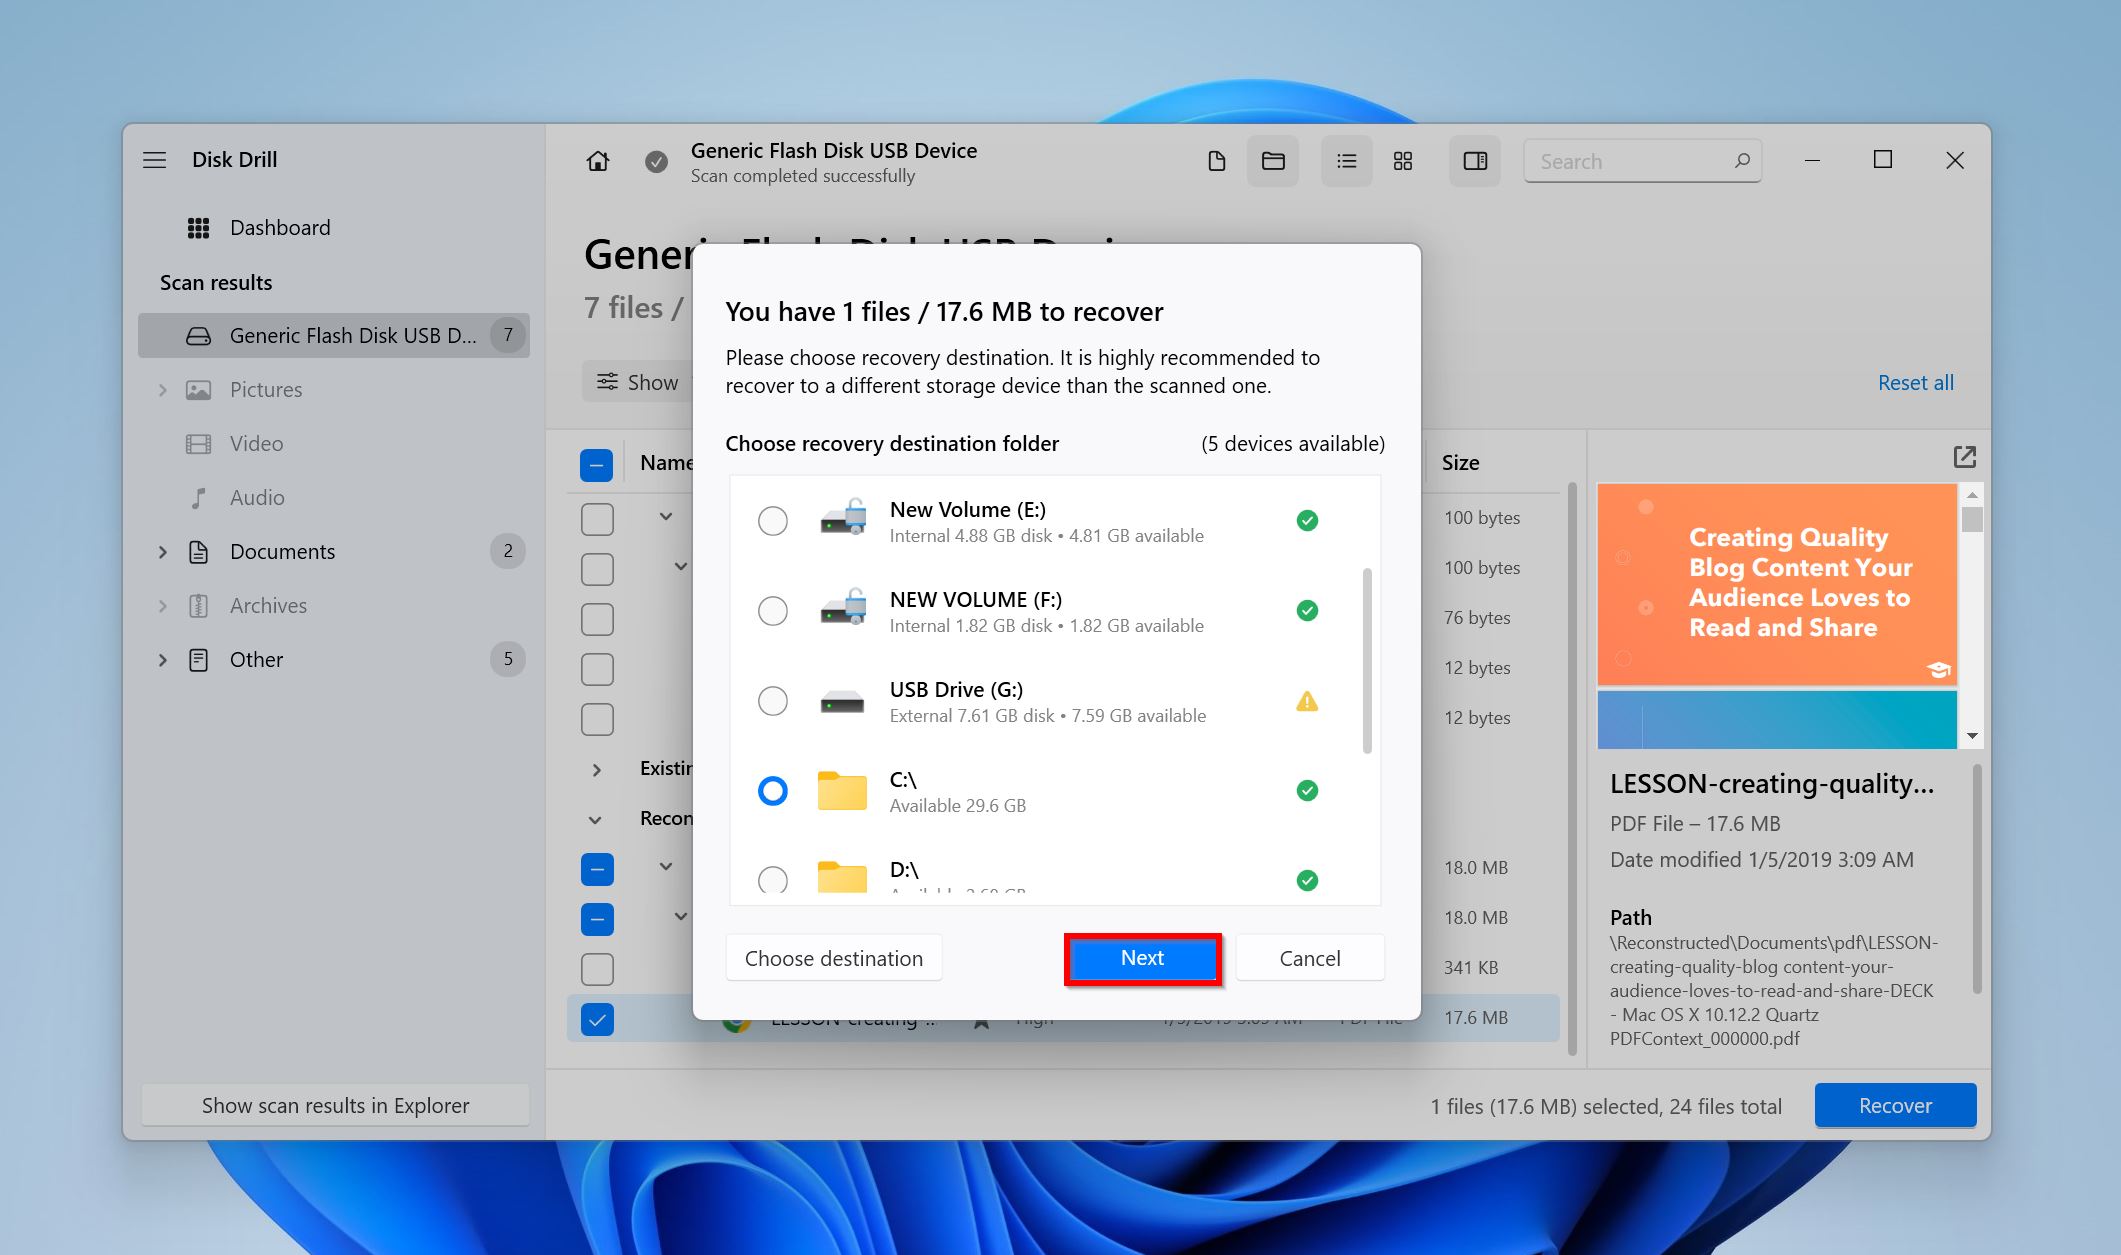
- Disk Drill will recover the selected files.
Method 2: Recover Deleted Files Not in Recycle Bin with Windows Backup
If you had set up Windows Backup and selected the relevant folder before deleting your files, you can run Windows Backup & Restore to recover your files.
Here’s how you can do this:
- Make sure the drive containing the backup is connected to your computer.
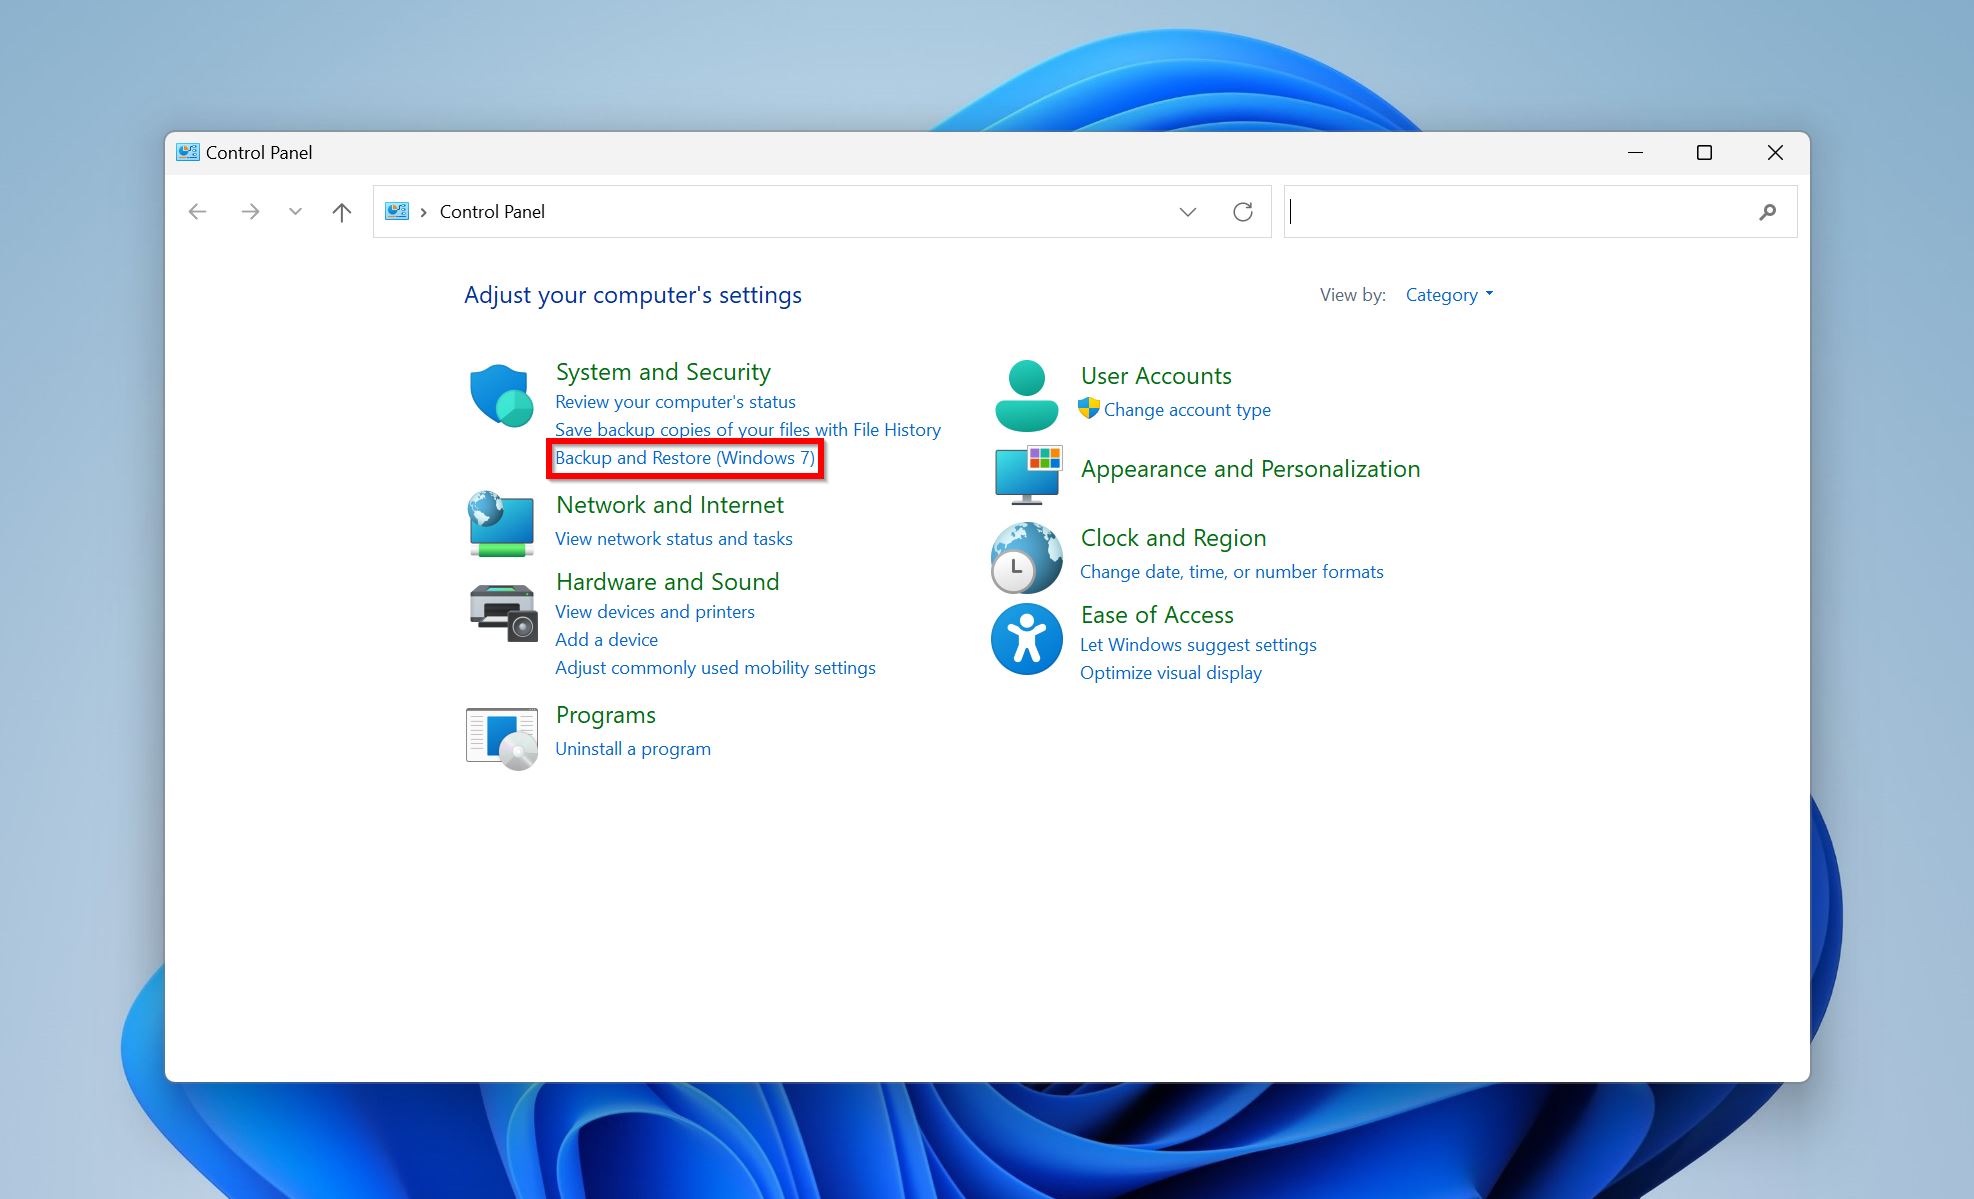
- Open Control Panel. You can search for it in Windows Search (Windows Key + S).
- Click on Backup and Restore (Windows 7) under System and Security.
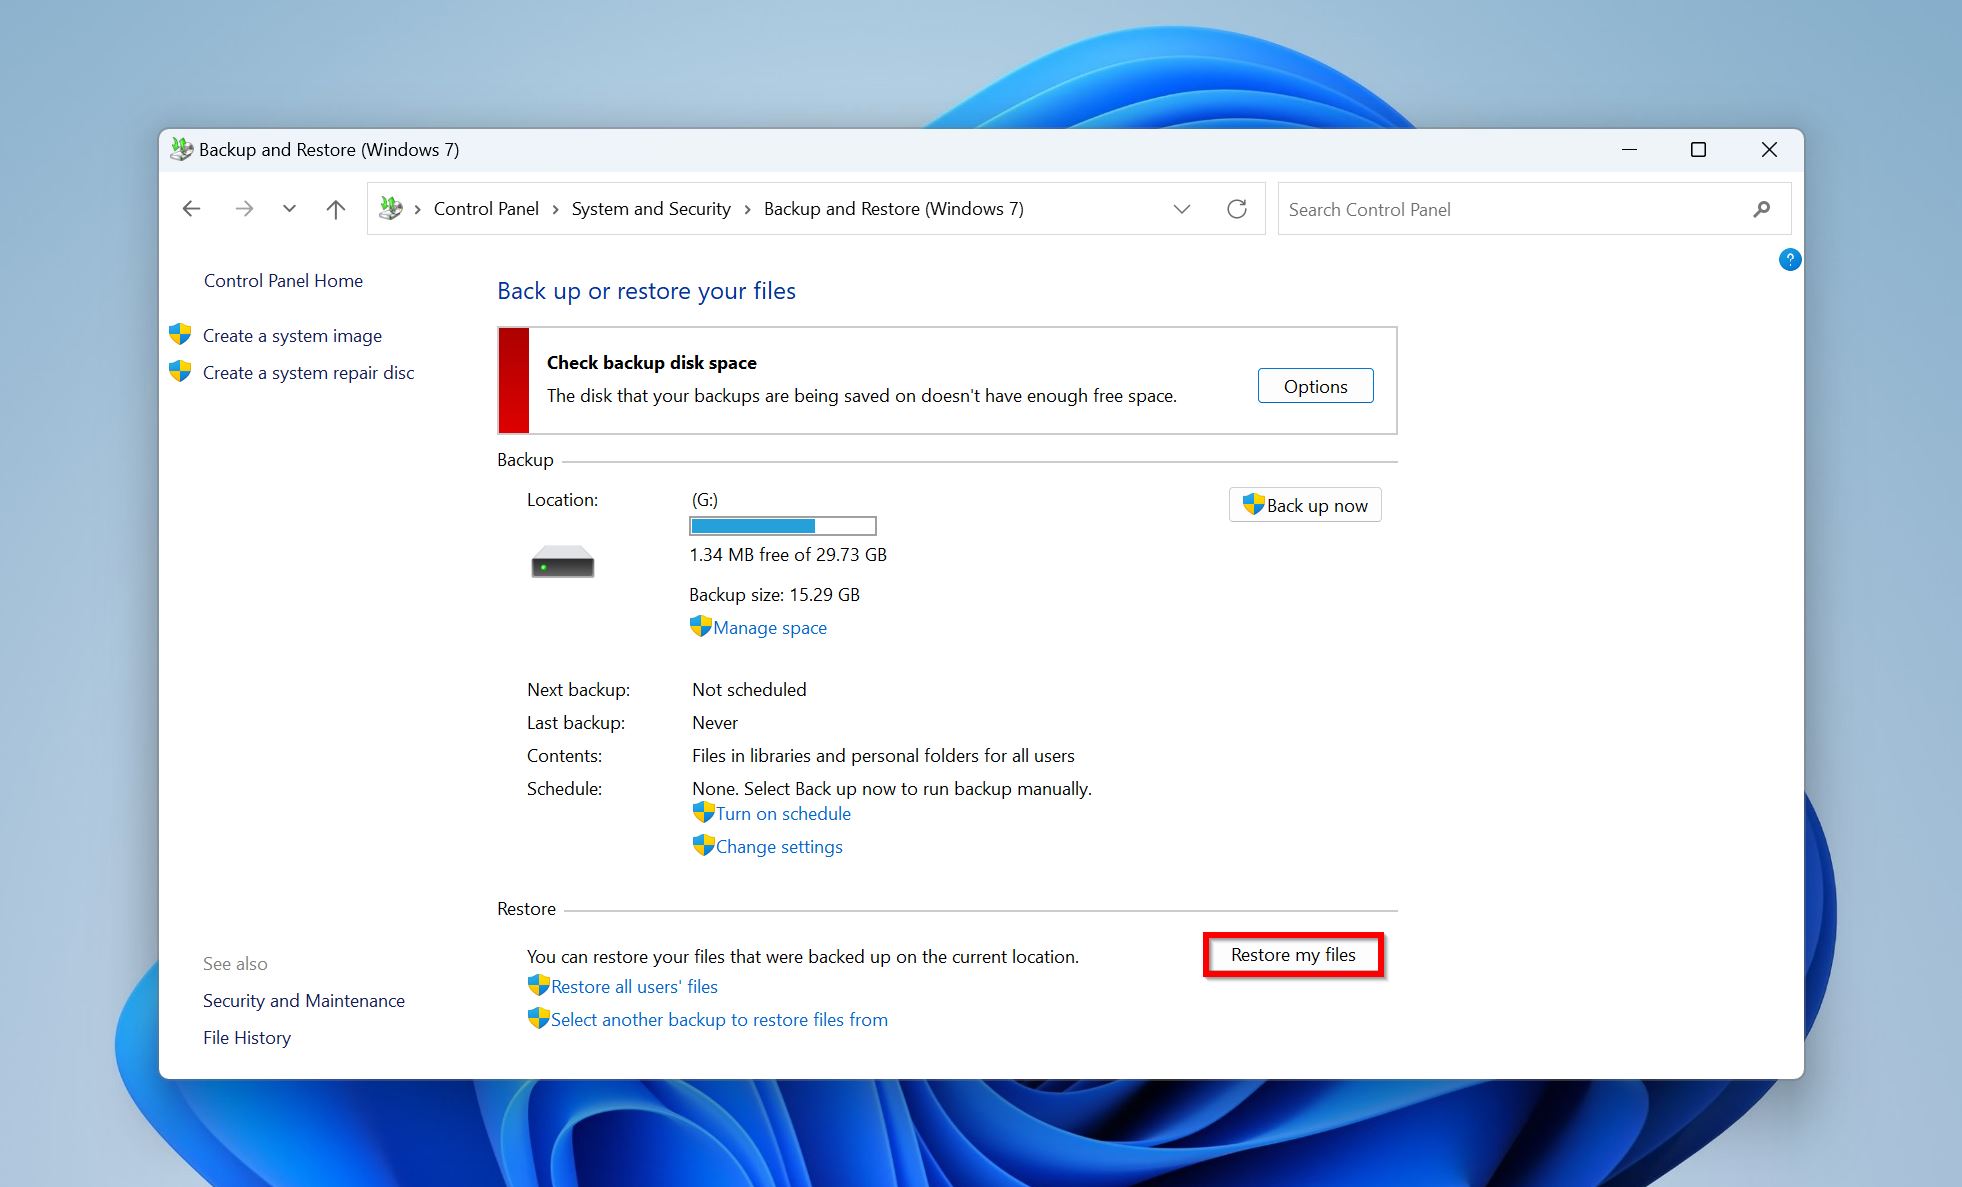
- Click on the Restore my files button.
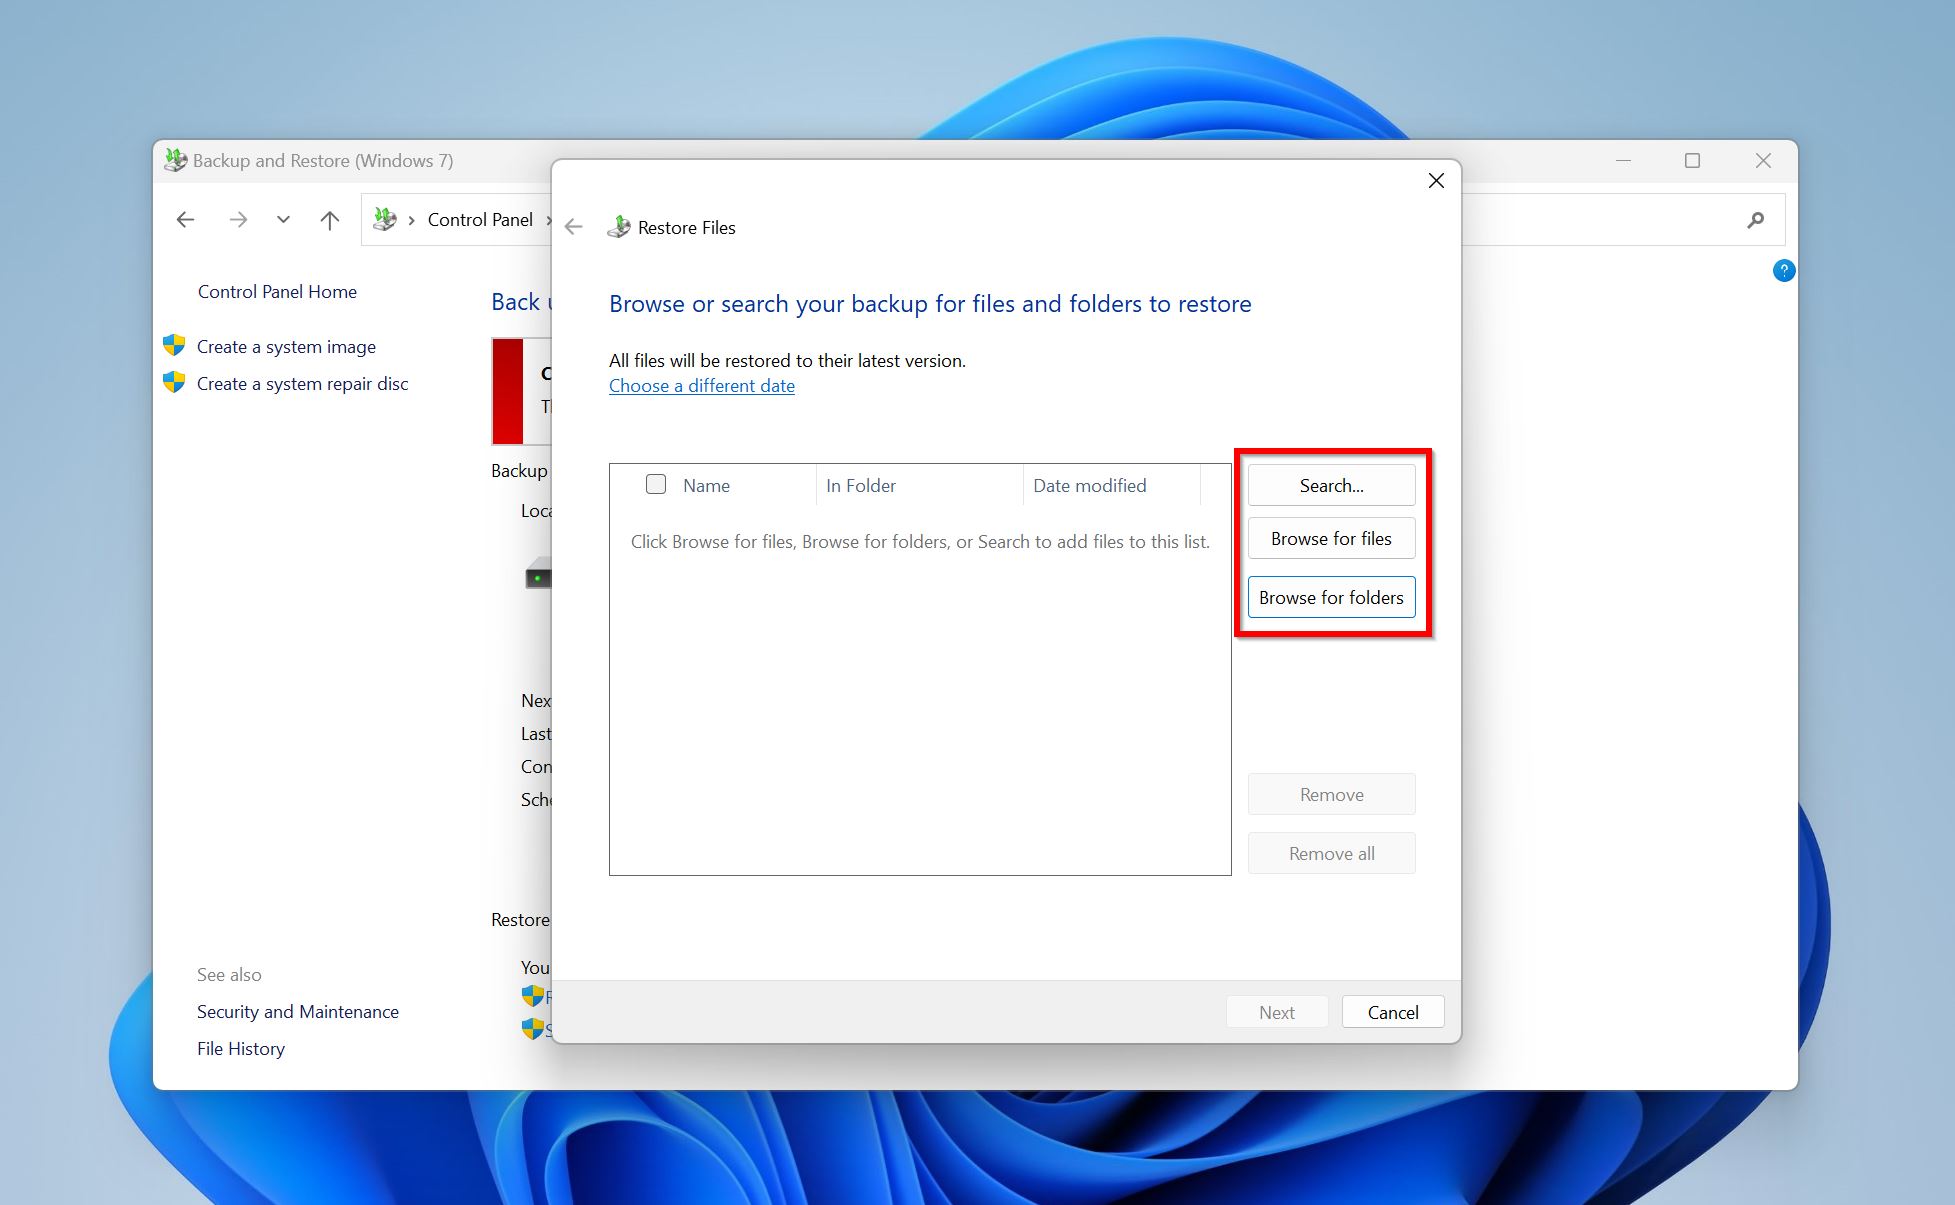
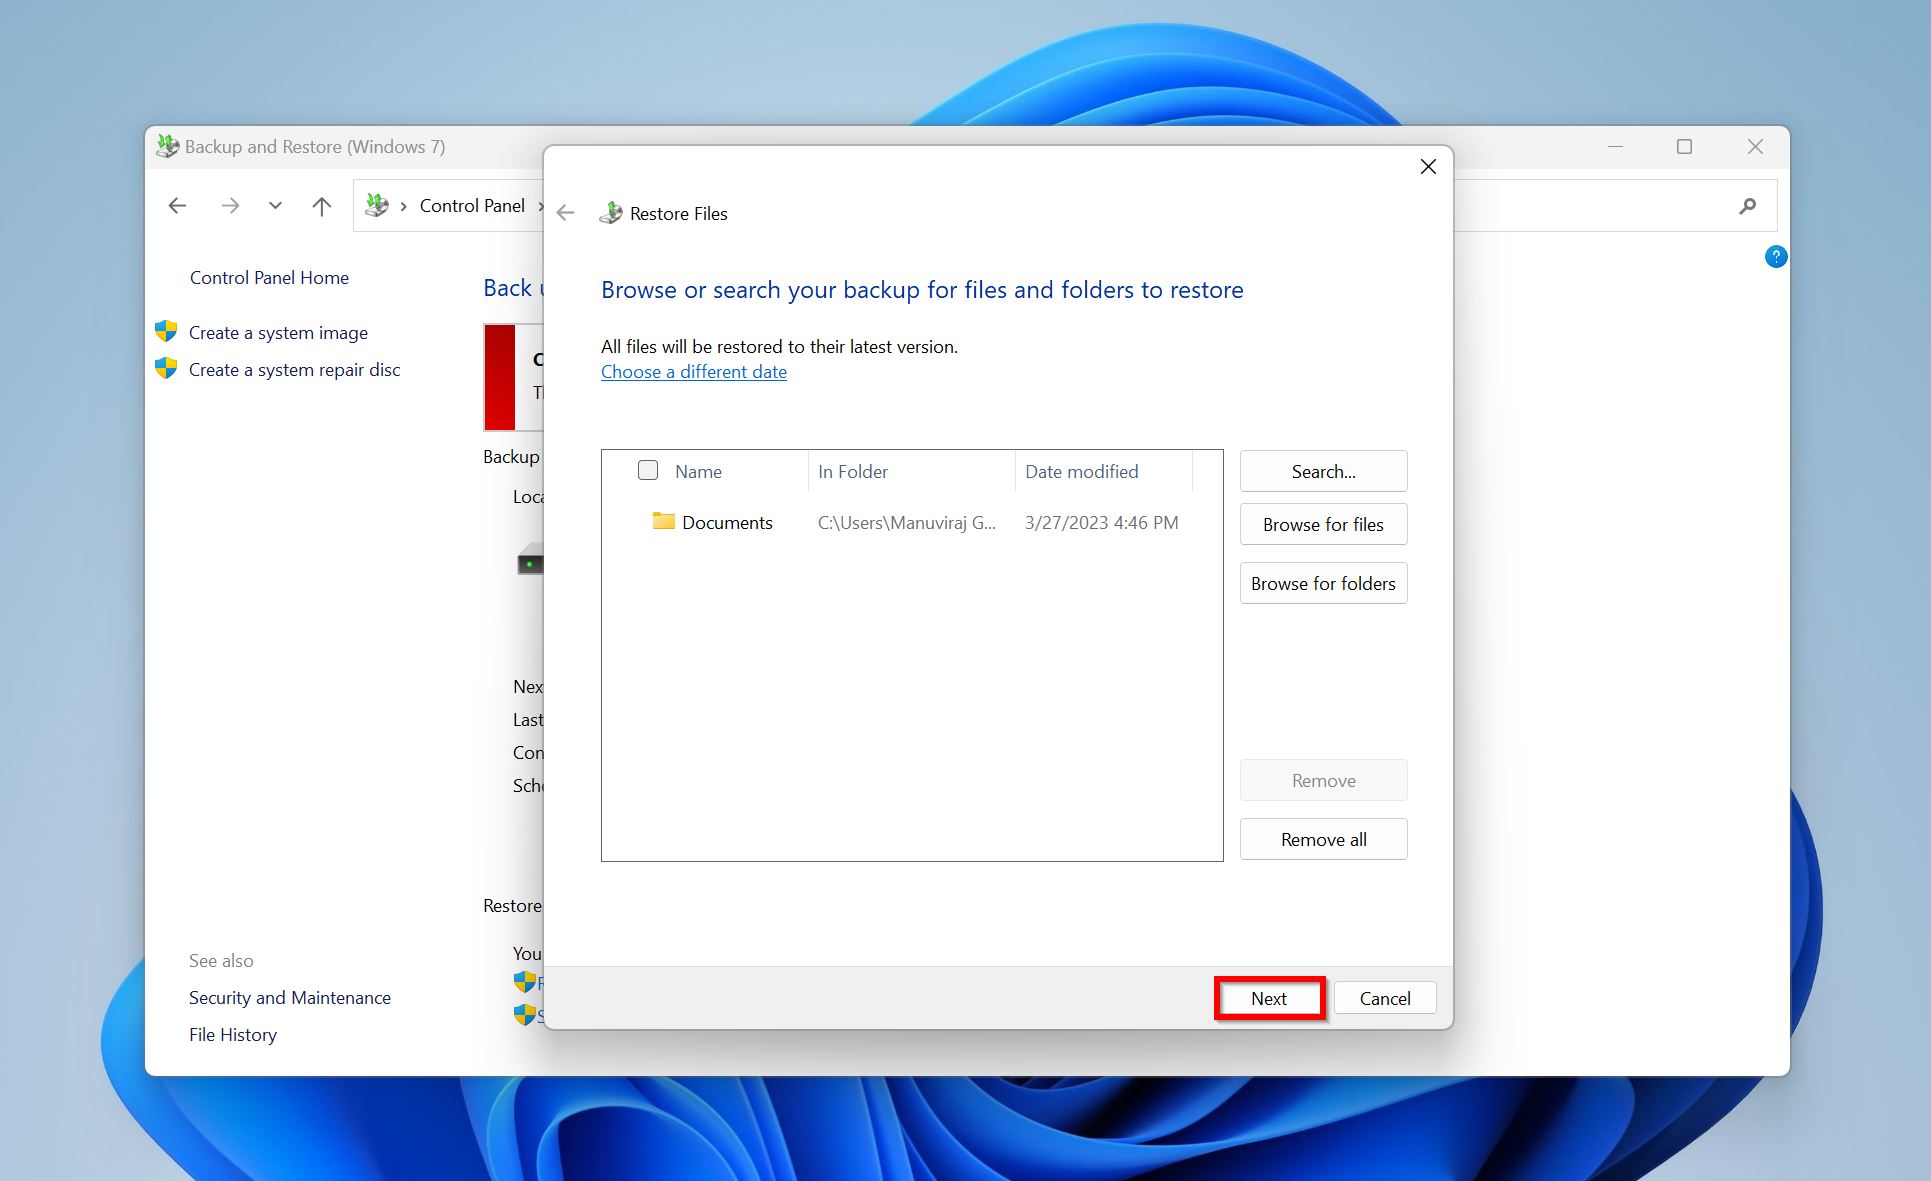
- Use the Search, Browse for files, or Browse for folder options to find the files you want to restore. Select them and click Add.
- Click Next after you’ve added the deleted folder that was not in the Recycle Bin.
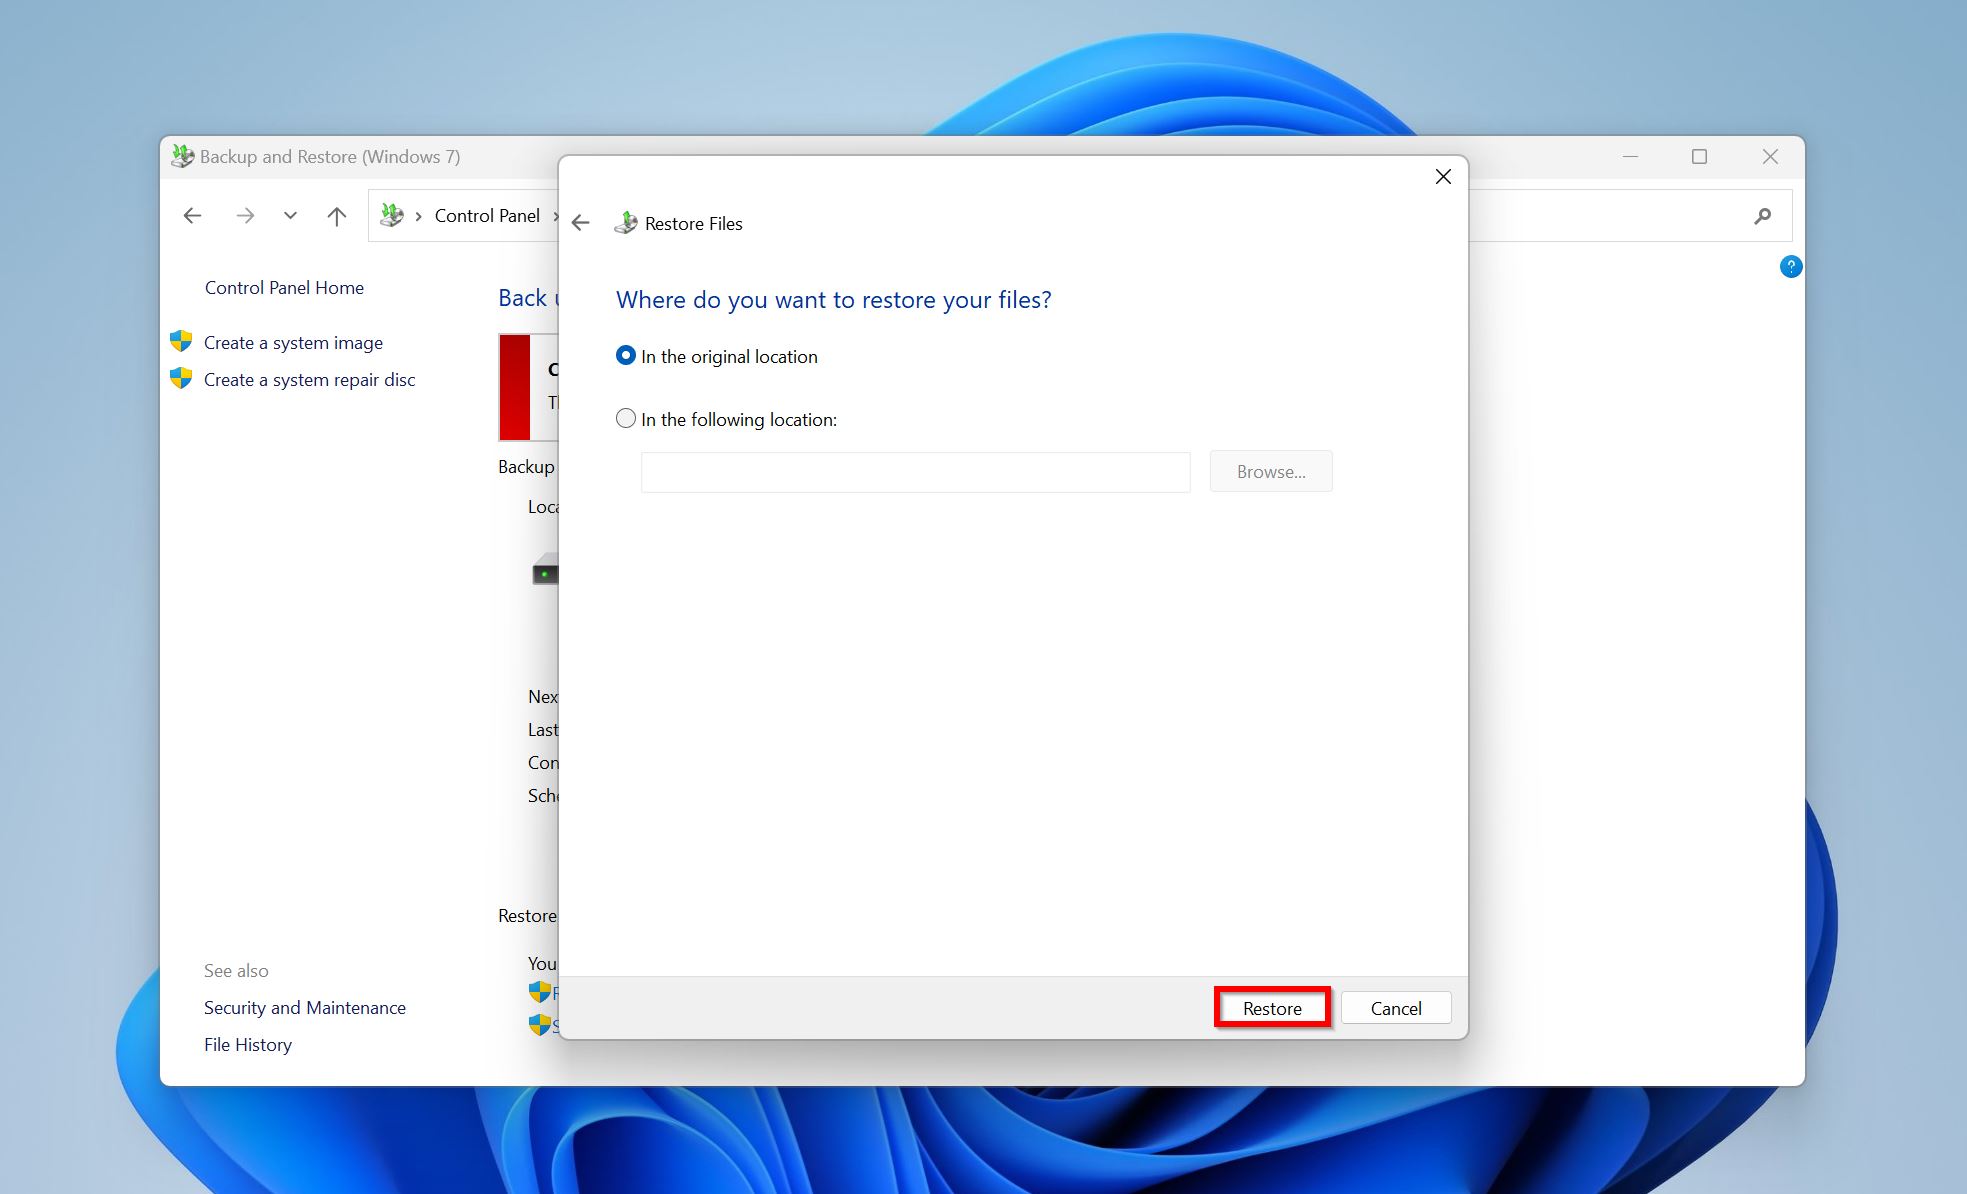
- Choose whether you would like to restore the files to their original location or to a custom one. Click Restore.
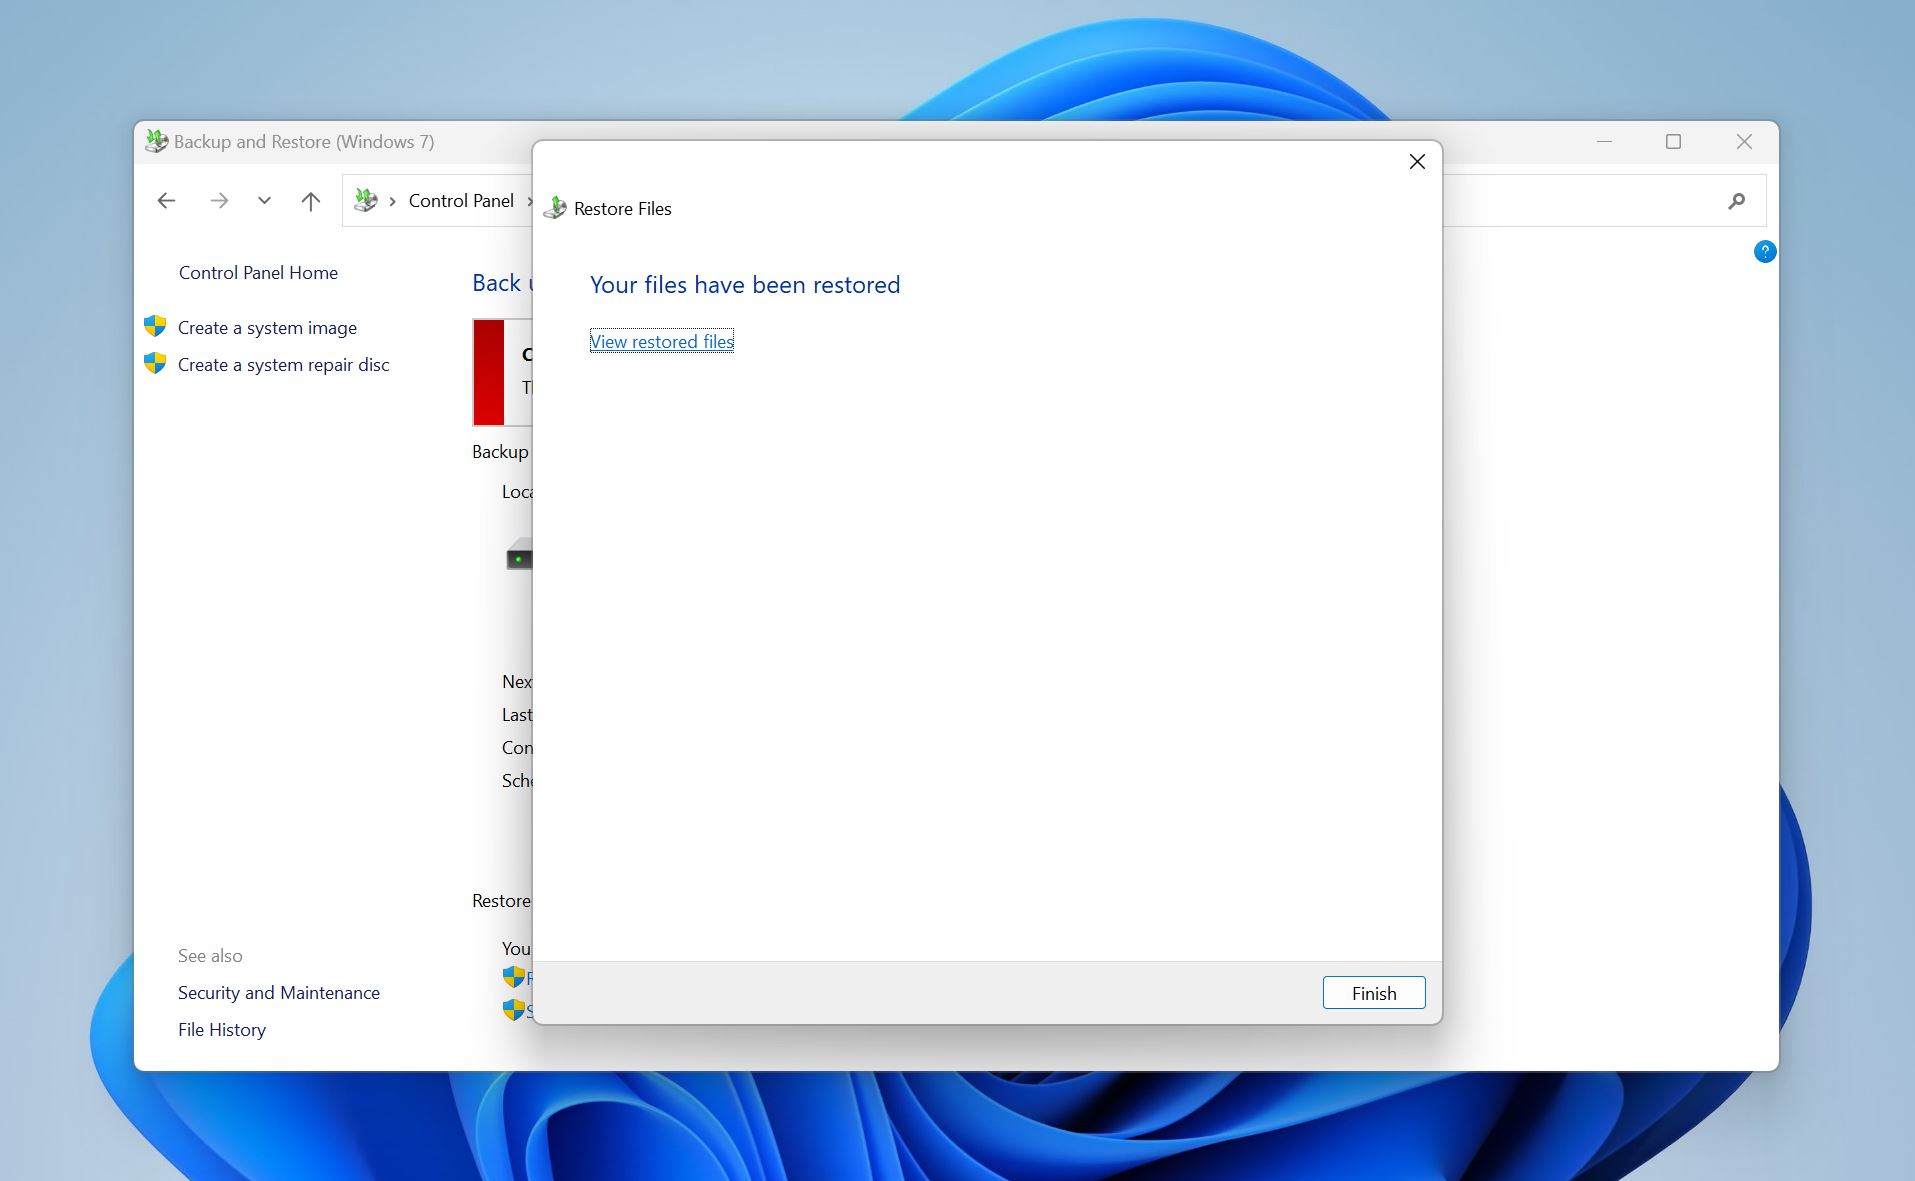
- Windows Backup and Restore will restore the files.
Method 3: Restore Deleted Files Using the Previous Versions Feature
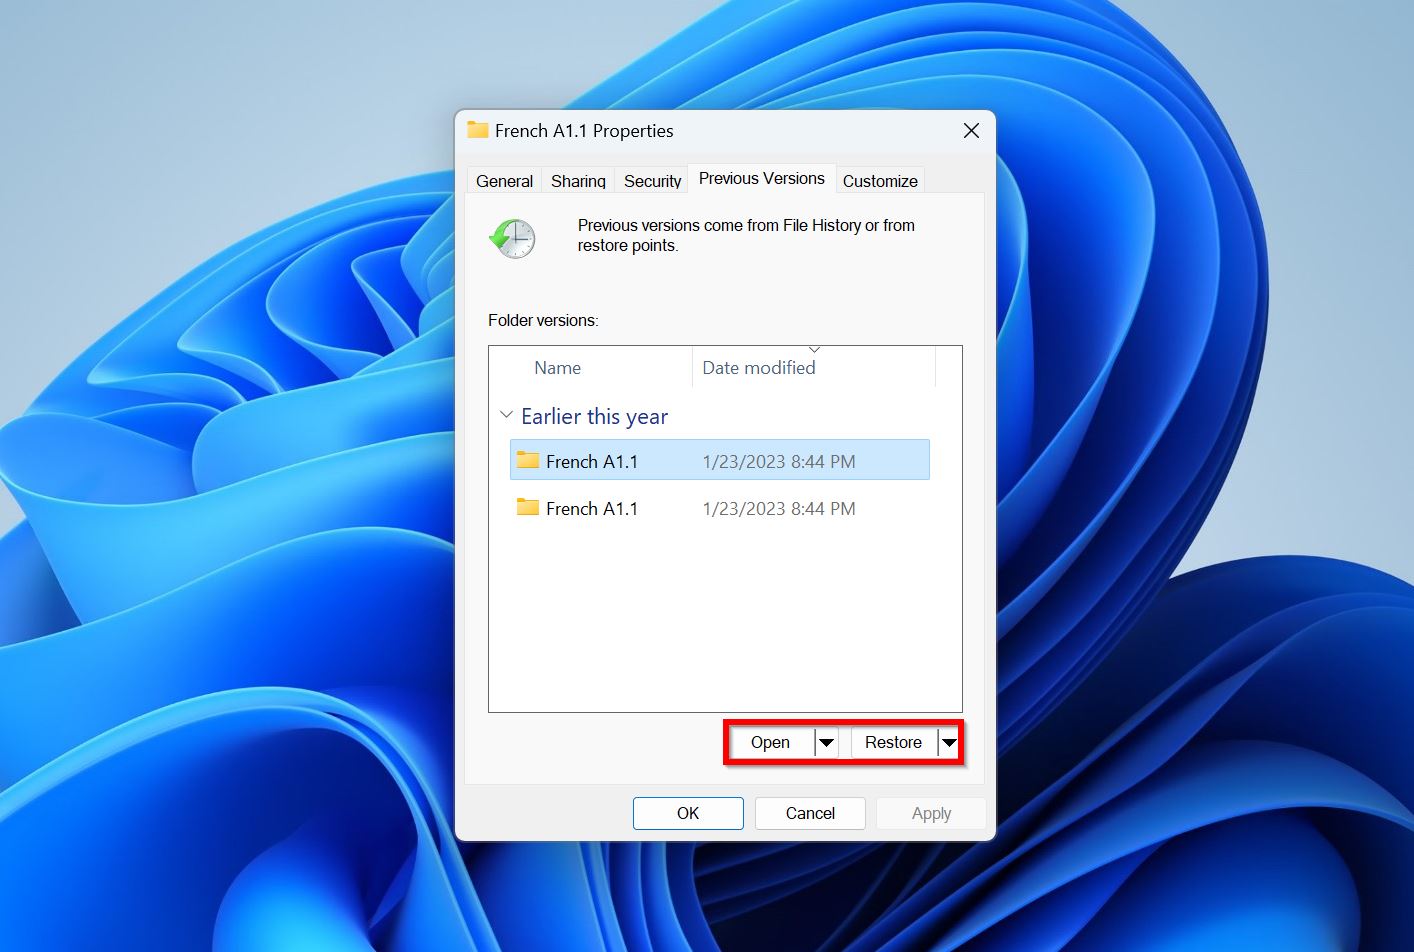
To recover deleted files in Windows 10 and Windows 11, you can use the Previous Versions feature. It finds the previous versions of your files using Windows Restore Points or File History. Again, both features should have been enabled before your files were deleted.
Here’s how to use the Previous Versions feature to restore deleted files not in the Recycle Bin:
- Ensure the drive you used to set up File History is connected to your computer.
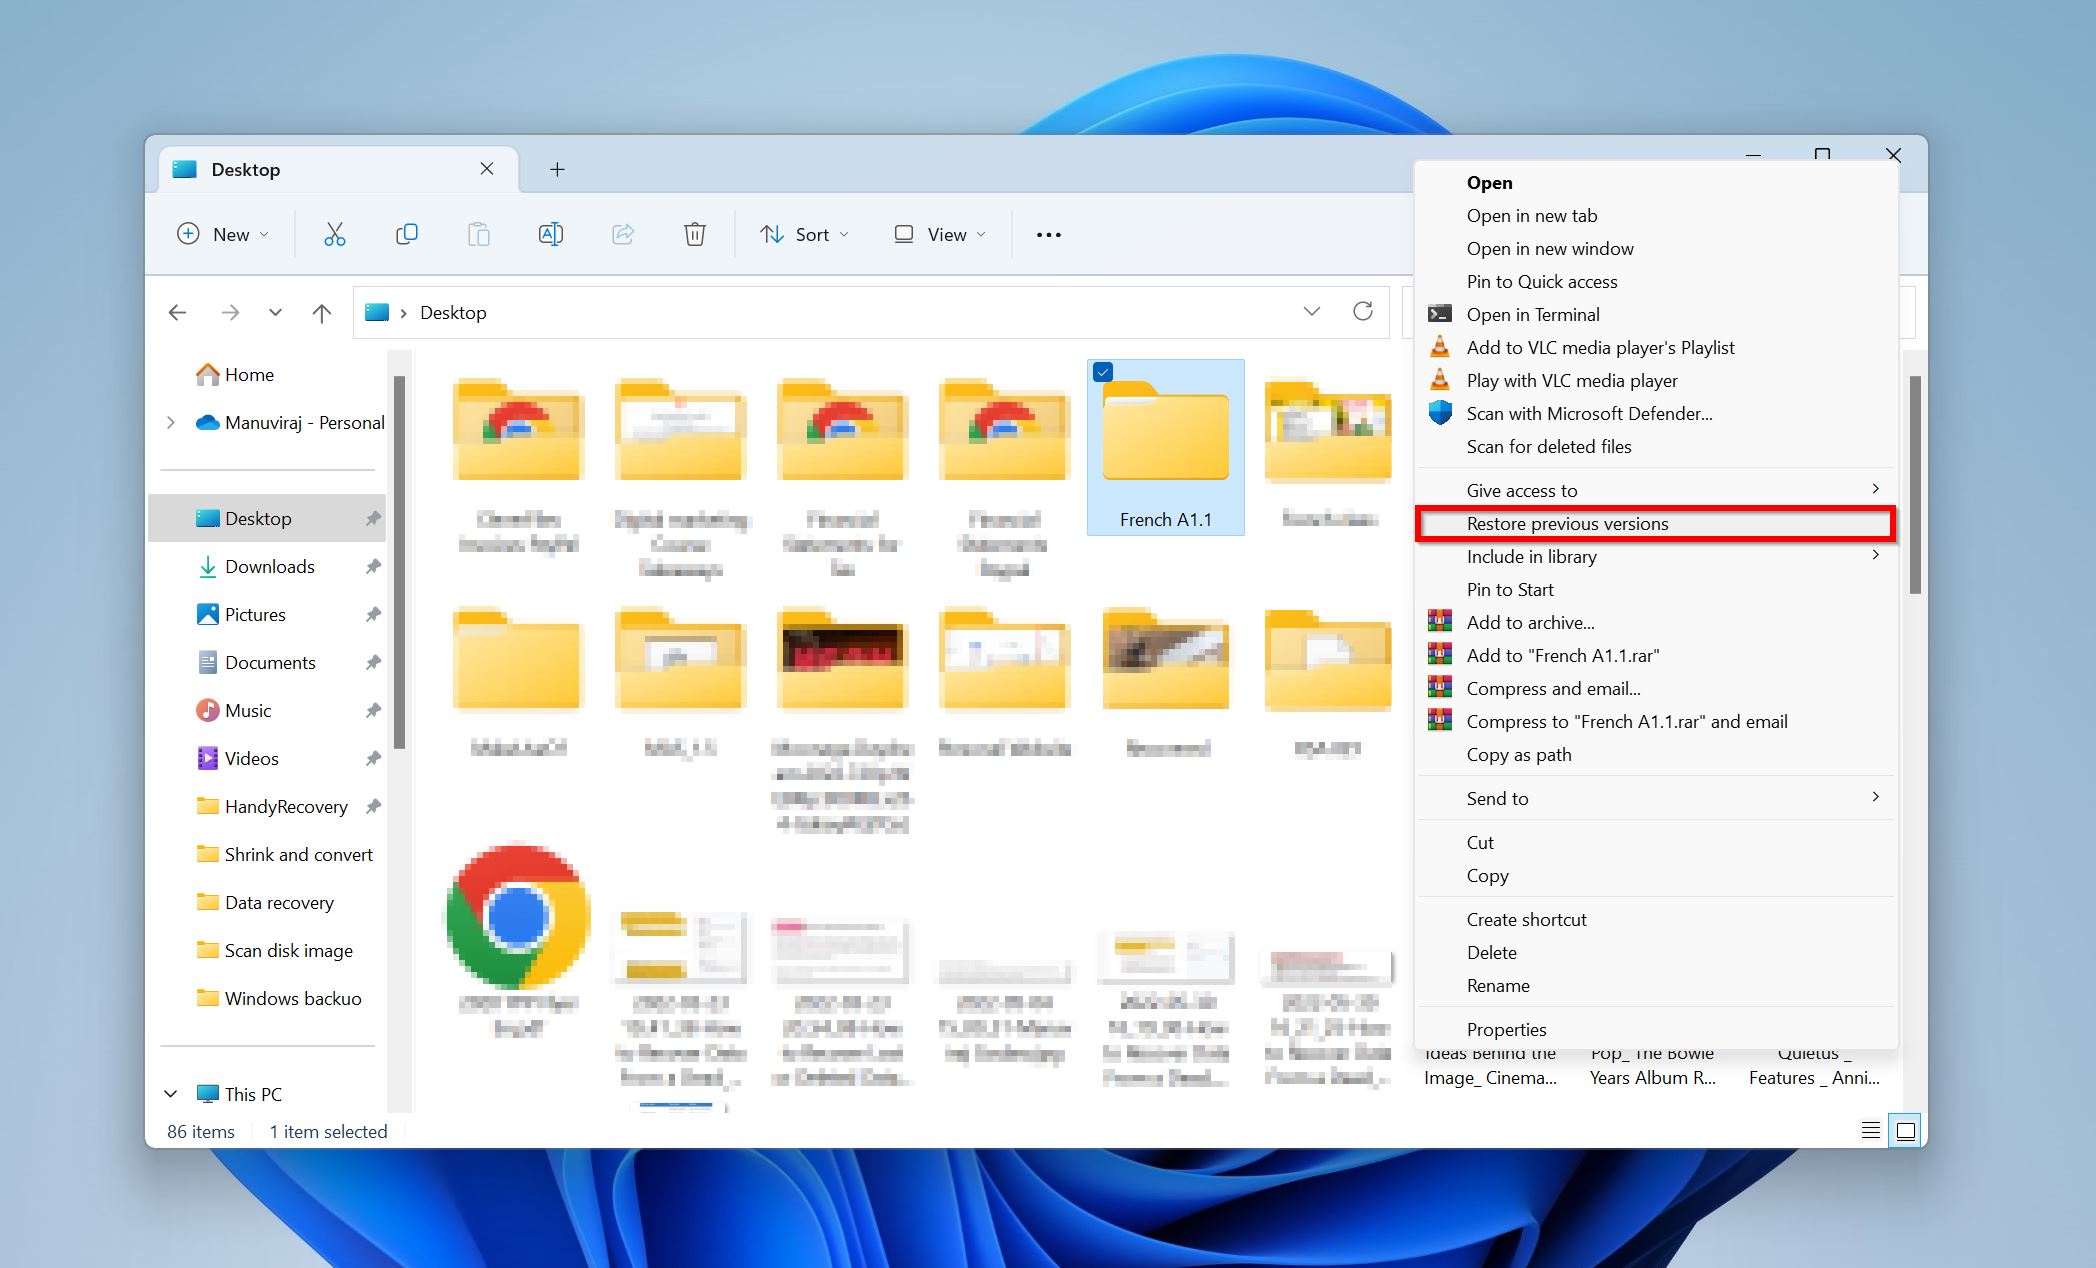
- Navigate to the folder that contained the files you want to restore. Right-click and select Restore previous versions. In Windows 11, you’ll need to click on Show more options > Restore previous versions.
- Select the version of the folder you wish to restore. Double-check that it contains the required files using the Open option. After confirming, click on the Restore option to restore the folder and get back your deleted files.
Conclusion
Being unable to locate your files in the Recycle Bin doesn’t mean they’re lost forever. You can use third-party software to get them back, but it’s even better to create regular backups of important files. If you didn’t create a backup and none of the methods above worked for you, contact a professional data recovery service.
FAQ
- The Recycle Bin is disabled.
- The Recycle Bin got corrupted.
- You deleted the files from an external storage drive.
- The Recycle Bin ran out of space.

