 Dell has been an industry go-to for many when it comes to laptops since the company has an impressive product line that caters to almost anyone. Unfortunately, Dell laptops are not impervious to data loss, so you should be prepared to know what your options are if suddenly a bunch of your files has seemingly disappeared.
Rest assured, this article will show you different ways you can recover deleted files on a Dell laptop with ease.
How to Recover Deleted Data from Dell Laptop
Dell data recovery can often be easy if you tackle the problem as soon as it happens. If you’ve experienced any type of data loss, like Dell laptop hard drive failure, then check out these useful recovery options.
Solution #1: Data Recovery Software
Data recovery software can make short work of Dell hard drive data recovery. Designed specifically to scan your hard drive for lost or deleted files, data recovery software has the ability to recover data from almost any data loss situation your Dell hard drive has faced.
The data recovery tool we’re going to use today is Disk Drill. It has a proven track record of successful recoveries and is more than capable of recovering the data from your Dell laptop hard drive.
- Download and install Disk Drill. Avoid installing it to the same hard drive you’re recovering from.
- Select your hard drive from the device list. Click Search for lost data.
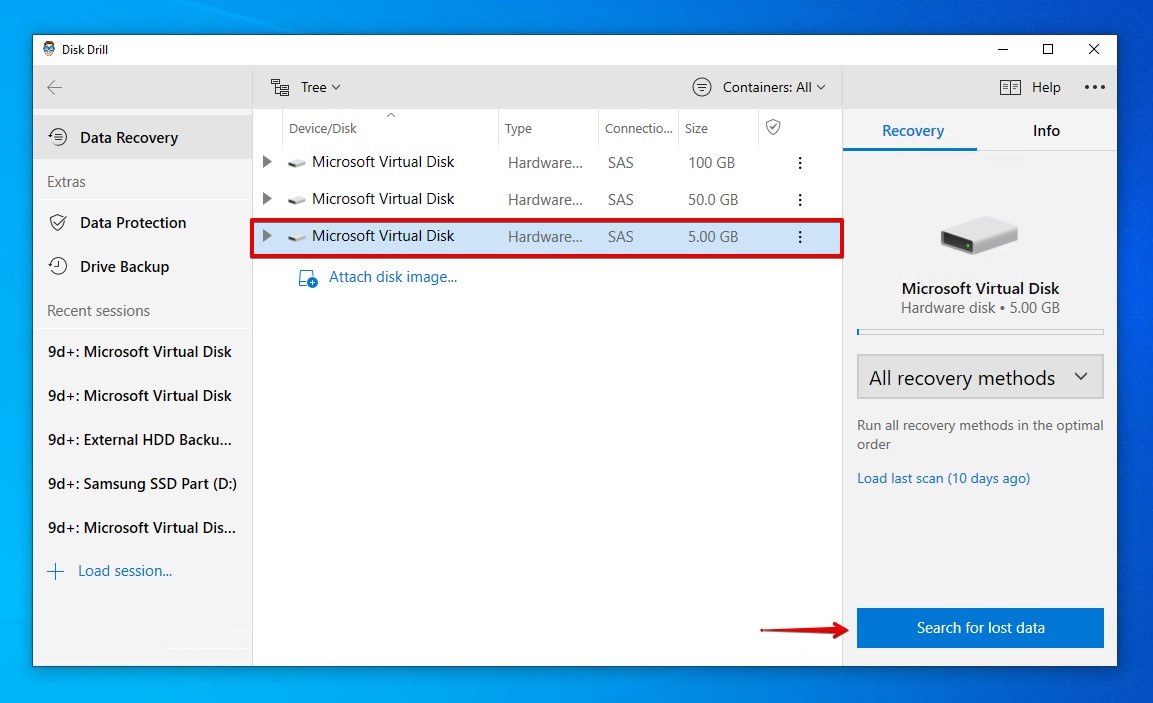
- Click Review found items when the scan has finished. You can also do so while the scan is still running.
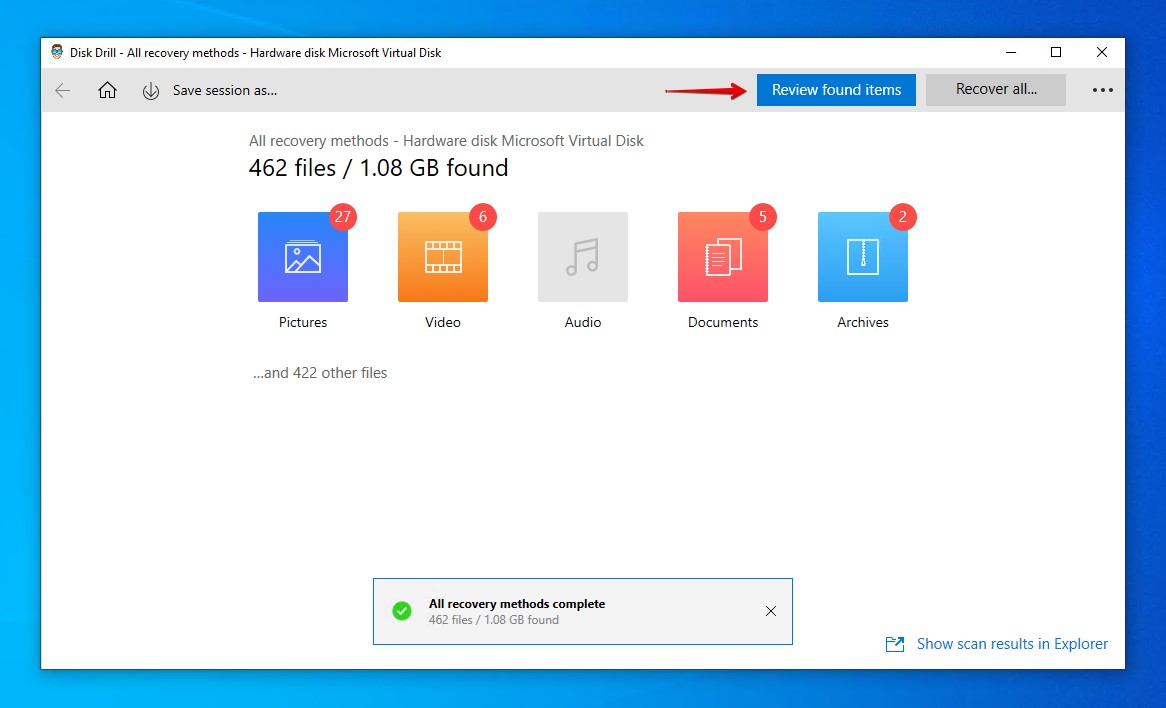
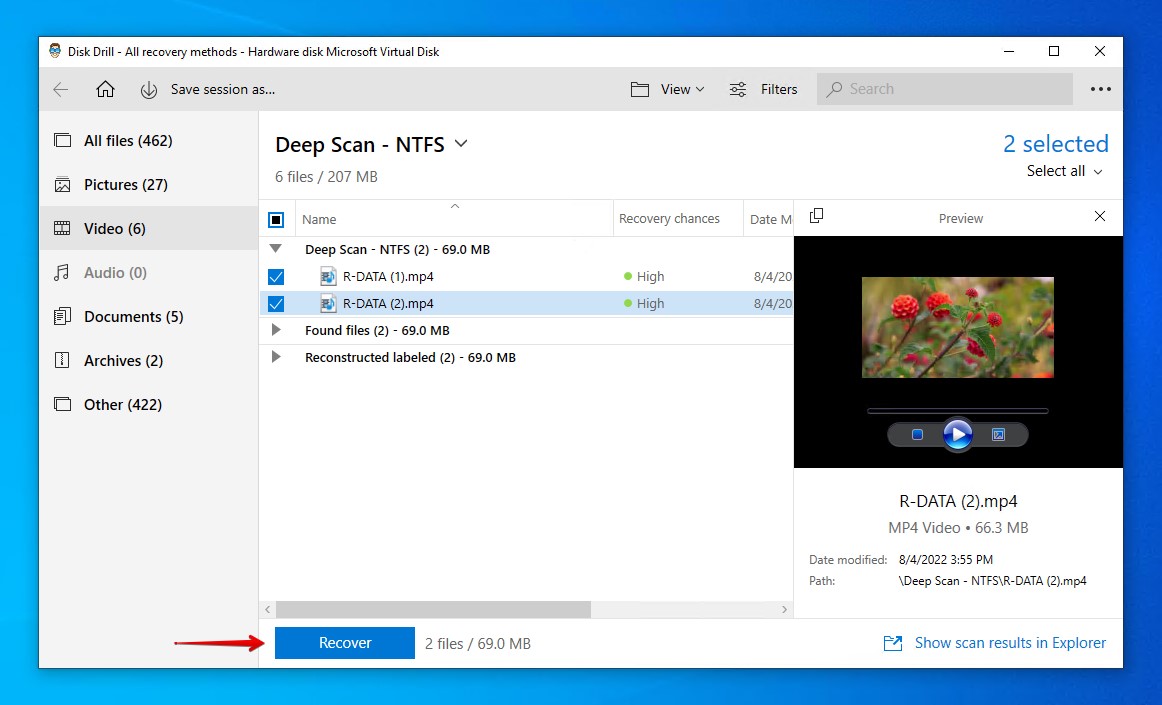
- Mark what files you want to recover from your Dell laptop’s hard drive. The Recovery chances column gives you a hint at what files have the best chance of recovery. You can also use the preview panel to easily see what you’re recovering. When ready, click Recover.
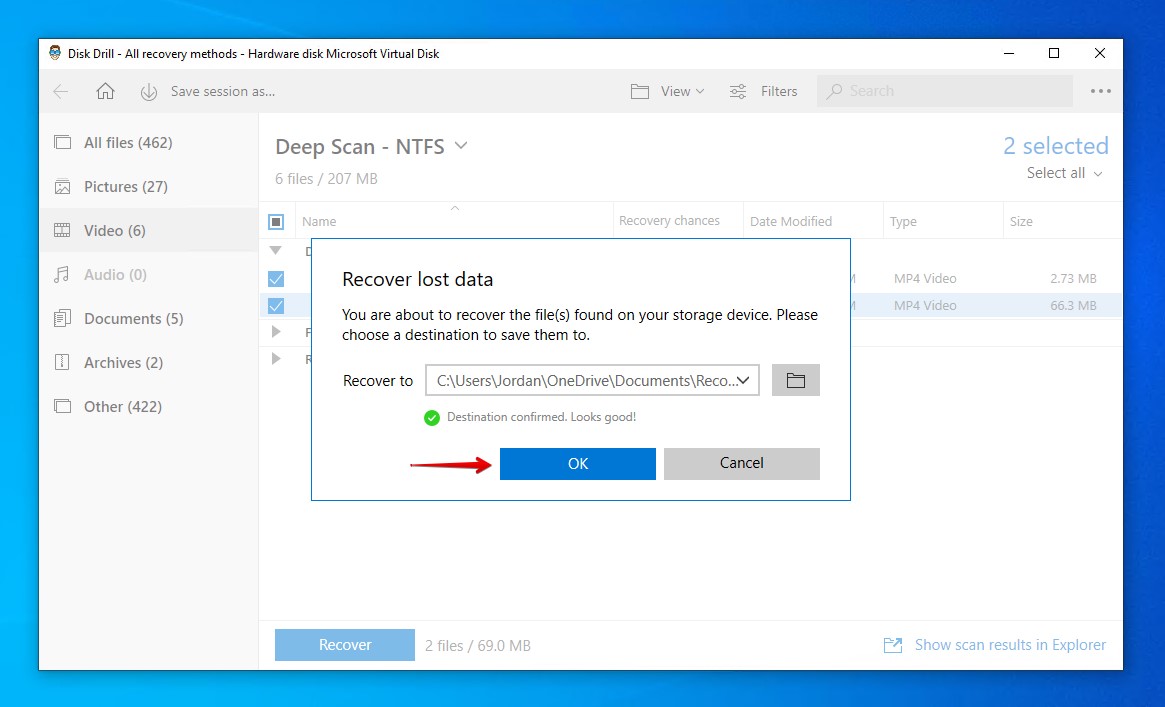
- Choose where you want to restore the files. Avoid restoring the recovered files to the same drive you’re recovering from. Click OK.
Solution #2: Data Recovery Service
In some more severe data loss cases, data recovery software may not cut it. Or, you may find that performing data recovery yourself can be too intimidating. Thankfully, there are other options available.
Using a data recovery service ensures you have the best chance of recovery. A data recovery service employs the services of data recovery specialists who, using industry-grade equipment and best practices, can recover data from hard drives for Dell laptops. This service isn’t limited to just Dell recovery, but it’s also a go-to for any of the major brands, including Samsung, Lenovo, and ASUS data recovery.
If your Dell laptop has experienced a data wipe, a data recovery service is your best bet at recovering the data that was on the drive.
Reasons for Data Loss from Dell Laptop
Data loss can occur for many reasons on a Dell laptop, oftentimes swiftly and unpredictably. Here are a few common reasons why data loss occurs on Dell laptops:
- 💥 Hard drive failure – Hard drives contain moving parts. Over time, these moving parts begin to degrade. As your hard drive nears the end of its life, it will display symptoms such as clicking noises and severely degraded performance.
- 😰 Improper formatting – The Dell ‘format hard drive’ process can easily result in the loss of data if something goes wrong. If the wrong setting is selected, or the format process is interrupted partway through, data loss has a high chance of occurring.
- ❌ Data corruption – Data corruption often occurs as a result of interrupted data writing processes. If your Dell laptop is shut down while files are being copied, the files can be left in a corrupted state.
- 🦠 Malware – Malware, such as viruses, can attack your hard drive and the data on it. In such cases, an anti-virus application can remove the malware, but it cannot restore the damage caused to your files.
With these reasons in mind, let’s now look at how you can protect your data going forward.
How to Protect Data on a Dell Laptop
Windows includes a lot of useful features that allow you to back up your data and keep it safe. File History is a native Windows backup solution that was created with the intention of making backups quick and easy. This is how you can set it up:
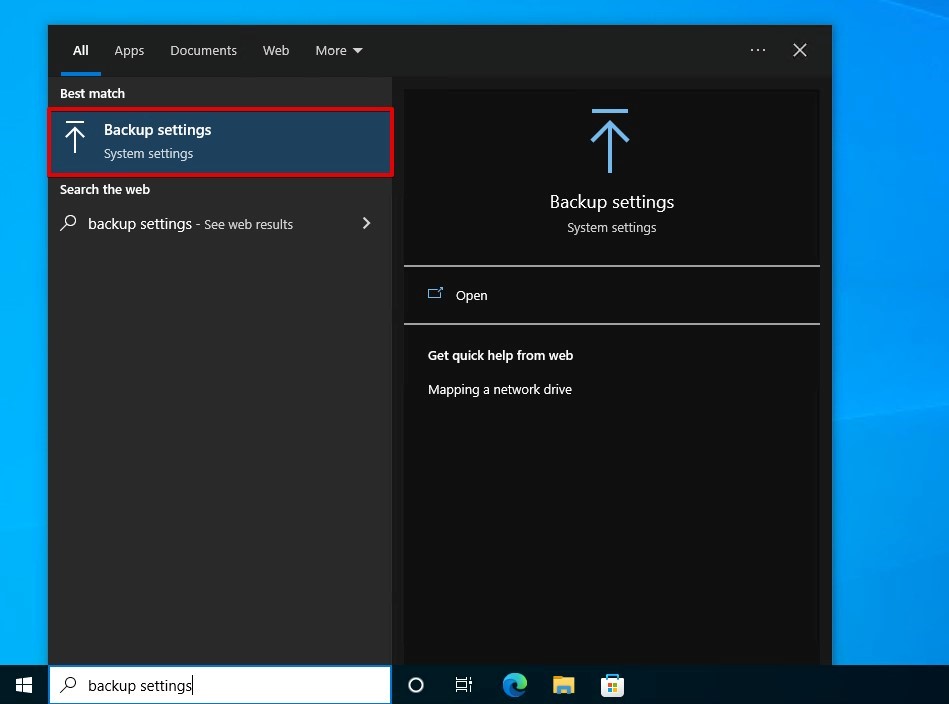
- Press Windows Key + S and search “Backup settings”. Select the first result.
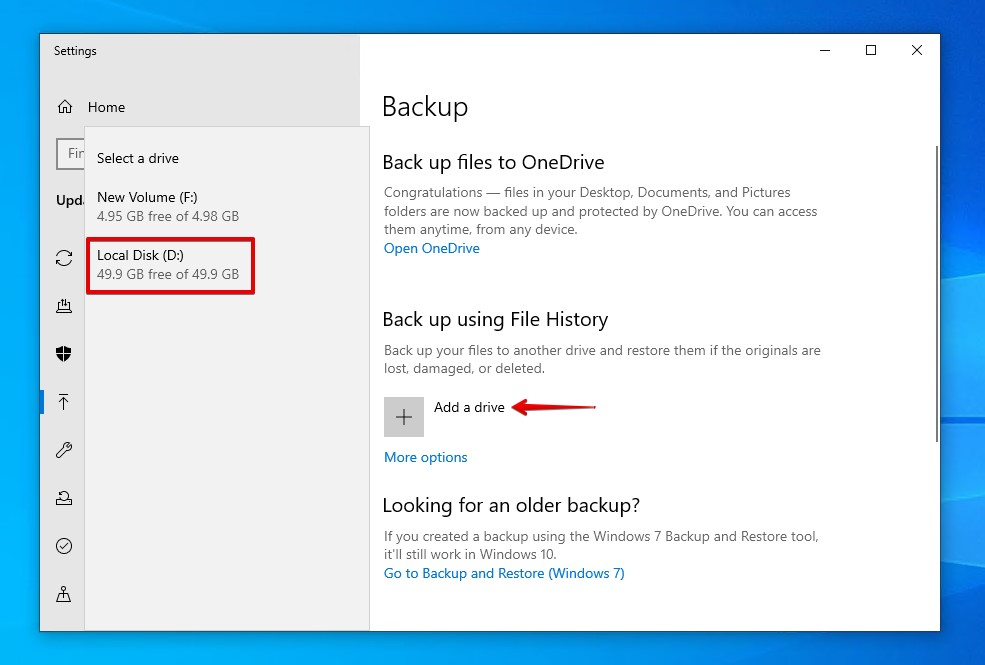
- Click Add a drive and select a drive to store the backups.
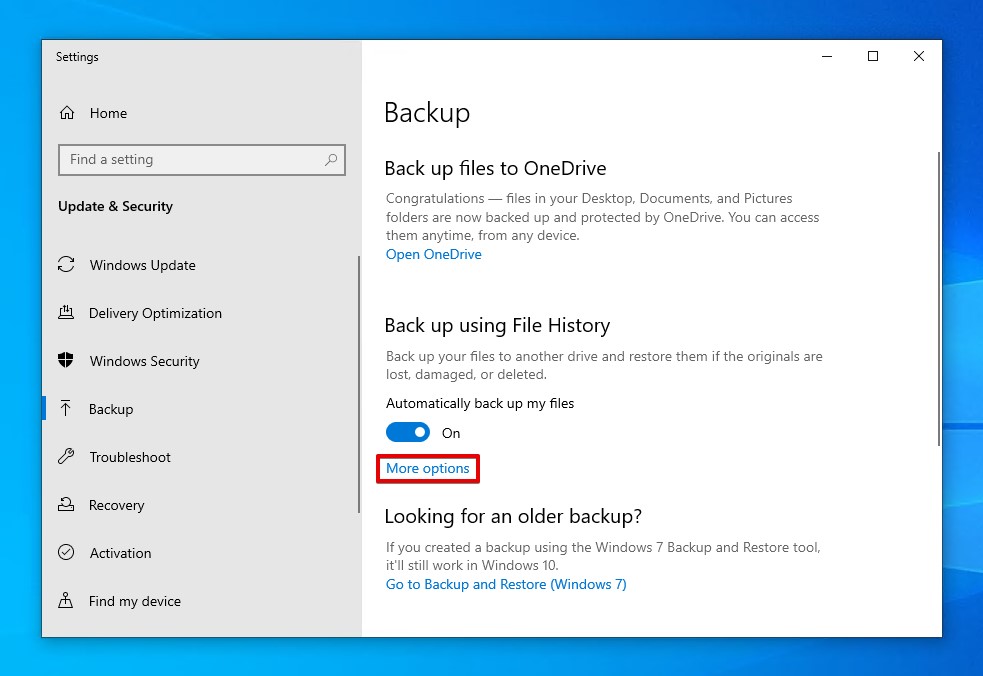
- Click More options to add custom folders to the backup. This is also where you can see what folders File History backs up by default.
Once you’ve set up File History, the drive you selected to store the backup will essentially be your Dell data recovery hard drive for the next time a data loss event occurs.


