 As small as SD cards are, they are capable digital storage devices for all kinds of data, from cute cat photos to your aesthetic travel videos and important documents. But like any storage device, SD cards are vulnerable to all kinds of file and system corruption.
In some cases, the only way to repair your card might be to format it. Luckily, there are tons of ways to format your SD card, including running commands in the Command Prompt.
In this article, we’ll show you how to format an SD card using CMD without losing data, along with step-by-step guides you can easily follow.
All You Need to Know About Formatting
Formatting your storage device involves recreating its file system structure and erasing all its data in the process. This serves as a device reset, helping to prevent errors, enhance performance, and clean your device from malware and virus infections. Some also use it as a last resort to fix corrupted SD cards.
There are two primary ways to format your card:
- Quick Format – A quick format erases your device’s file structure, emptying the drive. However, it doesn’t check for system errors or bad sectors.
- Full Format – A full format erases all the data on the SD card and rebuilds the file system from scratch. It also checks for bad sectors and other potential errors along the way. This makes the process take much longer to complete. A full format also makes data recovery way more difficult, since it wipes the card completely and resets data structures that contain the previous file’s information.
How to Avoid Losing Data When Formatting SD Card
As mentioned earlier, formatting your SD card will erase all your data. If you’re formatting
to repair your SD card and can’t manually back up your important files, you can rely on recovery software like Disk Drill to recover your files before formatting.
Disk Drill is a well-tested and trusted data recovery tool available online. It has a set of deep-scanning recovery algorithms working together to find as many recoverable files as possible. It can scan and recover hundreds of file formats and can even preview files before recovery.
With Disk Drill for Windows, you can try out its features and scan and recover up to 500 MB worth of files for free.
Here’s a quick step-by-step guide on how to use Disk Drill to recover your files before formatting your SD card:
- Download the Disk Drill installer and install the app. Then, connect your SD card to your computer.
- Next, open Disk Drill. After the introductory messages, you should see the list of drives you can scan on the home screen. Select your SD card and click Search for lost data to initiate the scan.
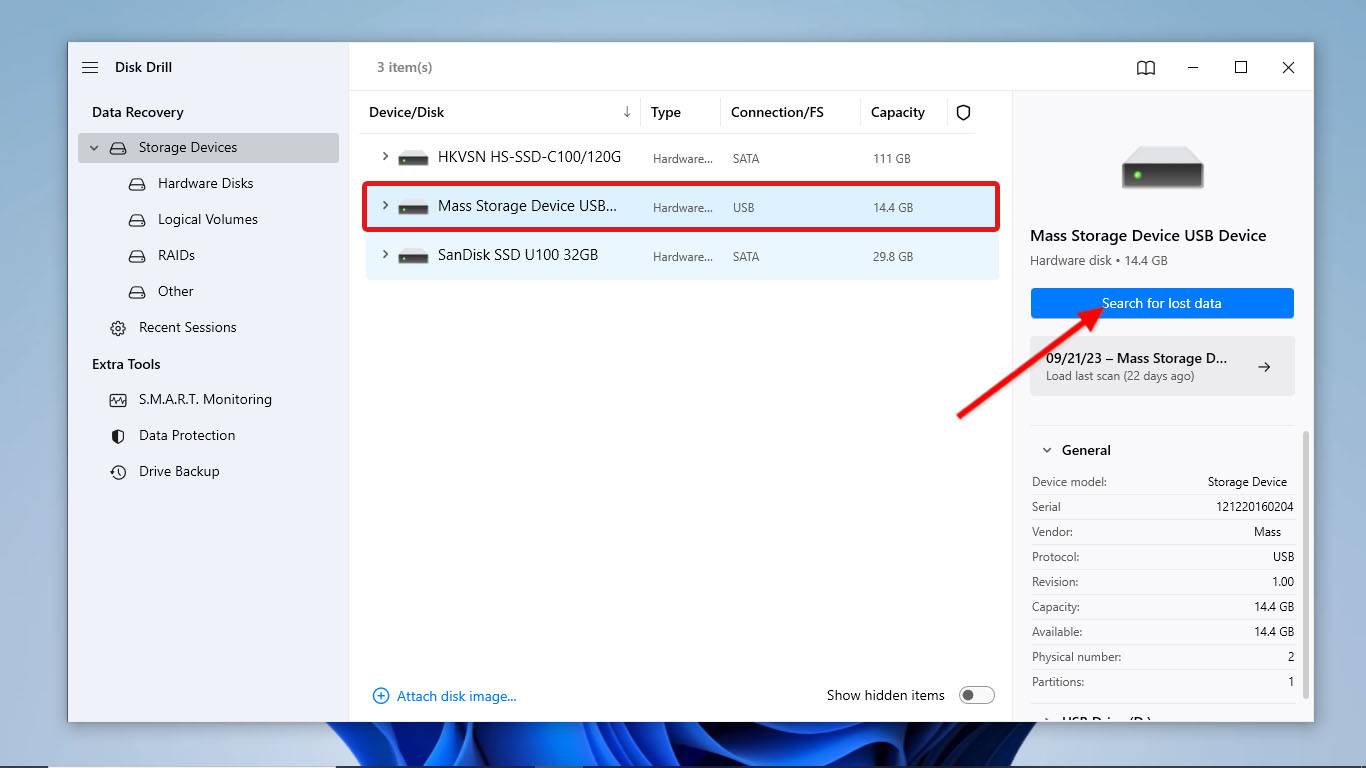
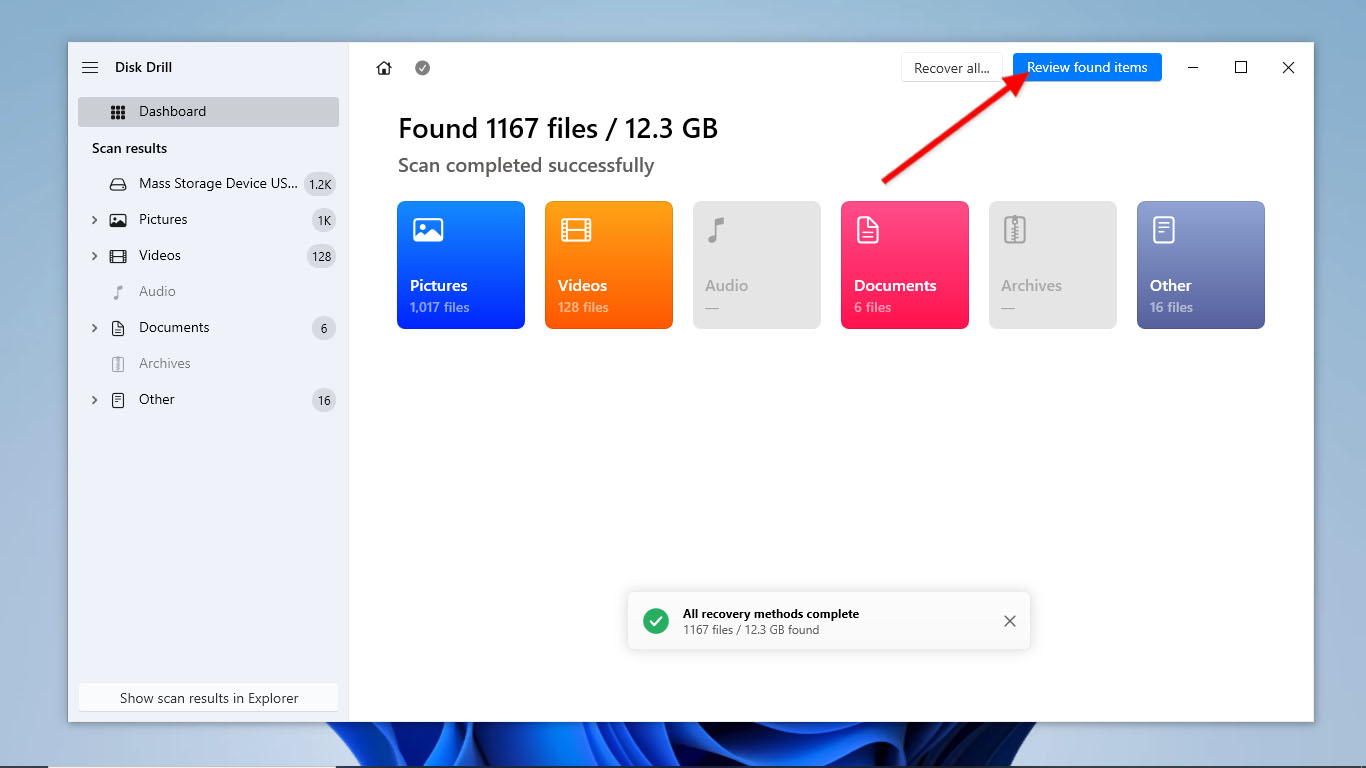
- You can check for the files Disk Drill found by clicking Review found items as the scan progresses or after it finishes.
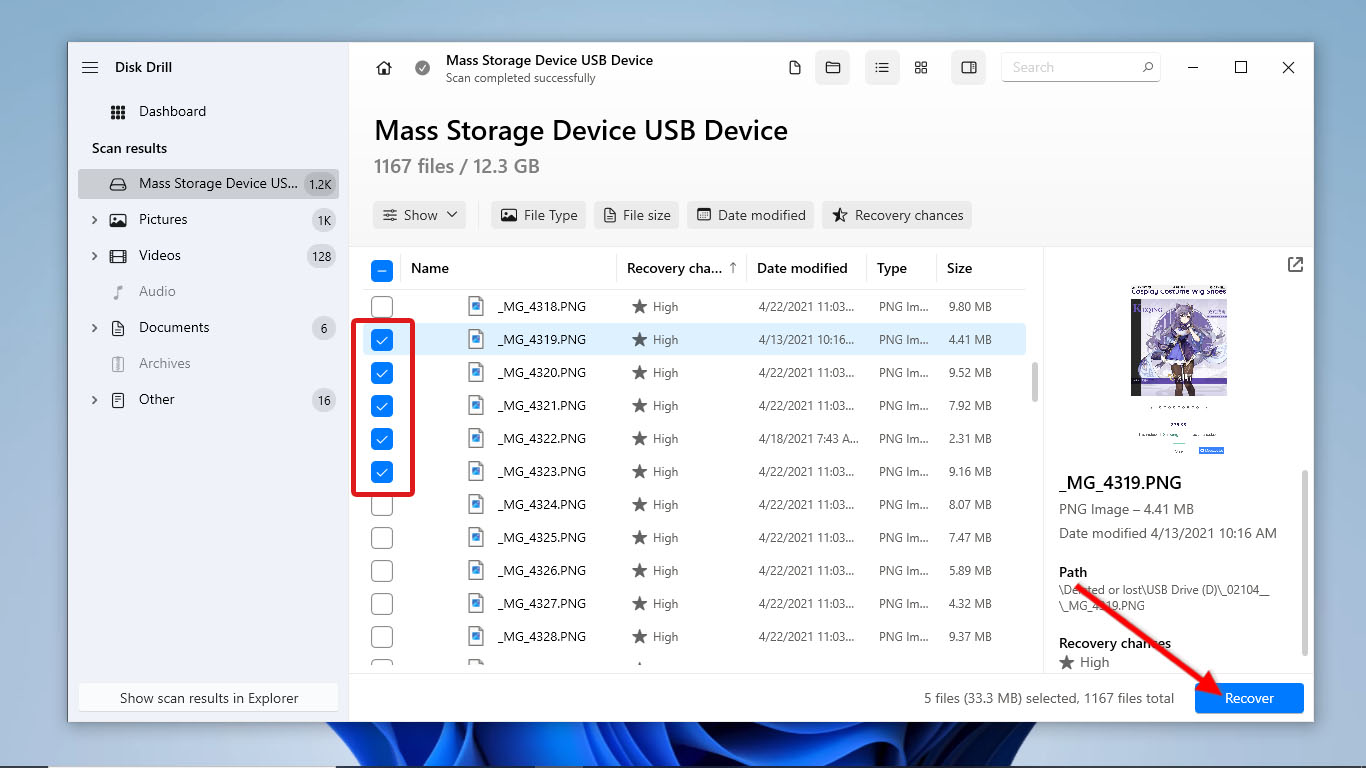
- You should see all the files Disk Drill found in the Existing, Found Files, or Reconstructed folder. Select the files you want to recover, and use the search bar if you remember the file names. Tick the checkboxes next to the files you wish to recover and click Recover.
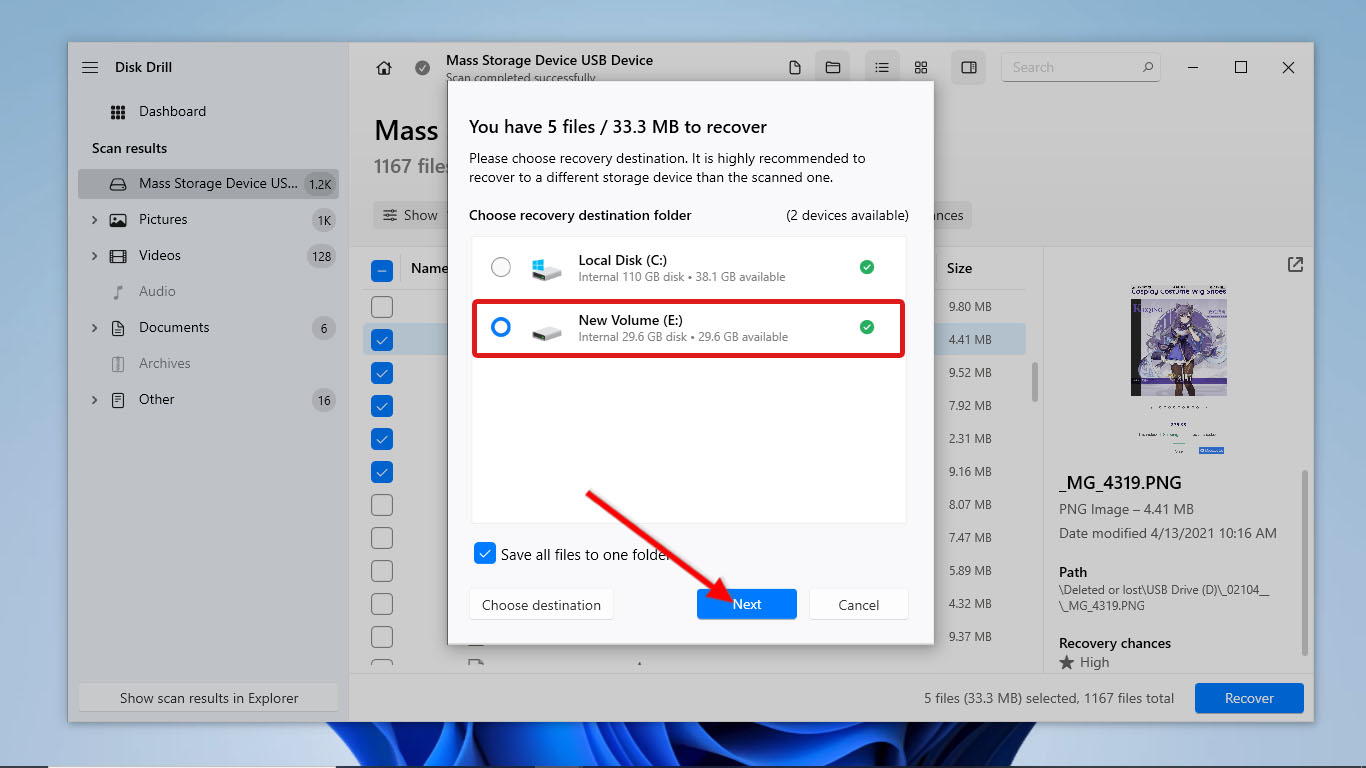
- Select the file destination for your recovered files. Make sure that you choose a different location than the SD card you’re trying to recover files from. Then, click Next to start the recovery process.
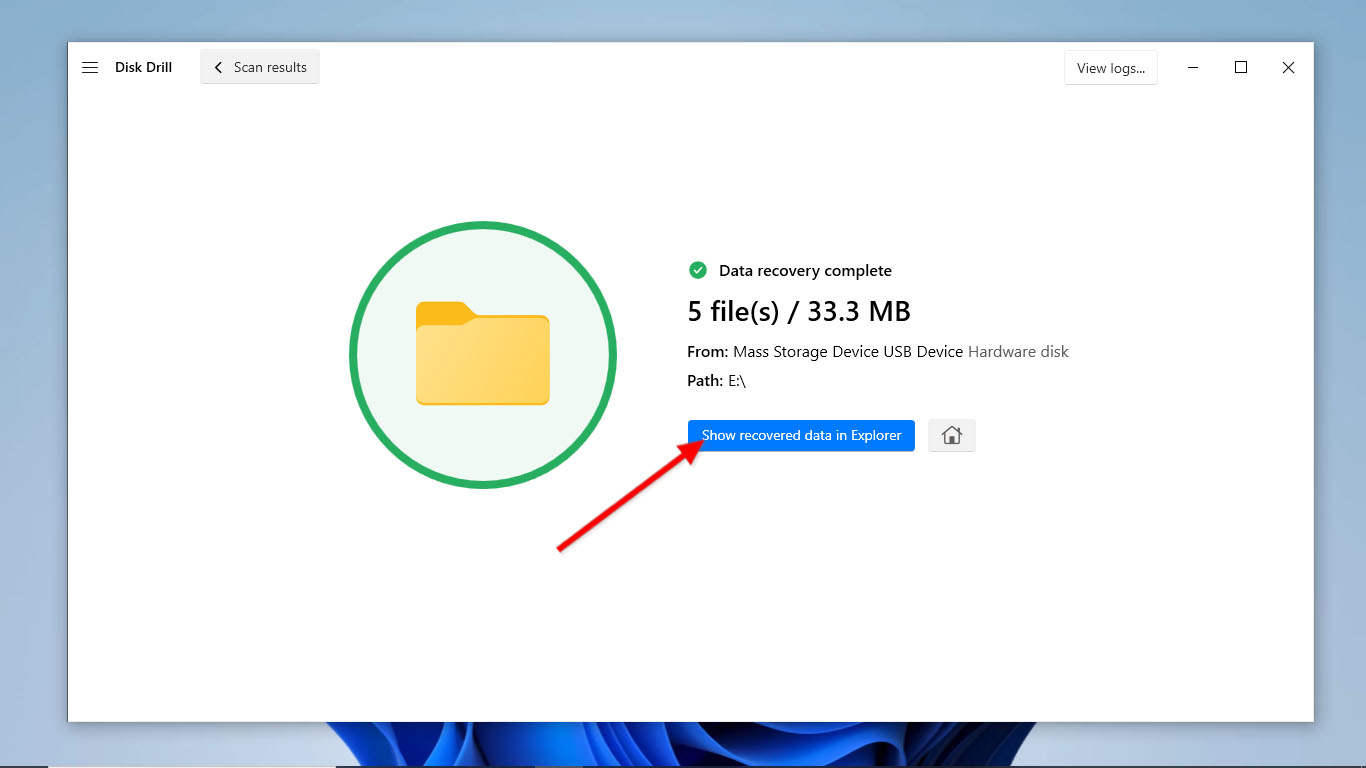
- Once the data recovery process is complete, you can check for your recovered files in File Explorer by clicking Show recovered data in Explorer.
How to Format SD Card Using CMD
Once you’re done recovering or backing up your important files, you can proceed to formatting your SD card with less worry.
There are different ways to format an SD card without losing data. If you’re encountering GUI bugs, unable to format through normal ways due to errors, or need to automate the process using scripts, among other reasons, you might find it useful to format an SD card with CMD. The Command Prompt may not have a modern-looking interface, but it hosts comprehensive tools for disk management.
We’ll guide you through this process using the Format command and the DiskPart utility in the Command Prompt.
Method 1: Format Command
The Format command by itself creates a new root directory, checks for bad sectors and system errors, and deletes all data on the disk. To use the Format command, ensure that you open the Command Prompt as an administrator. Then, type format X:, replacing X with the drive letter of your SD card. Press Enter to execute the command.
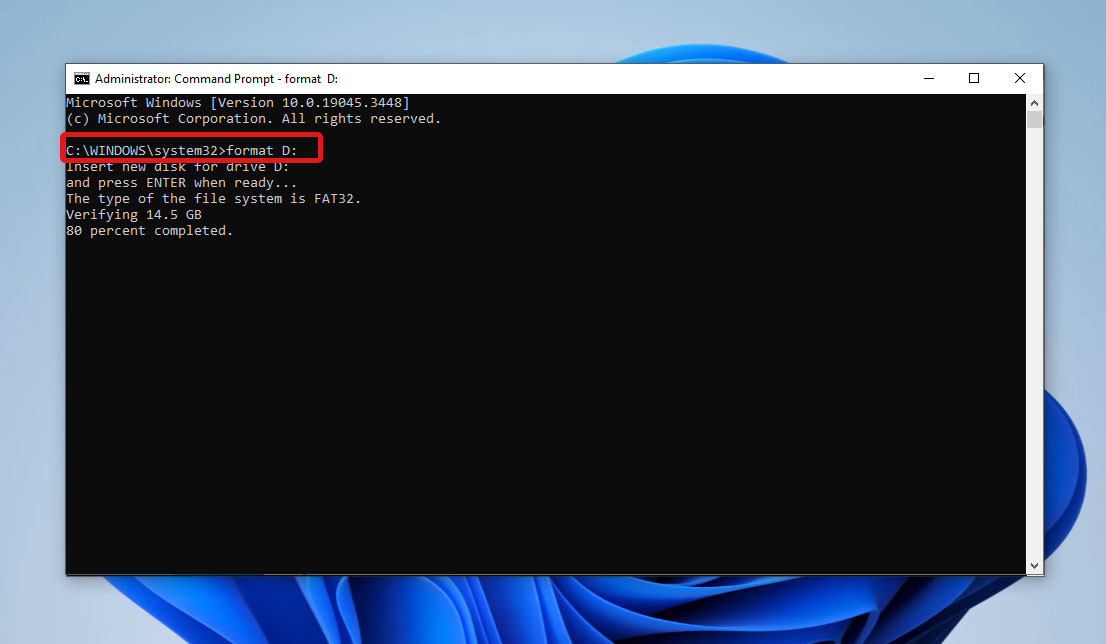
This command performs a full format of your device while retaining its same file system. You can also customize it for your specific needs by appending different switches to the command.
Take note that this command works for Windows 10 and up, so it may not be applicable if you’re looking to know how to format an SD card using CMD on Windows 7.
Here are some common switches used with the ‘Format’ command:
| Switch | Description |
| /Q | Performs a quick format |
| /FS:file-system | Specifies the file system type Replace ‘file-system’ with your preferred one. e.g., FAT32, NTFS |
| /V:drive-letter | Assigns a drive letter to the formatted SD card. Replace ‘drive-letter’ with your preferred letter. |
| /X | Forces the volume to dismount before formatting if needed. |
Method 2: Diskpart
DiskPart is a versatile utility that can be accessed via Command Prompt. It has various advanced functions for disk management, including formatting, assigning and maintaining partitions, and more.
In cases where your SD card requires more complicated disk management, use DiskPart instead of running the format command. You can also use this utility to force format SD card, which can be handy for repairing a read-only SD card.
Format your SD card using DiskPart by doing the following:
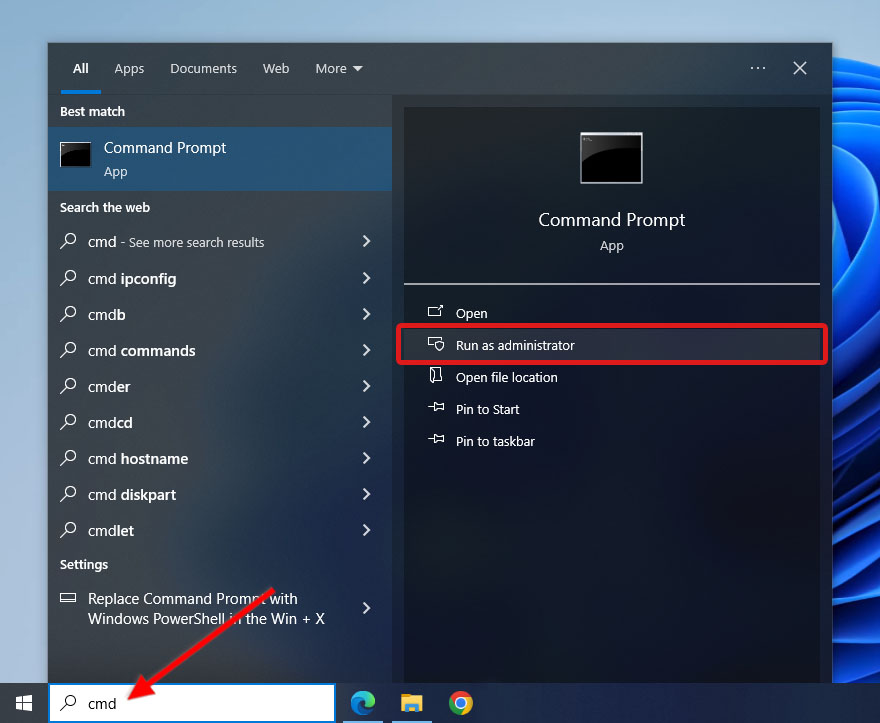
- Open Command Prompt as an administrator by searching for “Command Prompt” in the Start menu and selecting Run as administrator.
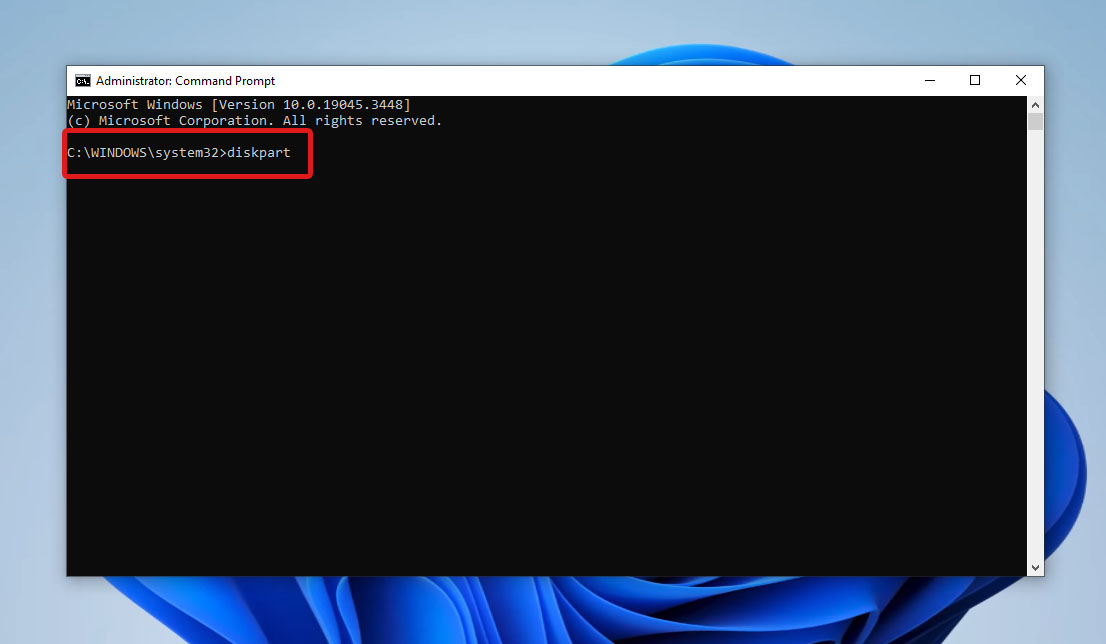
- Then, launch DiskPart by typing
diskpartand pressing Enter.
- Now, type
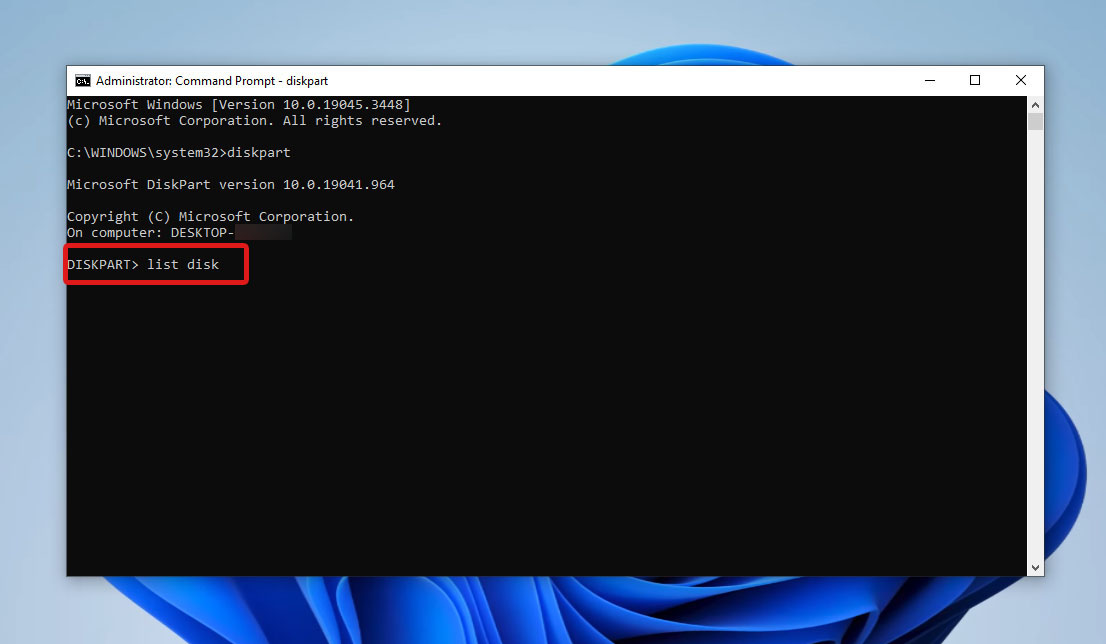
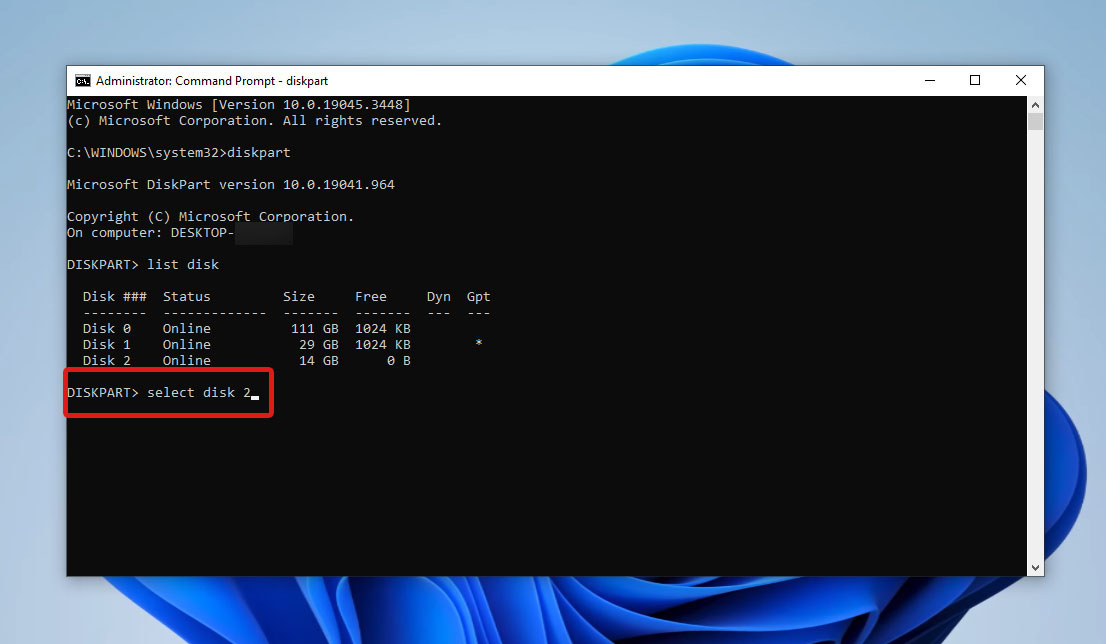
list diskand press Enter to see the list of all available drives on your computer. Take note of the drive letter of your SD card.
- Type
select disk N, replacing N with your drive letter.
- After that, type
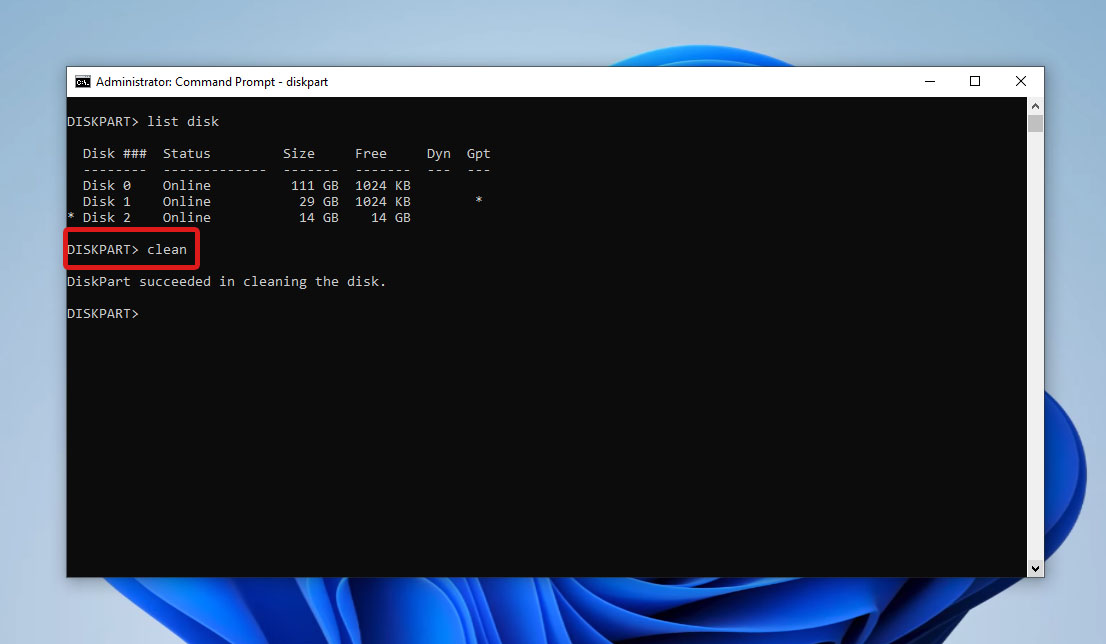
cleanand press Enter to erase all data, including the signature and partitions on your SD card.
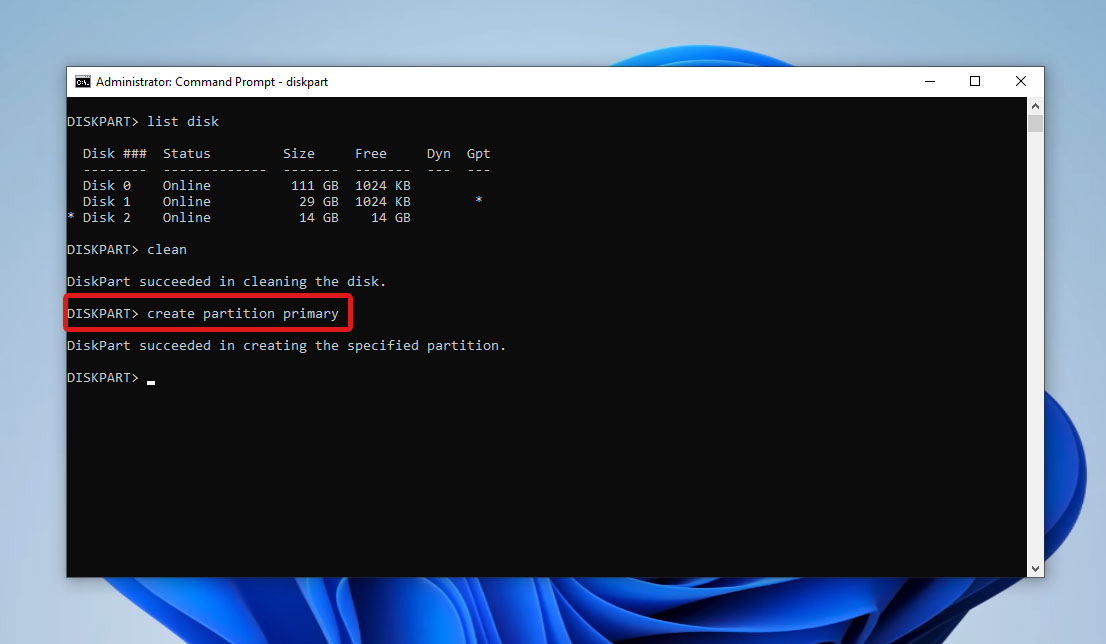
- Next, type
create partition primaryand hit Enter.
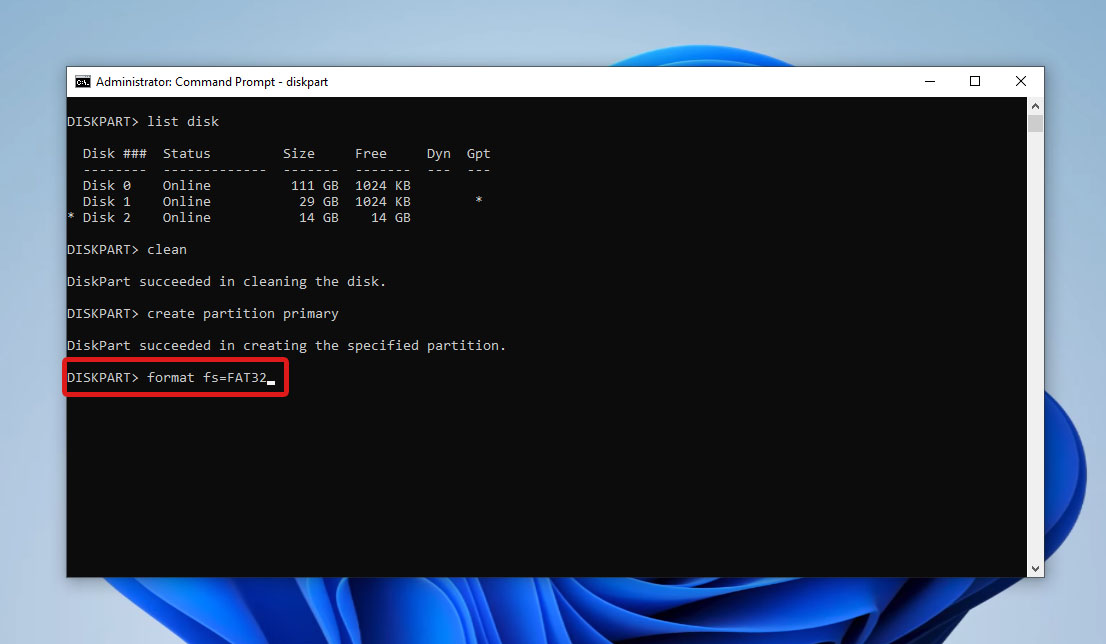
- To perform a full format on your SD card, type
format fs=FAT32, and press Enter. You can change the file system according to your preferences, or append quick to perform a quick format.
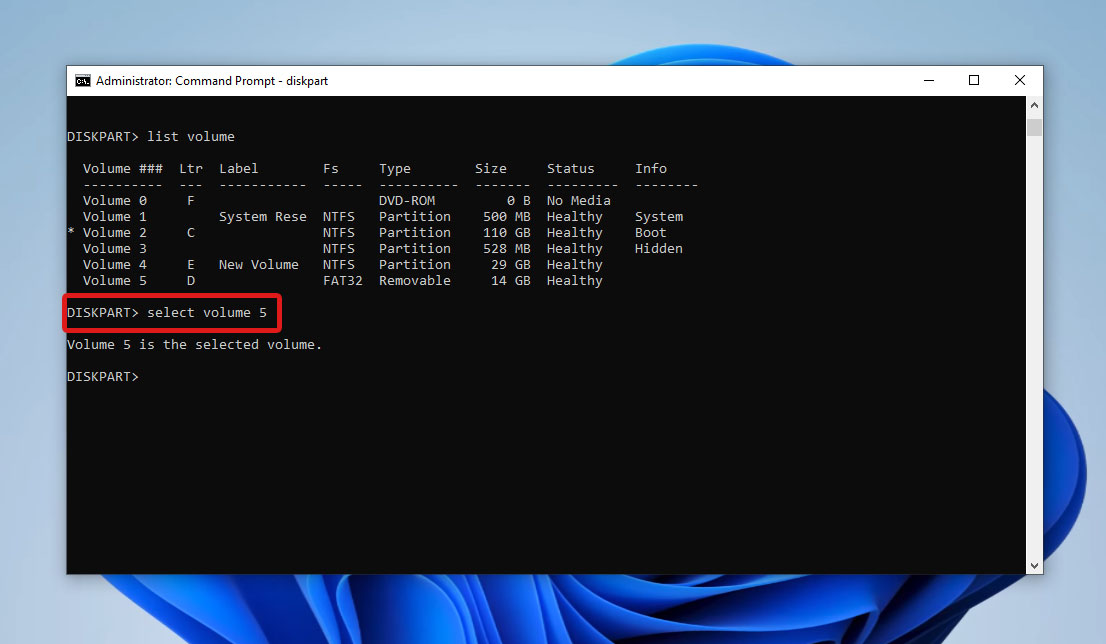
- Now, type
list volumeand press Enter. Take note of your SD card’s volume number. - Then, type
select volume N, replacing N with your SD card’s volume number. Then, press Enter.
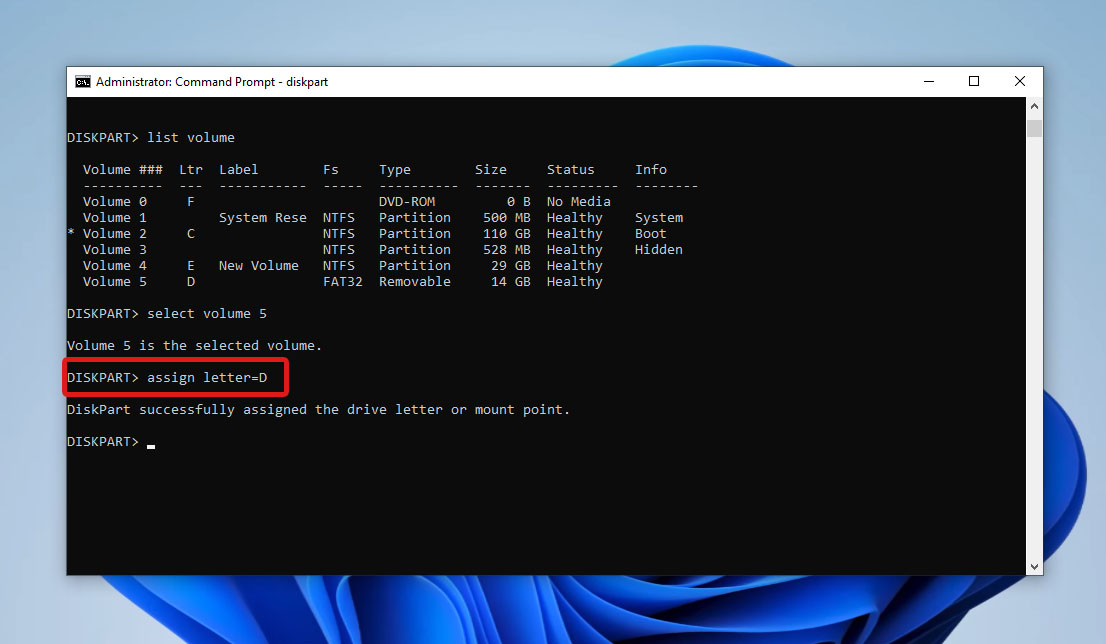
- Finally, type
assign letter=D, replacing D with your preferred drive letter. Then, press Enter to proceed.
After completing these steps, you can now access your drive to check if your device was properly formatted.
Conclusion
Various circumstances may require you to format your SD card, which erases all data from your storage device. In cases where you need to format a corrupted SD card or have no choice but to perform the format, using data recovery software like Disk Drill can help recover your important files.
Once your files are safe, you can now format an SD card using CMD without losing data using the Format command or the DiskPart utility. Use the Format command and modify it with switches according to your needs. For more flexible functionality, you can use DiskPart to format your device.
Always remember to take care of your SD card by minimizing interruptions during write operations to minimize the need for formatting in the future.
FAQ:
- Launch Command Prompt as an administrator.
- Type diskpart and press Enter
- Type select disk N, replacing “N” with your SD card’s drive letter.
- Type attributes disk clear readonly and press Enter.
- Open Command Prompt as administrator.
- Launch DiskPart by typing diskpart and pressing Enter.
- Type list disk and press Enter. Take note of your SD card’s drive letter.
- Next, type select disk N, replacing N with your drive letter.
- Type clean and press Enter.
- After that, type create partition primary and hit Enter.
- Type format fs=FAT32 and press Enter. You can change “FAT32” to the file system you prefer.
- Type assign letter D, replacing D with the drive letter you prefer. Then, press Enter.
