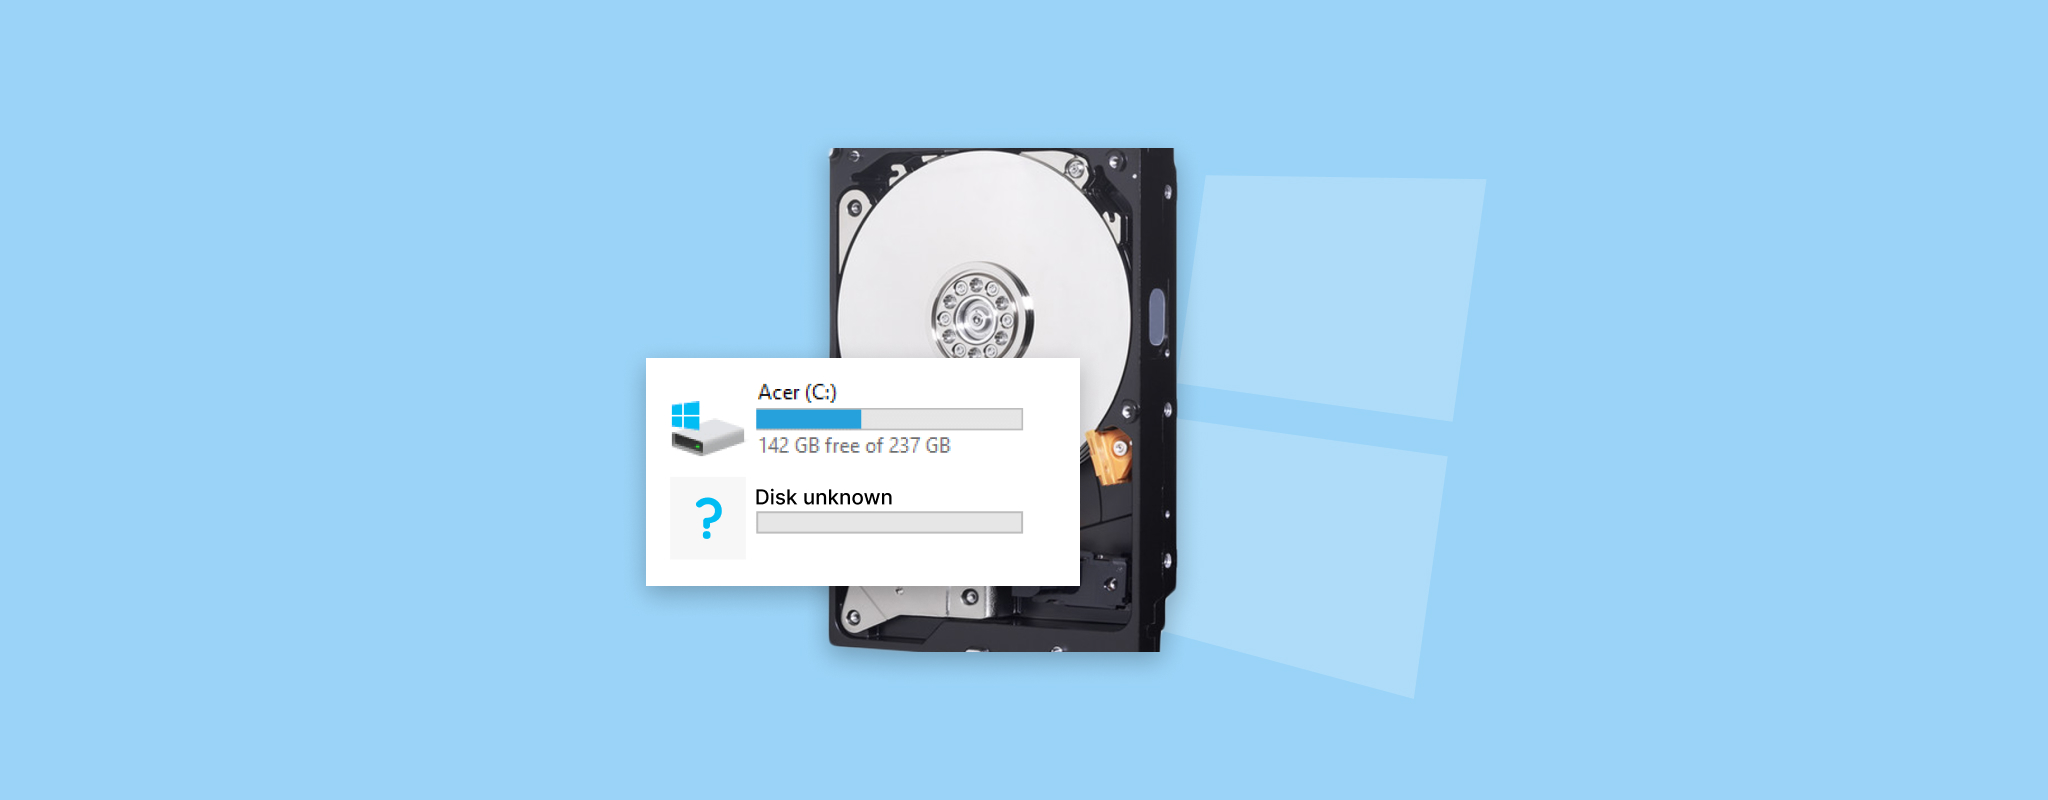
 Can’t access your files because the drive is not showing up in File Explorer? Whether it’s internal or external, this is a common issue on Windows 10/11. This issue pops up all the time – our team sees it constantly, so we’ve pulled together the most reliable fixes into one easy guide to help you get your drive (and your data) back.
This guide was written using Windows 11, but if you’re still on Windows 10, every method and tool we cover works the same. There are no major differences that affect how this issue is handled, so you can follow along without any changes. Some UI elements may look slightly different, but the steps and results are identical.
Why Is My External Hard Drive Not Showing Up in File Explorer
So why is your hard drive not showing up in File Explorer? It usually comes down to a handful of things, and most of them are not particularly dramatic.
- Sometimes it’s a configuration thing. Like if the drive doesn’t have a letter assigned or it hasn’t been initialized yet – Windows won’t list it in File Explorer even if it’s physically connected. You could have a perfectly healthy drive that’s invisible because the system doesn’t know what to do with it yet.
- File system problems are another big one. If the drive was formatted on a Mac (APFS), used in a Linux box (EXT4), or the partition table got corrupted, Windows won’t recognize it. The disk might still show up in certain system tools, but File Explorer won’t touch it if it doesn’t understand the file system.
- Then you’ve got drives that were pulled from other machines – like older PCs, RAID setups, or network storage. These can show up as “foreign” or “offline,” which again means File Explorer skips them until they’re re-imported or activated manually.
- Power and connectivity problems are common too, especially with USB hard drives. If the port isn’t supplying enough power, or the cable is loose, or the enclosure is failing (the drive might not spin up at all).
- There’s also the chance the drive is failing. If it’s been clicking, freezing up, or randomly disconnecting, you could be dealing with degraded sectors or controller problems. And that can make it vanish intermittently or report unreadable data that Windows ignores.
- And yes – if the drive is brand new, it simply hasn’t been initialized or formatted yet. File Explorer won’t list it until that happens. This throws a lot of people off because nothing appears to be broken.
Heads up if your files matter: this problem usually shows up with external hard drives or internal drives that aren’t your main system drive. As you can tell from the list above, there isn’t one single cause. There are different reasons a drive might not appear in File Explorer, and each one might need a different fix.
That’s why it’s important to pause here and ask yourself: Is there anything important on that drive you want to keep? If the answer is yes, it’s a good idea to try recovering your data first, before any fixes. Some of the methods we’ll cover (like initializing the disk or creating a new volume) can wipe files that were still recoverable before you made changes.
We’ll show you all the options either way. But if saving your data is the priority, start with data recovery.
How to Recover Data When a Drive Doesn’t Show Up in File Explorer
Even if your drive has disappeared from File Explorer, that doesn’t always mean the data is lost. File Explorer is picky – if the drive isn’t mounted properly, or there’s no letter assigned, it won’t show up. But that doesn’t mean recovery is off the table.
In fact, most of the time, you can still retrieve your files using data recovery software. The only thing that matters is whether your operating system can see the drive at all. You don’t need a drive letter. You don’t need it to open. You just need the system to detect it on a hardware level.
Here’s a quick check: open Disk Management (press Win + X and click it from the list).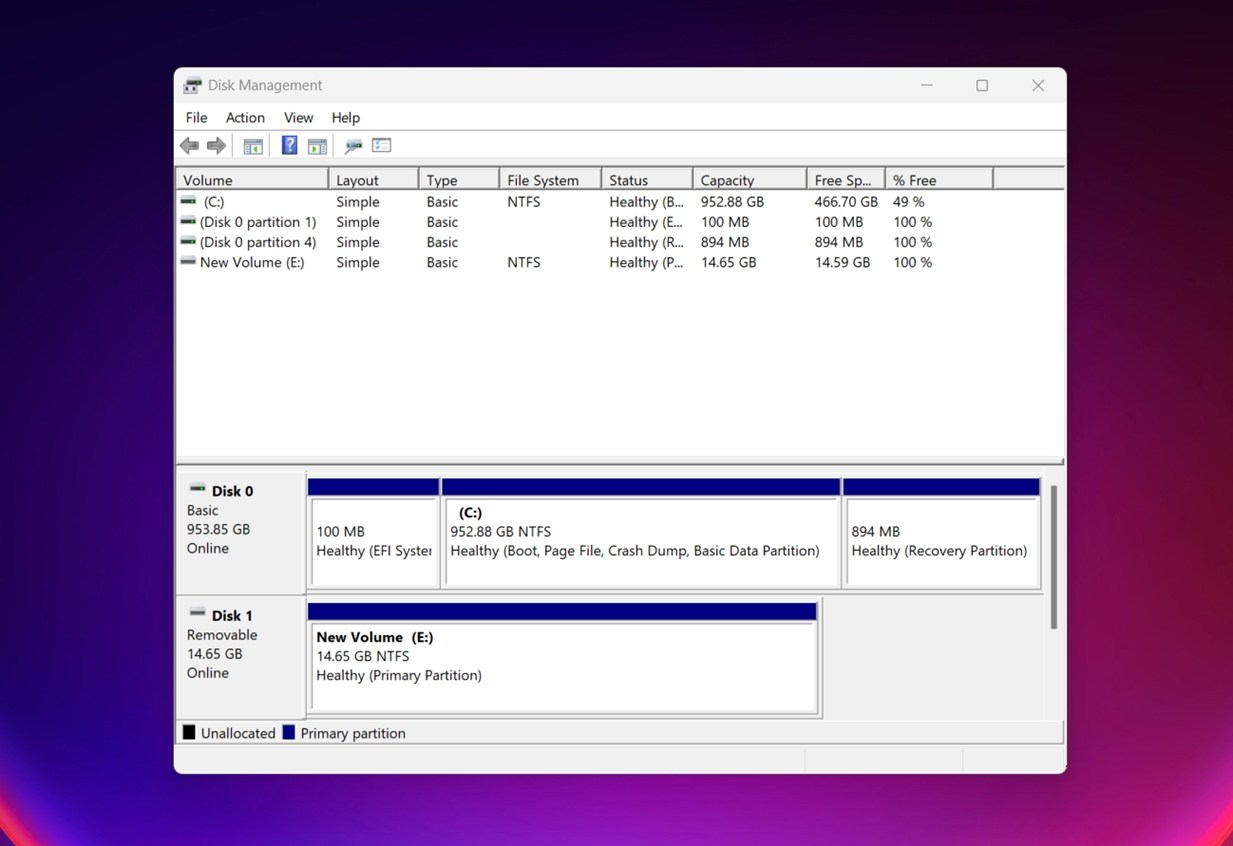 If the drive shows up there (with the correct size), you’re still in the game. That means the issue is likely with the partition, formatting, or drive letter. It’s a logical problem, not a hardware failure.
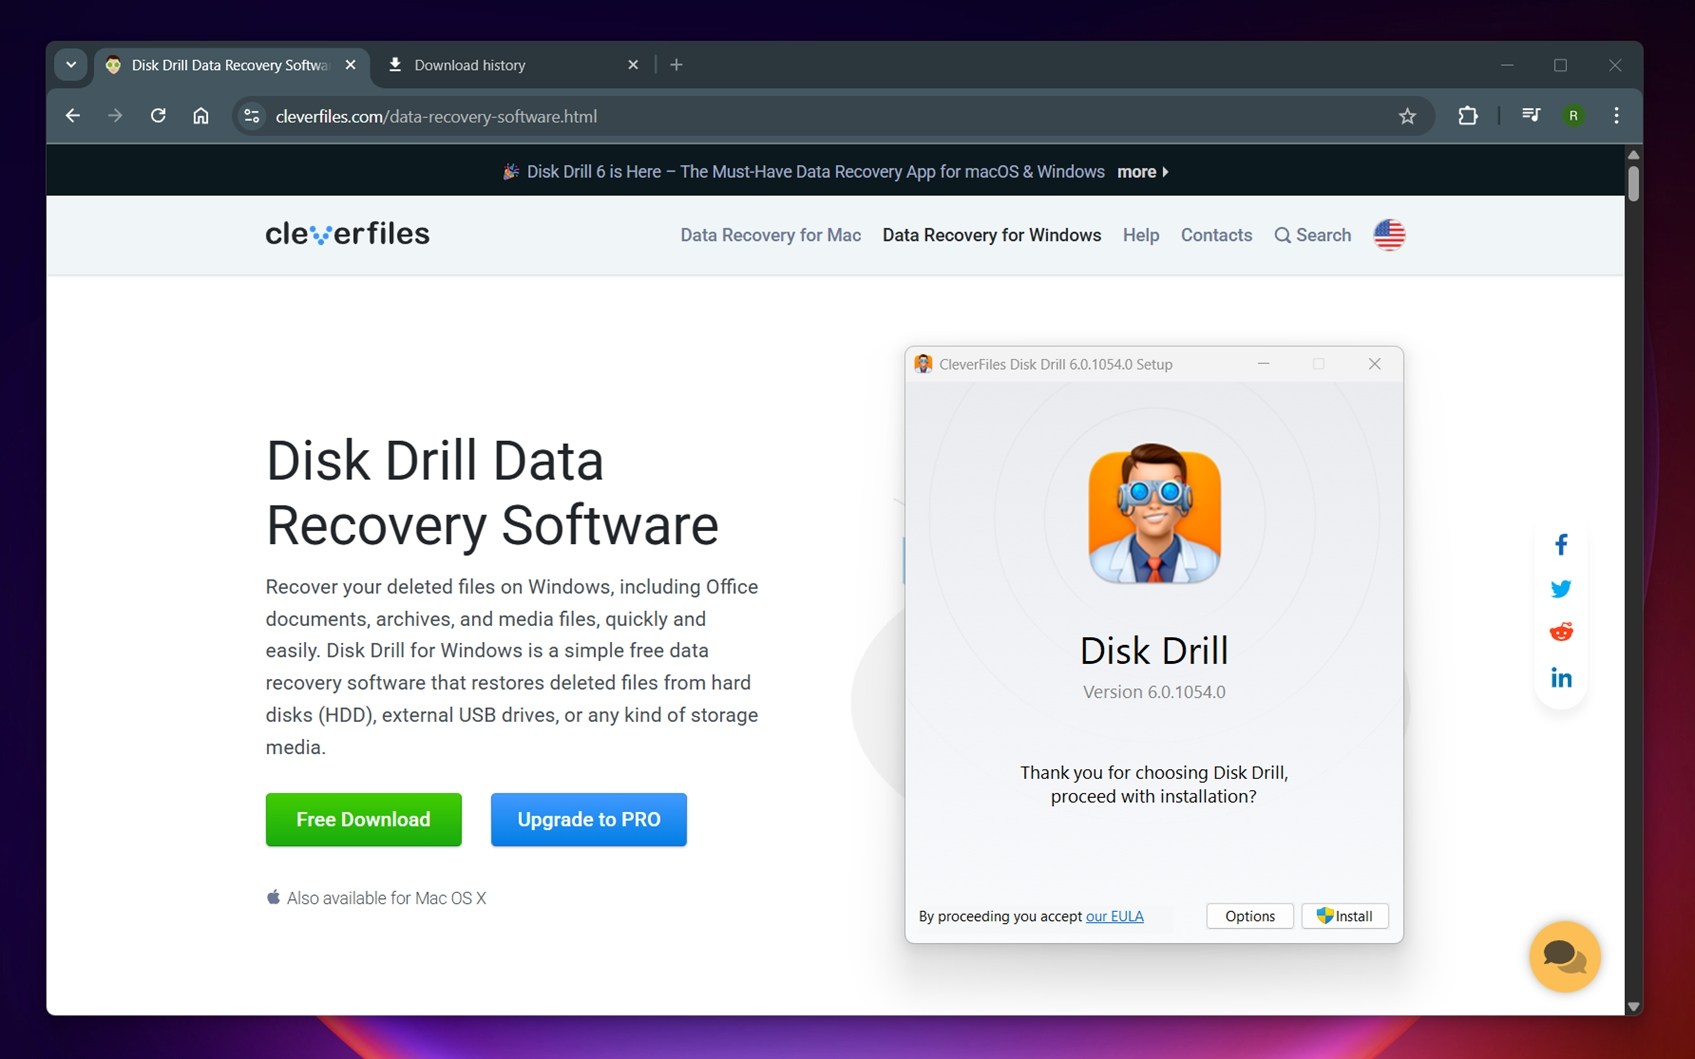
We’ll walk you through the process step by step using Disk Drill – one of our go-to tools when dealing with this kind of issue. Normally, people use it to recover deleted files from hard drives, USB sticks, memory cards, and so on. But in this case, where the drive isn’t showing up in File Explorer but still appears in Disk Management, it works just as well.
The key is that the drive shows up at all.
To recover files from your hard drive using Disk Drill, simply follow the steps outlined below:
- Download Disk Drill and install it on your PC.
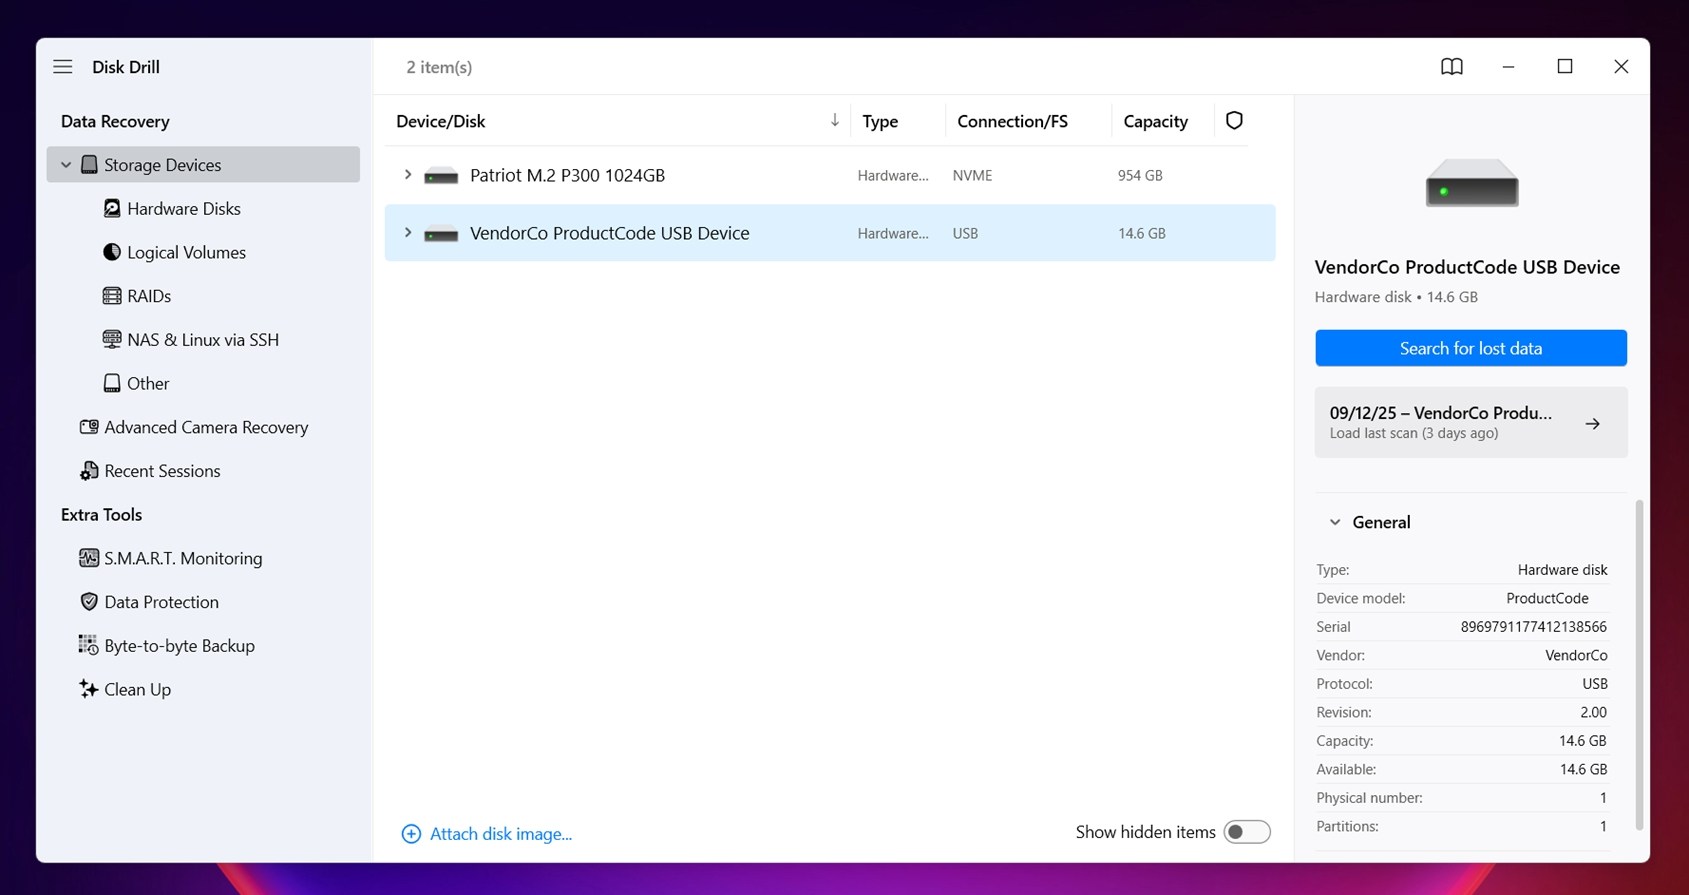
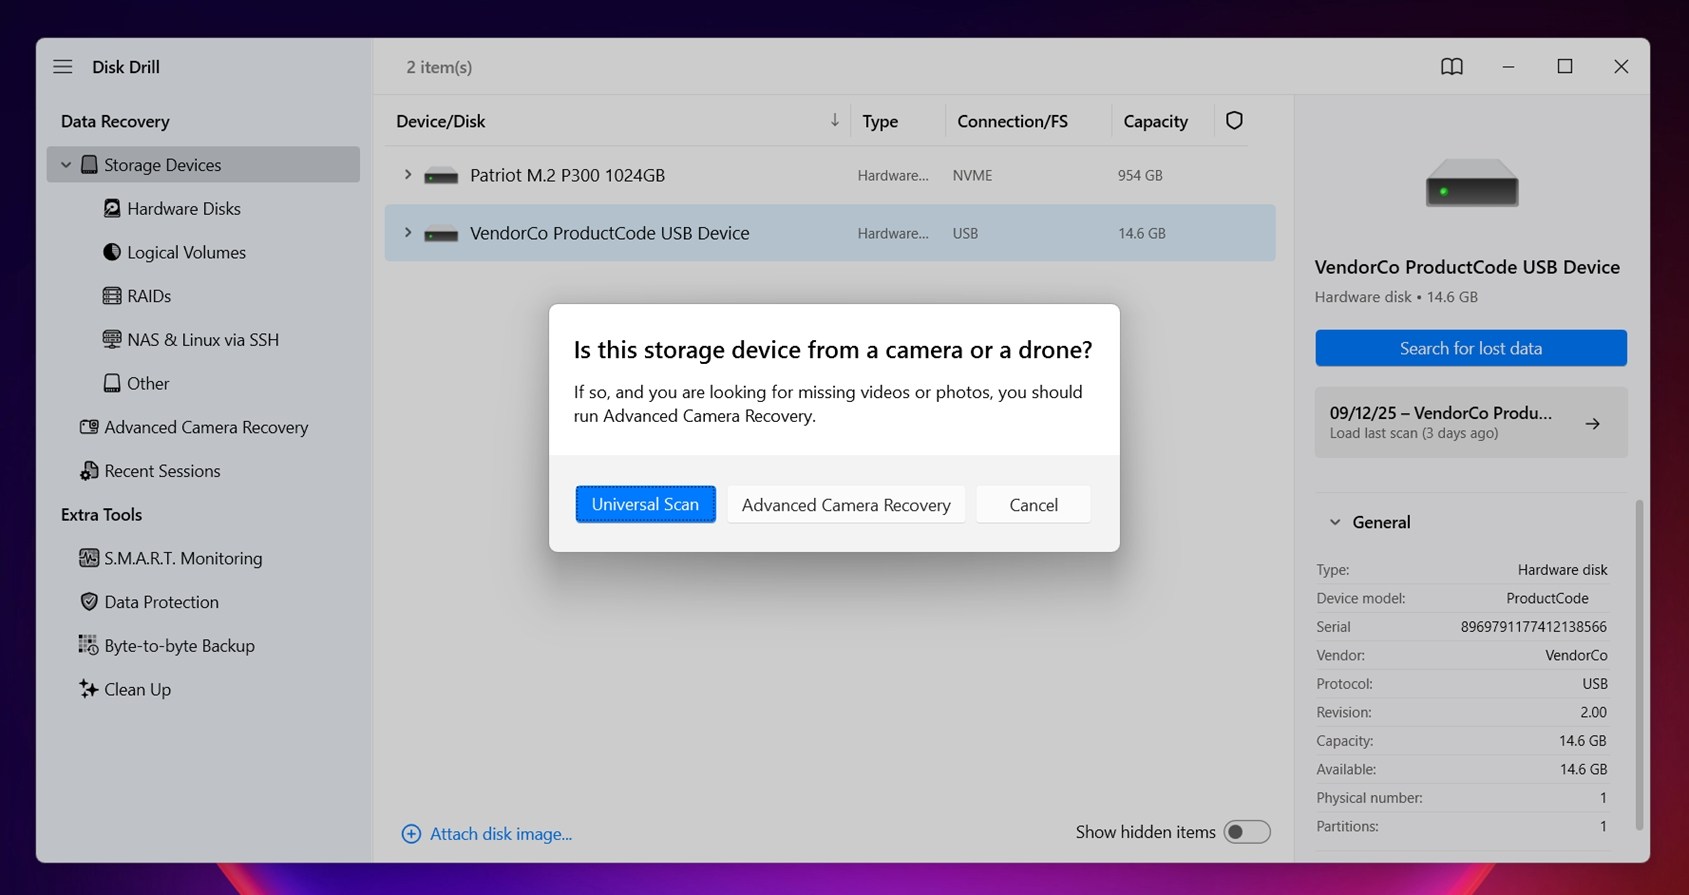
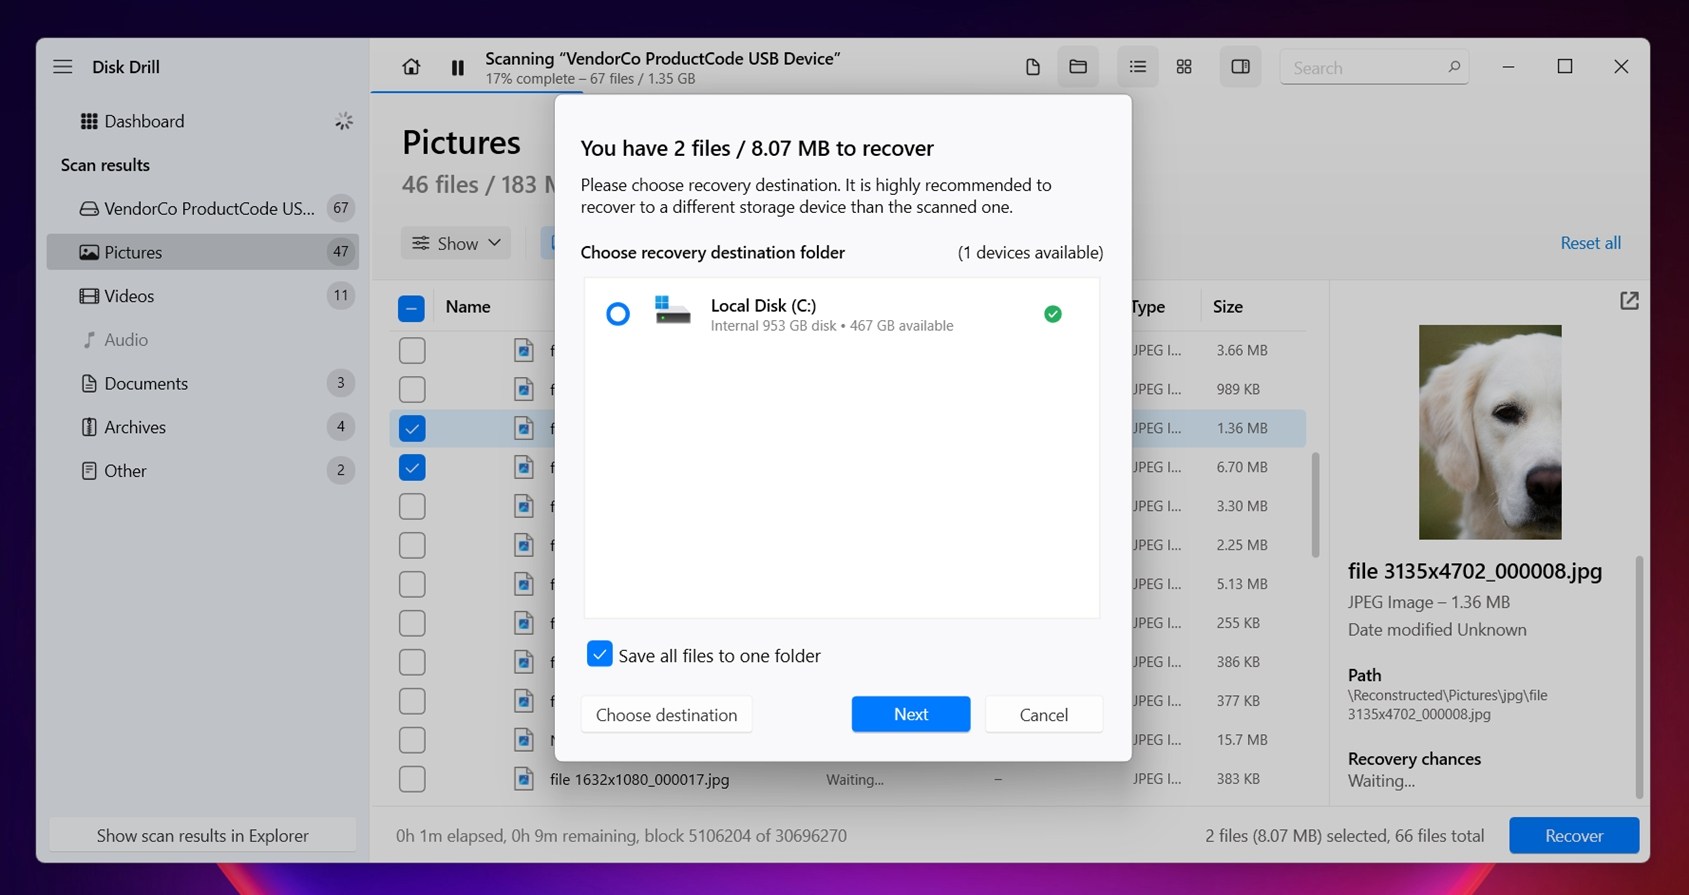
- Once you’ve installed Disk Drill, launch the app and select your hard drive from the app’s home screen. Then click on the Scan for lost data button.
- If the app asks you to choose a scan type, go with Universal Scan. That’s the option that combines a quick scan and deep scan automatically, so you don’t have to guess which one to start with. It’ll look for everything – all in one go.
- As the scan runs, you don’t have to sit there doing nothing. You’ve got two options. You can either wait for it to finish and then click the big Recover All button at the top – this will save everything Disk Drill found in one go – or you can start digging through files while the scan is still in progress.
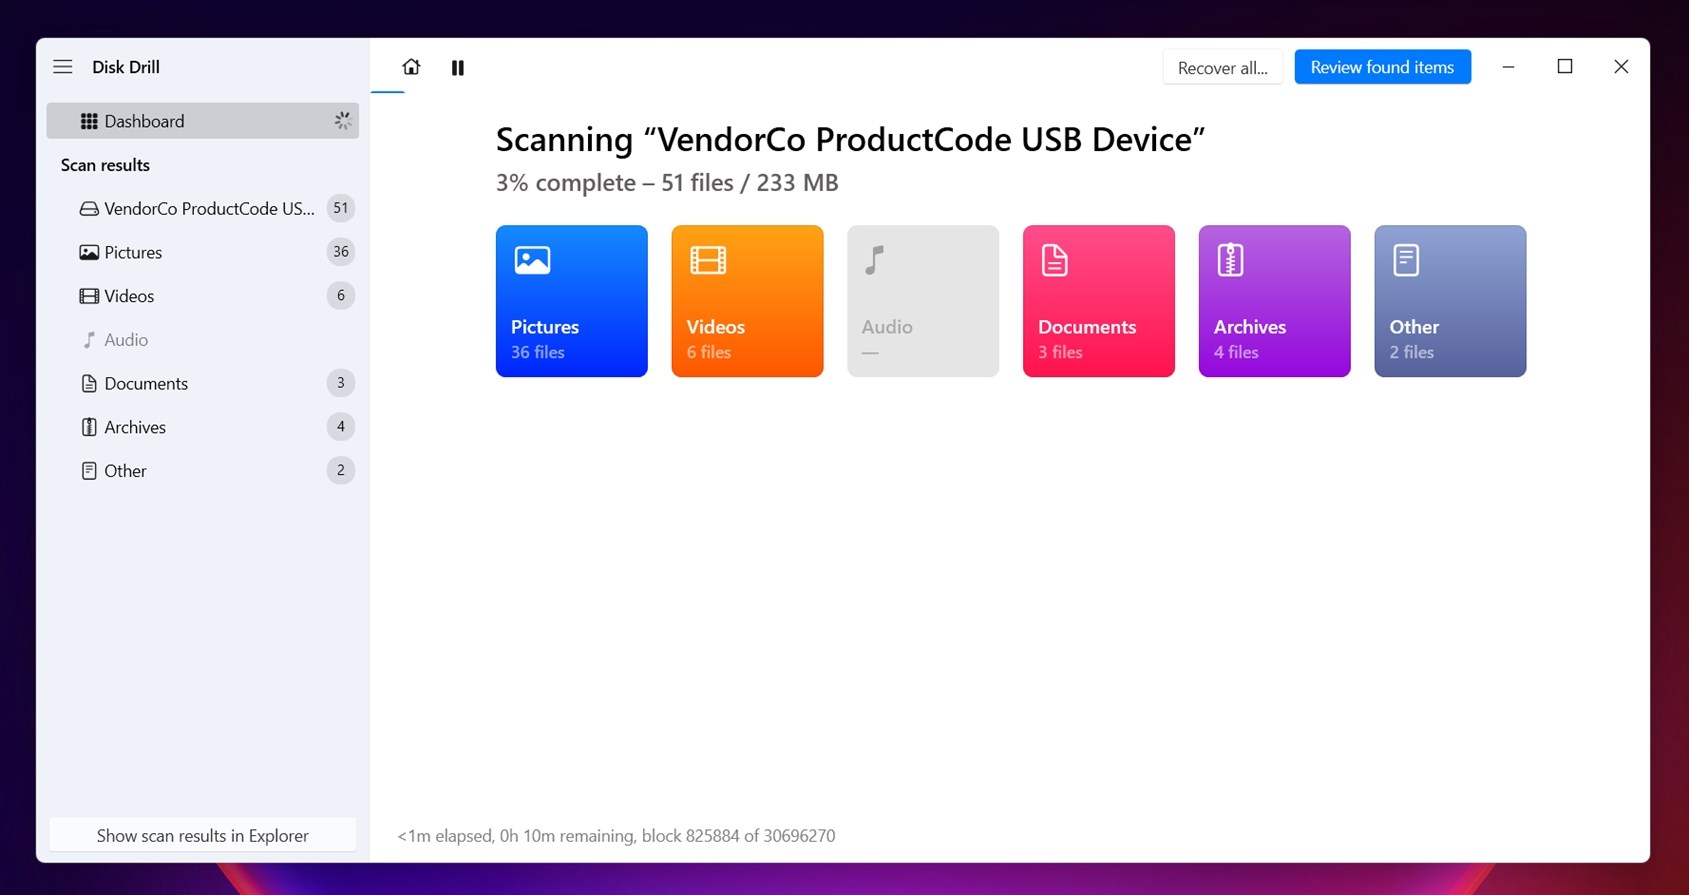
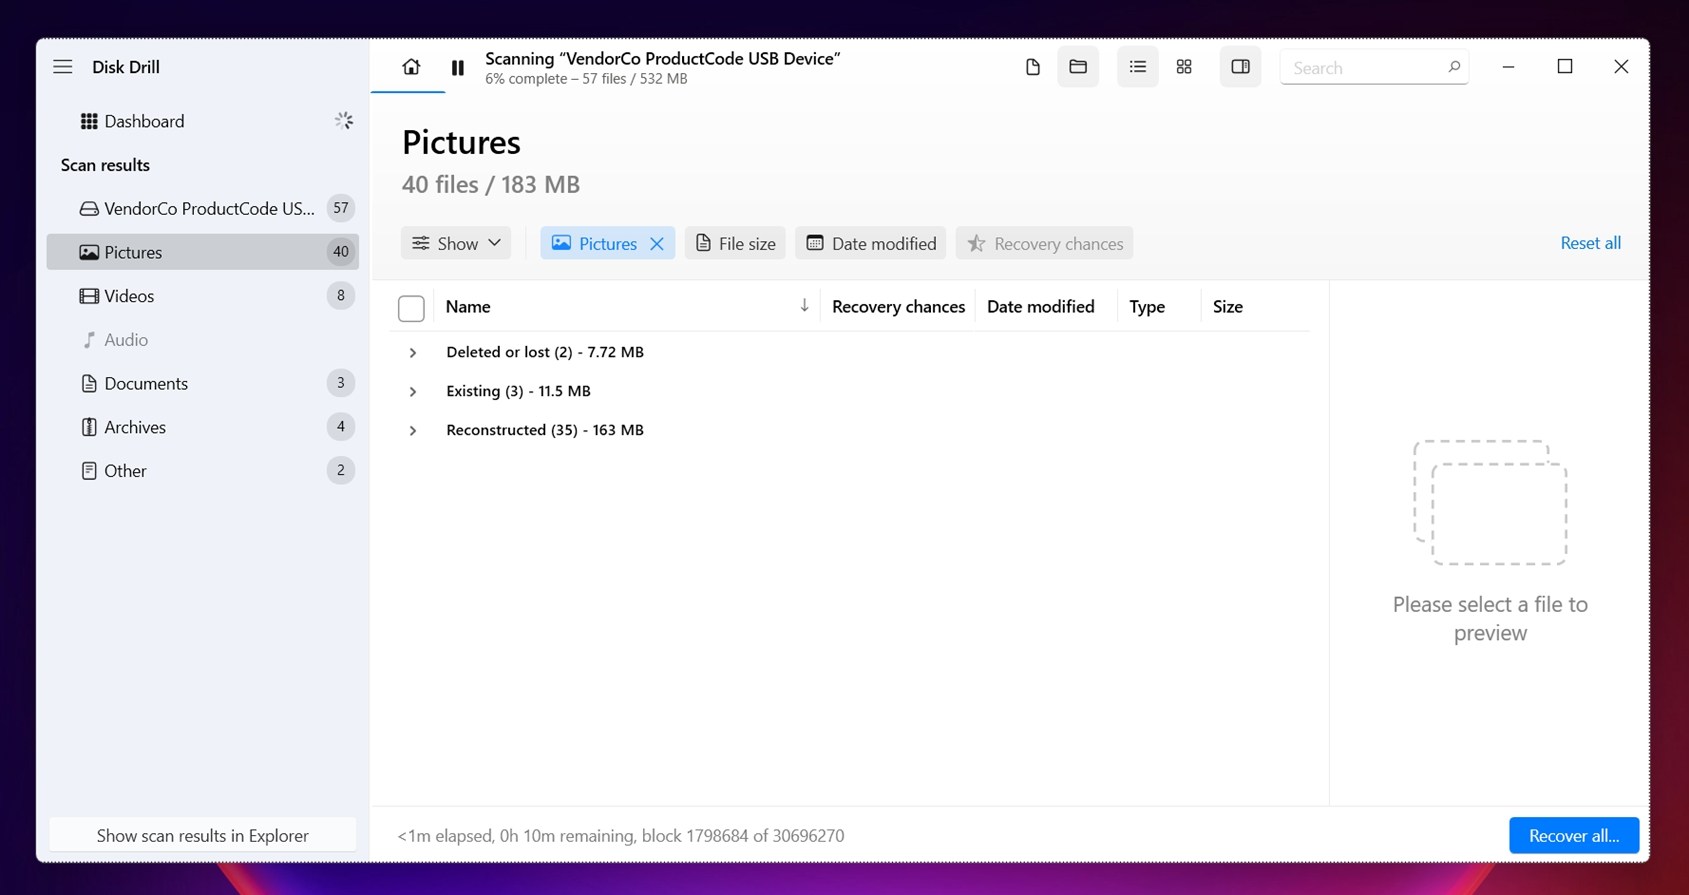
- To do that, click Review found items. That’ll open up a new window where you can browse through the files Disk Drill has already located. The layout is super straightforward, and it’s split into a few useful sections: Deleted or Lost (where you’ll find files that were deleted or are no longer part of any existing file system), Existing (these are files that are still on the drive, readable by the system but hidden from File Explorer), Reconstructed (this section contains files Disk Drill rebuilt by scanning raw sectors).
- As you click on files in the results list, you’ll notice that Disk Drill shows a live preview on the right side of the window. This comes in handy when filenames are scrambled. You can scroll through the list and visually check what’s inside each file without having to recover it first.
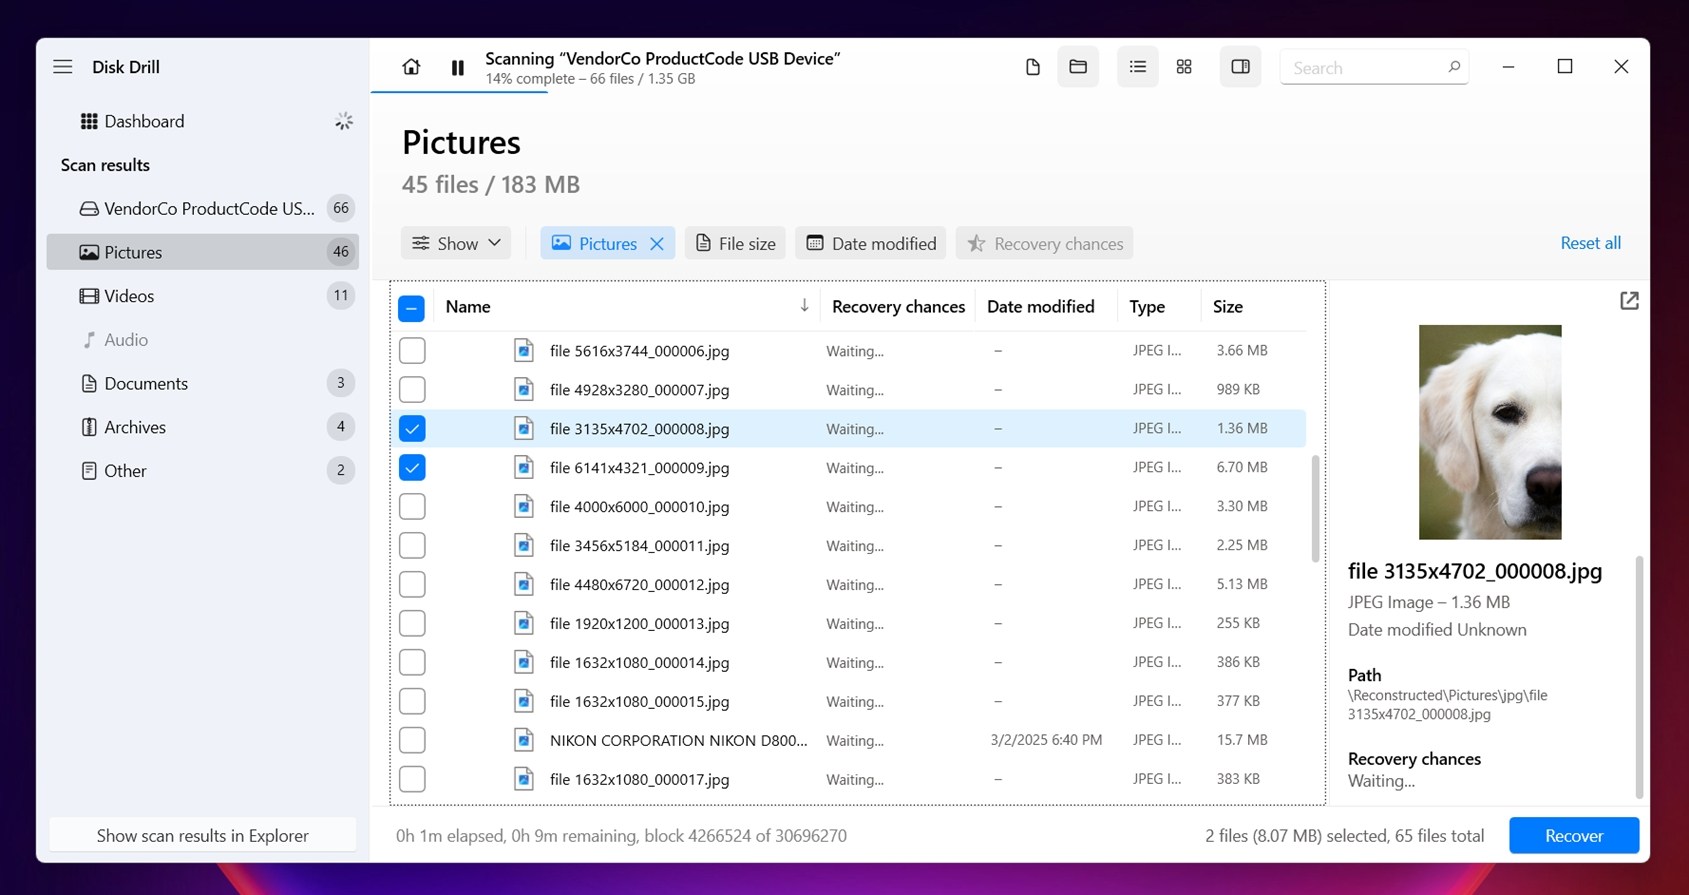
- There’s also a search bar at the top. You can use it to filter the results by full filename, part of the name, or even just a file extension. So if you’re only looking for .docx, .jpg, or .mp4, you can type those in and instantly narrow down the list. That saves a lot of scrolling.
- Once you’ve found what you’re looking for and previewed a few to confirm they’re intact, select them, hit Recover, and choose a safe destination. Don’t save anything back to the same drive you’re scanning. You haven’t fixed that drive yet, and writing to it now could overwrite recoverable data.
If you’re using Disk Drill’s free version, here’s what to know: it lets you recover up to 100 MB of data at no cost. That’s often enough to grab a few critical documents or test whether the recovery works for your case. It’s also a solid way to see if the software finds what you need before deciding whether to upgrade to PRO.
Want the full breakdown? We’ve tested Disk Drill thoroughly; you can check out our full review here to see how it performs, what it recovers well, and where it has limits.
How to Fix a Hard Drive Not Showing Up in File Explorer on Windows 11
Now that your files are safe, it’s time to fix the real issue – the reason your drive doesn’t show up in File Explorer in the first place.
There’s no one-size-fits-all solution here, and that’s fine. We’re going to walk through a full range of fixes. Each method will start with a quick note about who it applies to, so if one doesn’t look like your case, skip ahead.
Method 1: Plug the Hard Drive into Another Port or Computer
This might sound basic, but it’s one of the first things to try.
If your drive doesn’t show up in File Explorer, the issue could be as simple as a bad USB port, a loose cable, or a flaky connection.
Try this:
- Unplug the hard drive and reconnect it to a different USB port – preferably one directly on your PC or laptop, not through a hub. If you’re on a desktop, use one of the USB ports on the back of the tower. These tend to be more reliable because they connect directly to the motherboard.
- If it’s an external drive, try a different cable. Some drives use USB-A, USB-C, or those mini-USB connectors that never seem to fit right on the first try. Swapping the cable rules out physical connection issues fast.
- If the drive has its own power supply (like many 3.5″ desktop external drives), make sure it’s plugged in and powered on. If you’re using one of those universal SATA-to-USB adapters – the ones that let you connect a bare 2.5″ or 3.5″ drive via USB – pay attention here. These adapters are handy, but not always reliable. One common issue we’ve seen (and heard from users repeatedly) is when the drive tries to spin up, then immediately powers down in a loop. That usually points to the adapter not delivering enough power over certain USB ports.
- And finally, if you have another computer nearby, plug it in there. If the drive works on another machine, that tells you it’s probably not the drive itself, but something about your current setup (like power settings, or a Windows glitch).
This step is about ruling out the simple stuff first. If nothing changes after trying a new port, cable, or computer, move on to the next method.
Method 2: Initialize the Drive
If you’ve got a new hard drive not showing up in File Explorer, chances are it hasn’t been initialized yet. This is common with brand-new internal or external drives – Windows detects the hardware, but won’t assign a letter or format anything until you set it up.
Usually, Windows will prompt you with a pop-up the first time you connect the drive, asking if you want to initialize it. But that doesn’t always happen. If you don’t see any pop-up, you can still do it yourself.
Important: This method is for new or empty drives. If the drive had files on it and is showing “Not Initialized,” don’t proceed unless you’ve already recovered the data or you’re okay with wiping it.
To initialize a new disk:
- Press Win + X and choose Disk Management.
- Look for a drive that says “Unknown” and “Not Initialized”. Usually, the space to the right will show up as unallocated with a black bar across the top.
- Right-click on it, and select Initialize Disk.
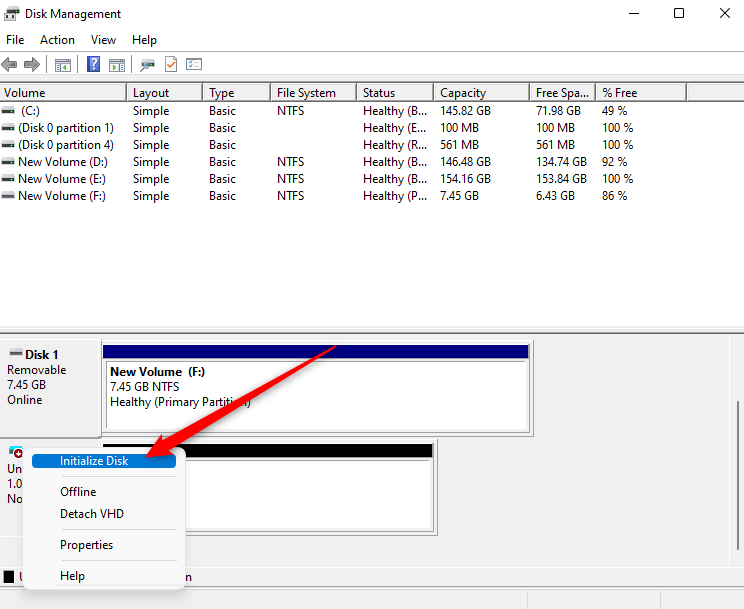
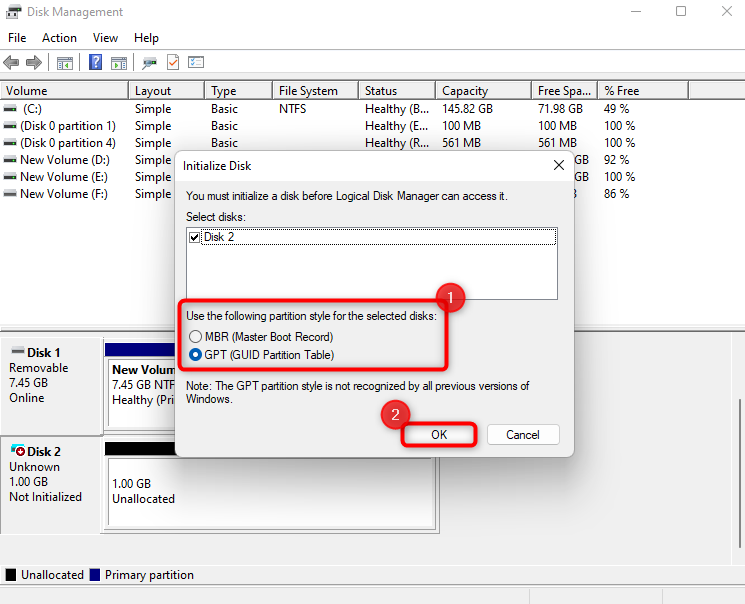
- A dialog box should open. Select the appropriate disk and partition style. Choose GPT if you’re using a modern system (UEFI), or MBR if it’s an older BIOS setup. GPT is usually the better default for Windows 10/11.
- Continue following the prompts to create a New Simple Volume, give the partition a size (the default is set to the full drive size), assign a drive letter, and select NTFS (or FAT or exFAT based on your preference) and click Finish.
Method 3: Assign a Drive Letter
Another common reason why your drive doesn’t show up in File Explorer is that Windows has detected the drive, but never gave it a letter. No drive letter = no visibility in File Explorer – even though the drive is perfectly usable.
To assign or change the drive letter:
- Press Win + X and choose Disk Management from the menu.
- Right-click on the hard drive and select Change Drive Letter and Paths.
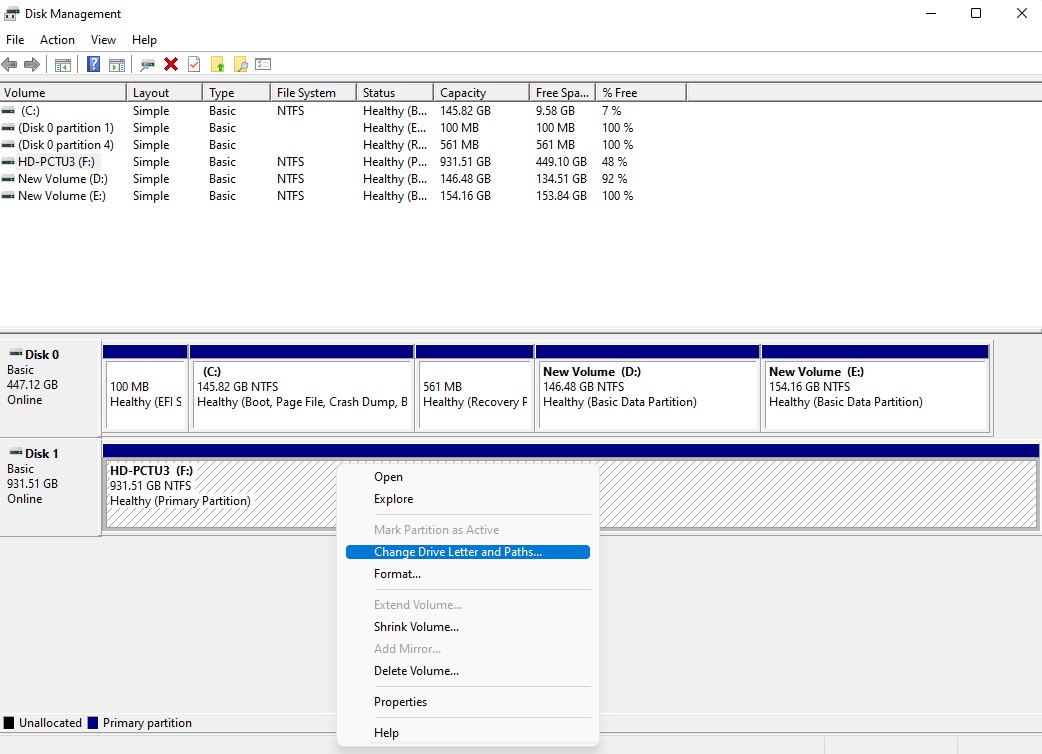
- Select Add to assign a new drive letter or Change to change the currently assigned drive letter.
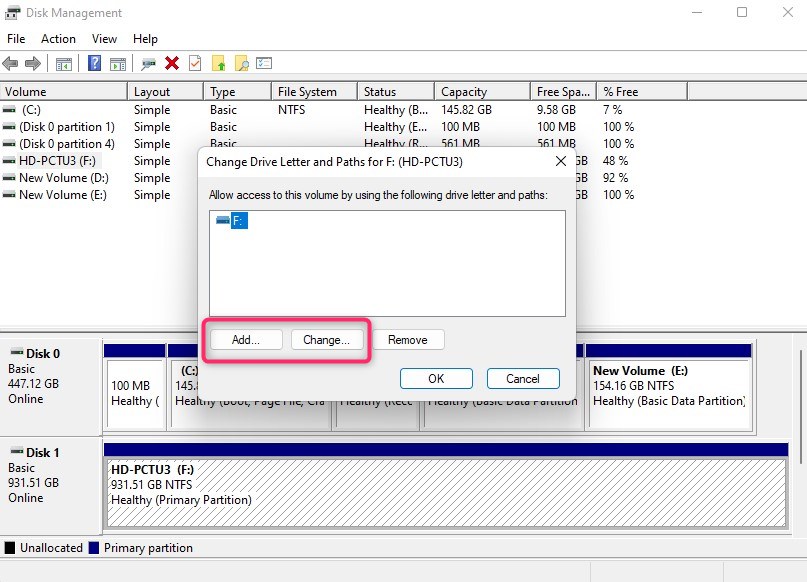
- Select a letter from the drop-down list and click OK to exit.
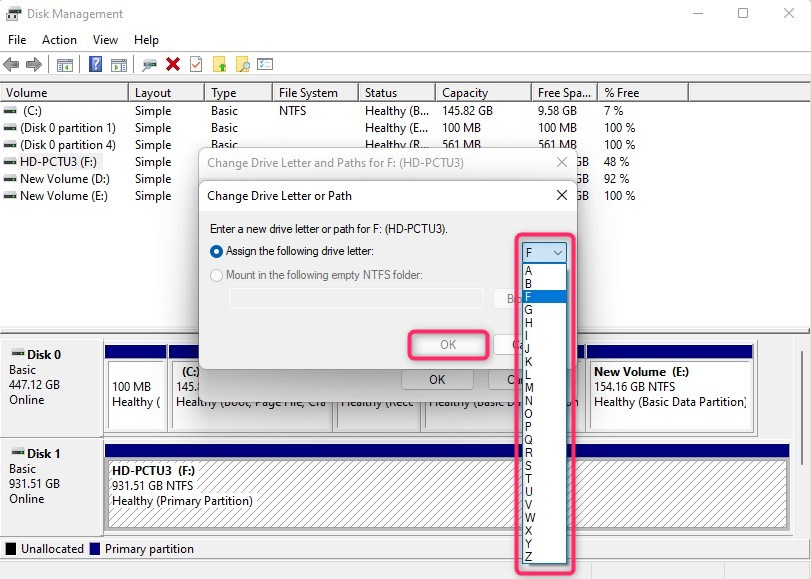
Assigning a new drive letter won’t erase anything. It’s a harmless, reversible step that simply tells Windows where to mount the drive so you can see it in File Explorer.
But if you don’t see the option to Add or Change the drive letter, that usually means the drive is in a weird state. It could be offline, unformatted, or using a file system that Windows doesn’t recognize. In that case, you may need to bring the drive online first or format it before assigning a letter.
Important: Formatting is not harmless. Make sure you’ve recovered any important files before going that route.
Method 4: Configure New Partition
If the partition on your drive is missing, corrupted, or was never created to begin with, that’s a clear reason why your HDD not showing in File Explorer.
When this happens, the drive will usually still show up in Disk Management, but it’ll be marked as Unallocated. You’ll see the correct capacity listed, so the system sees the drive, but there’s no volume and no drive letter.
That means Windows has the space available, but no instructions for how to use it. Until you manually set up a partition, File Explorer won’t know what to display.
Just like with most methods to fix a disk not showing up in File Explorer, this one should only be used if your data is already backed up somewhere else or you’ve recovered what matters.
Here’s how you do it in Disk Management:
- Press the Win + X to open the shortcut menu. Then, select Disk Management to open the app.
- In Disk Management, locate your drive and right-click on it. Then, select New Simple Volume.
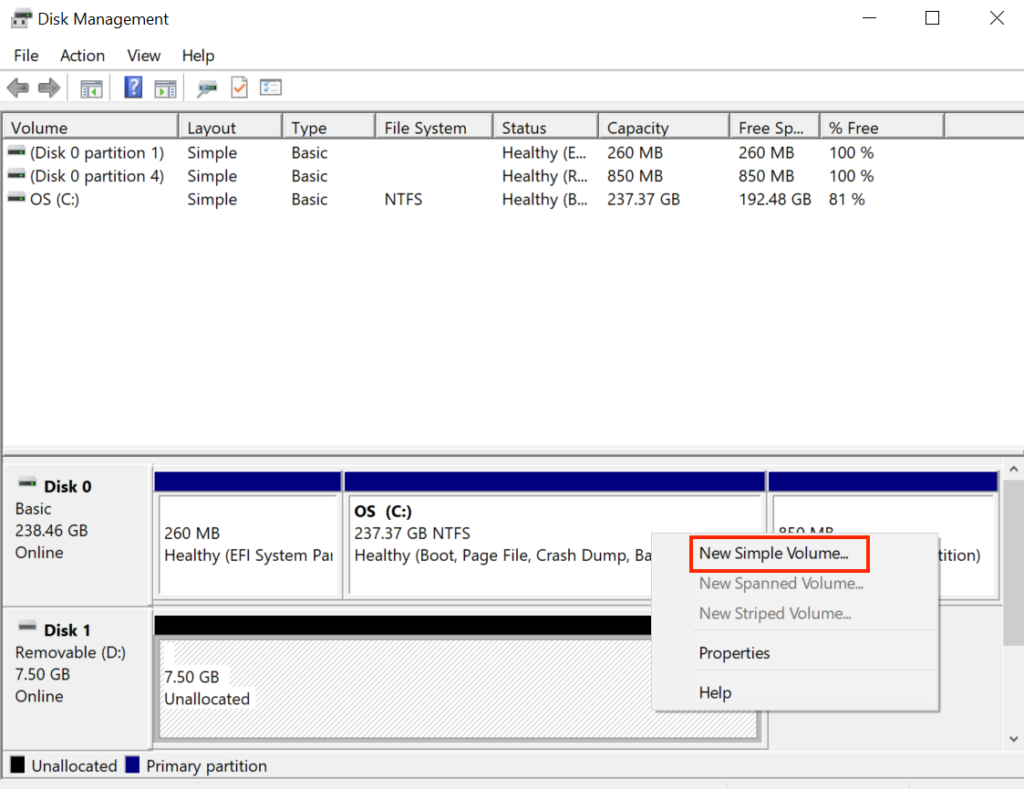
- When prompted, specify the partition size, file system format, and other details for your partition.
If the New Simple Volume option is grayed out, it usually means the drive hasn’t been initialized yet, or Windows doesn’t recognize its current layout. In most cases, initializing the disk first (see Method 2) will unlock that option. If the drive is already initialized and it’s still grayed out, the partition table may be damaged or formatted in a way Windows can’t handle, like leftover RAID metadata or a Linux file system.
Method 5: Set Drive Online
Sometimes when you check Disk Management, you’ll see your drive there marked as Offline. This usually happens with internal drives that were previously used in another system, or external drives that were pulled from an enclosure or dock. It can also happen after power issues or improper ejection.
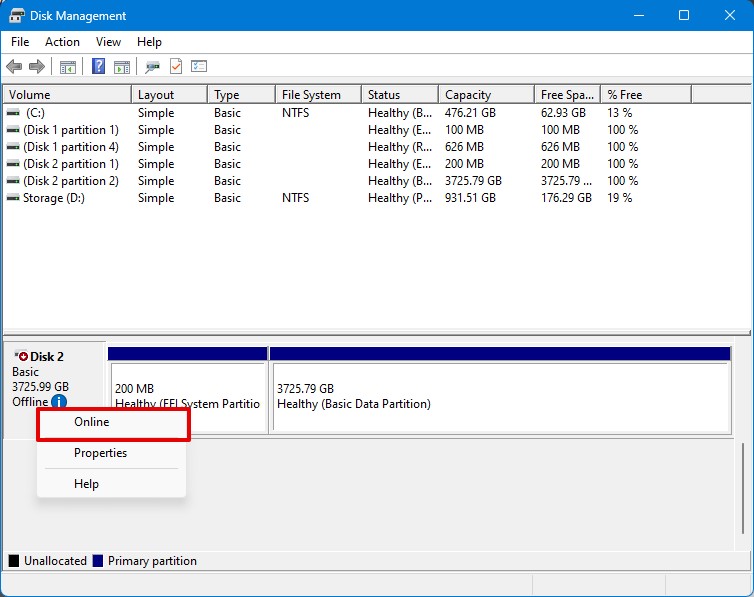
Here’s what to do:
- Press the Win + X to open the shortcut menu. Then, select Disk Management in the options to open the app.
- Look for your hard drive in the Disk Management window and right-click on it.
- Select Online from the drop-down menu to set your drive back online.
If you see something like “The disk is offline because of a signature collision”, that means another drive with the same disk ID is already mounted. This often happens when cloning drives or moving them between machines. In that case, you’ve got a few ways to fix it:
- If the older disk is no longer needed, you can wipe it completely and reinitialize it. Open Command Prompt as Administrator, type diskpart, select the disk, and use the clean command. But make sure you’re cleaning the correct drive, because this erases all data.
- Change the identifier with DiskPart (non-destructive). Still in DiskPart, you can give the conflicting disk a new ID with the uniqueid disk command.
- Advanced option with a hex editor. The identifier lives in sector 0 (the Master Boot Record). Tools like HxD Hex Editor let you manually edit this field. This is advanced territory and not necessary for most users, but it’s possible if DiskPart doesn’t work.
Method 6: Restore Lost Partitions with TestDisk
Sometimes it’s possible to fix partition problems with third-party software, and one of the best free options out there is TestDisk. It’s open source, works on Windows, macOS, and Linux, and has built a strong reputation as one of the most reliable partition repair tools.
For example, if your drive shows up in Disk Management as Unallocated or RAW, but you’re sure it had data and partitions before, TestDisk can often detect that missing partition table and rebuild it. Instead of formatting the drive (which would wipe your files), TestDisk scans the disk for traces of old partition structures and lets you restore them.
Although it’s powerful, TestDisk is not exactly easy to use. The interface is text-based and looks old-school, so you won’t find the usual buttons and menus you’re used to in Windows apps. You’ll be navigating through keyboard prompts, which can feel a bit intimidating at first.
And while TestDisk can sometimes restore a lost partition with all of its data intact, that’s not something you should count on every time. Partition repair always carries some risk. That’s why we recommend saving your data somewhere else first before letting TestDisk touch anything.
How to restore a lost/deleted partition with TestDisk:
- Go to the official TestDisk website. Scroll down to the Download section and pick the version for Windows. The file comes as a compressed ZIP archive.
- Right-click the ZIP file and choose Extract All. Windows will prompt you to pick a location – the Desktop or Downloads folder works fine. After extraction, you’ll see a folder called something like testdisk-7.x.
- Open that folder. Inside, you’ll find several files. For Windows users, the one you want is testdisk_win.exe.
- Double-click testdisk_win.exe to launch the program. Don’t worry if a black, text-based window appears – that’s how TestDisk is supposed to look. If Windows asks whether to allow the app, click Yes.
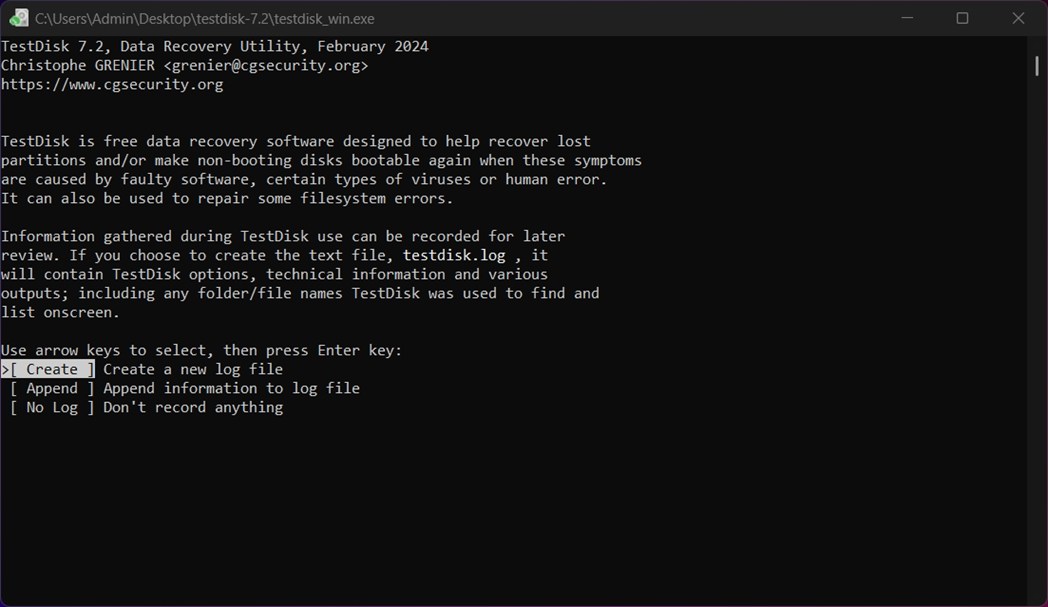
- When asked whether to create a log file, choose Create and press Enter. It helps track what TestDisk does and can be useful later.
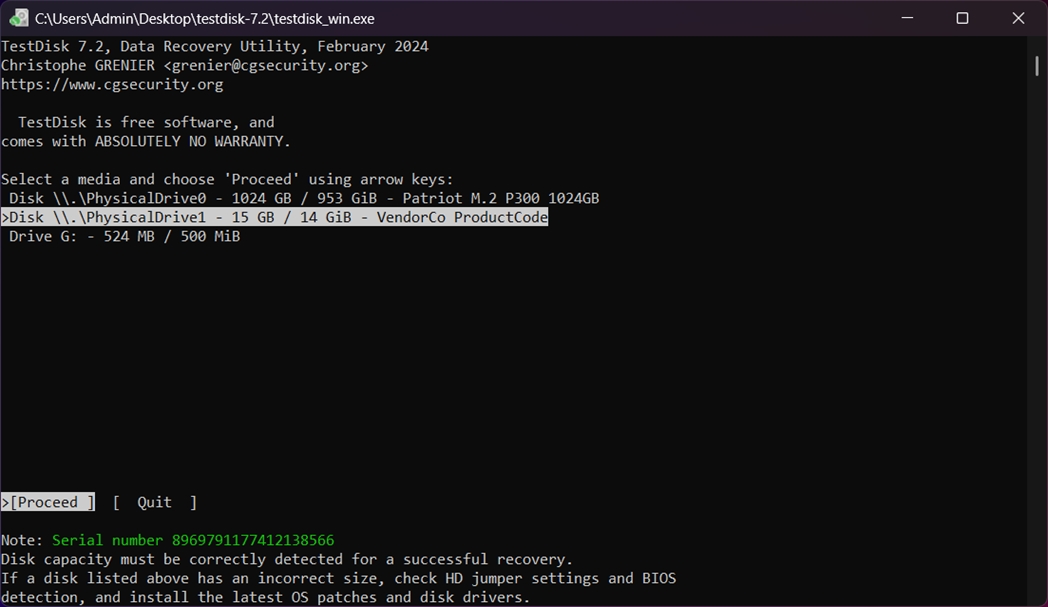
- You’ll see a list of physical disks. Use the arrow keys to highlight the drive that’s missing or showing as unallocated in Disk Management. Once selected, press Enter.
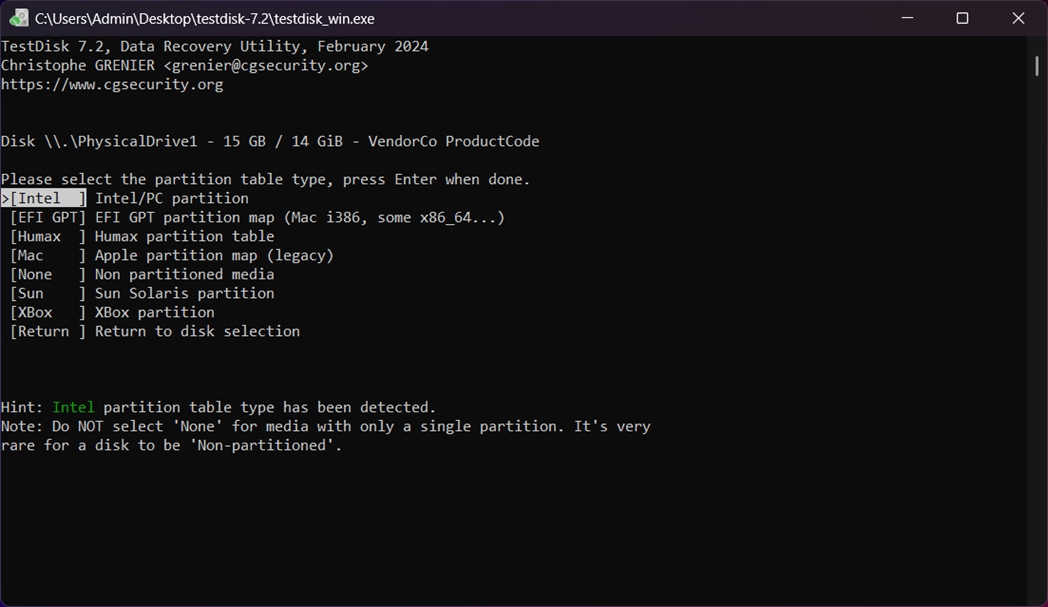
- Choose the partition table type. For most modern drives, it’ll select Intel for MBR or EFI GPT for GPT partitions. Accept the default unless you know for sure it’s wrong, then press Enter.
- Choose Analyse from the menu and press Enter. TestDisk will quickly check the drive for existing and deleted partitions.

- Once the scan finishes, TestDisk will list any partitions it finds. If something looks familiar (correct size, file system, label), highlight it and press P to view the file list.
If you can browse your folders and files here, great. Press Q to go back.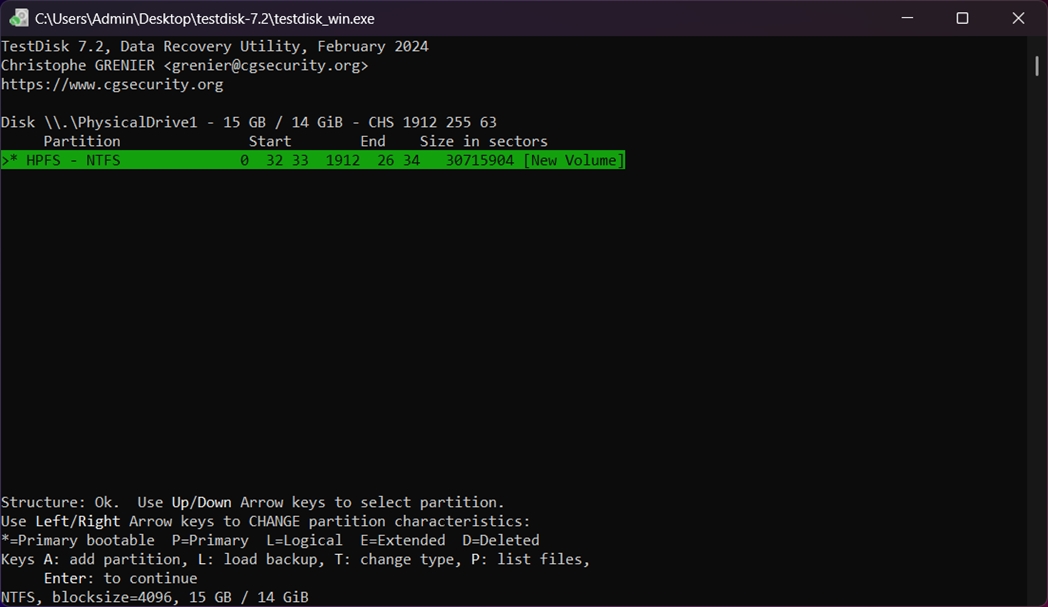
- If the quick search didn’t find the right partition, choose Deeper Search. This may take longer but it digs through more of the drive.
- After the deeper scan, highlight the correct partition. Again, press P to verify that your files are still there. Press Enter when ready.
- After confirming the correct partition, choose Write from the bottom menu. Confirm with Y when prompted.
Once TestDisk has written the partition table, close the window and restart your PC.
If everything went well, your lost partition should now show up again in File Explorer.
Method 7: Format the Drive
This method overlaps a bit with some of the previous ones, because if you’ve already created a new partition or volume, then technically you’ve formatted the drive as part of that process. But let’s walk through how to format a drive manually, in case you skipped the volume wizard or need to format an old or corrupted disk that still has a visible partition.
Formatting erases everything on the selected volume. If there’s any chance the drive holds data you still want to recover, stop and go back to the recovery methods before doing this.
Here’s how to do it:
- Press Win + X and open Disk Management.
- Find the drive in the bottom section of the window. Look for a volume that you want to format.
- Right-click the partition and choose Format…

- Give the volume a name (optional), and choose the file system: NTFS is best for internal drives and large file support, exFAT works better for external drives shared between Windows and macOS.
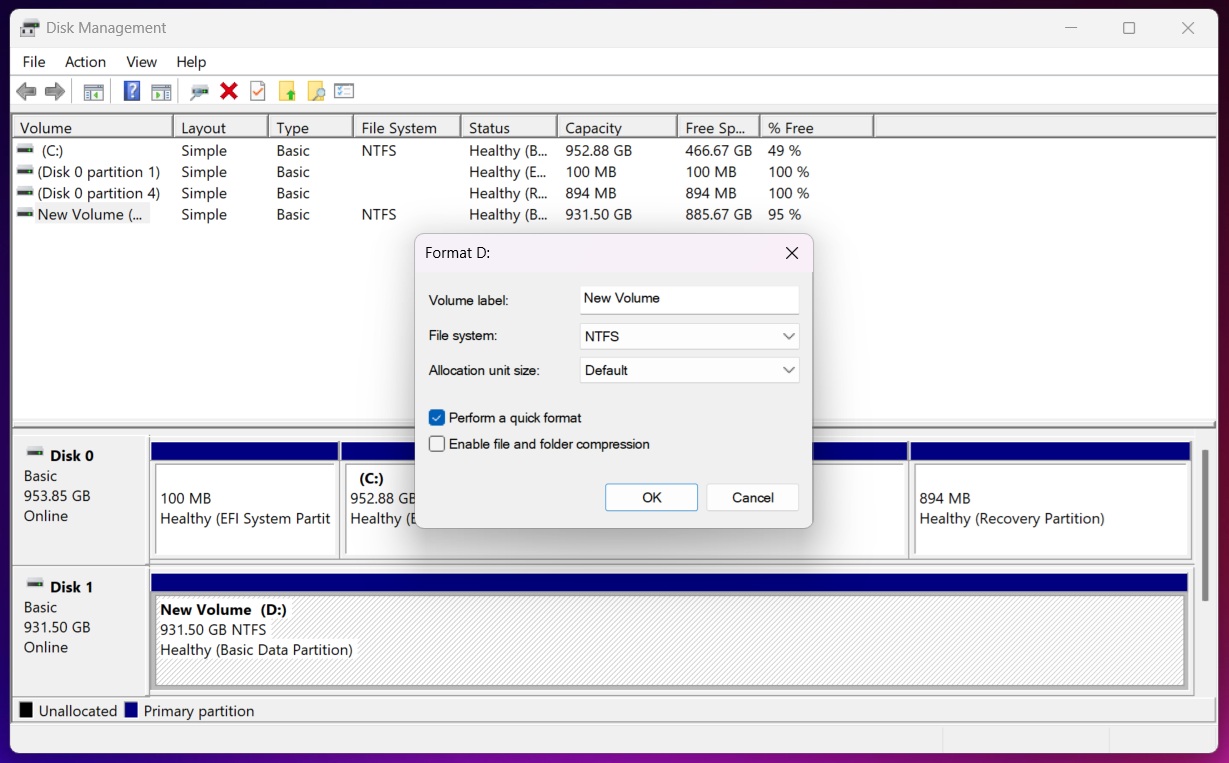
- Leave Allocation unit size as Default.
Leave Quick Format checked – unless you’re trying to wipe the disk more securely (which takes much longer). - Click OK, confirm once more, and Windows will format the drive.
After this, the drive will be fully usable again, and you should see it appear instantly in File Explorer.
Method 8: Format the Drive Using CMD
Also, formatting doesn’t have to be done through Disk Management. You can do it using Command Prompt, and in some situations, that’s actually more reliable, especially if the drive doesn’t show up properly in the Windows interface, or the Format button is grayed out.
Here’s how you can do it:
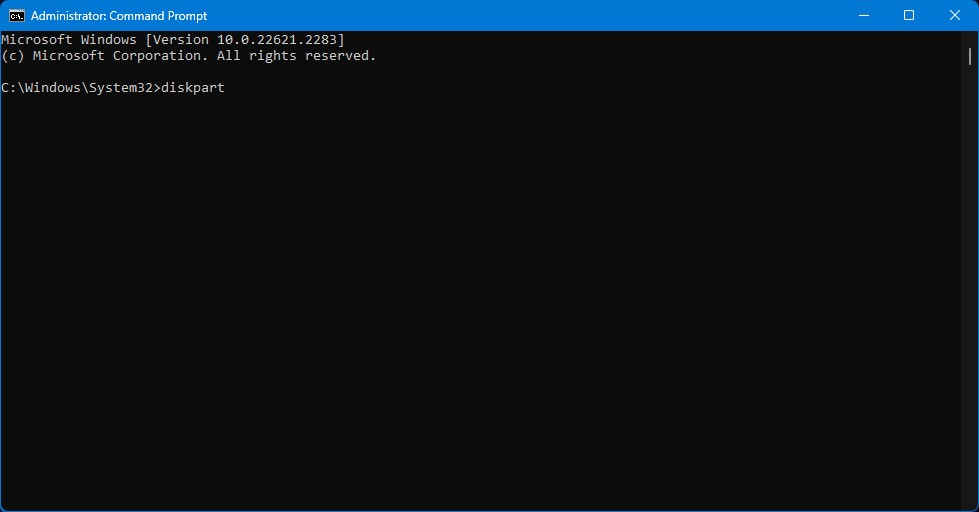
- Run Command Prompt as an administrator by pressing the Windows key, typing “cmd”, and selecting Run as administrator from the options that appear.
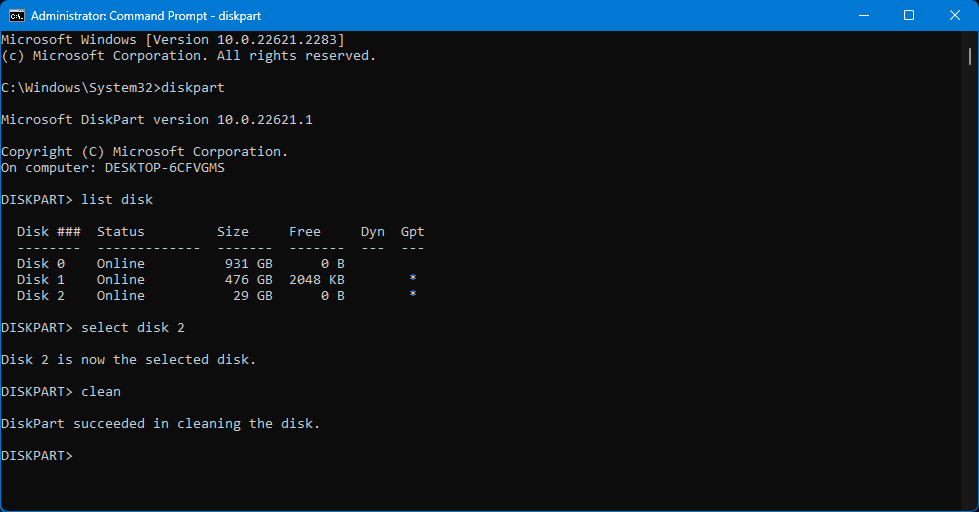
- Type diskpart and press Enter to activate the Diskpart tool.
- Type list disk and press Enter to list all drives currently available in your computer.
- Make a note of the disk number corresponding to your hard drive.
- Type select disk N, replacing N with the disk number of your drive. Then, press Enter.

- Type clean and press Enter to erase data and partition information on your drive.
- Type format fs=fat32 to format your disk to fat32. Replace fat32 with with the file system you prefer (e.g. format fs=NTFS).

Once the formatting process is complete, type exit and press Enter to exit the tool.
Final Words
In our experience, most cases of a hard drive not appearing in File Explorer come down to minor logical issues that can often be resolved using built-in Windows tools like Disk Management or DiskPart.
But not every case is that simple. If you’ve tried the methods we covered and your drive still isn’t showing up, there may be deeper problems with the disk’s hardware or system issues.
That said, even in those scenarios, there’s often a way out. Over the years, our team has written in-depth guides covering everything from undetected drives to completely dead hard disks. If your situation seems more complicated, we recommend the following resources:
Both of those guides include practical steps, data recovery software recommendations, and much more to help you deal with tricky cases. And don’t forget to scroll down and check the FAQ section below – we’ve included answers to common scenarios that might save you time and point you straight to the right fix.
FAQ:
- Missing a drive letter
- Marked as RAW or unallocated
- Offline or not initialized
- Using a file system Windows doesn’t recognize (like APFS or EXT4)
- If the drive is formatted with a non-Windows file system (like ext4 from Linux or APFS from macOS), Windows won’t mount it.
- If the partition is marked as "offline" or “foreign,” you’ll need to import it or bring it online.
- If there’s no drive letter, you’ll have to assign one manually.
- And if the partition table got corrupted during the move, you might need to rebuild or recover it using tools like TestDisk.
- Use third-party software to access the data (like HFSExplorer or Linux File Systems for Windows by Paragon), or
- Or, if you don’t want to install drivers or you're worried about overwriting anything, you can use data recovery software like Disk Drill or R-Studio to scan the drive and recover your files to another location. After that, reformat the drive into something more universal, like exFAT, so it's fully compatible with your current system.


