Formatting a hard drive provides you with a clean slate. It can be a part of the regular upkeep of your hard drive, a way to clear out files that are no longer in use, and in some cases—a Hail Mary to deal with logical corruption. But, many users find themselves in a situation where they formatted the wrong partition or drive, or realize later on that they need some of the files that were lost during the format process.
Fortunately, it’s possible to recover data even after formatting your hard drive. In the sections below, we’ll take a look at the situations in which data recovery from a formatted hard drive is possible and how to go about it.
Can I Recover Data from a Formatted Drive?
Before taking a look at the factors affecting data recovery from a formatted drive, it’s vital to understand what happens during formatting.
Pro tip: Data recovery chances also depend on your storage device type. HDDs are comparatively easier to recover data from because deleted files technically remain on them until new files overwrite them. However, when you delete files from an SSD, the OS sends out a TRIM command that “cleans” the data blocks that stored the deleted files. Data recovery from a data block cleaned out by the TRIM command is exceedingly difficult, if not impossible. That’s why it’s even more important you attempt data recovery as soon as possible from an SSD, before the TRIM command is executed.
Formatting is of two types—low-level formatting and high-level formatting. As an end-user, you can only perform high-level formatting, since low-level formatting is already done from the factory. During a high-level format, all files are cleared from the disk and a file system is created on the drive, which facilitates the storage and management of files on the disk.
High-level formatting can be further subdivided into quick formatting and full formatting:
- A quick format, is well, quick. It does not look for bad sectors on the disk, and only deletes the record of the files on the disk. That is, the files are technically still there on the disk, only the OS is no longer aware of their existence. Consequently, the space they occupy can be used by new files which overwrite these older files.
- On the other hand, a full format is more extensive and takes much more time to complete. In it, all data blocks on the drive are overwritten with zeroes, and the OS also looks for bad sectors in the process.
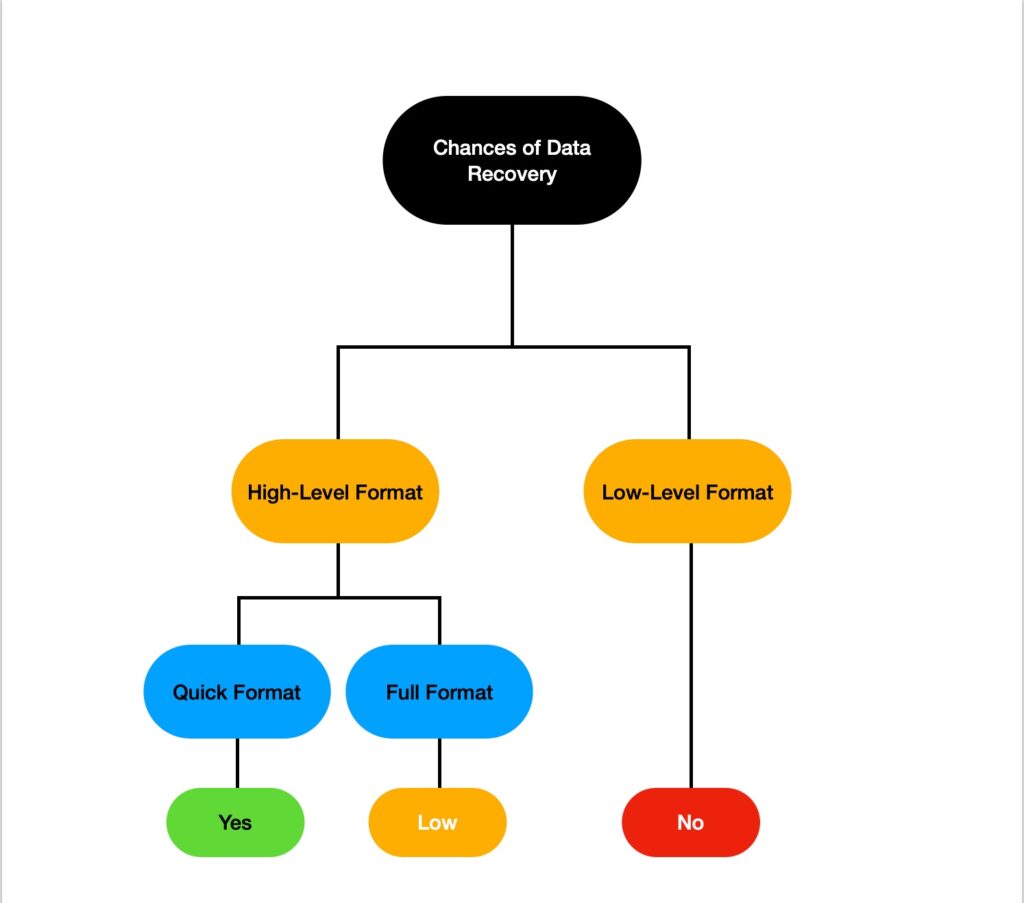
The extent and chances of data recovery will depend on two primary factors—the type of format performed, and whether new data was written to the drive after formatting.
It’s possible to recover all your data after a quick format, but impossible to recover any of it after a full format.
How to Recover a Formatted Drive on Windows or Mac
You have three primary ways to recover data from a formatted hard drive—scan it using a data recovery tool, restore your data from a backup, or contact a professional data recovery service.
If your drive shows no signs of physical damage, a data recovery program can usually recover most, if not all of your data. However, contact a professional data recovery service in case you notice physical damage, or your Windows or Mac device refuses to detect the drive in Disk Management or Disk Utility respectively.
Of course, nothing beats having a previous backup that you can restore.
We’ve added a list of pros/cons for each method so you can make a more informed decision.
Method 1: Use Professional Data Recovery Software
For most data loss scenarios, including when you wish to recover data from a formatted drive, third-party data recovery apps are the easiest, cheapest, and most convenient option. But, the internet is chock-full of data recovery programs, all claiming to be the best. You can find which ones are actually worth your time and money (and why) in our curated list of the best data recovery apps.
For this article, we decided to go with Disk Drill, and PhotoRec—two excellent data recovery programs, each with its own pros and cons. Both tools are available for macOS, and Windows.
Here’s how you recover a formatted disk using these tools:
Option A: Disk Drill
Unexpected data loss is an incredibly stressful situation for most users, and the last thing you need is the additional burden of figuring out how to use a data recovery app.
Disk Drill, with its incredibly simple UI, in-built tutorials, and detailed documentation, eliminates this problem entirely. It’s not just all show—the program has the features and functionality to complement its ease-of-use. It works with almost all drive types and file systems so you don’t have to worry about double-checking for compatibility. It even supports RAW drives. Additionally, it comes loaded with extra data protection, disk analysis, and drive backup features to help you avoid data loss in the future. That’s why Disk Drill is our first pick for data recovery from a formatted hard drive.
The steps for data recovery remain the same across the Windows and macOS versions of Disk Drill:
- Download Disk Drill, and install it. Do this on a drive that wasn’t formatted. The installation will be wizard based on Windows, and drag-and-drop based on macOS.
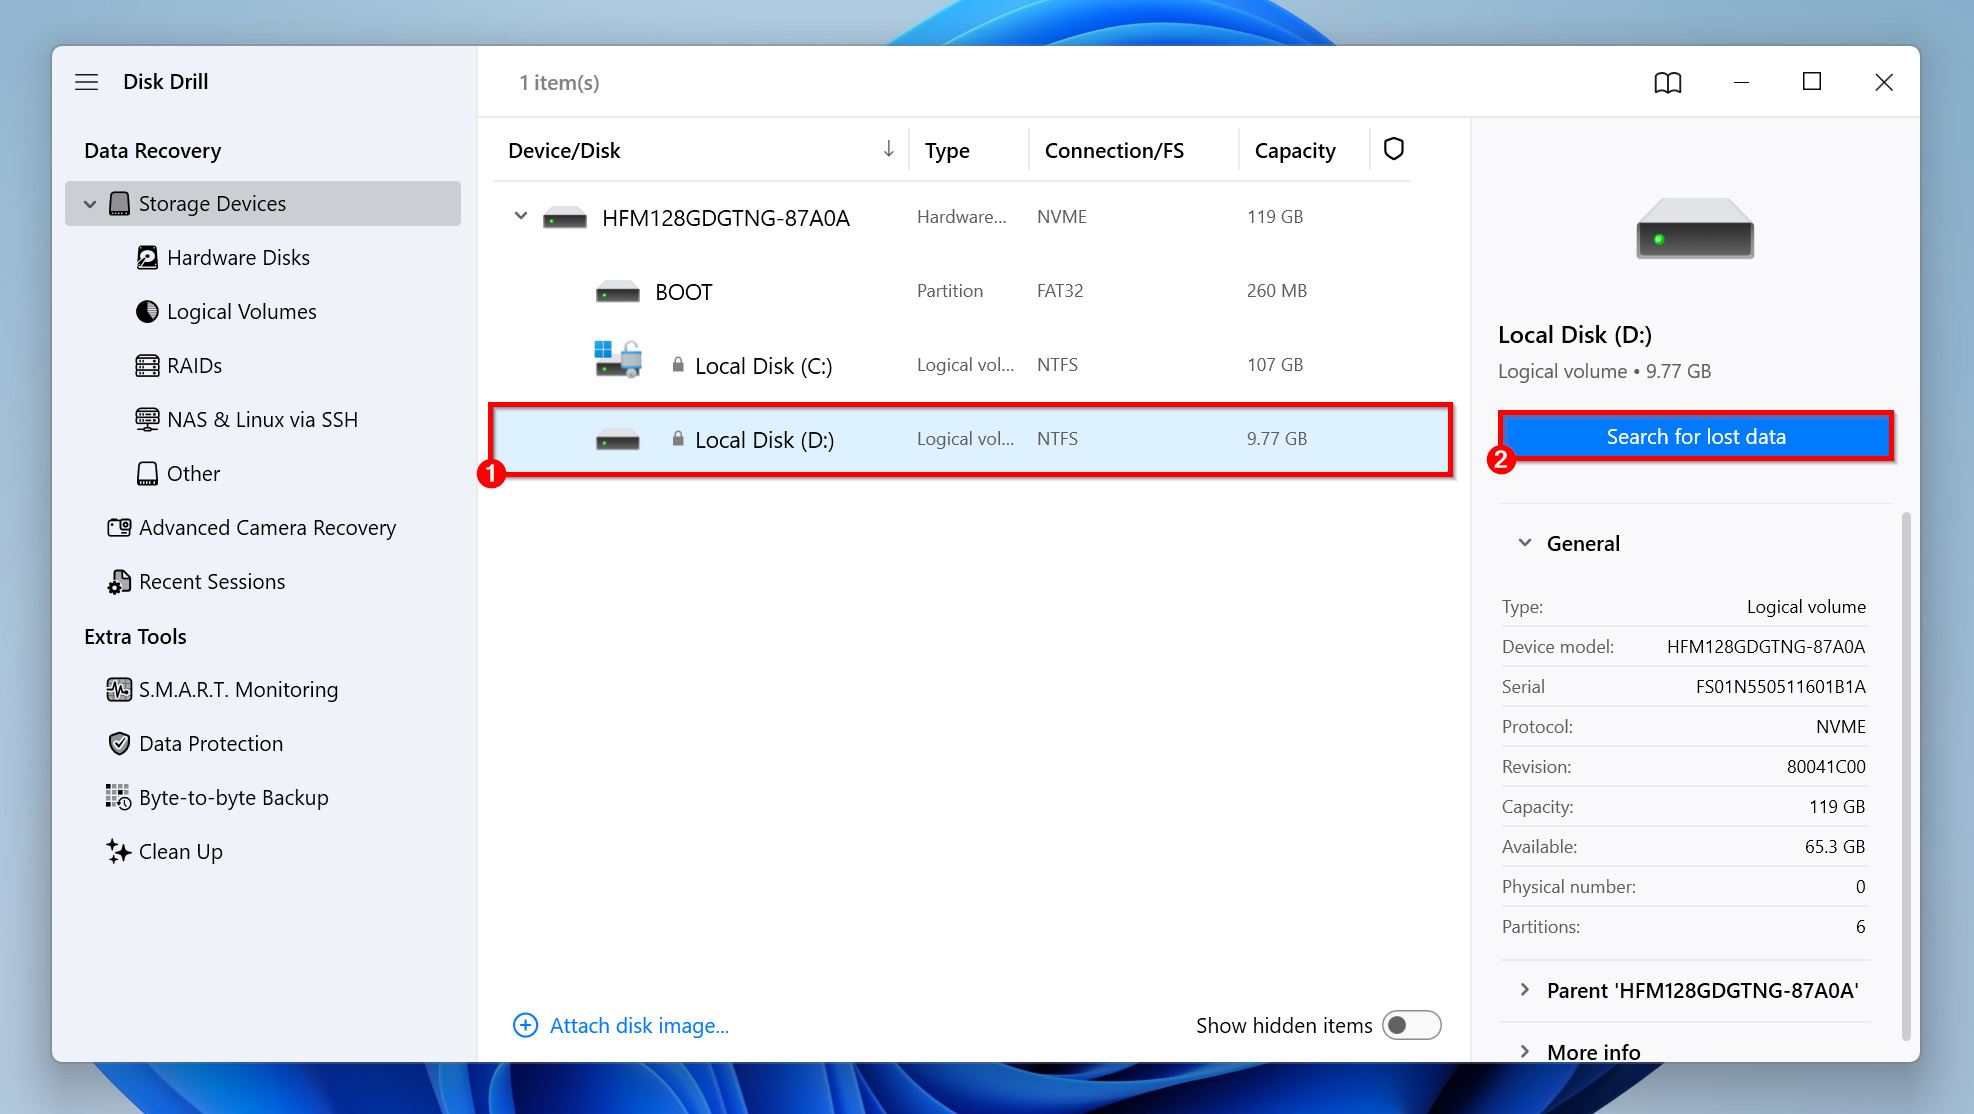
- Open Disk Drill, select the drive that was formatted, and click on Search for lost data. The data recovery scan will begin—it can be paused and resumed at any time.
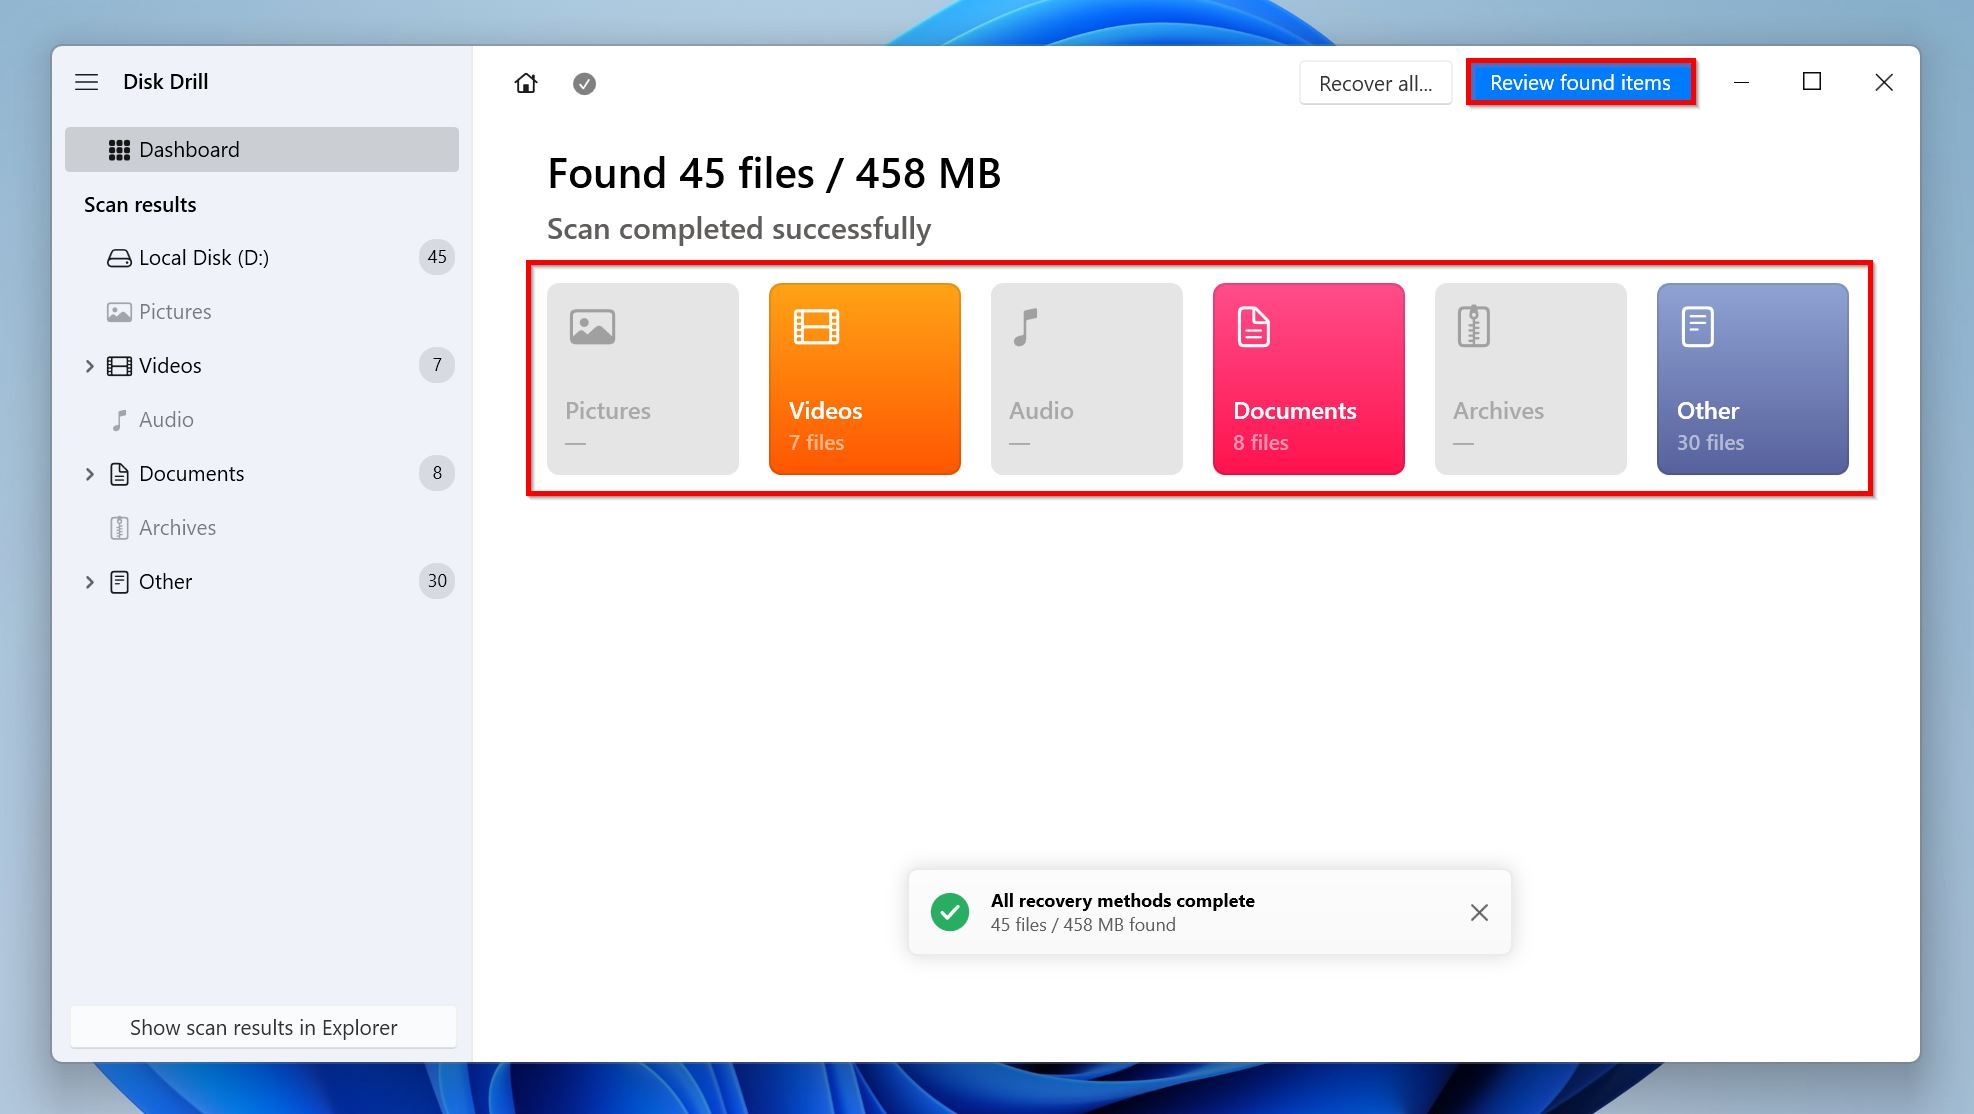
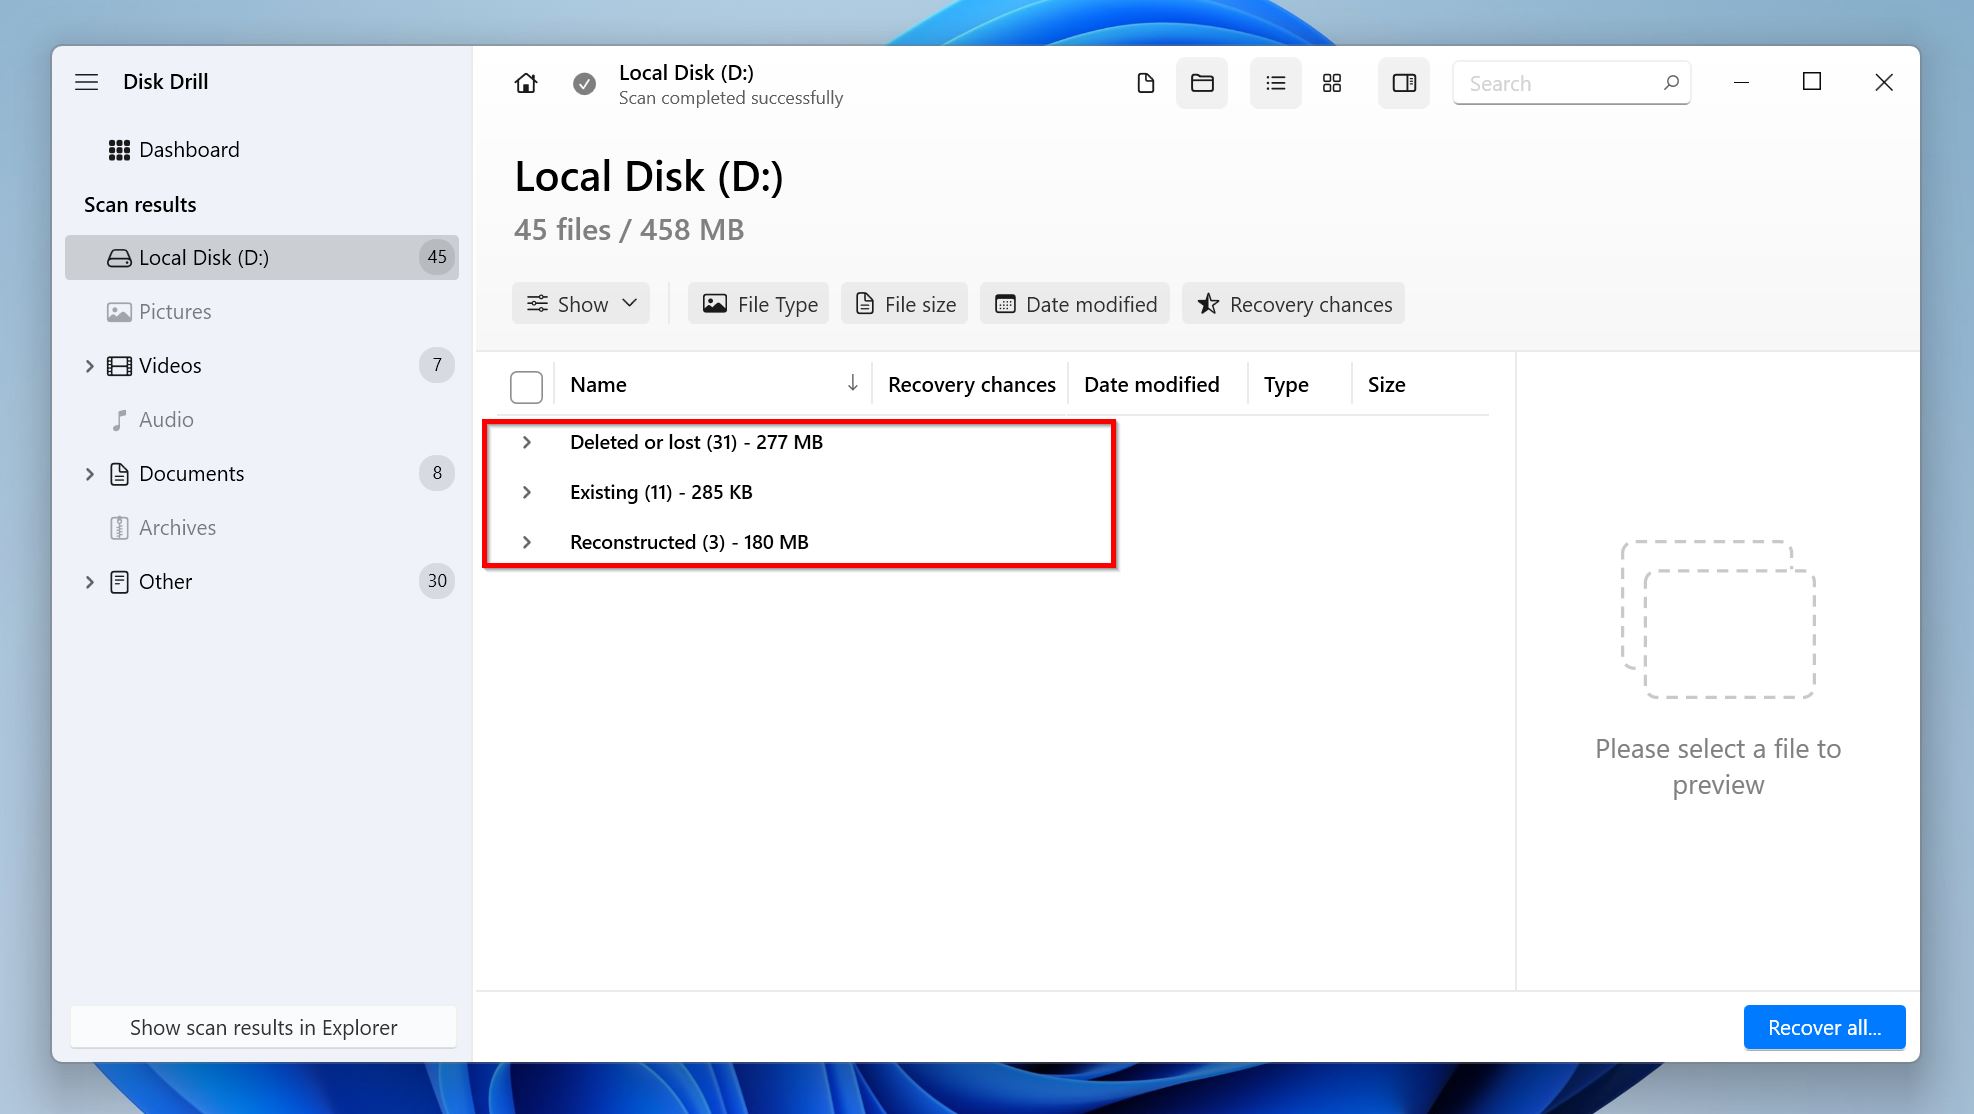
- Click on Review found items to view all recoverable files Disk Drill has discovered. Alternatively, you can view just file types you wish to recover by clicking the relevant tiles: Pictures, Videos, Audio, Documents, Archives, and Other. In case you wish to recover all the files, just click the Recover All button on this screen.
- Expand the Deleted or lost, and Reconstructed sections to view deleted files that can be recovered. The files under Reconstructed whose folder structure couldn’t be recovered, but the files themselves are available. Each file will have its recovery chances listed next to it.
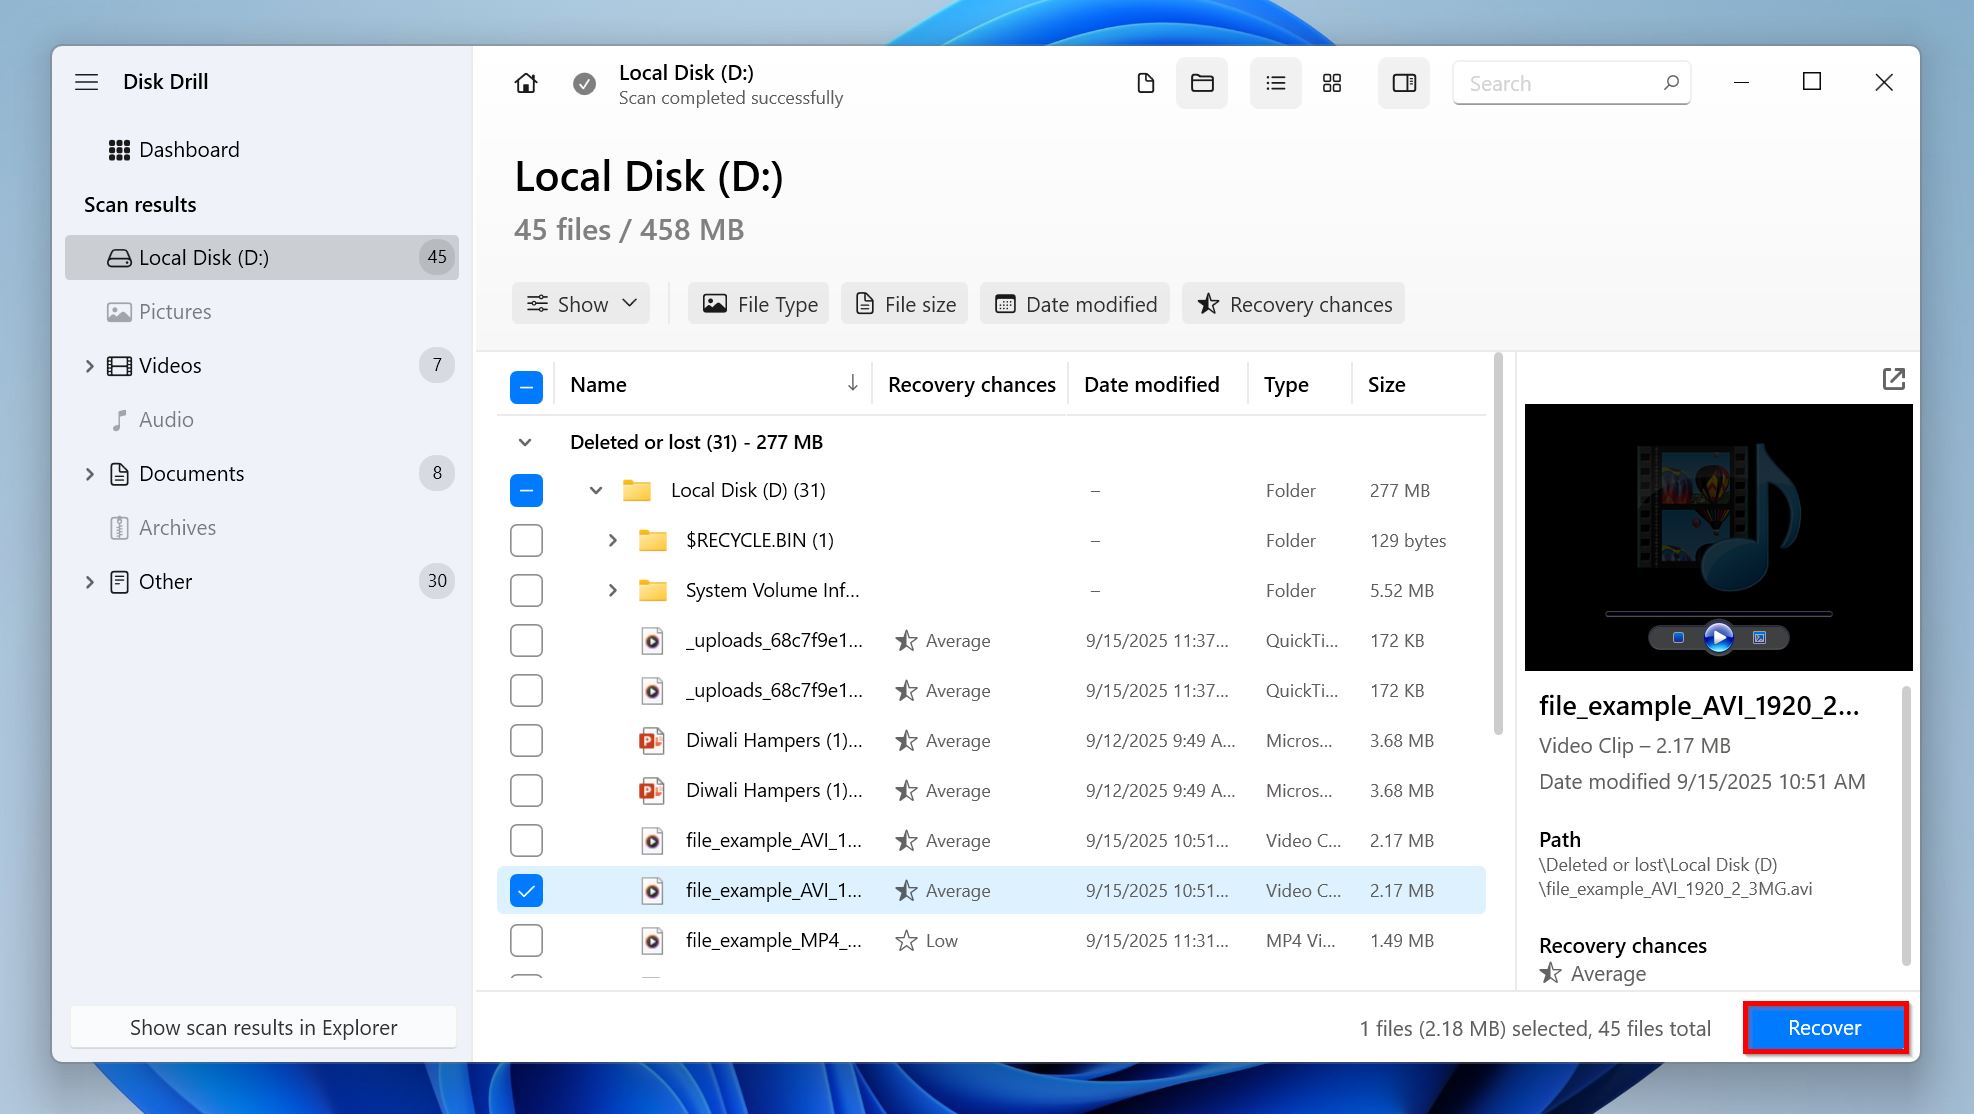
- Click the checkbox next to the files you wish to recover. You can filter between Folder Tree View, and Thumbnail View to identify the required files more easily, or you could just search for the files using the in-built search bar. Additionally, Disk Drill automatically displays a preview of the selected file, but you can manually preview any file by clicking the eye icon next to its filename. Click Recover after confirming your selection.
- Choose a recovery destination for the files. Ensure you don’t recover them to the drive that you scanned. Click Next.
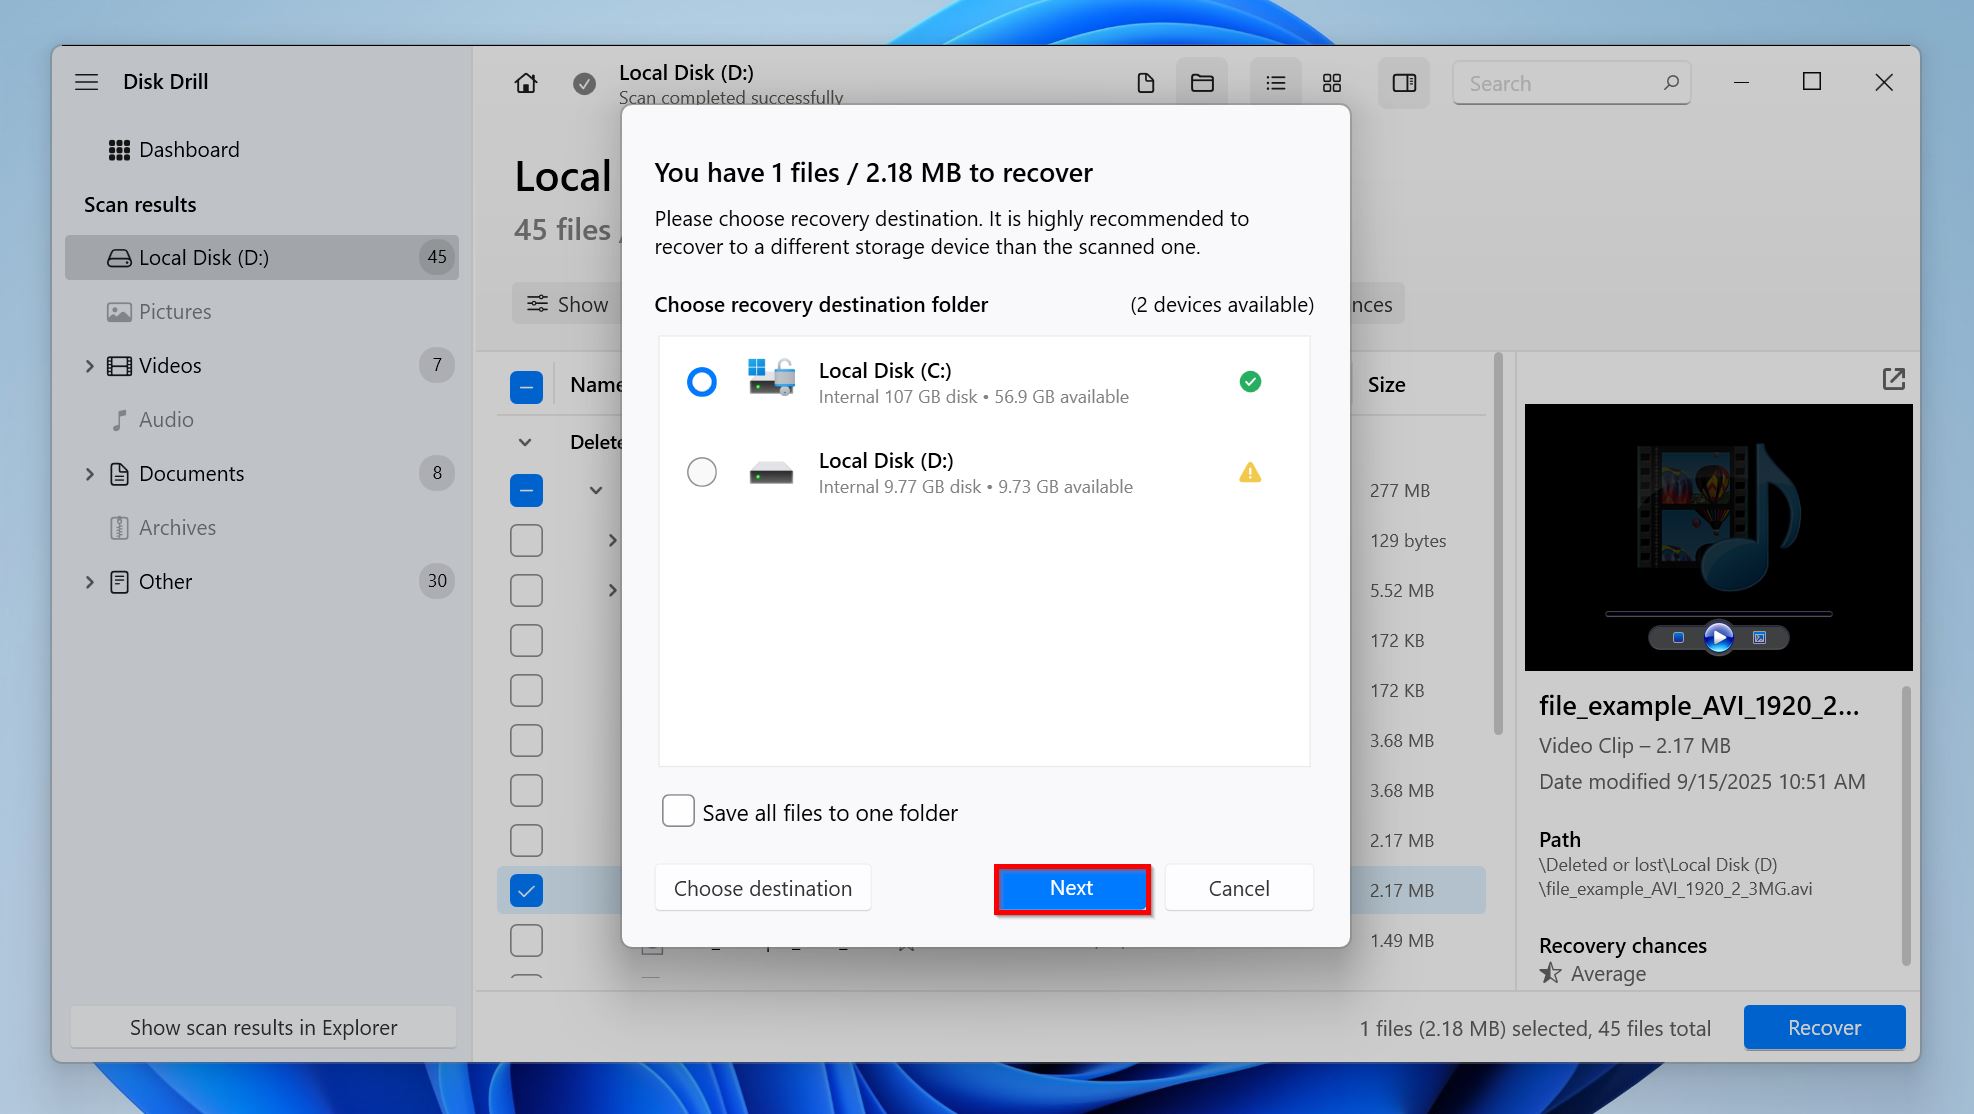
- Disk Drill will recover the selected files.
Pros
- Easy to use.
- Supports almost 400 file types.
- Fast scan speeds.
- Loads of additional features at no extra cost.
- Free trial for Windows users.
- The Mac version doesn’t have a free trial.
- No phone support.
Option 2: PhotoRec
PhotoRec is a good option if you’re looking for a free, open-source data recovery app. While it’s not a match for proprietary data recovery apps, it does get the job done in most cases. It supports a wide range of file systems including FAT32, exFAT, ext2/3/4, and HFS+, and more. The GUI version (available only for Windows) is simple enough for most users, but macOS users will struggle with the tedious process of installing, running, and using the program on a purely command-line based interface. If you’re willing to let go of file previews, filename recovery (PhotoRec only supports signature scans), and ease-of-use, PhotoRec is a capable alternative to paid data recovery programs for those looking to recover files from a formatted disk.
The data recovery steps differ across Windows, and macOS.
On Windows
- Download TestDisk & PhotoRec (they’re bundled together). We suggest downloading the latest stable version, which is 7.2 as of writing this article. Extract the downloaded archive.
- Run qphotorec.exe from the extracted archive.
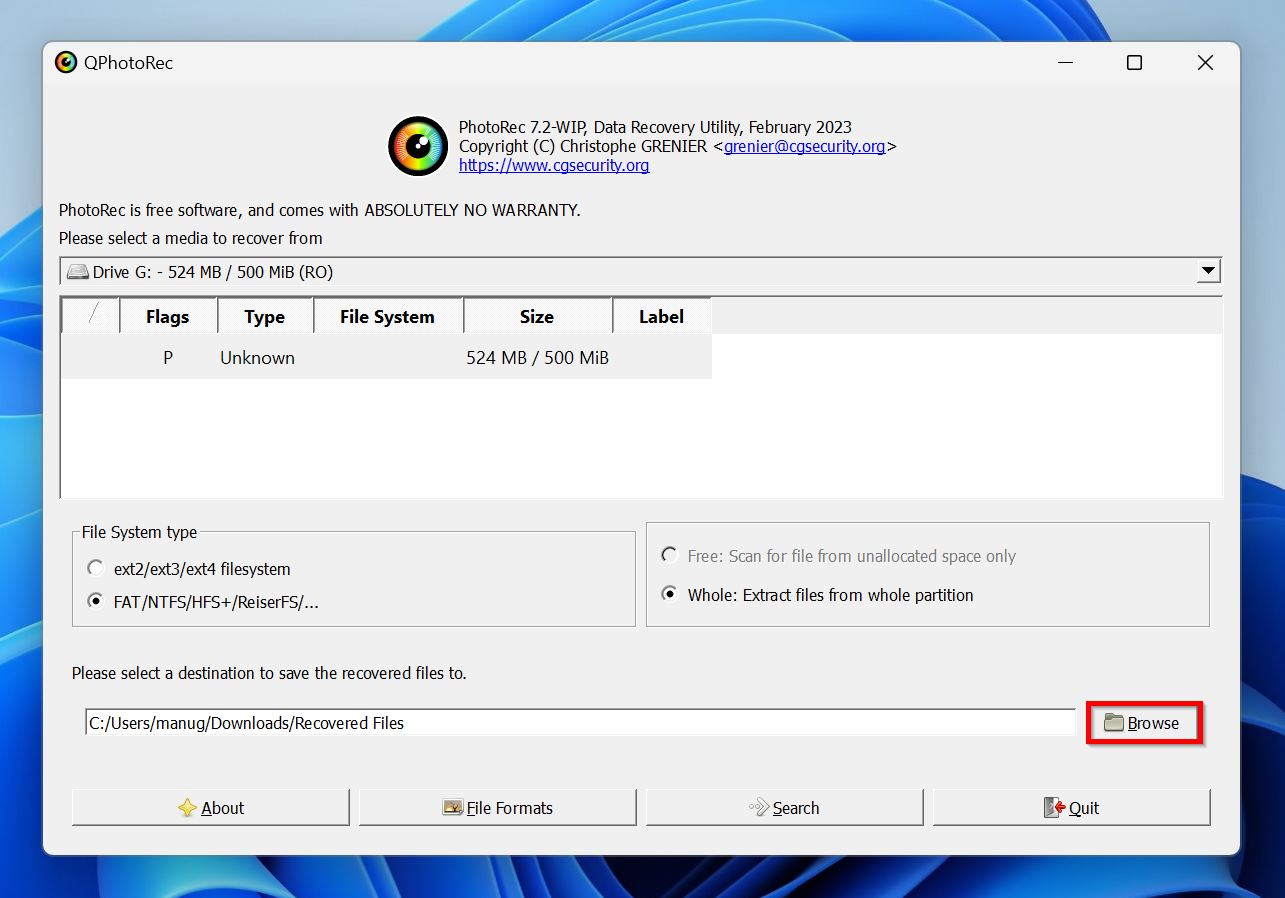
- Using the drop-down menu, select the drive that was formatted and requires data recovery.
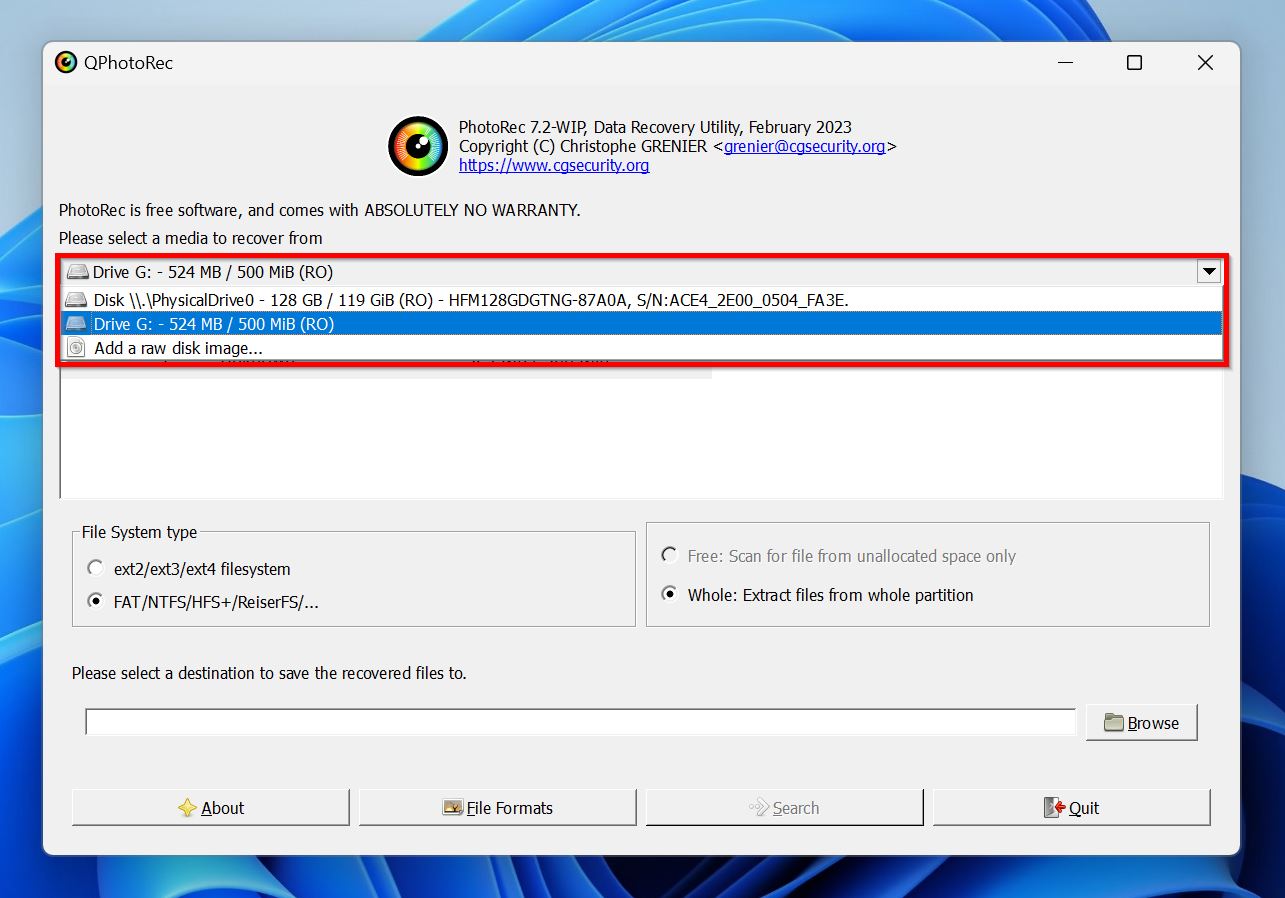
- Tick the set of file systems you wish to recover data from. You can also click on File Formats, and tick the file types you wish to recover. If you’re unsure, leave them all ticked.

- Click on Browse, and select the recovery destination for the files. Pick a drive other than the one you’re recovering data from.
- Click on Search.
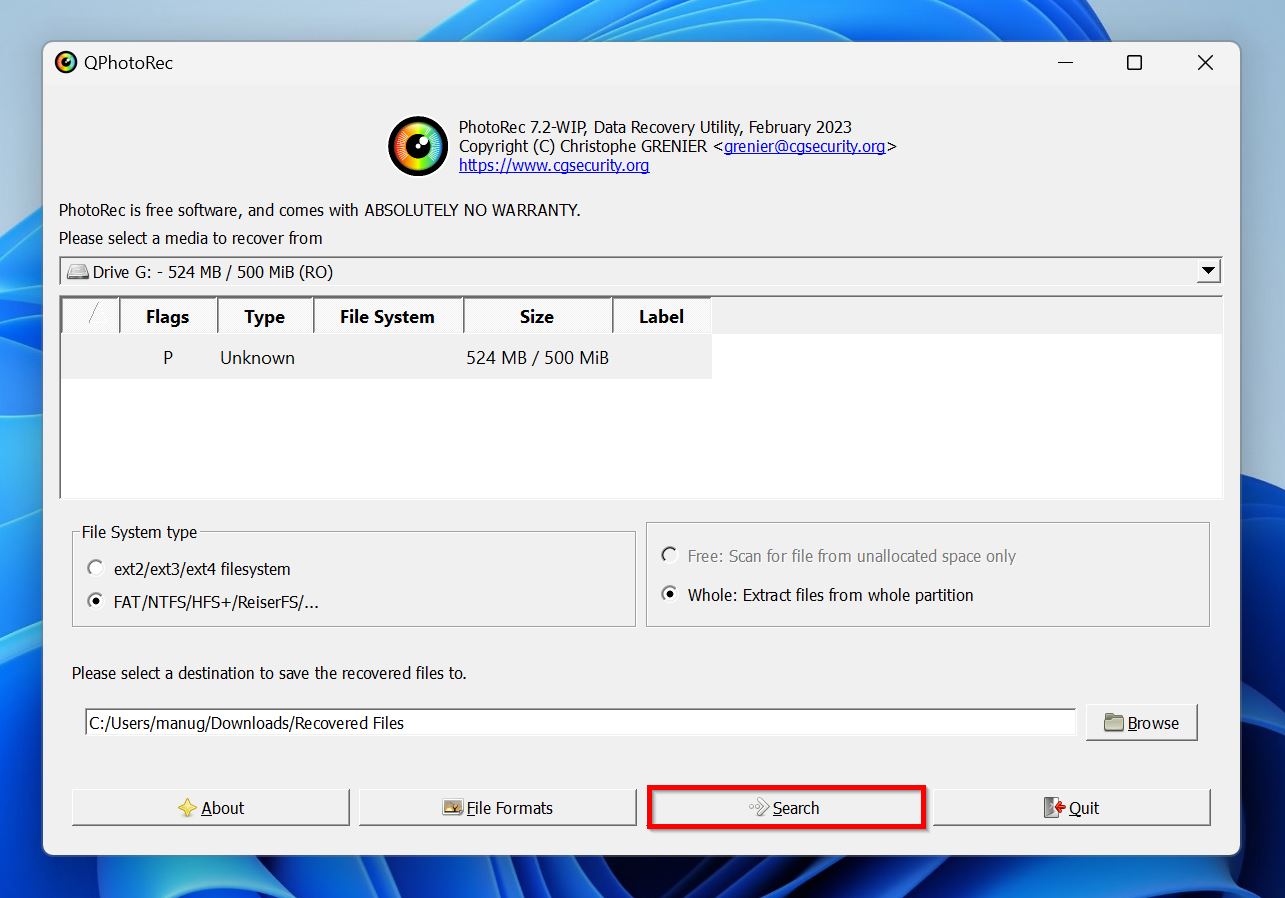
- PhotoRec will find recoverable files and save them to the selected directory.
On macOS
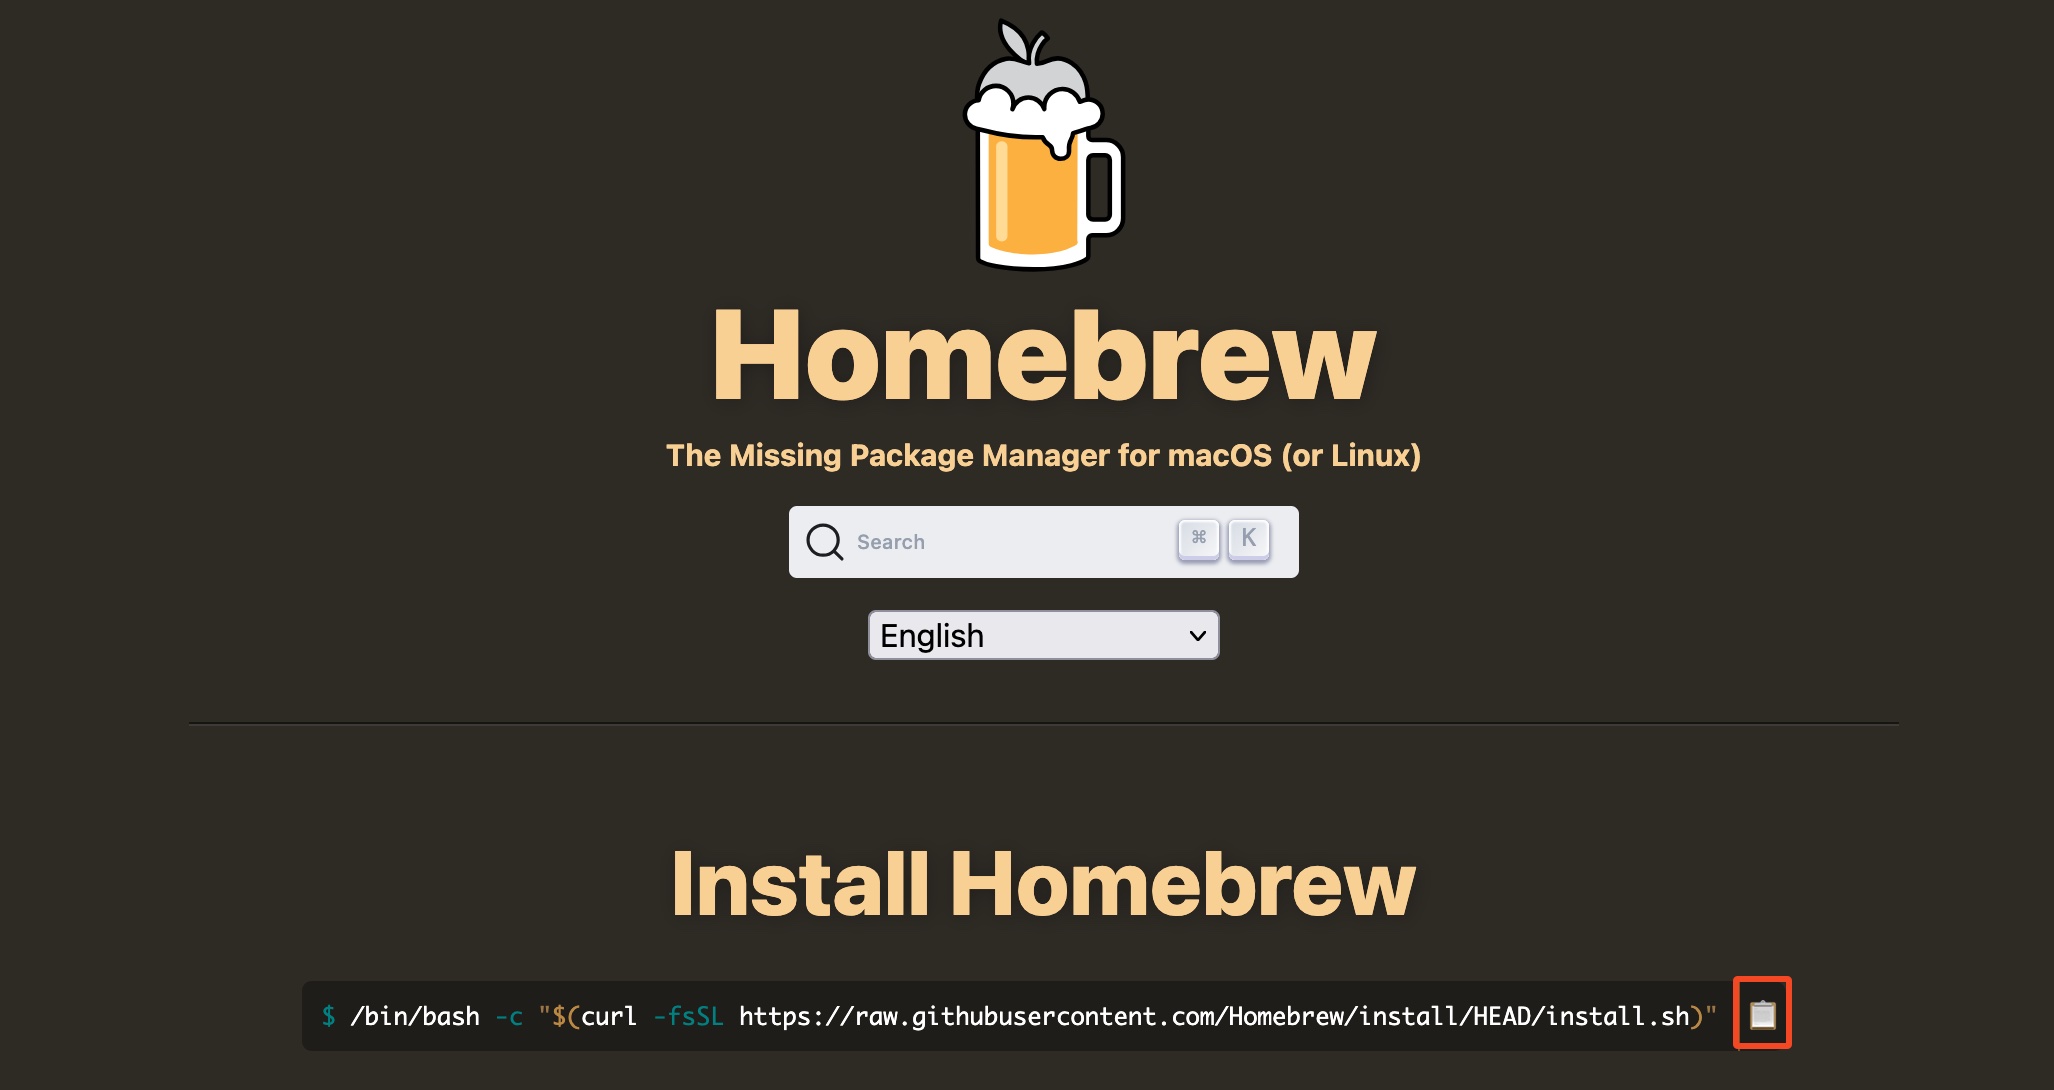
- Open your web browser, and open the Homebrew website.
- Copy the command by clicking the clipboard icon next to it.
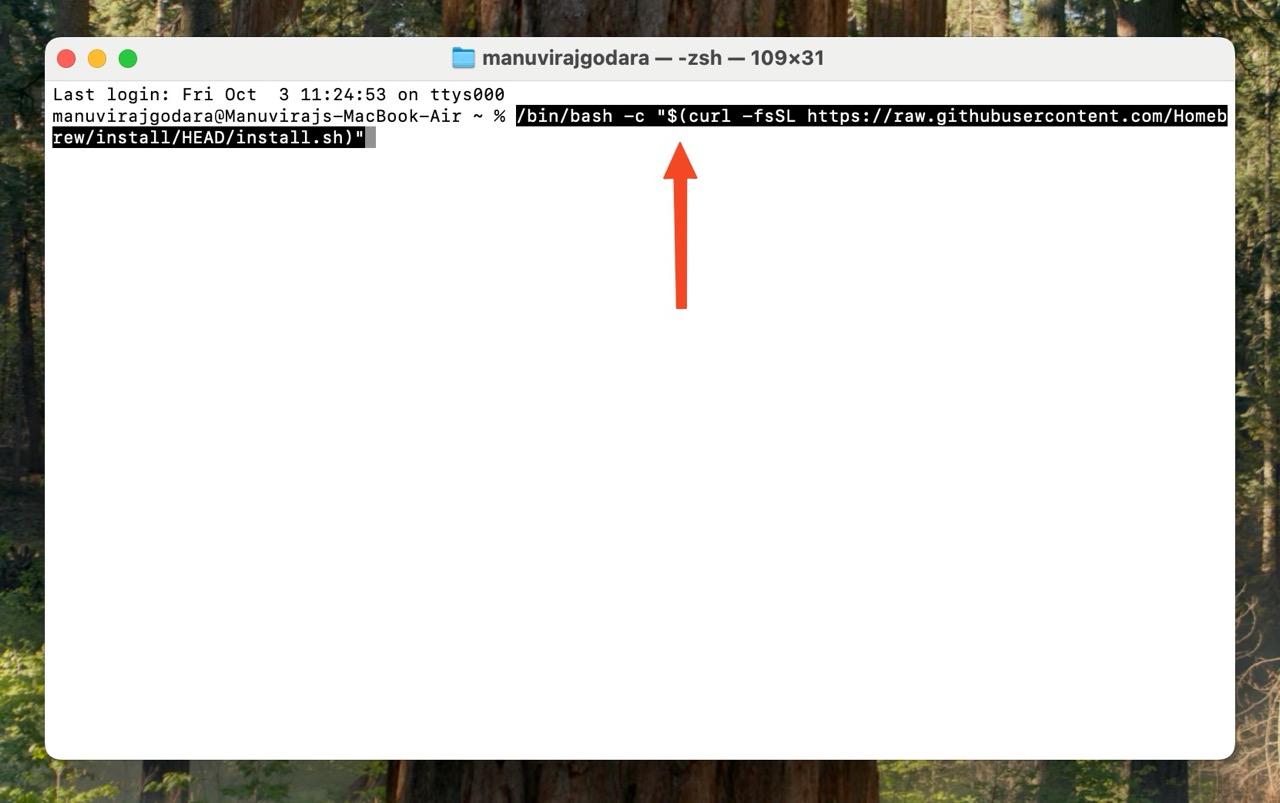
- Search for “terminal” in Spotlight (Command + Space), and click Terminal.
- Paste the code you just copied, and press Enter. Mac will download and install Homebrew, a package manager and installer for macOS.
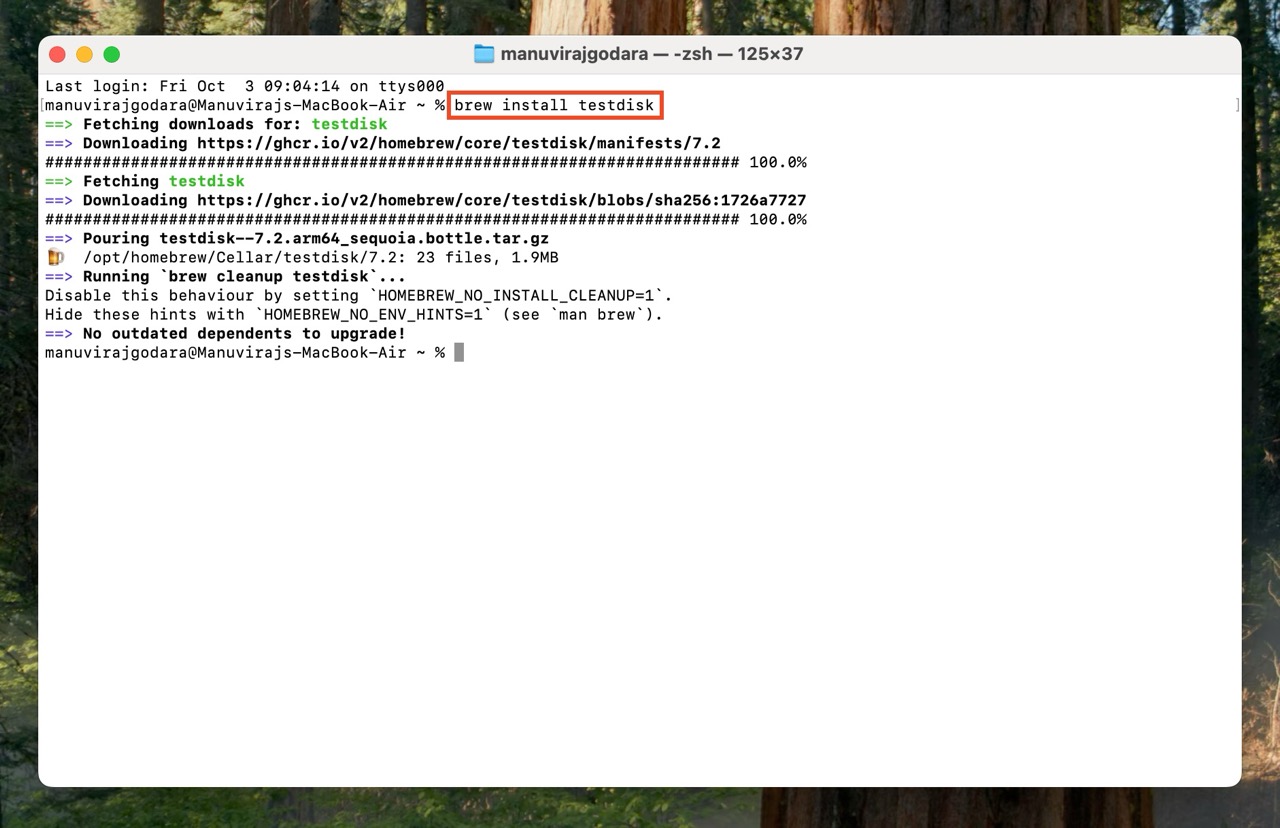
- Type brew install testdisk and press Enter. This will download and install TestDisk & PhotoRec.
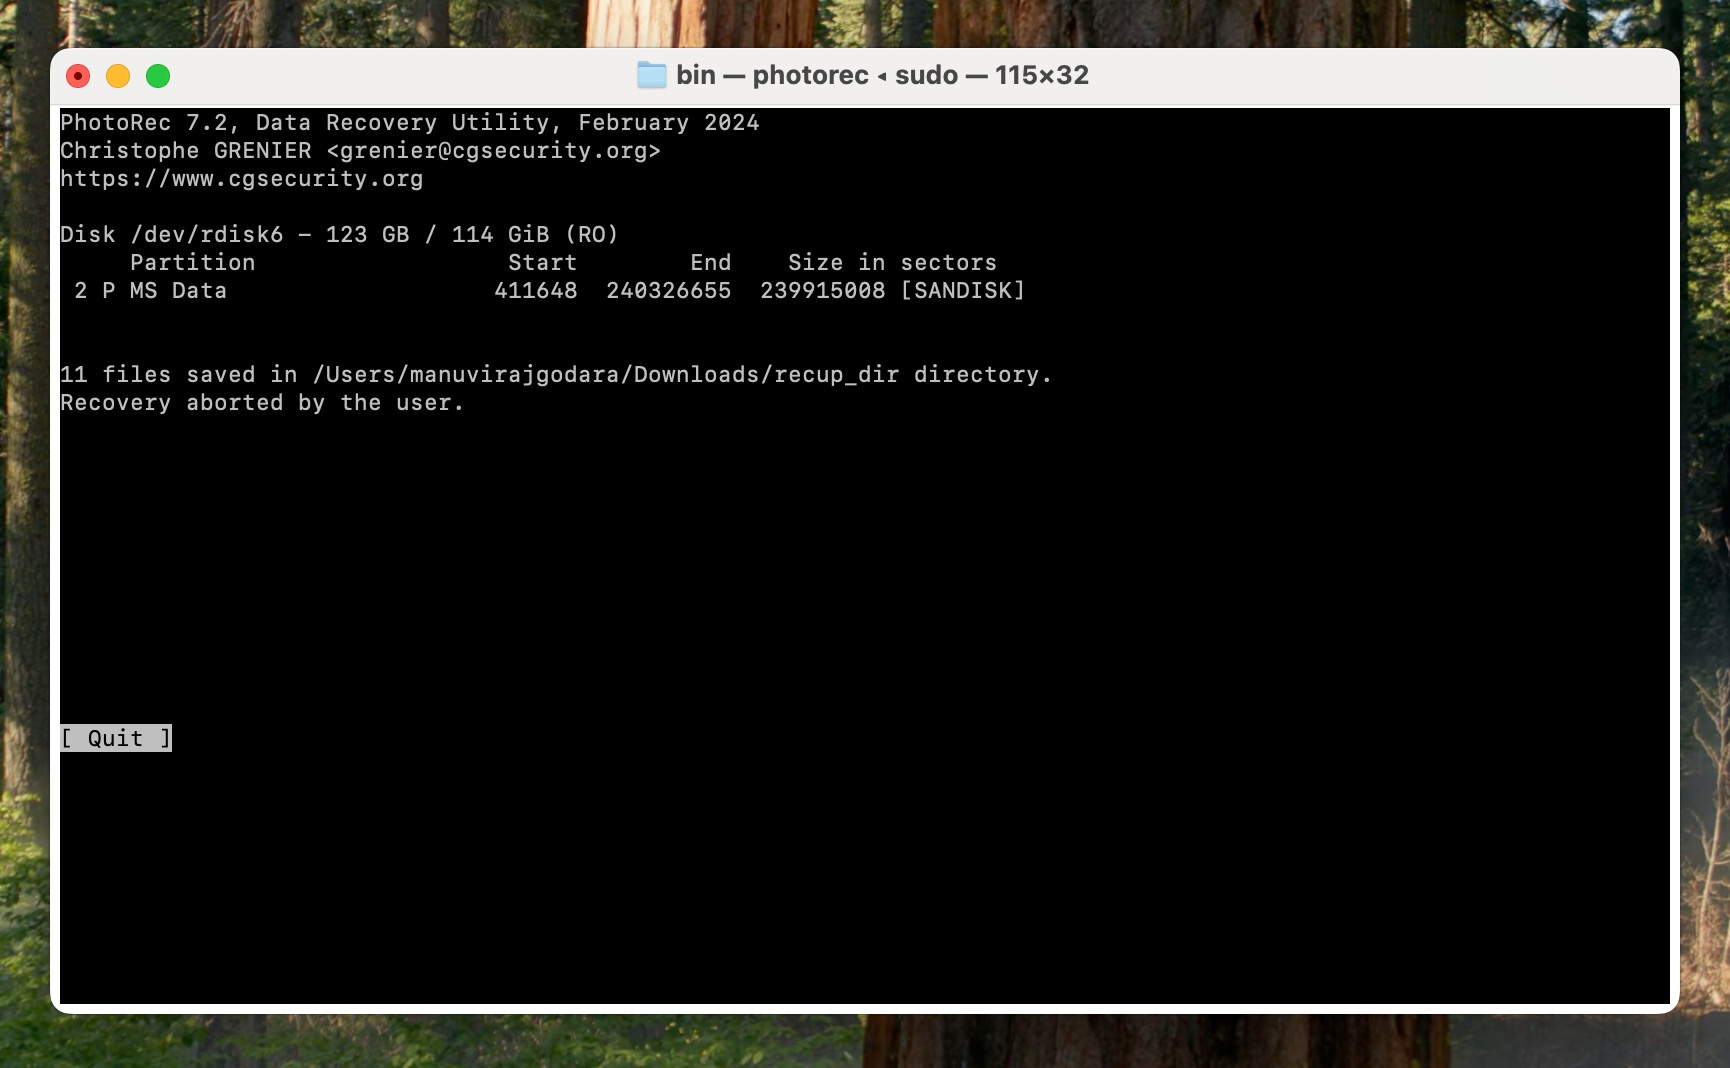
- Close Terminal, and relaunch it. Type sudo photorec, press Enter, and then type in your Mac account’s password. You won’t be able to see the characters as you type them. If Terminal successfully launches PhotoRec, skip Step 7 & Step 8 below.
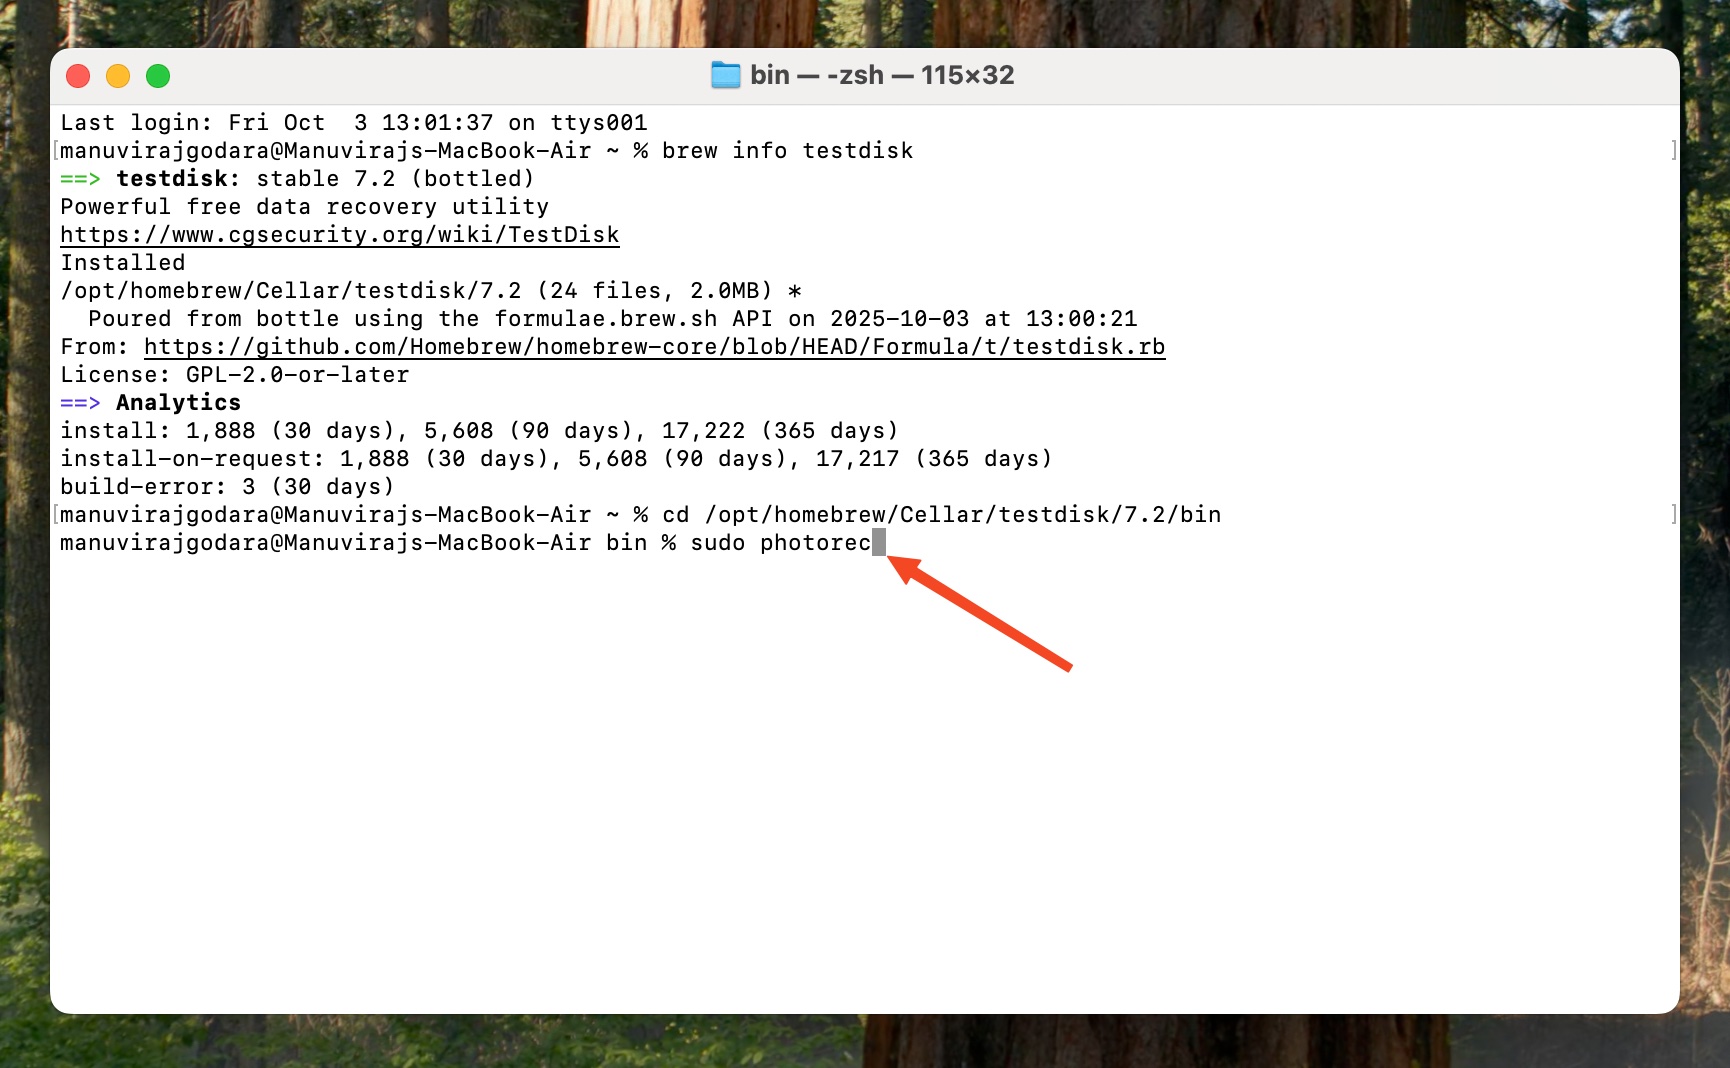
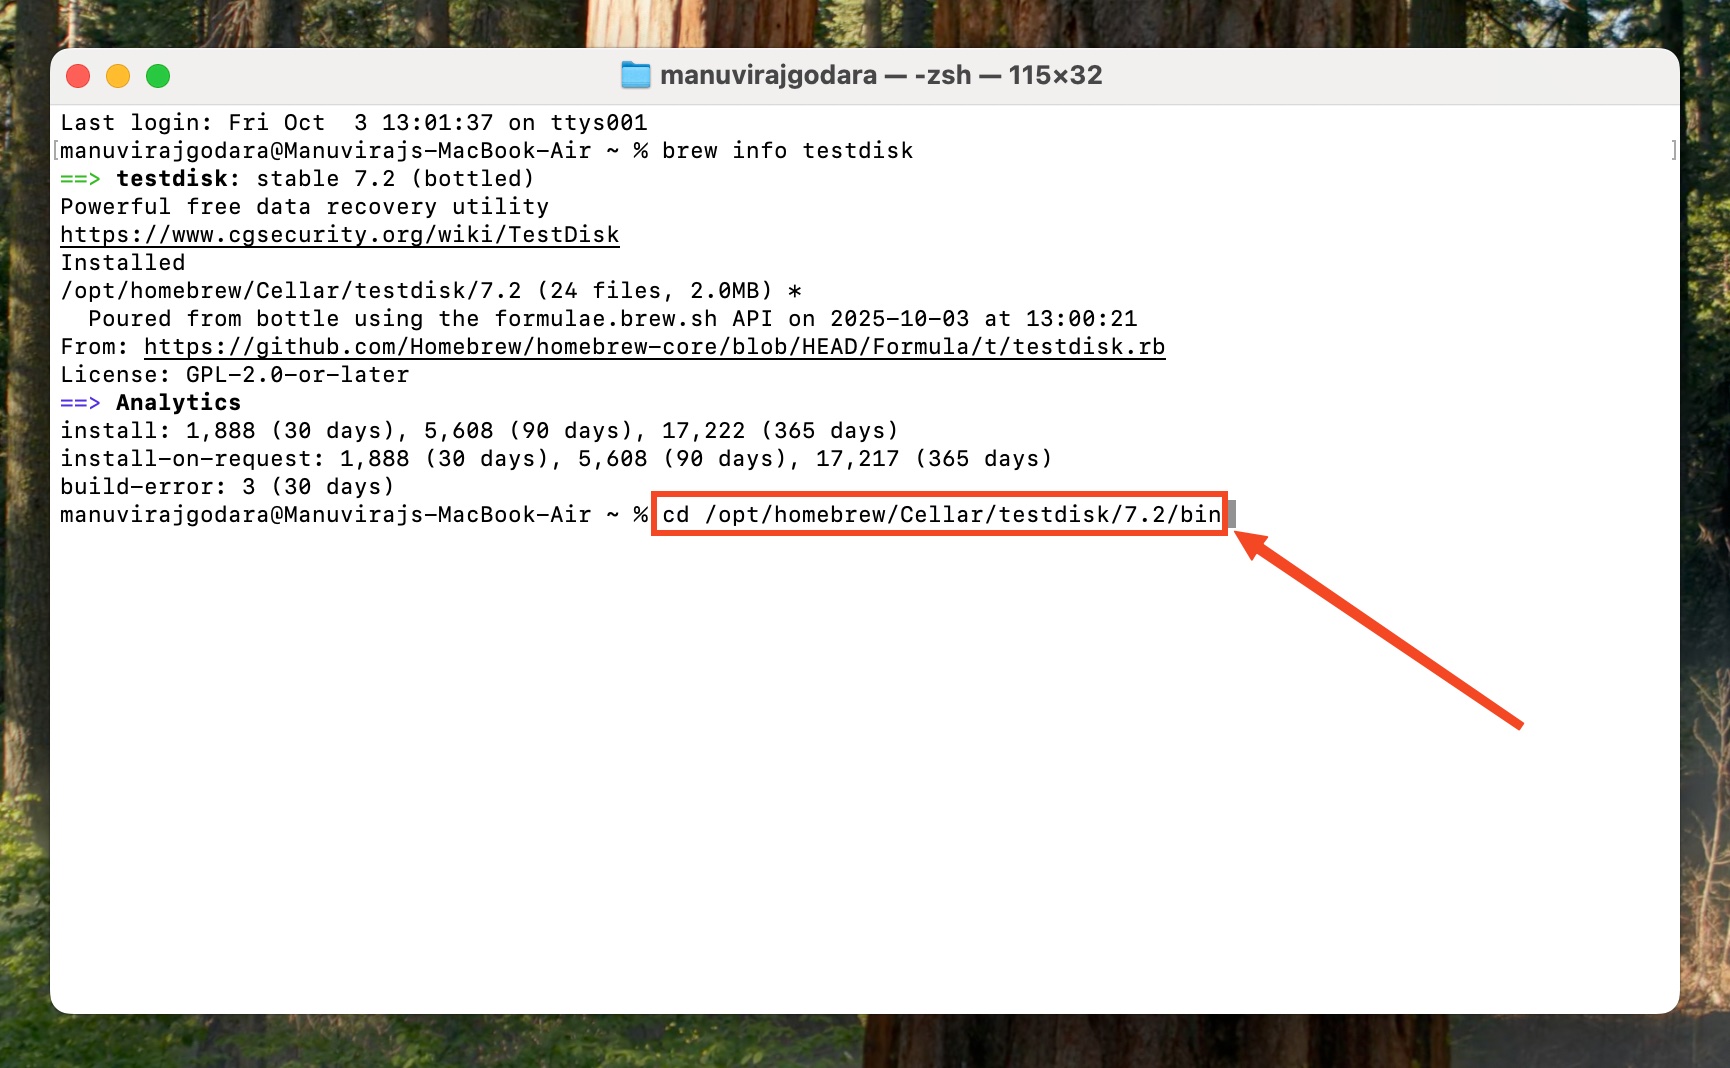
- (OPTIONAL) If Terminal gives you an error that the file isn’t found, type brew info testdisk, and press Enter. Note down the folder path that appears.

- (OPTIONAL) Type cd<filepath you copied/bin> and press Enter. Attempt Step 6 again.
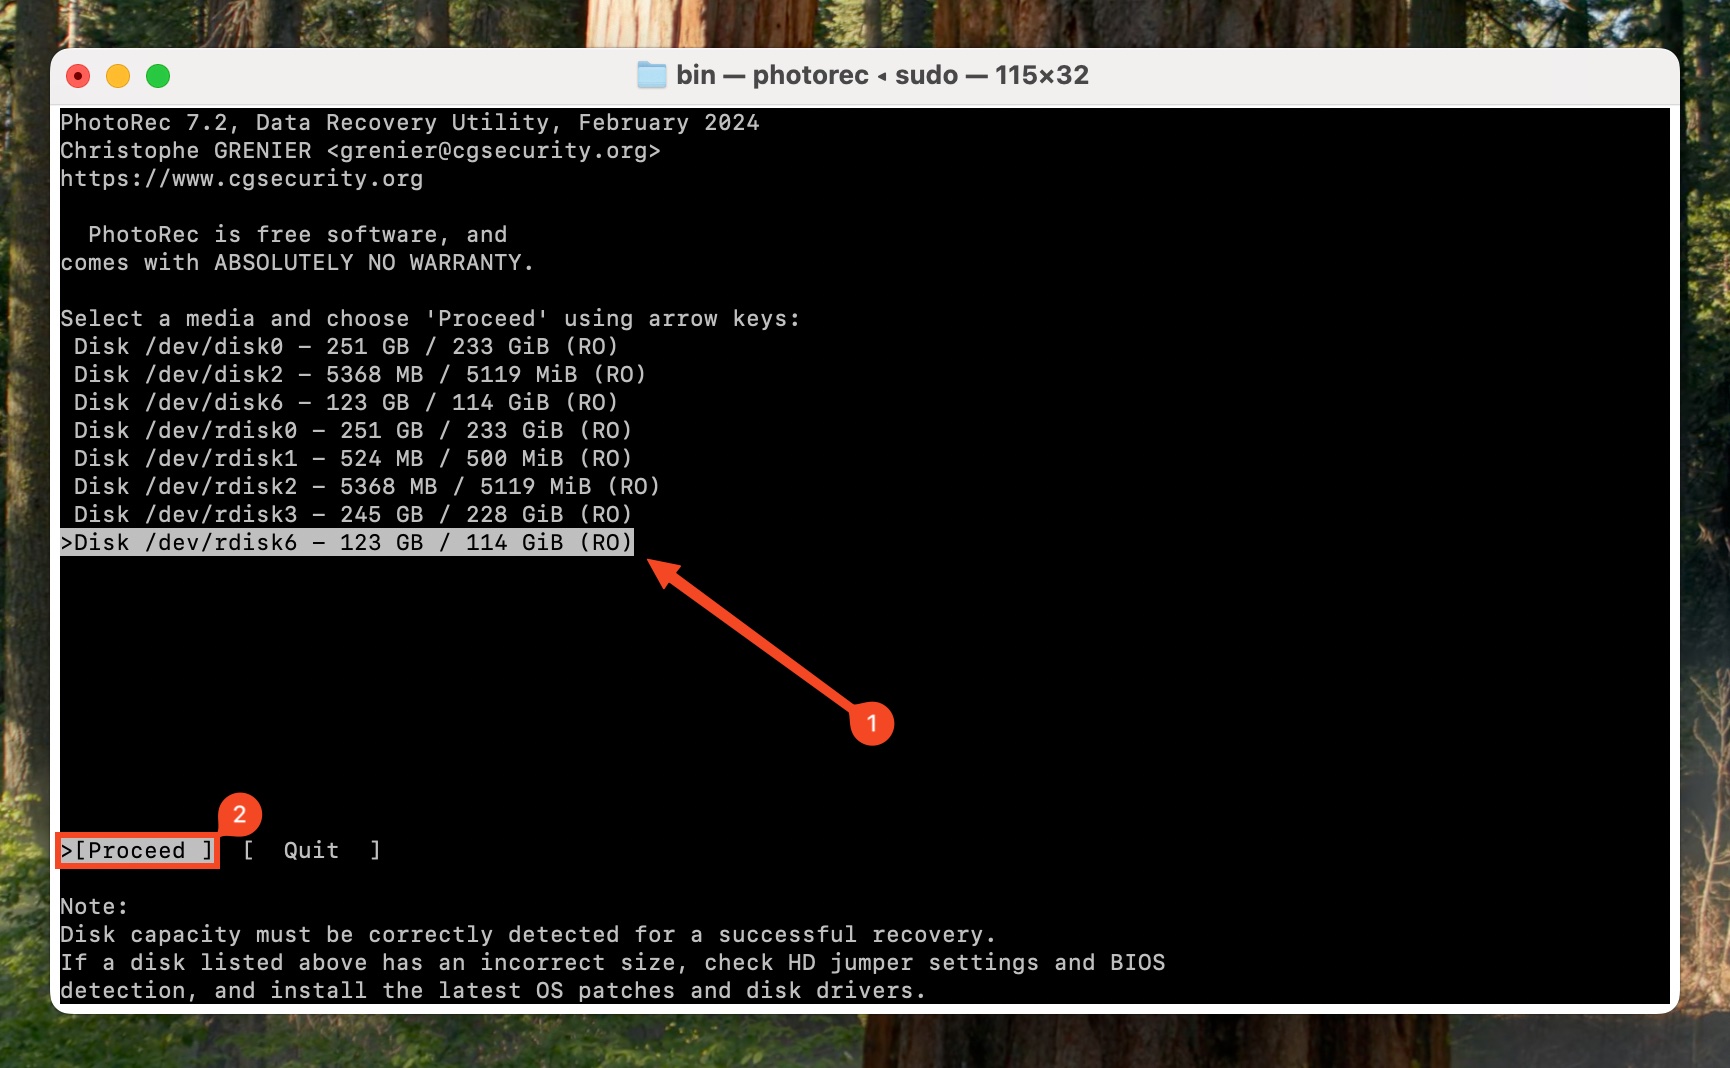
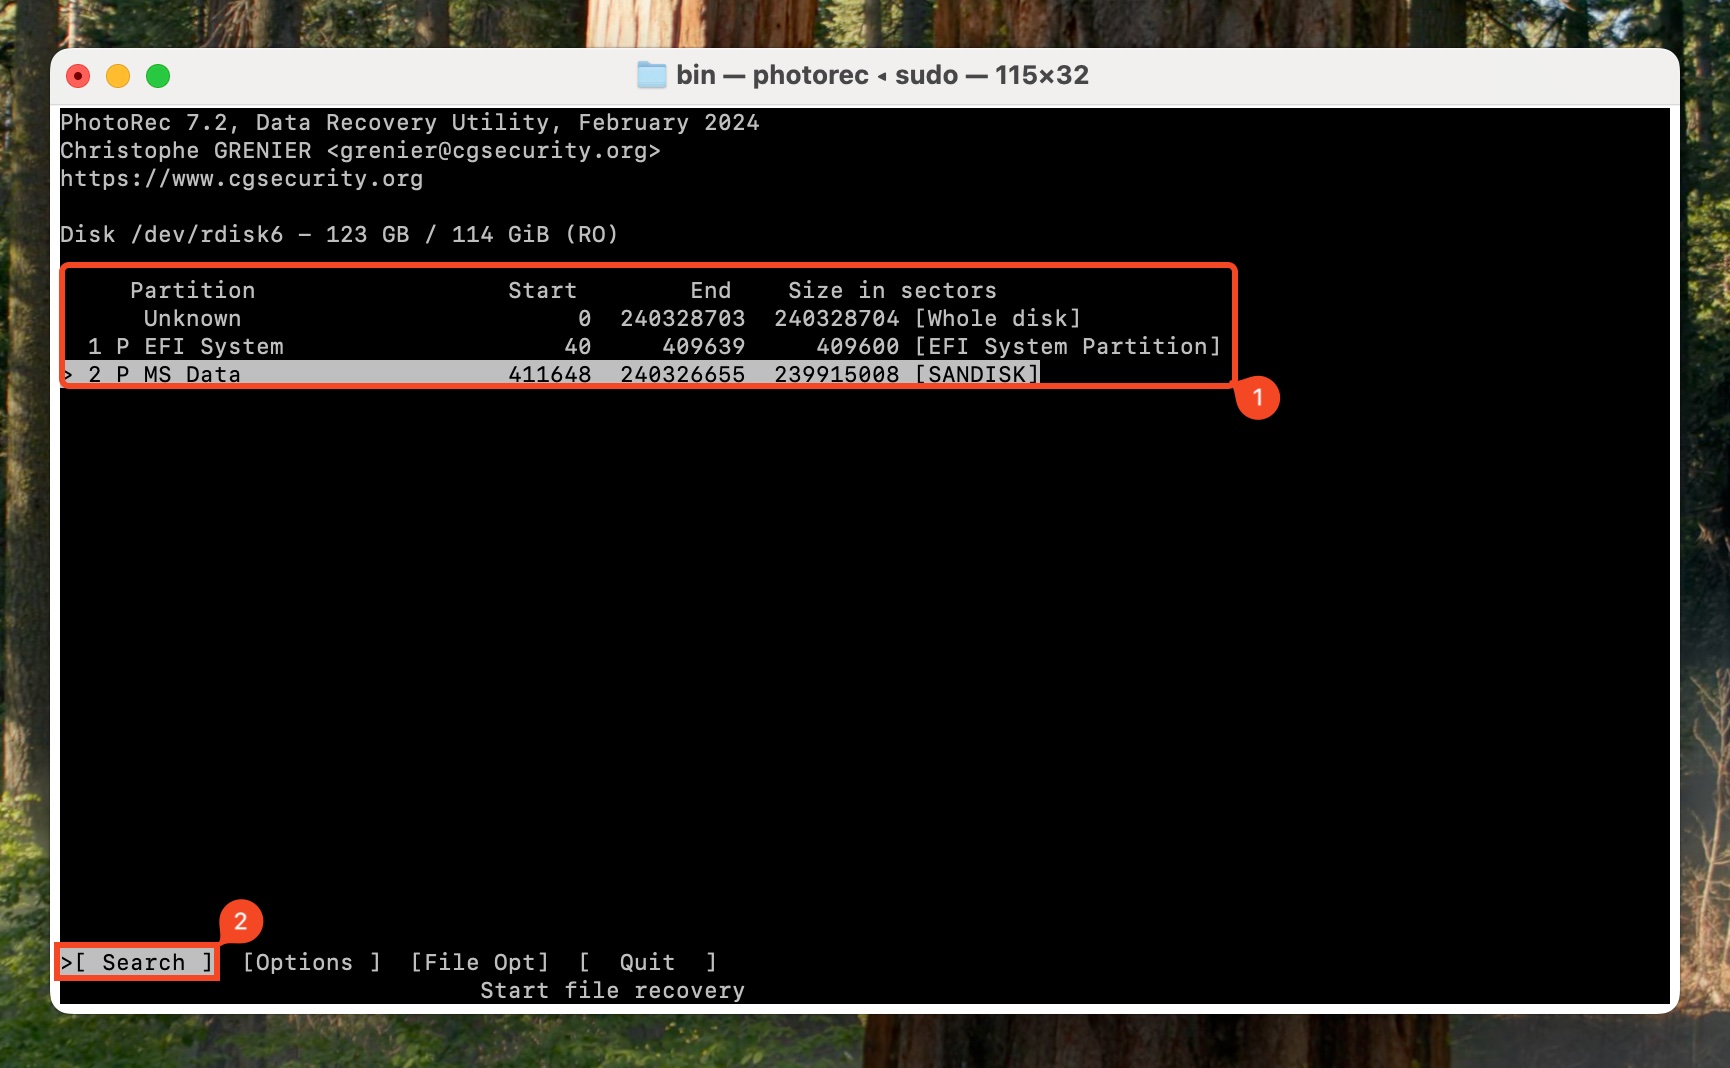
- Select the drive you wish to scan and press Enter. Ensure the Proceed button is highlighted.
- Select the disk partition you wish to scan from the selected drive, and press Enter.
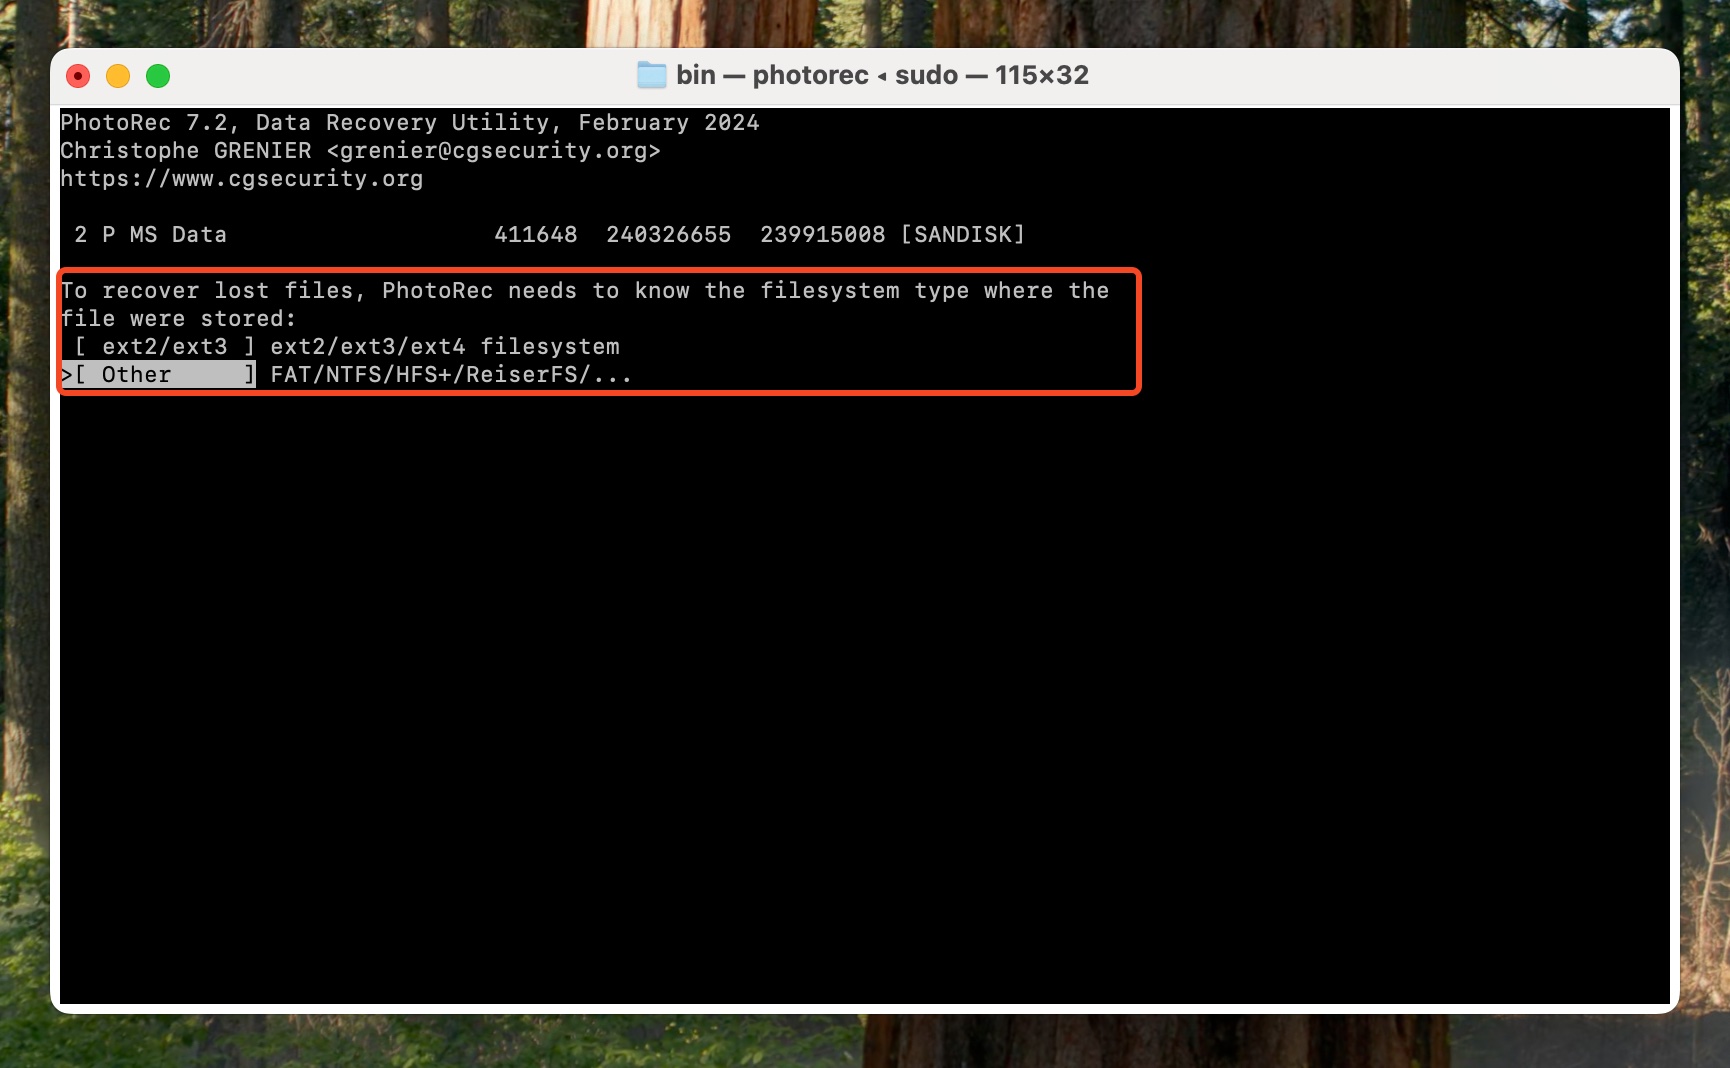
- Select the drive’s file system. Unless, you’re sure it’s ext2/3/4, select Other, and press Enter.
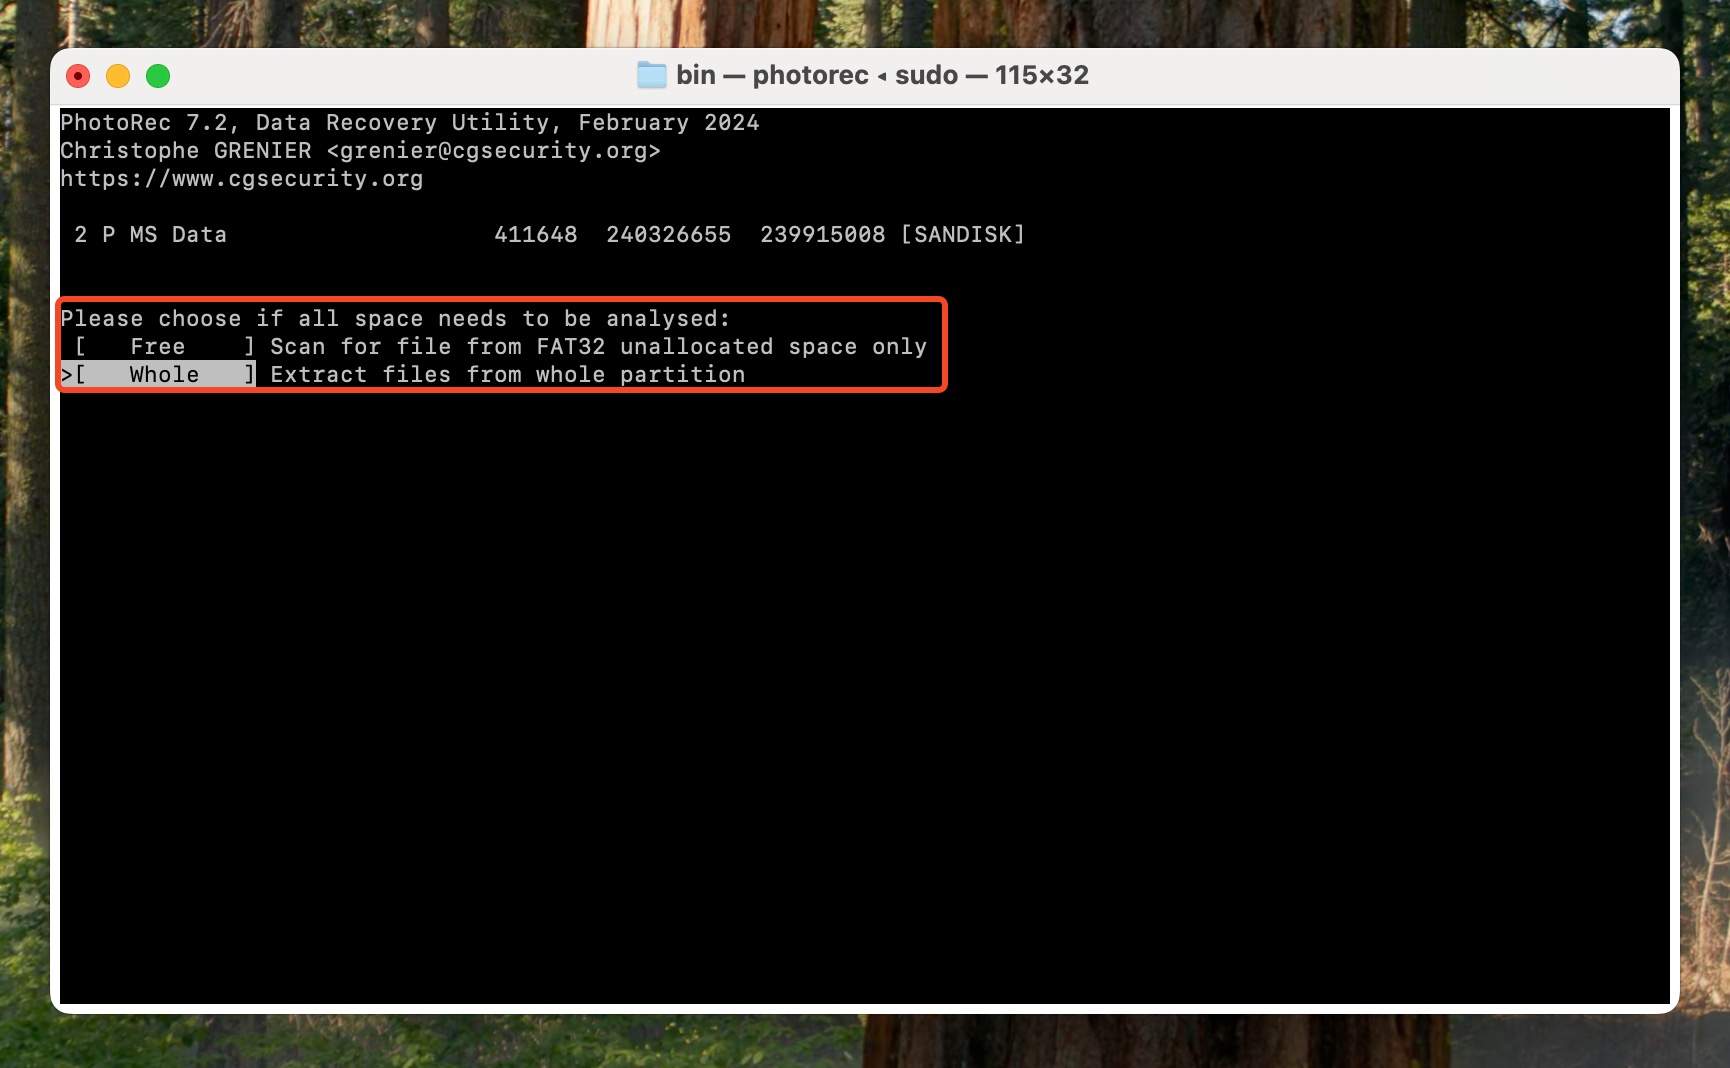
- Select if you wish to scan unallocated space only, or the whole disk. We suggest choosing Whole and pressing Enter.
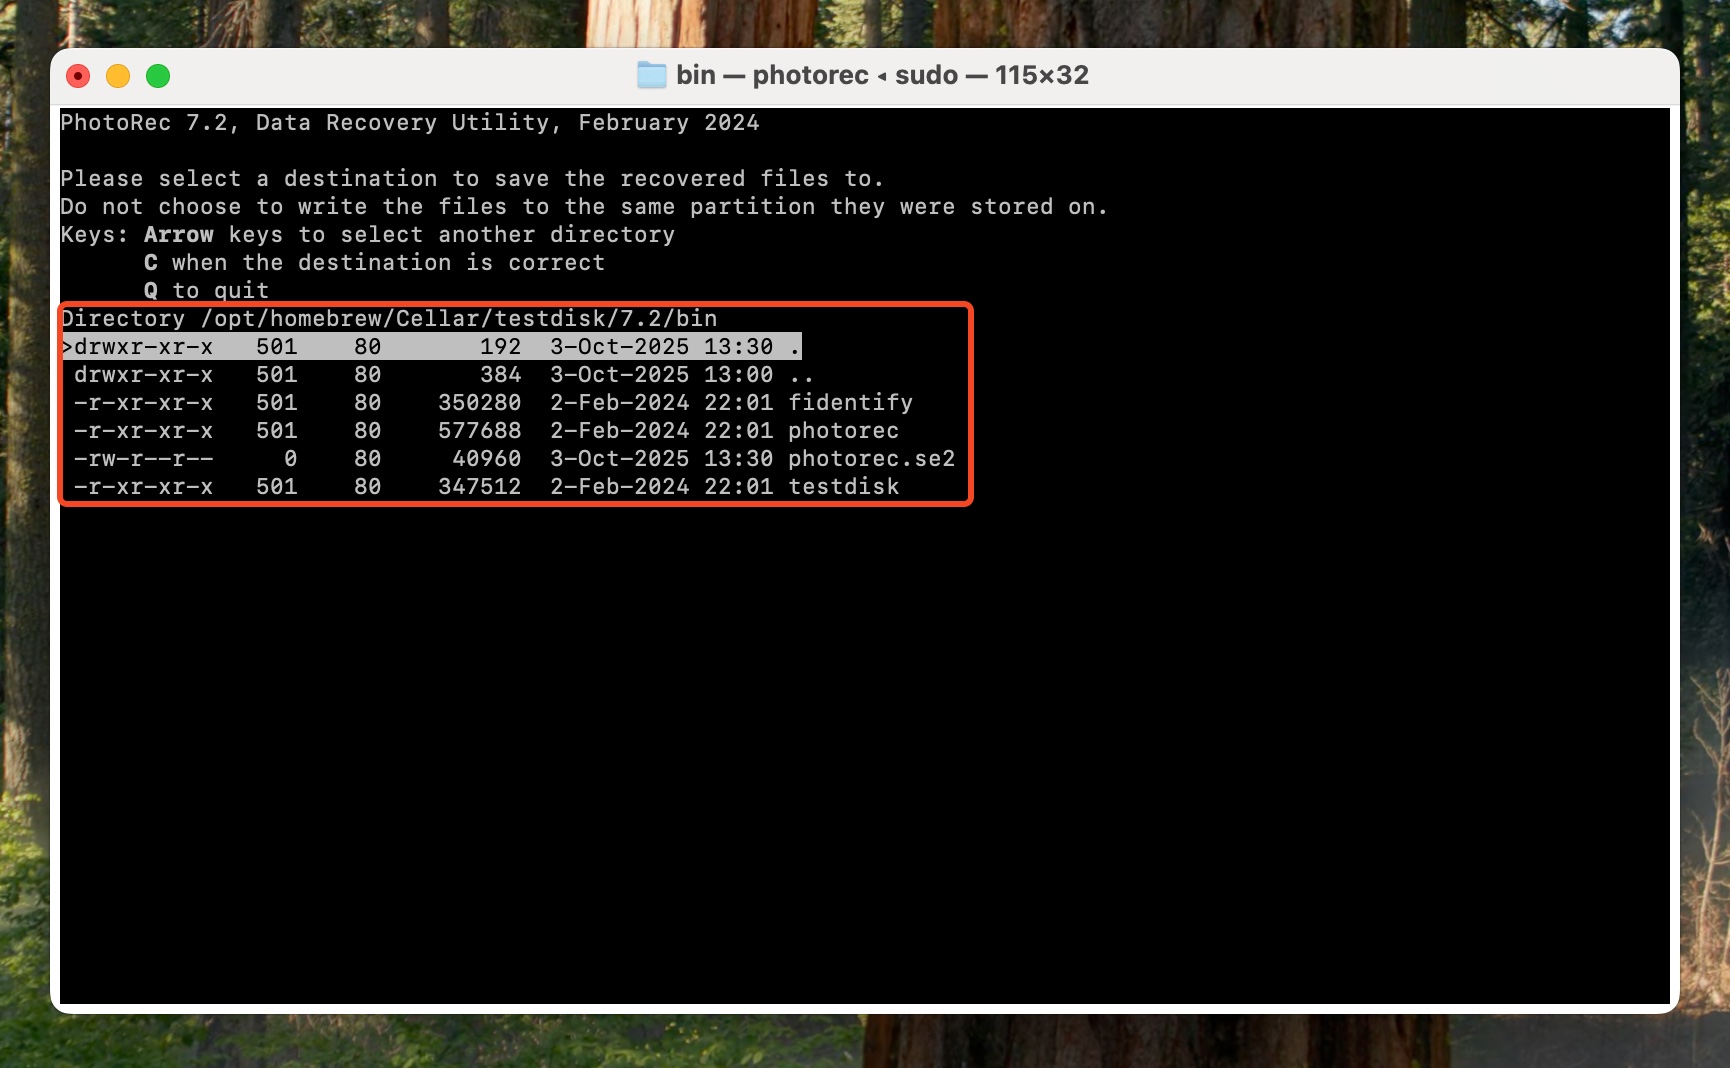
- Choose the recovery destination. Navigate using the arrow keys, the 2nd option from the top will open the parent directory of the current destination. Keep doing this until you reach your disk folder. Then, you can navigate to the folder of your choice by highlighting it, and pressing Enter. Press C on your keyboard to select the directory. PhotoRec will begin scanning the selected drive.
- Once recovery completes, select Quit.
Note: PhotoRec for macOS has a bunch of other options to fine tune data recovery. Go through the official documentation to know what they are.
Pros
- Completely free, and open-source.
- Lets you select the file types you wish to recover before scanning.
- Detailed documentation available.
- Lightweight, and portable.
- Tedious to use on macOS.
- Doesn’t recover filenames, and files are unorganized.
- Slow scan speeds.
- No file preview.
Method 2: Restore Data from Backup
A reliable way to recover files from a formatted HDD, is to restore a backup created before you formatted the drive. According a data backup survey by Handy Recovery Advisor, about 78% of users back up their data, but only 33% do so regularly. A regular backup schedule is the best way to avoid losing your files in the face of unexpected data loss.
Both macOS and Windows provide free backup and restore tools that you should be using regularly to protect your valuable data. Here’s how to recover files after formatting a hard drive with a backup.
However, both tools are only convenient to use when backing up and restoring data from internal hard drives—it’s quite cumbersome to use these tools to back up and restore data from external storage drives.
Here’s how to restore your data using in-buit backup and restore tools in Windows, and Mac:
Windows Option: File History
Windows’ in-built backup feature, File History, can be a life-saver if you’d set it up before data loss occurred. By default, it backs up the Desktop, Documents, Pictures, and Videos folders, as well as your Contacts, and Favorites. You may be able to restore other folders and files, provided you’d manually selected them while setting up File History.
Here’s how to recover data from a formatted hard drive using File History:
- Connect the drive you’d used to set up File History.
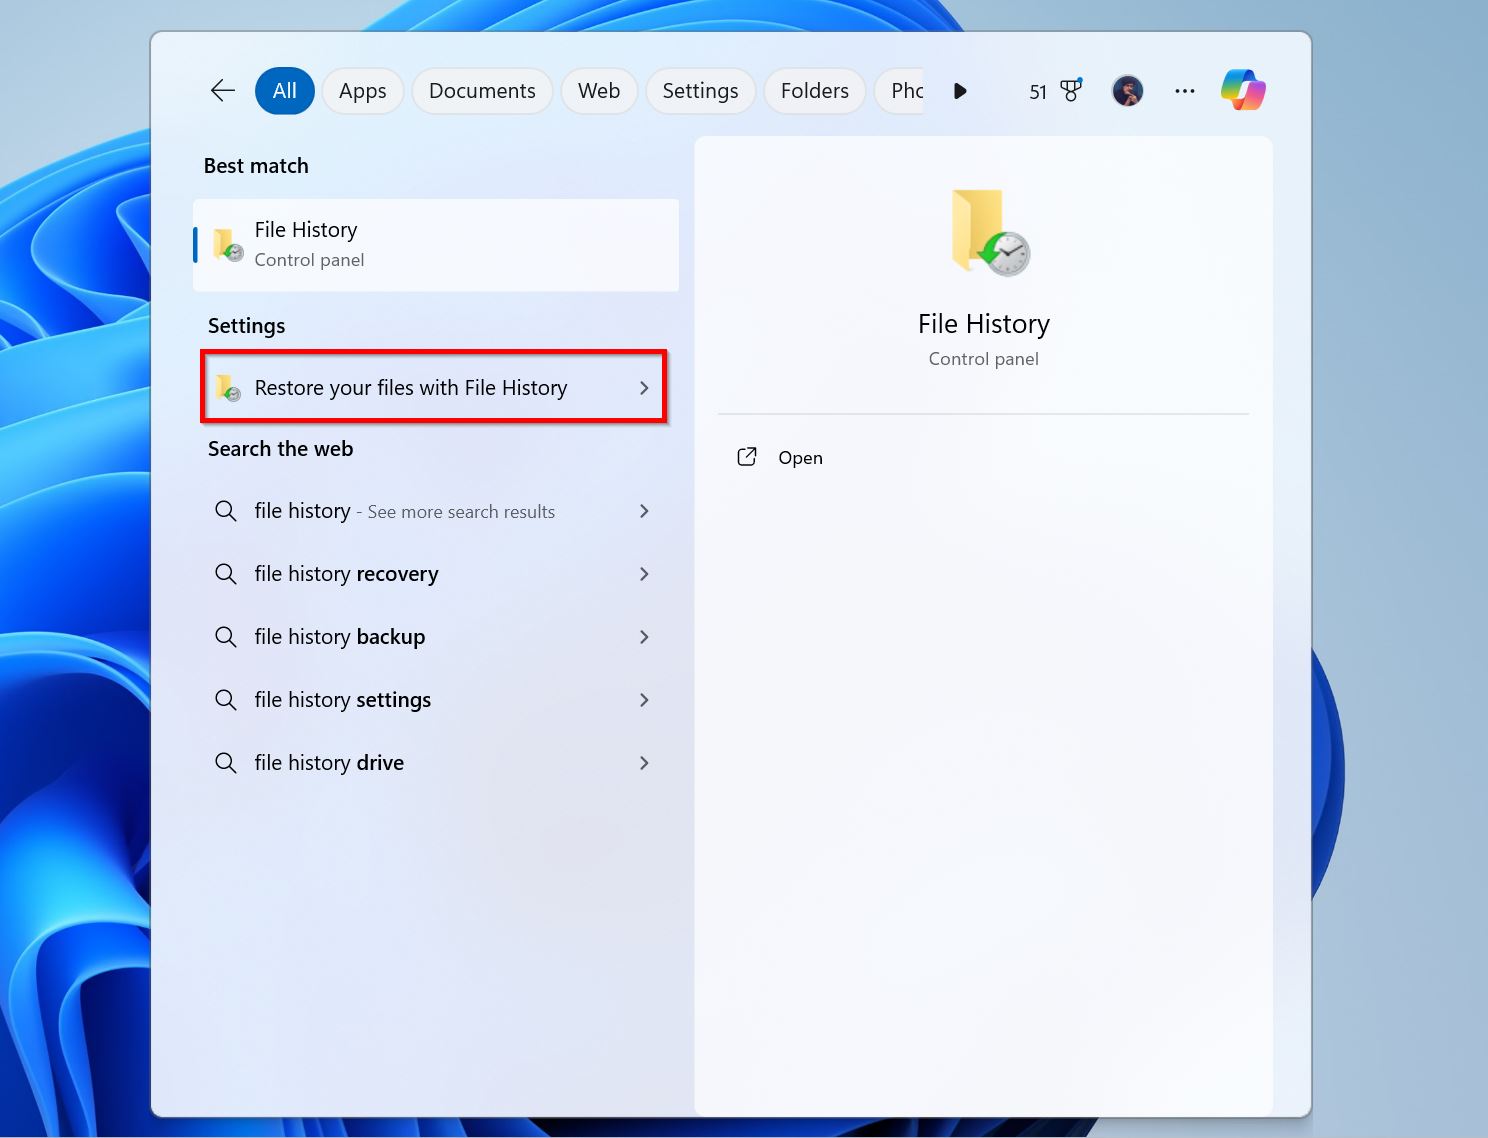
- Type “file history” in Windows Search (Windows Key + S), and click the Restore your files with File History option.
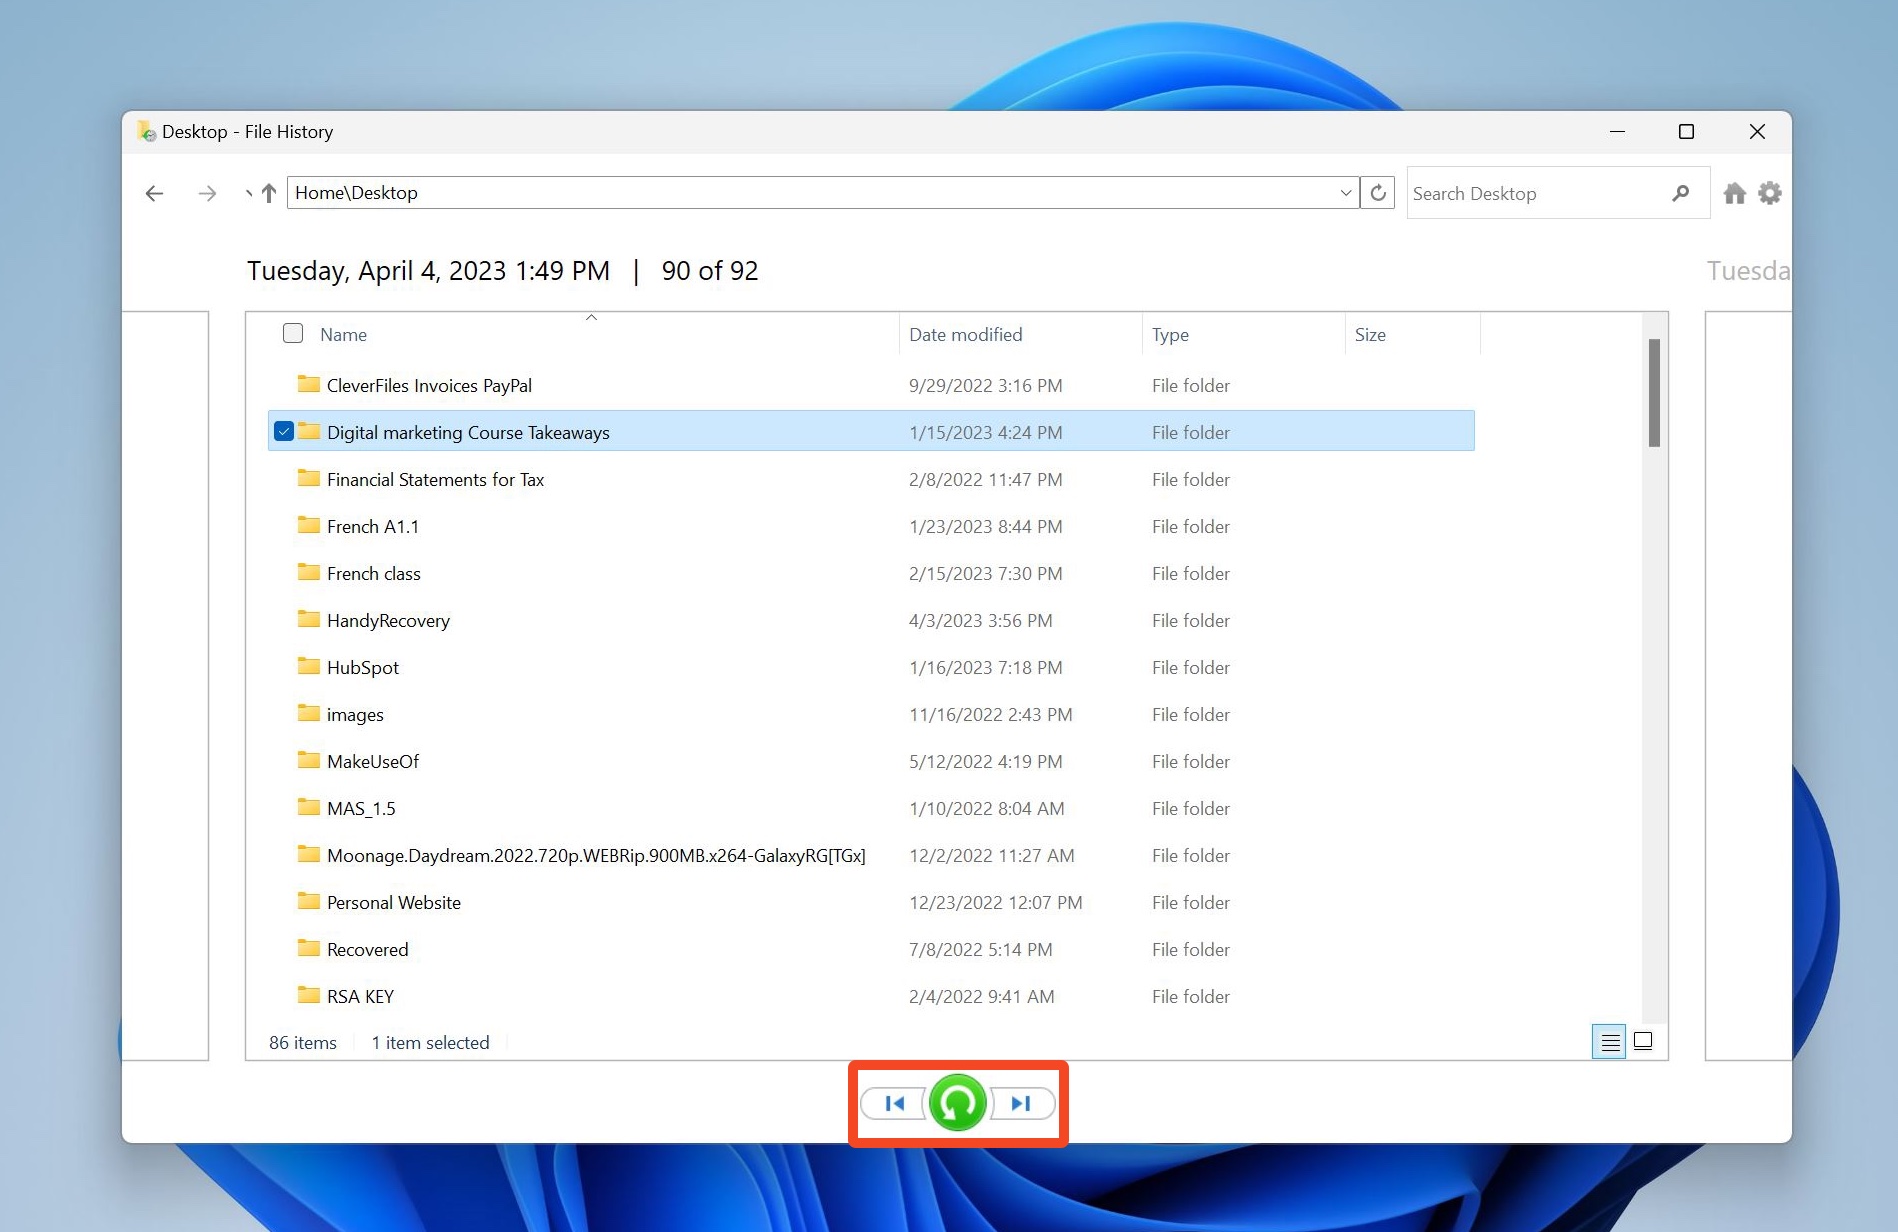
- Cycle through the backups using the navigation buttons at the bottom till you find the one containing the required files.
- Select the folders you wish to recover and click the green restore button at the bottom.
Windows has another backup & restore feature called Backup and Restore (Windows 7) that you can use on Windows versions that don’t have File History. It’s also possible you backed up your previous data from an older PC using this feature. Anyways, to restore a backup using this feature, search for “control panel” in Windows search and click on Control Panel. Then, go to Backup and Restore > Restore my files, and follow the wizard.
Pros
- Backs up important folders by default.
- Lets you restore previous versions of your files.
- Incremental backups that save disk space.
- Easy-to-use.
- Does not cover installed applications or entire disks/partitions.
- Only works if it was set up before data loss occurred.
Mac Option: Time Machine
Mac users can use the built-in Time Machine backup and recovery application to protect their data with backups. Perform the following steps if you need to use the backup storage media to restore files from a formatted drive.
- Connect the storage media containing the Time Machine backups to your Mac.
- Open a Finder window in the folder where the files you need were last stored.
- Open Time Machine by clicking the clock icon on the menu bar.
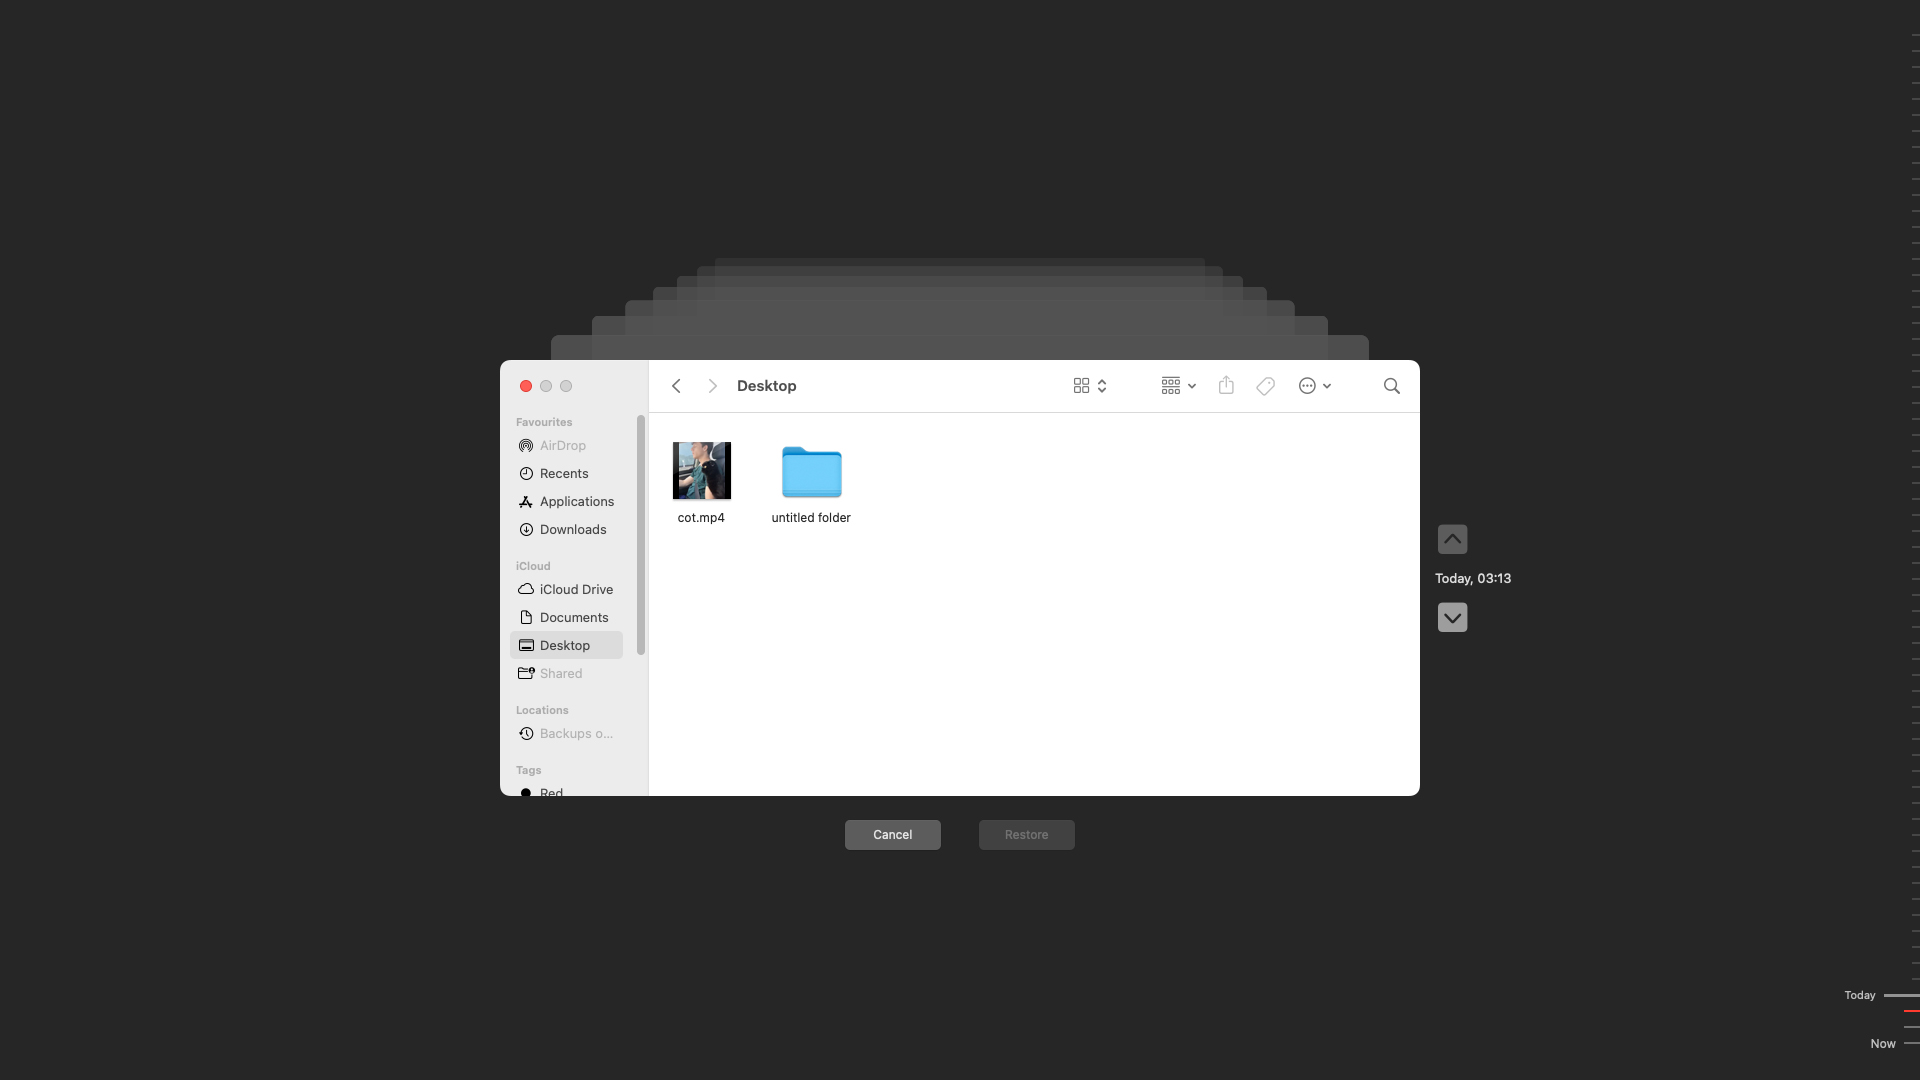
- Use Time Machine’s on-screen navigation to find the files you want to recover.
- Press the Space Bar to preview the file.
- Select the files you want to recover.
- Click Restore to recover the item.
Pros
- Creates full, and incremental backups that let you restore your entire system, including user profiles, settings, and individual files.
- Straightforward UI.
- Stores multiple versions of your files.
- Won’t work if it wasn’t set up prior to data loss.
- Cannot restore data if the local backup disk itself was formatted.
Method 3: Use a Professional Data Recovery Service
Professional data recovery services can be quite expensive. But they offer the highest chances of data recovery, barring a previously created backup. Additionally, it’s best to go to a data recovery service right away if you notice physical damage on your formatted hard drive, or if the data is too valuable to take chances with.
Note: Even a professional data recovery service won’t be able to recover your data after a full format because it overwrites all sectors of the drive with 1s and 0s. Nothing can restore overwritten data, except a time machine (pun intended).
Most data recovery services have a “No Data, No Fee” policy where you don’t pay a penny if no data is recovered. However, you may have to bear the costs of shipping or dropping off your drive. In case data is recoverable, expect to pay anywhere between $100 to thousands of dollars depending upon your data loss scenario, and how urgently you want your data back. The standard turnaround time for these services ranges from a few business days, to a few weeks. Some companies also offer a 24-48 hour turnaround time if you choose the emergency recovery option.
Here’s what to expect when using a professional data recovery service:
- Contact the data recovery company. Most have a 24*7 emergency hotline.
- Explain your data loss scenario and what led to it.
- Ship your drive to the company, or drop it off.
- The data recovery service will inspect the drive and provide you with a quote. The inspection itself is typically free.
- You can then choose to proceed with data recovery, or not.
Pros
- Unparalleled peace of mind because your drive is being handled by experts.
- Advanced data recovery tools and experts ensure that the chances of data recovery are maximized.
- Can recover data from physically damaged drives as well.
- Substantially more expensive than data recovery apps.
- Can’t undo a full format.
- Shipping or dropping off the drive may be a hassle.
- Finding a good data recovery service in a small town can be difficult.
To Summarize
Data recovery from a formatted drive is possible provided you performed a quick format. There’s no dearth of options either. You can go the DIY route by using a professional data recovery app, or restoring a backup. If your data is critical, and you don’t wish to take any chances, a professional data recovery service is the best option for you.
If you’re still struggling to get back your data after reading this article, go through the FAQs below, and feel free to leave a comment.
FAQ:
- Double-click the Recycle Bin icon on the Desktop.
- Select the files you want to recover.
- Right-click them, and choose Restore.
- Click on the Trash icon on the Dock.
- Select the files you want to restore.
- Right-click and choose Put Back.


