 With the accessibility of camera gadgets nowadays, it’s easy to take a bunch of photos at a time, transfer them to your hard drive, and take some more. But what if all your photos accidentally get lost on your drive? Can you recover them?
In this guide, we will explain what affects your chances of photo recovery from a computer hard drive, along with a step-by-step guide on the different methods to recover deleted photos from hard drive on Windows 10 and 11.
Is It Possible to Recover Deleted Photos from Hard Drive?
Yes! Recovering photos from a computer hard drive is possible. But the chances of successful photo recovery depend on why they were lost in the first place.
For example, hard drive photo recovery will become extremely difficult, if not impossible, if your hard drive suffered severe physical damage. Similarly, full formatting of your drive will also harm your chances of photo recovery.
Here are some other factors that can impact your chances of successfully recovering your photos:
- ⏳ Time since deletion or overwriting of data. The longer you wait, the higher the chances that your data will be overwritten, which in turn lessens the chance of successful photo recovery.
- 🛠️ Recovery tool. The data recovery software you use matters. Some tools can preview and recover way more image file types than others.
- ⚠️ System errors. System corruption can make your data harder to identify and piece together, even with good data recovery software.
- 🧩 Defragmentation. In simple terms, defragmentation rearranges the data placement on your drive, aiming to improve its read/write speed. If you defragment your drive after data loss, it will be harder to recover pictures from hard drive.
- 📐 File size. Recovering photos with larger file sizes might take longer or make it harder for data recovery software.
Remember to attempt data recovery as soon as you can to increase your chances of successfully getting your files back.
How to Recover Deleted Photos and Pictures from Hard Drive
It can be simple to recover permanently deleted photos from PC using the right tools and methods. Let’s take a look at some of the tested ways to recover your photos:
Method 1:Checking Recycle Bin
I know it sounds obvious, but checking if the Recycle Bin hasn’t been emptied yet is a good start when attempting photo recovery. Maybe your files just got accidentally deleted, but they still exist in the Recycle Bin.
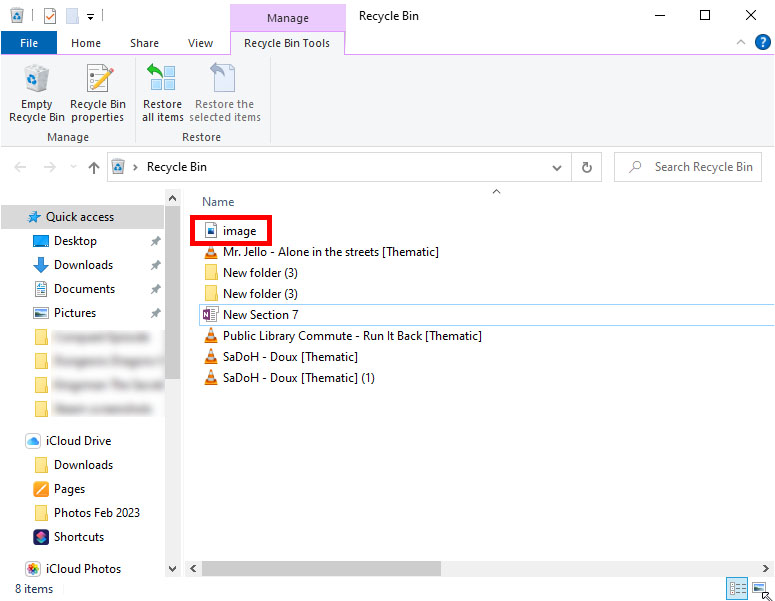
Get your photos back by going to the Recycle Bin, searching and selecting the deleted photos, and right-clicking the photos > Restore.
Method 2:Using backups
If you’re someone who regularly backs up your important files, you can use this method to restore your photos. If you do not have existing backups, go ahead and skip to the next method.
File History
File History is a built-in tool on Windows for backing up and restoring your files. Once you turn on File History, it will keep track of the older versions of your files and allow you to restore a previous version of them.
So if you want to use this for photo recovery, you have to check the folder where your photos/images were and verify if previous versions exist.
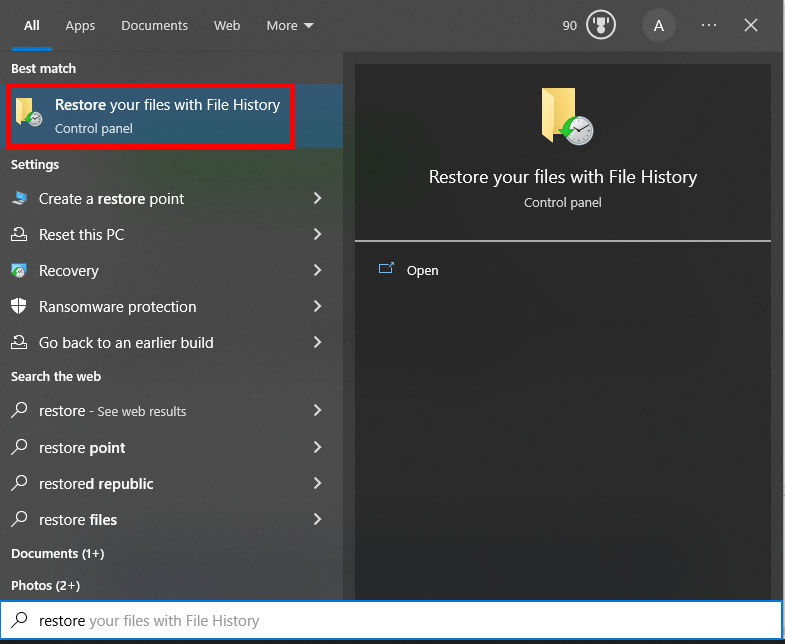
Here’s a quick and easy step-by-step guide on how to restore accidentally deleted photos using File History:
- First, go to the Start Menu and search “File History” or “Restore your files with File History” and select Restore your files with File History.
- Next, check for the photos that you want to restore. Once you find your photos, select them and click the Restore button on the bottom part of the window.
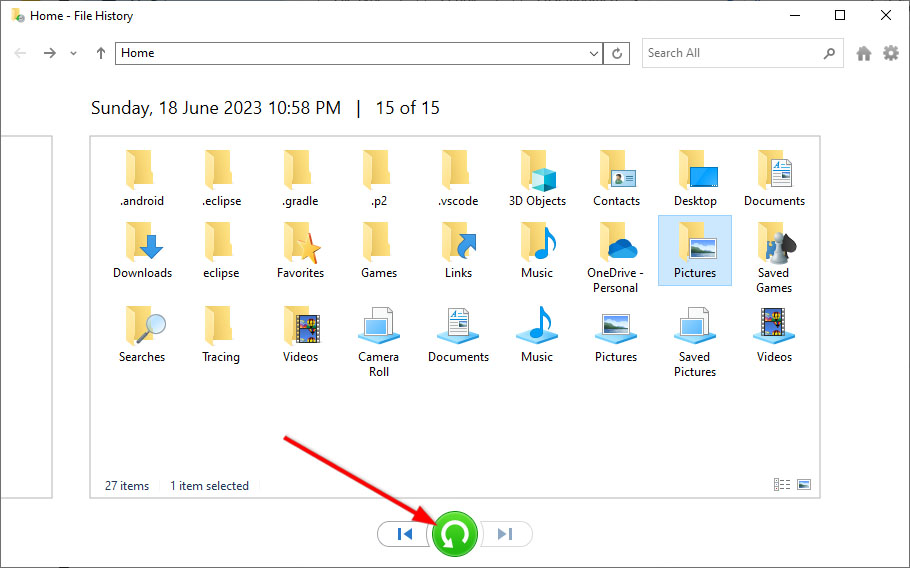
You can also restore a previous version of a folder that contained your photos prior to data loss. Just Right-click on the folder, select Restore previous versions, check for the older versions that exist, choose which one you want to recover, and click Restore.
OneDrive
For Windows 8.1 and up, OneDrive is already included on Windows. If you use OneDrive to back up your files, you can easily find and restore your deleted photos by going to your OneDrive account.
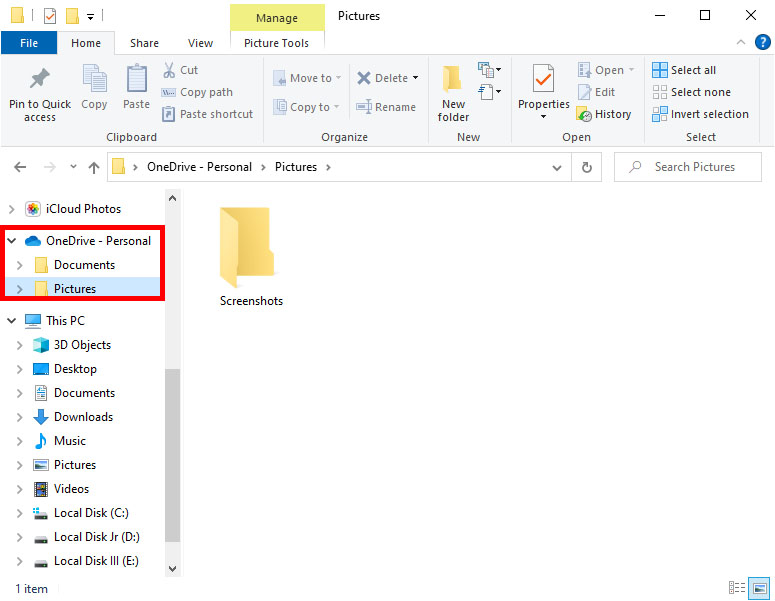
Simply open your OneDrive folder on the web or in File Explorer to search for your lost photos and download them to a new location.
Other cloud storage backups
You can also check for other cloud backup options you may have used in the past. Some of these include Google Drive, Dropbox, and iCloud. All you have to do is log in to your cloud backup account and search for the folder where your photos were.
If your photos originally came from another device, such as a smartphone or a camera, you can also try to recover deleted photos from your phone by checking for automatic backups performed before data loss. For example, Google allows you to automatically backup photos on Google Photos and use up to 15GB of free storage.
Method 3:Use Data Recovery Software
If you’re left with no options or backups where you can get back your deleted photos, you can use a reliable photo recovery app to get the job done.
Disk Drill is a popular choice for Windows photo recovery software. Not only can it deeply scan your hard drive, but it also supports photo recovery for cameras and other storage devices. It has a user-friendly interface and can preview and recover almost every image file type available nowadays, such as RAW photos, .jpg, .png, .bmp, .gif, and many more.
Disk Drill also has other handy features, such as byte-to-byte backups for your hard drive, SMART monitoring, and data protection. You can also recover deleted photos from hard drive for free with Disk Drill Windows for up to 500 MB allotment for the free version.
Remember that if your hard drive is not accessible for any reason, it’s best to perform a byte-to-byte backup of your drive first and scan the drive image created instead.
To recover deleted photos from hard disk on Windows 10/11, simply follow the steps outlined below:
- First, download and install Disk Drill.

- Once successfully installed, open Disk Drill. The main window displays all the drives and partitions you can scan. Click your hard drive and click Search for lost data.

- Upon clicking, the scan will begin. You can choose to preview the photos that have been scanned so far by clicking on the Pictures filter, even when the scan hasn’t finished yet. If you want to finish the scan first, skip to the next step.

- After the scan is complete, click the Pictures filter or click Review found items.

- You can search for your photos by file name using the search bar on the upper-right side of the window. Alternatively, you can browse through all the scanned photos to find the ones you want to recover. Select all the photos you want to restore and click Recover.

- After that, choose a file destination and click Next.

- The photo recovery process will start. Once it’s done, Disk Drill will redirect you to an information page displaying recovery information. Finally, you can click Show recovered data in Explorer to open File Explorer and view your photos.

A good tip when trying to recover permanently deleted photos from hard drive is to avoid using your hard drive after data loss. We also recommend storing your recovered photos on a different drive to avoid overwriting data.
Conclusion
Using the right tools and proven methods, you can increase your chances to recover and get pictures off a hard drive on Windows 10/11. But remember that the reason for data loss will affect the recoverability of your photos. If your hard drive is physically damaged or has undergone a full format, the chances of recovery will be lower.
By checking the Recycle Bin for your photos, restoring from a Windows backup or other cloud storage solutions, or using data recovery software like Disk Drill, you can try to recover your cherished photos and images with a few steps.
We recommend that you stop using your hard drive after data loss and perform photo recovery as soon as you can to maximize your data recovery chances.
FAQ:
- Download and install Disk Drill. Open it.
- Click on your external hard drive, then click Search for lost data.
- Once Disk Drill has finished scanning the drive, click Review found items.
- Review the discovered recoverable files and tick the files you want to recover. When ready, click Recover.
- Specify a recovery location, then click Next.
