 USB drives are commonly used by malicious actors to infect and steal data from unsuspecting users. If you’re wondering how to deal with a virus-infected pen drive, you’re in the right place, as this article tells you all you need to know about USB virus removal. We’ve also included a guide on how to recover your data in case the virus compromised your files.
Understanding USB Viruses
USB drives are a cheap and convenient way to transfer data between computers. Their small form factor allows you to attach them to your keys or keep them in your pocket. What’s more, USB drives have reached storage sizes of up to 1 TB, which is mind-boggling, considering they are smaller than the average human thumb.
But, all the things that make the pen drive so fantastic, are also why it’s a big red use me button for hackers and malicious actors. It’s extremely easy to infect a computer using a USB drive. Many hackers simply drop an infected USB drive in a public space. Seven times out of ten, curiosity gets the better of the person who picks up the drive, and they connect the drive to their PC. Here’s an interesting study about this phenomenon on the Elie website.
There are several types of USB malware. Some common ones include:
| Type of USB Virus | Description | Symptoms |
| Autorun.inf | A type of virus that replicates and creates copies of itself on all your drives. It infects the victim’s PC as soon as they open the USB drive in Windows Explorer, by exploiting Windows’ Autorun.inf file, which is responsible for auto-playing media and performing specific actions as soon an external storage drive is connected. | You are automatically being redirected to malicious websites, or random apps are being installed and launched on your PC. Mysteriously disappearing documents and other important files. |
| USB shortcut virus | Typically, a combination of a worm and Trojan horse malware. Like dedicated Autorun.inf viruses, shortcut viruses also take advantage of the Autorun feature on Windows. The shortcut virus hides all the original files on your computer, replacing them with malicious shortcuts. Clicking on these shortcuts executes the virus, and it replicates and performs various malicious activities on your computer. | All your programs have been replaced with shortcuts. Slow system performance, random programs being installed, and redirection to shady websites are also some common symptoms. |
| USB worms | Worms are viruses that replicate themselves within a PC or network. Usually, they are created to steal information, provide a backdoor into the computer/network, and corrupt files. | Worms can take up huge amounts of memory and storage bandwidth, thus slowing down your computer and rapidly decreasing free storage space. Watch out for missing files or new ones being created. |
| USB Trojans | UBS Trojans are programs that look harmless on the surface but are malicious underneath. Hackers use them to steal passwords, record keystrokes. These viruses can also modify your system in a way that it’s left unusable. | Symptoms of a Trojan horse infection include–slow PC performance, frequent system crashes and freezes, frequent internet pop-ups, and apps behaving strangely. |
How to Remove Viruses from a USB Drive
There are several ways to deal with the different types of USB viruses. We’ll guide you through all the methods in this section. But, before you proceed, it’s a good idea to disable the Autorun feature on Windows, as most viruses exploit the Autorun.inf file to infect a computer.
Here’s how to disable Autorun in Windows:
- Press Windows + R to open the Run application. Type
regeditin the text box and press Enter. - Navigate to HKEY_CURRENT_USER\Software\Microsoft\Windows\CurrentVersion\Policies in the Registry Editor.
- Right-click on the blank space in the right pane and click on New > DWORD (32-bit) Value.
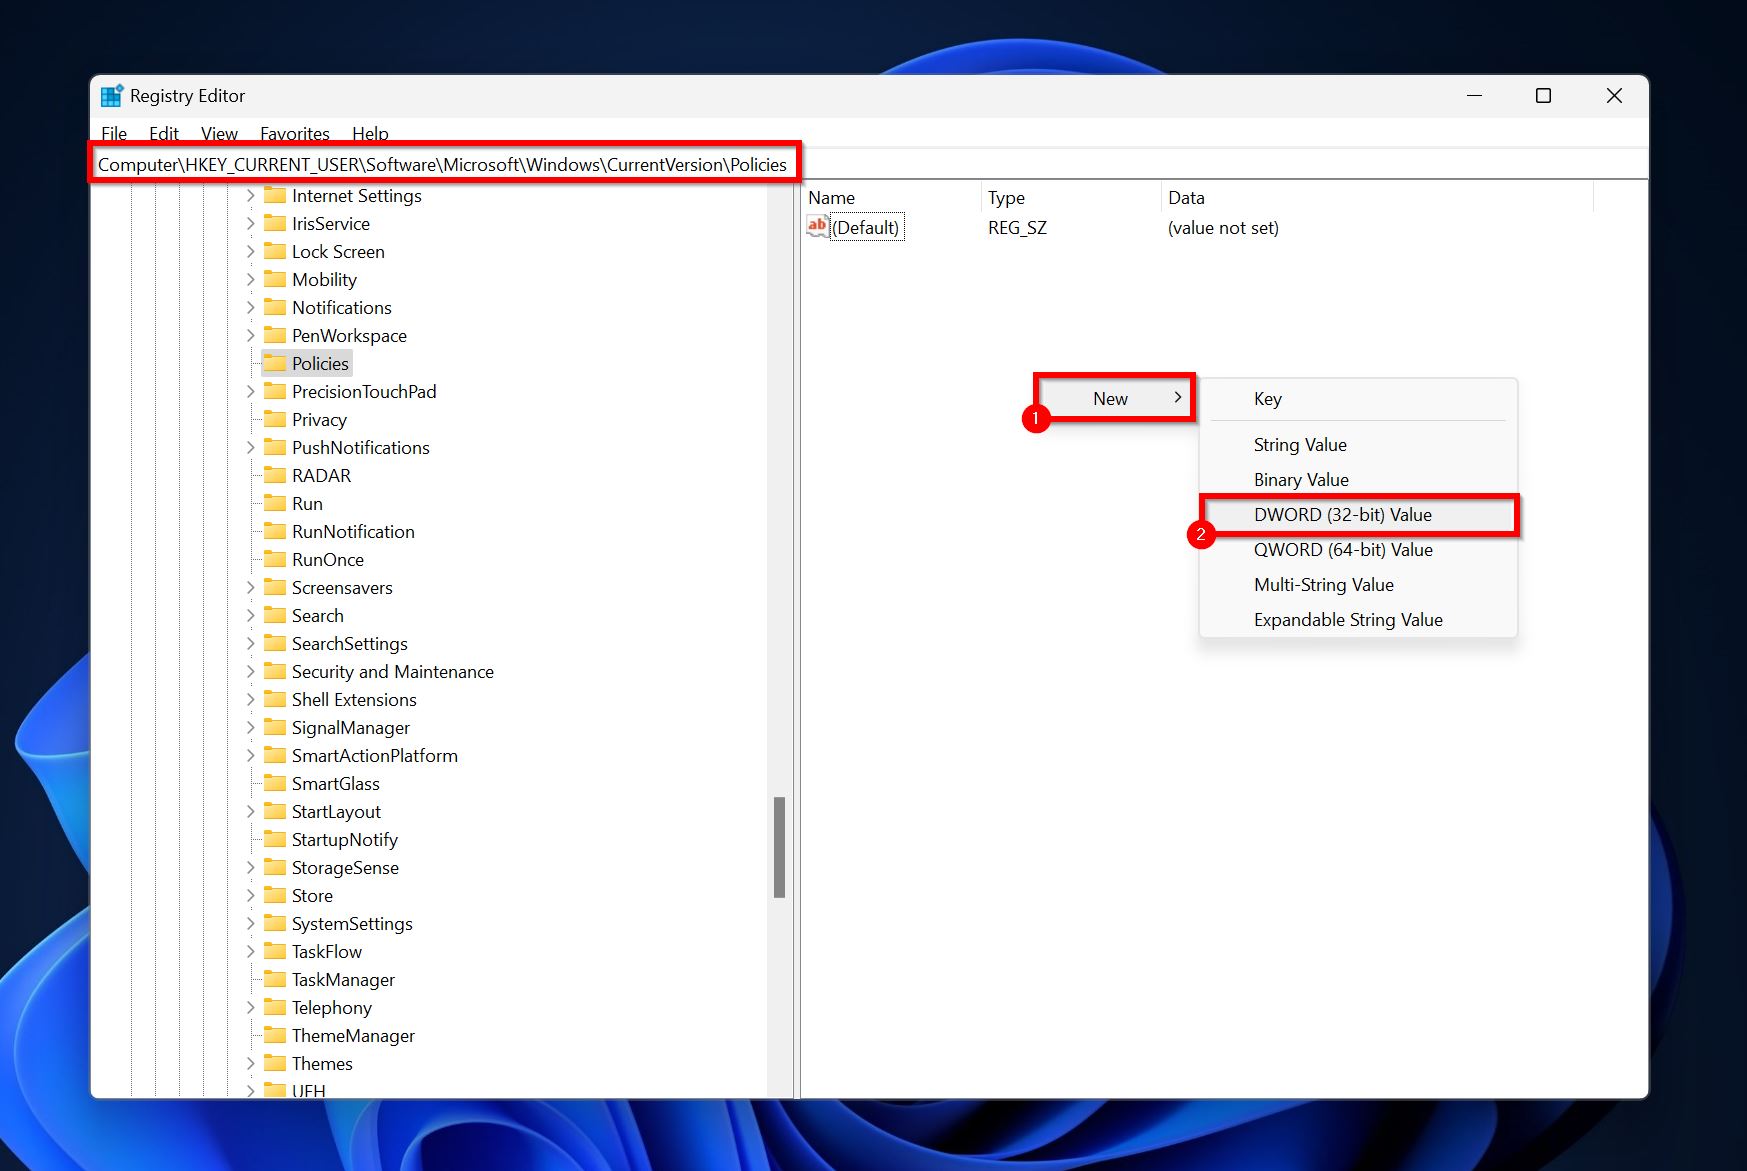
- Name this entry you created as NoDriveTypeAutorun.
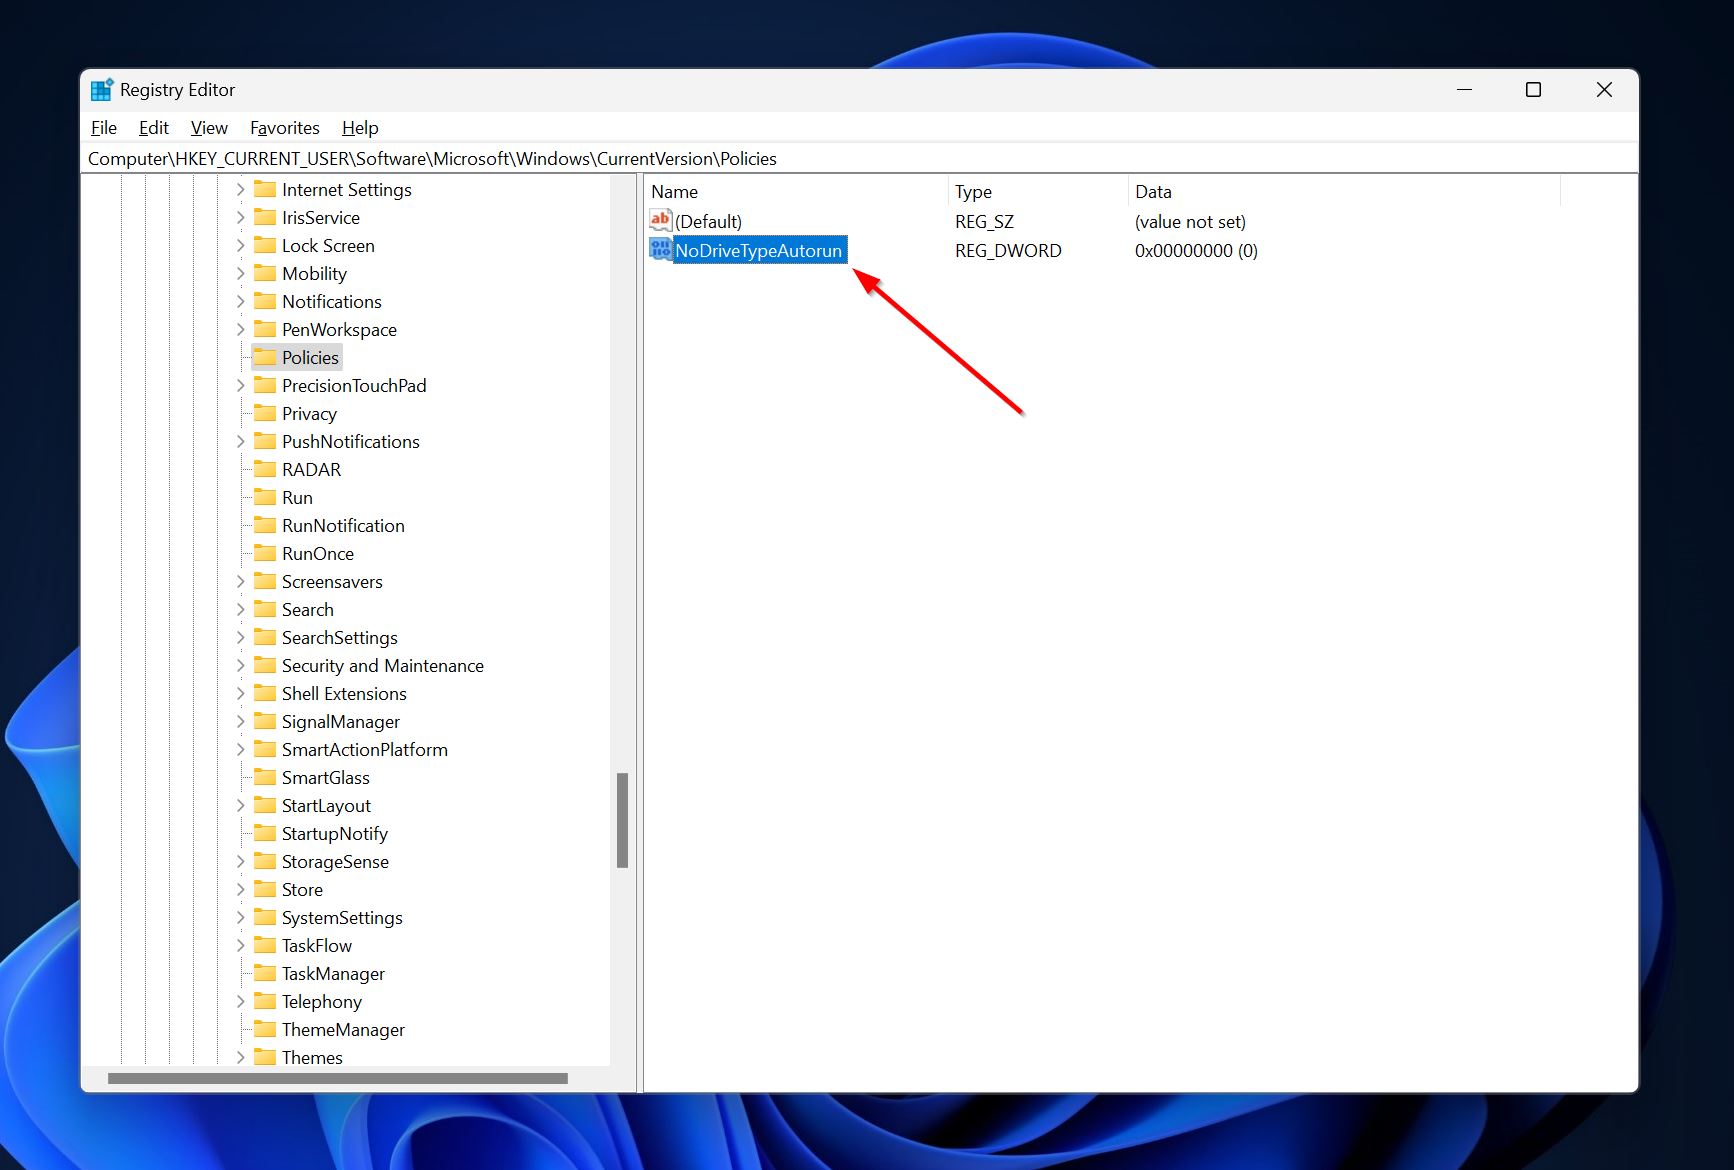
- Double-click on the NoDriveTypeAutorun entry and under Value data, type FF and click OK.
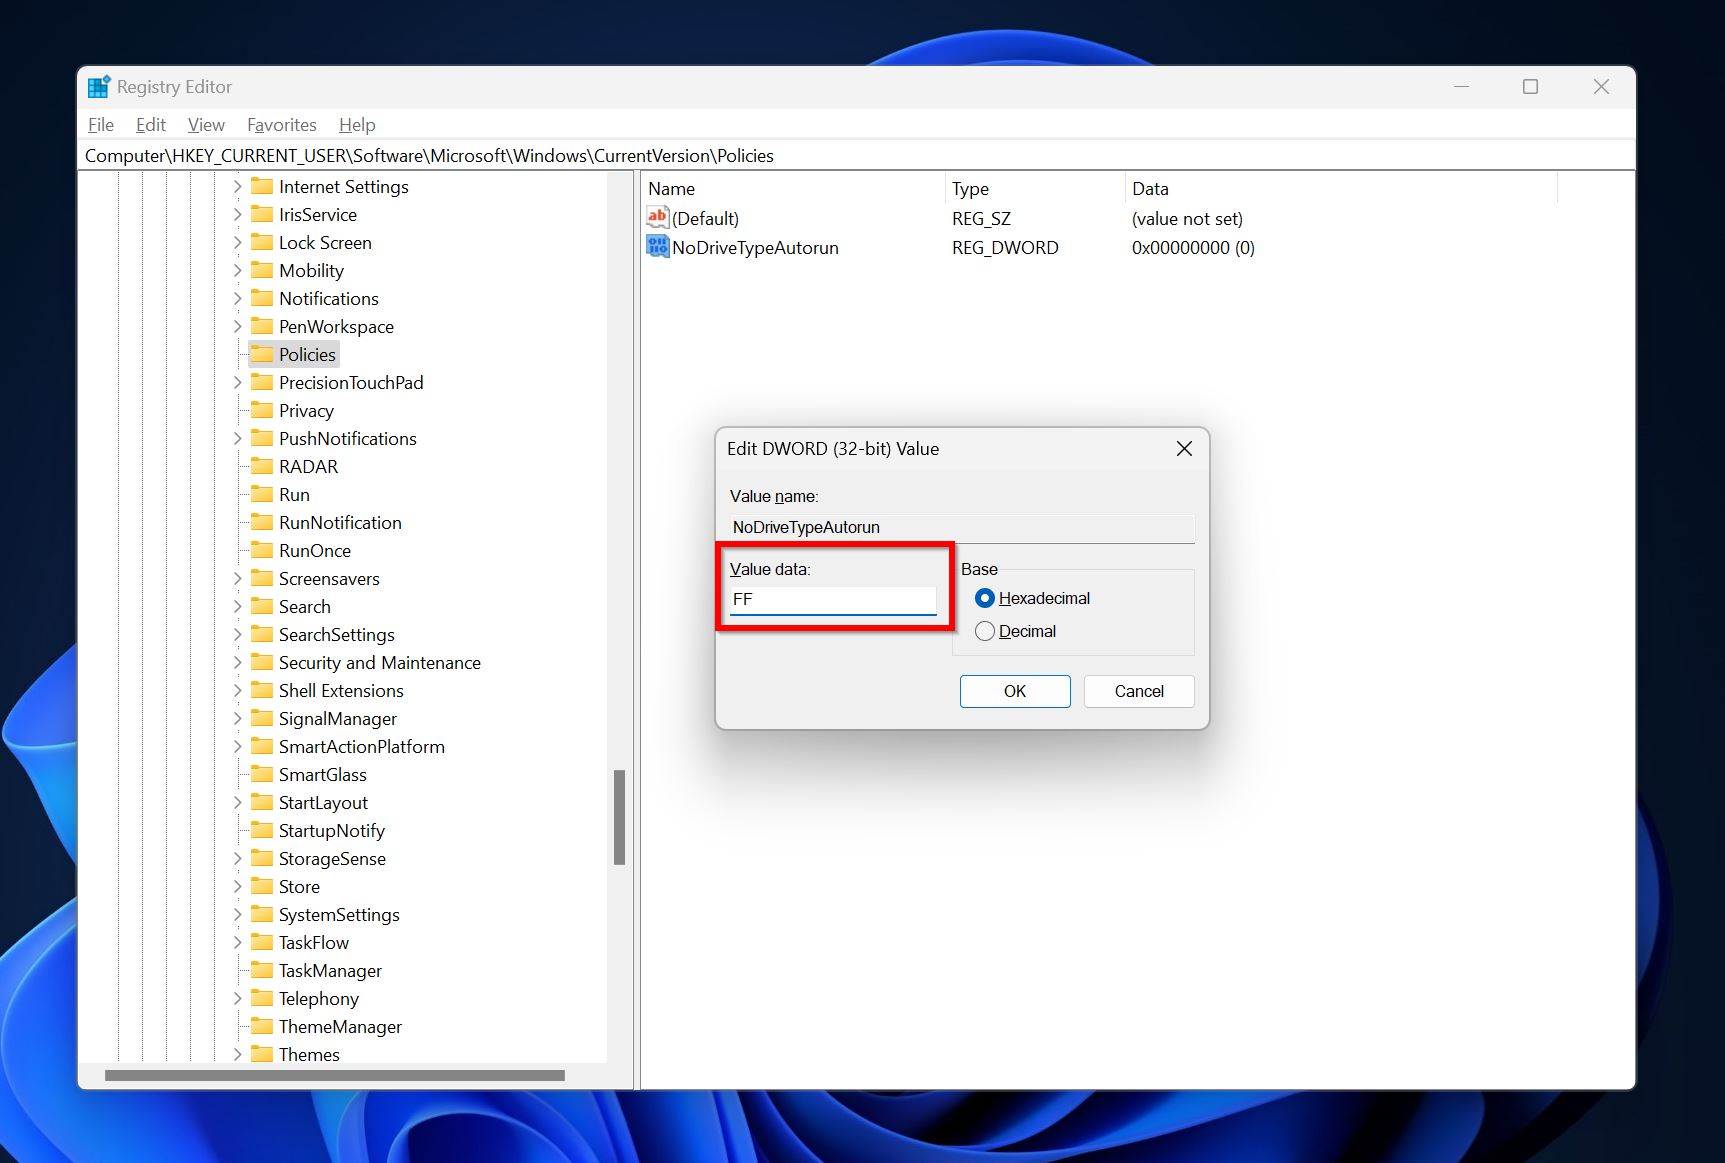
Now, let’s take a look at the various ways you can remove viruses from your USB drive.
Method 1:Scan the Drive Using an Antivirus Software
A good antivirus program should be able to detect and remove the virus from your pen drive, regardless of the type of malware. The easiest and most straightforward way to remove malware from your USB drive is to scan with an antivirus program of your choice. Nowadays, even the in-built antivirus solutions in Windows – Windows Defender/Windows Safety (Windows 10 and Window 11), or Windows Safety Scanner (Windows 8) – can detect and remove a wide array of viruses.
The exact process of performing an antivirus scan on your USB drive using a third-party antivirus will differ, depending on the vendor. Usually, you can simply right-click on the infected flash drive and choose the Scan with option.
For Windows Safety and Windows Defender, the USB virus removal process will look something like this:
- Search for Windows Security in Windows Search (Windows + S) and open the app.
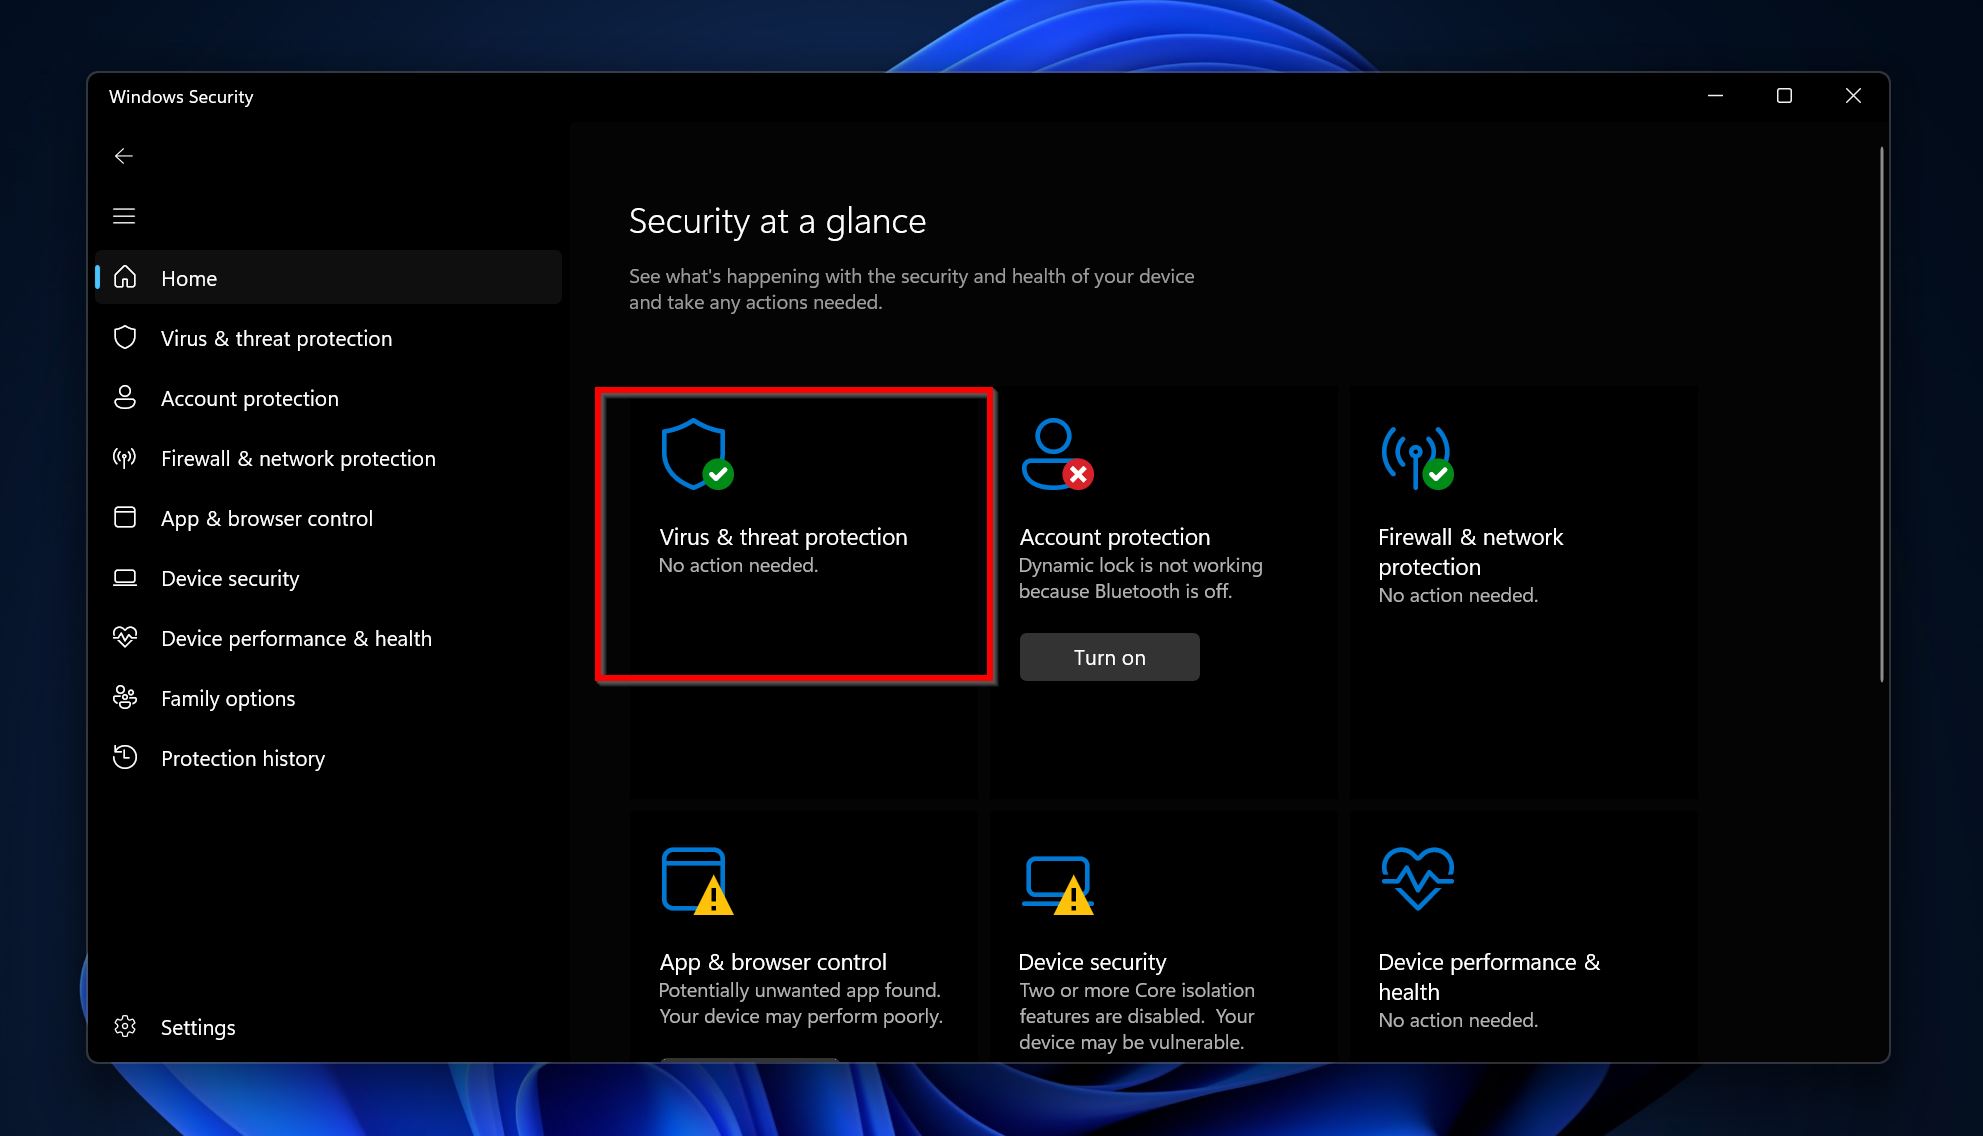
- Click on Virus & threat protection in the Windows Security dashboard.
- Click on Scan options under Current Threats.
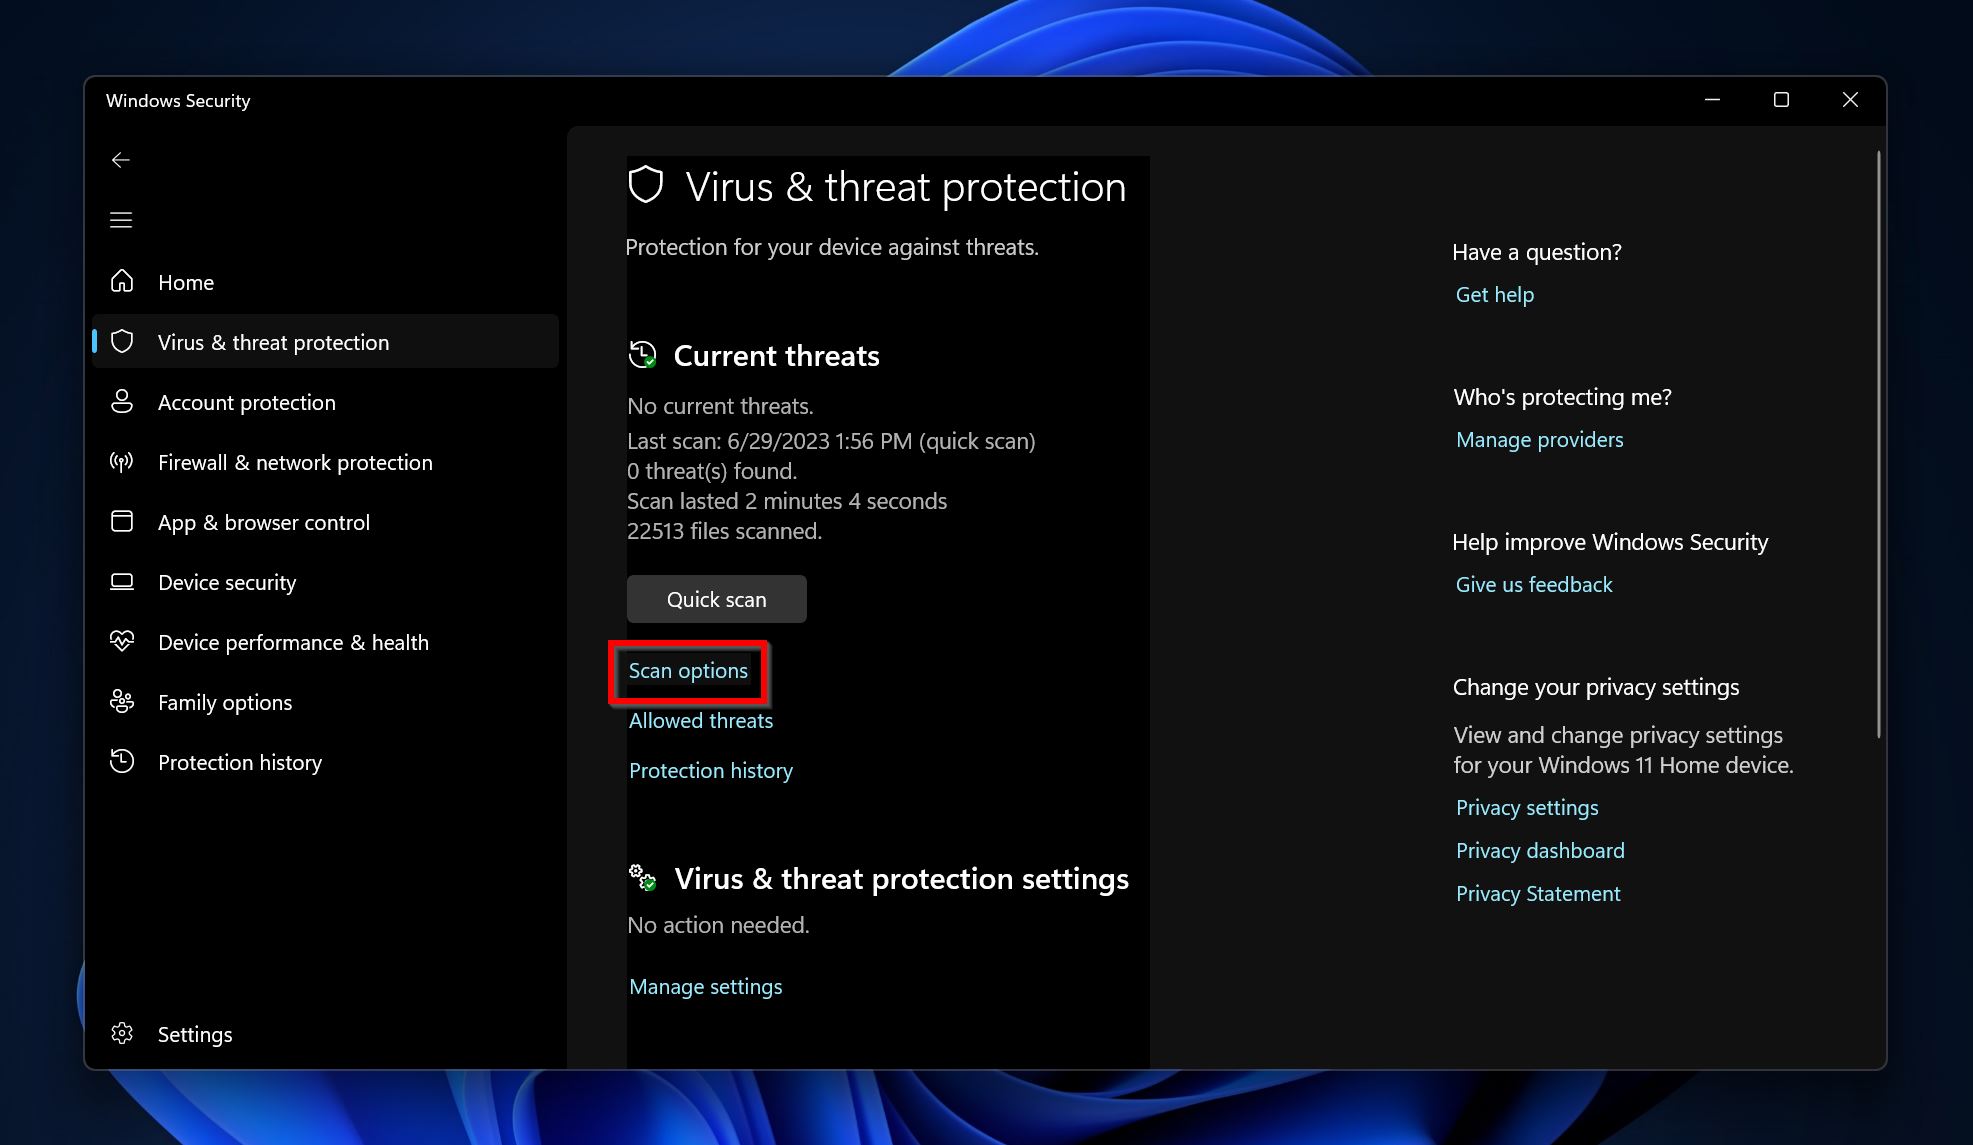
- Select Custom scan and then click on Scan now.
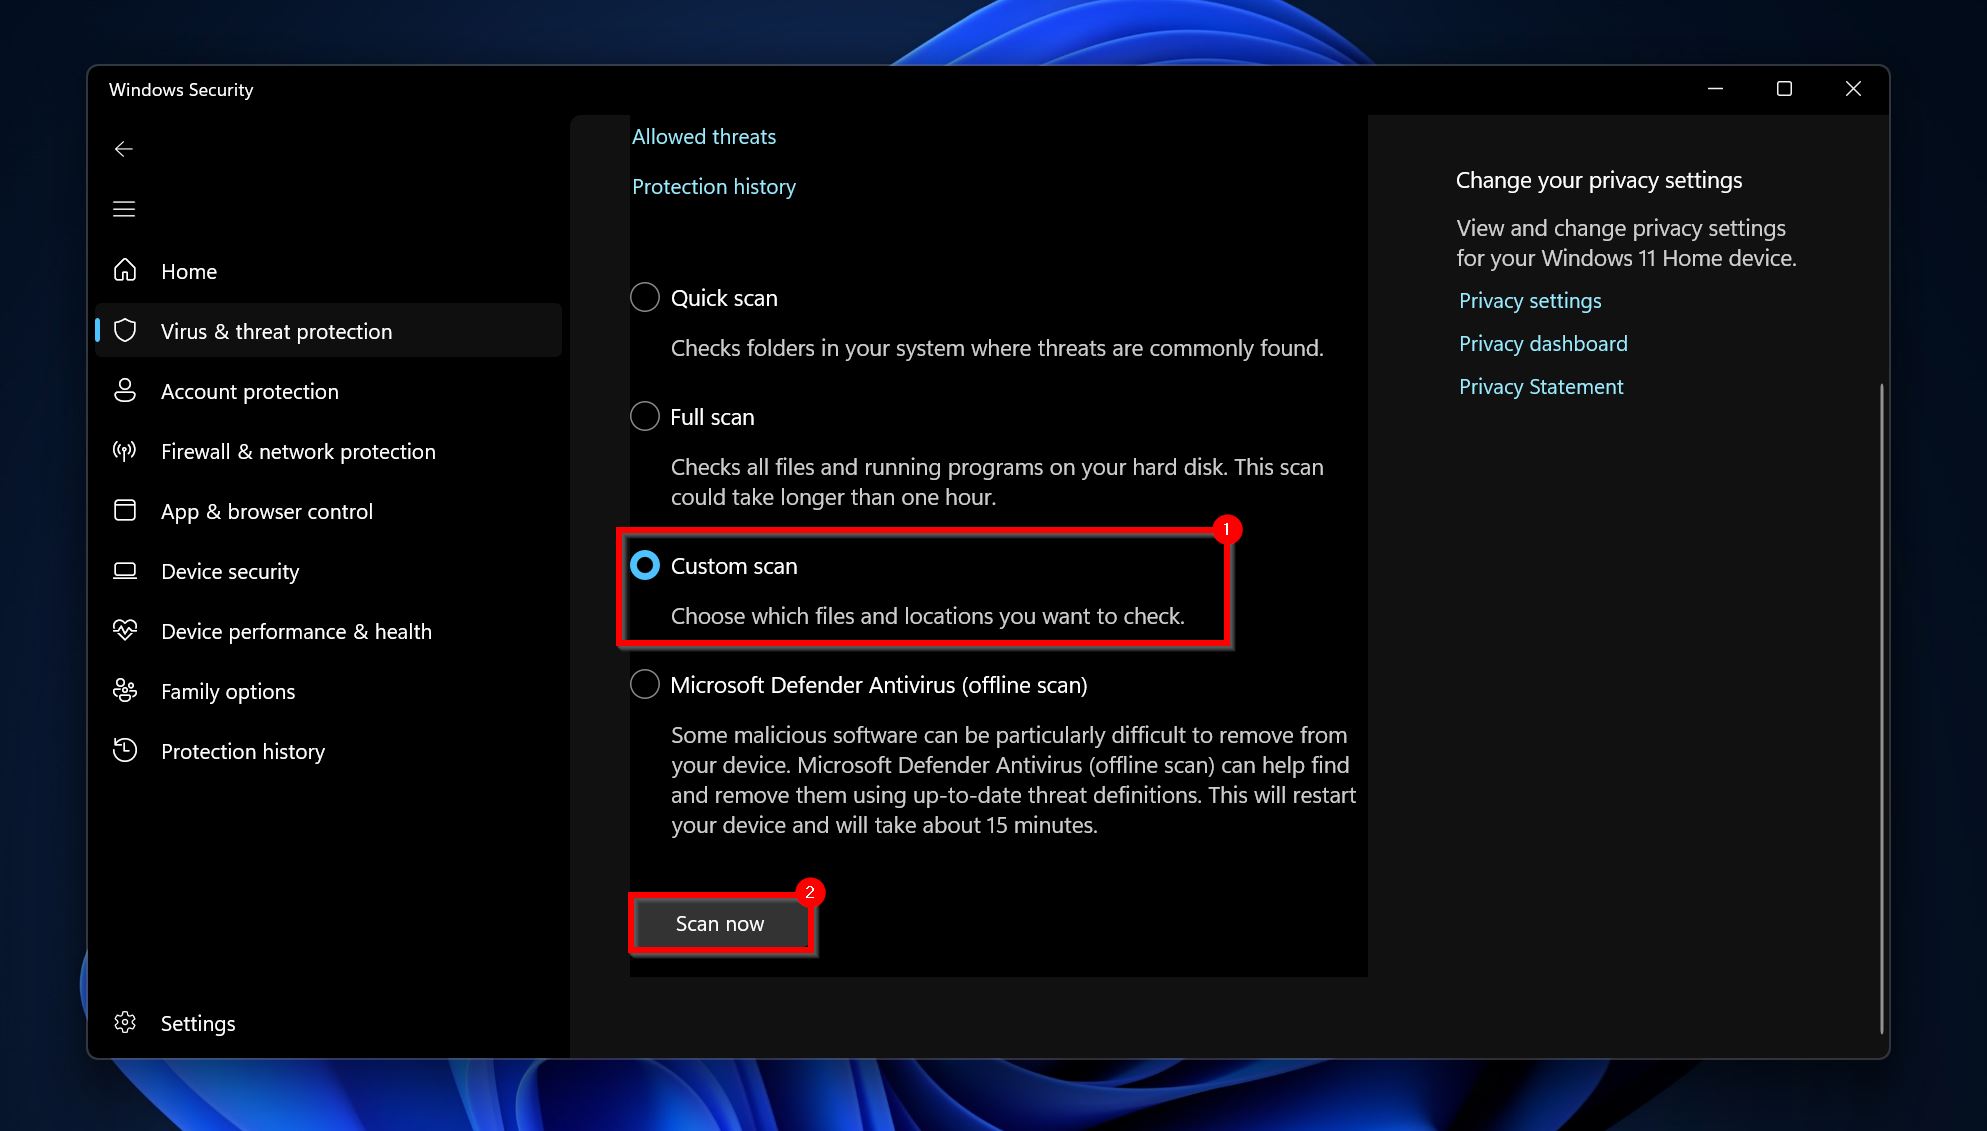
- Browse to the USB drive and select a folder to scan it. You cannot scan the entire drive at once. To make the process easier, you can move all the files to one folder and select that folder.
Method 2:Remove Viruses Manually
If the antivirus scan didn’t detect the virus on your USB drive, you can opt to manually delete it from the drive. There are two ways of going about this–selecting the suspicious files and deleting them from the drive, or formatting the USB.
We recommend you perform a format since that’s what is most likely to remove all viruses from your pen drive. You may wonder, “What about the useful files on my flash drive?” Well, as long as the “Perform a quick format” option is ticked while formatting, you can get those files back using a data recovery program. More on this, in the data recovery section of this article.
For now, let’s see how you can format the pen drive to remove the virus:
- Open Windows Explorer (Windows + E).
- Right-click on the pen drive and choose Format.
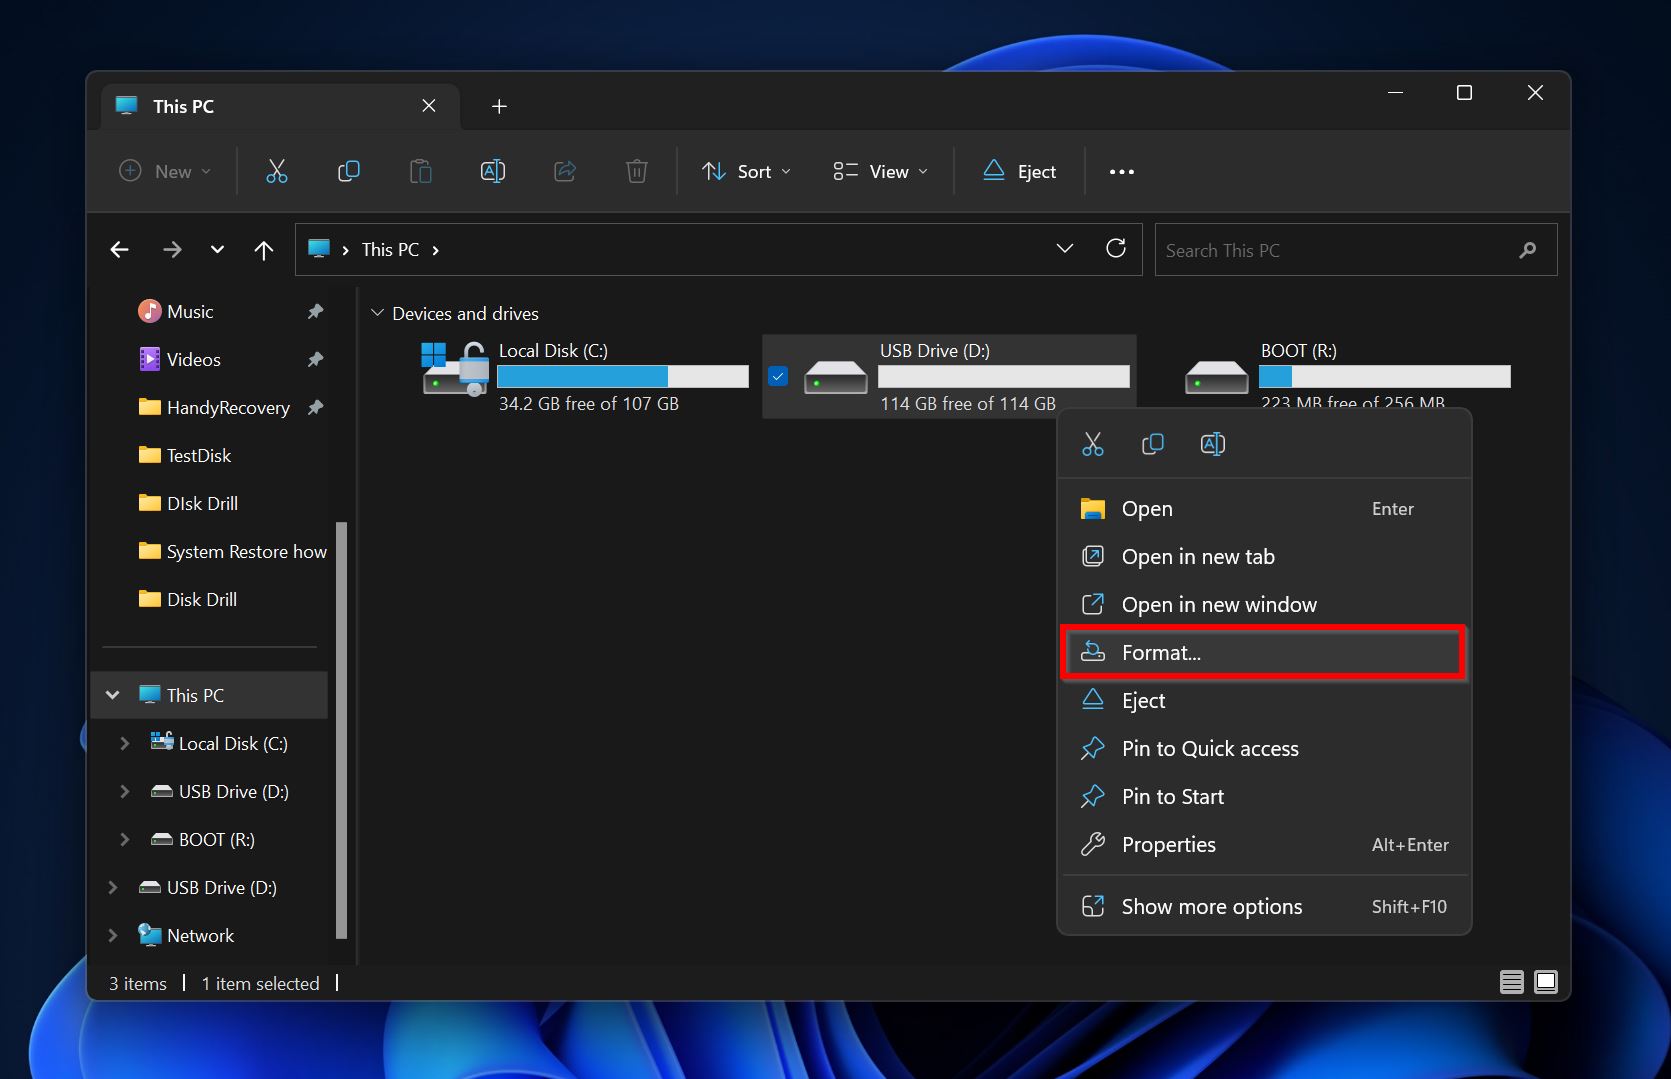
- Choose the format options according to your needs. Ensure the Quick format option is ticked and then click on Start.
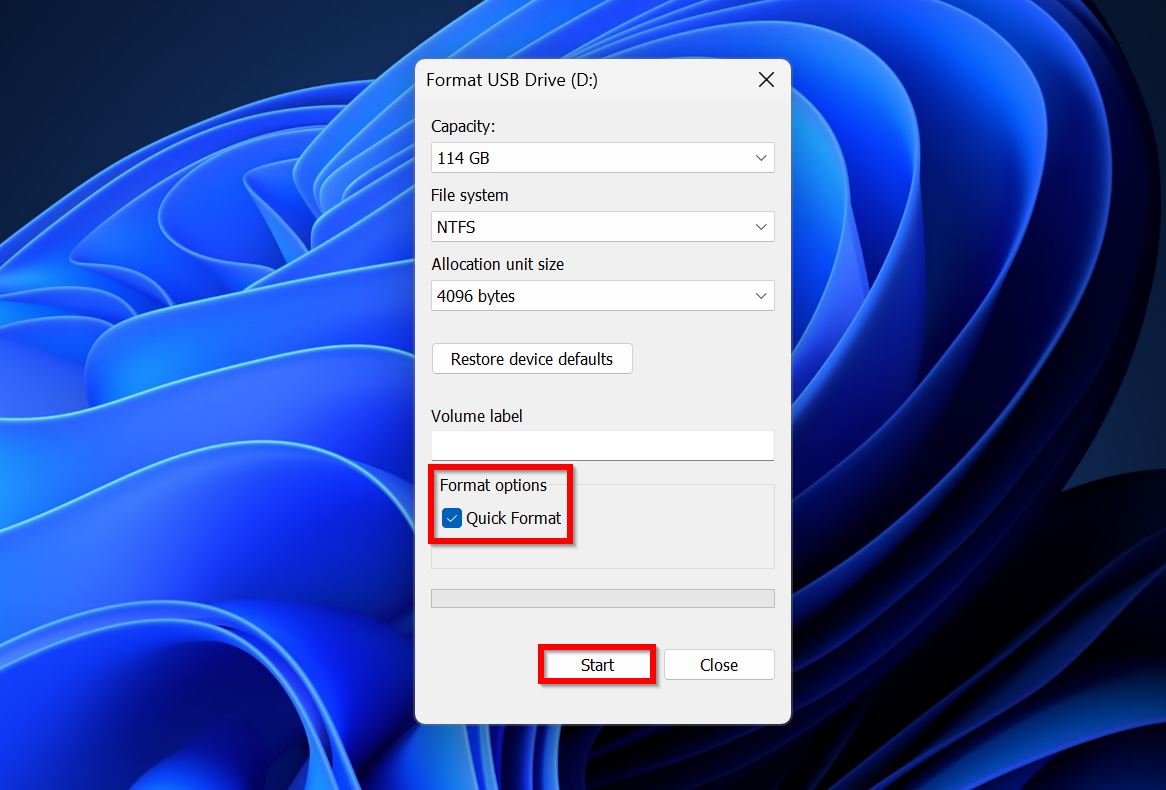
- Windows will format the USB drive.
Method 3:Remove the Shortcut Virus
Shortcut viruses are particularly adept at escaping detection by humans and antivirus programs alike. There are dedicated, free USB shortcut virus remover tools available on the web that can detect and delete shortcut viruses automatically, but we cannot vouch for their efficacy.
If you didn’t run any of the shortcuts created by the virus–you can manually remove the shortcut virus from your USB, using CMD or the Command Prompt. This method eliminates the need to download any additional tools to do the deed.
Follow these steps carefully:
- Search for “cmd” in Windows Search (Windows + S) and right-click on Command Prompt > Run as administrator from the search results.
- Type
X:in the console and press Enter. Replace X with the drive letter of the USB drive (such as D:, F:, etc.). You can use the Windows Explorer to find this out.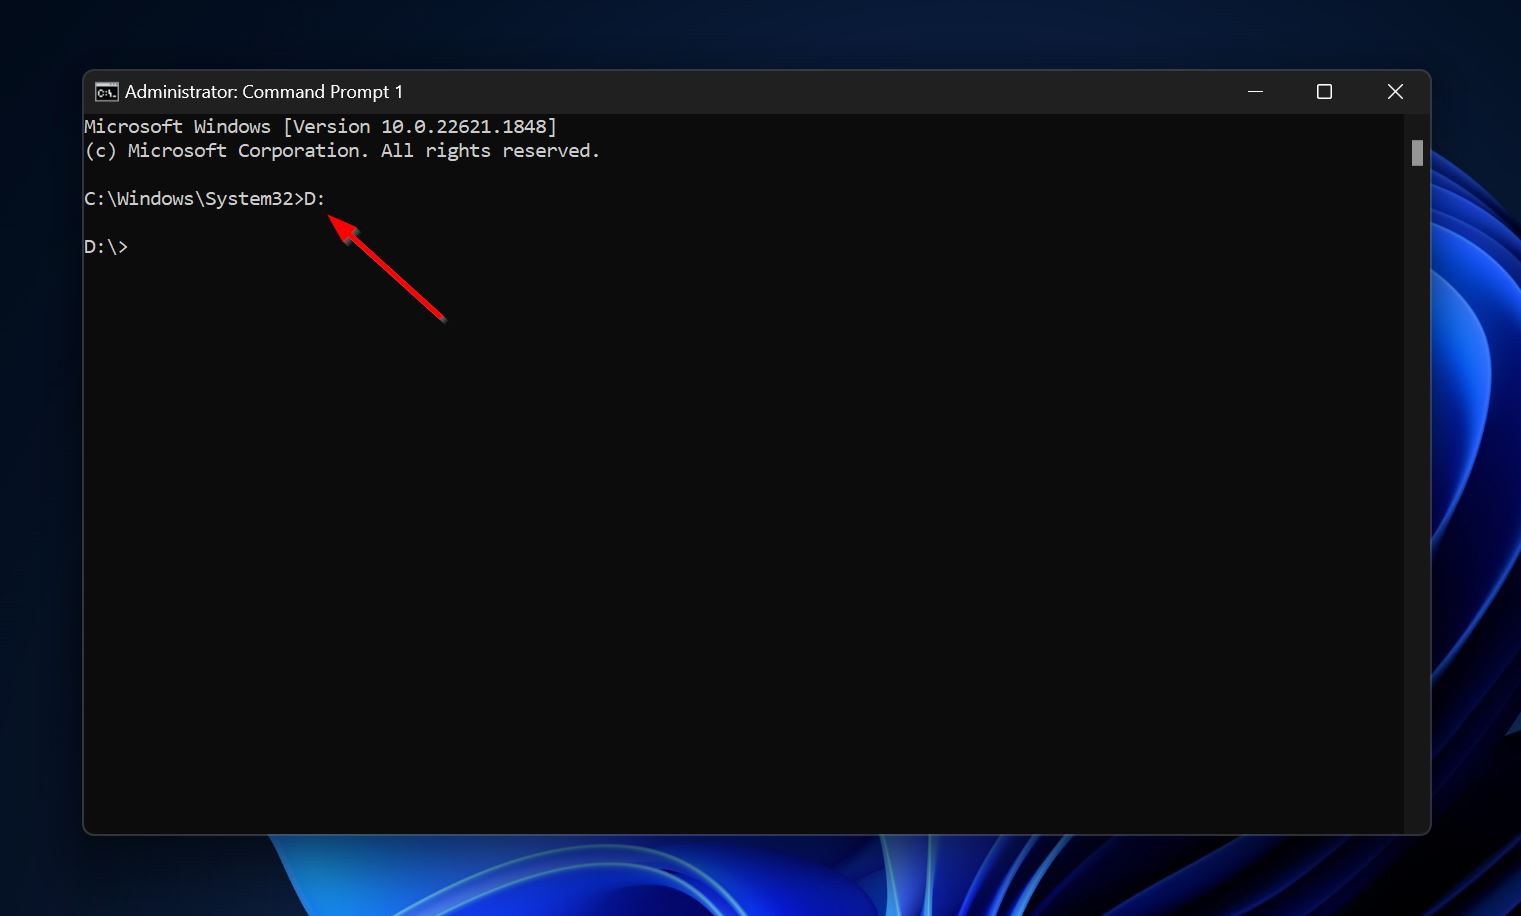
- Now, type
del *.lnkand press Enter. This will delete all shortcuts from the drive.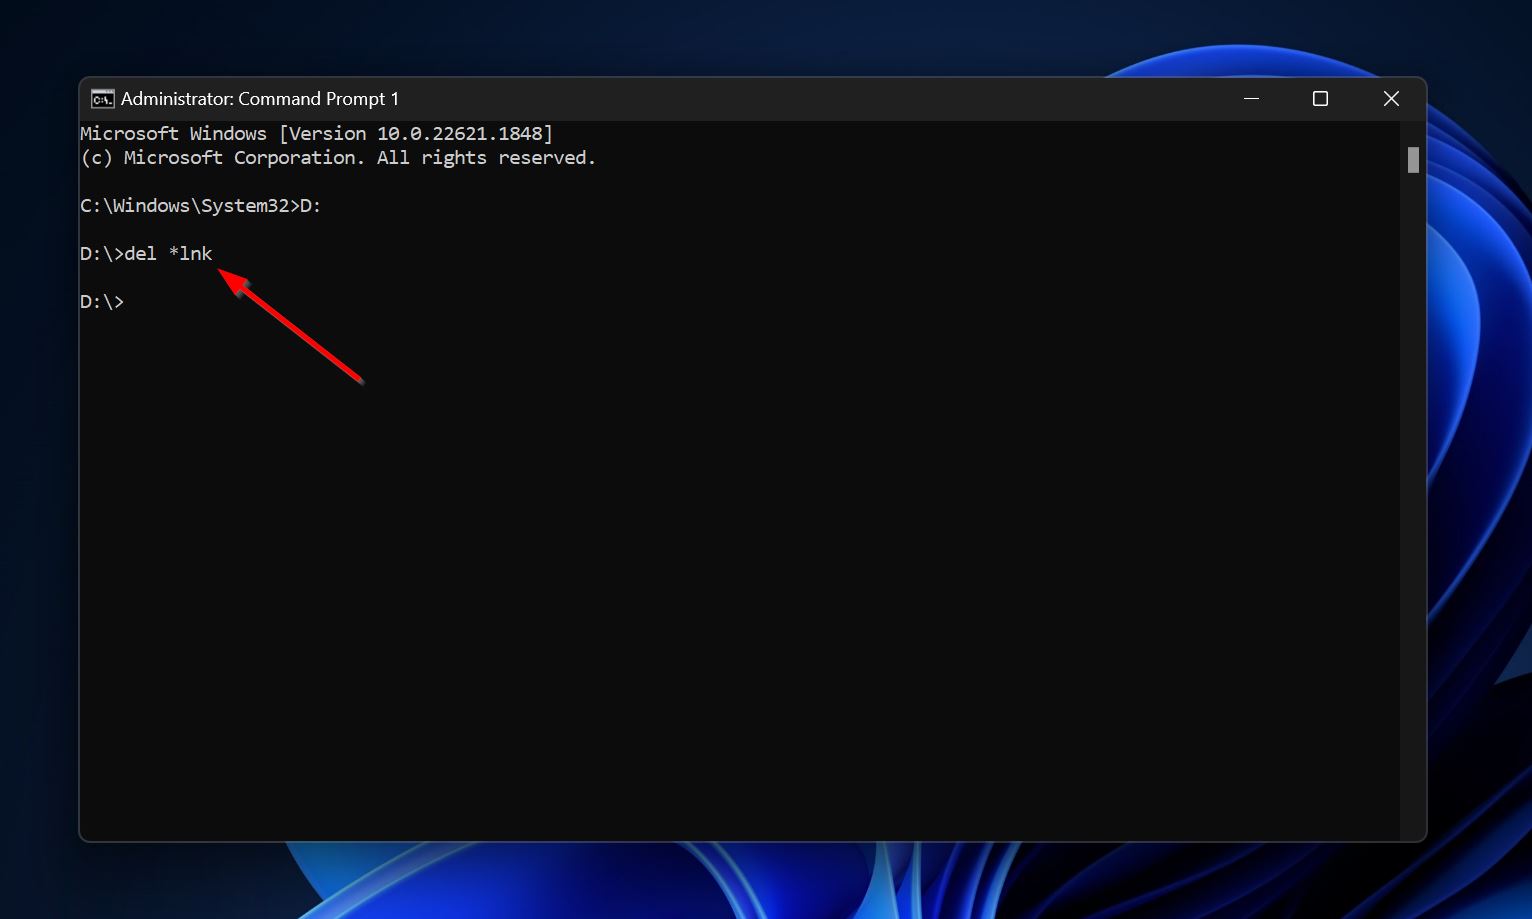
- Finally, type
attrib -s -r -h /s /d *.*and press Enter. This will make all the programs and files that the shortcut virus hid, visible again.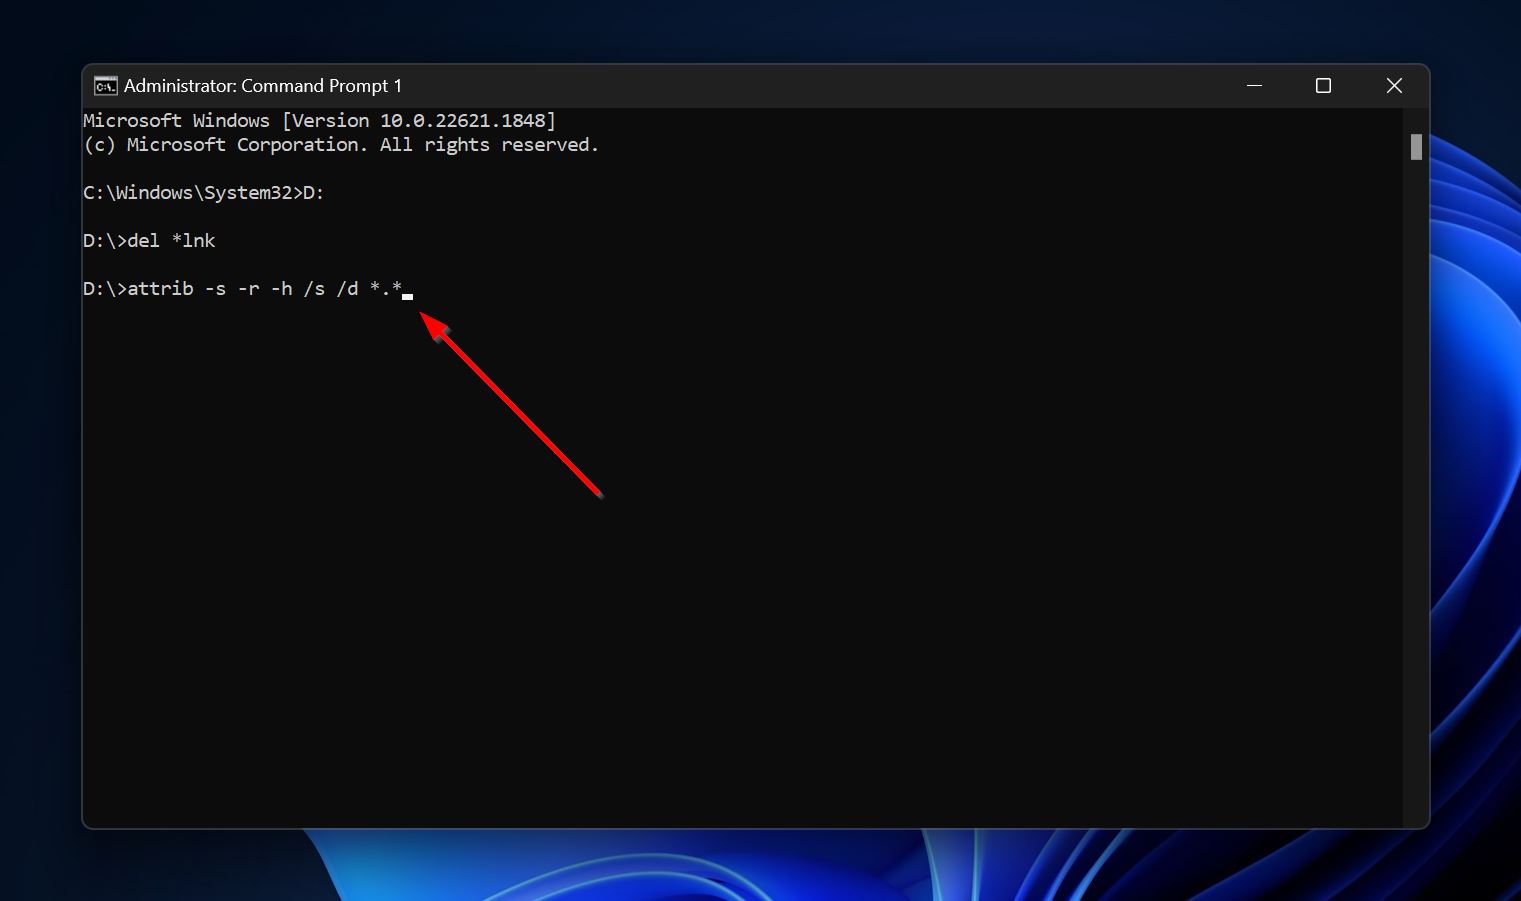
How to Recover Data Lost Due to a Virus on Your USB Drive
Most viruses will impact your data in some way–either corrupt it, or outright delete it. Additionally, removing a virus could require formatting your pen drive. How do you get back your files in this case? It’s simple, use a reliable data recovery program.
For our tutorial, we decided to use Disk Drill, because of its ease of use and advanced data recovery algorithm. The best part is, you don’t have to worry about whether it’ll work with your particular USB drive or not, as Disk Drill is compatible with all major file systems. As a Windows user, you can take advantage of the program’s free trial that lets you recover up to 500 MB of files at no cost.
Here’s to recover data from your USB drive after a virus attack:
- Download Disk Drill and install it.
- Connect the USB drive to your PC.
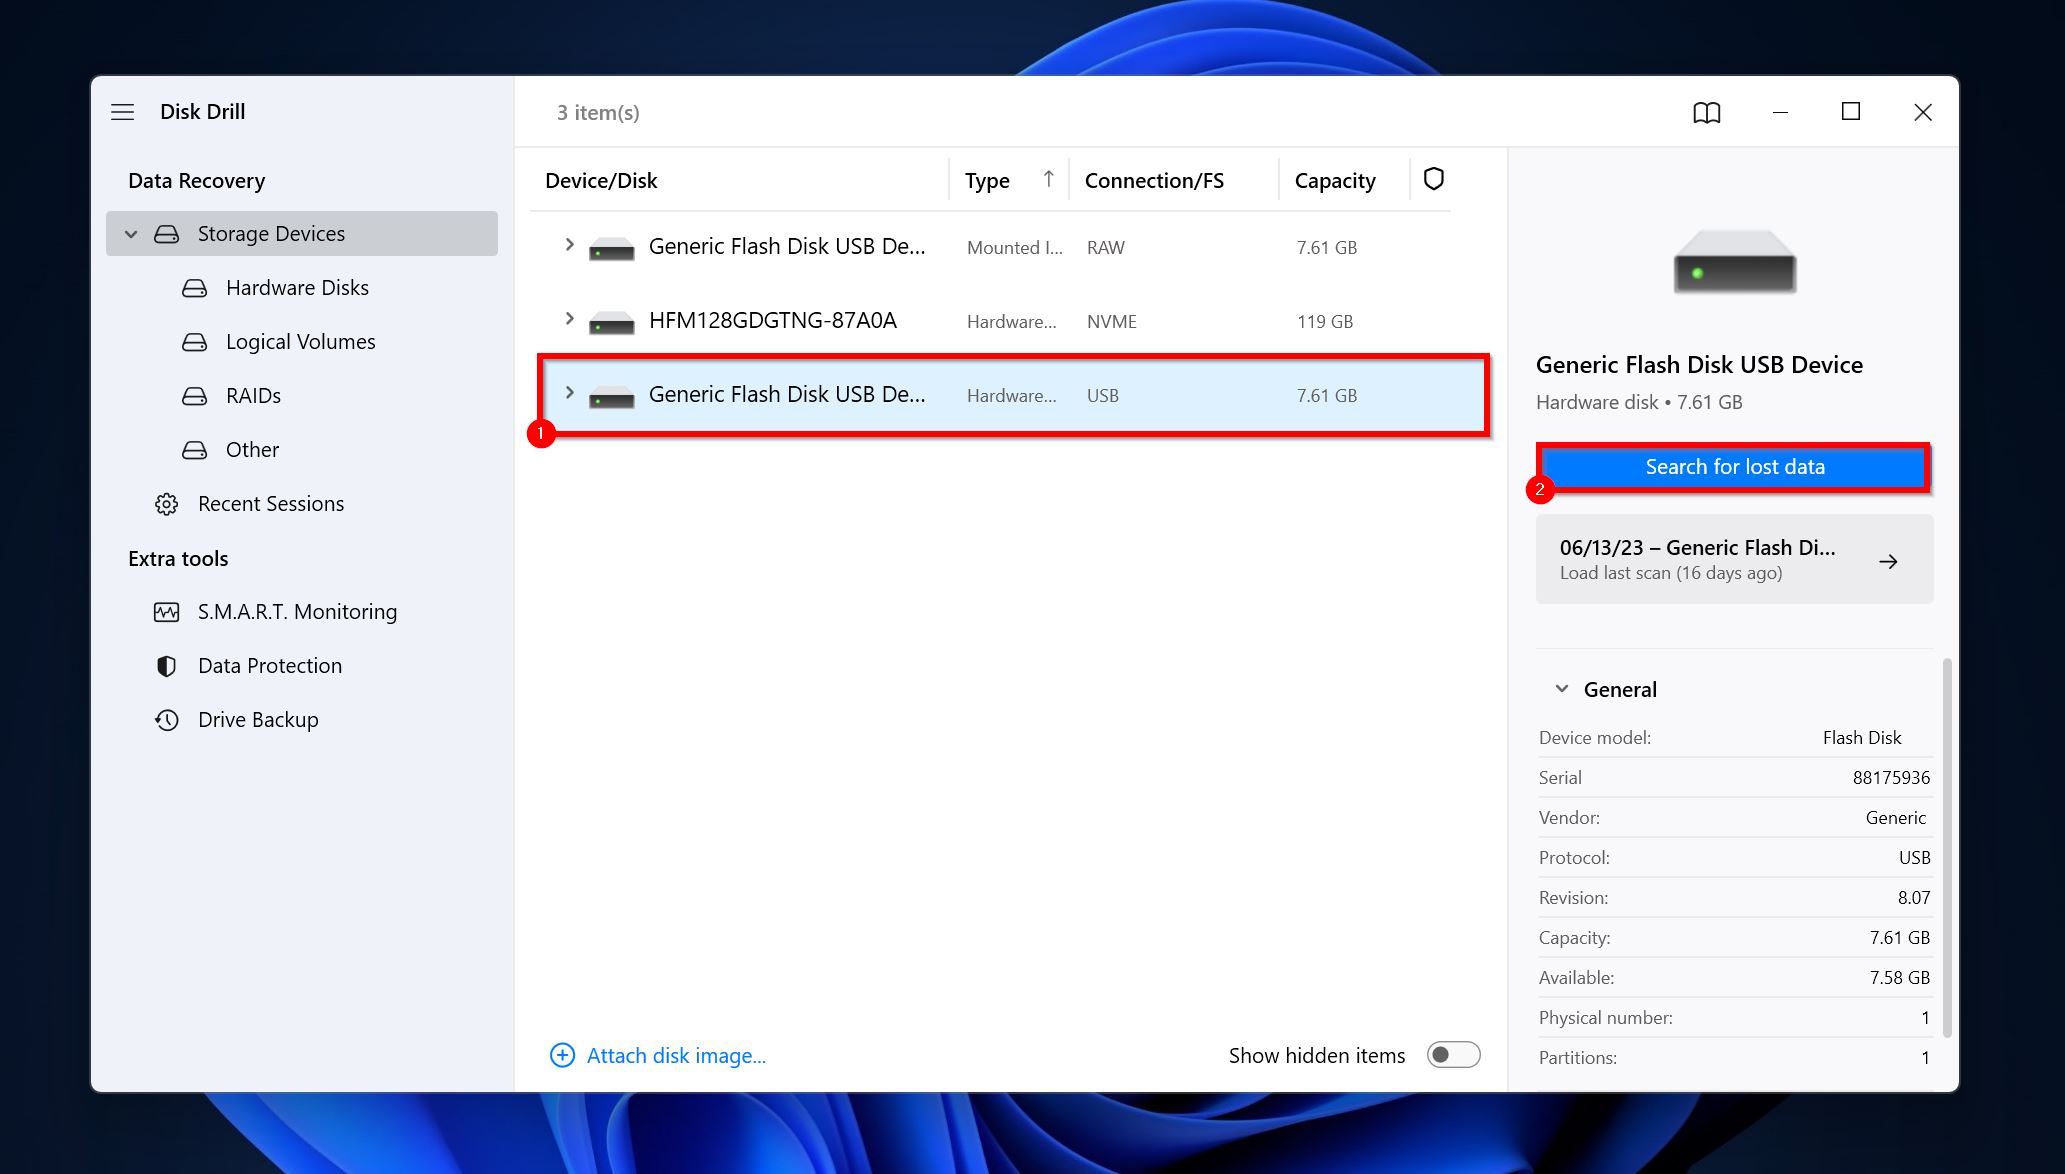
- Open Disk Drill, select the pen drive, and click on Search for lost data.
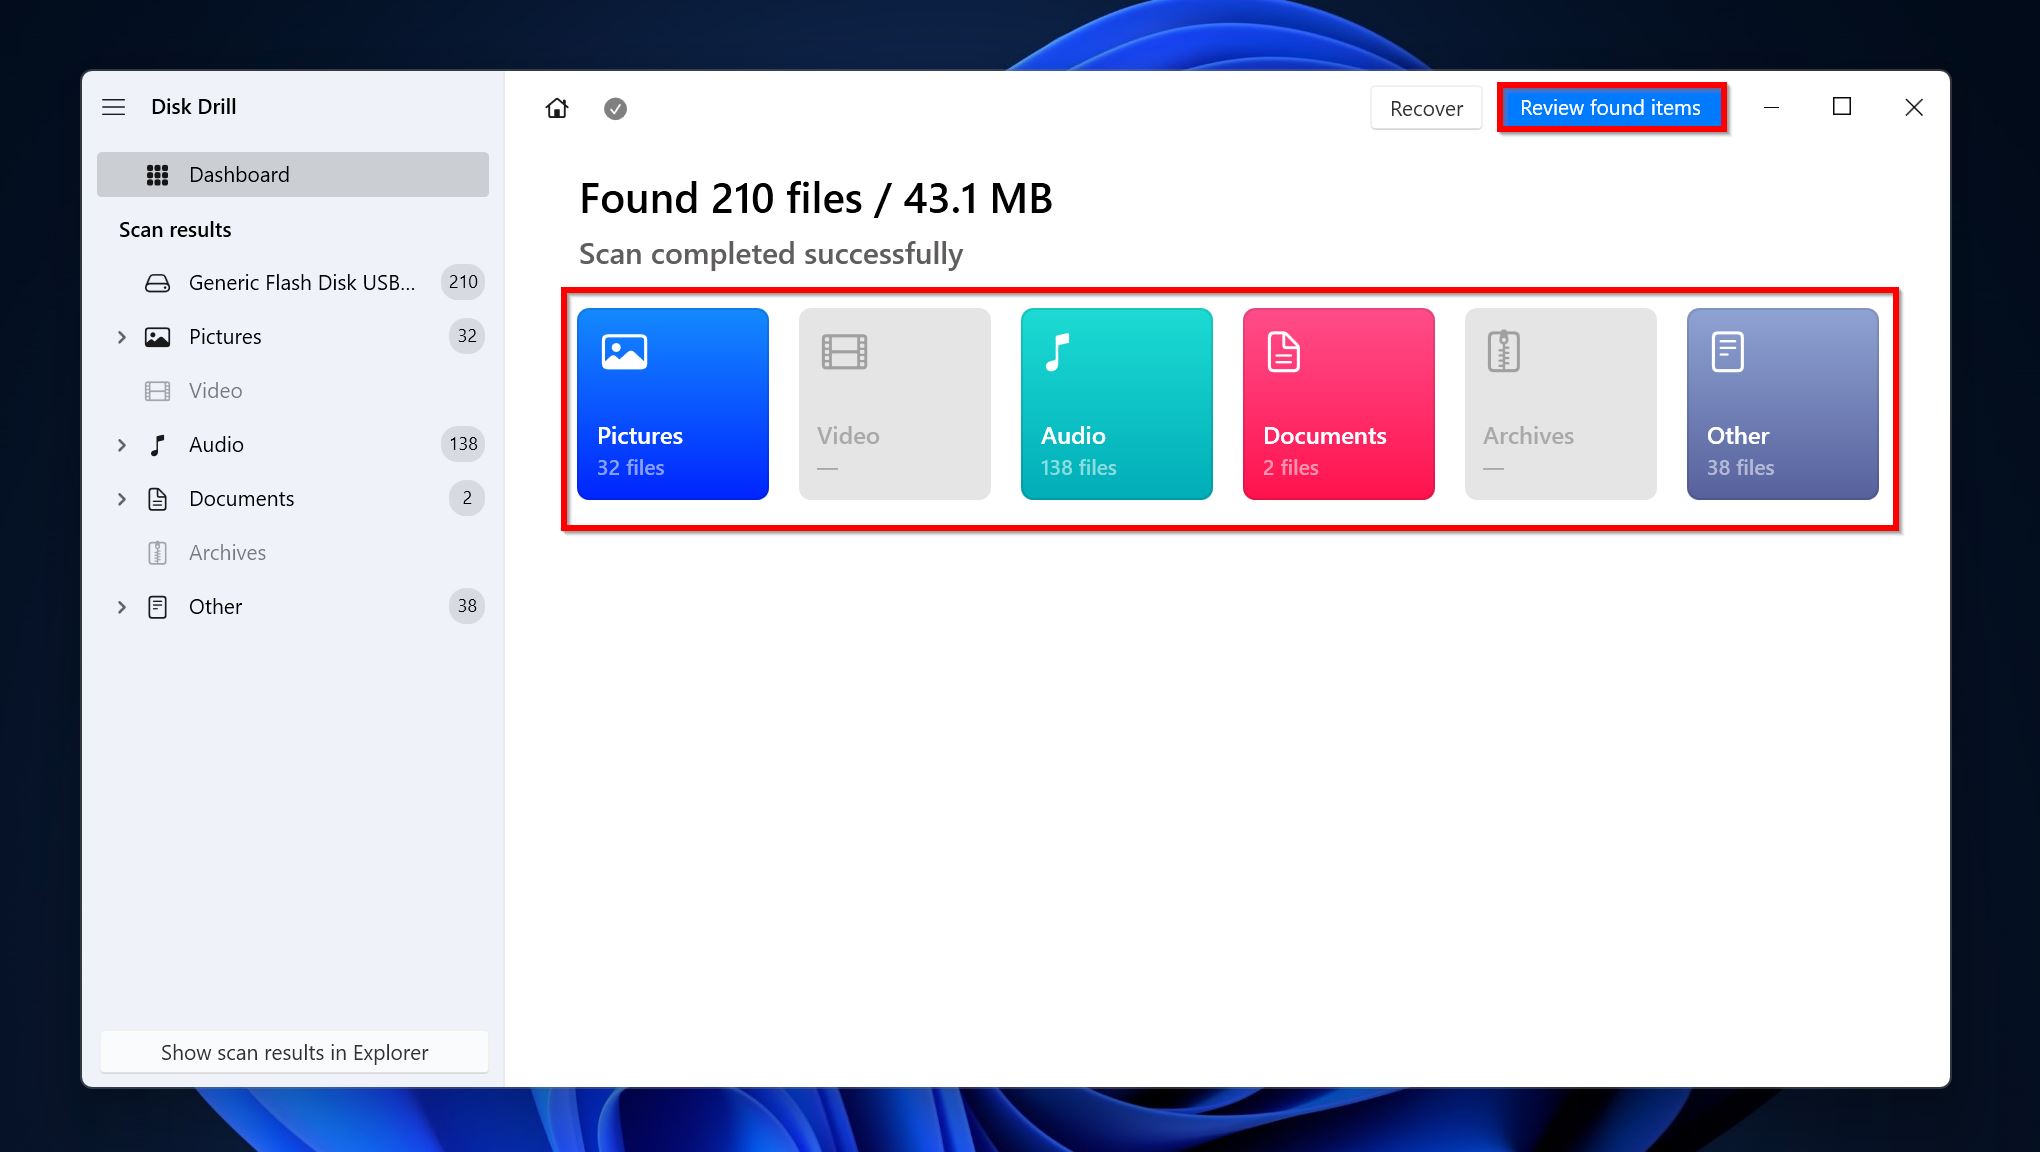
- Click on Review found items to see the recoverable files. You can directly click on the relevant file type you want to recover, as well (Pictures, Video, Audio, Documents, Archives, and Other).
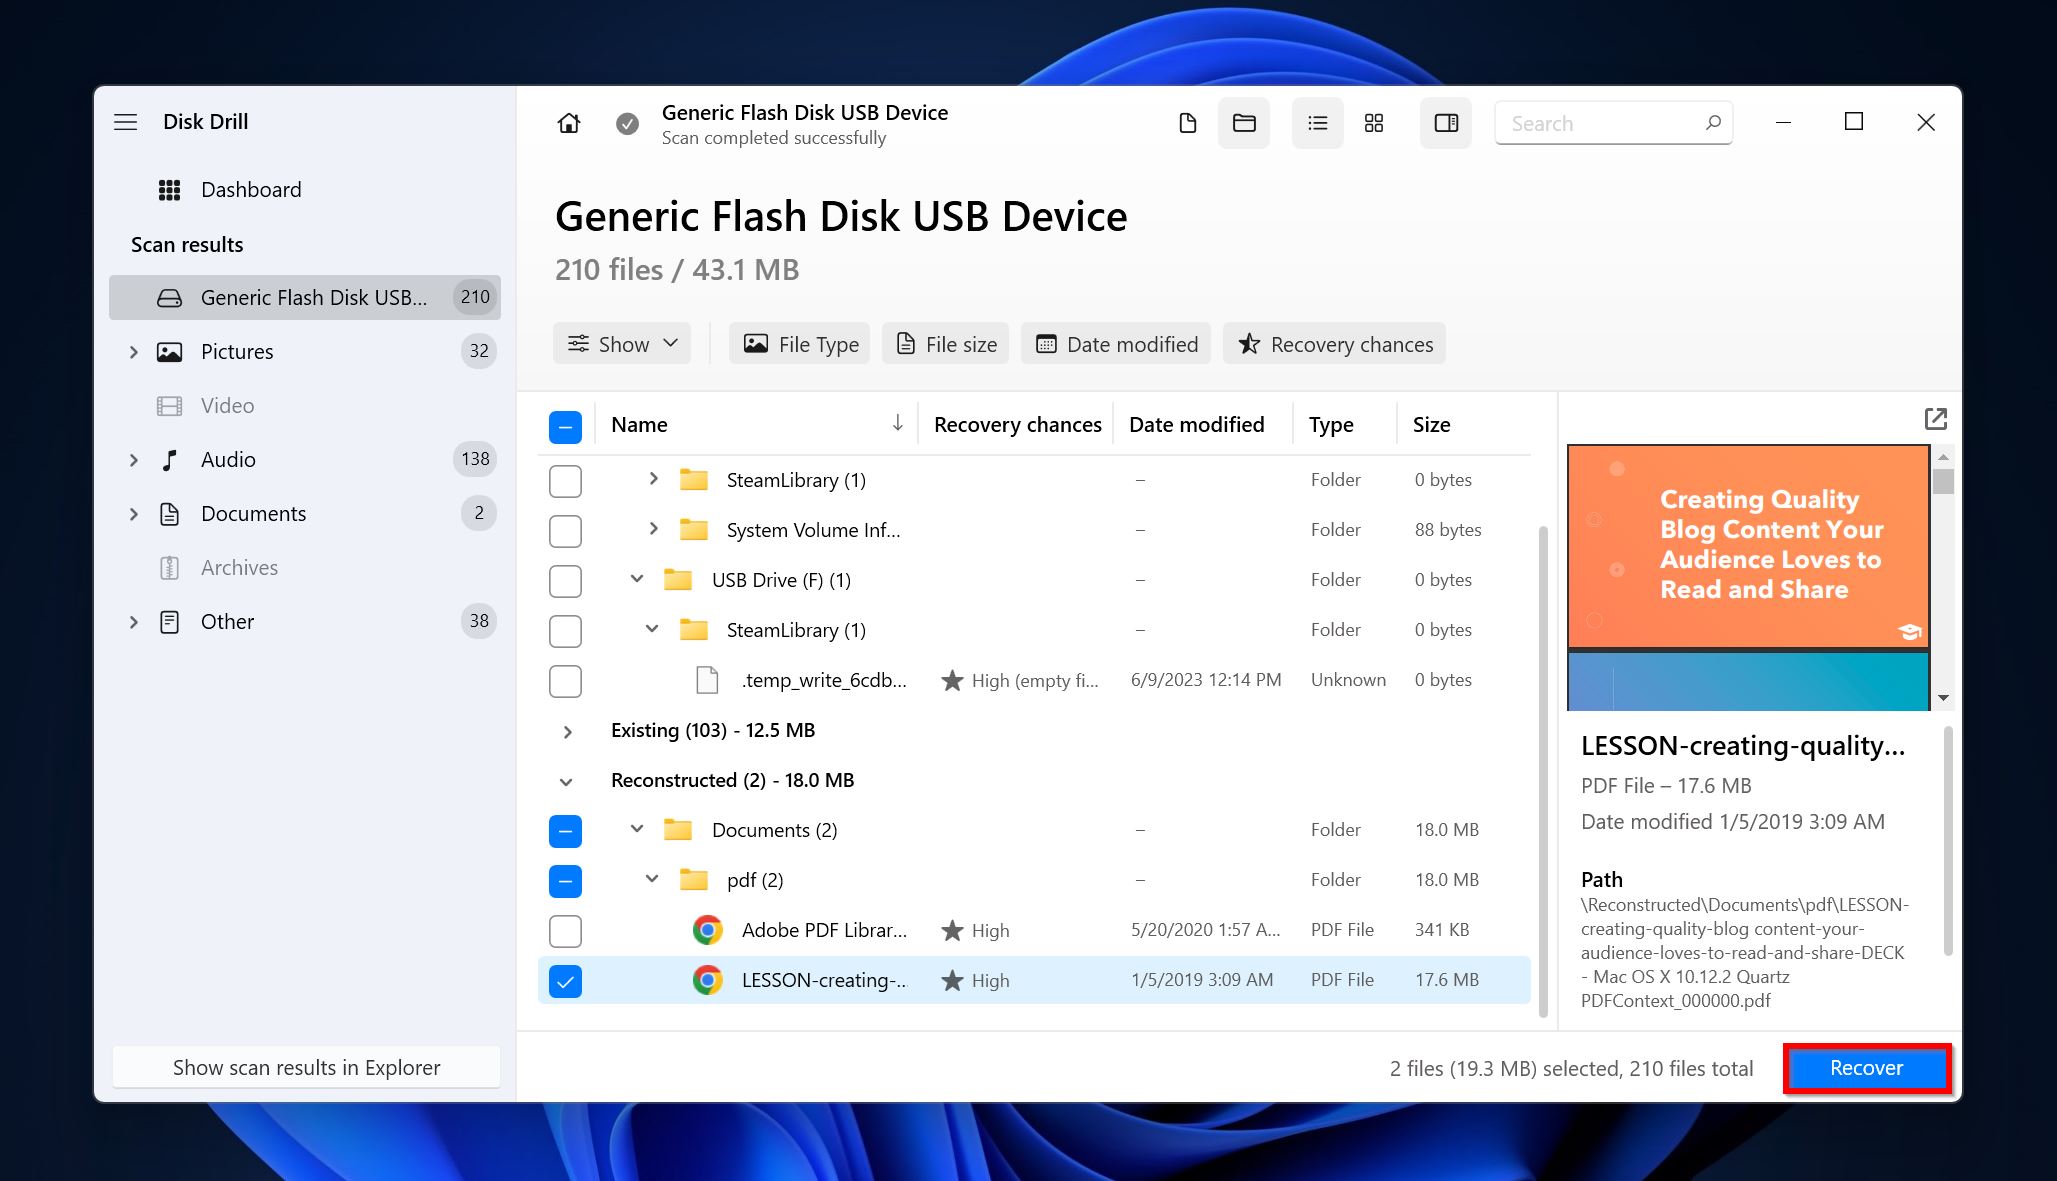
- Expand the Deleted or lost and Reconstructed sections to view deleted files that are recoverable.
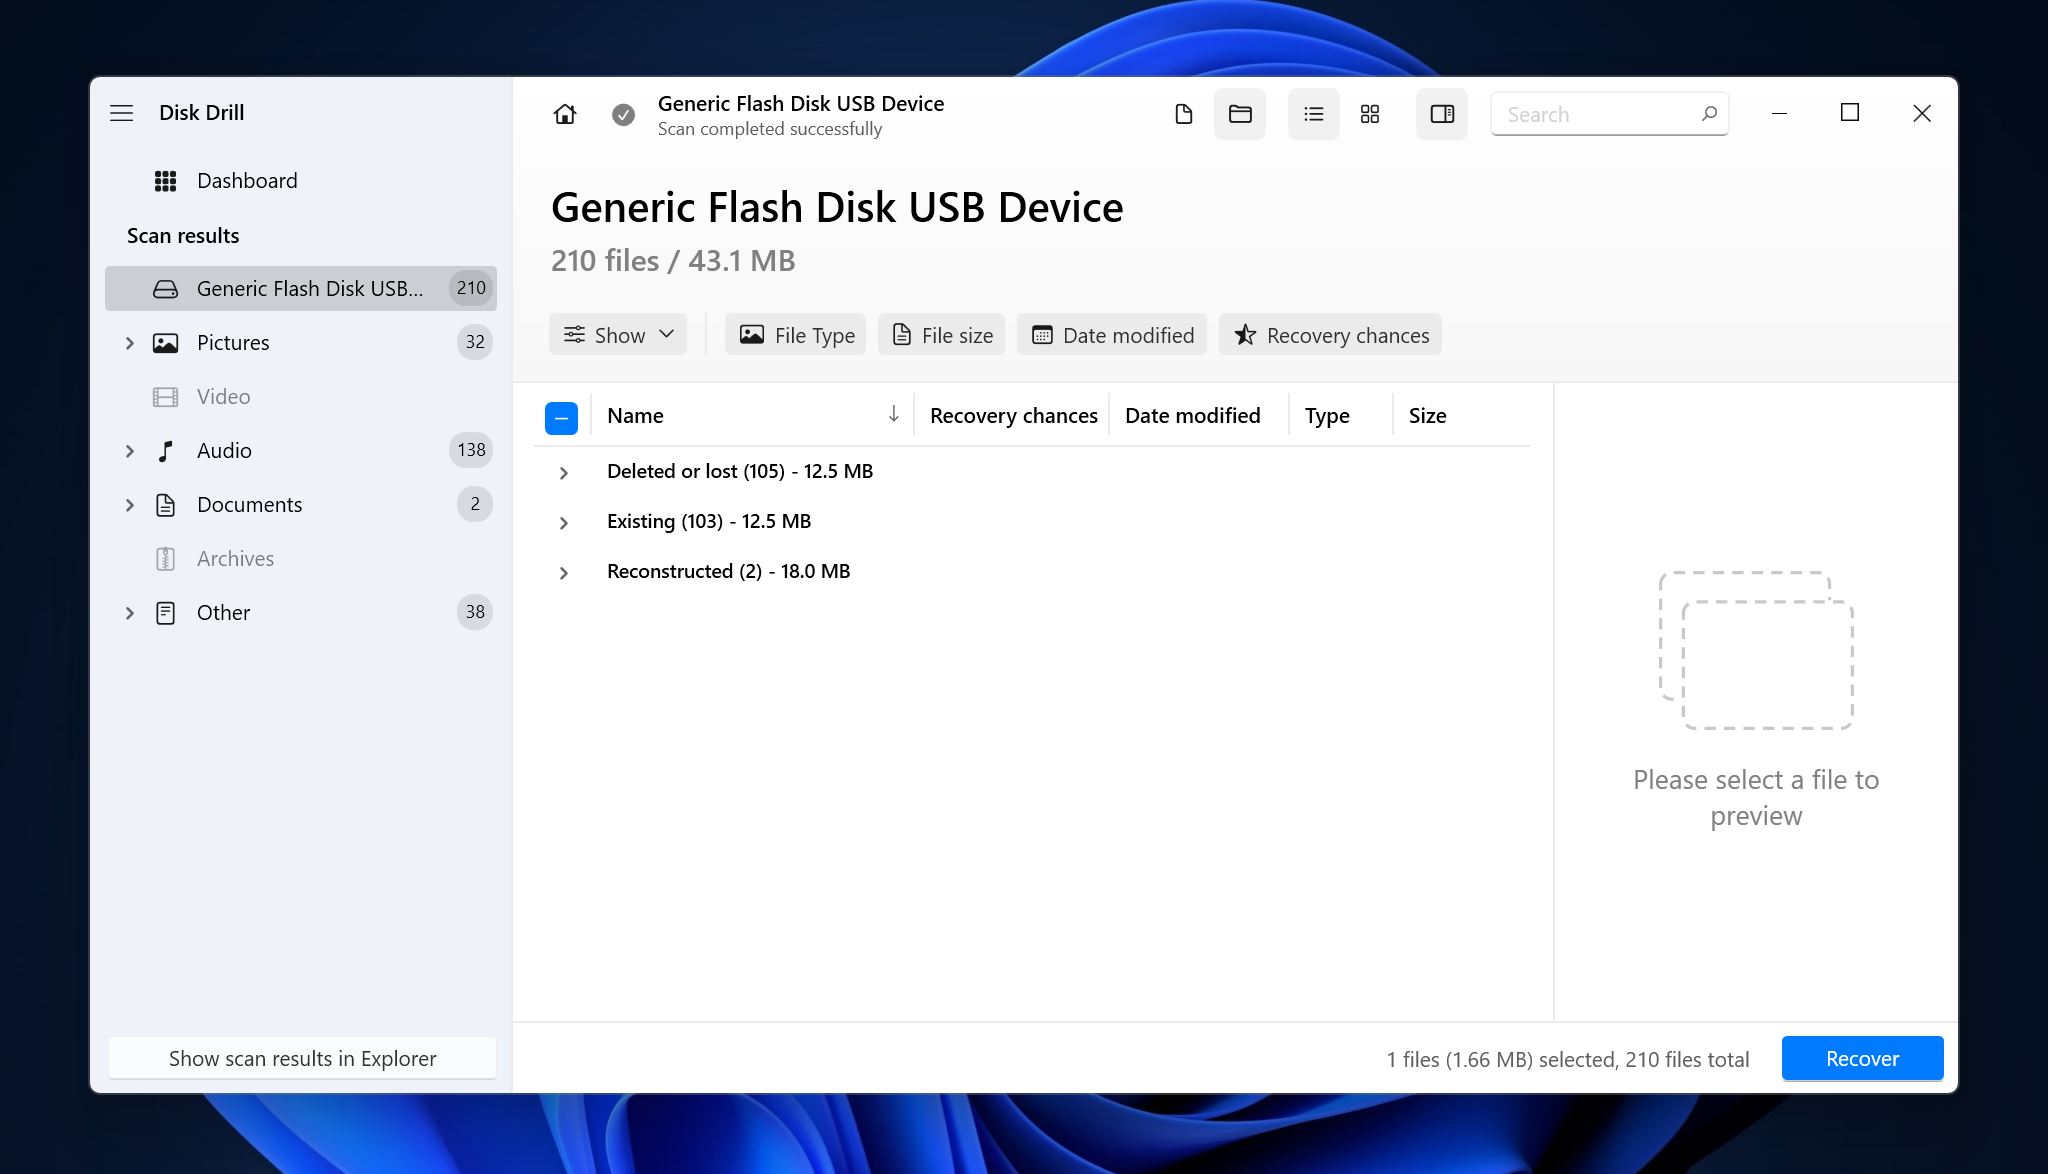
- Select the files you wish to recover. Disk Drill will display a preview of the currently selected file, but you can manually preview files by clicking the eye icon next to their filename as well. Click on Recover after confirming.
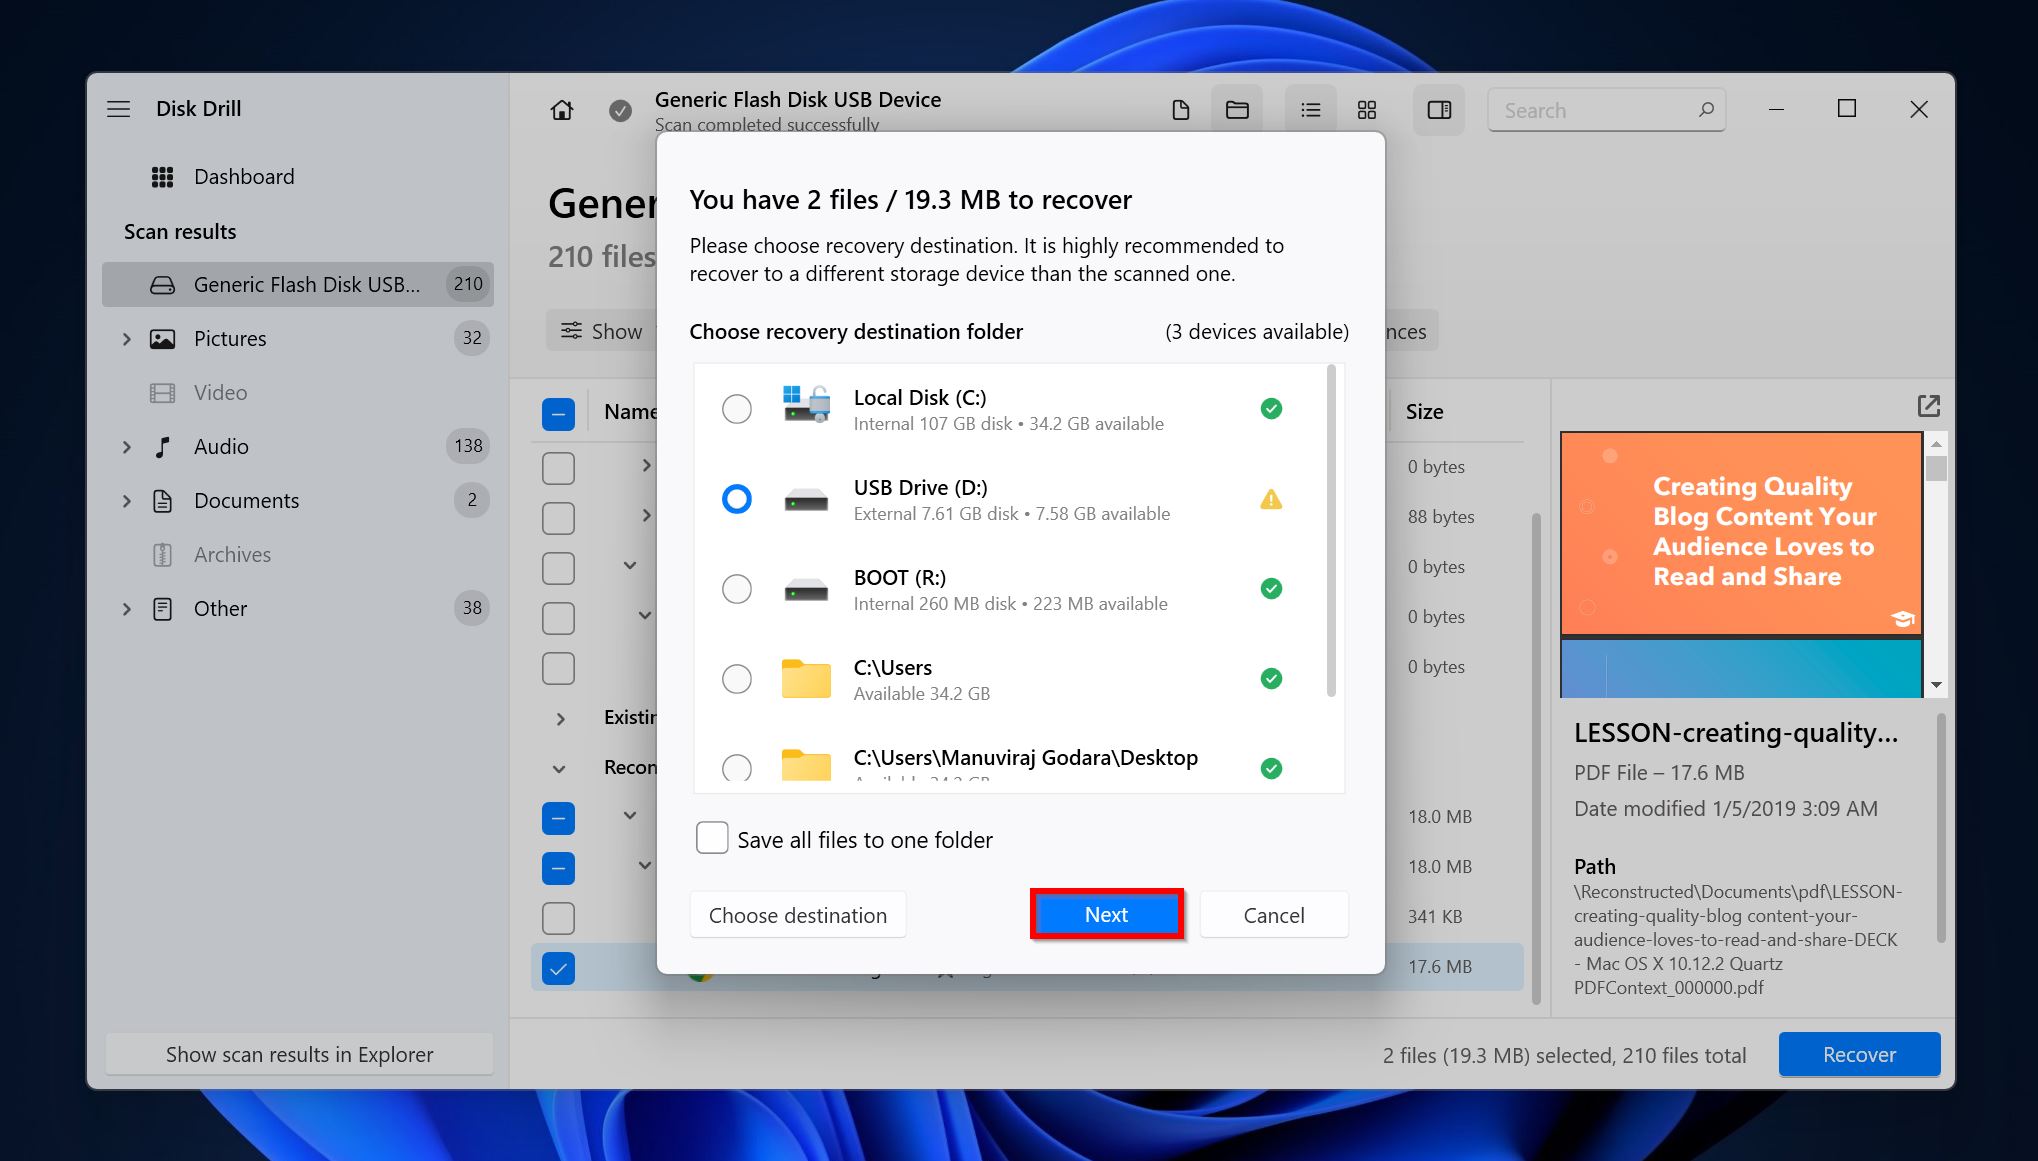
- Choose a recovery destination for the files and click Next.
- Disk Drill will recover the selected files.
How to Avoid USB Virus Infections in the Future
Protecting your PC and its data from USB viruses isn’t rocket science. Follow these simple tips and you should be secure:
- 🦠 Use a good antivirus program: If possible, invest in an effective antivirus solution that automatically scans USB drives as soon as they are connected to your PC.
- ⌨️ Disable AutoRun: It’s best to keep AutoRun disabled as it isn’t an essential feature and is only there to make your life slightly easier at best. Keep it disabled to keep viruses that exploit Autorun.inf, at bay.
- 🔗 Avoid connecting random USB drives to your PC: Only connect drives that come from a trustworthy source. Don’t connect random USB drives to your PC.
- 📝 Use write-protected drives: If possible, use drives with a hardware write-protection feature to store important data. If that’s not possible, use a software-based write protection feature.
- 🌐 Open the USB drive in a virtual machine: If you suspect your pen drive is already infected, it’s best to test and launch it in a Virtual Machine on a UNIX-based OS like Linux or macOS.
Conclusion
USB drives can be a really convenient way to transfer data between computers. But, you should use them with caution. Even though you can deal with viruses after they have infected your PC, the damage is already done. Thus, prevention is always better–regularly back up your data and follow the recommended cybersecurity guidelines to prevent USB virus infections.
