 Is your Mac stubbornly ignoring your external drive? An external hard drive not mounting on Mac is a common issue that affects thousands of Mac users around the world every single day, but the good news is that most cases can be fixed in minutes. This guide walks you through a systematic checklist of quick fixes, from simple cable swaps to advanced terminal commands. We’ll also show you exactly how to retrieve your files even when the drive won’t mount properly.
Note on Search Trends: According to Google Trends data, searches for “external hard drive not mounting mac” maintain steady interest with notable spikes during major macOS releases. The issue peaked in July 2019, likely coinciding with macOS Catalina’s beta release and its stricter security requirements for external drives. Today, the problem remains highly relevant, with 60% of searches originating from the United States, where Mac adoption is highest.
Why Is Hard Drive Not Mounting on Mac?
Let’s diagnose why your external hard drive is not mounting on Mac. Understanding what’s causing your drive to fail helps you pick the right fix and get back to your files faster.
Here are the most common culprits and their solutions:
| Reason | Description | Recommended Recovery Methods |
| 🔌 Loose or faulty USB cable | Your USB cable might be loose in the port or damaged internally. A worn cable can cause intermittent connections that prevent proper mounting. | Check and replace the cable. Test with a different USB cable to rule out cable failure. |
| ❌ Damaged USB port | Mac USB ports can fail from wear, liquid damage, or power surges. One bad port doesn’t mean they’re all broken. | Try different USB ports on your Mac. If one port fails but others work, you’ve identified the problem and found your workaround. |
| 🦠 Drive corruption | File system errors from improper ejection, sudden power loss, or interrupted transfers can prevent mounting. Malware is less common on Mac but still possible. | Run First Aid in Disk Utility to repair file system errors. For severe corruption, you may need to format the drive after recovering your data. |
| 💻 Older macOS version | macOS compatibility varies by file system. For example, High Sierra can’t read APFS drives, and older versions struggle with exFAT or NTFS formats. | Use a third-party external drive mounter for NTFS drives. Update macOS if possible for better native file system support. |
| ⚙️ Wrong settings | Your drive might be mounting correctly but hidden from view. Finder and Desktop display settings control drive visibility. | Change macOS display settings to enable External disks in Finder Preferences. |
| 🔋 Insufficient power | USB-powered drives need adequate power to spin up and mount. Some drives require more power than a single USB port provides. | Reset NVRAM/PRAM and SMC to restore proper power management. These resets often fix power delivery issues to USB ports. |
| 🚫 Drive won’t mount but is visible | Drive appears in Disk Utility but won’t mount automatically (often due to minor file system issues or mounting conflicts). | Force mount the drive in Disk Utility. This manual mounting bypasses automatic mounting problems and usually provides immediate access. |
Real-Users Insights
At 7 Data Recovery Experts, our experts analyzed over 500 community discussions from Apple Forums, Reddit, WD Community, and StackExchange to identify patterns in external drive mounting failures. We’ve compiled this data to help you recognize your specific issue and apply the solution that’s worked for others when your Mac external hard drive won’t mount:
| Reason | Amount % | Short Text with User Insight + Links to Real Threads/Comments |
| OS updates often cause file system and driver incompatibility | 25% | Users on Apple Discussions report that encrypted APFS drives commonly appear greyed out after macOS updates but can be mounted through Recovery Mode. One Ventura user discovered their Paragon NTFS driver needed updating after the OS upgrade, even though they’d paid for the software. |
| Connection and power issues | 20% | A WD Community member’s advice to check connections, try different port, and use Disk Utility & First Aid sounds obvious, but what’s not obvious is that newer Macs provide less power through USB ports. One Apple user with a 10-year-old Lacie drive found it wouldn’t mount on their M3 MacBook Pro through any adapter until they tried a powered hub, and it worked instantly. |
| System glitches and permission problems | 15% | SMC and NVRAM resets remain reliable fixes for these mysterious mounting failures, but users have also discovered various bizarre solutions. For example, an Apple Forums user found out that changing “Allow Accessories to connect” from “Ask Every Time” to “Automatically When Unlocked” in Privacy & Security immediately restored their drive access. |
| Drive corruption | 15% | Drive corruption hits another 15% of users, but it’s not always a death sentence. A StackExchange user described a drive that was detectable but not usable. They used Disk Drill to rebuild the file system, successfully mounted it, and then reformatted. The lesson? Don’t write off a “dead” drive until you’ve tried recovery software. |
| Brand-specific quirks, particularly with Western Digital drives | 15% | A WD Community member reported that their hard drive appeared only in WD Drive Utilities but not in Finder. They eventually discovered that the real cause of the issue was a process created by the Spotlight tool. |
| Edge cases | 10% | The remaining 10% face edge cases that test everyone’s patience. One determined user left their drive plugged in overnight and found it mounted by morning (the Mac had been running fsck checks in the background that took hours to complete). |
The biggest takeaway from all this is that most “broken” external drives aren’t broken at all, as many users have demonstrated across different forums. Instead, they’re software casualties that can be fixed in minutes if you know how.
How to Get Data from a Drive That Is Not Mounted
When your hard drive is not mounting on Mac, you don’t have to lose your data. Disk Drill, a professional-grade recovery tool trusted by over 10 million users worldwide, can retrieve files from unmountable drives as long as your Mac’s hardware can detect the drive (even if macOS can’t mount it). The key indicator? If you see your external drive in Disk Utility’s sidebar with the correct storage capacity listed, recovery is possible.
Disk Drill bypasses macOS’s mounting requirements and reads data directly at the sector level. This means it can access files even when the file system is corrupted, the partition table is damaged, or the drive refuses to mount due to logical errors. It supports virtually every external drive brand, such as Seagate, WD, SanDisk, LaCie, Toshiba, Samsung, and more, regardless of their file system (APFS, HFS+, exFAT, NTFS, FAT32).
Follow these steps to retrieve the data from your external hard drive on your Mac using Disk Drill:
- Download Disk Drill for Mac and follow the installation prompts. The free version lets you scan and preview recoverable files before committing to recovery.
- Plug the unmountable external hard drive into your Mac. Use a direct connection when possible as USB hubs can interfere with data recovery.
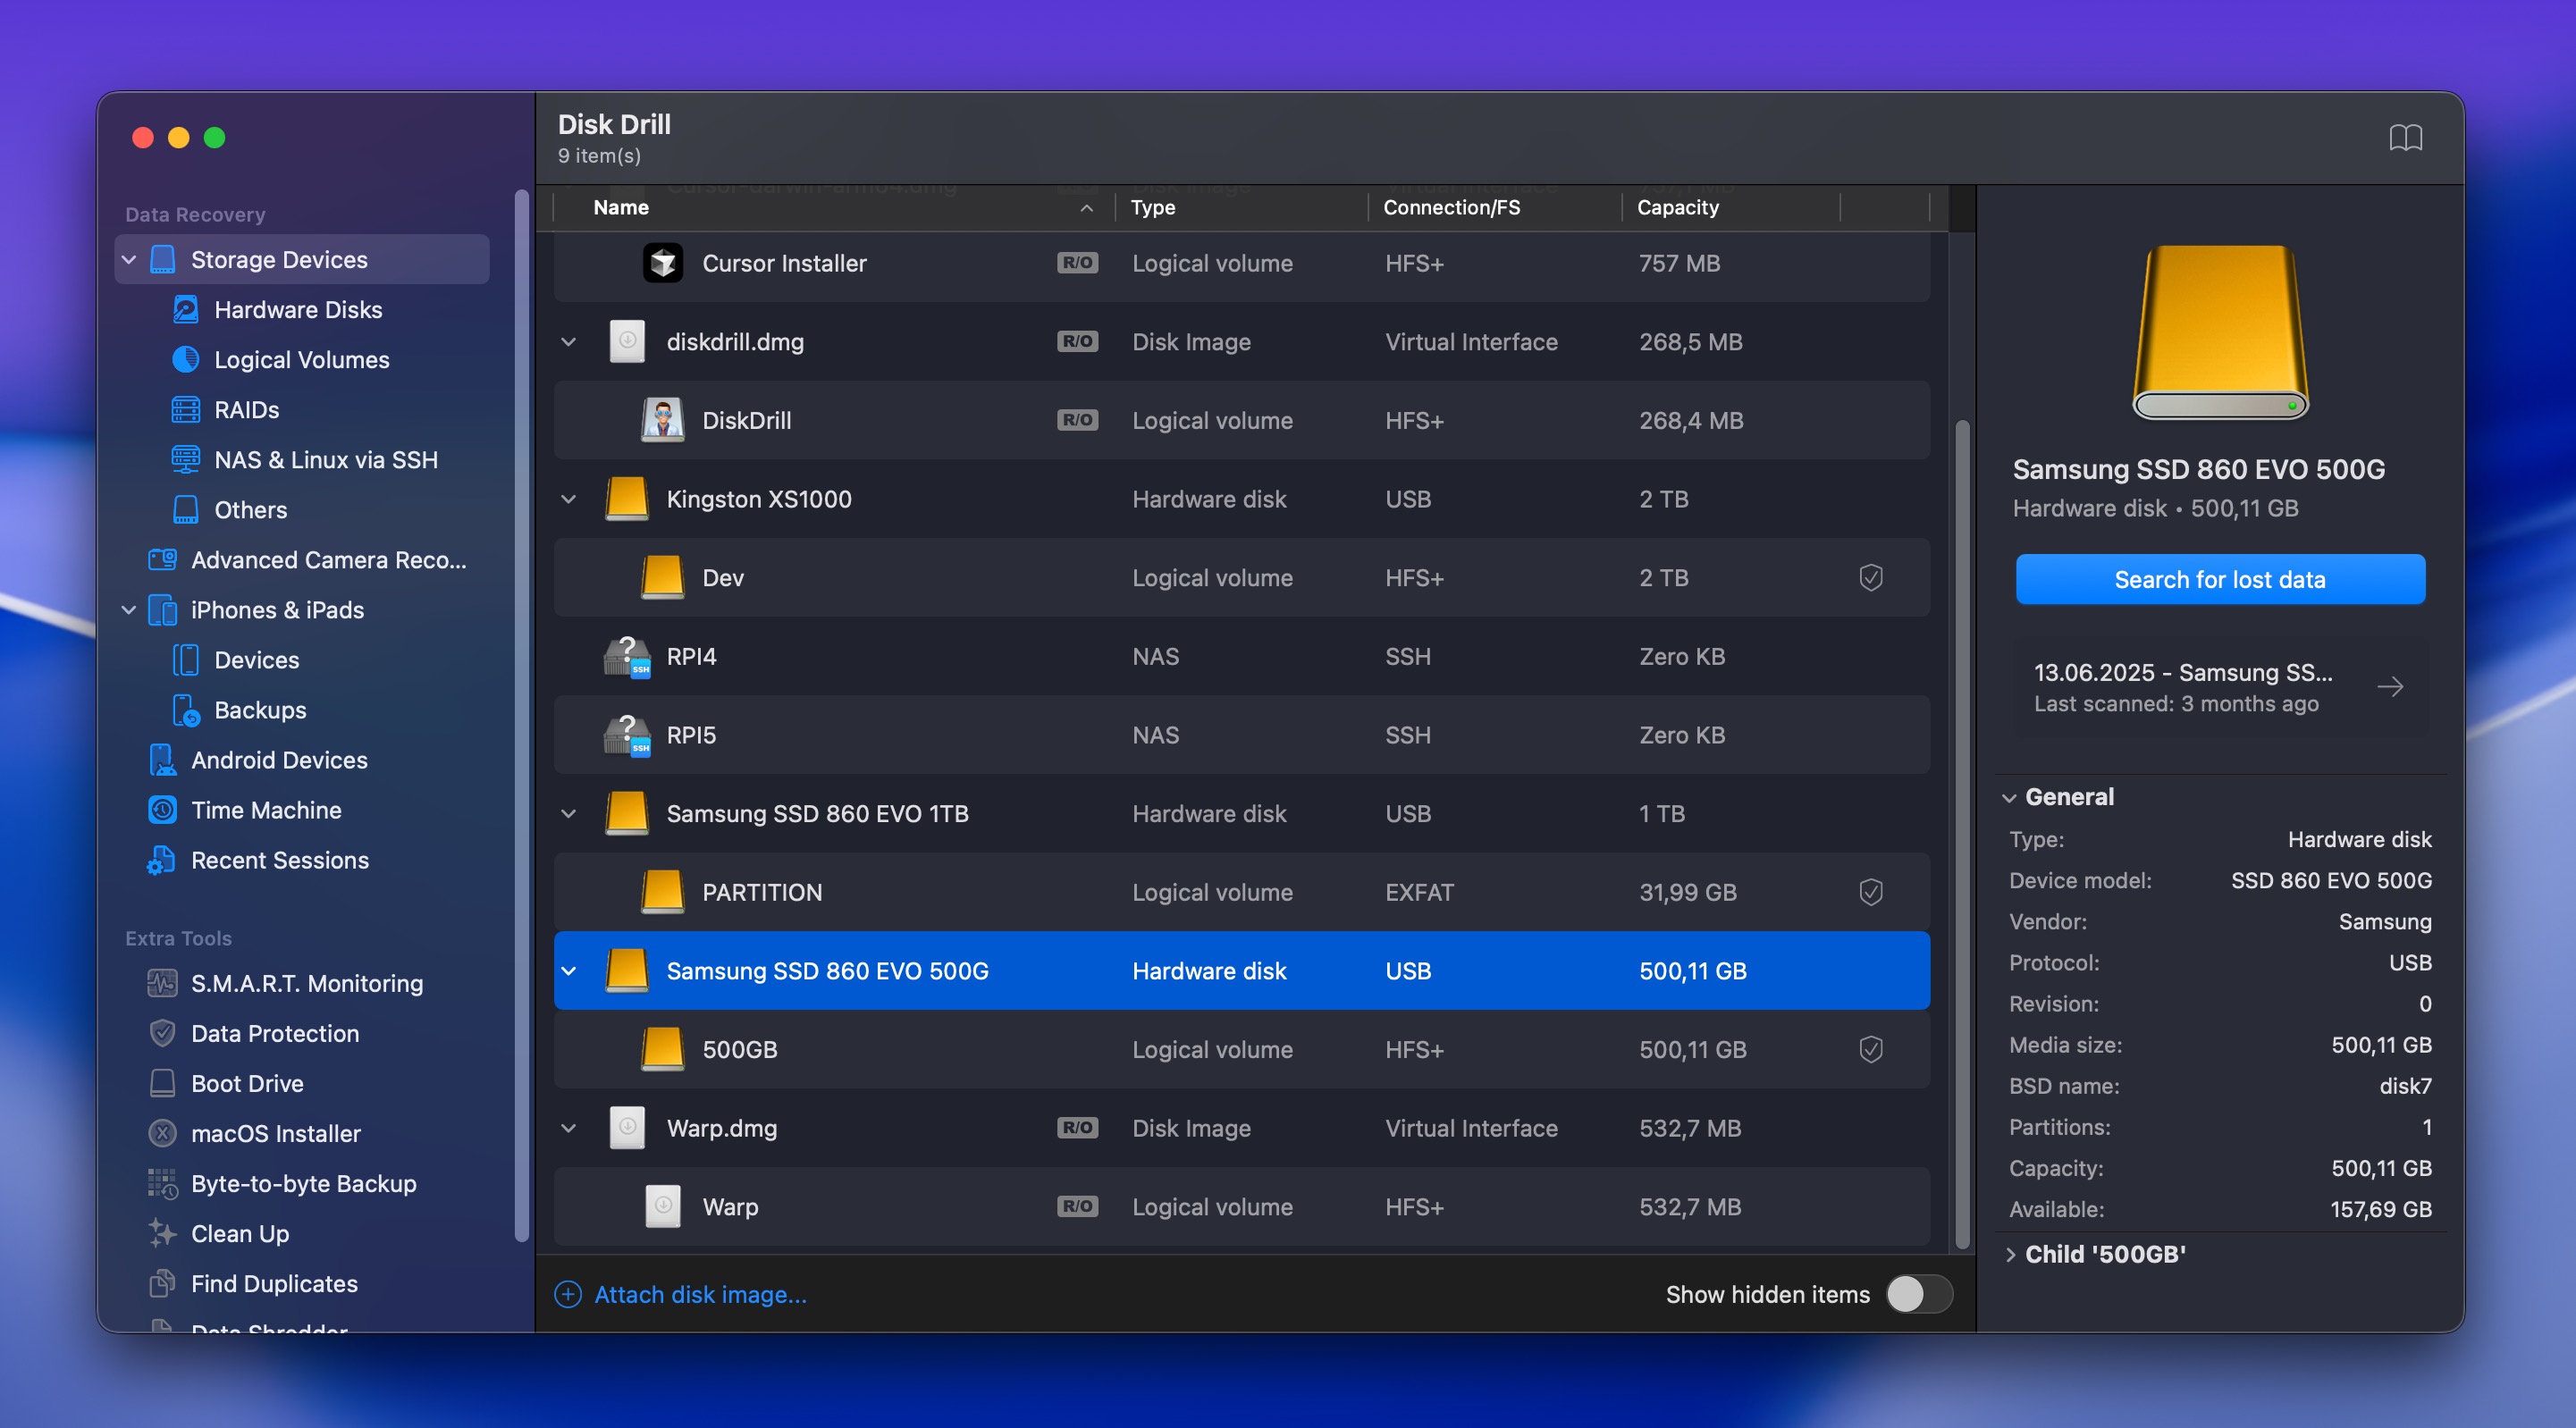
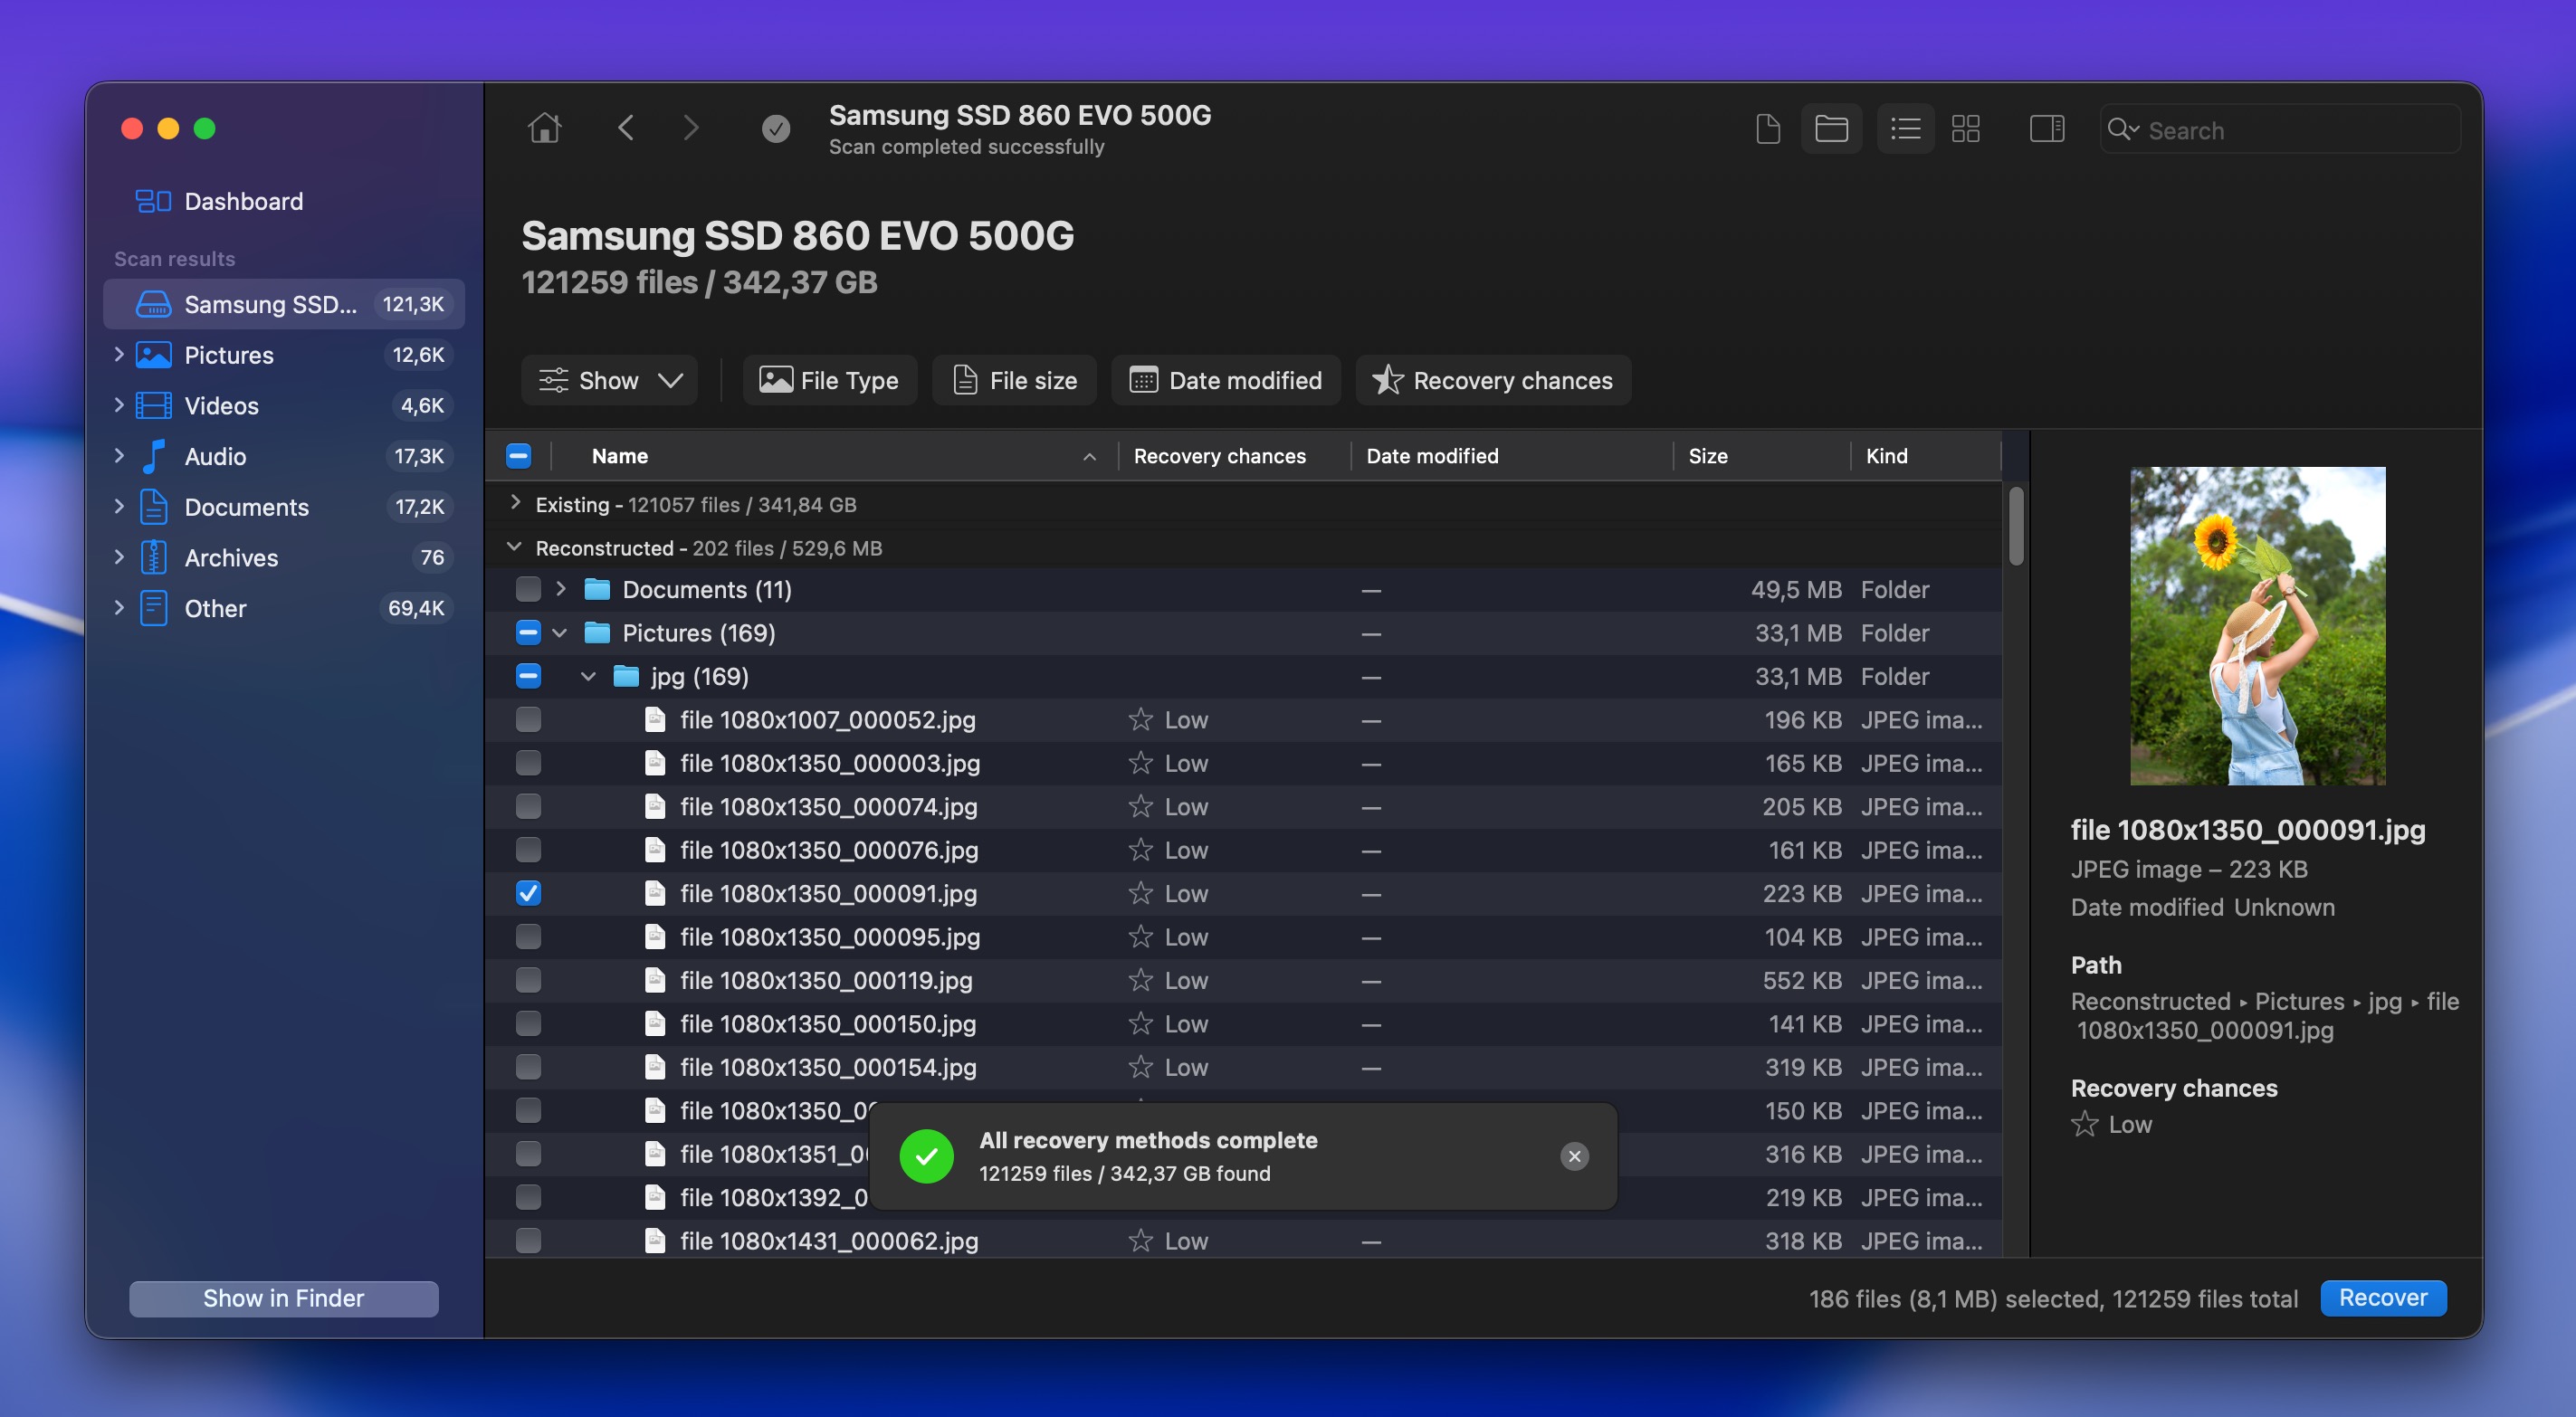
- Open Disk Drill and select Storage devices from the sidebar. Your unmountable drive should appear here even if it’s not showing in Finder.
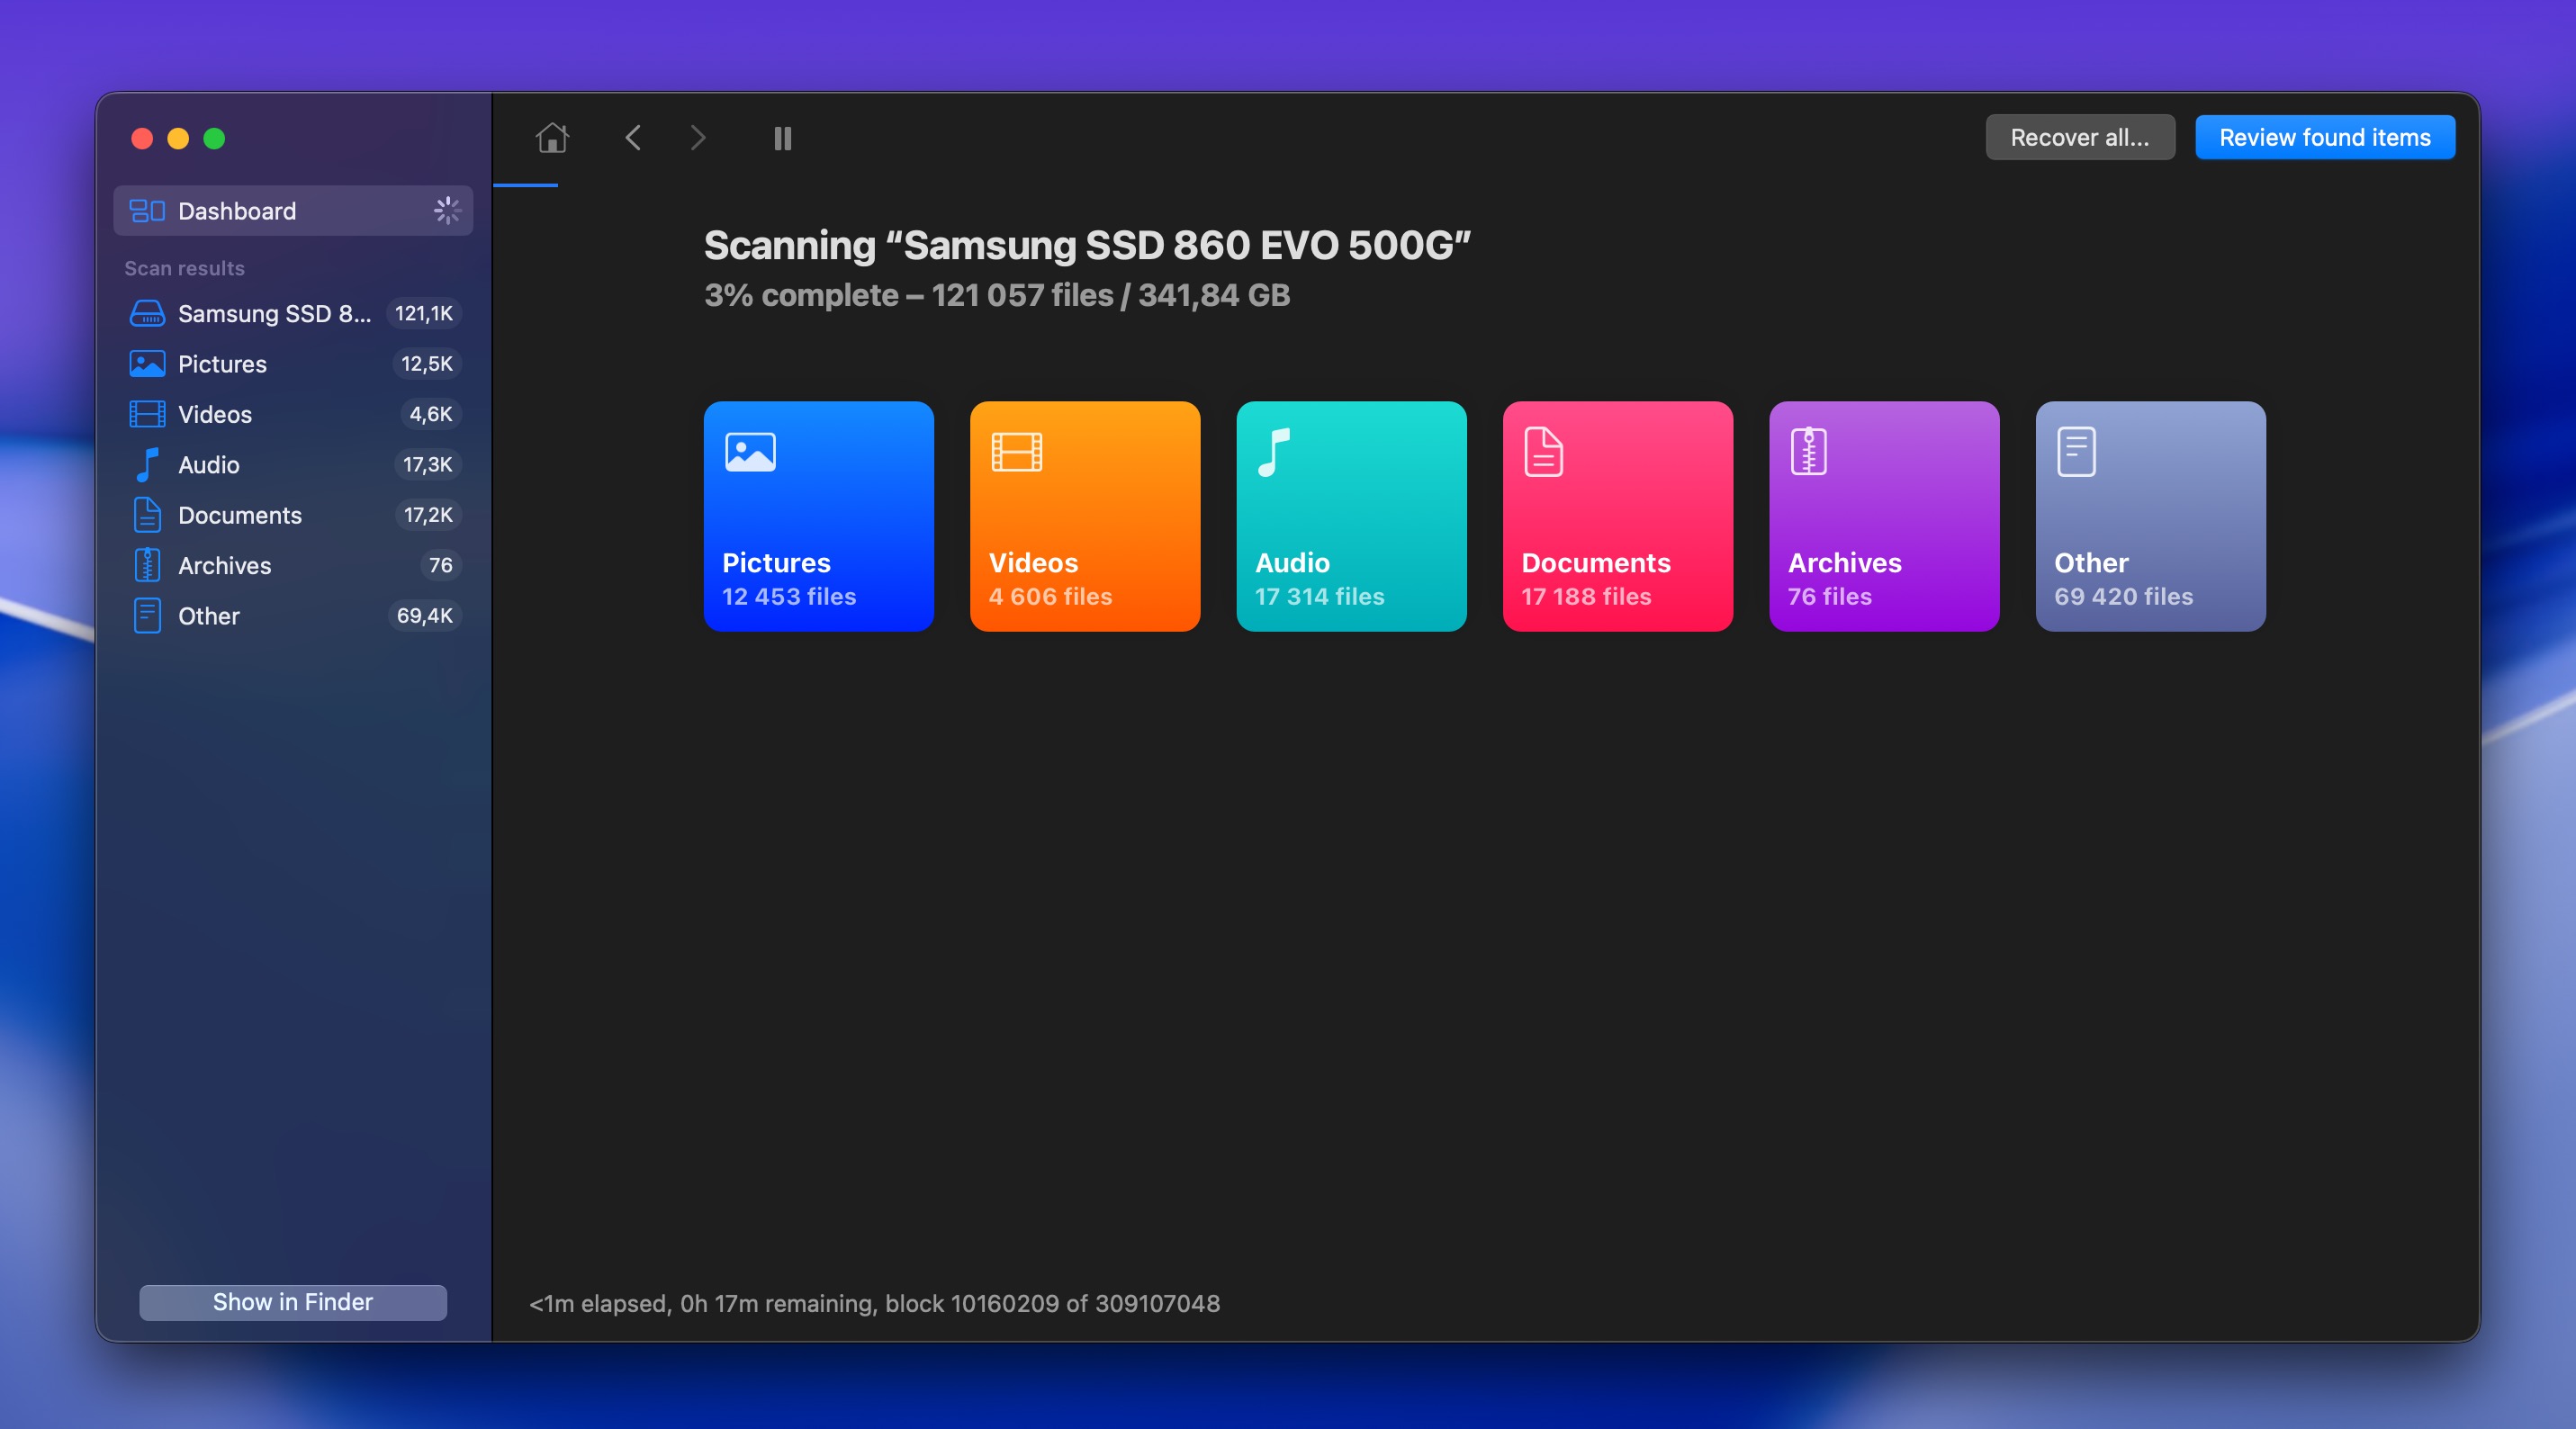
- Click on your external drive to select it. You can then click the Search for lost data button to start a scan. Drill offers two main scanning approaches:
- Universal Scan: Combines Quick and Deep Scan methods, ideal for most recovery scenarios.
- Advanced Camera Recovery (ACR): Specialized for recovering fragmented video files from cameras, GoPros, and drones.

- The scan duration depends on drive size and condition, and you can pause and resume anytime.
- Deleted or Lost: Recently deleted files with intact metadata.
- Reconstructed: Files rebuilt from fragments (may have generic names like “file001.jpg”).
- Existing Files: Current files still on the drive but inaccessible due to mounting issues.Once scanning completes, click Review found items. Disk Drill categorizes recovered files into three types:
- Use the powerful filtering options to find what you need. For example, you can enter file names, extensions (.docx, .jpg), or partial names in the search bar or choose to display only certain file types.
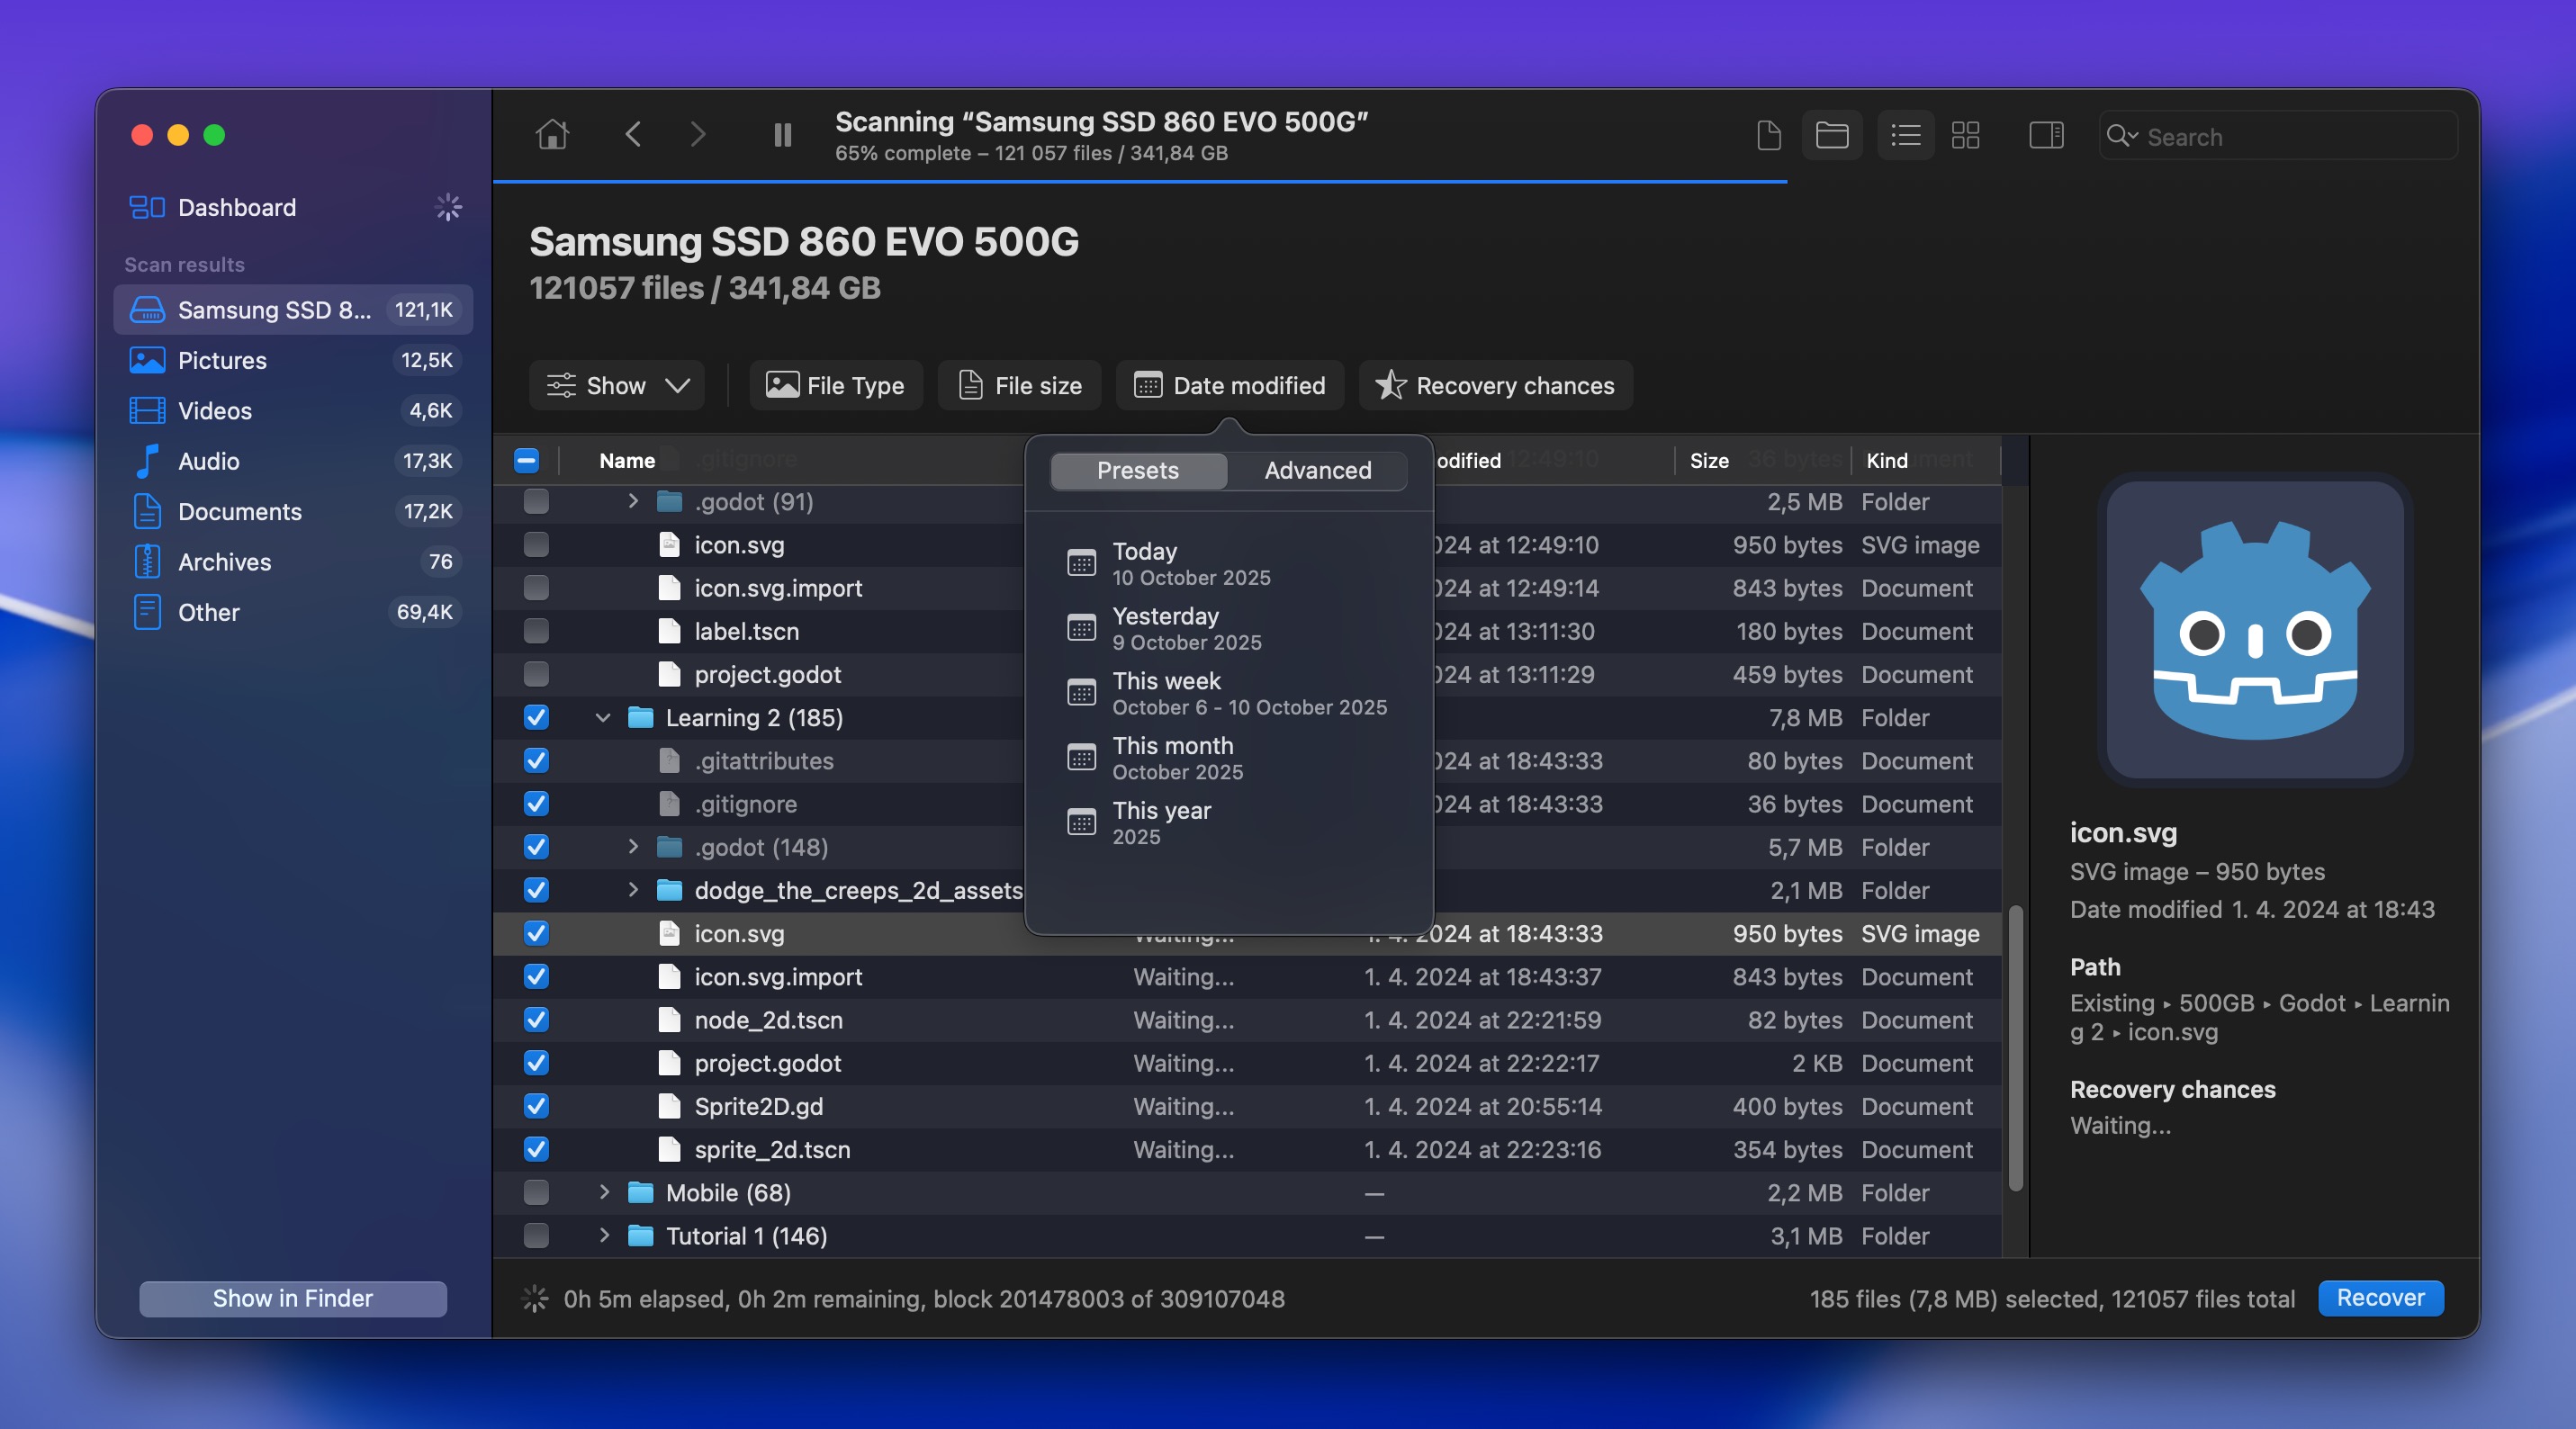
- Preview images before you check the boxes next to them so that you can verify their content and integrity. Files that can be previewed can also be recovered.
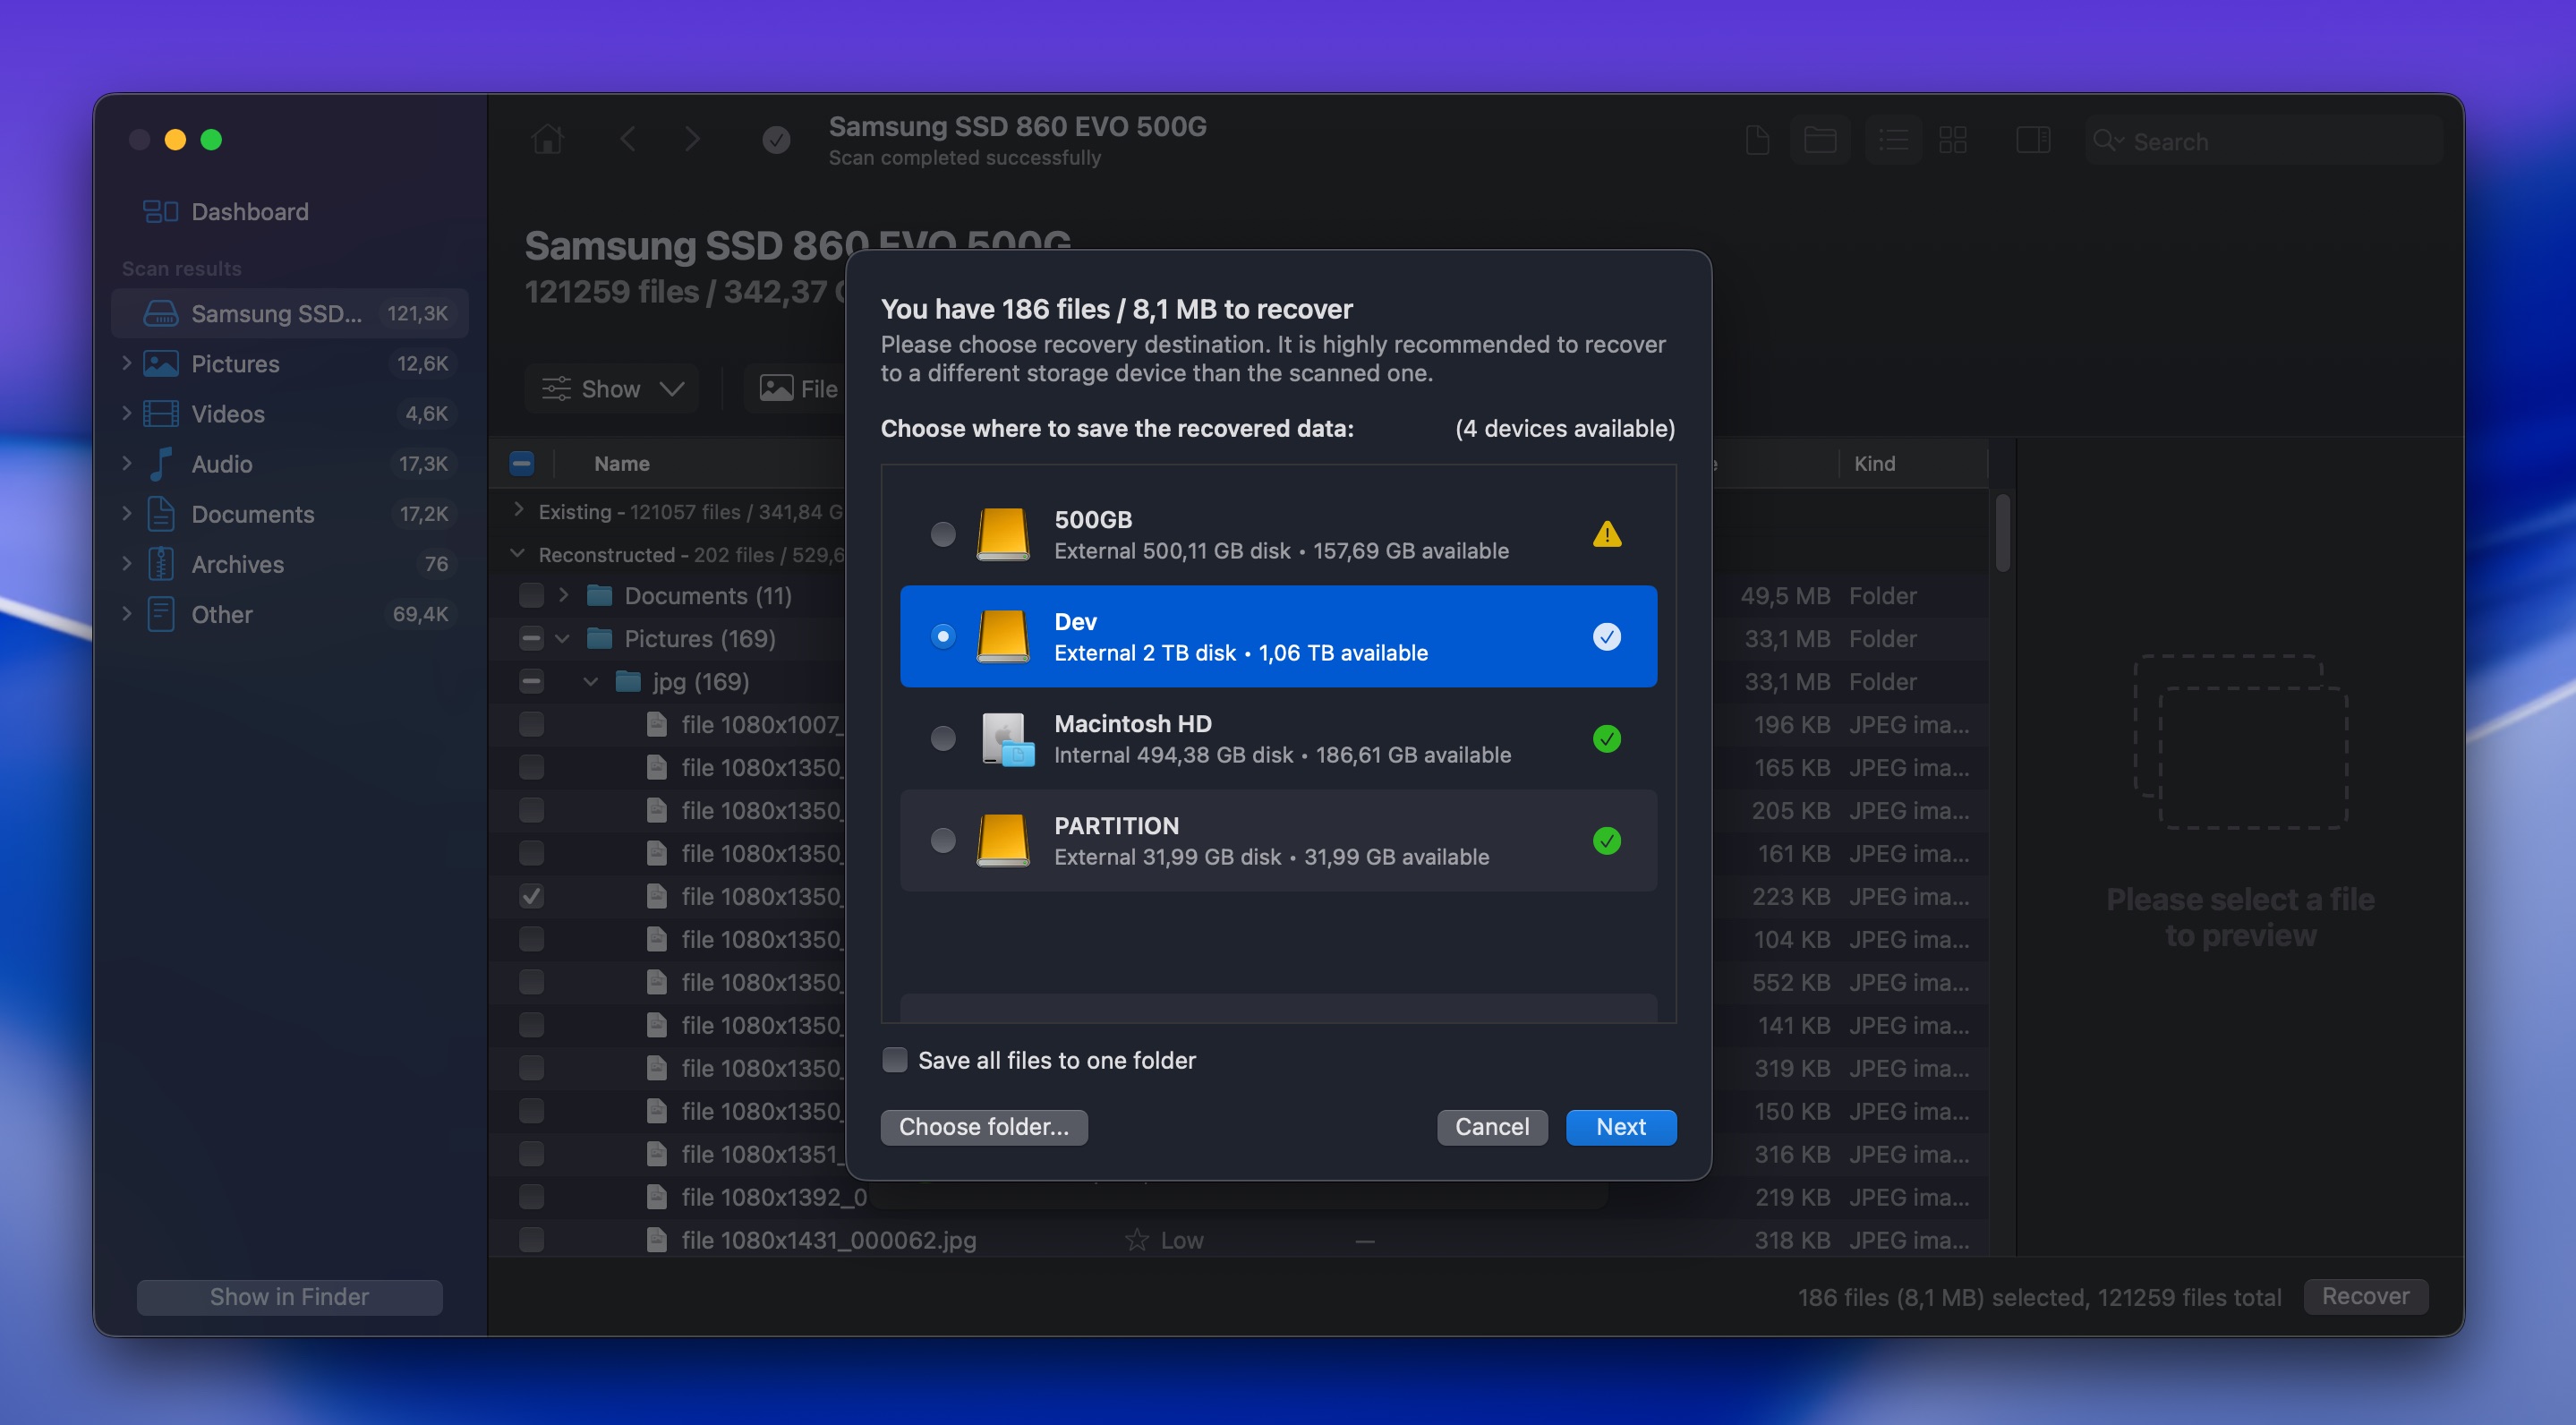
- Click the Recover button at the bottom right whenever ready.
- Choose a folder on a different drive than the one you’re recovering from and confirm.
As you can see, Disk Drill makes it very easy to perform file recovery even for non-technical users, but knowing how it works under the hood can improve your recovery success rate.
Basically, the software preserves crucial file metadata whenever possible, including original file names, folder structures, timestamps, and even file permissions. When metadata is destroyed (common in severe corruption), Disk Drill switches to signature-based carving. These reconstructed files get generic names like “file001.jpg,” but the content remains intact. The software recognizes over 400 file signatures and uses header-footer analysis to rebuild files byte by byte.
💡 Pro Tip: If you’re dealing with a clicking drive or bad sectors, create a byte-to-byte backup first. You can then scan the image multiple times without stressing the failing hardware.
How to Fix External Drive That Is Not Mounting on Mac
Ready to fix your external hard drive not mounting on Mac? These proven methods work on all Mac models (MacBook Pro, MacBook Air, iMac, Mac mini, or Mac Studio). We’ve organized them from quickest to most complex, so you can get your drive working with minimal effort.
💡 Pro Tip: Start with the simple fixes first. Many mounting issues are solved by the first three options alone, which take less than 5 minutes total.
| Fix Option | Time Required | Difficulty | Success Rate | Best For |
| 1. Change USB Ports | 30 seconds | Easy | 85% | Connection issues, port failures |
| 2. Check the Cable | 1-2 minutes | Easy | 90% | Faulty cables, loose connections |
| 3. Reset NVRAM or PRAM | 2 minutes | Easy | 70% | System glitches, power issues |
| 4. SMC Reset | 2 minutes | Easy | 65% | Power management problems |
| 5. Change macOS Display Settings | 1 minute | Easy | 95% | Hidden but mounted drives |
| 6. Use Third-Party Drive Mounter | 5-10 minutes | Medium | 80% | NTFS drives, cross-platform drives |
| 7. Run First Aid in Disk Utility | 5-15 minutes | Medium | 75% | File system errors, minor corruption |
| 8. Force Mount in Disk Utility | 2 minutes | Medium | 60% | Drives are visible but not mounting |
| 9. Format the Drive | 10-20 minutes | Medium | 100%* | Last resort (*erases all data) |
⚠️ Important: Before attempting Options 7-9, make sure you have backups of important data. These methods may modify your drive’s structure.
Option 1:Change USB Ports
It might sound pretty obvious, but a lot of times, the reason why you can’t mount an external hard drive to your Mac lies behind a broken or faulty USB port (especially if you’re having trouble with mounting all of the external devices to your Mac).
In such a case, you can either try a different USB port, or if it also doesn’t work, you might need to resort to a professional to fix the issue on your Mac.
Option 2:Check the Cable
Another reason why you can’t connect the external drive to your Mac might be a faulty USB cable. So it’s a good idea to try mounting the external hard drive with a different USB connector to see if it might be causing all the trouble.
Option 3:Reset NVRAM or PRAM
It’s quite possible that the issue isn’t with your external hard drive but with your Mac. Sometimes a corrupt NVRAM or PRAM might be causing various problems on your computer and even prevent external drives from successfully mounting to it. And even though NVRAM corruption doesn’t happen very often, it’s best to reset it to rule out this problem.
📝 Note: If you’re using an M1 Mac, then all you need to do to reset NVRAM or PRAM on it is to restart your computer.
Here’s what you should do to reset NVRAM or PRAM on your Intel-based Mac to eliminate the issue:
- Turn off your computer.
- Press the power button to turn your Mac back on, and then immediately press and hold the following key combination: Command + Option + P + R.
- Hold the key combination until you see the Apple logo appear on your screen for the second time (it takes around 20 seconds).
Option 4:SMC Reset
SMC (System Management Controller) is a sub-system on Macs that helps with power management, fan control, etc. Moreover, it can sometimes even be the cause of external drive connectivity issues.
📝 Note: On M1 Macs, all you need to do to reset SMC is to shut down the computer for around 30 seconds and then power it back on.
Here’s how to reset SMC on an Intel-based Mac:
- Turn off your Mac.
- Press and hold the power button for 15 seconds.
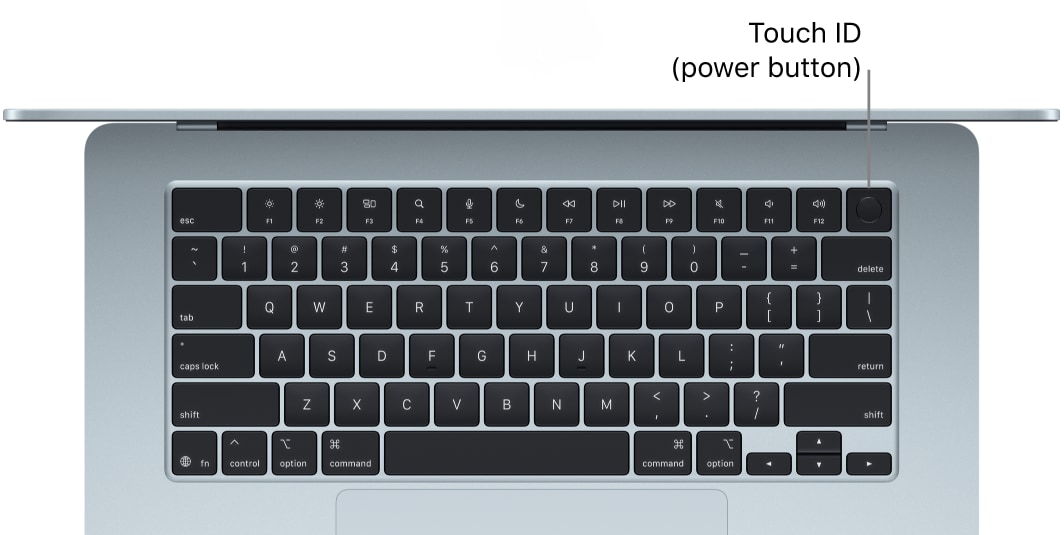
- Restart your computer.
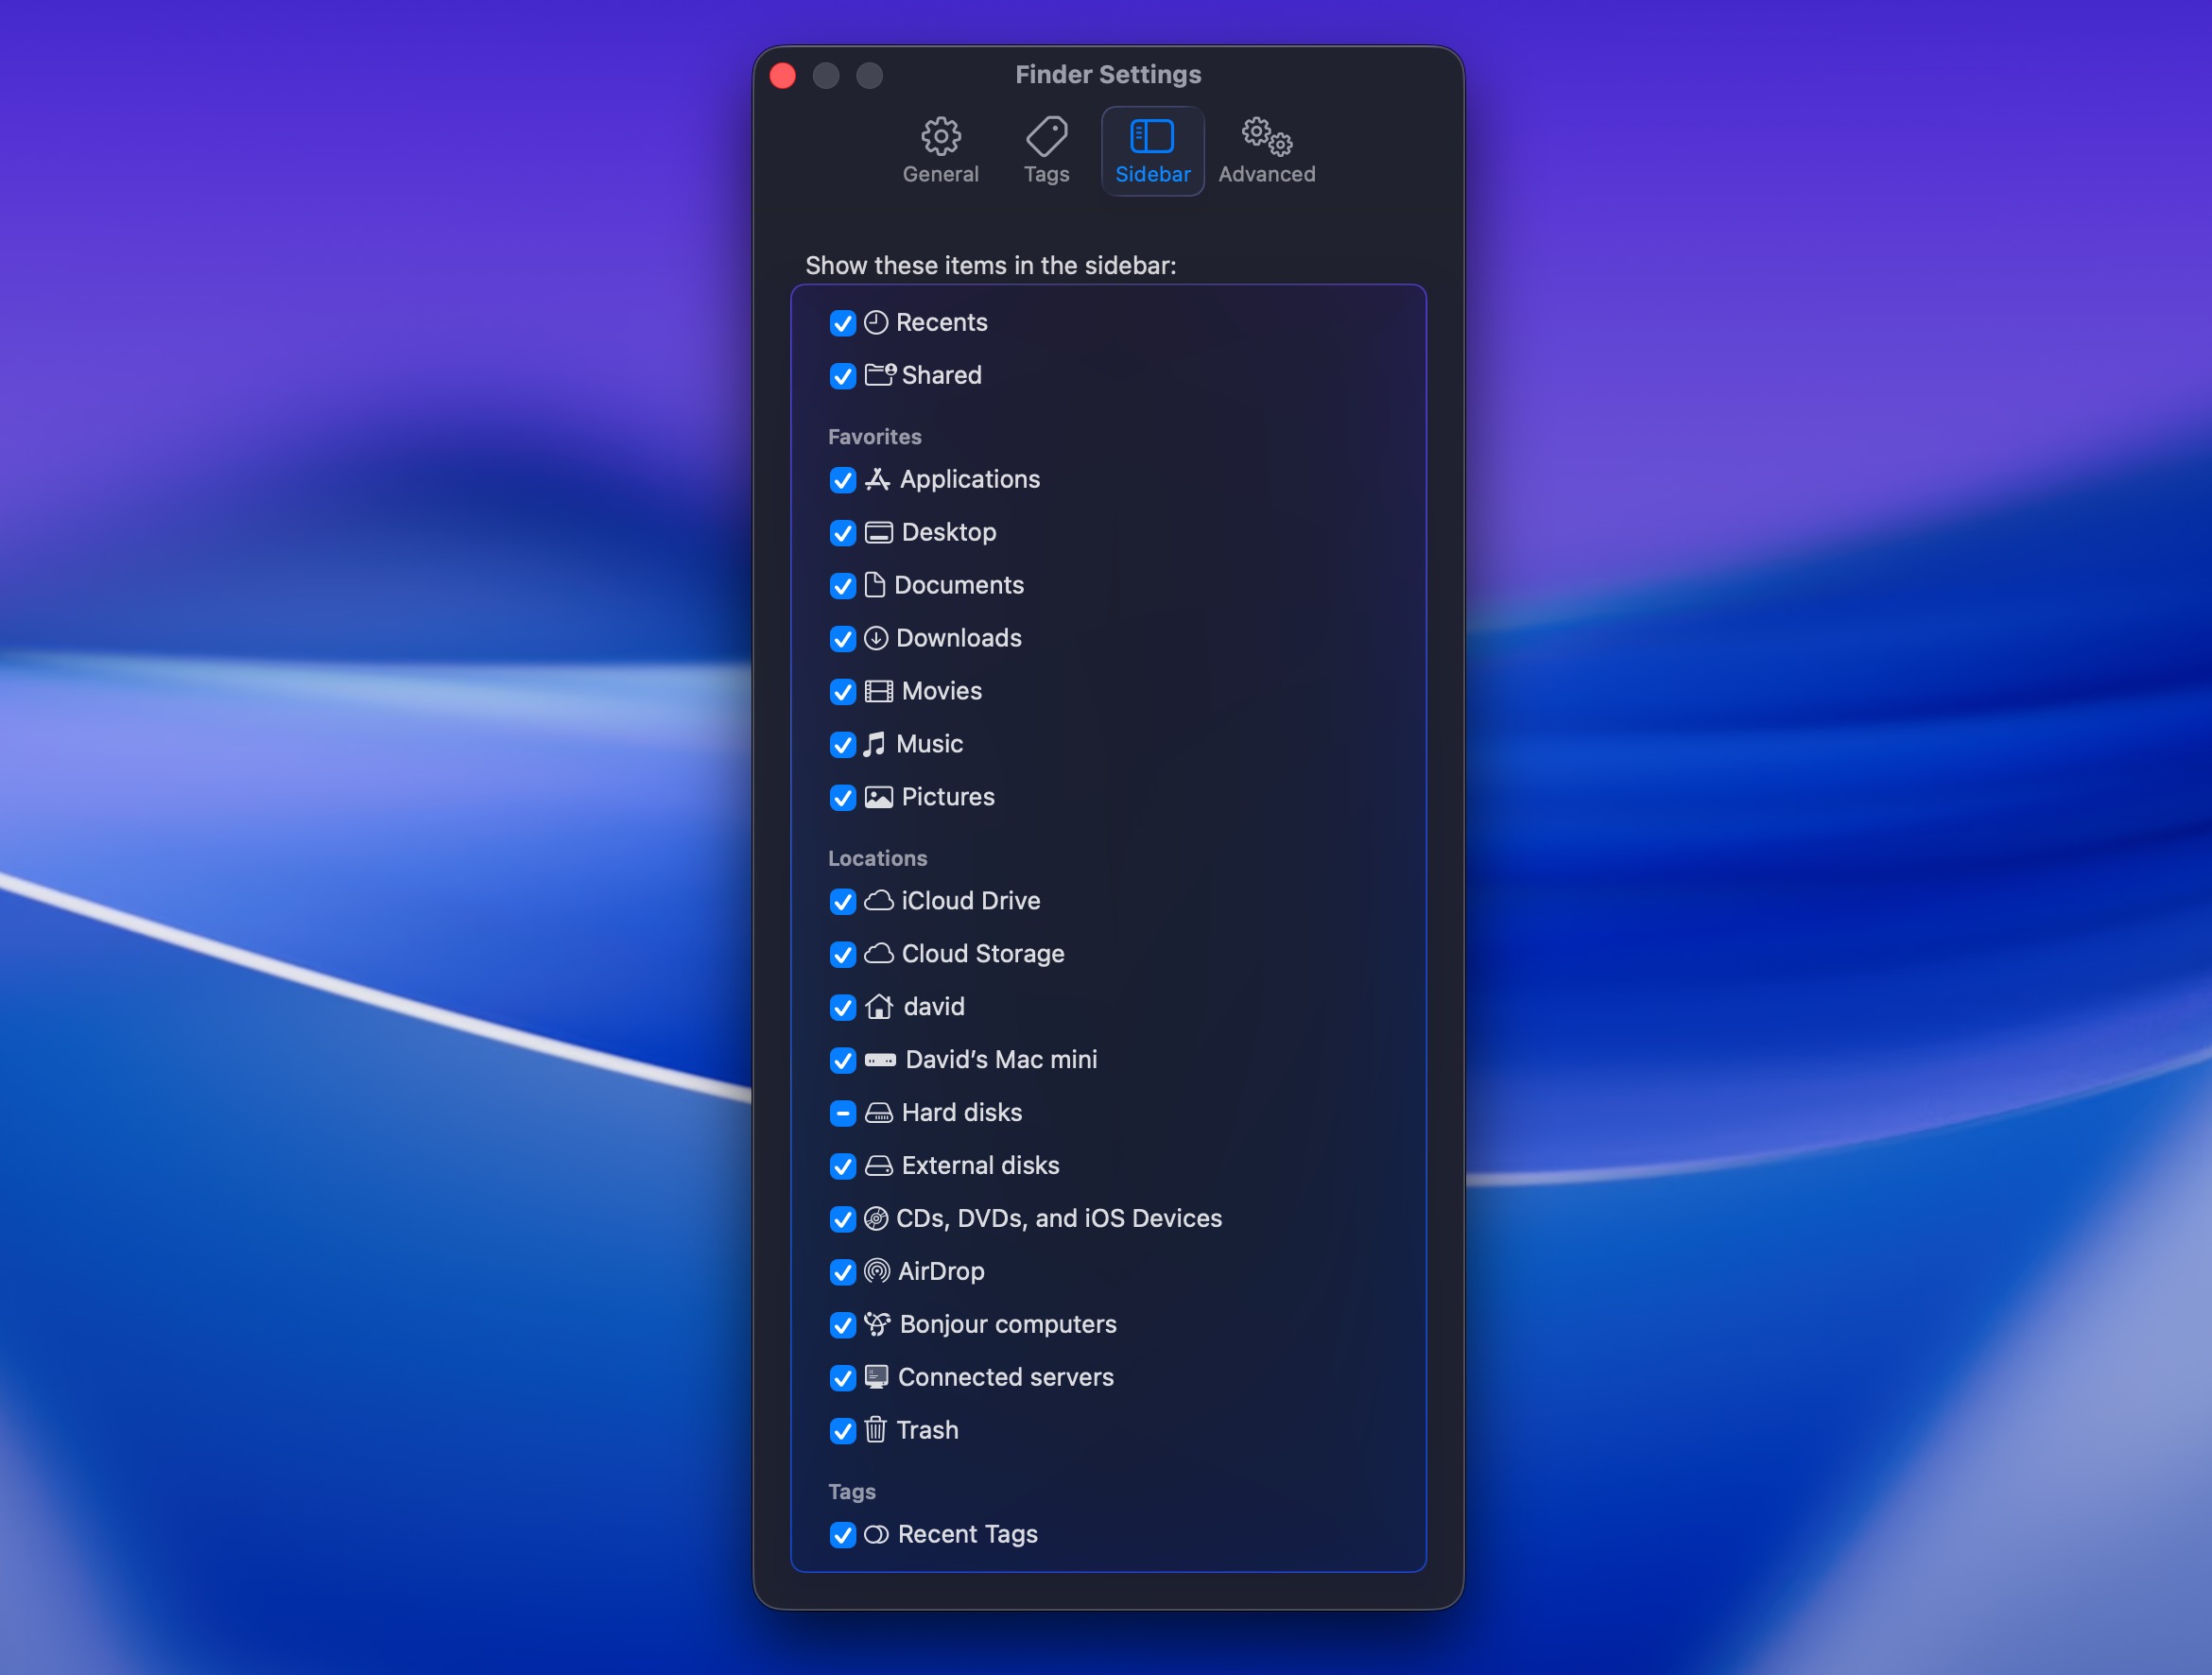
Option 5:Change macOS Display Settings
If your external drive works fine and you can see that it is mounted to your Mac in Disk Utility, it’s a good idea to check your computer’s settings. It’s quite possible that you can’t view the external drive neither on the desktop nor in Finder because of these settings.
Here’s what you should do to make your external drive viewable again on your Mac:
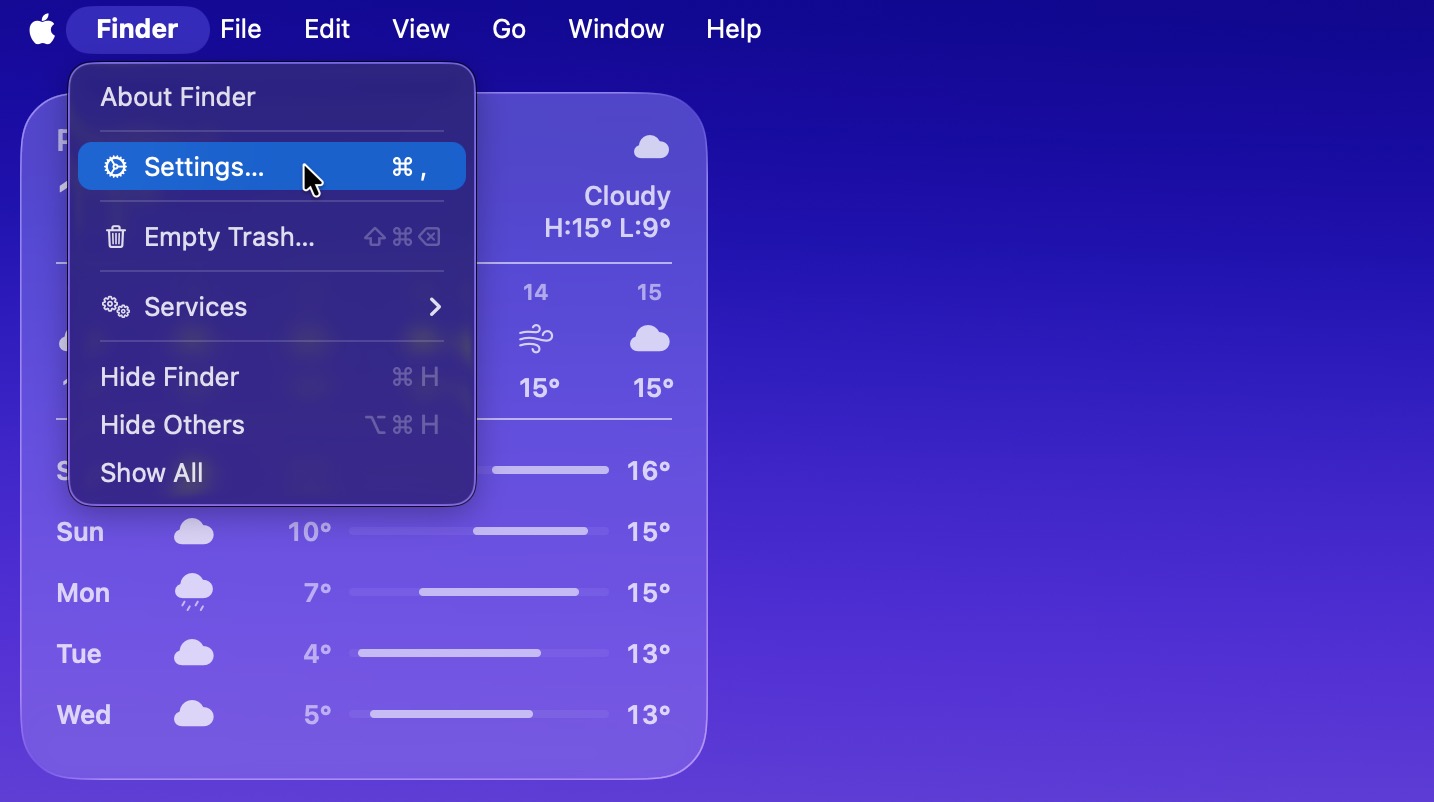
- Click your Mac’s desktop and then choose Finder from the menu at the top.
- Choose Settings from the drop-down menu.
- Click the General tab and click the box near External disks to place a tick (if it’s already selected, move to the next step).
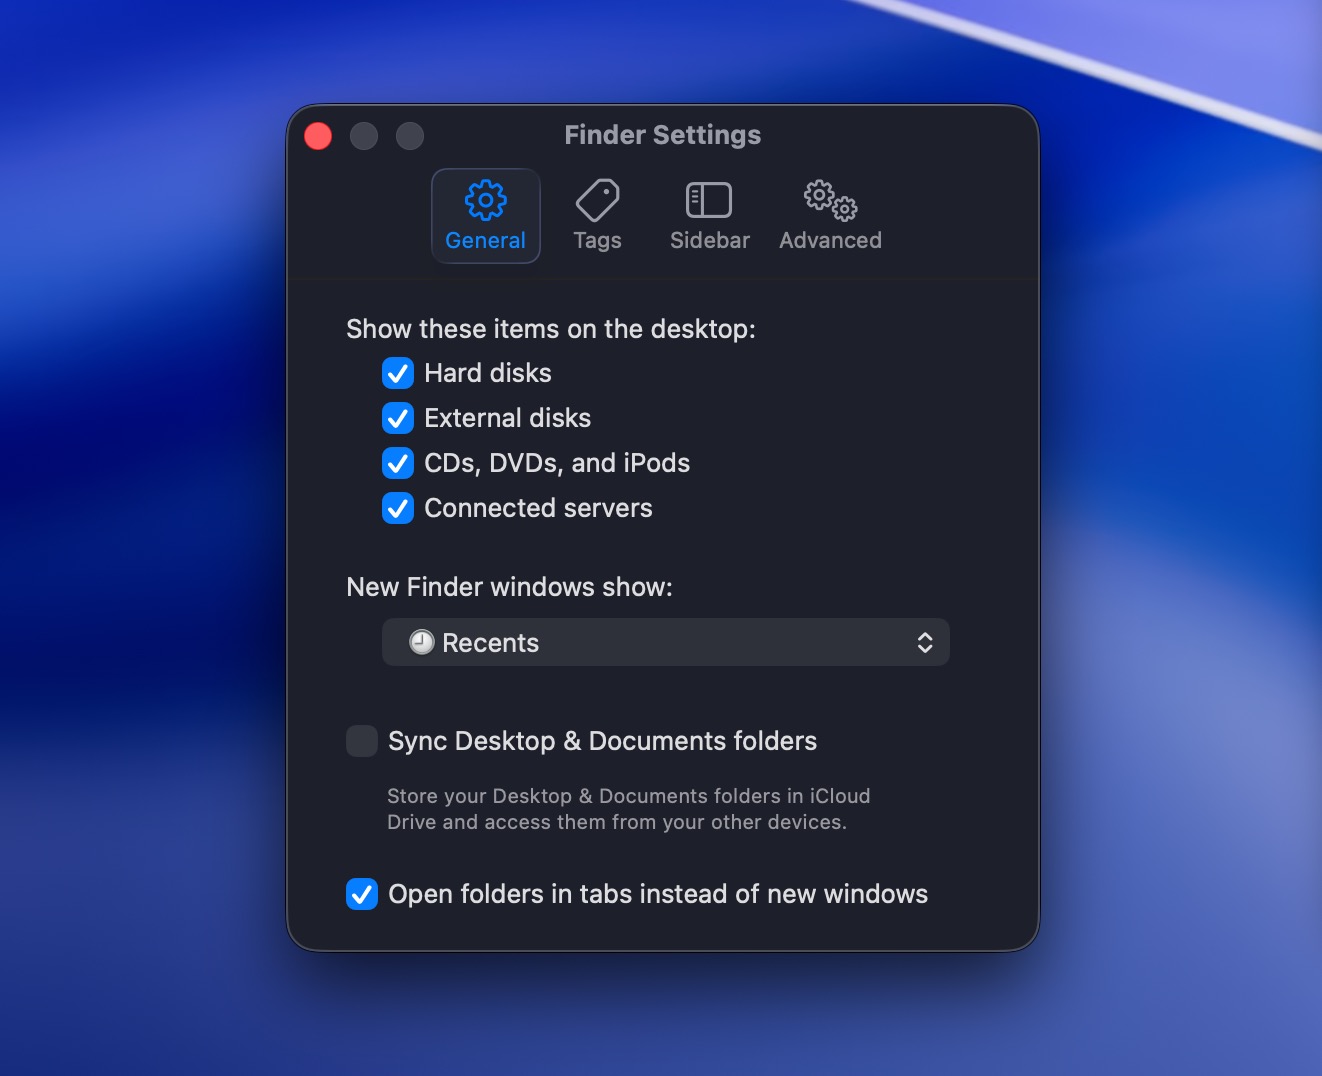
- Go to the Sidebar tab and look for External disks under the Locations section. Click the box near it to place a tick and start seeing the connected external disks in the Finder’s sidebar.
Option 6:Use a Third-Party External Drive Mounter
While macOS can read NTFS drives, it can’t write to them without third-party software. Additionally, certain drive configurations won’t mount at all, including NTFS drives with BitLocker encryption or NTFS volumes with non-standard cluster sizes. macOS also doesn’t natively support Linux file systems like ext3, ext4, or Btrfs. If your external drive uses an unsupported format, you’ll need a specialized third-party mounter app to fully access your data.
Option 7:Run First Aid in Disk Utility
Every Mac comes equipped with a tool called Disk Utility which you can use to perform various drive-related tasks. If you think that your external hard drive might have file system errors and, because of that, doesn’t mount to your Mac, you can use this app to try to find and repair those errors.
Here’s what you should do:
- Launch Disk Utility on your Mac (go to Finder > Applications > Utilities and click Disk Utility to open it).
- Select your external drive from the sidebar on the left.
- Click the First Aid button at the top.
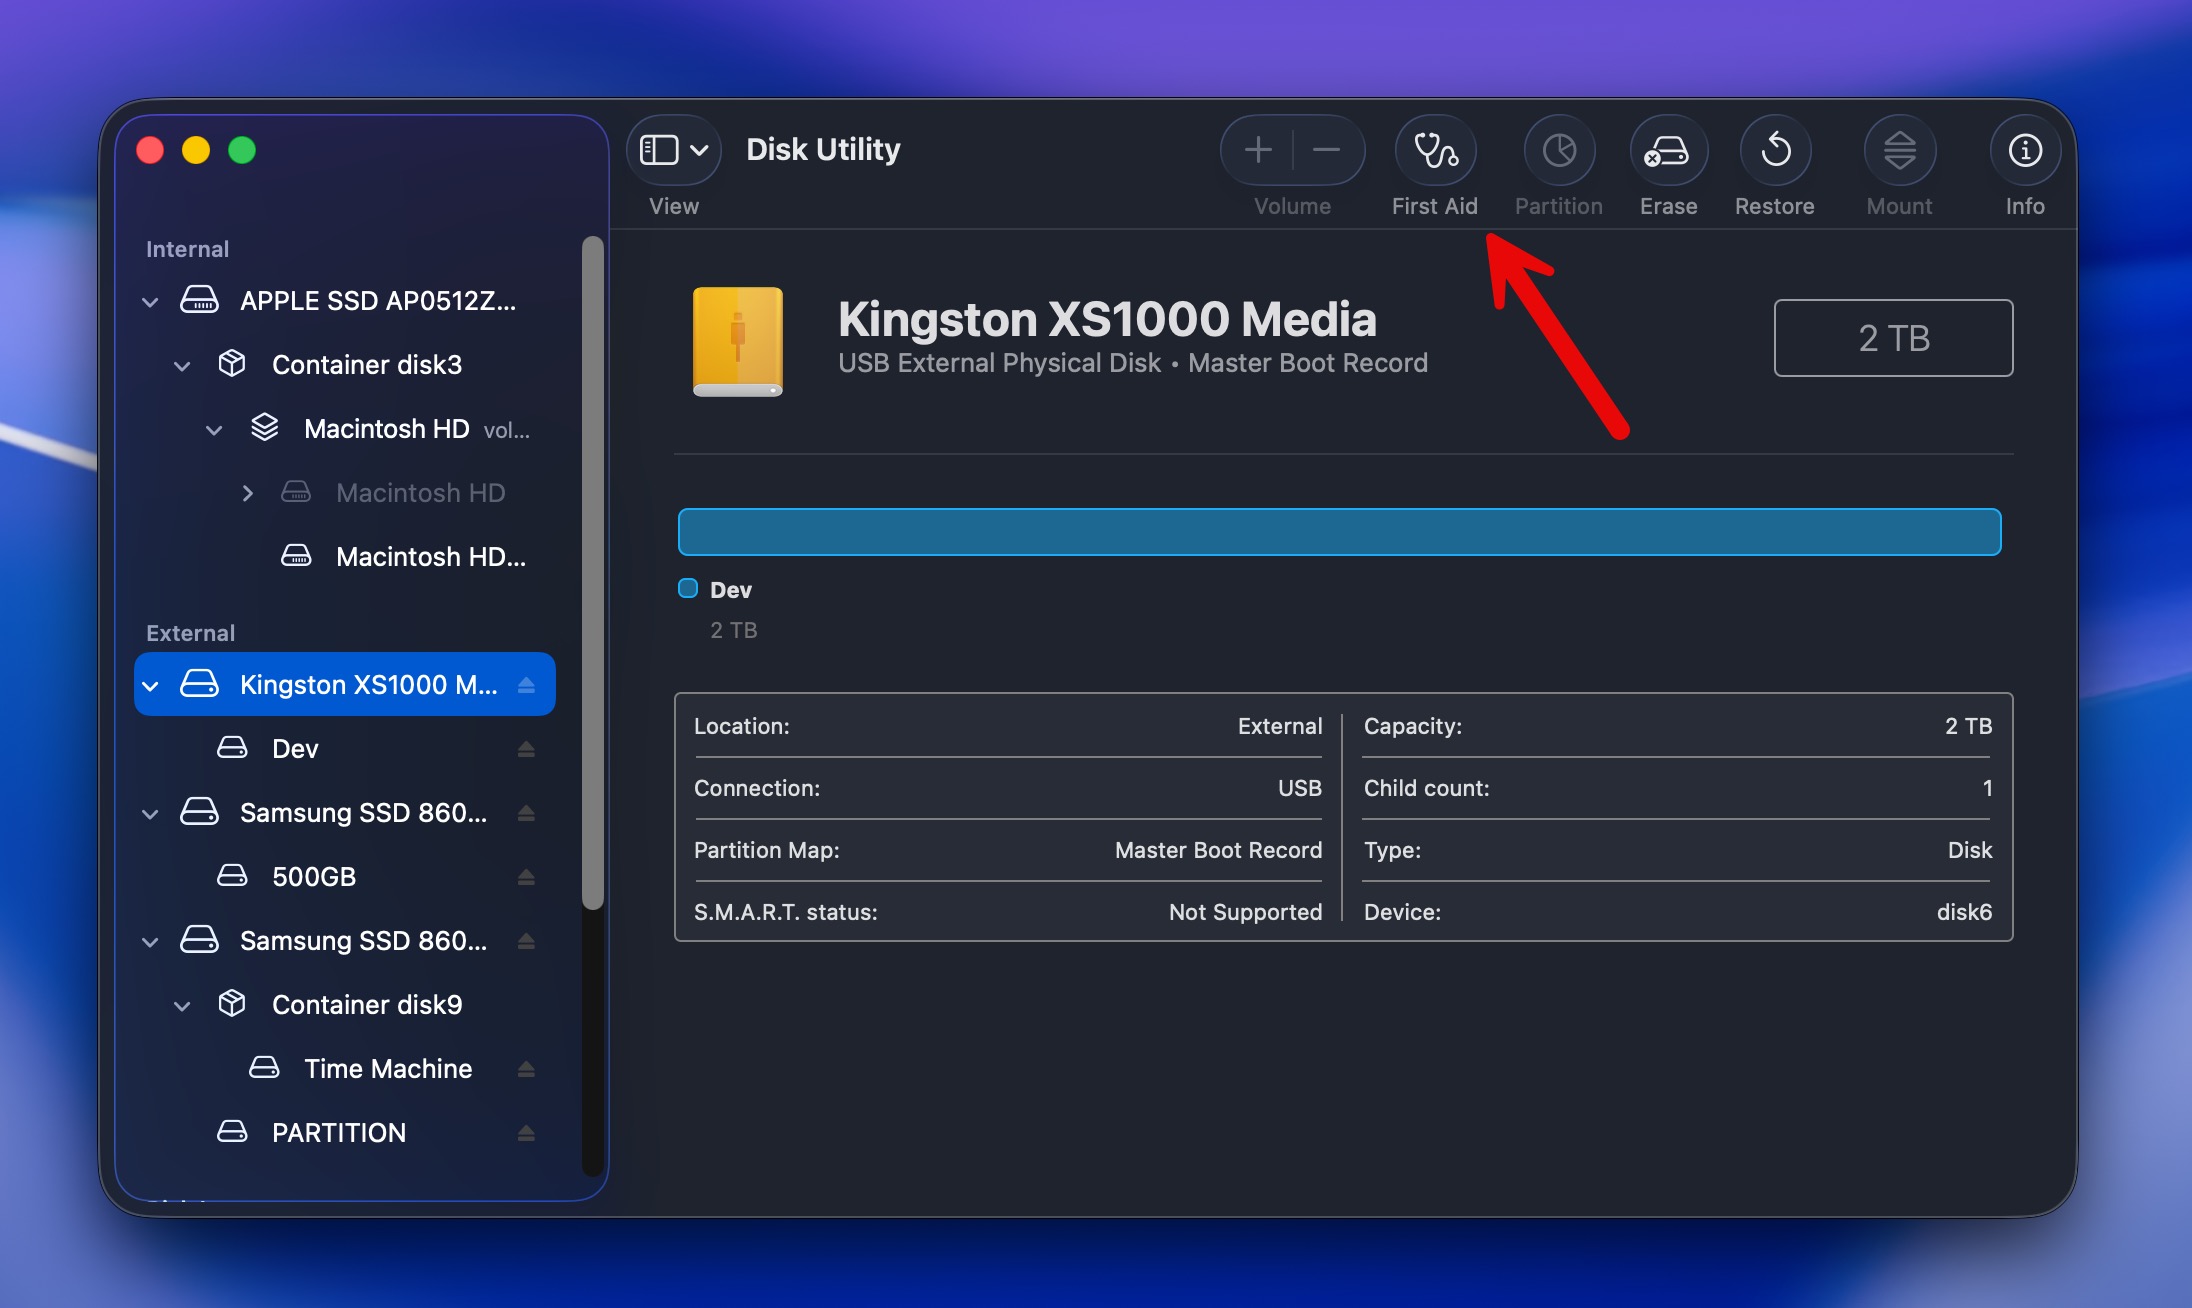
- Click Run to confirm.
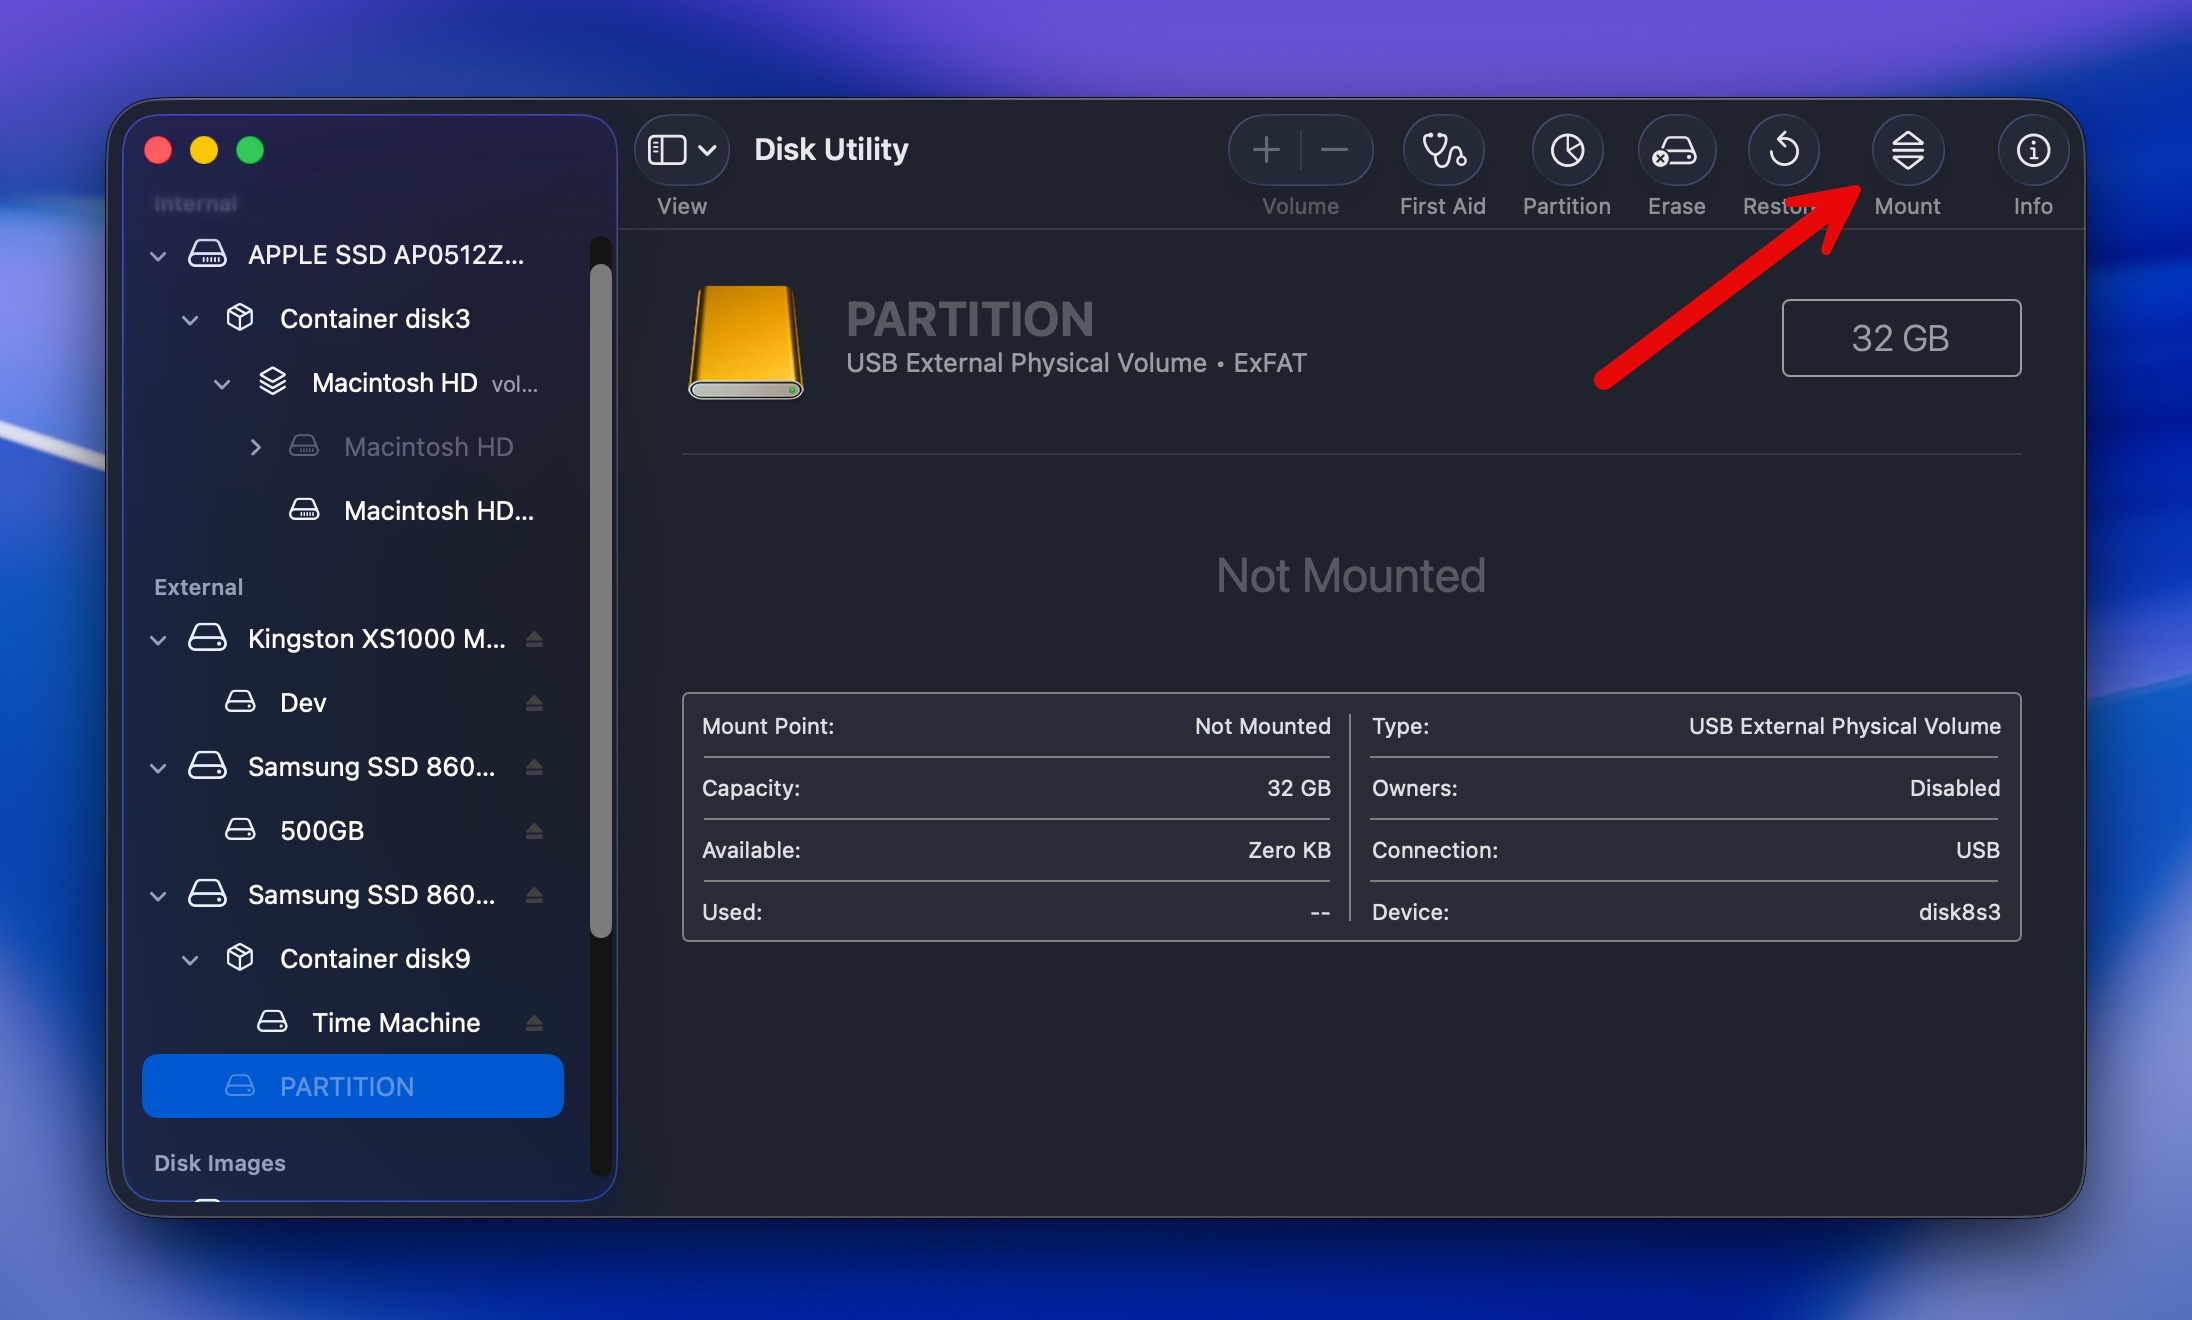
Option 8:Force Mount the Drive in Disk Utility
If the external hard drive is viewable in Disk Utility, but you can’t access the data located there, it’s possible to force mount the disk in this application. Once you succeed, you should be able to access the files stored on that drive on your Mac.
Here’s what you should do to manually force mount a hard drive on a Mac:
- Launch Disk Utility on your Mac (go to Finder > Applications > Utilities and click Disk Utility to open it).
- Choose the needed external drive from the sidebar on the left.
- Click the Mount button at the top.
Option 9:Format the Drive
If you’ve tried the above-mentioned methods and still were unable to mount the external hard drive to your Mac, there is one more option for you to try, which is formatting it. It’s a great option since it can fix your external drive and make it mountable again if the reason for the trouble is a corrupted filesystem.
📝 Note: Keep in mind that this will erase all of the files from your drive. Although you might still be able to recover the data from the formatted drive with a data recovery tool.
You can format an external hard drive either via Disk Utility or Terminal.
Here’s how to format an external hard drive on your Mac using Disk Utility:
- Launch Disk Utility on your Mac (go to Finder > Applications > Utilities and click Disk Utility to open it).
- Choose the needed external drive from the sidebar on the left.
- Click the Erase button at the top.

- Type in a preferred name for your hard drive, choose a format, and scheme.
Terminal offers more control and can sometimes format drives that Disk Utility can’t handle, but requires careful command entry:
- Open Terminal (Finder > Applications > Utilities > Terminal).
- Type diskutil list and press Enter to identify your drive’s identifier (like disk2 or disk3).
- Unmount the drive: diskutil unmountDisk /dev/diskX (replace X with your disk number).
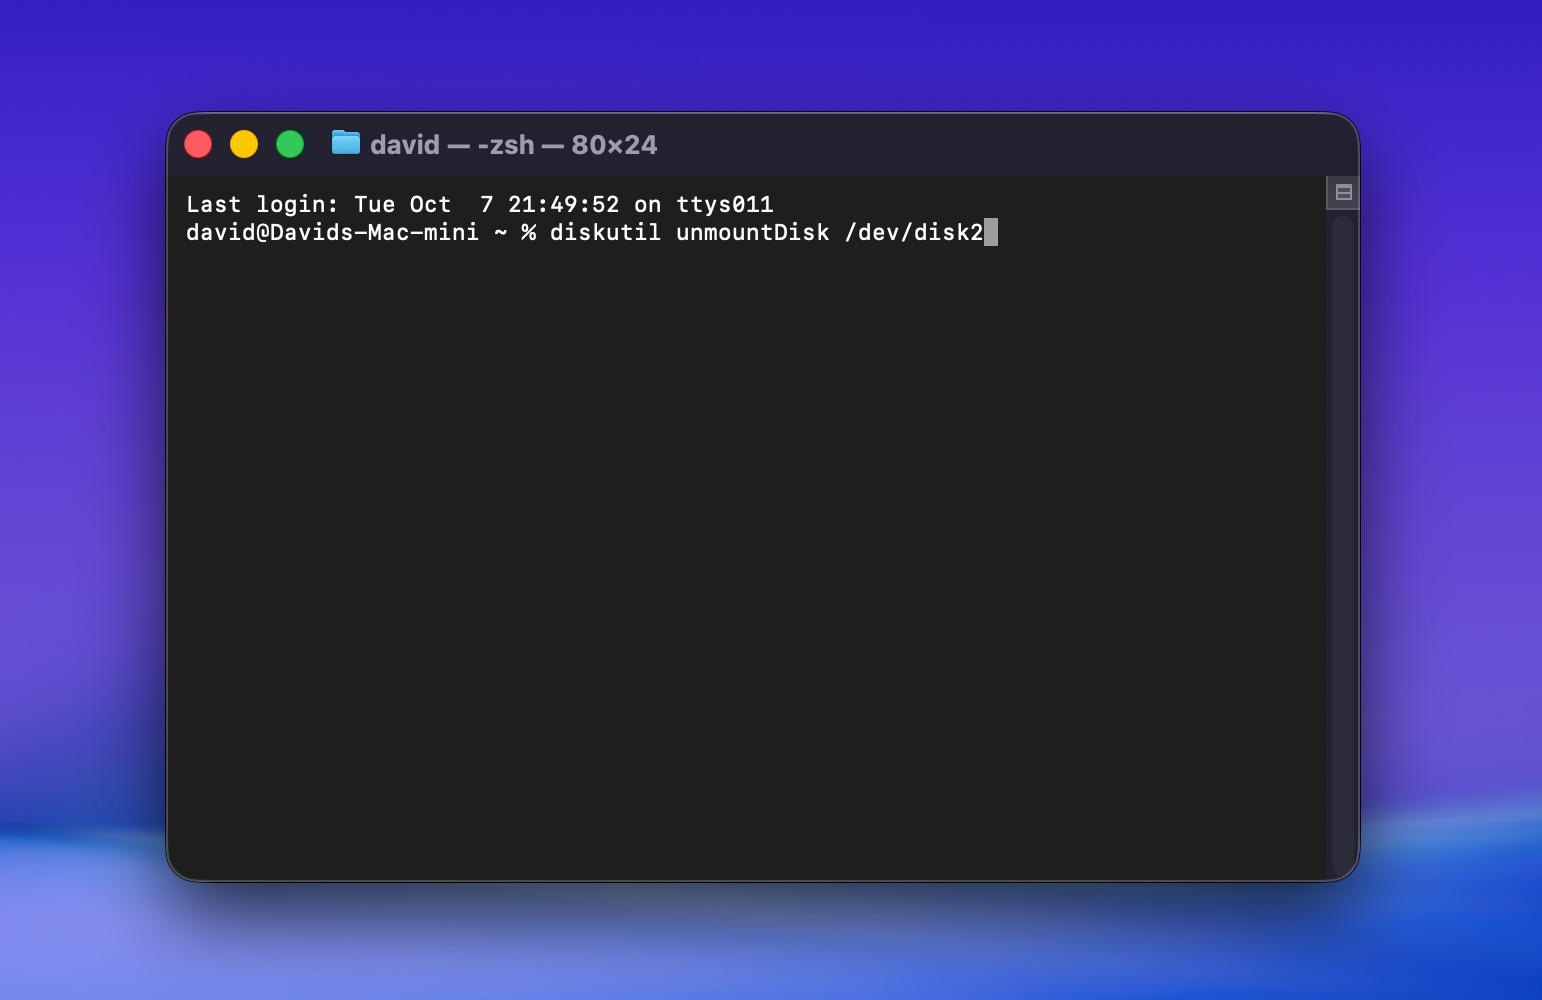
- Format the drive with your chosen file system, such as: diskutil eraseDisk APFS “DriveName” /dev/diskX for APFS.
- Press Enter and wait for the process to complete.
Terminal should only be used when Disk Utility fails or when you need specific formatting options not available in the GUI. One wrong character in a Terminal command could format the wrong drive instantly, with no undo option.
Still Stuck? Here’s What to Do Next
If none of the above solutions worked and your hard drive is not mounting on Mac, don’t give up yet. Here are your final troubleshooting steps and when to seek professional help:
- Connect your drive to a different Mac or even a Windows PC. If it mounts there, the issue is with your Mac’s configuration, not the drive itself.
- Try a powered USB hub. Many mounting failures are simply power issues in disguise. A powered hub provides consistent electricity that your Mac’s ports might not deliver, especially for older or high-capacity drives.
- Not all USB cables are equal. Some only carry power, not data. Use a cable you know works with other drives, preferably the original that came with your external drive or a certified Thunderbolt/USB-C cable for newer drives.
When you’ve exhausted all options or suspect physical damage, professional recovery services become necessary. They have clean rooms and specialized equipment to recover data from failed drives. Yes, it’s expensive (typically $500-3000), but it’s your only option for physically damaged drives with important data.
For more comprehensive guidance on recovering data from problematic external drives, check out our detailed guide on external hard drive recovery for Mac.
FAQ
- Connect the drive to your Mac.
- Open Disk Utility on your computer (go to Finder > Applications > Utilities and click Disk Utility to open it).
- Select your external HDD on the sidebar on the left.
- Click the Mount button at the top.
- Click Finder on the Dock on your MacBook.
- Click Finder at the menu on the top of the screen and choose Preferences from the drop-down menu.
- Select the Sidebar tab.
- Place a tick in the box near External disks by clicking it.


