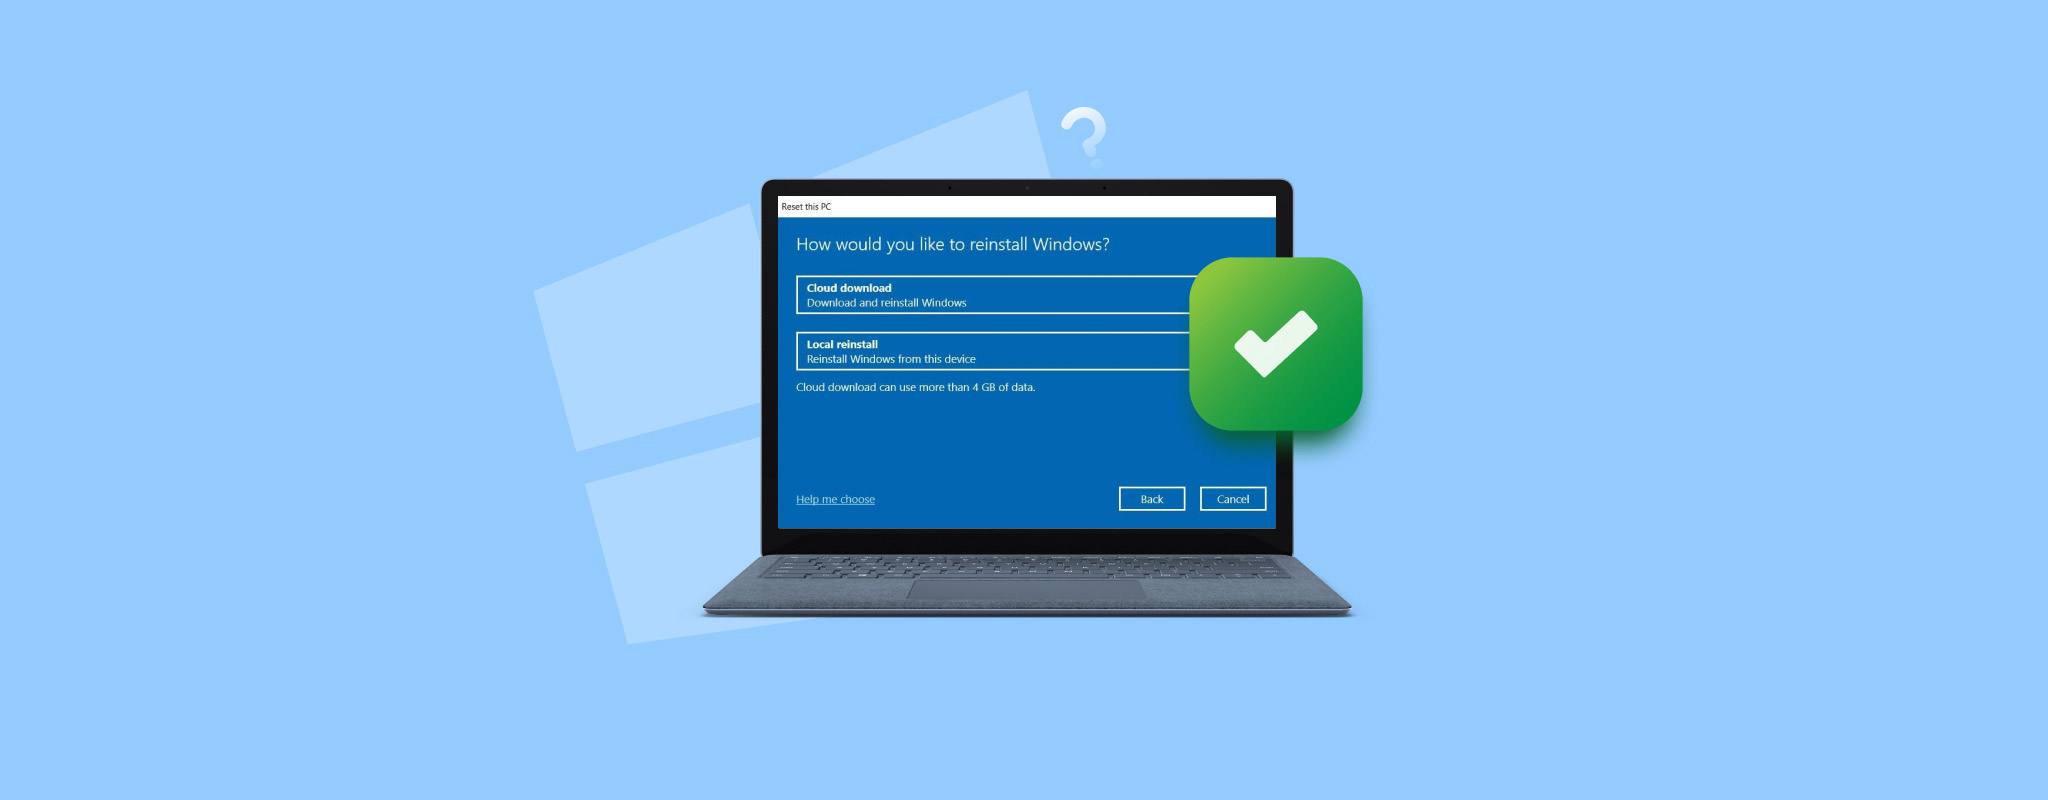
 Reinstalling Windows is complicated enough without the worry of losing your data. As you would expect, if you don’t do it right, all of your photos, videos, documents, and any other files will be lost for good. You need a way to move that data across, safely but efficiently. Thankfully, reinstalling Windows doesn’t mean you need to wave goodbye to all of your important personal or work files. Rest assured, we will show you how to reinstall Windows without losing files, along with some recovery options if you’ve lost some files in the process.
Can I Reinstall Windows Without Losing Files?
You can absolutely reinstall Windows without losing data, but you must go about it the right way. When reinstalling Windows, you will have the option to keep files that you don’t want to lose during the reinstall. Other times, you won’t. Either way, even if you choose to keep your files, this is not a guarantee that your data will be safe. If the drive fails, the installation freezes, or you lose power, your system could be left unusable. This is why a backup is essential when you need to reinstall Windows without losing files. Windows includes several options for backing up personal data, but you can also use third-party solutions like Clonezilla or Acronis True Image. Creating a backup of all the data on the drive means you can easily restore anything that’s lost by a clean or failed installation.
I had to reinstall Windows because my computer stopped booting today & now I gotta download my entire Dropbox and get back all the programs & games I use one-by-one pic.twitter.com/gLFVbBC6rD
— Polyhex (@tylermcbride) November 11, 2018
If you’ve already tried reinstalling Windows but ended up losing some of your data in the process, you still have a chance to get that data back if you act quickly. Jump ahead to our section on how to recover files lost during Windows reinstall.
How to Back Up Your Drive Before Reinstalling Windows
No matter how you create the backup, simply backing up your data means it’s safe in case something goes wrong and allows you to quickly recover files after a factory reset of Windows. The below options will include Backup and Restore, a backup utility native to Windows, and OneDrive, Microsoft’s own cloud storage app.
Method 1: Use the Windows Backup and Restore Tool
Backup and Restore may be the predecessor to the now-preferred File History, but it has one quality that makes it the better option here: the ability to back up the entire system, rather than specific folders. Of course, you can still manually select folders and files to be backed up.
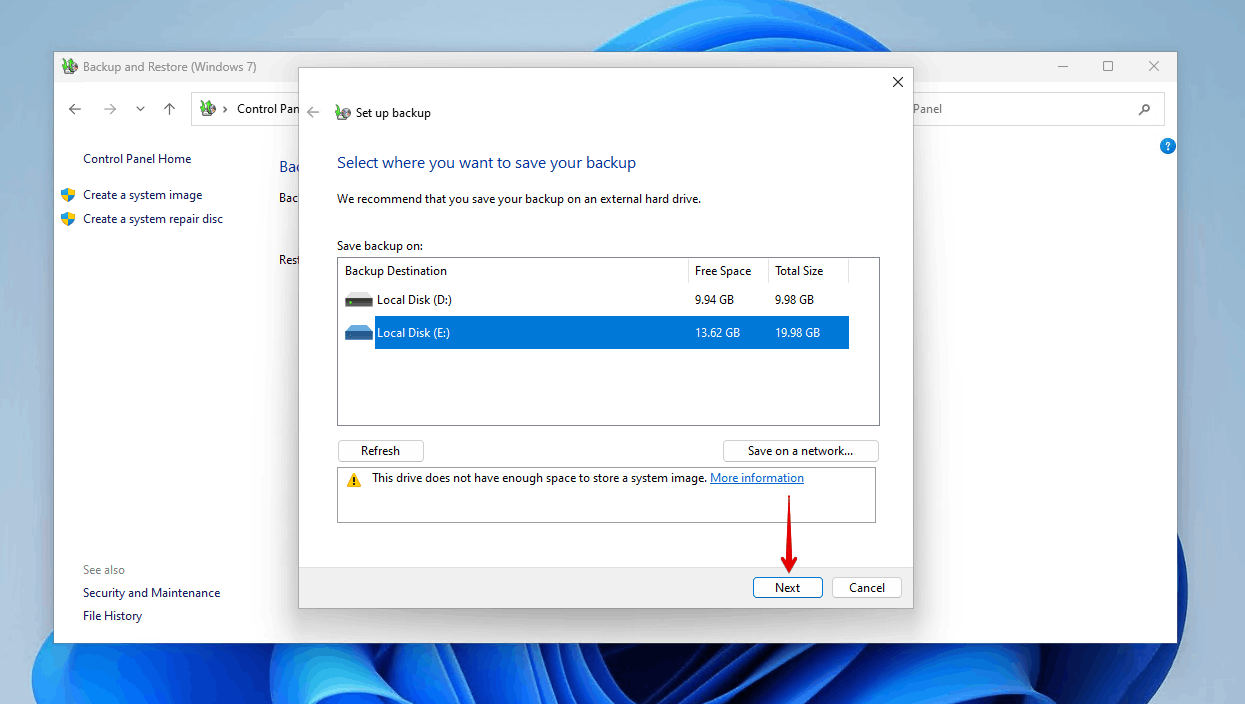
An external drive or internal non-system drive of equal size or more is required to create and store the entire backed-up partition.
Follow these steps to create a backup with Backup and Restore:
- Press Win + S on your keyboard and search “Control Panel”. Open the first result.

- Click Backup and Restore (Windows 7).
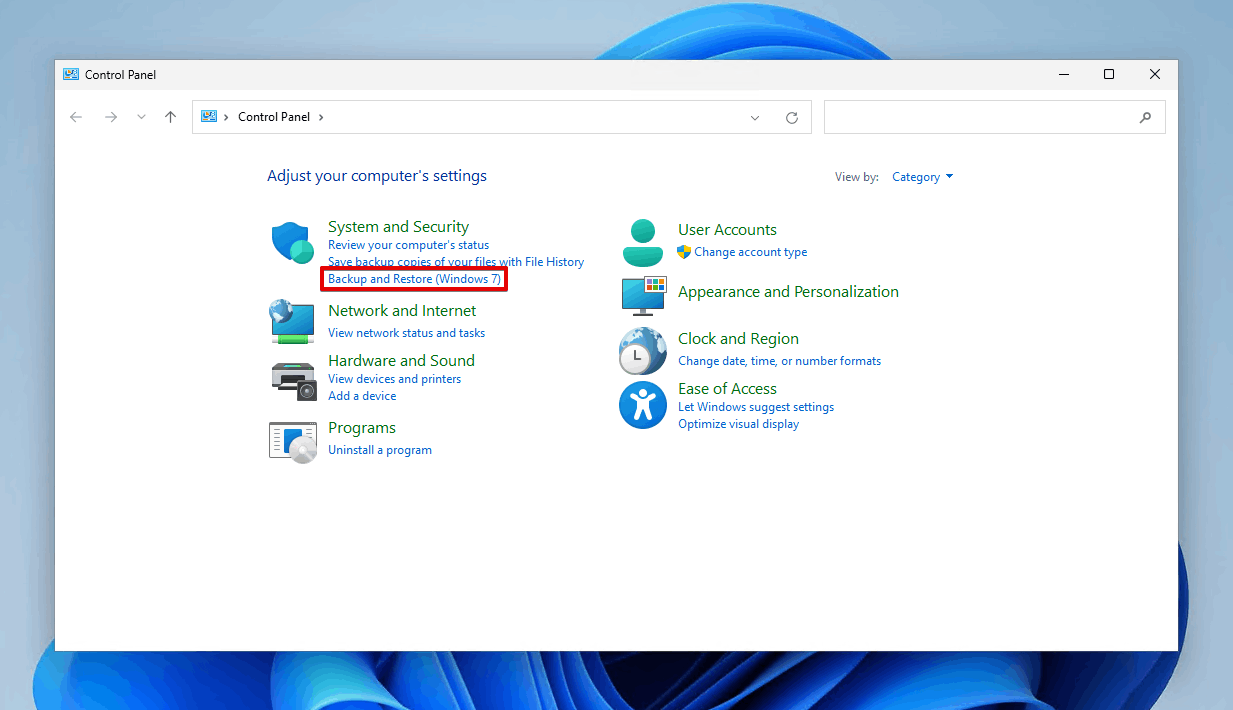
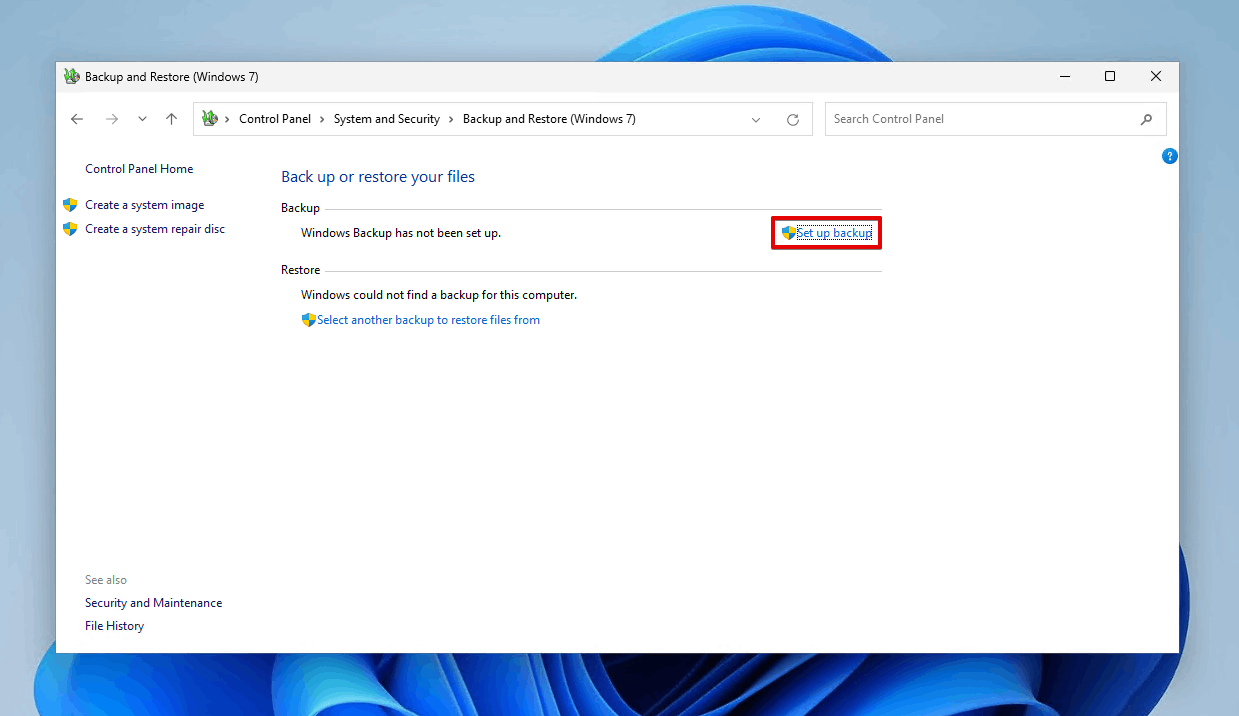
- Click Set up backup.
- Select where you want to store the backup and click Next.
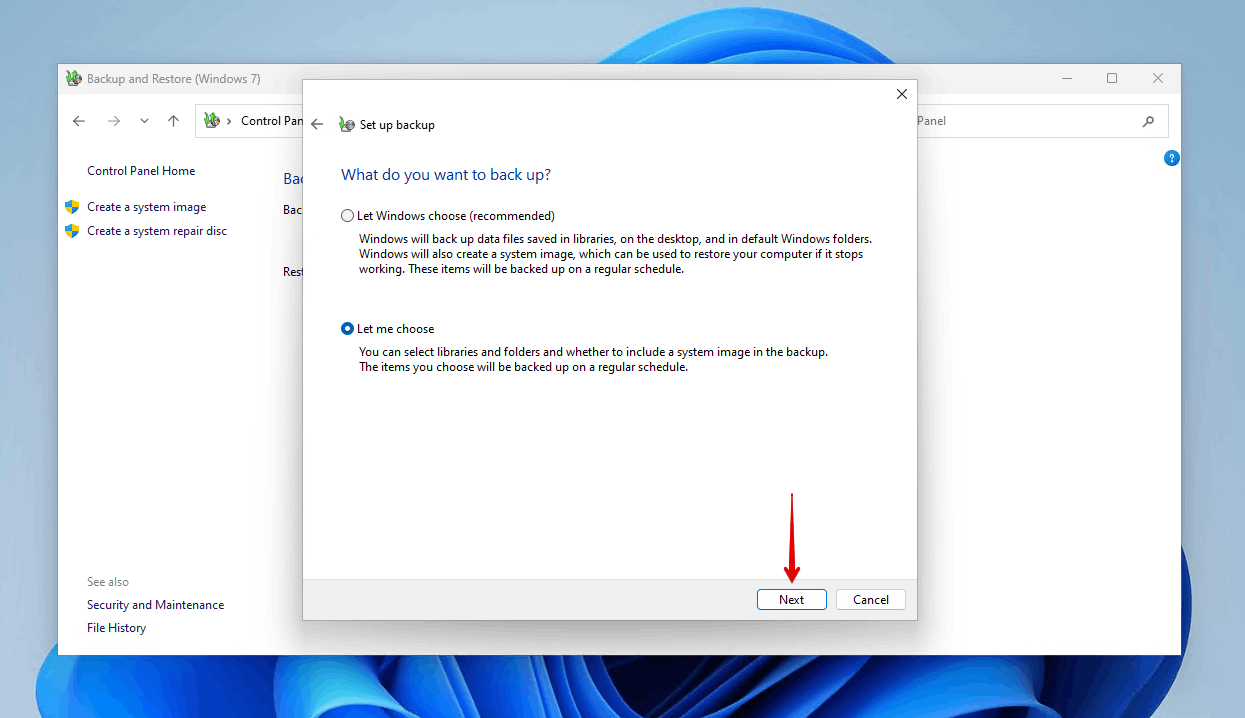
- Click Let me choose, then click Next.
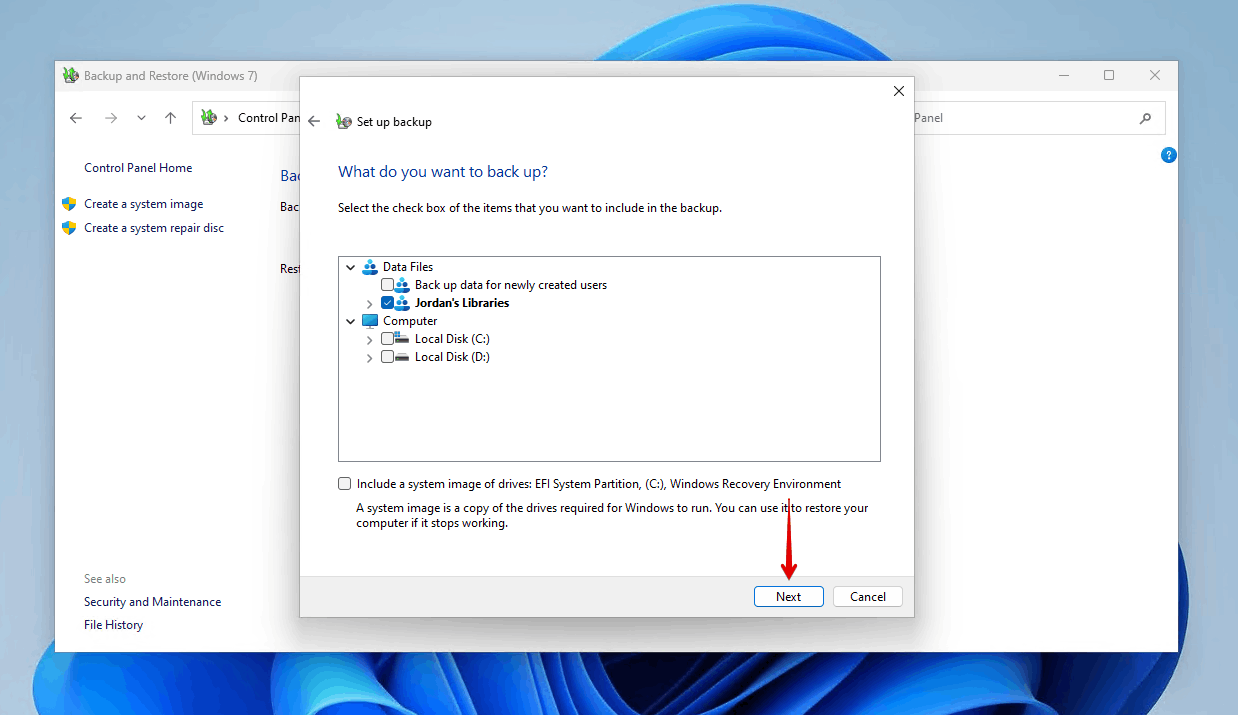
- Select what data you’d like to back up, then click Next.
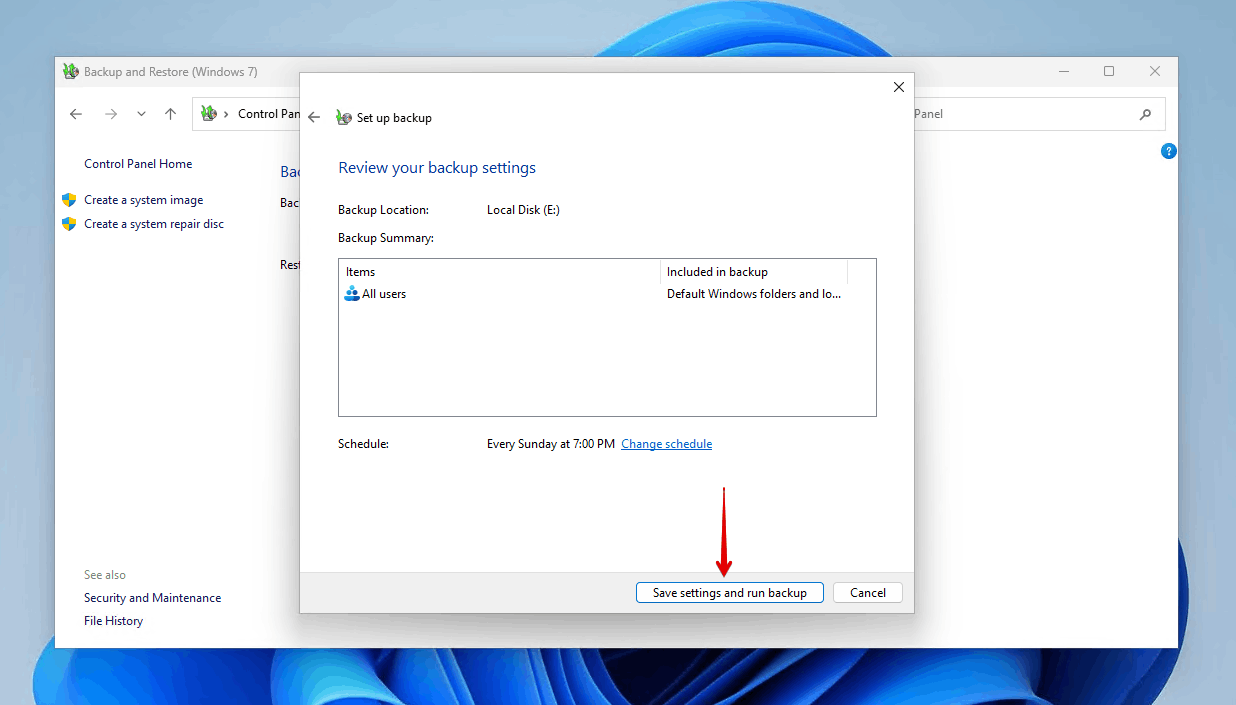
- Click Save settings and run backup.
Method 2: Upload Files to OneDrive for Backup
OneDrive, when set up, will automatically sync files in designated folders with its servers. This means that, for example, even if something is deleted from your Documents folder, you will still be able to download a copy from your OneDrive account. OneDrive is only ideal if you need to back up select files, as uploading everything to your OneDrive will (1) take a very long time, and (2) cost a lot in cloud storage quota. But, it’s still a quick and easy option. This is how you upload files to the cloud so you can reinstall the OS without losing data:
- Sign in to your OneDrive account in a browser.
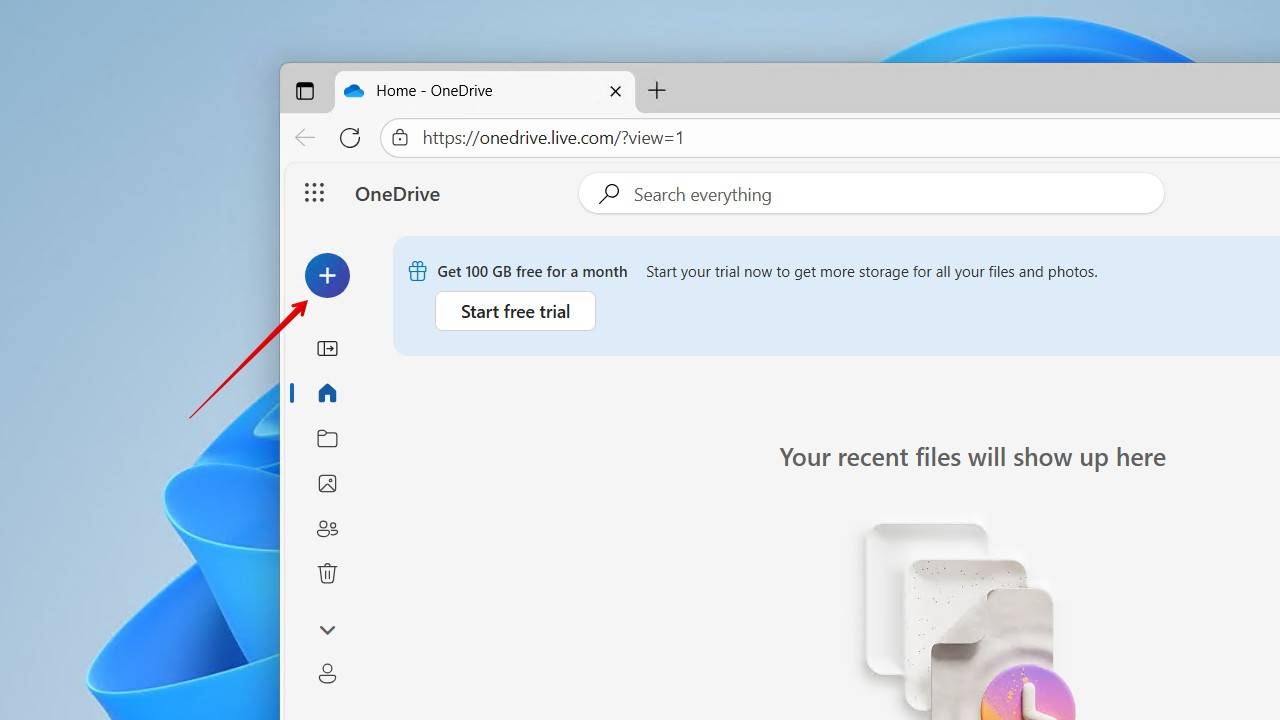
- Click on the blue plus button.
- Click Files upload or Folders upload, depending on how you prefer to select data.
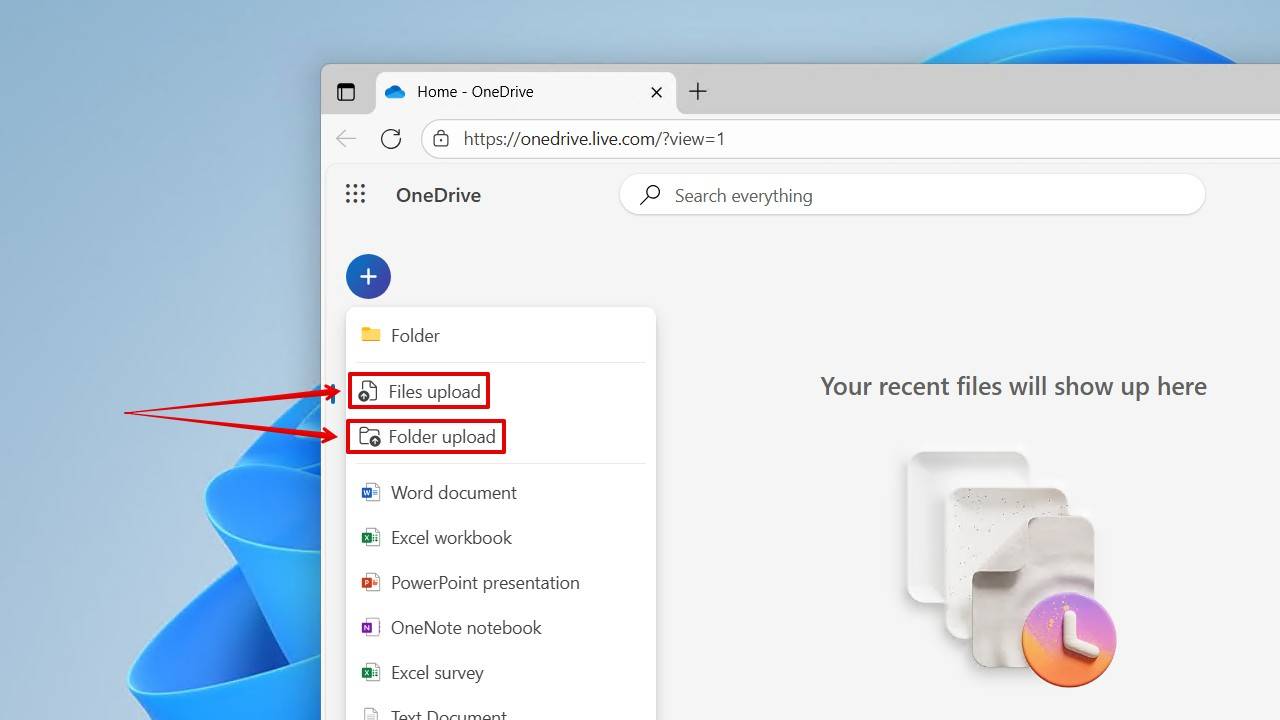
- Choose the files or folders you want to upload.
You don’t have to use OneDrive. You can use other cloud storage services like Google Drive and Dropbox. The principle remains the same.
3 Methods to Reinstall Windows
After creating a backup, you can reinstall or clean install Windows without losing data. We’ve included instructions for reinstalling Windows using various methods to give you a range of options on how to change OS without losing data.
A quick reminder that some of these methods will require a clean install. Therefore, if you haven’t backed up your data yet, we recommend doing so before continuing.
Method 1: Using the ‘Reset PC’ Option
If you want it easy, the Reset PC option is by far the easiest way to reinstall Windows. You don’t need any additional storage devices to use it, and it can be accessed from your Settings or the Windows Recovery Environment (WinRE). It gives you two options:
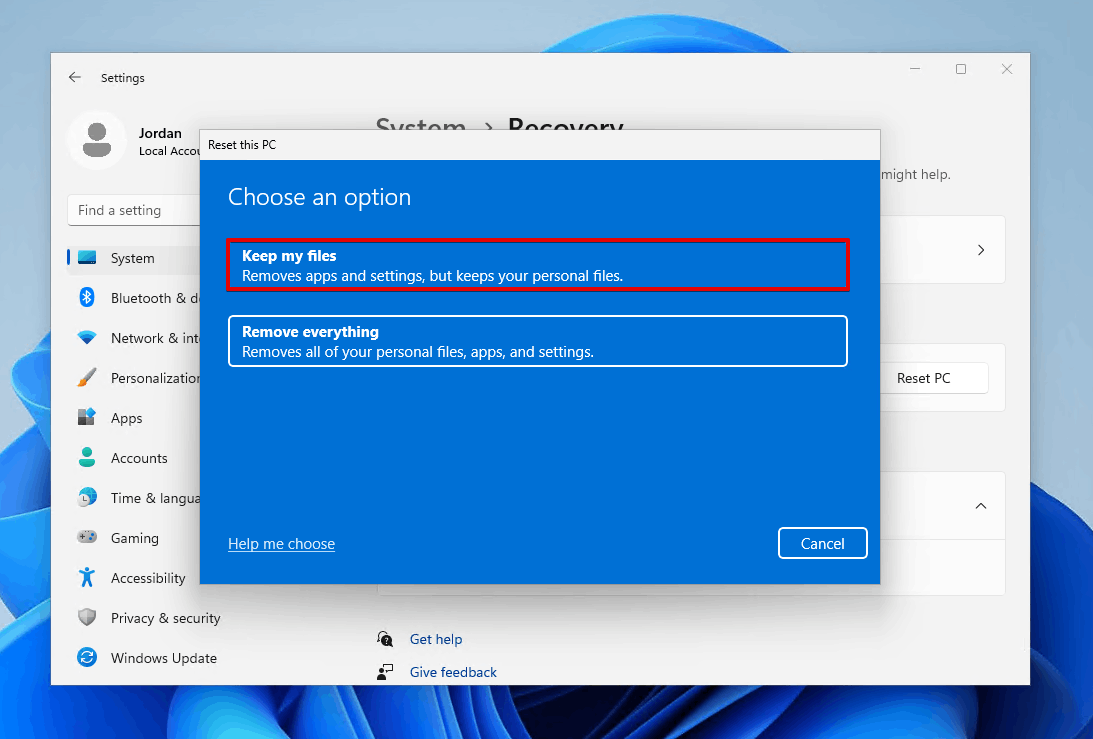
- Keep my files – The personal data stored in the Users folder (including subfolders Desktop, Downloads, Documents, Pictures, Music, and Videos) is preserved, allowing you to reinstall the operating system without losing data. Any apps that you installed, as well as data stored outside of the aforementioned folders, are removed.
- Remove everything – All of your data is deleted, along with any apps that you installed.
In order to use this option, your computer must have sufficient storage space. If it doesn’t, you will be advised to clear up some space before proceeding with the reset. These instructions will show you how to reinstall Windows without losing data using the Reset PC option:
- Right-click Start and click Settings.
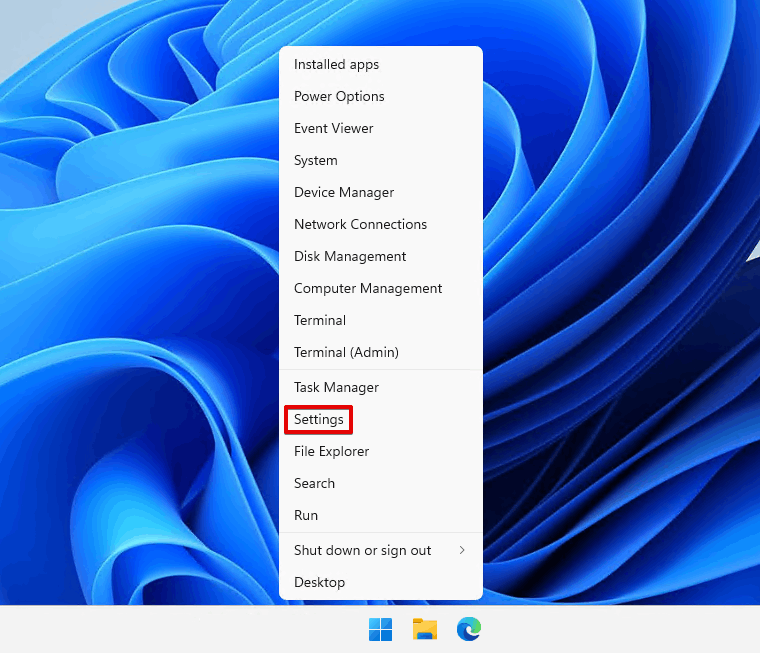
- Click Recovery.
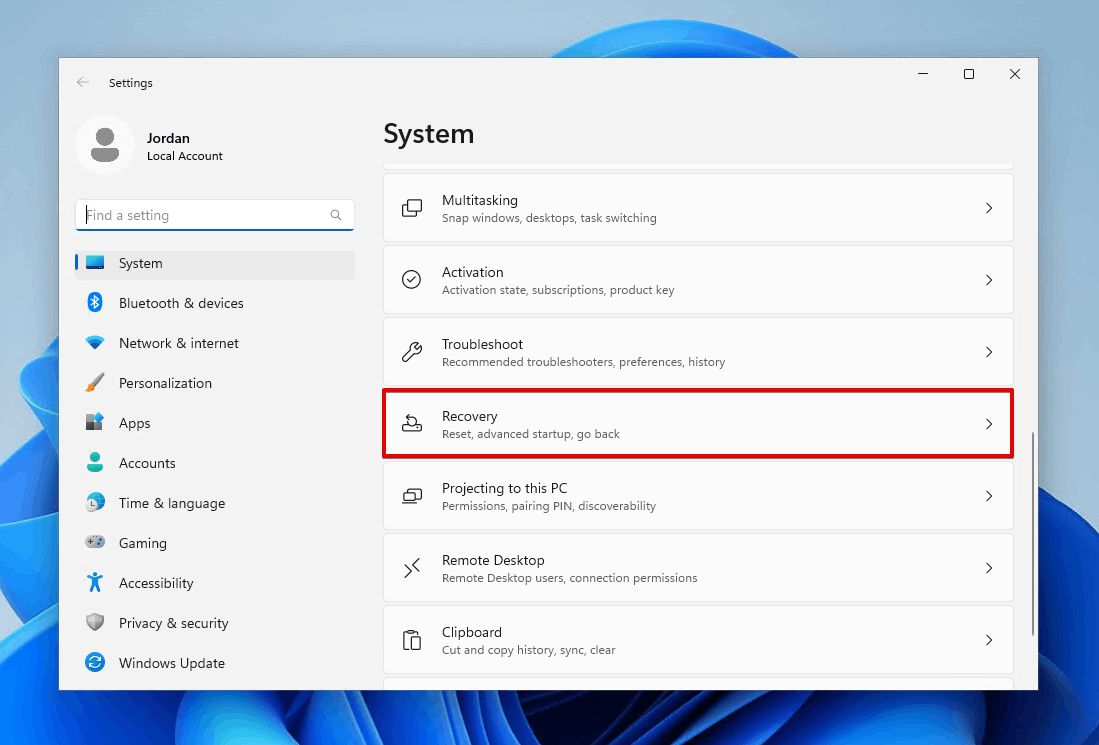
- Click Reset PC.
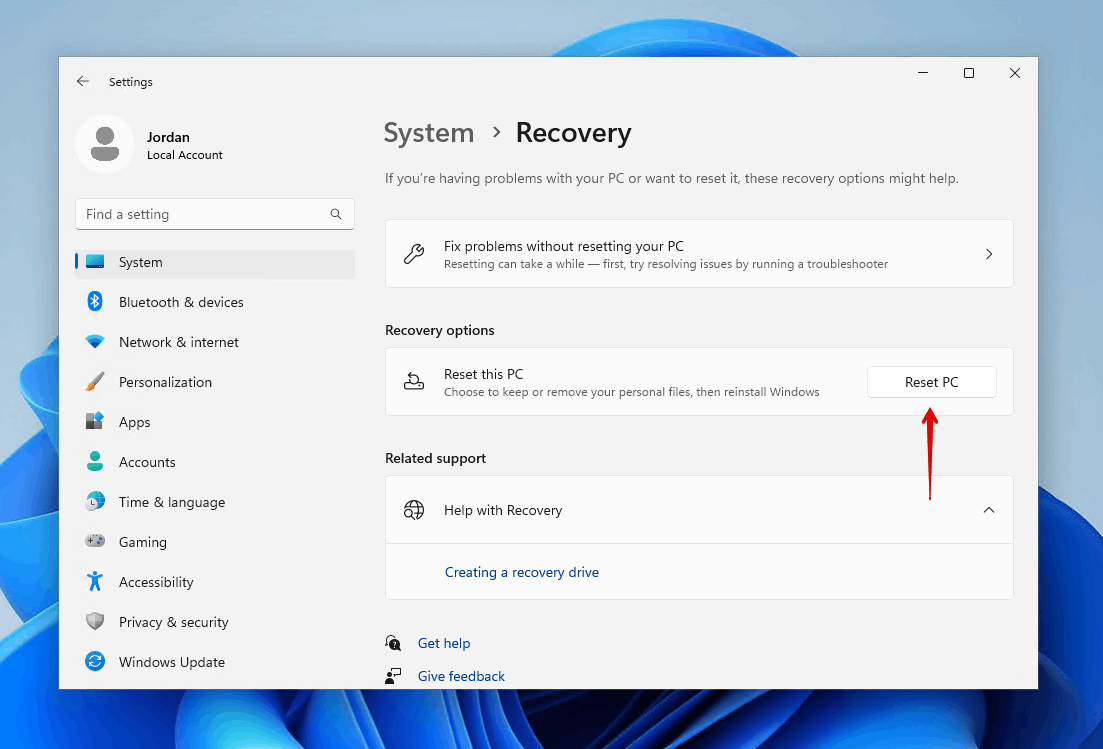
- Select Keep my files.
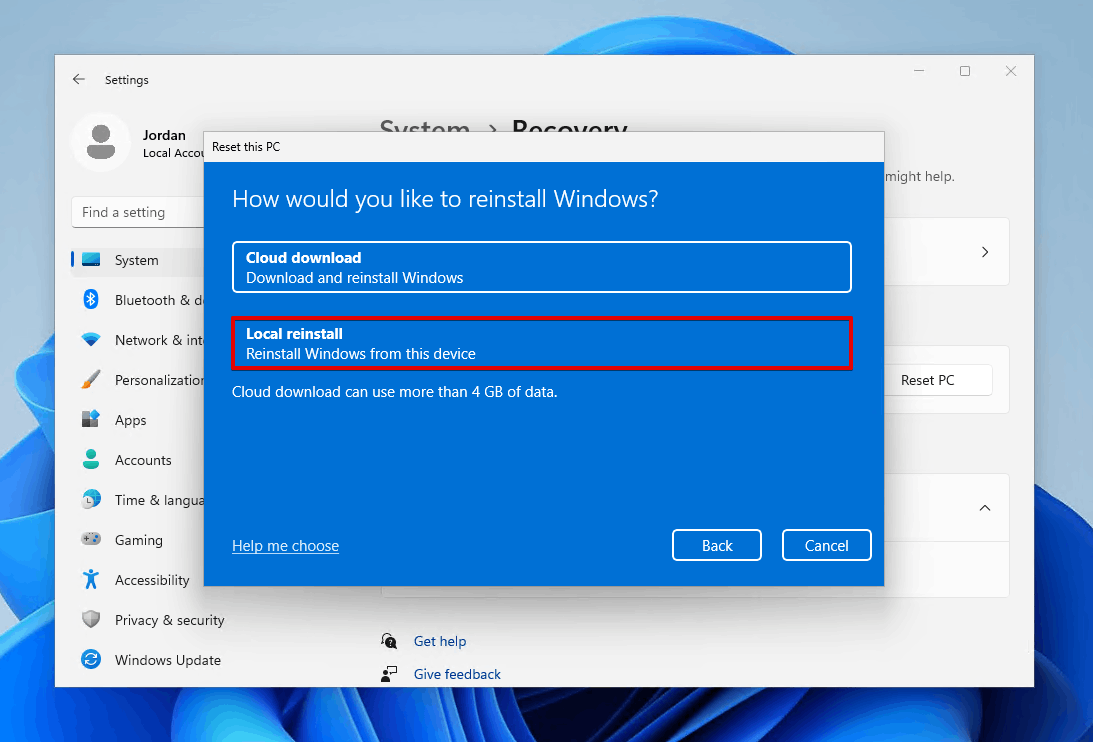
- Select Local reinstall.
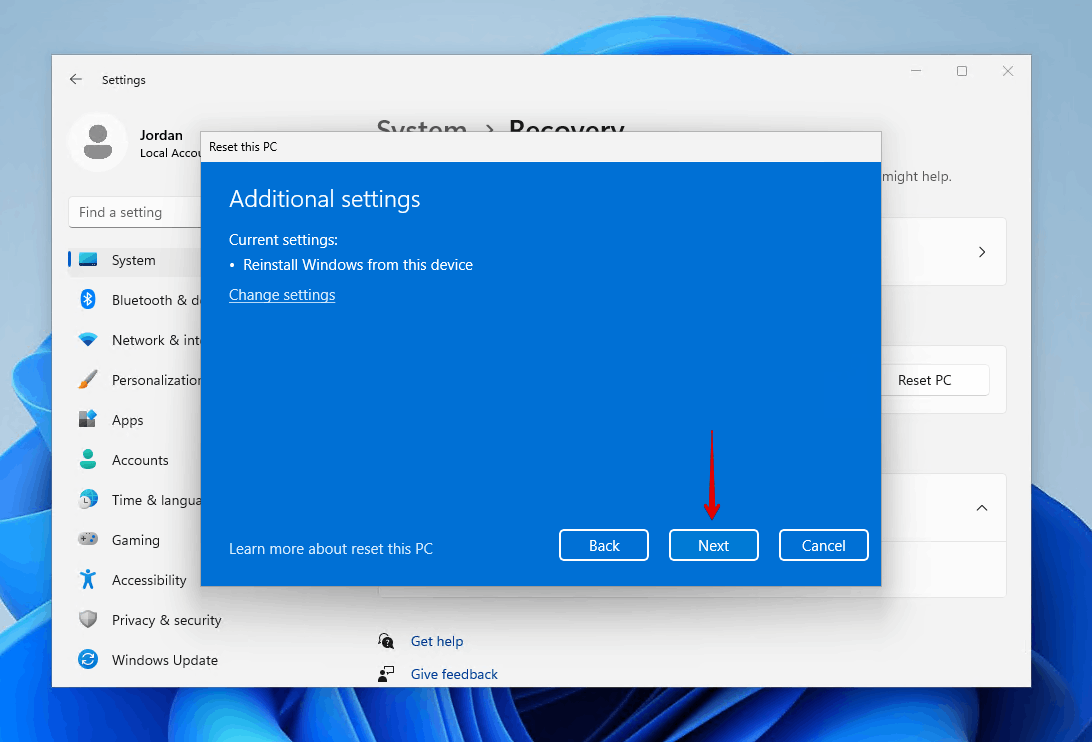
- Click Next.
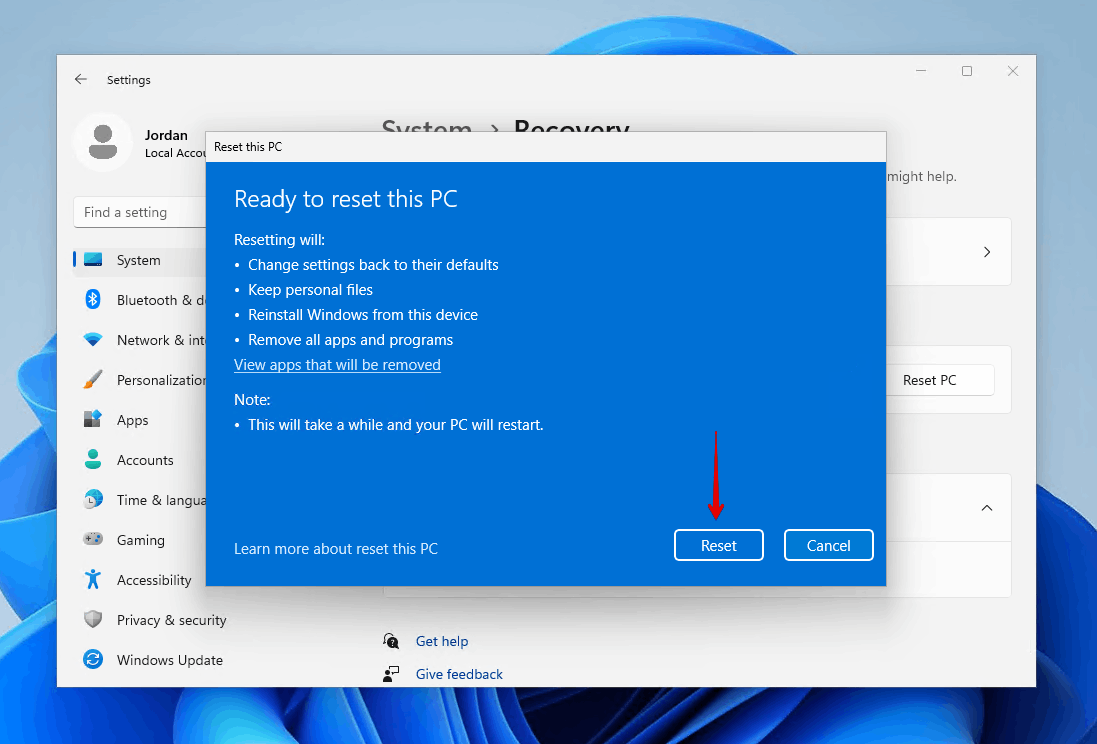
- Click Reset.
Method 2: Using Media Creation Tool
The Windows Media Creation Tool is a free Microsoft utility that can be used to reinstall Windows in-place, or reinstall Windows from a USB and keep files. A copy of Windows will be downloaded from the cloud, which you can then open and choose the type of reinstall you’d like to perform. The steps below, for reference, will show you how to reinstall Windows 11 without losing apps and files:
- Download and open the Windows Media Creation Tool.
- Click Accept.
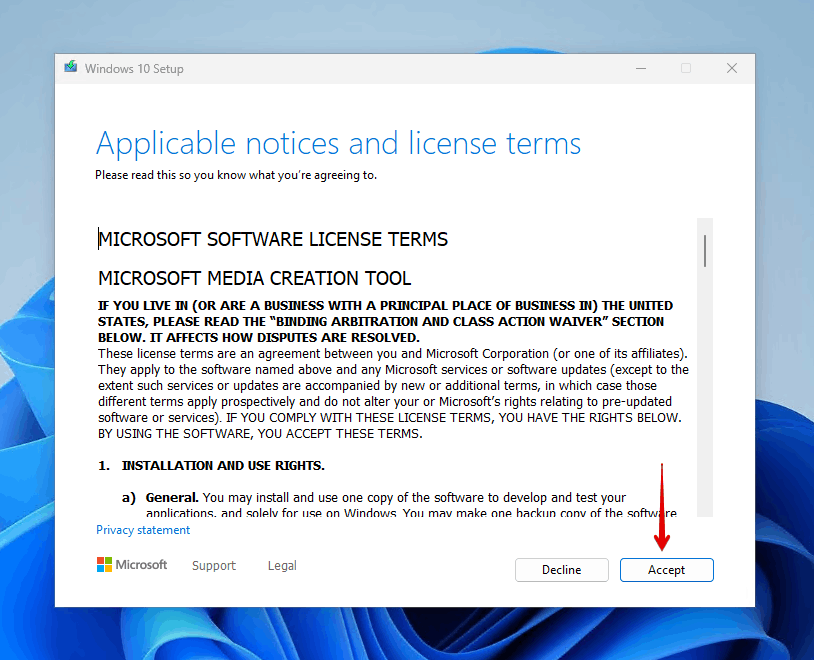
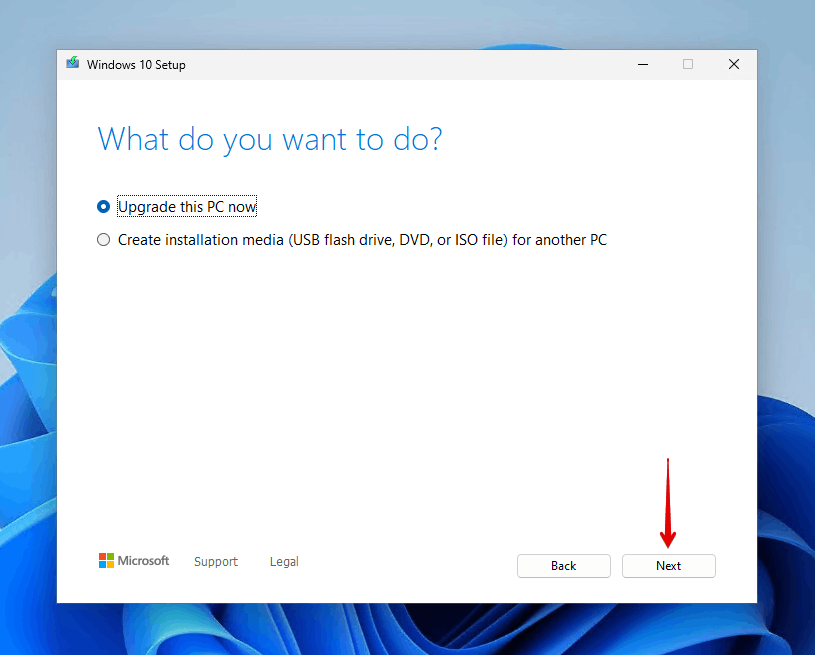
- Select Upgrade this PC now and click Next.
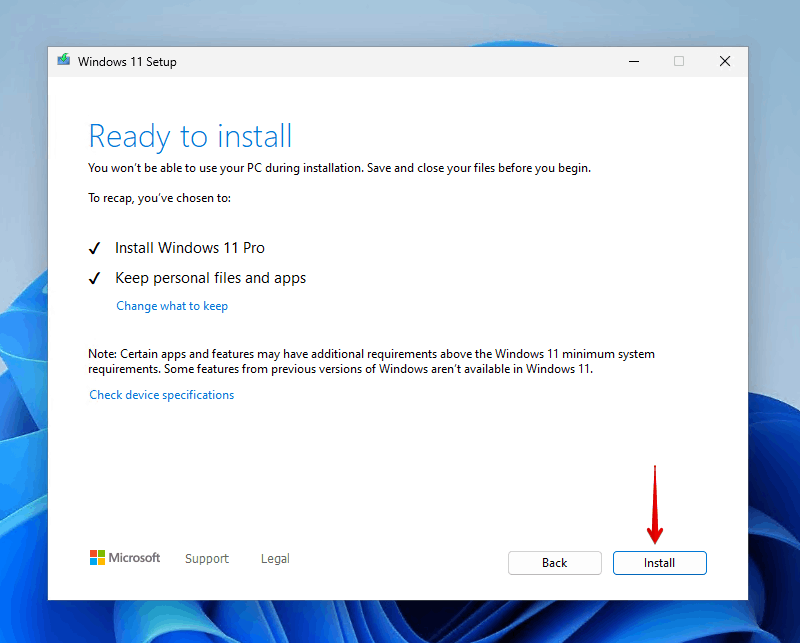
- Click Install.
Method 3: Using a USB or DVD
You can perform a Windows reinstall and keep files using its installation media. For this, you will need a USB or DVD, a copy of the Windows version you’d like to install, and a program called Rufus. Rufus is a free tool that lets you create bootable media with a Windows ISO.
While you can create a bootable USB using the Media Creation Tool, we’ll be showing you using Rufus to give you an alternative option.
Be sure to back everything up on the installation media you will be using, as it will be deleted in the process. This method will give you two options:
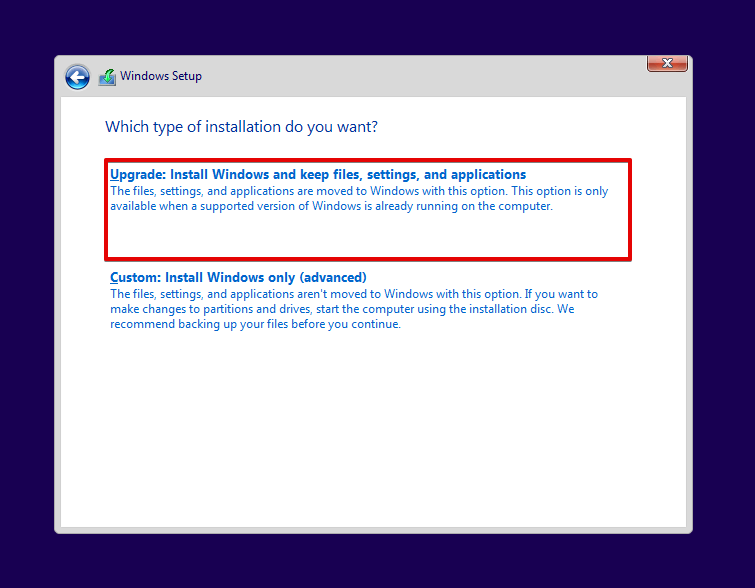
- Upgrade: Install Windows and keep files, settings, and applications – This option will preserve your personal data, apps, and settings. Use this option to reinstall or update Windows 10 from a USB without losing data.
- Custom: Install Windows only (advanced)– All your personal data, settings, and apps will be deleted.
We will demonstrate how to reinstall Windows 10 from a USB.
- Download and open Rufus.
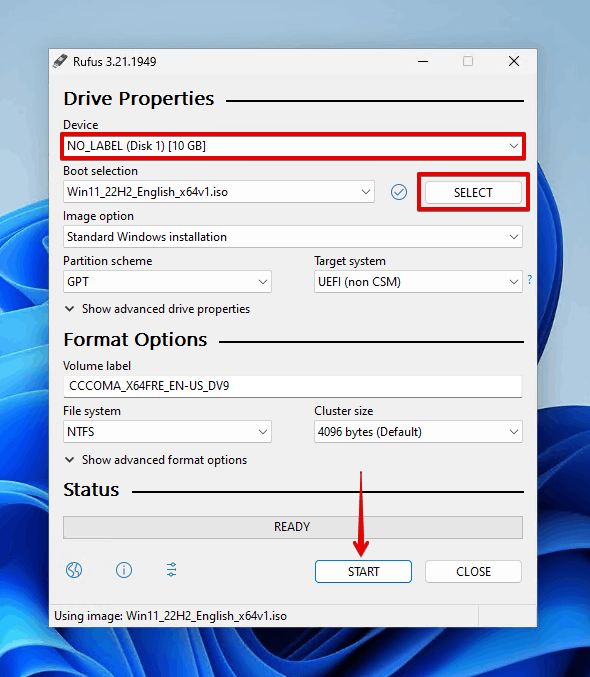
- Connect the USB to your computer and select it from the Device dropdown list. Then, click Select and select the Windows image file. When ready, click Start.
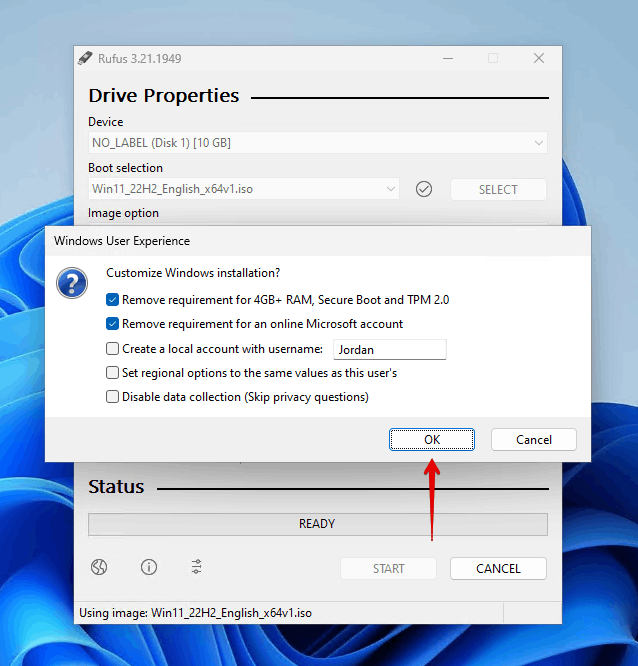
- Click OK. Click OK again if asked to confirm.
- Connect the USB drive to the target computer.
- Boot to your BIOS and modify the boot order so your computer boots to the USB. Every BIOS or UEFI is different, so check the website of your motherboard’s manufacturer for detailed instructions.
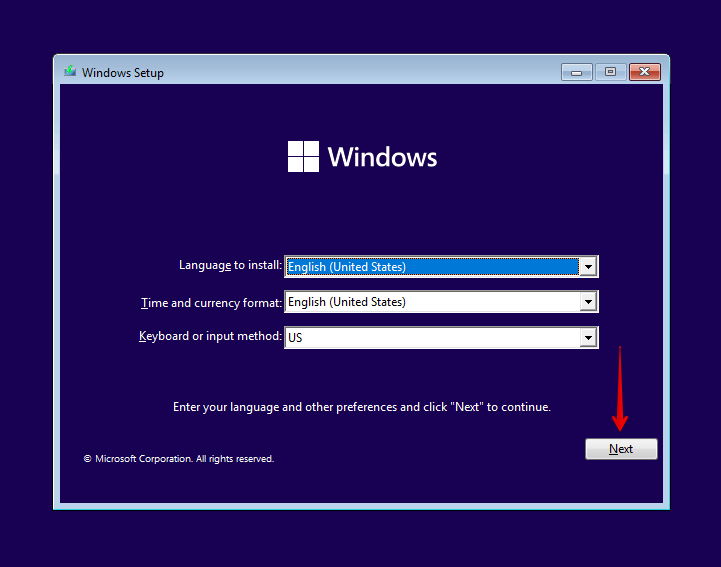
- Choose a language and time and currency format. Click Next.
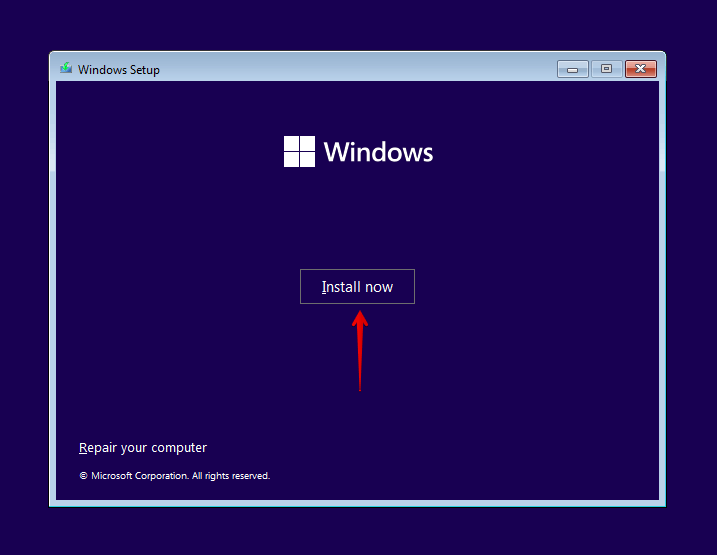
- Click Install now.
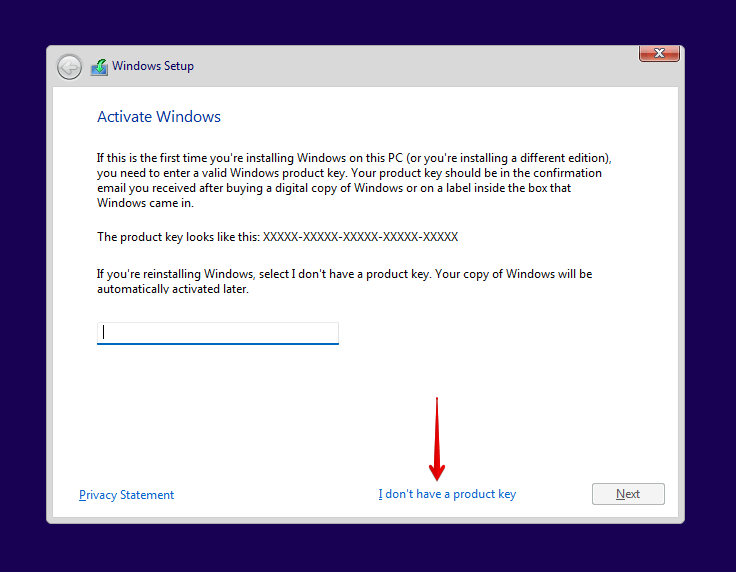
- Enter your product key or press I don’t have a product key.
- Select your Windows version (if needed). Click Next.
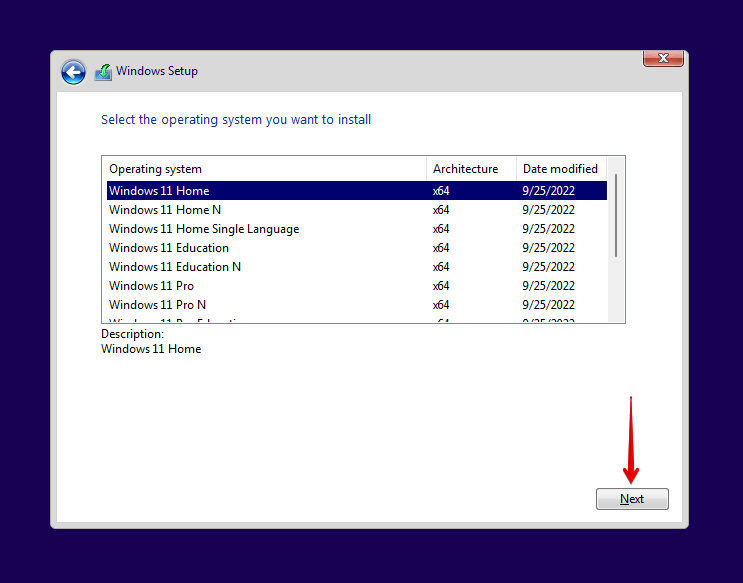
- Accept the terms and click Next.
- Click the Upgrade option to avoid losing files and apps.
- Follow the rest of the instructions.
How to Restore Files from Backup After System Reinstall
Following a clean reinstall, you’ll need to restore your data. You might also need to do it if the reinstall failed at first, leading to your data becoming lost or inaccessible.
If you already know how to restore your data, or you chose to keep your data, you can skip this section.
Method 1: Restore from Local Backup
Restoring data from a backup created with Backup and Restore is easy, only requiring a few clicks to get your data back. This is how you restore files from a local backup:
- Press Win + S on your keyboard and search “Control Panel”. Open the first result.
- Click Backup and Restore (Windows 7).
- Click Restore my files.
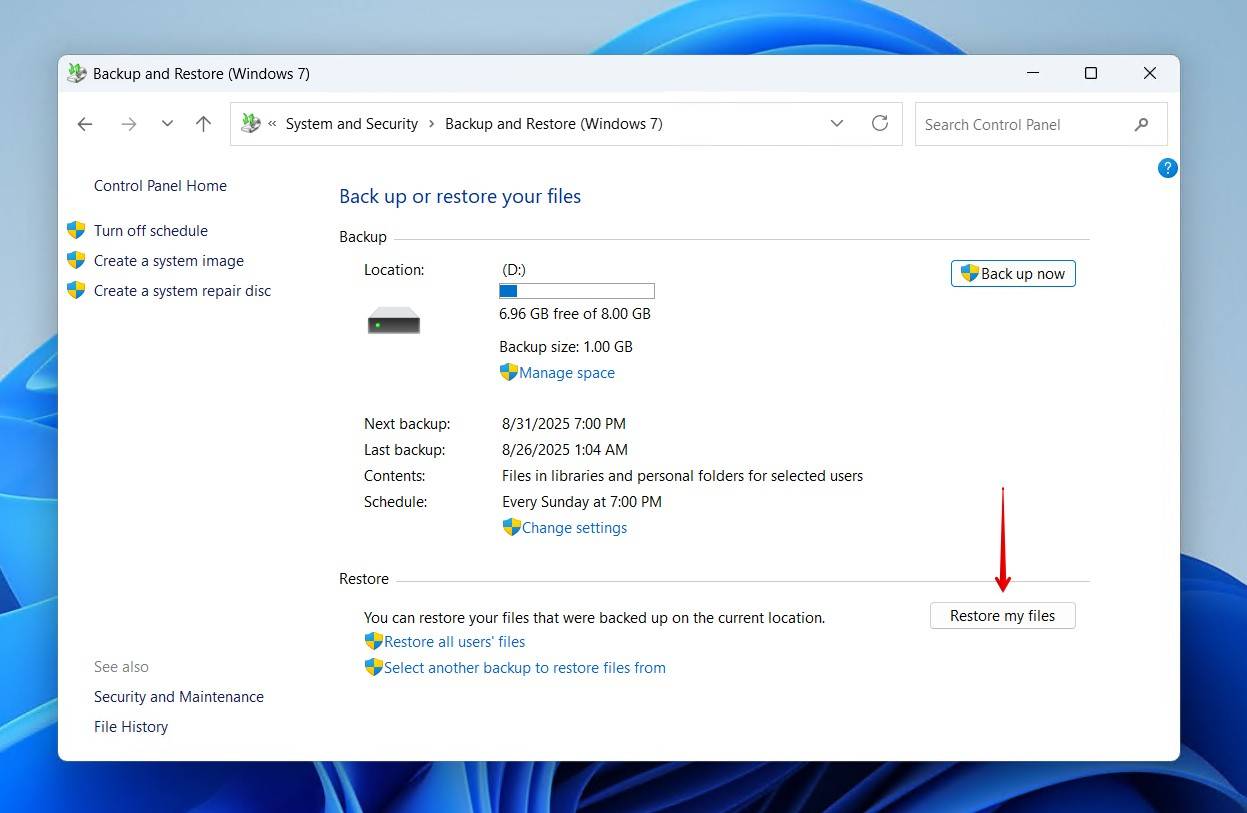
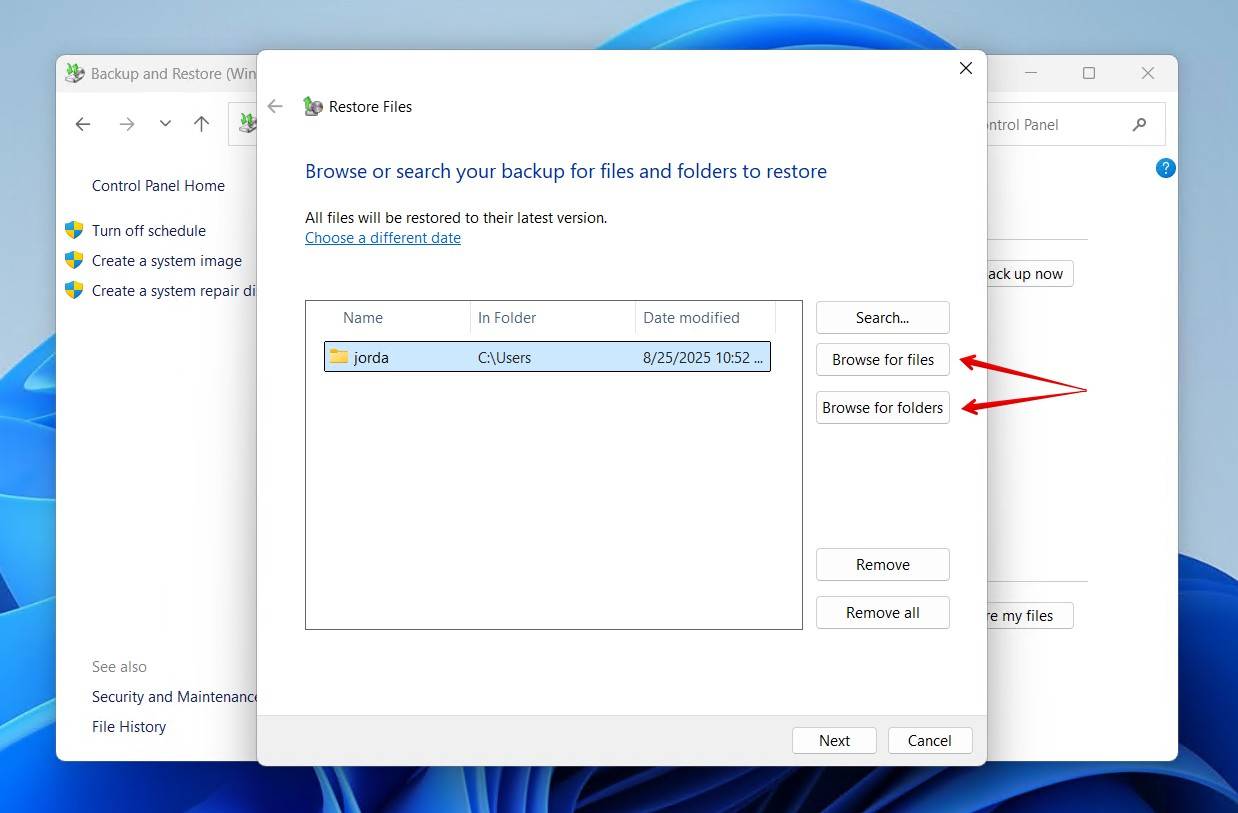
- Click Browse for files or Browse for folders, depending on your preference, and select the data to be restored. Click Next.
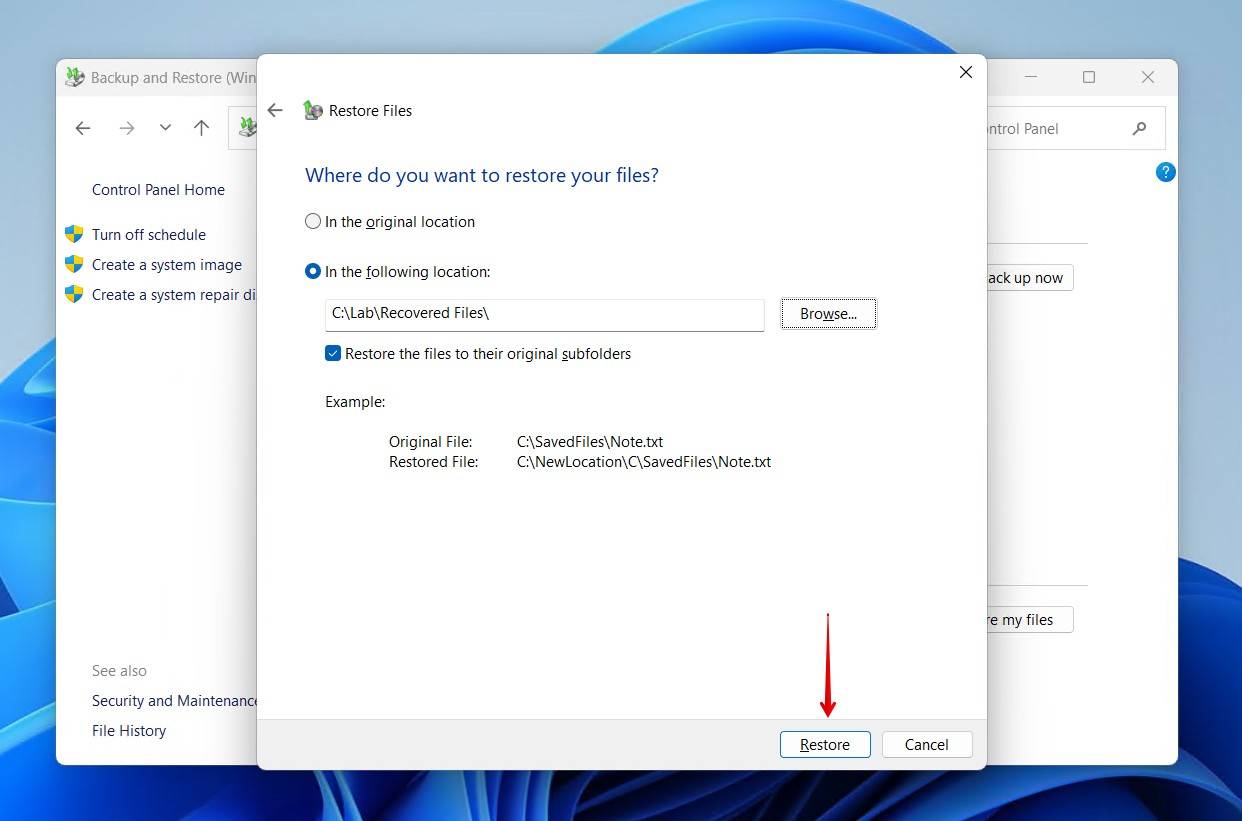
- Choose whether you want to restore the data to the same place, or somewhere else, then click Restore.
Method 2: Restore from Cloud Backup
Simply signing in with your Microsoft account will sync the data from your OneDrive account to your system. Therefore, you may find the data already there. However, you can also manually download the data from OneDrive. Here’s how you download backed-up files from OneDrive:
- Head back to your OneDrive.
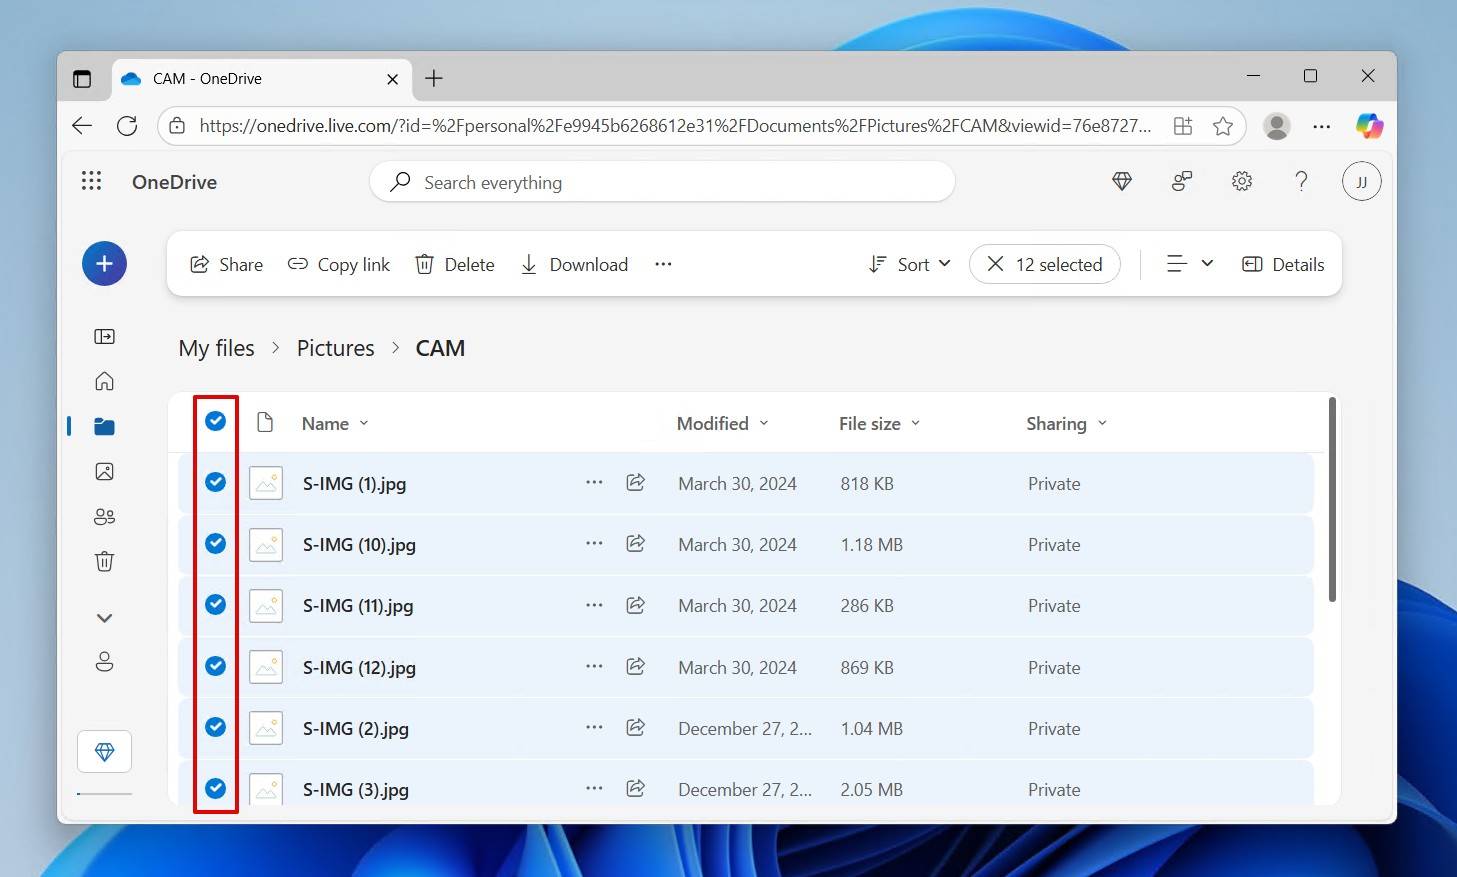
- Locate and select the files you wish to download.
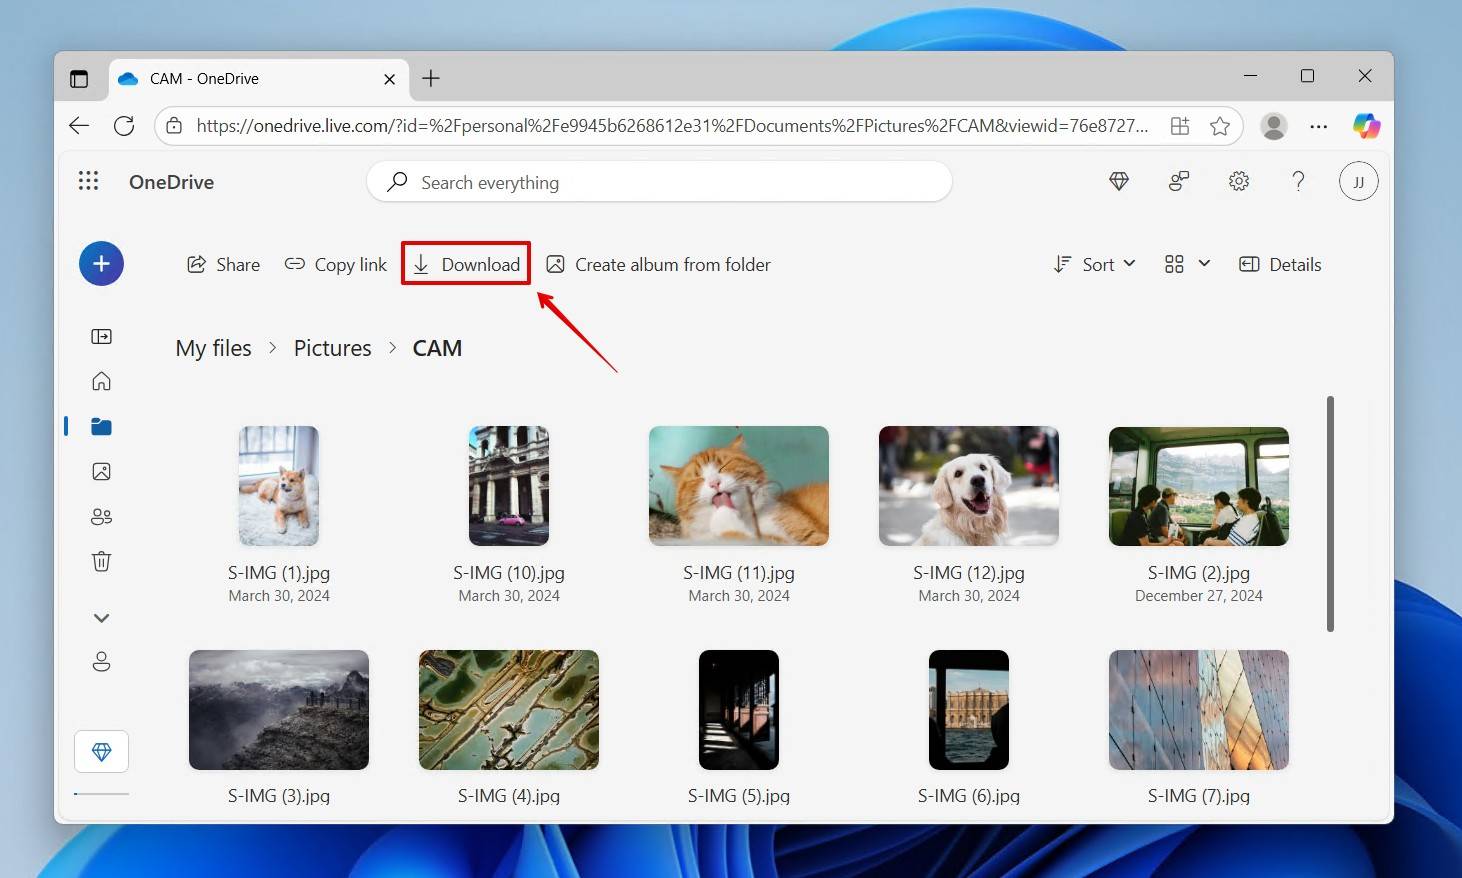
- Click Download.
- Extract the contents of the ZIP folder.
How to Recover Files Lost During Windows Reinstall
If you performed a clean install, or if something went wrong during the reinstall of your Windows operating system, the only way to get that data back without a backup is with data recovery software.When recovering data that has been deleted due to a format, we prefer to use Disk Drill, mainly because it uses several scanning algorithms to find as much data as possible, but also because you can create backups and restore data from them all within the application.
Keep in mind that there are some situations where data recovery is impossible, even with the help of professional data recovery services. If you use an SSD with TRIM, the data will become unrecoverable once a TRIM command is issued. The same is true if files from the reinstall overwrote your data. Likewise, if the drive was encrypted and you no longer have the decryption keys, no data will be recoverable.
Here’s how you can recover files that were lost during a Windows reinstall using Disk Drill:
- Download and install Disk Drill to a separate drive.
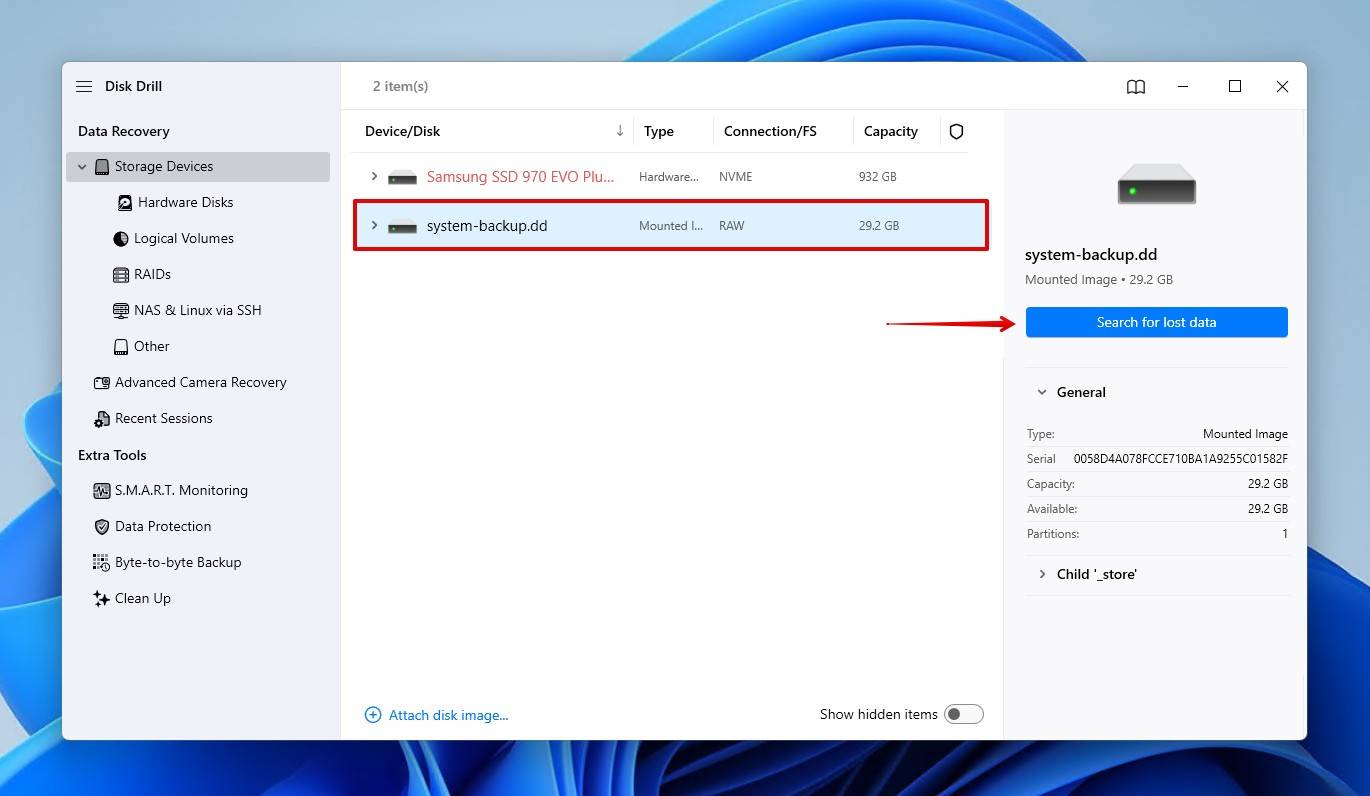
- Select the drive on which Windows was reinstalled. Click Search for lost data.
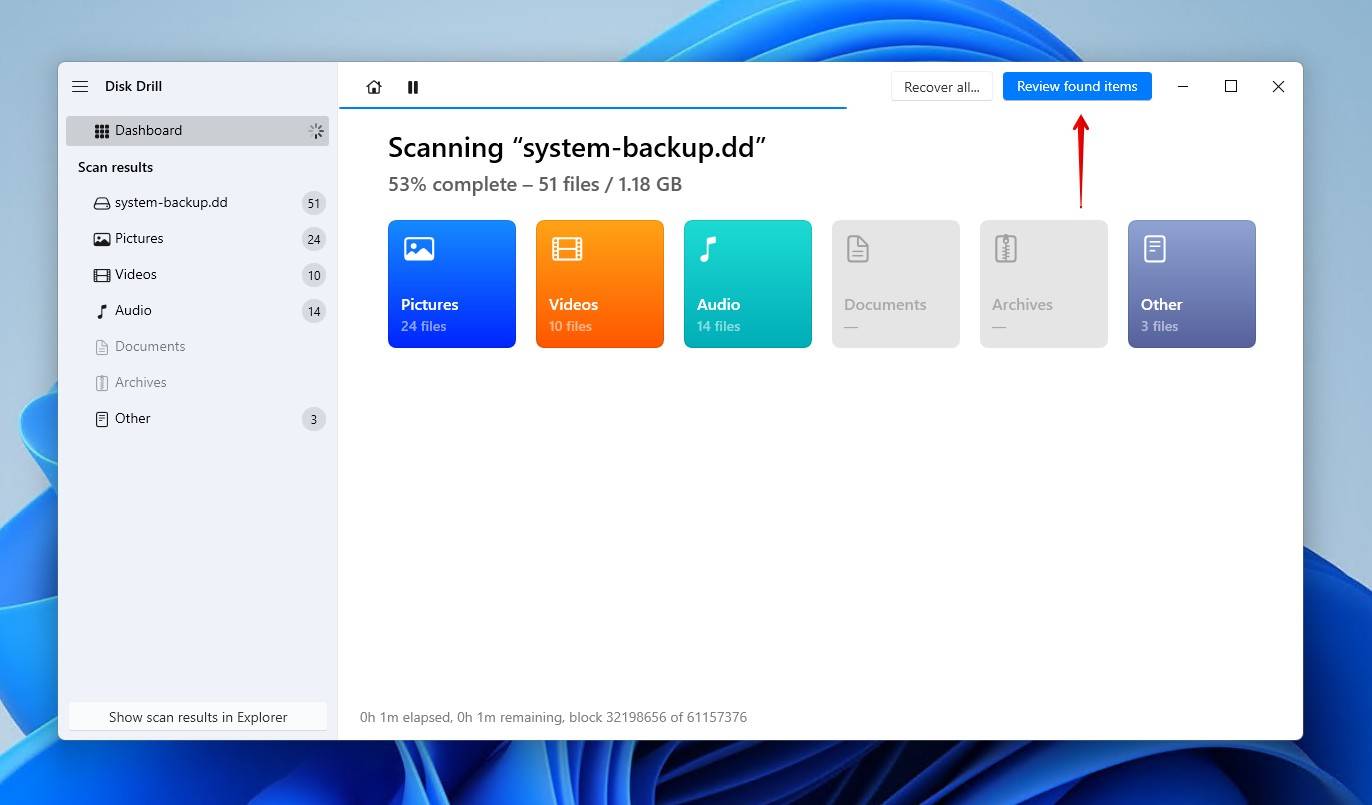
- Click Review found items. If you want to recover as much data as possible, you can instead click Recover all.
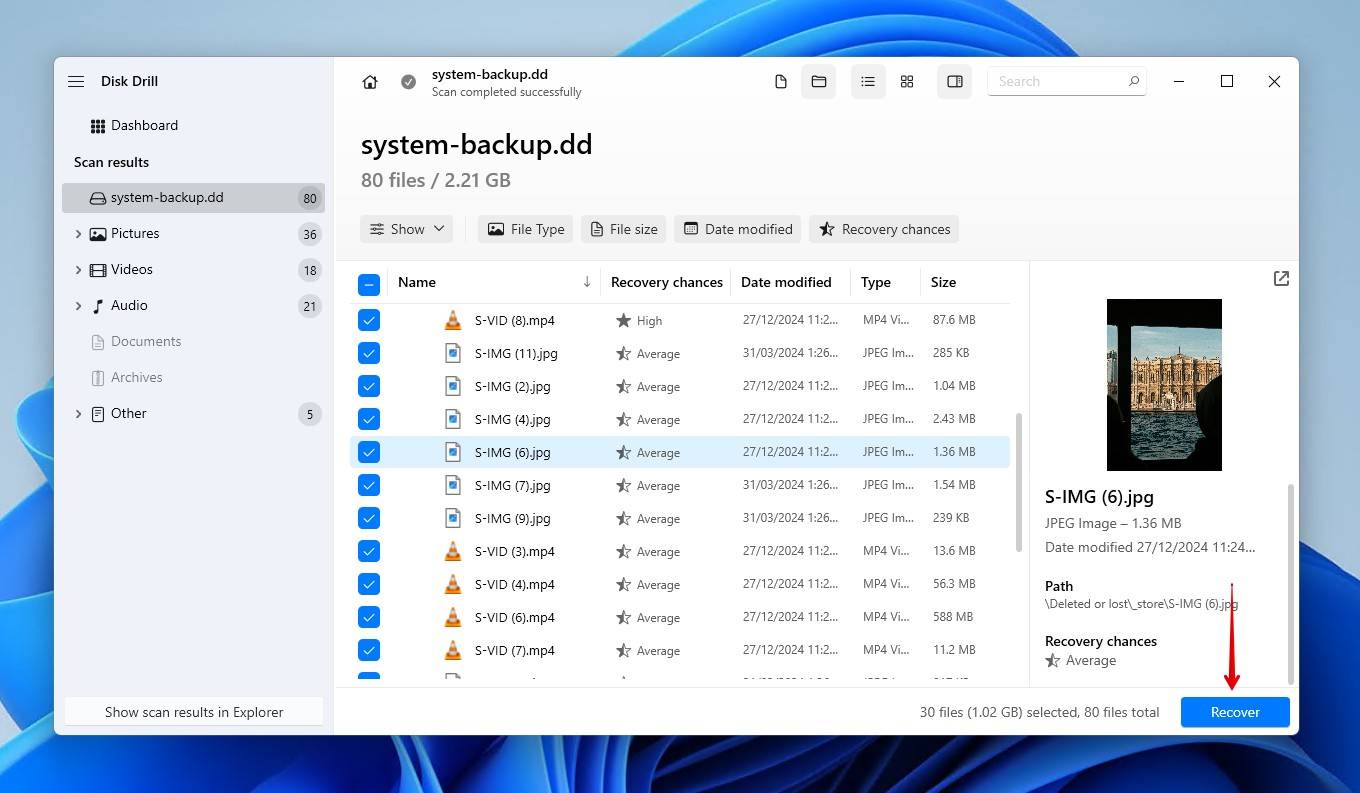
- Select the data you want to recover. Use the recovery chances column and preview panel to identify which data is in a healthy state for recovery. When you’re finished selecting all of the files you want to recover, click Recover.
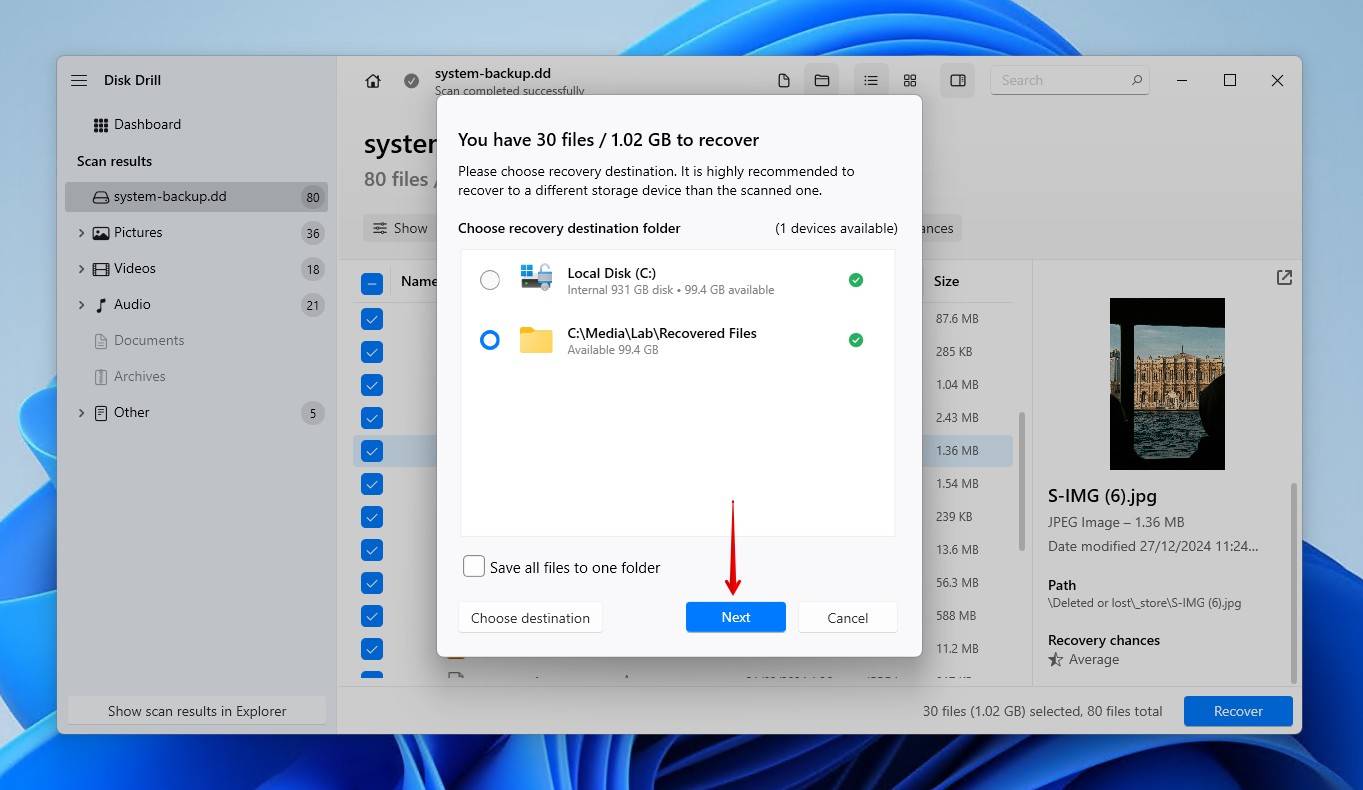
- Select an appropriate recovery location. Make sure you don’t recover the data to the same drive you’re recovering it from. Click Next.
Conclusion
There are times when it’s necessary to reinstall Windows. But does reinstalling Windows delete files? Well, yes and no. Most methods allow you to keep your data so it’s not deleted in the process. However, there are some methods that may require you to perform a clean install. The only surefire way of keeping your data safe is by creating a backup beforehand. Whether it’s using a backup tool, adding the data to the cloud, or simply copying and pasting it to a separate drive, the main point is that there’s a copy of that data. If you were unable to create a backup and lost some of your data in the process, be sure to recover it using a data recovery tool such as Disk Drill. Did one of the solutions we mentioned work for you? Or, perhaps an issue presented itself. Either way, let us know in the comments.
FAQ
- Right-click Start and click Settings.
- Click Update & Security.
- Click Recovery.
- Click Get started (under Reset this PC).
- Choose whether you want to keep your files or perform a clean install.
- Follow the provided instructions to complete the reinstall.


