 If you suspect something’s off with your SD card, or want to know if it’s still reliable, there are ways to check SD card health you should know about. A quick test can catch many early signs of trouble. To help with that, we pulled together every useful method and tool we often use ourselves when we want to check a card’s health. This guide lays them out clearly so you can test yours too.
What Affects SD Card Health?
While SD cards don’t have spinning parts like HDDs, they’re far from invincible. They wear out in quieter ways. Most people don’t notice until files go missing, transfers freeze, or the card refuses to mount.
At the core, SD cards rely on flash memory, and flash has a write limit. Every time you save a photo, move a video, or format the card, it eats into that limit. Manufacturers don’t often advertise the exact number, but typical consumer-grade cards can handle around 3,000 write-erase cycles per memory block (depending on your SD card manufacturer, its lifespan could range from 1,500 to 10,000 read-write cycles). That may sound like a lot, but it adds up faster than you’d expect, especially in high-write setups like dashcams or security cameras where the card gets hammered all day.
Then there’s card quality. Some brands build in better error correction and wear leveling. Others cut corners. We’ve tested cards that held up through years of use, and others that failed after a few months of light work. Fake capacity cards are still out there too. You buy a “256GB” card, and it turns out to be 32GB. Those fail in weird ways, often after you pass the real capacity limit.
Heat and power loss can also mess with card health. Using a microSD card in a cheap USB adapter that doesn’t safely eject before pulling it out? That’s a common way to cause SD card corruption. The same goes for cards left baking in car dashcams during summer.
SD cards look simple, but they have a quiet expiration date built in. If you rely on one regularly, it’s smart to test its health every so often.
How to Recover Data From a Failing SD Card
Before we go into the tools and tests, there’s something important we need to point out.
If your SD card isn’t accessible, that’s not the time to run a bunch of health checks. Stop right there. Scans, write tests, or surface checks on a failing card can make things worse. If the card is hanging on by a thread, those operations could push it over the edge.
So if you’ve got anything important stuck on there, data recovery should be your first move. In cases like that, there’s a specific way we usually handle it to keep the odds of saving your files as high as possible.
If you’re seeing signs of SD card corruption or imminent failure, such as multiple errors or files randomly appearing or disappearing, it’s best to move your data to another storage device.
If you’re still able to access the SD card, just copy and paste the data to a different location. However, if you’re unable to access the data, you’ll need to use SD card data recovery software.
We usually turn to Disk Drill. It has a feature called Byte-to-byte backup, and it’s exactly what you need in this kind of case
What is Byte-to-Byte backup? This feature creates a full, sector-by-sector copy of your SD card (even if parts of it are damaged or unstable). Disk Drill does this smartly: it skips over unreadable areas on the first pass to build the image quickly, then goes back and retries the bad spots several times using smaller read sizes. You get a complete clone without pushing the card too hard, and that gives you a safe copy to work from when recovering files.
Here’s a step-by-step explanation of how to recover data from an SD card using Disk Drill:
- Download Disk Drill and install it on your computer. Once you’ve installed Disk Drill, launch the app.
- On the left sidebar, select “Byte-to-byte Backup.”
 Pick your SD card from the list, then click “Create backup” in the top-right corner. Disk Drill will ask where to save the backup file, choose a location on a different drive (make sure there’s enough space, at least equal to the size of your SD card).
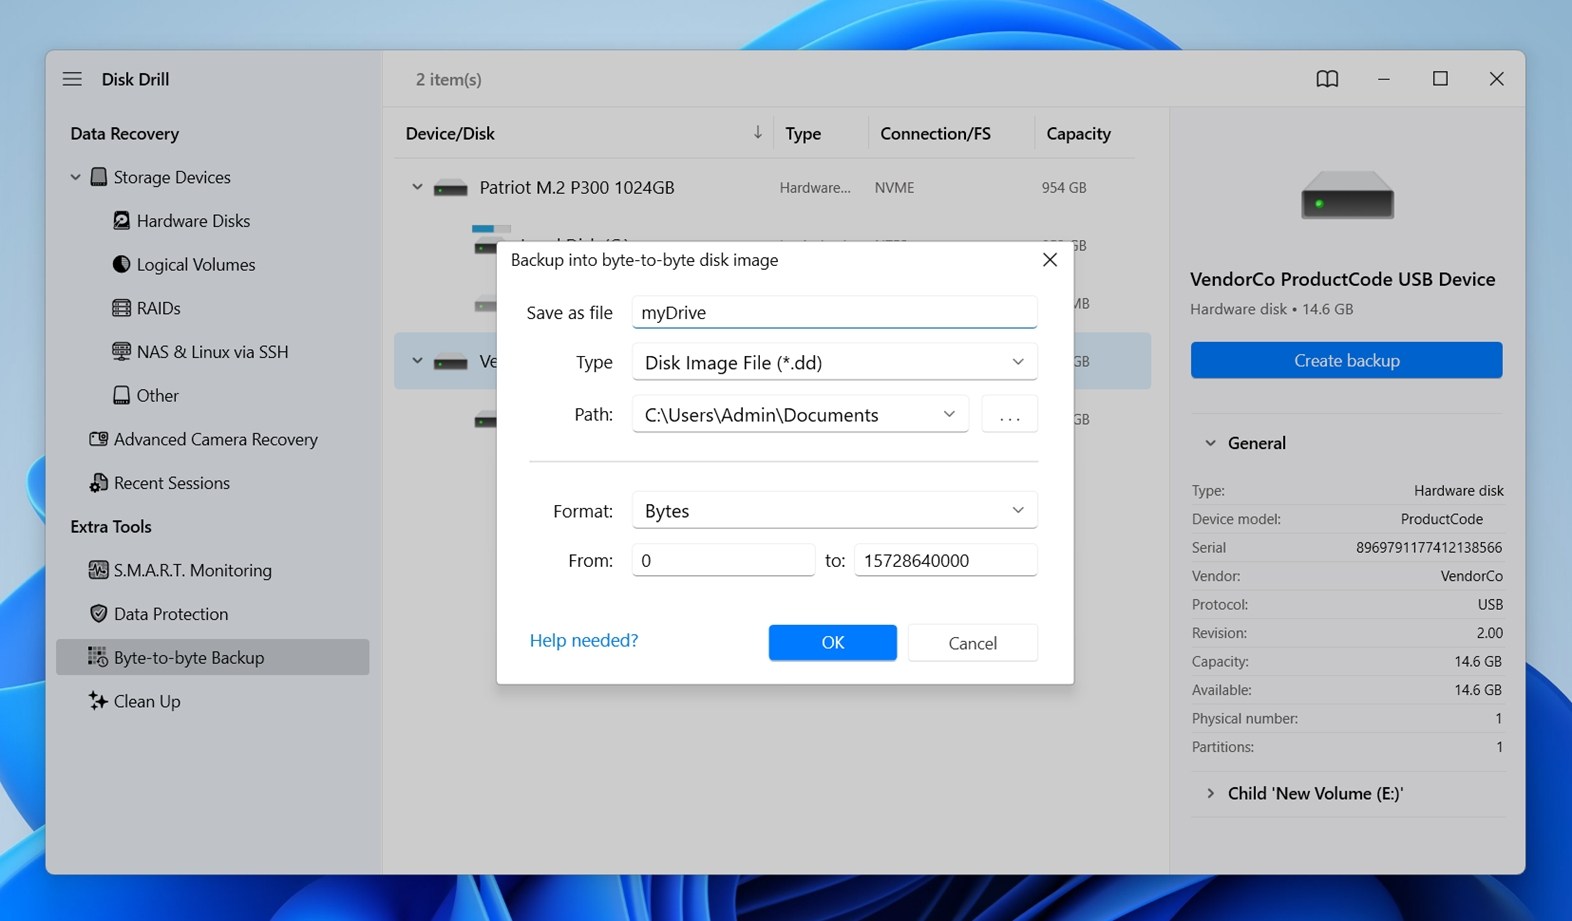
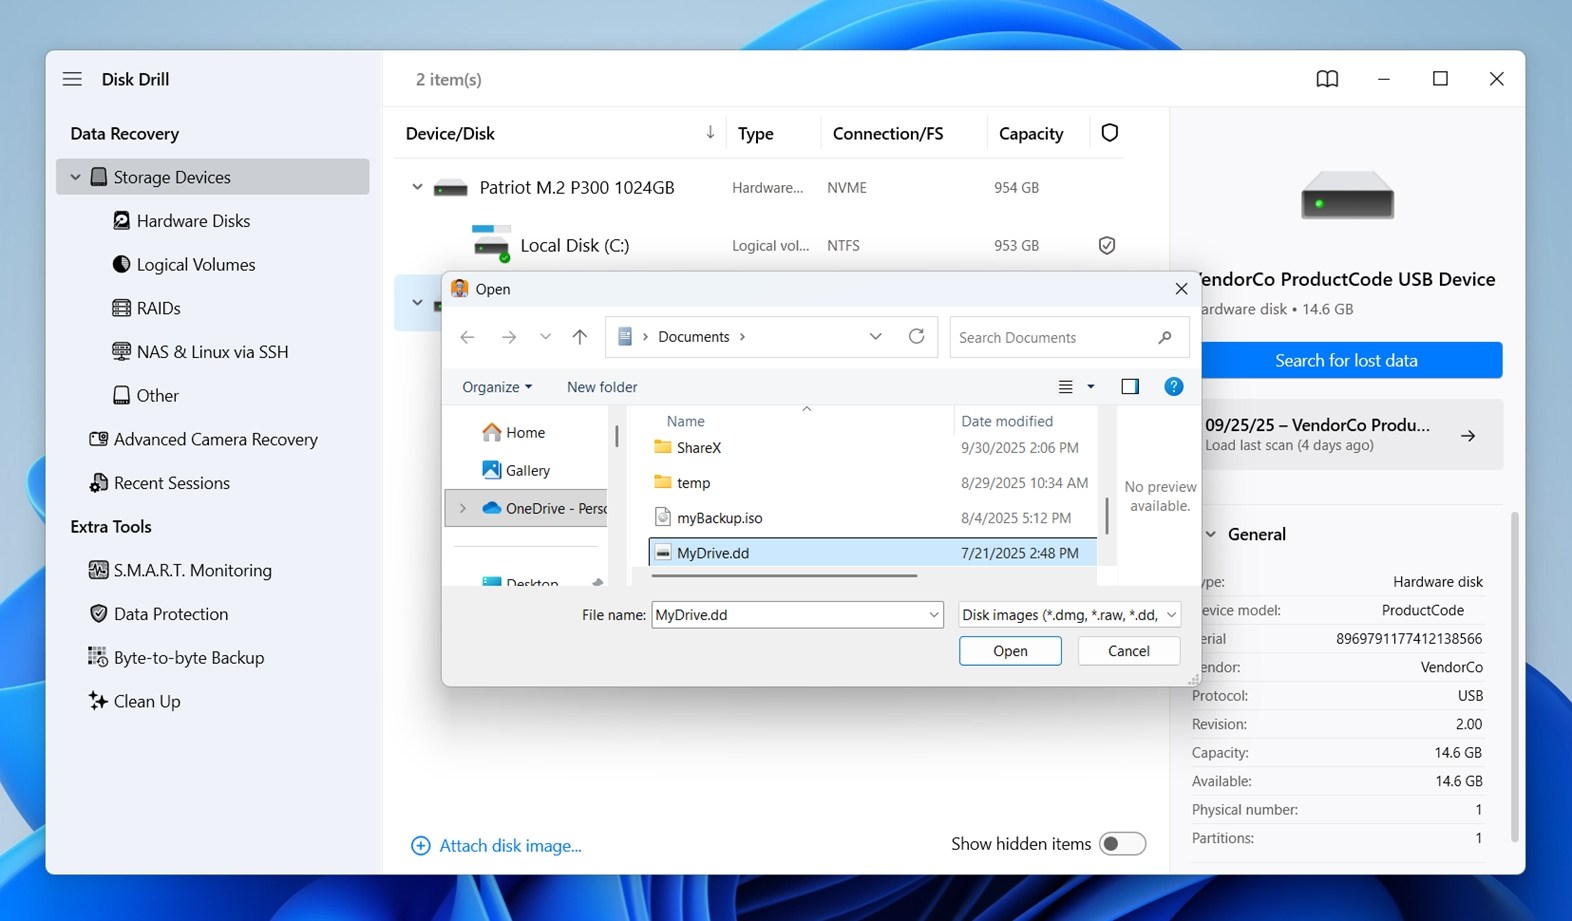
- Once the backup is complete, go back to the main screen and scroll down until you see “Attach disk image.” Click that, find the backup file you just made, and open it. Disk Drill will add your backup image to the list of drives.
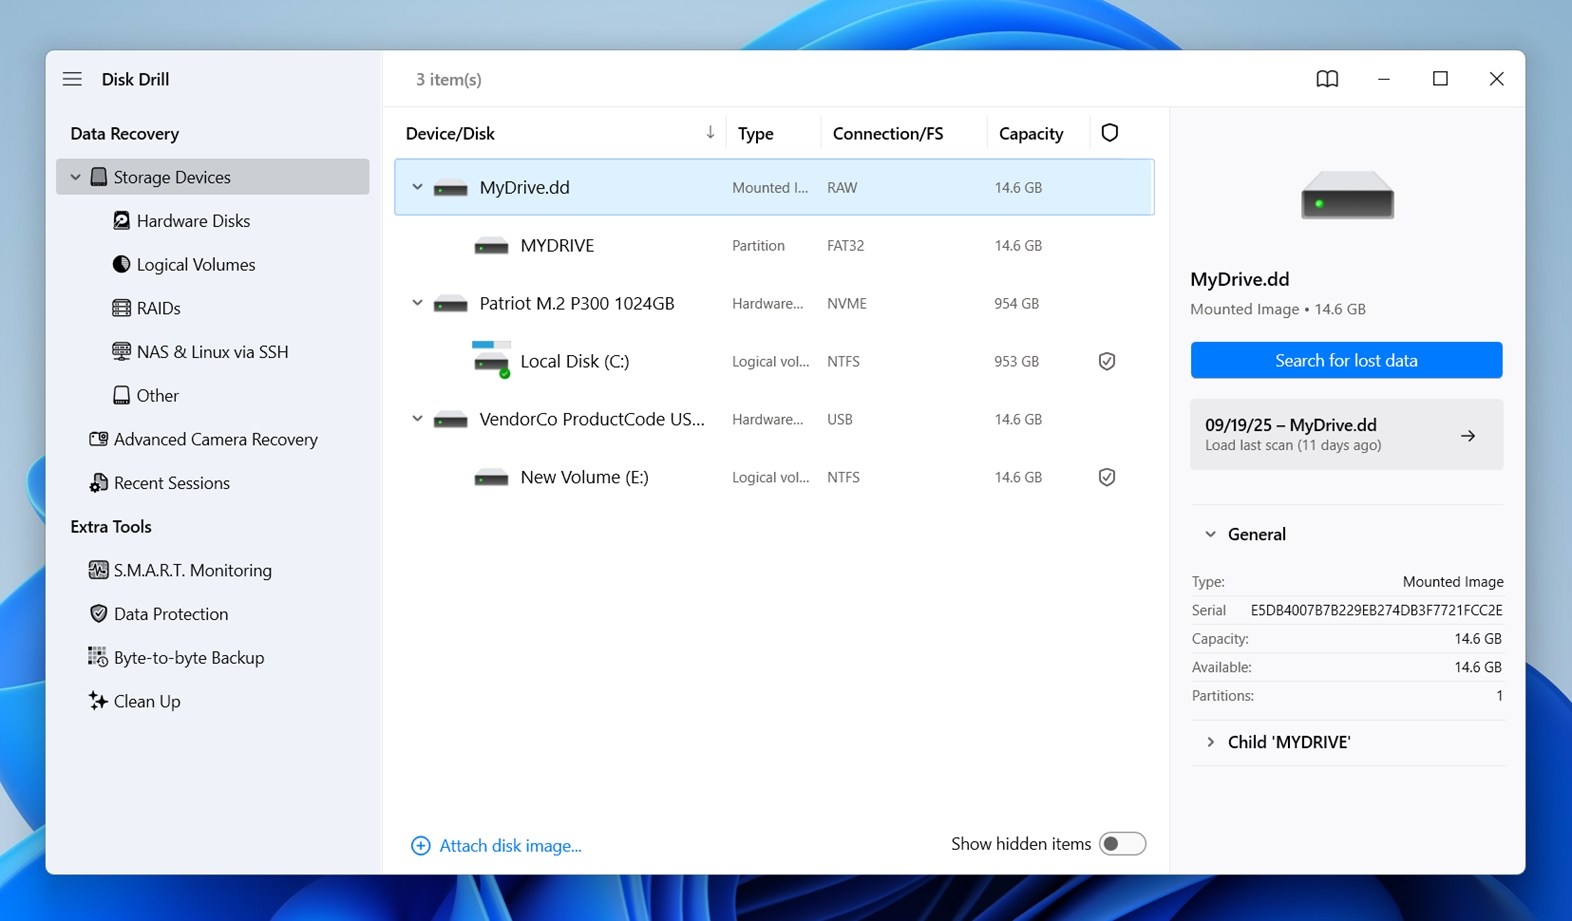
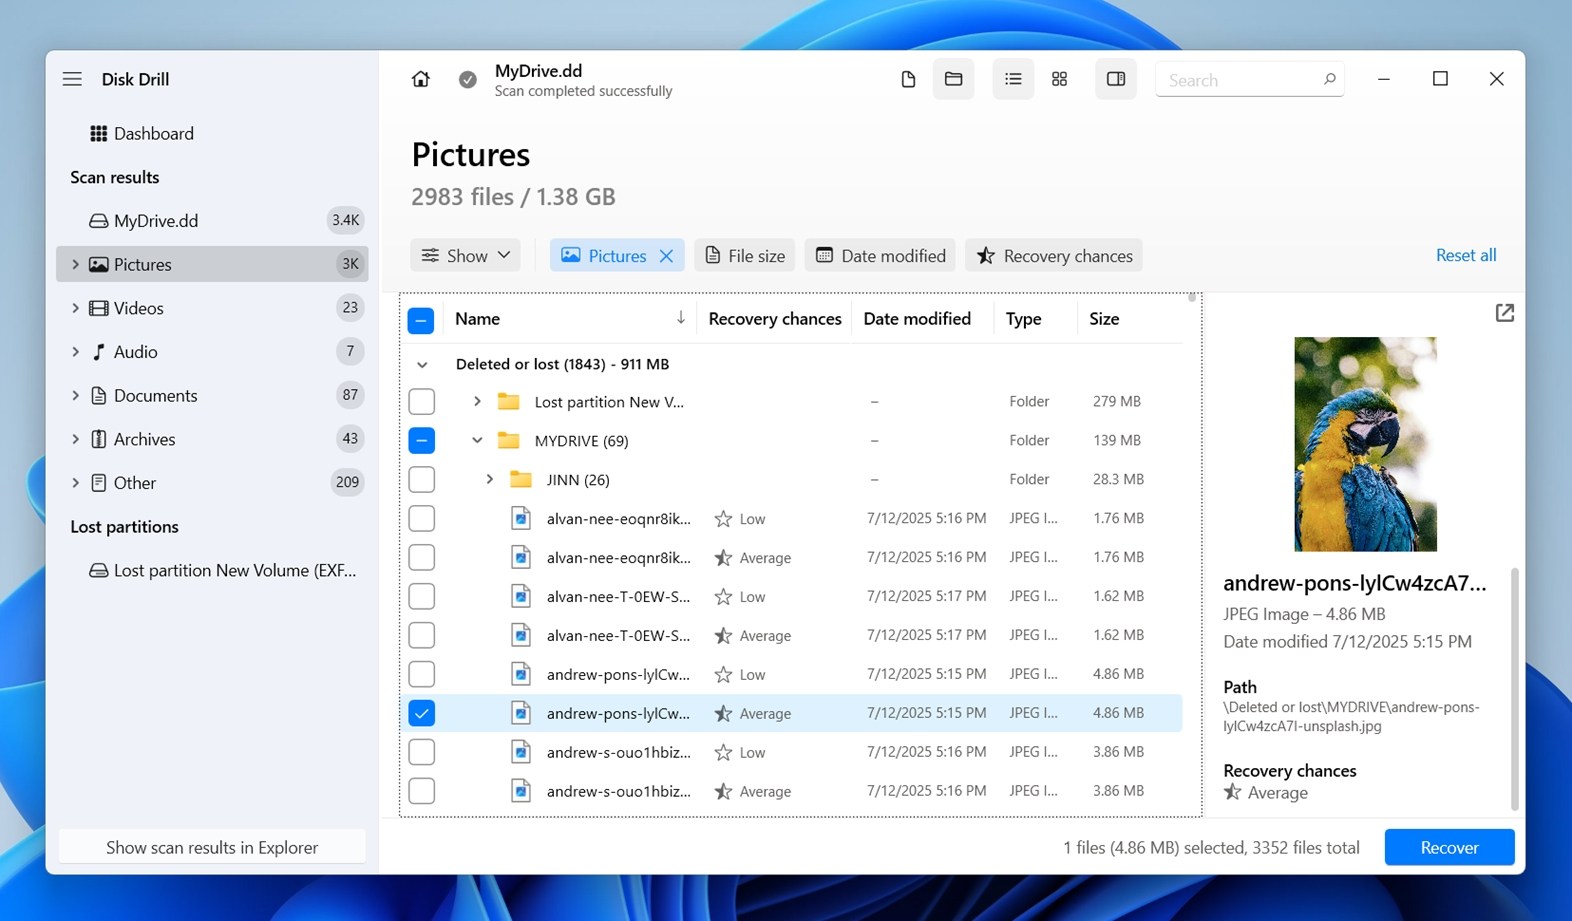
- Now you can run recovery safely. Select the image (not the physical card), and click “Search for lost data.” When Disk Drill asks which scan type to use, go with Universal Scan. It works great with SD cards and covers everything in one go.
- You’ll see files appear in real time. If you want to recover everything, let the scan finish and click “Recover all…” Otherwise, browse through the categories: Pictures, Video, Audio, Documents, and so on.
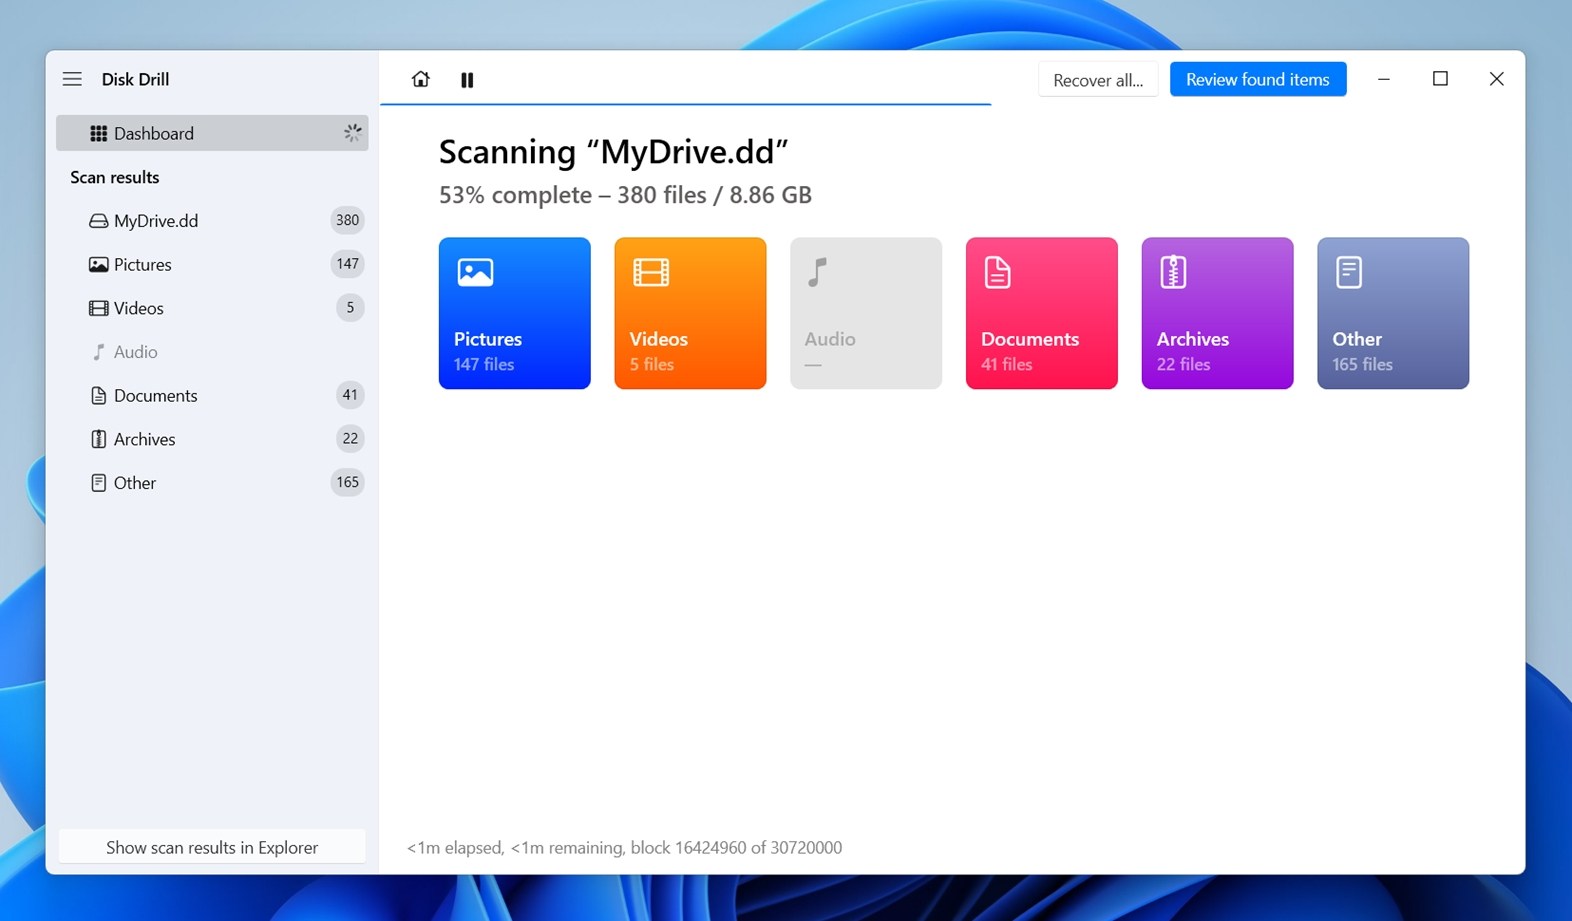
- Want to be sure a file is intact? Click it. A preview will show up on the right. If it loads fully, that file is definitely recoverable.
- Once you’ve selected the files or folders you want, click “Recover.”
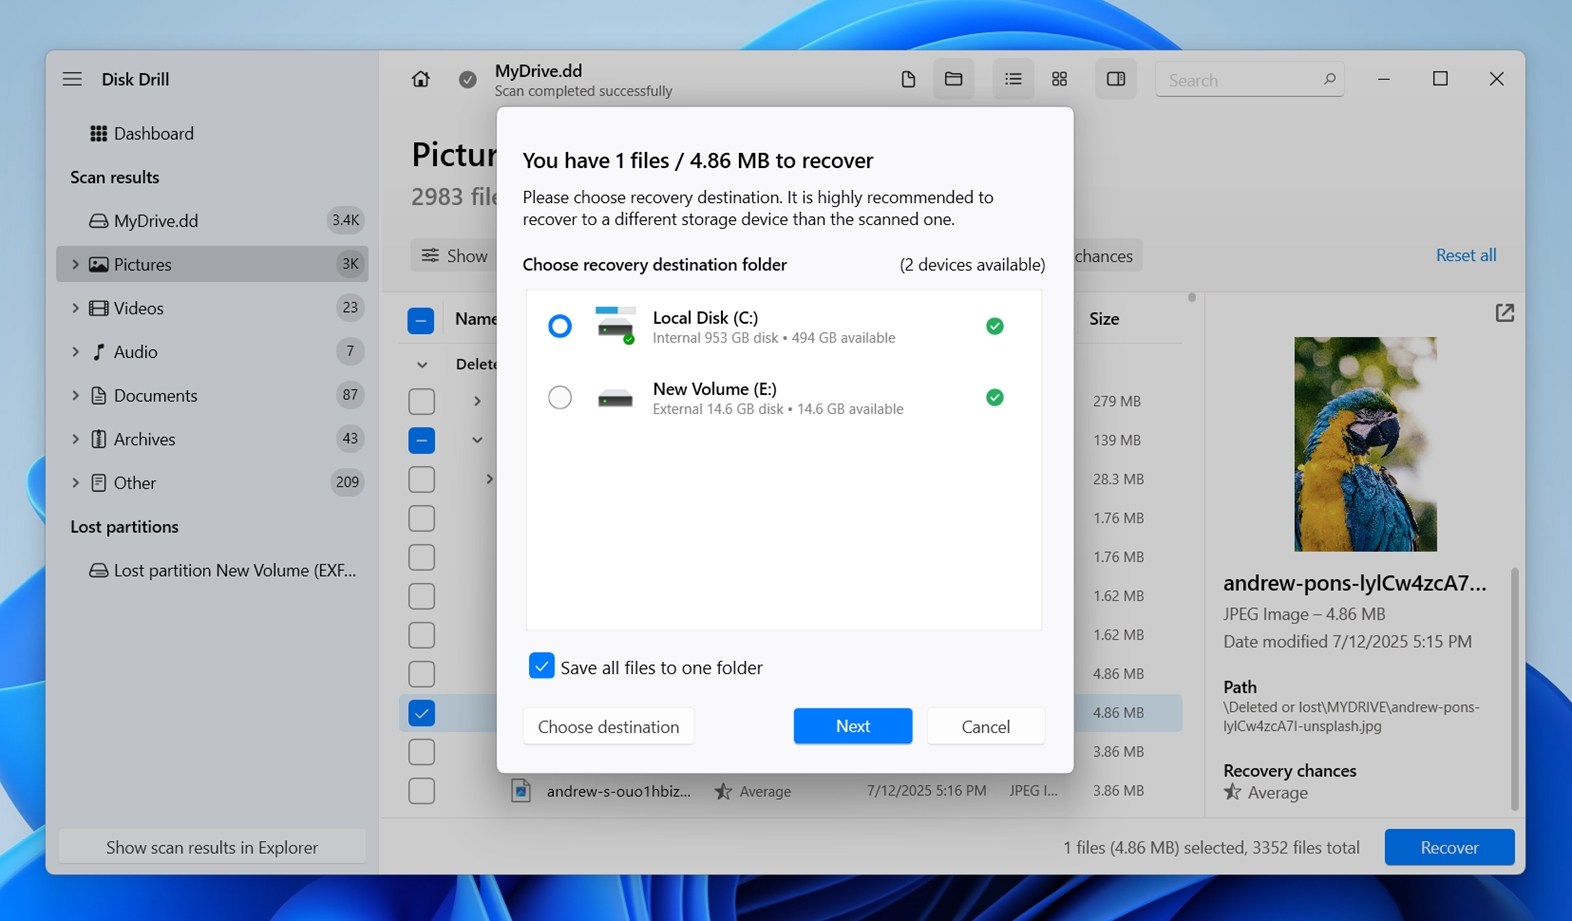 Important note: don’t save recovered files back onto the SD card – that could overwrite data you haven’t recovered yet. Pick a different drive instead. Disk Drill will warn you if you forget.
 - When it’s done, click “Show recovered data in Explorer” to open the folder and check everything.
By the way, Disk Drill has even more useful extras. It also includes S.M.A.R.T. monitoring, which is typically used to check the health of SSDs and hard drives. You’ll find that option in the app’s main menu – it pulls real-time stats like temperature, power cycles, and bad sectors (if the drive supports it). We’ll get into that in more detail toward the end of this guide (including whether it’s useful with SD cards at all).
How to Check the Health of an SD Card
Alright, now let’s get into the part you came here for: how to check SD card health. Whether you’re working with a full-size SD card or a tiny microSD in an adapter, these tools will help you figure out if your card’s still solid.
We’ll walk through each method and explain what the tool checks for.
Method 1:Use CHKDSK (Built-in Windows Utility)
If your SD card still holds important files that you haven’t recovered yet, it’s safer to skip CHKDSK for now. We always recommend recovering the files first, then running CHKDSK afterward if needed, since in some cases it might lead to minor data loss.
CHKDSK is the most basic SD card repair tool and way to check SD card health on Windows; yet it’s still one of the most useful. CHKDSK doesn’t give you deep stats about wear levels or flash cycles, but it does tell you if something’s wrong at the file system level. That includes corruption, bad sectors, or inconsistencies that could point to bigger problems under the hood. To run it:
- Plug your SD card into your PC and note the drive letter it gets (like E: or F:).
- Then open Command Prompt as Administrator (just hit Start, type “cmd”, right-click it, and choose “Run as administrator”).
- Now type this: chkdsk E: /f (Change E: to match your SD card’s letter.)
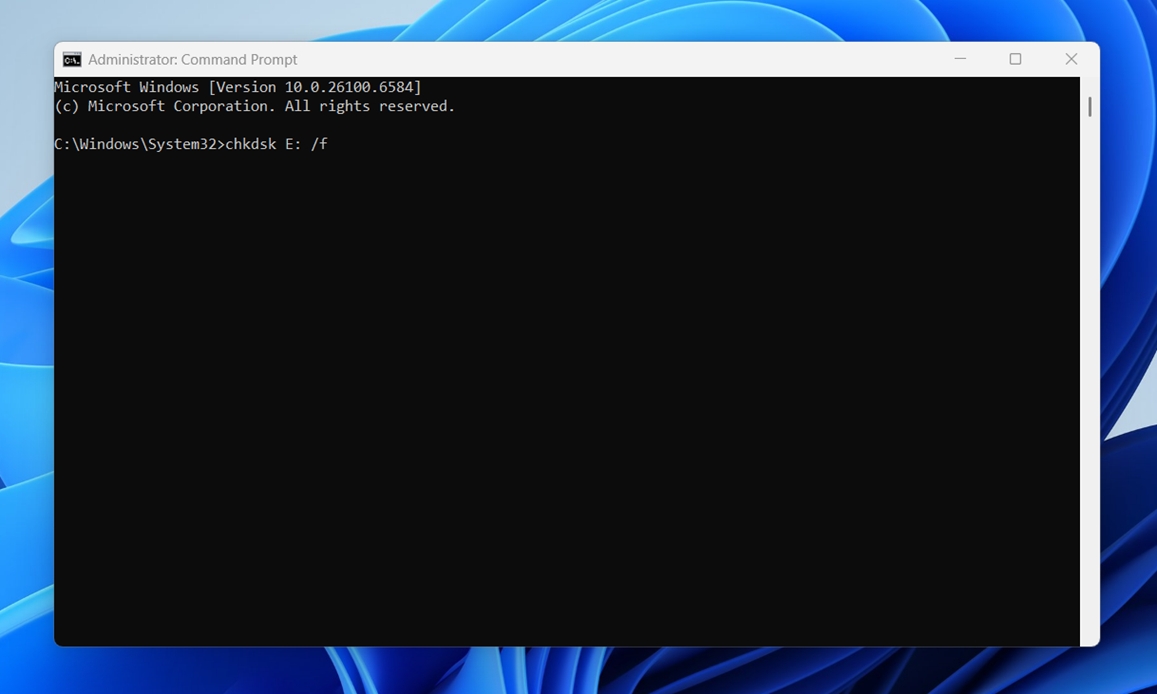
This command tells CHKDSK to scan the card and fix any file system issues it finds. If you want a deeper check that also looks for physical bad sectors, you can use:
chkdsk E: /r
That one takes longer – it reads every sector on the card and tries to recover data from bad spots. Not something to run if you’re in a hurry, but it gives you more info.
After the scan finishes, you’ll get a summary. If it says no problems were found, that’s a good sign. If you see lines about bad sectors or corrections made – that’s your cue to either back up your data ASAP or consider retiring the card.
Method 2:Run a Full Surface Test With H2testw
If you want to check SD card health thoroughly (especially to confirm whether the card is fake, corrupted, or slowly breaking down), H2testw is the tool to start with.
It’s small, free, and weirdly good at catching problems other tools miss.
This one doesn’t just check for file system errors. It writes data to every single part of the card, then reads it back to see if anything got changed, skipped, or silently failed. If your 128GB card only holds 32GB of real storage, this test will expose it. If there are bad sectors lurking near the end of the card, you’ll see those too. To use it:
- Download H2testw from a trusted source (it’s been around for years, so plenty of mirrors exist).
- There’s no installation – just unzip the folder and run the .exe file.
- When the app opens, click Select target and choose your SD card.
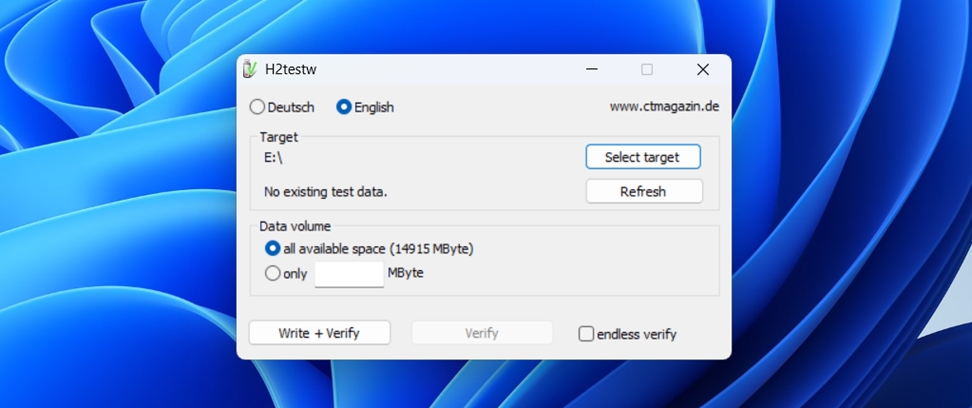
- Leave the data size at the default (it’ll try to fill the card completely) and click Write + Verify.
Now here’s the part you’ll need patience for: this test takes a while. Expect at least 30 minutes to a few hours, depending on your card size and speed.
Don’t multitask with the card during this process.
When it finishes, you’ll get a full report.
- If everything’s fine, you’ll see something like “Test finished without errors” and 0 corrupted bytes.
- If not, you’ll see how many sectors failed, how much data couldn’t be verified, or how much actual capacity was usable. That’s your signal to replace the card.
We’ve used H2testw to catch more than one “too-good-to-be-true” cheap SD card. It works, and it’s one of the few tools that give you a no-nonsense picture of the card’s physical health.
Method 3:Benchmark the Card With CrystalDiskMark
If your SD card feels slow (or files take longer than usual to copy) it’s worth doing a speed check. Performance issues can be an early sign something’s off, and that’s where CrystalDiskMark comes in. It’s not a deep SD card tester like H2testw, but it’s one of the easiest ways to test SD card health by measuring read and write speeds under load. Here’s how to use it:
- Download the tool from the official Crystal Dew World site, install it, and launch it.
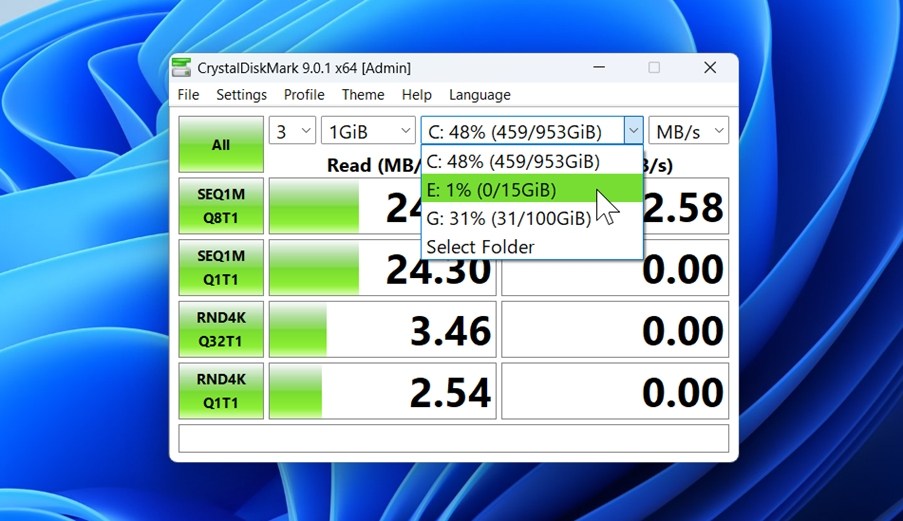
- It looks simple, but don’t let that fool you. At the top, choose your SD card from the dropdown list (make sure you’ve selected the right drive – don’t accidentally benchmark your system SSD).
- Now here’s what we usually do: Set the test size to 1GiB and the test count to 3 or 5. That’s enough to get a reliable snapshot without stressing the card too much.
- Click All to start the test.
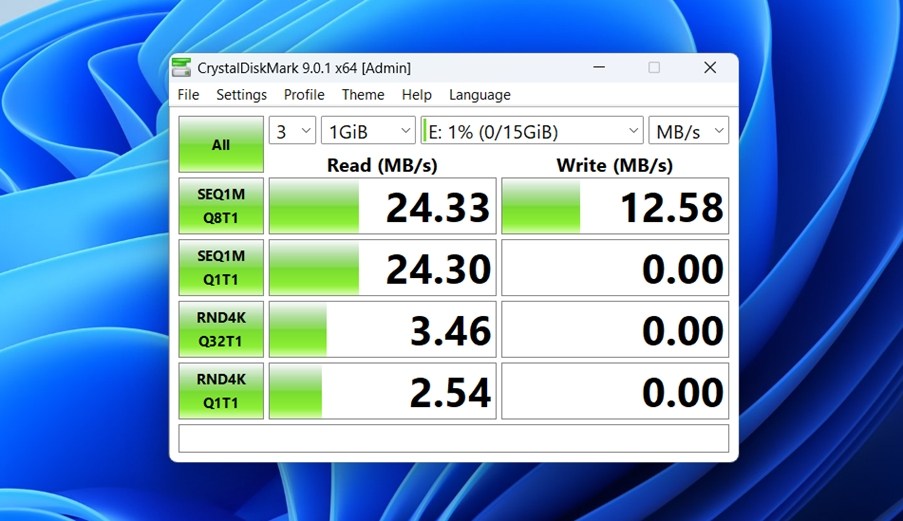
It’ll run several rounds, simulating different types of data access (sequential, random, large blocks, small blocks).
If the card’s healthy, you’ll see consistent numbers that match what the manufacturer advertised (or at least come close). For example, a decent UHS-I card might pull 80–90 MB/s sequential read and 30–60 MB/s write.
If you see big drops, inconsistent results, or single-digit write speeds, that’s a red flag. It could mean the card is nearing the end of its life (or that it’s a low-grade knockoff to begin with).
Keep in mind: performance alone doesn’t confirm if the card is physically healthy, but when paired with other tools in this guide, it helps paint the bigger picture.
Method 4:Run a Health Test With Check Flash / FakeFlashTest
If you look for a dead-simple SD card health checker, these two tools are solid options when you’re trying to catch faulty cards.
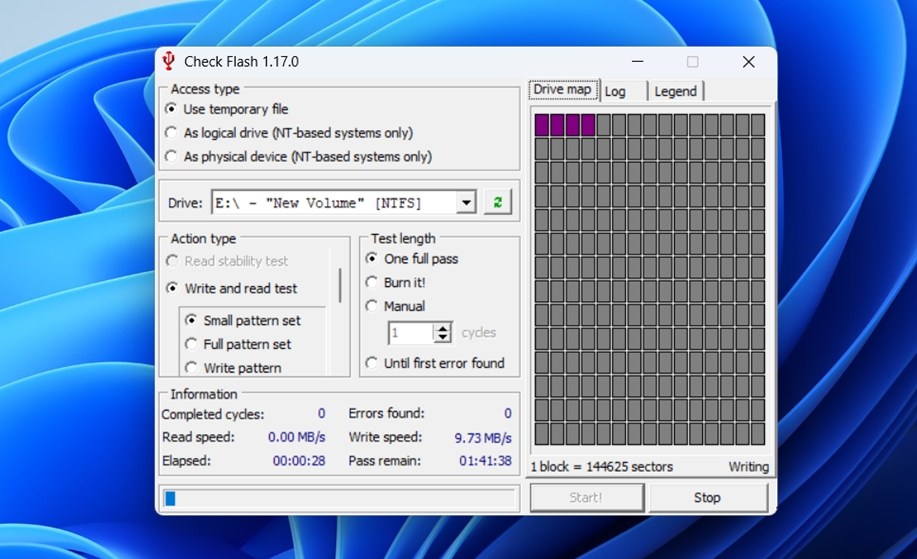
Check Flash (ChkFlsh) is an old-school Windows tool that’s still weirdly good at stress-testing SD cards. It works by writing data across the entire surface of the card and then verifying it. You can run it in read-only mode too, but to get real results, most people go with the full write/verify test. It’s helpful when you want to make sure your SD card can actually store what it says it can. Here’s how to use ChkFlsh:
- Once you launch Check Flash.
- Select your SD card from the dropdown (make sure it’s the right one), then pick a test type.
- Use the full read+write pattern test if the card doesn’t have any valuable data on it. If it does, either skip this method or make a full byte-to-byte backup first like we showed earlier.
Another tool that works well for this purpose is FakeFlashTest, made by the same developer behind RMPrepUSB. It’s even more focused – this one specifically checks for fake capacity cards. If you bought a “256GB” card for $8 online, run this immediately. FakeFlashTest fills the card with dummy data and then checks if it all reads back correctly. If it starts erroring out halfway through, the card’s not what it claimed to be.
Neither of these tools gives you wear level or remaining lifespan info – they’re not that kind of health monitor. But if your goal is to catch fake cards or check for severe corruption before trusting the card with real files, they’re absolutely worth running.
Method 5:Monitor Real-Time Activity With Hard Disk Sentinel
Hard Disk Sentinel is usually thought of as a tool for SSDs and HDDs, but it can also help you monitor SD card health in a more indirect way (if you’re looking for real-time behavior rather than diagnostics). Here’s how you can use it:
- Once you install and open the program, it immediately scans for all connected drives.
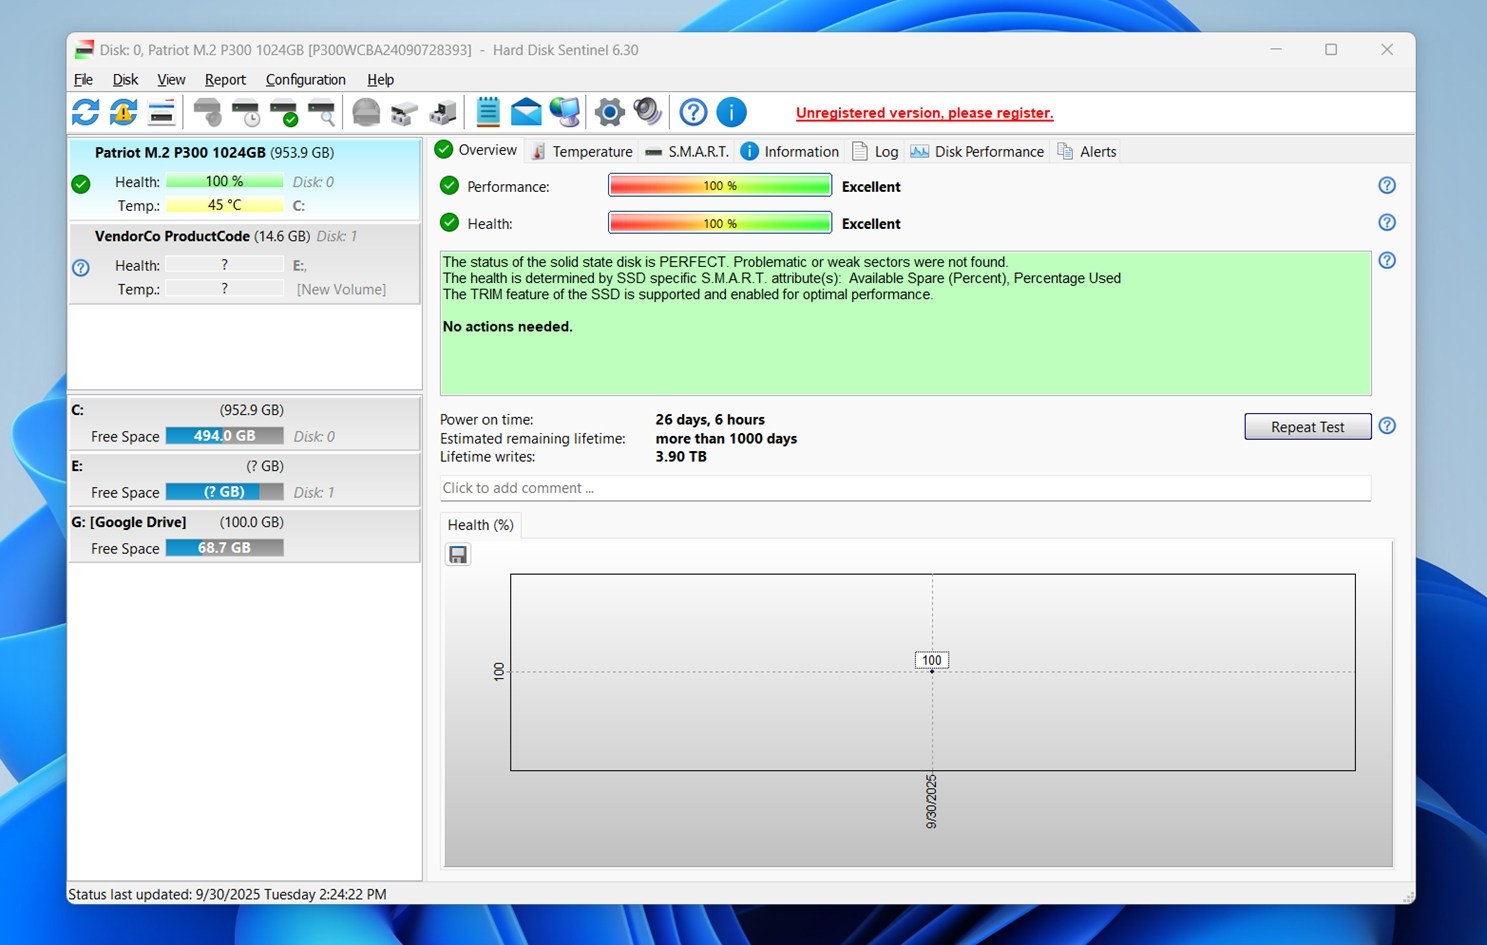
- If your SD card is plugged in using a USB reader, you should see it listed in the left-hand column along with your other drives. It might be labeled as a “Removable” or “USB”. Click it once to select it.
- Now look at the right-hand side of the window. If your SD card supports S.M.A.R.T. (most don’t), you’ll see detailed stats like “Reallocated Sectors” or “Power-On Hours.” For regular SD cards, this part will likely say “S.M.A.R.T. not supported” or be blank. That’s normal.
- Click the “Disk” menu at the top, then choose “Surface Test” > “Start Test”.
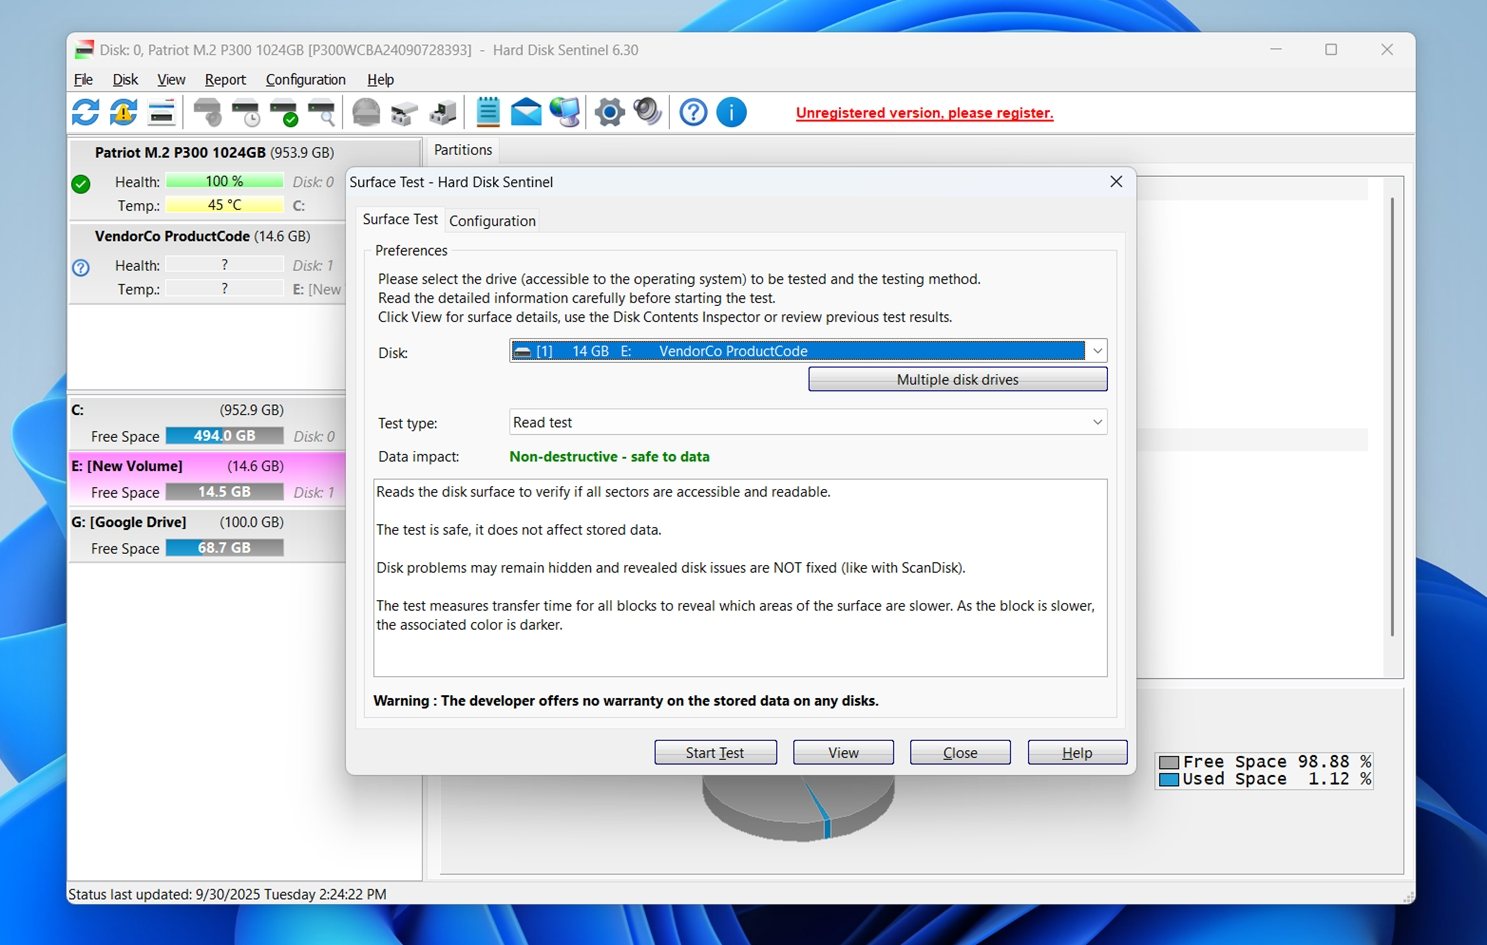 This lets you watch in real time as the card is read block by block. If it slows down in certain areas or throws errors, you’ll see it right on the test grid.
 - You can also go to the “Log” tab.
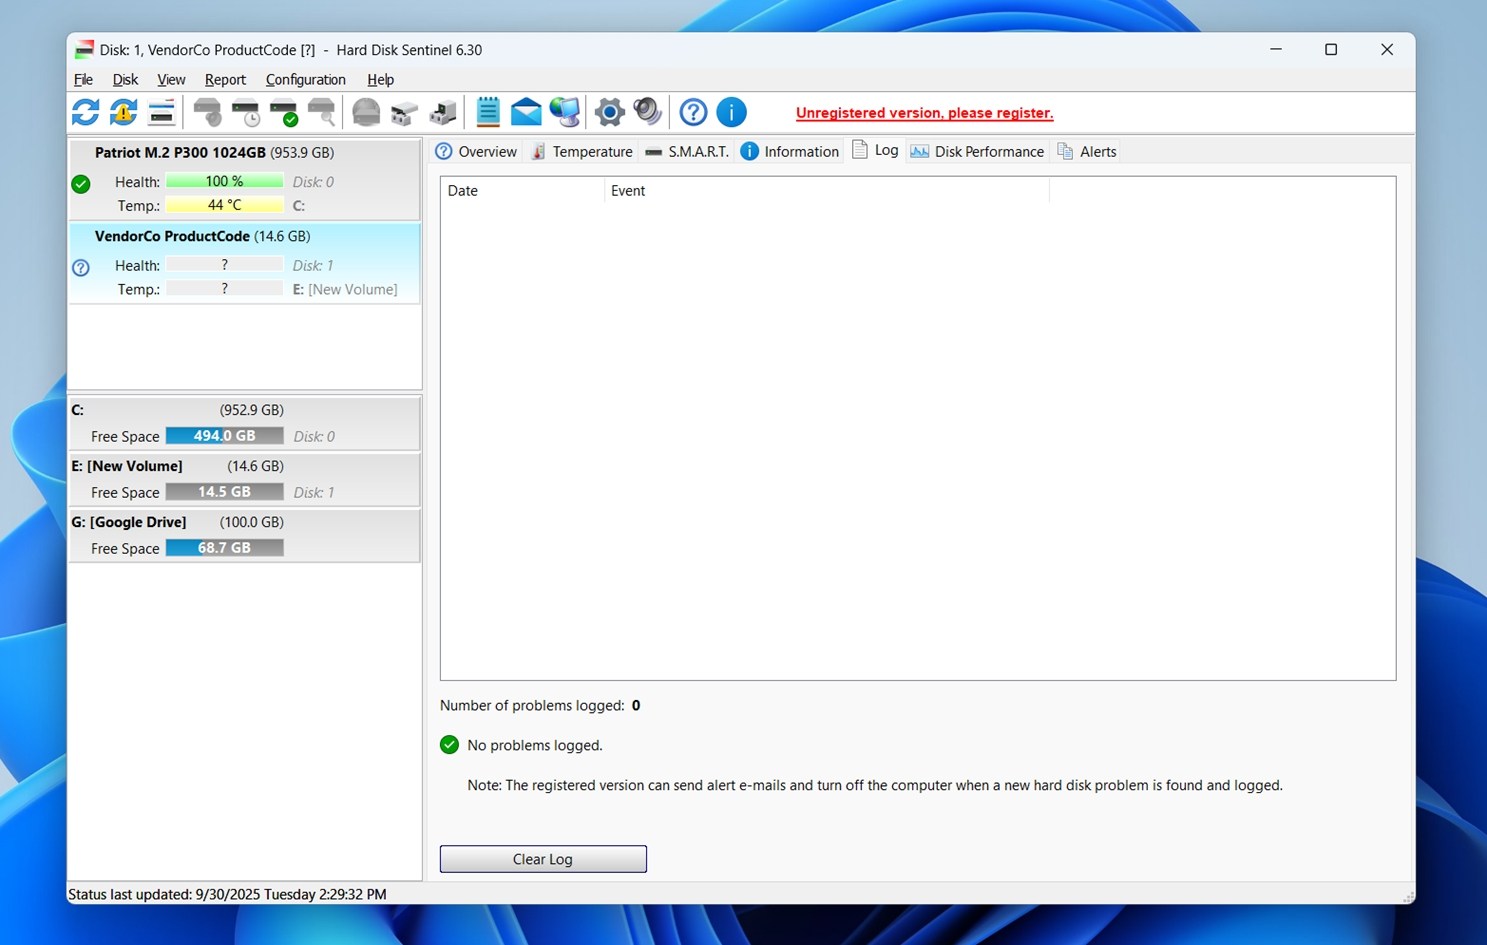 This keeps a running record of anything unusual – timeouts, retries, failed read attempts. If your card randomly disconnects or fails during a backup, this log is where you’ll spot patterns.
We usually leave Hard Disk Sentinel running in the background while transferring files from questionable cards. If the system freezes, the card stalls, or anything else feels off, the program catches it right away, even if Windows doesn’t show an error.
If you want to use it long-term, there’s a paid version, but the free trial is enough for most SD card troubleshooting.
Method 6:Run an SD Card Health Test with Victoria
If you’ve ever dug around older data recovery forums, you’ve probably seen Victoria mentioned. It’s a no-frills utility for testing drives at the sector level. It’s definitely not beginner-focused, but if you’re comfortable poking around with advanced tools, Victoria can give you raw access to your card’s performance and stability.
Use caution. Victoria is powerful and assumes you know what you’re doing. Stick with read-only tests unless the card is empty and you’re experimenting. And always back up first if the card has anything you care about.
This tool is especially useful when you want to run a low-level SD card health test. To get started:
- Download Victoria (no installation is needed – it runs as a portable app).
- When you launch it, from the list, select your SD card.
 If it’s in a USB reader, make sure you choose the correct one – it’ll usually say “Removable” in the interface type. If your SD card doesn’t appear, try running Victoria with admin rights.
 - Once selected, switch over to the “Test & Repair” tab.
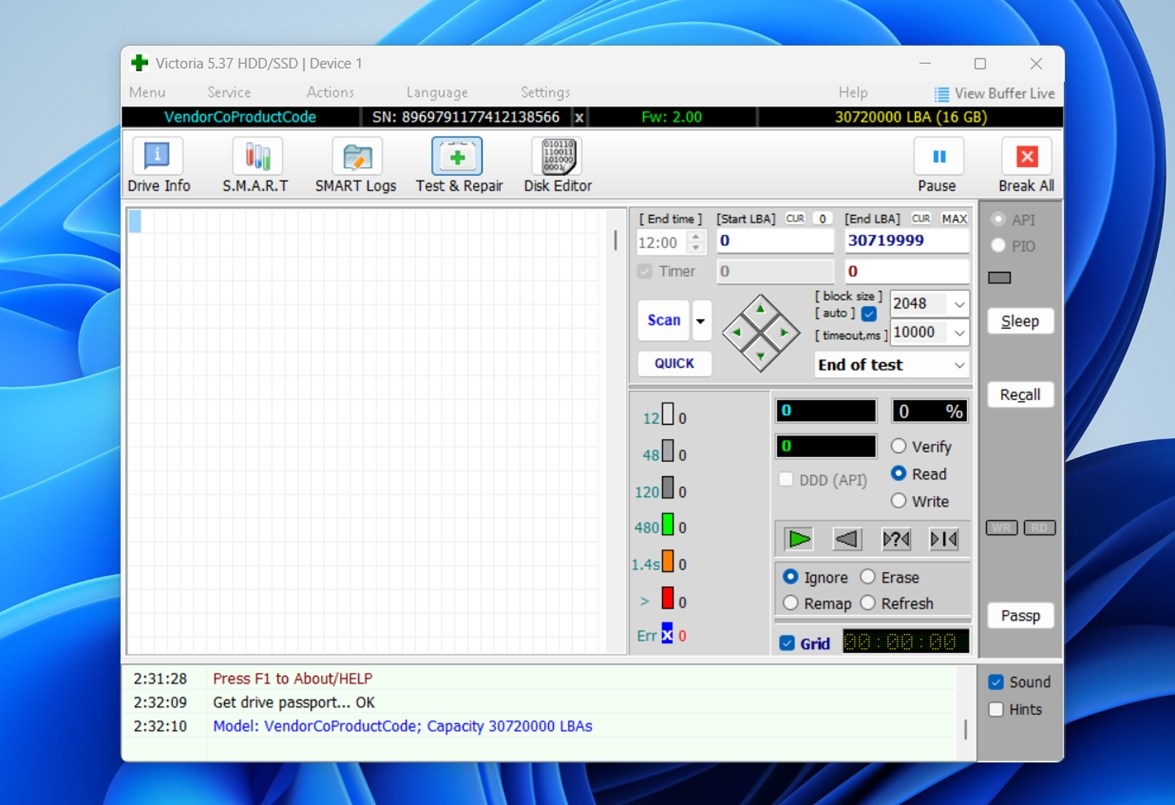
- Look near the top-right area for the “Scan” buttons. You’ll see options to run a full scan or a quick scan. The full scan is slower, but it’s better for catching errors that might only show up under heavier testing.
- As the scan runs, keep an eye on the grid view. It’s color-coded: green means healthy blocks, yellow means slow, red means bad. If you see red blocks showing up – those are bad sectors, and that means the card has already started failing.
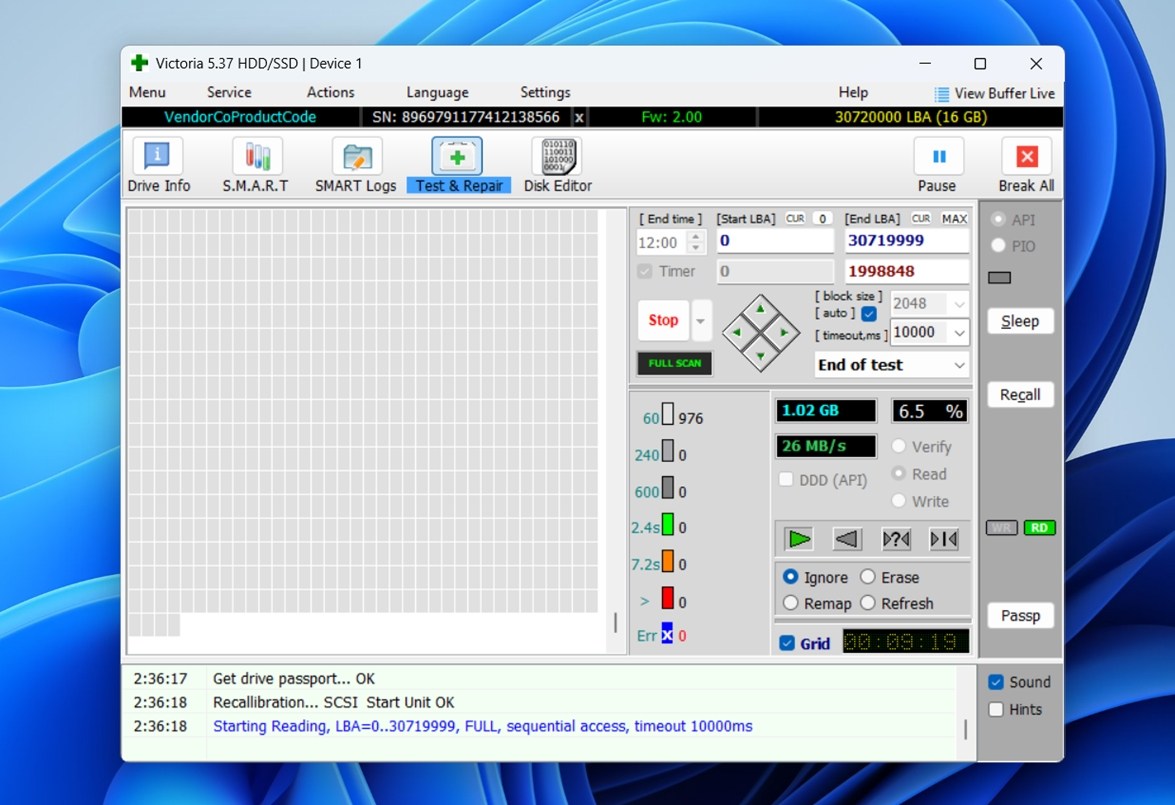
As the scan runs, you’ll see color-coded response times: green is good, yellow means slow sectors, and red indicates bad or unreadable ones. If you see lots of yellow or red early in the scan, that’s a solid reason to stop using the card immediately.
One unique thing about Victoria: it shows individual block response times in milliseconds. You’re seeing real-world access behavior at the hardware level.
If your SD card is acting unstable, and tools like CHKDSK or CrystalDiskMark didn’t flag anything, Victoria might be what finally gives you the full picture.
Method 7:Use Manufacturer Tools (Sony, SanDisk Industrial)
This method won’t work for everyone, but if you’re using a card from a major brand – especially one labeled “industrial” or “high endurance, you might have access to a real SD card health monitor provided by the manufacturer.
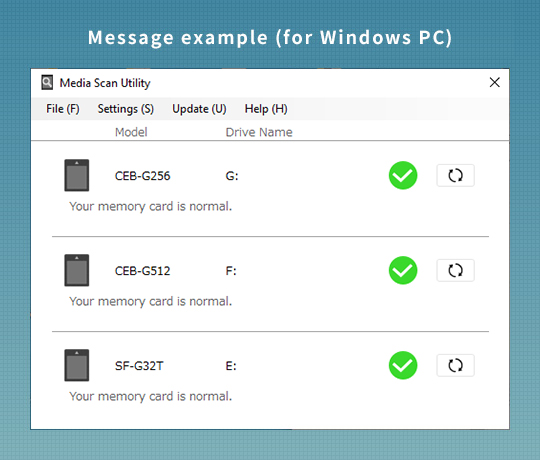
For example, Sony offers something called the Media Scan Utility for some of their pro-grade SD cards. When you insert a supported card, the tool automatically checks for wear levels and tells you if it’s time to replace it. It looks at actual internal health data stored in the card’s controller.
SanDisk and a few other brands also embed health-related info in their industrial-grade microSDs, but accessing it usually requires specialized reader hardware or custom software – nothing most users would run into unless they’re in a lab or work in embedded systems.
And that’s the catch: regular consumer SD cards don’t expose this kind of data. Even if you install all the right tools, they’ll often come up blank because the card itself doesn’t support any health reporting standard.
Still, it’s worth checking your manufacturer’s website, especially if your card came with its own setup app. We’ve seen bundled software from Kingston, Samsung, and Transcend that can at least verify firmware versions or test for basic read/write errors.
If your card is one of those rare supported models, this is one of the cleanest ways to monitor its remaining life.
Does S.M.A.R.T. Work With SD Cards?
We’ve heard this question a lot, mainly because most people are already familiar with S.M.A.R.T. monitoring from SSDs and hard drives. Tools like CrystalDiskInfo can show things like reallocated sectors, power-on hours, or temperature changes over time. So naturally, people expect to check SD card health the same way.
But the thing is, most SD cards don’t support S.M.A.R.T. at all.
S.M.A.R.T. (Self-Monitoring, Analysis, and Reporting Technology) relies on the storage device’s controller actively reporting data back to the system. Consumer-grade SD and microSD cards, even from major brands like SanDisk, Samsung, and Kingston, don’t expose that kind of info. When you plug them into a card reader, tools like CrystalDiskInfo usually show blank fields or nothing at all.
So if you’re hoping to check SD card health using S.M.A.R.T. (the way you would with an SSD), you’ll likely hit a wall.
That said, there are a few exceptions. Some industrial-grade SD cards do support health monitoring, but it’s often through proprietary registers rather than standard S.M.A.R.T. You’ll typically need the card manufacturer’s tool (like Sony’s Media Scan Utility we mentioned above) and, in some cases, specific hardware card readers that can actually access that hidden diagnostic data.
We’ve tested multiple cards ourselves, and none of the regular consumer models reported S.M.A.R.T. data. They either show N/A values or don’t detect the card at all.
Got a Story? Drop It in the Comments
We’ve run into all kinds of SD card situations over the years, but we know that’s nothing compared to what others have seen out in the wild. If you’ve got a story about a card that failed, survived disaster, or saved the day, we’d love to hear it.
Also, if you still have questions about testing or recovering SD cards, scroll down to the FAQ section. We packed it with answers to the things people ask most often.
FAQ
- If you’re recording video 24/7 (like in a dashcam or security cam), don’t use regular consumer cards. Look for ones labeled “high endurance” or “industrial grade.” These are built for constant writing and survive far more write cycles.
- Avoid unnecessary formatting. Formatting rewrites the file system and can trigger extra wear, especially on aging cards. Only format when needed - don’t treat it like a cleanup button.
- Always use “Safely Remove Hardware” before unplugging. Yanking the card mid-write is one of the easiest ways to corrupt data or damage internal structures.
- Skip automatic syncing apps if you're using the card in a phone or tablet. Disable features like background photo backups that constantly write data. And don’t use SD cards for things like swap files or active cache storage.
- Don’t defragment. Defragmenting an SD card doesn’t speed it up. Flash memory doesn’t benefit from it the way spinning drives do. Skip it entirely.
- Avoid extreme heat, moisture, or cheap USB readers. Cards exposed to unstable power or overheating tend to fail faster.
- Use Disk Utility. Open Disk Utility (Applications → Utilities) and select your SD card from the list. Click First Aid, then run a check. This scans for file system errors (not physical damage) but it’s a good first step if your card isn’t behaving normally.
- Try Blackmagic Disk Speed Test. This free app from the Mac App Store tests read/write speeds. Slower-than-expected performance can point to aging flash memory or controller issues.
- You can use diskutil verifyDisk or diskutil verifyVolume commands in Terminal to run integrity checks. These won't expose deep hardware issues but may catch structural problems.
- Use third-party tools like F3 or H2testw (via Parallels/Boot Camp) macOS doesn’t have native access to low-level surface testers like H2testw or Victoria, but if you run Windows through Boot Camp or Parallels, you can use them to fully scan the card.
- Some cards from Sony, SanDisk (industrial line), or Lexar may have macOS-compatible health check apps (support varies).
- First, you can use a tool called badblocks. It scans your SD card for unreadable sectors. To run it, you’ll need to know the device name of your SD card, for example, /dev/sdb. You can find that using a tool like lsblk. Once you have the device name, badblocks will go through the card and report any damaged blocks. This gives you a good sense of whether your SD card is physically healthy or not.
- Another option is a tool called F3, which stands for Fight Flash Fraud. It’s a test utility that fills the SD card with data, then reads it all back to make sure it matches. This is especially helpful if you suspect the card has fake capacity or hidden corruption. If the card can’t handle the full write-read cycle, the tool will show you exactly where things failed.
- If you're using a higher-end or industrial-grade SD card, you might try smartctl from the smartmontools package to read S.M.A.R.T. data. But keep in mind that most regular SD cards do not support S.M.A.R.T., so this tool usually won't return anything useful for consumer-grade cards.
- You can also look at system logs using dmesg. This shows low-level events like read errors, write failures, or disconnects. If your SD card is unstable or randomly vanishing, these logs often hold useful clues even if the card seems to work part of the time.


