 If data has disappeared from your external hard drive (maybe you deleted something by mistake or the drive started throwing errors), then you should know that Mac external hard drive data recovery is possible in most cases.
As long as your files haven’t been completely overwritten and are still physically sitting on the device somewhere, there’s a real shot at getting them back if you follow the right recovery approach. We’ve tested the methods described in this article across common data loss scenarios, so we’re confident in their effectiveness and ability to help you recover data from your external hard drive on Mac.
What’s Going on With Your External Drive?
For your convenience, here’s a quick overview that will take you to the right method depending on what’s happening with your drive. Instead of reading through everything, just find your situation below and jump straight to the solution that fits:
| If your situation is… | Jump to this section |
| I deleted a file from my external drive | Scenario 1: Recover deleted files from external hard drive Mac |
| I accidentally formatted the drive | Scenario 2, Method 1: Restore data from external hard drive Mac after formatting |
| I lost a partition, or it’s showing as unallocated | Scenario 2, Method 2: Restore lost partition |
| The drive shows up in Disk Utility, but throws errors when I try to access it | Scenario 3: Recover external hard drive on Mac when it won’t mount properly |
| The drive doesn’t show up in Finder (but appears in Disk Utility) | Scenario 3: Mac external hard drive recovery for unmounted drives |
| My external drive was used on Windows, and now files are inaccessible on my Mac | Scenario 3: Use data recovery Mac external hard drive software to extract files, then reformat to APFS or HFS+ for Mac use |
| I need to recover files from an external hard drive Mac for free | Scenario 1, Method 2 or Scenario 4: Free recovery options |
Note: We’ll focus on situations where the drive mounts properly and shows up in Disk Utility (even if it doesn’t appear in Finder). If you don’t see your drive in Disk Utility at all, check out this guide instead.
Before You Attempt Mac External Hard Drive Data Recovery
Before you start data recovery from an external hard drive on Mac, you should take a minute to avoid the following common mistakes that can make things worse:
- Continuing to use the external hard drive: Every time you copy, download, or browse files on it, you risk overwriting the deleted data you’re trying to recover. The less activity, the better your chances, so it’s best to stop using the drive immediately.
- Running all kinds of repair tools before recovering your data: Even if the cause of your data loss is corruption, it’s still best to use proper Mac external hard drive recovery software first because repair attempts could lead to overwriting.
- Installing data recovery system on the external hard drive: If you download a recovery app, install it on your Mac’s internal drive or a different external drive (never on the one you’re trying to recover). Installing software writes new data, which could overwrite the files you need.
- Recovering lost files to the same external hard drive: When you successfully find your lost files, save them to a different location (your Mac’s internal drive or another external drive). Recovering files back to the same drive can overwrite other recoverable data that’s still sitting there.
- Ignoring or not noticing signs of physical damage: If your external drive is making clicking or grinding noises, showing burn marks, or not being recognized by your Mac at all in Disk Utility, stop using it immediately. Physical damage requires professional help as DIY external hard drive data recovery Mac methods won’t work and could make things worse.
- Not having enough storage space ready for data recovery: When you restore data from an external hard drive Mac setups, you need somewhere to put those recovered files. Make sure you have enough free space on another drive before starting the recovery process.
If you’ve just read this list and realized you’ve already made one or more of these mistakes, it doesn’t automatically mean your data is gone forever. Just stop doing whatever you were doing and move forward carefully with the recovery steps below.
Scenario 1: Recover Deleted Files from an External Hard Drive on Mac
Let’s start with the simplest case: you just need to recover deleted files from your Mac external hard drive after an accidental deletion. In such cases, you have two main recovery options. The first one takes just a minute to attempt, and the second one requires software but works even when files have been permanently deleted or the Trash has been emptied.
Method 1: Check Trash on the External Device
In case you didn’t know, when you delete a file from an external hard drive on your Mac, it gets moved to the Trash folder (just like when you delete any other file from your Mac’s main drive). If you eject the drive from your computer, the deleted file will also disappear from the Trash. But as soon as you connect the hard drive back to your Mac, it will reappear.
Note: If you’ve configured Trash on your Mac to automatically remove the deleted files, the data you’ve deleted from the external hard drive will also get permanently erased after 30 days.
Follow these steps to recover files from an accidentally erased external hard drive on a Mac via Trash:
- Connect the external hard drive to your computer.
- Open the Trash folder (click the last icon on the Dock).
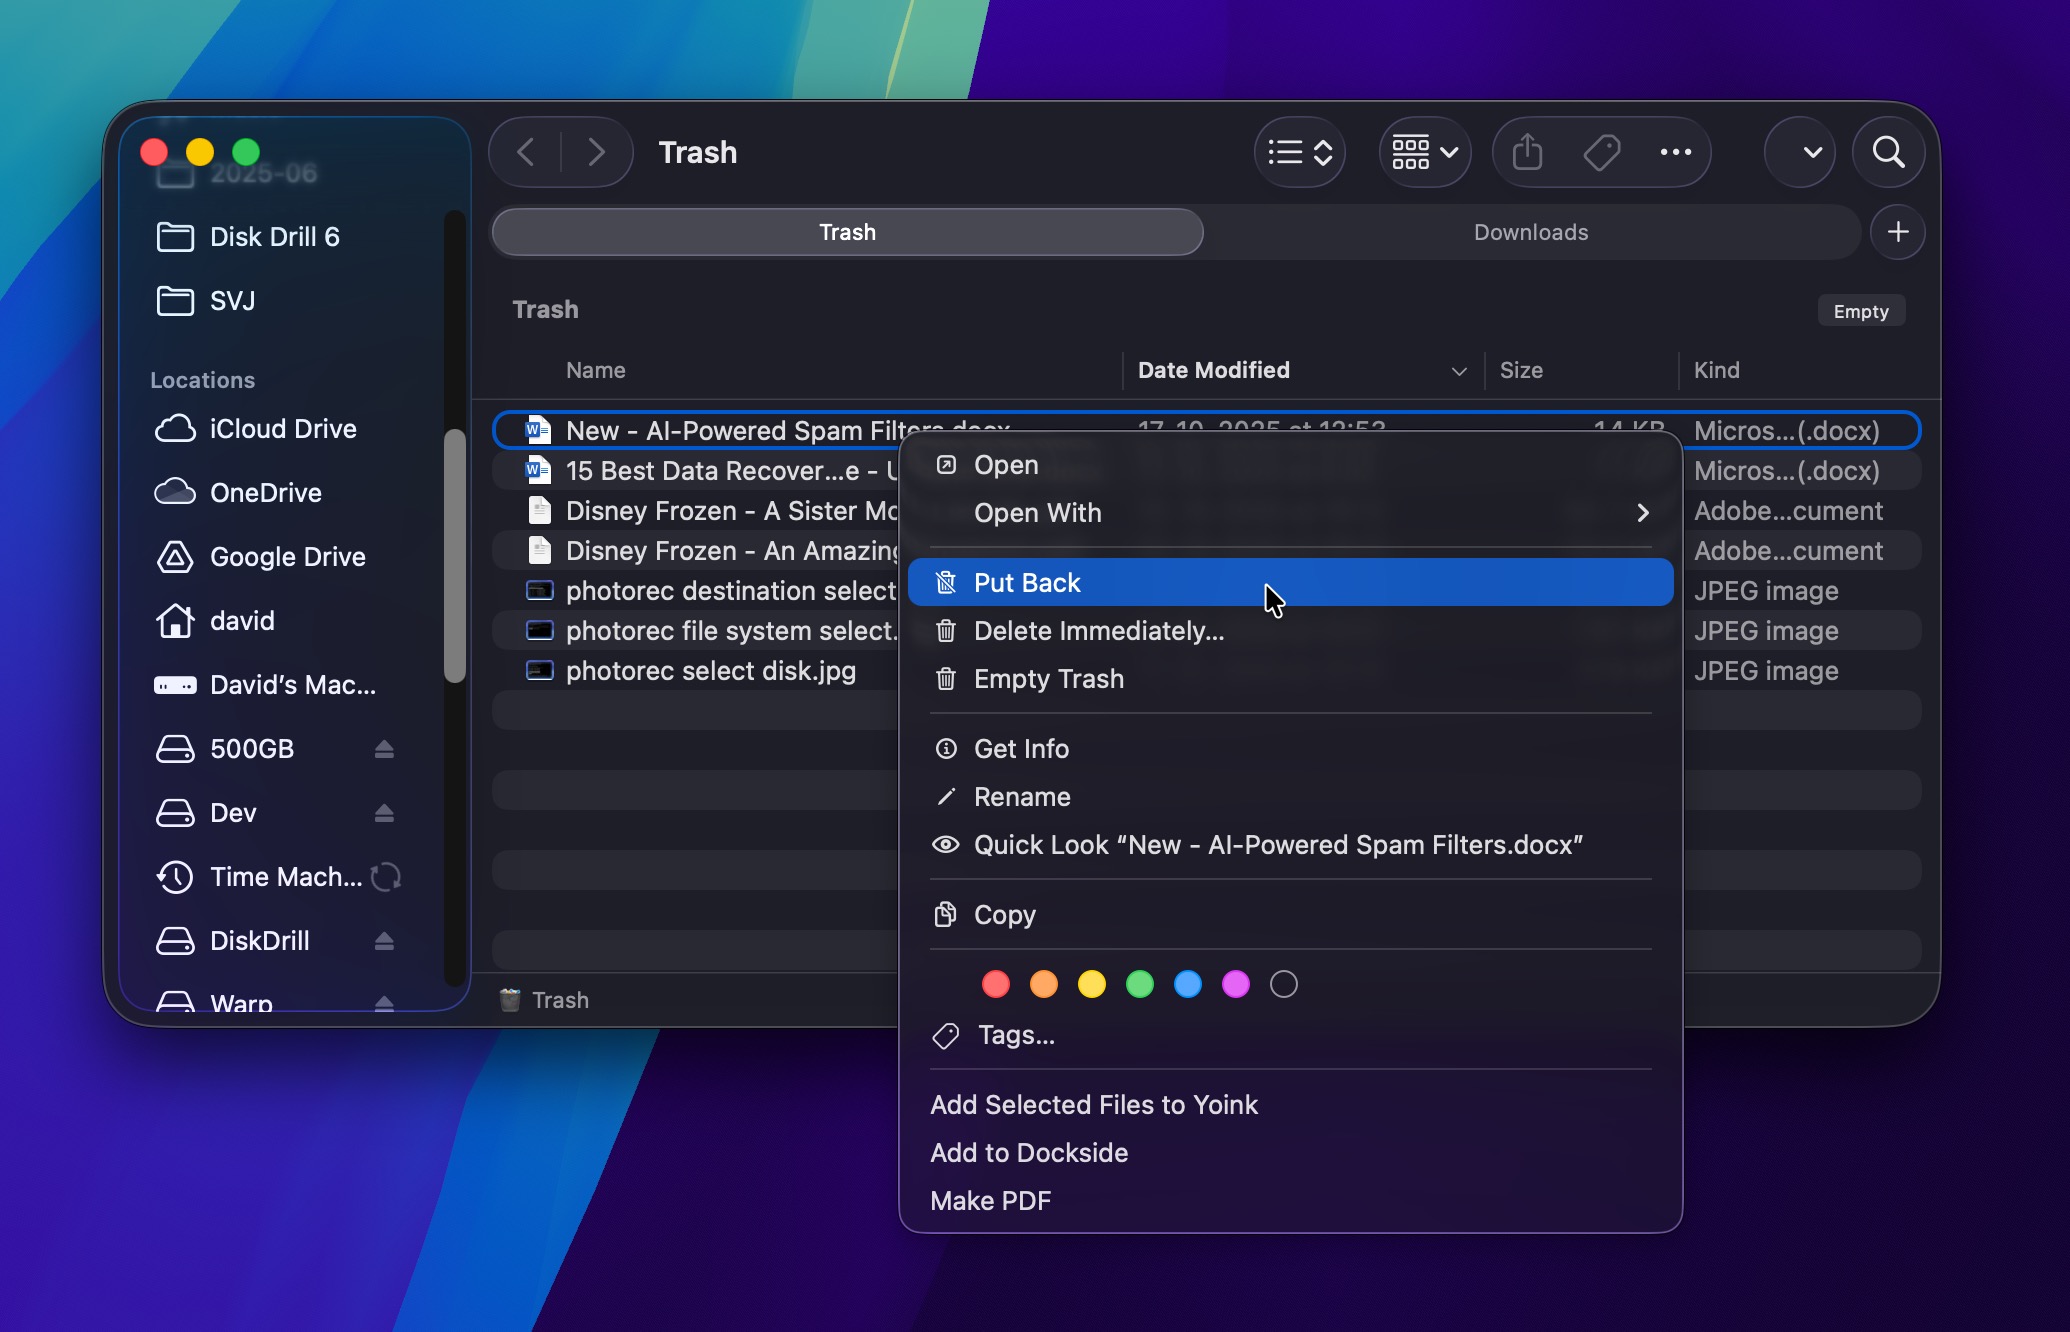
- Look through the deleted files to find the needed one.
- Right-click the file and choose Put Back from the drop-down menu to place the file back in its original location. Or drag and drop the file into any drive or folder.
In older version of macOS, you can also enable hidden folders on your external hard drive and access the deleted files directly from there. Here’s how to do it:
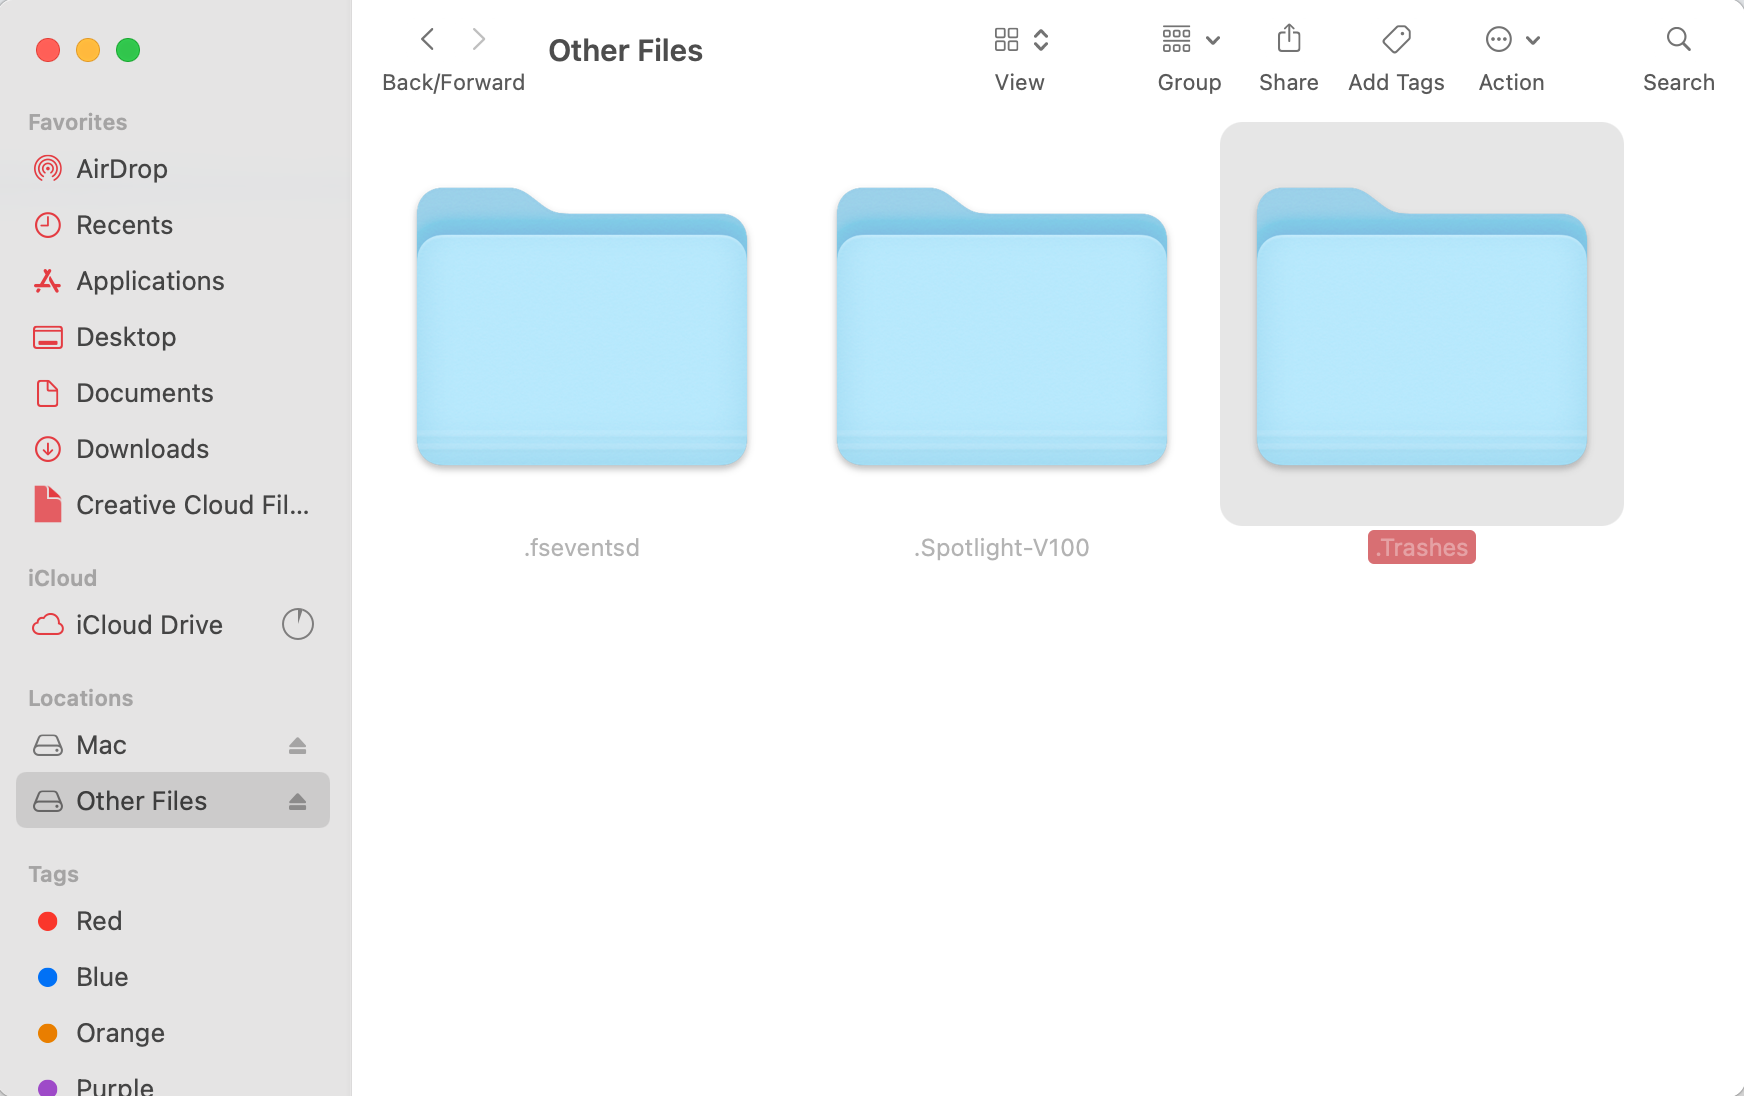
- Connect the external hard drive to your computer and open it through Finder.
- Press the following key combination: Shift + Command + .
- Open the .Trashes folder and look for the deleted file.
- If you need to change the folder permissions to open it, right-click the folder and choose Get Info from the drop-down menu. Click Sharing & Permissions and change your user privilege to Read and Write.
- Look for the deleted file and drag and drop it into a different folder.
Method 2: Use Data Recovery Software to Retrieve the Files
If the file isn’t in Trash (or if you’ve already emptied it), you’ll need data recovery Mac external hard drive software to scan the drive and find files that haven’t been overwritten yet.
For this guide, we’ll use Disk Drill because it performed well in our testing and strikes a good balance between being easy to use and having powerful features when you need them. It works reliably with file systems commonly used on external drives connected to Macs (APFS, HFS+, exFAT, and even NTFS in read-only mode). And if the file system is corrupted or unavailable, Disk Drill can still recover files from external hard drive Mac systems using signature-based recovery for over 400 file types.
Note: Disk Drill isn’t your only option for Mac external hard drive recovery. There are plenty of other solid tools out there, and we maintain a full rating of the best Mac recovery apps if you want to explore alternatives. That said, we’re using Disk Drill here because it handles most scenarios well, and it has some advanced features (like byte-to-byte backups and SMART monitoring) that can be useful in trickier situations.
Here’s how to recover deleted files from external hard drive Mac setups using Disk Drill:
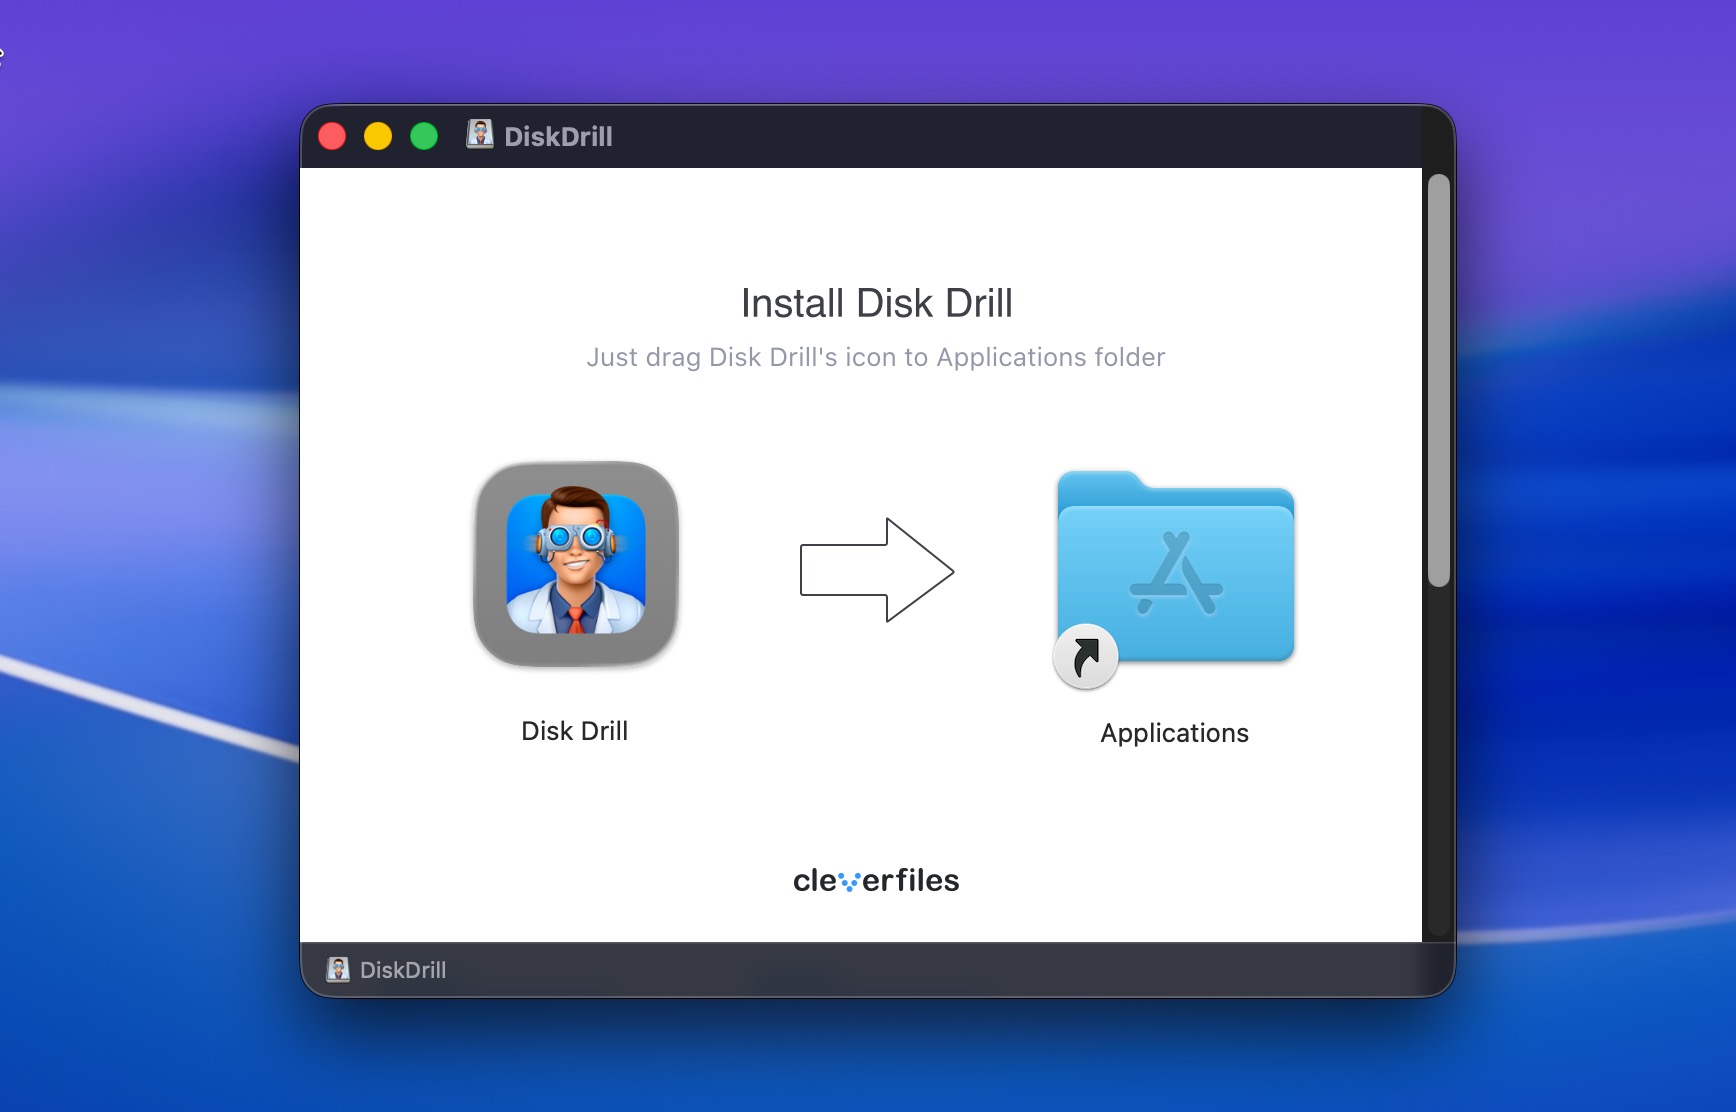
- Download Disk Drill and install it on your Mac’s internal drive (not on the external drive you’re trying to recover from).
- Connect your external hard drive to your Mac.
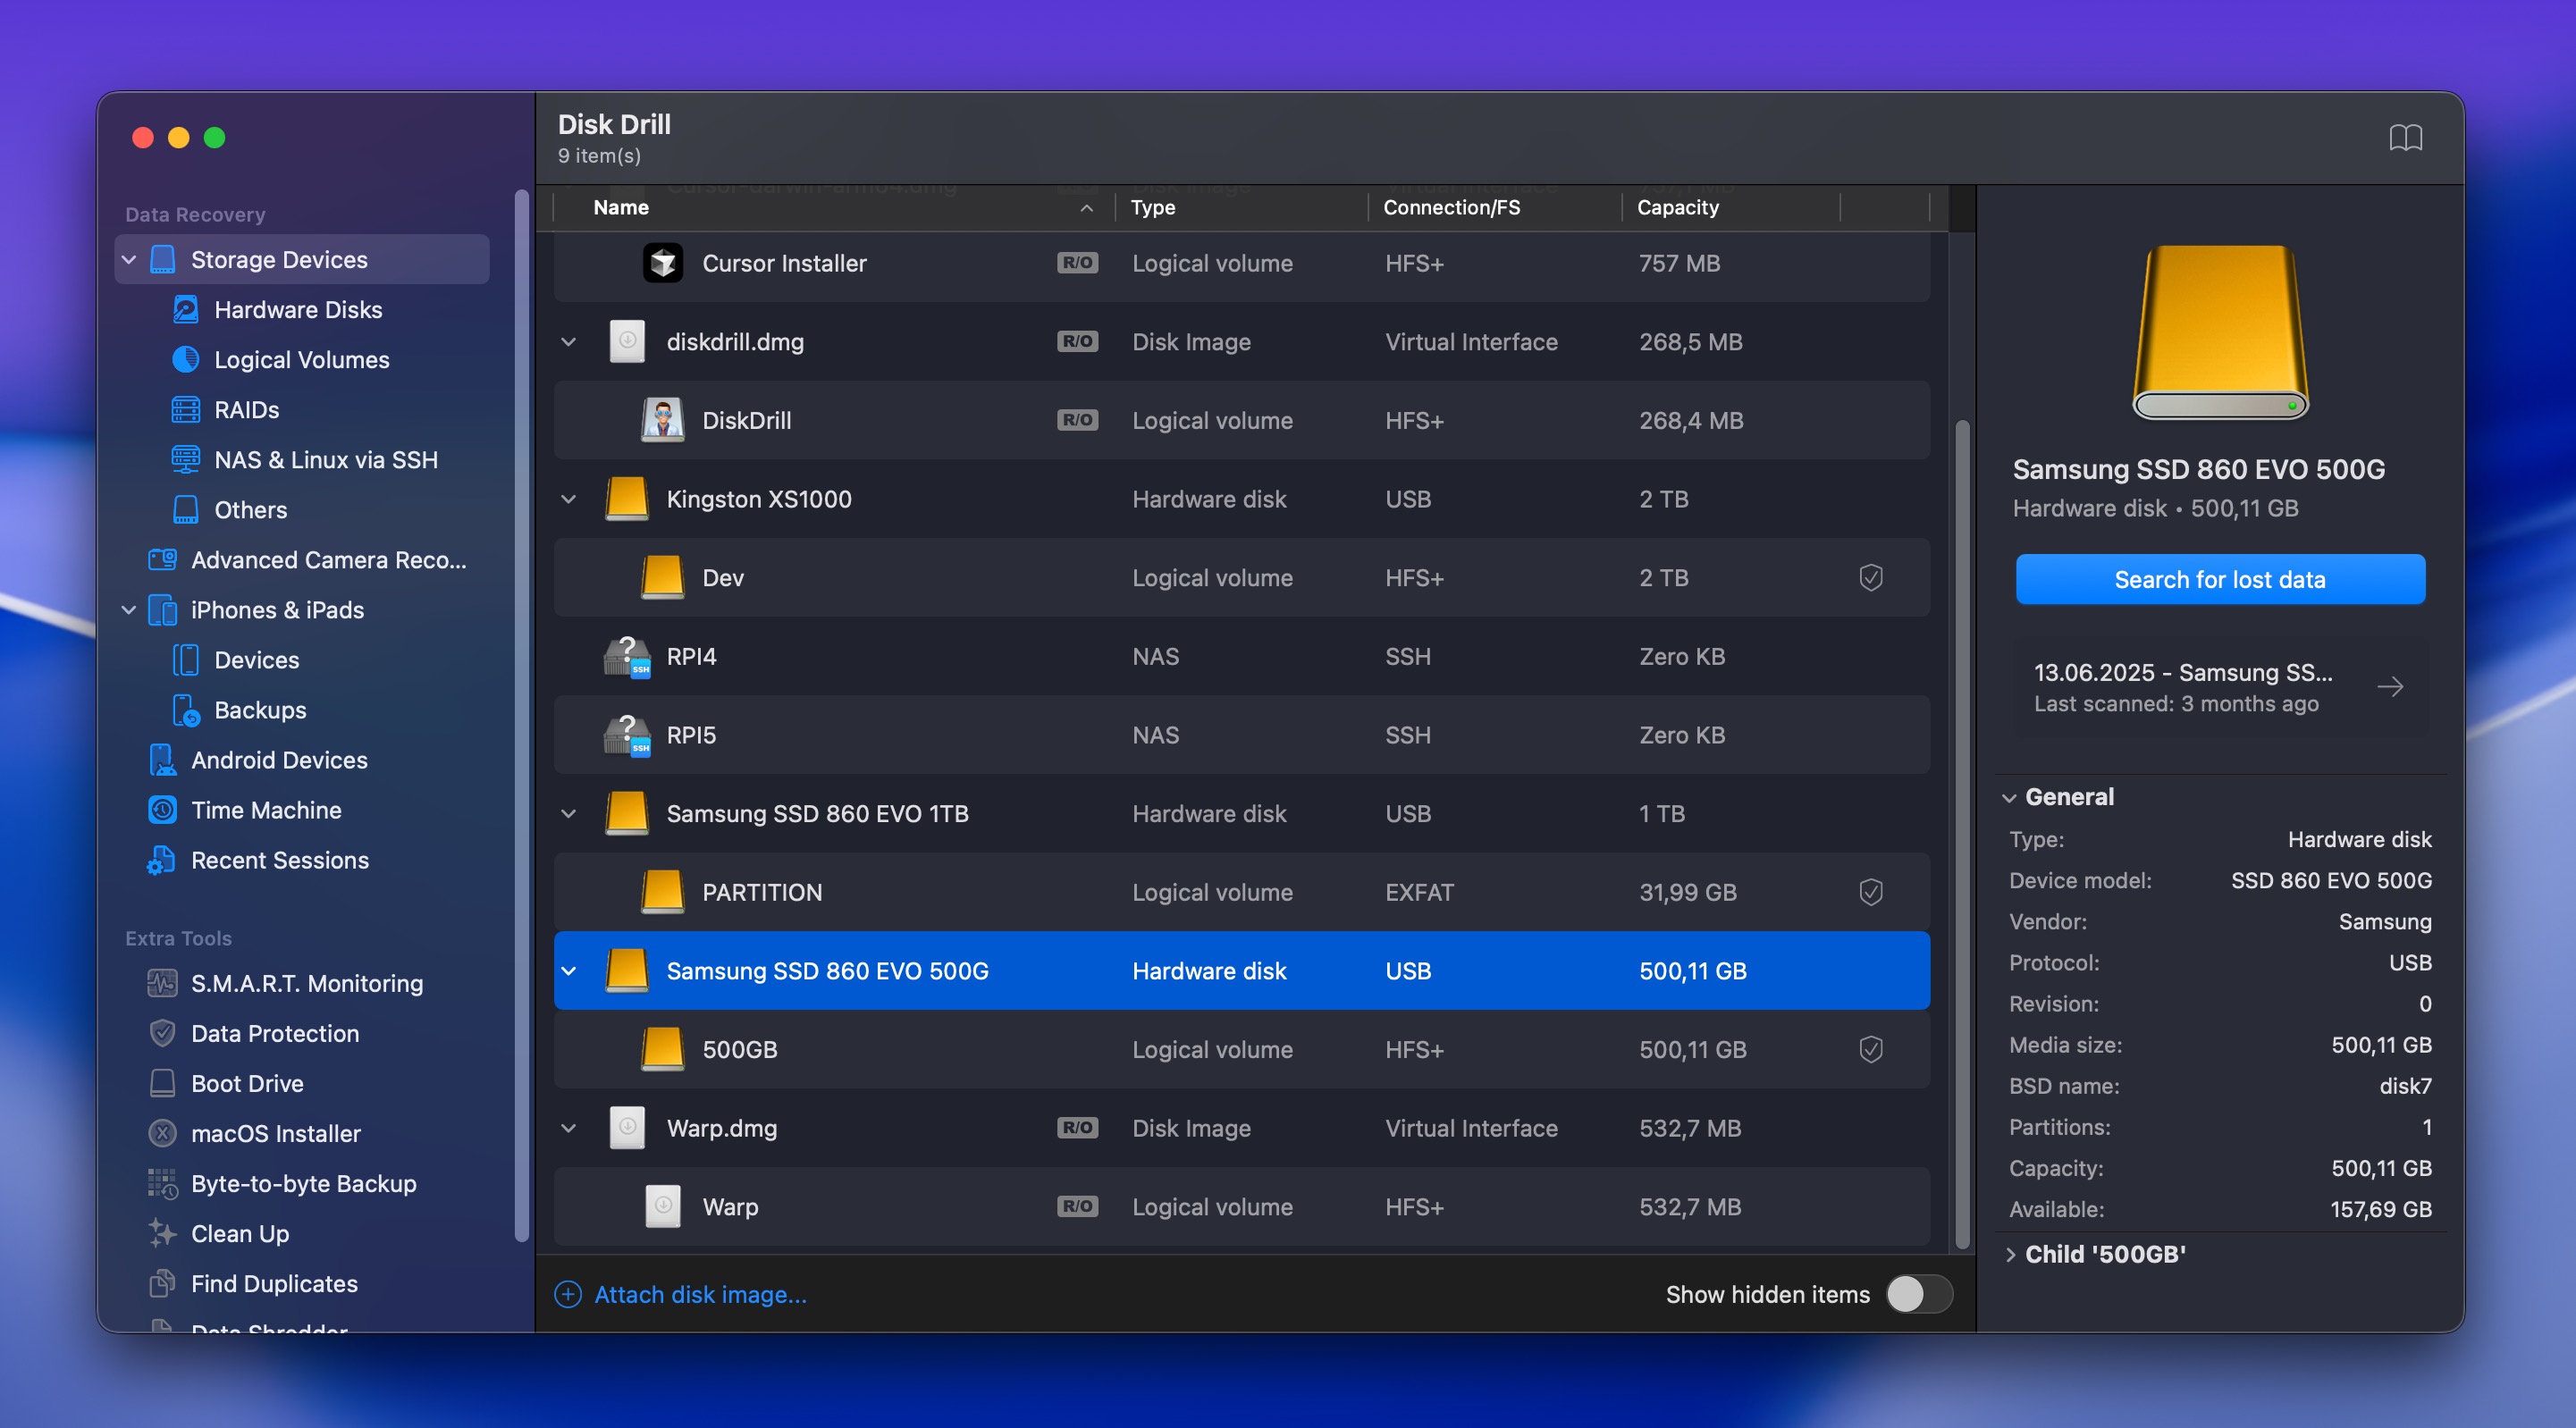
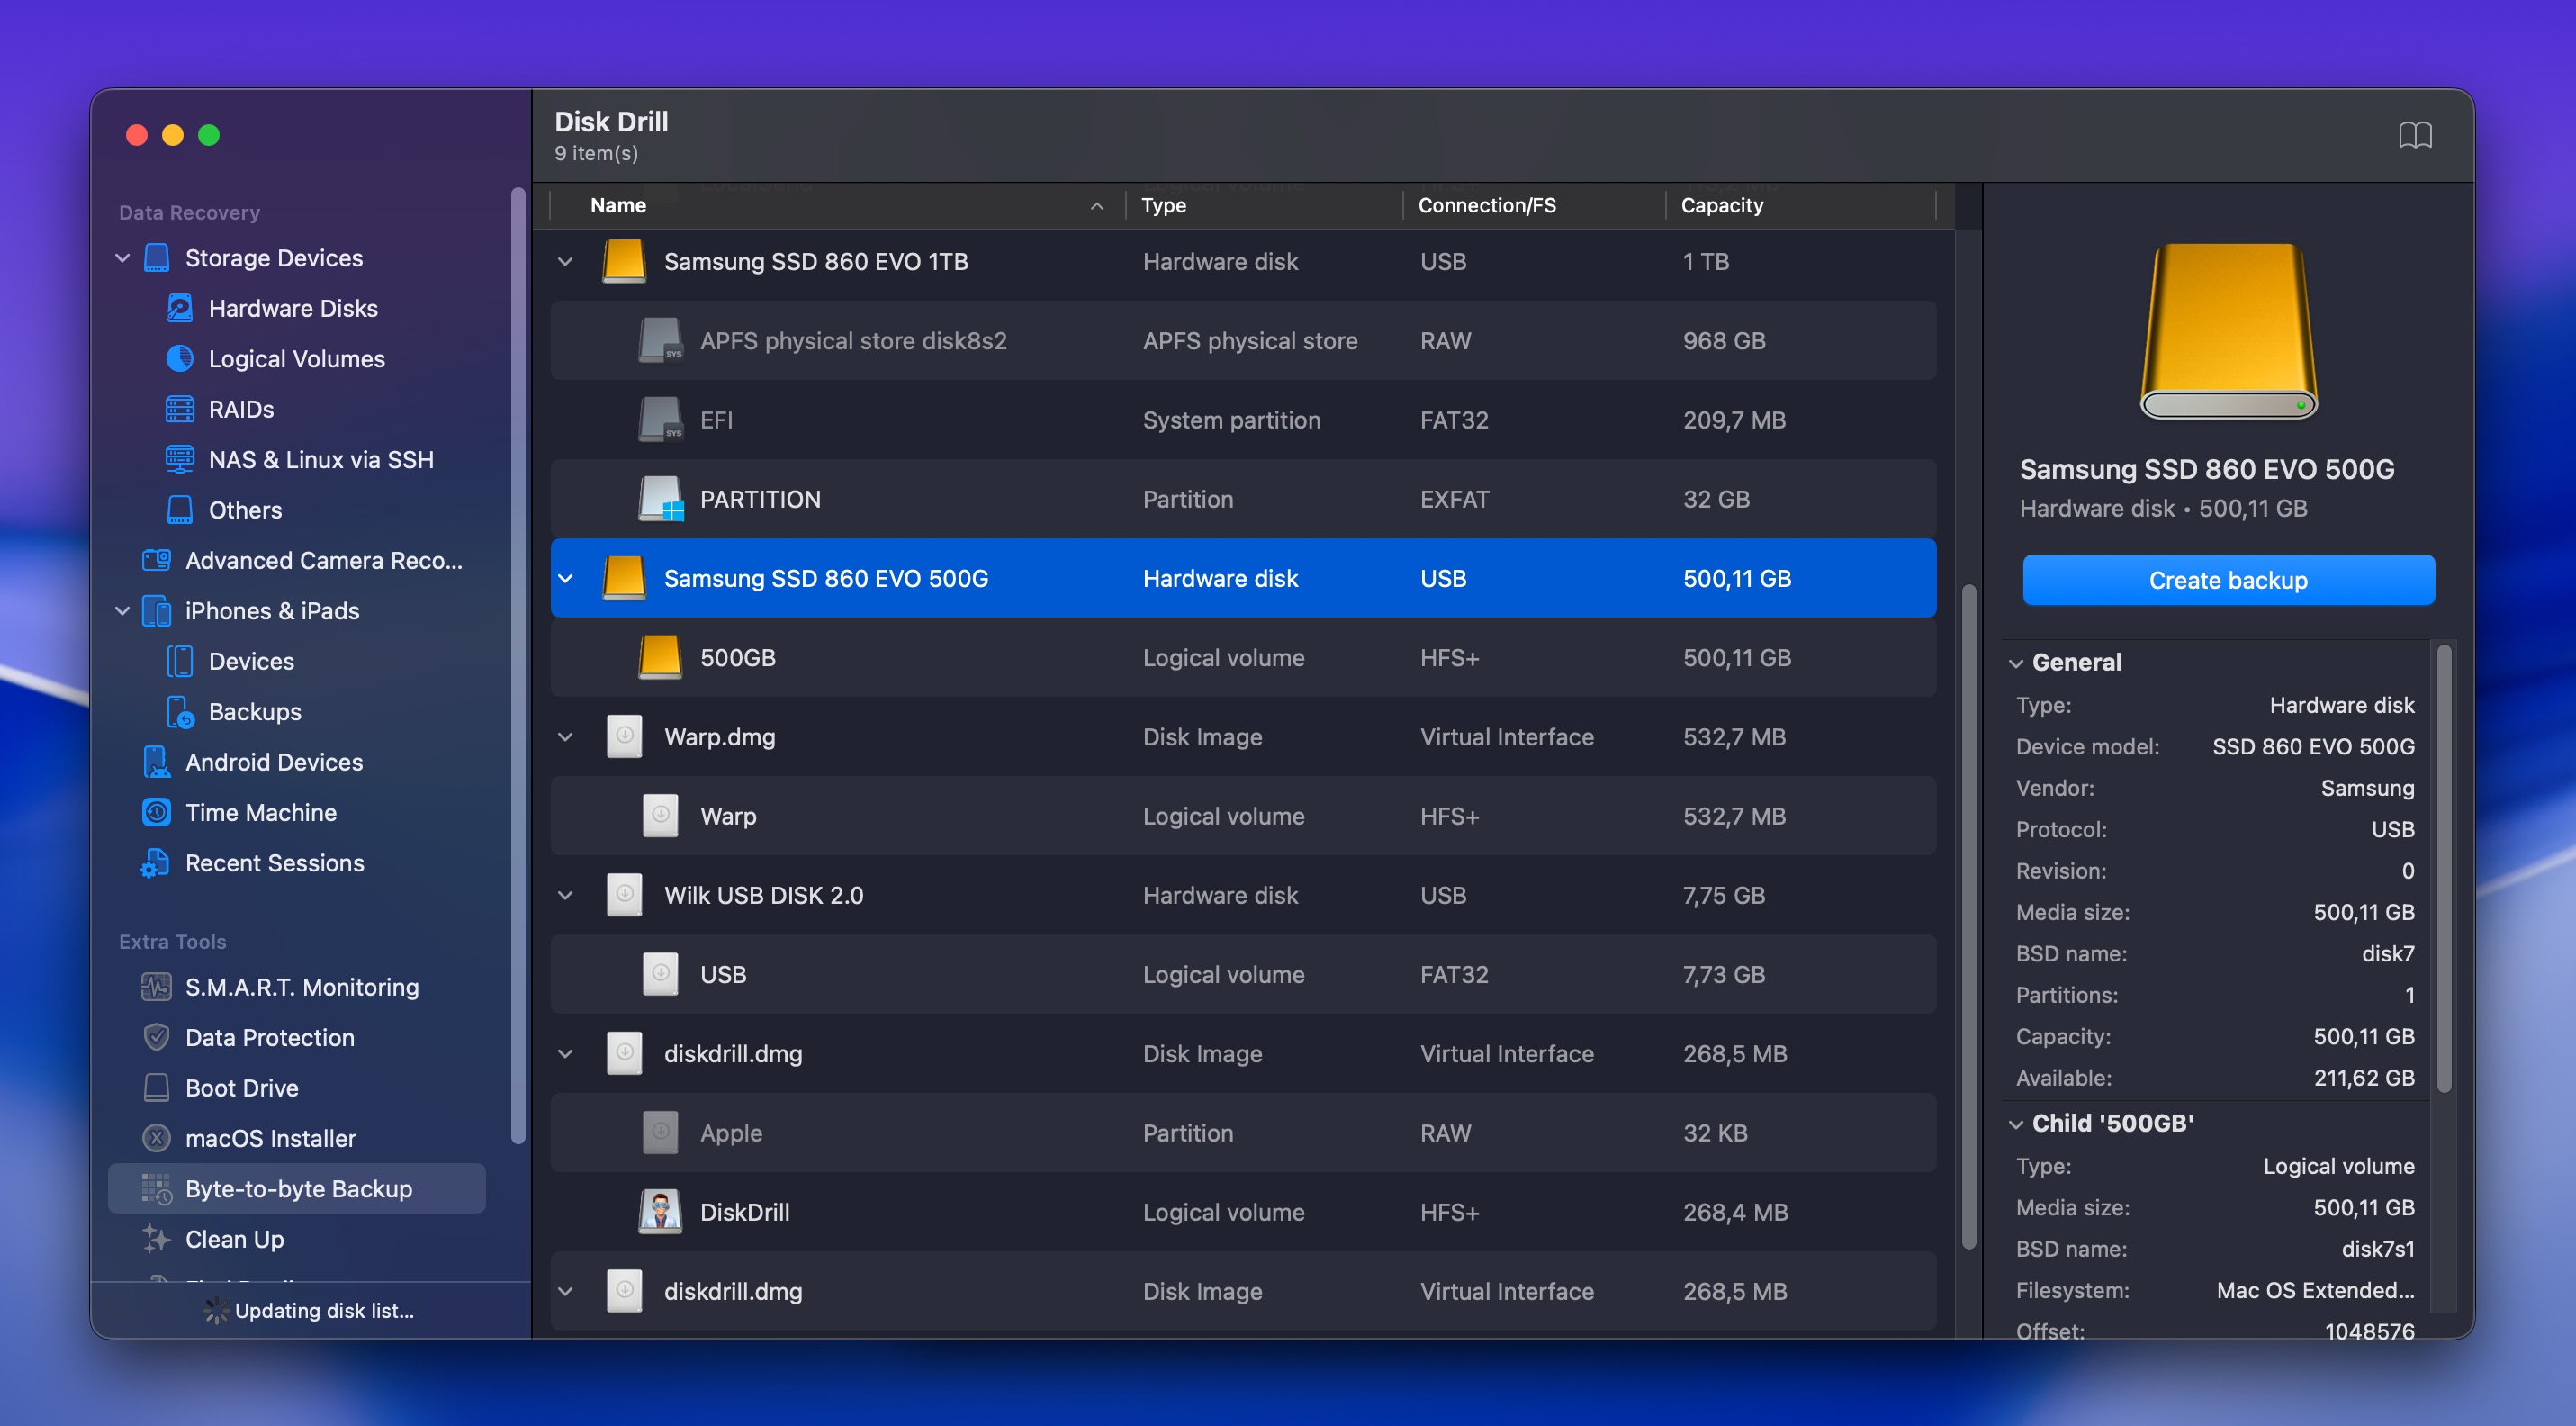
- Launch Disk Drill. You’ll see a list of all available drives. Find your external hard drive in the list and click on it to select it.
- Click the Search for lost data button to start scanning. Disk Drill will ask you which scan mode you want to use. Unless your goal is to recover fragmented video files only, choose Universal Scan.
- Scanning will start, but you don’t have to wait for it to finish. You can click the Review found items button at any time, and scanning will continue in the background. You can also pause it temporarily to free up system resources while you do something else.
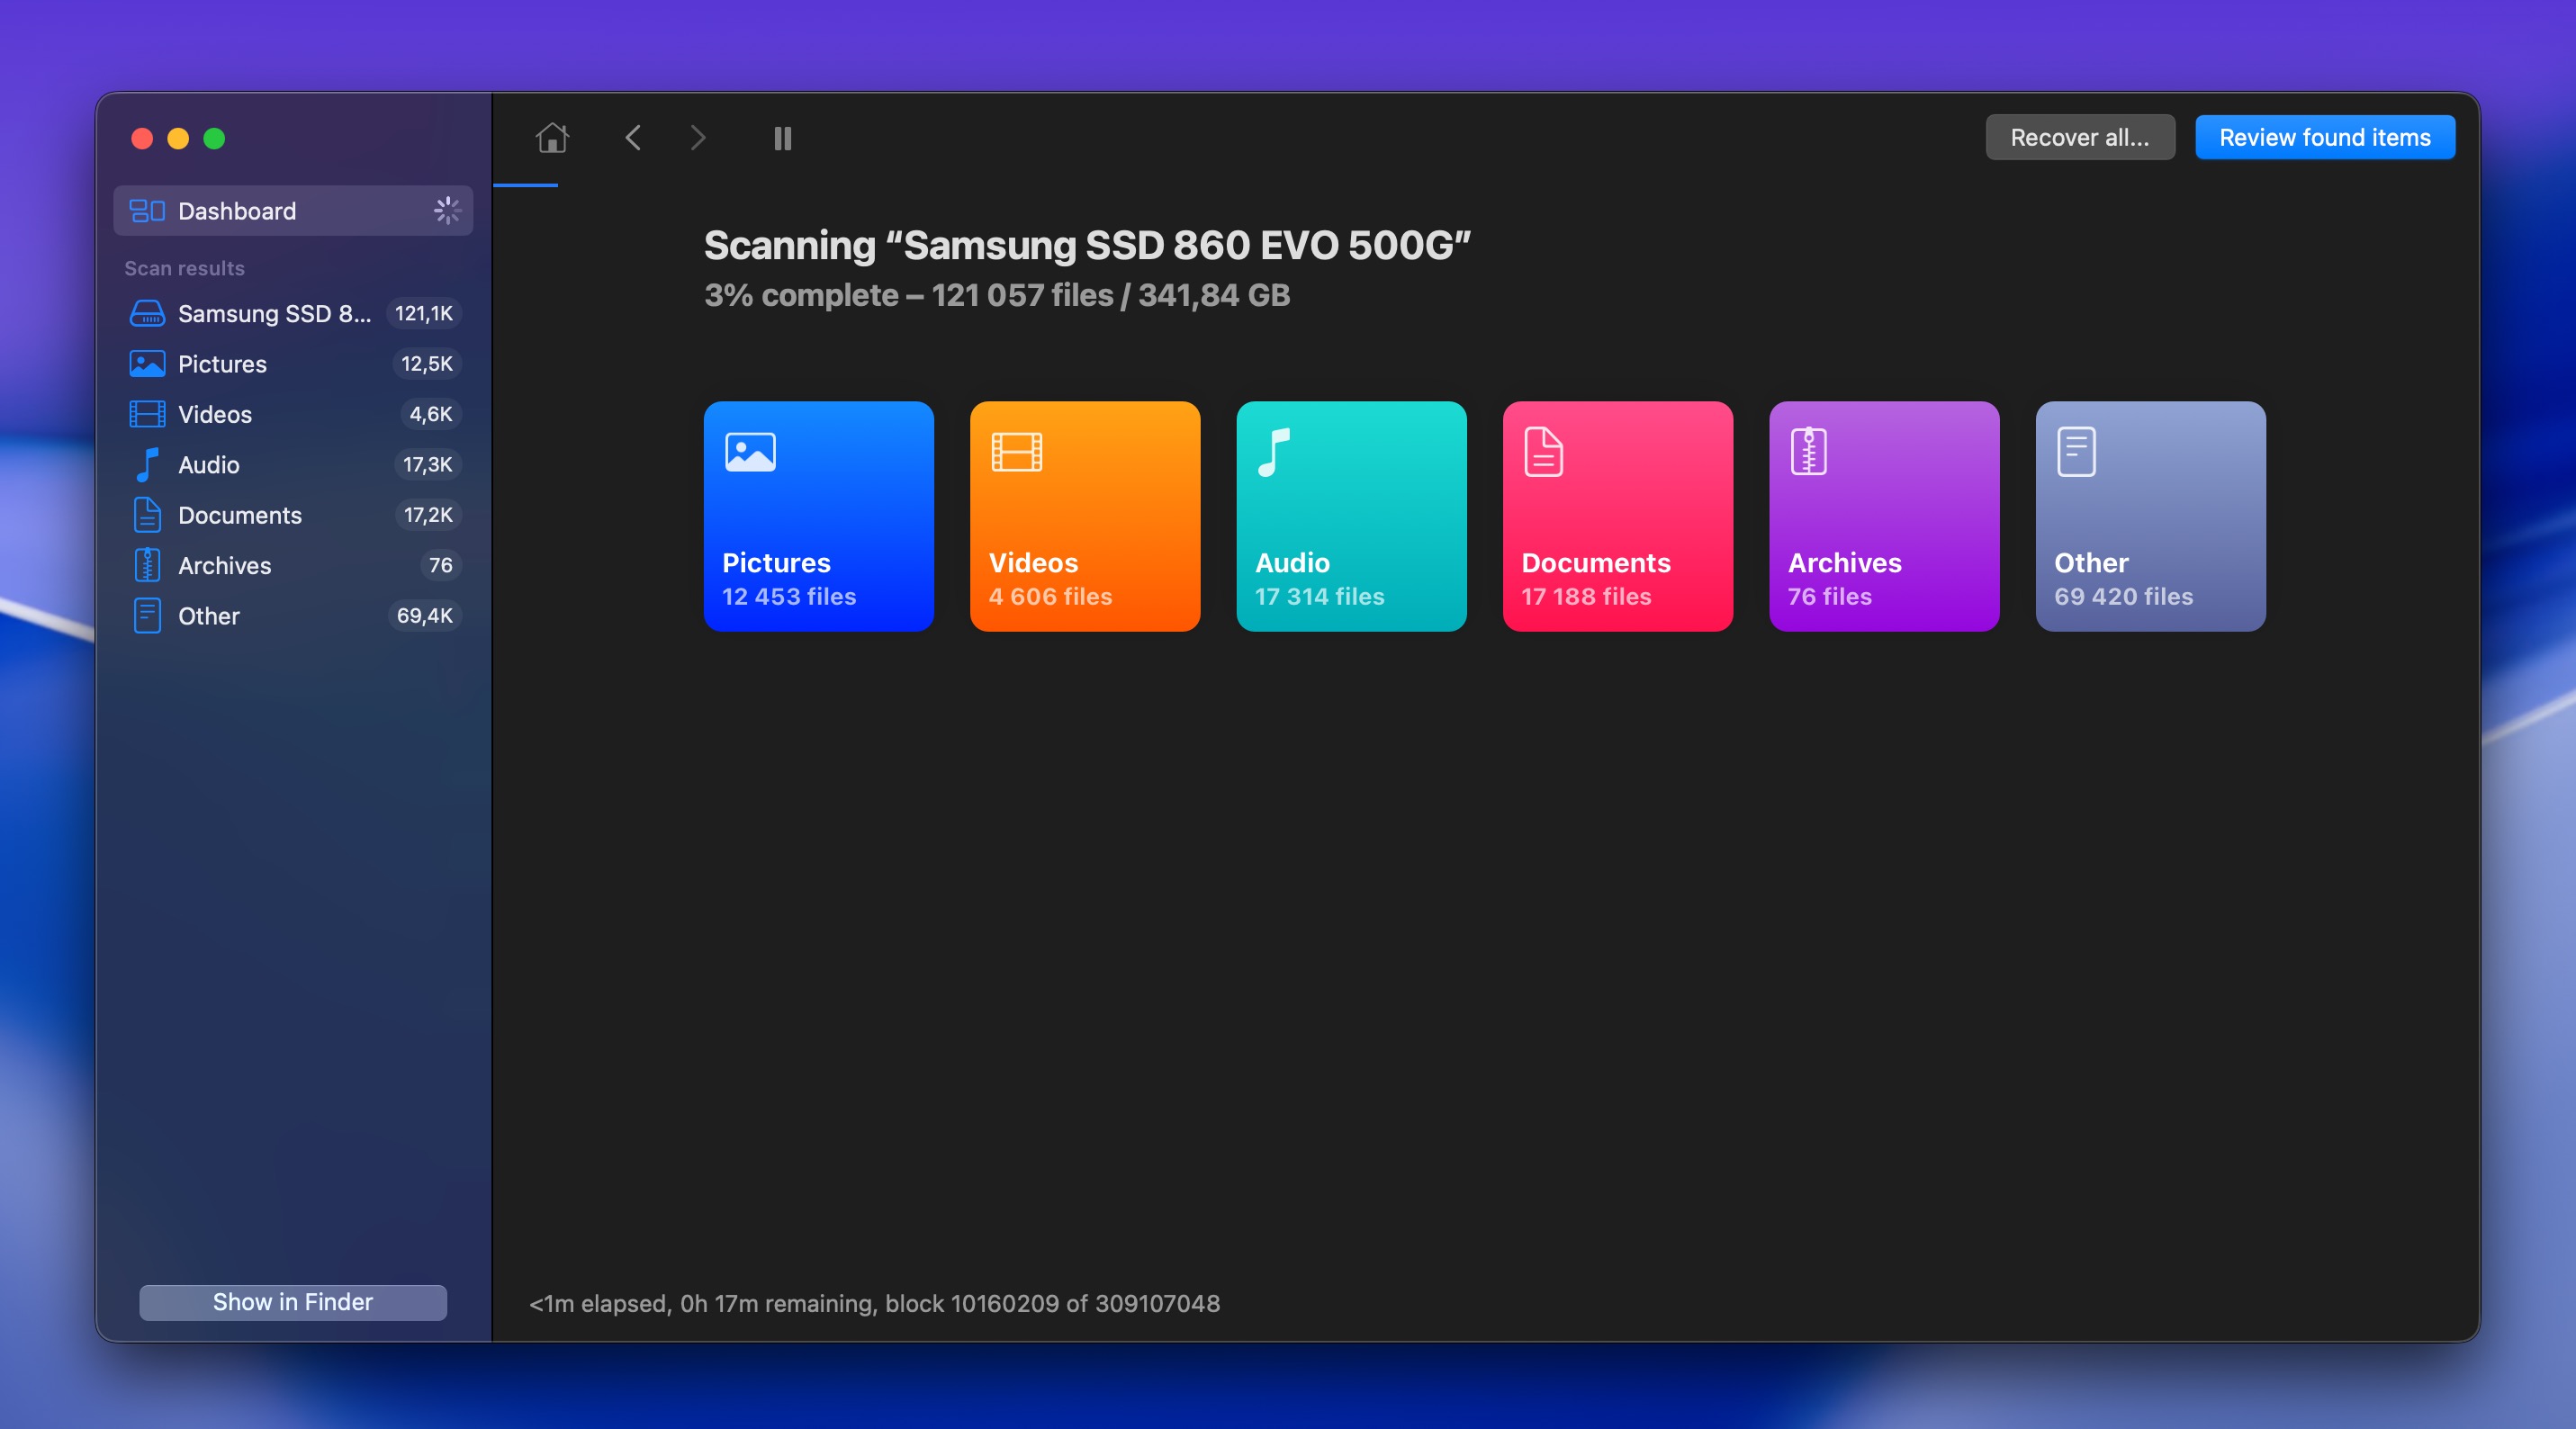
- Use the filters on the left sidebar to narrow down results by file type (Documents, Pictures, Videos, Audio, Archives, etc.). This makes it much easier to find what you’re looking for, especially if the drive has thousands of files.
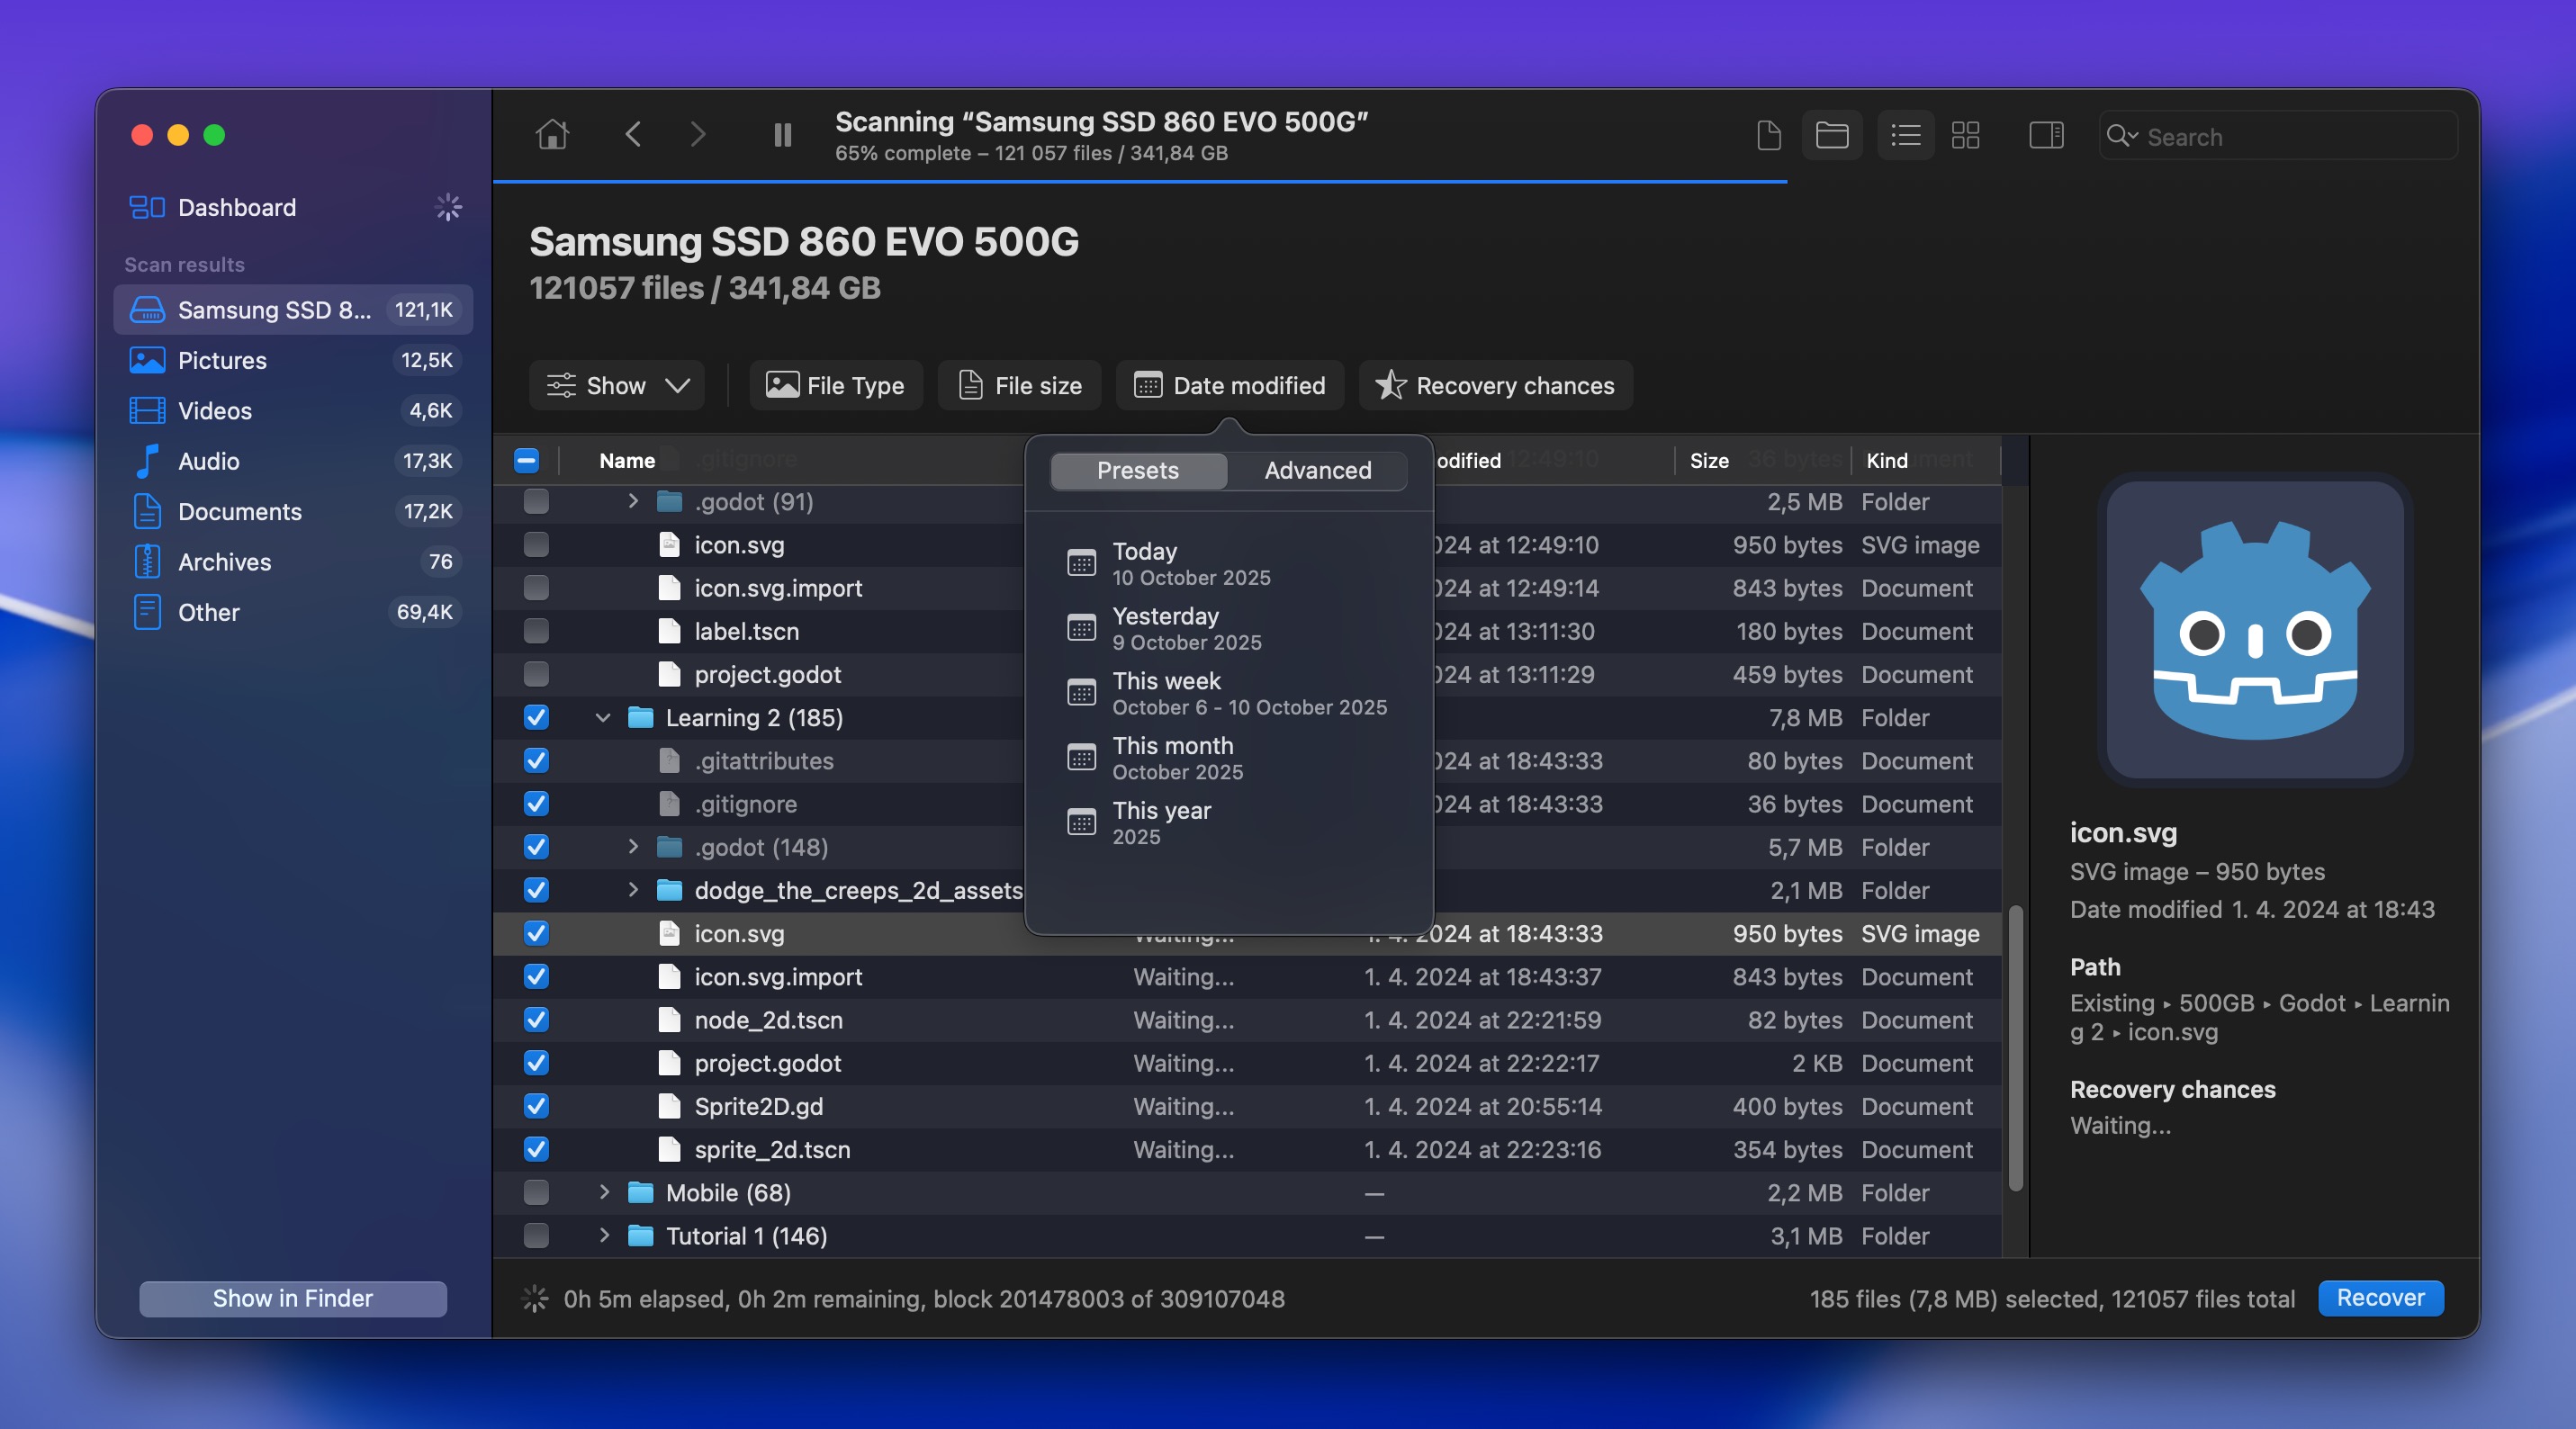
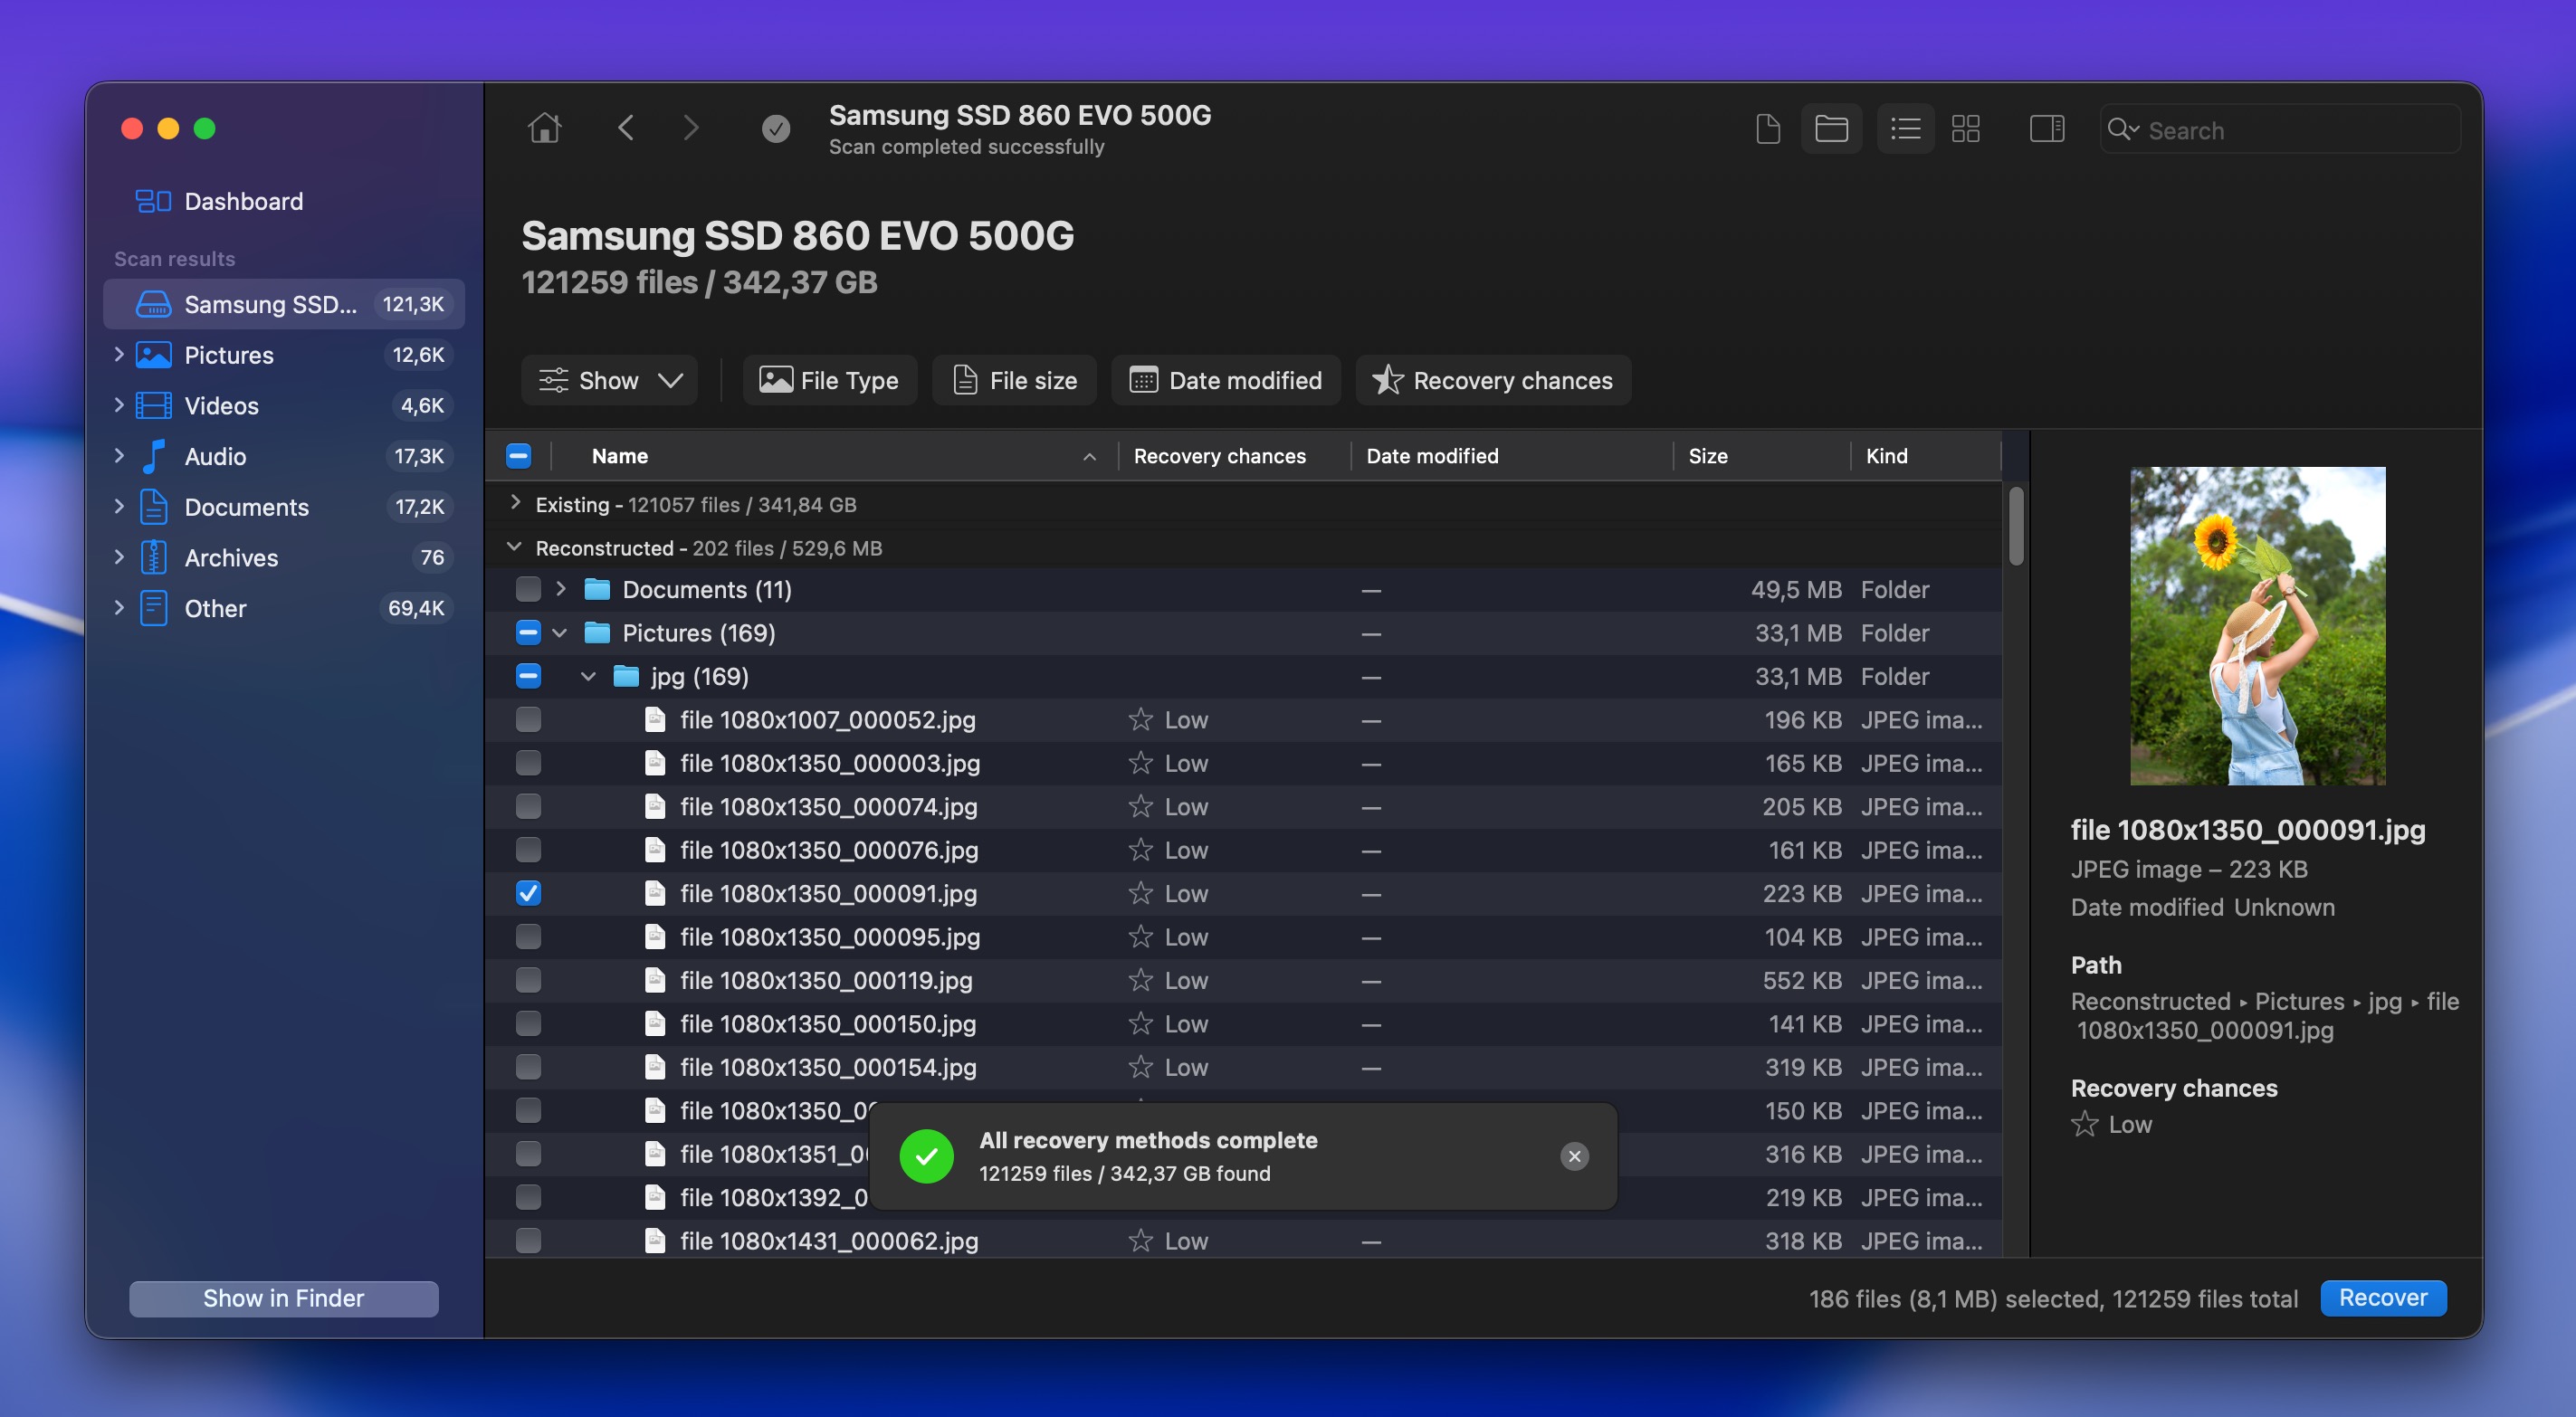
- Click on any file to preview it before recovery. Disk Drill lets you preview images, documents, videos, and other file types to make sure they’re intact and worth recovering.
- Once you’ve found the files you want to restore from external hard drive Mac systems, select them (you can select multiple files at once) and click the Recover button.
- Choose a recovery destination. Don’t save recovered files back to the same external hard drive. Instead, pick your Mac’s internal drive or a different external drive to avoid overwriting other recoverable data.
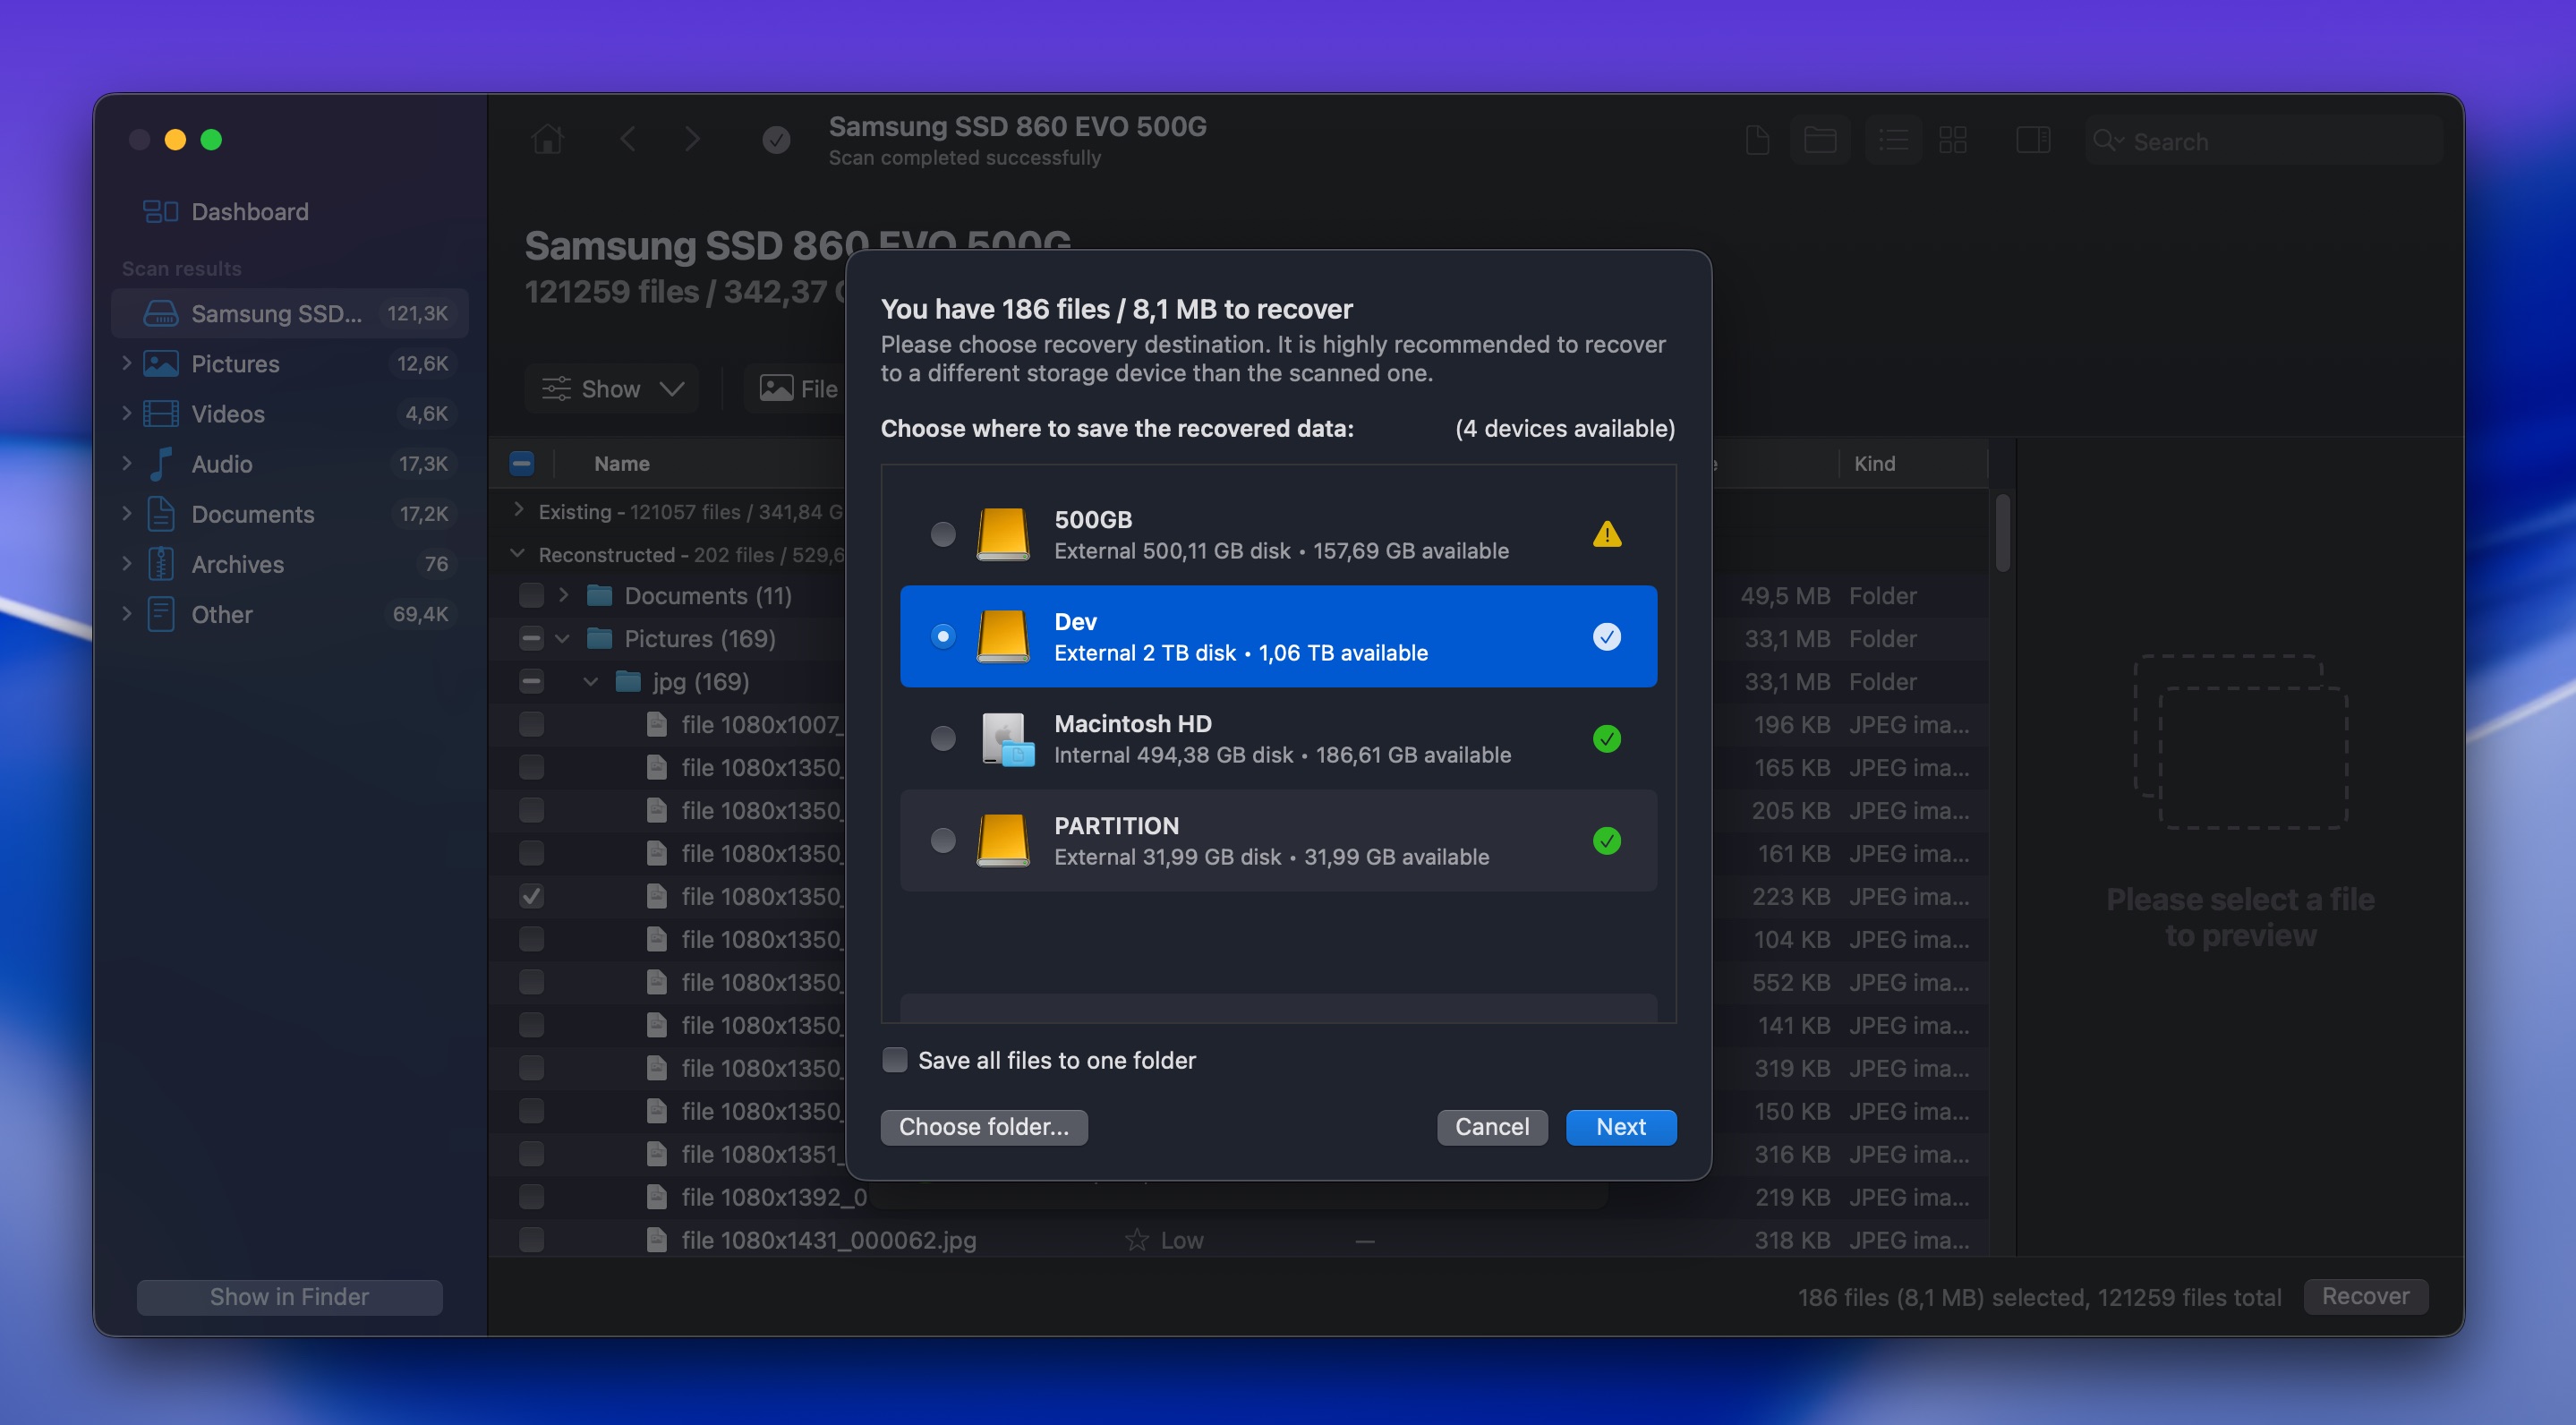
- Wait for Disk Drill to finish recovering the selected files. Once done, you can navigate to the recovery location and access your restored files.
In most cases, this method will successfully recover data from external hard drive Mac setups, as long as the deleted files haven’t been completely overwritten by new data. The free version of Disk Drill lets you scan and preview files for free, so you can verify your files are recoverable before deciding whether to upgrade for full recovery.
Scenario 2: Mac External Hard Drive Recovery After Formatting or Partition Loss
Here we’ll cover scenarios that involve total data loss, which can happen for the following reasons:
- You accidentally clicked Erase in Disk Utility and wiped the whole drive.
- A partition was deleted or is no longer visible in Finder or Disk Utility.
- Your Mac is prompting you to initialize the drive when you connect it.
- The drive shows up as unallocated or unformatted.
These scenarios look pretty serious at first glance, but attempts to restore external hard drive Mac data can still succeed in most cases, as long as the space hasn’t been completely overwritten with new data.
Method 1: Restore Data from an External Mac Drive After Formatting
Not all formatting actually wipes your data:
- When you use Disk Utility’s default Erase option, it only resets the file system structure (it’s like erasing the table of contents in a book while leaving all the pages intact). The actual ones and zeros that make up your images, documents, and so still physically on the drive, which means Mac hard drive data recovery is usually possible.
- On the other hand, a secure erase or zero-out format actively overwrites every sector with zeros or random data. If you chose one of these options in Disk Utility or used some special secure wiping software, then recovery becomes impossible.
If you just did a standard quick format, the recovery process is exactly the same as what we covered in Scenario 1, Method 2. Just scroll back up to that section and follow the steps to Mac recover data from external hard drive systems using Disk Drill.
For more detailed information about recovering formatted drives specifically, check out our complete guide.
💡 Good to know: There’s a common myth that data can be recovered even after being overwritten multiple times, which is why some “military-grade” wiping tools claim to overwrite data 35 times. But research shows that even a single complete overwrite makes data recovery practically impossible on modern hard drives. So if you did a secure erase, your data is truly gone.
Method 2: Restore Lost Partition from External Drive on Mac
Sometimes, entire partitions can disappear. Common causes of this data loss scenario include accidental deletion during partition management, file system errors, and hardware issues. But even when macOS can’t see the partition anymore, the raw data might still be sitting there intact. The partition table (which tells your Mac where partitions start and end) might be damaged, but the actual files could be completely fine.
So, the good news is that partition data recovery external hard drive Mac attempts can still work if you use the right tool, such as TestDisk, which is completely free and has been around for a long time. While it doesn’t have a graphical user interface, it’s packed with impressive partition recovery capabilities that can save the day even better than some commercial software.
Here’s how to restore lost partitions using TestDisk:
- Download and install TestDisk. Make sure your external drive is disconnected during installation to avoid accidentally overwriting any lost data.
- Connect your external hard drive to your Mac securely.
- Open the Terminal app (Finder > Applications > Utilities).
- Type the following command and hit Return:
sudo testdisk(If prompted, enter your Mac password and hit Return again.)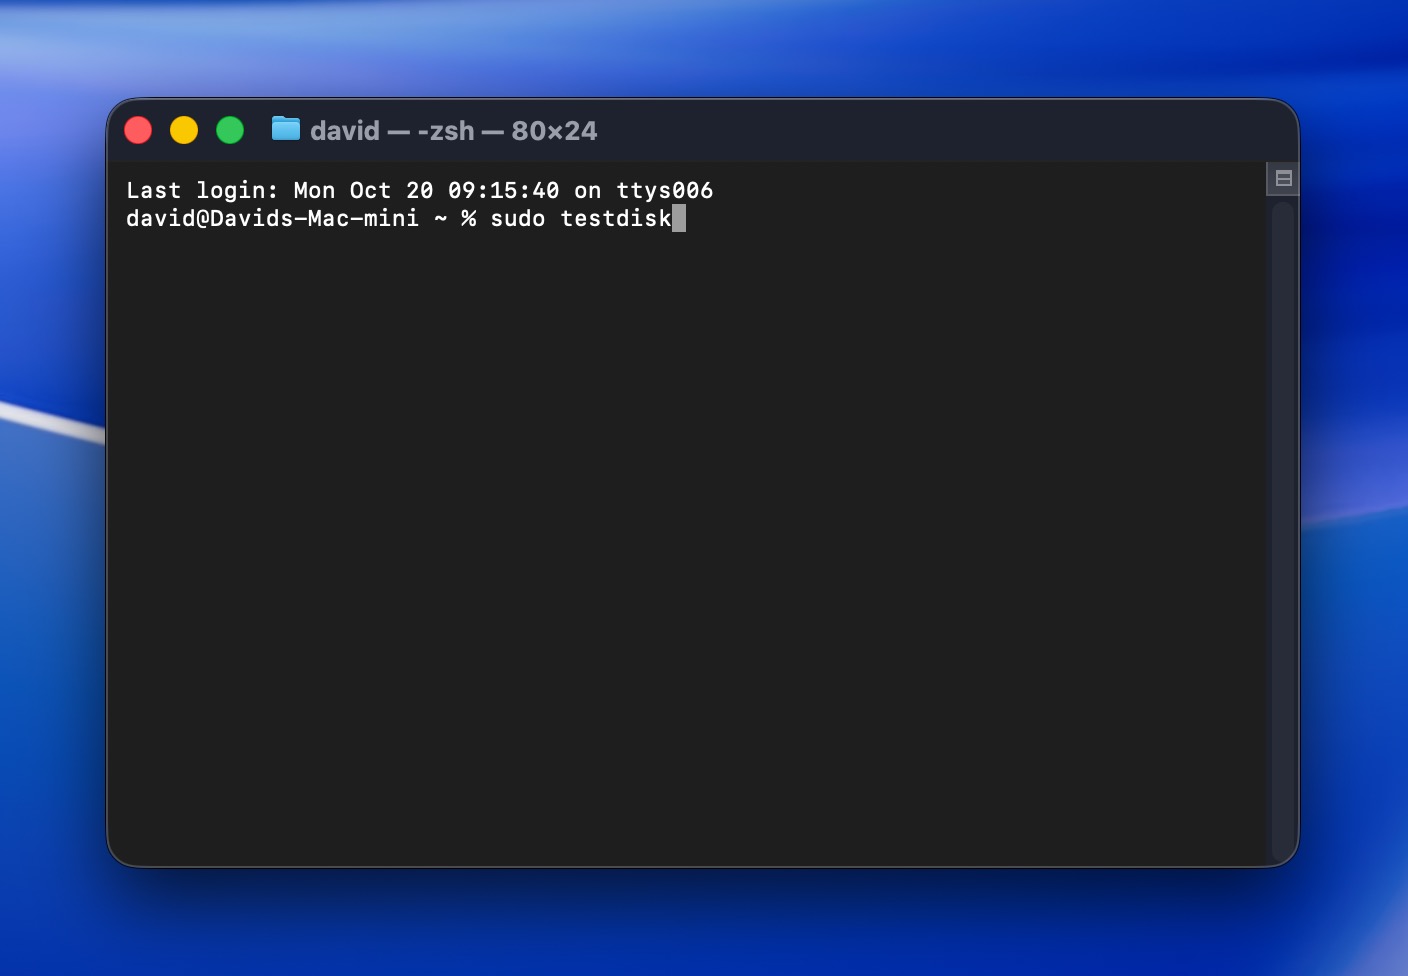
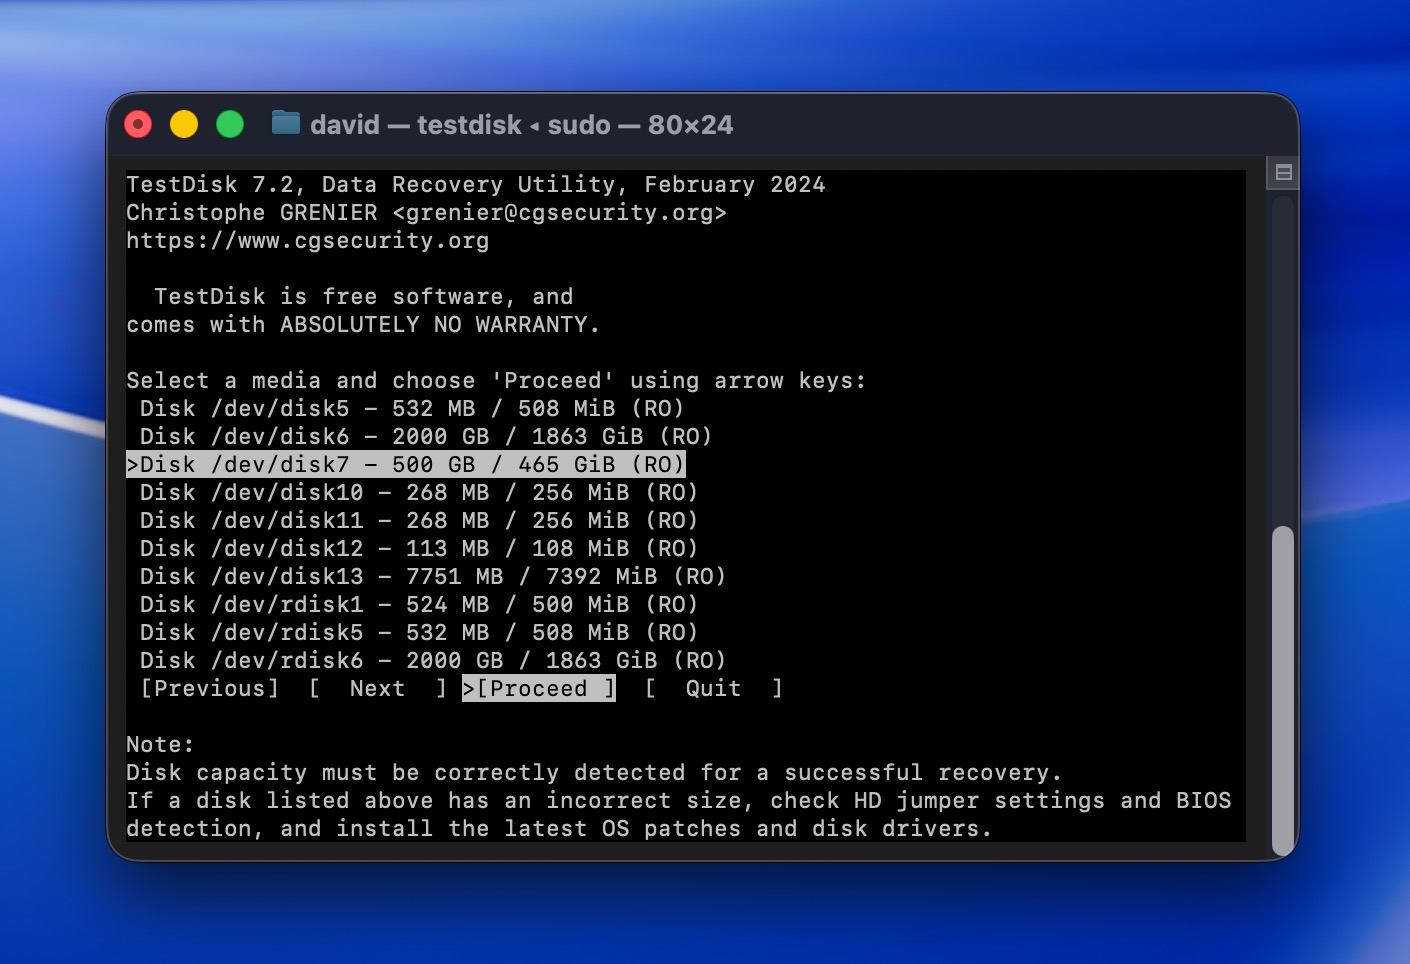
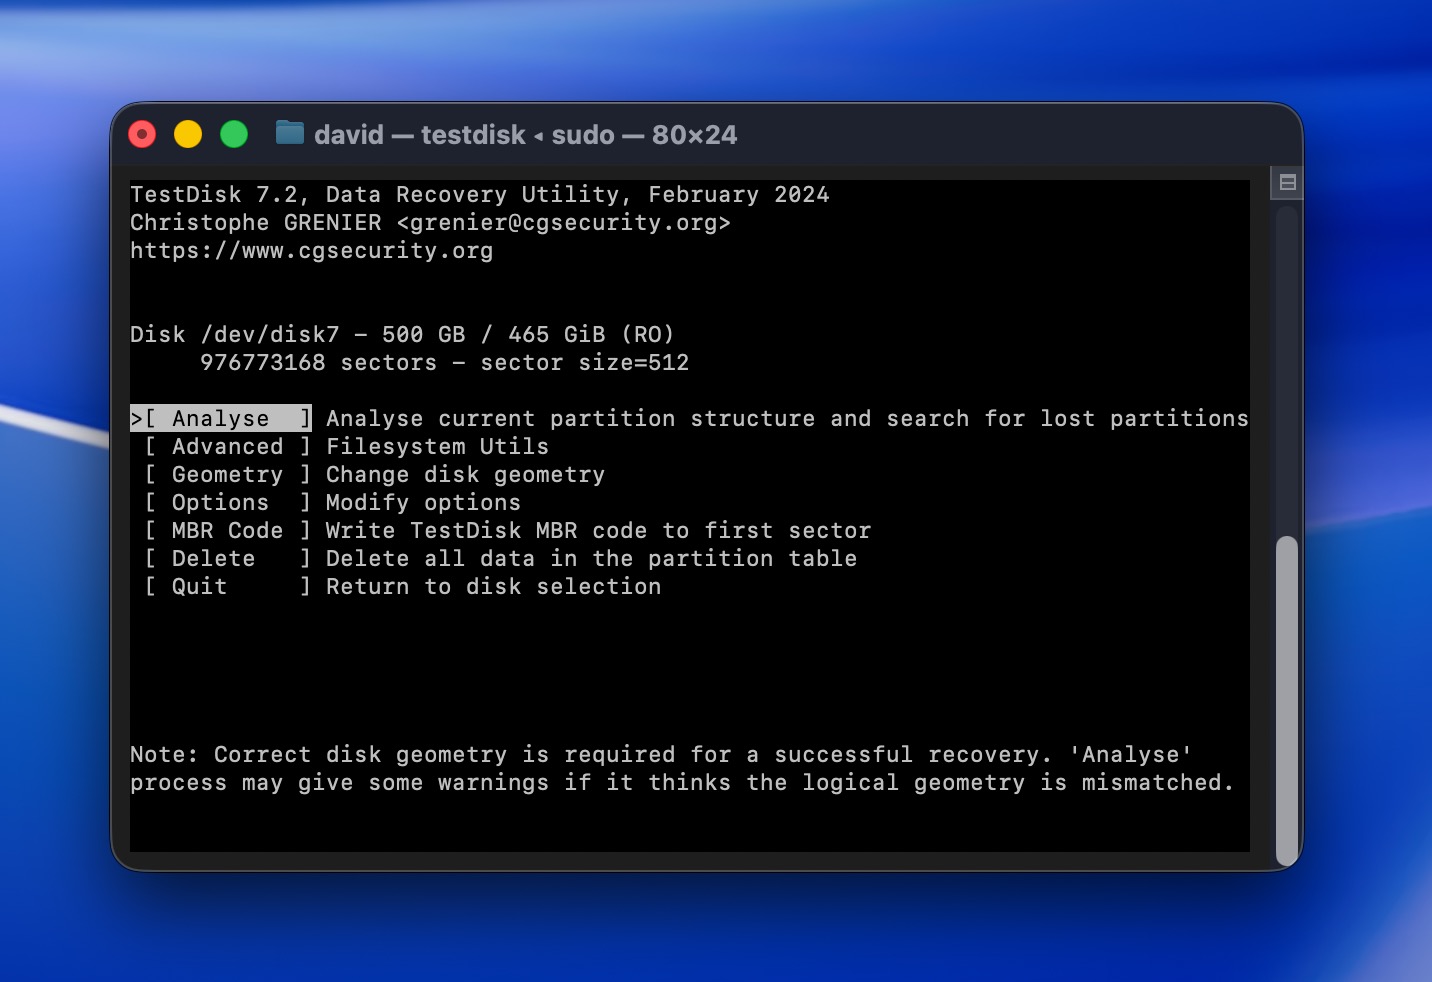
- Using your arrow keys, select Create and hit Return.
- Select your external drive from the list of drives, then select Proceed and hit Return.
- Select your drive’s partition table type and hit Return. TestDisk usually auto-detects the correct type for you.
- Select Analyse and hit Return.
- Select Quick Search and hit Return. TestDisk will scan for lost partitions.
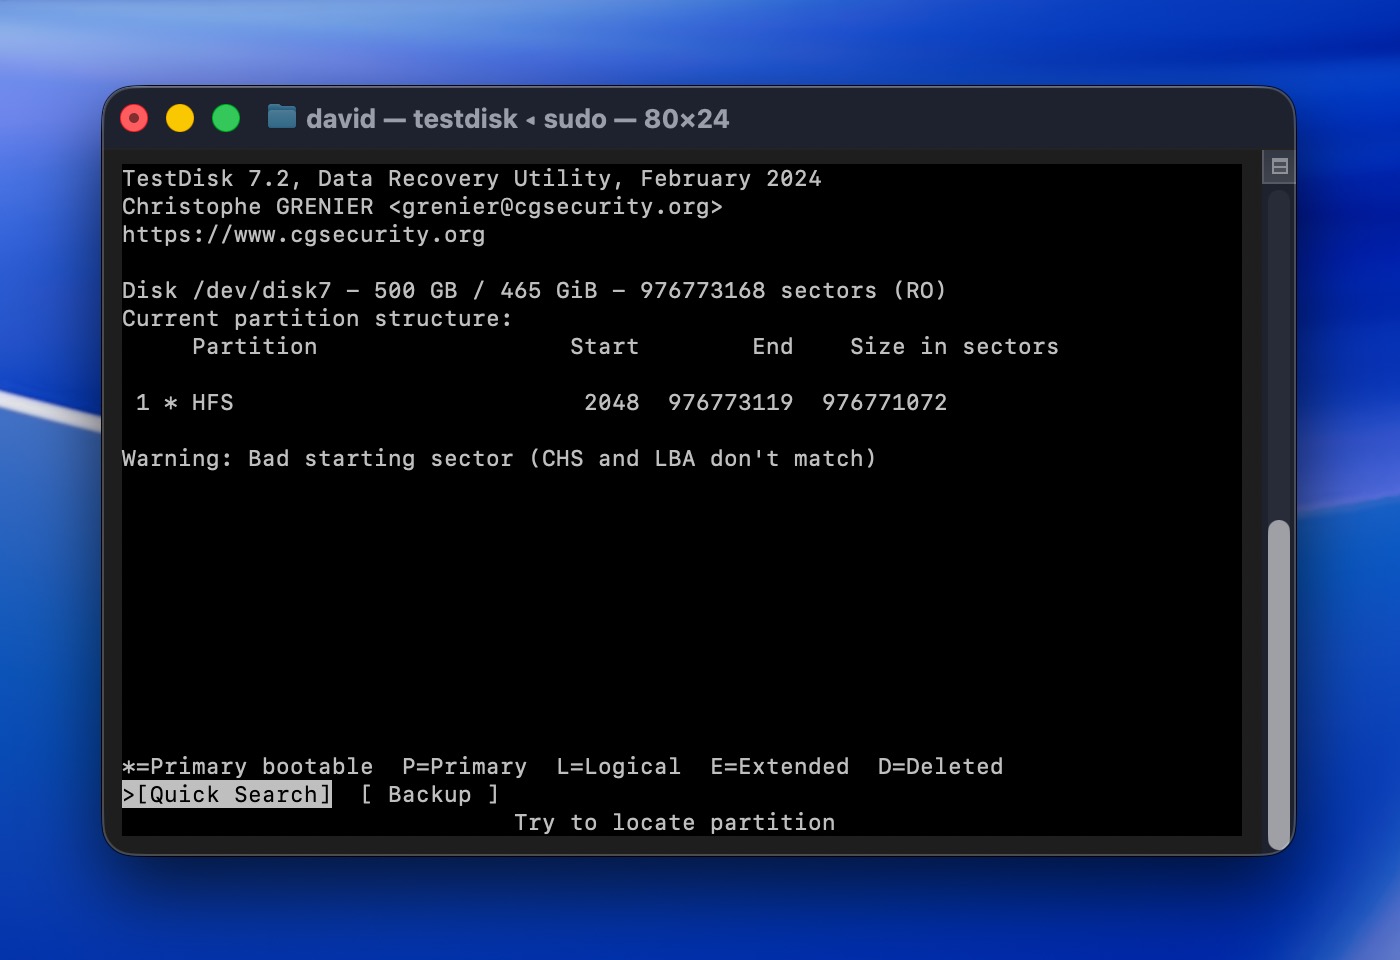
- If it finds the partition you need, select it and then choose Write and hit Return to restore it. If the partition doesn’t show up, choose Deeper Search and hit Return for a more thorough scan.
Note: TestDisk comes bundled with another tool called PhotoRec, which can recover raw files directly even if the entire file system is gone, and you can learn how to use it in our guide. Just know that PhotoRec doesn’t recover original file names or folder structure (everything comes back with generic names like “file001.jpg”), which makes organizing large batches of files pretty tedious.
Scenario 3: External Drive Won’t Show Up in Finder or Throws an Error When Accessed
This one’s a bit trickier than what we’ve covered so far. Your external drive might not show up in Finder at all, or maybe it appears but throws errors every time you try to open it or copy files. However, what actually matters is whether your drive shows up in Disk Utility (even if it doesn’t appear in Finder). If it does, then it means macOS can detect it at the hardware level.
If the drive itself is alive, then you need to start with the recovery of your data. Once that’s done, you can attempt to fix the drive to make it usable again.
Step 1: Recover Your Data from a Backup
This step is a bit different from what we’ve covered so far. When your drive is throwing errors or won’t mount properly, it’s often a sign of underlying issues (file system damage, bad sectors, or early hardware instability).
The problem is that scanning a drive with issues puts stress on it. If the drive is already struggling, forcing it through a full scan could make things worse. Instead, the safest approach for Mac users to recover data from external hard drive systems in this condition is to create a complete, sector-level copy (also called a byte-to-byte backup or disk image) of the entire drive first.
Disk Drill has a built-in feature for this called Byte-to-Byte Backup. When you create your image, you can mount it in Disk Drill and scan it with the application so that recovery happens on the copy. If something goes wrong during recovery, your original data is still safe on the external drive.
⚠️ Important: You’ll need another storage device with at least as much free space as the full size of your external drive. So if your external drive is 1 TB, you need 1 TB of free space available somewhere else (your Mac’s internal drive, another external drive, etc.). The backup file will be the same size as the drive, not just the used space.
Here’s how to create a byte-to-byte backup of your external drive:
- Connect your external hard drive to your Mac.
- Launch Disk Drill and select Byte-to-byte Backup from the left sidebar.
- Select your external drive from the list of available drives.
- Click Create backup and choose a destination where you can save your image. Confirm and Disk Drill will create a complete sector-by-sector copy of your drive.
- Wait for the backup to complete. This can take a while, depending on the size of your drive and its condition. If the drive has bad sectors, Disk Drill will automatically skip them and continue.
Once the backup is complete, here’s how to scan it:
- Navigate to the Storage Devices section, look for the Attach disk image option at the bottom.
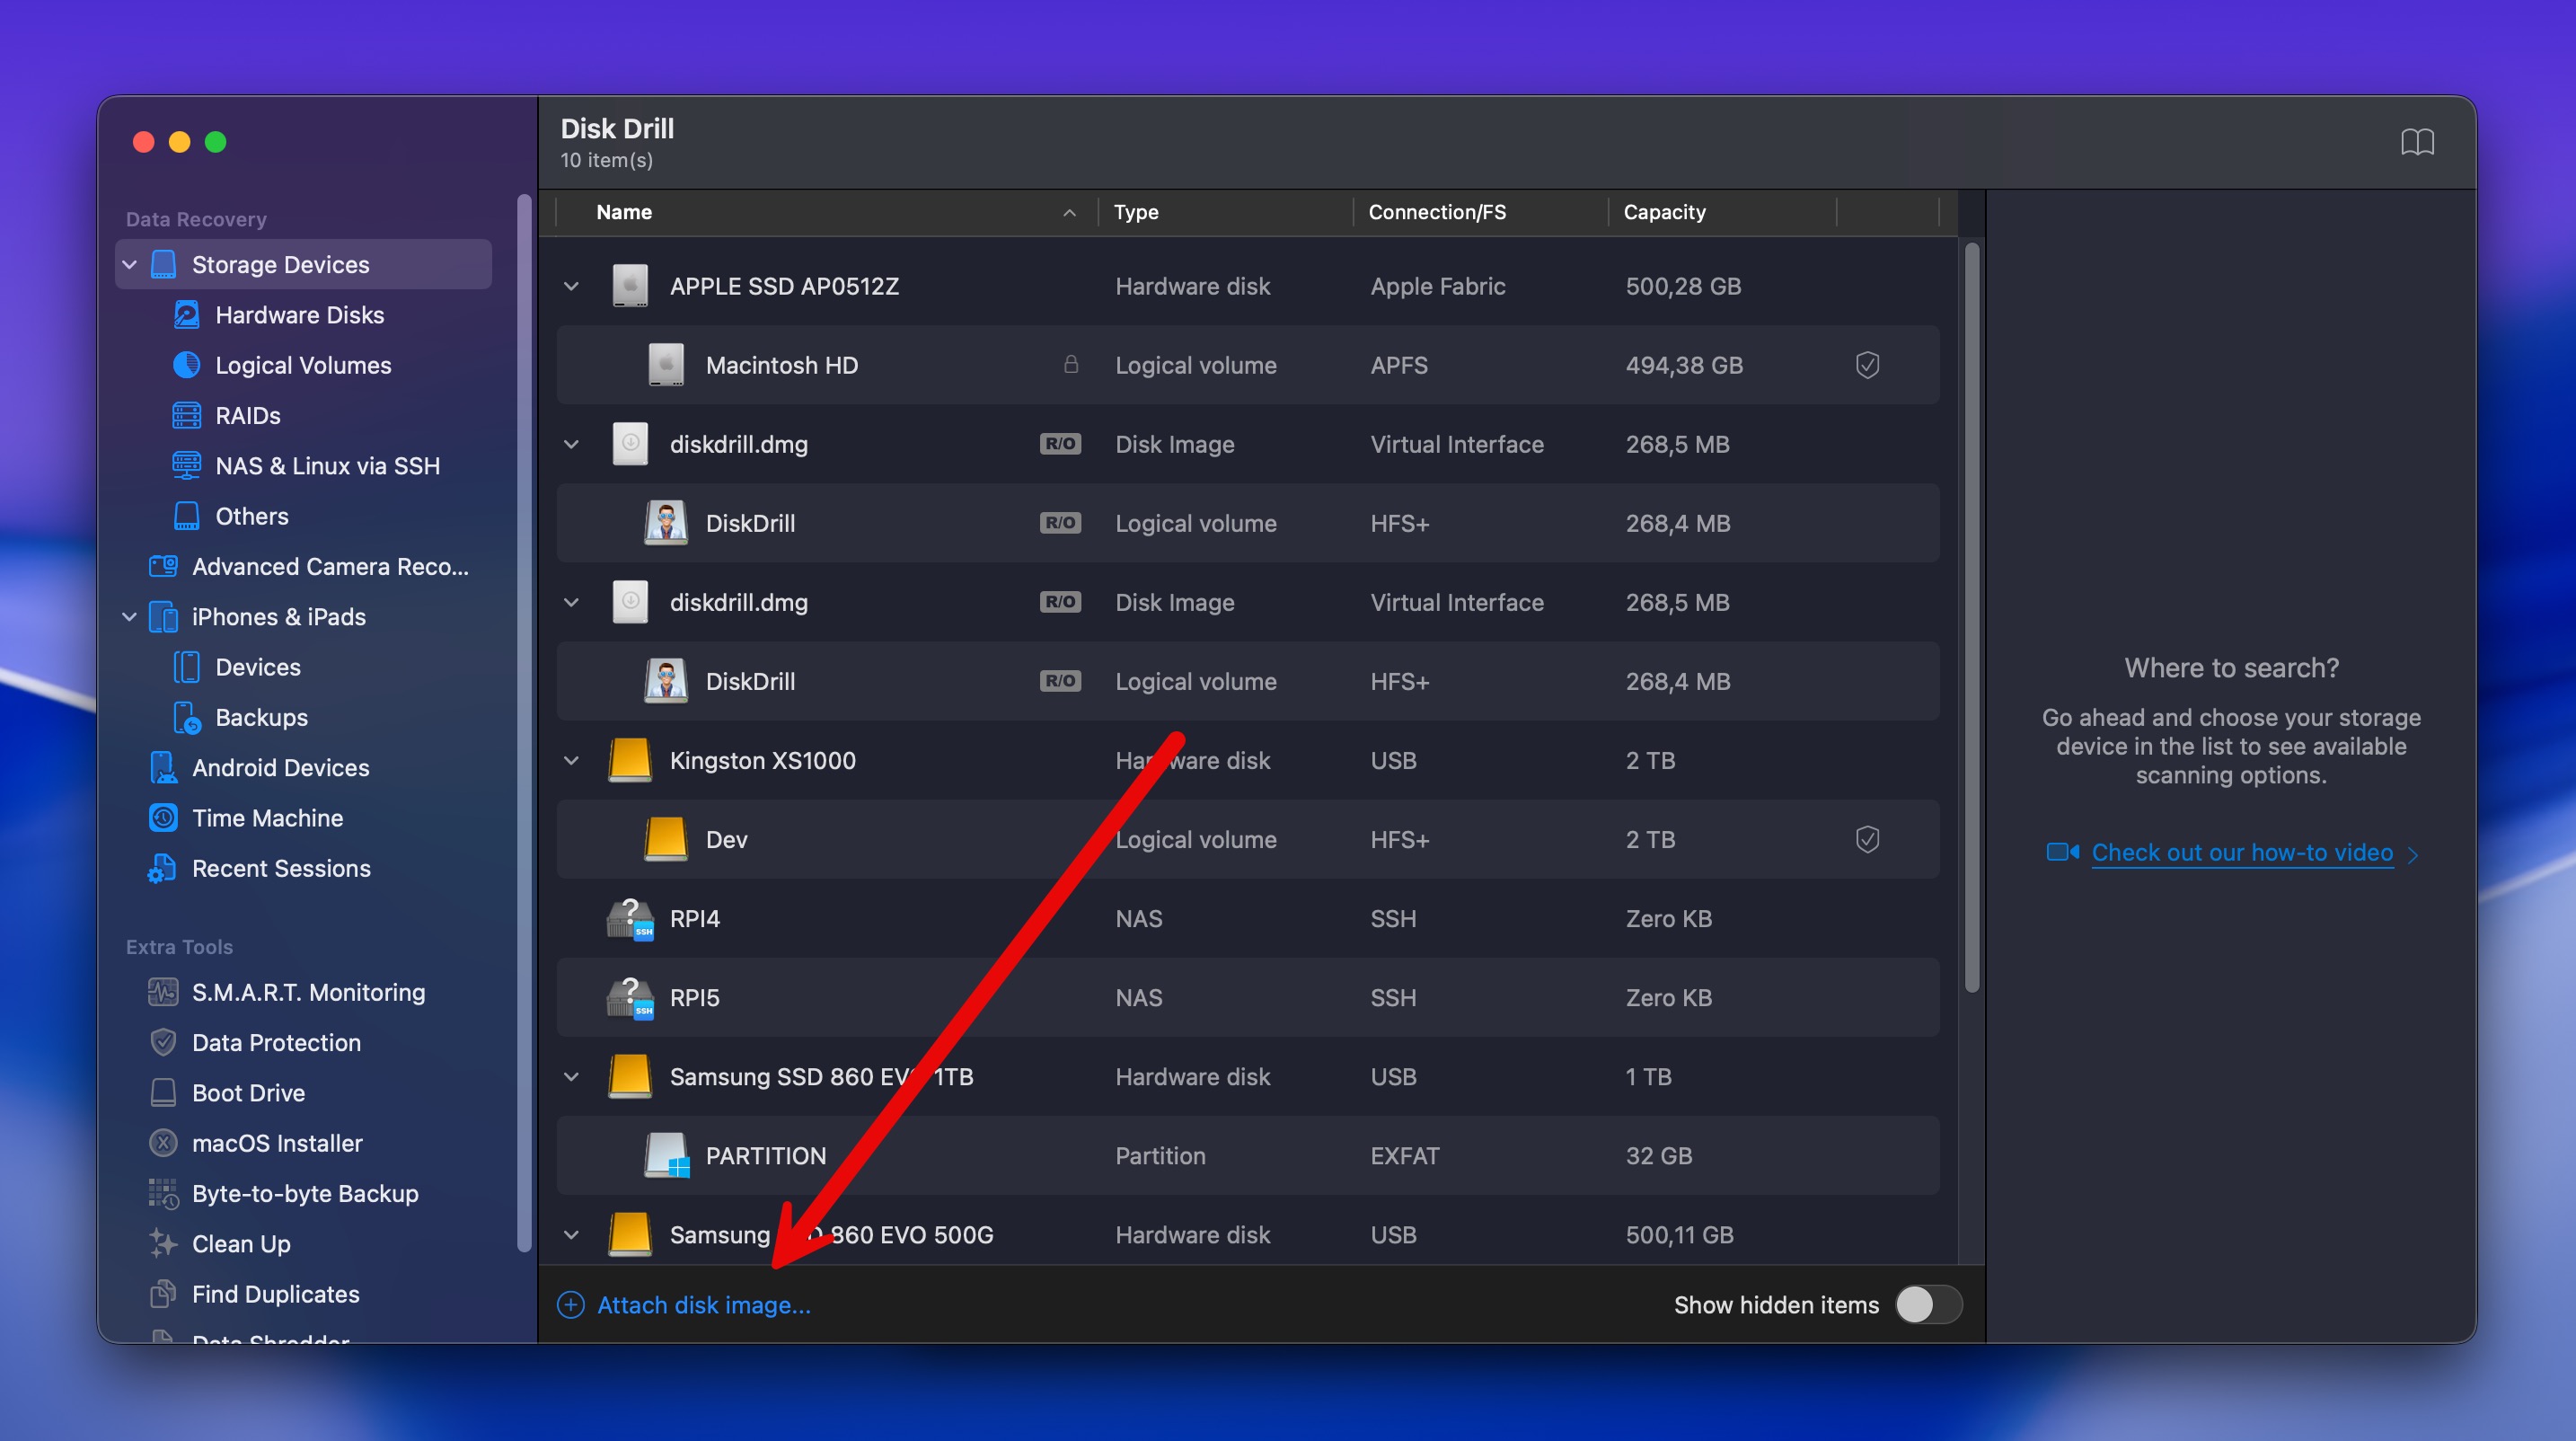
- Navigate to and select the backup file you just created. The disk image will now appear in Disk Drill’s drive list just like a regular drive.
- Follow the same recovery steps we covered in Scenario 1, Method 2: select the disk image, click Search for lost data, filter results, preview files, and recover them to a safe location.
Note: Before creating your backup, check the drive’s S.M.A.R.T. status in Disk Drill by selecting the drive and looking for the SMART indicator in the drive info panel. S.M.A.R.T. monitors things like bad sectors, temperature, and reallocated sectors. If it shows warnings or failures, the drive is physically failing and you should prioritize getting your data off immediately rather than trying to fix it.
Step 2: Fix the Drive After Recovery
Now that you’ve safely recovered your data, it’s time to repair the drive itself so you can actually use it again. Fortunately, macOS includes built-in tools that can often fix the logical issues that were preventing the drive from working correctly.
Method 1: First Aid in Disk Utility
First Aid scans the drive for errors and attempts to repair them automatically. It’s built into macOS and works well for minor file system issues.
Here’s how to run First Aid on your external drive:
- Launch Disk Utility (open Launchpad and type Disk Utility in the search field).
- Choose your external hard drive from the list of devices on the sidebar.
- Click the First Aid button at the top of the window.
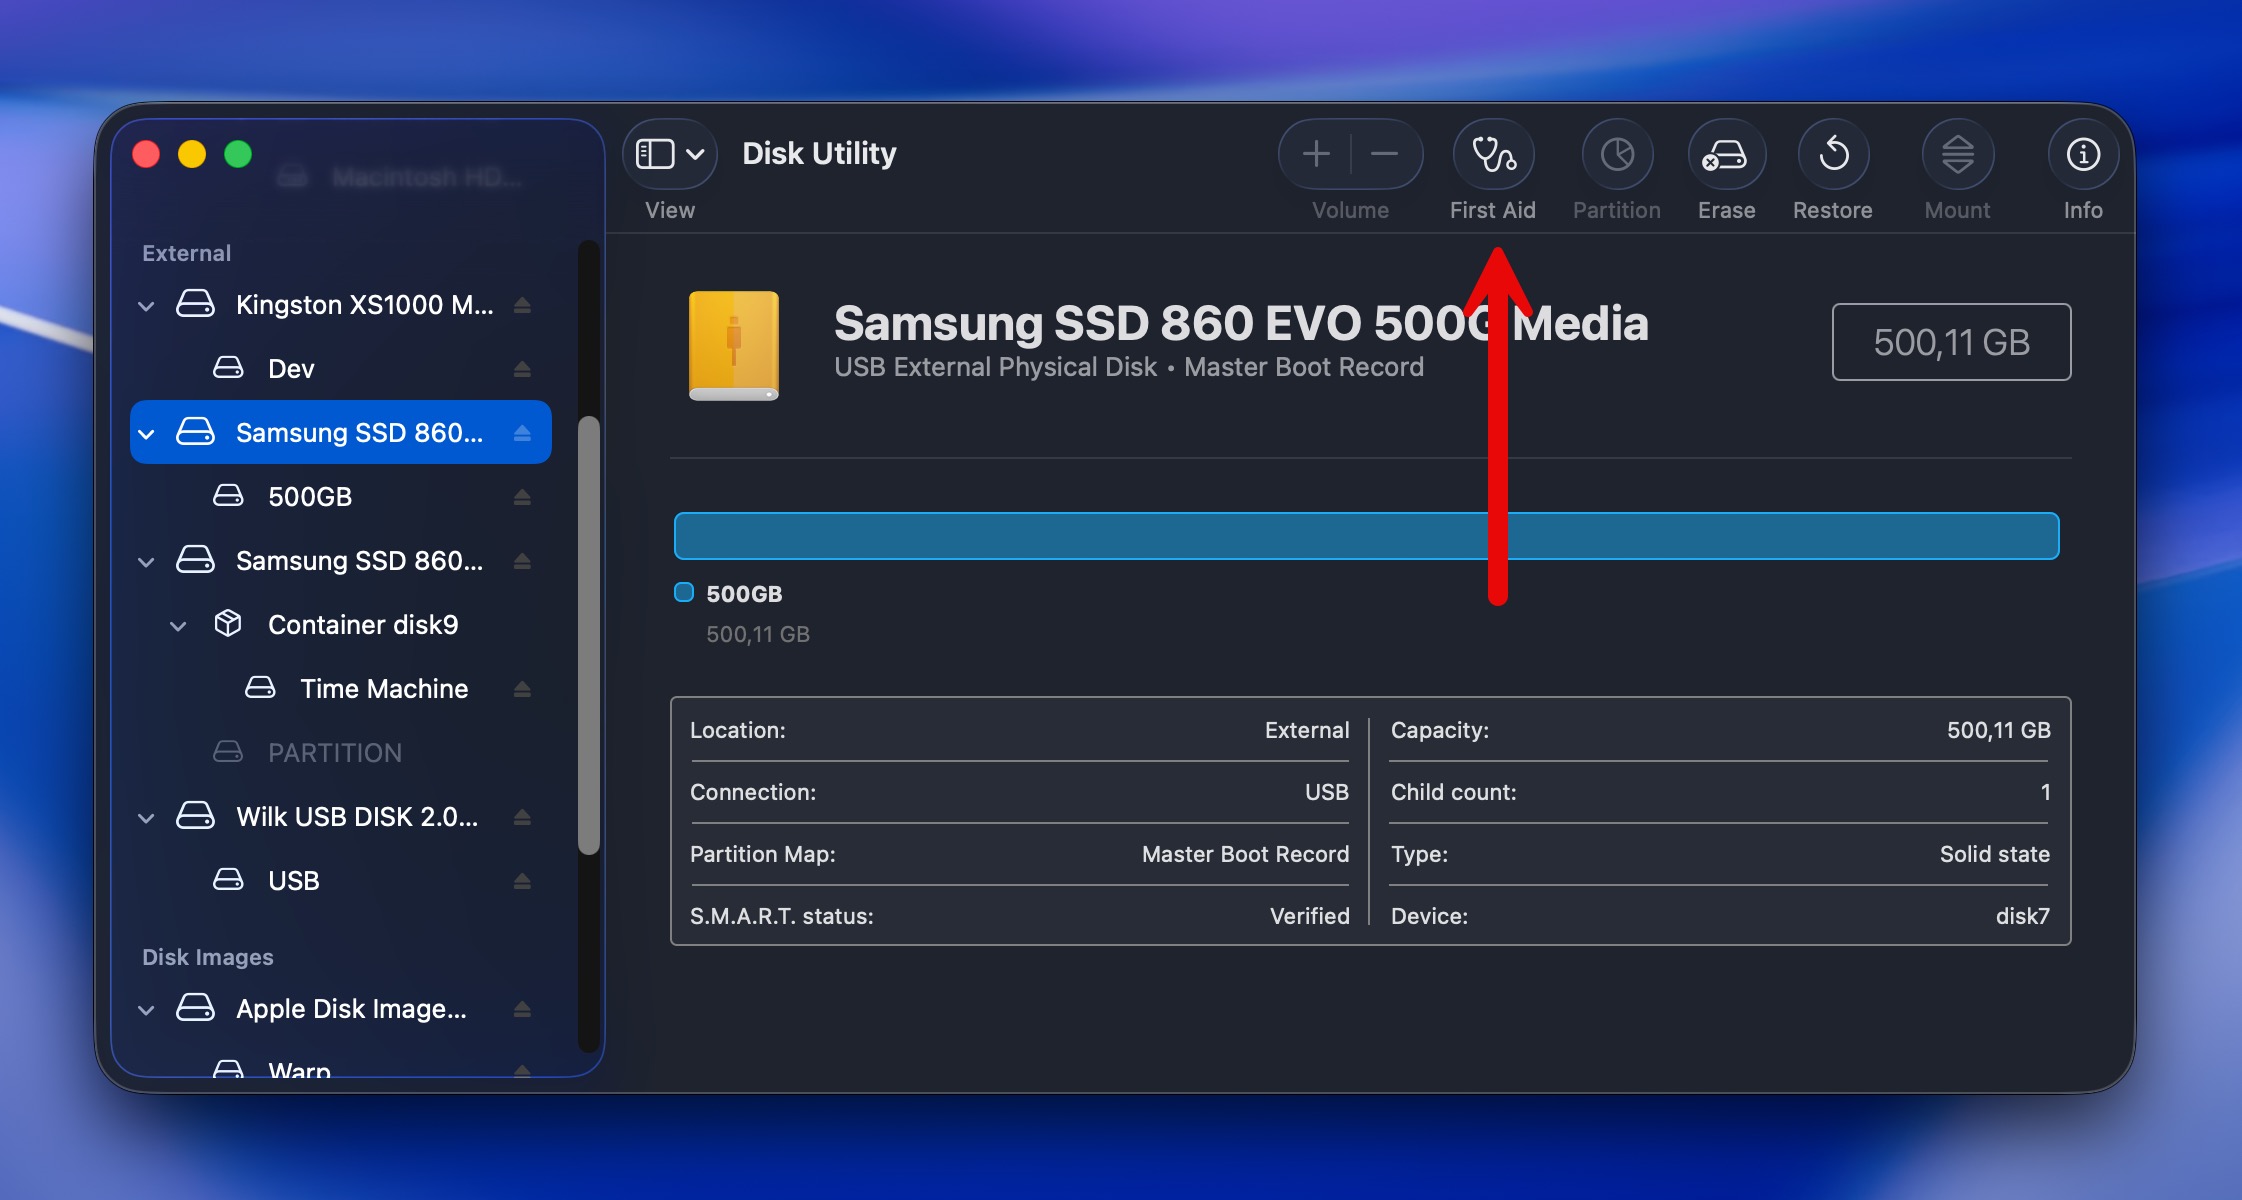
- Click Run to confirm.
- Wait for the process to complete. Disk Utility will scan the drive and attempt to fix any errors it finds.
- Once the process is finished, click Done.
If First Aid reports that it successfully repaired the drive, try accessing it in Finder to see if it’s working normally now. If it still has issues or First Aid reports that it couldn’t fix the problems, move on to formatting.
Note: Sometimes people are unable to run First Aid on their external drives at all (the button might be grayed out or the process fails immediately). If that happens to you, don’t worry. Formatting the drive (Method 2 below) is still a valid and often more reliable fix.
Method 2: Format the External Drive
Formatting completely erases the drive and rebuilds its file system from scratch. This is the most effective way to fix persistent corruption or file system issues, and since you’ve already backed up your data, there’s no risk involved.
Here’s how to format your external hard drive on Mac:
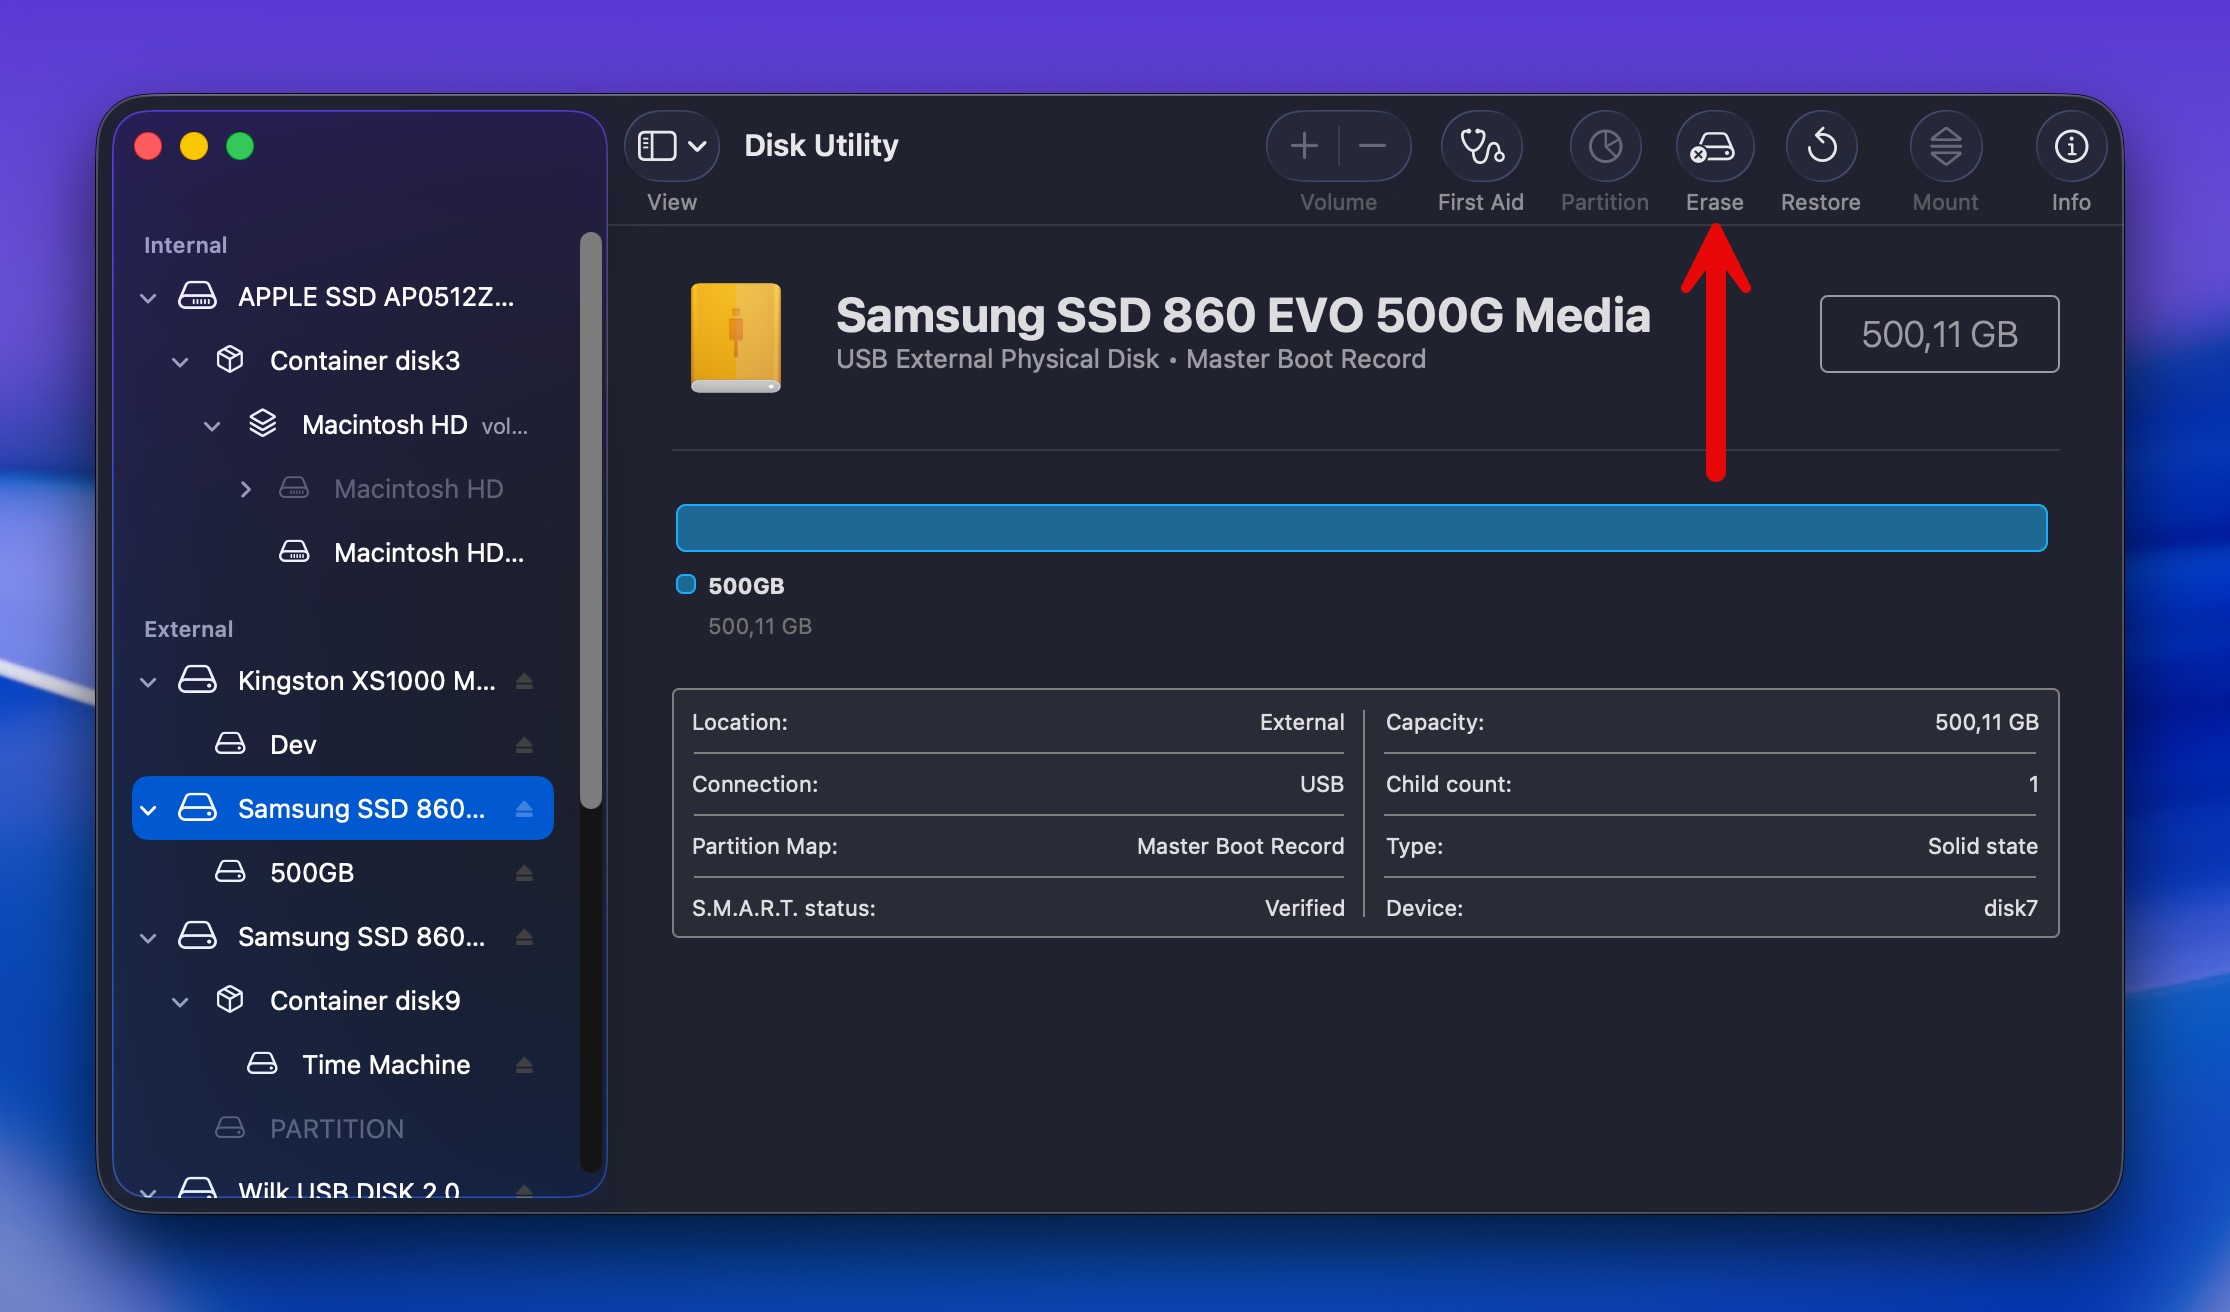
- Launch Disk Utility (open Launchpad and type Disk Utility in the search field).
- Click on your external drive on the sidebar on the left to select it.
- Click the Erase button at the top of the window.
- Choose a file system format:
- APFS: Best for external hard drives used exclusively with modern Macs (macOS 10.13 or later).
- Mac OS Extended (Journaled): For external hard drives used with older Macs or as Time Machine backups.
- exFAT: If you need the external hard drive to be compatible with both Mac and Windows.
- Give your drive a name if you want to change it from the default.
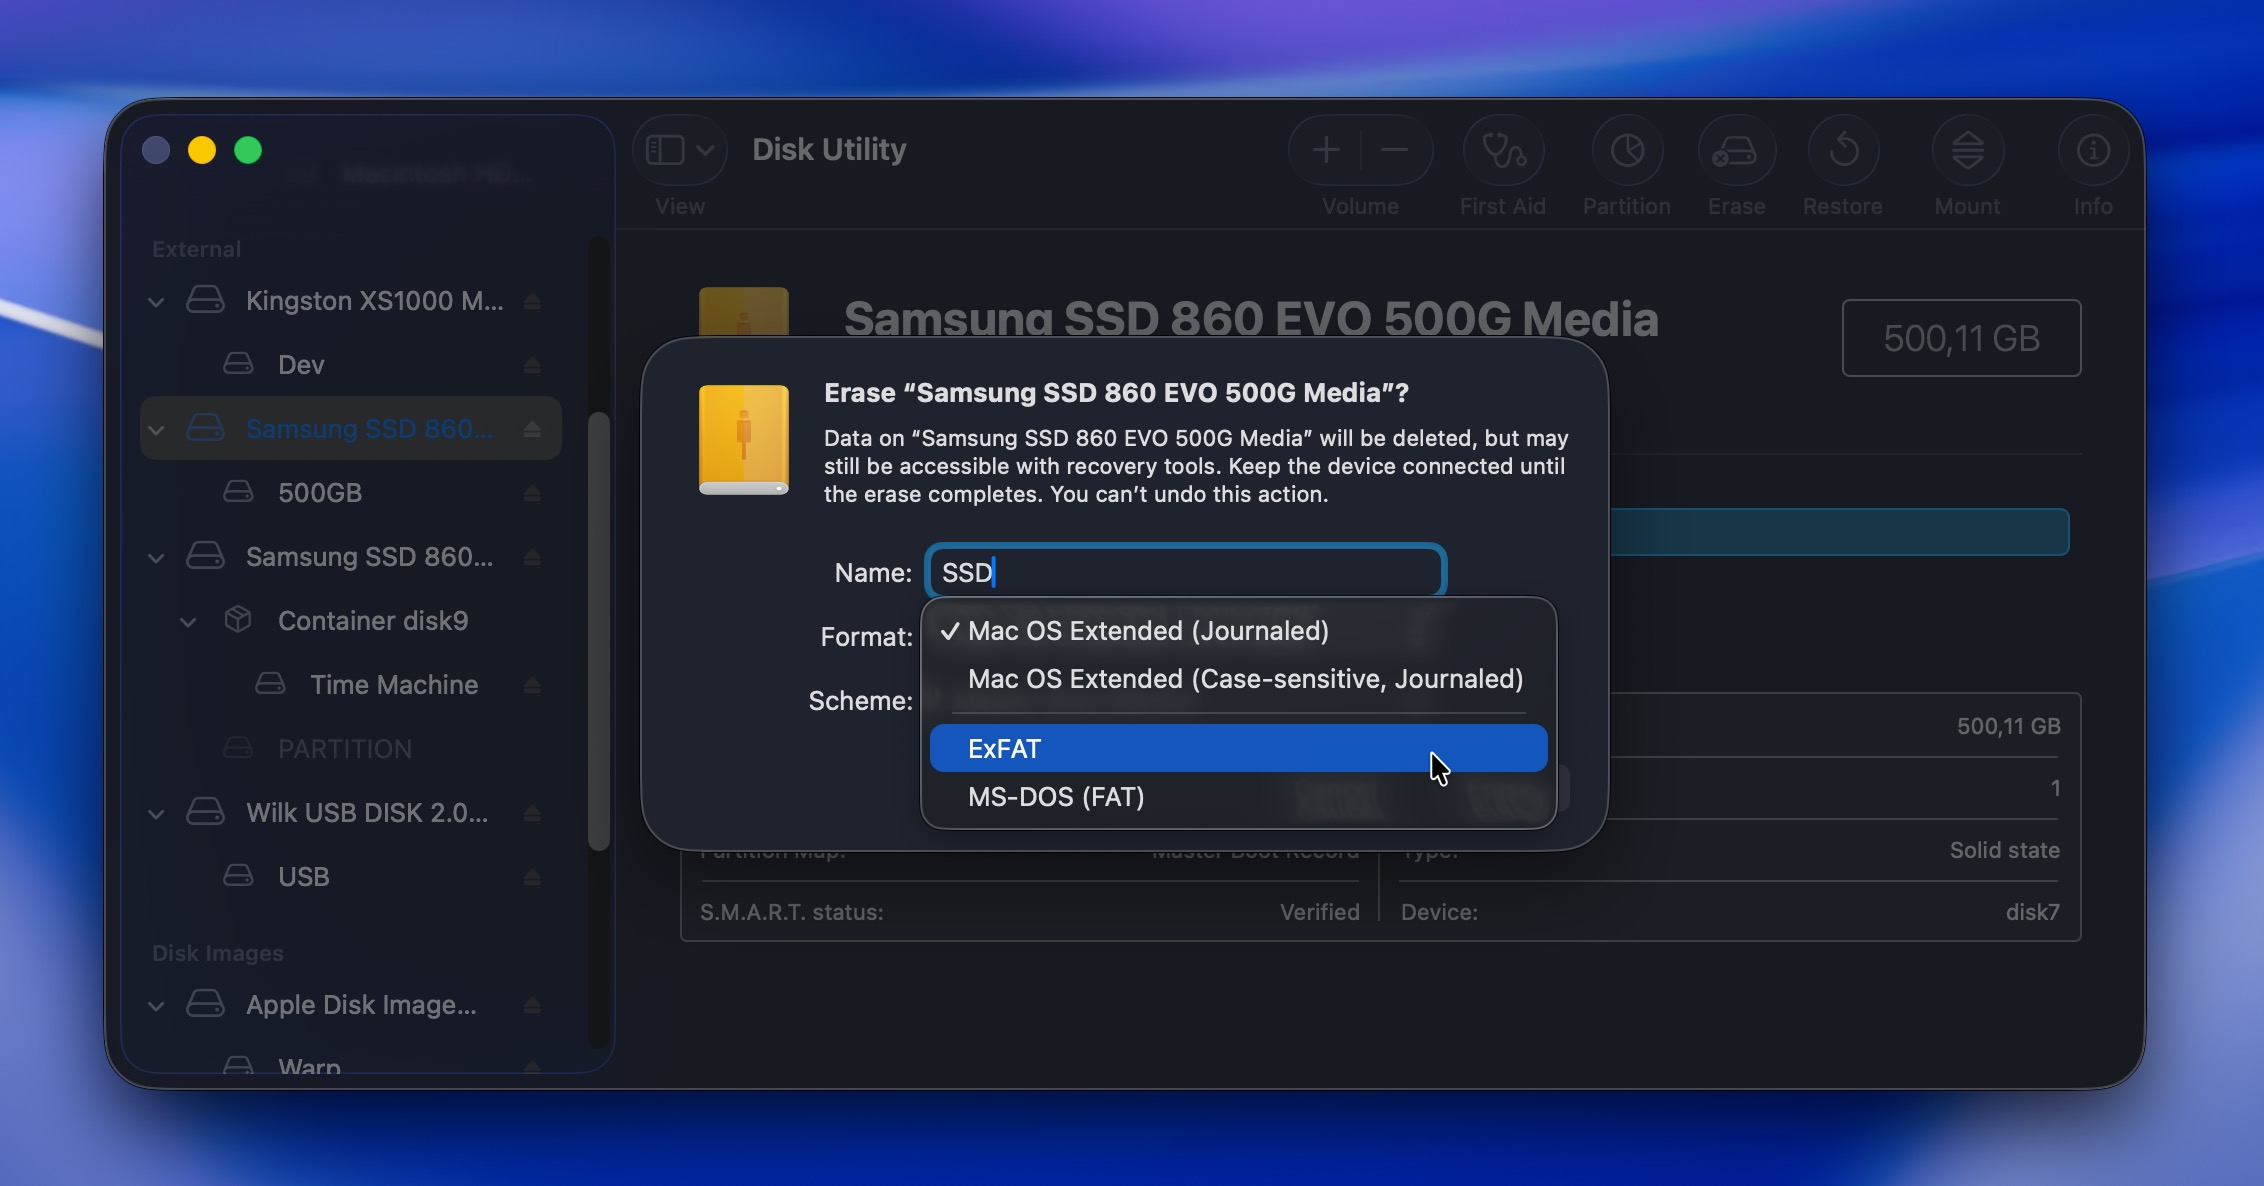
- Click Erase and confirm.
Once formatting is complete, your drive should be fully functional again. You can now copy your recovered files back onto it if needed, or start using it fresh for new data.
Scenario 4: Restore an External Hard Drive on a Mac with Cloud Backups
Most people don’t intentionally back up their external drives to cloud services, but it’s still worth checking if any files from your drive ever made it to the cloud (maybe you manually copied some important files at some point or had automatic syncing enabled without realizing it).
While cloud services like Google Drive or iCloud immediately synchronize changes made to files (this includes deletion), they have their own Trash folders, and deleted files typically stay there for 30 days. What’s more, deletions made without access to the internet aren’t synchronized until internet access is restored.
Let’s demonstrate how the recovery of external hard drive data from the cloud works with Google Drive (other cloud backup services are very similar):
- Open your web browser and go to drive.google.com.
- Sign in with your Google account.
- Use the search box at the top to look for your missing files by name, file type, or date modified.
- If you find the files you’re looking for, right-click and select Download to save them back to your Mac.

- If you don’t find your files, then you should navigate to Trash in the left sidebar and click on it.
- Browse through the deleted files or use the search box to filter results.
- When you find a file you want to recover, right-click on it and select Restore. The file will be moved back to its original location in your Drive.
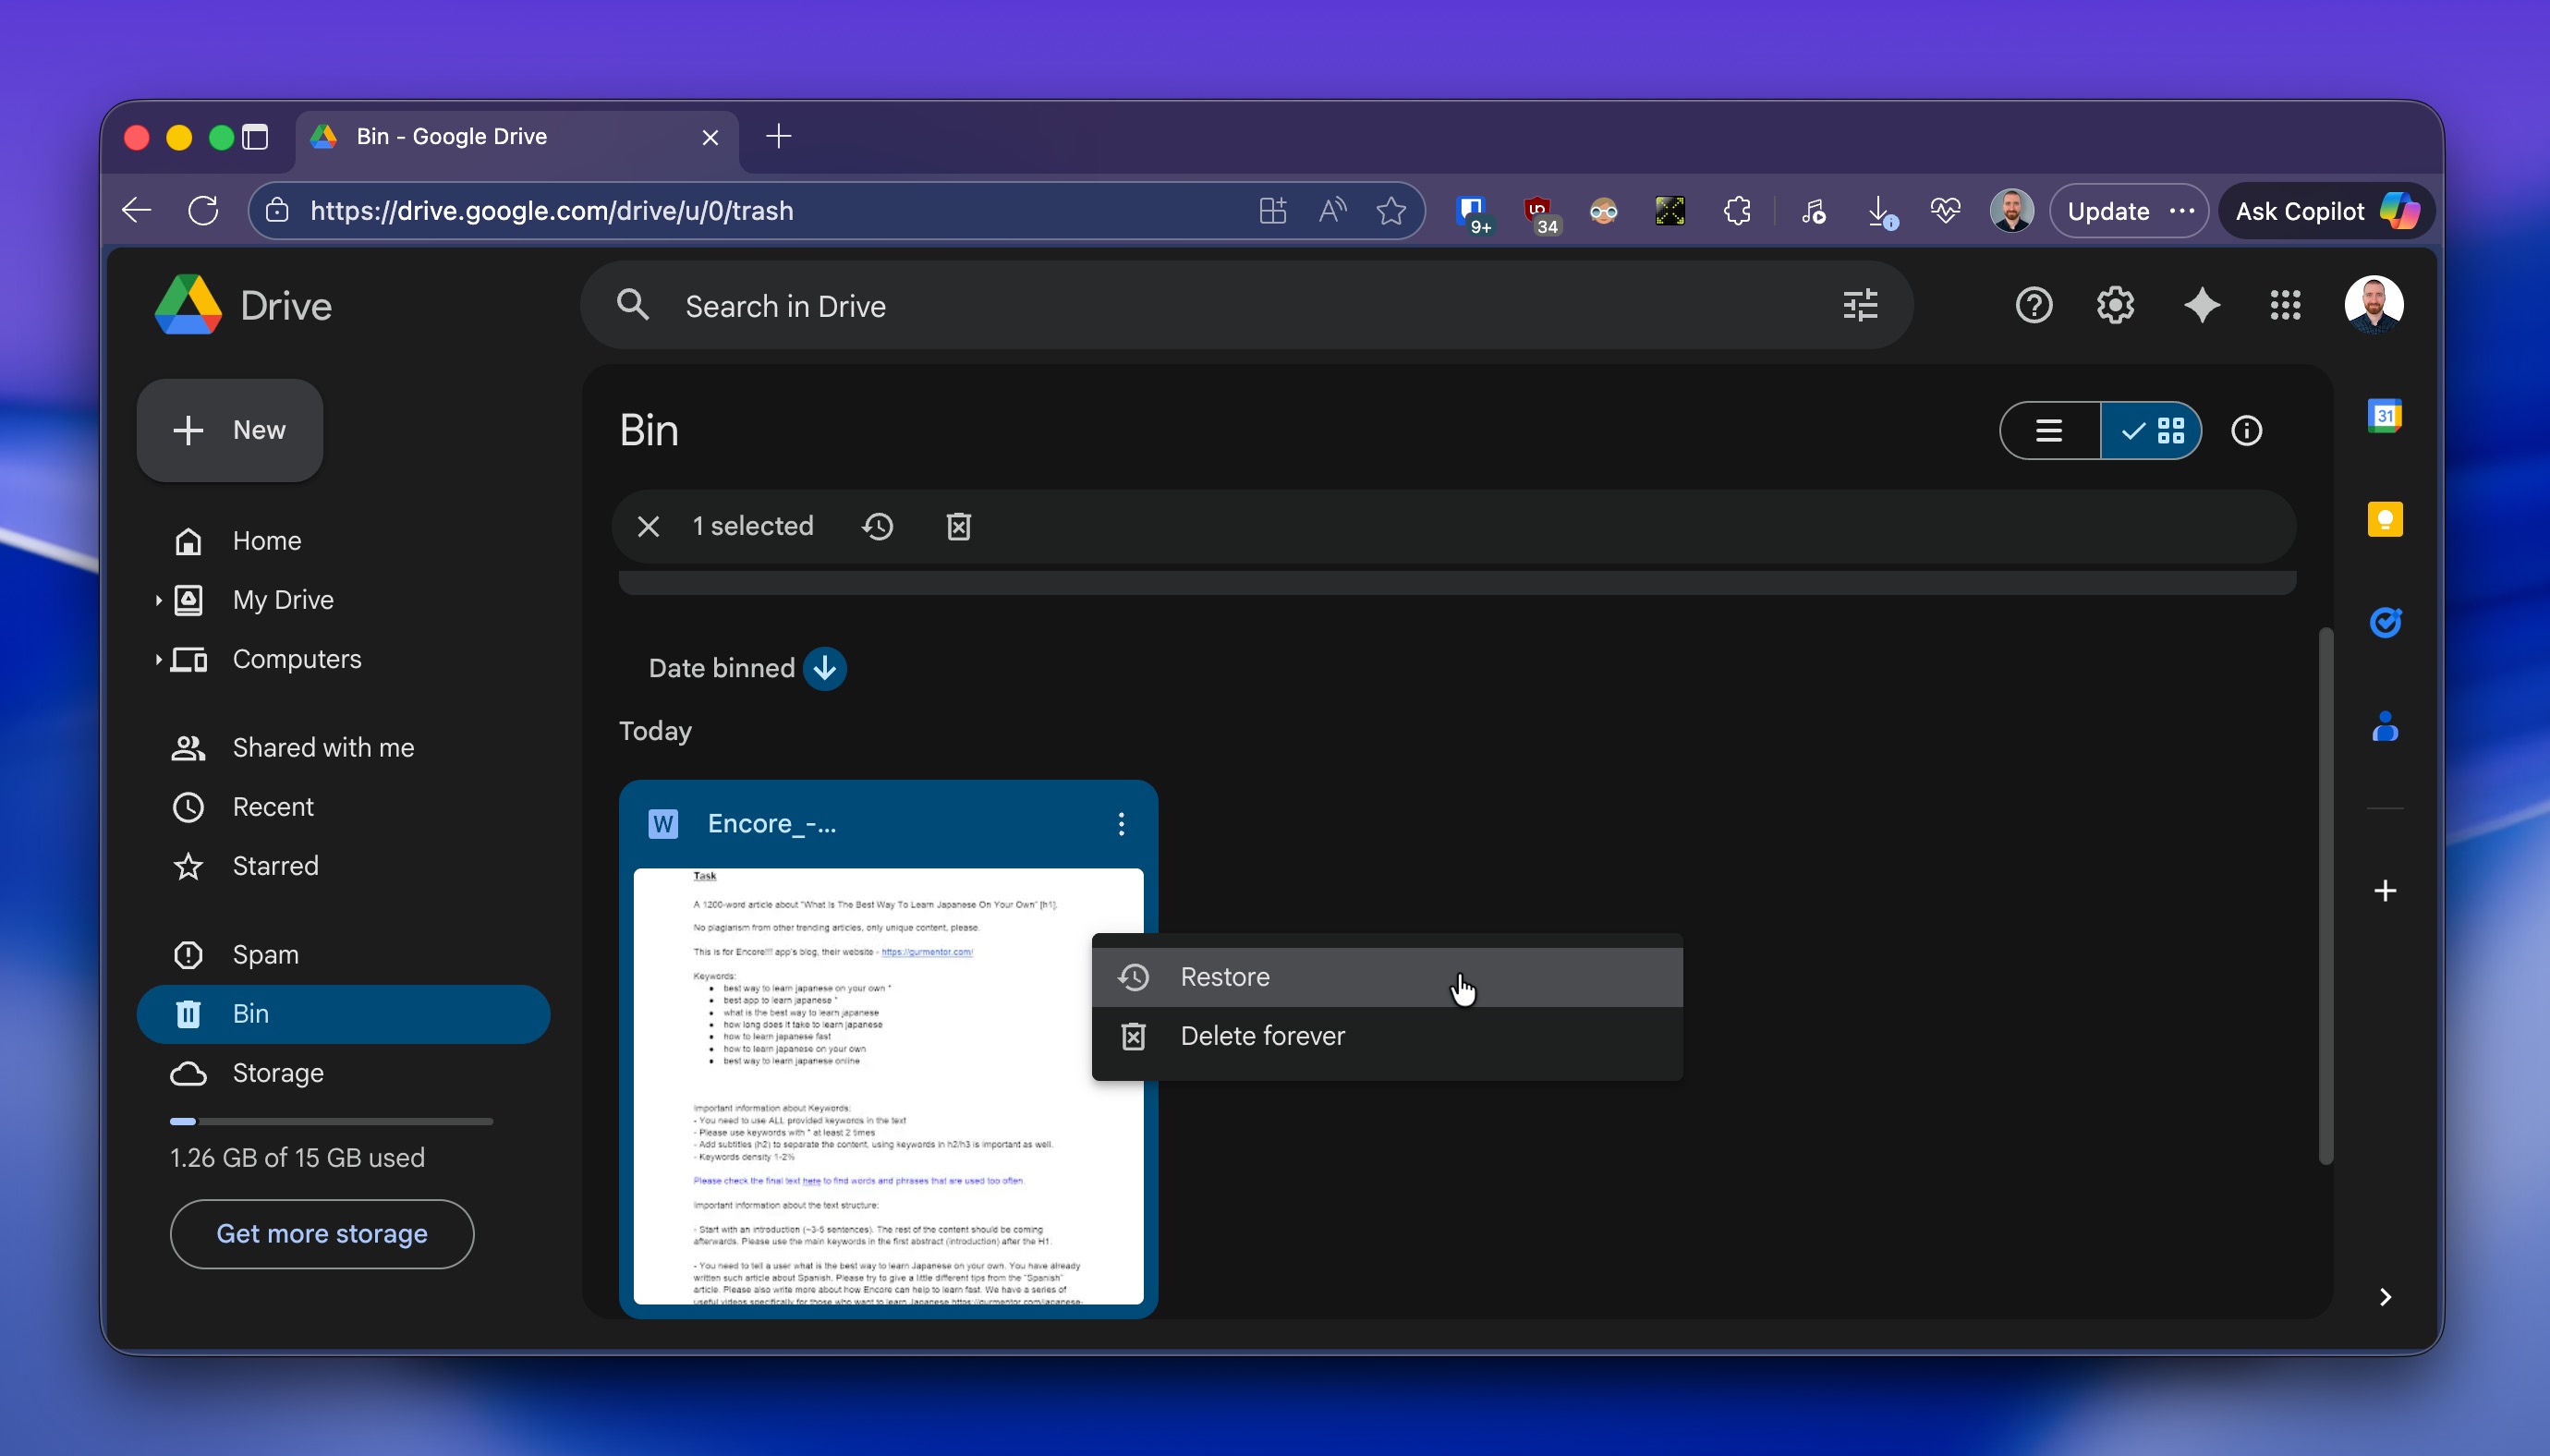
- Once restored, download the files back to your Mac by right-clicking them and selecting Download.
⚠️ Important: Again, this method only works if your external drive was synced or backed up to the cloud before the data loss occurred. If you never set up cloud sync for that drive, you’ll need to use one of the other recovery methods covered earlier in this guide.
Final Words
Data recovery is never guaranteed, but here’s what our experience shows: in roughly 8 out of 10 cases, users successfully recover data from an external hard drive on Mac as long as the drive is at least recognized by the operating system (meaning it shows up in Disk Utility).
But if your drive is clicking, grinding, not spinning up, or doesn’t appear in Disk Utility at all, that’s a different story because such symptoms point to physical damage, and that means your only real solution is a professional data recovery service like CleverFiles Data Recovery Center or SalvageData.
That said, most situations aren’t that severe. If you’re reading this guide and your drive shows up in Disk Utility (even if it won’t mount or throws errors), there’s a good chance that you’ll be able to recover it using the DIY methods described above. Just make sure to start the recovery process promptly.


