
Have you opened this guide because you were writing an important document in Word when your screen suddenly froze or something caused the Blue Screen of Death? Or maybe you accidentally hit delete on the wrong file, and now you’re trying to figure out how to get back your lost work? Regardless of why you need to recover a Word document, there are multiple solutions that can help. In this guide, we’ll walk you through every proven method, from the simple Ctrl+Z trick to advanced data recovery software that can find documents you thought were gone forever.
Quick Start Guide to Word Document Recovery
Before you try any recovery methods, we recommend you figure out which situation applies to you so that you can use this quick guide to jump straight to the right fix:
| Your Situation | Where to Start | Jump to These Methods |
| Word crashed and you never saved | Use Word’s built-in recovery tools first. They usually auto-save drafts every 10 minutes. | Document Recovery Pane |
| You accidentally closed Word without saving | Check Word’s UnsavedFiles folder or use the Manage Document option. | Recover Unsaved Documents |
| You deleted a saved file | Start with the Recycle Bin, then try Previous Versions or OneDrive, and finally recovery software if needed. | Recycle Bin |
| You used Shift+Delete or emptied the Recycle Bin | Use recovery software to scan your drive for deleted Word files. | Data Recovery Software |
| The file disappeared or you can’t find it | Search using the Start menu and File Explorer. Enable Show Hidden Items if needed. | Find via Start Menu |
| You overwrote the file and need the old version | Restore an earlier copy using OneDrive Version History or Windows Previous Versions. | OneDrive Version History |
💡 Pro tip: The longer you wait, the more likely your document will be overwritten by new data. To buy yourself more time, stop using your computer for other tasks until you’ve attempted recovery.
How to Recover Deleted Word Documents on Windows
So you’ve deleted a Word document (whether by accident or on purpose) and now you need it back. The good news is that Windows doesn’t immediately wipe deleted files from your hard drive. Instead, it just marks that space as “available.” As such, your document is still there, waiting to be recovered.
If you just hit the Delete key, your document is probably chilling in the Recycle Bin. Used Shift+Delete or emptied the bin already? Then you either need to use data recovery software or recover the file from existing backups. If you’re not sure, then you can start from the first method and work your way down until you recover deleted Word documents successfully.
⚠️ Important: If you have an SSD (which most modern computers do), the TRIM feature can permanently erase deleted data within hours, so act fast.
Method 1:Undo Deletion of Word File
The fastest way to recover deleted documents in Word is using Ctrl+Z, but only if you just deleted the file recently and haven’t restarted your computer.
If you used Shift+Delete, emptied the Recycle Bin, deleted the file hours/days ago, or restarted your PC since the deletion, then this method won’t help you. In these cases, skip to Method 2 (Recycle Bin) or Method 3 (Data Recovery Software).
Follow these steps to undo the deletion of a Word file:
- Make sure the File Explorer window where you deleted the file is still active.
- Press CTRL + Z immediately (or right-click and select Undo Delete).

- Your Word document should reappear in its original location.
If Ctrl+Z doesn’t work, then your document isn’t necessarily gone. Move on to checking the Recycle Bin or using recovery software for more advanced Word file recovery options.
Method 2:Restore Deleted Word Document from Recycle Bin
We know you probably already checked the Recycle Bin since it’s the first place everyone looks. However, we’re covering it anyway because sometimes people miss their file among hundreds of others, or they don’t realize you can sort by date to find recent deletions. Plus, there are a few tricks that might help you retrieve a deleted Word document even if you think the Bin is empty.
⚠️ Important: This method only works if you deleted the file normally (using Delete key or right-click > Delete). If you used Shift+Delete, your file bypassed the Recycle Bin entirely, then skip to Method 3 for data recovery software. The same applies if you’ve already emptied the Recycle Bin.
Steps to restore a deleted Word document from the Recycle Bin:
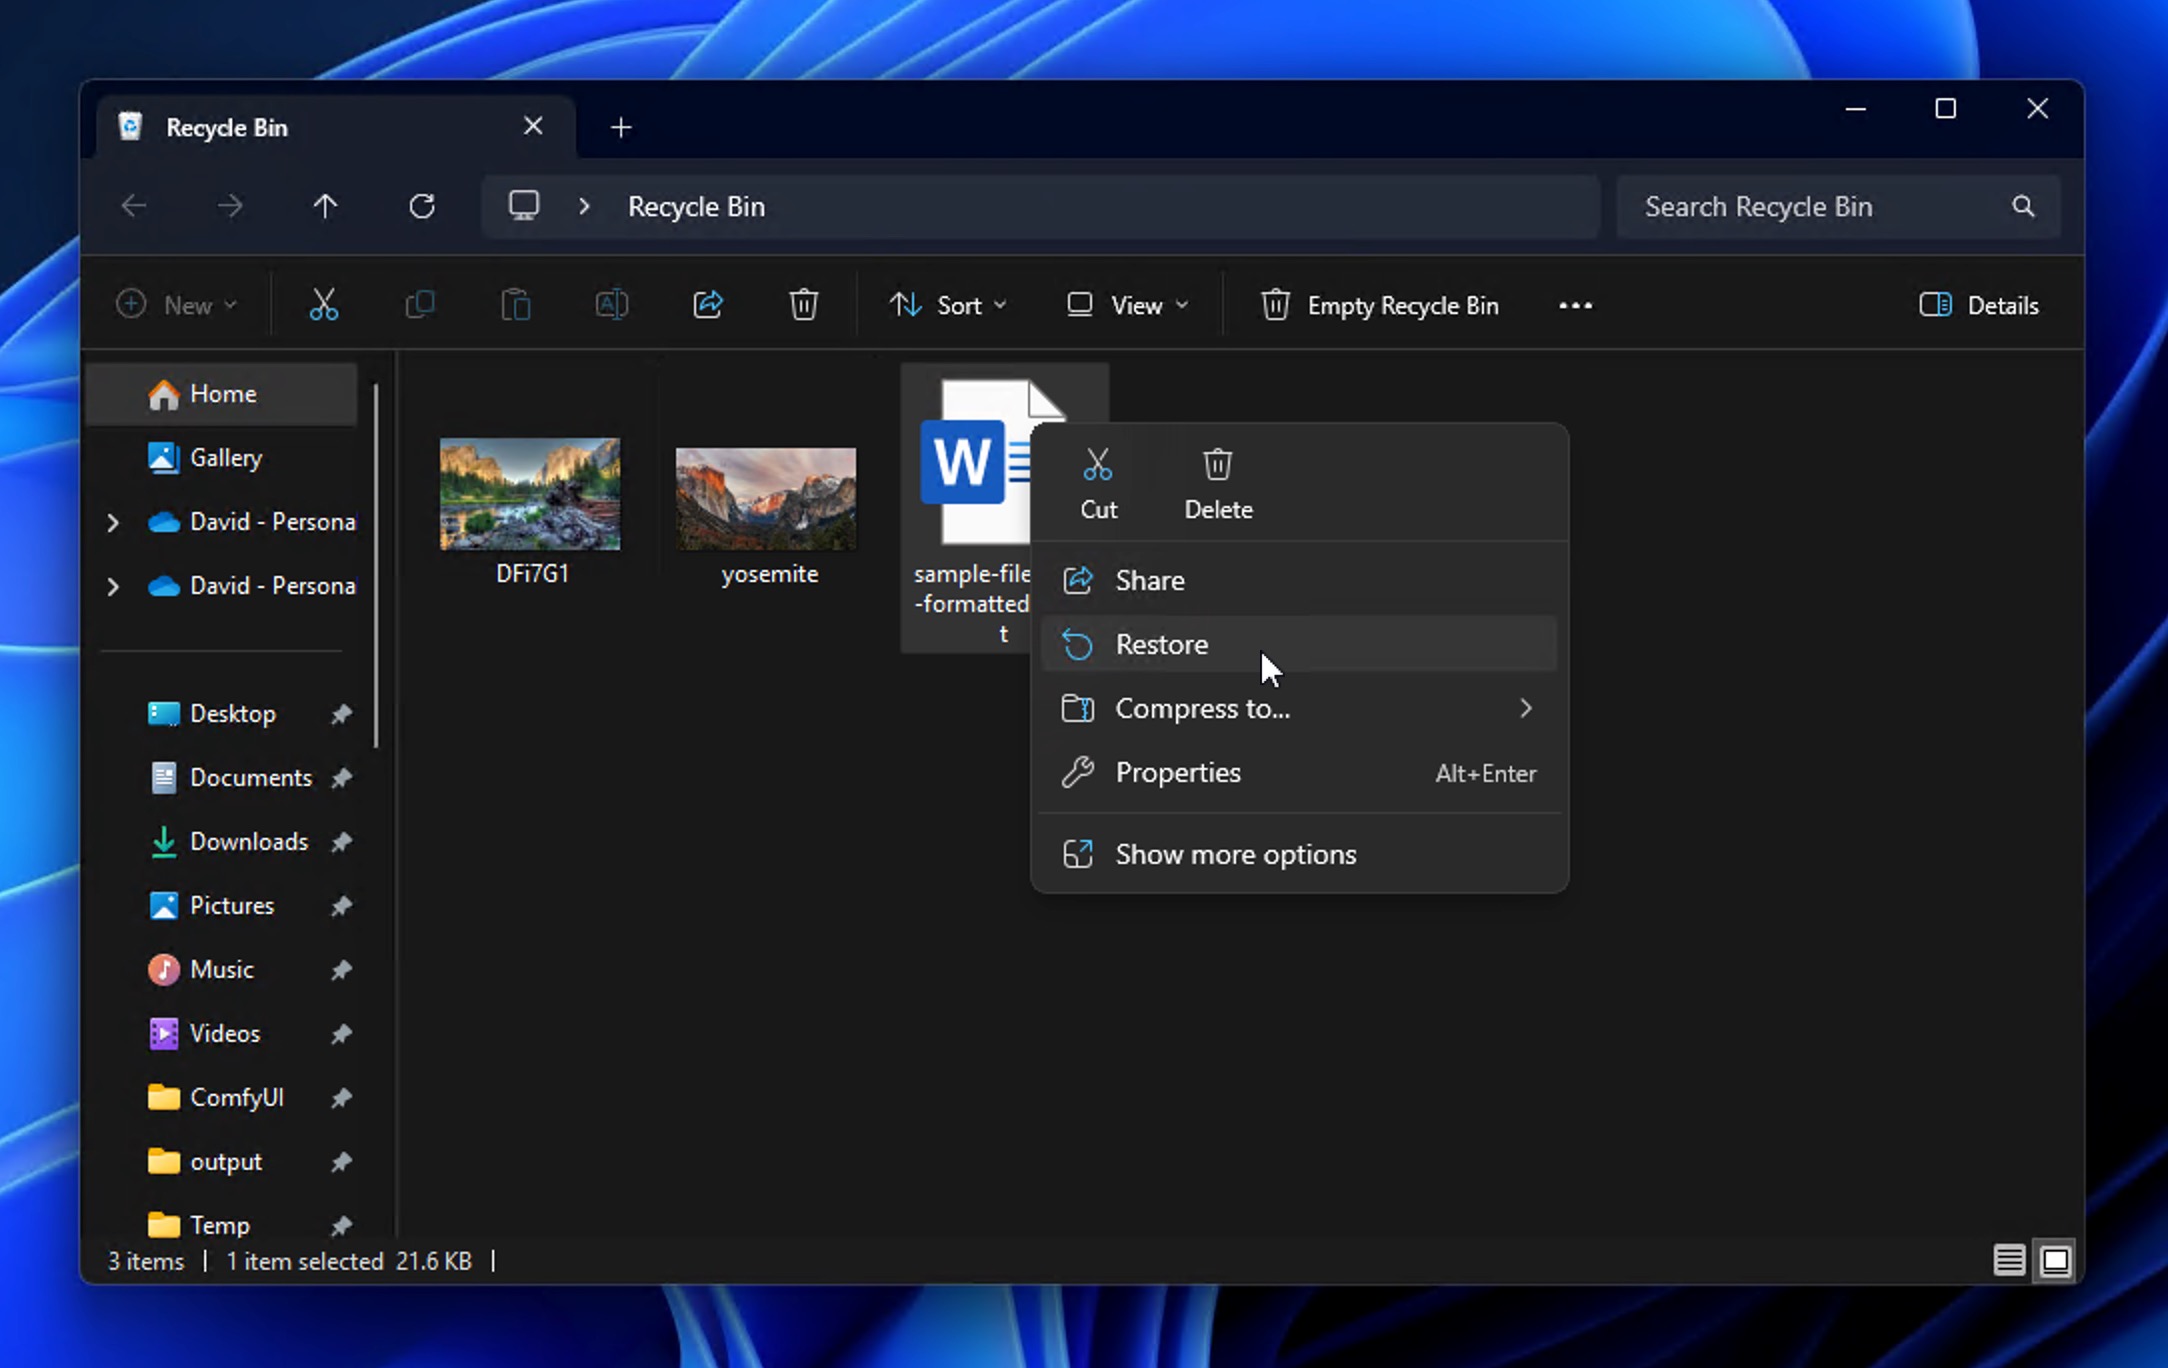
- Open the Recycle Bin (double-click the desktop icon).
- Find your document (search by name if needed). You can click Date Deleted to sort by most recent.
- Either right-click the file and select Restore to send it back to its original location, or simply drag it to wherever you want it (Desktop, Documents folder, etc.).
Are you certain that your deleted Word document should be in the Recycle Bin but isn’t? Then you can right-click the Recycle Bin icon and go to Properties. There, make sure Don’t move files to the Recycle Bin is unchecked. If it was checked, your files have been bypassing the Bin, and you need to move on to Method 3.
Method 3:Use Data Recovery Software
If there’s nothing in the Recycle Bin, you still have two excellent options on how to recover a Word document, and the first one is data recovery software, which works because even when Windows no longer shows your file, the actual data often still exists on your drive until it’s overwritten by new files.
For deleted Word document recovery in particular, Disk Drill is a great choice because it flawlessly supports the .doc and .docx Word file formats (as well as hundreds other document, audio, video, and image file formats) and can preview them before recovery.
Follow this simple recovery procedure to recover a deleted Word file using Disk Drill:
- Download Disk Drill and install it on a different storage device than the one where your deleted Word documents were located.
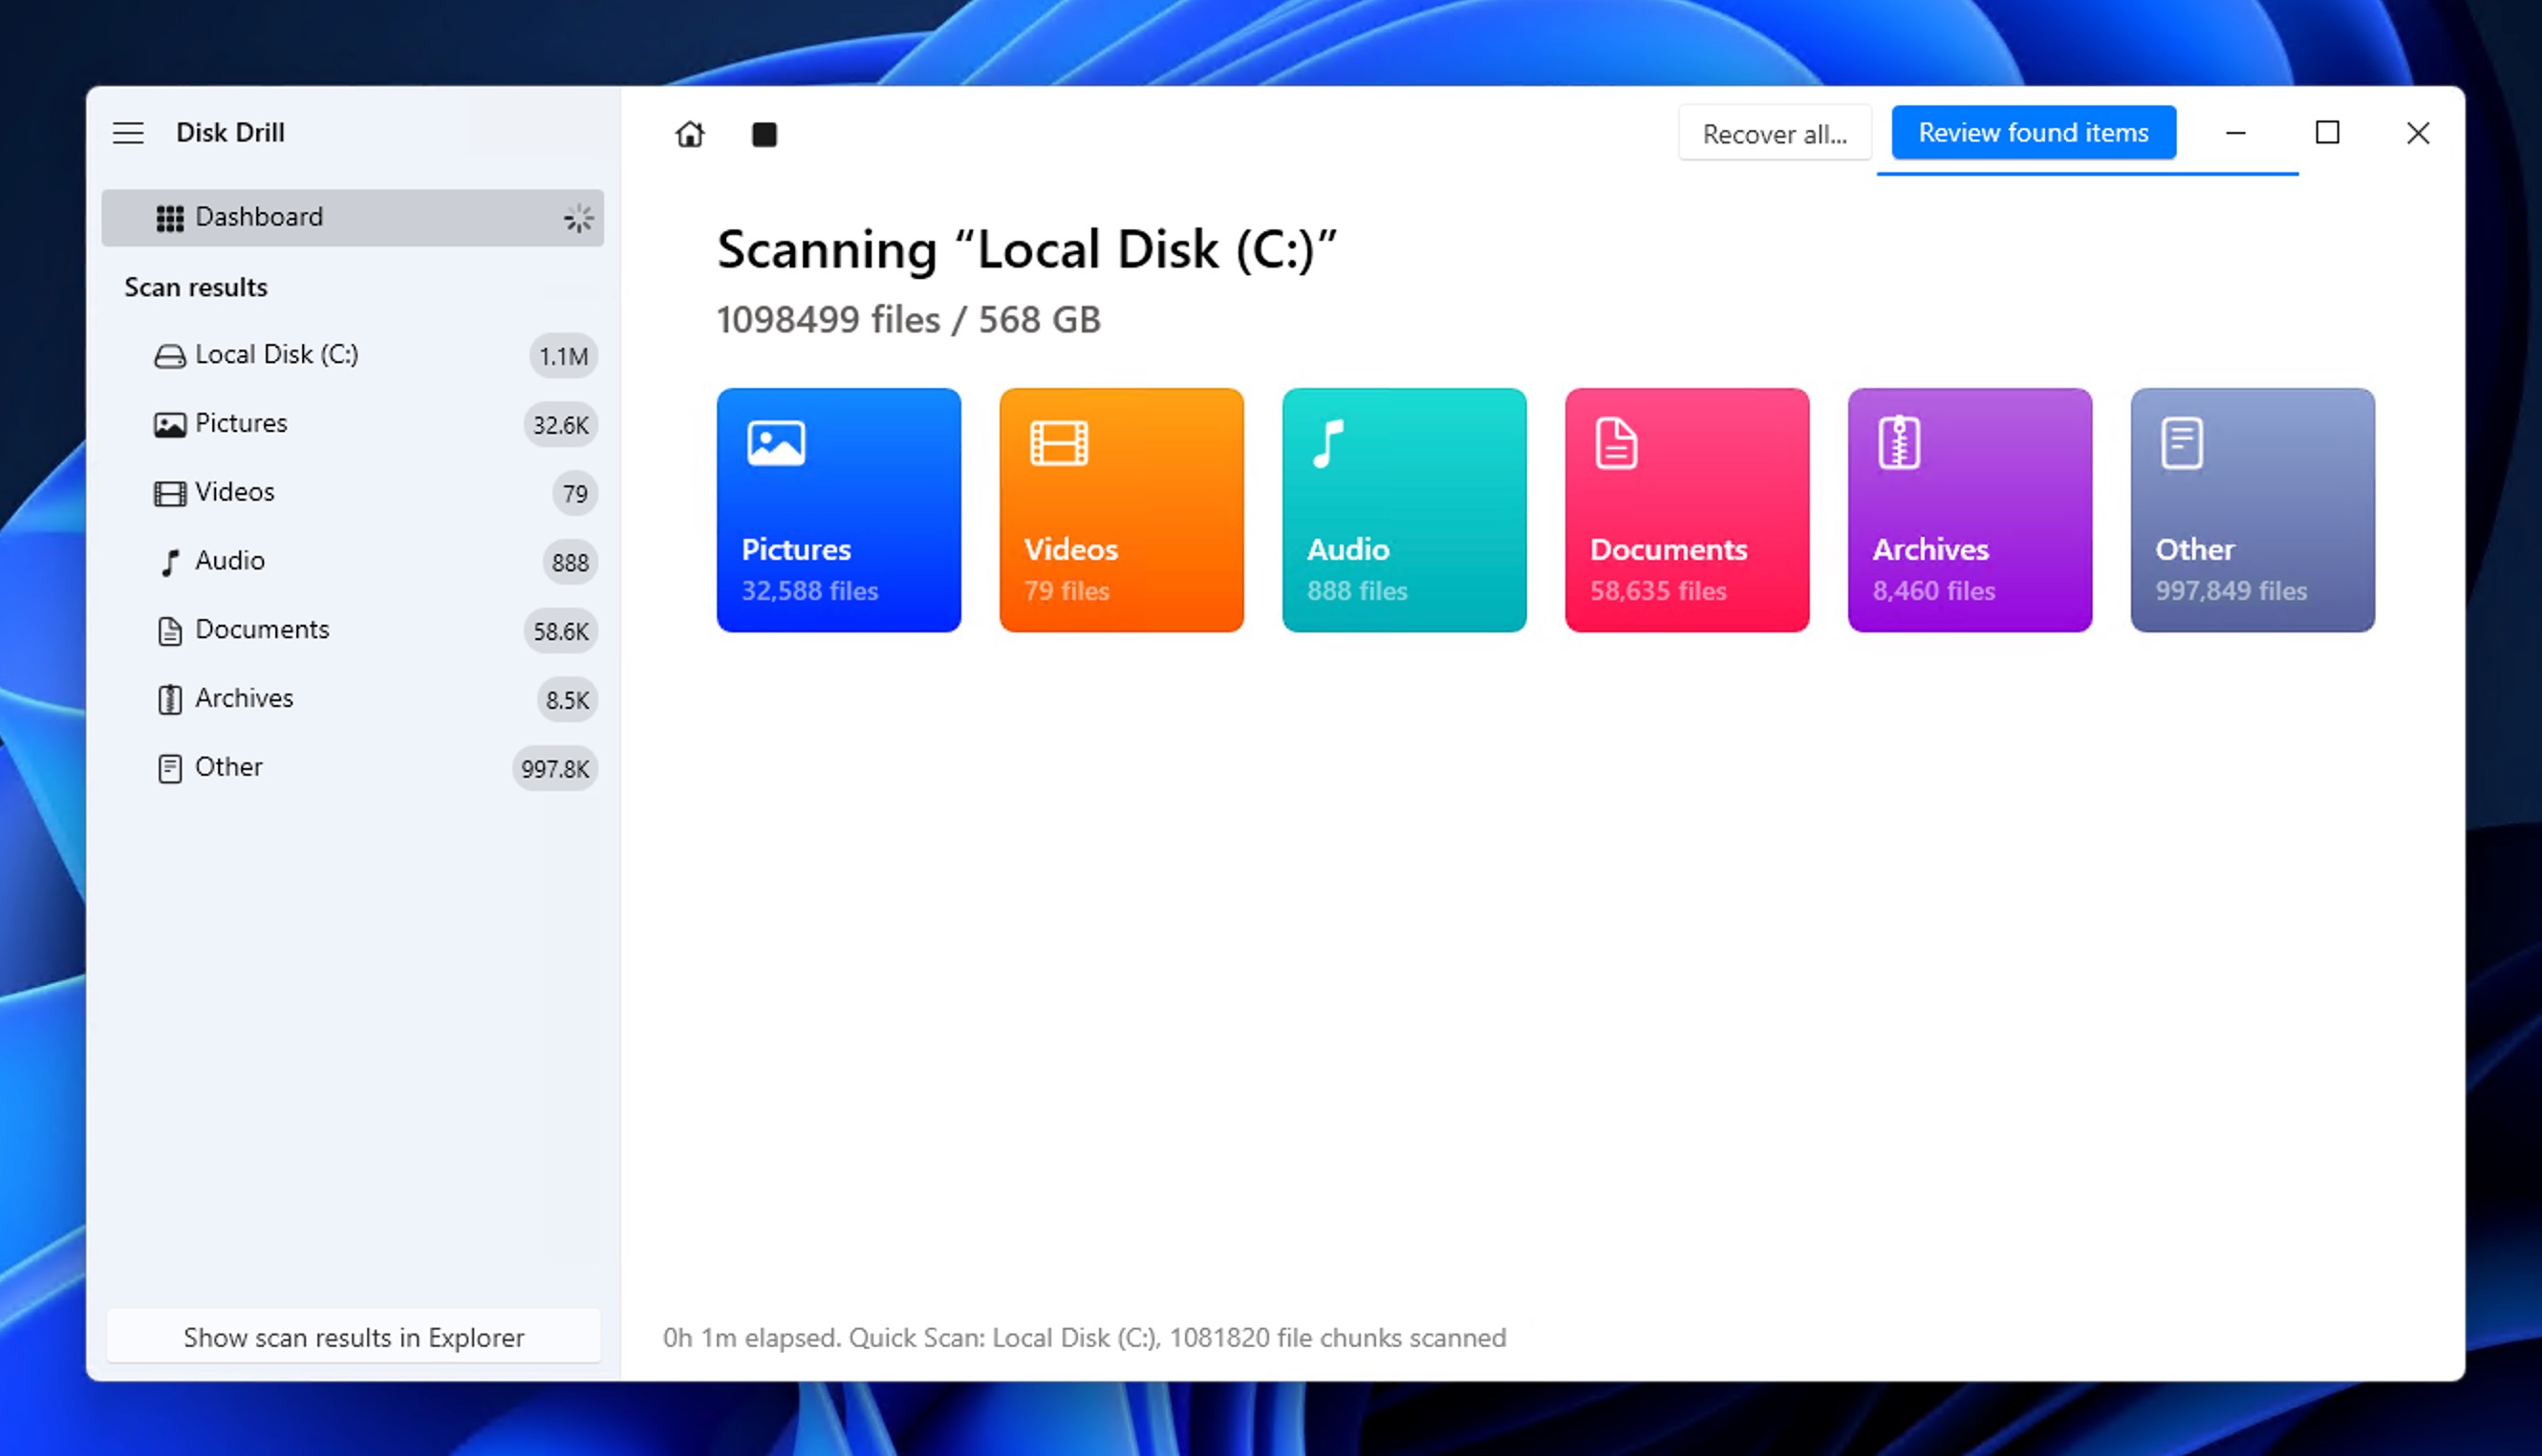
- Launch Disk Drill and select your storage device from the main screen. Click the Search for lost data button.

- Wait for the scan to complete or click the Review found files button to see found files immediately (scanning will continue in the background).
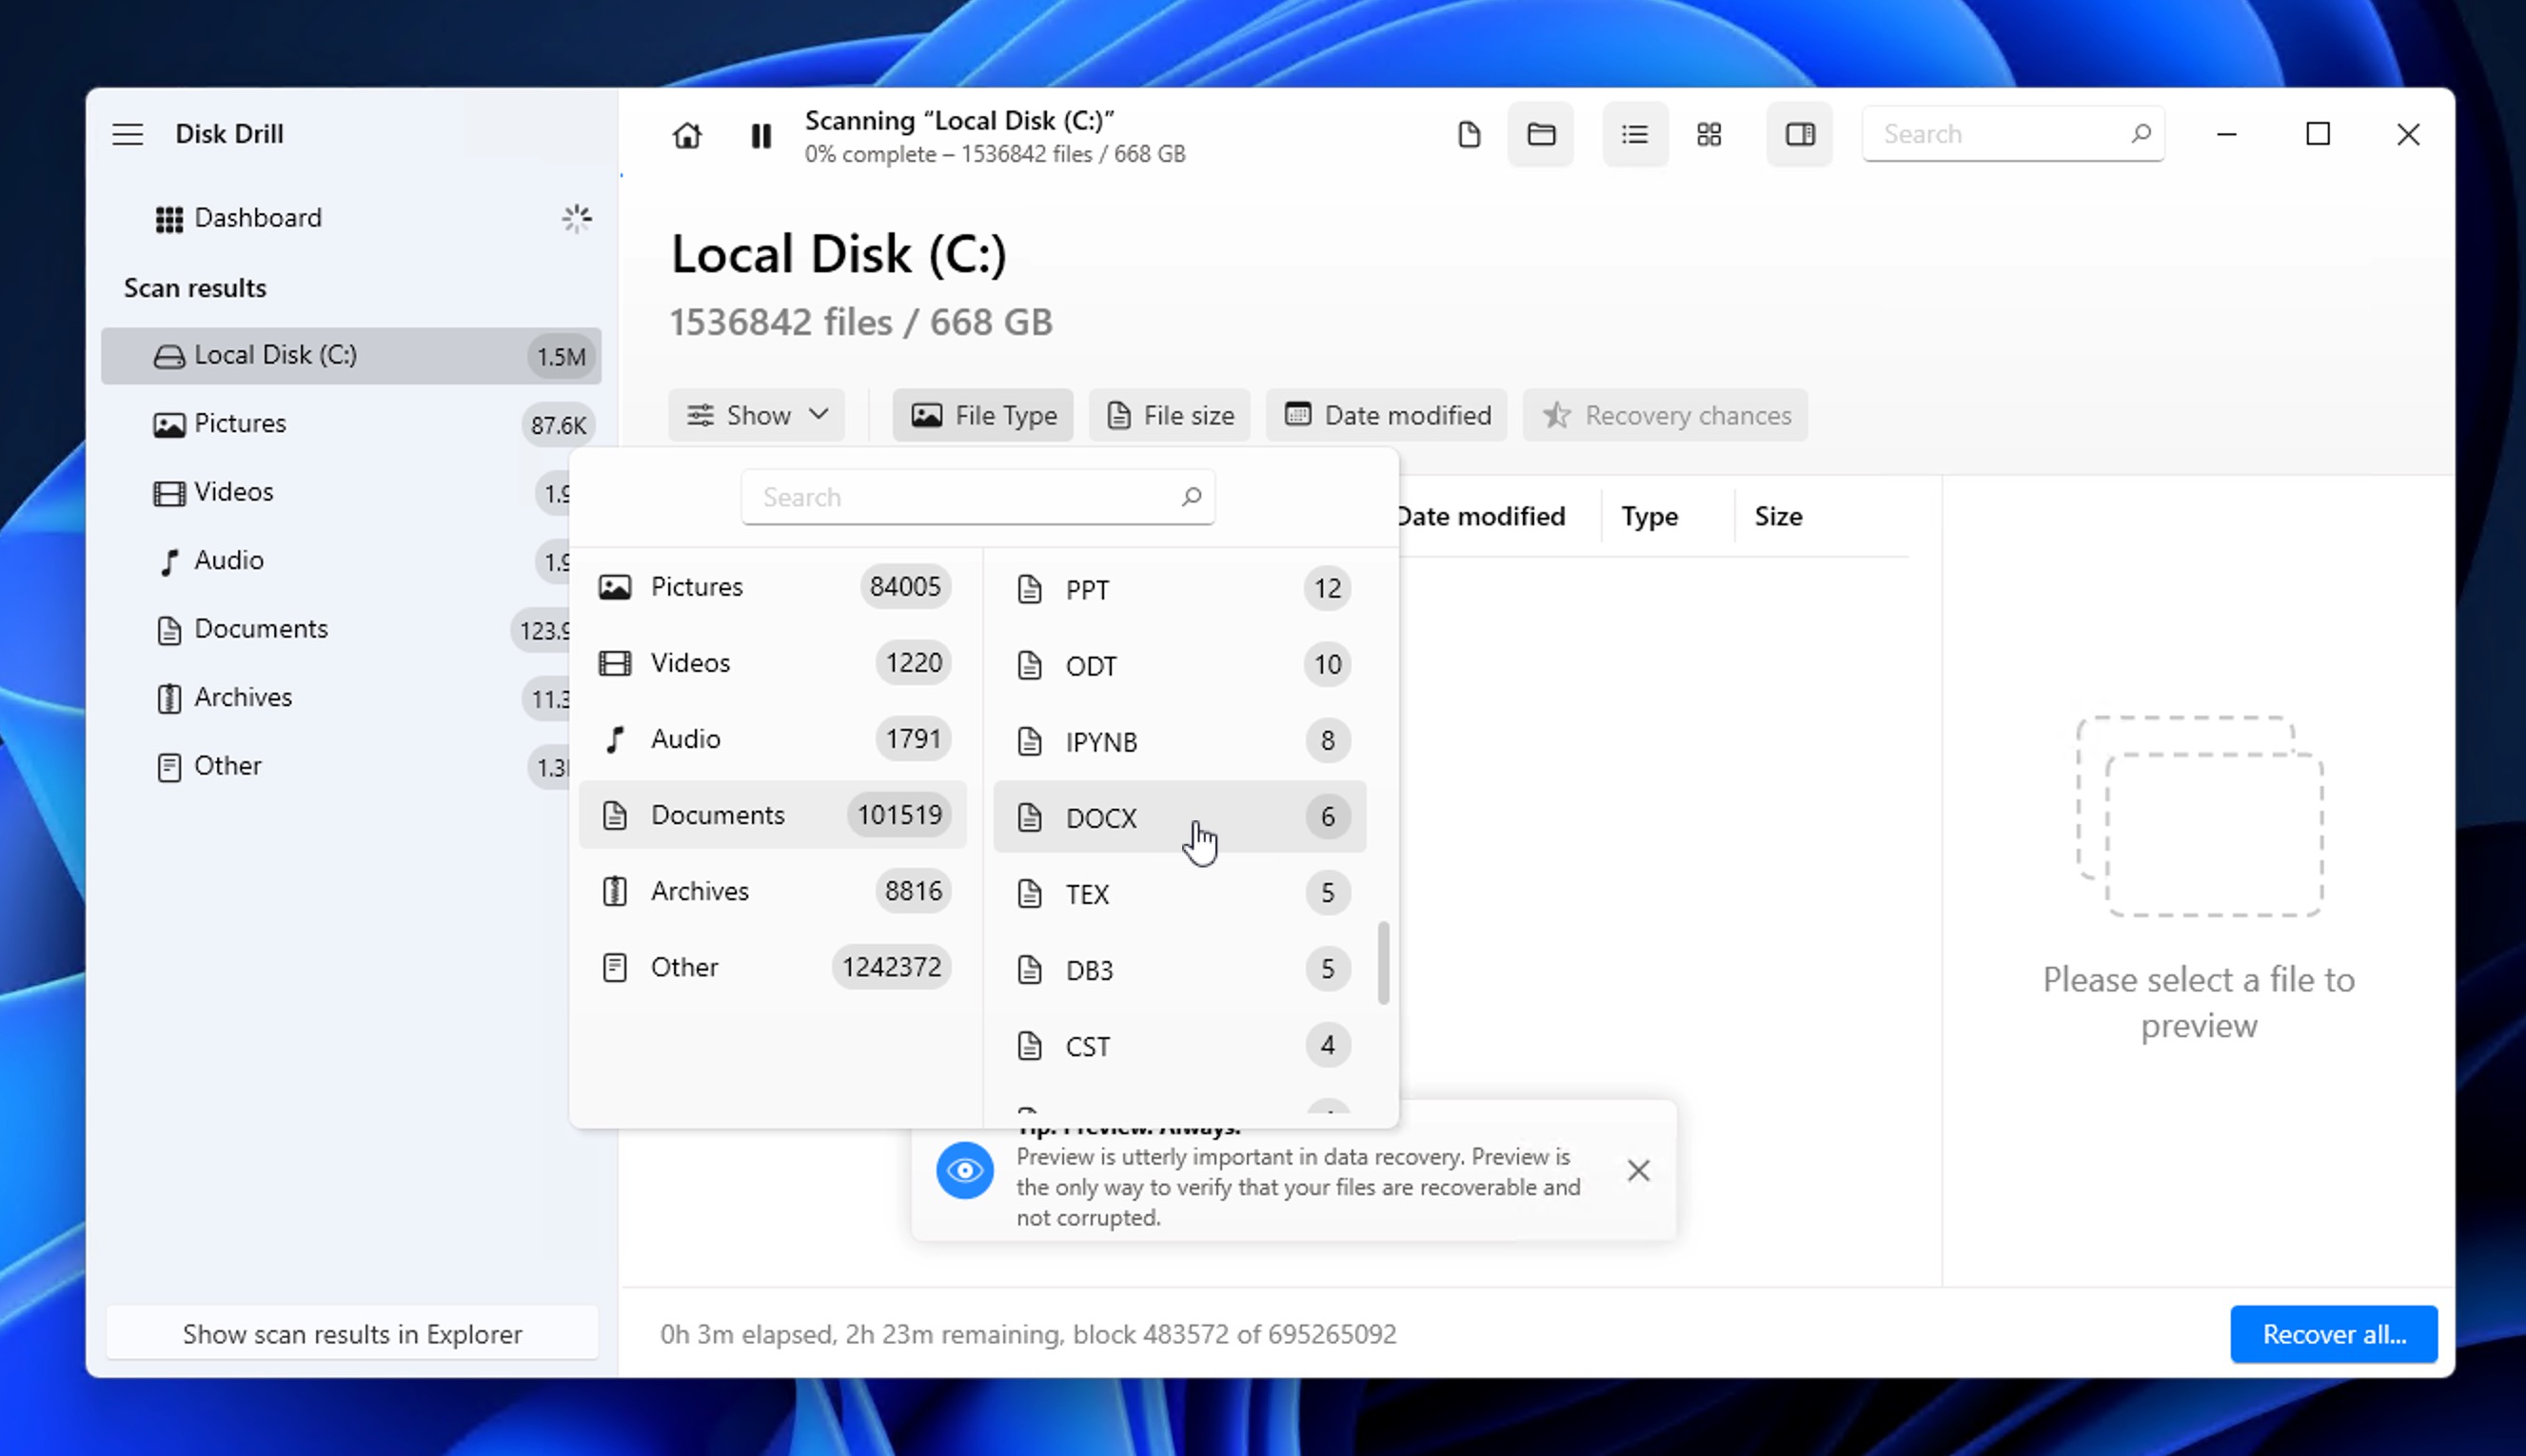
- Use the filters on the left to narrow results to document formats. Check boxes for .docx, .doc, .tmp, and .asd files to focus on Word documents and their backups. You can preview your documents right inside Disk Drill. A document that can be previewed can also be recovered without any issues.
- Select the checkboxes next to the Word files you want to recover, then click the Recover button.
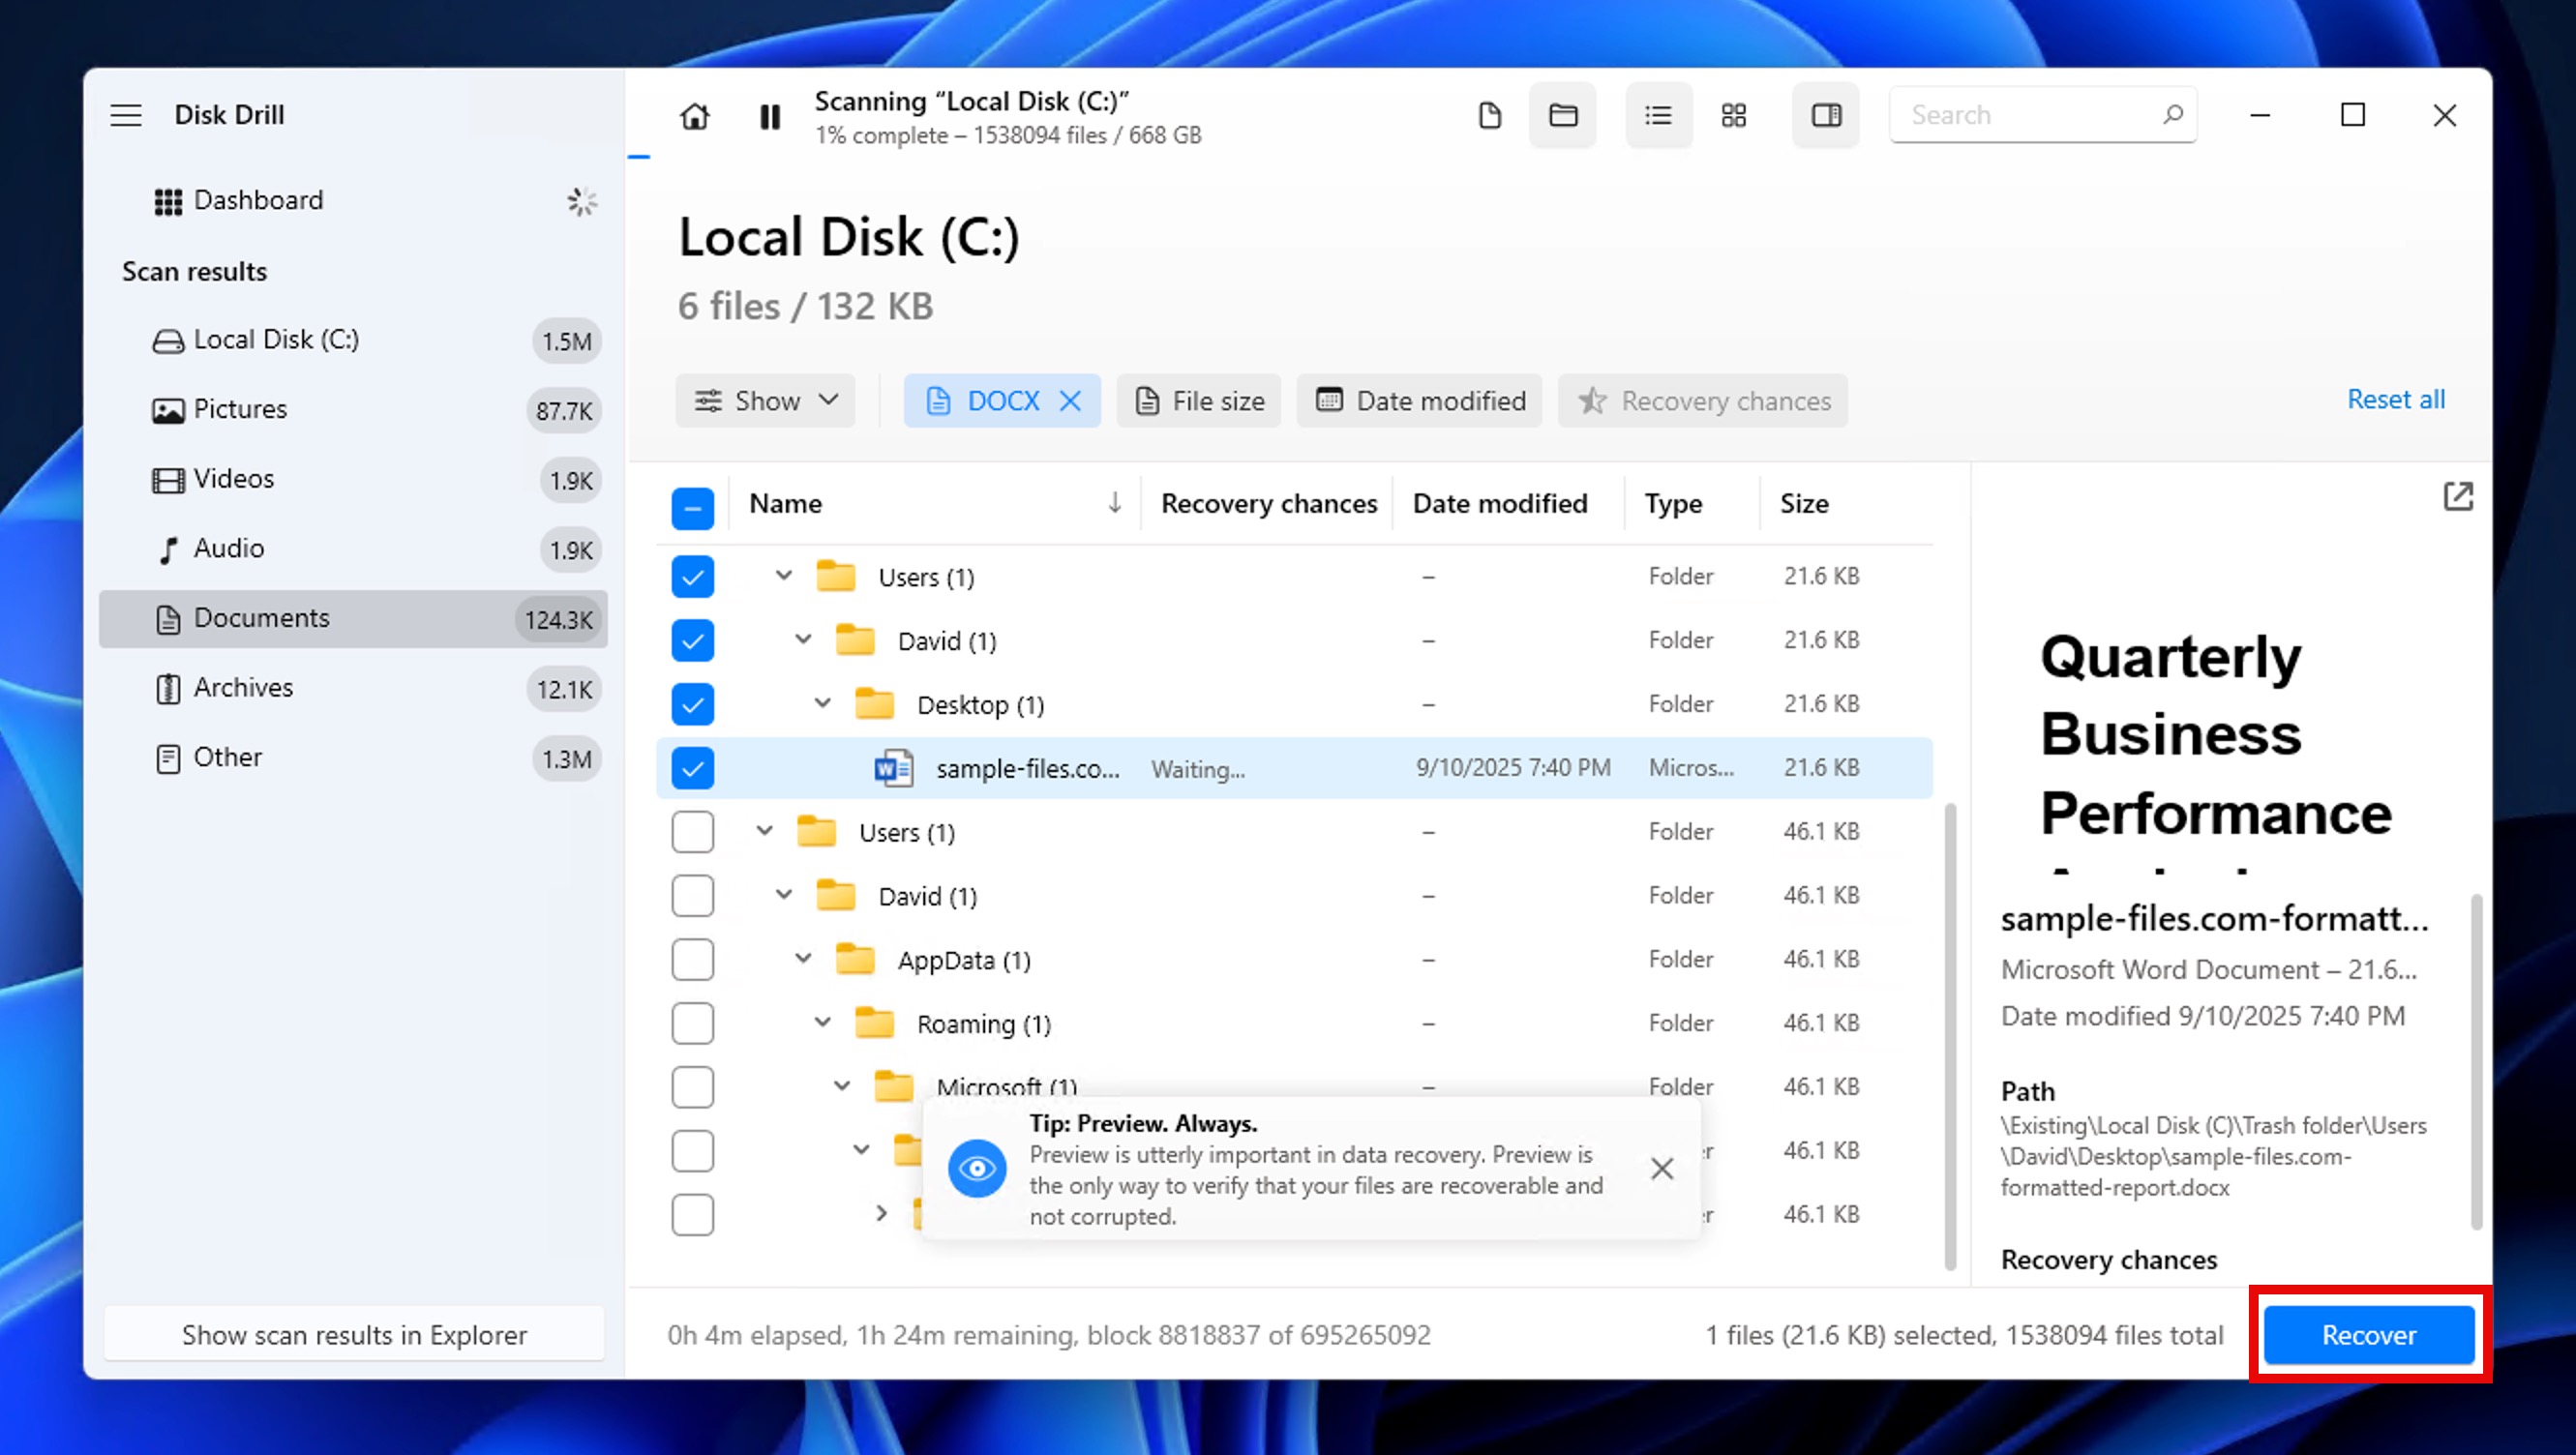
- Choose a recovery location (Disk Drill will instruct you to pick a different drive than where the files were deleted to avoid overwriting).
- Open the recovered files in Word to verify they’re intact.
✅ Good to know: The free version of Disk Drill for Windows lets you recover up to 500 MB, which is enough for hundreds of Word documents. If you need more, you’ll know your files are recoverable before upgrading thanks to the preview feature and recovery chance estimations.
Method 4:Recover Deleted Document from OneDrive Backup
Cloud storage can save the day when it comes to the recovery of Word documents, and we’re using OneDrive as our example since it comes preinstalled on every Windows 10/11 system.
However, if you use Google Drive, Dropbox, or another cloud service, definitely check those too. In fact, Google Drive might give you better recovery odds in some cases because if you delete a synced file locally, it often stays in Google Drive’s online Trash for 30 days, even if you emptied your computer’s Recycle Bin. OneDrive files, on the other hand, usually disappears from OneDrive’s recycle bin too when deleted locally and the Recycle Bin is emptied.
Here are the steps you should follow to recover deleted documents from OneDrive:
- Go to onedrive.com and sign in with your Microsoft account.
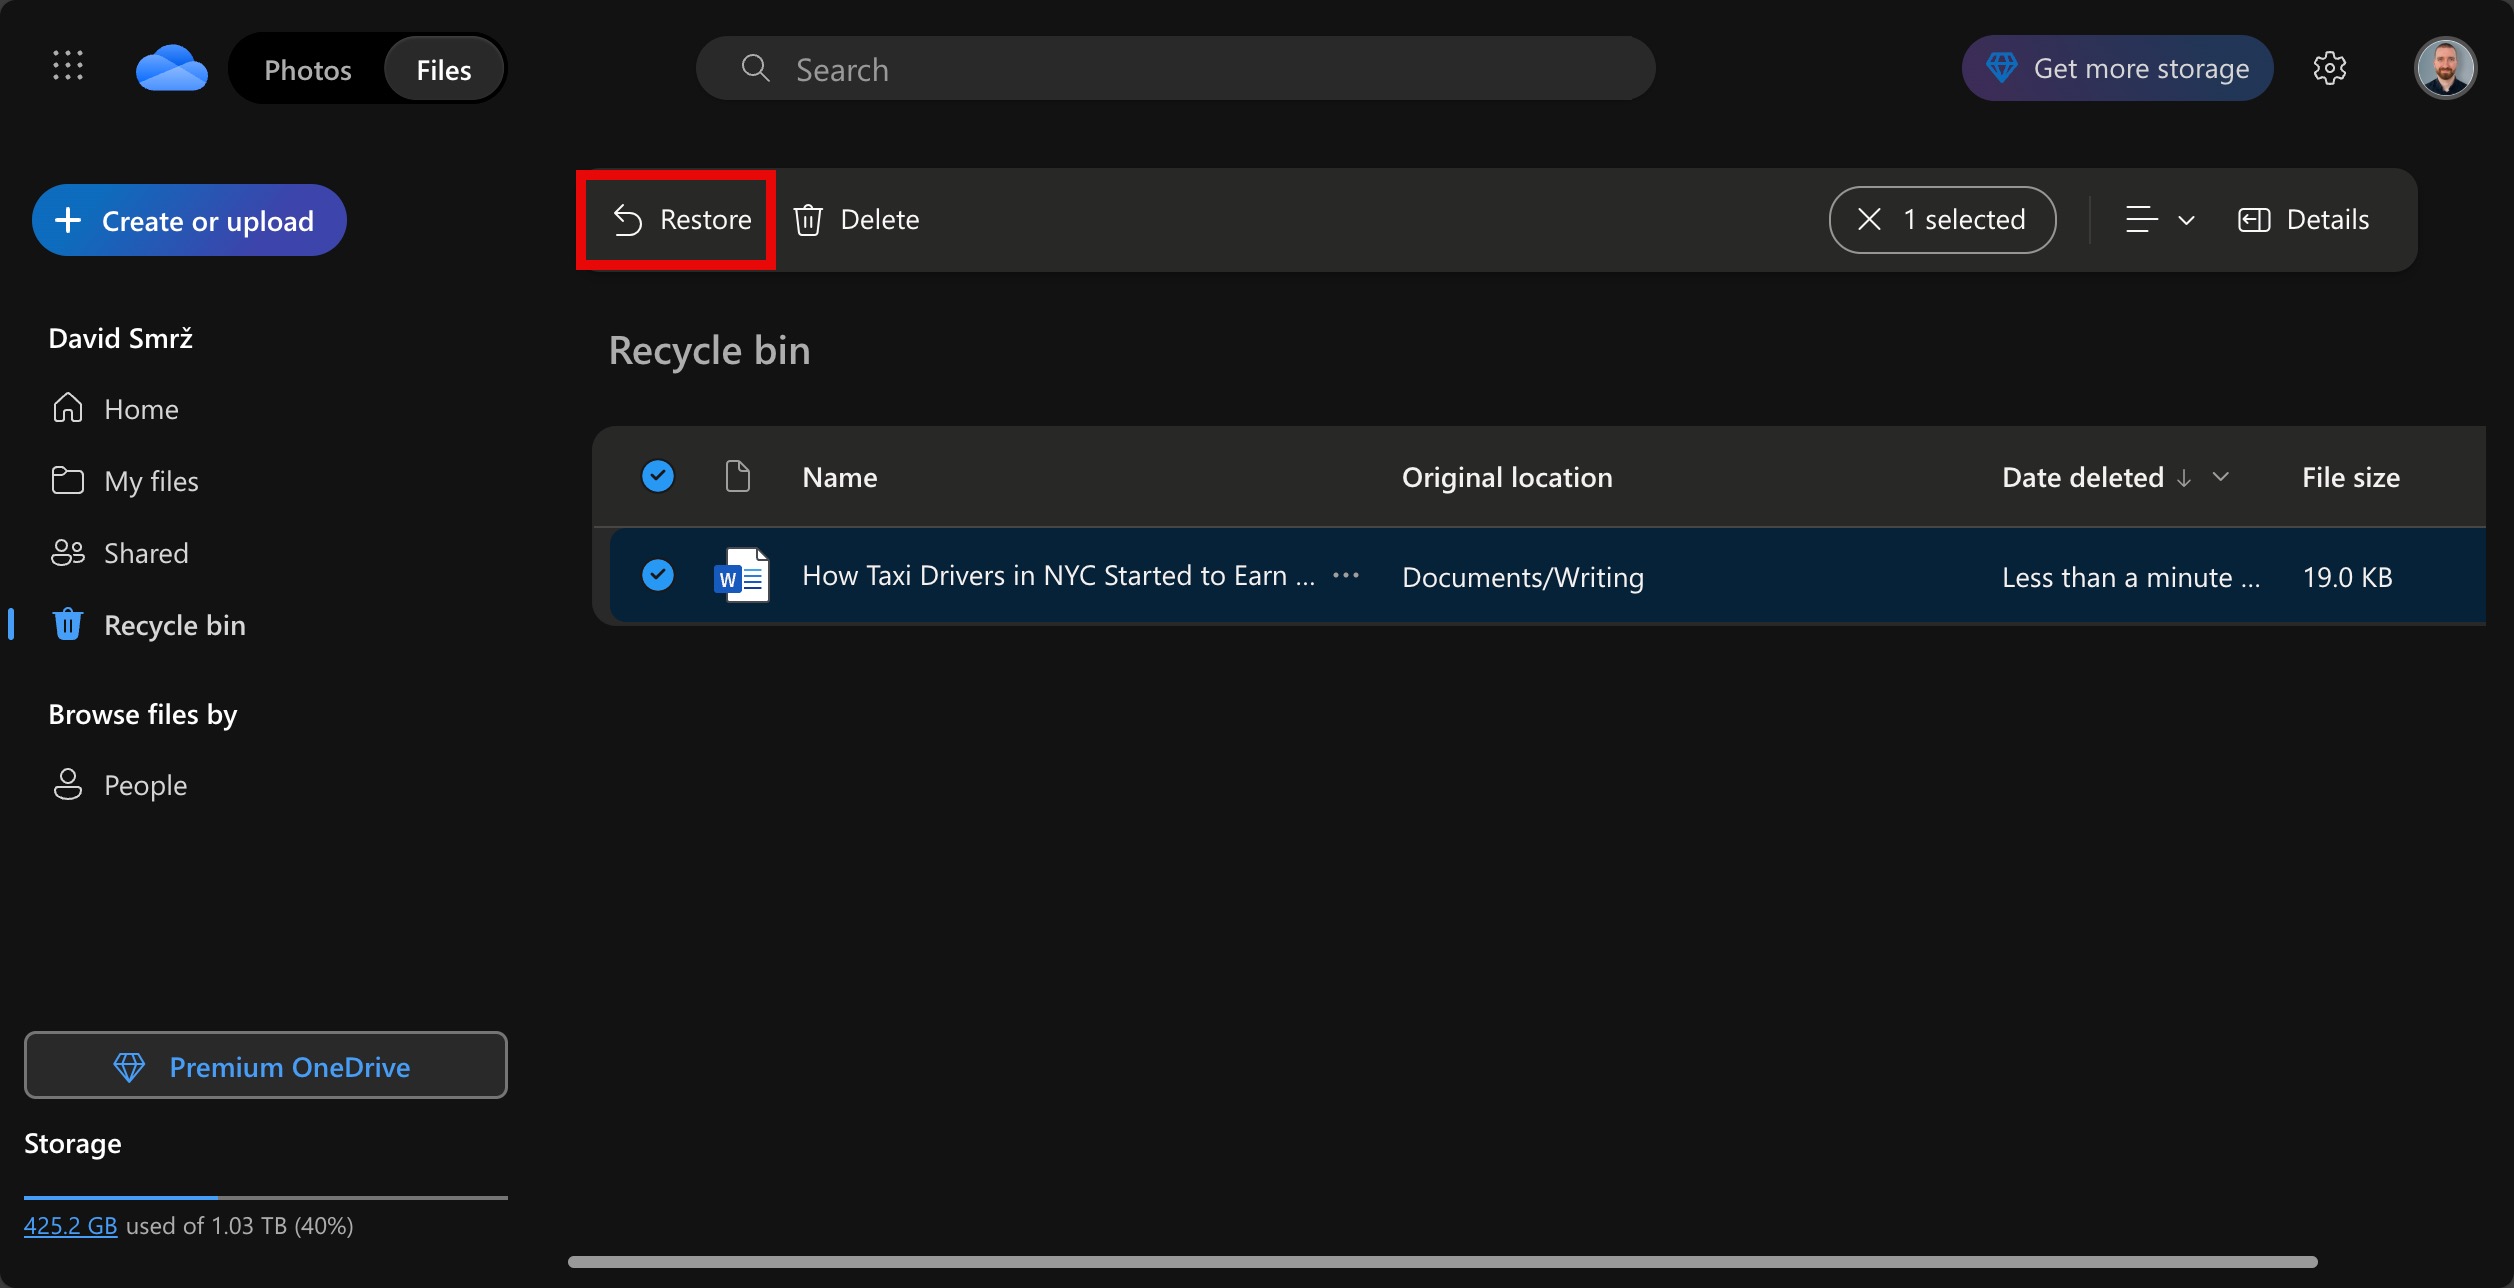
- Click Recycle bin in the left navigation panel.
- Look for your Word document in the list. You can sort by Date deleted to find recent files faster.
- Select the checkbox next to your document, then click Restore at the top of the page.
- The file returns to its original OneDrive folder and should sync back to your computer within minutes.
⚠️ Important: Keep in mind that OneDrive only keeps deleted files for 30 days (93 days for work/school accounts). After that, they’re permanently gone from OneDrive’s servers.
How to Recover Unsaved Word Documents on Windows
You’re not the first Windows user who has lost an unsaved Word document. Microsoft knows this happens all the time, which is why Word has multiple backup features that can save you.
Method 1:Automatically Recover Unsaved Documents from the Document Recovery Section
When Word crashes or closes unexpectedly, it automatically searches for AutoRecover files the next time you open it. If it finds anything, a Document Recovery pane appears on the left side of your screen with all available drafts. This is the simplest way for unsaved Word document recovery because Word does the heavy lifting for you.
Here’s all you need to do to recover from the document recovery section:
- Open Word after a crash or unexpected closure.
- Look for the Document Recovery pane on the left side. If it appears, you’ll see your unsaved documents listed with timestamps.
- Either view the file so you can check if it’s the right version by clicking the Open button or save the file to a location of your choice by clicking Save As.

Once you recover your document, Word might keep showing older versions in the Document Recovery pane. After you’ve saved the version you want, you can safely close the pane by clicking the X on each unwanted version.
Method 2:Manually Restore Unsaved Document from AutoRecover Folder
To protect users from their own negligence, Word saves AutoRecover files every 10 minutes (you can change the frequency in Options), making it possible for users to recover a closed Word document that hasn’t been saved properly.
For many possible reasons, Word’s automatic recovery sometimes doesn’t trigger properly, but the AutoRecover files are still sitting in a hidden folder, waiting to be rescued. That’s why you should use this method if Word crashed or you closed the file without saving and the Document Recovery pane didn’t show your draft when you reopened Word.
Steps to find and recover your document from the AutoRecover folder:
- Open Word and go to File > Options > Save.
- Look for AutoRecover file location and copy the entire file path shown there. It usually looks something like: C:\Users\[YourUsername]\AppData\Roaming\Microsoft\Word\

- Open File Explorer and paste this path into the address bar, then press Enter. The folder location can vary depending on your Word version and whether someone customized the settings. Always trust the path shown in your Word Options.
- Look for files with .asd extension (AutoSave Documents). The file names might look cryptic, but check the Date modified column to find files from when you were working.
- To open the .asd file: Go back to Word, click File > Open > Browse, then change the file type dropdown from All Word Documents to All Files (*.*) to see the .asd files. Select your file and click Open.
- If Word opens your document, immediately save it with File > Save As to preserve it properly.
Can’t find any .asd files? Check if AutoRecover was actually turned on:
- In Word, go to File > Options > Save.
- Make sure Save AutoRecover information every X minutes is checked.
- If it wasn’t checked, AutoRecover wasn’t creating backups, and you’ll need to try Method 2 or 3.
Method 3:Recover Word Document from Temporary File
Windows and Word create temporary backup files as you work, even if you never hit save. These temp files are your last line of defense when AutoRecover fails or wasn’t enabled. The only problem is that the files are, well, temporary, so you need to go through the steps below quickly.
Steps to find and recover from temporary files:
- Click the Start button or press the Windows key.
- In the search bar, type one of these: *.tmp (for temporary files), *.asd (for AutoSave files), ~* (files starting with tilde, which Word often uses for temp files). A few KB usually means it’s just a lock file (skip it). Larger files (100KB+) are more promising.
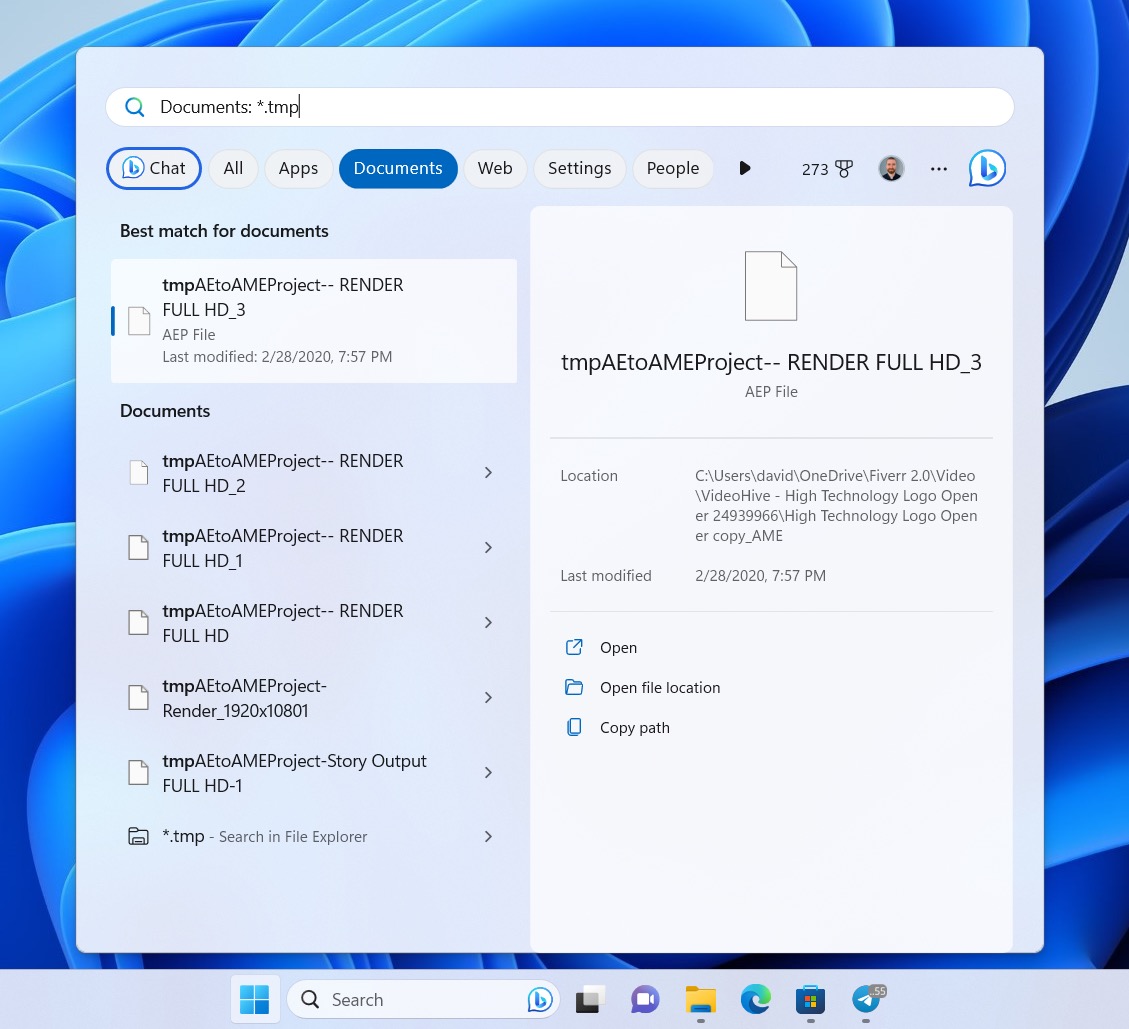
- Click on the Documents tab in the search results to filter for document files.
- To open a temp file, launch Word, go to File > Open > Browse, change the file type dropdown to All Files (*.*), then select and open your file. Prioritize .asd and .wbk files first as they’re more likely to be Word backups than generic .tmp files.
- If Word successfully opens the file, immediately save it with File > Save As before it disappears again.
Microsoft has a comprehensive guide for more complex recovery scenarios at their official troubleshooting page, so we recommend you check it out if you’ve still not restored your deleted Word files.
How to Find Disappeared Word Documents on Windows
Sometimes your Word document isn’t deleted, it’s just not visible. Maybe Windows marked it as hidden, you accidentally saved it to the wrong folder, or it got moved during a sync. In all these and other situations, you should look for the disappeared Word documents using the methods below.
Method 1:Unhide Disappeared Word Document
This method helps when your document exists but doesn’t show up in its folder or search results because Windows marked it as hidden (can happen after system updates, malware scans, or syncing issues).
Steps to unhide documents:
- Open File Explorer and navigate to the folder where your document should be.
- Click the View button in the toolbar, then hover over Show and click Hidden items to quickly toggle hidden files visibility.

If you’re on Windows 10, open File Explorer and navigate to your document’s folder. Click the View tab in the ribbon at the top, then click Options on the far right and select “Change folder and search options.” In the Folder Options window, go to the View tab, select “Show hidden files, folders, and drives” under Hidden files and folders, uncheck “Hide protected operating system files,” then click Apply and OK.
After finding your document, you should consider reversing these settings to keep system files protected.
To remove the hidden attribute from your document:
- Once you find your hidden document (it’ll appear slightly faded), right-click on it.
- Select Properties.
- Uncheck the Hidden box under Attributes.
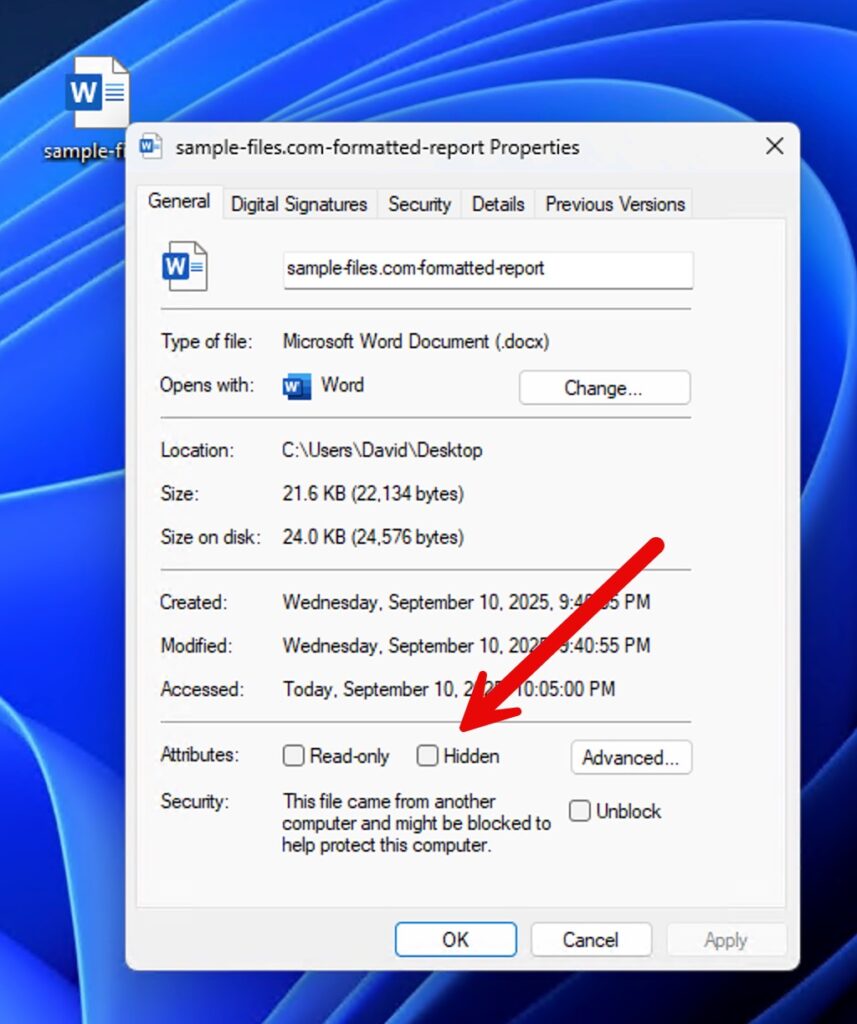
- Click OK.
Method 2:Find Lost Word Document from Start Menu
Windows Search is more powerful than most people realize. If your document is anywhere on your computer, you should be able to find it with its help.
Basic search steps:
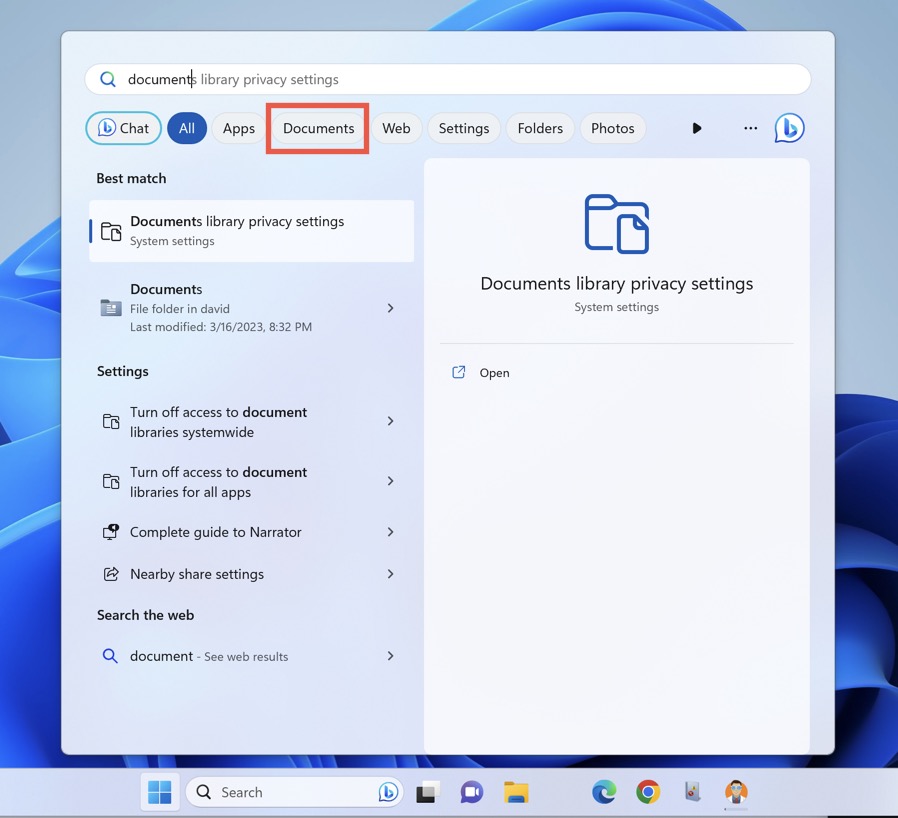
- Click the Start button or press the Windows key.
- Type your document name (or part of it) in the search box.
- Click Documents at the top to filter results.
Advanced search tips for better results:
- Use wildcards: Type report*.docx to find all Word files starting with “report”
- Search file contents: Type content:”specific phrase” to find documents containing that exact text (only works if Windows Search indexing is enabled)
- Search by date: Type datemodified:this week to find recently edited documents
- Expand your search: If nothing shows up, click Search my stuff at the bottom, then choose My stuff everywhere to search all drives and folders
You can also search on a different drive by clicking More in the search results and then select the Search This PC option. This way, the search will include all connected drives and not just the system one.
💡 Pro tip: If Windows Search isn’t finding your files or feels too slow, consider using Everything. It’s a free, lightning-fast file search tool that instantly searches all your drives and finds files Windows Search might miss.
How to Recover Overwritten Word Documents on Windows
You just saved over your document with the wrong version. Or maybe you pasted new content and saved before realizing you needed the old text. Unlike deletion, you can’t simply “undo” an overwrite once you’ve saved and closed the file. But here’s the good news: both Windows and OneDrive automatically keep version histories that can rescue your original document.
Method 1:Restore Deleted or Overwritten Documents from Local Previous Version
This method only works if File History was enabled BEFORE you overwrote your document. If this feature wasn’t turned on, Windows won’t have any previous versions to show you.
Steps to check for previous versions:
- Open File Explorer and navigate to the folder containing your overwritten document.
- Right-click on the document and select Properties.
- Click the Previous Versions tab at the top.
- If versions exist, you’ll see a list with dates and times. Check the Date modified column to find the version from before you overwrote it.
- Before restoring, preview first: Select a version and click Open to view it in read-only mode. This confirms it’s the right version without risking your current file.
- Once you’ve found the right version, you have two options:
- Restore: Replaces your current file with this older version (overwrites what you have now)
- Restore To…: Saves the older version to a different location (safer since it keeps both versions)

If no previous version is showing, it means the feature wasn’t enabled. To avoid this problem in the future:
For Windows 11:
- Open Control Panel (type Control Panel in the Start menu).
- Search for File History.
- Navigate to the File History section and enable the feature.
For Windows 10:
- Go to Settings > Update & Security > Backup.
- Turn on Back up using File History.
Regardless of whether you’re using Windows 11 or 10, you’ll need an external drive or network location for backups.
Method 2:Recover Overwritten Document From OneDrive Version History
This method works only for files stored in OneDrive or SharePoint, and the version history retention depends on your subscription plan or admin settings. Personal accounts typically keep versions for 30 days, while business accounts might keep them longer.
Steps to recover from OneDrive version history:
- Go to onedrive.com and sign in.
- Navigate to your file.
- Right-click it and select Version history.
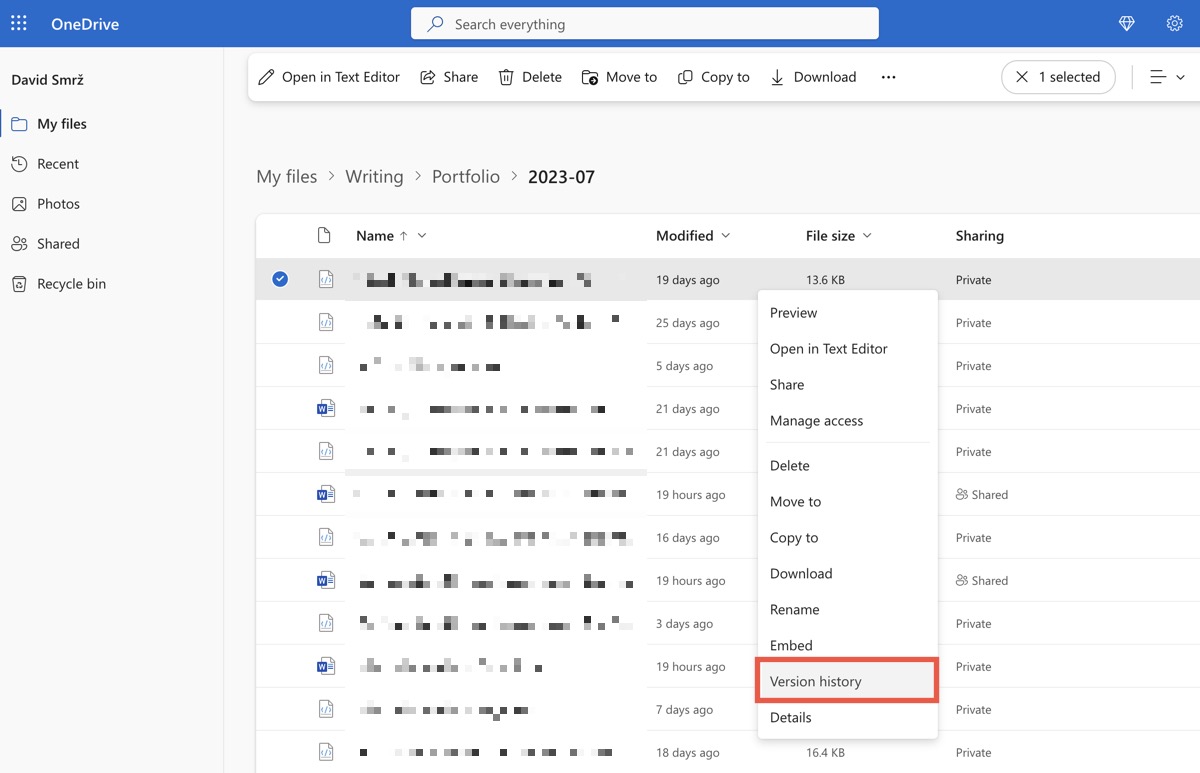
- Browse through the versions list. Each shows who made changes and when.
- Click the three dots (…) next to the version you want. You’ll see two options:
- Restore: Replaces your current file with this version (overwrites what you have now)
- Download: Saves a copy of this version without changing your current file (safer option)
If you’re unsure which version you need, always choose Download first. This way, you can review the older version without losing any recent changes you might want to keep.
Still Have Questions?
We’ve covered the main recovery scenarios (deleted files, unsaved documents, overwritten versions, and missing files), but we know every situation is a little different. If there’s something very specific we haven’t mentioned in this article yet, then you can check out the FAQs below for quick answers to trickier problems.
You can also drop a comment below with as much detail as possible (what happened, what you’ve tried, any error messages), and we’ll get back to you as soon as we can with personalized help.
FAQ:
- Launch Word and click the Microsoft Office button.
- Select Options and click Save in the navigation pane.
- Copy the path in the AutoRecover file location box.
- Launch File Explorer and paste the copied path and press Enter.
- Look for files whose names end in .asd (AutoRecover files).
- Locate the unsaved document and open it just like you would a regular Word document.
- Launch Word and click File > Open > Browse.
- Navigate to the location with the corrupted document.
- Select the document you want to recover and click the arrow next to Open.
- Click Open and Repair.
- Reopen Word.
- Navigate to File > Info > Manage Document.
- Click on Recover Unsaved Documents.
- Select your file and click Open to recover it.
- Open Word and click on File > Open.
- Click on the Recover Unsaved Documents option at the bottom of the Recent file list.
- Select the one you're looking for and click Open.


