An “Access is denied” message in Windows 10 or 11 indicates that the system is unable to open the external hard drive or display its contents. The drive remains visible in File Explorer, but access to the data is blocked.
This situation is relatively common. In our work, we’ve encountered and restored access to many drives affected by the same type of error. The following material is based on that experience and describes the sequence of actions that usually helps return a blocked drive to normal operation.
Why is Access Denied for Hard Drive on Windows 10/11
Several reasons can cause the access denied error when trying to access an external hard drive. The most common reasons include the following:
| Reason | Description |
| 🙅 Permission Settings | If you don’t have permission to access the external hard drive, you’re likely to see the “Access is denied” error. |
| 🔒 BitLocker encryption | If you’ve enabled BitLocker encryption, but the BitLocker Encryption service isn’t running, you may not be able to access the hard drive. |
| 💻 Using hard drive on both Mac and Windows | If you use your hard drive on both operating systems, either of them could have tinkered with the drive’s file system resulting in access being denied. |
| 🚿 Improperly ejecting hard drive | Ejecting the hard drive improperly or abruptly while data is being written to it can result in corruption. If your hard drive has become corrupt, you might face trouble accessing it. |
| ⚠️ Hard drive corruption | Corruption can occur because of several reasons, such as abrupt power failure or a virus attack. Whatever the reason for corruption, you might encounter the access denied error if your hard drive is corrupted. |
How to Recover Data from an External Hard Drive When Access is Denied
Before attempting repairs, create a sector-level image of the drive and work from that image whenever possible. Imaging preserves the original medium and prevents accidental overwrites while you run scans or repairs. The file system on the device remains unchanged when you scan an image instead of the physical disk.
For this article, we use Disk Drill as the example recovery tool because we have worked with it extensively and rely on it in cases where the operating system blocks access. The reason is technical: Disk Drill can open the device for raw (direct) access and scan the disk independently of File Explorer or other user-level components that the OS exposes. That direct access often allows a recovery tool to see file records and data structures that are not available to normal file-system calls, which makes it effective when the problem is caused by system-level access restrictions.
If the disk uses BitLocker (or another full-disk encryption), you can enter the decryption password or recovery key when starting the scan so the recovery tool can read the decrypted contents. If you do not have the BitLocker password or the recovery key, the data cannot be decrypted and therefore cannot be recovered by any software—access requires the correct decryption credentials.
In practice, the recovery process doesn’t take long. Here’s the sequence we usually use when working with drives that show the “Access is denied” message.
- Download and install Disk Drill on a system drive or another disk that is not affected by the problem. Avoid writing anything to the target drive.
- If Windows prompts to format or scan the disk, close those messages without agreeing to any operation. The drive must remain untouched before recovery.
- In the left sidebar, select Byte-to-Byte Backup. This module creates an image of the disk so the original remains unchanged during recovery.
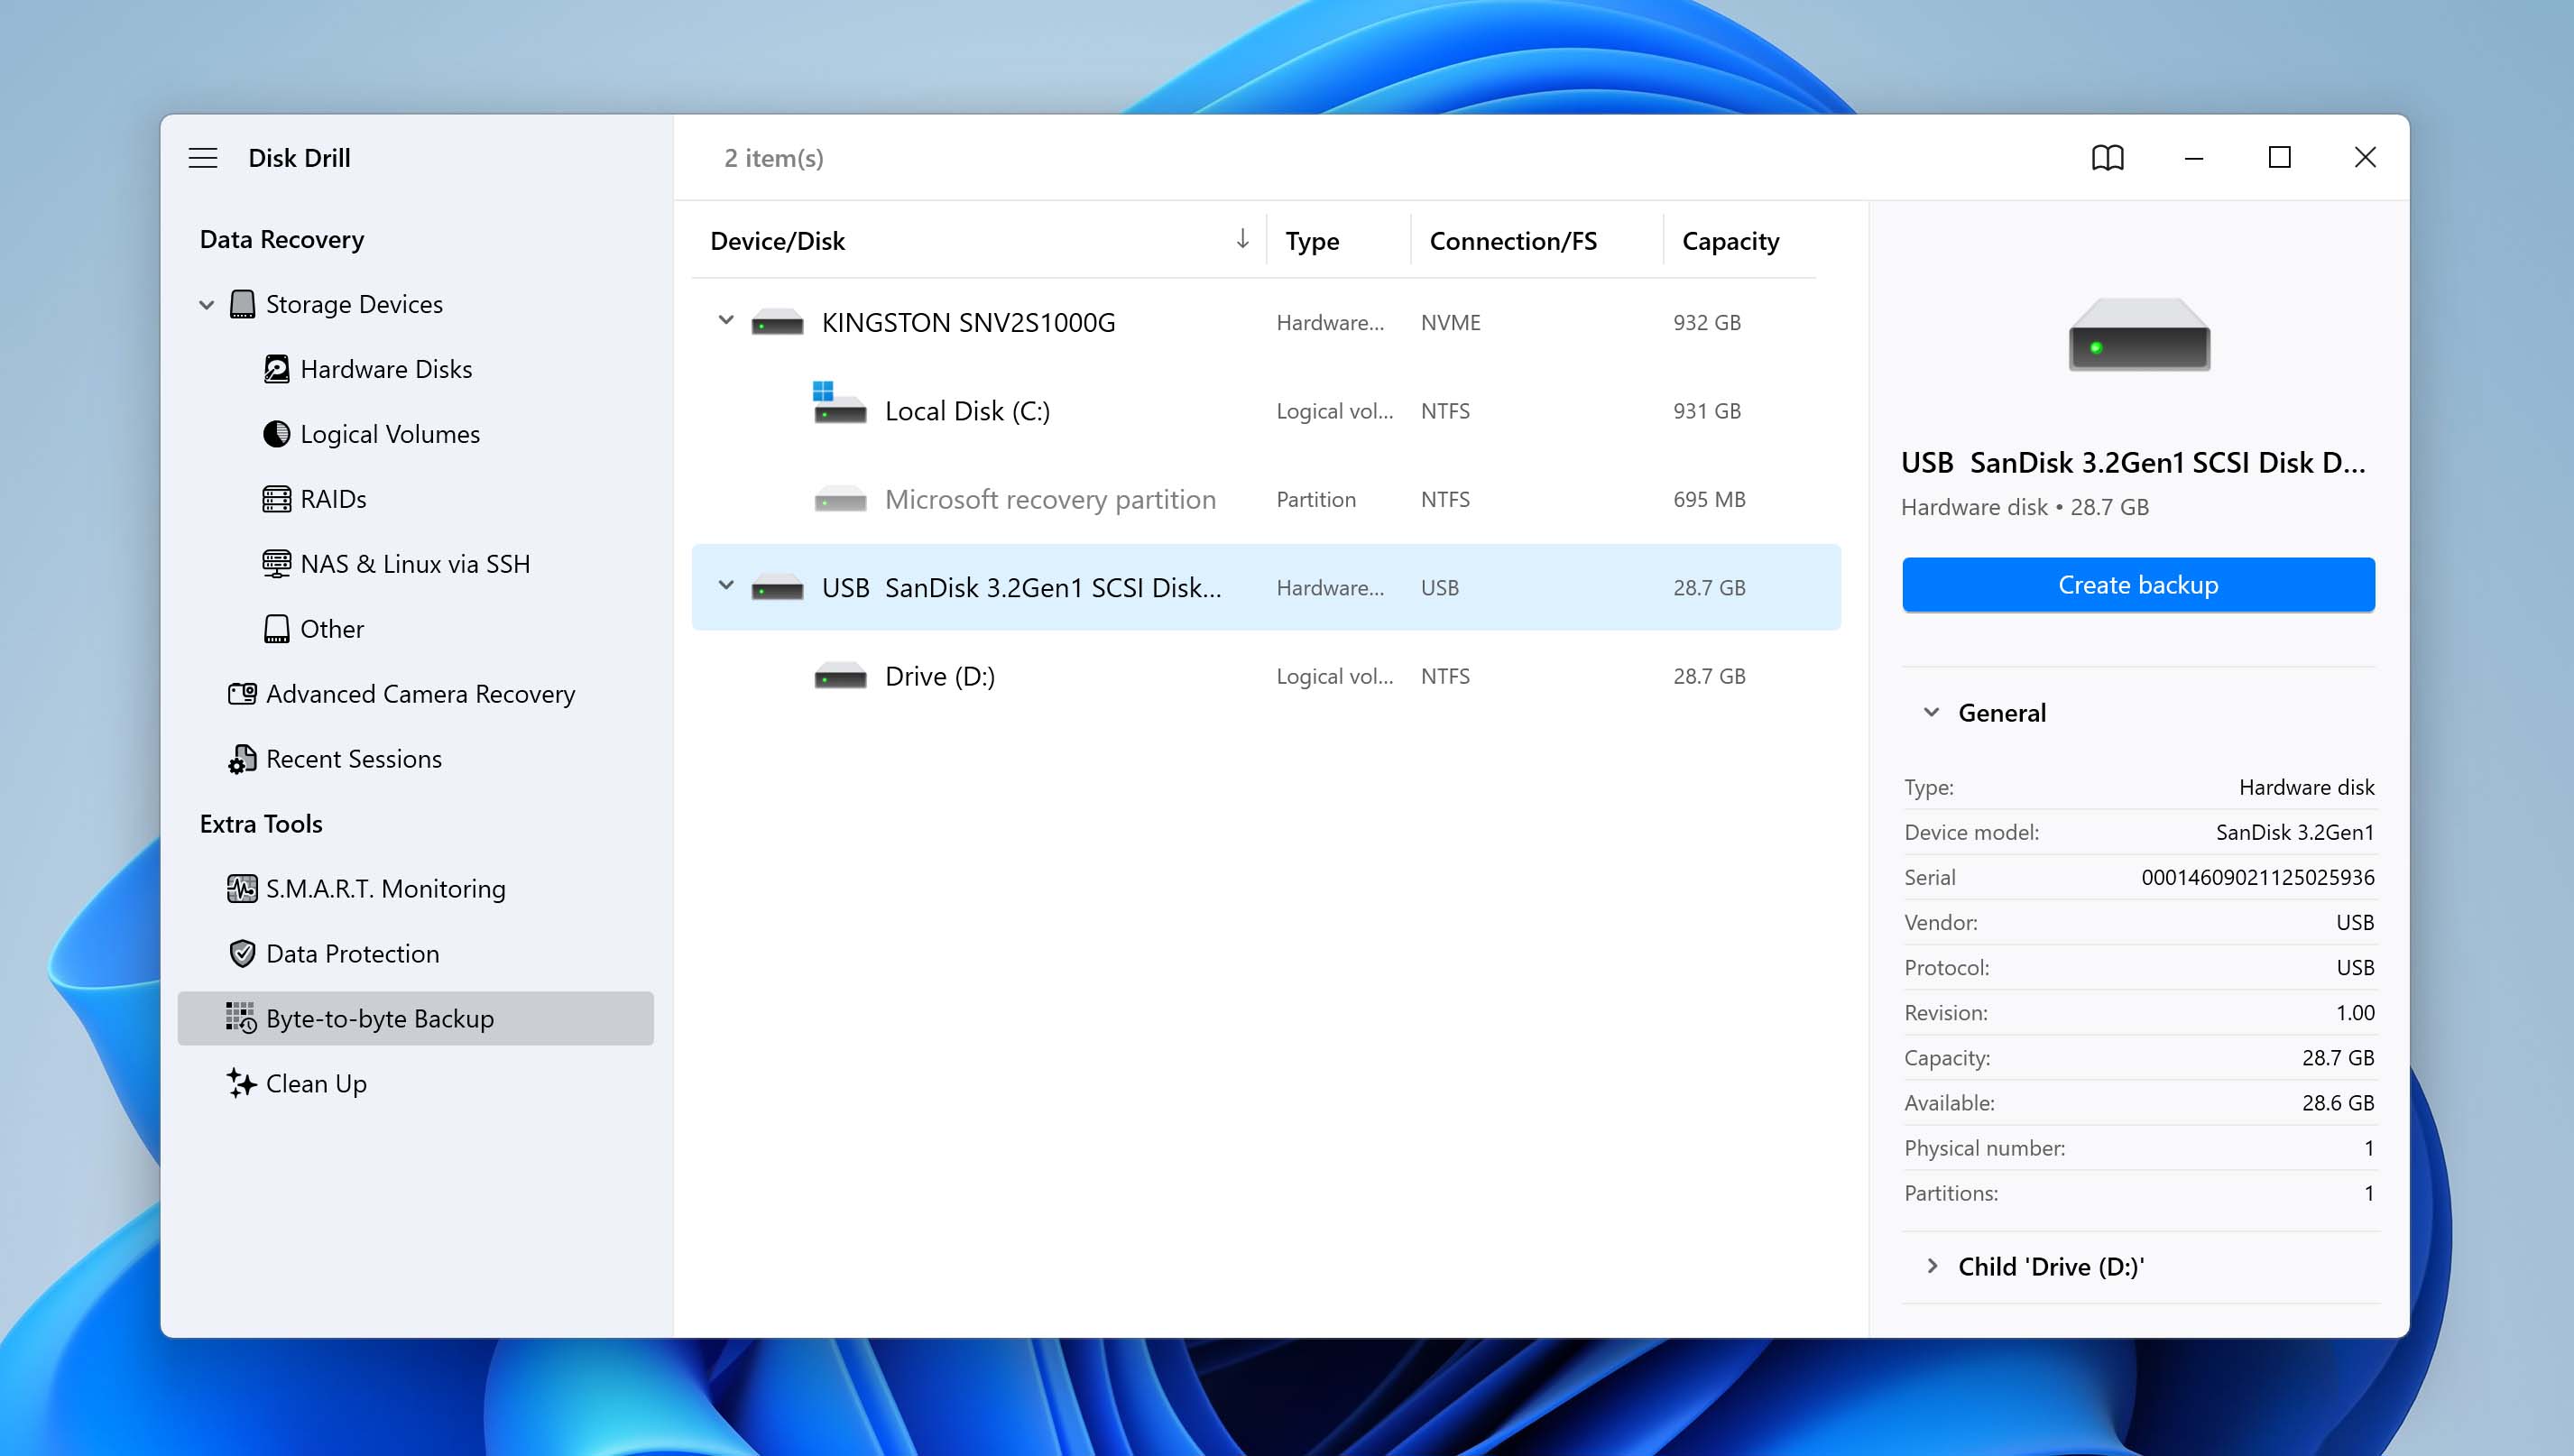
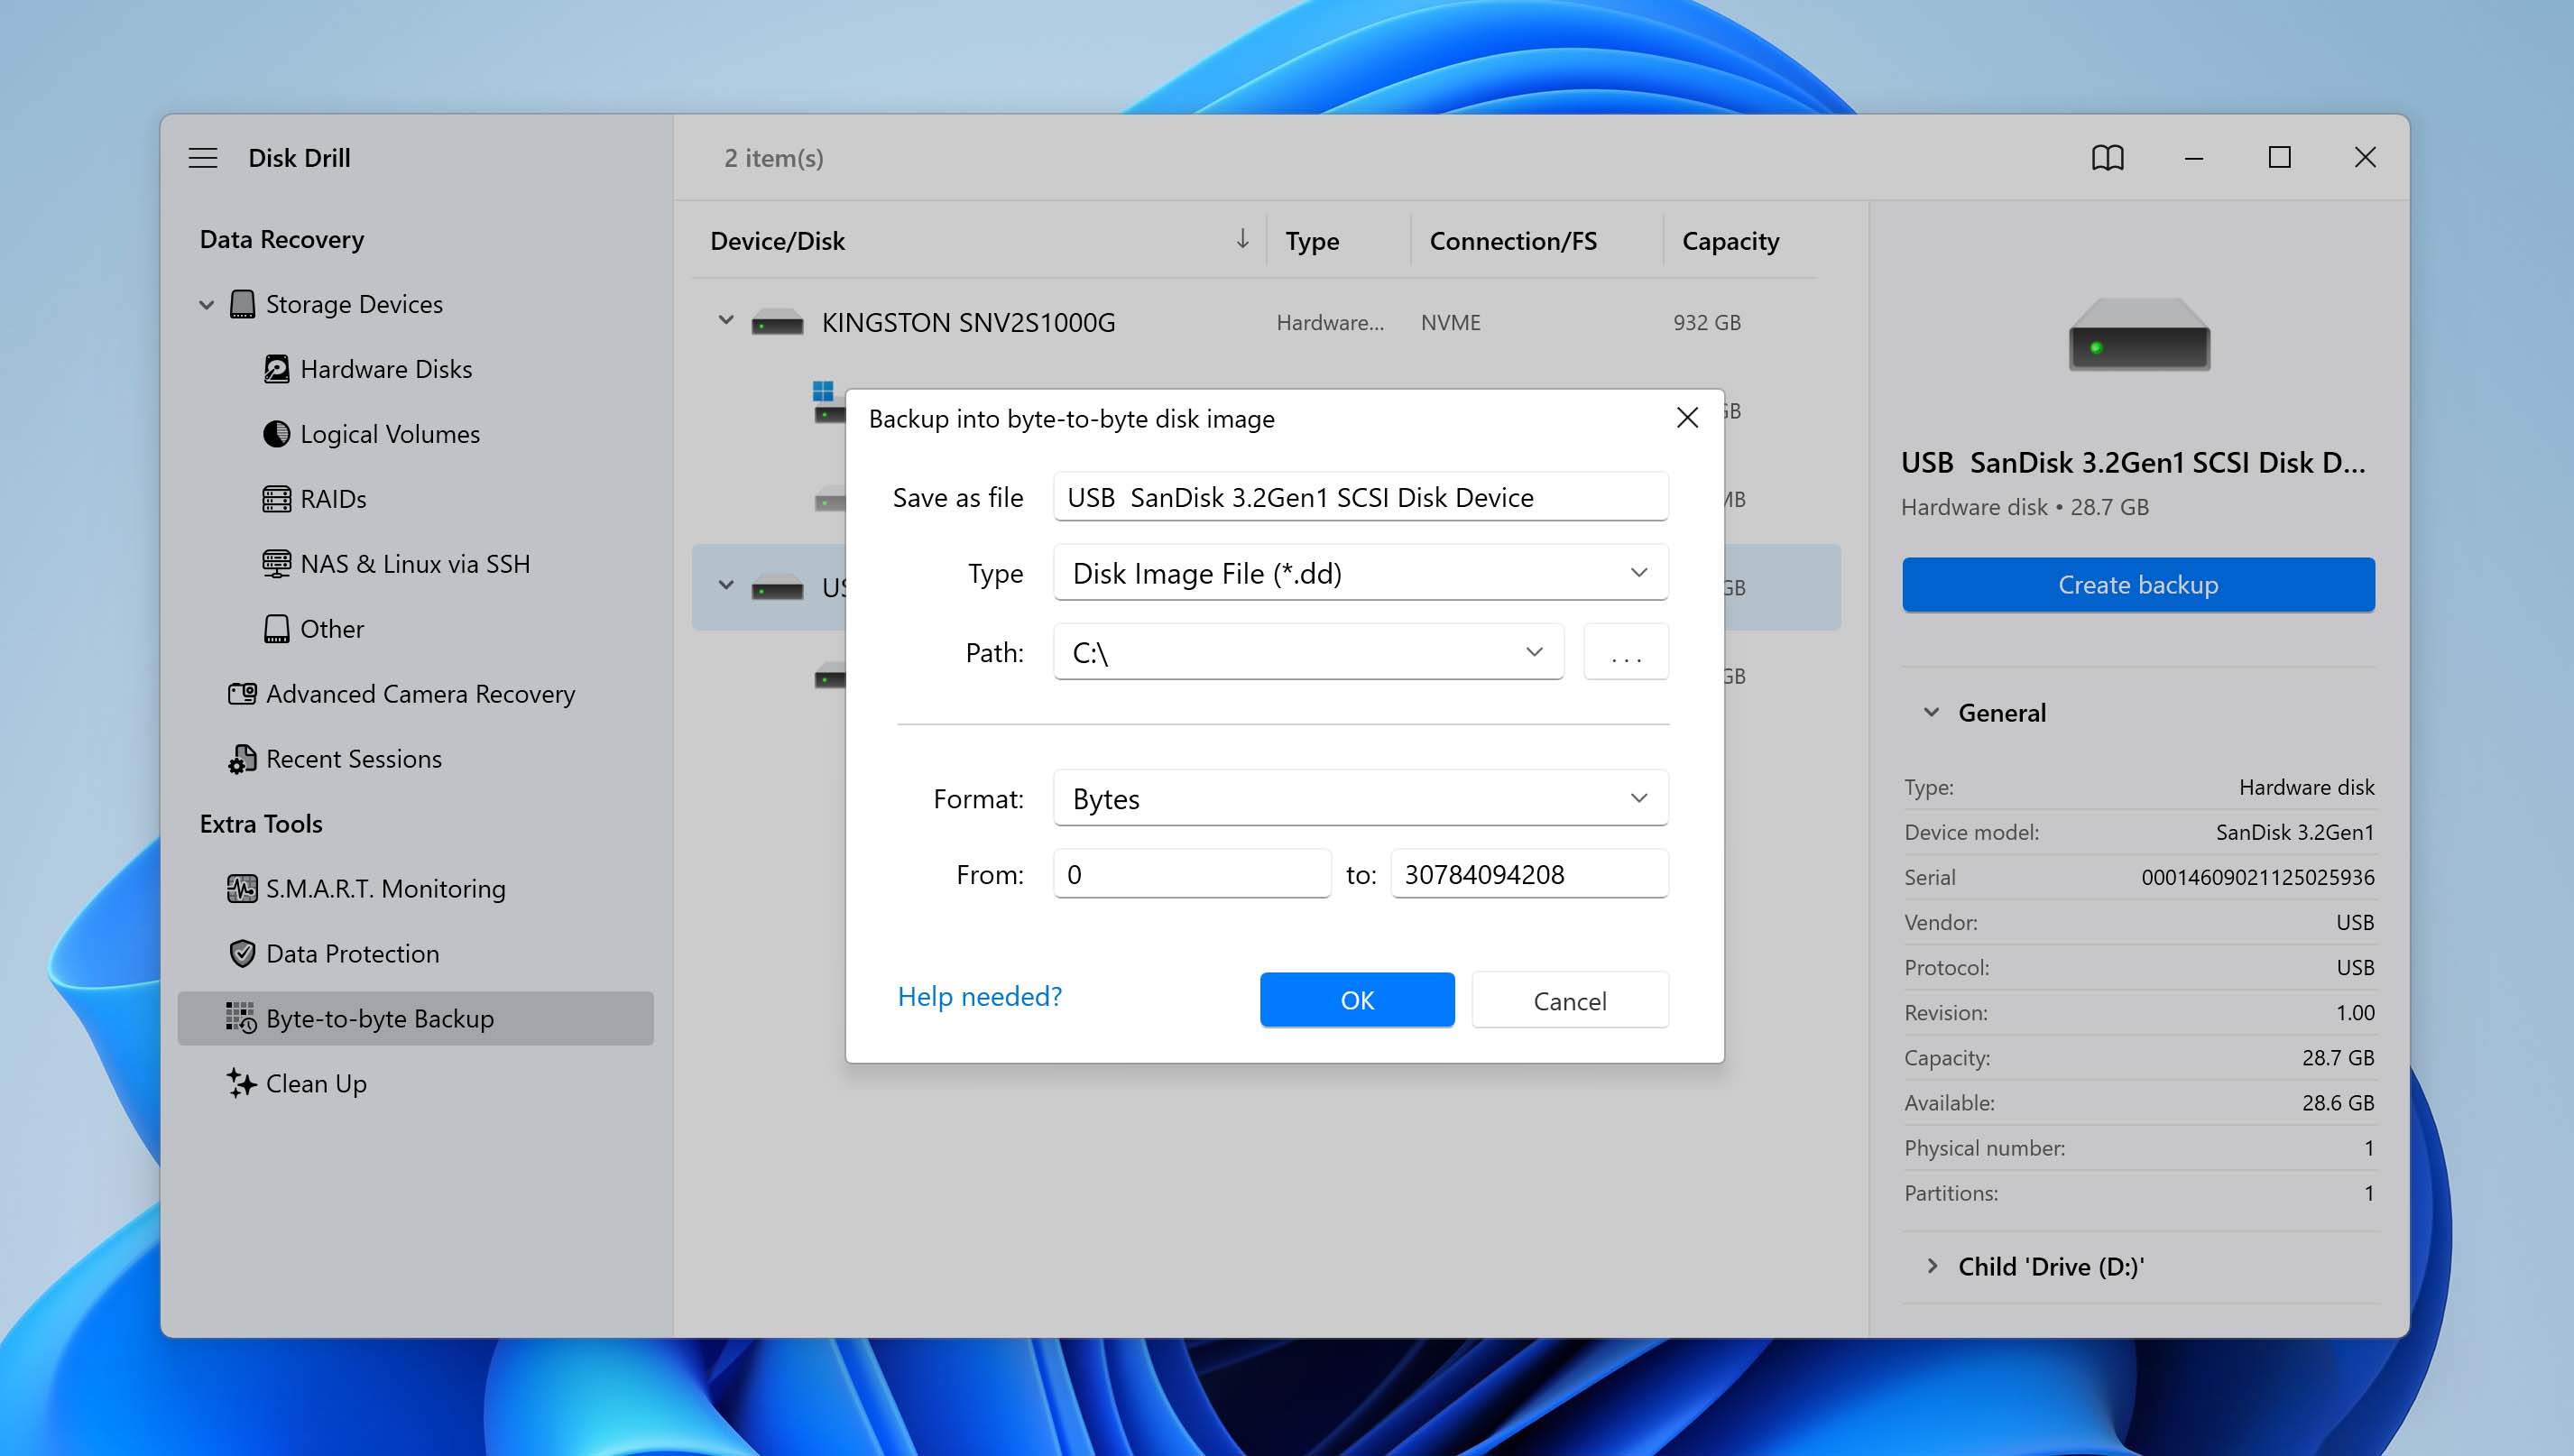
- Highlight the external drive in the list, click Create backup, and choose a location where the image file will be saved. The destination must have enough free space for the entire disk image.
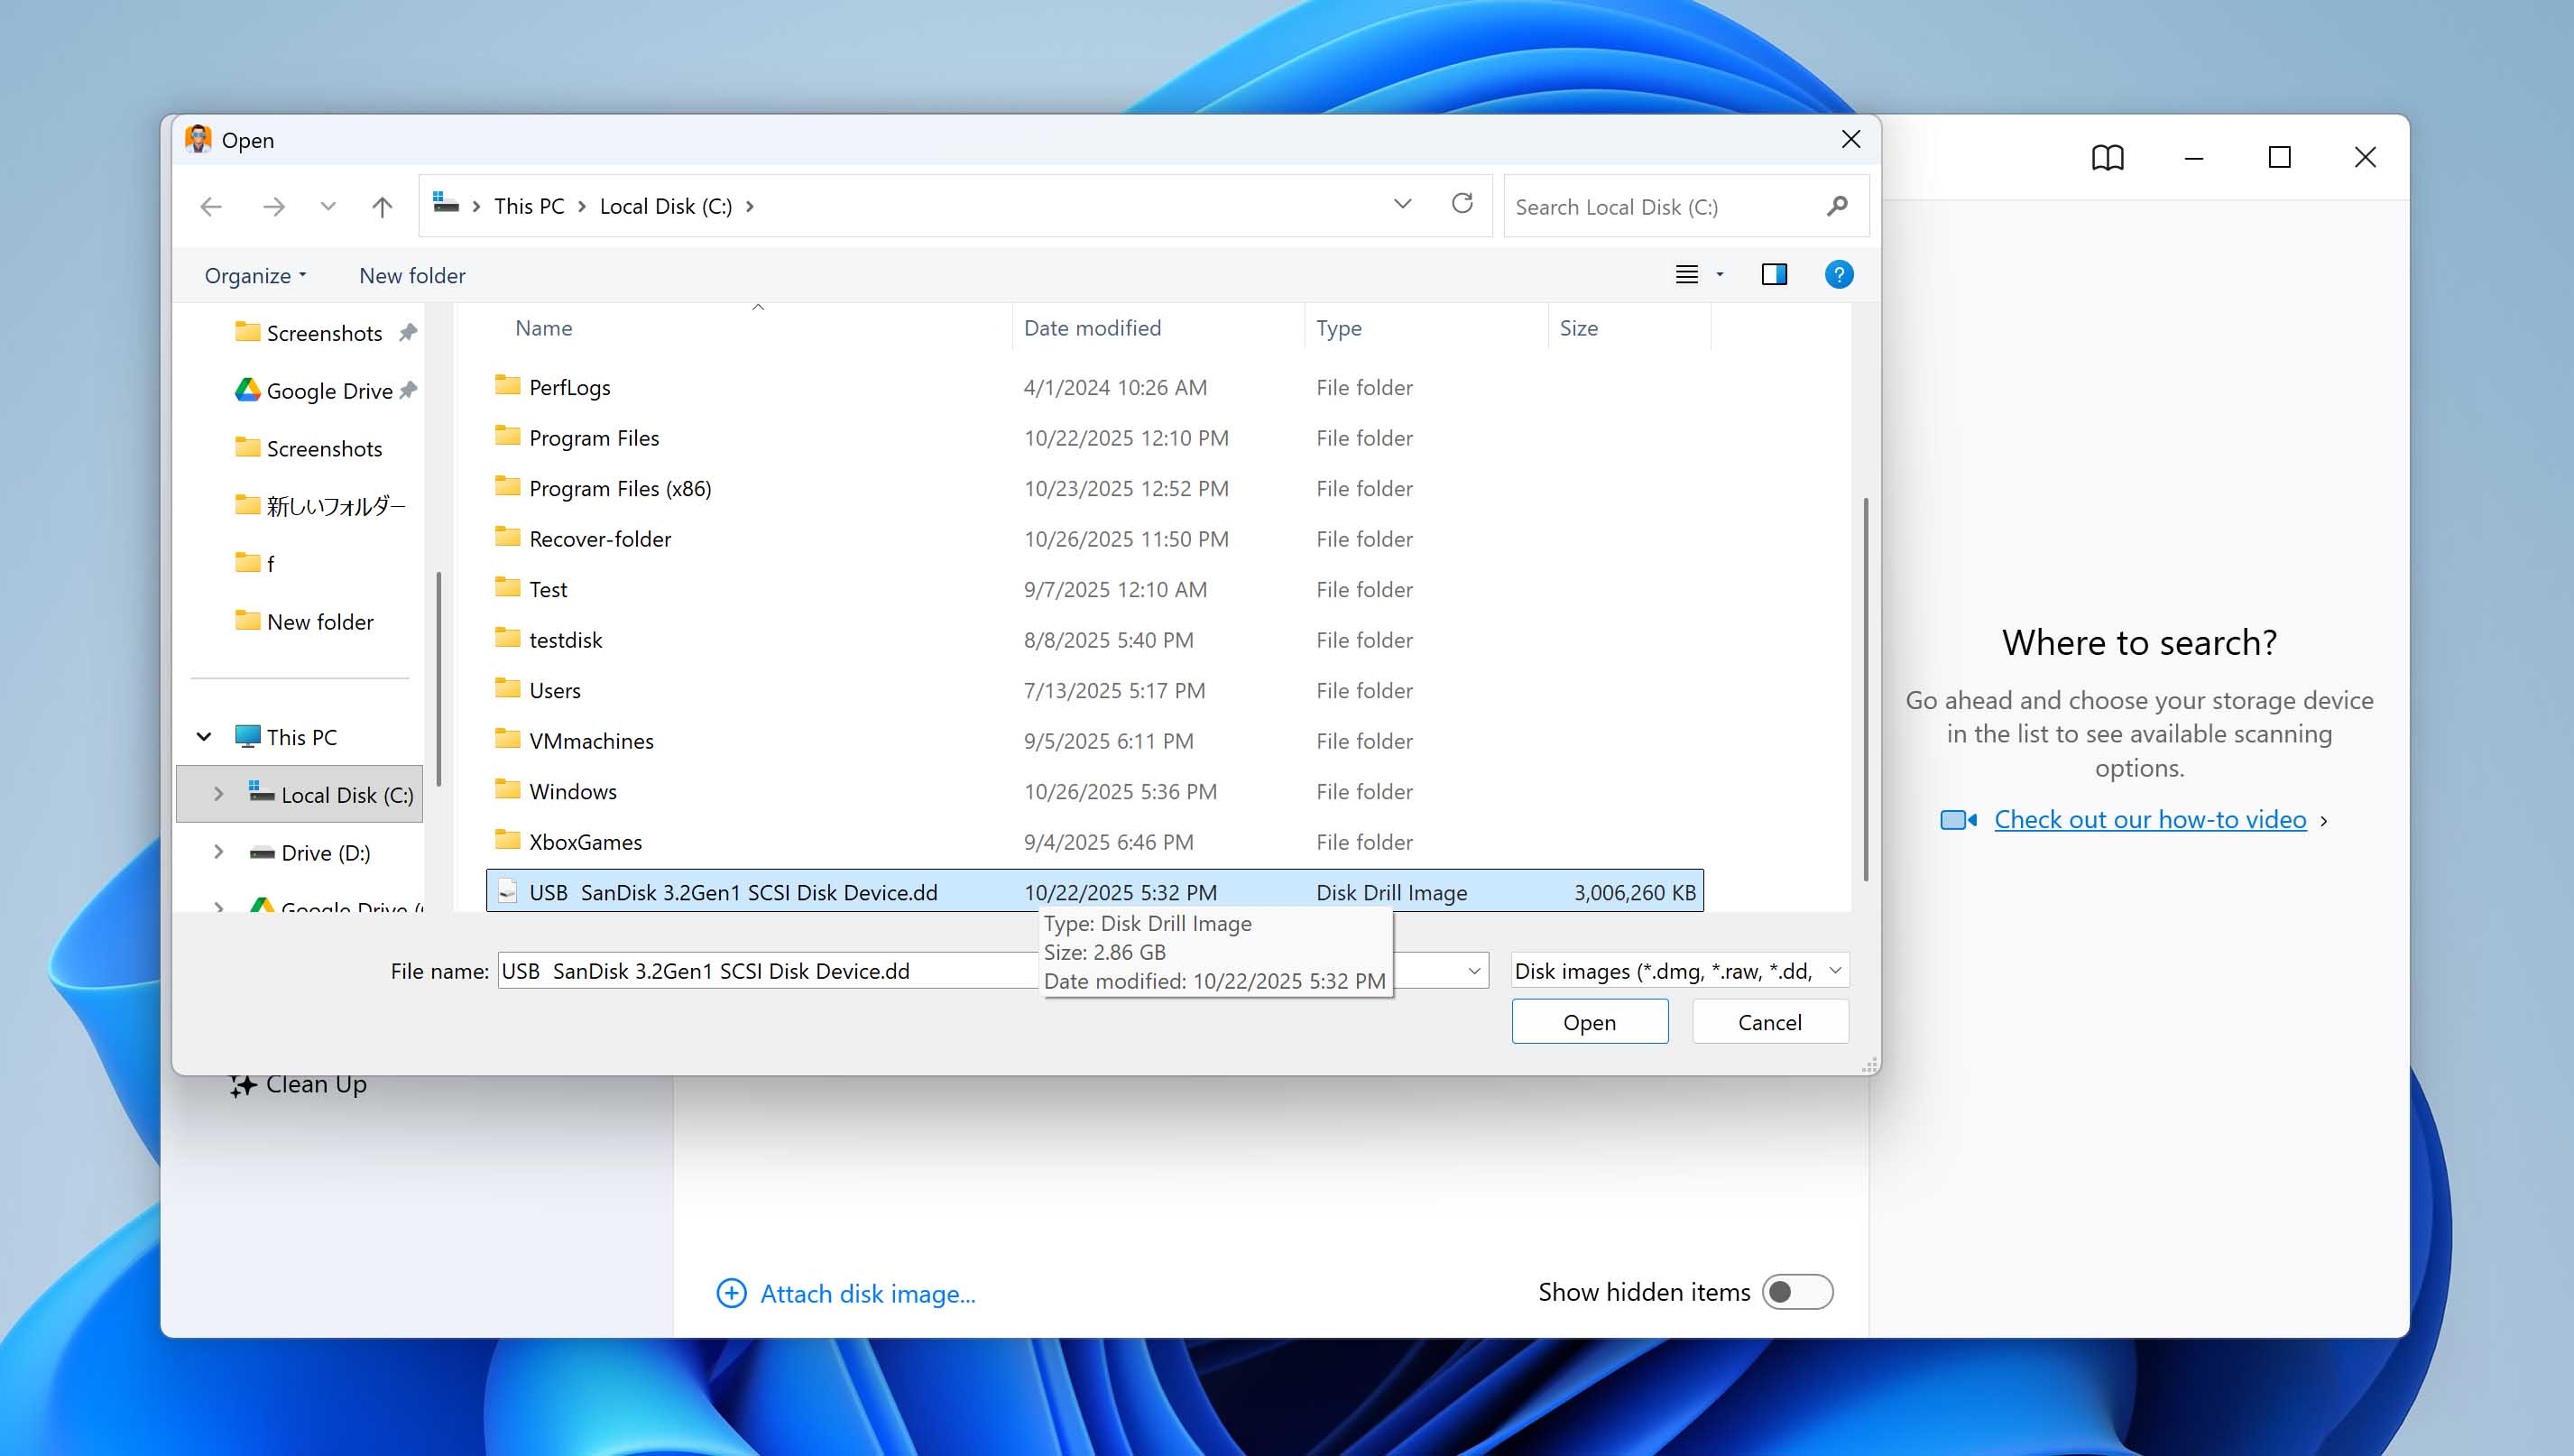
- When the backup completes, switch to the Storage devices tab. In the lower-left corner, click Attach disk image. Locate and select the image file you just made. It will appear in the list as a separate device.
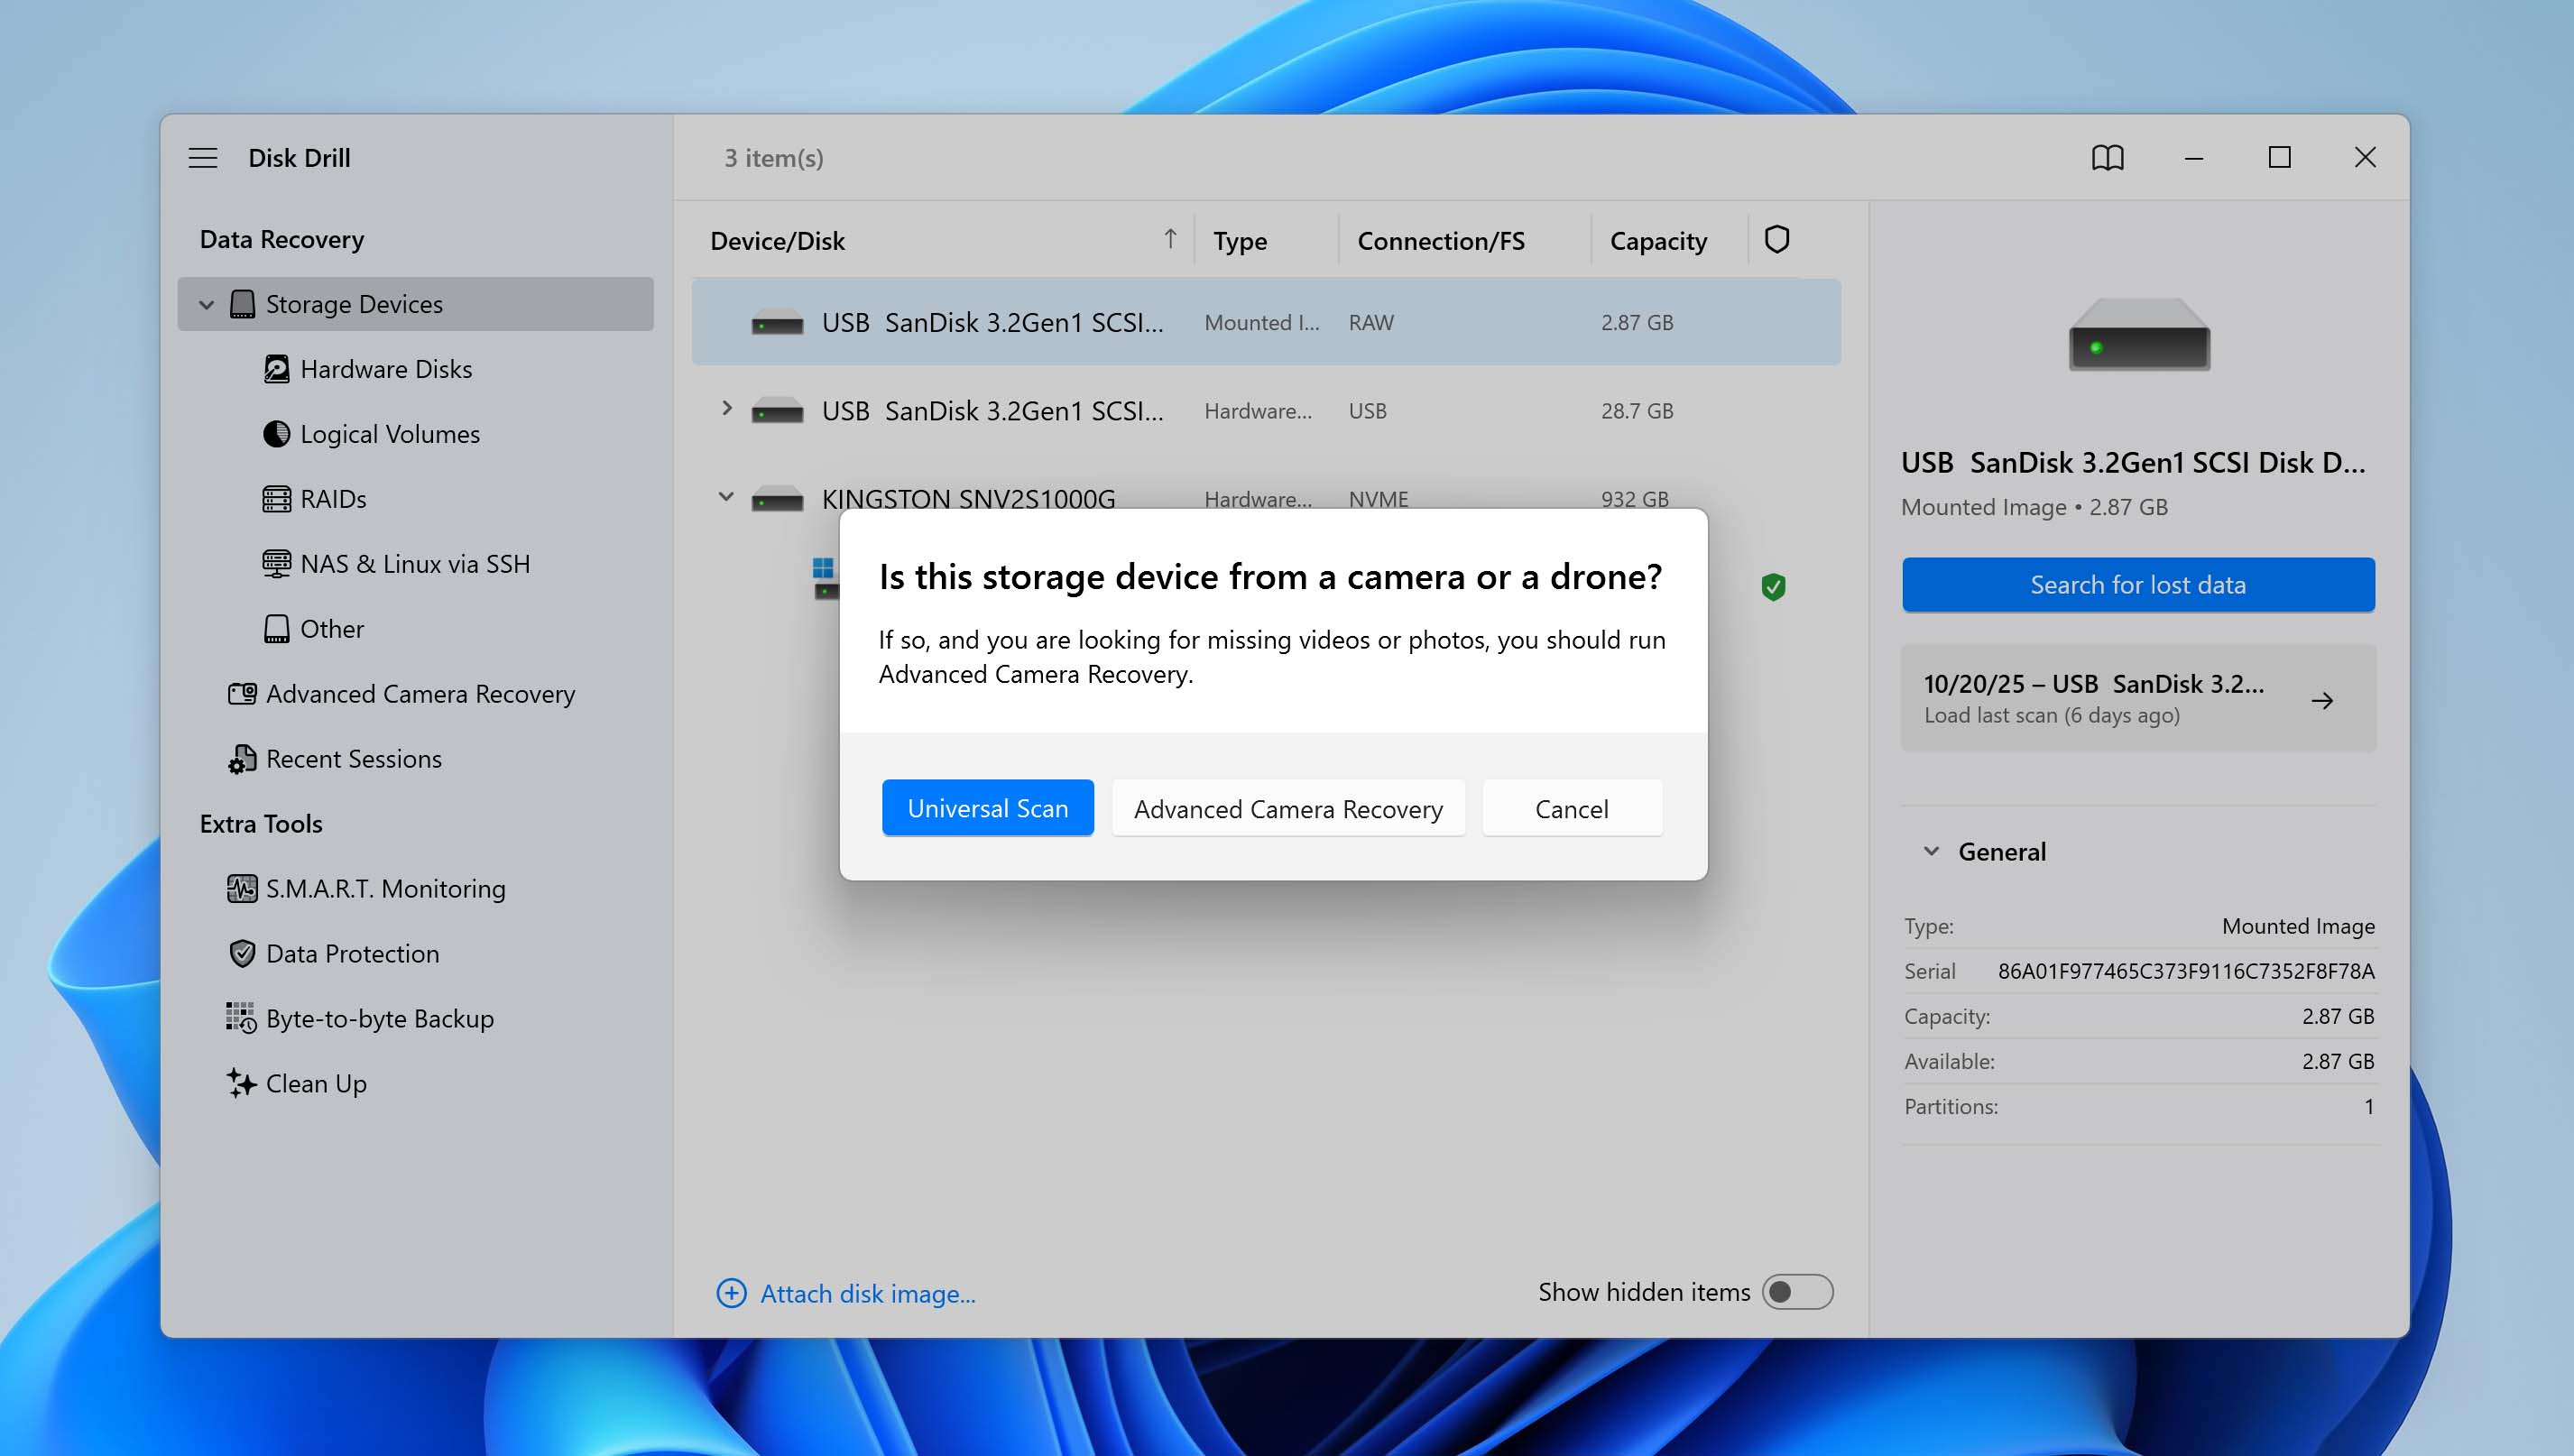
- Select the attached image and click Search for lost data. When the scan type window appears, choose Universal scan.
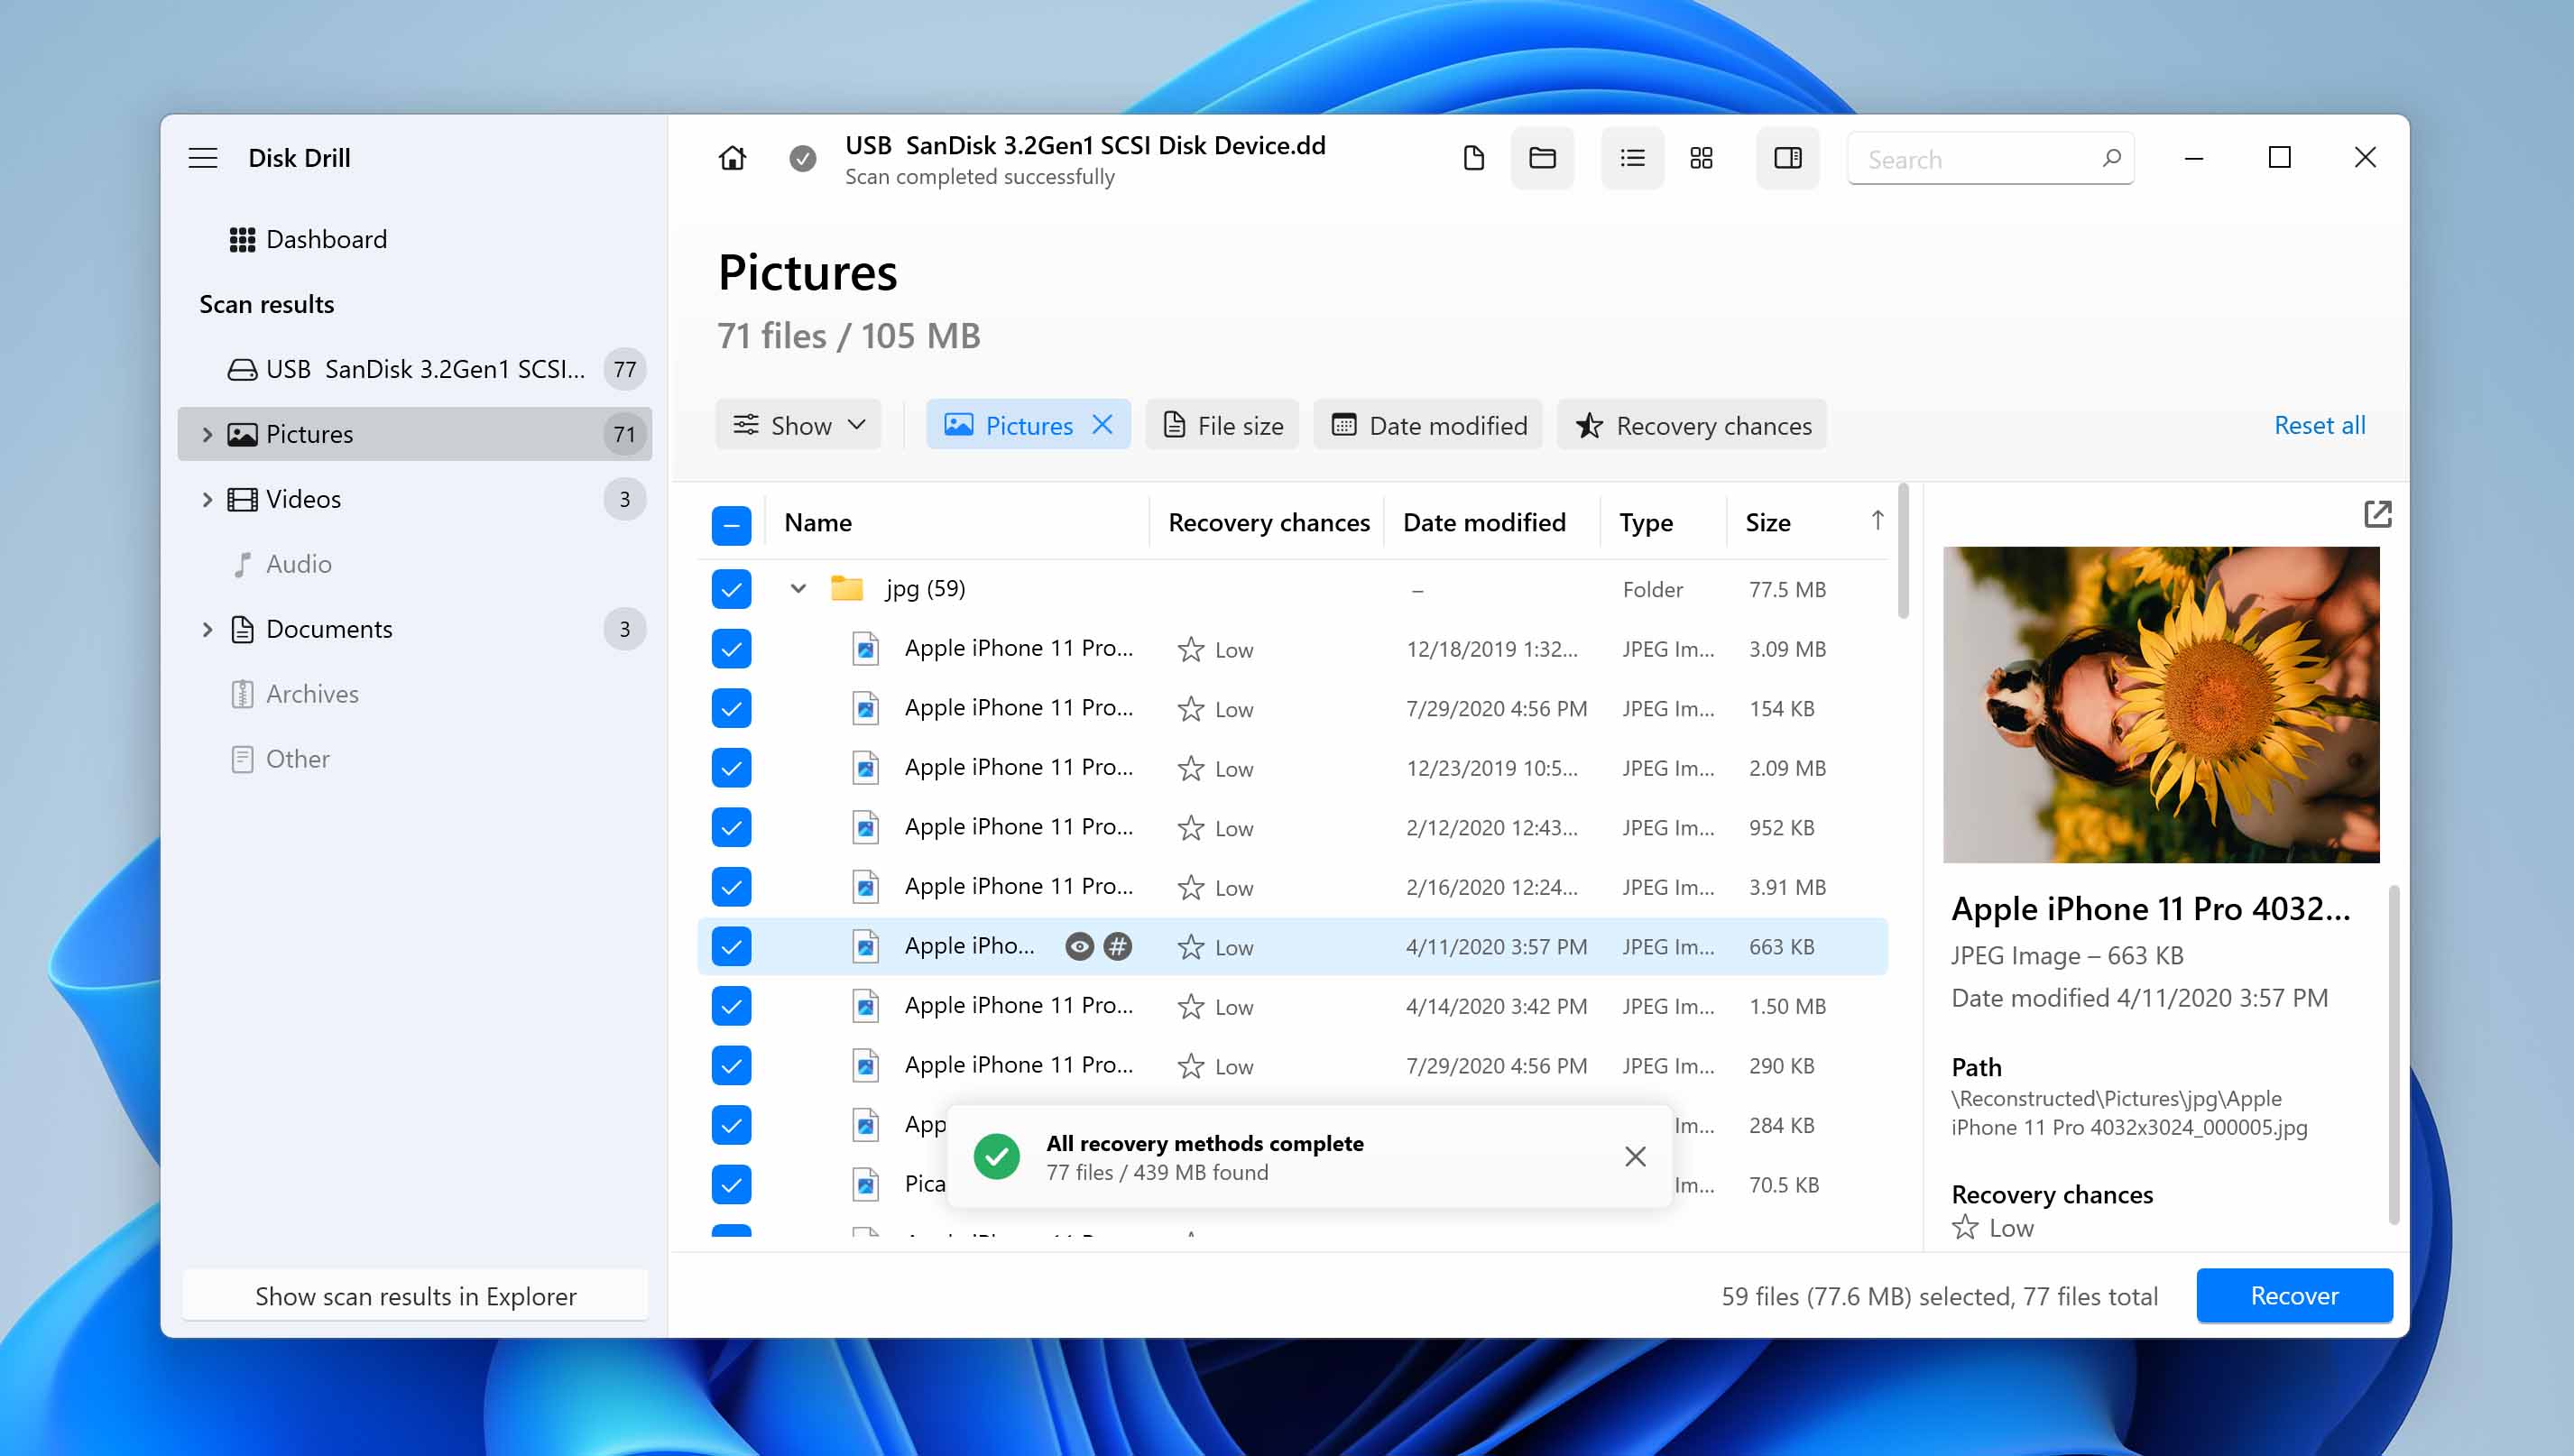
- The scan duration depends on the size and condition of the disk. You can review results while the scan progresses, but let it finish before starting recovery for the best results.
- Mark the items you want to restore and click Recover.
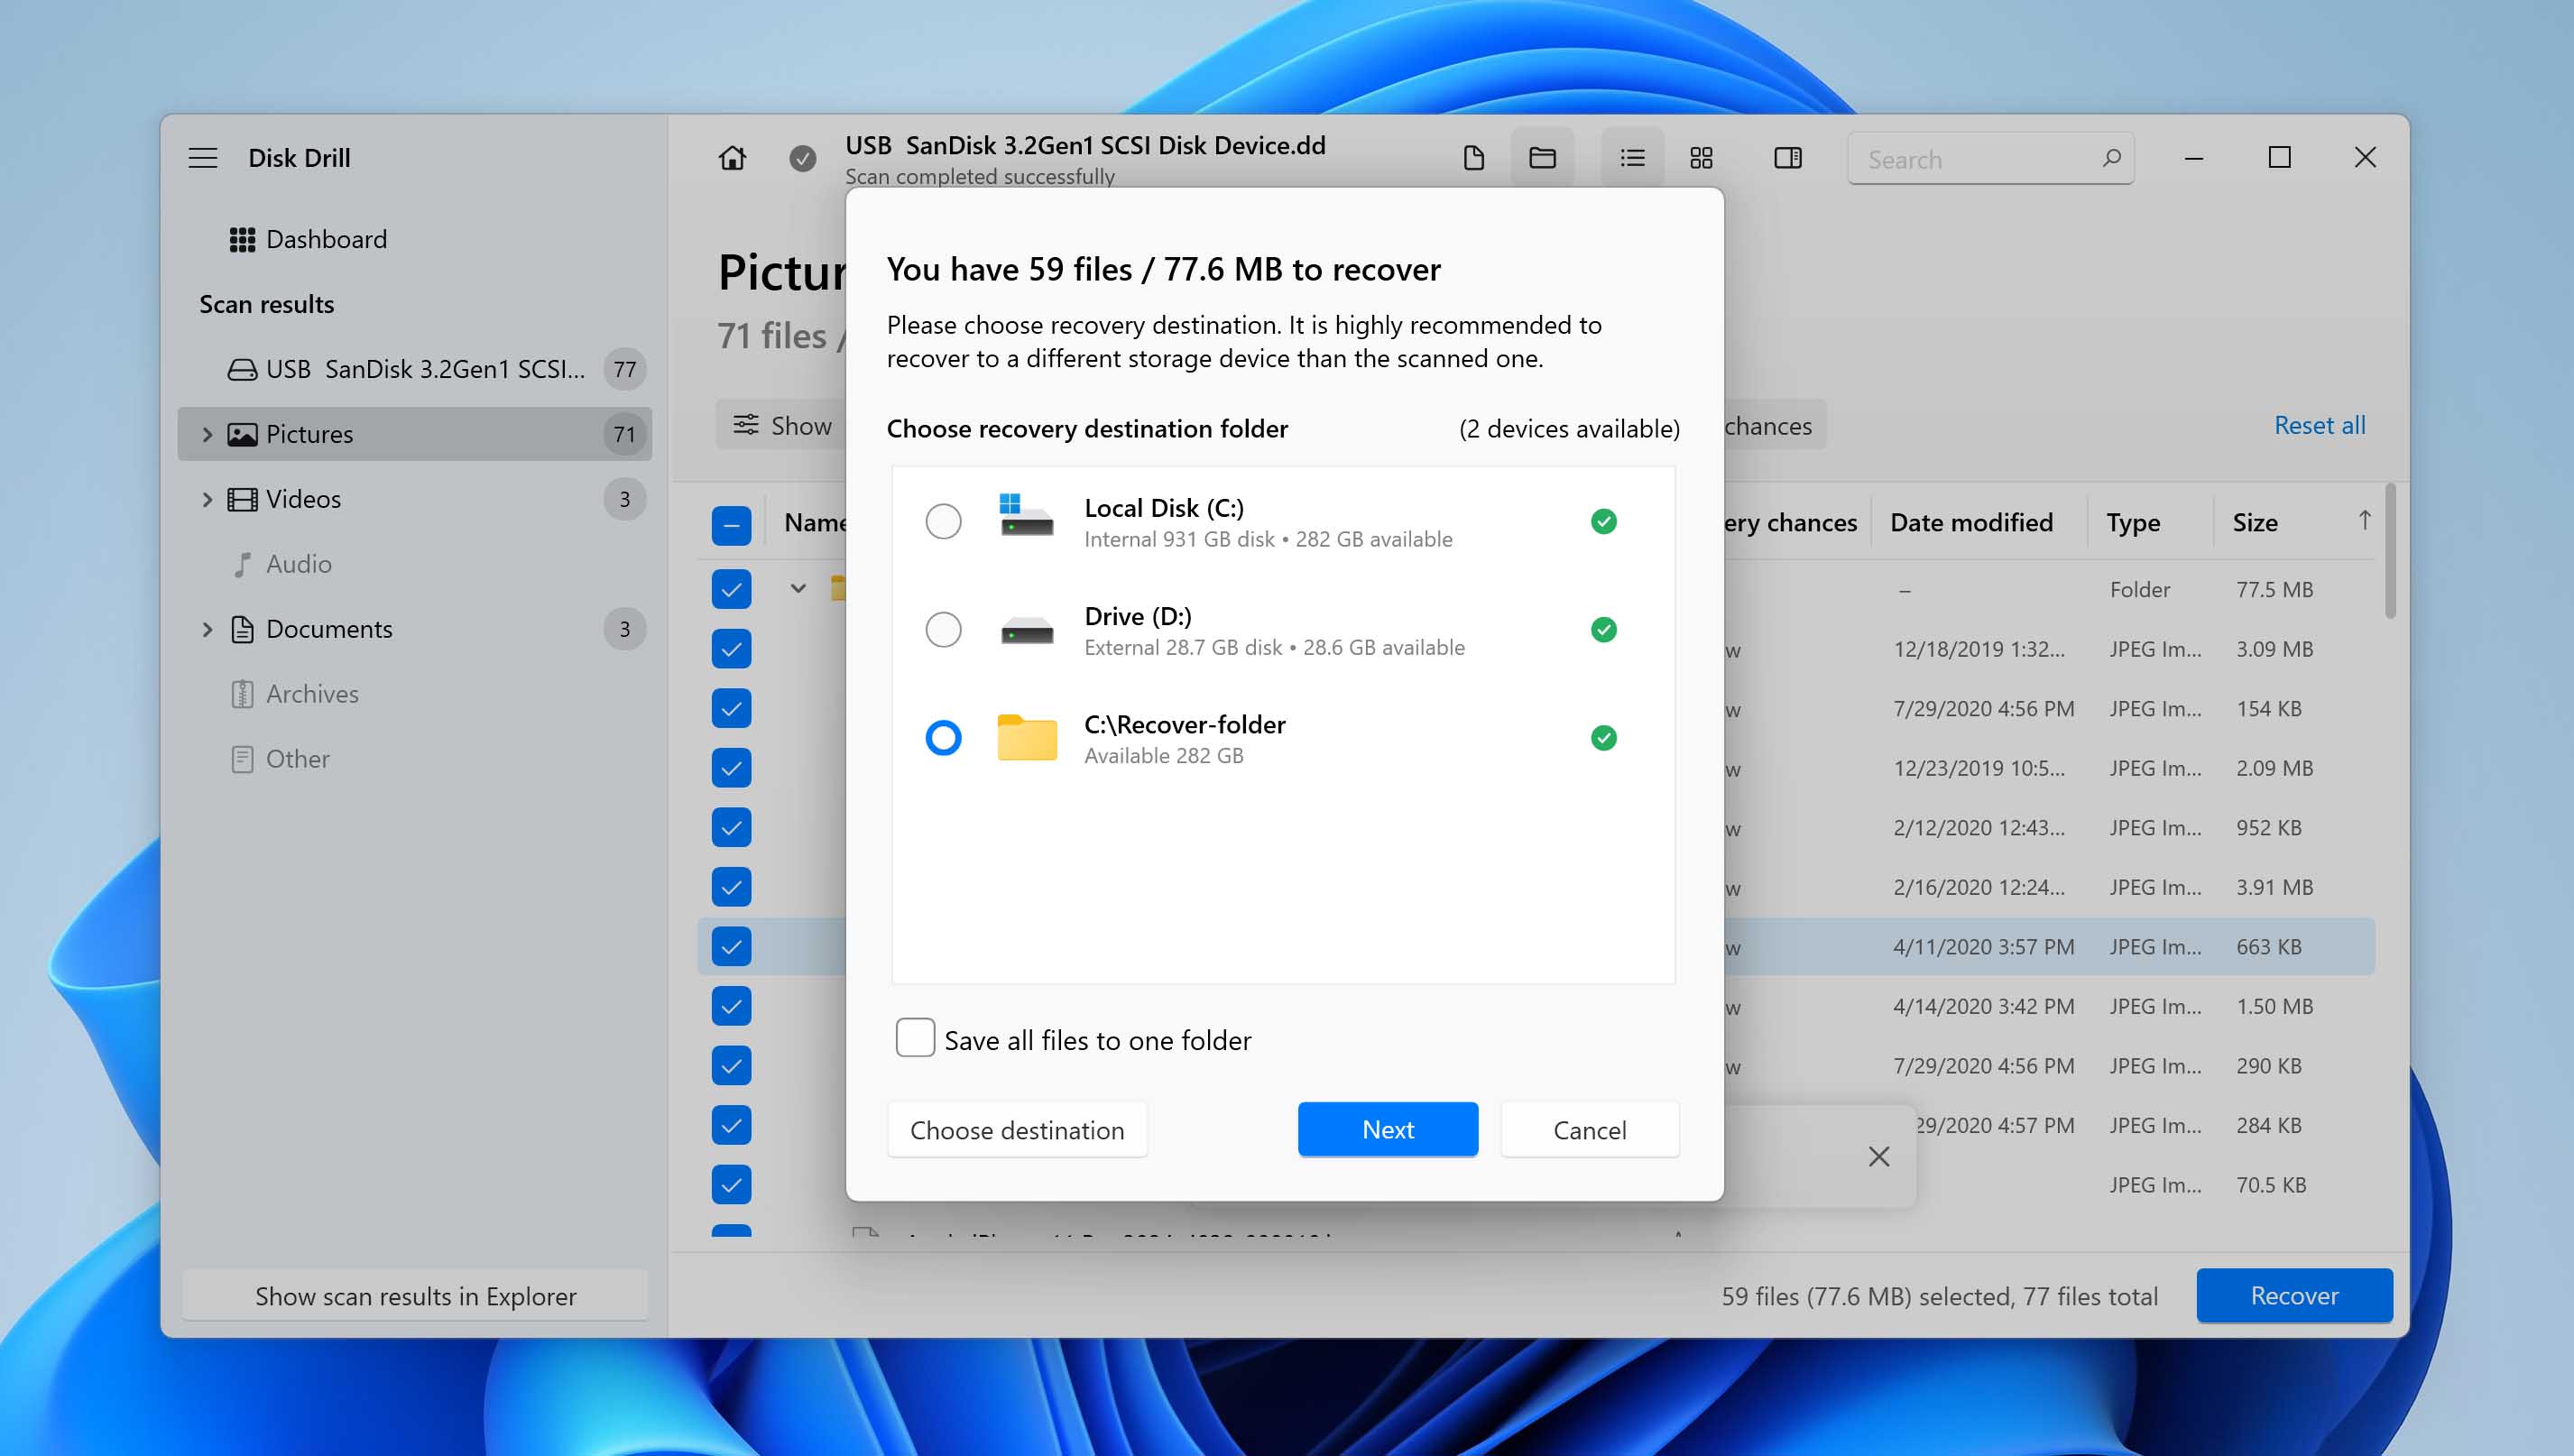
- Choose a safe destination on another disk to store the recovered data and click the Next button.
If the external drive is protected with BitLocker, Disk Drill will prompt for the password or recovery key at the start of the scan. Entering the correct key allows access to the decrypted data.
How to Fix Access Denied for an External Hard Drive
Once you’ve recovered the important files from the hard drive, you can start fixing the drive so you can reuse it. The fix depends on what’s causing the problem, but if you don’t know the cause, just follow the fixes in the order they’re explained.
Method 1: Change Permission for Accessing the External Hard Drive
On Windows 10/11, an external drive formatted with NTFS can block access if your account isn’t the owner or lacks the required permissions. The fix is straightforward: take ownership of the drive and give your account full control. (If the Security tab isn’t present, the drive is likely exFAT or FAT32 – skip this method and move on.)
Note: If the disk is protected with BitLocker, unlock it first (File Explorer → right-click the drive → Manage BitLocker → Unlock). Changing permissions won’t help on a locked volume.
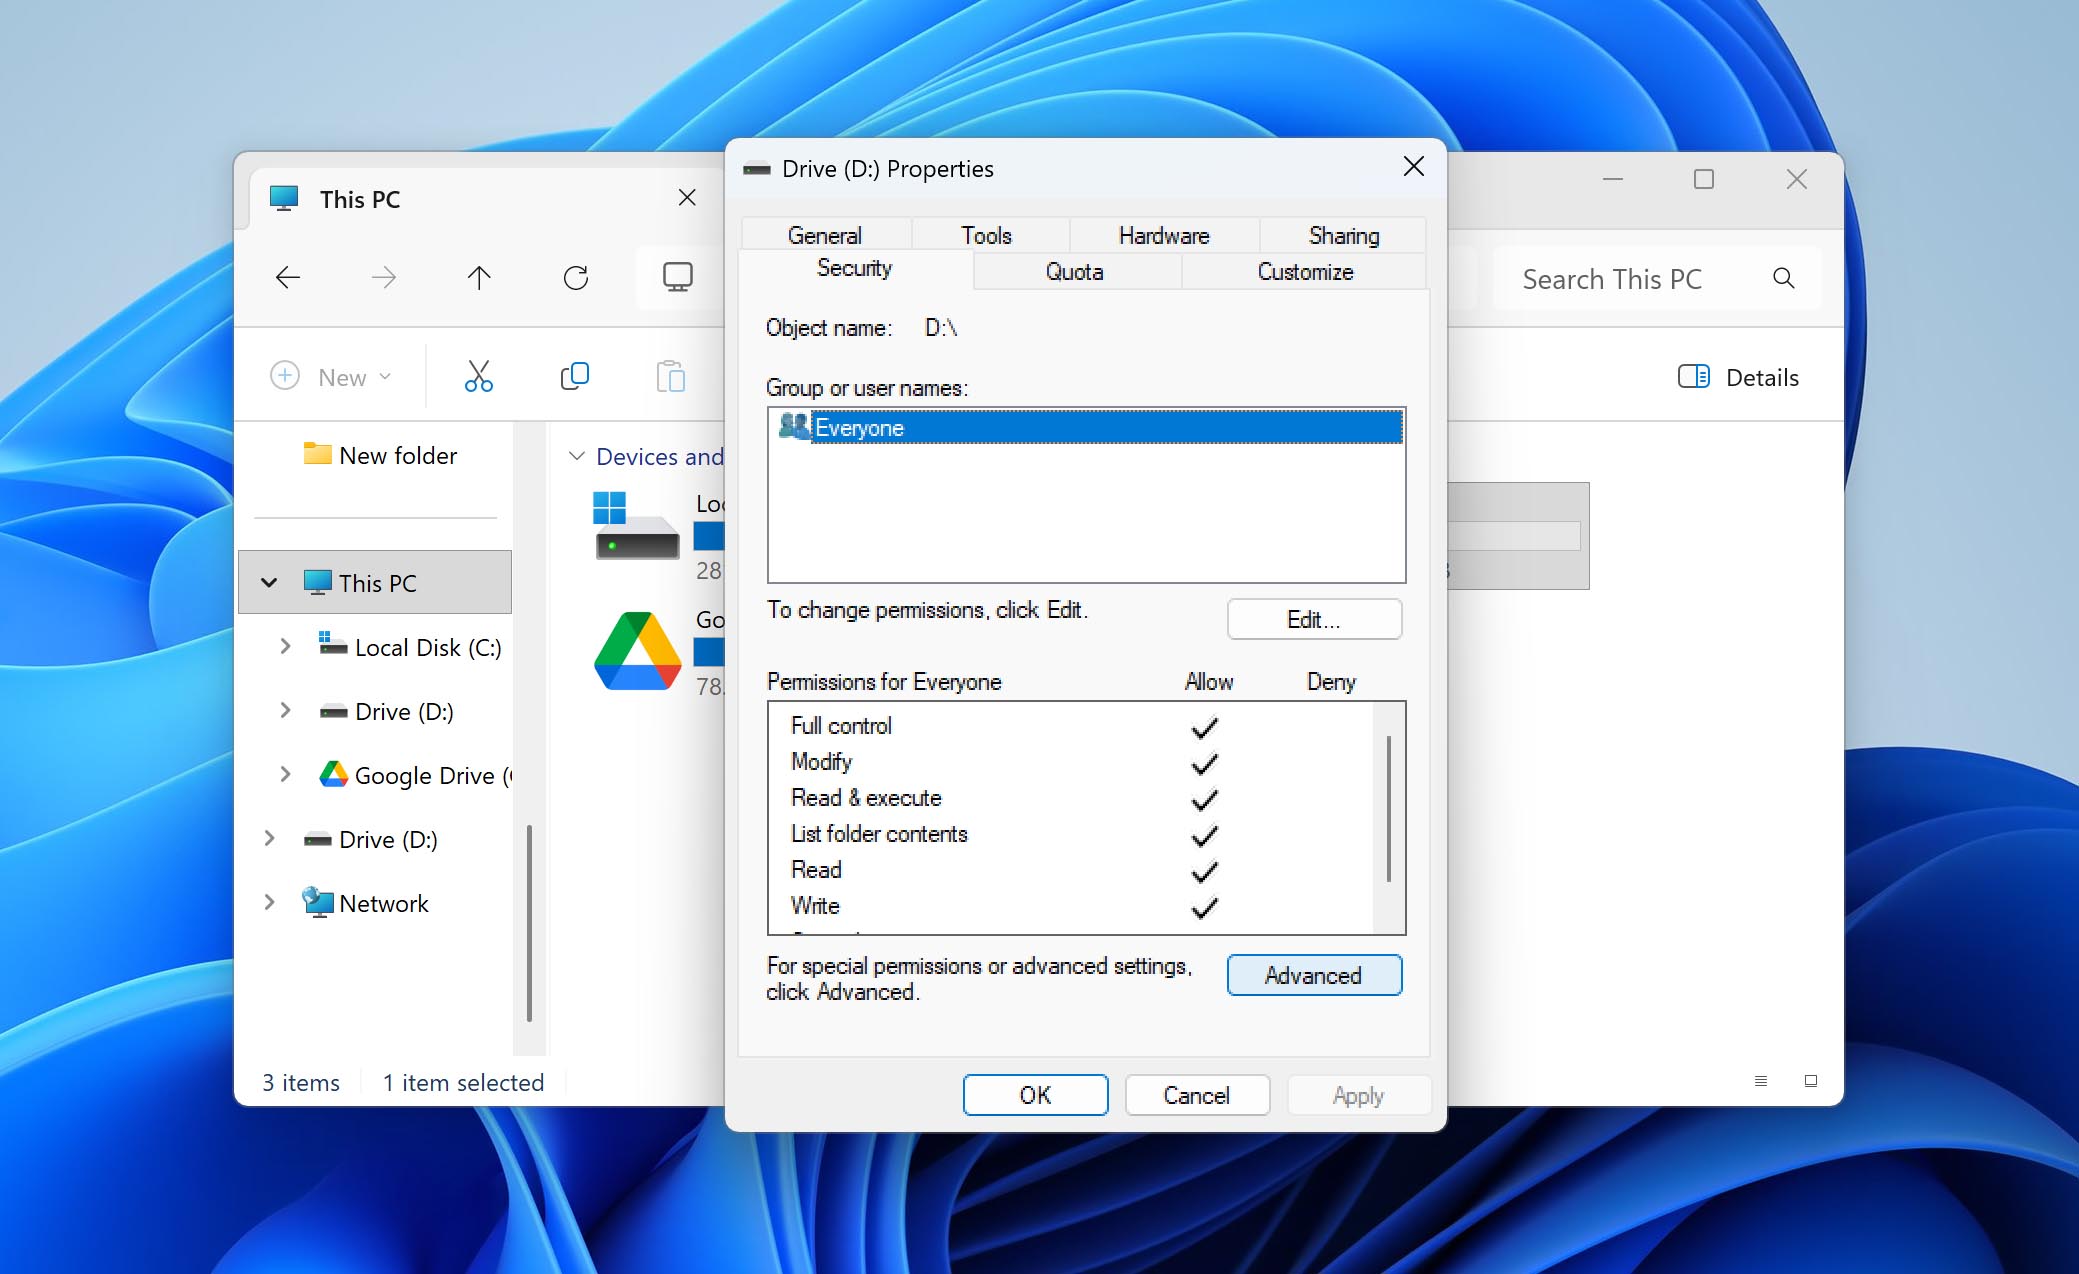
- Open File Explorer, right-click the external drive, choose Properties, then open the Security tab.
- Click Advanced.
- In the Advanced Security Settings window, click Add.
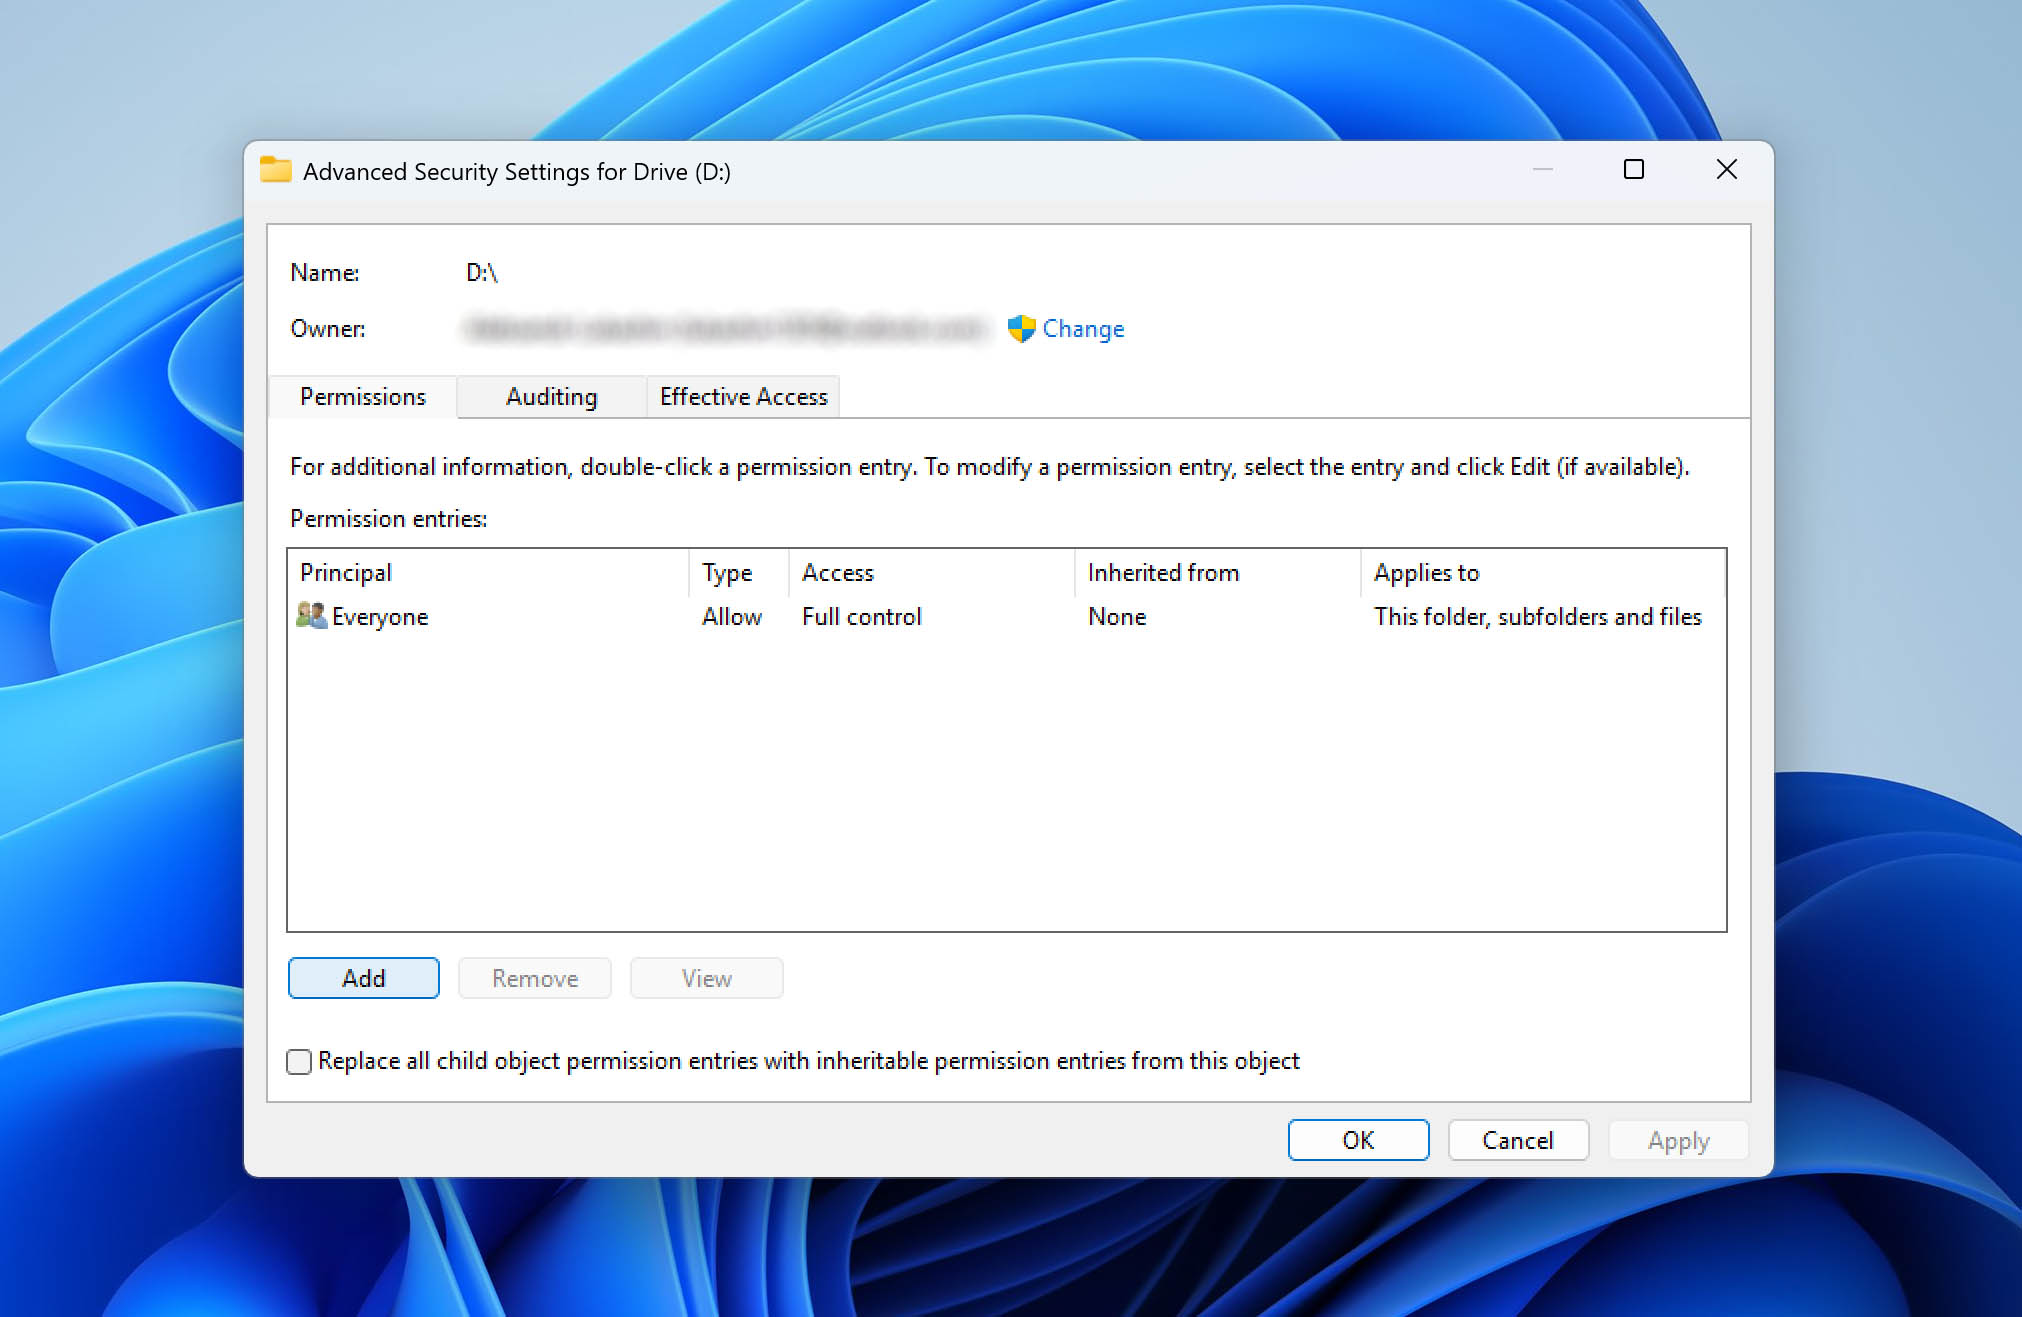
- Click Select a principal, enter your account name, Check Names, OK.
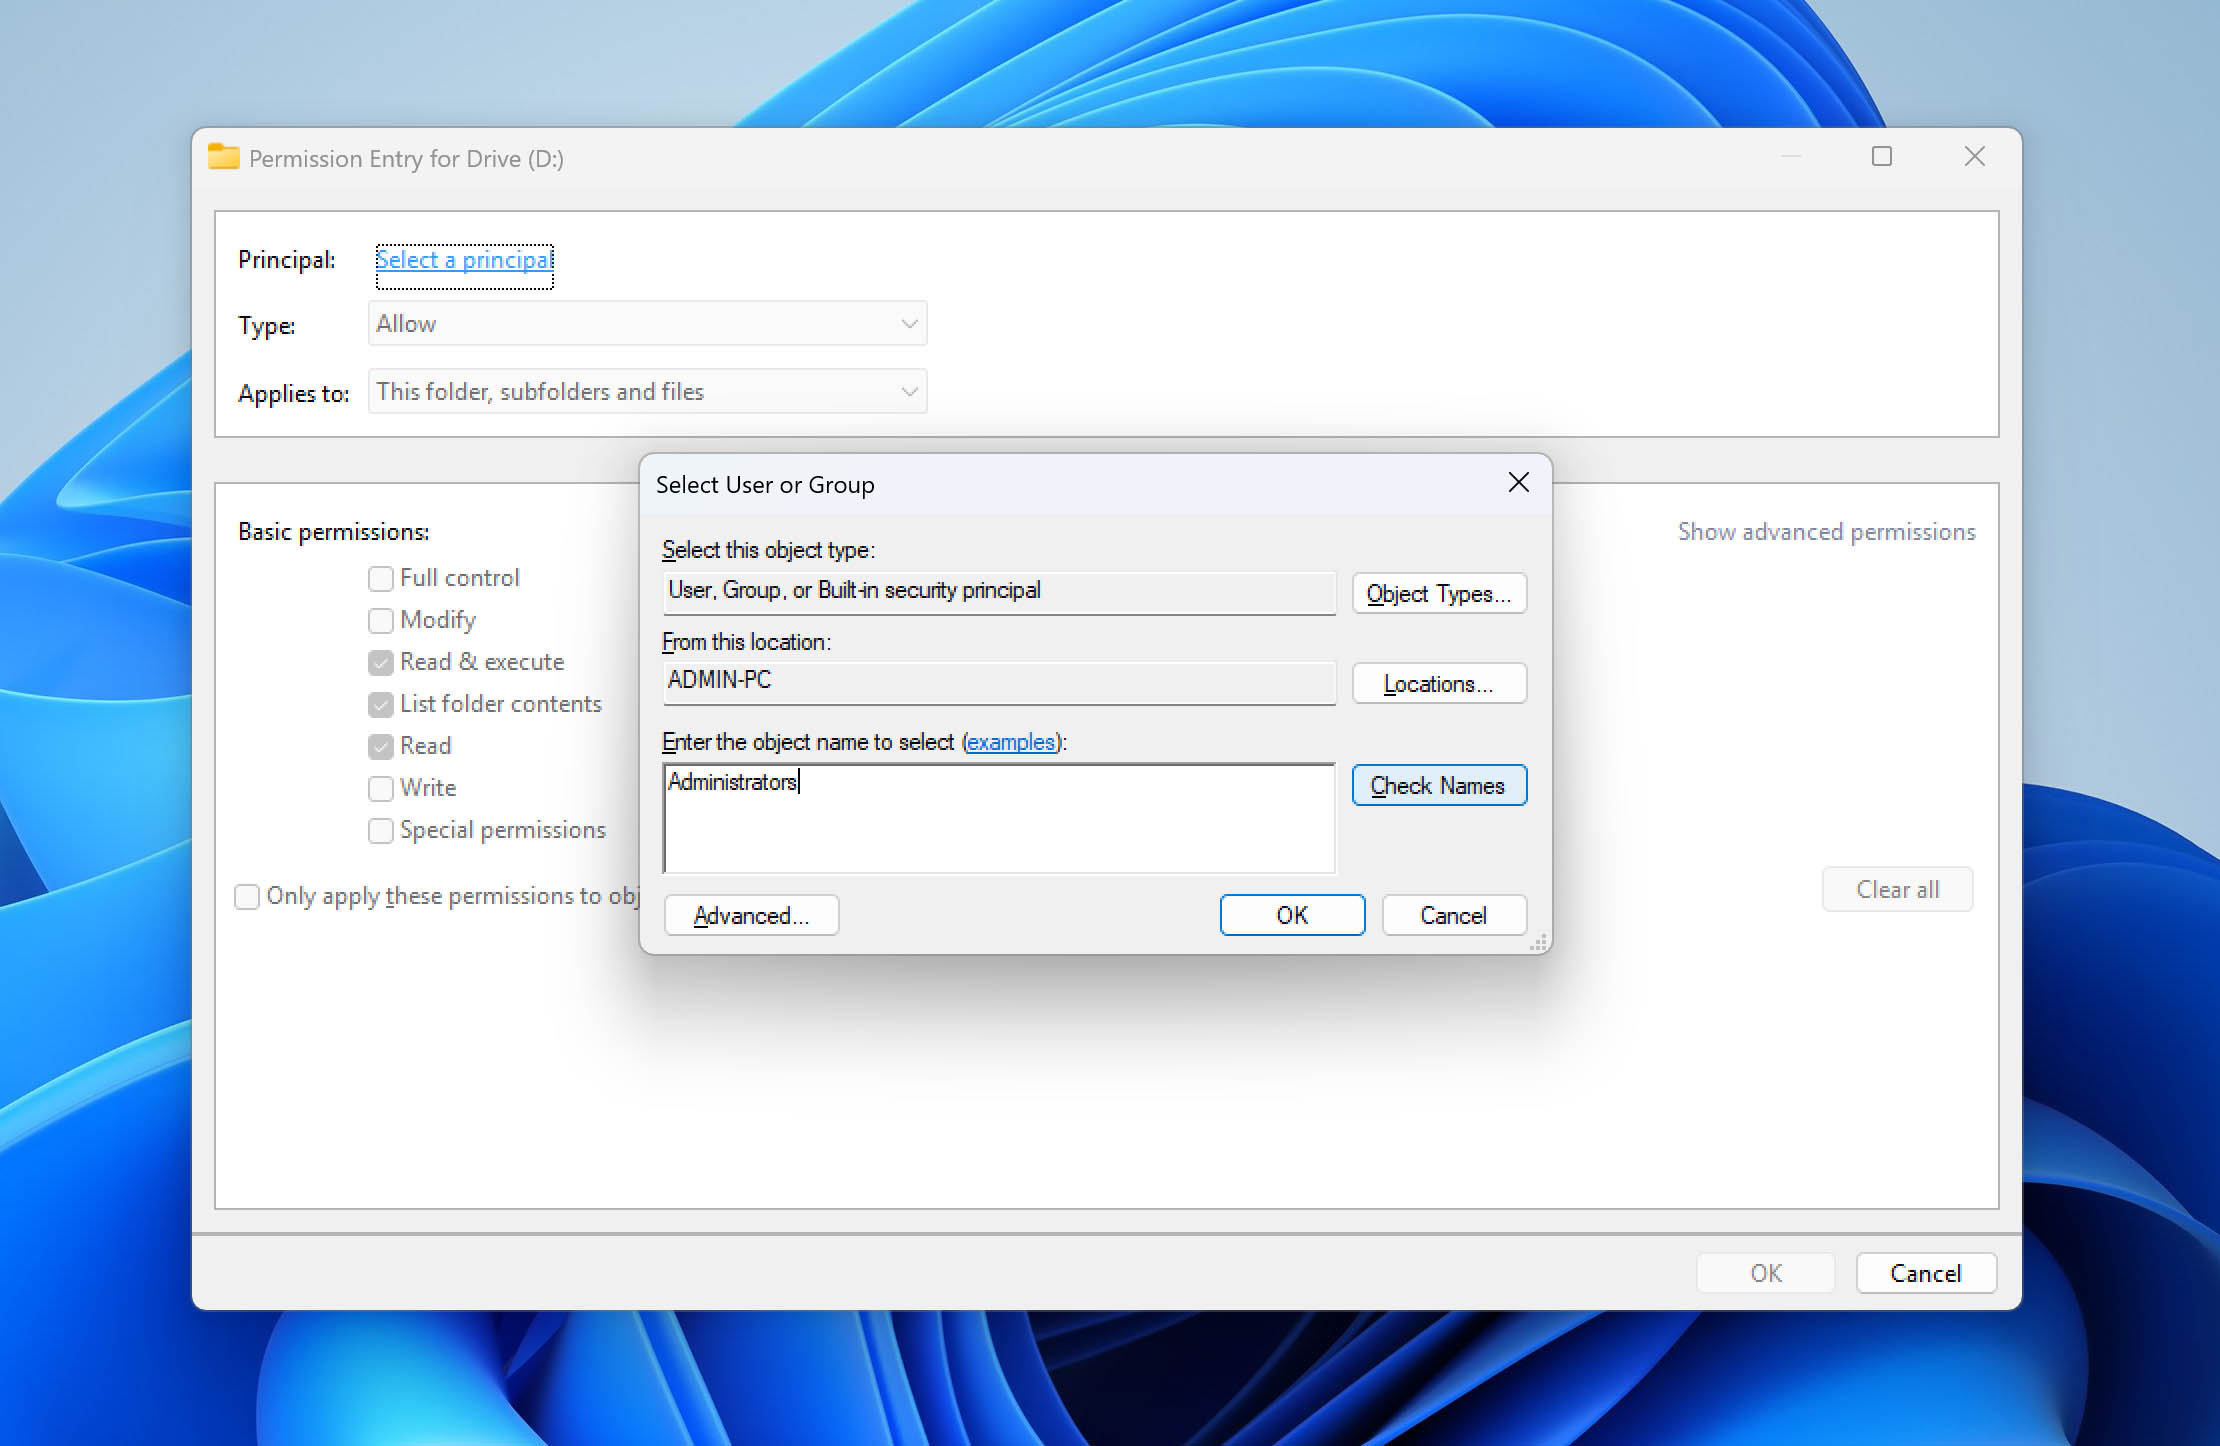
- Set Type: Allow, choose Applies to: This folder, subfolders and files, check Full control, click OK.
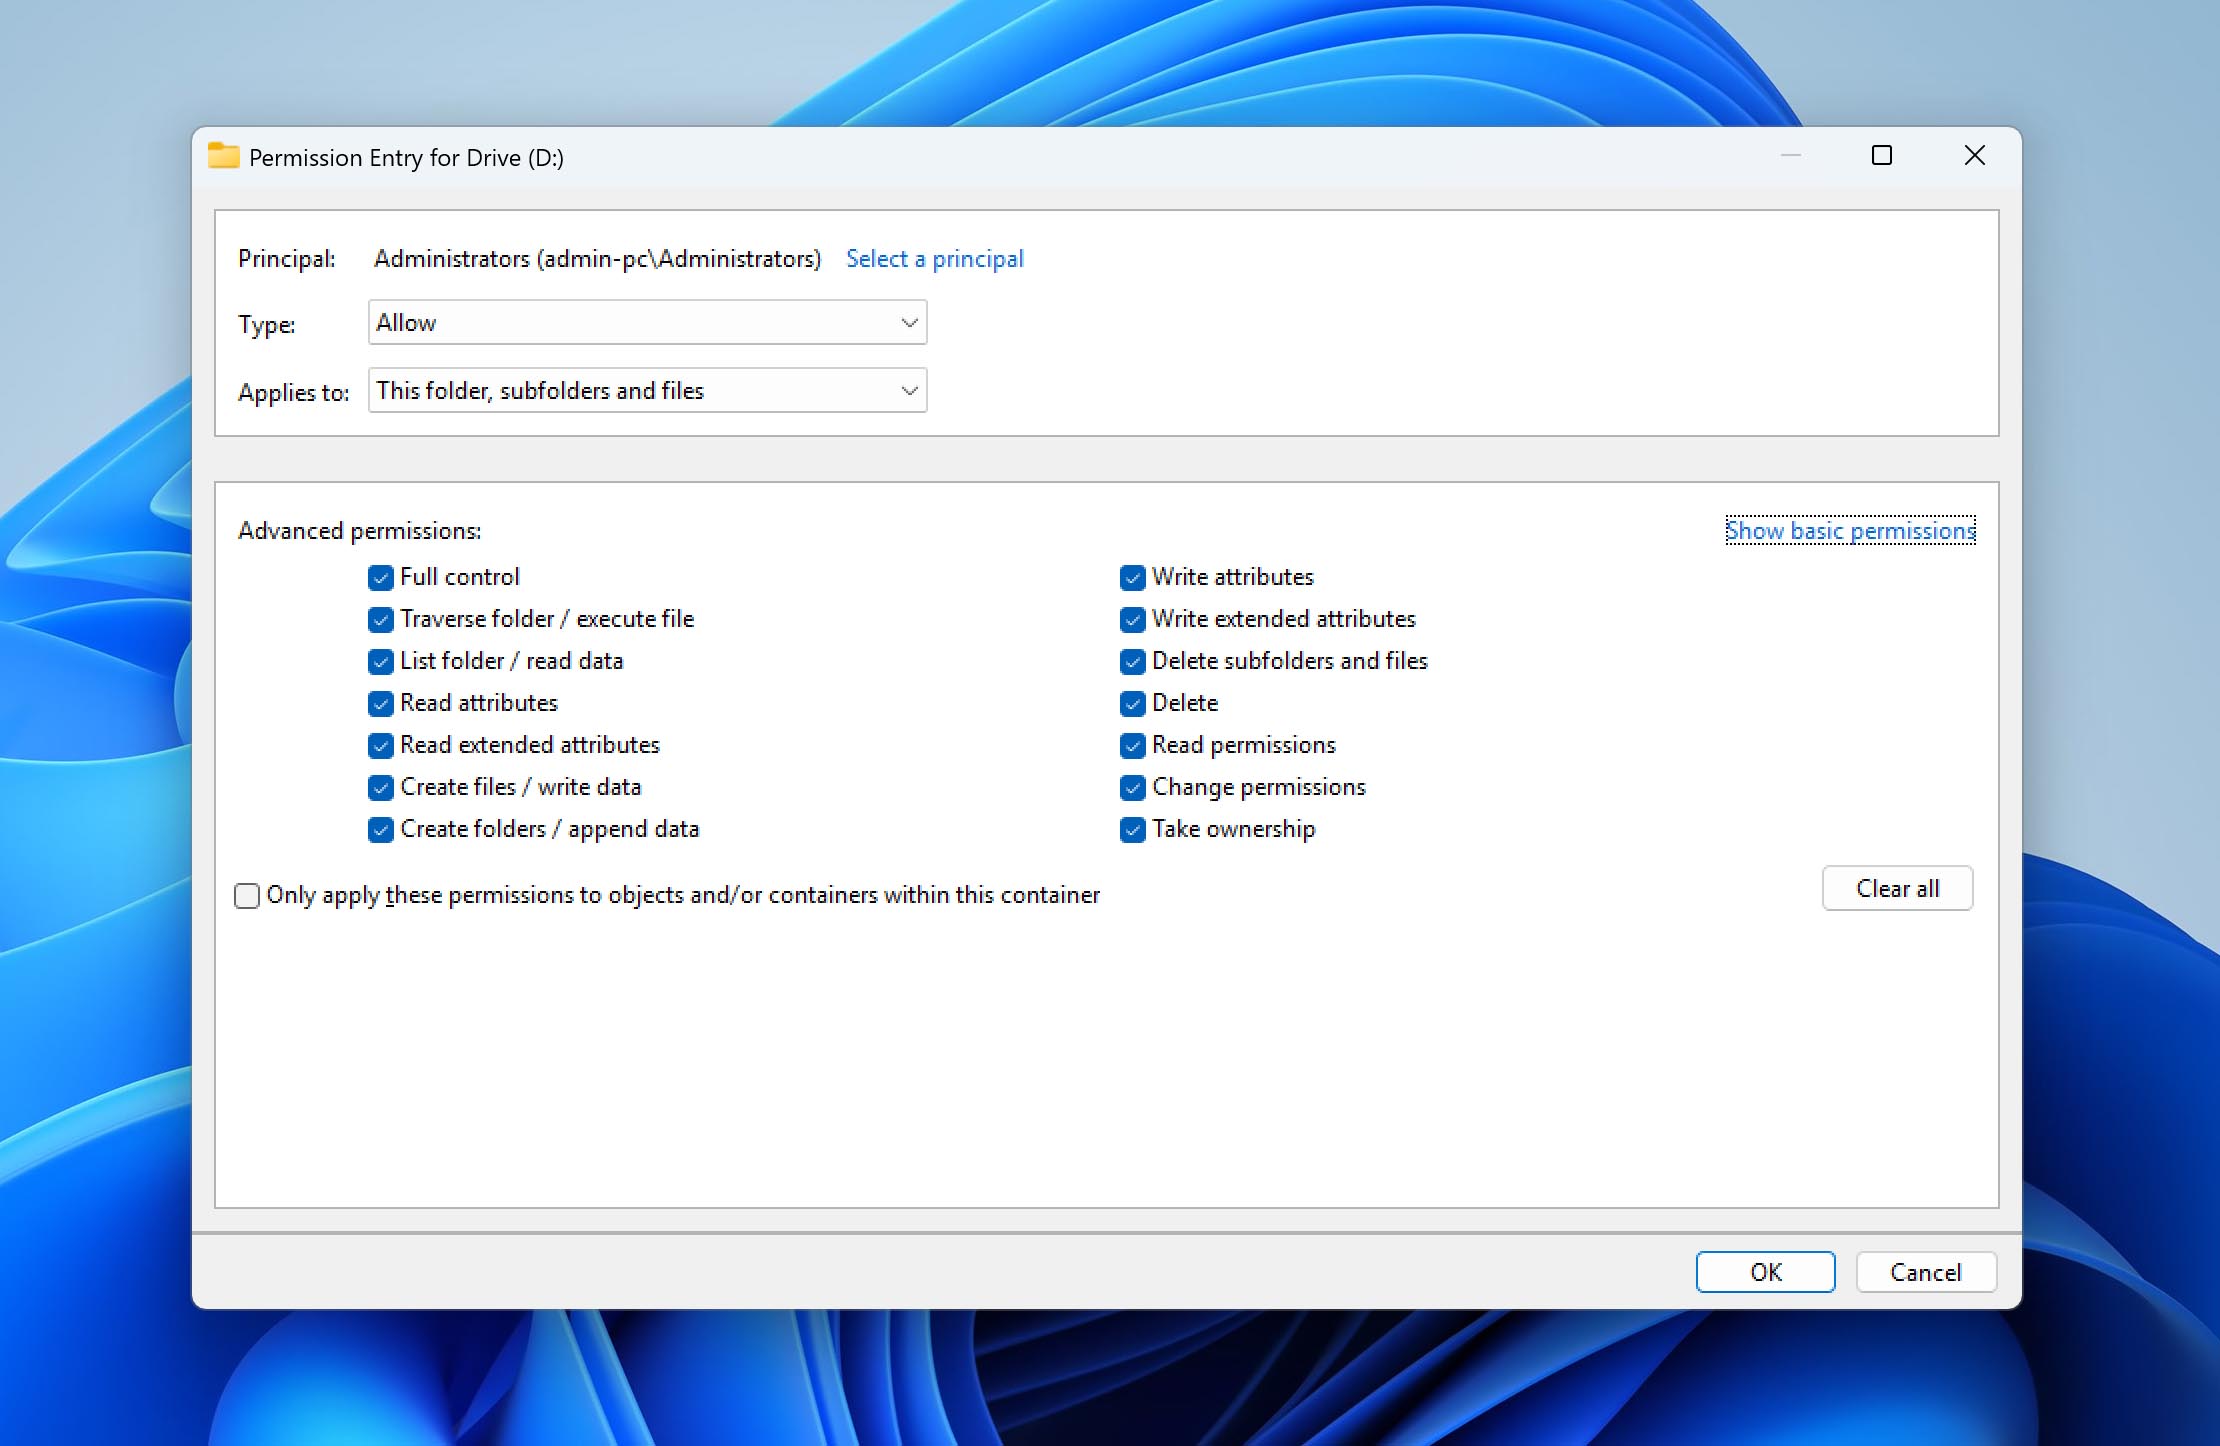
- If you see Enable inheritance, click it so permissions propagate.
- Click Apply, then OK to close all dialogs. Disconnect and reconnect the drive, then open it.
Method 2: Change Permissions via Terminal
Transferring drive rights from the command line can yield different results than the graphical method. If the previous method didn’t restore access, try this approach. Applicable to NTFS volumes.
- Press Win + S and search Command Prompt, and run it with Admin privileges.
- Approve the UAC prompt.
- Note the drive letter in File Explorer (replace X: below with yours).
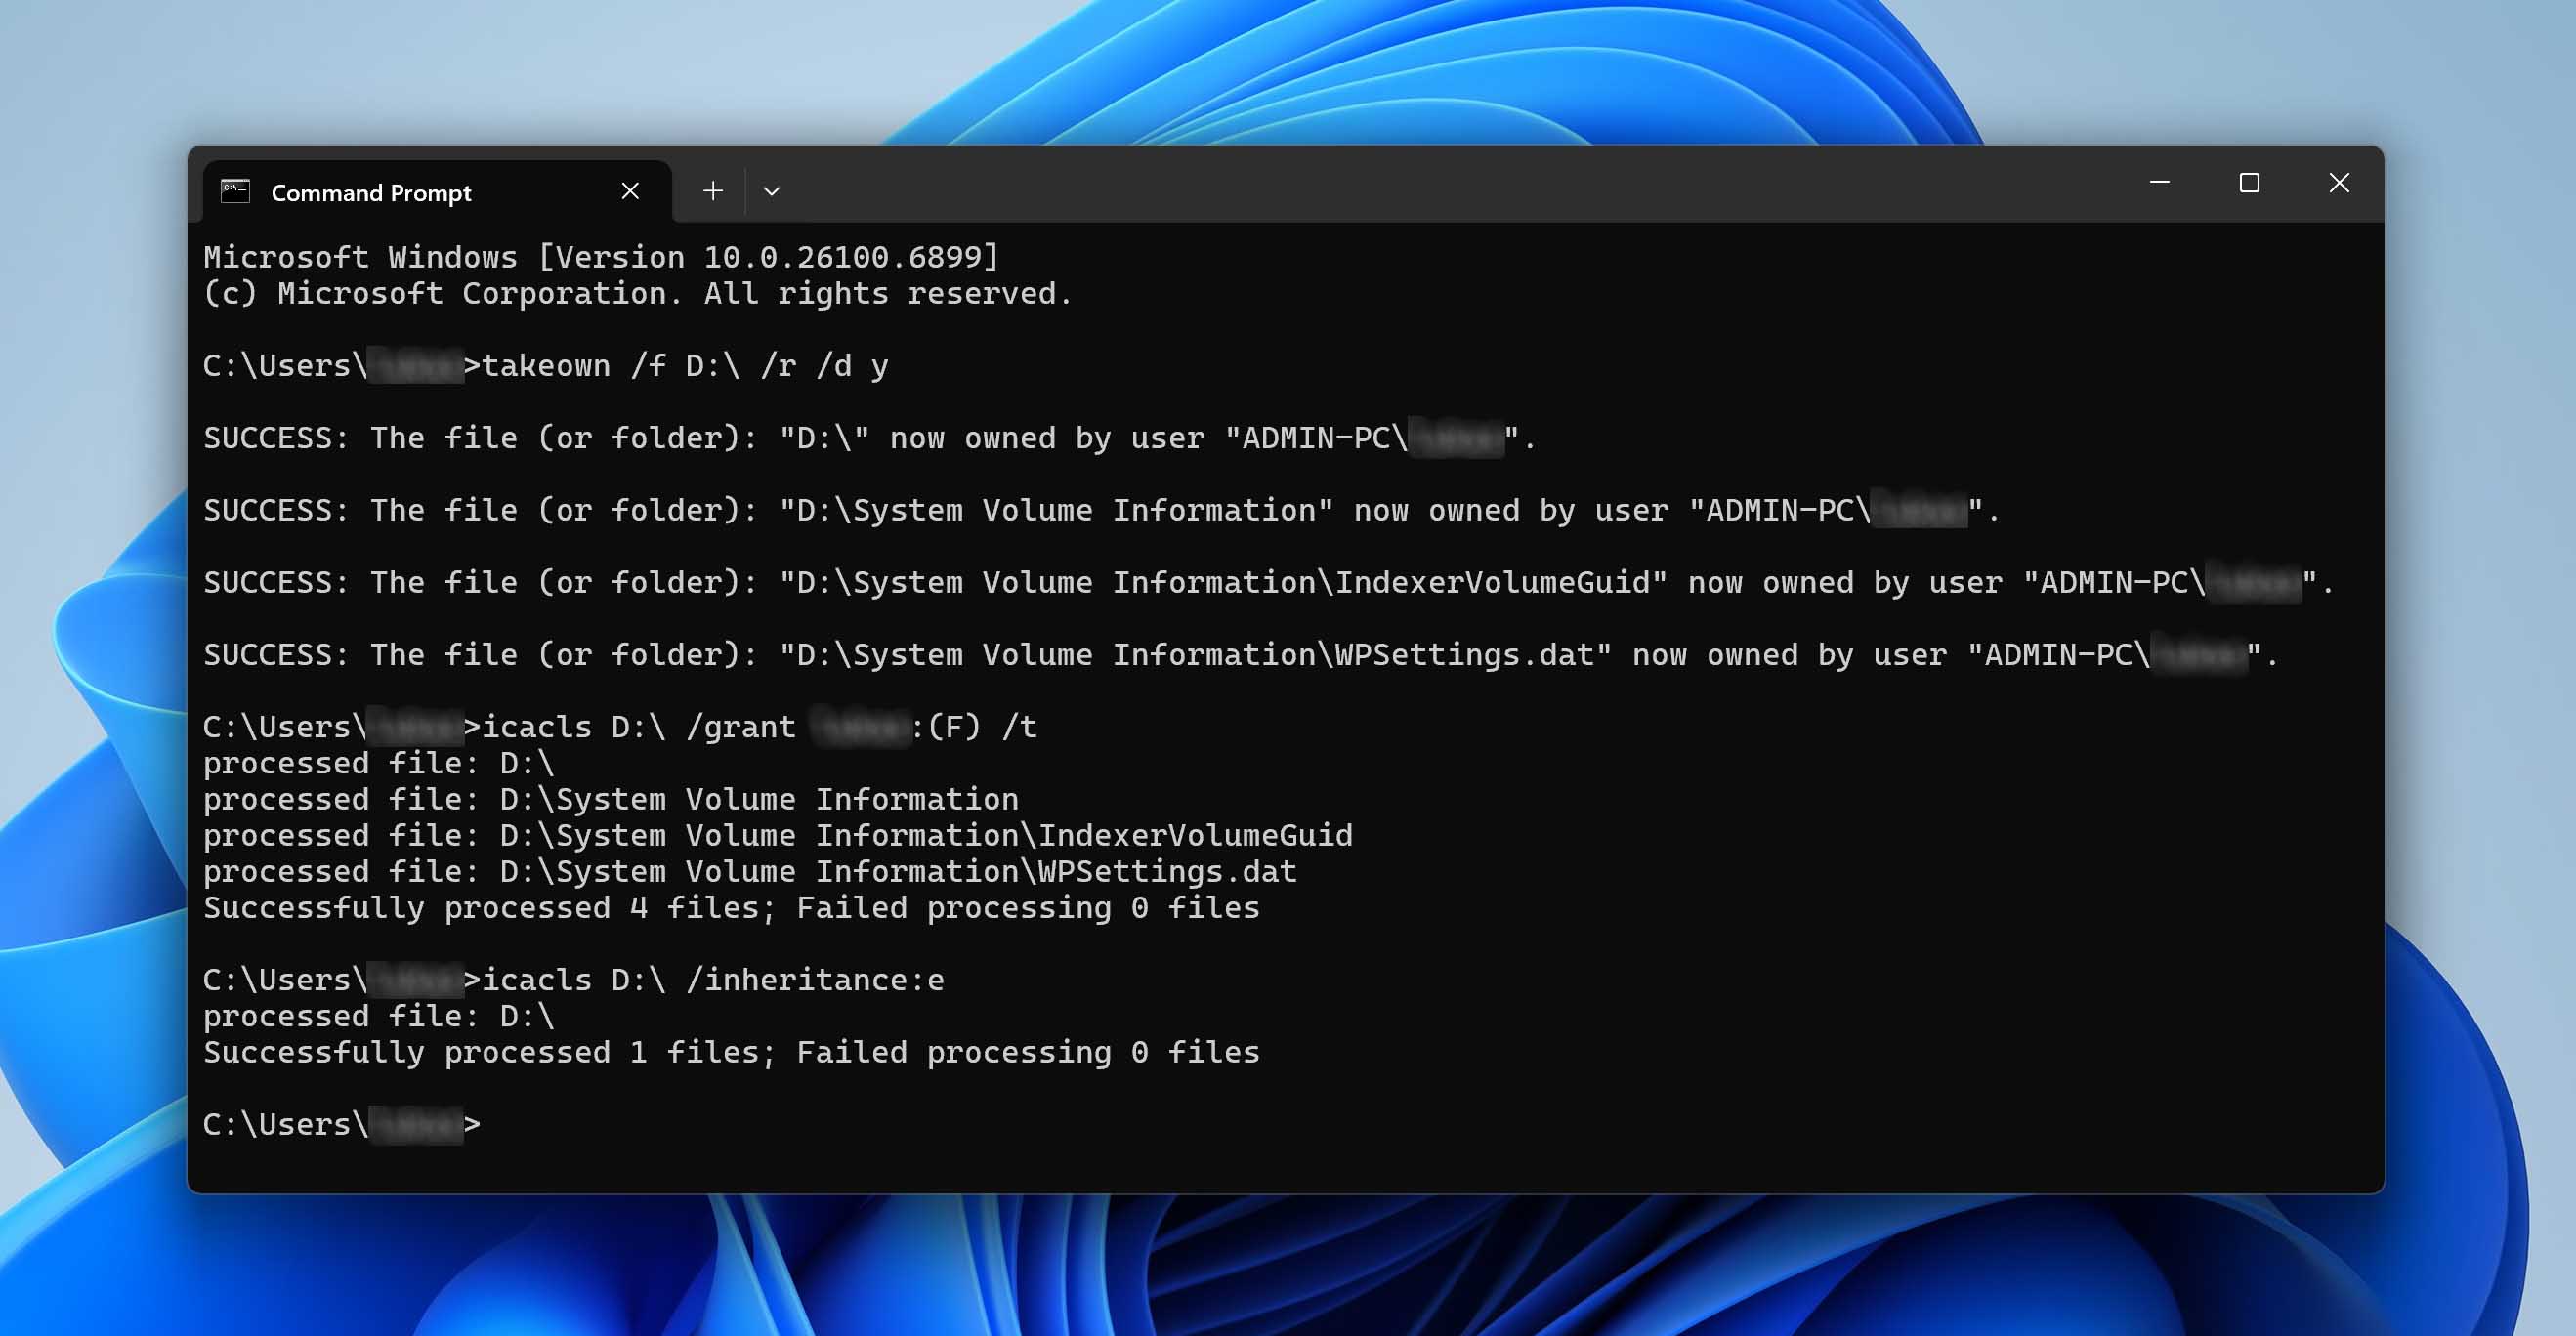
- In the elevated terminal, set yourself as owner: takeown /f X:\ /r /d y
- Grant your account full control across the drive: icacls X:\ /grant %USERNAME%:(F) /t
- Re-enable inheritance if it was disabled: icacls X:\ /inheritance:e
- Close the terminal, disconnect and reconnect the drive.
Method 3: Change the Drive Letter
Windows assigns a letter to every connected storage device. If two volumes end up using the same letter, or a previous mapping still exists, the system may not open the drive and instead display an “Access is denied” message. This isn’t the most common cause of the error, but it does happen, and reassigning a new letter is an easy check before moving on to other fixes.
- Press Win + X and select Disk Management.
- In the volume list, locate the external drive. Confirm you’re selecting the correct device by size and label.
- Right-click the partition on that drive and choose Change Drive Letter and Paths…

- Click Change…, pick an unused letter from the list (avoid letters already used by network mappings), then OK.
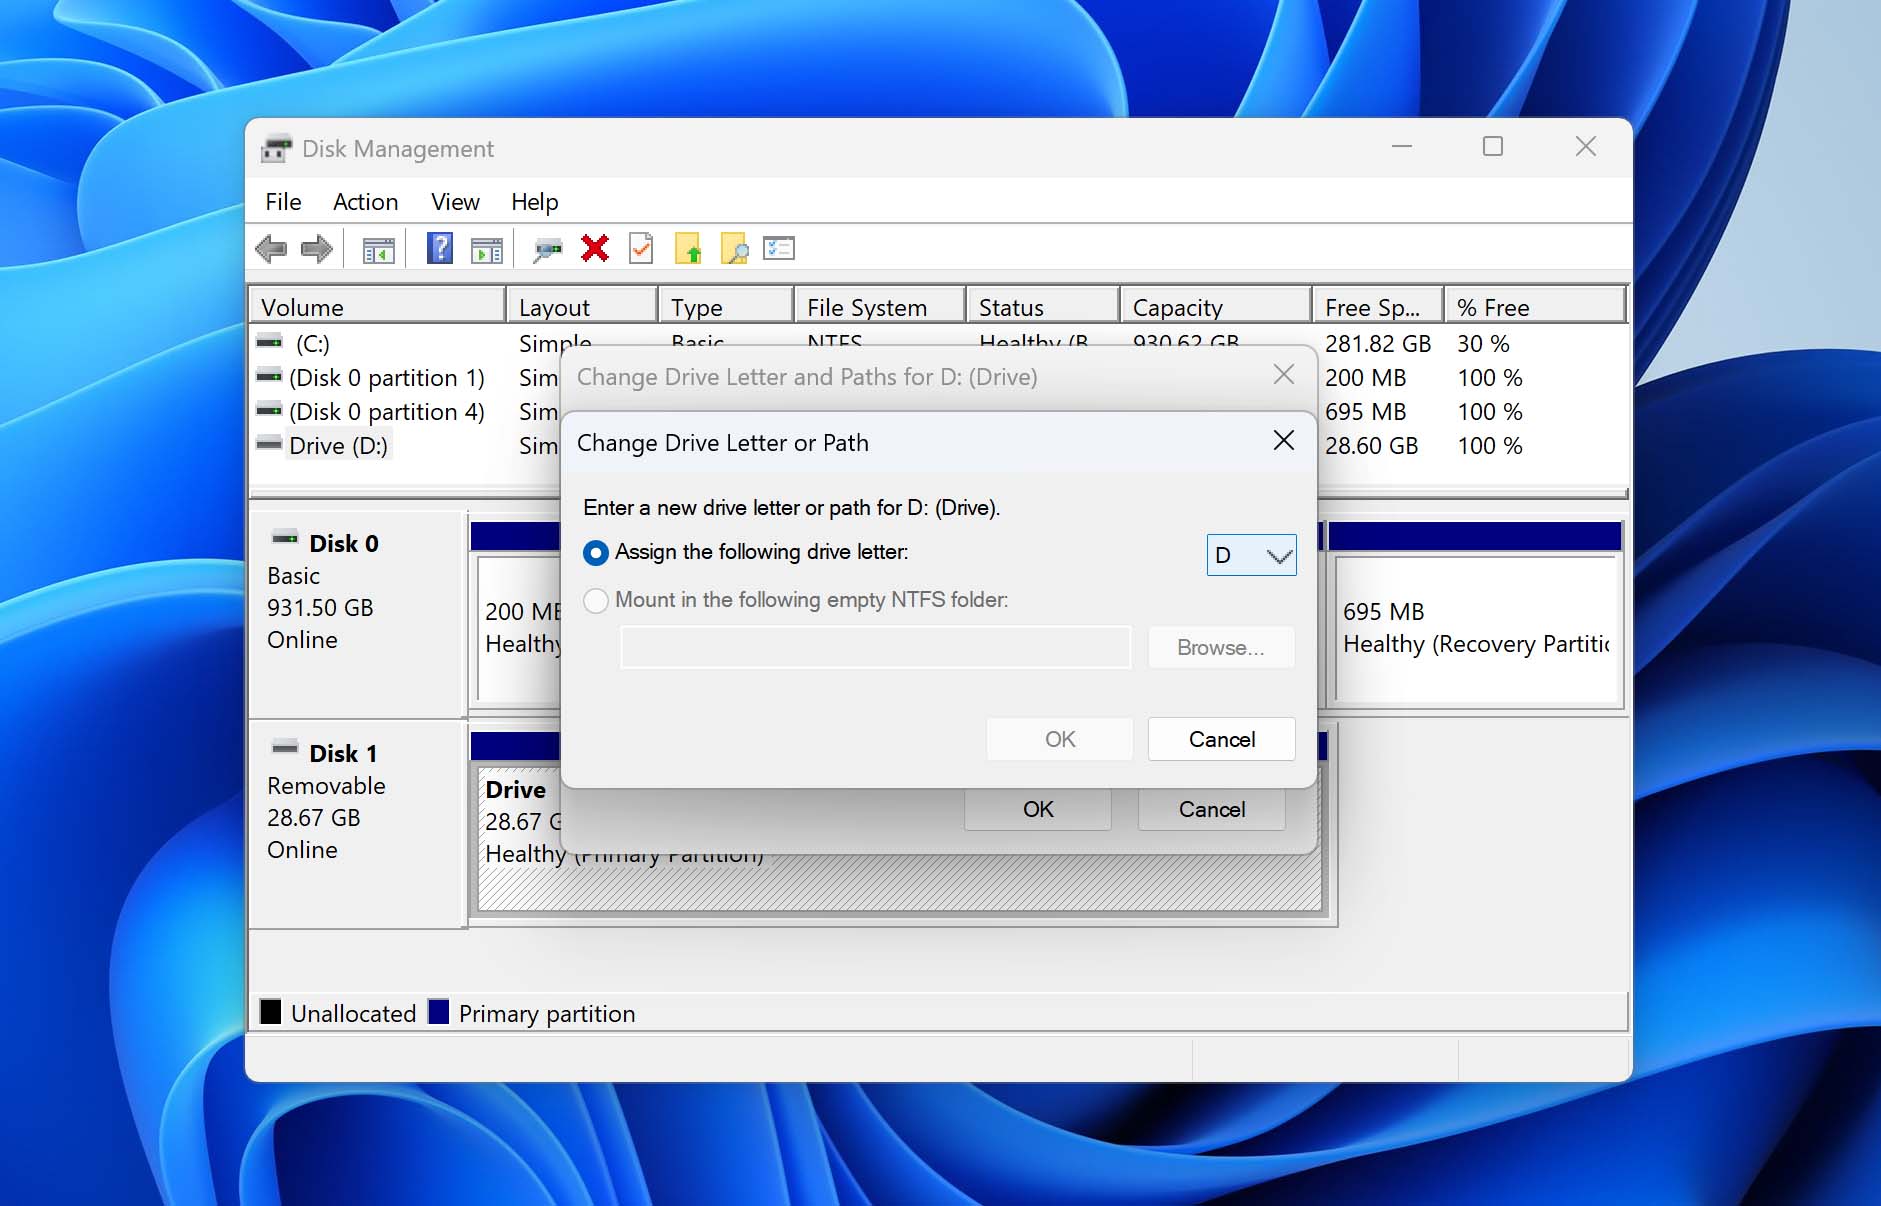
- Approve any prompts, close Disk Management, and reopen File Explorer to test access.
If the new letter also fails, repeat the steps with a different letter, or disconnect the conflicting device/network mapping and try again.
Method 4: Use the Error Checking Command
Sometimes the file system develops small inconsistencies in its internal records. When that happens, Windows may block access to the drive and report permission errors even though the data itself is still intact. The CHKDSK tool can check these structures and correct logical problems that prevent access.
Attention: Make sure important data is already imaged or recovered. CHKDSK modifies file-system structures.
- Press Win + X and choose Terminal (Admin).
- In the elevated window, run: chkdsk F: /f. Replace F: with your drive letter.
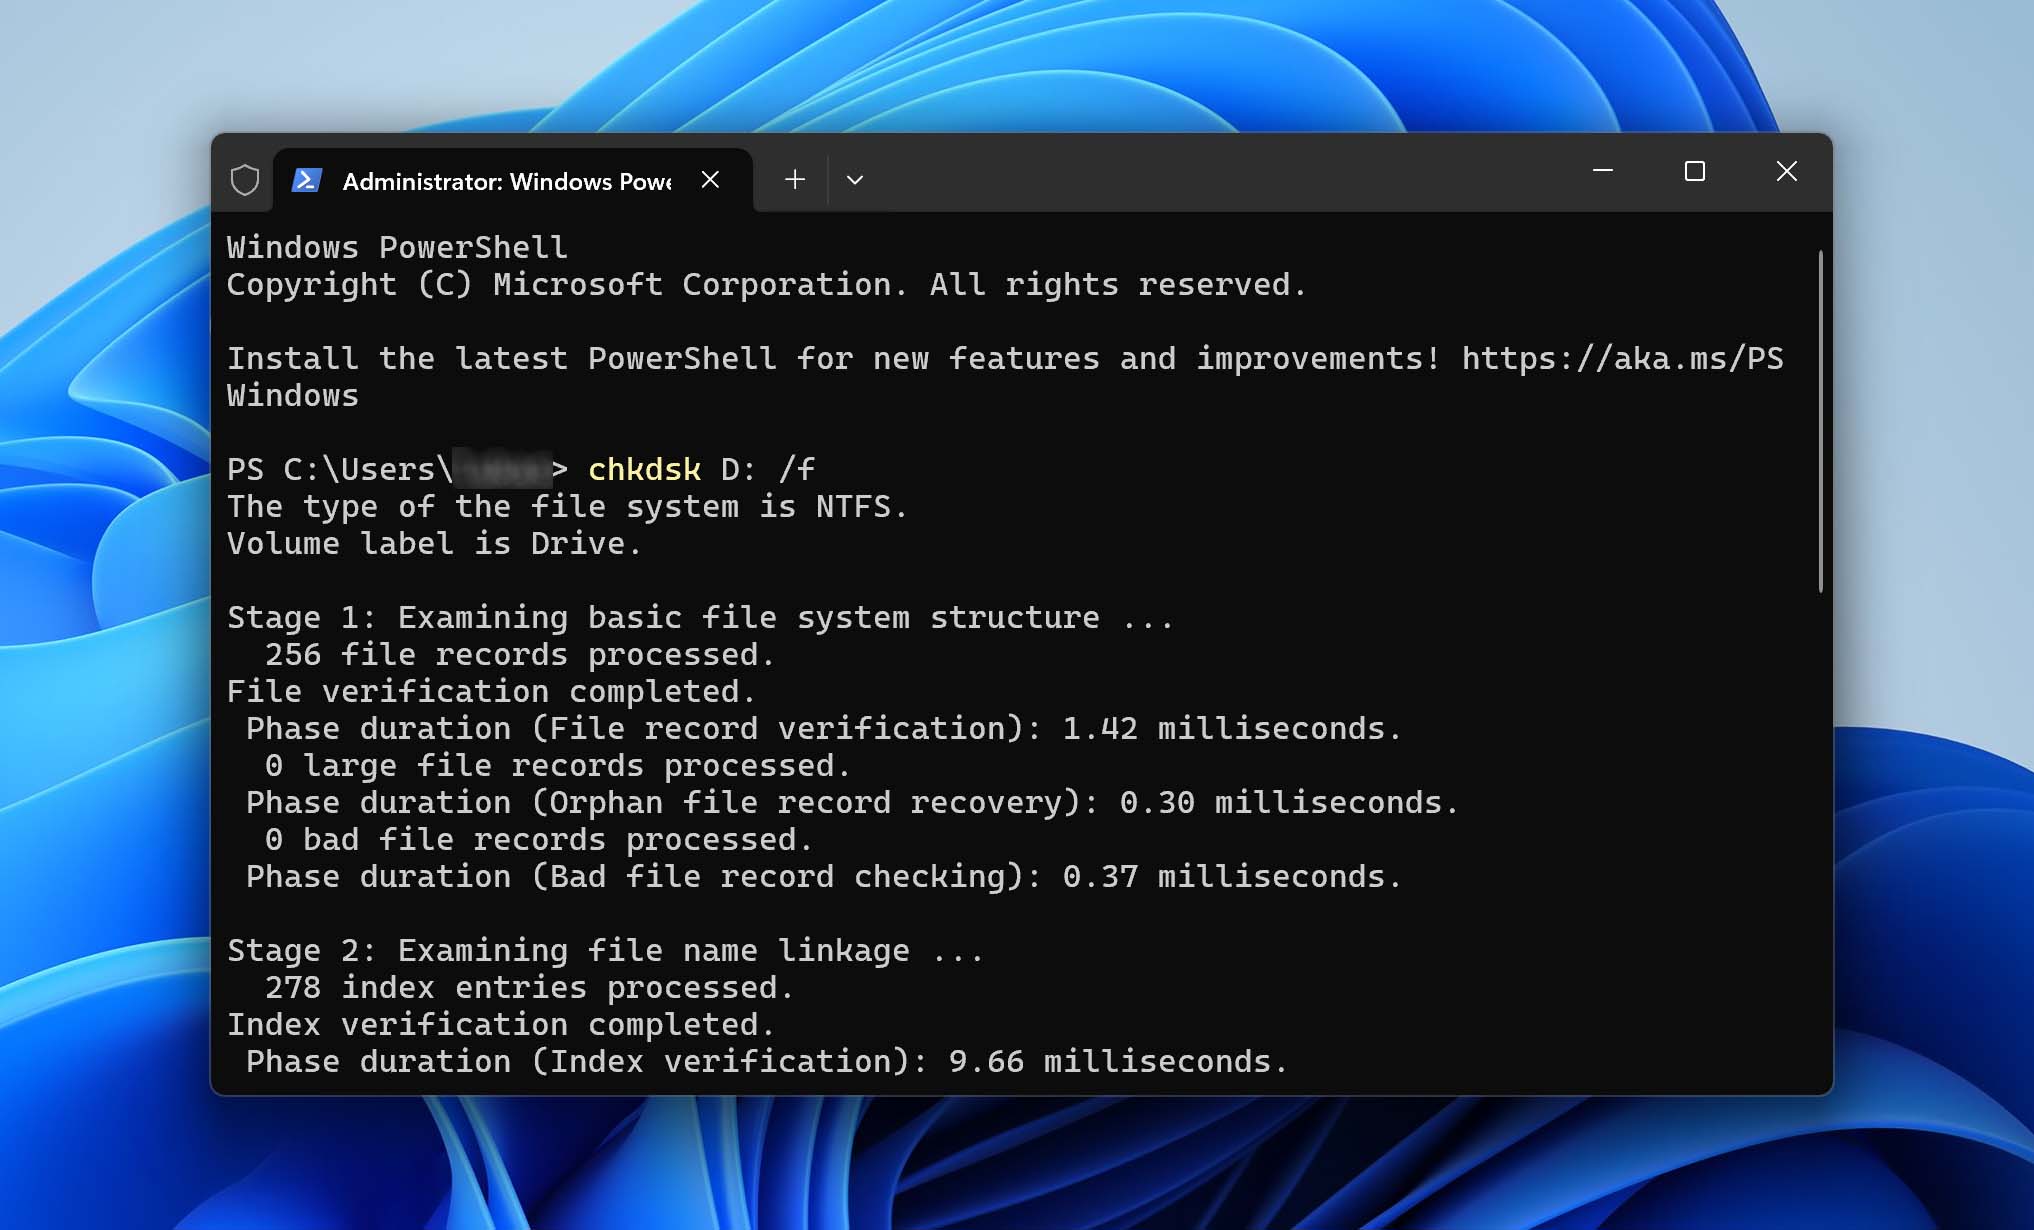
- Review the summary, disconnect and reconnect the drive, then try opening it in File Explorer. If access is still blocked, move on to the next method.
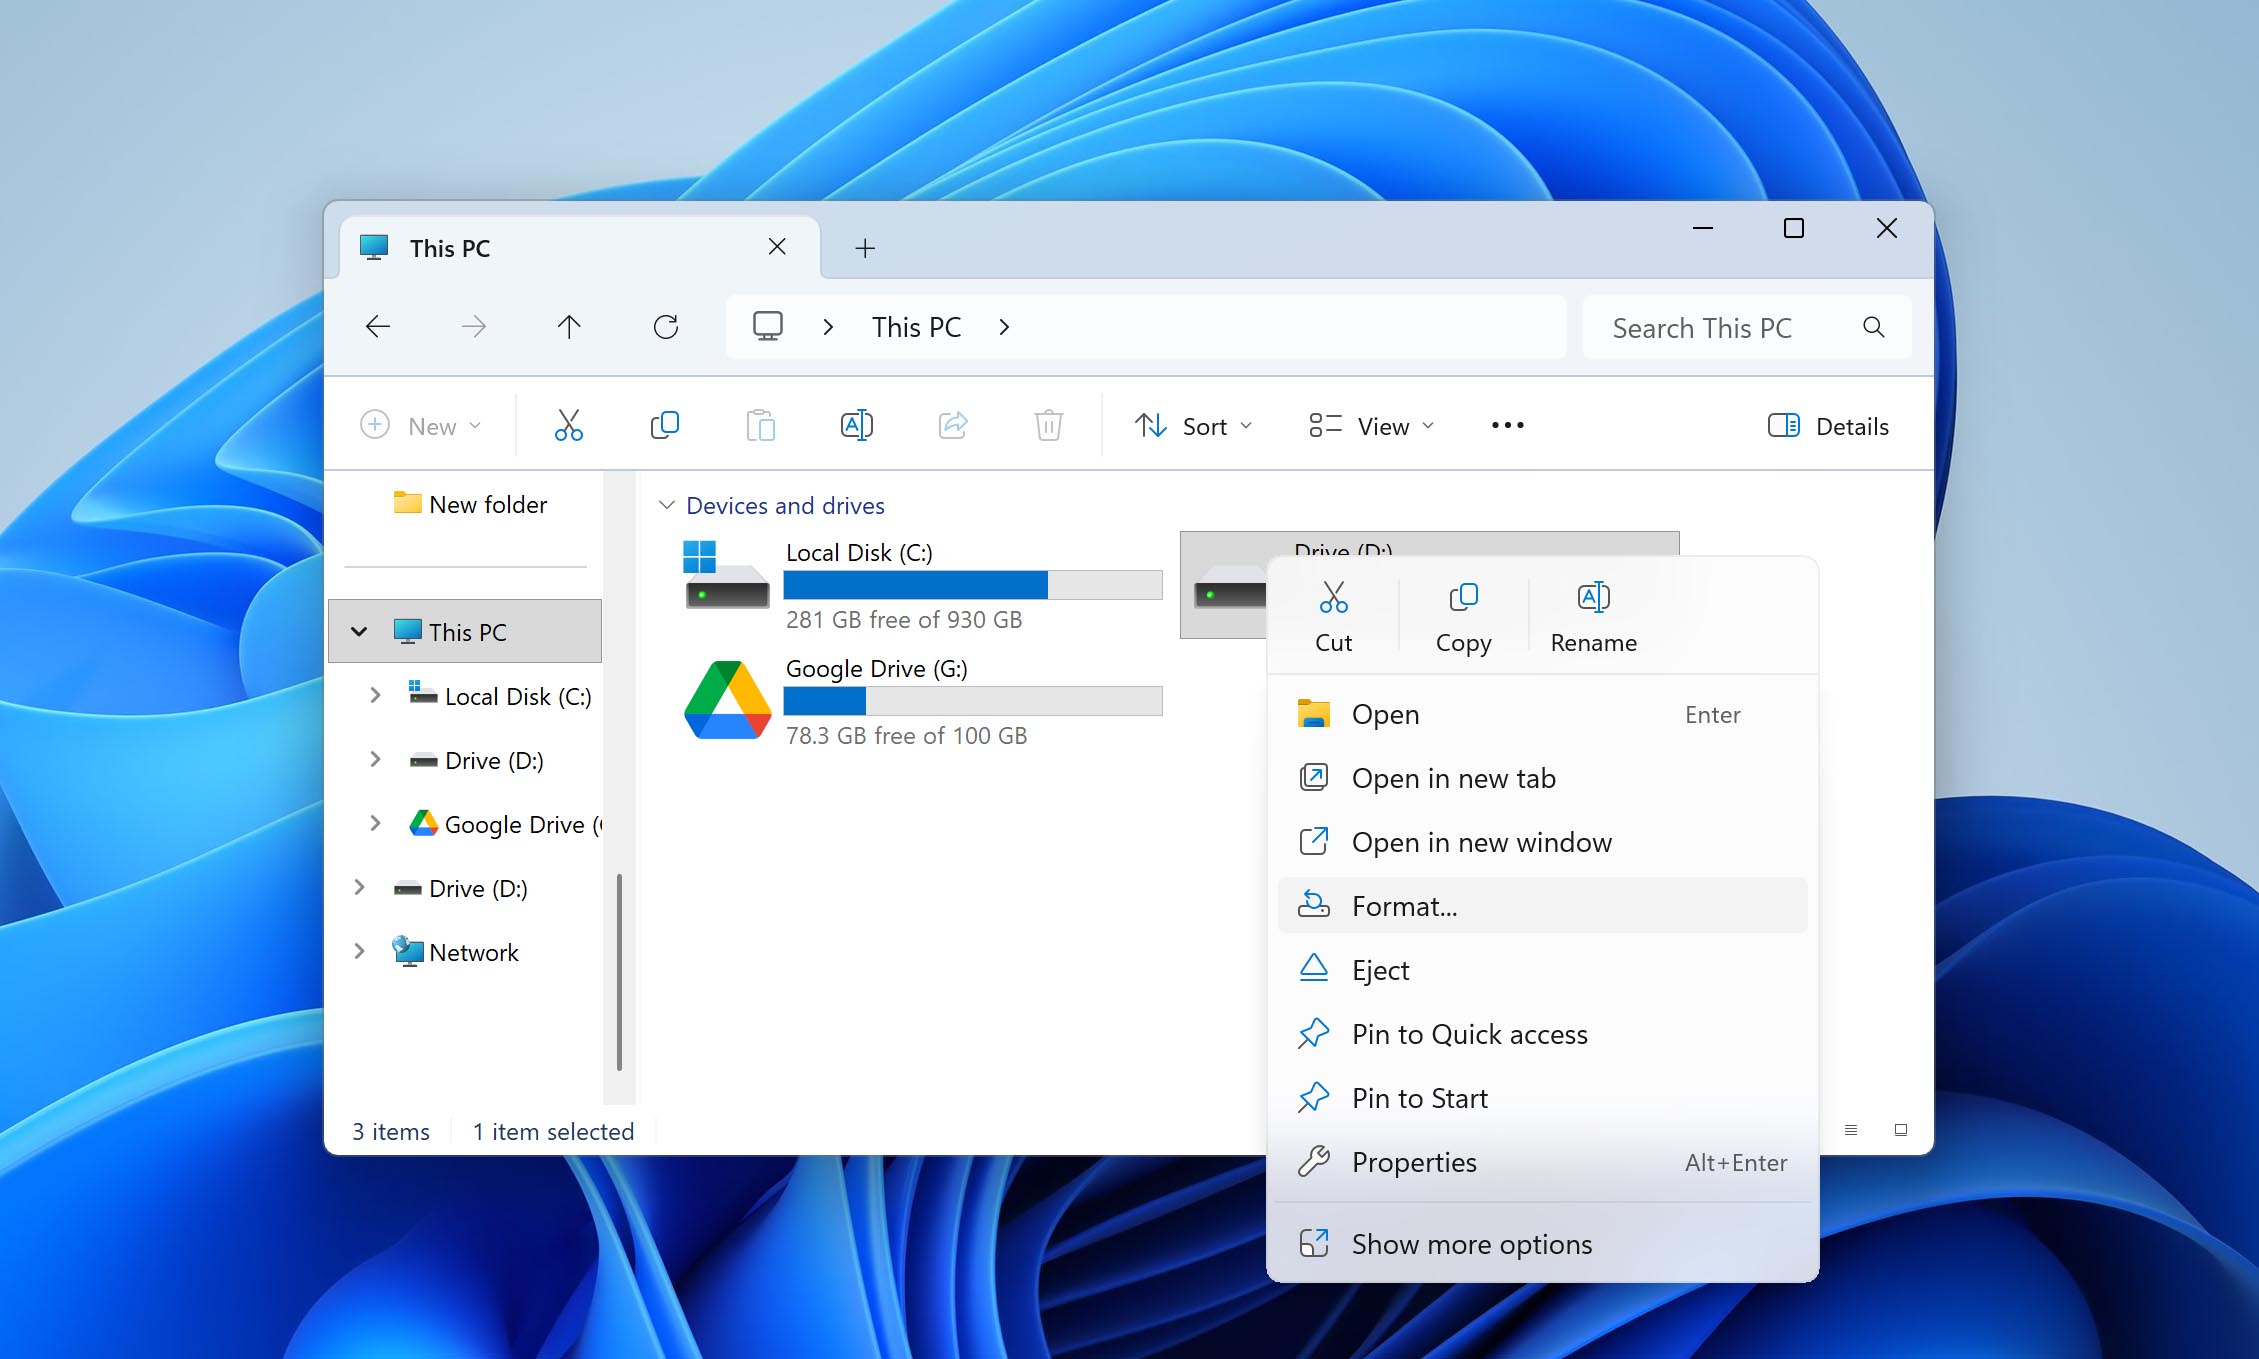
Method 5: Format Problematic Drive
If you’ve reached this point and still can’t open the external drive, formatting it is usually the only practical step left. It helps when file recovery is already complete or when the disk is encrypted and there’s no password or recovery key available. After formatting, the drive becomes usable again, though all previous data is erased.
You can do this directly through File Explorer, without opening additional tools.
- Open File Explorer and locate the external drive.
- Right-click the drive and choose Format.
- In the dialog box, select the file system you want to use — NTFS is suitable for Windows-only use, and exFAT works on both Windows and macOS.
- Enter a name for the drive in the Volume label field if you want to rename it.
- Leave Quick Format checked for faster results, or uncheck it if you want Windows to perform a surface scan.
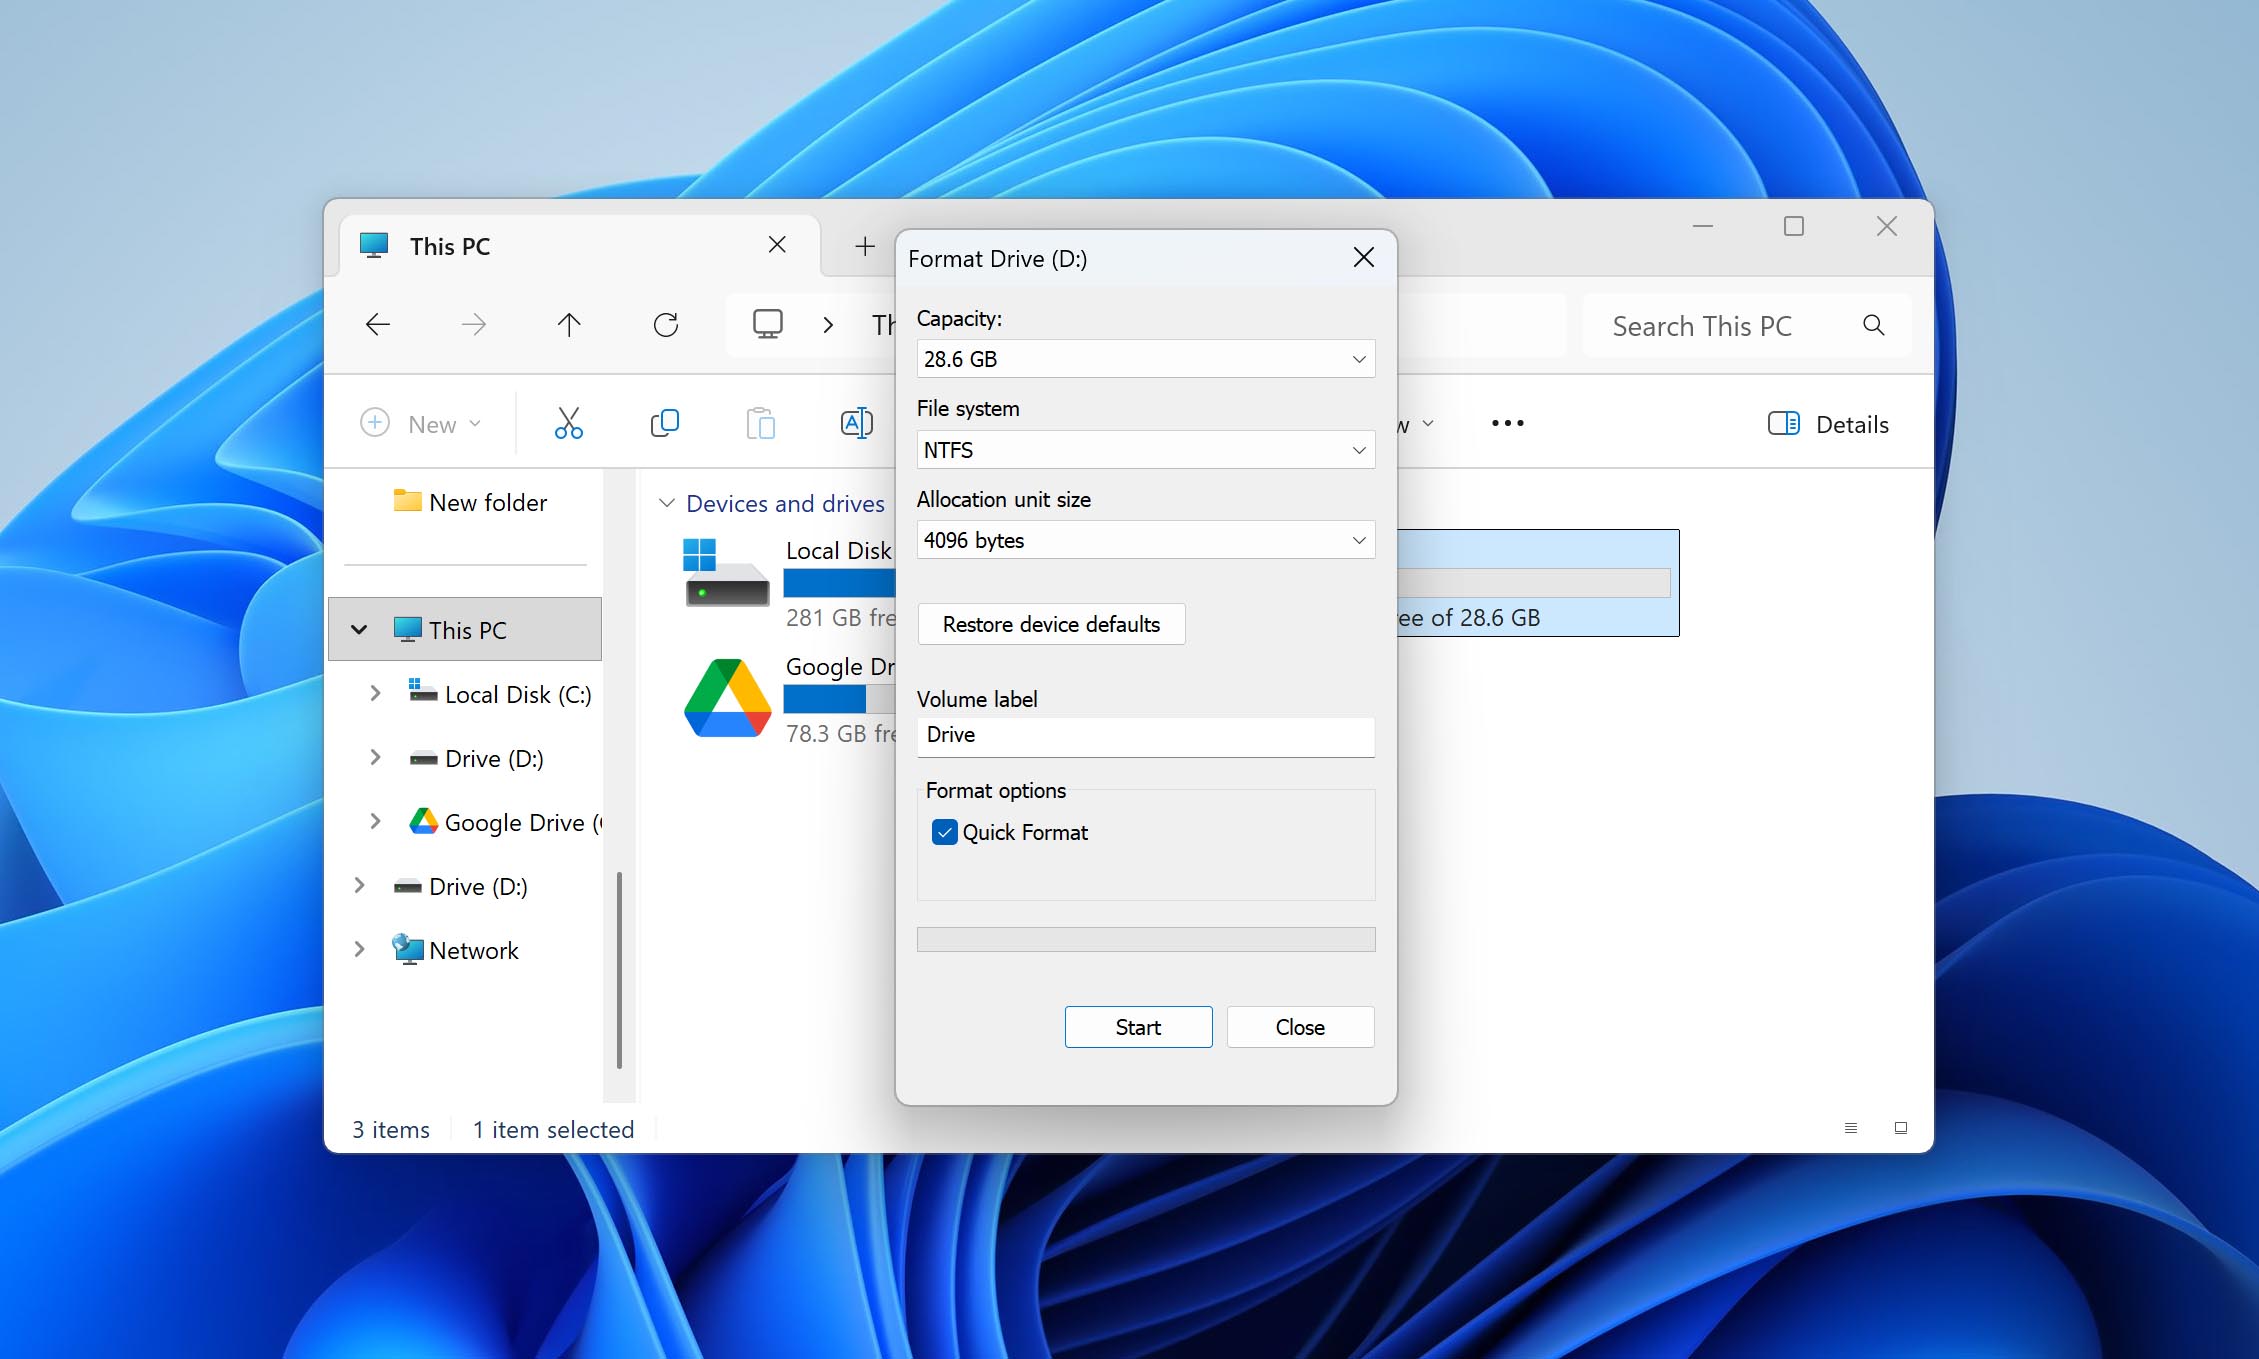
- Click Start, confirm the warning about erasing data, and wait for the process to complete.
- When finished, close the window. The drive will appear empty and ready for use.
Conclusion
Access errors with external drives can happen for different reasons, and not all of them are predictable. Even after fixing the problem, it’s worth taking a few preventive steps. Always keep your BitLocker recovery key somewhere safe — ideally offline, written on paper and stored with other important documents. If you use encryption tools from other vendors, make sure the passwords or keys are backed up separately from your devices.
We’d appreciate it if you share your experience in the comments below — what helped, what didn’t, and whether any of these steps restored access to your drive. Your feedback helps refine future instructions and gives other readers a clearer idea of what to expect.
FAQ:
- Right-click external hard drive > select Properties > navigate to Security tab
- Сlick on Edit > Click your username under Group or User Names
- Check boxes under Allow column > press OK > then click Apply
- Permission settings were changed.
- BitLocker encryption.
- You're using your drive both on Mac and PC.
- You've improperly ejected your drive causing it to malfunction.
- Your hard drive became corrupted due to some reason.
- Open Explorer.
- Right-click on Seagate external hard drive.
- Select Properties.
- Navigate to Security tab.
- Click on Edit. Here you can modify permissions for your Seagate external Hard Drive.


